
Write the model and serial
numbers here:
Model # _________________
Serial # _________________
You can find them on a label
on the bottom of the disposer.
GE is a trademark of the General Electric Company. Manufactured under trademark license.
OWNER’S MANUAL
AND INSTALLATION
INSTRUCTIONS
DISPOSALL
®
49-4000231 Rev 0 06-20 GEA
SAFETY INFORMATION ..........3
USING THE DISPOSER ...........6
CARE AND CLEANING .............6
INSTALLATION
INSTRUCTIONS ...................7
TROUBLESHOOTING ............14
LIMITED WARRANTY ...........15
CONSUMER SUPPORT ..........16
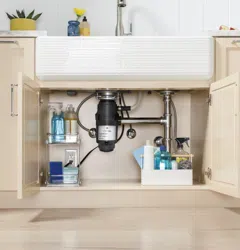
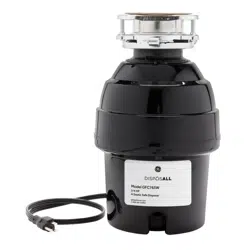
Food Waste Disposer
GREEN05
Pour obtenir une version de ces
instructions en français, visitez
GEAppliances.ca.
Para una version de estas
instrucciones en español, visite
GEAppliances.com.

2 49-4000231 Rev 0
THANK YOU FOR MAKING GE APPLIANCES A PART OF YOUR HOME.
Whether you grew up with GE Appliances, or this is your first, we’re happy to have you in the family.
We take pride in the craftsmanship, innovation and design that goes into every GE Appliances
product, and we think you will too. Among other things, registration of your appliance ensures that we
can deliver important product information and warranty details when you need them.
Register your GE appliance now online. Helpful websites and phone numbers are available in the
Consumer Support section of this Owner’s Manual. You may also mail in the pre-printed registration
card included in the packing material.
49-4000231 Rev 0 3
IMPORTANT SAFETY INFORMATION
READ ALL INSTRUCTIONS BEFORE USING THE APPLIANCE
SAFETY INFORMATION
WARNING
For your safety, the information in this manual must be followed to minimize
the risk of fire, explosion, electric shock, and to prevent property damage, personal injury,
or death.
WARNING
WHEN USING YOUR ELECTRICAL APPLIANCES, BASIC SAFETY
PRECAUTIONS SHOULD BE FOLLOWED, INCLUDING THE FOLLOWING:
Ŷ 8VHWKLVDSSOLDQFHRQO\IRULWVLQWHQGHGSXUSRVHDV
described in this Owner’s Manual.
Ŷ 5HDGDOOWKHLQVWUXFWLRQVEHIRUHXVLQJWKHDSSOLDQFH
Ŷ 7RUHGXFHWKHULVNRILQMXU\FORVHVXSHUYLVLRQLV
required when a disposer is used near children.
Ŷ 'RQRWSXWILQJHUVRUKDQGVLQWRDZDVWHGLVSRVHU
Ŷ 7XUQWKHSRZHUVZLWFKWRWKH2))SRVLWLRQEHIRUH
DWWHPSWLQJWRFOHDUDMDPRUUHPRYHDQREMHFWIURP
the disposer.
Ŷ :KHQDWWHPSWLQJWRORRVHQDMDPLQDZDVWH
GLVSRVHUXVHDORQJZRRGHQREMHFWVXFKDVD
wooden spoon or the wooden handle of a broom or
mop.
Ŷ :KHQDWWHPSWLQJWRUHPRYHREMHFWVIURPDZDVWH
disposer, use long-handled tongs or pliers. If
the disposer is magnetically actuated, use only
nonmagnetic tools.
Ŷ 7RUHGXFHWKHULVNRILQMXU\E\PDWHULDOVWKDWPD\
be expelled by a waste disposer, do not put the
following into a disposer:
a. Clam or oyster shells
b. Caustic drain cleaners or similar products
c. Glass, china or plastic
d. Large whole bones
e. Metal, such as bottle caps, tin cans, utensils
or aluminum foil
f. Hot grease or other hot liquids
g. Whole corn husks
Ŷ :KHQQRWRSHUDWLQJDGLVSRVHUOHDYHWKHGUDLQ
VWRSSHULQSODFHWRUHGXFHWKHULVNRIREMHFWVIDOOLQJ
into the disposer.
Ŷ )RUSURSHUJURXQGLQJLQVWUXFWLRQVVHHWKH
CONNECTING ELECTRICITY portion of this
manual.
READ AND SAVE THESE INSTRUCTIONS
If you are not familiar with electrical power and procedures, call a qualified electrician.
WARNING
Improper connection of
the equipment-grounding conductor can
result in a risk of electric shock. Check
with a qualified electrician or serviceman
if you are in doubt as to whether the
appliance is properly grounded. Do
not modify the plug provided with the
appliance if it will not fit the outlet; have
a proper outlet installed by a qualified
electrician.
For Models Equipped with a Grounded Cord:
GROUNDING INSTRUCTIONS: 7KLVGLVSRVHUPXVW
be grounded to reduce the risk of electric shock in
the event of a malfunction or breakdown. Grounding
provides a path of least resistance for electric current.
7KLVGLVSRVHULVHTXLSSHGZLWKDFRUGKDYLQJDQ
equipment-grounding conductor and a grounding
SOXJ7KHSOXJPXVWEHSOXJJHGLQWRDQRXWOHWWKDWLV
properly installed and grounded in accordance with all
local codes and ordinances.
CONNECTING ELECTRICITY
4 49-4000231 Rev 0
INFORMATION DE SÉCURITÉ
CONSIGNES DE SÉCURITÉ IMPORTANTES
LIRE TOUTES LES CONSIGNES AVANT D’UTILISER L’APPAREIL
LIRE ET CONSERVER CES INSTRUCTIONS
AVERTISSEMENT
Pour votre sécurité, veuillez suivre les directives données dans le
présent manuel afin de réduire au minimum les risques d’incendie, d’explosion et de
chocs électriques et prévenir tout dommage et blessure grave ou mortelle.
AVERTISSEMENT
LORS DE L’UTILISATION D’APPAREILS ÉLECTRIQUES,
RESPECTEZ LES PRÉCAUTIONS ÉLÉMENTAIRES DE SÉCURITÉ, NOTAMMENT :
Ŷ1¶XWLOLVH]FHWDSSDUHLOTXHGDQVOHEXWGpFULWSDUOH
SUpVHQWJXLGHG¶XWLOLVDWLRQ
Ŷ/LVH]O¶HQVHPEOHGHVLQVWUXFWLRQVDYDQWG¶XWLOLVHU
l’appareil.
Ŷ$ILQGHUpGXLUHOHULVTXHGHEOHVVXUHXQHVXUYHLOODQFH
pWURLWHHVWUHTXLVHORUVTXHOHEUR\HXUHVWXWLOLVpj
SUR[LPLWpG¶HQIDQWV
Ŷ1HSODFH]SDVOHVGRLJWVRXOHVPDLQVGDQVOH
EUR\HXUGHGpFKHWV
ŶeWHLJQH]O¶DSSDUHLODYDQWGHWHQWHUGHGpERXFKHUOH
EUR\HXURXG¶HQUHWLUHUXQREMHW
Ŷ/RUVTXHYRXVWHQWH]GHGpERXFKHUOHEUR\HXUGH
GpFKHWVXWLOLVH]XQREMHWORQJHWHQERLVFRPPH
XQHFXLOOqUHHQERLVRXXQPDQFKHjEDODLHQERLV
Ŷ3RXUWHQWHUGHUHWLUHUGHVREMHWVGXEUR\HXUGH
GpFKHWVXWLOLVH]GHORQJXHVSLQFHV6LOHEUR\HXU
HVWPDJQpWLVpXWLOLVH]GHVRXWLOVDPDJQpWLTXHV
Ŷ3RXUUpGXLUHOHVULVTXHVGHEOHVVXUHSURYRTXpHSDU
O¶H[SXOVLRQGHPDWpULDX[GXEUR\HXUGHGpFKHWVQH
MHWH]SDVOHVGpFKHWVVXLYDQWVGDQVOHEUR\HXU
a. coquilles d’huîtres ou de myes;
ESURGXLWVGHGpERXFKDJHFDXVWLTXHV
ou similaires;
c. verre, porcelaine ou plastique;
d. gros os entiers;
HPpWDOSDUH[HPSOHERvWHVGHFRQVHUYH
canettes, ustensiles ou papier aluminium;
f. huile chaude ou autres liquides chauds;
JpSLVGHPDwVHQWLHUV
Ŷ/RUVTXHYRXVQ¶XWLOLVH]SDVOHEUR\HXUODLVVH]OH
ERXFKRQGXGUDLQHQSODFHSRXUpYLWHUG¶\IDLUH
WRPEHUGHVREMHWV
Ŷ&RQVXOWH]OHVLQVWUXFWLRQVGpWDLOOpHVGHPLVH
jODWHUUHjODVHFWLRQBRANCHEMENTS
ÉLECTRIQUESGXSUpVHQWJXLGH
Si vous n’êtes pas à l’aise avec les procédures et connexions électriques, faites appel
à un électricien qualifié.
AVERTISSEMENT
Une connexion
erronée du connecteur de mise à la terre
de l’appareil peut entraîner des risques
d’électrocution. Consultez un électricien
qualifié en cas de doute sur la mise à
la terre de l’appareil. N’altérez pas la
prise fournie avec l’appareil si elle ne
correspond pas à la prise murale. Le cas
échéant, faites installer une prise murale
adaptée par un électricien qualifié.
Pour les modèles équipés d’un câble de mise à la
terre :
INSTRUCTIONS DE MISE À LA TERRE : Ce broyeur
GHGpFKHWVGRLWrWUHPLVjODWHUUHDILQGHUpGXLUH
OHULVTXHGHGpFKDUJHpOHFWULTXHGDQVO¶pYHQWXDOLWp
G¶XQHGpIHFWXRVLWpRXG¶XQHSDQQH/DPLVHjODWHUUH
SURFXUHXQWUDMHWGHPRLQGUHUpVLVWDQFHSRXUOHFRXUDQW
pOHFWULTXH&HEUR\HXUHVWpTXLSpG¶XQFRUGRQGRWp
d’un conducteur de terre et d’une fiche de terre. La
ILFKHGRLWrWUHEUDQFKpHGDQVXQHSULVHFRUUHFWHPHQW
LQVWDOOpHHWPLVHjODWHUUHHQFRQIRUPLWpDYHFOHV
codes et règlements locaux.
BRANCHEMENTS ÉLECTRIQUES

49-4000231 Rev 0 5
INFORMACIÓN IMPORTANTE DE SEGURIDAD
LEA TODAS LAS INSTRUCCIONES ANTES DE USAR
INFORMACIÓN DE SEGURIDAD
ADVERTENCIA
Para su seguridad, siga las instrucciones de este manual a fin de
minimizar riesgos de incendio, explosión, descargas eléctricas, y para evitar daños en
su propiedad, lesiones personales o la muerte.
ADVERTENCIA
AL USAR SUS ELECTRODOMÉSTICOS, SE DEBERÁN SEGUIR
PRECAUCIONES BÁSICAS DE SEGURIDAD, INCLUYENDO LO SIGUIENTE:
Ŷ 8VHHVWHHOHFWURGRPpVWLFRVyORSDUDVXSURSyVLWR
RULJLQDOFRPRVHGHVFULEHHQHO0DQXDOGHO3URSLHWDULR
Ŷ /HDWRGDVODVLQVWUXFFLRQHVDQWHVGHXVDUHVWH
HOHFWURGRPpVWLFR
Ŷ $ILQGHUHGXFLUHOULHVJRGHOHVLRQHVVHUi
QHFHVDULDXQDVXSHUYLVLyQGHFHUFDFXDQGRVH
utilice un triturador cerca de los niños.
Ŷ 1RFRORTXHORVGHGRVQLODVPDQRVHQXQWULWXUDGRU
de desperdicios.
Ŷ &RORTXHHOLQWHUUXSWRUGHFRUULHQWHHQODSRVLFLyQ
2))$SDJDGRDQWHVGHLQWHQWDUGHVSHMDUXQ
DWDVFRRGHUHWLUDUXQREMHWRGHOWULWXUDGRU
Ŷ $OLQWHQWDUDIORMDUXQDWDVFRHQXQWULWXUDGRUGH
GHVSHUGLFLRVXWLOLFHXQREMHWRODUJRGHPDGHUD
WDOFRPRXQDFXFKDUDGHPDGHUDRODPDQLMDGH
madera de una escoba o mopa.
Ŷ $OLQWHQWDUUHWLUDUREMHWRVGHOWULWXUDGRUGHGHVSHUGLFLRV
XVHSLQ]DVRWHQD]DVFRQPDQLMDVODUJDV6LHO
WULWXUDGRUHVDFFLRQDGRGHIRUPDPDJQpWLFDXVH
KHUUDPLHQWDVQRPDJQpWLFDV~QLFDPHQWH
Ŷ $ILQGHUHGXFLUHOULHVJRGHOHVLRQHVFDXVDGDV
por materiales que puedan ser expulsados por un
triturador de desperdicios, no coloque lo siguiente
en un triturador:
D9DOYDVGHDOPHMDVXRVWUDV
E/LPSLDGRUHVGHGUHQDMHFiXVWLFRVRSURGXFWRV
similares
F9LGULRSRUFHODQDRSOiVWLFR
d. Huesos grandes enteros
e. Metales, tales como tapas de botellas, latas,
utensilios o papel de aluminio
f. Grasa caliente u otros líquidos calientes
J+RMDVGHPDt]HQWHUDV
Ŷ &XDQGRQRXWLOLFHXQWULWXUDGRUGHMHHOWDSyQGH
GUHQDMHHQVXSRVLFLyQ\UHGX]FDHOULHVJRGHTXH
ORREMHWRVFDLJDQHQHOWULWXUDGRU
Ŷ 3DUDDFFHGHUDLQVWUXFFLRQHVSDUDXQDFRQH[LyQD
WLHUUDDGHFXDGDFRQVXOWHODVHFFLyQGHCONEXIÓN
DE LA ELECTRICIDAD de este manual.
LEA Y GUARDE ESTAS INSTRUCCIONES
Si no está familiarizado con la corriente eléctrica y sus procedimientos, comuníquese
con un electricista calificado.
ADVERTENCIA
Una conexión inadecuada
del conductor de conexión a tierra del equipo
podrá producir riesgos de descargas eléctricas.
Si tiene dudas de que el electrodoméstico se
encuentre conectado a tierra apropiadamente,
consulte a un electricista calificado o a personal
del servicio. No modifique el enchufe provisto
con el electrodoméstico si éste no coincide
con el tomacorriente; solicite la instalación
de
un tomacorriente apropiado a un electricista
calificado.
Para los Modelos Equipados con Cable a Tierra:
INSTRUCCIONES DE CONEXIÓN A TIERRA: Este
WULWXUDGRUGHEHUiVHUFRQHFWDGRDWLHUUDDILQGH
UHGXFLUHOULHVJRGHGHVFDUJDVHOpFWULFDVHQFDVRGH
XQDIDOODGHIXQFLRQDPLHQWRRDYHUtD/DFRQH[LyQD
tierra brinda un camino de menor resistencia para la
FRUULHQWHHOpFWULFD(VWHWULWXUDGRUHVWiHTXLSDGRFRQ
XQFDEOHFRQXQFRQGXFWRUSDUDODFRQH[LyQDWLHUUD
GHOHTXLSR\XQHQFKXIHFRQFRQH[LyQDWLHUUD(O
HQFKXIHGHEHUiHVWDUFRQHFWDGRDXQWRPDFRUULHQWH
LQVWDODGRHQIRUPDDGHFXDGD\FRQFRQH[LyQDWLHUUD
GHDFXHUGRFRQWRGRVORVFyGLJRV\RUGHQDQ]DV
locales.
CONEXIÓN DE LA ELECTRICIDAD

6 49-4000231 Rev 0
READ ALL SAFETY INSTRUCTIONS BEFORE USING THIS DISPOSER.
7KLVGLVSRVHUXVHVDQWLMDPVZLYHOLPSHOOHUVWKDWPDNHDFOLFNLQJVRXQGDVWKH\VZLQJLQWRSODFH7KLVLQGLFDWHV
normal operation.
A. Remove the sink stopper and turn on a medium flow
of cold water.
B.7XUQWKHVZLWFKWR21
C.6FUDSHLQIRRGZDVWH7RVSHHGXSIRRGZDVWH
disposal, cut or break up large bones, rinds and cobs.
Large bones and fibrous husks require considerable
grinding time and are more easily thrown away with
RWKHUWUDVK'RQRWEHDODUPHGWKDWWKHGLVSRVHU
VORZVGRZQZKLOHJULQGLQJ7KHGLVSRVHULVDFWXDOO\
LQFUHDVLQJWRUTXHJULQGLQJSRZHUDQGLVRSHUDWLQJ
under normal conditions.
D. Before turning the disposer off, let the water and
the disposer run for approximately 25 seconds
DIWHUVKUHGGLQJVWRSV7KLVDVVXUHVWKDWDOOZDVWHLV
thoroughly flushed through the trap and drain.
E. 'RQRWXVHKRWZDWHUZKLOHUXQQLQJWKHGLVSRVHU&ROG
water will keep food waste and fats solid so they can
be flushed down the drain.
Helpful Hints
A. Be sure the disposer is empty before using the
dishwasher so it can drain properly.
B. You may want to leave the stopper in the drain when
QRWLQXVHWRSUHYHQWXWHQVLOVDQGIRUHLJQREMHFWVIURP
falling into the disposer.
C. 7KHGLVSRVHULVUXJJHGO\EXLOWWRJLYH\RX\HDUVDQG
years of trouble-free service. It will handle all normal
IRRGZDVWHV%87LWZLOOQRWJULQGDQGGLVSRVHVXFK
items as tin cans, bottles and bottle caps, glass,
china, leather, cloth, crockery, rubber, string, feathers,
RUFODPRUR\VWHUVKHOOV7KHVHDUHZDVWHPDWHULDOV
and belong in the trash can or trash compactor.
D.7263(('83)22':$67(',6326$/&XWRU
break up large bones, melon rinds, grapefruit skins
and corn cobs. Items such as large bones, fibrous
husks like lima bean pods and corn husks, require
FRQVLGHUDEOHFXWWLQJWLPH)RUWKLVUHDVRQ\RX
may prefer to place them in the trash can or trash
compactor.
Care and Cleaning
THE MOTOR IS PERMANENTLY LUBRICATED FOR LIFE. DO NOT ATTEMPT TO LUBRICATE YOUR
DISPOSER. 7KHGLVSRVHULVVHOIFOHDQLQJDQGVFRXUVLWVHOIZLWKHDFKXVH
Ŷ1(9(5SXWO\HRUFKHPLFDOFOHDQHUVLQWRWKHGLVSRVHU
as they cause serious corrosion of metal parts.
Ŷ<RXUGLVSRVHULVHTXLSSHGZLWKDUHPRYDEOHVSODVK
guard for ease of cleaning or replacement. Remove
WKHVSODVKJXDUGE\SXOOLQJLWRXWIURPWKHWRS7R
replace, insert into the sink flange and push down until
it is properly seated.
Ŷ,IDQRGRUGHYHORSVUXQRUDQJHRUOHPRQULQGV
WKURXJKWKHGLVSRVHU$GR]HQLFHFXEHVVSULQNOHGZLWK
a little household scouring powder will also work.
USING THE DISPOSER / CARE AND CLEANING
Using the Disposer / Care and Cleaning
49-4000231 Rev 0 7
BEFORE YOU BEGIN
Read these instructions completely and carefully.
FOR YOUR SAFETY
Read and observe all WARNINGS and CAUTIONS
shown throughout these instructions.
While performing installations described in this booklet,
gloves and safety glasses or goggles should be worn.
IMPORTANT – Observe all governing codes and
ordinances.
• Save these instructions for local inspector’s use.
• Note to Installer – Be sure to leave these
instructions with the consumer.
• Note to Consumer – Keep these instructions
for future reference.
• Skill level – Installation of this appliance requires
basic mechanical skills.
•3URSHULQVWDOODWLRQLVWKHUHVSRQVLELOLW\RIWKHLQVWDOOHU
WARNING
• )253(5621$/6$)(7<5HPRYHKRXVHIXVHRURSHQ
FLUFXLWEUHDNHUEHIRUHEHJLQQLQJLQVWDOODWLRQ'RQRWXVH
an extension cord or adapter plug with this appliance.
• )253(5621$/6$)(7<'RQRWSRVLWLRQ\RXUKHDG
or body under disposer; unit could fall during removal
or installation.
• 7KHLPSURSHUFRQQHFWLRQRIWKHHTXLSPHQWJURXQGLQJ
conductor can result in a risk of electric shock. Check
with a qualified electrician or service representative if you
are in doubt that the appliance is properly grounded.
• If house wiring is not 2-wire with ground, a ground
must be provided by the installer. When house wiring
LVDOXPLQXPEHVXUHWRXVH8//LVWHGDQWLR[LGDQW
compound and aluminum-to-copper connectors.
Installation Instructions
Disposer
•3URGXFWIDLOXUHGXHWRLPSURSHULQVWDOODWLRQLVQRW
covered under the Warranty.
AVANT DE COMMENCER
Lisez attentivement ces instructions, dans leur intégralité.
POUR VOTRE SÉCURITÉ
Veuillez lire et observer toutes les mises en garde AVERTISSEMENT
et ATTENTION données dans les présentes directives.
Pour effectuer l’installation décrite dans les présentes directives,
il faut porter des et gants ou des lunettes de sécurité.
IMPORTANT – 5HVSHFWH]WRXWHVOHVQRUPHVHW
UpJOHPHQWDWLRQVHQYLJXHXU
• &RQVHUYH]OHVSUpVHQWHVLQVWUXFWLRQVjO¶DWWHQWLRQGH
l’inspecteur local.
• Remarque à l’installateur : $VVXUH]YRXVGH
IRXUQLUOHVSUpVHQWHVLQVWUXFWLRQVjO¶XWLOLVDWHXU
• Remarque à l’utilisateur : &RQVHUYH]OHVSUpVHQWHV
LQVWUXFWLRQVSRXUSRXYRLUYRXV\UHSRUWHUXOWpULHXUHPHQW
• Niveau de compétence : L’installation de cet appareil
UHTXLHUWGHVFRPSpWHQFHVPpFDQLTXHVGHEDVH
•/DFRQIRUPLWpGHO¶LQVWDOODWLRQUHOqYHGHODUHVSRQVDELOLWp
de l’installateur.
AVERTISSEMENT
• 32859275(6e&85,7e3(56211(//((QOHYH]
OHIXVLEOHRXGpFOHQFKH]OHGLVMRQFWHXUDXSDQQHDXGH
distribution principal avant de commencer l’installation.
1¶XWLOLVH]SDVXQHUDOORQJHpOHFWULTXHRXXQDGDSWDWHXUGH
fiche avec cet appareil.
• 32859275(6e&85,7e3(56211(//(1HSODFH]
SDVYRWUHWrWHRXYRWUHFRUSVHQGHVVRXVGXEUR\HXUFHOXLFL
pourrait tomber pendant son retrait ou son installation.
• 8QEUDQFKHPHQWLQDGpTXDWGXFRQGXFWHXUGHPLVHjODWHUUH
SHXWSUpVHQWHUGHVULVTXHVGHFKRFpOHFWULTXH6LYRXVQ¶rWHV
SDVFHUWDLQTXHO¶DSSDUHLOHVWFRUUHFWHPHQWPLVjODWHUUH
FRQVXOWH]XQUpSDUDWHXURXXQpOHFWULFLHQTXDOLILp
• 6LOHFkEODJHpOHFWULTXHGHODUpVLGHQFHQ¶HVWSDVFRQVWLWXp
GHGHX[ILOVSOXVXQILOGHPLVHjODWHUUHO¶LQVWDOODWHXUGRLW
LQVWDOOHUXQILOGHPLVHjODWHUUH6LOHFkEODJHpOHFWULTXHGHOD
UpVLGHQFHHVWHQDOXPLQLXPXWLOLVH]XQDJHQWDQWLR[\GDQWHWGHV
FRQQHFWHXUVSRXUUDFFRUGV©DOXPLQLXPFXLYUHªKRPRORJXpV8/
ANTES DE EMPEZAR
Lea estas instrucciones completa y cuidadosamente.
PARA SU SEGURIDAD
Lea y cumpla con todas las ADVERTENCIAS y
PRECAUCIONES que figuran en estas instrucciones.
Al realizar las instalaciones descriptas en este manual, se
deberán usar guantes y anteojos o gafas de seguridad.
IMPORTANTE ±2EVHUYHWRGRVORVFyGLJRV\yUGHQHVGHOH\
• Guarde estas instrucciones para uso del inspector local.
•
Nota al instalador – $VHJ~UHVHGHGHMDUHVWDV
instrucciones con el consumidor.
•
Nota al consumidor – Conserve estas instrucciones
para referencia futura.
• Nivel de destreza – /DLQVWDODFLyQGHHVWHDSDUDWR
UHTXLHUHGHGHVWUH]DVPHFiQLFDVEiVLFDV
• /DLQVWDODFLyQDSURSLDGDHVODUHVSRQVDELOLGDGGHOLQVWDODGRU
/DIDOODGHOSURGXFWRGHELGRDXQDLQVWDODFLyQLQDGHFXDGD
QRHVWiFXELHUWDSRUODJDUDQWtD
ADVERTENCIA
• 3$5$6(*85,'$'3(5621$/4XLWHHOIXVLEOHRDEUDHO
LQWHUUXSWRUGHFLUFXLWRVDQWHVGHFRPHQ]DUODLQVWDODFLyQ1RXWLOLFH
XQFDEOHGHH[WHQVLyQRXQHQFKXIHDGDSWDGRUFRQHVWHDUWHIDFWR
• 3$5$686(*85,'$'1RSRVLFLRQHVXFDEH]DRVX
FXHUSRGHEDMRGHOWULWXUDGRUODXQLGDGSRGUiFDHUGXUDQWH
HOUHWLURRODLQVWDODFLyQ
• /DFRQH[LyQLQDGHFXDGDGHOFRQGXFWRUGHFRQH[LyQDWLHUUD
del equipamiento puede provocar un riesgo de descarga
HOpFWULFD&RQVXOWHDXQHOHFWULFLVWDFDOLILFDGRRUHSUHVHQWDQWH
GHVHUYLFLRWpFQLFRVLWLHQHGXGDVVREUHODFRUUHFWDFRQH[LyQ
a tierra del aparato.
• 6LHOFDEOHDGRGRPpVWLFRQRFXHQWDFRQXQFDEOHGH
KLORVFRQFRQH[LyQDWLHUUDXQLQVWDODGRUGHEHUHDOL]DUXQD
FRQH[LyQDWLHUUD&XDQGRHOFDEOHDGRGRPpVWLFRHVGH
DOXPLQLRDVHJ~UHVHGHXVDUXQFRPSXHVWRDQWLR[LGDQWH\
FRQHFWRUHVGHDOXPLQLRDFREUHDSUREDGRVSRU8/
•
/HVGpIDLOODQFHVGXSURGXLWSURYRTXpHVSDUXQHLQVWDOODWLRQ
incorrecte ne sont pas couvertes par la garantie.
8 49-4000231 Rev 0
Installation Instructions
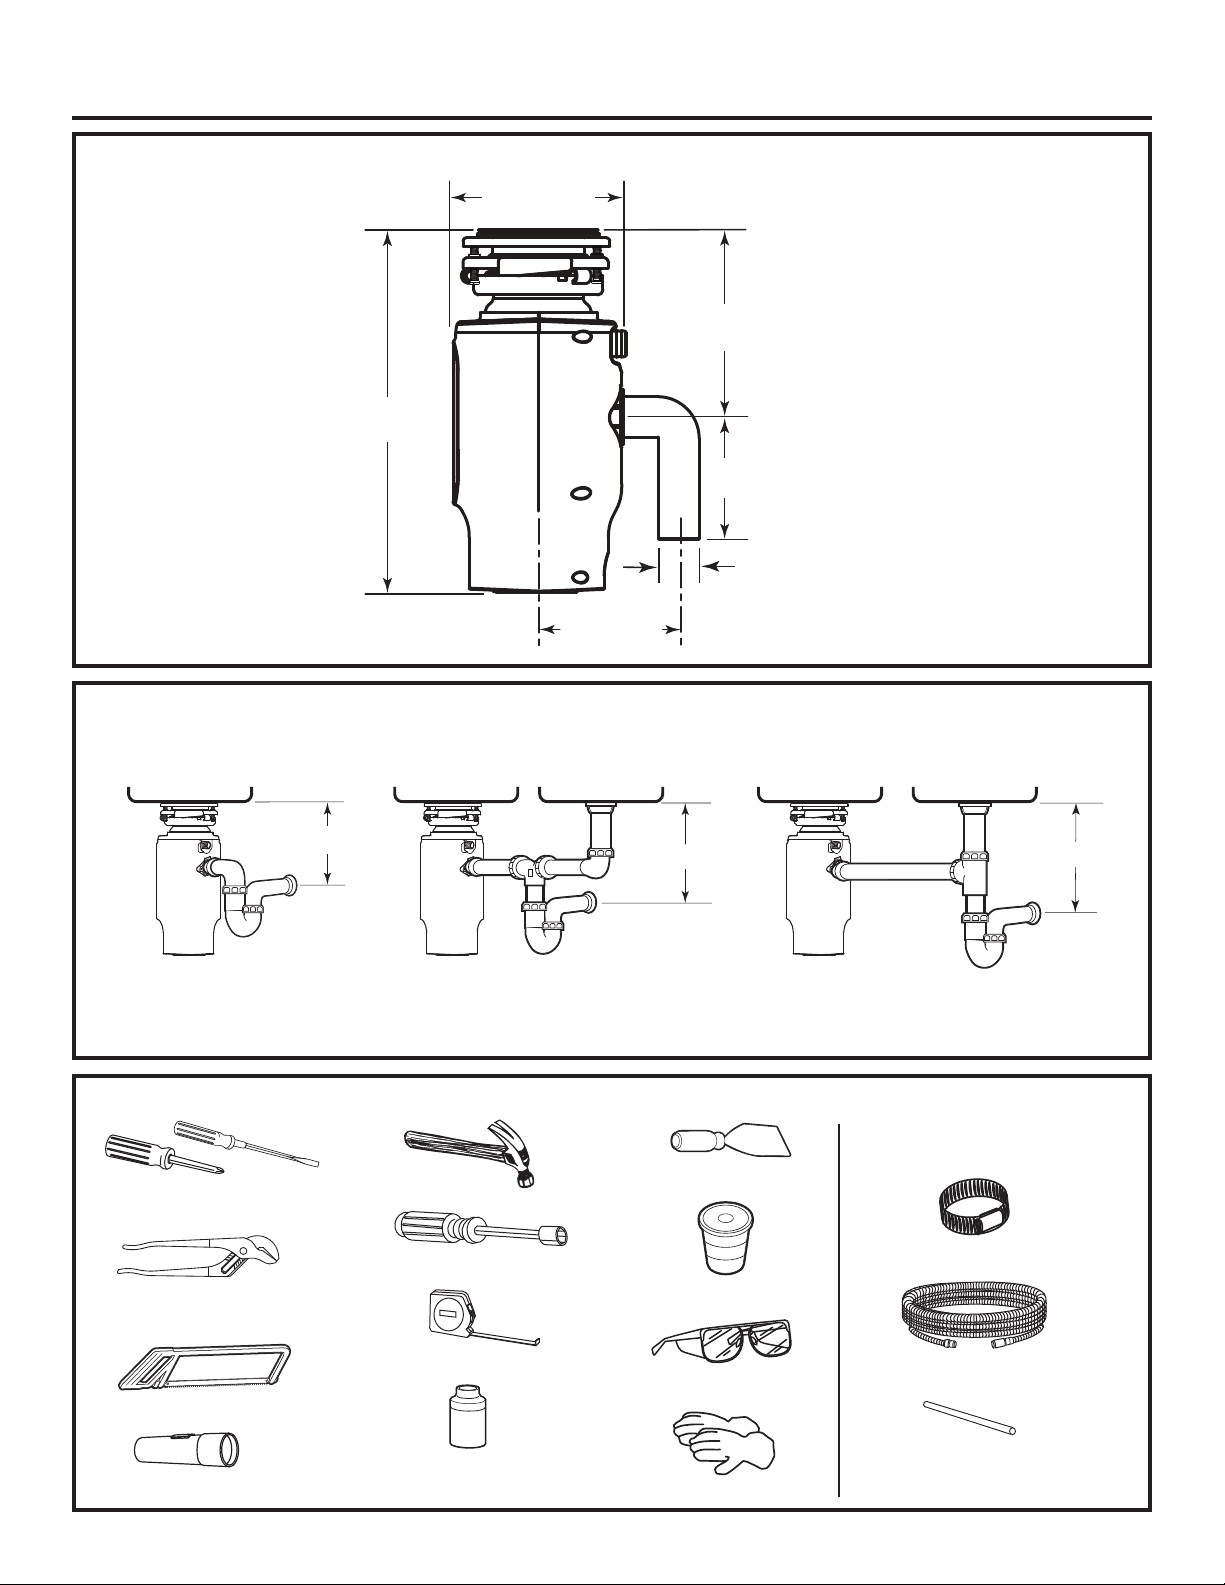
WHAT YOU WILL NEED
ƒ3KLOOLSVDQGIODWEODGH
screwdrivers
ƒ+DPPHU
ƒ1XW'ULYHU
ƒ&KDQQHOORFNSOLHUV
VOLSMRLQW
SOME TYPICAL INSTALLATIONS
*It is essential for the proper operation of the disposer that this dimension be 9”-12” to avoid standing water in disposer
motor housing.
)OH[LEOHGUDLQSLSHPD\EHQHFHVVDU\IRUWKLVDSSOLFDWLRQ
SINGLE BOWL
*Approx.
DOUBLE BOWL
CENTER OUTLET**
*Approx.
DOUBLE BOWL
END OUTLET**
*Approx.
DIMENSIONS
ƒ+DFNVDZ
ƒ6DIHW\*ODVVHV
ƒ*ORYHV
ƒ3XWW\.QLIH
ƒ3OXPEHUV3XWW\
ƒ7DSH0HDVXUH
ƒ:RRGHQGRZHO
or steel punch
ƒ)OH[LEOH'UDLQ+RVH
ƒ+RVHFODPSV
Only needed if connecting
to a dishwasher:
ƒ)ODVKOLJKW
ƒ/LTXLGVRDSRU
SHWUROHXPMHOO\
6-7/8"
4-1/2"
1-1/2"
13-3/8"
6-1/4"
5-3/16"
Bottom of Sink
49-4000231 Rev 0 9
Installation Instructions
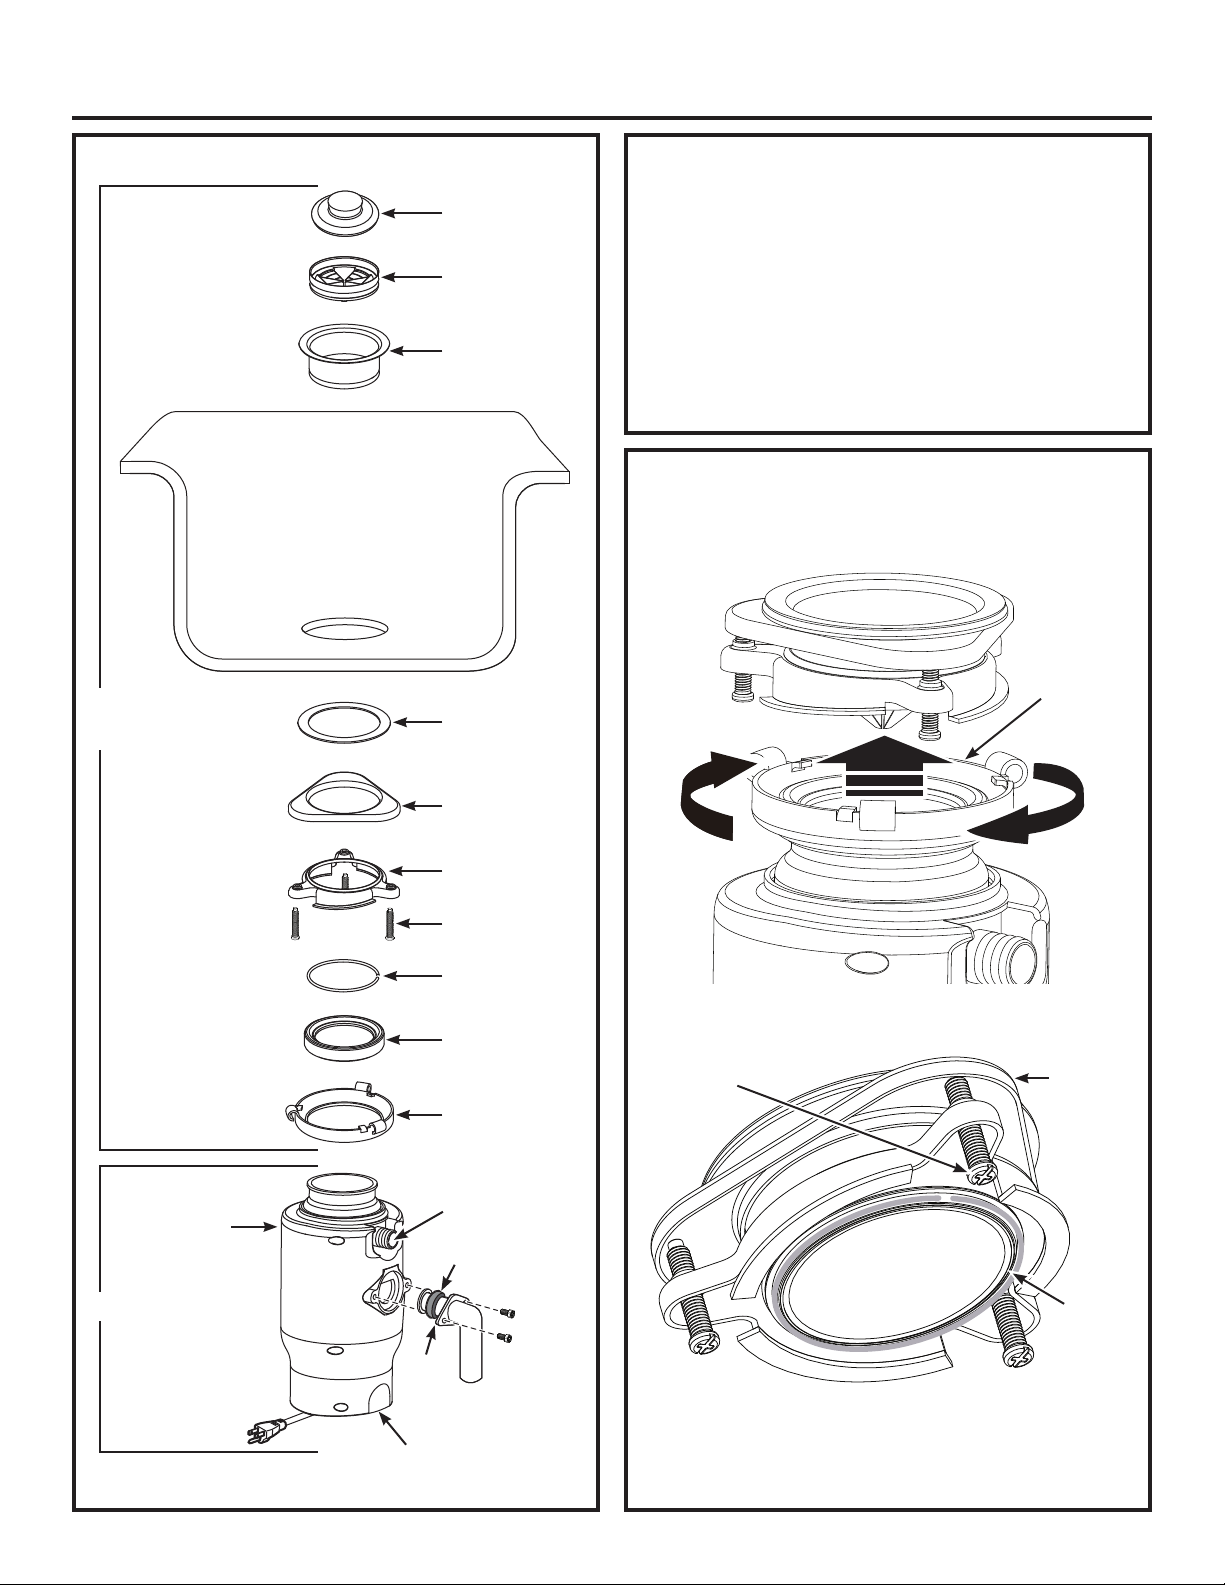
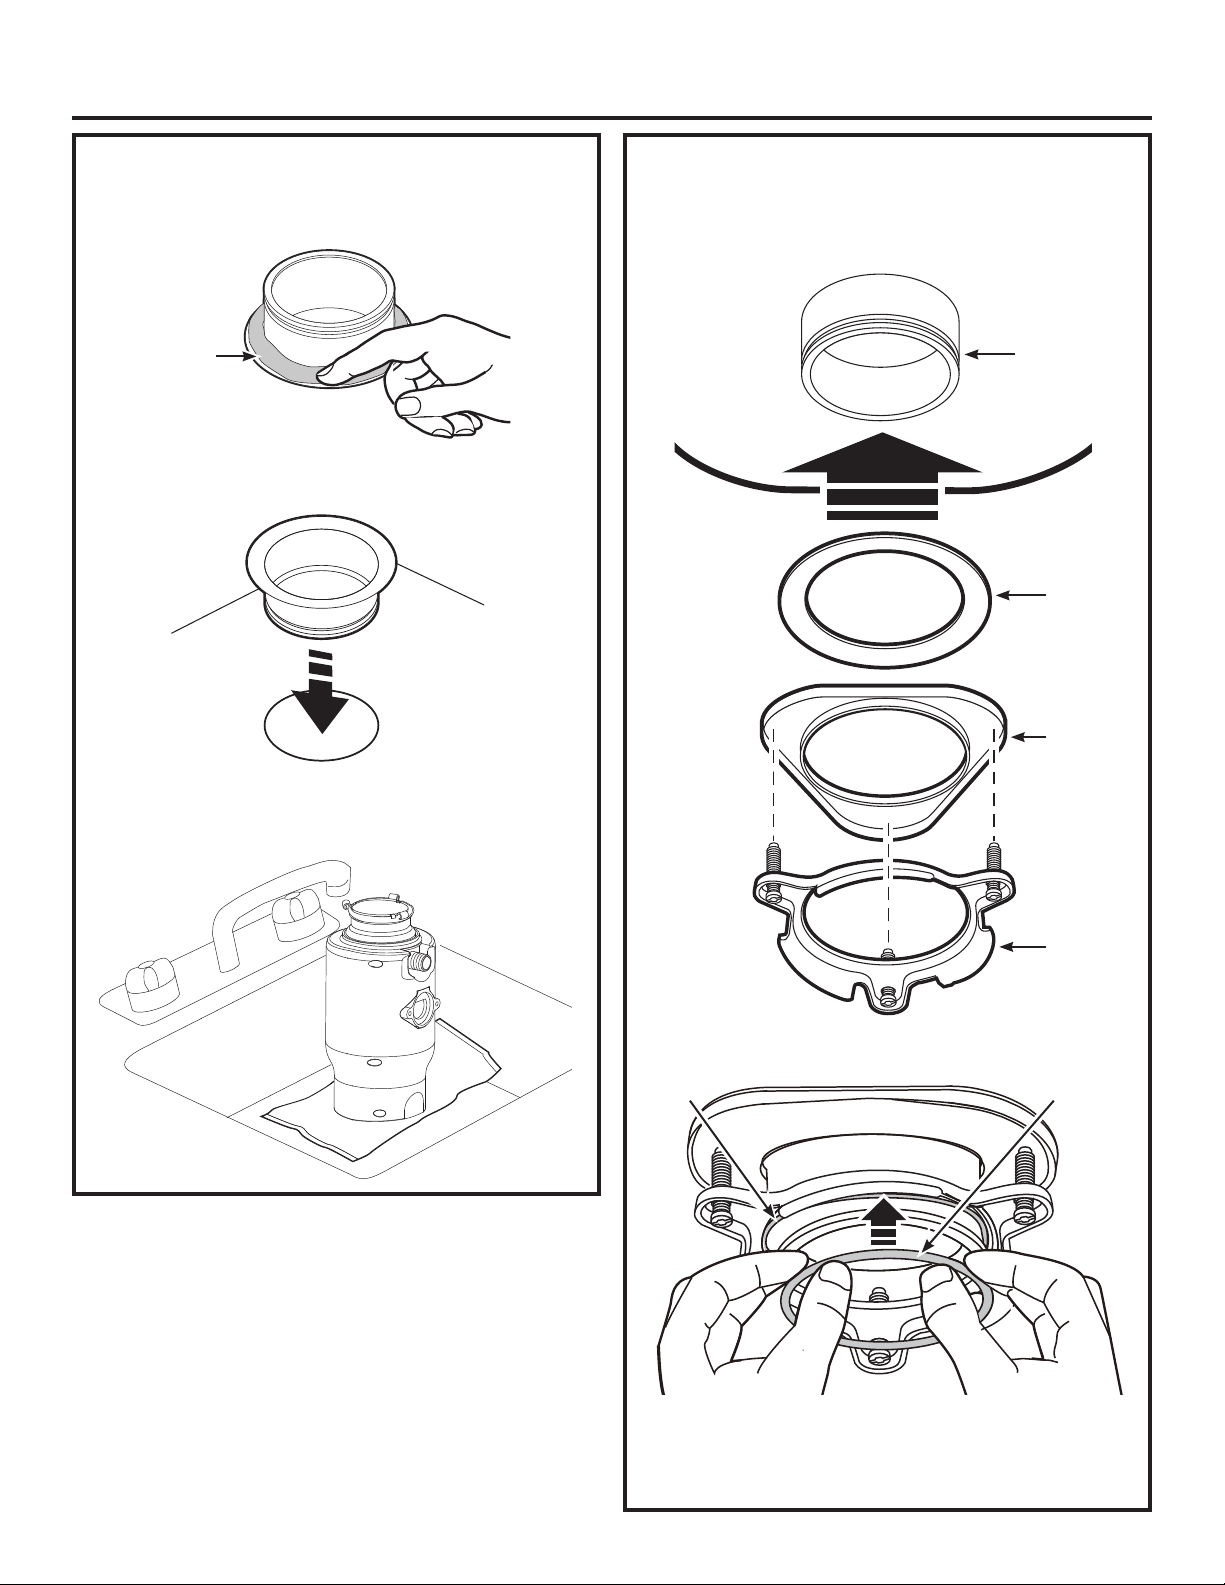
COMPONENTS
Sink
)ODQJH
Assembly
Stopper
Sink
)ODQJH
Sink
)LEHU
Gasket
6XSSRUW)ODQJH
8SSHU0RXQWLQJ
Ring
6FUHZV
Snap Ring
'LVSRVHU
Cushion Mount
Lower Mounting
Ring
'LVKZDVKHU
'LVFKDUJH,QOHW
Gasket
Screws
Reset Button
5HDFKXSDQGXQGHU
SURWHFWLYHVKLHOGWRSUHVV
)ODQJH
'LVFKDUJH
Elbow
Hopper
PREPARATION
'LVFRQQHFWHOHFWULFDOSRZHUVXSSO\WRGLVSRVHU
2. Remove old disposer or sink flange assembly.
3. Inspect drain line. If it is heavily coated with
hardened grease and accumulations, rout out with a
plumber’s snake.
4. Remove old sealing materials and gasketing from
sink opening, both top and bottom.
NOTE:7RSDQGERWWRPRIVLQNVXUIDFHVPXVWEHFOHDQ
dry and free of any residue to prevent leaks.
Splash
Guard
3RZHU&RUG
RQVRPH
PRGHOV
DISASSEMBLE TO INSTALL
7XUQWKHORZHUPRXQWLQJULQJFORFNZLVHXQWLOLW
releases and lift the entire hardware assembly from
the disposer.
2. Loosen the three screws from the upper mounting
ring and slide it toward the support flange.
3. Insert a flat blade screwdriver under the snap ring
and remove it.
4. Separate the upper mounting ring and support flange
from the sink flange.
Lower
Mounting
Ring
Loosen
VFUHZV
Remove
snap ring
Support
)ODQJH
10 49-4000231 Rev 0
Installation Instructions
INSTALL THE UNDER SINK
MOUNTING HARDWARE
1. Assemble together the fiber gasket, support flange
and upper mounting ring onto the lower sink flange.
Secure the assembly in place on the sink flange by
inserting the snap ring into the sink flange snap groove.
IMPORTANT: Make sure the snap ring is secured into
place in the snap groove. If the snap ring is not secured
in the snap groove, trapping the assembled parts in
place, then the disposer cannot be properly installed.
)LEHU
Gasket
Support
)ODQJH
8SSHU
Mounting
Ring
Sink
)ODQJH
Snap RingGroove
INSTALL THE SINK FLANGE
1. Roll plumbers putty in a 3/8” thick rope, turn the sink
flange up-side-down and apply around the bottom of
the flange.
2. Install the sink flange into the sink opening by
pressing it in firmly and removing excess plumbers
putty.
3ODFHDWRZHORYHUWKHVLQNERWWRPDQGIODQJHDQG
weight the flange down to hold it in place while you
add the other mounting components.
3OXPEHUV
3XWW\
49-4000231 Rev 0 11
Installation Instructions
INSTALL THE UNDER SINK
MOUNTING HARDWARE (CONT.)
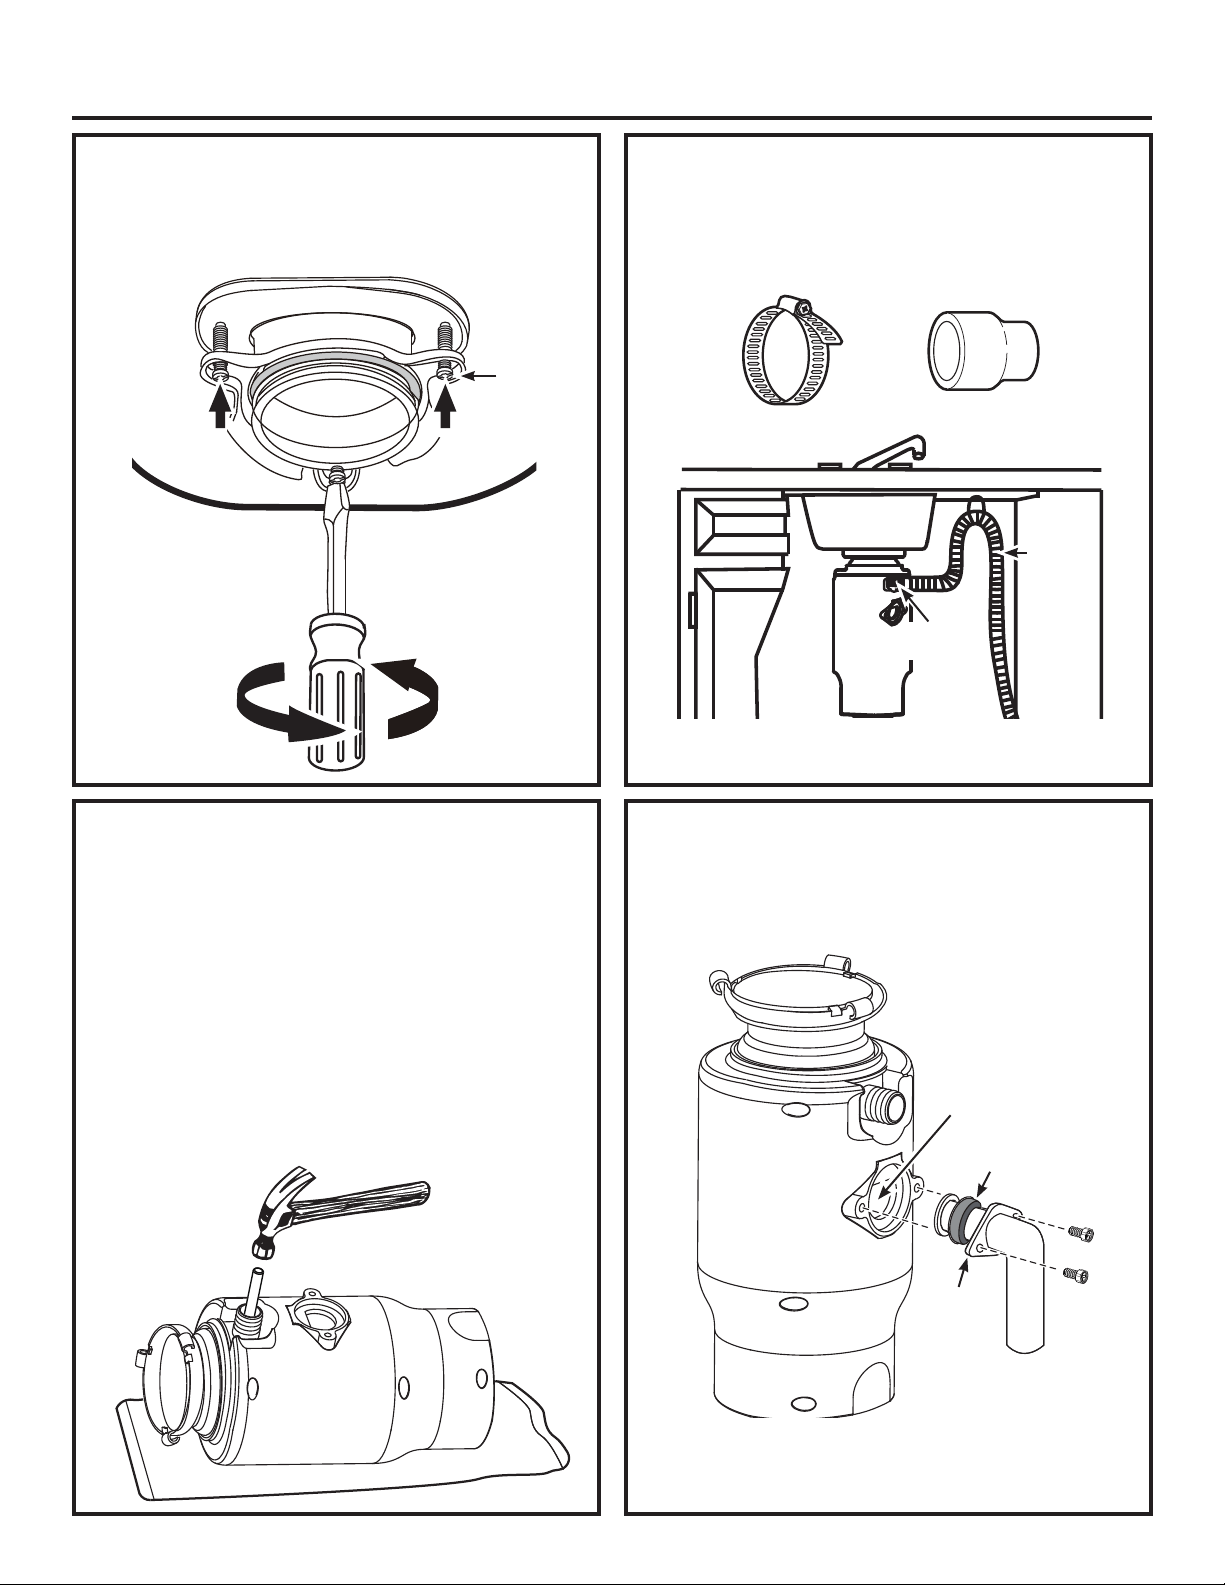
7LJKWHQWKHWKUHHXSSHUPRXQWLQJULQJVFUHZVLQWR
the support flange.
6FUHZV
IF CONNECTING TO A
DISHWASHER
If you are connecting to a dishwasher, complete this step.
If a dishwasher is not to be connected, skip to ATTACH
THE DISCHARGE ELBOW section and continue.
6HWWKHGLVSRVHURQWKHIORRU3ODFHLWRQLWVVLGHRQD
SURWHFWHGVXUIDFH8VHDEOXQWLQVWUXPHQWVWHHOSXQFK
RUZRRGHQGRZHOWRNQRFNRXWWKHHQWLUHGLVKZDVKHU
GLVFKDUJHSOXJ'RQRWXVHDVFUHZGULYHURUVKDUS
instrument. When knockout plug falls into disposer, you
may remove it or simply grind it up when the disposer
LVXVHG7KLVZLOOQRWGDPDJHWKHGLVSRVHULQDQ\ZD\
but may take some time to grind, over the course of
several uses.
IF CONNECTING TO A
DISHWASHER (CONT.)
2. Connect the flexible drain hose to the dishwasher
GLVFKDUJHXVLQJDKRVHFODPS,IWKHKRVHVL]HLV
different, you will need a stepped rubber adapter.
See the Installation Instructions that came with your
dishwasher for details.
ATTACH THE DISCHARGE ELBOW
• Slide the discharge flange and then the discharge gasket
onto the discharge elbow. Insert the discharge elbow and
gasket into the disposer discharge outlet and attach the
flange assembly to the disposer with the two screws.
NOTE: Some installations may require a straight pipe
or flexible drain pipe connection. Consult a licensed
plumber as needed.
'LVFKDUJH2XWOHW
Gasket
Screws
)ODQJH
'LVFKDUJH
Elbow
Hose Clamp
Stepped Rubber Adapter
Clamp
connection
)OH[LEOH
'UDLQ
Hose
8VHDSXQFKRU
GRZHORQO\'RQRW
use a screwdriver or
VKDUSLQVWUXPHQW
12 49-4000231 Rev 0
Installation Instructions
MOUNT THE DISPOSER
IMPORTANT: Before performing this step, read it
completely to understand how the disposer is mounted.
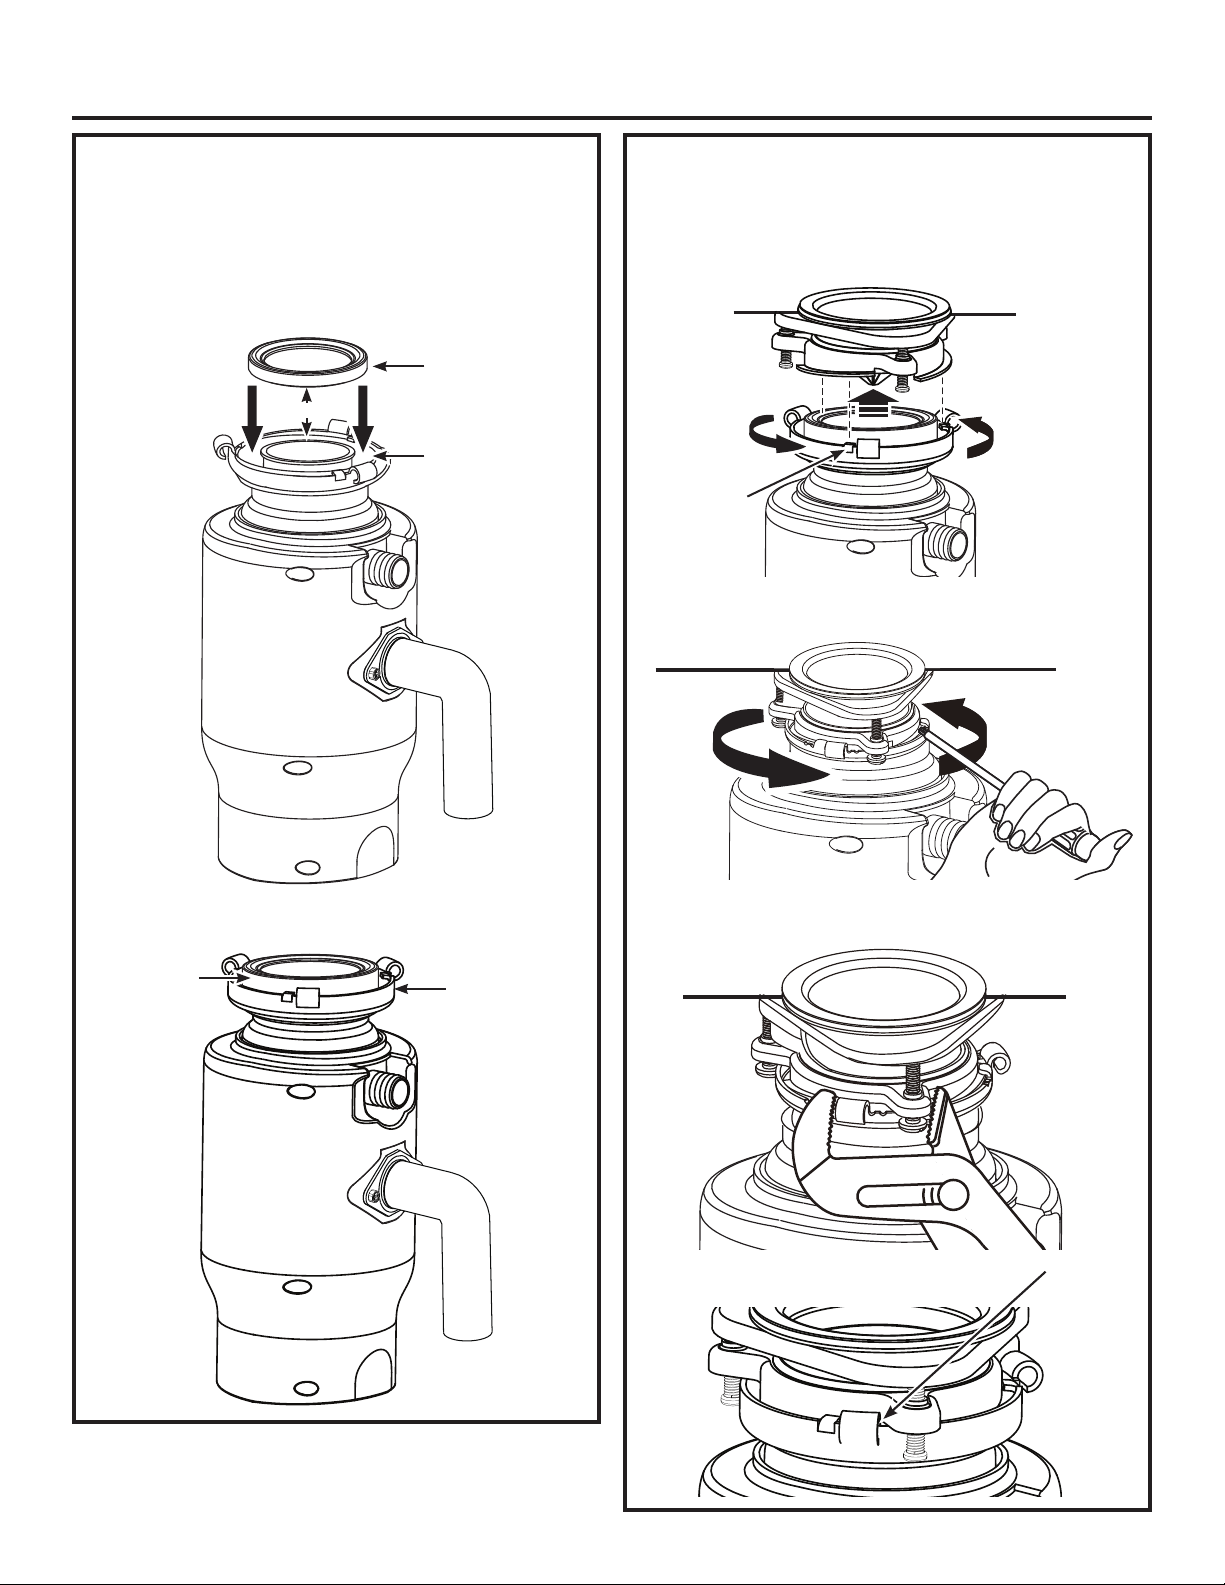
1. $SSO\DVPDOODPRXQWRIOLTXLGVRDSRUSHWUROHXP
MHOO\RQWRWKHERWWRPRIWKHFXVKLRQPRXQWDQGWR
the bottom of the the lower mounting ring to aid its
sliding and rotation onto the upper mounting ring.
2. Seat the cushion mount onto the top ring of the
disposer.
MOUNT THE DISPOSER (CONT.)
3. Lift and prop the disposer into place on the upper
mounting ring. Mount it by turning the lower mounting
ring until its tabs engage onto the slide ramps of the
upper mounting ring.
Insert a screwdriver into a lower hook and leverage it
counterclockwise into place.
Use channel lock pliers to fully lock the lower
mounting ring tabs onto the upper slide ramps.
Shown fully locked:
Sink
Sink
Engage tabs onto
upper slide ramps
7DEV
Sink
7RJHWKHU
when fully
locked
Cushion
Mount
Lower
Mounting
Ring
Apply soap
Lower
Mounting
Ring
Cushion
Mount
7XUQWKHORZHU
mounting ring to
ramp it onto the
upper mounting ring
49-4000231 Rev 0 13
Installation Instructions
CONNECT PLUMBING
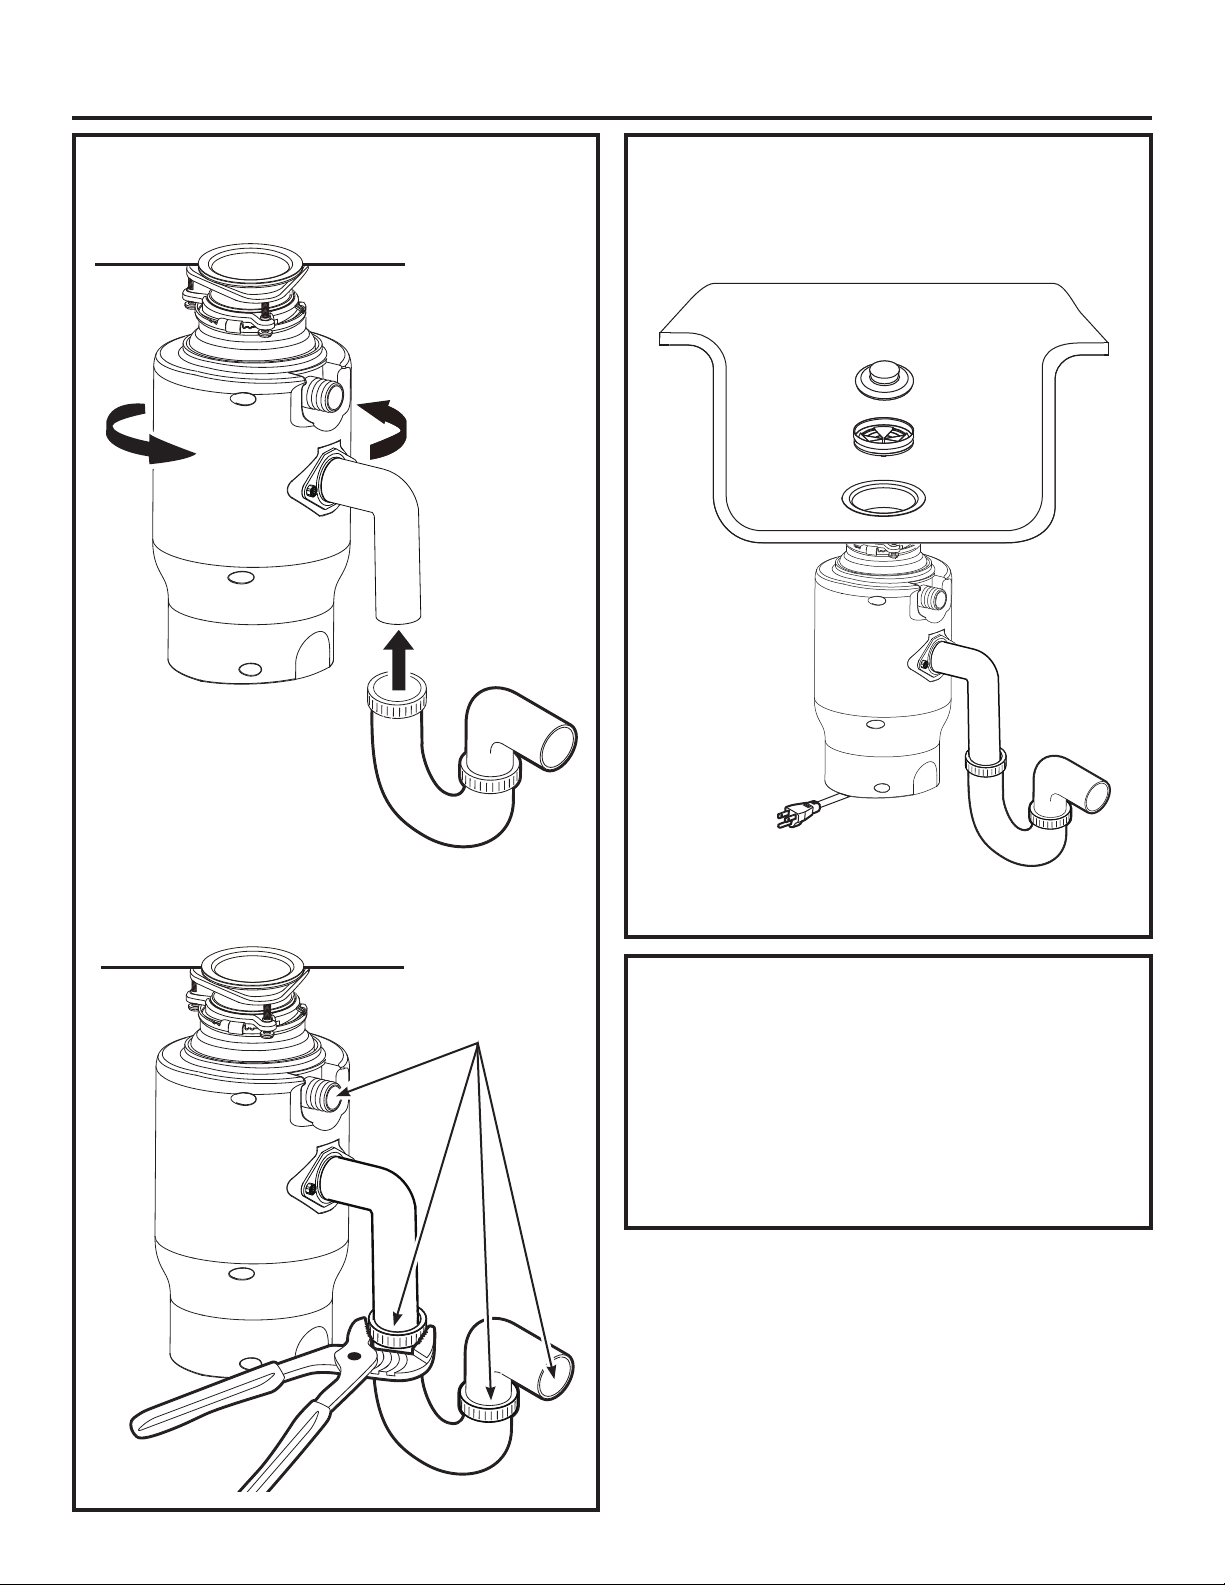
7XUQWKHGLVSRVHUXQWLOWKHGLVSRVHUGLVFKDUJHHOERZ
lines up with the outlet drain pipe.
2. Securely connect all plumbing, including the drain
SLSHDQGWKHGLVKZDVKHUGUDLQLIXVHGREVHUYLQJDOO
codes and ordinances.
INSTALL SPLASH GUARD AND
STOPPER
• 3UHVVWKHVSODVKJXDUGLQWRSODFHLQWKHVLQNIODQJH
Insert the stopper over the splash guard.
NOTE: Both the splash guard and stopper may be
removed and cleaned as needed.
CONNECT POWER AND TEST FOR
LEAKS
• 3lug the disposer into an outlet that is properly
installed and grounded in accordance with all local
codes and ordinances.
• Run water to check the disposer for leaks 24 hours
after installation and first operation.
• Keep and refer to this Owner’s Manual for proper use
and care of this disposer.
Stopper
Splash
Guard
Sink
)ODQJH
Rotate the disposer
as needed to align
with the drain pipe
Sink
Outlet
'UDLQ
3LSH
Secure all plumbing
connections
Sink
Outlet
'UDLQ
3LSH

14 49-4000231 Rev 0
Problem Possible Cause What To Do
Loud noises (other
than those during
grinding of bones
and fruit pits)
6LOYHUZDUHERWWOHFDSRURWKHUIRUHLJQREMHFWKDVIDOOHQ
into the disposer
Remove the splash guard and remove the
REMHFWZLWKORQJKDQGOHGWRQJV5HSODFH
the splash guard.
Disposer does not
start
Reset button has been tripped With the splash guard removed, check to see
if the turntable will move freely using a broom
handle. If the turntable moves freely, replace
the splash guard and check the reset button
WRVHHLILWKDVEHHQWULSSHG7KHUHVHWEXWWRQ
is red, located opposite the discharge elbow,
near the bottom of the disposer behind
its protective shield. Reach up and under
the protective shield and push the button
in until it clicks and remains depressed. If
the reset button has not been tripped, check
for a shorted or broken wire connecting to
the disposer. Check the electrical power
switch, fuse box or circuit breaker. If wiring
and electrical components are intact,
the unit may have internal problems that
require service or replacement.
7XUQWDEOHFDQQRWURWDWH If the turntable does not turn freely, check
IRUDQREMHFWORGJHGEHWZHHQWKHWXUQWDEOH
DQGWKHJULQGULQJ'LVORGJHWKHREMHFWE\
moving the turntable with a broom handle.
7KHQUHPRYHWKHREMHFW
,IQRIRUHLJQREMHFWLVSUHVHQWWKHUHPD\
be internal problems.
Disposer leaks If the leak is at the top, it may be caused by:
,PSURSHUVHDWLQJRIVLQNIODQJHJDVNHWFKRLFHSXWW\
or tightening.
2. Support ring not tightened properly.
'HIHFWLYHFXVKLRQPRXQW
If the leak is at the discharge elbow, leak may be
caused by improper tightening of elbow flange screws.
TROUBLESHOOTING TIPS
Troubleshooting Tips... Before you call for service
SAFETY NOTE: Before investigating, you must disconnect the power supply.
WARNING
Before resetting, disconnect the power supply-please see SAFETY NOTE above. The
overload control prevents the motor from operating should overloading occur. This feature
protects your house wiring and your disposer. When overloaded, the motor will stop automatically.
Reset Button
5HDFKXSDQG
under protective
VKLHOGWRSUHVV
'LVSRVHUVKRZQRQLWVEDFN
'LVSRVHU
shown upright
Remove Splash
Guard
7XUQWDEOH
REMARQUE RELATIVE À LA SÉCURITÉ : Avant de manipuler le broyeur pour rechercher une
panne, débranchez toujours l’alimentation.
AVERTISSEMENT
Avant la réinitialisation, débranchez l’alimentation. Voir la REMARQUE RELATIVE
À LA SÉCURITÉ ci-dessus. Le contrôle de surcharge protège le moteur des
opérations impliquant une surcharge. Cette fonctionnalité protège à la fois votre installation électrique et
votre broyeur. En cas de surcharge, le moteur s’arrête automatiquement.
NOTA SOBRE SEGURIDAD: Antes de investigar, usted deberá desconectar el suministro de corriente.
Antes de realizar la reconfiguración, desconecte el suministro de corriente – por
favor consulte la NOTA SOBRE SEGURIDAD anterior. El control de sobrecarga
evita que el motor funcione en caso de sobrecarga. Esta función protege el cableado de su hogar y su
triturador. Cuando se encuentre sobrecargado, el motor se detendrá automáticamente.
ADVERTENCIA
49-4000231 Rev 0 15
GEAppliances.com
$OOZDUUDQW\VHUYLFHLVSURYLGHGE\RXU)DFWRU\6HUYLFH&HQWHUVRUDQDXWKRUL]HG&XVWRPHU&DUH
®
WHFKQLFLDQ7RVFKHGXOH
service online, visit us at GEAppliances.com/serviceRUFDOO*($SSOLDQFHVDW*(&$5(63OHDVH
have your serial number and your model number available when calling for service.
LIMITED WARRANTY
GE Appliances Disposer Limited Warranty
For the period of GE Appliances will replace
Three Years
)URPWKHGDWHRIWKH
original purchase
7KHHQWLUHGLVSRVHULIWKHUHLVDGHIHFWLQPDWHULDOVRUZRUNPDQVKLSUHODWLQJWRIXQFWLRQDO
SDUWVRQO\DSSHDUDQFHSDUWVDUHH[FOXGHG'XULQJWKLVlimited three-year warranty,
GE Appliances will also provide, free of charge, all labor charges related to replacing the
original disposer along with the replacement disposer within the first year.
6WDSOH\RXUUHFHLSWKHUH3URRIRIWKHRULJLQDOSXUFKDVH
date is needed to obtain service under the warranty.
7KLVOLPLWHGZDUUDQW\LVH[WHQGHGWRWKHRULJLQDOSXUFKDVHUDQGDQ\VXFFHHGLQJRZQHUIRUSURGXFWVSXUFKDVHGIRUKRPH
XVHZLWKLQWKH86$,IWKHSURGXFWLVORFDWHGLQDQDUHDZKHUHVHUYLFHE\D*($SSOLDQFHV$XWKRUL]HG6HUYLFHULVQRW
DYDLODEOH\RXPD\EHUHVSRQVLEOHIRUDWULSFKDUJHRU\RXPD\EHUHTXLUHGWREULQJWKHSURGXFWWRDQ$XWKRUL]HG*(
Appliances Service location for service. In Alaska, the limited warranty excludes the cost of shipping or service calls to
your home.
6RPHVWDWHVGRQRWDOORZWKHH[FOXVLRQRUOLPLWDWLRQRILQFLGHQWDORUFRQVHTXHQWLDOGDPDJHV7KLVOLPLWHGZDUUDQW\
JLYHV\RXVSHFLILFOHJDOULJKWVDQG\RXPD\DOVRKDYHRWKHUULJKWVZKLFKYDU\IURPVWDWHWRVWDWH7RNQRZZKDW\RXU
legal rights are, consult your local or state consumer affairs office or your state’s Attorney General.
Warrantor: GE Appliances, a Haier company
Louisville, KY 40225
What is not covered:
Ŷ
Service trips to your home to teach you how to use
the product.
Ŷ
Improper installation, delivery or maintenance.
Ŷ
)DLOXUHRIWKHSURGXFWLILWLVDEXVHGPLVXVHGRUXVHGIRU
other than the intended purpose or used commercially.
Ŷ
Replacement of house fuses or resetting of circuit
breakers.
Ŷ
3URGXFWVZKLFKDUHQRWGHIHFWLYHRUEURNHQRUZKLFK
are working as described in the Owner’s Manual.
Ŷ
'DPDJHWRWKHSURGXFWFDXVHGE\DFFLGHQWILUH
floods or acts of God.
Ŷ
Incidental or consequential damage caused by
possible defects with this appliance.
Ŷ
'HIHFWVRUGDPDJHGXHWRRSHUDWLRQLQIUHH]LQJ
temperatures.
Ŷ
'DPDJHFDXVHGDIWHUGHOLYHU\
Ŷ
3URGXFWQRWDFFHVVLEOHWRSURYLGHUHTXLUHGVHUYLFH
EXCLUSION OF IMPLIED WARRANTIES
Your sole and exclusive remedy is product repair as provided in this Limited Warranty. Any implied warranties,
including the implied warranties of merchantability or fitness for a particular purpose, are limited to one year or the
shortest period allowed by law.

16 49-4000231 Rev 0
Consumer Support
CONSUMER SUPPORT
3ULQWHGLQ&KLQD
GE Appliances Website
+DYHDTXHVWLRQRUQHHGDVVLVWDQFHZLWK\RXUDSSOLDQFH"7U\WKH*($SSOLDQFHV:HEVLWHKRXUVDGD\DQ\GD\
of the year! You can also shop for more great GE Appliances products and take advantage of all our on-line support
VHUYLFHVGHVLJQHGIRU\RXUFRQYHQLHQFH,QWKH86GEAppliances.com
In Canada: GEAppliances.ca
Register Your Appliance
5HJLVWHU\RXUQHZDSSOLDQFHRQOLQHDW\RXUFRQYHQLHQFH7LPHO\SURGXFWUHJLVWUDWLRQZLOODOORZIRUHQKDQFHG
communication and prompt service under the terms of your warranty, should the need arise. You may also mail in the
SUHSULQWHGUHJLVWUDWLRQFDUGLQFOXGHGLQWKHSDFNLQJPDWHULDO,QWKH86GEAppliances.com/register
In Canada: Prodsupport.mabe.ca/crm/Products/ProductRegistration.aspx
Schedule Service
Expert GE Appliances repair service is only one step away from your door. Get on-line and schedule your service at
\RXUFRQYHQLHQFHDQ\GD\RIWKH\HDU,QWKH86GEAppliances.com/service or call 800.432.2737 during normal
business hours.
In Canada: GEAppliances.ca/en/support/service-request or call 800.561.3344.
Extended Warranties
3XUFKDVHD*($SSOLDQFHVH[WHQGHGZDUUDQW\DQGOHDUQDERXWVSHFLDOGLVFRXQWVWKDWDUHDYDLODEOHZKLOH\RXU
warranty is still in effect. You can purchase it on-line anytime. GE Appliances Services will still be there after your
ZDUUDQW\H[SLUHV,QWKH86GEAppliances.com/extended-warranty or call 800.626.2224 during normal business
hours.
In Canada: GEAppliances.ca/en/support/purchase-extended-warranty or call 866.277.9842.
Parts and Accessories
Individuals qualified to service their own appliances can have parts or accessories sent directly to their homes
9,6$0DVWHU&DUGDQG'LVFRYHUFDUGVDUHDFFHSWHG2UGHURQOLQHWRGD\KRXUVHYHU\GD\
,QWKH86GEApplianceparts.com or by phone at 877.959.8688 during normal business hours.
In Canada: GEAppliances.ca/en/products/parts-filters-accessories or call 800.661.1616.
Instructions contained in this manual cover procedures to be performed by any user. Other servicing
generally should be referred to qualified service personnel. Caution must be exercised, since improper
servicing may cause unsafe operation.
Contact Us
If you are not satisfied with the service you receive from GE Appliances, contact us on our Website with all the
details including your phone number, or write to:
,QWKH86*HQHUDO0DQDJHU&XVWRPHU5HODWLRQV_*($SSOLDQFHV$SSOLDQFH3DUN_/RXLVYLOOH.<
GEAppliances.com/contact
,Q&DQDGD'LUHFWRU&RQVXPHU5HODWLRQV0&&200(5&,$/,1&_6XLWH)DFWRU\/DQH_0RQFWRQ1%(&0
GEAppliances.ca/en/contact-us