To insure trouble-free operation of your SHARP calculator, we recommend the following:
The calculator should be kept in areas free from extreme temperature changes, mossture, and dust
A soft, dry cloth should be used to clean the calculator. Do not use solvents or a wet cloth
Since this product is not waterproof, do not use it or store it where fluids, for example water, can splash onto it. Raindrops, water spray, juice, coffee, steam, perspiration, etc. will also cause malfunction
If service should be required, use only a SHARP servicing dealer, a SHARP approved service faality or SHARP repair service
SHARP will not be liable nor responsible for any incidental or consequential economic or property damage caused by misuse and/or malfunctions of this product and its peripherals, unless such hability is acknowledged by law.
USING THE CALCULATOR FOR THE FIRST TIME
First, pull out the insulation sheet for the memory protection battery (installed for retaining the date/time/tax rate information). Reset the calculator to initialize the unit's state, then adjust the date and time before using the calculator.
Removing the insulation sheet, and resetting
1. Pull out the insulation sheet for the memory protection battery
2. Press the RESET switch located on the back of the unit
(See "RESETTING THE UNIT")
*The clock starts, indicating the current date and time as January 1, 2008, 12:00:00 a.m
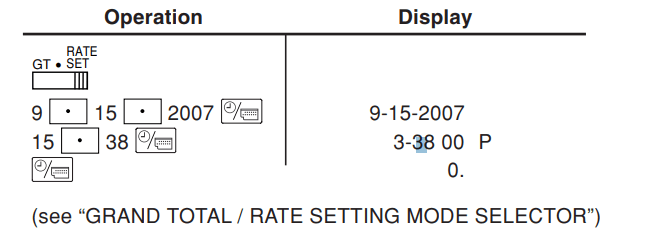
Adjusting date and time
Example: When the date is September 15. 2007. and the time is 3:38 p.m.
When the adjustment is complete. the clock starts at 3:38:00 p.m.
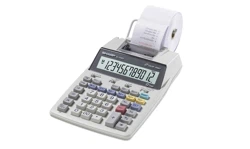
OPERATING CONTROLS
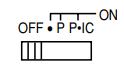
POWER SWITCH; PRINT / [TEM COUNT MODE SELECTOR:
Power OFF
Power ON. Set to the non print mode.
Power ON. Set to the print mode.
Power ON. Set to the print and item count mode.
1) For addition or subtraction, each time is pressed, 1 is added to the item counter, and each timeis pressed, 1 is subtracted.
The count is printed when the calculated result is obtained.
Pressing of clears the counter.
2) When the grand total/rate setting mode selector is in the ON position (GT), the counter will count the number of times that the calculation results have been stored in the grand total memory. To print and clear the count, press key.
3) The memory item counter will count the number of times that the key has been pressed in the addition.
Note:
Each time thekey is used in the subtraction, 1 will be subtracted from the count.
The count is printed when the memory is recalled.
Pressing of the key clears the counter.
Note: The counter has a maximum capacity of 3 digits (up to £399). If the coun! exceeds the maximum, the counter will recount from zero.
ROUNDING SELECTOR:
Example: Set Decimal Selector to 2.
Note: The decimal point floats during successive calculation by the use of or
If the decimal selector is set to “F then the answer is always rounded down ().
GRAND TOTAL / RATE SETTING MODE SELECTOR:
“GT”: Grand Total
Neutral
“RATE SET” To set the date, time, and tax rate, et this switch at the “RATE SET" position.
Date:
Enter in the order of month, day and year, then press to complete the entry.
Use to separate month, day, and year.
Whenis pressed, the number entered is evaluated and displayed as “date” if the value is within the following range; “Error” is displayed otherwise, and the previously set date is restored.
Month: 1 - 12; day: 1 - 31; Year: 2000 - 2099 (in 4 digits) or 00 - 93 (in 2 digits)
Time:
Enter in the order of hour, minutes, then press 1o complete the entry. (There is no entry available for the seconds value. The clock starts al zero second.)
If the hour/minute digit is less than 10, it is not necessary 1o enter the first digit "0".
Use to separate hour and minute values.
When is pressed, the number entered is evaluated and displayed as “time” if the value is within the following range; “Error” is displayed otherwise, and the previously sel time is reslored.
Hour: 0 - 23 (24-hour system for the hour enlry). Minute: 0 - 59
Taxt rate:
Press three times, enter the tax rate, followed by
A maximum of 4 digits can be stored (decimal point is not counted as a digit).
Only one rate can be stored. If you enter a new rate, the previous rate will be cleared.
DECIMAL / ADD MODE SELECTOR:
“ 3 2 0”Presets the number of decimal places in the answer.
"F": The answer is displayed In the floating decimal system.
"A" The decimal point in addition and subtraction entries Is automatically positioned 1o the 2nd digit from the lowest digit of entry number. Use of the add mode permits addition and subtraction of numbers without entry of the decimal point. Use of and will automatically override the add mode and decimally correct answers will be printed.
CLOCK/ CALENDAR KEY:
Each time this key is pressed, the mode swilches.Calculation mode —> Date display mode —> Clock display mode —>Calculation mode
Use this key also to adjust date and time (see “GRAND TOTAL / RATE SETTING MODE SELECTOR).
PAPER FEED KEY
LAST DIGIT CORRECTION KEY
NON-ADD / SUBTOTAL KEY:
Non-add — When this key is pressed right after an entry of a number in the Print mode, the entry is printed on the left-hand side with the symbol *#”. This key is used to print out numbers not subjecifio calculation such as code, date, elc.
Subtotal — Used to get sul 2) of additions and/or subtractions. When pressed following the key, the subtotal is printed with the symbol “0” and the calculation may be continued.
By pressing this key even in the Non-print mode, the displayed number is printed without any symbol.
When the POWER SWITCH; PRINT / ITEM COUNT MODE SELECTOR is set “P” or position, and Date or Clock is displayed, press this key to print the displayed contents, including *#" symbol, from the left side of the paper roll. Example
When the Date / Glock printing is bomplete, the Calculation mode is restored.
CLEAR / CLEAR ENTRY KEY
Press this key twice, followed by to print the set tax rate.
TOTAL KEY
EQUAL KEY
CHANGE SIGN KEY:
Changes the algebraic sign of a number (i.e., positive lo negative or negative to positive).
RECALL AND CLEAR MEMORY KEY
RECALL MEMORY KEY
TAX-INCLUDING KEY
PRE-TAX KEY
GRAND TOTAL KEY
COST PRICE ENTRY KEY:
Press this key to enter the cost price.
SELLING PRICE ENTRY KEY:
Press this key 10 enter the selling price.
MARGIN ENTRY KEY:
Press this key 1o enter the margin.
CHANGE CALCULATION KEY:
To see how much change to return, have the price amount displayed, then enter the pay amount, followed by this key. The change is calculated in accordance with the DECIMAL / ADD MODE SELECTOR setup as well as the ROUNDING SELECTOR setup.
The intermediate result of an addition or subtraction in the Change calculation is retained.
While the POWER SWITCH / PRINT / ITEM COUNT MODE SELECTOR is placed in"P" or “P+IC”, the pay amount is printed after “= ««s=s=scce<.” and the change printed with "CG".
Note: The displayed change value will not be added to the grand total memory.
DISPLAY SYMBOLS:
M : Appears when a number is in the memary.
:Appears when a number is negative.
:Appears when a number is in the grand total memory.
E : Appears when an overflow or other error is detected.
TAX+ : Appears when the total calculated includes tax.
TAX- : Appears when the total calculated excludes tax.
TAX: Appears when the tax rate is set.
INK ROLLER REPLACEMENT
If printing is blurry even when the ink roller is in the proper position, replace the roller.
Ink roller: Type EA-772R
WARNING APPLYING INK TO WORN INK ROLLER OR USE OF UNAPPROVED INK ROLLER MAY CAUSE SERIOUS DAMAGE TO PRINTER.
Set the power switch to OFF.
Remove the printer cover. (Fig. 1)
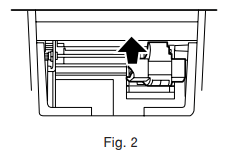
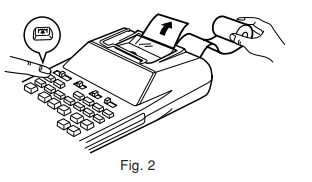
Hold the top of the ink roller and remove the roller by pulling it toward you and then upward. (Fig. 2)
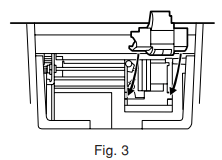
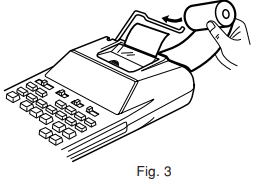
Install the new ink roller in the correct position. Make sure that the roller is securely in place. (Fig. 3)
Put back the printer cover.
Cleaning the printing mechanism
It the print becomes dull after long time usage, clean the printing wheel according to the following procedures:
Remove the printer cover and the ink roller.
Install the paper roll and feed it until it comes out of the front of the printing mechanism.
Hold a small brush (like a tooth brush) lightly to the printing wheel and clean it by pressing
Put back the ink roller and the printer cover.
Note: Do not rotate the printing mechanism manually, this may damage the printer.
PAPER ROLL REPLACEMENT
Always cut leading edge with scissors first.
Inert the laading adage of the paper mil int tha opening (Fig 1)
Turn the power on and feed the paper by pressing . (Fig. 2)
Lift the attached metal paper holder up and insert the paper roll 10 the paper holder. (Fig.3)
DO NOT PULL PAPER BACKWARDS AS THIS MAY CAUSE DAMAGE TO PRINTING MECHANISM.
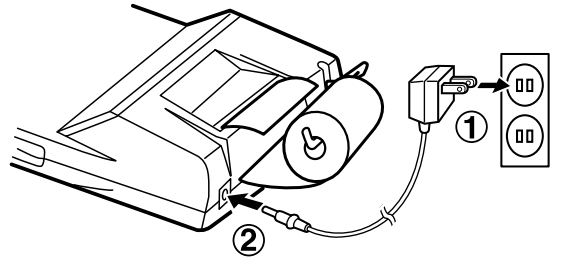
HOW TO CONNECT THE AC ADAPTOR
This machine can also be operated on AC power by use of the AC Adaptor. When the AC adaptor is connected to the calculator. the power source is automatically switched over from dry batteries to AC power source
AC adaptor: Model EA-65A. EA-28A
Make sure that you turn the calculator’s power off when connecting or disconnecting the AC adaptor.
To connect the AC adaptor. follow steps 1 and 2.
To disconnect the AC adaptor. simply reverse the procedure.
BATTERY REPLACEMENT (OPTION)
To Install or Replace Batteries — When the battery power becomes weak. printing may be halted. and displayed images may disappear. If such symptoms are observed. replace the batteries with new ones.
Set the power switch to OFF.
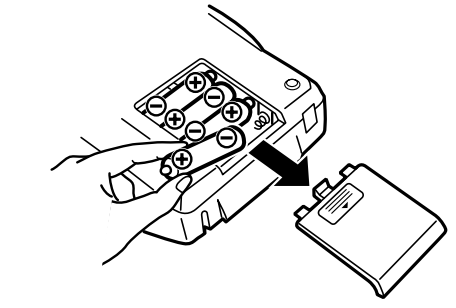
Remove the battery cover by sliding it in the direction of the arrow on the cover.
Replace the batteries. Be sure that the “+” and “~” marks on the battery correspond to the “+” and “—” marks in the calculator. Always put back the 4 batteries at the same time.
Put back the battery cover.
Battery: Manganese dry battery. size AA (or R6) x 4
ERRORS
There are several situations which will cause an overflow or an error condition. When this occurs, “E” will be displayed. The contents of the memory at the time of the error are retained.
If an “E 0.” is displayed at the time of the error, “– – – – – – –” will be printed in red and must be used to clear the calculator.
Also, in rare cases, printing may stop midway and the indication “E” will appear on the display. This is not a maliunction but is caused when the calculator is exposed to strong electromagnetic naise or static electricity from an external source. Should this occur, press the key and then repeal the calculation from the beginning.
Error conditions:
When the integer portion of an answer exceeds 12 digits.
When the integer portion of the contents of the memary ar grand total memory exceeds12 digits.
When any number is divided by zero.
REPLACEMENT OF BATTERY FOR MEMORY PROTECTION
Time for battery replacement
Lite of the memory protection batiery is approximately 2,500 hours at 25°C(77°F) with the power plug not connected lo the socket
When the memory protection battery is weak, the date/lime getting is initialized (1/1/2008, 12:00:00 a.m.)
Verity the datetime setting in the date/clock display mode when connecting the power plug to the socket
If the date/time setting is modified or incofrect, promptly replace the memory protection battery with new one
(The life of the pre-installed baftery may be shorter than expected because of the time the calculator spends during shipment )
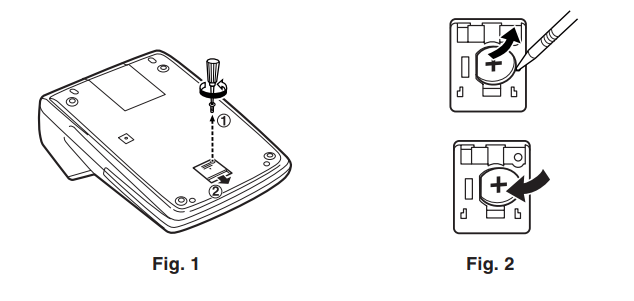
How to change the battery
Use one lithium battery (CR2032).
Caution: Replacing the battery will clear the date and time settings, and the stored tax rate.
Turn the power switch “OFF~ and unplug the power supply plug from the outlet.
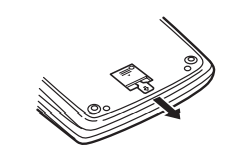
Remove the battery cover on the back of the unit. (Fig. 1)
Remove the exhausted battery and install one new lithium battery. Wipe the battery weil with a dry cloth and place the plus "+" side upward. (Fig. 2)
Replace the battery cover by reversing the removal procedure.
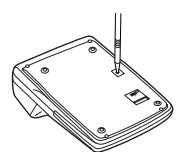
Press the RESET switch on the back of the unit (See "RESETTING THE UNIT").
After battery replacement
Connect the power supply plug to an outlet and turn the power switch "ON". Check that "0." is displayed. If "0." is not displayed, remove the battery, reinstall it, and check the display again.
Readjust date, ime, and tax rale setings.
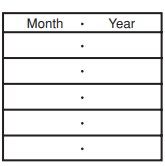
In the box on the right, fill in the month/year (hal you changed the battery, as a reminder of when to change it again.
Precautions on battery use
Do not leave an exhausted battery in the equipment.
Do not expose the battery to water or fire, and do not take it apan
Store batteries out of the reach of amall children
Notes for handling Lithium batteries:
CAUTION
Danger of explosion if batiery is incorrectly replaced
Replace only with the same or equivalent type recommended by the manutactures.
Dispose of used batteries according lo the manufacturer's instructions
RESETTING THE UNIT
Strong impacts, exposure to electrical fields, or other unusual conditions may render the unit inoperative, and pressing the keys will have no affect. If this occurs, you will have lo press the RESET switch on the bottom of the unit. The RESET swilch should be pressed only when:
an abnormal event occurs and all keys are disabled.
Notes:
Pressing the RESET switch will clear the date and time settings, the tax rate setting, and the memory contents.
Use only a ballpoint pen to press the RESET switch. Do not use anything breakable or anything with a sharp tip, such as a needle.
ANler pressing the RESET switch, connect the power supply plug to an outlet. Turn the power swilch “ON” and check that “0.” is displayed.
LIMITED WARRANTY
SHARP ELECTRONICS CORPORATION warrants to the first consumer purchaser that this Sharp brand product (the “Product”), when shipped in its original container, will be free from defective workmanship and materials, and agrees that it will, at its option, either repair the defect or replace the defective Product or part thereof with a new or remanufactured equivalent at no charge to the purchaser for parts or labor for the period(s) set forth below.
This warranty does not apply to any appearance items of the Product nor to the additional excluded item(s) set forth below nor to any Product the exterior of which has been damaged or defaced, which has been subjected to improper voltage or other misuse, abnormal service or handling, or which has been altered or modified in design or construction.
In order to enforce the rights under this limited warranty, the purchaser should follow the steps set forth below and provide proof of purchase to the servicer.
The limited warranty described herein is in addition to whatever implied warranties may be granted to purchasers by law. ALL IMPLIED WARRANTIES INCLUDING THE WARRANTIES OF MERCHANTABILITY AND FITNESS FOR USE ARE LIMITED TO THE PERIOD(S) FROM THE DATE OF PURCHASE SET FORTH BELOW. Some states do not allow limitations on how long an implied warranty lasts, so the above limitation may not apply to you.
Neither the sales personnel of the seller nor any other person is authorized to make any warranties other than those described herein, or to extend the duration of any warranties beyond the time period described herein on behalf of Sharp.
The warranties described herein shall be the sole and exclusive warranties granted by Sharp and shall be the sole and exclusive remedy available to the purchaser. Correction of defects, in the manner and for the period of time described herein, shall constitute complete fulfillment of all liabilities and responsibilities of Sharp to the purchaser with respect to the Product, and shall constitute full satisfaction of all claims, whether based on contract, negligence, strict liability or otherwise. In no event shall Sharp be liable, or in any way responsible, for any damages or defects in the Product which were caused by repairs or attempted repairs performed by anyone other than an authorized servicer.
Nor shall Sharp be liable or in any way responsible for any incidental or consequential economic or property damage. Some states do not allow the exclusion of incidental or consequential damages, so the above exclusion may not apply to you.
THIS WARRANTY GIVES YOU SPECIFIC LEGAL RIGHTS. YOU MAY ALSO HAVE OTHER RIGHTS WHICH VARY FROM STATE TO STATE.
Your Product: Six (6) months parts and labor from date of purchase.
Warantty period for this Product: Additional Items Excluded Any consumable items such as paper, maintenance cartridge, ink cartridges supplied with the Product or to any equipment or any hardware, software, firmware, fluorescent lamp, power cords, covers, rubber parts, or peripherals other than the Product.
Where to Obtain Service : At a Sharp Authorized Servicer located in the United States. To find out the location of the nearest Sharp Authorized Servicer, call Sharp toll free at 1-800-BE-SHARP.
What to do to Obtain Service : Ship (prepaid) or carry in your Product to a Sharp Authorized Servicer. Be sure to have proof of purchase available. If you ship or mail the Product, be sure it is packaged carefully.
Q: Suddenly, although my calculator is displaying the numbers I enter, it’s not printing them on the tape. It is printing a strange symbol with each entry, but no numbers. It’s set to print, so what’s up with it? Thanks, Brenda Reply
 POWER SWITCH; PRINT / [TEM COUNT MODE SELECTOR:
 Power OFF
 Power ON. Set to the non print mode.
 Power ON. Set to the print mode.
 Power ON. Set to the print and item count mode.
 is pressed, 1 is added to the item counter, and each time
 is pressed, 1 is subtracted.
 clears the counter.
 key.
key. key has been pressed in the addition.
 key is used in the subtraction, 1 will be subtracted from the count.
 key clears the counter.
 ROUNDING SELECTOR:
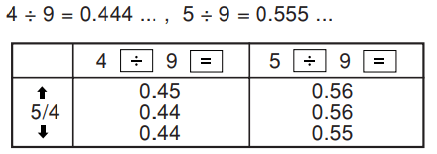
 or
or 
 ).
). GRAND TOTAL / RATE SETTING MODE SELECTOR:
 to complete the entry.
 to separate month, day, and year.
 three times, enter the tax rate, followed by
 DECIMAL / ADD MODE SELECTOR:
 and
and  will automatically override the add mode and decimally correct answers will be printed.
 CLOCK/ CALENDAR KEY:
 PAPER FEED KEY
 LAST DIGIT CORRECTION KEY
 NON-ADD / SUBTOTAL KEY:
 key, the subtotal is printed with the symbol “0” and the calculation may be continued.
 “P” or
  position, and Date or Clock is displayed, press this key to print the displayed contents, including *#" symbol, from the left side of the paper roll.
 CLEAR / CLEAR ENTRY KEY
 to print the set tax rate.
 TOTAL KEY
 EQUAL KEY
 CHANGE SIGN KEY:
 RECALL AND CLEAR MEMORY KEY
 RECALL MEMORY KEY
 PRE-TAX KEY
 GRAND TOTAL KEY
 COST PRICE ENTRY KEY:
 SELLING PRICE ENTRY KEY:
 MARGIN ENTRY KEY:
 CHANGE CALCULATION KEY:
 :Appears when a number is negative.
 :Appears when a number is in the grand total memory.
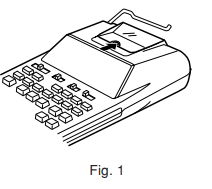


 must be used to clear the calculator.