
Questions or Concerns?
Please contact us Mon-Fri 9:00AM-5:00PM PST
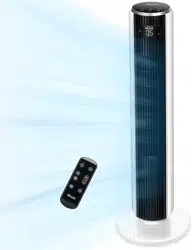
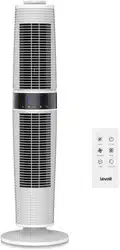
37-inch Three-speed
Oscillating Tower Fan
Model: LV373TF
Questions or Concerns?
(888) 726-8520
ENGLISH • ESPAÑOL

- 2 -
Thank you for purchasing the LV373TF 37-inch Three-Speed Oscillating Tower Fan by Levoit. We
are dedicated to providing you with quality products so that you can see a better you. Should
you have any questions or concerns about using your new product, feel free to reach out to our
helpful customer support team at [email protected] or by phone at (888) 726-8520.
We hope you enjoy your new product!
Thank You.
- 3 -
Table of Contents
Safety Information
Main Functions
Display Functions
Set-Up
Operation
· Nature Mode Power Levels
Cleaning & Maintenance
Troubleshooting
Warranty Information
Customer Support
Español
4
6
7
8
10
12
13
14
15
16
18
Power Supply: AC 120V / 60Hz
Rated Power: 45W
Noise Level: ≤ 55dB
Remote Control Battery: 3V CR2025
1 x Tower fan
1 x Remote control
1 x 3V CR2025 Battery (pre-installed)
1 x User manual
Package Contents
Specifications

- 4 -
Important Safety Information
General Safety
• Read all instructions before using this appliance.
• Only use the fan for the purposes described in
this manual.
• To protect against electrical shock do not
immerse unit, plug, or cord in water.
• Only connect the plug to a 120V AC electrical
outlet.
• Close supervision is necessary when this
appliance is being used by or near children.
• Avoid contact with moving parts.
• WARNING: To reduce the risk of electrical
shock and injury to persons, do not mount this
appliance on windows.
• WARNING: To reduce the risk of fire or electric
shock, do not use this fan with any solid-state
speed control device.
• DO NOT operate in the presence of explosive
and/or flammable fumes.
• DO NOT operate the tower fan in wet
environments such as bathrooms or saunas.
Use & Care
• To properly disconnect the fan, grip the plug and
pull from the wall outlet. Never yank on the cord.
• Unplug from outlet when not in use, when
moving fan from one location to another,
before putting on or taking o parts, and before
cleaning.
• Always use the fan on a dry, level surface.
• DO NOT operate fan until fully assembled with all
parts properly in place.
• To avoid fire hazard, NEVER place the cord or
any parts near an open flame, cooking appliance,
or other heating appliance.
• DO NOT run the cord under carpeting. Do not
cover the cord with throw rugs, runners, or similar
coverings. Do not route cord under furniture or
appliances.
• DO NOT let the power cord hang over the edge
of a table or counter, where it can be easily
tripped over, or pulled by children.
• DO NOT operate the appliance if the power cord
or plug is damaged, if the appliance malfunctions,
or if the appliance has been dropped/damaged
in any manner. Contact customer support
immediately with the information provided on
page 16. Do not discard the broken appliance.
• DO NOT use any third-party attachments for
the fan; doing so will void your warranty. No
attachments are sold by the manufacturer for this
product.
• DO NOT use the fan outdoors.
• DO NOT use this product for commercial or
industrial applications. This product is intended
for household use ONLY.
When using electrical appliances, basic precautions should always be followed to reduce the risk of fire,
electric shock, and injury to persons, including the following:
- 5 -
READ AND SAVE THESE INSTRUCTIONS
HOUSEHOLD USE ONLY
NOTE FOR THE PLUG:
This appliance has a polarized plug (one blade is wider than the other). To reduce the
risk of electric shock, this plug is intended to fit in a polarized outlet only one way. If
the plug does not fit fully in the outlet, reverse the plug. If it still does not fit, contact a
qualified electrician. Do not attempt to modify this safety feature in any way.
- 6 -
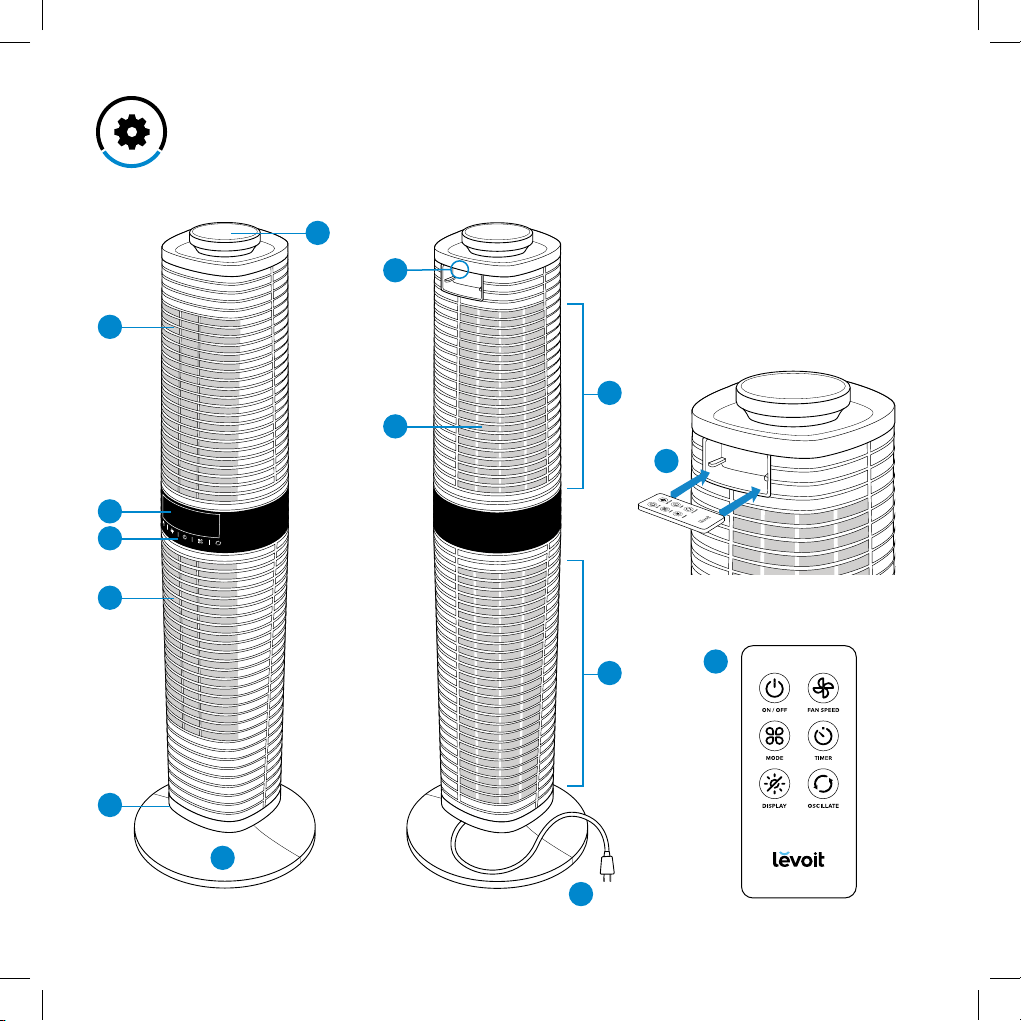
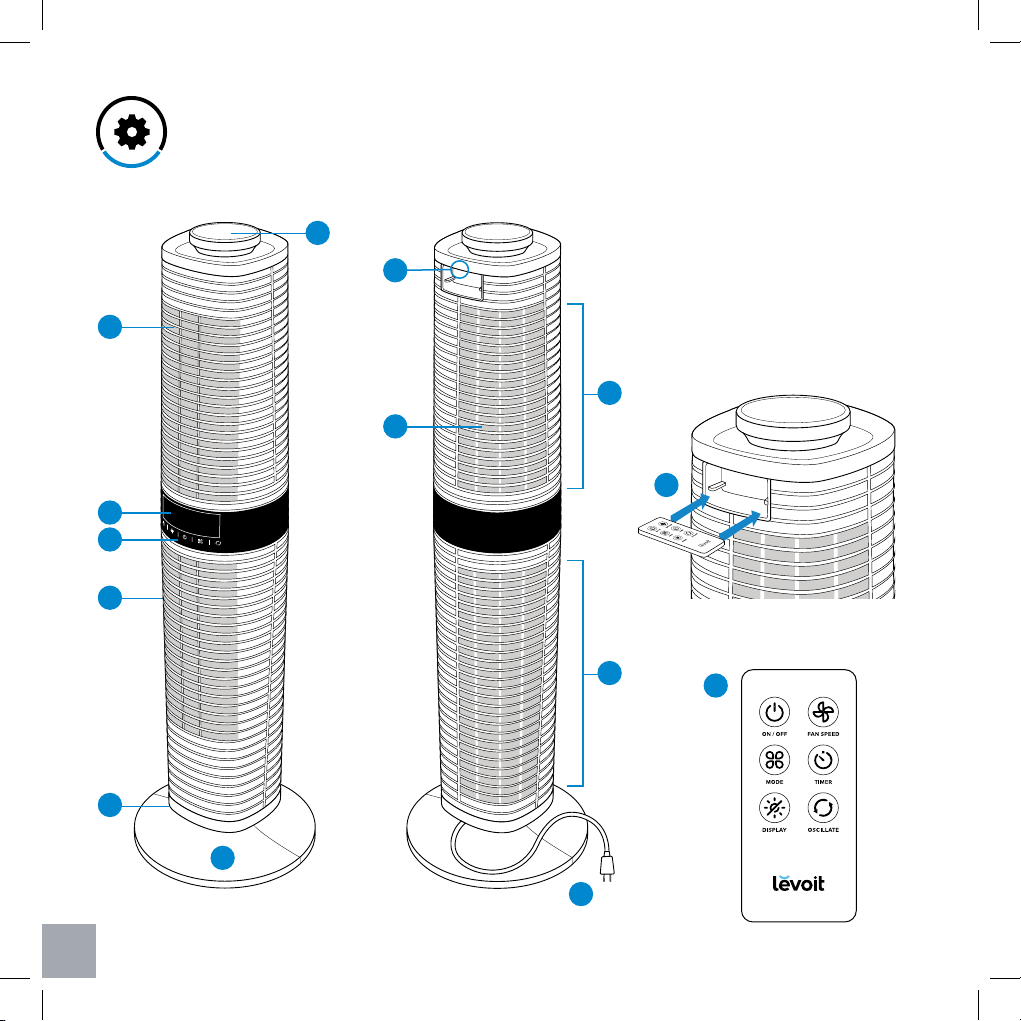
Main Functions
1. Rotating knob
2. Grip handle
3. Remote control storage
4. Remote control
5. Upper air outflow vent
6. Upper air intake vent
7. Screen filters
8. Display
9. Control panel
10. Lower air outflow vent
11. Lower air intake vent
12. Oscillating base
13. Base plate
14. Power cord
1
2
3
4
5
9
8
6
11
13
14
7
Front Back
10
12

- 7 -
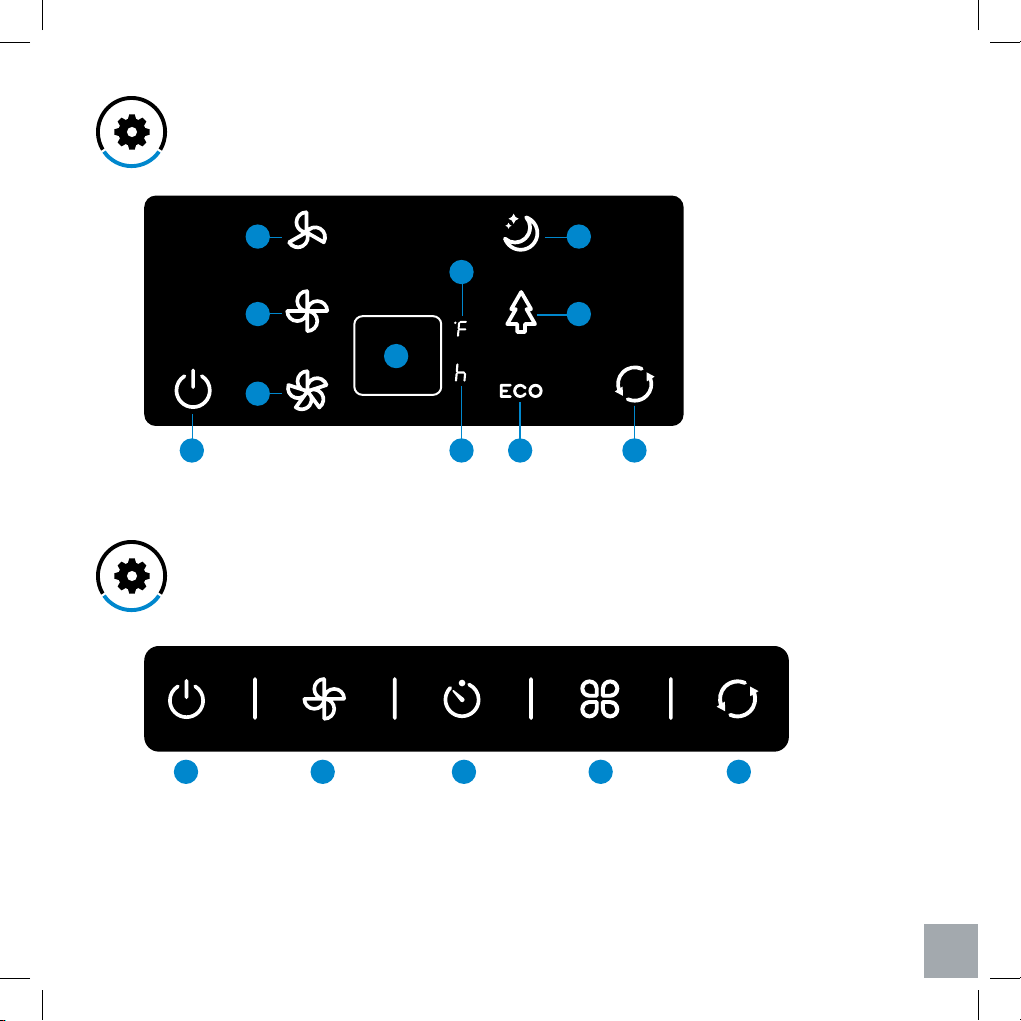
Display Functions
Control Panel
1. Power indicator
2. Low speed
3. Medium speed
4. High speed
5. Timer/Temperature
6. Temperature unit (°F only)
7. Timer unit (hours only)
8. Sleep mode
9. Nature mode
10. ECO mode
11. Oscillation indicator
1. Power button
2. Fan speed button
3. Timer button
4. Mode button
5. Oscillation button
11 10 7
6
5
2
3
4
1
9
8
1 32 4 5
- 8 -
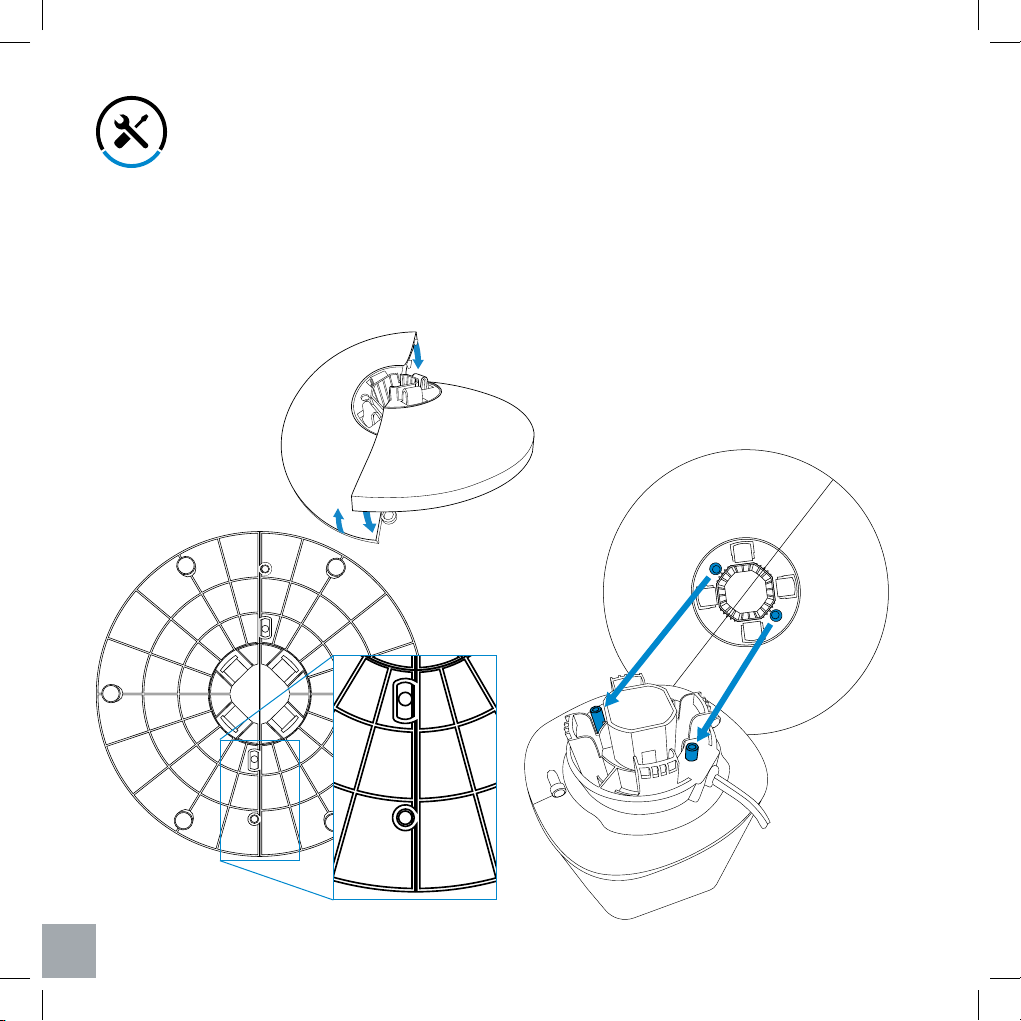
Set-Up
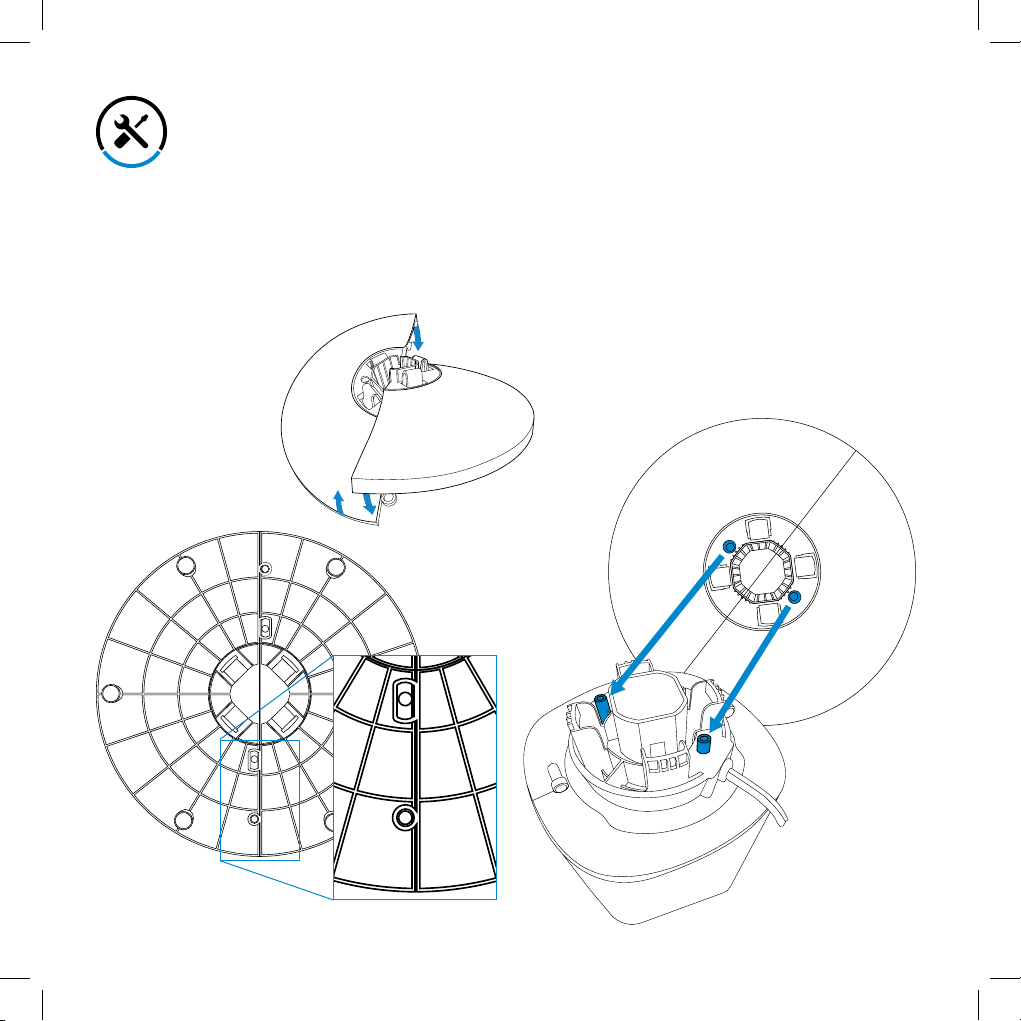
Assembling the Base Plate
1. Remove all parts from the packaging and make
sure all contents are included.
2. Assemble the base plate by interlocking both
parts as shown below. [Figures 1.1 & 1.2]
3. Align the two pegs on the oscillating base with
their respective holes on the base plate to
assemble the tower fan. Gently press on the
base plate, making sure all four tabs on the base
plate snap into place. [Figure 1.3]
NOTE: For easier installation, the fan can be laid on
its side on a flat surface while attaching the base
plate to the fan.
4. Once the fan is completely assembled, stand the
fan up on the base and plug it into an electrical
outlet.
Bottom of base plate
Top of base plate
Bottom of oscillating base
Figure 1.1
Figure 1.2
Figure 1.3
- 9 -
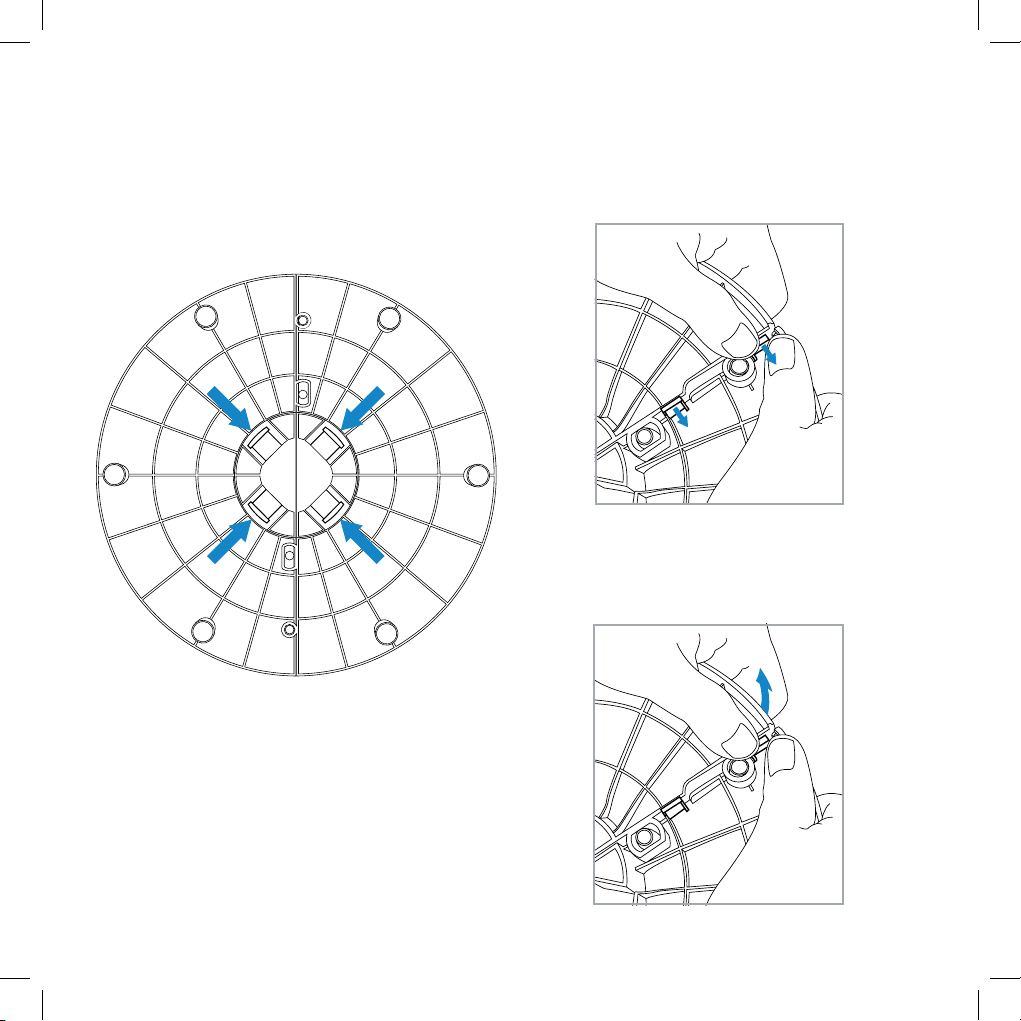
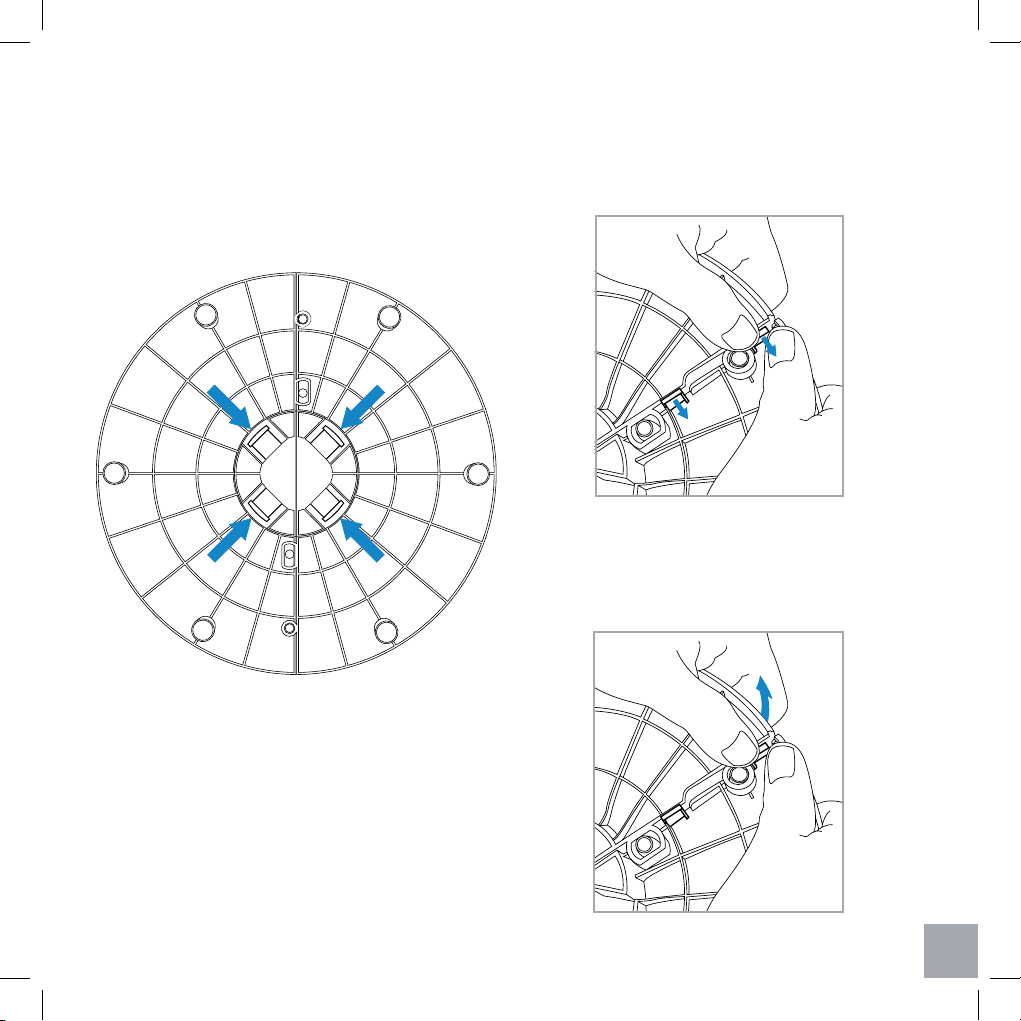
Removing & Disassembling the Base Plate
NOTE: For easier disassembly, the fan can be laid
on its side on a flat surface.
1. Simultaneously press all four tabs on the bottom
of the base plate, then remove the plate from the
fan. [Figure 2.1]
2. Grip the base plate with both hands. Push the
locking clips to the right then push down on one
side of the plate.
3. Repeat step 2 for the other side of the plate.
[Figure 2.2]
4. Once the locking clips have been released,
gently pull one side of the base plate so that it
detaches from the other side. [Figure 2.3]
Figure 2.1
Figure 2.2
Figure 2.3
- 10 -
Button Controls
Power Button: Turns on and turns o the
tower fan.
Fan Speed Button: Press ‘ ’ to cycle
through the dierent speeds on the fan.
The default fan speed is low when the fan
is first turned on. Press once to switch to
medium speed, press a second time to
switch to high speed, press a third time to
return to low speed.
Timer Button: Press the ‘ ’ to set the
timer anywhere from 1 to 12 hours. Once
you have reached your desired time,
the fan will automatically start the timer
and turn o once the timer has finished
counting down. To exit out of the timer,
press ‘ ’ repeatedly until “--” appears
on the display.
Mode Button: Use ‘ ’ to select a
specialized function for your tower fan.
Please note that you can adjust the fan
speed in all of the following modes using
‘ .’
• Sleep Mode ( ): Simulates an
evening breeze.
- Low Speed: The fan will continue to
run at normal low speed.
- Medium Speed: The fan will run at
medium speed for 30 minutes, then
drop to low speed.
- High Speed: The fan will run at high
speed for 30 minutes, then drops
to medium speed for another 30
minutes, then continue to operate at
low speed.
• Nature Mode ( ): Randomly selects
fan speed to simulate comfortable
outdoor breezes.
(See charts on page 12).
• ECO Mode ( ): On this mode, the
fan will automatically select a fan speed
based on the ambient temperature in
the room.
- Low speed: Ambient temperature is
less than 77°F
- Medium speed: Ambient temperature
is between 77°–85°F
- High speed: Ambient temperature is
above 85°F
NOTE: For added convenience, the same button
controls can be found on the included remote
control.
NOTE:
• Once a timer has been programmed, the time
and temperature will alternate on the display
every 5 seconds.
• To quickly select a time, press and hold the
‘ ’ until the desired time appears on the
display.
Operation
• To add more time while the timer is counting
down, press ‘ .’ The current timer will be
displayed, and then ‘ ’ can be pressed once
more to adjust the timer.

- 11 -
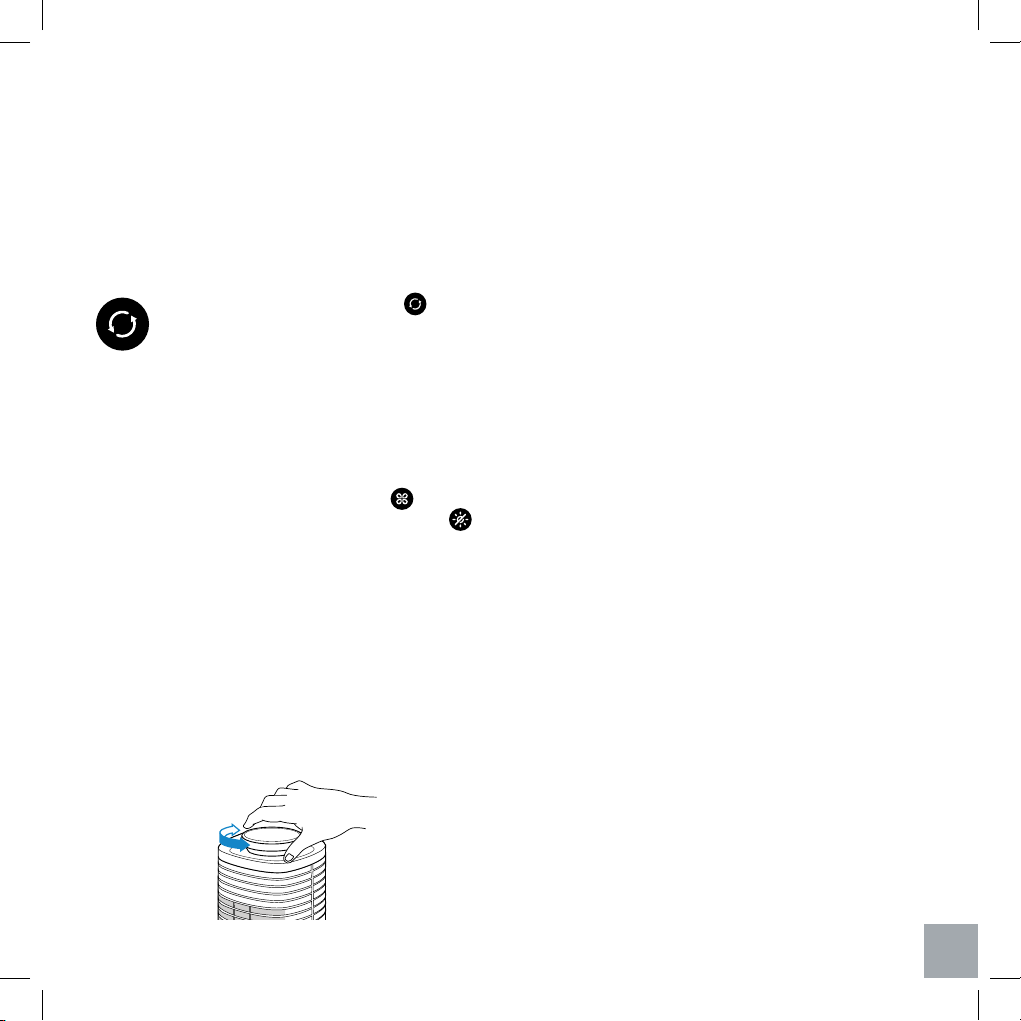
Oscillation Button: Press ‘ ’ once to
turn on or turn o the oscillating function.
Turning O the Display
While the unit is operating, the display will
automatically dim after 60 seconds. If you want to
manually turn o the display, press and hold ‘ ’
on the control panel for 3 seconds or press ‘ ’
once on the included remote control. To turn the
display back on, press any button, except for the
power button.
360˚ Rotation
The top portion of the tower fan is able to rotate
360 degrees to direct airflow toward multiple areas
at one time. Simply turn the top portion using the
silver rotating knob at the top of the fan. [Figure 3.1]
Temperature Display
The fan will automatically display the ambient
temperature of the room when it is turned on. When
a timer has been programmed, the temperature
and timer will alternate on the display every 5
seconds.
Memory Function
The fan will remember its programmed settings
when turned o, and will resume these settings
when turned back on. Please note that the fan must
remain plugged in for this memory function to work.
NOTE: The fan will remember the previous
fan speed, mode, and oscillation, but it will not
remember the previously programmed timer.
Remote Control
NOTE:
• Remove the plastic tab from the battery
compartment before using the remote control.
Your new tower fan can be operated with the
included remote control. The remote has all of the
same buttons as the fan, including a button to turn
on or turn o the display. It can conveniently be
stored in its compartment on the top portion of the
fan. Please note that the maximum eective range
for the remote is 15 feet (6m).
Figure 3.1
- 12 -
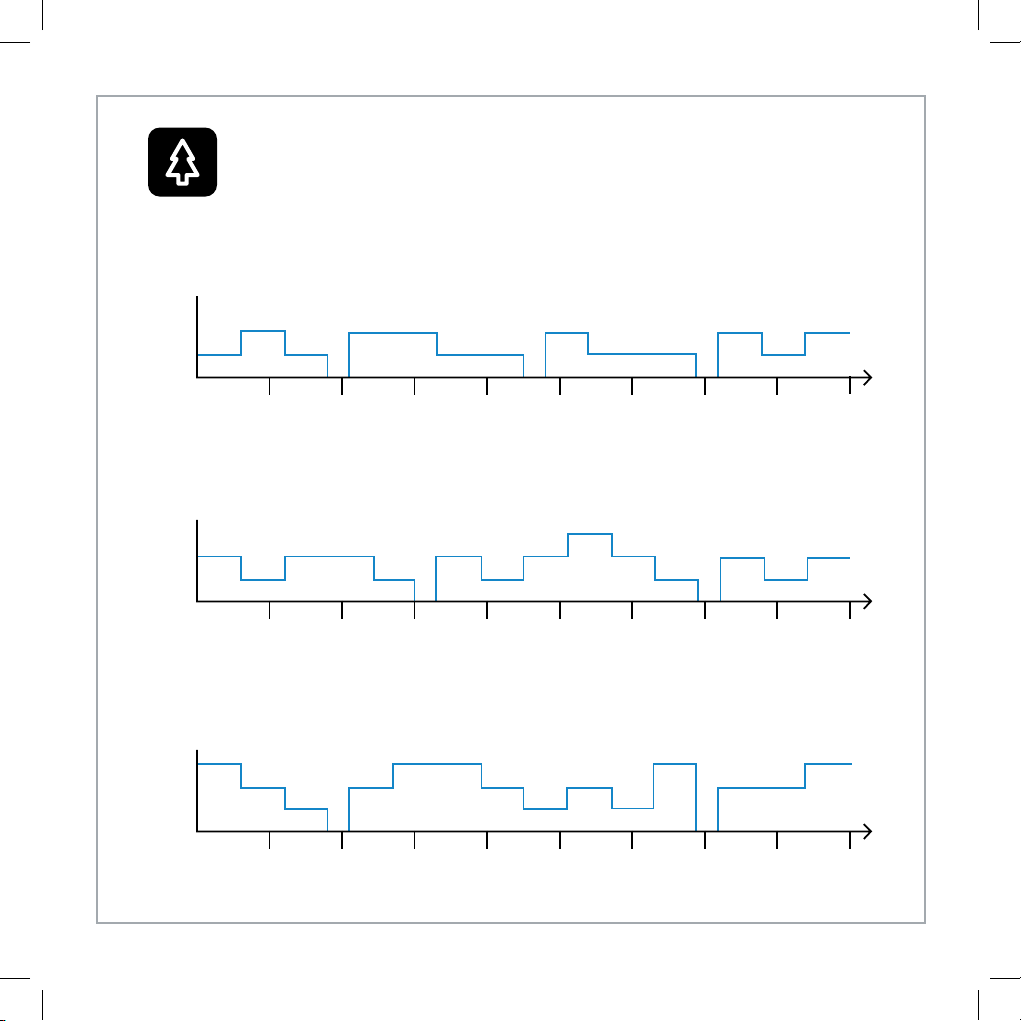
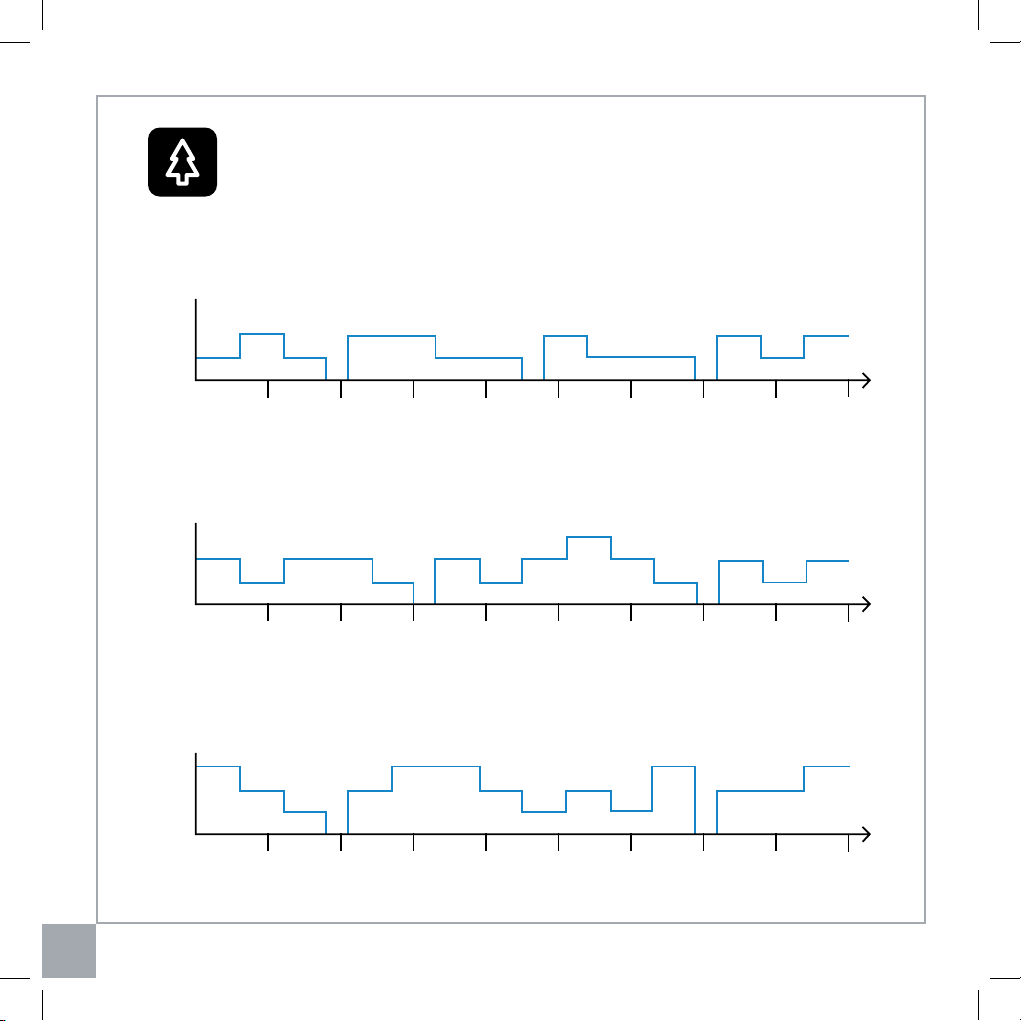
Nature Mode Power Levels
high
med
low
o
high
med
low
o
high
med
low
o
Seconds
10 40 7020 50 8030 60 90
Seconds
10 40 7020 50 8030 60 90
Seconds
10 40 7020 50 8030 60 90
- Low Speed: Operates between low and medium speeds for a 90 second interval, with the
low speed being the more common speed.
- Medium Speed: Operates using low, medium, and high speeds for 90 seconds, with the
medium speed being the most common speed.
- High Speed: Operates using low, medium, and high speeds for 90 seconds, with the high
speed being the most common speed.
- 13 -
General Maintenance
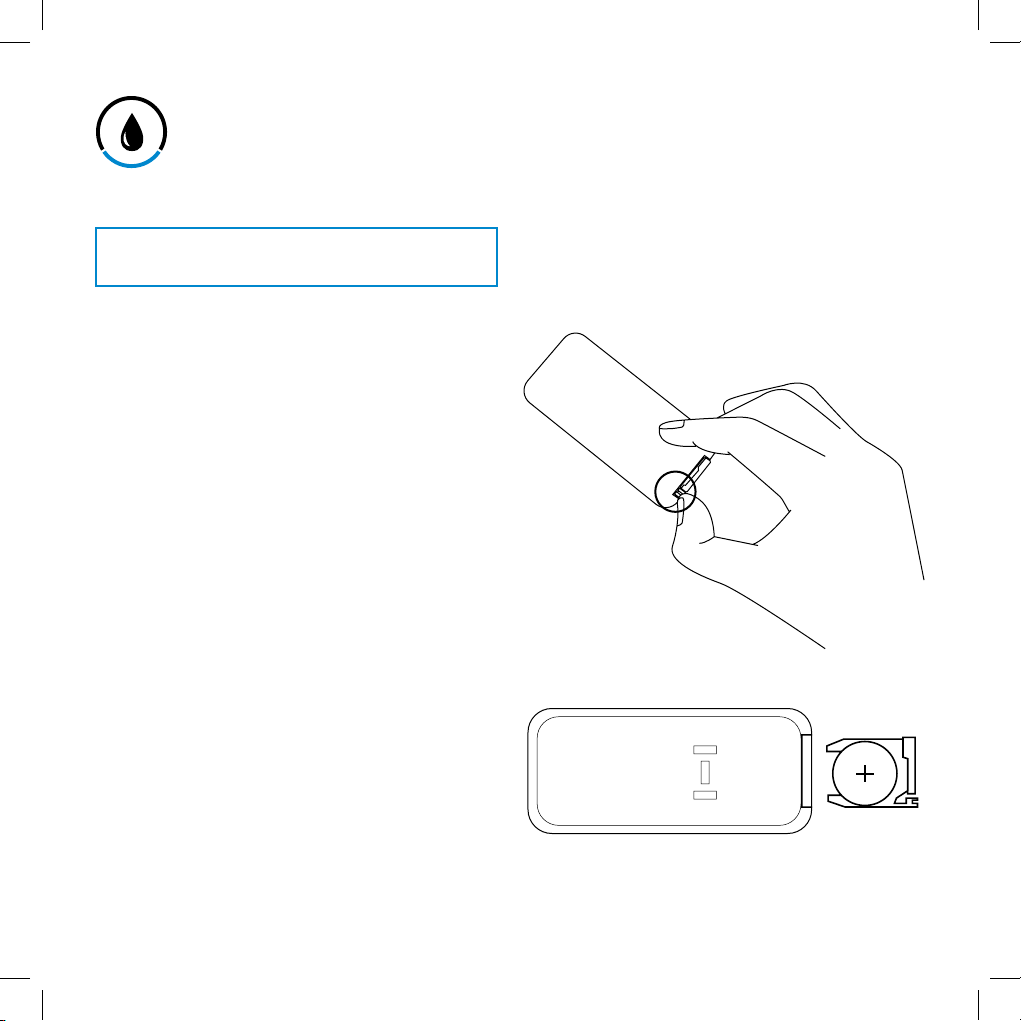
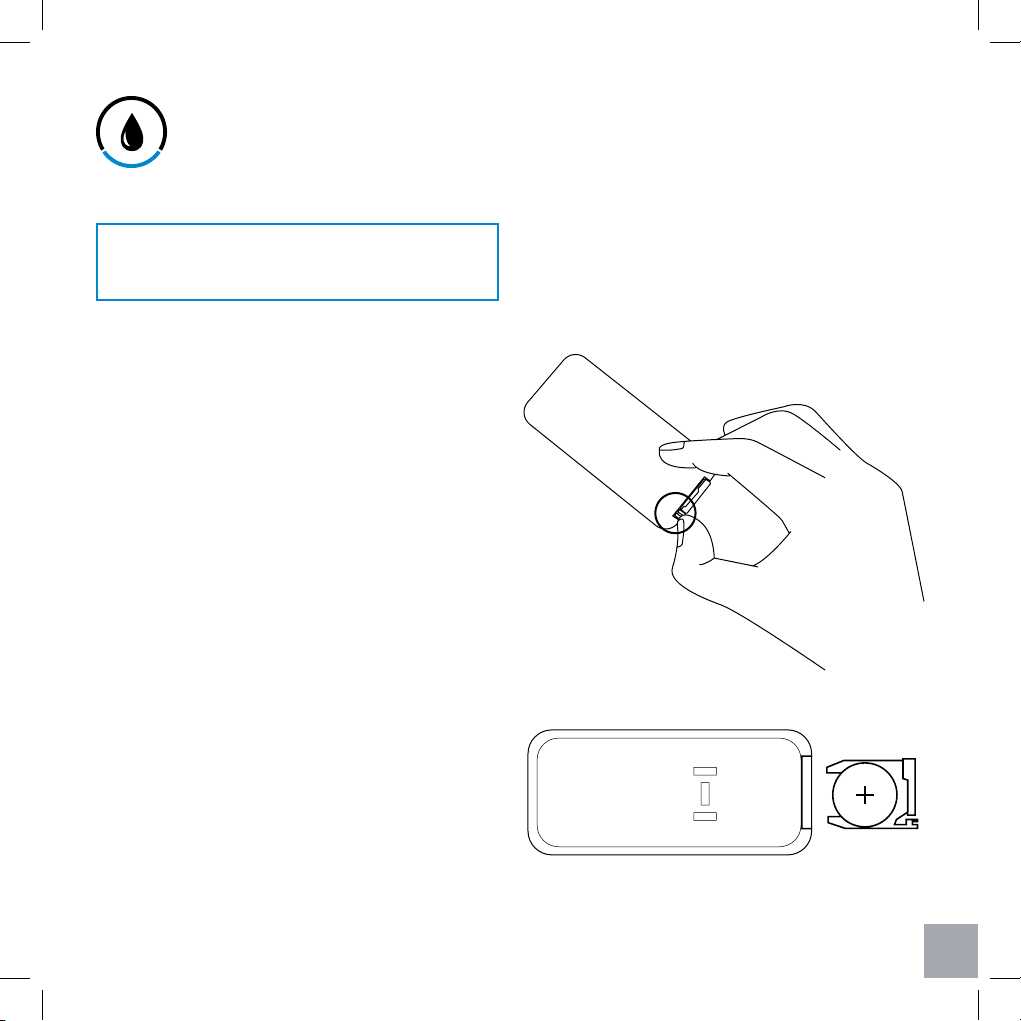
Replacing the Remote Control Battery
Storage
Cleaning & Maintenance
• Only use a soft clean cloth to gently wipe the
outer surfaces.
• DO NOT immerse the fan in water. Never allow
water to drip into the motor housing.
• DO NOT use chemical or abrasive cleaning
agents to clean the fan.
• DO NOT attempt to open the fan for self-
servicing. Doing so will void your warranty and
may present a hazard.
• It is recommended to use pipe cleaners or
flexible dust wands to clean in between the
vents.
• A vacuum cleaner (with a brush hose attachment)
can be used to clean the vents.
• For best results, clean in between the vents
using compressed air to blow out any residual
dust inside the fan.
1. Press the locking tab toward the pulling slot to
remove the battery compartment. [Figure 4.1]
2. Properly dispose of the old battery.
3. Place a new 3V CR2025 battery into the battery
compartment with the positive side facing up.
[Figure 4.2]
4. Replace the battery compartment into the
remote.
When not in use for long periods of time, store the
fan in a safe, dry location. It is recommended to
store the fan in its original packaging to protect it
from dust, moisture, and direct sunlight.
Figure 4.1
Figure 4.2
Turn o and unplug the fan before cleaning.
- 14 -
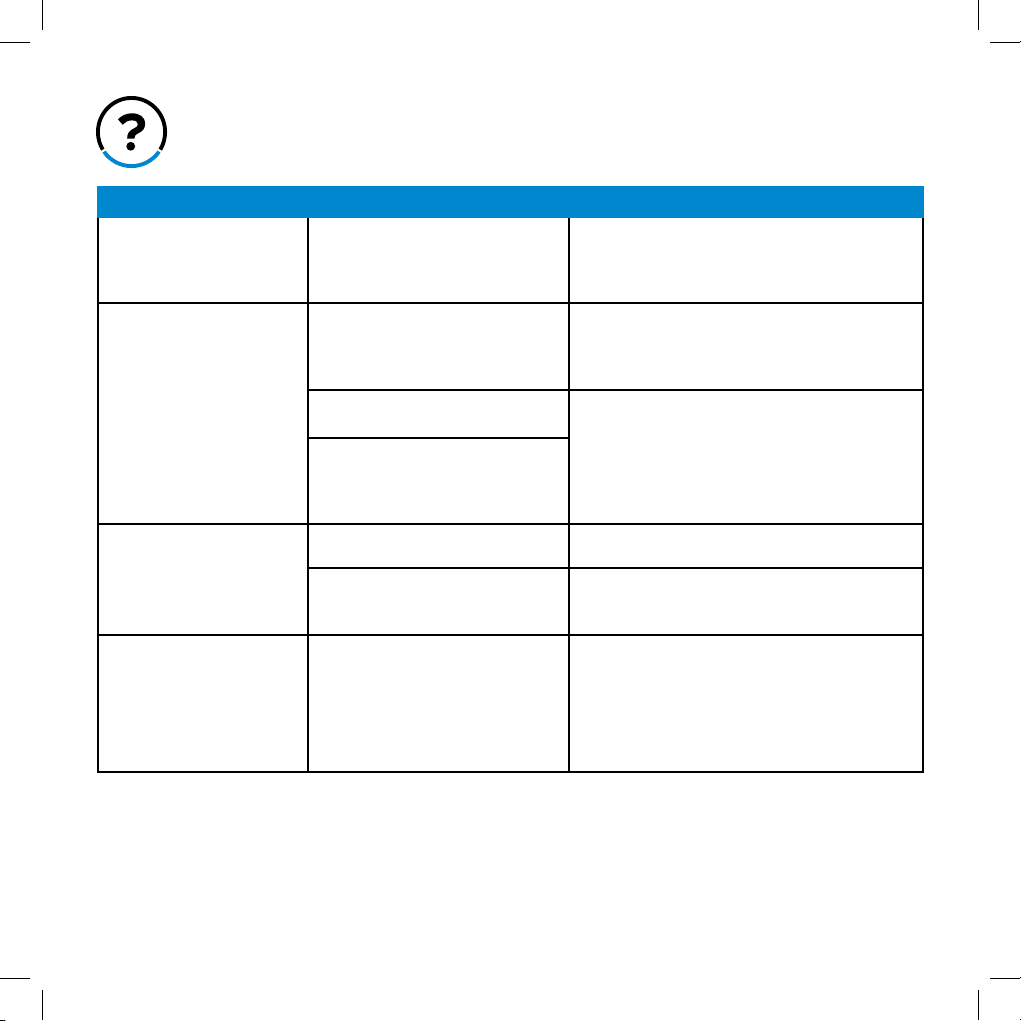
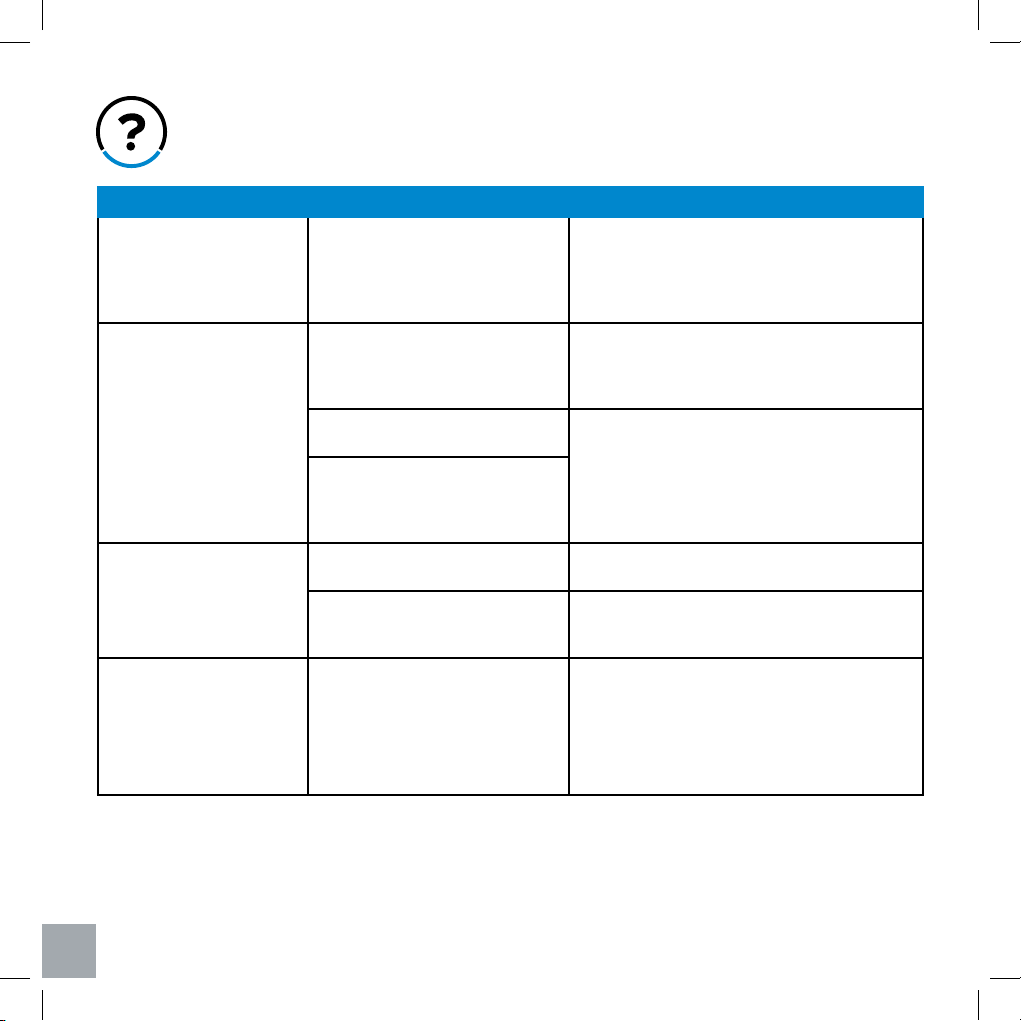
Troubleshooting
Problem Cause Solution
Fan does not turn on. The power cord is not plugged in
properly.
Check the connection into the wall to make sure
the plug is not loose in the outlet. If the problem
is not solved, try plugging the fan into another
outlet.
Fan does not rotate
smoothly.
The track for the motor may be
obstructed.
If possible, remove the obstruction from
the track. Please refer to the
Removing &
Disassembling the Base Plate
section on
page 9 on how to remove the base plate.
Fan motor is not properly
lubricated.
Contact Customer Support.
DO NOT attempt to
repair the motor.
There may be a problem with the
motor that prevents your fan from
oscillating properly; it may be faulty
or damaged.
The remote control cannot
control the fan.
The remote control has no power. Please change the batteries in the remote.
The remote control is out of the
eective range.
The remote controls the fan from up to 15 feet
(6m) away.
Air flow is noticeably
restricted.
The intake or exhaust vent is
dirty. Dust may have accumulated
between the blades and caused an
airflow obstruction.
Clean the fan according to the
Cleaning &
Maintenance
section on page 13.
- 15 -
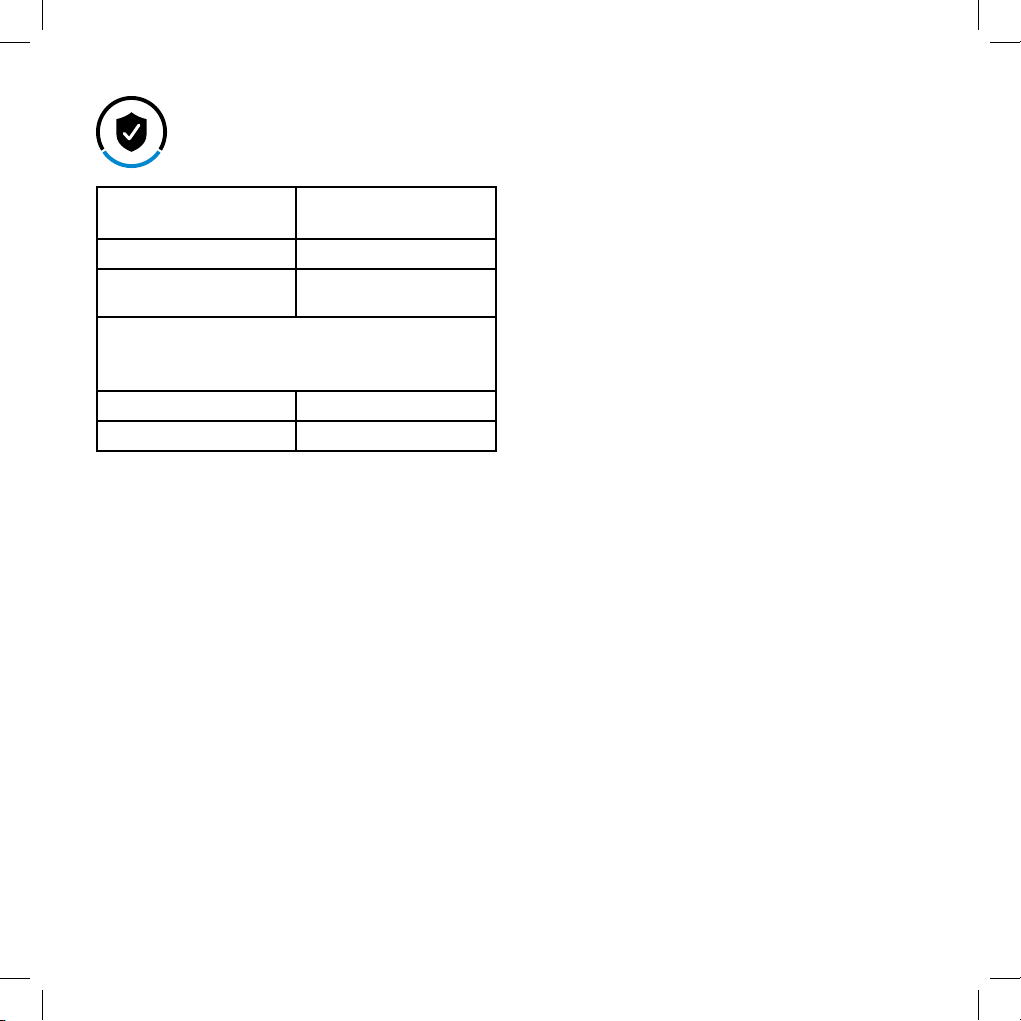
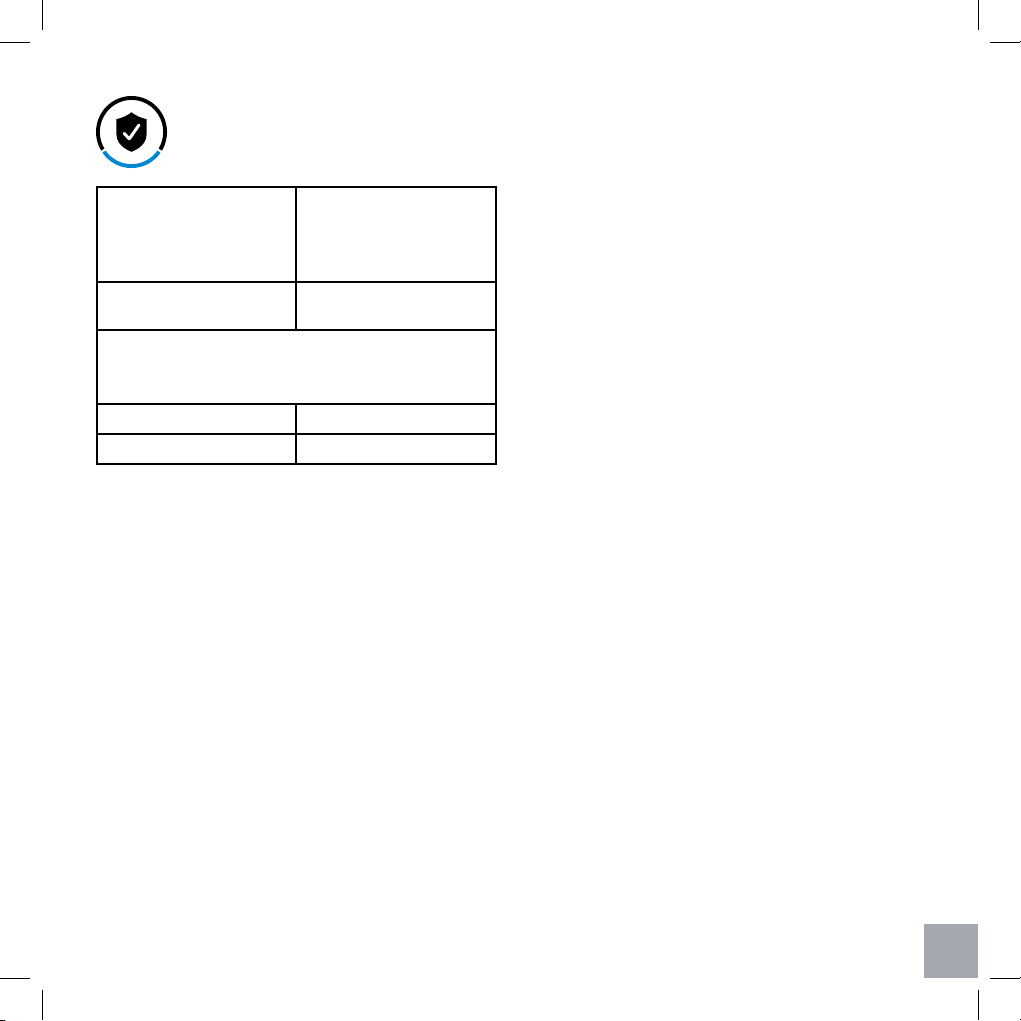
Warranty Information
Product Name: 37”-inch Three-Speed
Oscillating Tower Fan
Model Number: LV373TF
Default Warranty
Period:
1 Year
For your own reference, we strongly recommend
that you record your Order Number and date of
purchase.
Order Number:
Date of Purchase:
Levoit warrants all products to be of the highest quality
in material, craftsmanship, and service. Eective starting
from the date of purchase.
Levoit will replace any product found to be defective due
to manufacturer flaws based on eligibility; refunds are
available within the first 30 days of purchase. Refunds
are only available to the original purchaser of the of the
product. This warranty extends only to personal use and
does not extend to any product that has been used for
commercial, rental, or any other use in which the product
is not intended for. There are no warranties other than the
warranties expressly set forth with each product.
This warranty is non-transferrable. Levoit is not
responsible in any way for any damages, losses or
inconveniences caused by equipment failure or by user
negligence, abuse, or use noncompliant with the user
manual or any additional safety, use, or warnings included
in the product packaging and manual.
This warranty does not apply to the following:
• Damage due to abuse, accident, alteration, misuse,
tampering or vandalism.
• Improper or inadequate maintenance.
• Damage in return transit.
• Unsupervised use by children under 18 years of
age.
Levoit and its subsidiaries assume no liability for damage
caused by the use of the product other than for its
intended use or as instructed in the user manual. Some
states do not allow this exclusion or limitation of incidental
or consequential losses so the foregoing disclaimer may
not apply to you. This warranty gives you specific legal
rights and you may also have other rights which may vary
from state to state.
ALL EXPRESSED AND IMPLIED WARRANTIES,
INCLUDING THE WARRANTY OF MERCHANTABILITY,
ARE LIMITED TO THE PERIOD OF THE LIMITED
WARRANTY.
Additional 1-Year Warranty
You can extend your one-year warranty by an additional
year. Log onto www.levoit.com/warranty and enter your
order number (i.e. Amazon or Houzz) to register your new
product for the extended warranty.
If you are unable to provide the invoice and order number
for your product, please type a short note in the order
number field along with the date you received your
product.
Defective Products & Returns
Should your product prove defective within the specified
warranty period, please contact Customer Support via
[email protected] with your invoice and order number.
Once our customer service team has approved your
request, please return the unit with a copy of the invoice
and your order number.
Terms & Policy
- 16 -
Should you encounter any issues or have any questions regarding your
new product, feel free to contact our helpful Customer Support Team.
Your satisfaction is our goal!
Customer Support
Levoit Corporation
1202 N. Miller Street, Suite A,
Anaheim, CA 92806
Email: [email protected]
Toll-Free: 888.726.8520
Support Hours
Monday - Friday: 9:00am - 5:00pm PST
*Please have your invoice and order number ready before contacting
customer support.
Customer Support


- 18 -
Gracias por comprar el ventilador de torre oscilante de tres velocidades LV373TF de 37 “de
Levoit. Estamos dedicados a brindarle productos de calidad para que pueda verse mejor.
Si tiene alguna pregunta o inquietud sobre el uso de su nuevo producto, comuníquese con
nuestro equipo servicial de atención al cliente al (888) 726-8520 o por correo electrónico a
[email protected]. ¡Esperamos que disfrute de su nuevo producto!
Gracias.
ES
- 19 -
Índice
Información de seguridad
Funciones principales
Funciones de visualización
Preparación
Operación
Niveles de potencia del
modo de la naturaleza
Limpieza y mantenimiento
Solución de problemas
Información de garantía
Atención al cliente
20
22
23
24
26
28
29
30
31
32
Fuente de Alimentación: AC 120 V / 60 Hz
Potencia Nominal: 45 W
Nivel de Ruido: ≤ 55 dB
Batería de Control Remoto: 3 V CR2025
1 x Ventilador de la Torre
1 x Control Remoto
1 x 3 V CR2025 Batería (pre-instalada)
1 x Manual de Usuario
Contenidos del Paquete
Especificaciones
ES

- 20 -
Información de Seguridad Importante
ES
Al usar aparatos eléctricos, siempre se deben seguir precauciones básicas para reducir el riesgo de
incendio, descarga eléctrica y lesiones a las personas, incluyendo los puntos siguientes:
Seguridad General
• Lea todas las instrucciones antes de usar este
electrodoméstico.
• Utilice únicamente el ventilador para los fines
descritos en este manual.
• Para protegerse contra descargas eléctricas, no
sumerja la unidad, el enchufe o el cable en agua.
• Solo conecte el enchufe a un tomacorriente de
120V de CA.
• Es necesaria una estrecha supervisión cuando
este electrodoméstico esté siendo utilizado por
niños o cerca de ellos.
• Evite el contacto con partes móviles.
• ADVERTENCIA: Para reducir el riesgo de
descarga eléctrica y lesiones a personas, no
monte este electrodoméstico en ventanas.
• ADVERTENCIA: Para reducir el riesgo de
incendio o descarga eléctrica, no use este
ventilador con ningún dispositivo de control de
velocidad de estado sólido.
• NO opere en presencia de gases explosivos y/o
inflamables.
• NO opere el ventilador de la torre en ambientes
mojado como baños o saunas.
Uso & Cuidado
• Para desconectar correctamente el ventilador,
sujete el enchufe y sáquelo de la toma de
corriente. Nunca tire del cable.
• Desenchufe del tomacorriente cuando no esté
en uso, cuando mueva el ventilador de un lugar
a otro, antes de colocar o quitar piezas, y antes
de limpiarlo.
• Siempre use el ventilador en una superficie seca
y nivelada.
• NO opere el ventilador hasta que esté
completamente montado con todas las piezas en
su lugar.
• Para evitar el riesgo de incendio, NUNCA
coloque el cable debajo de alfombras ni coloque
ninguna pieza cerca de llamas, artefactos de
cocina u otros artefactos de calefacción.
• NO coloque el cable debajo de alfombras. No
cubra el cable con alfombras, tapetes o cubiertas
similares. No coloque el cable debajo de
muebles o electrodomésticos.
• NO se permite que el cable de alimentación se
cuelgue al borde de una mesa o un mostrador,
que se ponga en contacto con superficie
caliente o que se exponga en áreas de mucho
tránsito.
• NO opere el artefacto si el cable de alimentación
o el enchufe está dañado, si el aparato funciona
mal, o si el electrodoméstico se cayó / dañó
de cualquier manera. Póngase en contacto
con atención al cliente inmediatamente con la
información proporcionada en página 32. No
deseche el aparato roto.
• NO use ningún accesorio para el ventilador;
hacerio anulará su garantía. No hay accesorios
vendidos por el fabricante para este producto.
- 21 -
LEA Y GUARDE ESTAS INSTRUCCIONES
SOLO PARA USO DOMÉSTICO
NOTA PARA EL ENCHUFE:
Este electrodoméstico tiene un enchufe polarizado (una clavija es más ancha que
la otra). Para reducir el riesgo de descarga eléctrica, este enchufe está diseñado
para encajar en una toma polarizada de una sola manera. Si el enchufe no encaja
completamente en la toma de corriente, invierta el enchufe. Si todavía no encaja,
contacte a un electricista calificado. No intente modificar esta característica de
seguridad de ninguna manera.
ES
• NO use el ventilador al aire libre.
• NO use este producto para aplicaciones
comerciales o industriales. Este producto está
destinado SOLAMENTE para uso doméstico.
- 22 -
Funciones Principales
1. Botón giratorio
2. Empuñadura de agarre
3. Almacenamiento de
control remoto
4. Control remoto
5. Salida de aire superior
6. Entrada de aire superior
7. Filtros de pantalla
8. Monitor
9. Panel de control
10. Salida de aire inferior
11. Entrada de aire inferior
12. Base oscilante
13. Plato base
14. Cable de alimentación
1
2
3
4
5
10
6
11
12
13
14
7
ES
9
8
Frente
Reverso
- 23 -
Funciones de Pantalla
Panel de Control
1. Indicador de encendido
2. Baja velocidad
3. Velocidad media
4. Alta velocidad
5. Temporizador /
Temperatura
6. Unidad de temperatura
(°F only)
7. Unidad de tiempo
(hours only)
8. Modo de sueño
9. Modo de naturaleza
10. Modo ecológico
11. Indicador de oscilación
1. Botón de encendido
2. Botón de velocidad del
ventilador
3. Botón de temporizador
4. Botón de modo
5. Botón de oscilación
11 10 7
6
5
2
3
4
1
9
8
1 32 4 5
ES
- 24 -
Configuración
Ensamblaje de la Placa Base
1. Retirar todas las piezas de embalaje y confirme
si están incluidos todos los contenidos del
paquete.
2. Monte la placa base enclavijando ambas partes
como se muestra a continuación.
[Figuras 1.1 & 1.2]
3. Alinee las dos clavijas en la base oscilante con
sus orificios respectivos en la placa base para
ensamblar el ventilador de la torre. Presione
suavemente la placa base, para asegurar que las
cuatro pestañas de la placa base encajen en su
lugar. [Figura 1.3]
Notas: Para instalación más fácil, se recomienda
poner un lado del ventilador en un lugar plano
cuando se instala el plato de base del ventilador.
4. Una vez instalado completamente el
ventilador, levántelo y enchúfelo a la fuente de
alimentación.
Parte inferior de la placa base
Parte superior de la placa base
Parte inferior de la base oscilante
ES
Figura 1.1
Figura 1.2
Figura 1.3
- 25 -
Desmontaje y Desmontaje de la Placa Base
Notas: Para instalación más fácil, se recomienda
ponerlo en un lugar plano.
1. Presione simultáneamente las cuatro pestañas
en la parte inferior de la placa base, luego retire
la placa del ventilador. [Figura 2.1]
2. Sujete la placa base con ambas manos. Empuje
los clips de bloqueo hacia la derecha y luego
presione hacia abajo en un lado de la placa.
3. Repita el paso 2 en el otro lado de la placa.
[Figura 2.2]
4. Una vez que se hayan soltado los clips de
bloqueo, tire suavemente de un lado de la placa
base para que se desprenda del otro lado.
[Figura 2.3]
ES
Figura 2.1
Figura 2.2
Figura 2.3

- 26 -
Controles de Botones
Interruptor: Enciende y apaga el
ventilador de la torre.
Botón de Encendido: Presione ‘ ’ para
ajustar la velocidad del ventilador. La
velocidad predeterminada del ventilador
es baja cuando el ventilador se enciende
por primera vez. Presione una vez para
cambiar a velocidad media, presione
una segunda vez para cambiar a alta
velocidad, presione una tercera vez para
volver a velocidad baja.
Botón de Temporizador: Presione el ‘ ’
para configurar el temporizador entre 1
y 12 horas. Una vez que haya alcanzado
el tiempo deseado, el ventilador
automáticamente iniciará el temporizador
y se apagará una vez que el temporizador
haya terminado la cuenta regresiva. Para
salir del temporizador, presione ‘ ’
repetidamente hasta que aparezca “-” en
la pantalla.
Botón de Modo: Utiliza ‘ ’ para
seleccionar una función especializada
para su ventilador de torre. Tenga en
cuenta que puede ajustar la velocidad del
ventilador en todos los modos siguientes
utilizando ‘ .’
• Modo de Sueño ( ): Simula una brisa
vespertina.
- Baja Velocidad: El ventilador
continuará correr a baja velocidad
normal.
- Velocidad Media: El ventilador
funcionará a la velocidad media
durante 30 minutos, y luego bajar a
baja velocidad.
- Alta Velocidad: El ventilador
funcionará a alta velocidad durante
la primera media hora, luego caerá a
velocidad media y, después de otra
media hora, seguirá funcionando a
baja velocidad.
- Modo Naturaleza ( ): Selecciona
al azar la velocidad del ventilador
para simular la brisa confortable al
aire libre. (Véase en la página 28).
• Modo Ecológico ( ): En este
modo, el ventilador seleccionará
automáticamente una velocidad del
NOTA: Para mayor conveniencia, los mismos
controles de botón se pueden encontrar en el
control remoto incluido.
NOTA:
• Una vez programado el temporizador, la hora y
la temperatura se alternarán en la pantalla cada
5 segundos.
• Para seleccionar un tiempo rápido, pulse y
Operación
mantenga presionado el botón ‘ ‘ hasta que
aparezca el tiempo preferido.
• Para agregar más tiempo mientras el
temporizador está realizando la cuenta atrás,
presione ‘ .’ Se mostrará la hora actual, luego
‘ ’ se puede presionar una vez más para
ajustar el temporizador.
ES
- 27 -
Botón de Oscilación: prensa ‘ ’ una
vez para activar o desactivar la función
oscilante.
Apagando la pantalla
Mientras el ventilador funciona, el brillo de la
pantalla se atenuará automáticamente después
de 60 segundos. Si desea apagar la pantalla
manualmente, mantenga presionada ‘ ’ en el
panel de control por 3 segundos o presione ‘ ’
una vez en el control remoto incluido. Para volver
a encender la pantalla, presione cualquier botón,
excepto el botón de encendido.
360˚ Rotación
La parte superior del ventilador de la torre puede
rotar 360 grados para dirigir el flujo de aire hacia
múltiples áreas a la vez. Simplemente gire la parte
superior con la perilla giratoria plateada en la parte
superior del ventilador. [Figura 3.1]
Pantalla de Temperatura
El ventilador mostrará automáticamente la
temperatura ambiental de la habitación cuando
está encendido. Cuando se ha programado un
temporizador, la temperatura y el temporizador se
alternarán en la pantalla cada 5 segundos.
Función de Memoria
El ventilador recordará su configuración
programada cuando esté apagado, y reanudará
estos ajustes cuando se vuelva a encender.
Tenga cuenta que el ventilador debe permanecer
enchufado para activar esta función de memoria.
Notas: el ventilador puede momorizar la velocidad,
el modo y la oscilación seleccionada previamente,
excluyendo el tiempo.
Control Remoto
Notas:
• Quite la etiqueta plástica del compartamiento de
la batería antes de empezar el control remoto.
Su nuevo ventilador de torre puede ser operado
por control remoto. El control remoto tiene todos
los mismos botones que el ventilador, incluido
un botón para encender o apagar la pantalla.
Se puede almacenar cómodamente en su
compartimento en la parte superior del ventilador.
Tenga en cuenta que el rango efectivo máximo
para el control remoto es de 15 pies (6 m).
ventilador de acuerdo con la temperatura
ambiental de la habitación.
- Velocidad baja: La temperatura ambiental está
inferior a 77 ° F
- Velocidad media: La temperatura ambiental
está entre 77 ° F y 85 ° F
- Velocidad alta : La temperatura ambiental está
superior a 85 ° F
ES
Figura 3.1
- 28 -
Niveles de Potencia del Modo de la Naturaleza
alto
med
baj
o
alto
med
baj
o
alto
med
baj
o
Segundos
10 40 7020 50 8030 60 90
Segundos
10 40 7020 50 8030 60 90
Segundos
10 40 7020 50 8030 60 90
- Baja Velocidad: Funciona a velocidad baja y media con intervalos de 90 segundos, y la baja
es la más común.
- Velocidad Media: Funciona a velocidad baja, media y alta con intervalos de 90 segundos, y
la media es la más común.
- Alta Velocidad: Funciona a velocidad baja, media y alta con intervalos de 90 segundos, y la
alta es la más común.
ES
- 29 -
Mantenimiento General
Reemplazo de la Batería del Control Remoto
Almacenamiento
Limpieza y Mantenimiento
• Apague y desenchufe el ventilador antes de
limpiarlo.
• Utilice solo un paño suave y limpio para limpiar
suavemente las superficies externas.
• NO sumerja el ventilador en agua. Nunca permita
que el agua gotee en la carcasa del motor.
• NO use agentes de limpieza abrasivos o
químicos para limpiar el ventilador.
• NO intente abrir el ventilador para el
autoservicio. Hacerlo anulará la garantía y puede
resultar un peligro.
• Se recomienda utilizar limpiadores de tubería o
varillas de polvo flexibles para limpiar entre los
orificios de ventilación.
• Se puede limpiar las rejillas de ventilación
usando una aspiradora (con un accesorio de
manga de cepillo).
• Para obtener los mejores resultados, limpie entre
los respiraderos utilizando aire comprimido para
eliminar el polvo residual dentro del ventilador.
1. Presione la pestaña de bloqueo hacia la ranura
de extracción para extraer el compartimento de
la batería. [Figura 4.1]
2. Deseche apropiadamente la batería vieja.
3. Coloque una nueva batería 3V CR2025 en el
compartimiento de la batería con el lado positivo
hacia arriba. [Figura 4.2]
4. Reemplace el compartimiento de la batería en el
control remoto.
Si no se usa durante un largo período, hay
que guardarlo en un lugar seguro y seco. Se
recomienda guardarlo en su embalaje original en
protección del polvo, la humedad y la luz solar
directa.
ES
Figura 4.1
Figura 4.2
Apague y desenchufe el ventilador antes de
la limpieza.
- 30 -
Solución de Problemas
Problema Causa Solución
El ventilador no se
enciende.
El cable de alimentación no está
enchufado correctamente.
Verifique la conexión en la pared para confirmar
que el enchufe no esté flojo en la toma de
corriente. Si el problema no está resuelto,
intente enchufar el ventilador en otra fuente de
alimentación.
El ventilador no gira
suavemente.
La vía del motor puede estar
obstruida.
Si es posible, quite los obstáculos de la vía. Por
favor, refiérese a
Desmontaje & Desmontaje
del Plato de Base
en la página 25 para
consultar cómo se quita el plato de base.
El motor del ventilador no está
lubricado correctamente.
Póngase en contacto con atención al cliente.
NO intente reparar el motor.
Puede haber un problema con
el motor que impide que su
ventilador oscile correctamente;
puede estar defectuoso o dañado.
El control remoto no puede
controlar el ventilador.
El control remoto no tiene energía. Por favor cambie las baterías en el control
remoto.
El control remoto está fuera del
alcance..
El alcance máximo del control remoto es de 15
pies (6 m).
El flujo de aire está
notablemente restringido.
La ventilación de entrada o salida
está sucia. El polvo puede haberse
acumulado entre las cuchillas y
haber causado un atasco del flujo
de aire.
Limpie el ventilador de acuerdo con la sección
Limpieza y Mantenimiento en la página
29.
ES
- 31 -
Información de Garantía
Producto LV373TF Ventilador
de torre oscilante: tres
velocidades de 37
pulgadas
Periodo de garantía
predeterminado
1 Año
Para su propia referencia, le recomendamos
encarecidamente que registre su número de
pedido y la fecha de compra.
Número de pedido:
Fecha de compra:
Levoit garantiza que todos los productos son de la más
alta calidad en materiales, mano de obra y servicio.
contado a partir de la fecha de compra.
Levoit reemplazará cualquier producto que se encuentre
defectuoso debido a fallas del fabricante según la
elegibilidad; los reembolsos están disponibles dentro
de los primeros 30 días de la compra. Esta garantía se
extiende solo a uso personal y no
extender a cualquier producto que se haya utilizado con
fines comerciales, de alquiler o de cualquier otro uso
para el que no esté destinado el producto. No hay más
garantías que las garantías expresamente establecidas
con cada producto.
Esta garantía no es transferible. Levoit no es responsable
en modo alguno de los daños, pérdidas o inconvenientes
causados por fallas del equipo o por negligencia, abuso
o uso por parte del usuario que no cumplan con el
manual del usuario o cualquier seguridad adicional, uso
o advertencias incluidas en el empaque y el manual del
producto.
Esta garantía no se aplica a los siguientes:
• Daño debido a abuso, accidente, alteración, mal
uso, manipulación o vandalismo.
• Mantenimiento inadecuado o erróneo.
• Daño en el tránsito de retorno.
• Uso no supervisado por niños menores de 18 años.
Levoit y sus subsidiarias no asumen ninguna
responsabilidad por daños causados por el uso del
producto que no sea para su uso previsto o como
se indica en el manual del usuario. Algunos estados
no permiten esta exclusión o limitación de pérdidas
incidentales o consecuentes, por lo que es posible que la
renuncia anterior no se aplique en su caso. Esta garantía
le otorga derechos legales específicos y también puede
tener otros derechos que pueden variar de estado a
estado.
TODAS LAS GARANTÍAS EXPRESAS E IMPLÍCITAS,
INCLUIDA LA GARANTÍA DE COMERCIABILIDAD,
ESTÁN LIMITADAS AL PERÍODO DE LA GARANTÍA
LIMITADA.
Garantía Adicional de 1 Año
Puede extender su garantía de un año por un año
adicional. Inicie sesión en www.levoit.com/warranty
e ingrese su número de pedido (es decir, Amazon o
Houzz) para registrar su nuevo producto para la garantía
extendida.
Si no puede proporcionar el número de pedido de su
producto, o si lo recibe como regalo, escriba una breve
descripción en el blanco de número de pedido junto con
la fecha en que recibe su producto.
Productos Defectuosos y Devoluciones
En caso de que su producto resulte defectuoso dentro
del período de garantía especificado, comuníquese con
Atención al cliente a través de [email protected] con
su número de pedido. Una vez que nuestro equipo de
servicio al cliente haya aprobado su solicitud, devuelva
la unidad con una copia de la factura o su número de
pedido.
Términos y Política
ES
- 32 -
Si tiene algún problema o alguna pregunta con respecto a su nuevo producto,
póngase en contacto con nuestro equipo servicial de atención al cliente.
¡Su satisfacción es nuestra meta!
Atención al Cliente
Levoit Corporation
1202 N. Miller Street, Suite A,
Anaheim, CA 92806
Email: [email protected]
Toll-Free: 888.726.8520
Horas de Soporte
Lunes - Viernes: 9:00am - 5:00pm PST
*Tenga a mano su número de pedido antes de contactar al servicio de atención
al cliente.
Atención al Cliente
ES

- 33 -

www.levoit.com