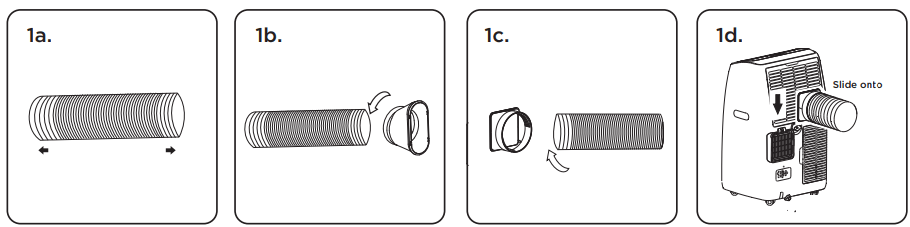
• Extend both sides of the hose. (Fig. 1a) • Screw on the hose inlet (Fig. 1b) • Screw on the hose outlet (Fig. 1c) • Attach the exhaust hose by sliding the hose outlet from the top down into the air outlet grille. (Fig. 1d)
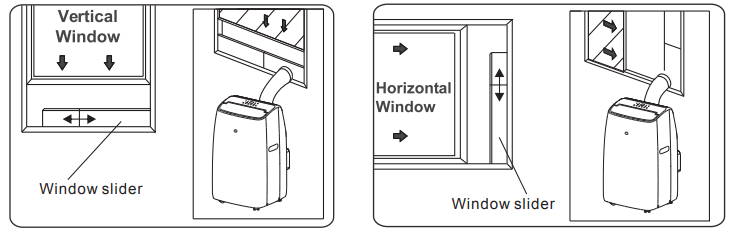
Step 2: Window Slider Kit Installation
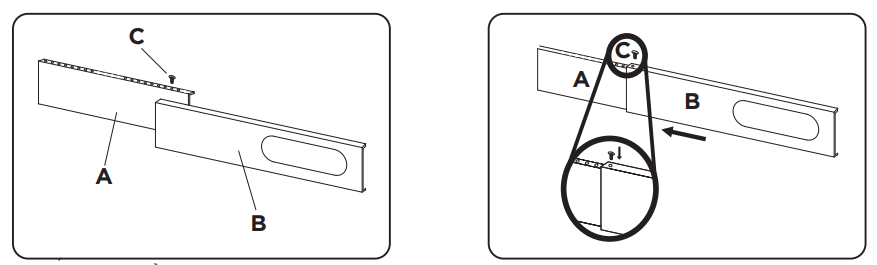
Parts Needed:
A. Panel
B. Panel with one hole
C. Screw or plastic pin
Assembly
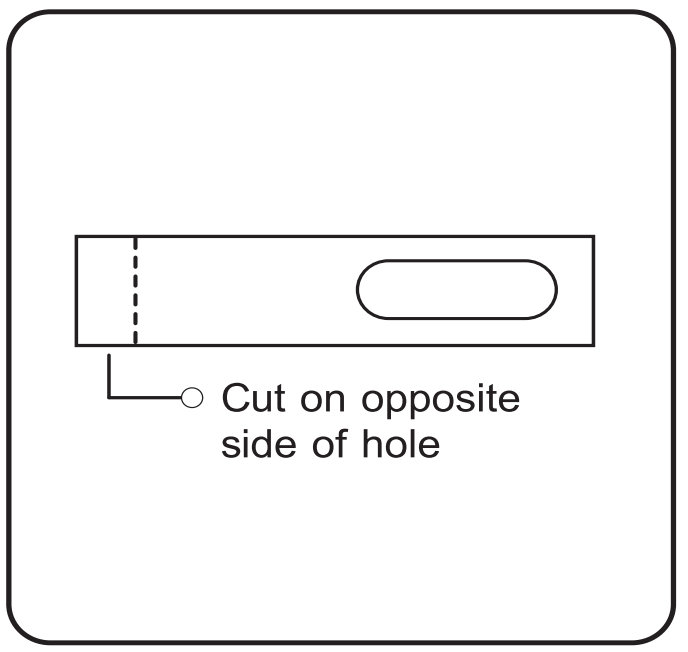
1. Slide Panel A into Panel B and size to window width. Windows sizes vary. When sizing the window width, be sure that the window kit assembly is free from gaps when taking measurements. If necessary, cut Panel B down to size. Cut on the side opposite the hole.
2. Lock the screw into the holes that correspond with the width that your window requires to ensure that there are no gaps in the window kit assembly after installation.
3. Use the provided foam seal to fill in any gaps.
4. Attach the hose outlet to the window slider kit.
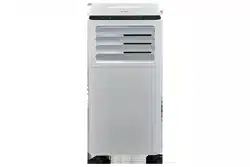
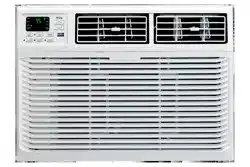
CONTROL YOUR AC
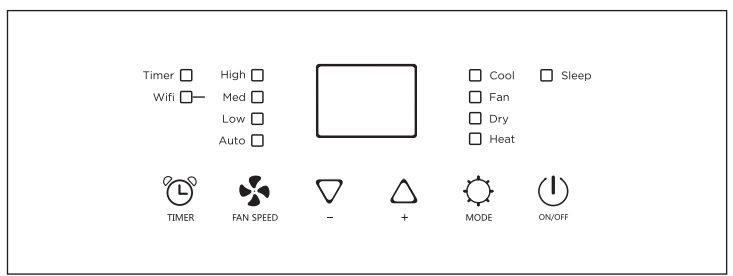
Control panel
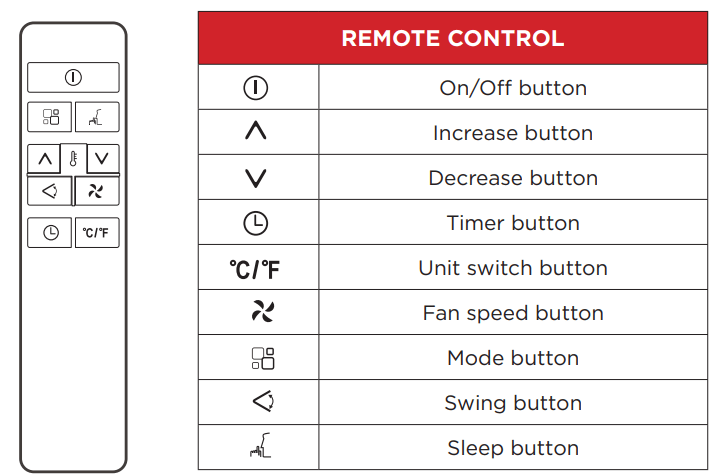
SWING Function
The swing function on the remote can be used to allow the air deflector to swing continuously.
To enable press the power (Insert button image) on the remote to enable the deflector to swing continuously. Press again to cause the deflector to stop in the desired position.
Power button – press the on the control panel or the remote control to turn the air conditioner on and off. Never turn the appliance off by unplugging from the power source. Always press the Power button, then wait for a few minutes before unplugging. This allows the appliance to perform a proper shutdown.
Cool Mode – press the on the control panel or remote until the Cool mode is lit. Select the target temperature 18° - 32°(64°-90°) by pressing the or button until the corresponding value is displayed. Select the required fan speed by pressing the fan speed button.
Dry Mode – press the on the control panel or remote until the Dry symbol appears, “dh” will appear on the display. In this model, the default fan speed is low, and cannot be selected.
Fan Mode – press the on the control panel until the Fan symbol appears. You can then select you desired fan speed, either High or Low .
Sleep Mode - press the SLEEP button on the remote control (there is no sleep mode on the control panel). This function is useful when you are sleeping as it gradually reduces operation of the appliance. To set this function correctly, select the cool or dry mode as described above. Press the button. The appliance operates in the previously selected mode.
When you choose the sleep function, the brightness of the screen is reduced and fan speed is lowered.
The SLEEP function maintains the room at optimum temperature without excessive fluctuations in either temperature or humidity with silent operation. Fan speed is always at Low, while room temperature and humidity vary gradually to ensure your comfort.
When in COOL mode, the selected temperature will decrease by 1° per hour in a 2 hour period.
This new temperature will be maintained for the next 6 hours and then the appliance will turn off.
The SLEEP function can be canceled at any time during operation by pressing the “Sleep”, “Mode” or “Fan Speed” button.
In FAN or DRY mode, SLEEP function cannot be set.
Setting the Timer using the control panel or remote control
Programming Start Up –
Turn on the appliance, choose the mode you want, for example cool, 72°F, high fan speed.
Turn off the appliance.
Press the Timer button, the symbol and the screen will display 1-24 hours.
Press several times until the corresponding time is displayed.
Wait about 5 seconds, the timer will be active, then the symbol is displayed on the screen.
Press the Timer button again, the timer will be canceled, and the symbol will disappear from screen.
Programming Shut Off -
When the appliance is running, press the button, the screen will display 1-24 hours
Press several times until the corresponding time is displayed.
Wait about 5 seconds, the timer will be active, then the symbol is displayed on the screen.
Press the Timer button again, the timer will be canceled, and the “Timer” symbol will disappear from screen
TIPS FOR CORRECT USE
To get the best performance from your appliance, follow these recommendations:
Close the windows and doors in the room to be air conditioned (Fig. 1). When installing the appliance semi-permanently, you should leave a door slightly open (as little as 1/2“) to guarantee correct ventilation.
Protect the room from direct exposure to the sun by partially closing curtains and/or blinds to make the appliance much more economical to run (Fig. 2).
Never rest objects of any kind on the appliance.
Do not block the air inlet or outlet of the appliance.
Reduced air flow will result in poor performance and could damage the unit (Fig. 3).
Make sure there are no heat sources in the room.
Never use the appliance in very damp rooms (bathroom for example).
Never use the appliance outdoors.
Make sure the appliance is standing on a level surface. If necessary, place the caster locks under the front wheels.
Water drainage method
When there is excess water condensation inside the unit, the appliance stops running and shows “”. This indicates that the water condensation needs to be drained using the following procedures:
Manual Draining
1. Power off and unplug the unit from power source. 2. Place a pan under the lower drain plug. 3. Remove the lower drain plug. 4. Water will drain out and collect in the pan. 5. After the water is drained, replace the lower drain plug firmly. 6. Turn on the unit.
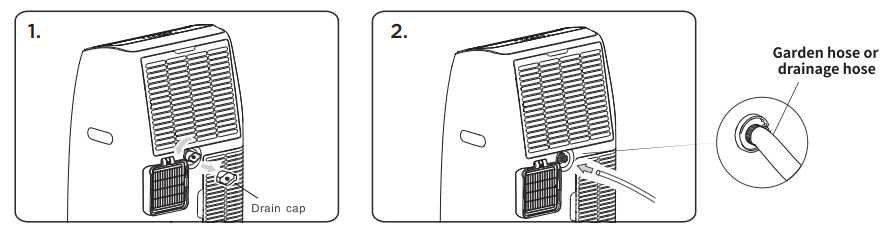
Continuous drainage
When unit is running in Dry mode, you can use the method below for continuous drainage.
Power off and unplug the unit from the power source.
Remove the drain plug (Fig. 1). While doing this operation some residual water may spill so please have a pan to collect the water.
Connect a drain hose (Fig. 2). Note: Drain hose is not included.
The water can be continuously drained through the hose into a floor drain or bucket.
Turn on the unit.
IF DISPLAYED
WHAT SHOULD I DO?
Probe Failure (sensor malfunction)
If this is displayed, contact customer service
Full Tank (condensation reservoir full)
Empty the internal safety tank, following the instructions in the “End of season operations” paragraph.
TROUBLESHOOTING
PROBLEM
POSSIBLE CAUSES
SOLUTIONS
Air Conditioner will not start
The air conditioner is unplugged
• Make sure the air conditioner plug is pushed completely into the outlet
The fuse is blown/circuit breaker is tripped
• Check the house fuse/circuit breaker box and replace the fuse or reset the breaker
Power Failure
• The unit will automatically re-start when power is restored
• There is a protective time delay (approx.
3 minutes) to prevent damage to the compressor. For this reason, the unit may not start normal cooling for 3 minutes after it is turned back on.
The current interrupter device is tripped
• Press the RESET button located on the power cord plug
• If the RESET button will not stay engaged, discontinue use of the air conditioner and contact a qualified service technician
Air Conditioner does not cool as it should
Airflow is restricted
• Change to make sure there are no curtain, blinds, or furniture blocking the air intakes of the air conditioner
The temperature control may not be set correctly
• Lower the set thermostat temperature
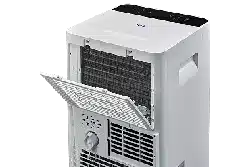
The air filter is dirty
• Clean the filter. See the Cleaning and Care Section of the manual
The room may be too warm
• Please allow time for the room to cool down after turning on the air conditioner
Cold air is escaping
• Check for open furnace registers and cold air returns
The Cooling Coils are frozen
• See “Air Conditioner Freezing Up” below
The air exhaust is detached from the appliance.
• Reattach the air exhaust hose to the back of the appliance.
Air Conditioner is freezing up
Ice blocks the air flow and stops the air conditioner from cooling the room
• Set the MODE to HIGH FAN or HIGH COOL and set the thermostat to a higher temperature
Remote Control is not working
The batteries are inserted incorrectly The batteries may be dead
• Check the position of the batteries
• Replace the batteries
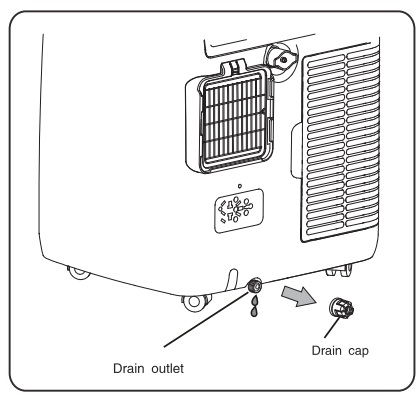
Digital display reads “Ft”
The tank is full.
• The drain cap must be removed from the rear of the appliance and the tank will need to be drained.
WiFi App Installation
Step 1: Download and Install the TCL Home+ App
Using the camera function on your smartphone, please scan the QR code below to be directed to the TCL Home+ page. If your phone does not have a QR scanner, download one from the app store or manually type in the URL below in your smartphone’s web browser. Then, download and launch the app.
Note: The App only supports the 2.4 GHz WiFi band (all routers have a 2.4 GHz band).
Please connect to the 2.4 GHz band before you begin the app setup process.
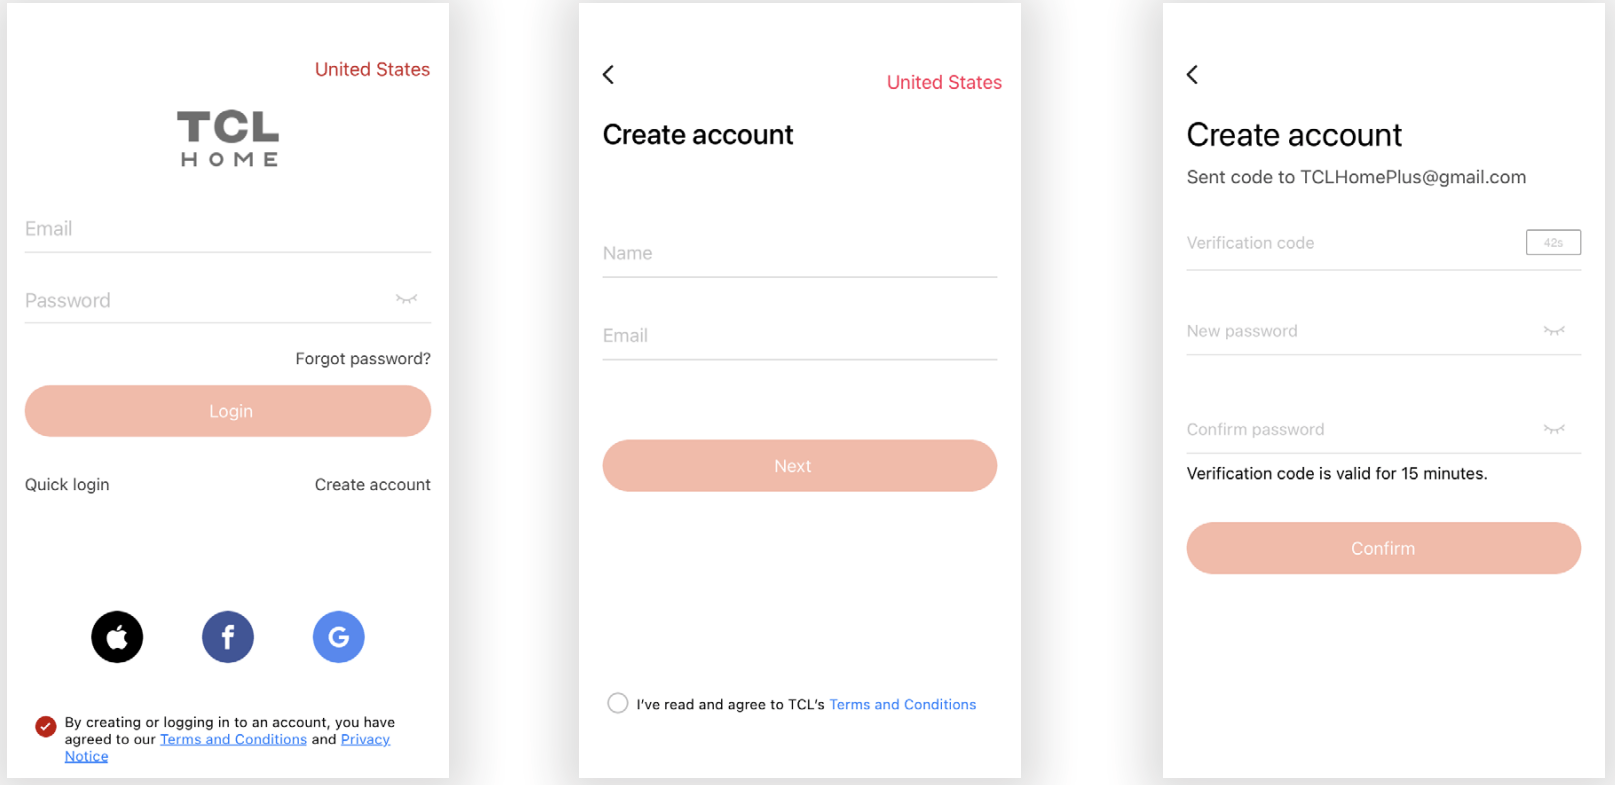
Step 2: Create an Account
Once you have opened the app, select “Create account.” You will then be sent a verification code to your email. Input the code and continue.
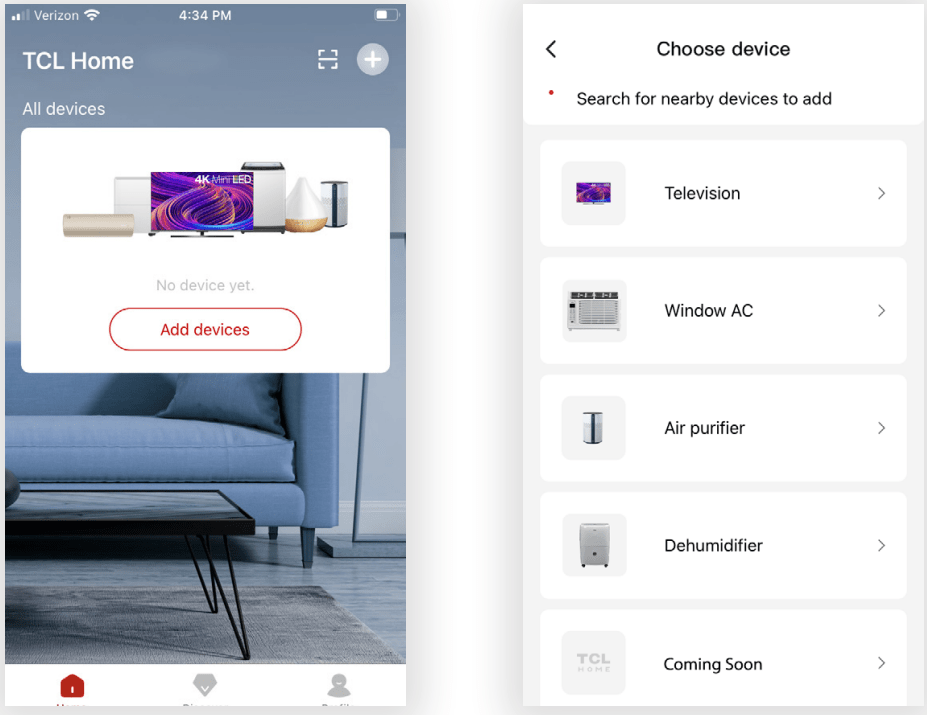
Step 3: Add Your Device
Select the “Add Device” button and follow the in-app instructions to complete the setup.
Troubleshooting while installation
PROBLEM
POSSIBLE CAUSES
SOLUTIONS
TCL Home+ App loses connectivity to AC during setup
Wireless router may be too far from AC
• Relocate wireless router closer to AC
Network error
• Restart wireless router, AC, and mobile device.
TCL Home+ App cannot find AC
Network error
• Restart wireless router, AC, and mobile device.
App & AC are not on the same 2.4GHz channel
• Confirm your device is connected to the 2.4GHz channel.
Router blocking TCL Home+ App
• Verify App is not being blocked by the router’s firewall.
Incorrect WiFi Password
• Reinput and verify WiFi password.
Unable to find or connect to Wireless Network
App may need permission to location
• Give TCL Home+ App permission to Location in phone settings.
 function on the remote can be used to allow the air deflector to swing continuously.
 on the control panel or the remote control to turn the air conditioner on and off. Never turn the appliance off by unplugging from the power source. Always press the Power button, then wait for a few minutes before unplugging. This allows the appliance to perform a proper shutdown.
 on the control panel or remote until the Cool mode is lit. Select the target temperature 18° - 32°(64°-90°) by pressing the
  or
or  button until the corresponding value is displayed. Select the required fan speed by pressing the fan speed button.
 or Low
  .
. button. The appliance operates in the previously selected mode.
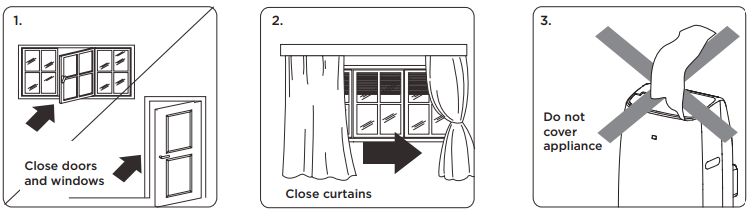
 ”. This indicates that the water condensation needs to be drained using the following procedures: