User Manual
Let’s get started!
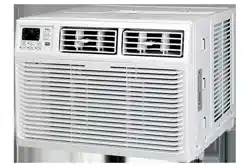
Step 1: Testing
Before you install your AC, let’s test it to make sure it made it safely to your home and your outlet has the proper power level to run your AC. Place it on a flat surface, only plug it directly into a wall outlet (never use a power strip or other device), and turn it on. Next, use the Mode button on your control panel to change the AC to Cool Mode and press the down arrow to set the temperature to the lowest setting. After 3 minutes, the AC should be blowing cool air.
Step 2: Installation
A few quick notes before installing:
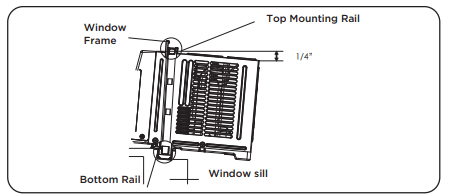
- This unit is made to fit inside a standard double-hung window.
- Check the size of your window before installing.
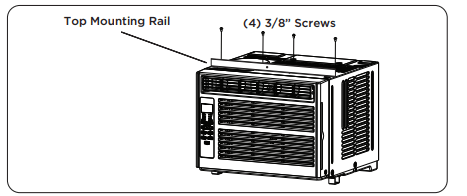
1. Use the (4) included 3/8” screws to fasten the top mounting rail to the unit.
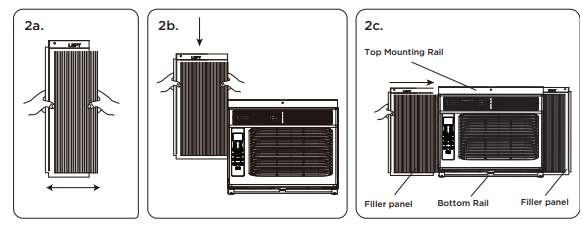
2. Fasten the accordion styled window panel expander pieces to the unit. They are marked “Right” and “Left”. Pull the leading edge of them to its maximum width. Then slide the panel expanders into the grooved notches (slide downward) on the sides of the unit, and make sure they are inserted into the metal rails tightly.
3. Carefully place the window air conditioner into the window where it is to be installed (2 people are recommended for this step). Close the window securely. The AC unit should be slightly tilted to the outside area to allow water to drain out from the unit.
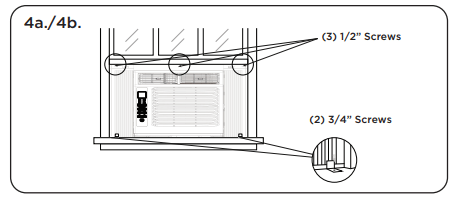
4a. Fasten the air conditioner to the window frame, using the included ½” screws. Fasten each of the panel extenders (Left and Right). You may have to drill a pilot hole in the window frame to fasten these screws to the window sash.
4b. Attach the lock frame between the panel extender and the window sill and fasten them together with the included ¾” locking screw. Repeat for each side.
4c. Attach the sash lock between the top of the sliding window and window frame, using 1 of the included ¾” screws to secure the window closed.
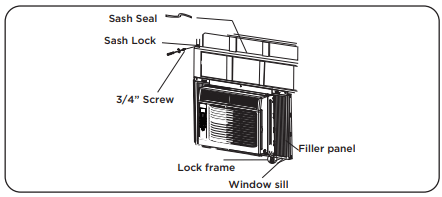
4d. To prevent outside air from entering the room, insert the foam top window gasket. You can cut the foam top to match the width of the window.
5. Plug the unit into the electrical outlet as specified above in the electrical requirements. Set the unit to Cool Mode.
How to Control Your AC
All the basics you need to know to stay cool!
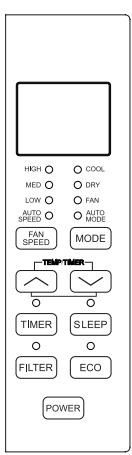
1. Power – turn the air conditioner on and off.
2.  Buttons – use these buttons on the control panel or remote control to increase or decrease the desired temperature, or time using the Timer. The temperature range is: 61 -88 degrees Fahrenheit or 16 - 31 degrees Celsius.
3. Display – By pressing the Display button on the remote, it can switch off/on all lights and LED Display. When the timer is not in use, the operation mode and the set temperature will be displayed. Time will be displayed under the timer setting.
4. Modes – Press the mode button on the control panel to cycle and select a MODE, OR select a MODE by pressing the desired button on the remote.
- Auto Mode – The unit automatically chooses the mode of operation (cool, dry or fan). In this mode the temperature will be set according to the room temperature (tested by the temperature sensor which is incorporated in the indoor unit.).
- Cool Mode - The cooling function allows the air conditioner to cool the room and reduce air humidity at the same time. Adjust the fan speed and temperature to your desired comfort level. In this mode, if Eco is not enabled, the fan may continue to run after reaching the desired temperature.
- Eco Mode – In Eco mode, the unit will turn off once the room is cooled to the user-set temperature. The unit will turn back on when the room temperature rises above the user-set temperature. While in Eco mode, the fan will occasionally turn on for a few seconds in order to take an accurate temperature reading.
- Fan Mode – Fan Mode helps to circulate air in your home, but only works when the air conditioner is vented.
- Fan Speed – Press the Fan Speed button to choose the fan speed options. You can choose Hi, Med, Lo or auto speed in cool mode and choose Hi, Med, Lo in fan mode.
- Dry Mode – This function reduces the humidity of the air to make the room more comfortable. Press the Mode button to set to Dry mode. An automatic function of alternating cooling cycles and air fan is activated.
5. Timer Button – press the TIMER button on the panel or the Timer button on the remote to set the timer.
- Set Timer On: With the AC off, press the Timer button and then use the
 buttons to set the desired temperature. Press the Timer button again and use the
  buttons to set the desired amount of time before the AC turns on. Press the timer button again to start the countdown.
- Set Timer Off: With the AC on, press the Timer button and then use the
 buttons to set the length of time before the AC will turn off. Press the timer button again to start the countdown.
Note: It can be set to automatically turn off or on in 0.5-24 hours. Each press of the buttons will increase or decrease the timer. The Timer can be set in 0.5 hours increment below 10 hours and1-hour increments for 10 hours or above.
The SET light will turn on while setting. To cancel the set function, press the TIMER button again.
6. Sleep Button – In Sleep mode, all of the display lights will turn off after a while, but the Sleep light stays on. In SLEEP mode, the air conditioner will automatically adjust the temperature and fan speed to make the room more comfortable during the night. The set temperature will automatically raise every 30-60 minutes, and at most change six times until the set temperature is 81 or 82 degrees.
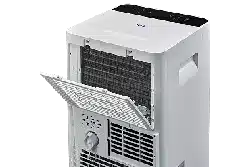
7. Filter Button – After the fan motor runs for 500 total hours, the Filter Check light will turn on to remind the user to clean the filter. After you clean the filter, you can turn off the light by pressing the Filter button.
Normal Operating Sounds
You may hear a pinging noise, caused by the water hitting the condenser on rainy days, or when the humidity is high. This design feature helps remove moisture and increase efficiency.
You may hear the thermostat click when the compressor cycles on and off. Water will collect in the base pan on rainy days, or high humidity days. The water may overflow and drip from the unit on the outside. The fan may run, even when the compressor is not on.
Troubleshooting
Having trouble completing installation? Don’t worry, it’s usually an easy fix
Air Conditioner will not start
- The air conditioner is unplugged
- Make sure the air conditioner is plug is pushed completely into the outlet
- The fuse is blown/circuit breaker is tripped
- Check the house fuse/circuit breaker box and replace the fuse or reset the breaker
- Power Failure
- The unit will automatically re-start when power is restored
- There is a protective time delay (approx. 3 minutes) to prevent damage to the compressor. For this reason, the unit may not start normal cooling for 3 minutes after it is turned back on.
- The current interrupter device is tripped
- Press the RESET button located on the power cord plug
- If the RESET button will not stay engaged, discontinue use of the air conditioner and contact a qualified service technician.
Air Conditioner does not cool as it should
- Airflow is restricted
- Make sure there are no curtains, blinds, or furniture blocking the front of the air conditioner
- The temperature control may not be set correctly
- Lower the set thermostat temperature
- The air filter is dirty
- Clean the filter. See the Cleaning and Care Section of the manual
- The room may be too warm
- Please allow time for the room to cool down after turning on the air conditioner
- Cold air is escaping
- Check for open furnace registers and cold air returns
- The Cooling Coils are frozen
- See “Air Conditioner Freezing Up” below
Air Conditioner is freezing up
- Ice blocks the air flow and stops the air conditioner from cooling the room
- Set the Mode to High Fan or High Cool and set the thermostat to a higher temperature
Remote Control is not working
- The batteries are inserted incorrectly
- Check the position of the batteries
- The batteries may be dead
Water is dripping outside
Water is dripping inside the room
- The air conditioner is not correctly tilted outside
- For proper water drainage, make sure the air conditioner is slightly tilted downward from the front of the unit to the rear
Water collects in the base pan
- Moisture removed from the air is draining into the base pan
- This is normal for a short period in areas with low humidity and normal for a longer period in areas with high humidity
Digital Display reads “E1”, “E2”
TCL Home+ App loses connectivity to AC during setup
- Wireless router may be too far from AC
- Relocate wireless router closer to AC.
- Network error
- Restart wireless router, AC, and mobile device.
TCL Home+ App cannot find AC
- Network error
- Restart wireless router, AC, and mobile device.
- App & AC are not on the same 2.4GHz channel
- Confirm your device is connected to the 2.4GHz channel.
- Router blocking TCL Home+ App
- Verify App is not being blocked by the router’s firewall.
- Incorrect WiFi Password
- Reinput and verify WiFi password.
Unable to find or connect to Wireless Network
- App may need permission to location
- Give TCL Home+ App permission to Location in phone settings.