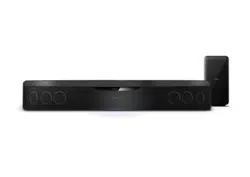
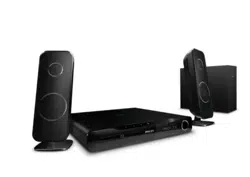
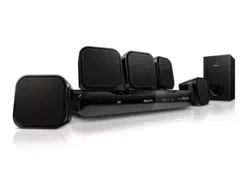
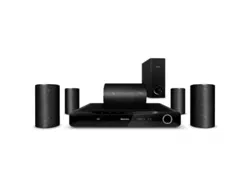
User Manual Philips HTS7140/12 Home Theatre
Use your home theater
Before you start
Check that you:
- Make the necessary connections described in the Quick Start and User Manual.
- Complete the fi rst time setup. First time setup appears when you turn on the home theater for the fi rst time. If you do not complete the setup, you are prompted to complete it each time you turn on the home theater.
- Switch the TV to the correct source for the home theater.
The home menu gives you easy access to connected devices, audio and video settings, and other features.
- Press ( Home). -> The home menu appears
- Press the Navigation buttons and OK to select the following:
- [play Disc] : Starts disc play
- [browse USB] : Accesses the content browser of the connected USB storage device
- [browse iPod] : Accesses the content browser of the connected iPod or iPhone.
- [browse Net TV] : Accesses Net TV.
- [Setup] : Accesses menus to change picture, sound and other settings.
- [User Manual] : Launches the electronic user manual.
Choose your sound
This section helps you choose the ideal sound for your video or music.
- Press SOUND SETTINGS / (Sound OPTIONS).
- Press the Navigation buttons (left/right) to access the sound OPTIONS.
| Sound experience |
Description |
| AUTO VOLUME |
Sets a constant output signal at the speaker output. This option is best for TV audio input where the commercial signal level is usually higher than the content |
| SOUND |
Selects a sound mode |
| SURROUND |
Selects a surround sound or stereo sound. |
| TREBLE |
Adjusts the high frequency output. |
| MID |
Adjusts the middle frequency output. |
| BASS |
Adjusts the low frequency output. |
| AUDIO SYNC |
Delays the audio to match the video. |
3. Select an option, then press OK.
4. Press BACK to exit. If you do not press a button within fi ve seconds, it automatically exits the menu.
Change auto volume
Select the level of volume which output from your TV or other devices to the home theater.
- Press SOUND SETTINGS / (Sound OPTIONS).
- Select AUTO VOLUME, then press OK.
- Press the Navigation buttons (up/down) to select ON or OFF.
- Press OK to confi rm your choice.
Change sound mode
Select predefi ned sound modes to suit your video or music.
- Press SOUND SETTINGS / (Sound OPTIONS).
- Select SOUND, then press OK.
- Press the Navigation buttons (up/down) to select the following settings:
- ACTION/ROCK : Enhanced low and high-range. Ideal for action movies and rock or pop music.
- PURE/PURE : Clear mid and high range for sound purity.
- GAMING/PARTY : Moderate low range and strong mid-range. Ideal for video games and party
- CONCERT/CLASSIC : Neutral sound. Ideal for live concerts and classical music
- SPORTS : Moderate mid-range and surround effects for clear vocals and the atmosphere of a live sport venue
- NEWS : Enhanced mid-range for clear vocals and speech.
4. Press OK to confi rm your choice.
Change surround sound mode
Experience an immersive audio experience with surround sound modes.
- Press SOUND SETTINGS / ( Sound OPTIONS).
- Select SURROUND, then press OK
- Press the Navigation buttons (up/down) to select the following settings:
- AUTO : Surround sound output based on the audio stream.
- STEREO : Two-channel stereo sound. Ideal for listening to music.
- AMBISOUND : Stereo sound output or multi-channel surround output.
4.Press OK to confi rm your choice.
Change treble, mid and bass
Change the high frequency (treble), mid frequency (mid) and low frequency (bass) settings of the home theater to suit your video or music.
- Press SOUND SETTINGS / (Sound OPTIONS)
- Select TREBLE, MID or BASS, then press OK.
- Press the Navigation buttons (up/down) to adjust the frequency level.
- Press OK to confi rm
Synchronize audio with video
If the audio and video are not synchronized, you can delay the audio to match the video.
- Press SOUND SETTINGS / (Sound OPTIONS).
- Select AUDIO SYNC, then press OK.
- Press the Navigation buttons (up/down) to sync the audio with the video.
- Press OK to confirm.
Play a disc
The home theater can play a wide variety of discs, including video, audio and mixed media (for example, a CD-R that contains JPEG pictures and MP3 music).
- Insert a disc into the home theater
- Press DISC. » The disc plays or the disc main menu appears.
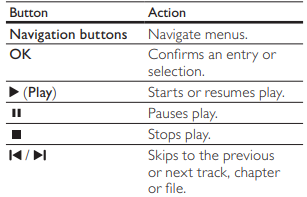
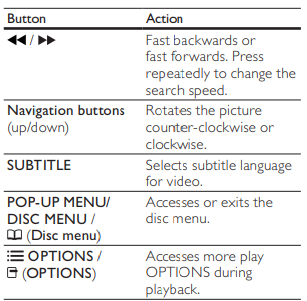
- Press the following buttons to control play:
Use Bonus View on Blu-ray
Blu-ray discs that support the Bonus View feature (also known as Picture-In-Picture) allow you to view special content such as a director’s commentary while watching the main feature.
- If necessary, enable BonusView (or PictureIn-Picture) in the Blu-ray disc menu.
- During playback of the main feature, press OPTIONS / ( OPTIONS). » The OPTIONS menu is displayed.
- Select [PIP Selection] > [PIP], then press OK.
-> PIP OPTIONS [1]/[2] depend on the video contents
-> The picture-in-picture video appears in a small window.
4. Select [2nd Audio Language] or [2nd Subtitle Language], then press OK.
5. Select the language to play, then press OK.
Access BD-Live on Blu-ray
BD-Live enabled Blu-ray discs include exclusive services such as movies and other online bonuses
- Prepare the internet connection and set up the network
- Connect the USB storage device to the home theater
- Select the BD-Live icon in the disc menu, then press OK . -> BD-Live starts to load. The loading time depends on the disc and your internet connection
- Press the Navigation buttons to navigate BD-Live.
- Press OK to select an item.
Note
- The range of BD-Live services depends on the disc
- When you use BD-Live, data on the disc and home theater are accessed by the content provider.
- Use a USB storage device with at least 1 GB of free space to store the downloaded files.
- If there is insuffi cient memory to download BD-Live content, clear memory space
Play 3D video
Your home theater can play 3D videos on 3D TVs. Before you start, make sure that:
- your TV is a 3D TV, and is connected to your home theater through HDMI,
- your disc is a Blu-ray 3D disc, and
- you have 3D glasses that are compatible with your 3D TV.
- Insert a Blu-ray 3D disc into your home theater. » Your TV switches to the correct HDMI source, and the disc plays automatically
- If the disc does not play automatically, press DISC or select [play Disc] in the home menu, and then press OK.
- Press the play buttons to control play . When you search forward or backward, and in some other play modes, the video displays in 2D. It returns to 3D when you play normally again.
- Put on the 3D glasses to enjoy the 3D effects.
Play 3D discs in 2D
- Press ( Home).
- Select [Setup] > [Video] > [Blu-ray 3D video] > [Off].
- Press OK.
- Play your Blu-ray 3D disc. » The 3D video is displayed in 2D.
Play from a USB storage device
The home theater is fi tted with a USB connector that allows you to view pictures, listen to music or watch movies stored on a USB storage device.
- Connect the USB storage device to the home theater.
- Press ( Home). » The home menu appears.
- Select [browse USB], then press OK. » A content browser appears.
- Select a fi le, then press OK.
- Press the playback buttons to control play
More play features for disc or USB
Use video OPTIONS
Access several useful features while viewing video
- Press OPTIONS / ( OPTIONS). » The video OPTIONS menu appears
- Press the Navigation buttons and OK to select and adjust:
- [Audio Language] : Selects audio language for video.
- [Subtitle Language] : Selects subtitle language for video.
- [Subtitle Shift] : Adjusts the subtitle position on the screen.
- [Info] : Displays information about what is playing.
- [Character Set] : Selects a character set that supports the DivX subtitle
- [Time Search] : Skips to a specifi c part of the video by entering the time of the scene.
- [2nd Audio Language] : Selects the second audio language to play
- [2nd Subtitle Language] : Selects the second subtitle language to play
- [Titles] : Selects a specific title
- [Chapters] : Selects a specific chapter
- [Angle List] : Selects a different camera angle.
- [Menus] : Displays the disc menu.
- [PIP Selection] : Displays Picture-inPicture window
- [Zoom] : Zooms into a video scene or pi
- ture. Press the Navigation buttons (left/right) to select a zoom factor.
- [Repeat] : Repeats a chapter or title.
- [Repeat A-B] : Marks two points within a chapter or track for repeat play, or turns off repeat mode.
- [Picture Settings] : Selects a predefi ned color setting.
Use picture OPTIONS
Access several useful features while viewing pictures.
- Press OPTIONS / ( OPTIONS). » The pictures OPTIONS menu appears.
- Press the Navigation buttons and OK to select and adjust
- [Rotate +90] : Rotates the picture 90 degree clockwise
- [Rotate -90] : Rotates the picture 90 degree counter-clockwise.
- [Zoom] : Zooms into a video scene or picture. Press the Navigation buttons (left/right) to select a zoom factor
- [Info] : Displays picture information.
- [Duration per slide] : Sets the display speed for each picture in a slide show.
- [Slide Animation] : Selects animation for the slide show.
- [Picture Settings] : Selects a predefi ned color setting.
- [Repeat] : Repeats a selected folder
Use audio OPTIONS
Access several useful features while audio is played
Press OPTIONS / ( OPTIONS) repeatedly to cycle through the following functions:
- REPEAT TRACK : Repeats the current track.
- REPEAT DISC : Repeats all the tracks on the disc or folder.
- REPEAT RANDOM : Plays audio tracks in random order
- REPEAT OFF : Turns off repeat mode.
Play a musical slideshow
Play music and pictures simultaneously to create a musical slideshow.
- Select a music track, then press OK
- Press BACK and go to the picture folder.
- Select a picture, then press OK to start slideshow.
- Press to stop slideshow.
- Press again to stop music
Browse Net TV
With the home theater connected to the Internet, you can use Net TV to access videos, pictures, music, information, games and other online services
Access Net TV
- Prepare the internet connection and set up the network
- Press ( Home). » The home menu appears.
- Select [browse Net TV], then press OK. » The Net TV home page appears.
- Press the Navigation buttons to navigate Net TV web pages or services.
- Press OK to view or select an item
- Press BACK to return to the previous page, or press ( Home) to exit.
Clear browsing history
Clear browsing history to remove passwords, cookies and browsing data from your home theater
- Press ( Home).
- Select [Setup], then press OK
- Select [Network] > [Clear Net TV Memory], then press OK .
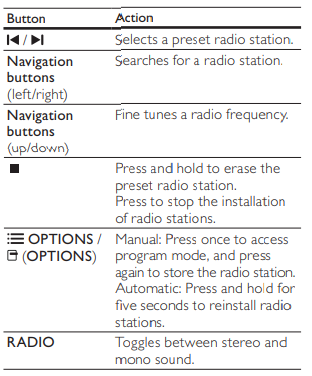
Play from radio
The home theater can store up to 40 radio stations.
- Check that the FM antenna is connected.
- Press RADIO. » “ AUTO INSTALL...PRESS PLAY’ appears on the display panel if you have not installed any radio stations. Press ( Play).
- Press the following buttons to control play:
Change tuning grid
In some countries, you can switch the FM tuning grid between 50 kHz and 100 kHz. Changing the tuning grid erases all preset radio stations.
- Press RADIO.
- Press ( Stop).
- Press and hold ( Play) to toggle between 100 kHz and 50 kHz frequency
Play audio from TV or other devices
Press SOURCE / AUDIO SOURCE repeatedly to select the audio output of the connected device
Play from an MP3 player
Connect and play audio fi les from an MP3 player or other external audio devices.
- Connect the MP3 player to the home theater as described in the Quick start guide
- Press SOURCE / AUDIO SOURCE repeatedly until ‘ MP3 LINK’ appears on the display panel
- Press the buttons on the MP3 player to select and play audio fi les.
Play from an iPod or iPhone
By connecting and installing a Philips Dock for iPod/iPhone, you can use the home theater to play music, movies and photos from your iPod or iPhone.
Dock your iPod or iPhone
- Connect the dock to the home theater and connect the yellow composite cable from the dock to the TV. For more information, see the Quick Start provided with the dock.
- Switch on the iPod or iPhone and place it in the dock.
- On the home theater remote control, press ( Home), then select [browse iPod] and press OK.
Listen to music
- Dock your iPod or iPhone
- Press DOCK for iPod on the home theater remote control. » The playlists are displayed on the TV
- Press the Navigation buttons and OK to select and play tracks.
Watch video or view slideshows
- Dock your iPod or iPhone
- Switch the TV to the AV/VIDEO source (corresponding to the yellow composite cable). » The TV screen goes blank.
- Browse on the iPod or iPhone screen to select videos or photos.
- Press ( Play) to play the video and photos. » The picture is displayed on the TV.
Troubleshooting
Main unit
The buttons on this home theater do not work
- Disconnect the home theater from the power outlet for a few minutes, then reconnect.
Picture
No picture.
- Ensure that the TV is switched to the correct source for the home theater
No picture on HDMI connection
- Change the HDMI video setting or wait for 15 seconds for auto recover.
- Check if the HDMI cable is faulty. Replace with a new HDMI cable.
No picture on the Component (Y Pb Pr) connection
- If the HDMI video connection is set to [Auto] or [1080p/24Hz], there is no video output through the component connection. Change the HDMI video setting or remove the HDMI connection
No high-definition video signal on the TV.
- Ensure that the disc contains high-defi nition video.
- Ensure that the TV supports high-defi nition video.
Sound
No sound.
- Ensure that the audio cables are connected and select the correct input source (for example, SOURCE / AUDIO SOURCE) for the device you want to play
No sound on HDMI connection.
- You might not hear any sound if the connected device is not HDCP (Highbandwidth Digital Content Protection) compliant or only DVI compatible. Use an analog or digital audio connection.
- Ensure that the [HDMI Audio] is enabled
No sound from TV program.
- Connect an audio cable from the audio input on the home theater to the audio output on the TV, then press SOURCE / AUDIO SOURCE repeatedly to select the correct audio source
Distorted sound or echo.
- Ensure that the TV volume is muted or set to minimum if you are playing audio through the home theater
Audio and video are not synchronized.
- Press SOUND SETTINGS / (Sound OPTIONS)
- Press the Navigation buttons (left/right) repeatedly until AUDIO SYNC is displayed, then press OK
- Press the Navigation buttons (up/down) to sync the audio with the video.
Play
Disc cannot be played.
- Clean the disc.
- Ensure that the home theater supports the disc
- Ensure that the home theater supports the region code of the disc.
- For DVD±RW or DVD±R, ensure that the disc is finalized
DivX video files cannot be played.
- Ensure that the DivX file is encoded according to the ‘Home Theater Profi le’ with the DivX encoder.
- Ensure that the DivX video file is complete.
DivX subtitles do not display correctly.
- Ensure that the subtitle file name is the same as the movie file name.
- Select the correct character set: 1) Press OPTIONS / ( OPTIONS). 2) Select [Character Set]. 3) Select the supported character set. 4) Press OK.
The contents of a USB storage device cannot be read.
- Ensure that the format of the USB storage device is compatible with the home theater
- Ensure that the USB storage device is formatted with a fi le system that is supported by the home theater
‘No entry’ or ‘x’ sign appears on the TV.
- The operation is not possible.
EasyLink feature does not work.
- Ensure that the home theater is connected to a Philips brand EasyLink TV and that EasyLink is on
I do not want my home theater to be switched on when I switch on my TV
- This is the correct behavior for Philips EasyLink (HDMI-CEC). To make the home theater work independently, switch off EasyLink
I cannot access BD-Live features.
- Check the network connection(see ‘Connect to the Internet’ on page 10 )or ensure that the network has been set up
- Clear memory storage
- Ensure that the Blu-ray disc supports BD-Live feature.
The video (movies, photos, video clips, etc.) contents of the iPod/iPhone do not display on TV
- Video and photo browsing is not supported, you can only browse the video and photo contents on the iPod/iPhone itself.
Cannot see pictures from my iPod/iPhone on the TV
- Connect a yellow composite cable from the dock to the TV
- Switch the TV to the AV/VIDEO source (corresponding to the yellow composite cable).
- Press PLAY on the iPod or iPhone to start the slideshow.
The audio is interrupted when I play music from my iPod or iPhone in the docking station
- Ensure that you have installed the latest fi rmware on your iPod or iPhone. For more information, refer to the support website of your iPod or iPhone.
My 3D video plays in 2D mode.
- Ensure that your home theater is connected to your 3D TV through HDMI.
- Ensure that your disc is a Blu-ray 3D disc
- Ensure that the [Blu-ray 3D video] setting is turned on(see ‘Change video settings’ on
I see black video on my TV screen.
- Ensure that your home theater is connected to the TV through HDMI.
- Switch to the correct HDMI source on your TV