User Manual
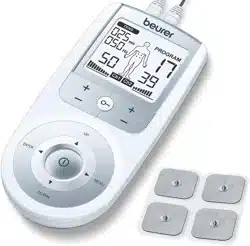
Parts and Controls
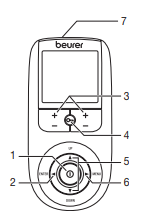
Buttons:
1 ON/OFF button
2 ENTER button
3 Intensity setting buttons (Ch1 +/- left, Ch2 +/- right)
4 Keylock
5 Selection button UP and DOWN
6 MENU button
7 Sockets for electrodes
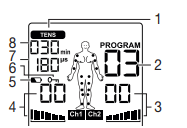
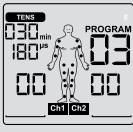
Display (full screen):
1 Menu TENS
2 Program number
3 Impulse intensity channel 2
4 Impulse intensity channel 1
5 Low battery
6 Keylock
7 Frequency display (Hz), pulse width (μs) or pause time
8 Timer function (remaining time display) or working time
Button functions
Each time you press a button, the unit beeps to notify you. This beeping cannot be switched off.
ON/OFF
(1) Press briefly to switch the device on.
(2) Press once to interrupt stimulation treatment.
(3) Press and hold to switch off the device (approx. 2 seconds).
UP and DOWN
Choice of treatment program, treatment time, frequency, pulse width, operating time, and pause time.
MENU
Return to program selection screen.
ENTER
(1) Menu selection.
(2) Confirmation of a selection made using UP/DOWN, except channel intensity.
Intensity setting buttons (Ch1 +/- left, Ch2 +/- right)
Adjusts impulse intensity.
Keylock
Locks the buttons to avoid them being pressed accidentally.
(1) To activate, press and hold the button until the symbol is visible in the display (approx. 3 seconds).
(2) To deactivate, press and hold the button until the symbol disappears from the display (approx. 3 seconds).
Electrode Pad Usage
- Do not bend or fold pads. Store pads on the plastic storage sheet when not in use.
- Do not apply ointment or any solvent to the pads or to your skin.
- The pads are pre-gelled and will adhere to your skin.
- Apply the pads only to the skin or to the plastic storage sheet provided.
- Place the pads at least two inches (5 cm) apart on your skin. The pads should never touch each other.
- Always place clean pads in accordance with illustrations provided. Make sure the components are connected properly and the pads are attached to the part of the body you wish to treat.
- Pads should not touch each other when placed onto your skin.
- Do not place on your spine or backbone.
- Pads should not touch any metal object, such as a belt buckle or necklace.
- Pads should not be placed simultaneously on the soles of both feet.
- Pads should not be placed simultaneously on the calves of both legs.
- Do not share pads with another person. This may cause a skin irritation or infection. Pads are intended for use by one person.
- Do not place or relocate the pads while the device is on. Always turn the power off before removing or changing the pad location.
- Do not leave pads attached to the skin after treatment.
- Always pull firmly on electrodes to remove them from the skin to prevent injuries in the unusual case of highly sensitive skin.
- Do not expose the device to direct sunlight or high temperatures.
- Protect the device from dust, dirt and humidity. Never immerse the device in water or other liquids.
- The device is suitable for self-treatment.
- If the device does not work properly, or you feel unwell or experience pain, stop using it immediately.
- Do not modify electrodes (e.g. by cutting them). This increases the current intensity, which is potentially hazardous (max. recommend�ed output value for the electrodes is 58.1 mA/sq in (9 mA/cm²), an effective current intensity beyond 12.9 mA/sq in (2 mA/cm²) requires increased awareness).
- Ensure that no metallic objects (e.g. belt buckles or necklaces) come into contact with the electrodes during stimulation. If you are wearing jewellery or have piercings in the area to be treated (e.g. a navel piercing), these must be removed before using the device. Failure to do so could result in spot burns.
- Make sure not to confuse the electrode cables including contacts with your headphones or other devices and do not connect the electrodes to other devices.
- Do not use the device whilst using other devices that transmit electrical impulses into your body.
- Do not use rechargeable batteries and always use the same battery types.
- During the initial few minutes use the device while sitting or lying down to minimise the risk of injuries as a consequence of isolated cases of vagal responses (feeling of faintness). If you feel faint, immediately switch off the device, lie down and support the legs in an elevated position (approx. 5 – 10 min).
Before First Use
1. Remove the belt clip from the unit (if attached).
2. Remove the battery compartment cover on the rear of the device by sliding it in the direction of the arrow.
3. Insert three „AAA“ alkaline batteries in accordance with the polarity markings inside the compartment.
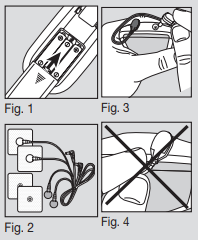
4. Reattach the battery compartment cover. (Fig.1)
5. Attach the belt clip, if desired.
6. Attach the electrodes to the cables. (Fig.2)
7. Insert the plugs of the cables into the sockets on the top of the device. (Fig.3)
Do not pull, twist or make sharp bends in the cables. (Fig.4)
NOTE: When the batteries are replaced or removed, all settings are restored to the factory defaults.
Positioning the Electrodes
It is important to position the electrodes properly. Consult your doctor to establish the ideal electrode positions for your intended application area. The figure on the display is intended as an initial aid to help you position the electrodes. Refer to the inside of the cover for more detailed information on how to position the electrodes.

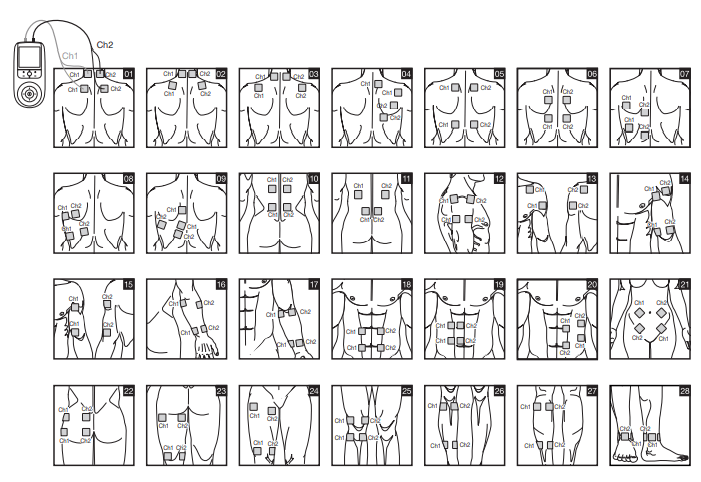
Distance Between Electrodes:
The larger the distance between electrodes, the larger the stimulated tissue volume. This applies to the area and depth of the tissue volume. At the same time, however, the stimulation intensity of the tissue falls the farther the electrodes are apart. As a result, greater distances between electrodes mean a larger tissue volume is stimulated, but less intensely. Consequently, you must increase the impulse intensity to boost stimulation. Use the following guidelines to select an appropriate electrode distance:
- Sensible distance: 2-6 in (5-15 cm).
- At distances below 2 in (5 cm), the unit stimulates surface structures intensely.
- At distances greater than 6 in (15 cm), large areas and deep structures are stimulated very weakly.
NOTES:
As part of pain relief treatment, position the electrodes of a channel so that the area affected by the pain is between the electrodes or position one electrode directly on the area affected by the pain and the other electrode at least one inch (2–3 cm) away.
You may use the electrodes of the second channel to simultaneously treat additional areas affected by pain or use them in conjunction with the electrodes of the first channel to restrict the area affected by pain (position electrodes opposite). In this case, position electrodes as crosses.
Always use all four electrodes for optimum treatment.
Use the electrodes on skin that is clean and has as little hair and oil as possible, in order to extend the life of the electrodes. If required, clean skin with water and remove hair prior to treatment.
If an electrode should come loose during use, the impulse intensity of both channels is reduced to the lowest level. Apply the electrode again and reset the desired intensity level.
TENS Program Table
NOTES:
TENS programs 1-12 can’t be customized- see below.
Electrode positions should surround the area affected by pain. In the event that groups of muscles cause pain, group the electrodes around the affected muscles.
To relieve joint pain, surround the joint with electrodes at the front and back as well as on the left and right of the joint, if possible. The distance between electrodes must be 2–6 inches (5 –15 cm).
Figures 25 and 28 apply to knee and ankle joints.
Burst programs are suitable for all areas of application to be treated with changing signal patterns (to minimize having the area become accustomed to the treatment).
To Use
NOTES:
- The device shuts off if it is not in use for two minutes (automatic shutoff). When the unit is switched on again, the LCD screen displays the menu selection and the most recently used menu flashes.
- A short beep sounds when a valid button is pressed. Two short beeps sound when an invalid button is pressed.
- Pause the stimulation at any time by pressing the ON/OFF button. To continue, press the ON/OFF button again and reset the desired impulse intensity.
Procedure for TENS programs 1–12:
1. Select a suitable program from the program tables.
2. Place the electrodes on the desired area for treatment. For positioning suggestions, see the „Positioning the Electrodes“ section. Connect the cables to the main unit. The figure on the display is to help you position the electrodes.
3. Select a program.
a. Press the ON/OFF button to switch on the device.
b. Using the UP/DOWN buttons, select the desired program and confirm your selection with the ENTER button.
4. To return to the previous selection menu, press the MENU button. By holding down the ENTER button, you can skip individual setting steps and start directly with the stimulation treatment.
5. At the start of a session, the impulse intensity of Ch1 and Ch2 is set to 00 by default. No impulses are sent to the electrodes yet. Using the +/- buttons, select the desired impulse intensity (Fig. 3). The impulse intensity of each channel can be set individually.
NOTE: If the program is in a pause phase, the intensity cannot be increased.
6. To end a session early, press the ON/OFF button.
Program 13:
Program 13 is a preset program that you can also personalize. In this program, you can set the impulse frequency between 1 and 120 Hz and the impulse width between 50 and 250 μs.
- Place the electrodes on the desired area for treatment. For positioning suggestions, see the „Positioning the Electrodes“ section. Connect the cables to the main unit. Select Program 13, as described in step 3 in the previous section.
- Select the desired impulse frequency using the UP/DOWN buttons and press the ENTER button to confirm.
- Select the desired impulse width using the UP/DOWN buttons and press the ENTER button to confirm.
- Select the desired treatment time using the UP/DOWN buttons and press the ENTER button to confirm.
- Select the desired impulse intensity.
Program 14:
Program 14 is a preset burst program that you can also personalize. In this program you can set an impulse width between 50 and 250 μs.
- Place the electrodes on the desired area for treatment. For positioning suggestions see the „Positioning the Electrodes“ section. Connect the cables to the main unit. Select Program 14.
- Select the desired impulse width using the UP/DOWN buttons and press the ENTER button to confirm.
- Select the desired treatment time using the UP/DOWN buttons and press the ENTER button to confirm.
- Select the desired impulse intensity.
Program 15:
Program 15 is a preset program that you can also personalize. In this program, you can set the impulse frequency between 1 and 120 Hz. The impulse width changes automatically during the stimulation treatment.
- Place the electrodes on the desired area for treatment. For positioning suggestions see the „Positioning the Electrodes“ section. Connect the cables to the main unit. Select Program 15.
- Select the desired impulse frequency using the UP/DOWN buttons and press the ENTER button to confirm.
- Select the desired treatment time using the UP/DOWN buttons and press the ENTER button to confirm.
- Select the desired impulse intensity.
Custom Function
The Custom Function is a special setting to allow you to access your personal program directly.
Your individual program settings are recalled and activated when the device is switched on.
Setting the Custom Function
- Select your program and the corresponding settings as described in chapter 7.
- At the start of treatment, the impulse intensity is set to 00 by default. No impulses are sent to the electrodes yet. Before setting the desired impulse intensity using the intensity setting buttons, press and hold the `CH2-´ button for 5 seconds. Storage in the Custom Function is confirmed by a long beep.
If you switch on the device again, the program you saved using the Custom Function is recalled.
Deleting the Custom Function
To clear the device and gain access to other programs again, press and hold the`CH2-´ button again for approx. 5 seconds. To do this, the impulse intensity must be set to 00. Deletion of the Custom Function is confirmed with a long beep.
Care and Maintenance
Adhesive Electrodes:
- To ensure that the adhesive on the electrodes lasts as long as possible, run the adhesive side under lukewarm water and pat dry with a lint-free cloth. Before cleaning with water, remove the connection cables from the electrodes.
- Reapply the electrodes to the carrier foil after treatment.
Main Unit:
- Remove the batteries from the device before cleaning.
- Clean the device after use with a soft, slightly damp cloth. You can also moisten the cloth with a mild detergent solution. Ensure that no water enters the device.
- Do not use any chemical or abrasive cleaning agents.
Storage:
- Remove the batteries from the device if you will not be using it for a prolonged period of time.
- Do not make sharp bends in the connection cables and electrodes.
- Disconnect the connection cables from the electrodes.
- Reapply the electrodes to the carrier foil after use.
- Store the device and accessories in a cool, well-ventilated space. Never place any heavy objects on the device.
Troubleshooting Guide
Problem: The device does not switch on.
Solutions:
- Ensure batteries have been inserted correctly and are in contact with the terminals.
- Replace batteries, if applicable.
- Contact Customer Service.
Problem: Electrodes do not adhere to the body.
Solutions:
- Clean the adhesive surface of the electrodes using a damp, lint-free cloth. Replace the electrodes if they still do not adhere securely.
- Clean the skin prior to any application; do not use skincare lotions or oils prior to treatment. Shaving may increase the life of electrodes.
Problem: There is no noticeable stimulation.
Solutions:
- Press the ON/OFF button to pause. Ensure the connection cables are correctly connected to the electrodes and that the electrodes are in firm contact with the treatment area.
- Ensure the connection plug is firmly connected to the device.
- Press the ON/OFF button to restart the program.
- Check electrode positions and ensure that adhesive electrodes do not overlap.
- Gradually increase the impulse intensity.
- Batteries are weak; replace batteries.
Problem: Unpleasant sensation near the electrodes.
Solution:
- The electrodes are not positioned correctly. Check and reposition.
- The electrodes are worn. This may cause irritated skin because of uneven current across the area. Replace the electrodes.
Problem: Skin in the treatment area turns red.
Solution:
- Immediately stop treatment and wait for the skin color to return to normal. If the redness is directly under the electrode and goes away after a brief time, this is normal and is caused by increased blood flow. Consult your doctor before continuing if the skin irritation persists and is accompanied by an itching sensation or inflammation, as this may be an allergic reaction to the adhesive.
Specifications
Type: EM44
Model: SEM 44
Output wave form: Biphasic rectangular pulse
Pulse length: 50–360 µs
Pulse frequency: 1–150 Hz
Max Output Voltage: 100 Vpp (500 ohm)
Max Output Current: 200 mApp (500 ohm)
Power Supply: 3 x 1.5 V AAA batteries
Treatment Time: 5–100 minutes
Intensity Levels: 0–50
Operating Conditions: 50 °F–104 °F (10 °C – 40 °C), relative humidity 30–85%
Storage Conditions: 14 °F–122 °F (-10 °C – 50 °C), relative humidity 10–95%
Dimensions: 5.2 x 2.5 x 1.2 in (132 x 63 x 29.5 mm) including belt clip
Weight: 3.5 oz (101 g) including belt clip
Electrode Pad Size: 1.8 x 1.8 in (45 x 45 mm)
Battery Life: About 15 hour
Warranty
Limited Lifetime Warranty For Original Purchaser
The Your Beurer Digital Tens Device Model EM 44, is warranted to be free from defects in materials and workmanship for the life of the pro�duct under normal conditions of intended use and service. This warranty extends only to the original retail purchaser and does not extend to retailers or subsequent owners.
We will, at our option, repair or replace the Beurer Digital Tens Device, Model EM 44, without additional charge, for any part or parts covered by these written warranties. No refunds will be given. Repair or replacement is our only responsibility and your only remedy under this written warranty. If replacement parts for defective materials are not available, Beurer reserves the right to make product substitutions in lieu of repair or replacement.
For warranty service contact our customer service department at 1-800-536-0366 or at [email protected] to provide a description of the pro�blem. If the problem is deemed to be within the scope of the limited lifetime warranty, you will be asked to mail the product at your costs in its original package with proof of purchase, your name, address and phone number. If the problem is not deemed to be within the scope of the limited lifetime warranty, we will provide a quotation for repair respectively replacement and return shipping fee.
This warranty does not cover damage caused by misuse or abuse; accident; the attachment of unauthorized accessory; alteration to the product; improper installation; misapplication; lack of reasonable care with respect to the product; unauthorized repairs or modifications; improper use of electrical/power supply; old worn batteries; normal wear; loss of power; dropped product; malfunction or damage of an ope�rating part as a result of failure to comply with instructions for use or to provide manufacturer’s recommended maintenance; transit damage; theft; neglect; vandalism; or environmental conditions; loss of use during the period the product is at a repair facility or otherwise awaiting parts or repair; or any other conditions whatsoever that are beyond the control of Beurer. This warranty is void if the product is ever used in a commercial or business environment. The maximum liability of Beurer under this warranty is limited to the purchase price actually paid by the customer for the product covered by the warranty, as confirmed by proof of purchase, regardless of the amount of any other direct or indirect damage suffered by the customer.
This warranty is effective only if the product is purchased and operated in the country in which the product is purchased. A product that requires modifications or adaptation to enable it to operate in any other country than the country for which it was designed, manufactured, approved and/or authorized, or repair of products damaged by these modifications is not covered under this warranty.
THE WARRANTY PROVIDED HEREIN SHALL BE THE SOLE AND EXCLUSIVE WARRANTY. ANY IMPLIED WARRANTIES, OBLIGATIONS, OR LIABILITES, INCLUDING BUT NOT LIMITED TO THE IMPLIED WARRANTY OF MERCHANTABILITY AND FITNESS FOR A PARTICULAR PURPOSE, ARE LIMITED IN DURATION TO THE DURATION OF THIS APPLICABLE WRITTEN WARRANTY. Some states do not allow limitations on how long an implied warranty lasts, so the above limitations may not apply to you.
IN NO EVENT SHALL BEURER BE LIABLE FOR ANY SPECIAL, INCIDENTAL, INDIRECT OR CONSEQUENTIAL DAMAGES FOR BREACH OF THIS OR ANY OTHER WARRANTY, EXPRESS, IMPLIED OR ANY OTHER THEORY OF LIABILITY, WHATSOEVER. Some states do not allow the exclusion or limitation of special, incidental, or consequential damages, so the above limitation may not apply to you.
Beurer does not authorize anyone, including, but not limited to, retailers, the subsequent consumer purchaser of the product from a retailer or remote purchaser, to obligate Beurer in any way beyond the terms set forth herein.
This warranty does not extend to the purchase of opened, used, repaired, repackaged and/or resealed products, including but not limited to sale of such products on Internet auction sites and/or products by surplus or bulk resellers. Any and all warranties or guarantees shall immediately cease and terminate in connection with any products or parts thereof which are repaired, replaced, altered, or modified, without the prior explicitly written consent of Beurer.