www.philips.com/welcome
BDL4660EL
User Manual (English)

BDL4660EL
ii
Safety Instructions
Safety precautions and maintenance
WARNING: Use of controls, adjustments or procedures other than those specied in this documentation may result in exposure to
shock, electrical hazards and/or mechanical hazards.
Read and follow these instructions when connecting and using your display:
Operation:
• Keepthedisplayoutofdirectsunlightandawayfromstovesoranyotherheatsources.
• Removeanyobjectthatcouldfallintoventilationholesorpreventpropercoolingofthedisplay’selectronics.
• Donotblocktheventilationholesonthecabinet.
• Whenpositioningthedisplay,makesurethepowerplugandoutletareeasilyaccessible.
• Whenturningoffthedisplaybydetachingthepowercord,wait6secondsbeforere-attachingthepowercordfornormaloperation.
• EnsuretheuseofanapprovedpowercordprovidedbyPhilipsatalltimes.Ifyourpowercordismissing,pleasecontactyourlocalservicecenter.
• Donotsubjectthedisplaytoseverevibrationorhighimpactconditionsduringoperation.
• Donotknockordropthedisplayduringoperationortransportation.
Maintenance:
• Toprotectyourdisplayfrompossibledamage,donotputexcessivepressureontheLCDpanel.Whenmovingyourdisplay,grasptheframetolift;do
notliftthedisplaybyplacingyourhandorngersontheLCDpanel.
• Unplugthedisplayifyouarenotgoingtouseitforanextensiveperiodoftime.
• Unplugthedisplayifyouneedtocleanitwithaslightlydampcloth.Thescreenmaybewipedwithadryclothwhenthepowerisoff.However,never
useorganicsolvent,suchas,alcohol,orammonia-basedliquidstocleanyourdisplay.
• Toavoidtheriskofshockorpermanentdamagetotheset,donotexposethedisplaytodust,rain,wateroranexcessivelymoistenvironment.
• Ifyourdisplaybecomeswet,wipeitwithdryclothassoonaspossible.
• Ifaforeignsubstanceorwatergetsinyourdisplay,turnthepoweroffimmediatelyanddisconnectthepowercord.Thenremovetheforeignsubstance
orwater,andsendtheunittothemaintenancecenter.
• Donotstoreorusethedisplayinlocationsexposedtoheat,directsunlightorextremecold.
• Inordertomaintainthebestperformanceofyourdisplayandensurealongerlifetime,westronglyrecommendusingthedisplayinalocationthatfalls
withinthefollowingtemperatureandhumidityranges.
- Temperature:0-40°C32-104°F
- Humidity:20-80%RH
IMPORTANT:Alwaysactivateamovingscreensaverprogramwhenyouleaveyourdisplayunattended.Alwaysactivateaperiodicscreenrefresh
applicationiftheunitwilldisplayunchangingstaticcontent.Uninterrupteddisplayofstillorstaticimagesoveranextendedperiodmaycause“burnin”,
alsoknownas“after-imaging”or“ghostimaging”,onyourscreen.Thisisawell-knownphenomenoninLCDpaneltechnology.Inmostcases,the“burned
in”or“after-imaging”or“ghostimaging”willdisappeargraduallyoveraperiodoftimeafterthepowerhasbeenswitchedoff.
WARNING:Severe“burn-in”or“after-image”or“ghostimage”symptomswillnotdisappearandcannotberepaired.Thisisalsonotcoveredunderthe
termsofyourwarranty.
Service:
• Thecasingcovershouldbeopenedonlybyqualiedservicepersonnel.
• Ifthereisanyneedforrepairorintegration,pleasecontactyourlocalservicecenter.
• Donotleaveyourdisplayunderdirectsunlight.
Ifyourdisplaydoesnotoperatenormally,havingfollowedtheinstructionssetoutinthisdocument,pleasecontactatechnicianoryour
localservicecenter.

BDL4660EL
iii
Read and follow these instructions when connecting and using your display:
• Unplugthedisplayifyouarenotgoingtouseitforanextensiveperiodoftime.
• Unplugthedisplayifyouneedtocleanitwithaslightlydampcloth.Thescreenmanybewipedwithadryclothwhenthepoweris
off.However,neverusealcohol,solventsorammonia-basedliquids.
• Consultaservicetechnicianifthedisplaydoesnotoperatenormallywhenyouhavefollowedtheinstructionsinthismanual.
• Thecasingcovershouldbeopenedonlybyqualiedservicepersonnel.
• Keepthedisplayoutofdirectsunlightandawayfromstovesoranyotherheatsources.
• Removeanyobjectthatcouldfallintotheventsorpreventpropercoolingofthedisplay’selectronics.
• Donotblocktheventilationholesonthecabinet.
• Keepthedisplaydry.Toavoidelectricshock,donotexposeittorainorexcessivemoisture.
• WhenturningoffthedisplaybydetachingthepowercableorDCpowercord,waitfor6secondsbeforere-attachingthepower
cableorDCpowercordfornormaloperation..
• Toavoidtheriskofshockorpermanentdamagetothesetdonotexposethedisplaytorainorexcessivemoisture.
• Whenpositioningthedisplay,makesurethepowerplugandoutletareeasilyaccessible.
• IMPORTANT:Alwaysactivateascreensaverprogramduringyourapplication.Ifastillimageinhighcontrastremainsonthe
screenforanextendedperiodoftime,itmayleavean‘after-image’or‘ghostimage’onthefrontofthescreen.Thisisawell-known
phenomenonthatiscausedbytheshortcomingsinherentinLCDtechnology.Inmostcasestheafterimagewilldisappeargradually
overaperiodoftimeafterthepowerhasbeenswitchedoff.Beawarethattheafter-imagesymptomcannotberepairedandisnot
coveredunderwarranty.
CE Declaration of Conformity
Wedeclareunderourresponsibilitythattheproductisinconformitywiththefollowingstandards:
• EN60950-1:2006+A11:2009+A1:2010+A12:2011+A2:2013(SafetyrequirementofInformationTechnologyEquipment).
• EN55022:2010(RadioDisturbancerequirementofInformationTechnologyEquipment).
• EN55024:2010(ImmunityrequirementofInformationTechnologyEquipment).
• EN61000-3-2:2006+A1:2009+A2:2009(LimitsforHarmonicCurrentEmission).
• EN61000-3-3:2008(LimitationofVoltageFluctuationandFlicker)
• EN50581:2012(Technicaldocumentationfortheassessmentofelectricalandelectronicproductswithrespecttotherestrictionofhazardous
substances)
• EN50564:2011(Electricalandelectronichouseholdandofceequipment—Measurementoflowpowerconsumption)
followingprovisionsofdirectivesapplicable.
• 2006/95/EC(LowVoltageDirective).
• 2004/108/EC(EMCDirective).
• 2009/125/EC(ErP,Energy-relatedProductDirective,ECNo.1275/2008and642/2009Implementing)
• 2011/65/EU(RoHSDirective)andisproducedbyamanufacturingorganizationonISO9000level.
Federal Communications Commission (FCC) Notice (U.S. Only)
ThisequipmenthasbeentestedandfoundtocomplywiththelimitsforaClassBdigitaldevice,pursuanttopart15oftheFCCRules.
Theselimitsaredesignedtoprovidereasonableprotectionagainstharmfulinterferenceinaresidentialinstallation.Thisequipment
generates,usesandcanradiateradiofrequencyenergyand,ifnotinstalledandusedinaccordancewiththeinstructions,maycause
harmfulinterferencetoradiocommunications.However,thereisnoguaranteethatinterferencewillnotoccurinaparticularinstallation.
Ifthisequipmentdoescauseharmfulinterferencetoradioortelevisionreception,whichcanbedetermined
byturningtheequipmentoffandon,theuserisencouragedtotrytocorrecttheinterferencebyoneormoreofthefollowing
measures:
• Reorientorrelocatethereceivingantenna.
• Increasetheseparationbetweentheequipmentandreceiver.
• Connecttheequipmentintoanoutletonacircuitdifferentfromthattowhichthereceiverisconnected.
• Consultthedealeroranexperiencedradio/TVtechnicianforhelp..
BDL4660EL
iv
Changesormodicationsnotexpresslyapprovedbythepartyresponsibleforcompliancecouldvoidtheuser’sauthoritytooperatethe
equipment.
UseonlyanRFshieldedcablethatwassuppliedwiththedisplaywhenconnectingthisdisplaytoacomputerdevice.
Topreventdamagewhichmayresultinreorshockhazard,donotexposethisappliancetorainorexcessivemoisture.
THISCLASSBDIGITALAPPARATUSMEETSALLREQUIREMENTSOFTHECANADIANINTERFERENCE-CAUSINGEQUIPMENTREGULATIONS.
ThisdevicecomplieswithPart15oftheFCCRules.Operationissubjecttothefollowingtwoconditions:(1)thisdevicemaynot
causeharmfulinterference,and(2)thisdevicemustacceptanyinterferencereceived,includinginterferencethatmaycauseundesired
operation.
Polish Center for Testing and Certication Notice
Theequipmentshoulddrawpowerfromasocketwithanattachedprotectioncircuit(athree-prongsocket).Allequipmentthatworkstogether(computer,
display,printer,andsoon)shouldhavethesamepowersupplysource.
Thephasingconductoroftheroom’selectricalinstallationshouldhaveareserveshort-circuitprotectiondeviceintheformofafusewithanominalvalue
nolargerthan16amperes(A).
Tocompletelyswitchofftheequipment,thepowersupplycablemustberemovedfromthepowersupplysocket,whichshouldbelocatednearthe
equipmentandeasilyaccessible.
Aprotectionmark“B”conrmsthattheequipmentisincompliancewiththeprotectionusagerequirementsofstandardsPN-93/T-42107andPN-89/
E-06251.
BDL4660EL
v
Electric, Magnetic and Electromagnetic Fields (“EMF”)
1. Wemanufactureandsellmanyproductstargetedatconsumers,which,likeanyelectronicapparatus,ingeneralhavetheabilitytoemitandreceive
electromagneticsignals.
2. OneofourleadingBusinessPrinciplesistotakeallnecessaryhealthandsafetymeasuresforourproducts,tocomplywithallapplicablelegal
requirementsandtostaywellwithintheEMFstandardsapplicableatthetimeofproducingtheproducts.
3. Wearecommittedtodevelop,produceandmarketproductsthatcausenoadversehealtheffects.
4. Weconrmthatifitsproductsarehandledproperlyfortheirintendeduse,theyaresafetouseaccordingtoscienticevidenceavailabletoday.
5. WeplayanactiveroleinthedevelopmentofinternationalEMFandsafetystandards,enablingustoanticipatefurtherdevelopmentsinstandardization
forearlyintegrationinitsproducts.
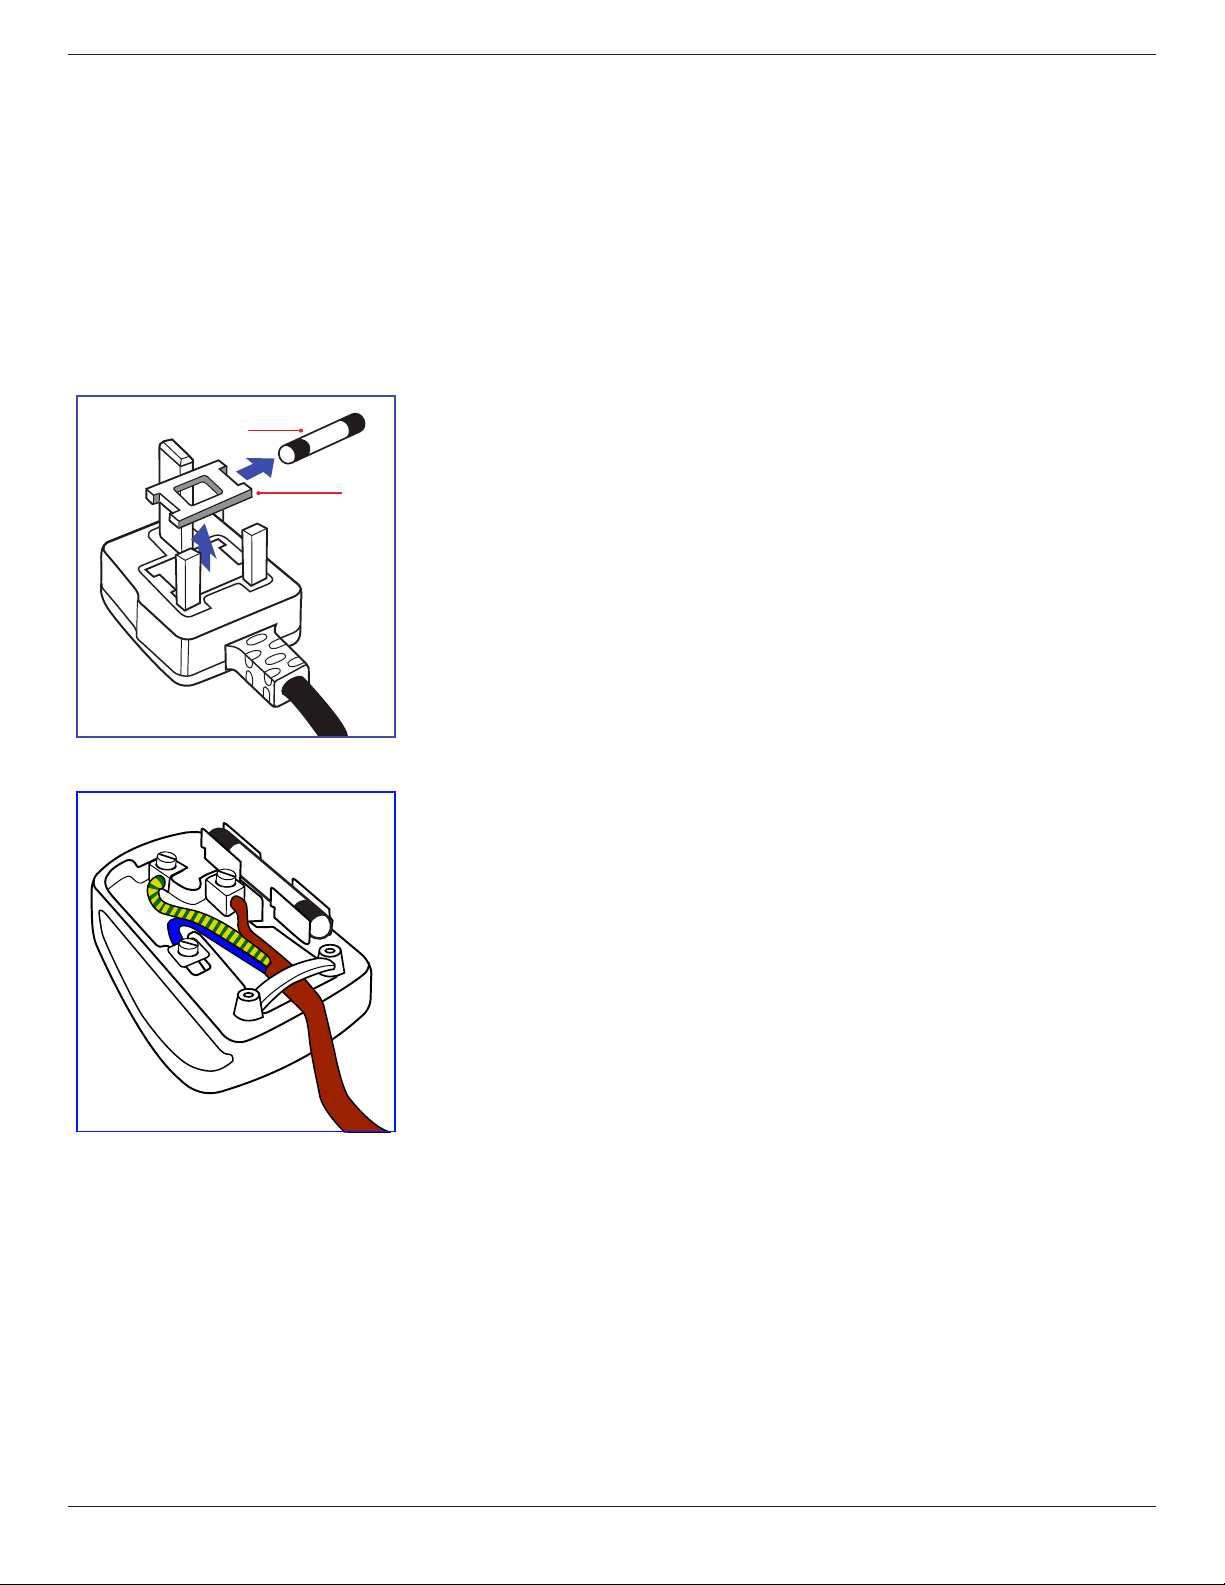
Information for U.K. only
(A)
(B)
WARNING - THIS APPLIANCE MUST BE EARTHED.
Important:
Thisapparatusissuppliedwithanapprovedmoulded13Aplug.Tochangeafuseinthistypeofplug
proceedasfollows:
1. Removefusecoverandfuse.
2. FitnewfusewhichshouldbeaBS13625A,A.S.T.A.orBSIapprovedtype.
3. Retthefusecover.
Ifthettedplugisnotsuitableforyoursocketoutlets,itshouldbecutoffandanappropriate3-pin
plugttedinitsplace.
Ifthemainsplugcontainsafuse,thisshouldhaveavalueof5A.Ifaplugwithoutafuseisused,thefuse
atthedistributionboardshouldnotbegreaterthan5A.
NOTE: Theseveredplugmustbedestroyedtoavoidapossibleshockhazardshoulditbeinserted
intoa13Asocketelsewhere.
How to connect a plug
Thewiresinthemainsleadarecolouredinaccordancewiththefollowingcode:
BLUE-“NEUTRAL”(“N”)
BROWN-“LIVE”(“L”)
GREEN&YELLOW-“EARTH”(“E”)
1. TheGREEN&YELLOWwiremustbeconnectedtotheterminalintheplugwhichismarkedwith
theletter“E”orbytheEarthsymbolorcolouredGREENorGREEN&YELLOW.
2. TheBLUEwiremustbeconnectedtotheterminalwhichismarkedwiththeletter“N”orcoloured
BLACK.
3. TheBROWNwiremustbeconnectedtotheterminalwhichmarkedwiththeletter“L”or
colouredRED.
Beforereplacingtheplugcover,makecertainthatthecordgripisclampedoverthesheathofthelead
-notsimplyoverthethreewires.
BDL4660EL
vi
China RoHS
中国电子信息产品污染控制标识要求 (中国RoHS法规标示要求) 产品中有毒有害物质或元素
的名称及含量
部件名称
有毒有害物质或元素
铅
(Pb)
汞
(Hg)
镉
(Cd)
六价铬
(Cr 6+)
多溴联苯
(PBB)
多溴二苯醚
(PBDE)
外壳 O O O O O O
液晶面板 X O O O O O
电路板组件 X O O O O O
附件
(遥控器,电源线,连接线)
X O O O O O
遥控器电池 X O O O O O
O: 表示该有毒有害物质在该部件所有均质材料中的含量均在 GB/T26572-2011 标准规定的限量要求以下.
X: 表示该有毒有害物质至少在该部件的某一均质材料中的含量超出 GB/T26572-2011 标准规定的限量要求.
10
環保使用期限
此標識指期限(十年),電子信息產品中含有的有毒有害物質或元素在正常使用的條件下不會發生外泄或突變
,電子信息產品用戶使用該電子信息產品不會對環境造成嚴重污染或對其人身、財產造成嚴重損害的期限。
中国能源效率标识
根据中国大陆《能源效率标识管理办法》,本显示器符合以下要求
能源效率(cd/W) >1.05
能效等级 1 级
能效标准 GB 21520-2008
详细有关信息请查阅中国能效标识网: http://www.energylabel.gov.cn/
《废弃电器电子产品回收处理管理条例》提示性说明
为了更好地关爱及保护地球,当用户不再需要此产品或产品寿命终止时,请遵守国家废弃电器电子产品
回收处理相关法律法规,将其交给当地具有国家认可的回收处理资质的厂商进行回收处理。
BDL4660EL
vii
North Europe (Nordic Countries) Information
Placering/Ventilation
VARNING:
FÖRSÄKRADIGOMATTHUVUDBRYTAREOCHUTTAGÄRLÄTÅTKOMLIGA,NÄRDUSTÄLLERDINUTRUSTNINGPÅPLATS.
Placering/Ventilation
ADVARSEL:
SØRGVEDPLACERINGENFOR,ATNETLEDNINGENSSTIKOGSTIKKONTAKTERNEMTTILGÆNGELIGE.
Paikka/Ilmankierto
VAROITUS:
SIJOITALAITESITEN,ETTÄVERKKOJOHTOVOIDAANTARVITTAESSAHELPOSTIIRROTTAAPISTORASIASTA.
Plassering/Ventilasjon
ADVARSEL:
NÅRDETTEUTSTYRETPLASSERES,MÅDUPASSEPÅATKONTAKTENEFORSTØMTILFØRSELERLETTEÅNÅ.
End-of-Life Disposal
YournewPublicInformationDisplaycontainsmaterialsthatcanberecycledandreused.Specializedcompaniescanrecycleyourproducttoincreasethe
amountofreusablematerialsandtominimizetheamounttobedisposedof.
PleasendoutaboutthelocalregulationsonhowtodisposeofyourolddisplayfromyourlocalPhilipsdealer.
(For customers in Canada and U.S.A.)
Thisproductmaycontainleadand/ormercury.Disposeofinaccordancetolocal-stateandfederalregulations.Foradditionalinformationonrecycling
contactwww.eia.org(ConsumerEducationInitiative)
Waste Electrical and Electronic Equipment-WEEE
Attention users in European Union private households
Thismarkingontheproductoronitspackagingillustratesthat,underEuropeanDirective2012/19/EUgoverningusedelectricaland
electronicappliances,thisproductmaynotbedisposedofwithnormalhouseholdwaste.Youareresponsiblefordisposalofthis
equipmentthroughadesignatedwasteelectricalandelectronicequipmentcollection.Todeterminethelocationsfordroppingoffsuch
wasteelectricalandelectronic,contactyourlocalgovernmentofce,thewastedisposalorganizationthatservesyourhouseholdorthe
storeatwhichyoupurchasedtheproduct.
Attention users in United States:
PleasedisposeofaccordingtoallLocal,StateandFederalLaws.Forthedisposalorrecyclinginformation,contact:www.mygreenelectronics.comorwww.
eiae.org.
End of Life Directives-Recycling
YournewPublicInformationDisplaycontainsseveralmaterialsthatcanberecycledfornewusers.
PleasedisposeofaccordingtoallLocal,State,andFederallaws.
AsanENERGYSTARPartner,
wehavedeterminedthatthisproductmeetstheENERGYSTARguidelinesforenergyefciency.

BDL4660EL
viii
Table Of Contents
1. Unpacking and Installation .......................................................1
1.1. Unpacking.........................................................................................1
1.2. PackageContents........................................................................1
1.3. InstallationNotes.........................................................................1
1.4. InstallingandRemovingTableStands(optional)........2
1.5. MountingonaWall....................................................................3
1.5.1. VESAGrid....................................................................3
1.6. MountinginPortraitPosition................................................4
1.6.1. Howtousethelogoguiderforportrait
position...........................................................................4
1.6.2. Howtoremovethelogo.....................................4
1.7. OperatingInstructionsofEdgeAlignmentKit............5
1.7.1. InstallingEdgeAlignmentKit..............................5
2. Parts and Functions ...................................................................6
2.1. ControlPanel.................................................................................6
2.2. Input/OutputTerminals.............................................................7
2.3. RemoteControl...........................................................................8
2.3.1. Generalfunctions.....................................................8
2.3.2. Insertingthebatteriesintheremote
control.............................................................................9
2.3.3. Handlingtheremotecontrol.............................9
2.3.4. Operatingrangeoftheremotecontrol......9
3. Connecting External Equipment.......................................... 10
3.1. ConnectingExternalEquipment(DVD/VCR/
VCD)...............................................................................................10
3.1.1. UsingCOMPONENTvideoinput..............10
3.1.2. UsingVideoSourceinput..................................10
3.1.3. UsingHDMIvideoinput...................................11
3.2. ConnectingaPC.......................................................................11
3.2.1. UsingVGAinput.....................................................11
3.2.2. UsingDVIinput......................................................11
3.2.3. UsingHDMIinput.................................................12
3.2.4. UsingDisplayPortinput.....................................12
3.3. ConnectingAudioEquipment...........................................12
3.3.1. Connectingexternalspeakers........................12
3.3.2. Connectinganexternalaudiodevice........13
3.4. ConnectingMultipleDisplaysinaDaisy-chain
Conguration..............................................................................13
3.4.1. Displaycontrolconnection..............................13
3.4.2. Digitalvideoconnection....................................13
3.4.3. Analogvideoconnection..................................14
3.5. IRconnection..............................................................................14
3.6. IRPass-throughConnection...............................................15
3.7. Wire-connectingtoNetwork...........................................15
4. Operation ................................................................................. 16
4.1. WatchtheConnectedVideoSource............................16
4.2. ChangePictureFormat.........................................................16
4.3. ChooseyourPreferredPictureSettings......................16
4.4. ChooseyourPreferredSoundSettings.......................16
4.5. PlaymultimedialesviaLocalAreaNetwork..........16
4.5.1. Setupthenetwork..............................................16
4.5.2. HowtouseDLNA-DMP.................................16
4.5.3. HowtouseDLNA-DMRfromPC............17
4.6. PlaymultimedialesfromUSBdevice.........................18
4.7. Playoptions..................................................................................18
4.7.1. Playingmusicles..................................................18
4.7.2. Playingmovieles.................................................19
4.7.3. Playingphotoles.................................................19
4.8. HowtouseOperabrowser(HTML5).......................19
5. Change your settings ............................................................. 20
5.1. Quickpictureandsound......................................................21
5.2. Settings............................................................................................21
5.2.1. Picture..........................................................................21
5.2.2. Sound...........................................................................21
5.2.3. Tiling..............................................................................22
5.2.4. Generalsettings......................................................23
5.3. NetworkSettings......................................................................25
6. USB device compatibility ....................................................... 26
7. Input Mode ............................................................................... 27
8. Pixel Defect Policy .................................................................. 28
8.1. PixelsandSub-Pixels...............................................................28
8.2. TypesofPixelDefects+DotDenition....................28
8.3. BrightDotDefects...................................................................28
8.4. DarkDotDefects.....................................................................29
8.5. ProximityofPixelDefects...................................................29
8.6. PixelDefectTolerances.........................................................29
8.7. MURA.............................................................................................29
9. Cleaning and Troubleshooting .............................................. 30
9.1. Cleaning..........................................................................................30
9.2. Troubleshooting.........................................................................31
10. Technical Specications ......................................................... 32
BDL4660EL
1
1. Unpacking and Installation
1.1. Unpacking
• Thisproductispackedinacarton,togetherwiththestandardaccessories.
• Anyotheroptionalaccessorieswillbepackedseparately.
• Duetothesizeandweightofthisdisplayitisrecommendedfortwopeopletomoveit.
• Afteropeningthecarton,ensurethatthecontentsarecompleteandingoodcondition.
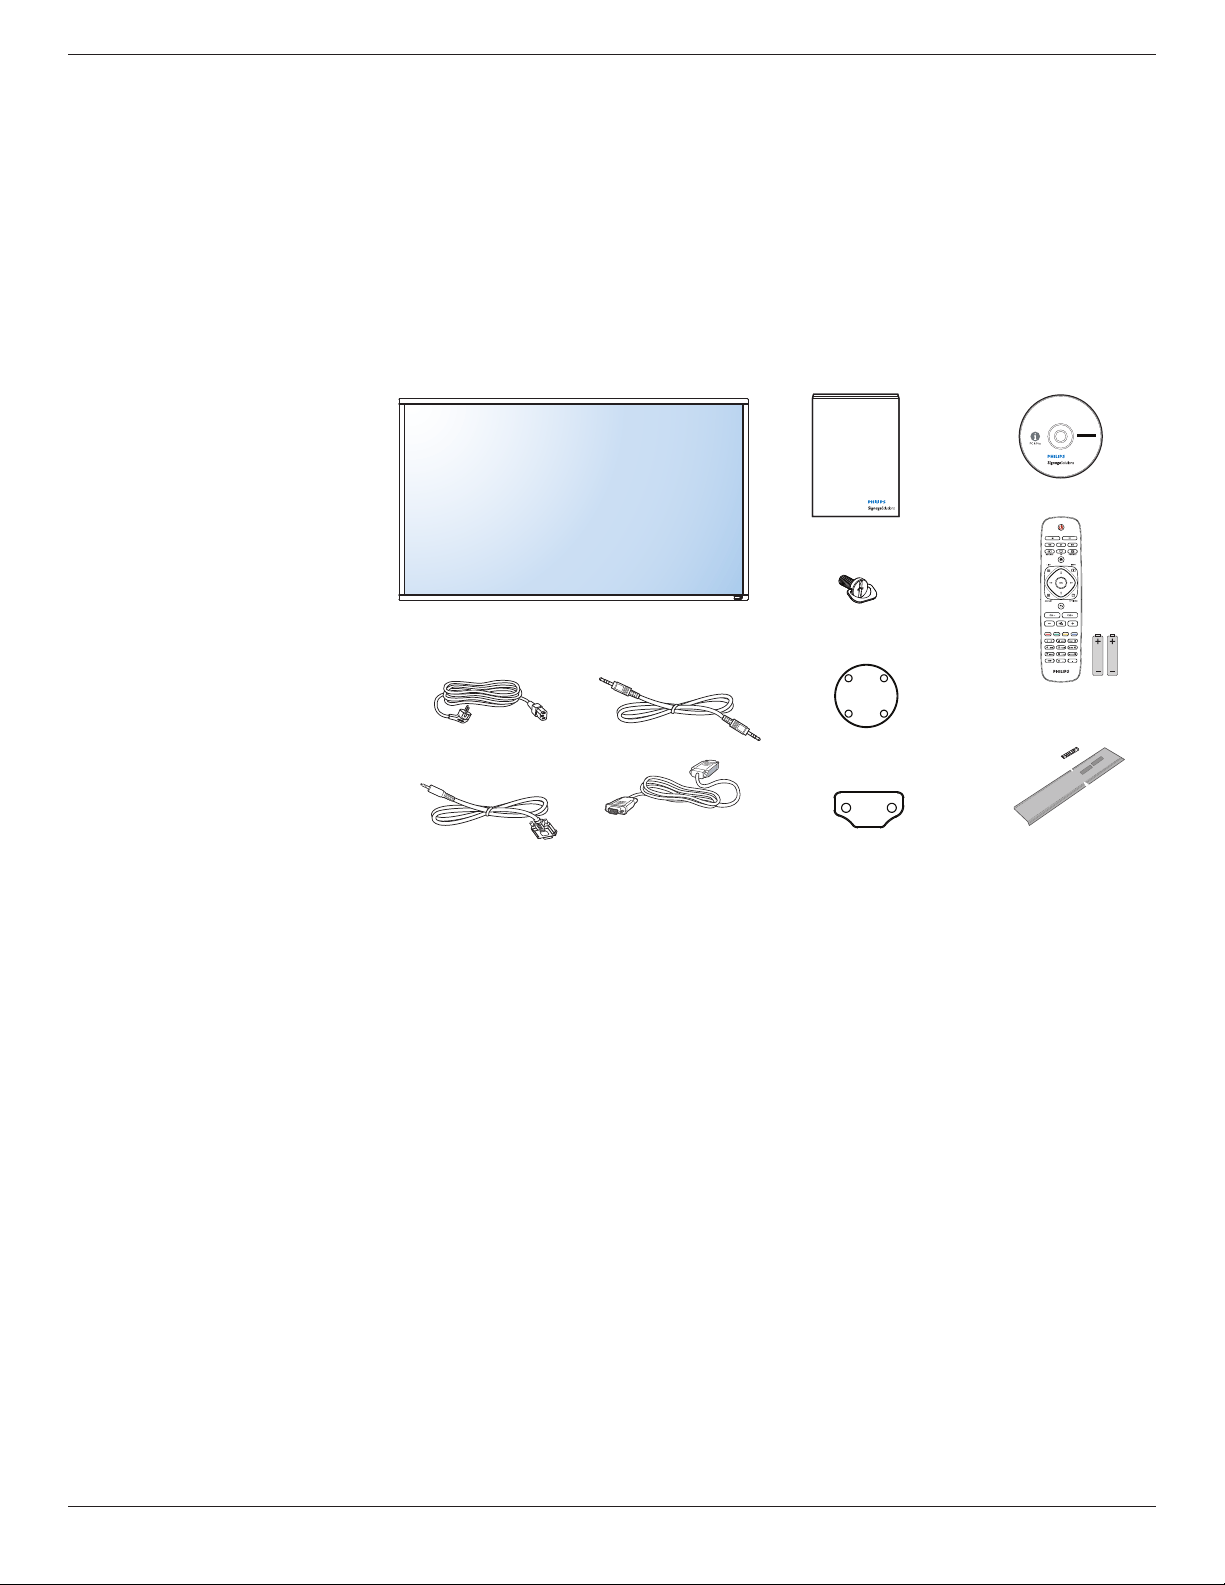
1.2. Package Contents
Pleaseverifythatyoureceivedthefollowingitemswithyourpackagecontent:
• LCDdisplay
• CDROM
• RemotecontrolwithAAAbatteries
• Powercord(1.8m)
• VGAcable(1.8m)
• RS232cable(1.8m)
• Loopthroughcable(1.8m)
• Quickstartguide
• Logoguider
• EdgeAlignmentKit-1:1PCS
• EdgeAlignmentKit-2:2PCS
• ThumbScrew:8PCS
* The supplied power cord varies depending on destination.
Power Cord
Video Signal Cable
(D-SUB to D-SUB Cable)
Logo guider
CD ROM
Quick start guide
Edge Alignment Kit-1
Edge Alignment Kit-2
Thumb Screw
Remote Control
and AAA Batteries
RS232 Cable
Loop through cable
NOTES:
• Forallotherregions,applyapowercordthatconformstotheACvoltageofthepowersocketandhasbeenapprovedbyandcomplieswiththe
safetyregulationsoftheparticularcountry.
• Youmightliketosavethepackageboxandpackingmaterialforshippingthedisplay.
1.3. Installation Notes
• Duetothehighpowerconsumption,alwaysusetheplugexclusivelydesignedforthisproduct.Ifanextendedlineisrequired,pleaseconsultyour
serviceagent.
• Theproductshouldbeinstalledonaatsurfacetoavoidtipping.Thedistancebetweenthebackoftheproductandthewallshouldbemaintained
forproperventilation.Avoidinstallingtheproductinthekitchen,bathroomoranyotherplaceswithhighhumiditysoasnottoshortentheservicelife
oftheelectroniccomponents.
• Theproductcannormallyoperateonlyunder3000minaltitude.Ininstallationsataltitudesabove3000m,someabnormalitiesmaybeexperienced.
BDL4660EL
2
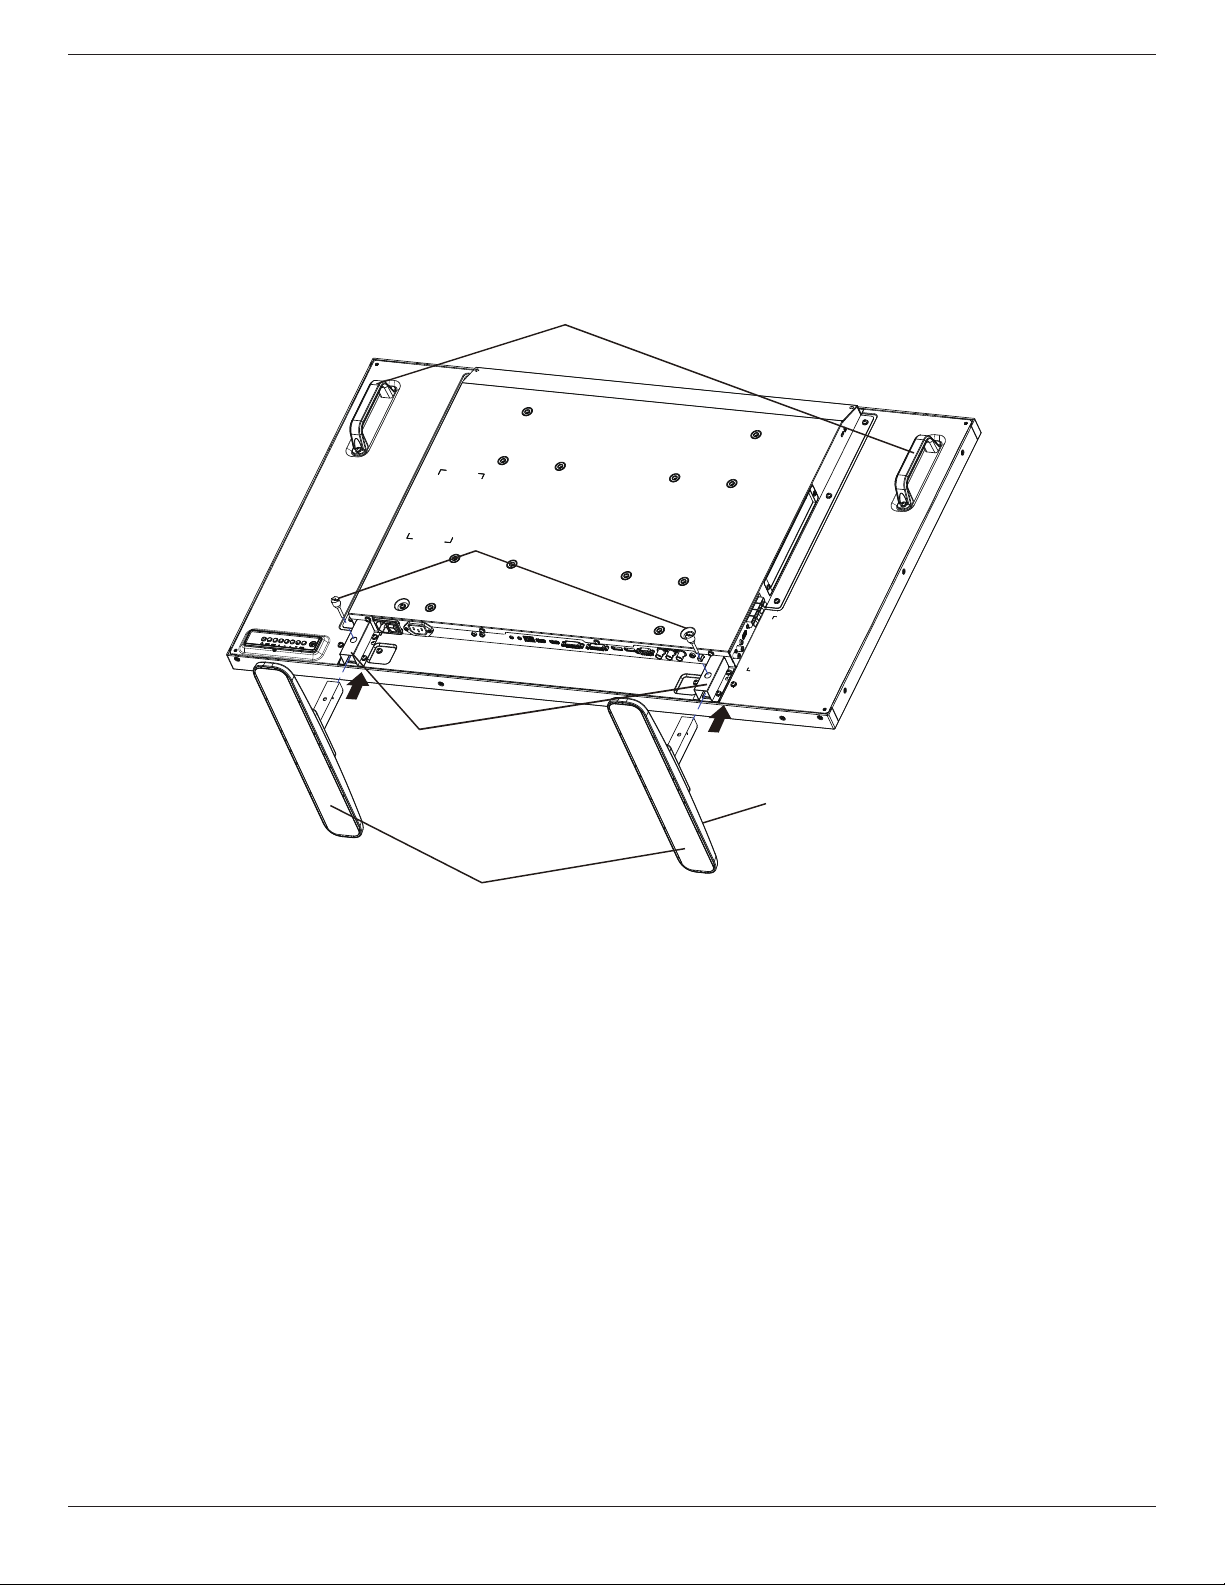
1.4. Installing and Removing Table Stands (optional)
To install table stands:
1. Ensureyourdisplayispoweredoff.
2. Spreadaprotectivesheetonaatsurface.
3. Grabthecarryinghandlesandplacethedisplayface-downontheprotectivesheet.
4. Afterinsertingthestandintheguideblock,tightenthescrewsonbothsidesofthedisplay.
NOTE: Thelongersideofthestandshouldfacethefrontofthedisplay.
Thumbscrews
Longer portions face the front
Table stand
Guide block
Carrying handle
To remove table stands:
1. Poweroffthedisplay.
2. Spreadaprotectivesheetonaatsurface.
3. Grabthecarryinghandlesandplacethedisplayface-downontheprotectivesheet.
4. Removescrewsusingascrewdriverandplacetheminasafeplaceforreuse.
BDL4660EL
3
1.5. Mounting on a Wall
Tomountthisdisplaytoawall,youwillhavetoobtainastandardwall-mountingkit(commerciallyavailable).Werecommendusingamountinginterface
thatcomplieswithTUV-GSand/orUL1678standardinNorthAmerica.
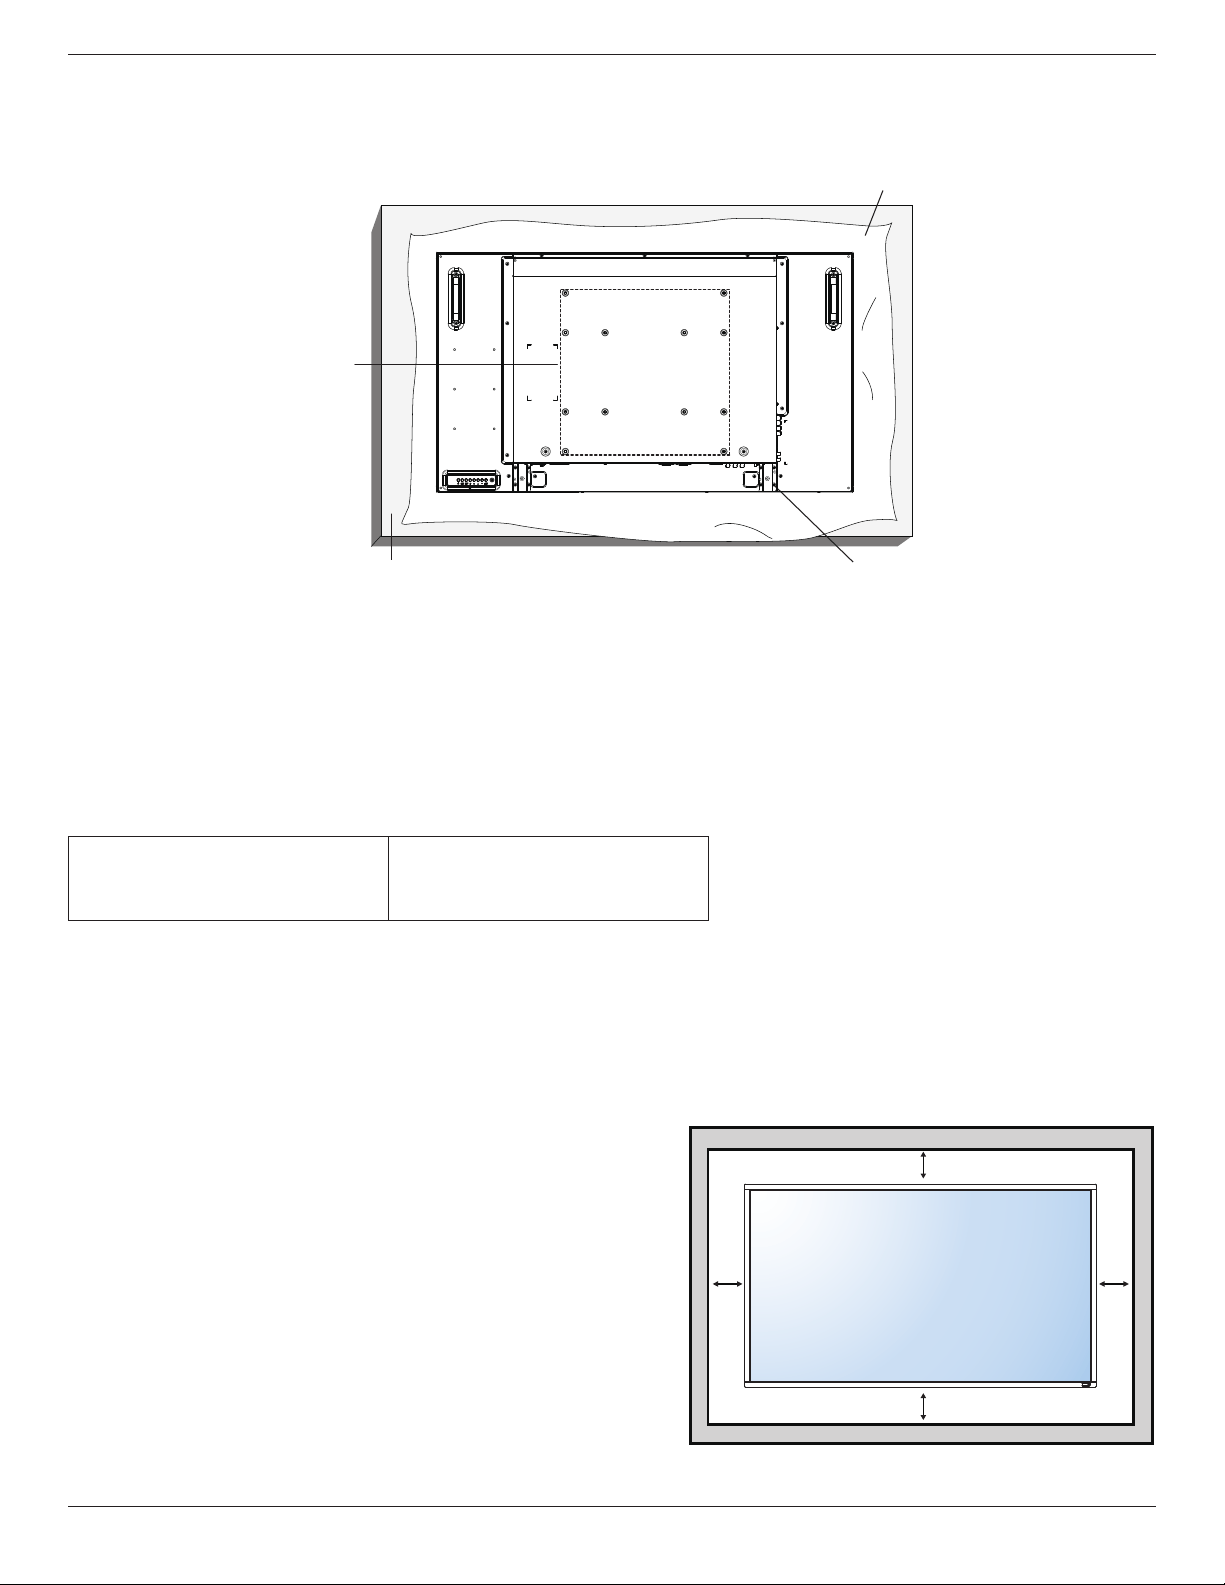
Protective Sheet
VESA Grid
Tabletop standTable
1. Layaprotectivesheetonatable,whichwaswrappedaroundthedisplaywhenitwaspackaged,beneaththescreensurfacesoasnottoscratchthe
screenface.
2. Ensureyouhaveallaccessoriesformountingthisdisplay(wallmount,ceilingmount,tablestand,etc).
3. Followtheinstructionsthatcomewiththebasemountingkit.Failuretofollowcorrectmountingprocedurescouldresultindamagetotheequipment
orinjurytotheuserorinstaller.Productwarrantydoesnotcoverdamagecausedbyimproperinstallation.
4. Forthewall-mountingkit,useM6mountingscrews(havingalength10mmlongerthanthethicknessofthemountingbracket)andtightenthem
securely.
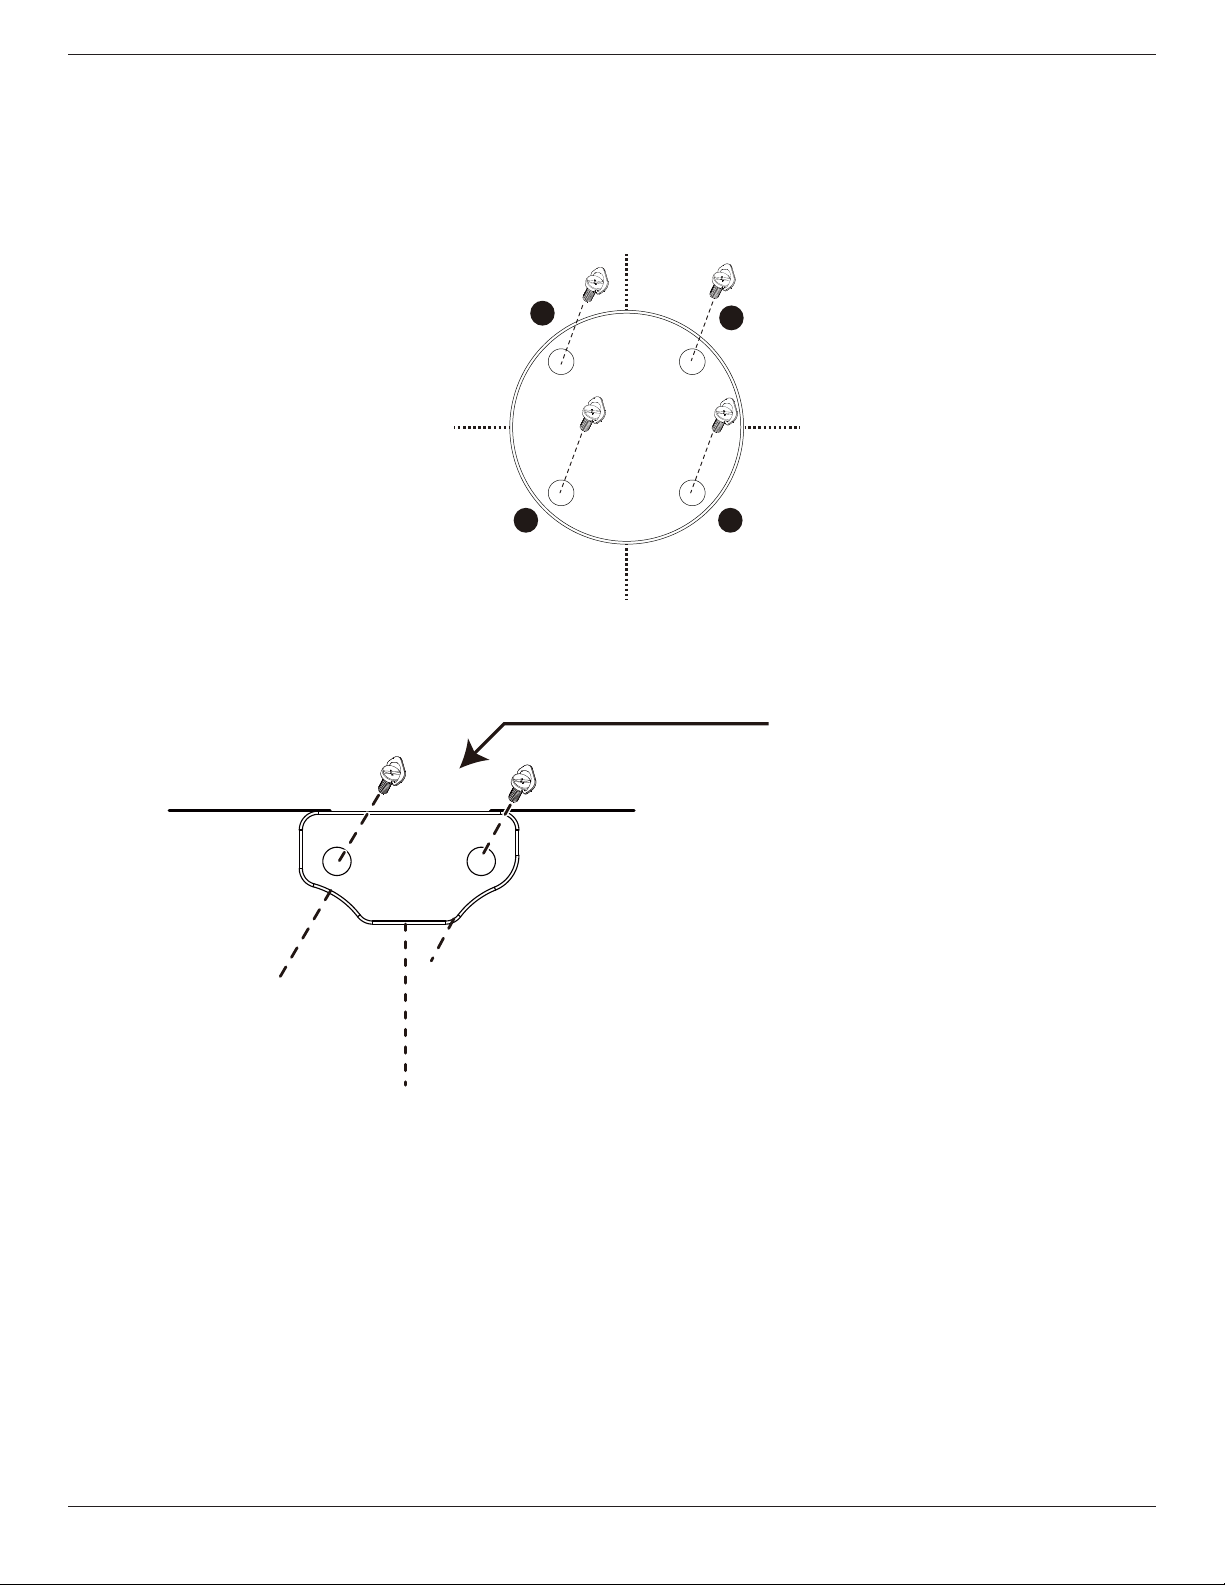
1.5.1. VESA Grid
BDL4660EL
400(H)x200(V)mm
200(H)x200(V)mm
400(H)x400(V)mm
Caution:
Topreventthedisplayfromfalling:
• Forwallorceilinginstallation,werecommendinstallingthedisplaywithmetalbracketswhicharecommerciallyavailable.Fordetailedinstallation
instructions,refertotheguidereceivedwiththerespectivebracket.
• Tolessentheprobabilityofinjuryanddamageresultingfromfallofthedisplayincaseofearthquakeorothernaturaldisaster,besuretoconsultthe
bracketmanufacturerforinstallationlocation.
Ventilation Requirements for enclosure locating
Toallowheattodisperse,leavespacebetweensurroundingobjectsasshowninthe
diagrambelow.
100 mm 100 mm
100 mm
100 mm
BDL4660EL
4
1.6. Mounting in Portrait Position
Thisdisplaycanbeinstalledinportraitposition.
1. Removethetablestand,ifattached.
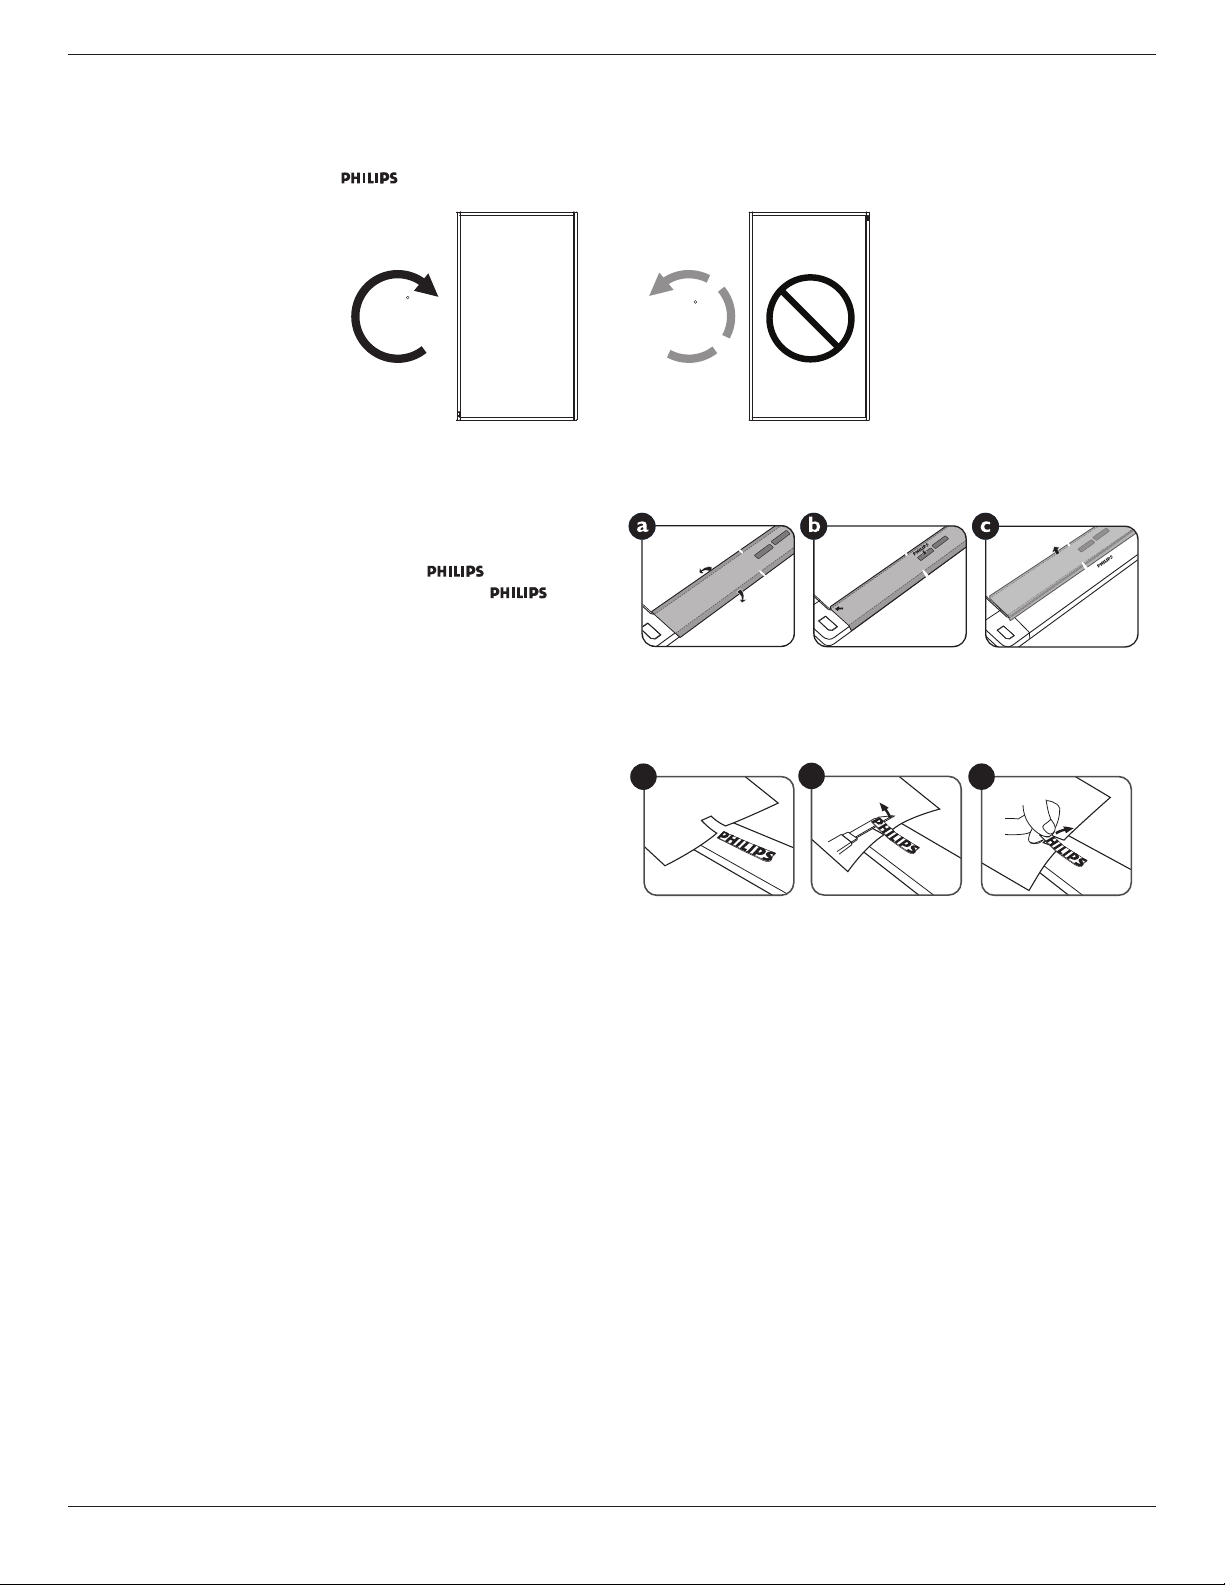
2. Rotate90degreesclockwise.The“ ”logoshouldbeontheLEFTsidewhenfacingthedisplay.
90
90
1.6.1. How to use the logo guider for portrait position
1. Puttheguideronthelower-leftcornerofthefrontbezelofthedisplay.
Folddownbothofitsedges.
2. Peelofftheprotectivelmatthebackofthe“ ”logosticker.
Holdandpresstheguiderwithyourlefthand.Putthe“ ”logo
stickerwithitsadhesivesidedownintothelogoholewithyourright
hand,andpresstomakeitsticktightlyontothefrontbezel.
3. Removetheguider.
1.6.2. How to remove the logo
1. Prepareapieceofpaperwithacuttingareaoflogoasaprotectorto
preventthefrontbezelfromscratching.
2. Usingaknife,carefullyremovethelogostickerwiththepaperplacing
beneath.
3. Tearoffthelogosticker.
1
2
3
NOTE: Wheninstallingthedisplayonawall,pleaseconsultaprofessionaltechnicianforproperinstallation.Weacceptnoliabilityforinstallationsnot
performedbyaprofessionaltechnician.
BDL4660EL
5
1.7. Operating Instructions of Edge Alignment Kit
1.7.1. Installing Edge Alignment Kit
• Beforeinstalledgealignmentkit,displaysmustbemountedtovideowallframecorrectly.
• Using“ThumbScrew”foreasyinstalling.
• Using“EdgeAlignmentKit-1”onadjacentfourdisplays.
1
2
4 3
• Using“EdgeAlignmentKit-2”onadjacenttwodisplays.
• Installthe“EdgeAlignmentKit-2”with2PCSofM4screw.
Longer edge face to the outer side of display
NOTE: Wheninstallingtheedgealignmentkit,pleaseconsultaprofessionaltechnicianforproperinstallation.Weacceptnoliabilityforinstallationsnot
performedbyaprofessionaltechnician.
BDL4660EL
6
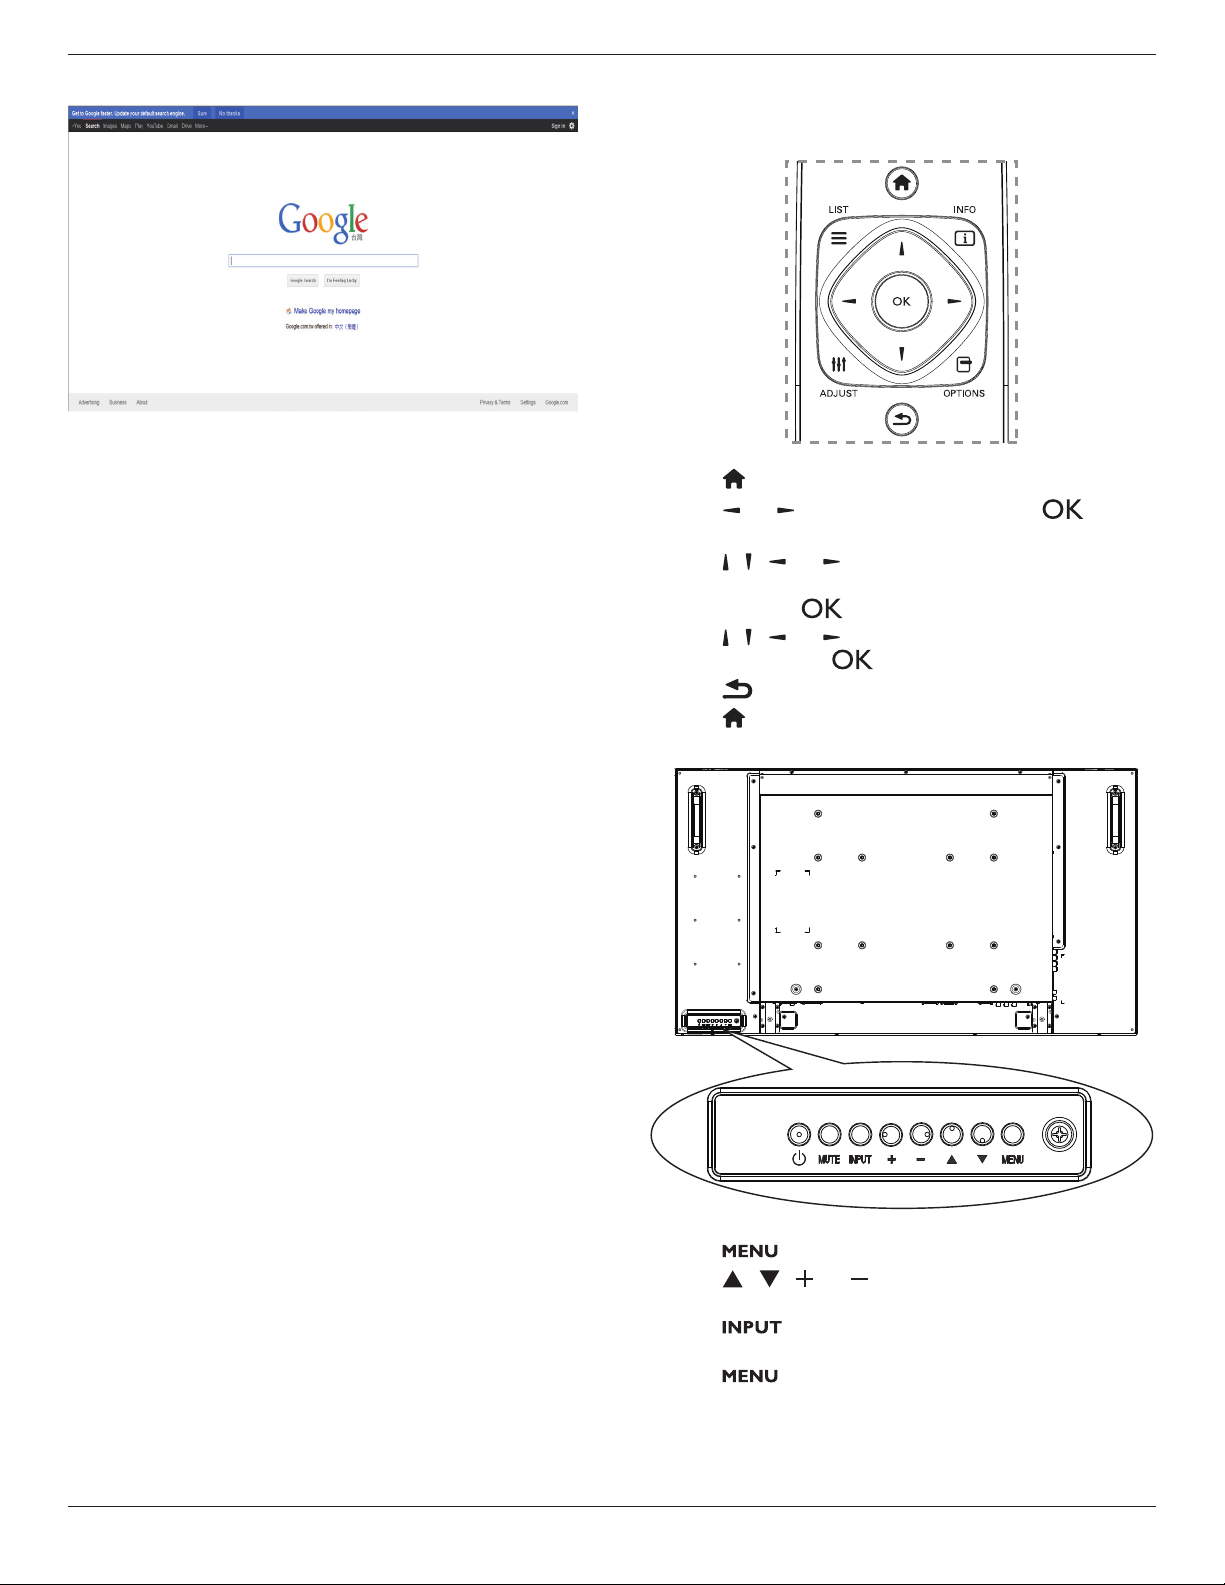
2. Parts and Functions
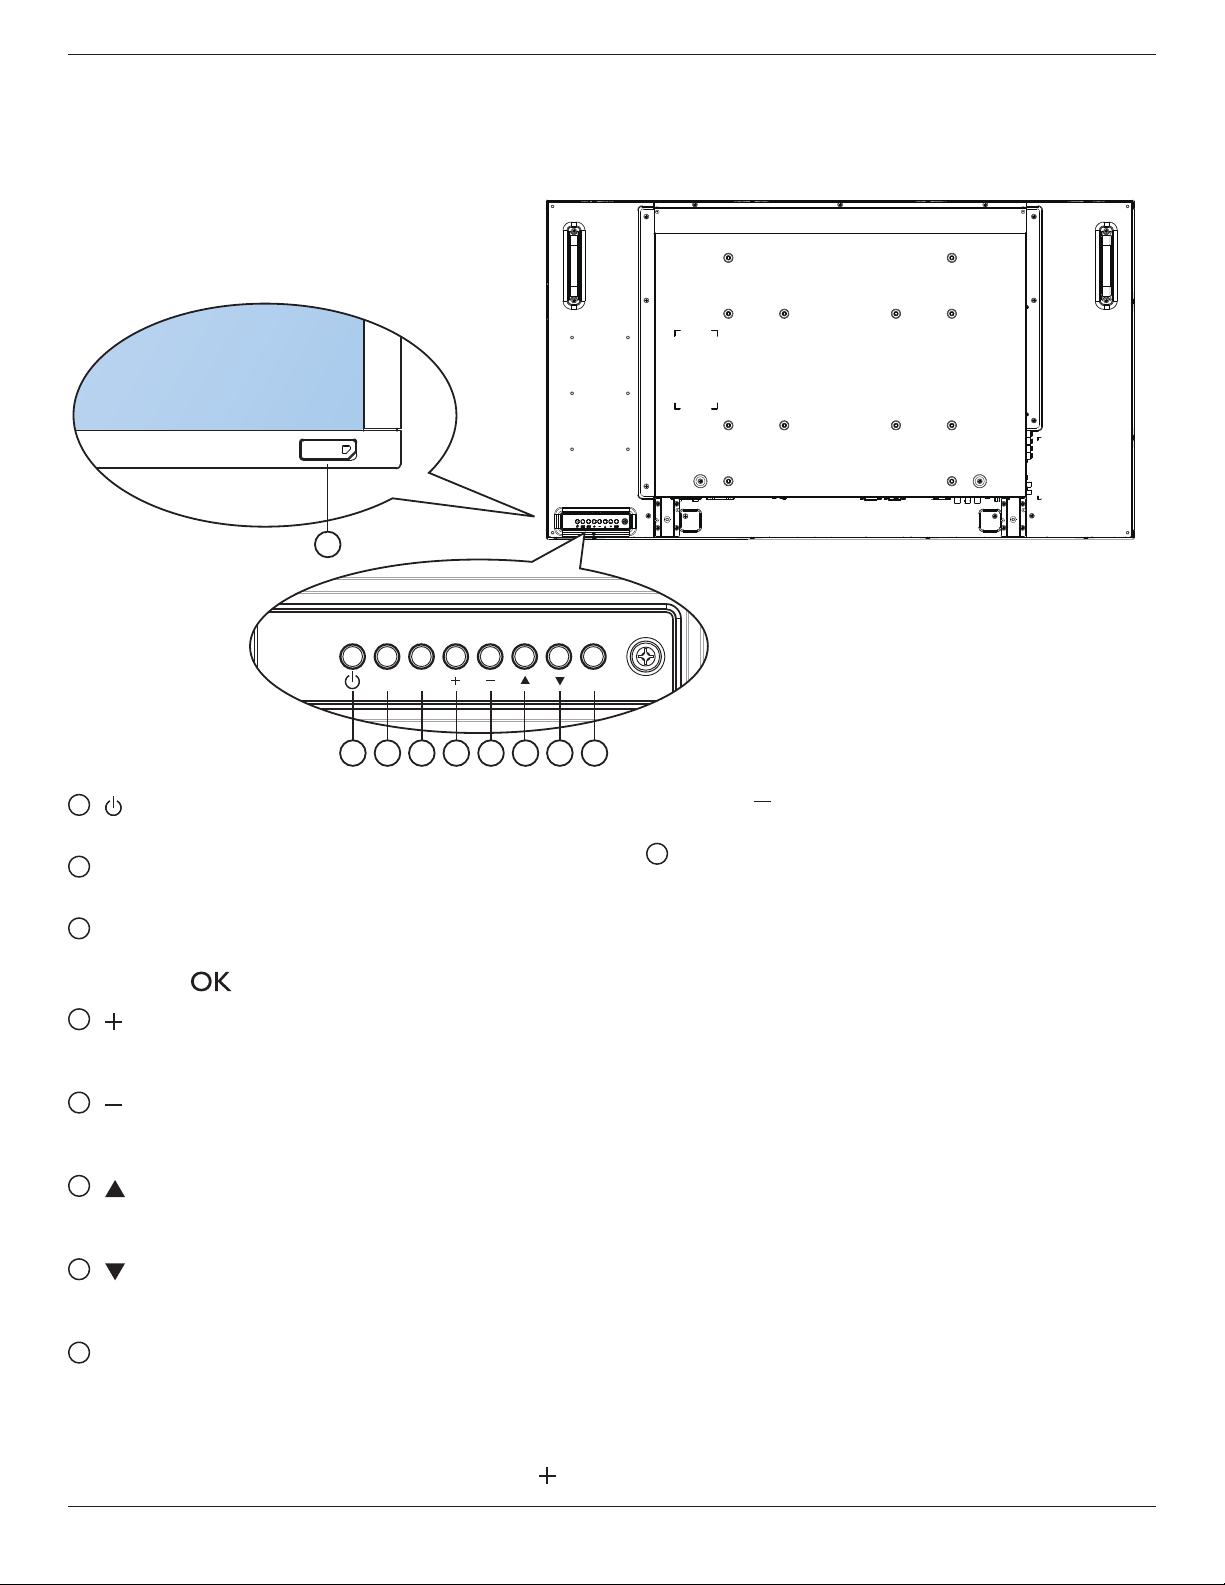
2.1. Control Panel
1 2 3 4 5 6 7 8
MUTE INPUT
MENU
9
1
[ ] button
Usethisbuttontoturnthedisplayonorputthedisplaytostandby.
2
[MUTE] button
SwitchtheaudiomuteON/OFF.
3
[INPUT] button
Choosetheinputsource.
• Usedas[ ]buttonintheOn-Screen-Displaymenu.
4
[ ] button
IncreasetheadjustmentwhileOSDmenuison,orincreasethe
audiooutputlevelwhileOSDmenuisoff.
5
[ ] button
DecreasetheadjustmentwhileOSDmenuison,ordecreasethe
audiooutputlevelwhileOSDmenuisoff.
6
[ ] button
MovethehighlightbaruptoadjusttheselecteditemwhileOSD
menuison.
7
[ ] button
MovethehighlightbardowntoadjusttheselecteditemwhileOSD
menuison.
8
[MENU] button
ReturntopreviousmenuwhileOSDmenuison,ortoactivatethe
OSDmenuwhenOSDmenuisoff.
NOTE: “Keyboard Control Lock Mode”Thisfunctioncompletely
disablestheaccesstoallKeyboardControlfunctions.To
enableordisablethekeyboardcontrollock,pressboth[ ]
and[ ]buttonsandholddowncontinuouslyformorethan
3(three)seconds.
9
Remote control sensor and power status indicator
• Receivescommandsignalsfromtheremotecontrol.
• IndicatestheoperatingstatusofthedisplaywithoutOPS:
- Lightsgreenwhenthedisplayisturnedon
- Lightsredwhenthedisplayisinstandbymode
- LightsamberwhenthedisplayentersAPMmode
- When{SCHEDULE}isenabled,thelightblinksgreenandred
- Ifthelightblinksred,itindicatesthatafailurehasbeen
detected
- Lightsoffwhenthemainpowerofthedisplayisturnedoff
BDL4660EL
7
2.2. Input/Output Terminals
24
20
21
22
23
1
2
3
5
8
189
14
10 11 12 13
15
16
4
17
7
6
19
1
AC IN
ACpowerinputfromthewalloutlet.
2
MAIN POWER SWITCH
Switchthemainpoweron/off.
3
AC OUT
ACpower
outputsupplytotheACINjackofamediaplayer.
4
IR IN /
5
IR OUT
IRsignalinput/outputfortheloop-throughfunction.
NOTES:
• Thisdisplay’sremote
controlsensorwillstopworkingifthejack
[IR IN]isconnected.
• ToremotelycontrolyourA/Vdeviceviathisdisplay,referto
page15for15fororIR Pass Throughconnection.
6
RS232C IN /
7
RS232C OUT
RS232Cnetworkinput/outputfortheloop-throughfunction.
8
RJ-45
LANcontrolfunctionfortheuseofremotecontrolsignalfrom
controlcenter.
9
HDMI1 IN /
10
HDMI2 IN
HDMIvideo/audioinput.
11
DVI IN
DVI-Dvideoinput.
12
DVI OUT / VGA OUT
DVIorVGAvideooutput.
13
DisplayPort IN /
14
DisplayPort OUT
DisplayPortvideoinput/output.
15
VGA IN (D-Sub)
VGAvideoinput.
16
COMPONENT IN (BNC)
ComponentYPbPrvideosourceinput.
17
Y/CVBS
Videosourceinput.
18
PC LINE IN
AudioinputforVGAsource(3.5mmstereophone).
19
SPEAKER SWITCH
Internalspeakeron/offswitch.
20
AUDIO IN
AudioinputfromexternalAVdevice(RCA).
21
AUDIO OUT
AudiooutputtoexternalAVdevice.
22
USB PORT
ConnectyourUSBstoragedevice.
23
SPEAKERS OUT
Audiooutputtoexternalspeakers.
24
KENSINGTON LOCK
Usedforsecurityandtheftprevention.
BDL4660EL
8
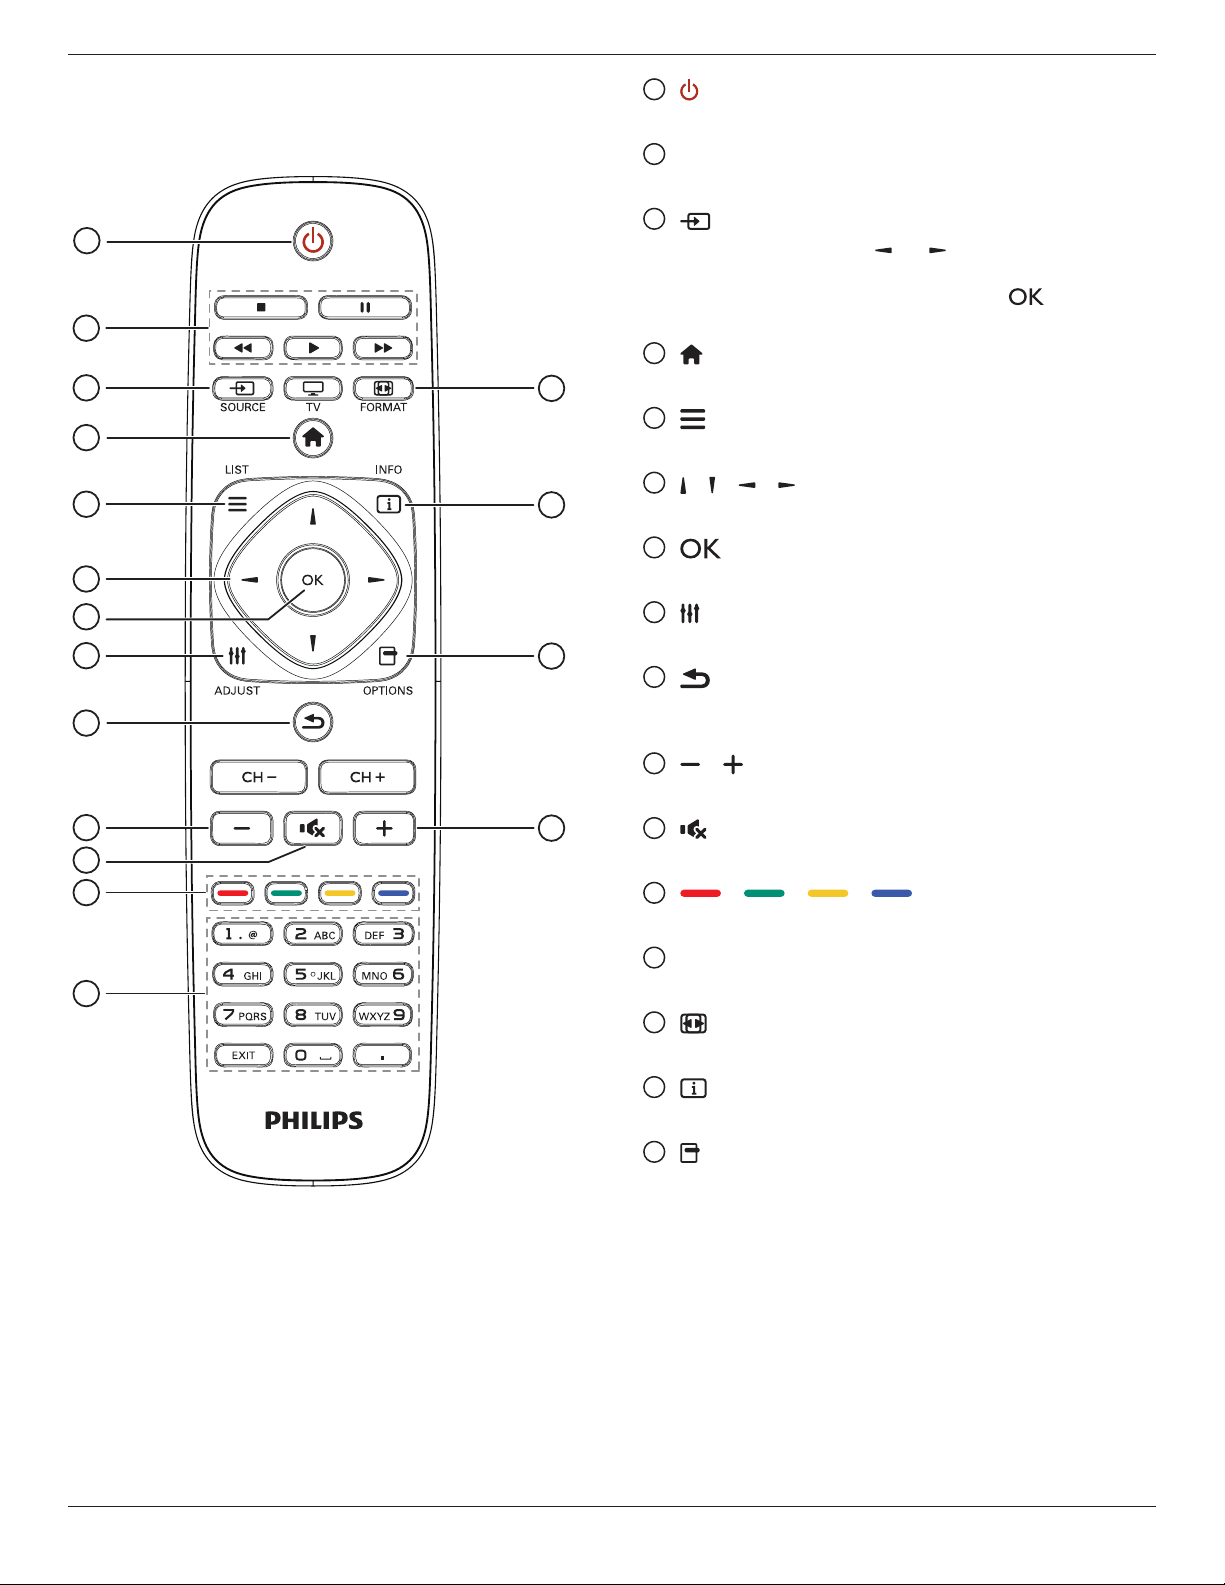
2.3. Remote Control
2.3.1. General functions
1
14
15
16
10
2
3
4
5
6
7
8
9
11
10
12
13
1
[ ] POWER button
Turnthedisplayonorputthedisplaytostandby.
2
[PLAY] buttons
Controlplaybackofmediales.
3
[ ] SOURCE button
Chooseinputsource.Press[ ]or[ ]buttontochoosefrom
USB
,
Network
,
HDMI 1
,
HDMI 2
,
DisplayPort
,
Card
OPS
,
DVI-D
,
YPbPr
,
AV
,or
VGA
.Press[ ]buttonto
conrmandexit.
4
[ ] HOME button
AccesstheOSDmenu.
5
[ ] LIST button
Nofunction.
6
[ ] [ ] [ ] [ ] NAVIGATION buttons
Navigatethroughmenusandchooseitems.
7
[ ] button
Conrmanentryorselection.
8
[ ] ADJUST button
Accesscurrentlyavailableoptions,pictureandsoundmenus.
9
[ ] BACK button
Returntothepreviousmenupageorexitfromtheprevious
function.
10
[ ] [ ] VOLUME button
Adjustvolume.
11
[ ] MUTE button
Presstoturnthemutefunctionon/off.
12
[ ] [ ] [ ] [ ] COLOR buttons
Choosetasksoroptions.
13
[NUMERIC] buttons
Entertextfornetworksetting.
14
[ ] FORMAT button
Changepictureformat.
15
[ ] INFO button
Displayinformationaboutcurrentactivity.
16
[ ] OPTIONS button
Accesscurrentlyavailableoptions,pictureandsoundmenus.
BDL4660EL
9
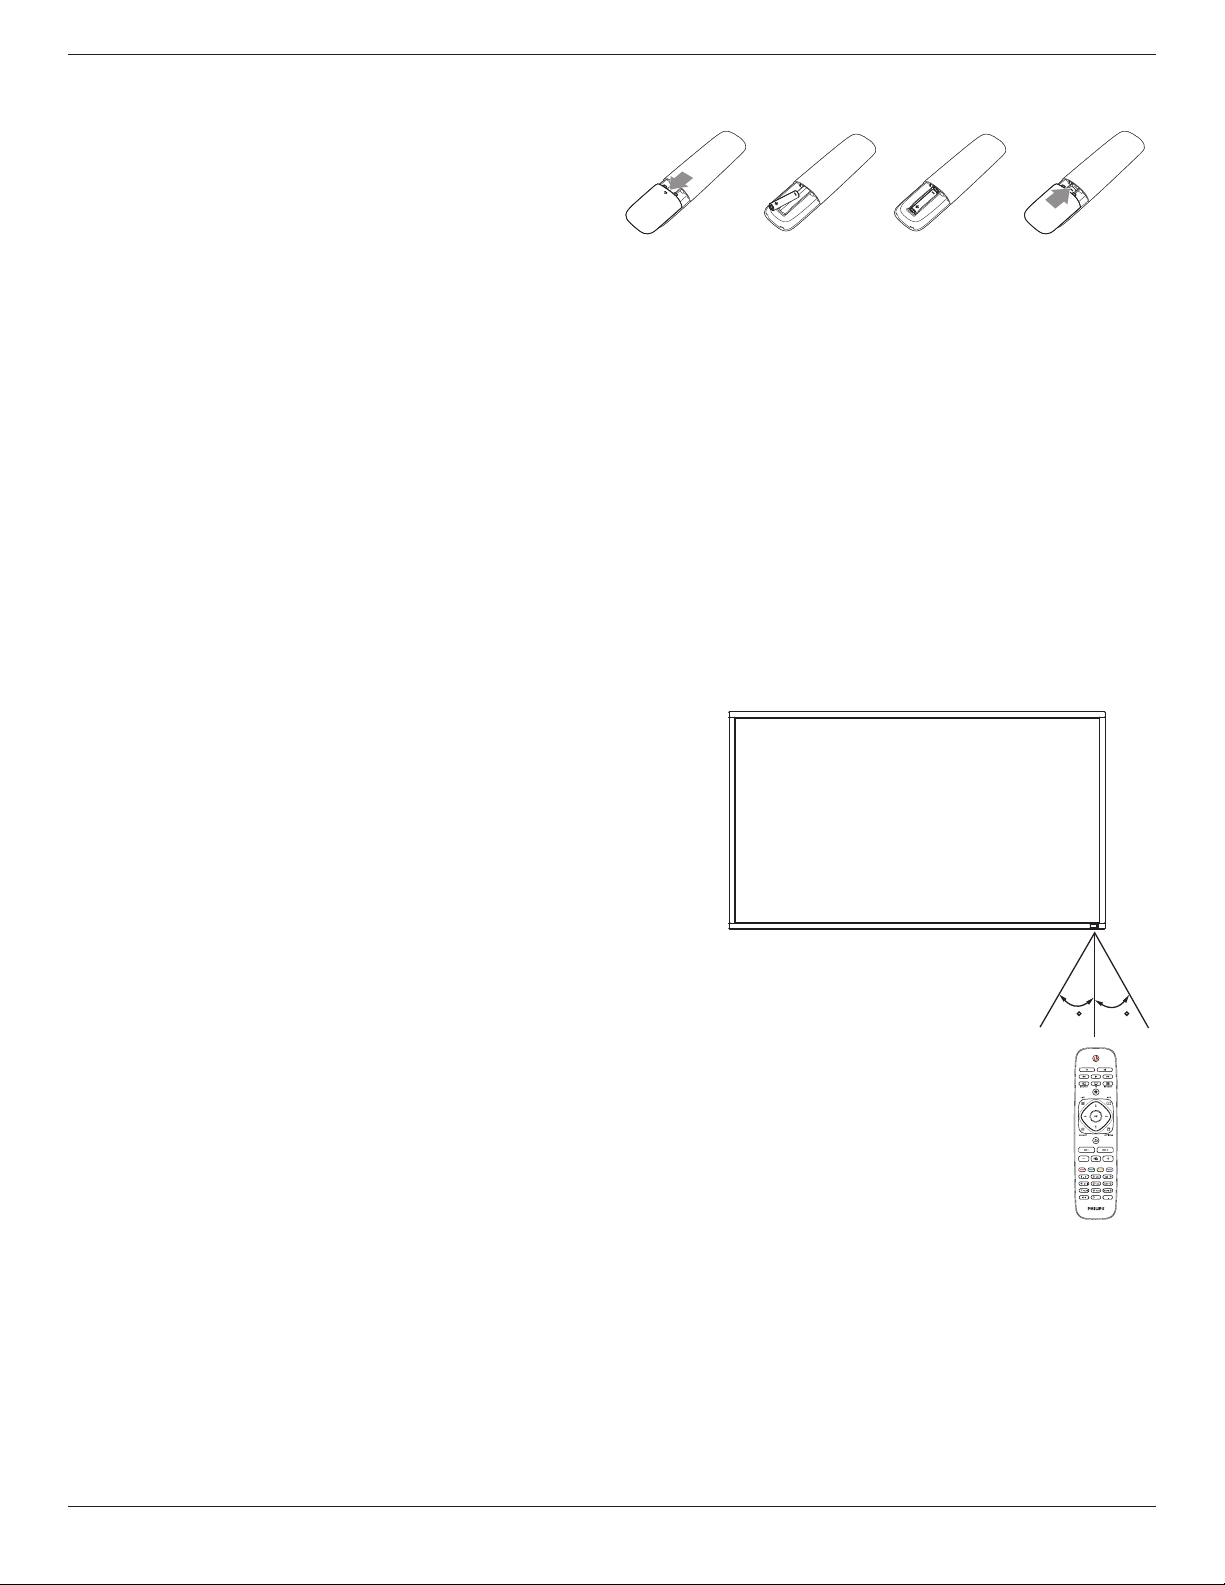
2.3.2. Inserting the batteries in the remote control
Theremotecontrolispoweredbytwo1.5VAAAbatteries.
Toinstallorreplacebatteries:
1. Pressandthenslidethecovertoopenit.
2. Alignthebatteriesaccordingtothe(+)and(–)indicationsinsidethe
batterycompartment.
3. Replacethecover.
Caution:
Theincorrectuseofbatteriescanresultinleaksorbursting.Besuretofollowtheseinstructions:
• Place“AAA”batteriesmatchingthe(+)and(–)signsoneachbatterytothe(+)and(–)signsofthebatterycompartment.
• Donotmixbatterytypes.
• Donotcombinenewbatterieswithusedones.Itcausesshorterlifeorleakageofbatteries.
• Removethedeadbatteriesimmediatelytopreventthemfromliquidleakinginthebatterycompartment.Don’ttouchexposedbatteryacid,asitcan
damageyourskin.
NOTE: Ifyoudonotintendtousetheremotecontrolforalongperiod,removethebatteries.
2.3.3. Handling the remote control
• Donotsubjecttostrongshock.
• Donotallowwaterorotherliquidtosplashtheremotecontrol.Iftheremotecontrolgetswet,wipeitdryimmediately.
• Avoidexposuretoheatandsteam.
• Otherthantoinstallthebatteries,donotopentheremotecontrol.
2.3.4. Operating range of the remote control
Pointthetopoftheremotecontroltowardthedisplay’sremotecontrolsensorwhen
pressingabutton.
Usetheremotecontrolwithinadistanceoflessthan8m/26ftfromthedisplay’ssensor,
andahorizontalandverticalangleoflessthan30degrees.
NOTE: Theremotecontrolmaynotfunctionproperlywhentheremotecontrol
sensoronthedisplayisunderdirectsunlightorstrongillumination,orwhen
thereisanobstacleinthepathofsignaltransmission.
30 30
BDL4660EL
10
3. Connecting External Equipment
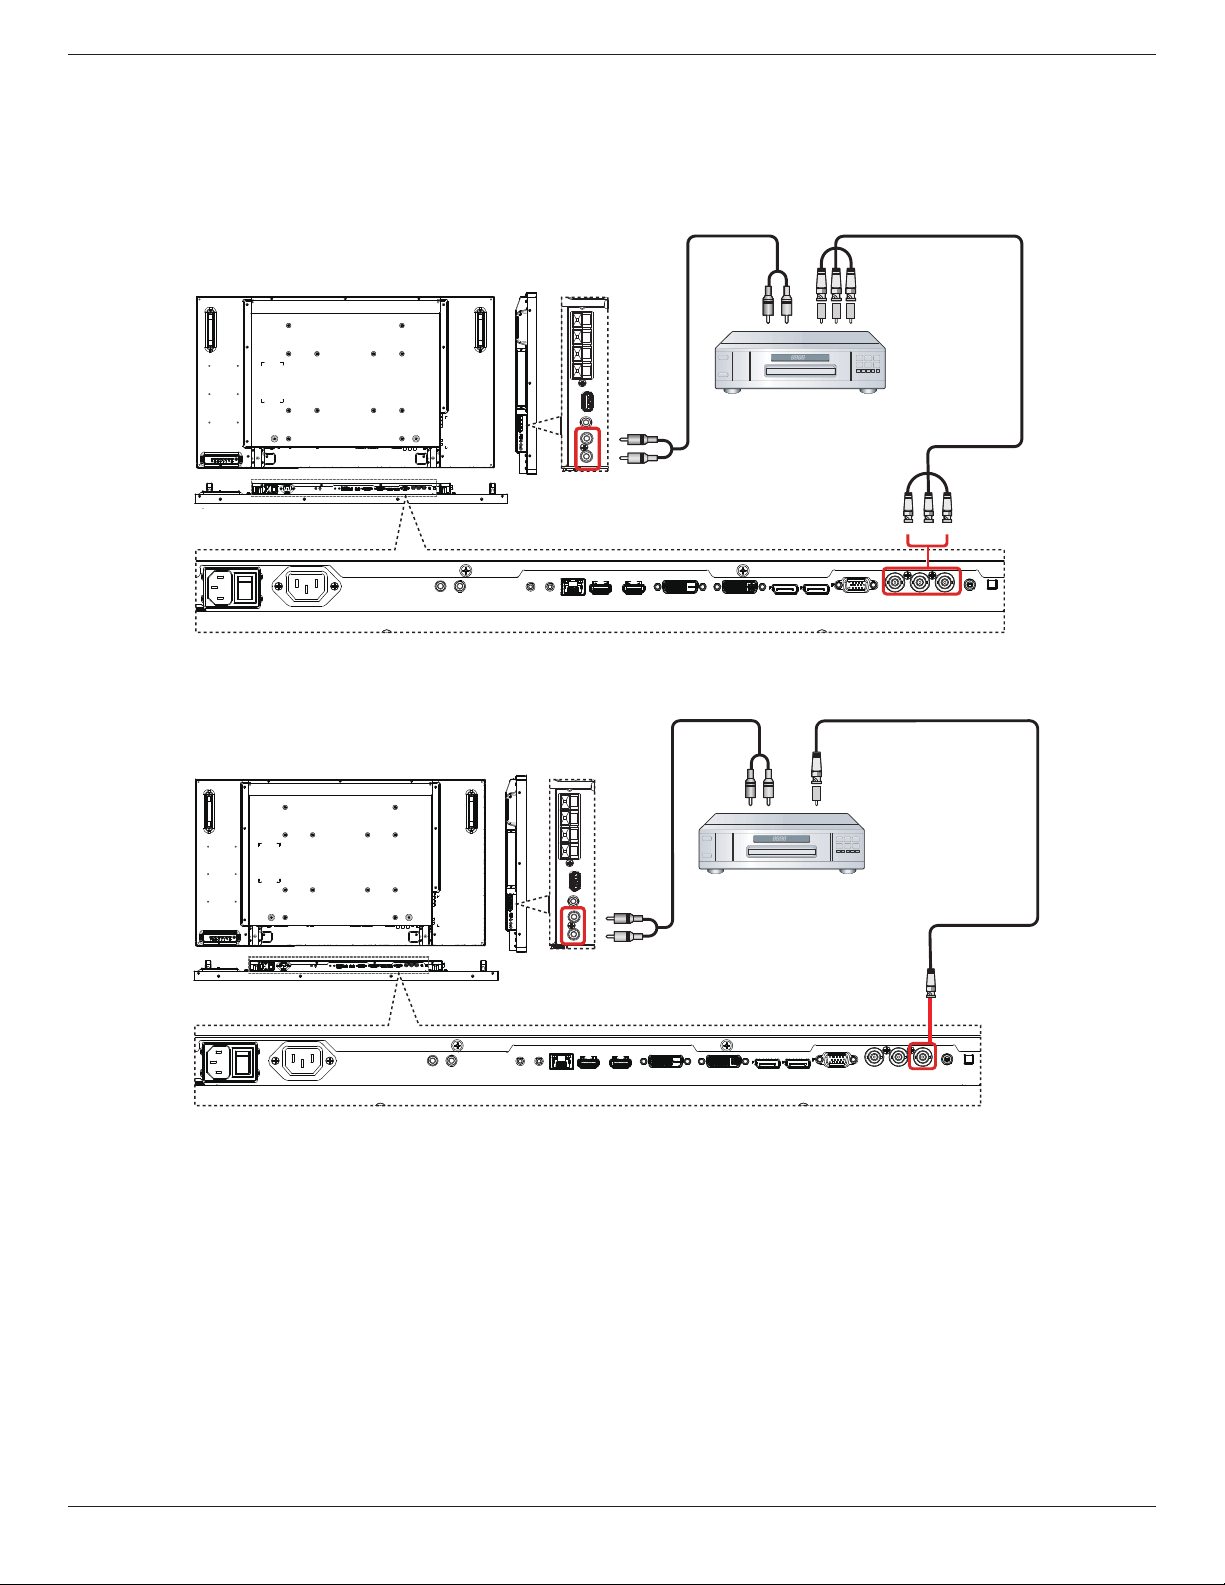
3.1. Connecting External Equipment (DVD/VCR/VCD)
3.1.1. Using COMPONENT video input
DVD / VCR / VCD
[AUDIO IN]
[COMPONENT IN]
(YPbPr)
COMPONENT Out
(YPbPr)
Audio Out
[R]
[L]
3.1.2. Using Video Source input
DVD / VCR / VCD
[AUDIO IN]
[Y/CVBS IN]
Y/CVBS Out
Audio Out
[R]
[L]
BDL4660EL
11
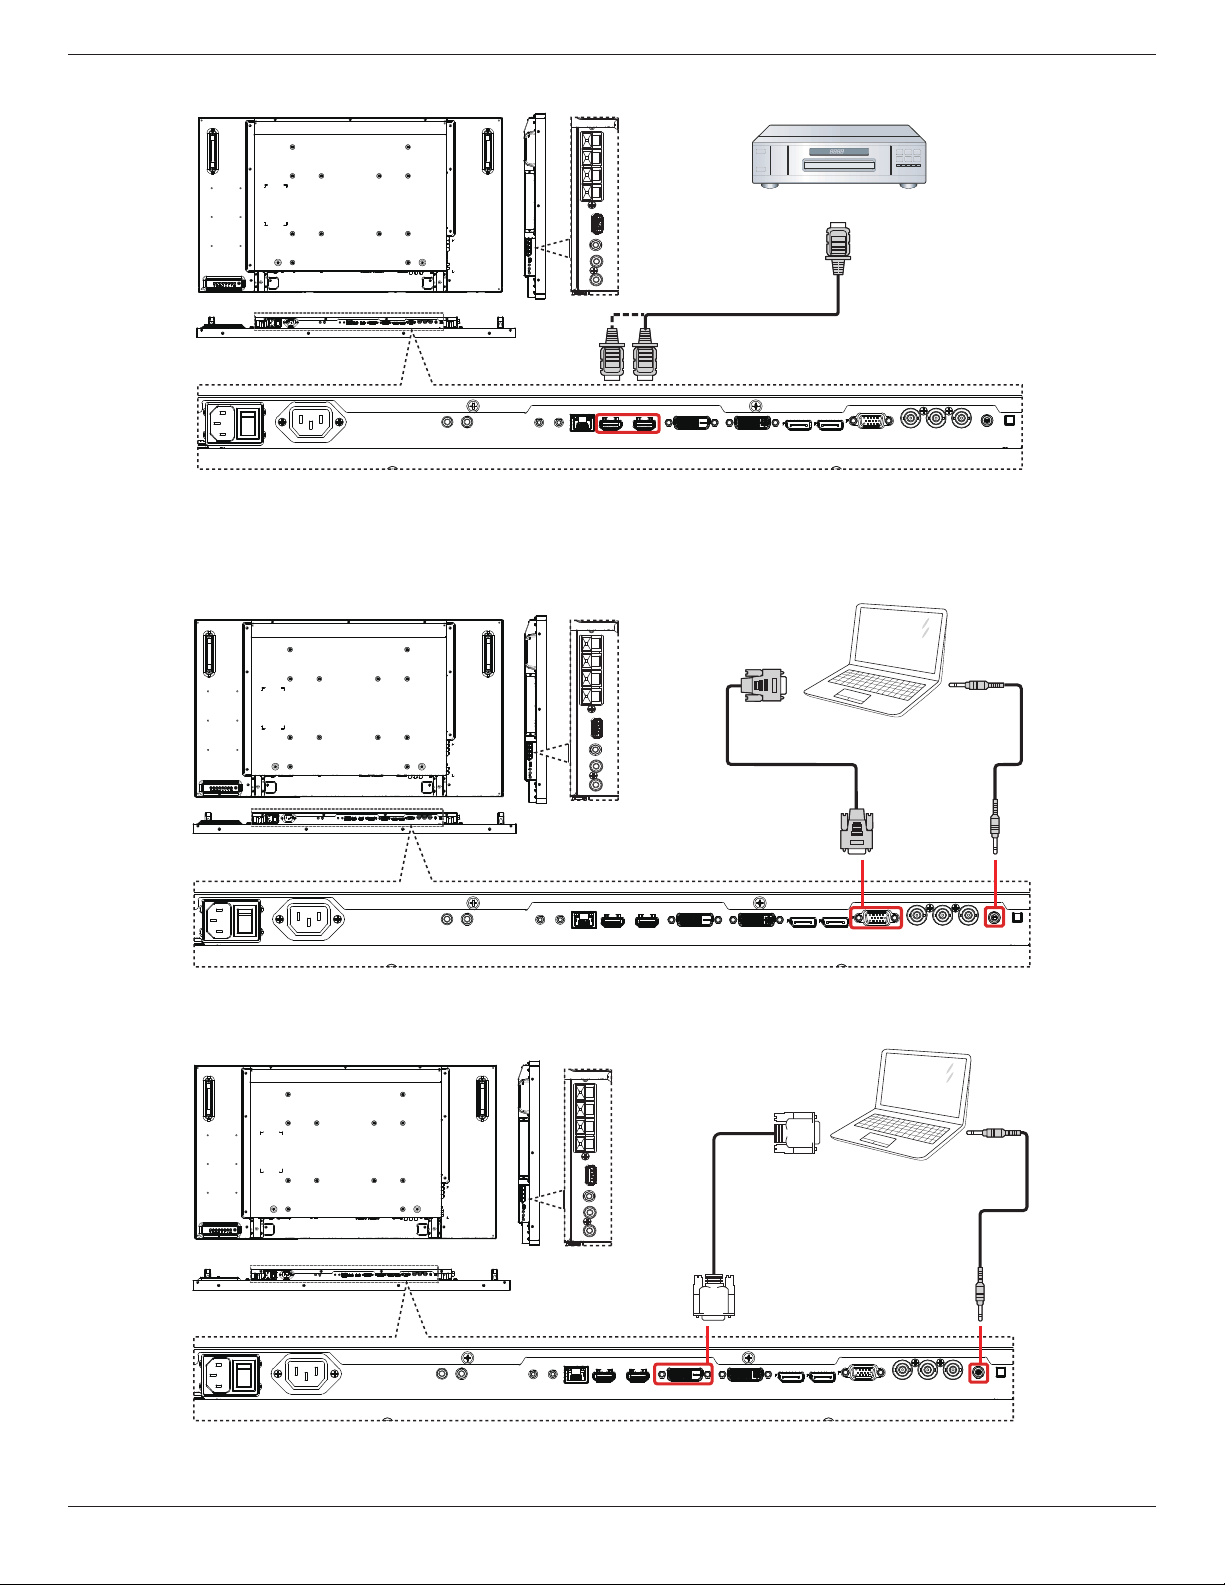
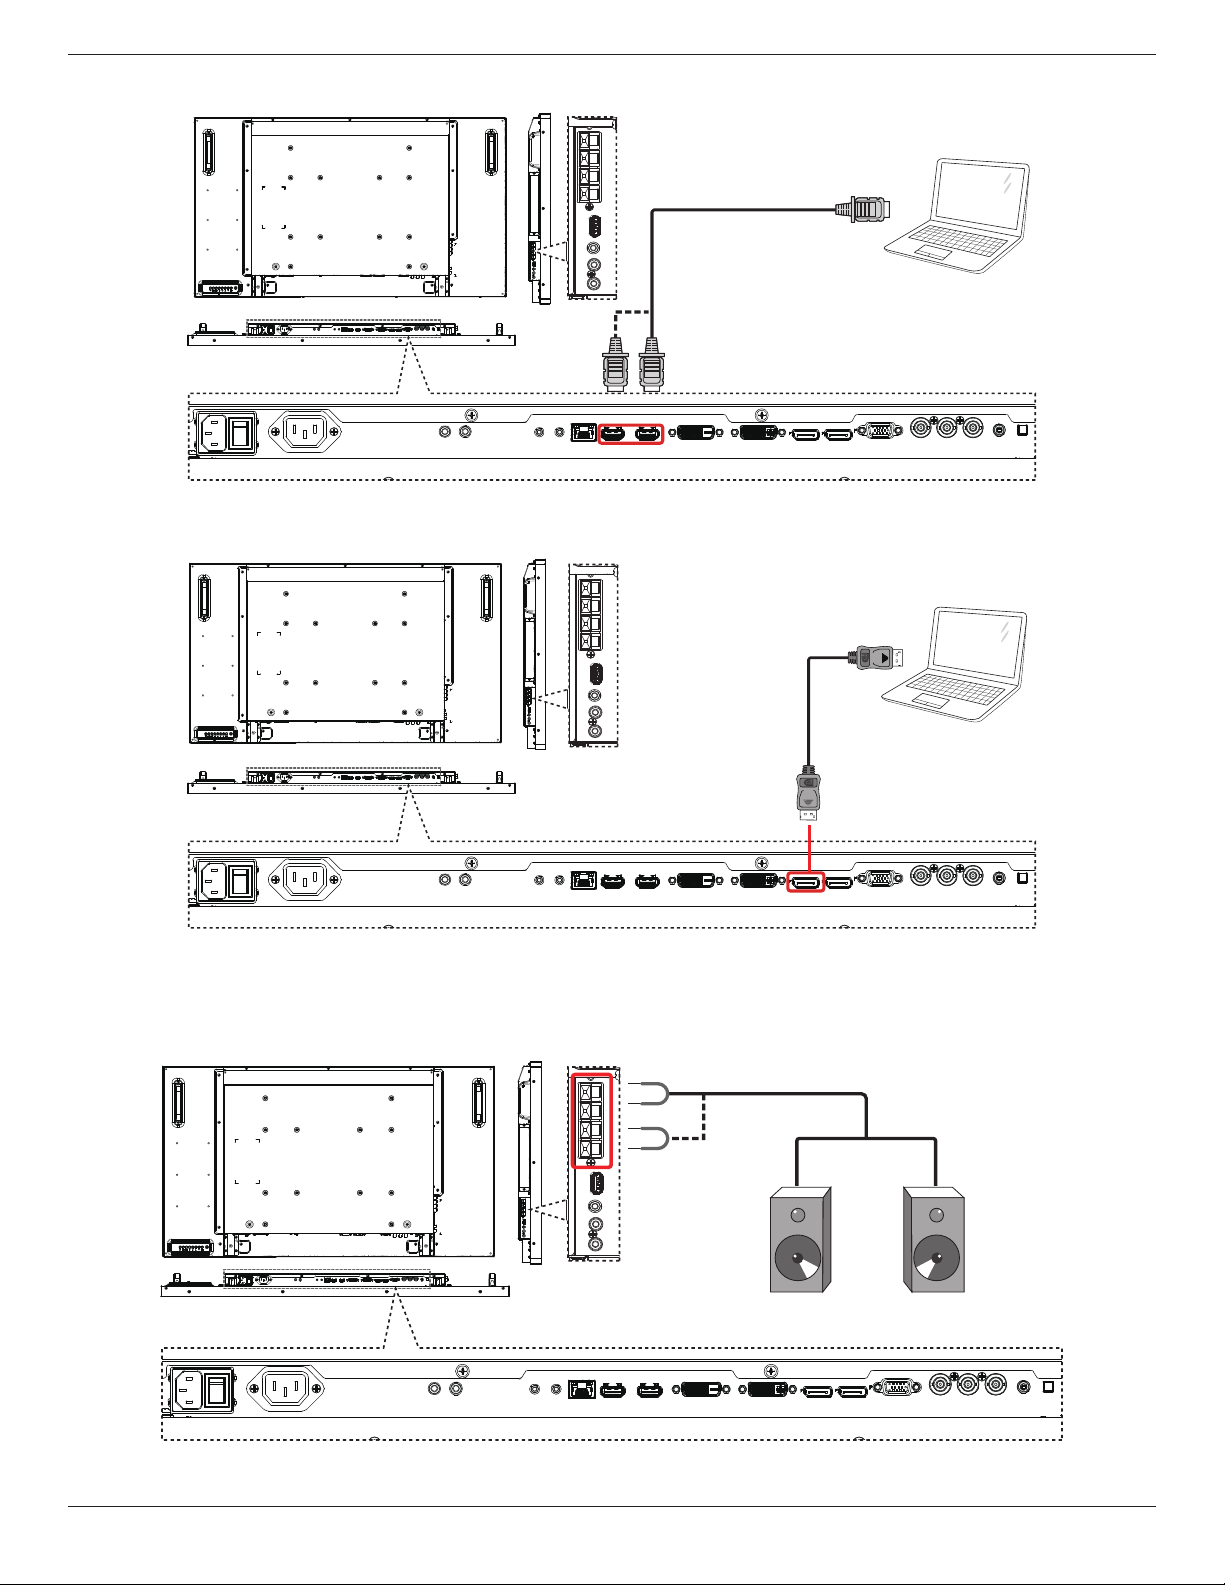
3.1.3. Using HDMI video input
DVD / VCR / VCD
HDMI Out
[HDMI IN]
3.2. Connecting a PC
3.2.1. Using VGA input
PC
[VGA IN]
[VGA AUDIO IN]
VGA Out
D-Sub 15 pin
Audio Out
3.2.2. Using DVI input
PC
[VGA AUDIO IN]
DVI Out
Audio Out
[DVI IN]
BDL4660EL
12
3.2.3. Using HDMI input
PC
HDMI Out
[HDMI IN]
3.2.4. Using DisplayPort input
PC
DisplayPort Out
[DisplayPort IN]
3.3. Connecting Audio Equipment
3.3.1. Connecting external speakers
External speakers
BDL4660EL
13
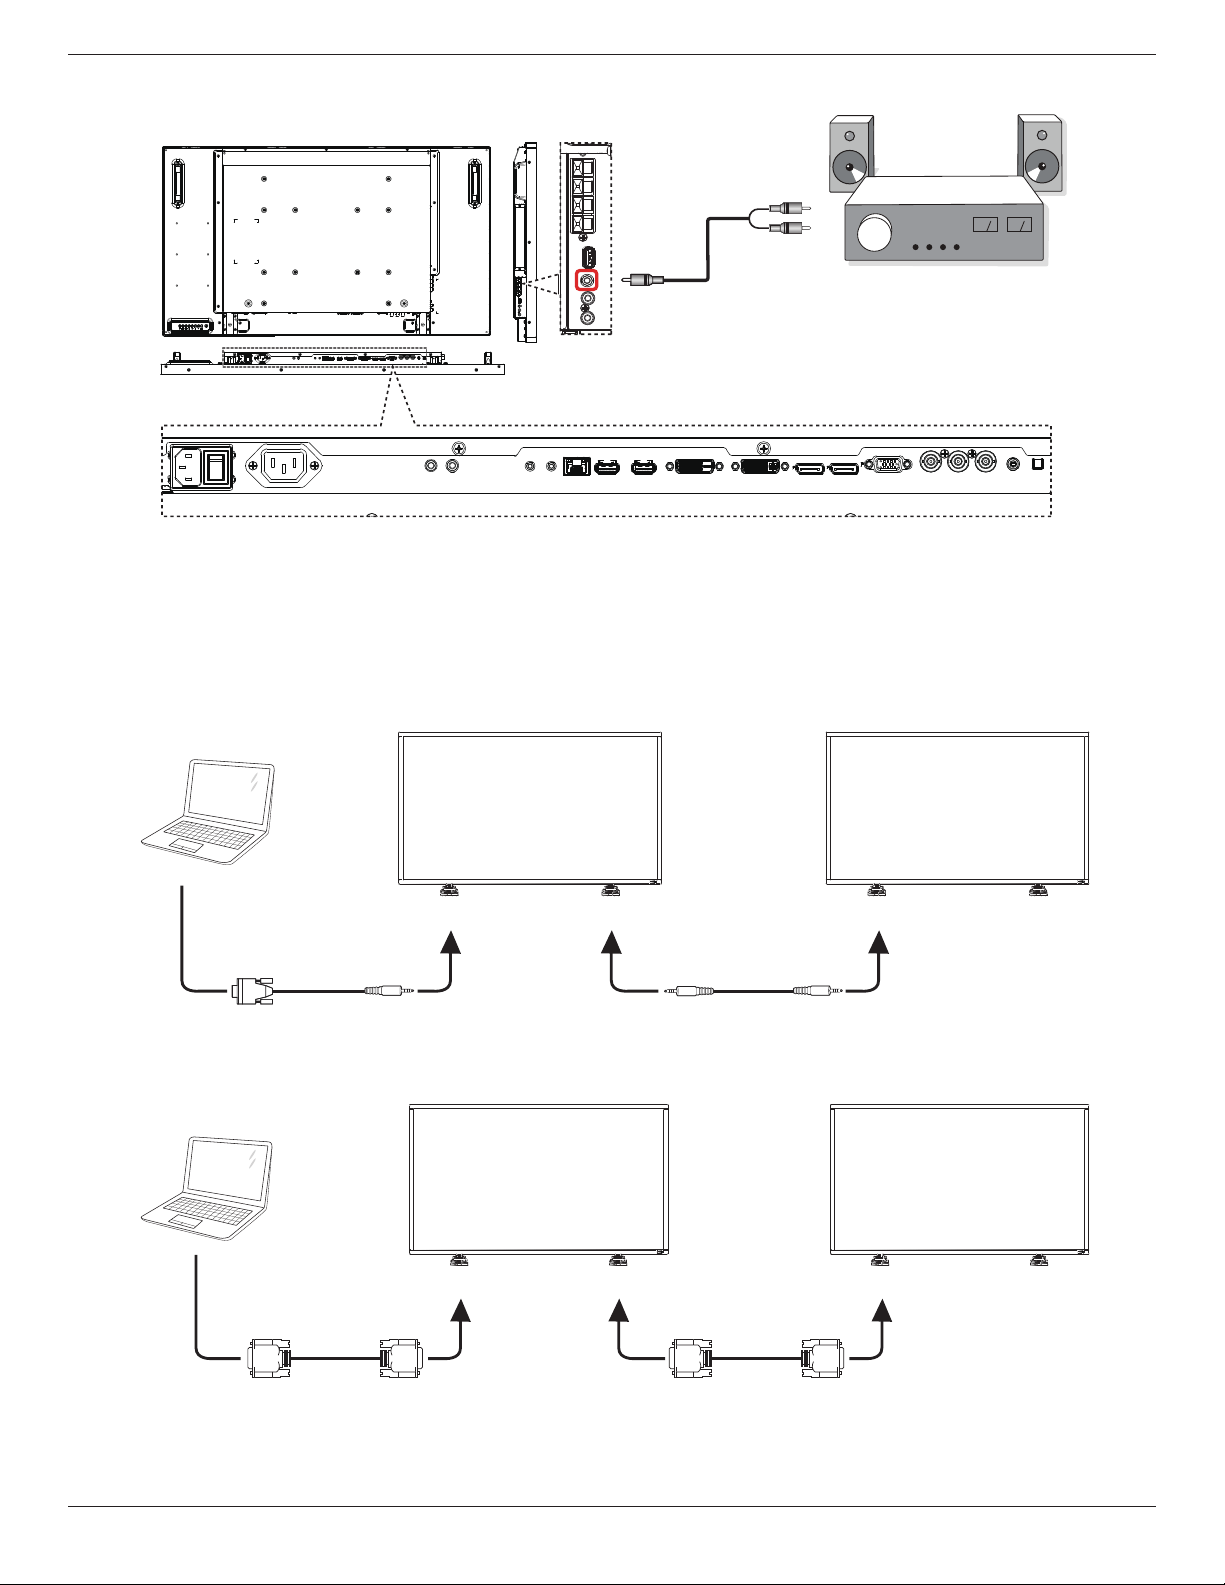
3.3.2. Connecting an external audio device
Stereo Amplifier
[AUDIO OUT]
Audio In
3.4. Connecting Multiple Displays in a Daisy-chain Configuration
Youcaninterconnectmultipledisplaystocreateadaisy-chaincongurationforapplicationssuchasavideowall.
NOTE: Maximum25displays(5x5)canbeusedinadaisy-chainconguration.
3.4.1. Display control connection
Connectthe[RS232COUT]connectorofDISPLAY1tothe[RS232CIN]connectorofDISPLAY2.
DISPLAY 1 DISPLAY 2
PC
[RS-232C IN]
[RS-232C]
[RS-232C OUT] [RS-232C IN]
3.4.2. Digital video connection
Connectthe[DVIOUT/VGAOUT]connectorofDISPLAY1tothe[DVIIN]connectorofDISPLAY2.
DISPLAY 1 DISPLAY 2
PC
[DVI IN]
[DVI]
[DVI/VGA OUT] [DVI IN]
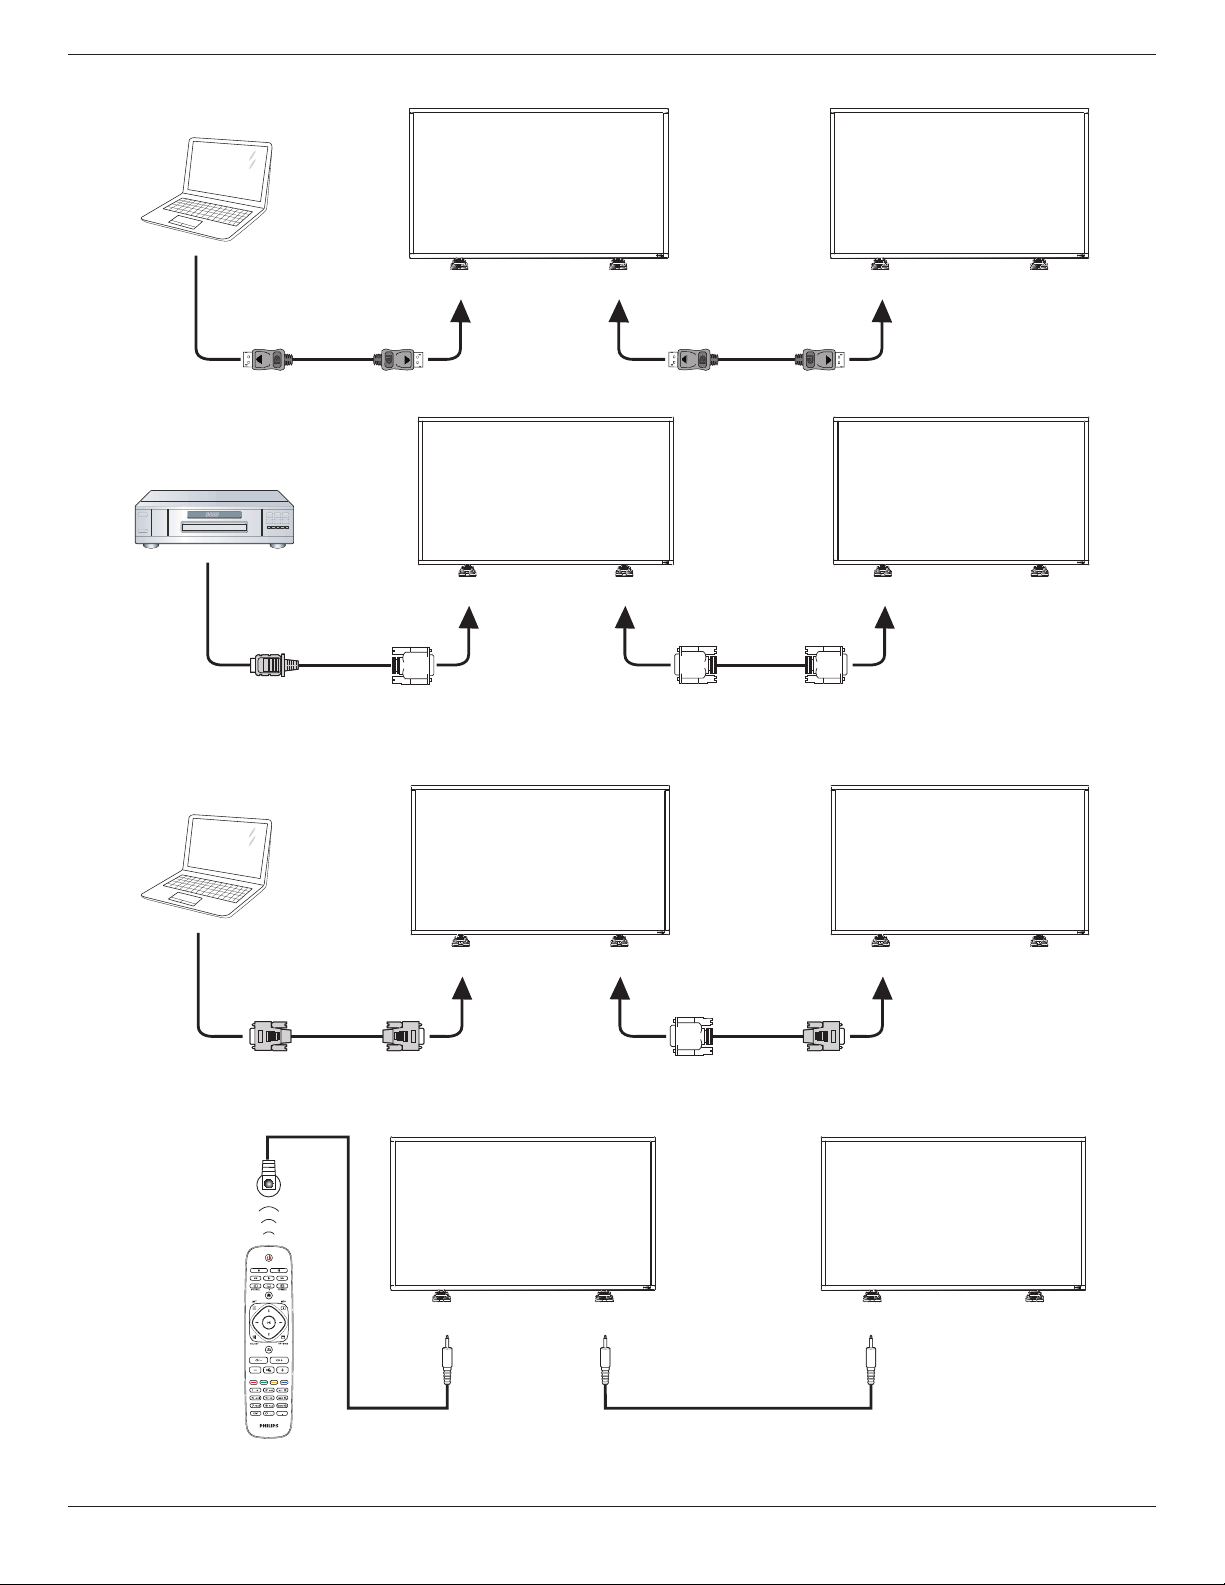
BDL4660EL
14
Connectthe[DPOUT]connectorofDISPLAY1tothe[DPIN]connectorofDISPLAY2.
DISPLAY 1 DISPLAY 2
PC
[DP IN]
[DP]
[DP OUT] [DP IN]
Connectthe[HDMIOUT]connectorofDISPLAY1tothe[DVIIN]connectorofDISPLAY2.
DISPLAY 1 DISPLAY 2
[DVI IN]
[HDMI]
[DVI OUT] [DVI IN]
DVD / VCR / VCD
3.4.3. Analog video connection
Connectthe[DVIOUT/VGAOUT]connectorofDISPLAY1tothe[VGAIN]connectorofDISPLAY2.
DISPLAY 1 DISPLAY 2
PC
[VGA IN]
[VGA]
[DVI/VGA OUT] [VGA IN]
3.5. IR connection
DISPLAY 1 DISPLAY 2
[IR IN] [IR OUT] [IR IN]
External
IR Receiver
NOTE: Thisdisplay’sremotecontrolsensorwillstopworkingifthe[IR IN]isconnected.

BDL4660EL
15
3.6. IR Pass-through Connection
DVD / VCR / VCD
(DVD / VCR / VCD)
(BDL4660EL)
Remote Control
[IR OUT]
[IR IN]
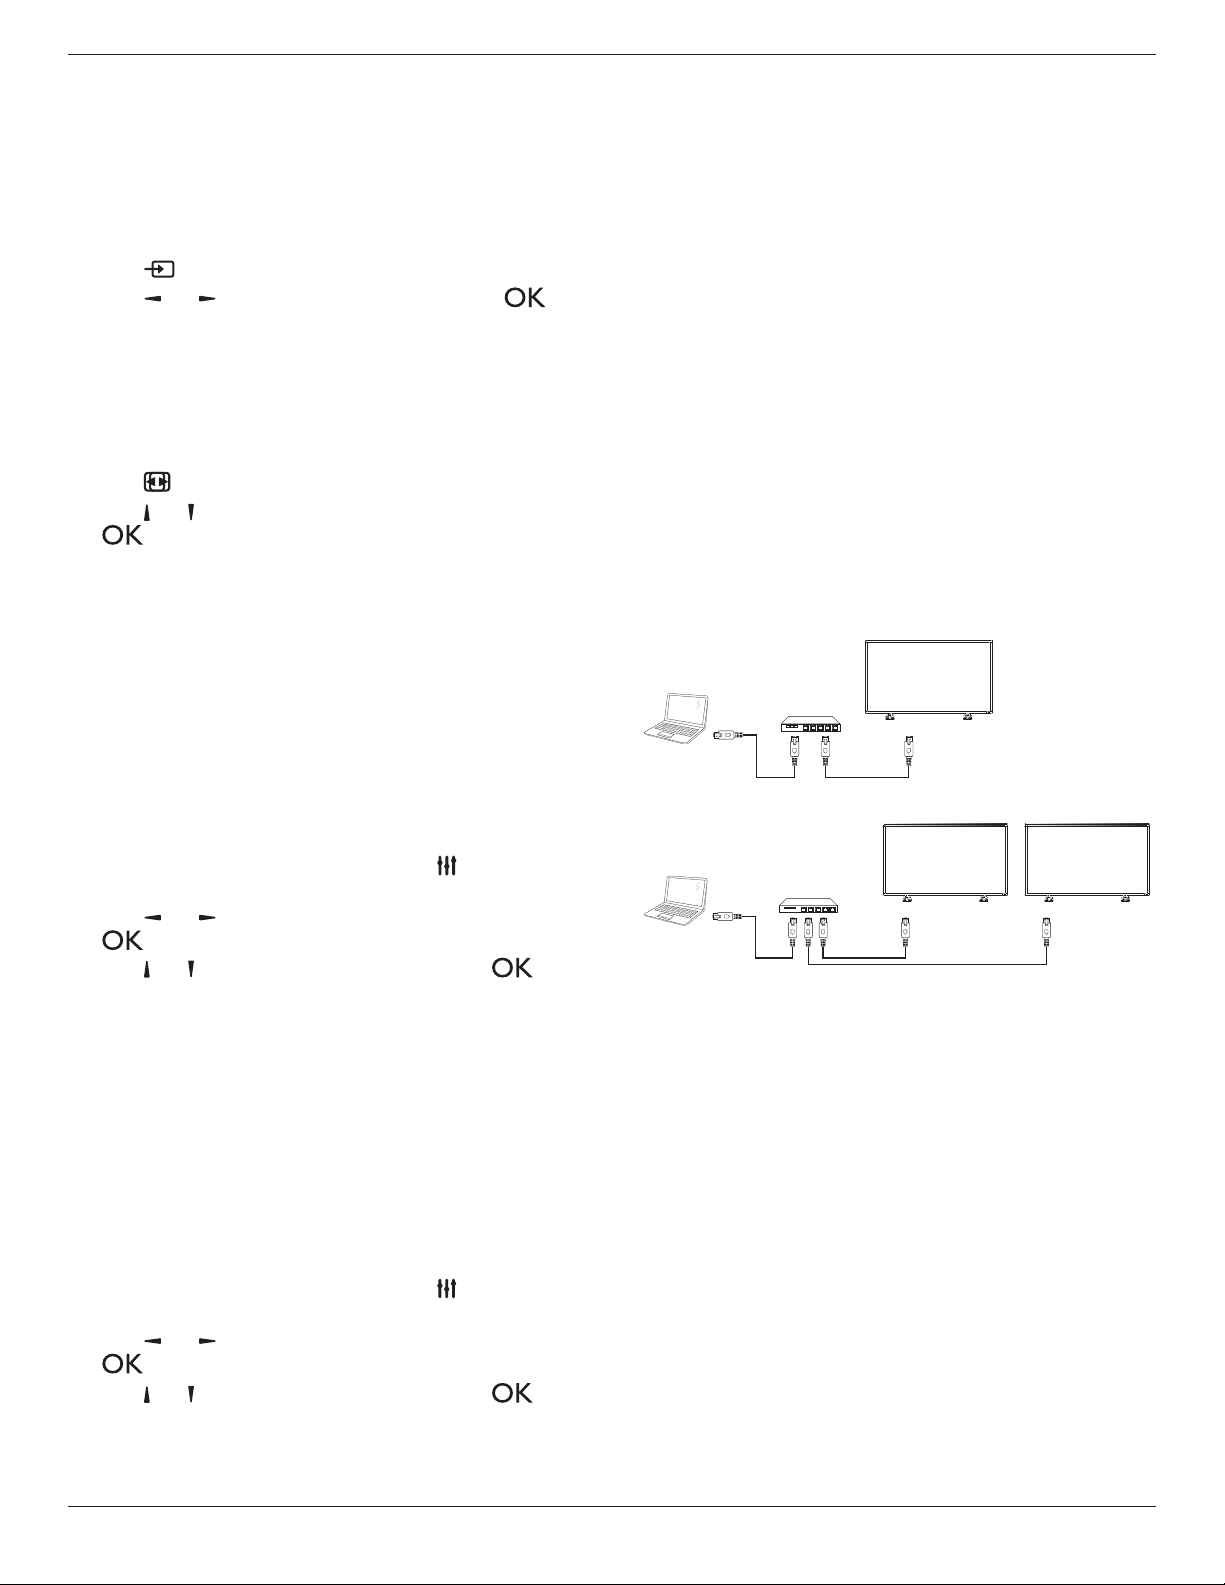
3.7. Wire-connecting to Network
Ifyouconnectthisdisplaytoahomenetwork,youcanplayphotos,musicandvideosfromyourcomputer.SeePlay multimedia les via Local Area Network
(Page16)formoredetail.
PC
[RJ-45]
[RJ-45]
ROUTER
INTERNET
To setup the network:
1. SwitchontherouterandswitchonitsDHCPsetting.
2. ConnecttheroutertothisdisplaywithanEthernetcable.
3. Press[ ] HOME
buttonontheremotecontrol,thenselect
Setup
.
4. Select
Connect to network
,thenpress[ ]button.
5. Followtheon-screeninstructionstoinstallthenetwork.
6. Waitforthisdisplaytondthenetworkconnection.
7. Ifyouareprompted,agreetothe“End User Licence Agreement”.
NOTE: ConnectingwithashieldedCAT-5EthernetcabletocomplywiththeEMCdirective.
BDL4660EL
16
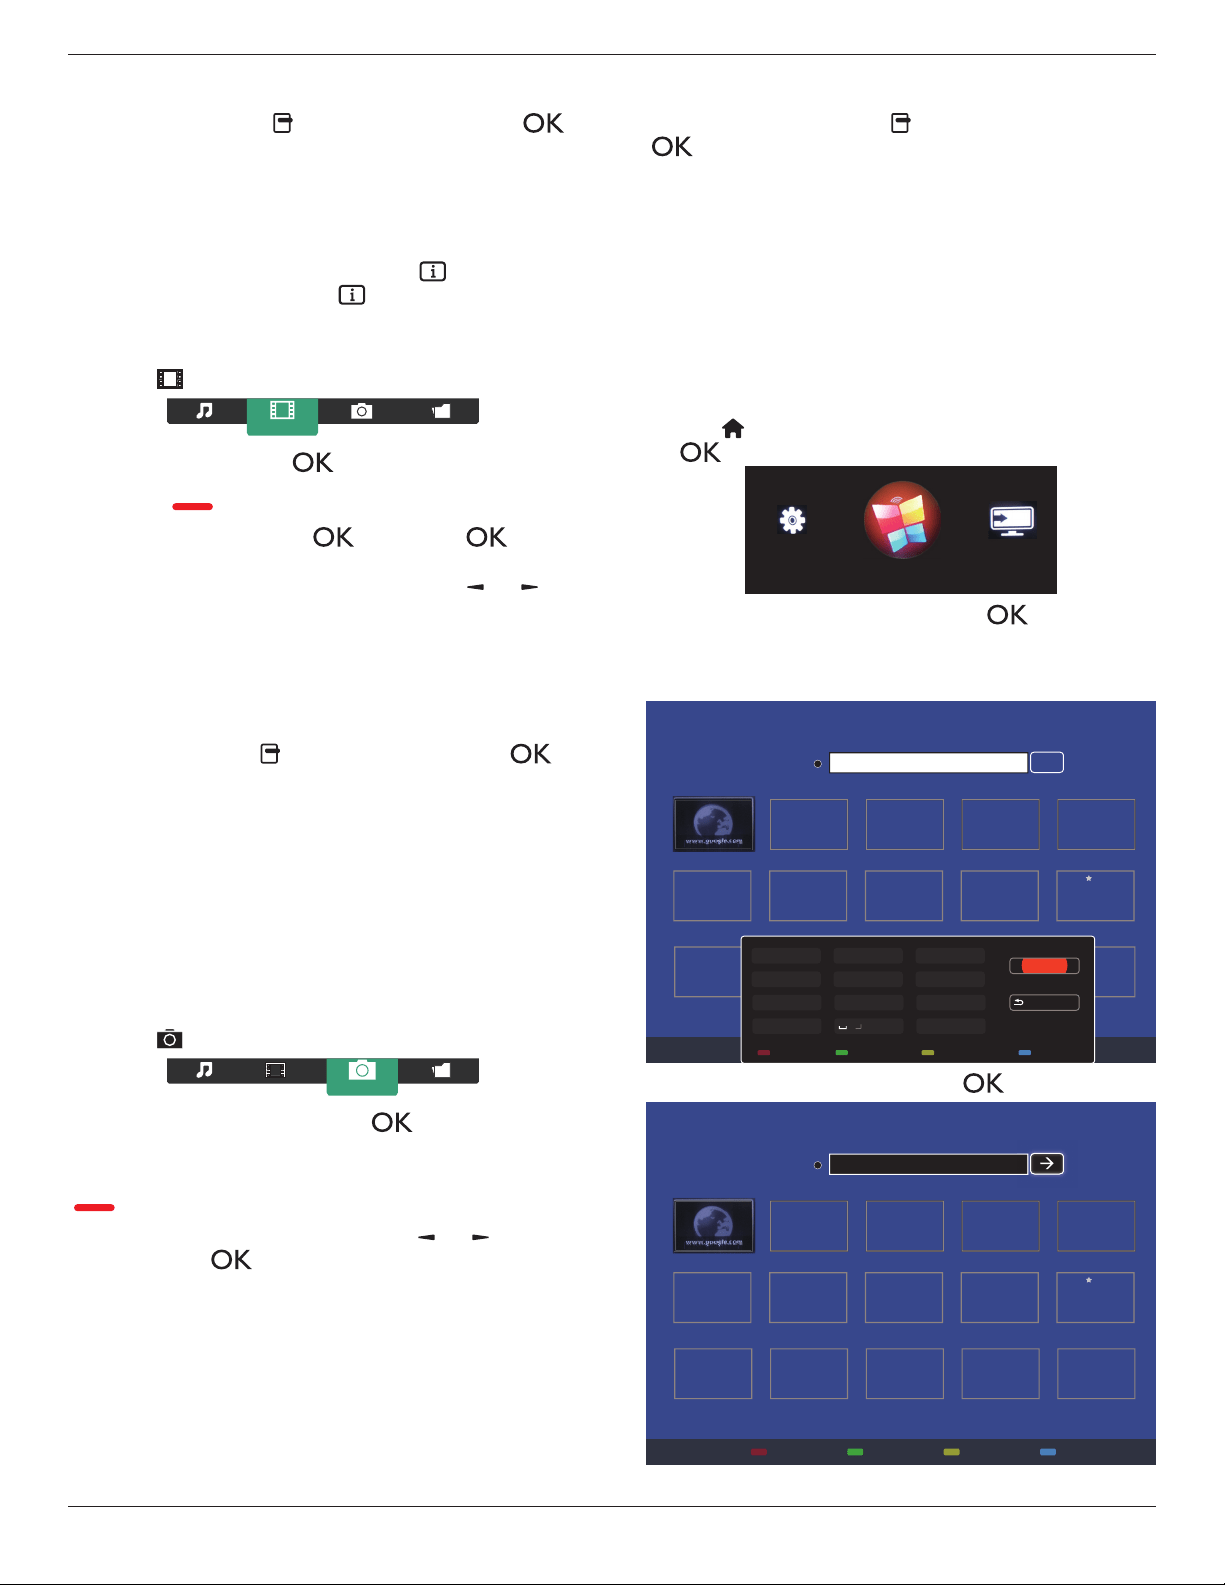
4. Operation
NOTE: Thecontrolbuttondescribedinthissectionismainlyonthe
remotecontrolunlessspeciedotherwise.
4.1. Watch the Connected Video Source
Seepage10forexternalequipmentsconnection.forexternalequipmentsconnection.
1. Press
[ ] SOURCEbutton.
2. Press[ ]
or[ ]buttontochooseadevice,thenpress[ ]
button.
4.2. Change Picture Format
Youcanchangethepictureformattosuitthevideosource.Eachvideo
sourcehasitsavailablepictureformats.
Theavailablepictureformatsdependonthevideosource:
1. Press[ ] FORMATbutton.
2. Press[ ]
or[ ]buttontochooseapictureformat,thenpress
[ ]button.
• {Auto zoom}:Enlargethepicturetollthescreen.
RecommendedforminimalscreendistortionbutnotforHD
orPC.
• {Movie expand 16:9}:Scale4:3formatto16:9.Not
recommendedforHDorPC.
• {Wide screen}:Showswidescreenformatcontentunstretched.
NotrecommendedforHDorPC.
• {Unscaled}:ProvidemaximumdetailforPC.Onlyavailable
whenPCmodeisselectedinthe{Picture}menu.
• {4:3}:Displaytheclassic4:3format.
4.3. Choose your Preferred Picture Settings
1. Whilethisdisplayisplayingvideosource,press[ ] ADJUST
button.
2. Press[ ]
or[ ]buttontochoose
Picture style
,thenpress
[ ]button.
3. Press[ ]or
[ ]buttontochooseanoption,thenpress[ ]
button:
• {Personal}:Applyyourpersonalisedpicturesettings.
• {Vivid}:Richanddynamicsettings,idealfordaytimeviewing.
• {Natural}:Naturalpicturesettings.
• {Standard}:Defaultsettingsthatsuitmostenvironmentsand
typesofvideo.
• {Movie}:Idealsettingsformovies.
• {Photo}:Idealsettingsforphotos.
• {Energy saving}:Settingsthatconservethemostenergy.
4.4. Choose your Preferred Sound Settings
1. Whilethisdisplayisplayingvideosource,press[ ] ADJUST
button.
2. Press[ ]
or[ ]buttontochoose
Sound style
,thenpress
[ ]button.
3. Press[ ]or
[ ]buttontochooseanoption,thenpress[ ]
button:
• {Personal}:Applyyourpersonalisedsoundsettings.
• {Original}:Settingsthatsuitmostenvironmentsandtypesof
audio.
• {Movie}:Idealsettingsformovies.
• {Music}:Idealsettingsforlisteningtomusic.
• {Game}:Idealsettingsforgames.
• {News}:Idealsettingsforspokenaudio,suchasthenews.
4.5. Play multimedia files via Local Area
Network
ToplaylesviaLocalAreaNetwork,youwillneed:
• Awiredhomenetwork,connectedwithaUniversalPlugandPlay
(uPnP)router.
• Optional:ALANcablethatconnectsyourdisplaytoyourhome
network.
• Amediaserverrunningonyourcomputer.
• Appropriatesettingsonyourcomputerrewalltoallowyoutorun
themediaserver.
4.5.1. Set up the network
1. Connectyourdisplayandthecomputertothesamehomenetwork.
Seeillustrationbelowtoconnectyourdisplaytoanetwork.
2. Switchonyourcomputerandtherouter.
• Single display setup:
PC
[RJ-45]
[RJ-45]
ROUTER
• Multiple display setup:
PC
[RJ-45]
[RJ-45]
DISPLAY 1
[RJ-45]
DISPLAY 2
ROUTER
NOTE: IftheapparatusdoesnotreturntoDLNAmodedueto
externalelectricaldisturbances(e.g.electrostaticdischarge),user
interventionisrequired.
Set up media sharing
1. Installamediaserveronyourcomputertosharemediales.These
aresomemediaservers:
• ForPC:WindowsMediaPlayer11(orhigher)orTVersity
• ForMac:Twonky
2. Switchonmediasharingonyourcomputerusingthemediaserver.
Formoreinformationonhowtosetupthemediaserver,referto
thewebsiteofthemediaserver.
4.5.2. How to use DLNA-DMP
1. PleaseconnectdisplayandyourPCtothesamerouterviaRJ-45.
2. Runwindowsmediaplayer.Setstreamhandlingaspublicsharing.
BDL4660EL
17
3. Press[ ] HOMEbutton,Then,choose
Setup
andpress[ ]
button.
Internet Source
Setup
4. Choose
Connect to network
andpress[ ]button.
Settings Network settings
Quick picture and sound
Connect to network
5. Choose
Connect
andpress[
]button.
2
3
Cancel
1
Connect this set to the internet to stay up to date and discover the advantages of the equipment
Connect
6. Choose
Wired
andpress[ ]button.
2
3
1
Cancel
Wired
This equipment can be
connected to a home
network.
Select which connection
you want to make.
7. Press[ ]buttontoclose.
2
3
1
The equipment is successfully connected to the home network!
Close
8. Press[ ]button,thendone.
2
3
1
Done
You can play photos, music and movies stored on a computer in your home network.
To do so, you need to install recent media server software on the computer. A list of
suitable media server software is available in the Help.
Play les from display
1. Press[ ] HOMEbutton.Then,choose
Source
andpress
[ ] button.
Internet
Source
Setup
2. Choose
Browse network
andpress[ ]button.
USB
Browse network
HDMI 2 DisplayPort Card OPSHDMI 1
3. Now,youcanseeallthePC’sconnectedtothesamerouteronthe
screen.Choosetherightone.
4. Press[ ]and[ ]tochoosethedirectoryandlestoplay.
5. Youcanconnectupto4displaystothesamePCandplaysame
mediastream.
WesuggesttouseDLNA-DMPfunctionviawirednetworkforthesake
ofhighersecurityandsufcientnetworkbandwidth.
4.5.3. How to use DLNA-DMR from PC
1. Press[ ] HOMEbutton,andgoto
Setup
menu.
2. Choose
Network Settings
andpress[ ]button.
Settings Network settings
Quick picture and sound
Connect to network
BDL4660EL
18
3. Set
DMR
as
ON
.
Off
On
View network settings
Network settings
Static IP configuration
Digital Media Renderer - D...
Network name
Clear Internet memory
4. Setthenameofyourdisplay.
View network settings
Network settings
Static IP configuration
Digital Media Renderer - D...
Network name
Clear Internet memory
Cancel
Done Clear
testabc
5. Press[ ] HOMEbutton,andgoto
Source
menu.Then,choose
Browse network
andpress[ ]button.
6. OnyourPC,goto
Network and Sharing Center
,andclick
Choose homegroup and sharing options
.
7. Checkthemediaformats.Then,click
Choose media
streaming options....
.
8. Goto
Advanced sharing settings
,andcheck
Turn on
network discovery
.
9. Now,gotothedirectoryofyourmediales.Choosethemedia
lebyrightclick.Onthesubmenufrom
Play To
,Youcanndall
displaysconnectedtoyournetwork.Choosethedisplay,andclick
themedialetoplay..
Play les
1. Press[ ] SOURCEbutton.
2. Choose
Browse network
,andpress[ ]button.
3. Choosealefromthecontentbrowser,andpress[ ]button
tostartplaying.
4. Pressthe[PLAY] buttonsontheremotecontroltocontrolplaying.
Tips:
• Choosethetopbartolteryourlesbytype.
• Choose
Sort
toarrangethelesbyalbumname,artist,orother
elds.
• Toclearthelistofofinemediaservers,press[ ] OPTIONS
button.Then,choose
Clear ofine servers
andpress[ ]
button.
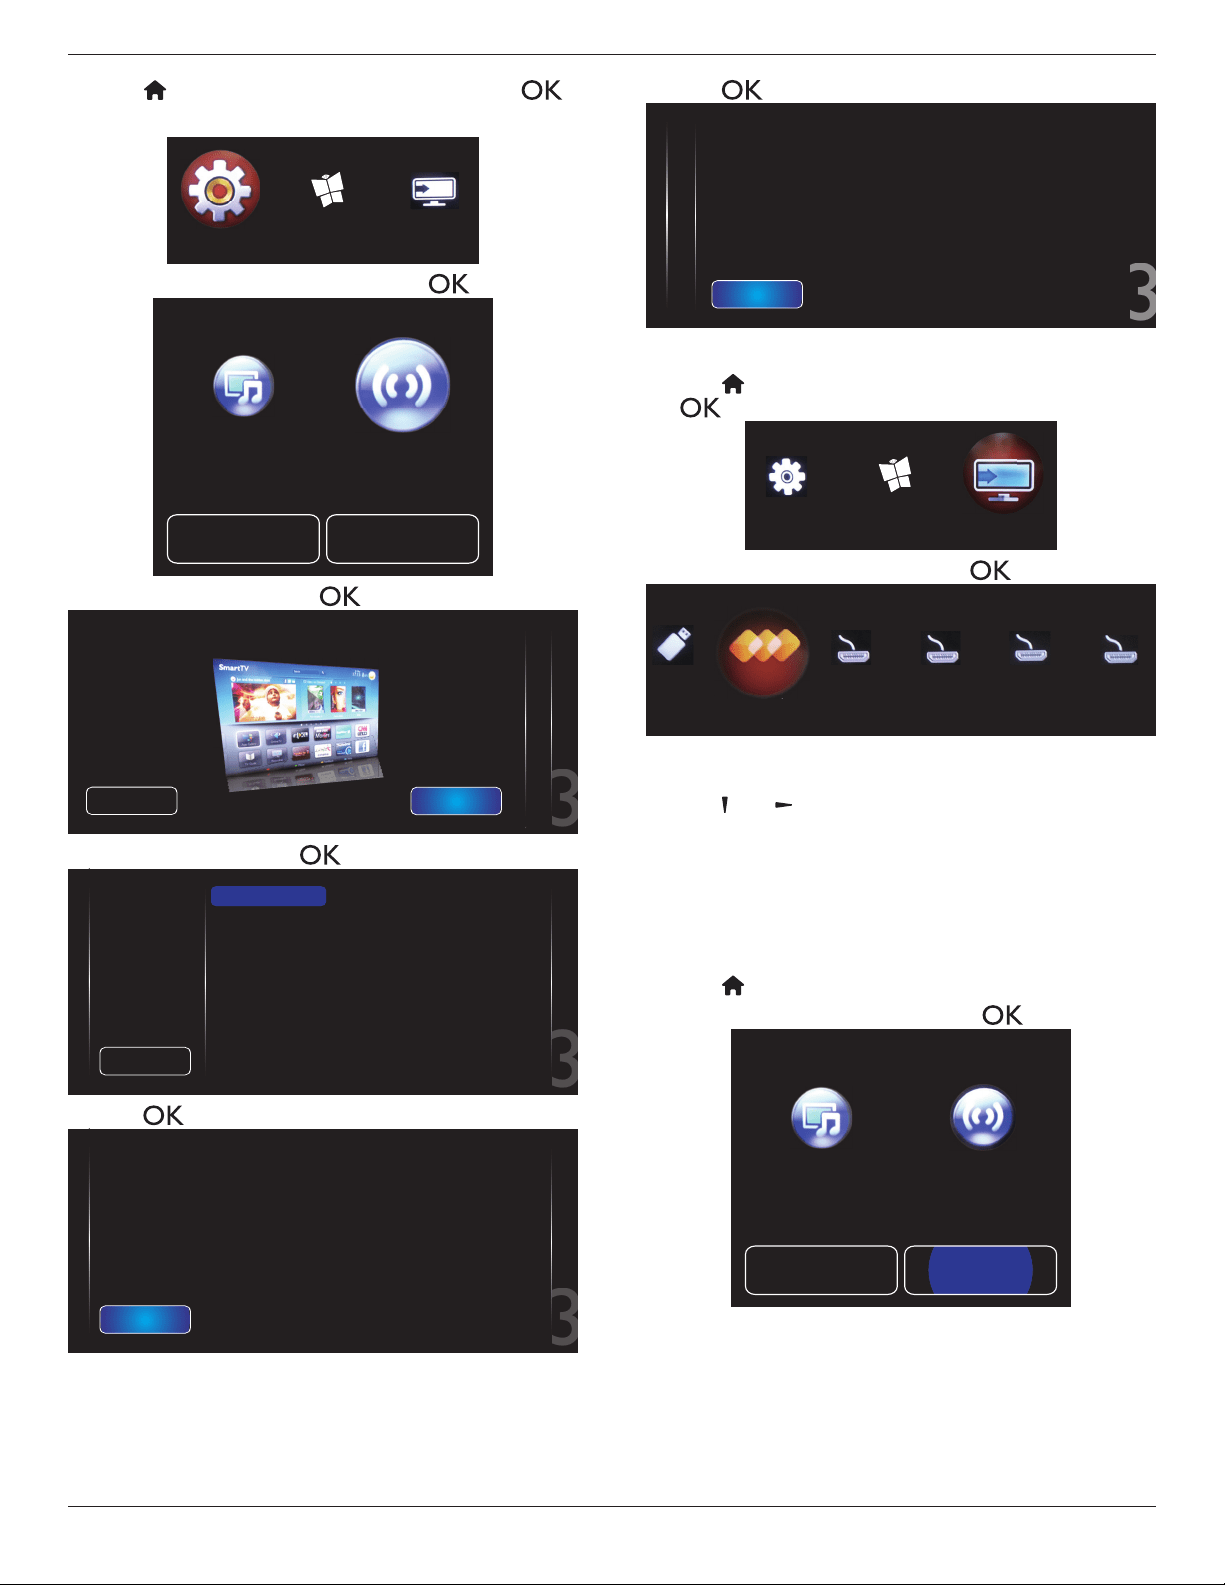
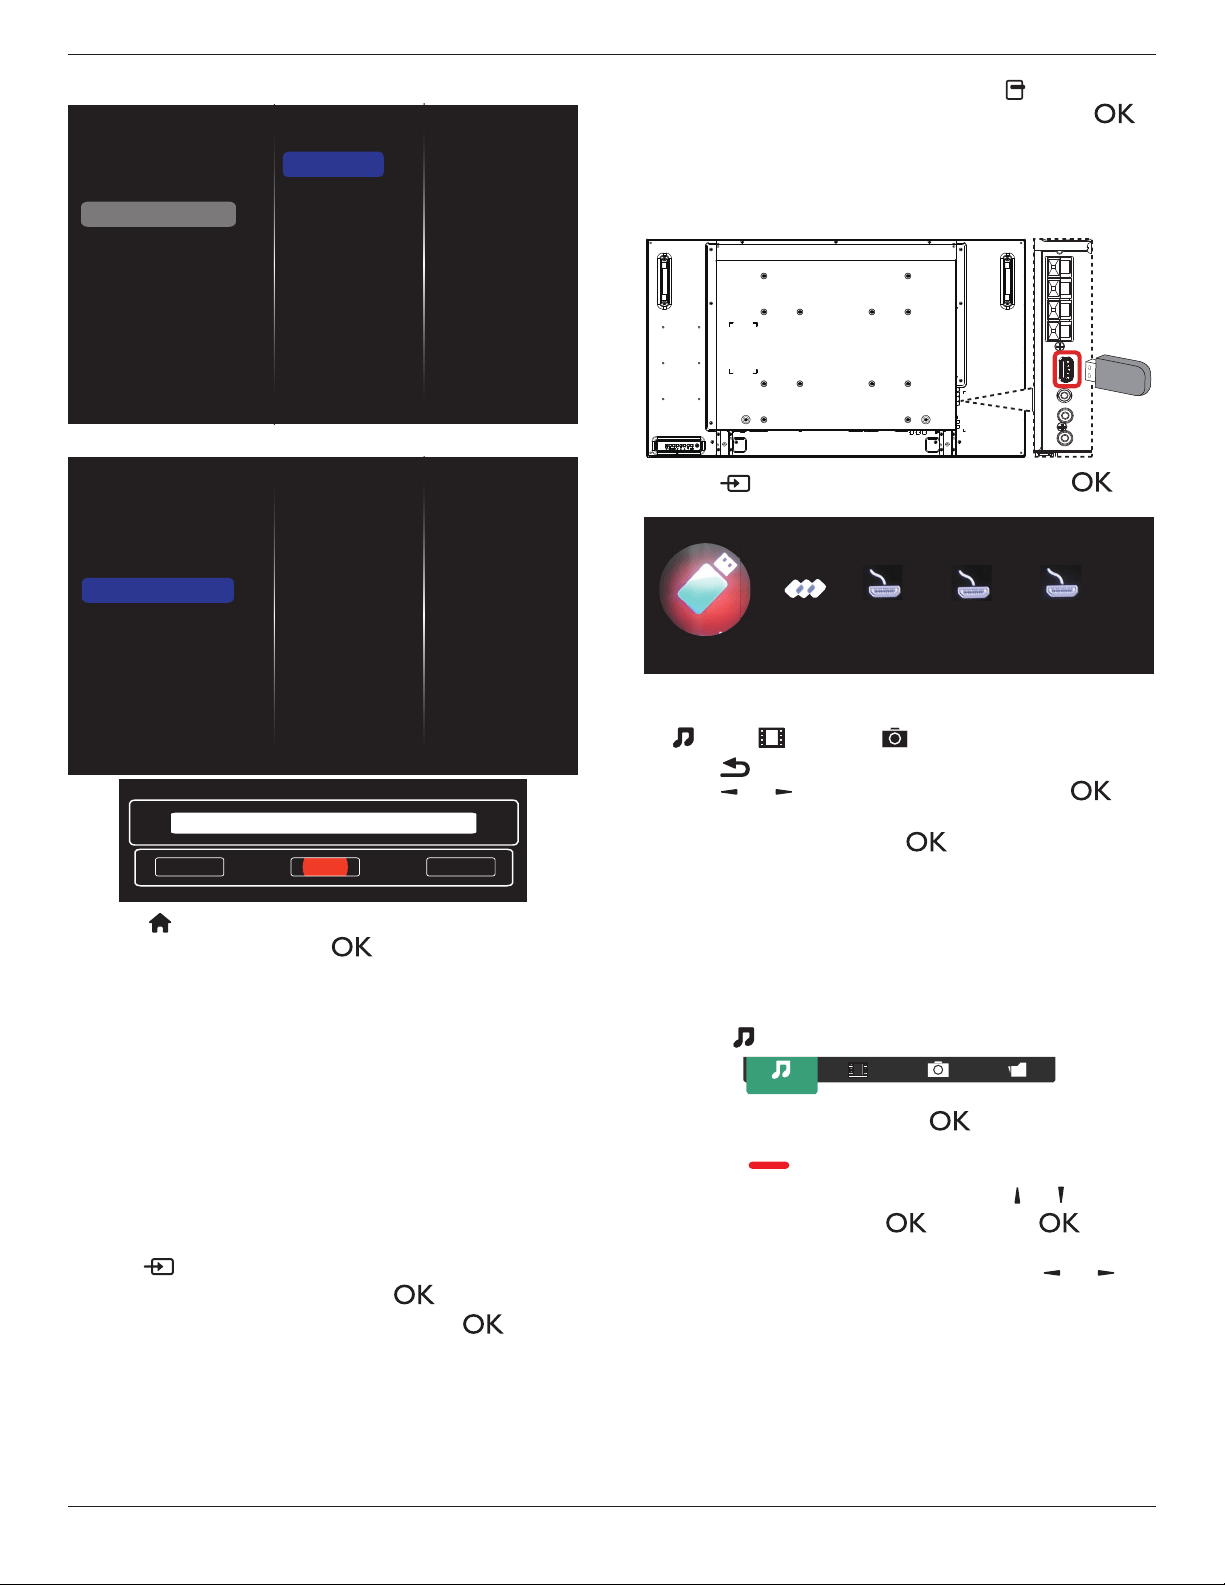
4.6. Play multimedia files from USB device
1. ConnectyourUSBdevicetotheUSBportonthedisplay.
USB
2. Press[ ] SOURCEbutton,choose
USB
,andpress[ ]
button.
HDMI 2 DisplayPortHDMI 1
Browse USB
Network
3. TheconnectedUSBdeviceisdetectedautomaticallyforallits
playableles,whichwillbeautomaticallysortedinto3types:
Music
,
Movie
,and
Photo
.
4. Press[ ] BACKbuttontogouptothetoplayerinthescreen.
Press[ ]
or[ ]buttontochoosetheletype.Press[ ]
buttontoenteritsplaylist.
5. Choosetheleyouwant.Press[ ]buttontostartplaying.
6. Followtheon-screeninstructiontocontroltheplayoption.
7. Press[PLAY] buttons(
H F G I J
)tocontrolplaying.
4.7. Play options
4.7.1. Playing music files
1. Choose
Music
inthetopbar.
Music
2. Chooseonemusictrack,andpress[ ]button.
• Toplayallthetracksinafolder,chooseonemusicle.Then,
press[ ] to
Play All
.
• Toskiptothenextorprevioustrack,press[ ] or [ ]button.
• Topausethetrack,press[ ]button.Press[ ]button
againtoresumeplayback.
•
Toskipbackwardorforward10seconds,press[ ]or[ ]
button.
• Tosearchbackwardorforward,press[
G
]
or
[
J
]button,
pressrepeatedlytotogglebetweendifferentspeeds.
• Tostopthemusic,press[
H
]button.
BDL4660EL
19
Music options
Whileyouplaymusic,press[ ] OPTIONS button,thenpress[ ]
buttontochooseanoption:
• {Shufe}:Enableordisablerandomplayoftracks.
• {Repeat}:Choose{Repeat}toplayatrackoranalbumrepeatedly,
orchoose{Play once}toplayatrackonce.
NOTE: Toviewinformationaboutasong(forexample,title,artistor
duration),choosethesong,thenpress[ ] INFObutton.To
hidetheinformation,press[ ] INFO buttonagain.
4.7.2. Playing movie files
1. Choose
Movie
inthetopbar.
Movie
2. Chooseavideo,andpress[ ]button.
• Toplayallthevideosinafolder,chooseonevideole.Then,
press[ ] to
Play All
.
• Topausethevideo,press[ ]button.Press[ ]button
againtoresumeplayback.
•
Toskipbackwardorforward10seconds,press[ ]or[ ]
button.
• Tosearchbackwardorforward,press[
G
]
or
[
J
]button,
pressrepeatedlytotogglebetweendifferentspeeds.
• Tostopthevideo,press[
H
]button.
Movie options
Whileplayingvideo,press[ ] OPTIONSbutton,thenpress[ ]
buttontochooseanoption:
• {Subtitles}:Choosetheavailablesubtitlesettings.
• {Subtitle Language}:Choosethelanguageforsubtitlesifavailable.
• {Shufe}:Enableordisablerandomplayofvideoles.
• {Repeat}:Choose{Repeat}toplaythevideolerepeatedlyor
{Playonce}toplaythevideoleonce.
• {Status}:Toviewinformationaboutavideo(forexample,played
position,duration,title,ordate).
4.7.3. Playing photo files
1. Choose
Photo
inthetopbar.
Photo
2. Chooseaphotothumbnail,thenpress ]button.
Start a slideshow
Iftherearemultiplephotosinafolder,chooseaphoto.Then,press
[ ] to
Play All
.
•
Toskiptothepreviousornextphoto,press[ ]or[ ]button,
andthenpress[ ]button.
• Tostoptheslideshow,press[
H
]button.
Slideshow options
Whileyouplayaslideshow,press[ ] OPTIONSbutton,thenpress
[ ]buttontochooseanoption:
• {Shufe}:Enableordisablerandomdisplayofpicturesinthe
slideshow.
• {Repeat}:Choose{Repeat}towatchaslideshowrepeatedlyor
{Play once}towatchonce.
• {Slideshow Time}:Choosethedisplayingtimeforeachphotointhe
slideshow.
• {Slideshow Transitions}:Choosethetransitionfromonephototo
thenext.
4.8. How to use Opera browser (HTML5)
1. Press[ ] HOMEbutton,andchoose
Internet
andpress
[ ] button.
Internet
Source
Setup
2. MovethecursortoURLaddressbar.Press[ ] buttonandit
willpopouttheon-screenkeyboard.Youcanmovethecursorto
entertheURLaddress.AfternishingtheURLaddress,choose
Done
.
History
Bookmark
Web Address:
X
Internet
www.google.com
http://
w
w
w
w
w
w
w
w
w
w
w
w
w
w
w
w
w
w
w
w
w
w
w
w
w
w
w
w
w
w
w
w
w
w
w
w
w
w
w
w
w
w
w
w
w
w
w
w
w
w
w
w
w
w
w
w
w
w
w
w
w
w
w
w
w
w
w
w
w
w
w
w
w
w
w
w
w
w
w
w
w
w
w
w
w
w
w
w
w
w
w
w
w
w
w
w
w
w
w
w
w
w
w
w
w
w
w
w
w
w
w
w
w
w
w
w
w
w
w
w
w
w
w
w
w
w
w
w
w
w
w
w
w
w
w
w
w
w
w
w
w
w
w
w
w
w
w
w
w
w
w
w
w
w
w
w
w
w
w
w
w
w
w
w
w
w
w
w
w
w
w
w
w
w
w
w
w
w
w
w
w
w
w
w
w
w
w
w
w
w
w
w
w
w
w
w
w
w
w
w
w
w
w
w
w
w
w
w
w
w
w
w
w
w
w
w
w
w
w
w
w
w
w
w
w
w
w
w
w
w
w
w
w
w
w
w
w
w
w
w
w
w
w
w
w
w
w
w
w
w
w
w
w
w
w
w
w
w
w
w
w
w
w
w
w
w
w
w
w
w
w
w
w
w
w
w
w
w
w
w
w
w
w
w
w
w
w
w
w
w
w
w
w
w
w
w
w
w
w
w
w
w
w
w
w
w
w
w
w
w
w
w
w
w
w
w
w
w
w
w
w
w
w
w
w
w
w
w
w
w
w
w
w
w
w
w
w
w
w
w
w
w
w
w
w
w
w
w
w
w
w
w
w
w
w
w
w
w
w
w
w
w
w
w
w
w
w
w
w
w
w
w
w
w
w
w
w
w
w
w
w
w
w
w
w
w
w
w
w
w
w
w
w
w
w
w
w
w
w
w
w
w
w
w
w
w
w
w
w
w
w
w
w
w
w
w
w
w
w
w
w
w
w
w
w
w
w
w
w
w
w
w
w
w
w
w
w
w
w
w
w
w
w
w
w
w
w
w
w
w
w
w
w
w
w
w
w
w
w
w
w
w
w
w
w
w
w
w
w
w
w
w
w
w
w
w
w
w
w
w
w
w
w
w
w
w
w
w
w
w
w
w
w
w
w
w
w
w
w
w
w
w
w
w
w
w
w
w
w
w
w
w
w
w
w
w
w
.
.
.
.
g
g
g
g
g
g
g
g
g
g
g
g
g
g
g
g
g
g
g
g
g
g
g
g
g
g
g
g
g
g
g
g
g
g
g
g
g
g
g
g
g
g
g
g
g
g
g
g
g
g
g
g
g
g
g
g
g
g
g
g
g
g
g
g
g
g
g
g
g
g
g
g
g
g
g
g
g
g
g
g
g
g
g
g
g
g
g
g
g
g
g
g
g
g
g
g
g
g
g
g
g
g
g
g
g
g
g
g
g
g
g
g
g
g
g
g
g
g
g
g
g
g
g
g
g
g
g
g
g
g
g
g
g
g
o
o
o
o
o
o
o
o
o
o
o
o
o
o
o
o
o
o
o
o
o
o
o
o
o
o
o
o
o
o
o
o
o
o
o
o
o
o
o
o
o
o
o
o
o
o
o
o
o
o
o
o
o
o
o
o
o
o
o
oo
o
o
o
o
o
o
o
o
o
o
o
o
o
o
o
o
o
o
o
o
o
o
o
o
o
o
o
o
o
o
o
o
o
o
o
o
o
o
o
o
o
o
o
o
o
o
o
o
o
o
o
o
o
o
o
o
o
o
o
o
o
o
o
o
o
o
o
o
o
o
o
o
o
o
o
o
o
o
o
o
o
o
o
o
o
o
o
o
o
o
o
o
o
o
o
o
o
o
o
o
o
o
o
o
o
o
o
o
o
o
o
o
o
o
o
o
o
o
o
o
o
o
o
o
o
o
o
o
o
o
o
o
o
o
o
o
o
o
o
o
o
o
o
o
o
o
o
o
o
o
o
o
o
o
o
o
o
o
o
o
o
o
o
o
o
o
o
o
o
o
o
o
o
o
o
o
o
o
o
o
o
o
o
o
o
o
o
o
o
o
o
o
o
o
o
o
o
o
o
o
o
o
o
o
o
o
o
o
o
o
o
o
o
o
o
o
o
o
o
o
o
o
o
o
o
o
o
o
o
o
o
o
o
o
o
o
o
o
o
o
o
o
o
o
o
o
o
o
o
o
o
o
o
g
g
g
g
g
g
g
g
g
g
g
g
g
g
g
g
g
g
g
g
g
g
g
g
g
g
g
g
g
g
g
g
g
g
g
g
g
g
g
g
g
g
g
g
g
g
g
g
g
g
g
g
g
g
g
g
g
g
g
g
g
g
g
g
g
g
g
g
g
g
g
g
g
g
g
g
g
g
g
g
g
g
g
g
g
g
g
g
g
g
g
g
g
g
g
g
g
g
g
g
g
g
g
g
g
g
g
g
g
g
g
g
g
l
l
l
l
l
l
l
l
l
l
l
l
l
l
l
l
l
l
l
l
l
l
l
l
l
l
l
l
l
l
l
l
l
l
l
l
l
l
l
l
l
l
l
l
l
l
l
l
l
l
l
l
l
l
l
l
l
l
l
l
l
l
l
l
l
l
l
l
l
l
l
l
l
l
l
l
l
e
e
e
e
e
e
e
e
e
e
e
e
e
e
e
e
e
e
e
ee
e
e
e
e
e
e
e
e
e
e
e
e
e
e
e
e
e
e
e
e
e
e
e
e
e
e
e
e
e
e
e
e
e
e
e
e
e
e
e
e
e
e
e
e
e
e
e
e
e
e
e
e
e
e
e
e
e
e
e
e
e
e
e
e
e
e
e
e
e
e
e
e
e
e
e
e
e
e
e
e
e
e
e
e
e
e
e
e
e
e
e
e
e
e
e
e
e
e
e
e
e
e
e
e
e
e
e
e
e
e
e
e
e
e
e
e
e
e
e
e
e
e
e
e
e
e
.
.
..
c
c
c
c
c
c
c
c
c
c
c
c
c
c
c
c
c
c
c
c
c
c
c
c
c
c
c
c
c
c
c
c
c
c
c
c
c
c
c
c
c
c
c
c
c
c
c
c
c
c
c
c
c
c
c
c
c
c
c
c
c
c
c
c
c
c
c
c
c
c
c
c
c
c
c
c
c
c
c
c
c
c
c
c
c
c
c
c
c
c
c
c
c
c
c
c
c
c
c
c
c
c
c
c
c
c
o
o
o
o
o
o
o
o
o
o
o
o
o
o
o
o
o
o
o
o
o
o
o
o
o
o
o
o
o
o
o
o
o
o
o
o
o
o
o
o
o
o
o
o
o
o
o
o
o
o
o
o
o
o
o
o
o
o
o
o
o
o
o
o
o
o
o
o
o
o
o
o
o
o
o
o
o
o
o
o
o
o
o
o
o
o
o
o
o
o
m
m
m
m
m
m
m
m
m
m
m
m
m
m
m
m
m
m
m
m
m
m
m
m
m
m
m
m
m
m
m
m
m
m
m
m
m
m
m
m
m
m
m
m
m
m
m
m
m
m
m
m
m
m
m
m
m
m
m
m
m
m
m
m
m
m
m
m
m
m
m
m
m
m
m
m
m
m
m
m
m
m
m
m
m
m
m
m
m
m
m
m
m
m
m
m
m
m
m
m
m
m
m
m
m
m
m
m
m
m
m
m
m
m
m
m
m
m
Done
Hide
. , @ ‘
g h i
p q r s
a b c
j k l
t u v
? ! -
<
d e f
m n o
w x y z
abc ABC 123 www Backspace
3. Movethecursorto“
”iconandpress[ ] button.
History
Bookmark
Web Address:
X
Internet
www.google.com
http://www.google.com
w
w
w
w
w
w
w
w
w
w
w
w
w
w
w
w
w
w
w
w
w
w
w
w
w
w
w
w
w
w
w
w
w
w
w
w
w
w
w
w
w
w
w
w
w
w
w
w
w
w
w
w
w
w
w
w
w
w
w
w
w
w
w
w
w
w
w
w
w
w
w
w
w
w
w
w
w
w
w
w
w
w
w
w
w
w
w
w
w
w
w
w
w
w
w
w
w
w
w
w
w
w
w
w
w
w
w
w
w
w
w
w
w
w
w
w
w
w
w
w
w
w
w
w
w
w
w
w
w
w
w
w
w
w
w
w
w
w
w
w
w
w
w
w
w
w
w
w
w
w
w
w
w
w
w
w
w
w
w
w
w
w
w
w
w
w
w
w
w
w
w
w
w
w
w
w
w
w
w
w
w
w
w
w
w
w
w
w
w
w
w
w
w
w
w
w
w
w
w
w
w
w
w
w
w
w
w
w
w
w
w
w
w
w
w
w
w
w
w
w
w
w
w
w
w
w
w
w
w
w
w
w
w
w
w
w
w
w
w
w
w
w
w
w
w
w
w
w
w
w
w
w
w
w
w
w
w
w
w
w
w
w
w
w
w
w
w
w
w
w
w
w
w
w
w
w
w
w
w
w
w
w
w
w
w
w
w
w
w
w
w
w
w
w
w
w
w
w
w
w
w
w
w
w
w
w
w
w
w
w
w
w
w
w
w
w
w
w
w
w
w
w
w
w
w
w
w
w
w
w
w
w
w
w
w
w
w
w
w
w
w
ww
w
w
w
w
w
w
w
w
w
w
w
w
w
w
w
w
w
w
w
w
w
w
w
w
w
w
w
w
w
w
w
w
w
w
w
w
w
w
w
w
w
w
w
w
w
w
w
w
w
w
w
w
w
w
w
w
w
w
w
w
w
w
w
w
w
w
w
w
w
w
w
w
w
w
w
w
w
w
w
w
w
w
w
w
w
w
w
w
w
w
w
w
w
w
w
w
w
w
w
w
w
w
w
w
w
w
w
w
w
w
w
w
w
w
w
w
w
w
w
w
w
w
w
w
w
w
w
w
w
w
w
w
w
w
w
w
w
w
w
w
w
w
w
w
w
w
w
w
w
w
w
w
w
w
w
w
w
w
w
w
w
w
w
w
w
w
w
w
w
w
w
w
w
w
.
.
.
.
g
g
g
g
g
g
g
g
g
g
g
g
g
g
g
g
g
g
g
g
g
g
g
g
g
g
g
g
g
g
g
g
g
g
g
g
g
g
g
g
g
g
g
g
g
g
g
g
g
g
g
g
g
g
g
g
g
g
g
g
g
g
g
g
g
g
g
g
g
g
g
g
g
g
g
g
g
g
g
g
g
g
g
g
g
g
g
g
g
g
g
g
g
g
g
g
g
g
g
g
g
g
g
g
g
g
g
g
g
g
g
g
g
g
g
g
g
g
g
g
g
g
g
g
g
g
g
g
g
g
g
g
g
g
o
o
o
o
o
o
o
o
o
o
o
o
o
o
o
o
o
o
o
o
o
o
o
o
o
o
o
o
o
o
o
o
o
o
o
o
o
o
o
o
o
o
o
o
o
o
o
o
o
o
o
o
o
o
o
o
o
o
o
oo
o
o
o
o
o
o
o
o
o
o
o
o
o
o
o
o
o
o
o
o
o
o
o
o
o
o
o
o
o
o
o
o
o
o
o
o
o
o
o
o
o
o
o
o
o
o
o
o
o
o
o
o
o
o
o
o
o
o
o
o
o
o
o
o
o
o
o
o
o
o
o
o
o
o
o
o
o
o
o
o
o
o
o
o
o
o
o
o
o
o
o
o
o
o
o
o
o
o
o
o
o
o
o
o
o
o
o
o
o
o
o
o
o
o
o
o
o
o
o
o
o
o
o
o
o
o
o
o
o
o
o
o
o
o
o
o
o
o
o
o
o
o
o
o
o
o
o
o
o
o
o
o
o
o
o
o
o
o
o
o
o
o
o
o
o
o
o
o
o
o
o
o
o
o
o
o
o
o
o
o
o
o
o
o
o
o
o
o
o
o
o
o
o
o
o
o
o
o
o
o
o
o
o
o
o
o
o
o
o
o
o
o
o
o
o
o
o
o
o
o
o
o
o
o
o
o
o
o
o
o
o
o
o
o
o
o
o
o
o
o
o
o
o
o
o
o
o
o
o
o
o
o
o
g
g
g
g
g
g
g
g
g
g
g
g
g
g
g
g
g
g
g
g
g
g
g
g
g
g
g
g
g
g
g
g
g
g
g
g
g
g
g
g
g
g
g
g
g
g
g
g
g
g
g
g
g
g
g
g
g
g
g
g
g
g
g
g
g
g
g
g
g
g
g
g
g
g
g
g
g
g
g
g
g
g
g
g
g
g
g
g
g
g
g
g
g
g
g
g
g
g
g
g
g
g
g
g
g
g
g
g
g
g
g
g
g
l
l
l
l
l
l
l
l
l
l
l
l
l
l
l
l
l
l
l
l
l
l
l
l
l
l
l
l
l
l
l
l
l
l
l
l
l
l
l
l
l
l
l
l
l
l
l
l
l
l
l
l
l
l
l
l
l
l
l
l
l
l
l
l
l
l
l
l
l
l
l
l
l
l
l
l
l
e
e
e
e
e
e
e
e
e
e
e
e
e
e
e
e
e
e
e
ee
e
e
e
e
e
e
e
e
e
e
e
e
e
e
e
e
e
e
e
e
e
e
e
e
e
e
e
e
e
e
e
e
e
e
e
e
e
e
e
e
e
e
e
e
e
e
e
e
e
e
e
e
e
e
e
e
e
e
e
e
e
e
e
e
e
e
e
e
e
e
e
e
e
e
e
e
e
e
e
e
e
e
e
e
e
e
e
e
e
e
e
e
e
e
e
e
e
e
e
e
e
e
e
e
e
e
e
e
e
e
e
e
e
e
e
e
e
e
e
e
e
e
e
e
e
e
.
.
..
c
c
c
c
c
c
c
c
c
c
c
c
c
c
c
c
c
c
c
c
c
c
c
c
c
c
c
c
c
c
c
c
c
c
c
c
c
c
c
c
c
c
c
c
c
c
c
c
c
c
c
c
c
c
c
c
c
c
c
c
c
c
c
c
c
c
c
c
c
c
c
c
c
c
c
c
c
c
c
c
c
c
c
c
c
c
c
c
c
c
c
c
c
c
c
c
c
c
c
c
c
c
c
c
c
c
o
o
o
o
o
o
o
o
o
o
o
o
o
o
o
o
o
o
o
o
o
oo
o
o
o
o
o
o
o
o
o
o
o
o
o
o
o
o
o
o
o
o
o
o
o
o
o
o
o
o
o
o
o
o
o
o
o
o
o
o
o
o
o
o
o
o
o
o
o
o
o
o
o
o
o
o
o
o
o
o
o
o
o
o
o
o
o
o
o
m
m
m
m
m
m
m
m
m
m
m
m
m
m
m
m
m
m
m
m
m
m
m
m
m
m
m
m
m
m
m
m
m
m
m
m
m
m
m
m
m
m
m
m
m
m
m
m
m
m
m
m
m
m
m
m
m
m
m
m
m
m
m
m
m
m
m
m
m
m
m
m
m
m
m
m
m
m
m
m
m
m
m
m
m
m
m
m
m
m
m
m
m
m
m
m
m
m
m
m
m
m
m
m
m
m
m
m
m
m
m
m
m
m
m
m
m
m
BDL4660EL
20
4. Now,youcanseethewebpage.
NOTES:
• TheOperabrowserdoesnotsupportFLASHformat.
• Thebrowserisnotavideosource.Itwillnotstayatthebrowser
screenafteryourestartthedisplay.
5. Change your settings
Using the remote control:
1. Press[ ] HOMEbuttontodisplaytheOSDmenu.
2. Press[ ] or[ ]buttontochoose
Setup
.Press[ ]button
toenter.
3. Press[ ] [ ] [ ] or[ ]buttontochoose
Quick picture and
sound
,
Settings
,
Connect to network
,or
Network
settings
.Press[ ]buttontoenter.
4. Press[ ] [ ] [ ] or[ ]buttontochooseitsmenuitemorto
adjustitsvalue.Press[ ]buttontoconrm.
5. Press[ ] BACKbuttontogobacktothepreviousmenulayer.
6. Press[ ] HOMEbuttontoexittheOSDmenu.
Using the display’s control buttons
1. Press[ ]buttontodisplaytheOSDmenu.
2. Press[ ][ ][ ]or[ ]buttontochoosemenuitemoradjust
itsvalue.
3. Press[ ]buttontoconrmmenuselectionandenterits
submenu.
4. Press[ ]buttontoexittheOSDmenu.
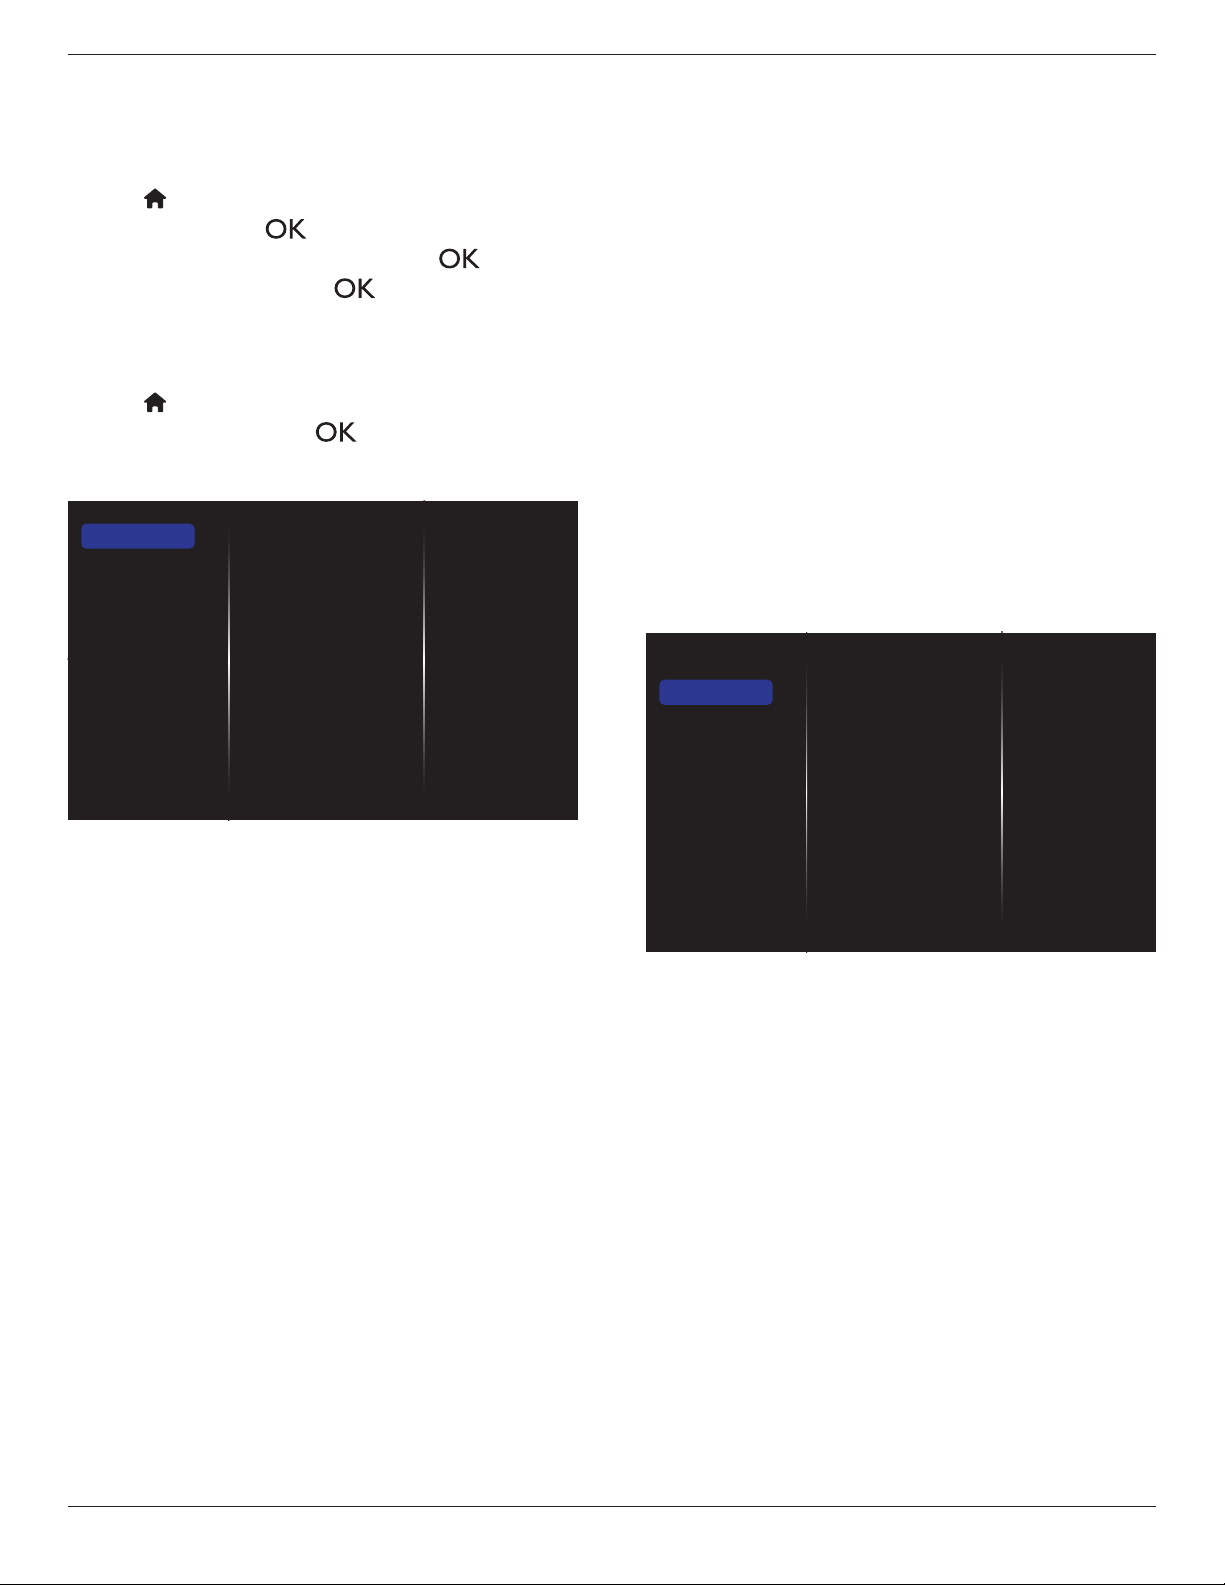
BDL4660EL
21
5.1. Quick picture and sound
Youcanchoosepictureandsoundsettingswiththehelpofthe
settingsassistant,whichdemonstratestheeffectofyourchosensetting
immediately.
1. Press[ ] HOMEbuttontodisplaytheOSDmenu.
2. Choose
Setup
.Press[ ]button.
3. Choose
Quick picture and sound
.Press[ ]button.
4. Choose
Continue
,thenpress[ ]button
5. Followtheon-screeninstructionstochooseyourpreferredsettings.
5.2. Settings
1. Press[ ] HOMEbutton,andgoto
Setup
menu.
2. Choose
Settings
andpress[ ]button.
5.2.1. Picture
menu
Picture style
Restore style
Backlight
Colour
Sharpness
Noise reduction
MPEG artifact reducti...
Digital Crystal Clear
Advanced
Game or computer
Foramat and edges
Picture
Sound
Tiling
General settings
Picture style
Chooseapredenedpicturesetting.
Restore style
Restorethelast-selectedpredenedpicturesetting.
Backlight
Adjustthebrightnessofthisdisplay’sbacklight.
Colour
Adjustthecoloursaturationofthepicture.
Sharpness
Adjustthesharpnessofthepicture.
Noise reduction
Choosetheamountofnoisereductionforthepicture.
MPEG artifact reduction
Smoothentransitionsandhazinessinthedigitalpicture.
Digital Crystal Clear
Fine-tuneeachpixeltomatchsurroundingpixelsandproduceabrilliant,
high-denitionimage.
• {Advanced sharpness}:Enablesuperiorsharpness,especiallyon
linesandcontoursinthepicture.
• {Dynamic contrast}:Dynamicallyenhancethedetailsinthe
dark,mediumandlightareasofthepicture.
• {Colour enhancement}:Dynamicallyenhancethevividnessand
detailsofcolours.
Advanced
Accessadvancedsettingssuchasgamma,tint,videocontrastandsoon.
• {Gamma}:Adjustthenon-linearsettingforpictureluminance
andcontrast.
• {Tint}:Changethecolourbalance.
• {Custom tint}:Customisecolourbalancesetting.Onlyavailable
if{Tint}
{Custom}ischosen.
• {Video contrast}:Adjustvideocontrast.
• {Brightness}:Adjustscreenbrightness.
• {Hue}:Adjustscreenhue.
Game or computer
Whenviewingcontentfromaconnectedgameconsole,choose{Game}
toapplygamesettings.WhenacomputerisconnectedthroughHDMI,
choose{Computer}.
Makesurethat{Format and edges}
{Picture format}
{Unscaled}
isselectedsoastoviewmaximumdetail.
Format and edges
• {Picture format}:Changethepictureformat.
Seepage16forthedescriptionsabout16forthedescriptionsabout
Picture format
.
5.2.2. Sound
Sound style
Restore style
Bass
Treble
Balance
Surround mode
Audio out
Advanced
Picture
Sound
Tiling
General settings
Sound style
Accesspredenedsoundsettings.
Restore style
Restorethelast-selectedpredenedsoundsetting.
Bass
Adjusttoincreaseordecreaselower-pitchedsounds.
Treble
Adjusttoincreaseordecreasehigher-pitchedsounds.
Balance
Adjusttoemphasizeleftorrightaudiooutputbalance.
Surround mode
Enhanceyouraudioexperience.
Audio out
Adjustaudiooutputvolume.
BDL4660EL
22
Advanced
Accessadvancedsettingstoenhanceyouraudioexperience.
• {Auto volume leveling}:Enablethereductionofsuddenvolume
changes.
• {Speaker settings}:Turnonorofftheinternalspeakers.
• {Clear sound}:Enhancesoundquality.
• {Audio out format}:Choosethetypeofaudiooutputthrough
thedigitalaudiooutputconnector.(HDMIonly)
• {Audio out delay}:Automaticallysynctheimageonthisdisplay
totheaudiofromaconnectedhometheatre.
• {Audio out offset}:Adjustthesettingforaudiooutputdelay.
Availableif{Audio out delay}isswitchedon.
5.2.3. Tiling
Enable
H monitors
V monitors
Position
Frame comp.
Picture
Sound
Tiling
General settings
Withthisfunctionyoucancreateasinglelarge-screenmatrix(video
wall)thatconsistsofupto100setsofthisdisplay(up to 10-sets on the
vertical and 10-sets on the horizontal sides).Thisfunctionrequiresa
daisy-chainconnection.
Enable
Chooseto{On}or{Off}theTilingfunction.If{On},thedisplaywill
applythesettingsin{H monitors},{V monitors},{Position},and
{Frame comp.}.
H monitors
Adjustdisplaysonthehorizontalside.
V monitors
Adjustdisplaysontheverticalside.
Position
Adjustthepositionofthisdisplayinthescreenmatrix.
Example: 2 x 2 screen matrix (4 displays)
Hmonitors=2displays
Vmonitors=2displays
1 2
3 4
H monitors
V monitors
Position
Example: 5 x 5 screen matrix (25 displays)
Hmonitors=5displays
Vmonitors=5displays
1 2
6 7
3 4
8 9
5
10
11 12 13 14 15
16 17 18 19 20
21 22 23 24 25
H monitors
V monitors
Position
Frame comp.
Choosetoturntheframecompensationfunctiononoroff.Ifselected
{On},thedisplaywilladjusttheimagetocompensateforthewidthof
thedisplaybezelsinordertoaccuratelydisplaytheimage.
{On}
{Off}
BDL4660EL
23
5.2.4. General settings
Picture
Sound
Tiling
General settings
Menu language
Group ID
Monitor ID
Eco mode
Auto search
Clock
Scheduling
Sleep timer
EasyLink
Local KB lock
RC lock
Menu language
ChooselanguageusedforOSDmenus.
Monitor group
Adjustthegrouprangebetween1to255.Thedefaultsettingis255.
Monitor ID
AdjusttheIDnumberforcontrollingthedisplayviatheRS232C
connection.EachdisplaymusthaveauniqueIDnumberwhenmultiple
setsofthisdisplayareconnected.MonitorIDnumberrangeisbetween
1to255.Thedefaultsettingis1.
Eco mode
Setthisdisplaytoreducethepowerconsumptionautomatically.
Auto search
Choosetoletthisdisplaydetectanddisplayavailablesignalsources
automatically.
Clock
Setthecurrentdateandtimeforthedisplay’sinternalclock.
Scheduling
Thisfunctionallowsyoutoprogramupto7differentscheduledtime
intervalsforthisdisplaytoactivate.
Youcanset:
• Whichinputsourcethedisplaywilluseforeachscheduled
activationperiod.
• Thetimeforthedisplaytoturnonandturnoff.
• Thedaysinaweekforthedisplaytoactivate.
NOTES:
• Werecommendyoutosetupcurrentdateandtimeinthe{Clock}
menubeforeusingthisfunction.
• Afterchangingthe{Clock}optioninthe{General settings}menu,
youneedtosetthis{Scheduling}again.
Picture
Sound
Tiling
General settings
Menu language
Group ID
Monitor ID
Eco mode
Auto search
Clock
Scheduling
Sleep timer
EasyLink
Local KB lock
RC lock
1. Thereare7schedulecanbeset.Goto
Status
andchoose
On
.
Status
Source
On time
Off time
Repeat modes
Playlist setting
Off
On
Schedule 1
Schedule 2
Schedule 3
Schedule 4
Schedule 5
Schedule 6
Schedule 7
2. Goto
Source
andchooseinputsource.If{Source}
{USB}
ischosen.Youneedtosetplayliist.If{Source}
{BROWSER}is
chosen.YouneedtosetURLaddress.
Status
Source
On time
Off time
Repeat modes
Playlist setting
Schedule 1
Schedule 2
Schedule 3
Schedule 4
Schedule 5
Schedule 6
Schedule 7
USB
HDMI 1
HDMI 2
DisplayPort
Card OPS
DVI-D
YPbPr
AV
VGA
BROWSER
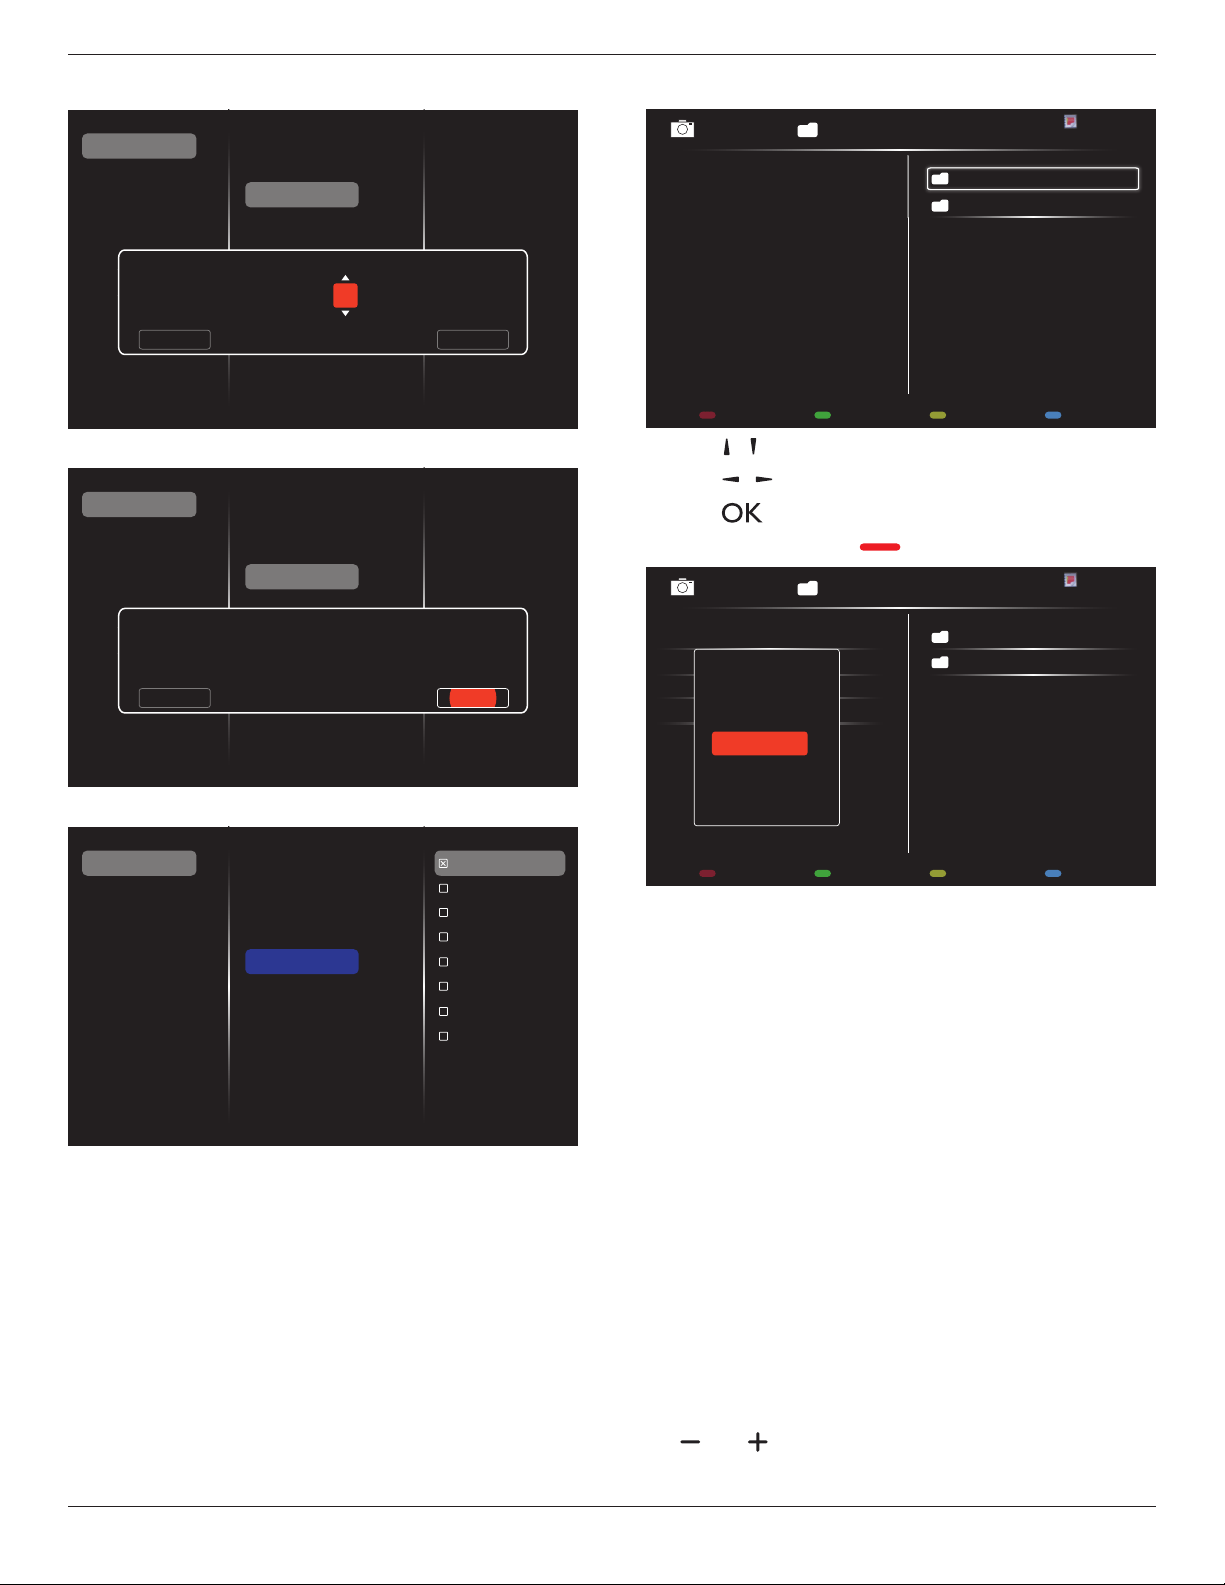
BDL4660EL
24
3. Set
On time
.
Status
Source
On time
Off time
Repeat modes
Playlist setting
Schedule 1
Schedule 2
Schedule 3
Schedule 4
Schedule 5
Schedule 6
Schedule 7
On time
Cancel Done
00 : 00
4. Set
Off time
.
Status
Source
On time
Off time
Repeat modes
Playlist setting
Schedule 1
Schedule 2
Schedule 3
Schedule 4
Schedule 5
Schedule 6
Schedule 7
Off time
Cancel
14 : 00
Done
5. Goto
Repeat modes
andchoose.
Status
Source
On time
Off time
Repeat modes
Playlist setting
Schedule 1
Schedule 2
Schedule 3
Schedule 4
Schedule 5
Schedule 6
Schedule 7
No repeat
Every Sunday
Every Monday
Every Tuesday
Every Wednesday
Every Thursday
Every Friday
Every Saturday
6. If{Source}
{USB}ischosen.Goto
Playlist setting
.
0001/0002
Options Exit
Photo
Photo
Video
- Press[ ] [ ] buttonstochooseles.
- Press[ ] [ ]buttonstoswitchPlaylistandFileManager.
- Press[ ]buttontosetorcleartheplaylist.
7. Tosavetheplaylist,press[ ] andchoose
Save list
.
0004/0004
Options Exit
Photo
Photo
[..]
Movie.avi
\media\photo
Photo1.jpg
Photo2.jpg
Photo3.jpg
Sort
Recursive Parser
Media Type
Save list
NOTES:
• EachPlaylistsupportsupto30les.
• Playlistwillnotbeclearedafter{Factory settings}.Youhaveto
manuallyremovethelesordeleteusb_schedulinglist.txtinthe
USB.
Sleep timer
Switchoffthisdisplayafteraspeciedtime.
EasyLink
ConnectandcontrolyourHDMI-CECcompliantdevicesthroughHDMI
porttothisdisplaywiththesameremotecontrol.
Auto adjust
UsethisfunctiontoautomaticallyoptimizethedisplayofVGAinput
image.
NOTE: ThisitemisfunctionalforVGAinputonly.
Local KB lock
Choosetoenableordisablethekeyboard(controlbuttons)functionof
thedisplay.
• {Unlock}:Enablethekeyboardfunction.
• {Lock all}:Lockallkeyboardfunction.
• {Lock but volume}:Disableallthekeyboardfunctionexceptthe
[ ] and [ ] button.
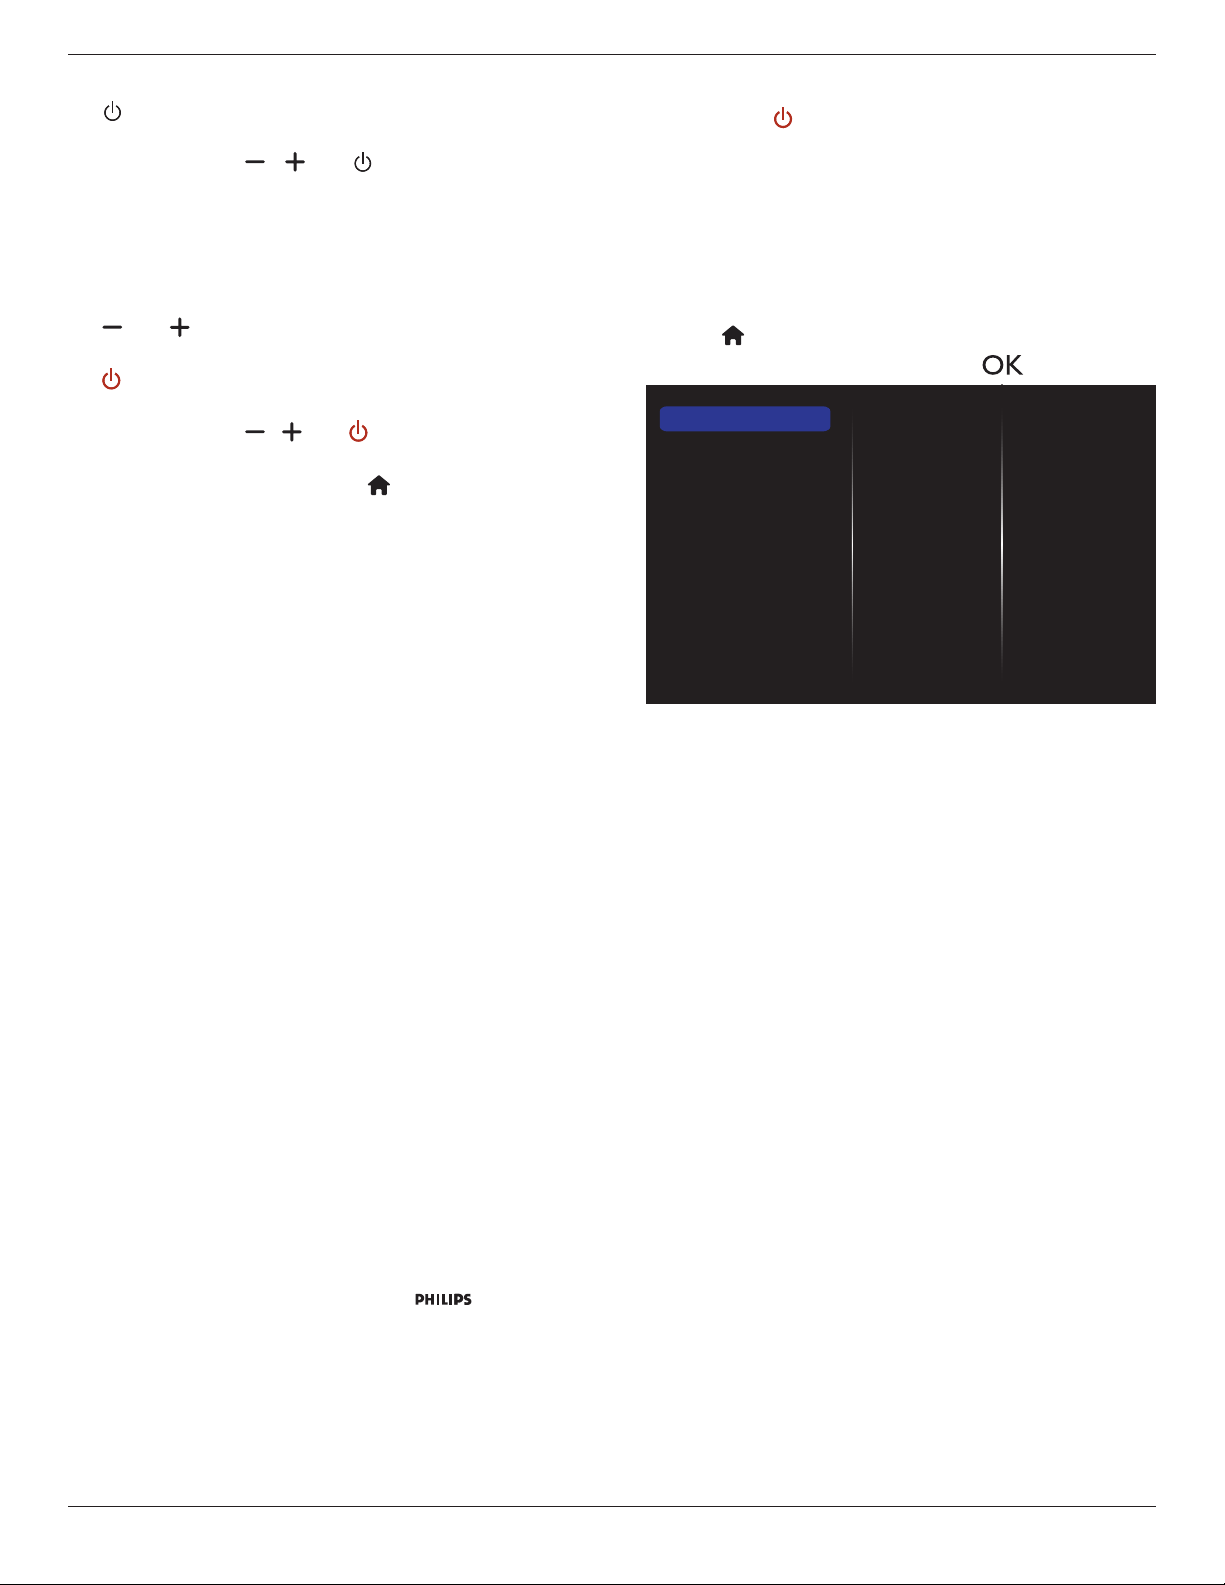
BDL4660EL
25
• {Lock but power}:Disableallthekeyboardfunctionexceptthe
[ ]button.
• {Lock all expect volume and power}:Disableallthekeyboard
functionexceptthe[ ], [ ] and [ ] button:
RC lock
Choosetoenableordisablethebuttonfunctionoftheremotecontrol.
• {Unlock}:Enablethekeyboardfunction.
• {Lock all}:Lockallkeyboardfunction.
• {Lock but volume}:Disableallthekeyboardfunctionexceptthe
[ ] and [ ] button.
• {Lock but power}:Disableallthekeyboardfunctionexceptthe
[ ] POWERbutton.
• {Lock all expect volume and power}:Disableallthekeyboard
functionexceptthe[ ] [ ] and [ ] POWER button:
NOTE: Todisablethelockfunctionfrom
Local KB lock
or
-
RC lock
item,pressbuttons[ ] and 1 9 9 8onthe
remotecontrol.
Pixel shift
Forvideoinputsources,youmaychoose{On}tomovethescreen
imageautomaticallytoprotectthedisplayfrom“burn-in”or“after-image”
symptoms30secondsafternotoperatingthedisplay.
Smart power
Chooseabacklightleveltooptimisedynamicpowerconsumptionand
picturecontrast.
Theoptionsare:{Off},{Standard},{Best Power},{Best Picture}.
Wake on lan
Choose{On}andyoucanturnonthedisplaybynetwork.
Switch on state
Choosethedisplaystatususedforthenexttimeyouconnectthe
powercord.
• {On}-Thedisplaywillturnonwhenthepowercordisconnected
toawalloutlet.
• {Standby}-ThedisplaywillremainStandbywhenthepowercordis
connectedtoawalloutlet.
• {Last status}-Thedisplaywillreturntothepreviouspowerstatus
(on/off/standby)whenremovingandreplacingthepowercord.
Light sensor
Choose{On}andthedisplaywillautomaticallyadjustbacklight.
LED
Choose{Off}toturnofftheindicator.
Switch on delay
Adjustthepower-ondelayingtime(inseconds)allowsasequential
powering-onforeachdisplaybytheirIDnumberwhenmultipledisplays
areconnected.
Logo
Choose{Off}andthedisplaywillnotdisplaythe logowhen
youswitchon.
DPMS
Choose{On}.Then,whennosignal,thedisplaywillautomaticallyturn
off.
Information OSD
Whenyoupress[ ] POWERbuttontoturnonthedisplayfrom
standbymodeorchangetheinputsignal,theinformationOSDis
displayedontheupperleftcornerofthescreen.
Choose{Off}toturnoffthisfunction.
Factory settings
Resetallyourcustomizedsettingstothefactorydefaults.
5.3. Network Settings
1. Press[ ] HOMEbutton,andgoto
Setup
menu.
2. Choose
Network Settings
andpress[ ]button.
View network settings
Network settings
Static IP configuration
Digital Media Renderer - D...
Network name
Clear Internet memory
View network settings
Viewconnectednetworkstatus.
Network settings
{Network conguration}:Choosehowthisdisplayshouldassign
addressestothenetworkresources.
Theusercanchoose{DHCP & Auto IP}(suggested)or{Static IP}.
Static IP Conguration
Dene{IP address},{Netmask},{Gateway},{DNS1},and{DNS2}for
thisdisplay.If{Network settings}
{Static IP}ischosen.
Digital Media Renderer - DMR
Receivemultimedialesfromtheconnecteddevicebyyournetwork.
Network name
Inthemultiple-displayconnection,youcanrenameeachdisplayforeasy
identication.
Usetheon-screenkeyboardortheremotecontrolkeypadtoenterthe
name.
Clear Internet memory
Clearallthecookies,bookmarks,historylistandtextusedforautoll.
BDL4660EL
26
6. USB device compatibility
USB Video Subtitle Formats (for language subtitles, etc.)
Name File extension Format
MPEG-4time-basedtext .ttxt XML
SAMI .smi HTML
SubRip .srt string-based
SubViewer .sub string-based
MicroDVD .subor.txt string-based
USB Multimedia Formats
File extension Container Video Codec Resolution Frame Rate (fps) Bit Rate (Mbps) Audio Codec
*.avi
*.mkv
AVI
MKV
DivX3.11/4x/5.1/6.0 1920x1080 6~30 8
MP3/AC3/LPCM/ADPCM/DTS
Core
XviD 1920x1080 6~30 8
H.264BP/MP/HP 1920x1080 6~30 25
MPEG4SP/ASP 1920x1080 6~30 8
MotionJPEG 1920x1080 6~30 8
*.asf
ASF
DivX3.11/4x/5.1/6.0 1920x1080 6~30 8
MP3/AC3/LPCM/ADPCM/WMA
XviD 1920x1080 6~30 8
H.264BP/MP/HP 1920x1080 6~30 25
MPEG4SP/ASP 1920x1080 6~30 8
MotionJPEG 1920x1080 6~30 8
*.wmv ASF WindowMediaVideov9 1920x1080 6~30 25 WMA
*.mp4 MP4
H.264BP/MP/HP 1920x1080 6~30 25
MP3/ADPCM/AAC
MPEG4SP/ASP 1920x1080 6~30 8
XVID 1920x1080 6~30 8
*.3gp
3GPP
H.264BP/MP/HP 1920x1080 6~30 25
ADPCM/AAC/
HE-AAC
HEMPEG4SP/ASP 1920x1080 6~30 8
*.vro
VRO
VOB
MPEG1 352x288 24/25/30 30
AC3/MPEG/LPCM
MPEG2 1920x1080 24/25/30 30
*.mpg
*.mpeg
PS
MPEG1 352x288 24/25/30 30
AC3/MPEG/LPCM/AACMPEG2 1920x1080 24/25/30 30
H..264 1920x1080 6~30 25
*.ts
*.trp
TS
MPEG2 1920x1080 24/25/30 30
AC3/AAC/MP3/DD+/HE-AACH..264 1920x1080 6~30 25
VC1 1920x1080 6~30 25
NOTES:
• Soundorvideomaynotworkifthecontentshaveastandardbitrate/framerateabovethecompatibleFrame/seclistedinthetableabove.
• VideocontentwithaBitrateorFrameratelargerthantheratespeciedinthetableabovecancausechoppyvideoduringplayback.
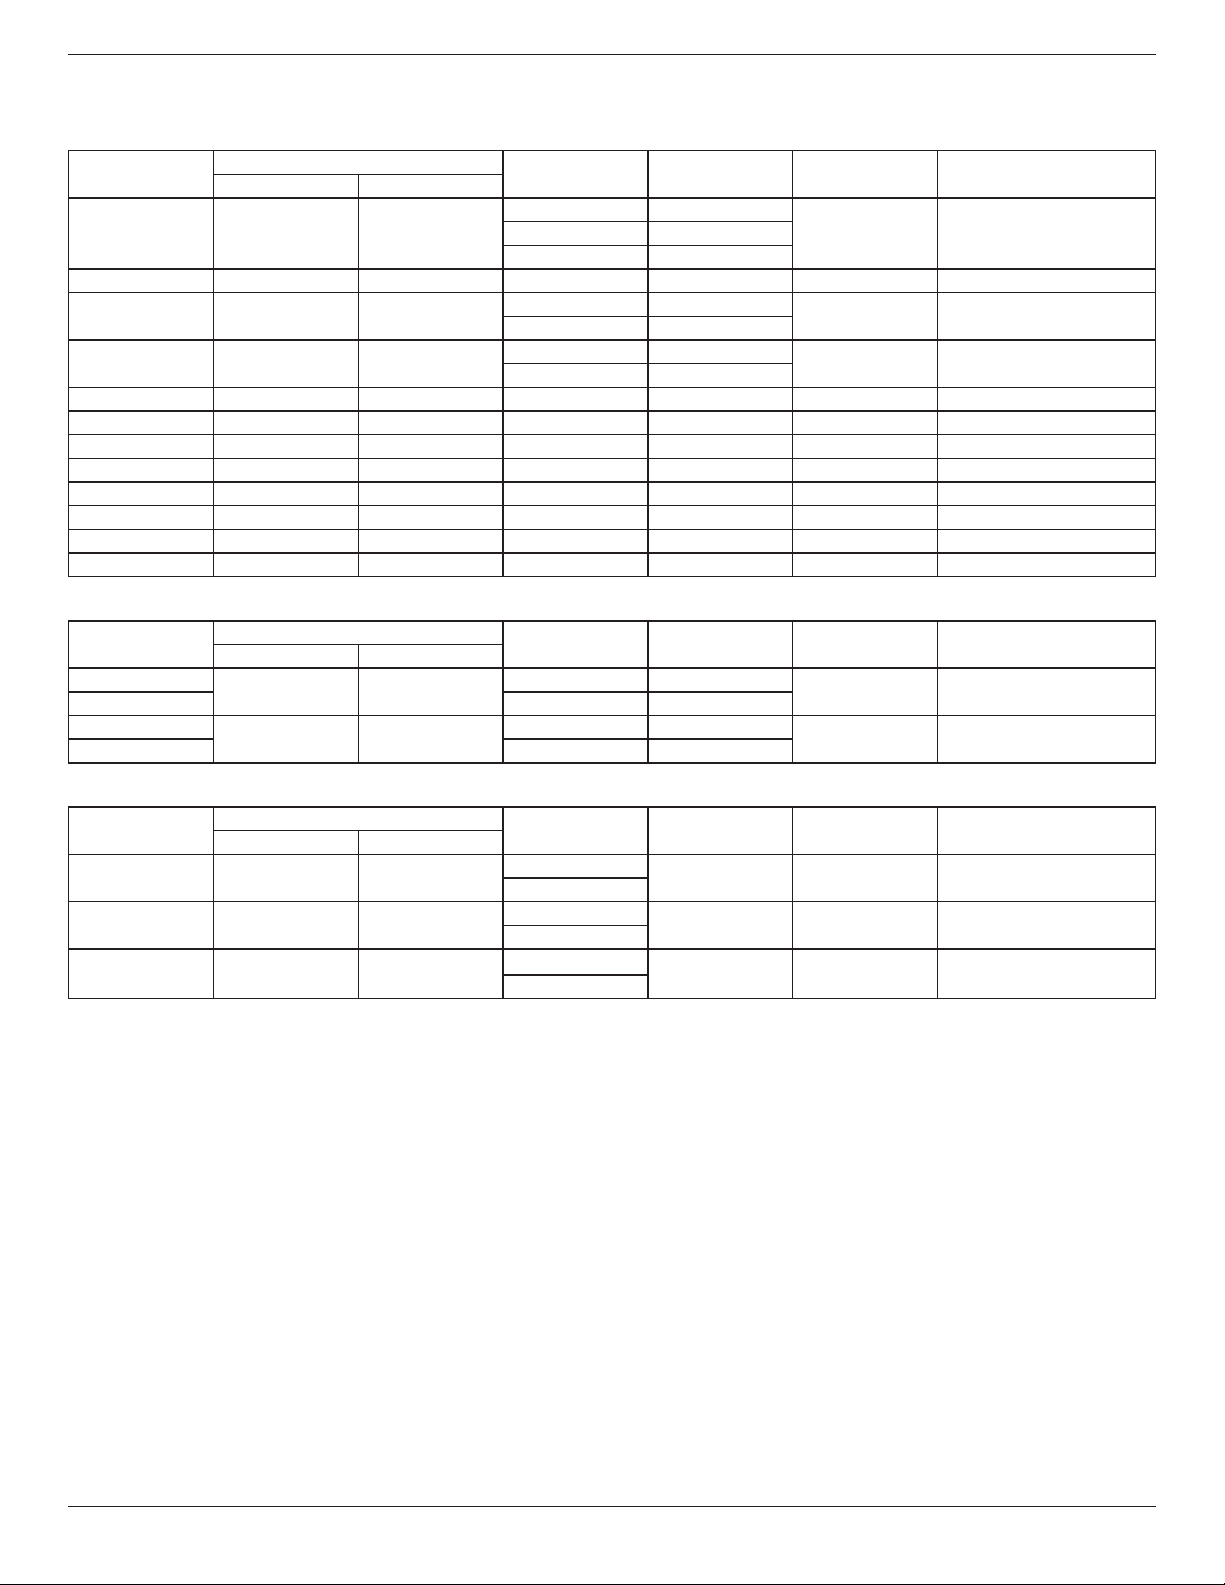
BDL4660EL
27
7. Input Mode
VGA Resolution:
Standard
Resolution
ActiveResolution
RefreshRate PixelRate AspectRatio StandforMode
HPixels VLines
VGA 640 480
60Hz 25.175MHz
4:3 VideoGraphicArray72Hz 31.5MHz
75Hz 31.5MHz
WVGA 720 400 70Hz 33.75MHz 16:9 WideVideoGraphicArray
SVGA 800 600
60Hz 40MHz
4:3 SuperVGA
75Hz 49.5MHz
XGA 1024 768
60Hz 65MHz
4:3 ExtendedGraphicArray
75Hz 78.75MHz
WXGA 1280 768 60Hz 79.5MHz 5:3 WideXGA
WXGA 1280 800 60Hz 79.5MHz 16:10 WideXGA
SXGA 1280 960 60Hz 108MHz 4:3 SuperXGA
SXGA 1280 1024 60Hz 108MHz 5:4 SuperXGA
WXGA 1360 768 60Hz 85.5MHz 16:9 WideXGA
WXGA 1366 768 60Hz 85.5MHz 16:9 WideXGA
UXGA 1600 1200 60Hz 162MHz 4:3 UltraXGA
HD1080 1920 1080 60Hz 148.5MHz 16:9 HD1080
SDTV Resolution:
Standard
Resolution
ActiveResolution
RefreshRate PixelRate AspectRatio StandforMode
HPixels VLines
480i
720 480
29.97Hz 13.5MHz
4:3 ModiedNTSCStandard
480p 59.94Hz 27MHz
576i
720 480
25Hz 13.5MHz
4:3 ModiedPALStandard
576p 50Hz 27MHz
HDTV Resolution:
Standard
Resolution
ActiveResolution
RefreshRate PixelRate AspectRatio StandforMode
HPixels VLines
720p 1280 720
50Hz
74.25MHz 16:9 NormallyDVBMode
60Hz
1080i 1920 1080
25Hz
74.25MHz 16:9 NormallyATSCMode
30Hz
1080p 1920 1080
50Hz
148.5MHz 16:9 NormallyATSCMode
60Hz
• ThePCtextqualityisoptimuminHD1080mode(1920x1080,60Hz).
• YourPCdisplayscreenmightappeardifferentdependingonthemanufacturer(andyourparticularversionofWindows).
• CheckyourPCinstructionbookforinformationaboutconnectingyourPCtoadisplay.
• Ifaverticalandhorizontalfrequency-selectmodeexists,select60Hz(vertical)and31.5KHz(horizontal).Insomecases,abnormalsignals(suchas
stripes)mightappearonthescreenwhenthePCpoweristurnedoff(orifthePCisdisconnected).Ifso,pressthe[INPUT]buttontoenterthe
videomode.Also,makesurethatthePCisconnected.
• WhenhorizontalsynchronoussignalsseemirregularinRGBmode,checkPCpowersavingmodeorcableconnections.
• ThedisplaysettingstablecompliestotheIBM/VESAstandards,andbasedontheanaloginput.
• TheDVIsupportmodeisregardedassametothePCsupportmode.
• Thebesttimingfortheverticalfrequencytoeachmodeis60Hz.
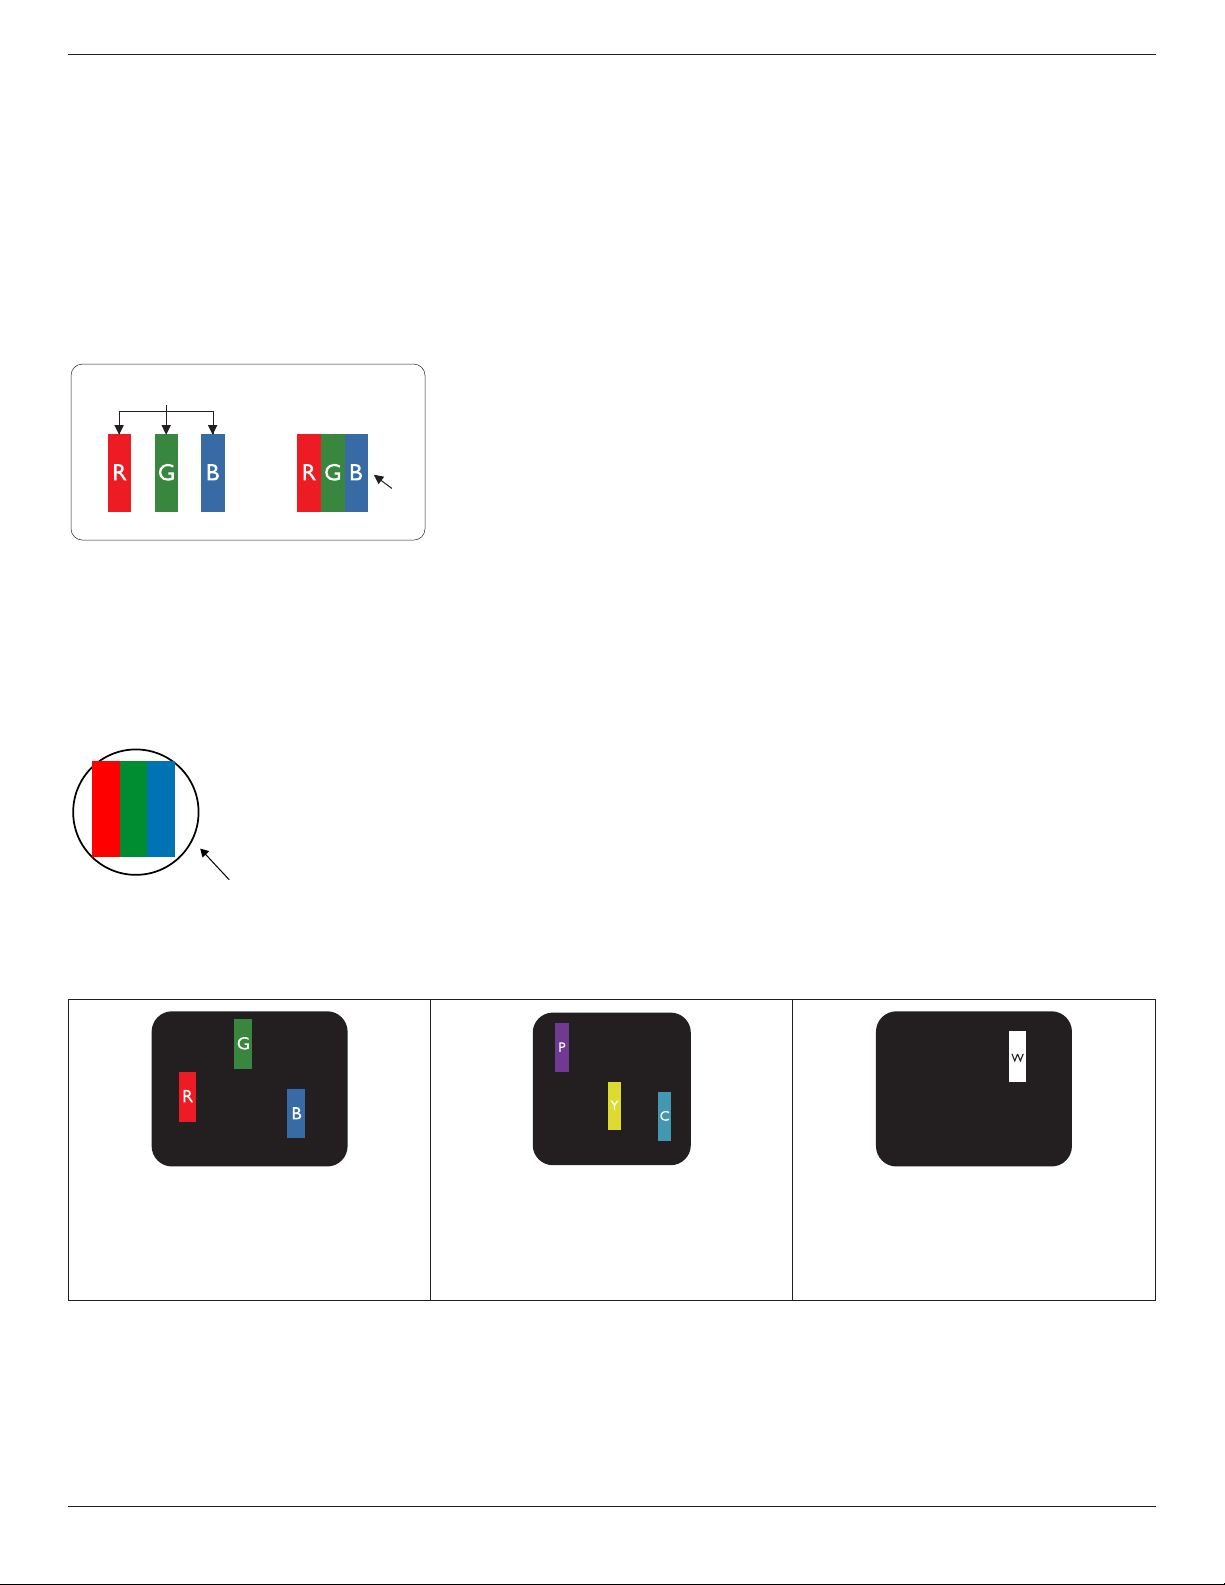
BDL4660EL
28
8. Pixel Defect Policy
Westrivetodeliverthehighestqualityproductsandusesomeoftheindustry’smostadvancedmanufacturingprocesseswhilstpracticingstringentquality
control.However,pixelorsub-pixeldefectsonthePDP/TFTpanelsusedinPlasma-&LCD-displaysaresometimesunavoidable.Nomanufacturercan
guaranteethatallpanelswillbefreefrompixeldefects,butPhilipsguaranteesthatanyPlasma-&LCD-displayswithanunacceptablenumberofdefects
willberepairedduringthewarrantyperiodinlinewithyourlocalguaranteeconditions.
ThisnoticeexplainsthedifferenttypesofpixeldefectsanddenestheacceptabledefectlevelfortheLCDscreen.Inordertoqualifyforrepairunder
warranty,thenumberofpixeldefectsmustexceedacertainlevelasshowninthereferencetable.IftheLCDscreeniswithinspecicationawarranty
exchange/claimbackwillberefused.Additionally,becausesometypesorcombinationsofpixeldefectsaremorenoticeablethanothers,Philipssetseven
higherqualitystandardsforthose.
8.1. Pixels and Sub-Pixels
subpixel
pixel
Apixel,orpictureelement,iscomposedofthreesub-pixelsintheprimarycolorsofred,greenand
blue.Manypixelstogetherformanimage.Whenallsub-pixelsofapixelarelit,thethreecolored
sub-pixelstogetherappearasasinglewhitepixel.Whenallaredark,thethreecoloredsub-pixels
togetherappearasasingleblackpixel.Othercombinationsoflitanddarksub-pixelsappearas
singlepixelsofothercolors.
8.2. Types of Pixel Defects + Dot Definition
Pixelandsub-pixeldefectsappearonthescreenindifferentways.Therearethreecategoriesofpixeldefectsandseveraltypesofsub-pixeldefectswithin
eachcategory.
Dot denition = What is a defective “Dot”? :
Oneormoredefective,adjacentsub-pixelaredenedasone“dot”.Theno.ofdefectivesub-pixelsarenotrelevanttodeneadefectivedot.Thismeans
thatadefectivedotcanconsistofone,twoorthreedefectivesub-pixelswhichcanbedarkorlit.
RR G B
Onedot=OnePixel;consistsofthreesub-pixelsofRed,Green,andBlue.
8.3. Bright Dot Defects
Brightdotdefectsappearaspixelsorsub-pixelsthatarealwayslitor“on”.Thesearetheexamplesofbrightdotdefects:
Onelitred,greenorbluesubpixel Twoadjacentlitsubpixels:
Red+Blue=Purple
Red+Green=Yellow
Green+Blue=Cyan(LightBlue)
Threeadjacentlitsubpixels(onewhitepixel)
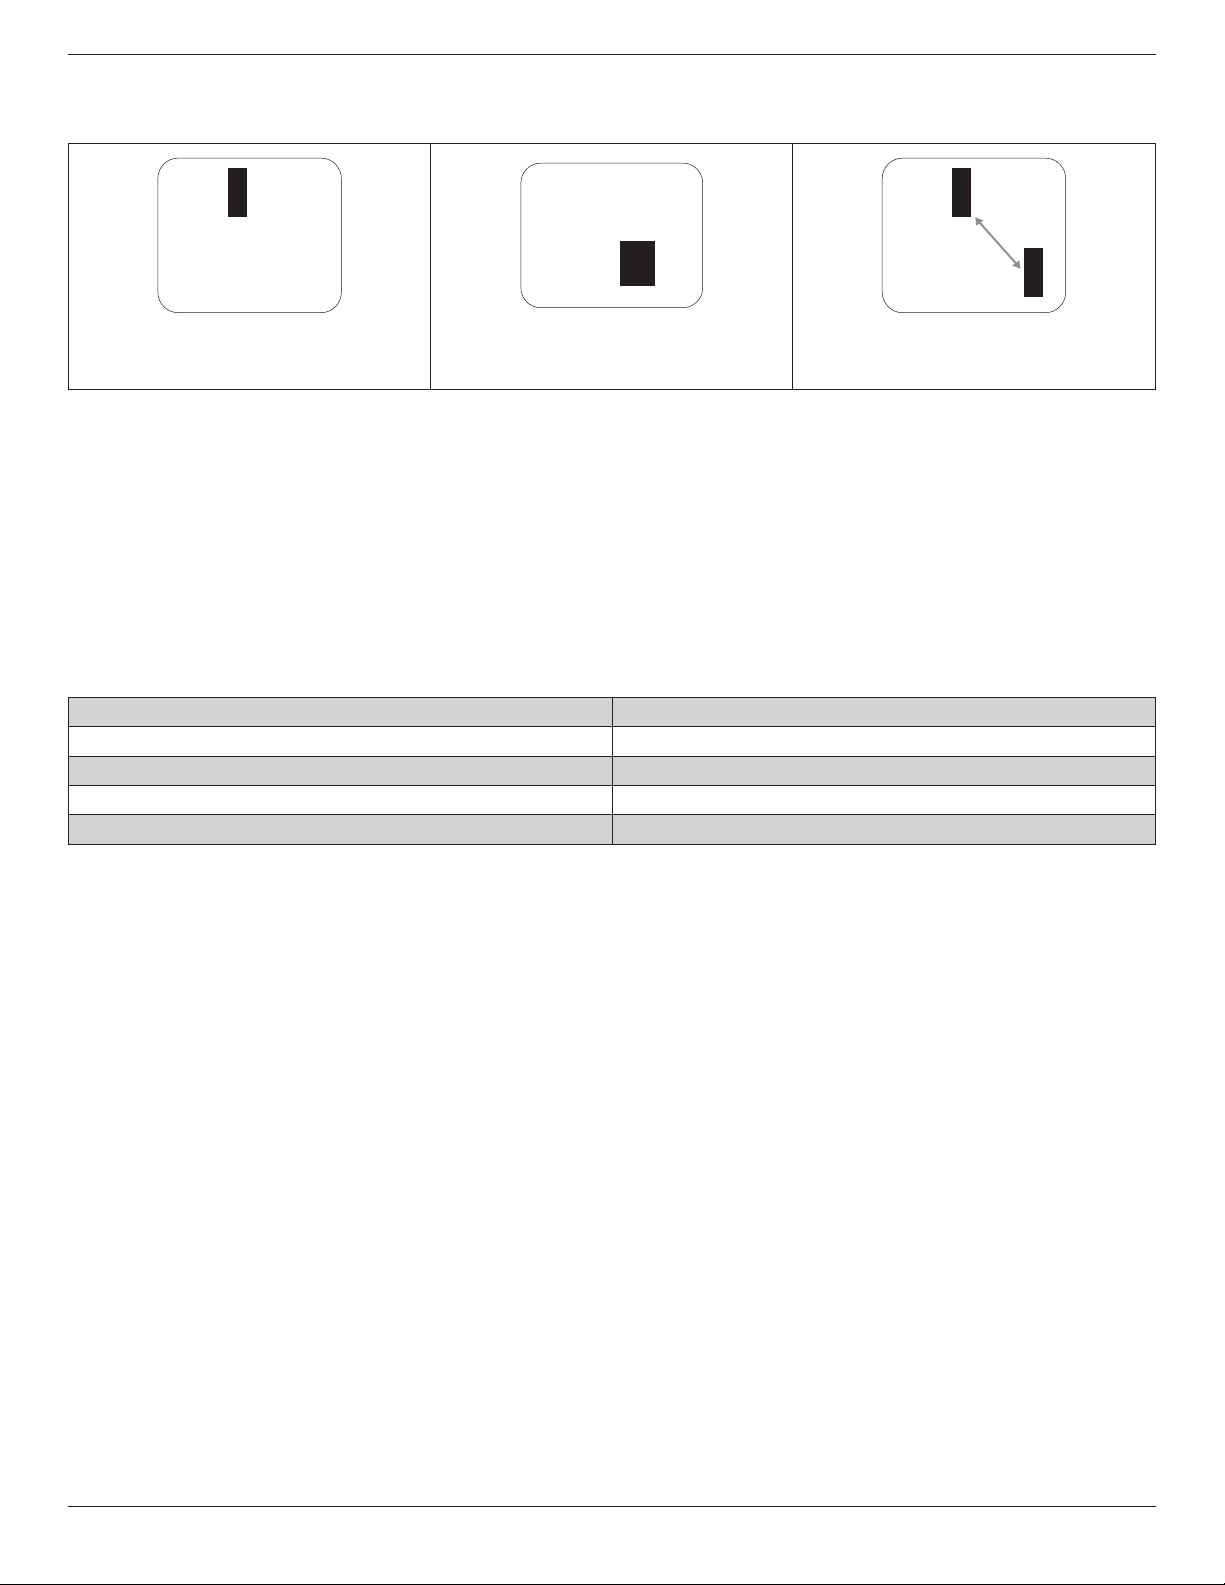
BDL4660EL
29
8.4. Dark Dot Defects
Blackdotdefectsappearaspixelsorsub-pixelsthatarealwaysdarkor“off”.Thesearetheexamplesofblackdotdefects:
Onedarkdot Twoadjacentdarkdots=1pairofdarkdots Twodarkdots,specicationsdenesthe
minimumdistancebetweendarkdots
8.5. Proximity of Pixel Defects
Becausepixelandsub-pixelsdefectsofthesametypethatarenearbyoneanothermaybemorenoticeable,Philipsalsospeciestolerancesforthe
proximityofpixeldefects.Inthetablebelowyoucanndspecicationsabout:
• Allowedamountofadjacentdarkdots=(adjacentdarkdots=1pairofdarkdots)
• Minimumdistancebetweendarkdots
• Totalno.ofalldefectivedots
8.6. Pixel Defect Tolerances
Inordertoqualifyforrepairduetopixeldefectsduringthewarrantyperiod,aPDP/TFTpanelinaPhilipsPlasma/LCD-displaymusthavepixelorsub-
pixeldefectsexceedingthetoleranceslistedinthefollowingtable.
BRIGHTDOTEFFECT ACCEPTABLELEVEL
1litsubpixel 2
BLACKDOTEFFECT ACCEPTABLELEVEL
1darksubpixel 10
TOTALDOTDEFECTSOFALLTYPES 12
NOTE:*1or2adjacentsubpixeldefects=1dotdefect
8.7. MURA
Darkspotsorpatchesmayoccasionallyappearonsomeliquidcrystaldisplay(LCD)panels.ThisisknownwithintheindustryasMura,whichisaJapanese
termfor“unevenness.”Itisusedtodescribeanirregularpatternorareainwhichunevenscreenuniformityappearsundercertainconditions.Muraisa
resultofthedeteriorationoftheliquidcrystalalignmentlayerandismostcommonlycausedbylong-termoperationunderhighambienttemperatures.It
isanindustry-widephenomenonandMuraisnotrepairable.Itisalsonotcoveredbyourwarrantyterms.
MurahasbeenaroundsincetheintroductionofLCDtechnologyandwithscreensgettingbiggerandinoperation24/7,manydisplaysarerunninginlow
lightconditions.ThisalladdstothepossibilityofMuraaffectingdisplays.
HOW TO SPOT MURA
TherearemanysymptomsofMuraandalsomultiplecauses.Severalofthesearelistedbelow:
• Impuritiesorforeignparticlesinthecrystalmatrix
• UnevendistributionofLCDmatrixduringmanufacturing
• Non-uniformluminancedistributionofthebacklight
• Panelassemblyinducedstress
• FlawswithintheLCDcells
• Thermalinducedstress-hightemperatureoperationoverlongperiodsoftime
HOW TO AVOID MURA
AlthoughwecannotguaranteethecompleteeradicationofMuraeverytime,ingeneraltheappearanceofMuracanbeminimizedbythesemethods:
• Lowerthebacklightbrightness
• Useascreensaver
• Reducetheambienttemperaturearoundtheunit

BDL4660EL
30
9. Cleaning and Troubleshooting
9.1. Cleaning
Caution When Using the Display
• Donotbringyourhands,faceorobjectsclosetotheventilationholesofthedisplay.Thetopofthedisplayisusuallyveryhotduetothehigh
temperatureofexhaustairbeingreleasedthroughtheventilationholes.Burnsorpersonalinjuriesmayoccurifanybodypartsarebroughttoo
close.Placinganyobjectnearthetopofthedisplaycouldalsoresultinheatrelateddamagetotheobjectaswellasthedisplayitself.
• Besuretodisconnectallcablesbeforemovingthedisplay.Movingthedisplaywithitscablesattachedmaydamagethecablesandthuscausere
orelectricshock.
• Disconnectthepowerplugfromthewalloutletasasafetyprecautionbeforecarryingoutanytypeofcleaningormaintenanceprocedure.
Front Panel Cleaning Instructions
• Thefrontofthedisplayhasbeenspeciallytreated.Wipethesurfacegentlyusingonlyacleaningclothorasoft,lint-freecloth.
• Ifthesurfacebecomesdirty,soakasoft,lint-freeclothinamilddetergentsolution.Wringtheclothtoremoveexcessliquid.Wipethesurfaceof
thedisplaytoremovedirt.Thenuseadryclothofthesametypetodry.
• Donotscratchorhitthesurfaceofthepanelwithngersorhardobjectsofanykind.
• Donotusevolatilesubstancessuchasinsertsprays,solventsandthinners.
Cabinet Cleaning Instructions
• Ifthecabinetbecomesdirty,wipethecabinetwithasoft,drycloth.
• Ifthecabinetisextremelydirty,soakalint-freeclothinamilddetergentsolution.Wringtheclothtoremoveasmuchmoistureaspossible.Wipe
thecabinet.Useanotherdryclothtowipeoveruntilthesurfaceisdry.
• Donotallowanywaterordetergenttocomeintocontactwiththesurfaceofthedisplay.Ifwaterormoisturegetsinsidetheunit,operating
problems,electricalandshockhazardsmayresult.
• Donotscratchorhitthecabinetwithngersorhardobjectsofanykind.
• Donotusevolatilesubstancessuchasinsertsprays,solventsandthinnersonthecabinet.
• DonotplaceanythingmadefromrubberorPVCnearthecabinetforanyextendedperiodsoftime.

BDL4660EL
31
9.2. Troubleshooting
Symptom Possible Cause Remedy
No picture is displayed 1. Thepowercordisdisconnected.
2. Themainpowerswitchonthebackofthe
displayisnotswitchedon.
3. Theselectedinputhasnoconnection.
4. Thedisplayisinstandbymode.
1. Pluginthepowercord.
2. Makesurethepowerswitchisswitchedon.
3. Connectasignalconnectiontothedisplay.
Interference displayed on the display or audible
noise is heard
Causedbysurroundingelectricalappliancesor
uorescentlights.
Movethedisplaytoanotherlocationtoseeisthe
interferenceisreduced.
Color is abnormal Thesignalcableisnotconnectedproperly. Makesurethatthesignalcableisattachedrmly
tothebackofthedisplay.
Picture is distorted with abnormal patterns 1. Thesignalcableisnotconnectedproperly.
2. Theinputsignalisbeyondthecapabilitiesof
thedisplay.
1. Makesurethatthesignalcableisattached
rmly.
2. Checkthevideosignalsourcetoseeifit
isbeyondtherangeofthedisplay.Please
verifyitsspecicationswiththisdisplay’s
specicationsection.
Display image doesn’t ll up the full size of the
screen
1. Thezoommodeisnotsetcorrectly.
2. ScanModemaybesetincorrectlyto
underscan.
3. Iftheimageexceedsthescreensize,Scan
ModemayneedtobesettoUnderscan.
UsetheZoommodeorCustomzoomfunction
intheScreenmenutonetunedisplaygeometry
andtimefrequencyparameter.
Can hear sound, but no picture Improperlyconnectedsourcesignalcable. Makesurethatbothvideoinputsandsound
inputsarecorrectlyconnected.
Can see picture but no sound is heard 1. Improperlyconnectedsourcesignalcable.
2. Volumeisturnedallthewaydown.
3. {Mute}isturnedon.
4. Noexternalspeakerconnected.
1. Makesurethatbothvideoinputsandsound
inputsarecorrectlyconnected.
2. Press[ ]or[ ]buttontohearsound.
3. SwitchMUTEoffbyusingthe[ ]button.
4. Connectexternalspeakersandadjustthe
volumetoasuitablelevel.
Some picture elements do not light up Somepixelsofthedisplaymaynotturnon. Thisdisplayismanufacturedusinganextremely
highlevelofprecisiontechnology:however,
sometimessomepixelsofthedisplaymaynot
display.Thisisnotamalfunction.
After-Images can still be seen on the display
after the display is powered off. (Examples
of still pictures include logos, video games,
computer images, and images displayed in 4:3
normal mode)
Astillpictureisdisplayedforanoverextended
periodoftime
Donotallowastillimagetobedisplayedfor
anextendedperiodoftimeasthiscancausea
permanentafter-imagetoremainonthedisplay.

BDL4660EL
32
10. Technical Specifications
Display:
Item Specications
ScreenSize(ActiveArea) 46”(116.8cm)LCD
AspectRatio 16:9
Numberofpixels 1920(H)x1080(V)
Pixelpitch 0.53025(H)x0.53025(V)[mm]
Displayablecolors 10bits(D),1073.7Mcolors
Brightness(typical) 450cd/m
2
Contrastratio(typical) 1300:1
Viewingangle 178degrees
In/Out Terminals:
Item Specications
SpeakerOutput InternalSpeakers
ExternalSpeakers
10W(L)+10W(R)[RMS]/8Ω
1Way1SpeakerSystem
82dB/W/M/160Hz~13KHz
AudioOutput
PhoneJackx1 0.5V[rms](Normal)/2Channel(L+R)
AudioInput RCAJackx2
3.5mmStereox1
0.5V[rms](Normal)/2Channel(L+R)
RS232C 2.5mmPhonejackx2 RS232Cin/RS232Cout
RJ-45 RJ-45Jackx1(8pin)
10/100LANPort
HDMIInput HDMIJackx2
(TypeA)(18pin)
DigitalRGB:TMDS(Video+Audio)
MAX:
Video-720p,1080p,1920x1080/60Hz(WUXGA)
Audio-48KHz/2Channel(L+R)
SupportsLPCMonly
DVI-DInput DVI-Djack DigitalRGB:TMDS(Video)
VGAInput D-SubJackx1(15pin) AnalogRGB:0.7V[p-p](75Ω),H/CS/V:TTL(2.2kΩ),SOG:1V[p-p](75Ω)
MAX:720p,1080p,1920x1080/60Hz(WUXGA)
DVI-I(DVI-D&VGA)
Output
DVI-IJackx1(29pin) DigitalRGB:TMDS(Video)
AnalogRGB:0.7V[p-p](75Ω),H/CS/V:TTL(2.2kΩ),SOG:1V[p-p](75Ω)
MAX:720p,1080p,1920x1080/60Hz(WUXGA)
ComponentInput BNCJackx3 Y:1V[p-p](75Ω),Pb:0.7V[p-p](75Ω),Pr:0.7V[p-p](75Ω)
MAX:480i,576i,480p,576p,720p,1080i,1080p
VideoInput BNCx1(Sharewith
Component_Y)
Composite1V[p-p](75Ω)
Displayportin/out DisplayportJackx2
(20pin)
DigitalRGB:TMDS(Video+Audio)
MAX:
Video-720p,1080p,1920x1080/60Hz(WUXGA)
Audio-48KHz/2Channel(L+R)
SupportsLPCMonly
BDL4660EL
33
General:
Item Specications
PowerInput 100-240V~,50-60Hz,5.5A
PowerOutput 100-240V~,50-60Hz,2.5A
PowerConsumption(Max) 250W
PowerConsumption(typ.) 109W
PowerConsumption(Standby&Off) <0.5W(RS232inactive)
Dimensions(WithStand)[WxHxD] 1052.7x662.7x400mm
Dimensions(WithoutStand)[WxHxD] 1052.7x607.3x69mm
Weight(WithStand) 23.6Kg
Weight(WithoutStand) 21.3Kg
GrossWeight(WithoutStand) 28.5Kg
Environmental Condition:
Item Specications
Temperature Operational 0~40°C
Storage -20~60°C
Humidity Operational 20~80%RH(Nocondensation)
Storage 5~95%RH(Nocondensation)
Altitude Operational 0~3,000m
Storage/Shipment 0~9,000m
Internal Speaker:
Item Specications
Type 1Way1Speaker
Input 10W(RMS)
Impedance 8Ω
OutputSoundPressure 82dB/W/M
FrequencyResponse 160Hz~13KHz

2014 © Koninklijke Philips N.V. All rights reserved.
Philips and the Philips Shield Emblem are registered trademarks of
Koninklijke Philips N.V. and are used under license from
Koninklijke Philips N.V.
Specications are subject to change without notice.