Additional tools
(if needed)
Herramientas adicionales
(si es necesario)
wood block
bloque de madera
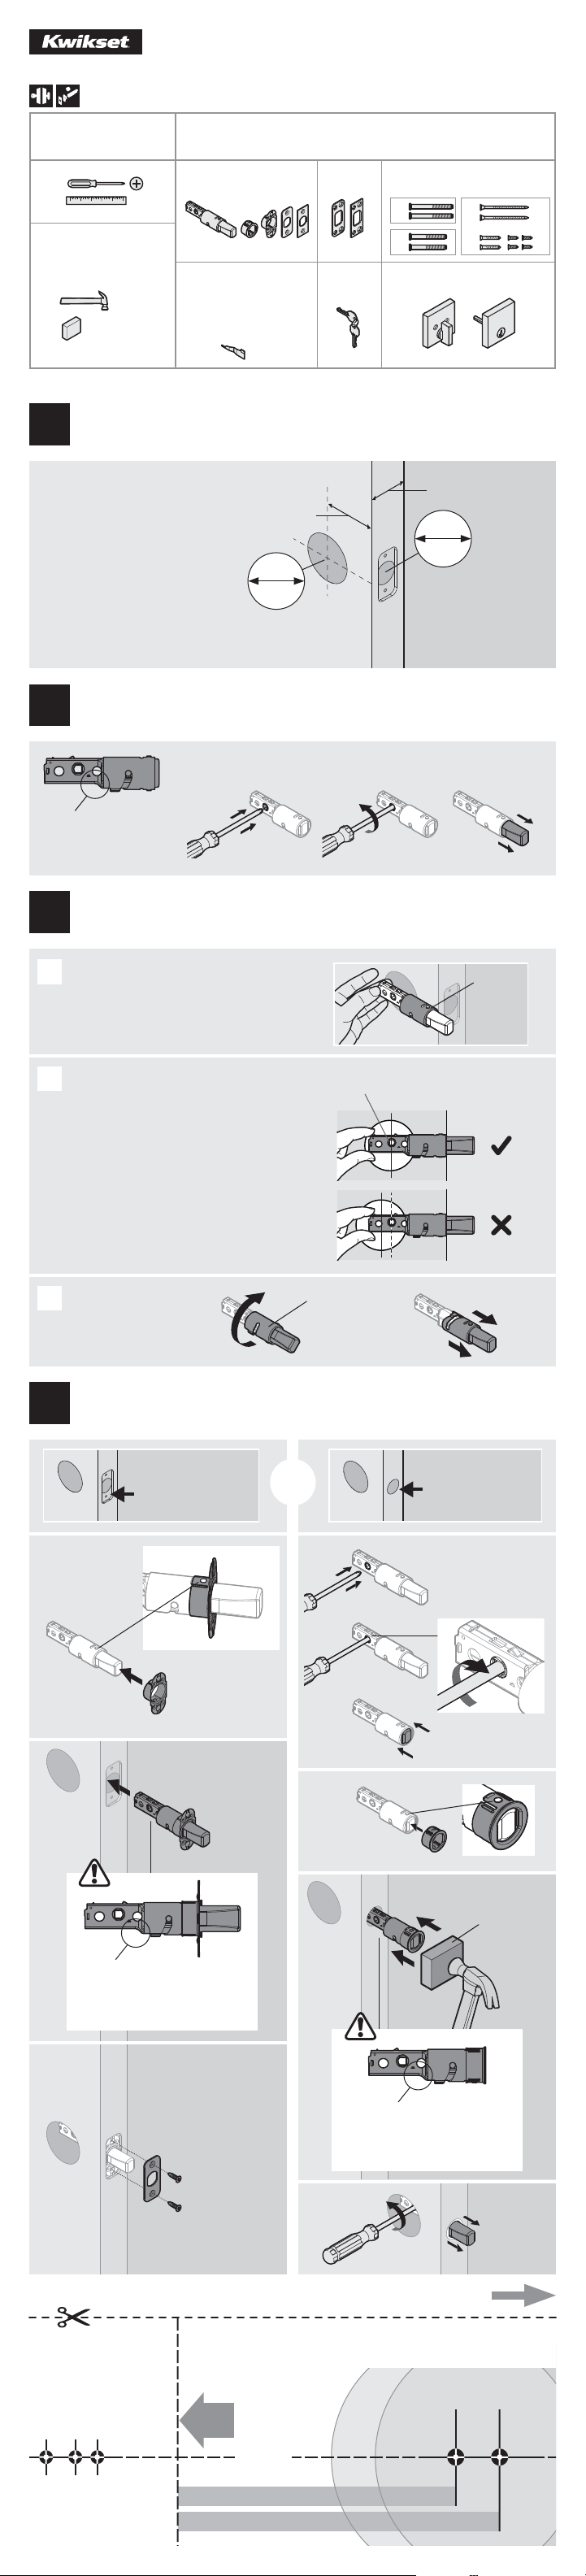
Parts in the box
Piezas en la caja
Required tools
Herramientas necesarias
Latch
Pestillo
Screws
Tornillos
Strikes
Placas
Keys
Llaves
Deadbolt
Cerrojo
SmartKey® tool
(SmartKey locks only)
Herramienta SmartKey
(las cerraduras de
SmartKey solamente)
A
A
A
A
A
B
C
BCDE F G
H
J
M
NP
Q
RS T
Hold the latch in front of the door hole, with
the latch case lush against the door edge.
Sostenga el pestillo en frente del oriicio
de la puerta, con la cubierta del pestillo
al ras con el borde de la puerta.
latch case
cubierta
del pestillo
If the D-shaped hole is centered
in the door hole, no adjustment is
required. Proceed to step 4.
If the D-shaped hole is NOT centered, adjust
latch. See “Latch Adjustment” (step 3C).
Si el oriicio en forma de “D” está
centrado con el oriicio de la puerta, no
se requiere ajustarlo. Vaya al paso 4.
Si el oriicio en forma de “D” NO está
centrado, ajuste el pestillo. Consulte
“Ajuste del pestillo” (el paso 3C).
Latch Adjustment
(only if needed)
Ajuste del pestillo
(si es necesario)
180°
Rotate the front of the
latch to extend it.
Gire el pestillo frontal
para alargar.
Use a screwdriver to
retract the latch bolt.
Utilice un destornillador
para retraer el pestillo.
Install
drive-in
collar.
Instale
el aro de
empuje.
Extend the
latch bolt.
Extiende el
pestillo.
D / E
P (2x)
Install backplate.
Instale la placa
trasera.
Install
faceplate.
Instale la
placa frontal.
centered
centrado
not centered
no centrado
Make sure the curve is on
the bottom of the latch.
Asegurarse de que la curva este
en la parte inferior del pestillo.
Make sure the curve is on
the bottom of the latch.
Asegurarse de que la curva este
en la parte inferior del pestillo.
D-shaped hole
oriicio en forma de “D”
If drilling a new door, use
the supplied template and
the complete door drilling
instructions available at
kwikset.com/doorprep
Si va a perforar una
puerta nueva, utilice la
plantilla suministrada y las
instrucciones completas
para la perforación de
la puerta disponibles en
kwikset.com/doorprep
*Call Kwikset to order
a service kit for 21/4"
(57 mm) thick doors.
*Llame a Kwikset para pedir
un kit de servicio para puertas
gruesas con un espesor
de entre 57 mm (21/4").
23/8" (60 mm)
or • o
23/4" (70 mm)
13/8"–21/4"*
35 mm–57 mm*
21/8"
54 mm
1"
25 mm
Door edge NOT
chiseled
La puerta sin el
borde cincelado
Door edge chiseled
La puerta con el
borde cincelado
Instructions continue on reverse
Las instrucciones continúan en el reverso de la hoja
23/8" (60 mm)
23/4" (70 mm)
Backset • Distancia al centro
Centerline
13/8" (35 mm)
13/4" (44 mm)
21/4" (57 mm)
Edge of the door
Borde de la puerta
Fold
Doble
Linea central
Drilling Template
Plantilla de perforación
Template is only needed if a new hole must be drilled in the door.
La plantilla solo se necesita en caso de que deba perforarse un nuevo oriicio en la puerta.
Face of the door
Frente de la puerta
180°
Use a screwdriver to extend the latch bolt.
Utilice un destornillador para extender el pestillo.
Make sure the curve is on
the bottom of the latch.
Asegurarse de que la curva este
en la parte inferior del pestillo.
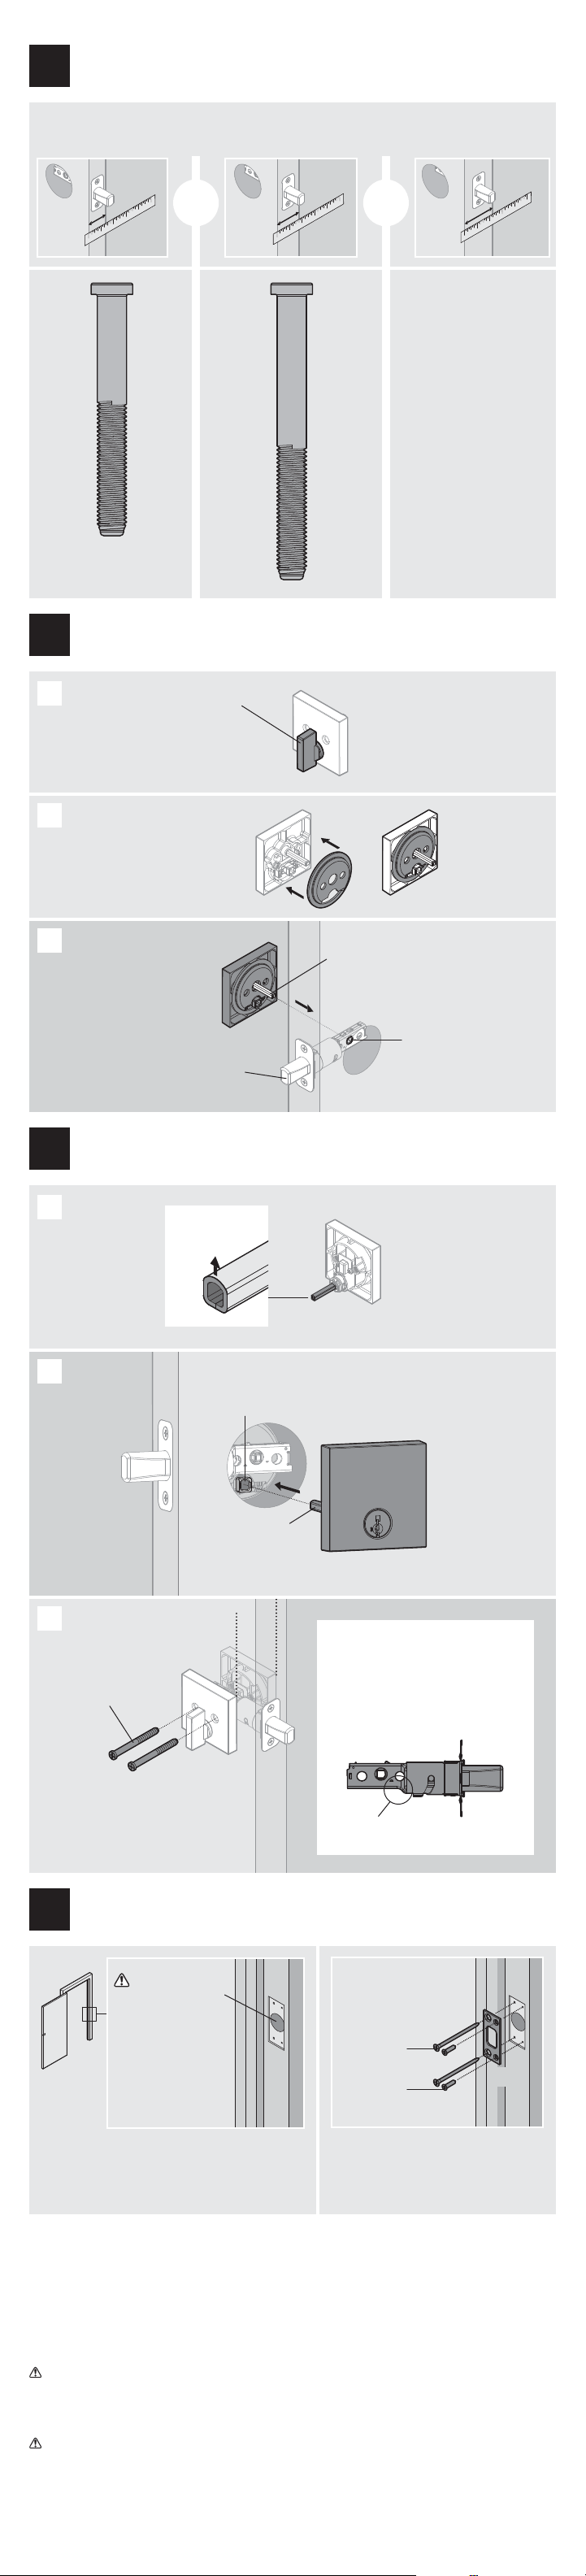
A
B
C
or
o
wood block
bloque de
madera
Installation Guide
Guía de instalación
18003275625 • www.kwikset.com
62842 / 01
258
Prepare door and check dimensions
Prepare la puerta y revise las dimensiones
1
Extend latch bolt
Extienda el perno de retención
2
Adjust the backset of the latch (if needed)
Ajuste la distancia al centro del pestillo (si es necesario)
3
Install latch
Instale el pestillo
4
Measure the thickness of your door to determine the required mounting screws for step 7.
Mida el espesor de su puerta para determinar los tornillos de montaje necesarios para el paso 7.
or
o
or
o
Actual size
Tamañ o re al
Actual size
Tamañ o re al
Call Kwikset to order a service
kit for 21/4" (57 mm)
thick doors. Use the screws
provided in the kit.
Llame a Kwikset para pedir un
kit de servicio para puertas
gruesas con un espesor de
entre 57 mm (21/4"). Utilice los
tornillos incluidos en el kit.
Make sure turnpiece is vertical.
Asegúrese de que la perilla este vertical.
torque blade
paleta de torsión
torque blade
paleta de
torsión
latch cam
leva del pestillo
turnpiece
perilla
interior
interior
exterior
exterior
J (2x)
M (2x)
F / G
F / G
N / P
(2x)
S
S
S
T
T
H (2x)
Make sure hole in
door frame is drilled
a minimum of 1"
(25 mm) deep.
Asegúrese de que el
oriicio en el marco
de la puerta se
perfora un mínimo
de 25 mm (1 “) de
profundidad.
Mounting plate should be
pre-installed on interior.
If removed, re-install.
La placa de montaje debe ser
pre-instalado en el interior. Si
se removio, reinstale la placa.
Make sure latch bolt is fully extended.
Asegúrese de que el pestillo esté
completamente extendido.
Support deadbolt
interior while
installing exterior.
Respalde el cerrojo
interior durante
la instalación del
cerrojo exterior.
WARNING: This Manufacturer advises that no lock can provide complete security by itself. This lock may be
defeated by forcible or technical means, or evaded by entry elsewhere on the property. No lock can substitute
for caution, awareness of your environment, and common sense. Builder’s hardware is available in multiple
performance grades to suit the application. In order to enhance security and reduce risk, you should consult a
qualiied locksmith or other security professional.
ADVERTENCIA: Este Fabricante hace saber que no hay cerrojos que puedan proporcionar completa seguridad
por sí mismos. Puede hacerse que falle este cerrojo forzándolo o utilizando medios técnicos, o puede evadirse
entrando por otra parte de la propiedad. No hay cerrojos que puedan hacer de sustitutos para la precaución, el estar
al tanto del entorno, y el sentido común. Pueden obtenerse piezas de ferretería de constructor con diversos grados
de rendimiento para ajustarse a la aplicación. Para realzar la seguridad y reducir los riesgos, debe consultar con un
cerrajero capacitado u otro profesional de seguridad.
Register your product at www.kwikset.com/productregistration
Rate your product for a chance to win at www.kwikset.com/reviews
Registre su producto en www.kwikset.com/productregistration
Clasiique su producto en www.kwikset.com/reviews
©2015 Spectrum Brands, Inc.
13/8"
35 mm
13/4"
44 mm
21/4"
57 mm
Use screws from step 5.
Utilice los tornillos del paso 5.
Keep parallel.
Mantengala paralela.
Note: The longer screws, M, (3" / 76 mm) must
be used to maintain highest security.
Nota: Los tornillos más largos, M, (3" / 76 mm) deben
utilizarse para mantener la máxima seguridad.
Longer screws (M)
install closest to jamb.
Los tornillos más largos
(M) se instalan más
cerca de la jamba.
Curve points up.
La curva apunta
hacia arriba.
Trouble sho oting
Solución de problemas
curve on bottom
la curva en la parte inferior
If the screws are di icult to tighten, make
sure the latch is installed correctly.
Si los tornillos son diíciles de ajustar,
asegúrese de que el pestillo se ha
instalado correctamente.
A
A
B
B
C
C
Determine required mounting screws
Determine los tornillos de montaje necesarios
5
Install deadbolt INTERIOR before exterior
Instale el cerrojo INTERIOR antes del exterior
6
Install deadbolt exterior
Instale el cerrojo exterior
7
Install strike on door frame
Instale la placa en el marco de la puerta
8