USER MANUAL Tv
Features of your new TV
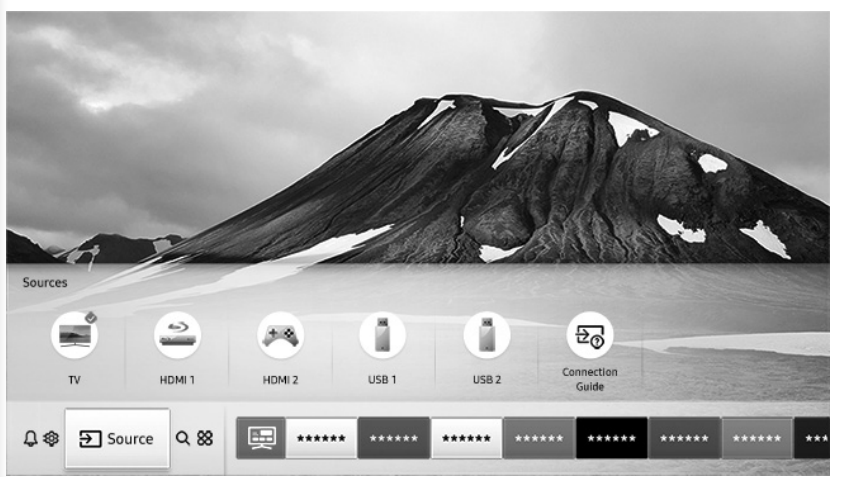
Home Screen: In Home Screen, you can easily run the apps that have been used previously or frequently. The apps can also be moved or deleted in the screen
e-Manual Get help from a detailed, on-screen user's manual built into your TV.
The TV Control Stick
Using the TV Controller
- You can use the TV Controller on the back of the TV instead of the remote control to control most of the functions of your TV. While watching TV or cable TV, you can change the channel or adjust the volume by pressing the TV Controller button. When using Smart Hub, the TV's menu, or selecting a source, move the TV Controller up, down, left, or right to move the cursor. Press the TV Controller button to select or activate the item highlighted by the cursor.
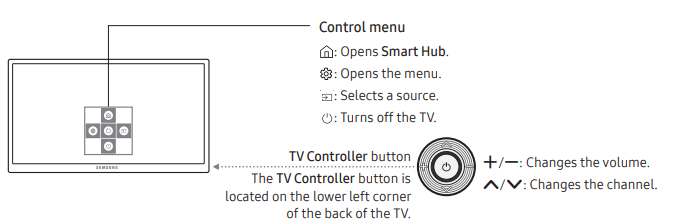
- The image on your TV may differ from the image above depending on the model and geographical area.
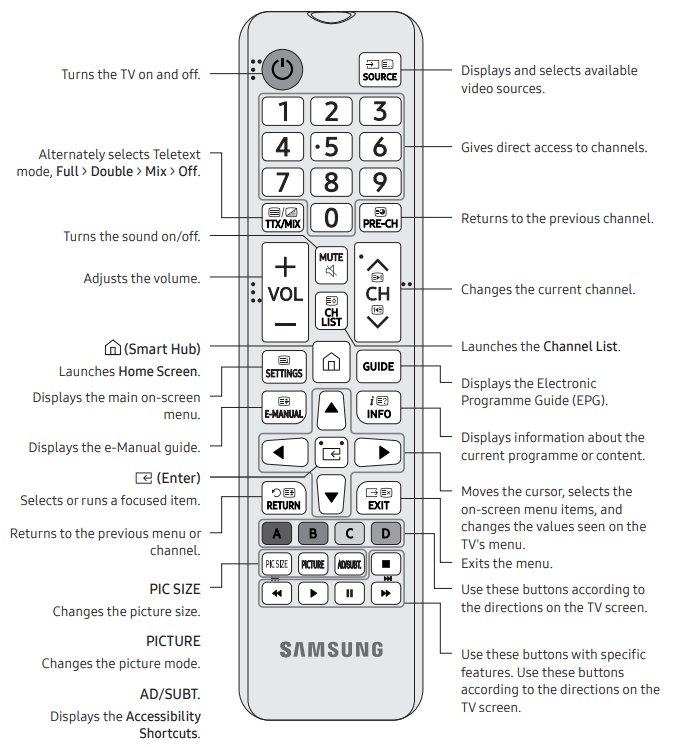
The Remote Control
About the Buttons on the Remote Control
- This remote control has Braille points on the Power, Channel, Volume, and Enter buttons and can be used by visually impaired persons.
- The images, buttons, and functions of the remote control may differ depending on the model.
- If you use the remote control that comes with your TV to control another TV, some functions may not operate normally.
Controlling External Devices with the TV Remote - Using the Universal Remote
 ->
->  -> Source > Universal Remote
You can control external devices connected to the TV using the remote control. To control external devices, register them by following the instructions on the screen.
- This function may not be supported depending on the model.
- You can also use the Anynet+ (HDMI-CEC) function to operate external Samsung devices with your TV's remote control without any additional setup.
- Certain external devices connected to the TV may not support the universal remote feature.
- Do not place any obstacles in front of an external device. It may cause signals from the remote control to be transmitted improperly.
- The TV memorises both the external device and its connection port (HDMI 1, HDMI 2, etc.).
The initial setup differs from model to model.
- Turn on the TV using the
 button on the remote control or TV controller.
- Noise may occur temporarily when the TV communicates with mobile devices.
- The SmartThings app is available on mobile devices for Android 6.0 or higher and iOS 10 or higher.
- To perform initialisation by using the SmartThings app, the mobile device must have been connected via Wi-Fi.
- When the pop-up for setup does not appear automatically on the SmartThings app of your mobile device, proceed with the process after manually adding the TV using Add Device on the dashboard of the SmartThings app.
You can also start the Initial Setup using the TV's menu ( >  Settings > General > Start Setup). Follow the instructions displayed on the Initial Setup screen and configure the TV's basic settings to suit your viewing environment.
Initial setup
When you turn on your TV for the first time, it immediately starts the Initial Setup. The Initial Setup allows you to configure the basic settings for the TV to operate, such as broadcast reception, channel search, and network connection, at one time.
- Before starting the Initial Setup, be sure to connect external devices first.
- To use the TV's smart features, the TV must be connected to the Internet.
- The picture may vary depending on the models.
- If you connect any external device to HDMI IN (STB) before starting initial setup, the source of your live TV signal is set to STB. After finishing with this process, you will not be able to scan all channels and stores them in the TV’s memory.
- If you want to connect aerial cable to your TV, select Aerial. In this case, you will be able to scan all channels and stores them in the TV’s memory
Connections
Connecting devices to your TV
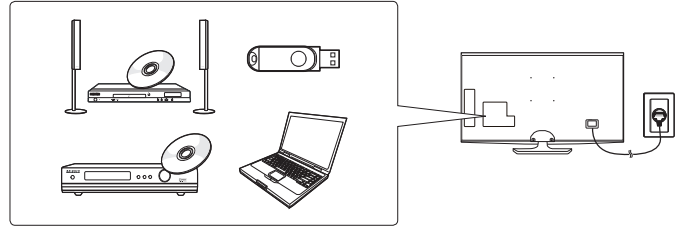
- You can connect various external devices using the connectors located at the back of the product. Check the connectors and then refer to the Quick Guide for more instructions on supported external devices.
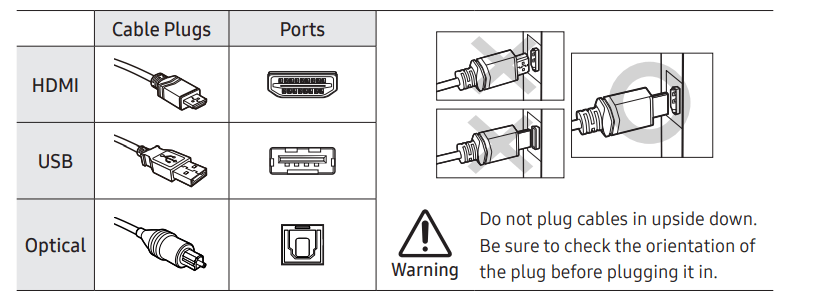
- For more information about connections, see the e-Manual chapter "Connections". Make sure you have the correct cable before plugging it in. Illustrations of common plugs and ports are shown below.
Connecting to the Internet
Connecting the TV to a network gives you access to online services such as the Smart Hub, as well as software updates.
- For more information about Smart Hub, see the e-Manual chapter, "Smart Features > Smart Hub".
- The shape of the rear panel differs among the models.
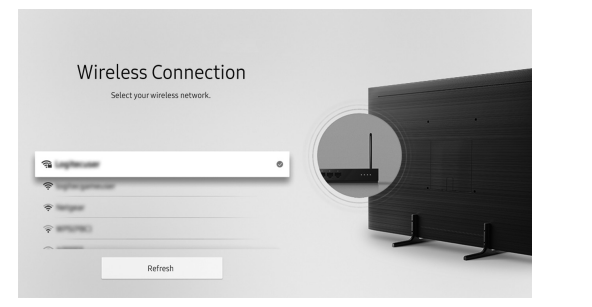
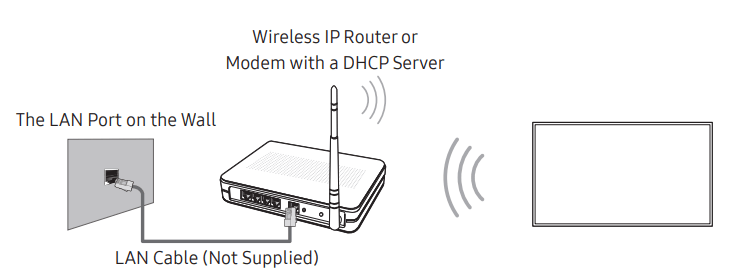
Network Connection - Wireless
- Connect the TV to the Internet using a standard router or modem.
Network Connection - Wired: There are three main ways to connect your TV to your network using cable, depending on your network setup. They are illustrated starting below:
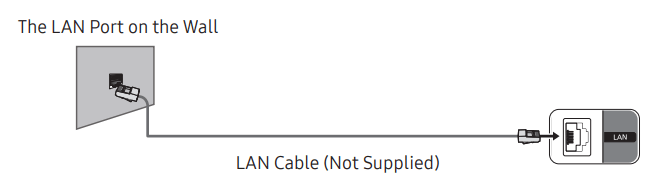
- The TV does not support network speeds less than or equal to 10Mbps.
- Use Cat7 (*STP Type) cable for the connection. * Shielded Twisted Pair
Selecting Connected Devices
Changing the input signal
- -> Source
- When you select a connected external device on the Source screen, the output of the selected device is displayed on the TV's screen.
- For more information about selecting connected devices, see the e-Manual chapter "Switching between external devices connected to the TV".
Editing external devices You can change the port name for a connected external device or add it to Home Screen.
- Move the focus to a connected external device.
- Press the Up directional button. The following 2 functions become available.
- Available functions may differ depending on the port type.
- Edit: You can rename each port with the name of an input device or the desired name in order to make it easier to change the input mode.
- Information: You can view the detailed information about the external devices connected to the TV.
- Add to Home: You can add the port of an external device to the Home Screen for quick switching.
Using additional functions You can use the following features on the Source screen.
- Connection Guide: The guide to device connections
- Universal Remote: You can control external devices connected to the TV using the remote control.
Troubleshooting and Maintenance
Troubleshooting
If the TV seems to have a problem, first review this list of possible problems and solutions. Alternatively, review the Troubleshooting Section in the e-Manual. If none of these troubleshooting tips apply, please visit “www.samsung.com” and click on Support, or contact the Samsung service centre listed on the back cover of this manual.
- This TFT LED panel is made up of sub pixels which require sophisticated technology to produce. There may be, however, a few bright or dark pixels on the screen. These pixels will have no impact on the performance of the product.
- To keep your TV in optimum condition, upgrade to the latest software. Use the Update Now or Auto update functions on the TV's menu ( > Settings > Support > Software Update > Update Now or Auto update).
1. The TV won’t turn on.
- Make sure that the AC power cord is securely plugged in to the TV and the wall outlet. • Make sure that the wall outlet is working and the power indicator at the bottom of the TV is lit and glowing a solid red.
- Try pressing the Power (
 ) button on the TV to make sure that the problem is not with the remote control. If the TV turns on, refer to “The remote control does not work”.
2. There is no picture/video/sound, or a distorted picture/video/sound from an external device, or “Weak or No Signal” is displayed on the TV, or you cannot find a channel.
- Make sure the connection to the device is correct and that all cables are fully inserted.
- Remove and reconnect all cables connected to the TV and the external devices. Try new cables if possible.
- Confirm that the correct input source has been selected ( -> Source).
- Perform a TV self diagnosis to determine if the problem is caused by the TV or the device ( > Settings > Support > Self Diagnosis > Start Picture Test or Start Sound Test).
- If the test results are normal, reboot the connected devices by unplugging each device's power cord and then plugging it in again. If the issue persists, refer to the connection guide in the user manual of the connected device.
- If you are not using a cable box or satellite box, and your TV is receiving TV signals from an antenna or a cable wall connector, run Auto Tuning to search for channels ( > Settings > Broadcasting > (Auto Tuning Settings) > Auto Tuning).
- The Auto Tuning Settings may not appear depending on the model or geographical area.
- If you are using a cable box or satellite box, please refer to the cable box or satellite box manual.
3. The CI+ does not work.
- Your Samsung TV conforms to the CI+ 1.4 standards.
- Where a CI+ Common Interface module is incompatible with this device then please remove the module and contact the CI+ operator for assistance.
4. The remote control does not work.
- Check if the power indicator at the bottom of the TV blinks when you press the remote's Power button. If it does not, replace the remote control's batteries.
- Make sure that the batteries are installed with their poles (+/–) in the correct direction.
- Try pointing the remote directly at the TV from 1.5-1.8 m away.
5. The cable box or satellite box remote control doesn’t turn the TV on or off or adjust the volume.
- Programme the cable box or satellite box remote control to operate the TV. Refer to the cable box or satellite box user manual for the SAMSUNG TV code.
6. The TV settings are lost after 5 minutes.
- The TV is in the Retail Mode. Change the Usage Mode in the General Menu to Home Mode ( > Settings > General > System Manager > Usage Mode > Home Mode).
7. Intermittent Wi-Fi
- Make sure the TV has a network connection ( > Settings > General > Network > Network Status).
- Make sure the Wi-Fi password is entered correctly.
- Check the distance between the TV and the Modem/Router. The distance should not exceed 15.2 m.
- Reduce interference by not using or turning off wireless devices. Also, verify that there are no obstacles between the TV and the Modem/Router. (The Wi-Fi strength can be decreased by appliances, cordless phones, stone walls/fireplaces, etc.)

- Contact your Internet Service Provider (ISP) and ask them to reset your network circuit to re-register the MAC addresses of your new Modem/Router and the TV.
8. Video Apps problems (Youtube etc)
- Change the DNS to 8.8.8.8. Select > Settings > General > Network > Network Status > IP Settings > DNS setting > Enter manually > DNS Server > enter 8.8.8.8 > OK.
- Reset by selecting > Settings > Support > Self Diagnosis > Reset Smart Hub.
9. What is Remote Support? Samsung Remote Support service offers you one-on-one support with a Samsung Technician who can remotely:
- Diagnose your TV
- Adjust the TV settings for you
- Perform a factory reset on your TV
- Install recommended firmware updates
10. How does Remote Support work? You can easily get Samsung Remote Support service for your TV:
- Call the Samsung service centre and ask for remote support.
- Open the menu on your TV and go to the Support section. ( > Settings > Support)
- Select Remote Management, then read and agree to the service agreements. When the PIN screen appears, provide the PIN number to the technician.
- The technician will then access your TV.
There Is a Problem with the Picture
When the TV has trouble with the picture, these steps may help resolve the problem.
1. Testing the picture
- > Settings > Support > Self Diagnosis > Start Picture Test Try Now
- Before you review the list of problems and solutions below, use Start Picture Test to determine if the problem is caused by the TV. Start Picture Test displays a high definition picture you can examine for flaws or faults.
1. Flickering and Dimming
If your Samsung Television is flickering or dimming sporadically, you may need to disable some of the energy efficiency features.
Disable Ambient Light Detection, Energy Saving Mode, or Motion Lighting
 ->
->  Settings -> General -> Eco Solution -> Ambient Light Detection
- -> Settings -> General -> Eco Solution -> Energy Saving Mode
- -> Settings -> General -> Eco Solution -> Motion Lighting
2. Component Connections and Screen Color
- If the color on your TV screen is not correct or the black and white colors are off, run Picture Test. -> Settings -> Support -> Device Care -> Self Diagnosis -> Start Picture Test.
- If the test results indicate that the problem is not caused by the TV, do the following:
- Confirm that the video input connectors are connected to the correct external device video output connectors.
- Check the other connections as well. If the TV is connected to an external device via a component cable, confirm that the Pb, Pr, and Y jacks are plugged into their proper connectors.
3. Screen Brightness
If the colors on your TV are correct but just a little too dark or bright, try adjusting the following settings first
- -> Settings -> Picture -> Expert Settings -> Backlight
- -> Settings -> Picture -> Expert Settings -> Contrast
- -> Settings -> Picture -> Expert Settings -> Brightness
- -> Settings -> Picture -> Expert Settings -> Sharpness
- -> Settings -> Picture -> Expert Settings -> Color
- -> Settings -> Picture -> Expert Settings -> Tint (G/R)
4. Unwanted Powering Off
If your TV appears to turn off by itself, try disabling some of the TV's energy ʪ efficiency functions.
See if Sleep Timer has been enabled. The Sleep Timer automatically turns the TV off after a specified period of time.
- -> Settings -> General -> System Manager -> Time -> Sleep Timer
If the Sleep Timer has not been enabled, see if Auto Power Off or Off Timer has been enabled and disable it.
- -> Settings -> General -> Power and Energy Saving -> Auto Power Off
- -> Settings -> General -> System Manager -> Time -> Off Timer
5. Problems Powering On
- If you are having problems powering on your TV, there are a number of things to check before calling the service department.
- Confirm that the TV's power cord is connected correctly at both ends and that the remote control is operating normally.
- Make sure that the antenna cable or cable TV cable is firmly connected.
- If you have a cable box or satellite box, confirm that it is plugged in and turned on.
6. Unable to find a Channel
- If your TV is not connected to a cable box or satellite box, run Auto Program. -> Settings -> Broadcasting -> Auto Program
The Auto Tuning Settings may not appear depending on the model or geographical area.
7. The TV image does not look as good as it did in the store
- Store displays are tuned to a digital HD channel.
- If you have an analog cable box or satellite box, upgrade to a digital cable box or satellite box. Use HDMI or Component cables to deliver HD (high definition) picture quality.
- Many HD channels are upscaled from SD (Standard Definition) content. Look for a channel that is broadcasting HD content.
- Cable/Satellite Subscribers: Try HD channels from the channel lineup.
- Air/Cable Antenna Connection: Try HD channels after running the Auto Program function
- -> Settings -> Broadcasting -> Auto Program
- Adjust the cable box or satellite box's video output resolution to 1080i or 720p
8. The picture is distorted
- The compression of video content may cause picture distortions, especially in fast moving pictures from sports programs and action movies.
- If the signal reception is weak or poor, screen distortion may be visible but it is not a malfunction.
- Mobile phones used close to the TV (within 3.2 ft) may cause noise on analog and digital channels.
9. The color is wrong or missing
- If you’re using a Component connection, make sure that the Component cables are connected to the correct jacks. Incorrect or loose connections may cause colour problems or a blank screen.
10. The colour is poor or the picture is not bright enough
Go to Picture and then adjust the Picture Mode, Brightness, Sharpness, and Color settings.
- -> Settings -> Picture -> Picture Mode
- -> Settings -> Picture -> Expert Settings -> Brightness
- -> Settings -> Picture -> Expert Settings -> Sharpness
- -> Settings -> Picture -> Expert Settings -> colour
See if Brightness Reduction has been enabled.
- -> Settings -> General -> Eco Solution -> Eco Solution
Try resetting the picture.
- -> Settings -> Picture -> Expert Settings -> Reset Picture
11. There is a dotted line on the edge of the screen
- Change Picture Size to 16:9 Standard. -> Settings -> Picture -> Picture Size -> 16:9 Standard
12. The picture is black and white
- If you are using AV or analog equipment, disconnect the adapter from the Component (Blue) input port on the TV and connect it to the AV (Yellow) input port.
- The Component or AV input port may not be provided depending on the model or geographical area.
- Component adapter, AV adapter may not provided depending on the model or geographical area.
If the test picture does not appear or there is noise or distortion, the TV may have a problem. Contact Samsung’s Call Center for assistance.
If the test picture is displayed properly, there may be a problem with an external device. Please check the connections.
If the problem persists, check the signal strength or refer to the external device’s user manual.
I Can't Hear the Sound Clearly
When the TV has difficulties with sound, these steps may help resolve the problem
Testing the sound
-> Settings -> Support -> Device Care -> Self Diagnosis -> Sound Test. If the TV plays the Sound Test melody without distortion, there may be a problem with an external device or the broadcast signal's strength.
1. There is no sound or the sound is too low at maximum volume
- Check the volume control of your TV, and then check the volume control of the external device (cable box or satellite box, DVD, Blu-ray, etc.) connected to your TV.
2. The picture is good but there is no sound.
- Set Sound Output to TV Speaker. -> Settings -> Sound -> Sound Output
- If you are using an external device, check the device’s audio output option.
- For example, you may need to change your cable box’s audio option to HDMI if the box connected to your TV is using an HDMI cable.
- To listen to computer sound, connect an external speaker to the computer’s audio output connector.
- If your TV has a headphone jack, make sure there is nothing plugged into it.
- Reboot the connected device by disconnecting and then reconnecting the device’s power cable.
3. No sound is heard.
- Check whether the Digital Output Audio Format is set to Dolby Digital+.
- If you are using a receiver that does not support Dolby Digital Plus, you will hear no sound when you select Dolby Digital+. -> Settings -> Sound -> Expert Settings -> Digital Output Audio Format -> Dolby Digital+
4. The speakers are making an odd sound.
- Run Sound Test. -> Settings -> Support -> Self Diagnosis -> Start Sound Test
- Make sure that the audio cable is connected to the correct audio output connector on the external device.
- For antenna or cable connections, check the signal information. A low signal level may cause sound distortions.
There Is a Problem with the Broadcast
When the TV has difficulties receiving broadcasts, these steps may help resolve the problem.
1. "Weak or No Signal" displayed in TV mode or cannot find channel.
- Make sure the antenna cable is connected securely to the TV. Select Source to confirm that the correct input source has been selected ->
 Source
- If the TV is not connected to a cable box or satellite box, run Auto Program to search for channels -> Settings -> Broadcasting -> Auto Program
2. The TV is not receiving all channels.
- Confirm that the coaxial cable is securely connected to the TV.
- Run Start Setup or Auto Program..
- -> Settings -> Broadcasting-> (Auto Tuning Settings) -> Auto Tuning
3. There are no subtitles with digital channels
- Go to Subtitle and change the Subtitle Mode.. -> Settings -> General -> Accessibility -> Subtitle Settings -> Subtitle Mode
- Some channels may not have caption data.
4. The picture is distorted.
- The compression of the video content may cause picture distortions.
- This is especially true with fast moving pictures from sports programs and action movies.
- A weak signal can cause picture distortions. This is not a problem with the TV.
5. The picture quality is low.
- Select high definition (HD) channels or programs.
My Computer / Game Console Won't Connect
When the TV has difficulties connecting to a PC or game console, these steps may help resolve the problem.
1. The "Mode Not Supported" message appears.
- Set output resolution of your PC or game console so it matches a resolution supported by the TV.
2. The video is OK but there is no audio.
- If you are using an HDMI connection, check the audio output setting on your PC.
- If you are using an HDMI-to-DVI cable, a separate audio cable is required.
- Note that the HDMI-to-DVI connection is only supported by the HDMI (DVI) port and this port does not transmit audio.
- To listen to the computer sound, connect external speakers to the audio output connection of the computer.
The TV Won't Connect to the Internet
When the TV has difficulties connecting to the Internet, these steps may help resolve the problem.
1. The TV cannot connect to your network or apps (for Internet compatible models only).
- Make sure the TV has a network connection. -> Settings -> General -> Network -> Network Status
- Contact your Internet service provider.
2. The wireless network connection failed.
- Confirm your wireless modem/router is on and connected to the Internet.
3. The wireless network signal is too weak.
- Position your wireless router, modem router, or access point in a central location. Avoid putting it in a corner.
- Use a wireless repeater to get an instant boost in your wireless signal strength.
- Place the repeater halfway between your wireless router and your TV.
Anynet+ (HDMI-CEC) Isn't Working
When Anynet+ (HDMI-CEC) isn't working, these steps may help resolve the problem.
1. Anynet+ does not work.
- Confirm that the device is an Anynet+ device. The Anynet+ system supports Anynet+ devices only.
- Check if the power cord of the Anynet+ device is properly connected.
- Check the cable connections of the Anynet+ device.
- Go to Anynet+ (HDMI-CEC) and see if Anynet+ (HDMI-CEC) has been set to On. -> Settings -> General -> External Device Manager -> Anynet+ (HDMI-CEC)
- Anynet+ (HDMI-CEC) Anynet+ may not function when some other functions are active, including Channel Search, Smart Hub, Initial Setup, etc.
- If you have disconnected and then reconnected the HDMI cable, scan for devices again or turn your TV off and on.
2. I want to start Anynet+.
- Move the focus to the Anynet+ device at -> Source, press the up directional button to move to Anynet+ (HDMI-CEC), and then press the Select button.
- Check if the Anynet+ device is properly connected to the TV, and then select Anynet+ (HDMI-CEC) menu to see if Anynet+ (HDMI-CEC) is set to On. -> Settings -> General -> External Device -> Manager Anynet+ (HDMI-CEC)
3. I want to exit Anynet+..
- Set Anynet+ (HDMI-CEC) to Off. -> Settings -> General -> External Device Manager -> Anynet+ (HDMI-CEC)
4. The message "Connecting to Anynet+ device..." or "Disconnecting from Anynet+ device" appears on the screen.
- You cannot use the remote control when the TV is configuring Anynet+ or switching to a viewing mode. Use the remote control after the TV has completed the Anynet+ configuration or has switched to a viewing mode.
5. The Anynet+ device won't play.
- You cannot use the play function when Start Setup is in progress.
6. The connected device is not displayed.
- Check whether the device supports Anynet+.
- Anynet+ devices must be connected to the TV using an HDMI cable. Make sure the device is connected to your TV with an HDMI cable. Some HDMI cables may not support Anynet+.
- Check whether the HDMI cable is properly connected.
- Go to Anynet+ (HDMI-CEC) and see if Anynet+ (HDMI-CEC) has been set to On. -> Settings -> General -> External Device Manager -> Anynet+ (HDMI-CEC)
- Scan for Anynet+ devices again.
- If the connection is terminated because there has been a power failure or the HDMI cable has been disconnected, please scan for the device again.
7. The TV audio is not being played through the AV receiver.
- Connect an optical cable to the TV and the AV receiver.
- ARC enables the TV to output digital sound via the HDMI (ARC) port.
- However, ARC is only available when the TV is connected to an AV receiver that supports ARC.
I Have Trouble Launching/Using Apps
When apps aren't working, these steps may help resolve the problem.
1. I launched an app, but it's in English. How can I change the language?
- Languages supported by the app may be different from the user interface language.
- The ability to change the language depends on the service provider.
2. My application is not working.
- Check with the service provider.
- Refer to the Help section on the application service provider's website.
My File Won't Play
When files don't play, this may help resolve the problem.
- Some files can't be played.
- This problem may occur with high-bitrate files.
- Most files can be played back, but you might experience problems with high-bitrate files.
I Want to Reset the TV
Initialize the settings to factory defaults.
1. Reset Settings
- -> Settings -> Support -> Self Diagnosis -> Reset: Resets Picture, Sound, Broadcasting, and all other settings, except for the network settings, to the default settings.
2. Reset Smart Hub
- -> Settings -> Support -> Self Diagnosis -> Reset Smart Hub: Resets all Smart Hub settings to their factory defaults and deletes all information related to Samsung accounts, linked service accounts, Smart Hub service agreements, and Smart Hub applications.
3. Reset Picture
- -> Settings -> Picture -> Expert Settings -> Reset Picture: Resets current picture settings to the default settings.
4. Reset Sound
- -> Settings -> Sound -> Expert Settings -> Reset Sound: Resets current sound settings to the default settings.
Other issues
Use these procedures to resolve other issues that may occur in relation to the product.
1. The TV is hot.
- Watching TV for an extended period of time causes the panel to generate heat.
- The heat from the panel is dissipated through internal vents running along the top of the TV.
- The bottom, however, may feel hot to the touch after extended use.
- Children watching TV need constant adult supervision to prevent them from touching the TV.
- This heat, however, is not a defect and does not affect the TV's functionality.
2. The picture won’t display in full screen.
- HD channels will have black bars on either side of the screen when displaying upscaled SD (4:3) content.
- Black bars will appear at the top and bottom of the screen when you watch movies that have aspect ratios different from your TV.
- Adjust the picture size options on your external device or set the TV to full screen. -> Settings -> Picture-> Picture Size Settings -> Picture Size
3. The "Mode Not Supported" message appears.
- The output resolution of the attached device is not supported by the TV.
- Check the TV's supported resolutions and adjust the external device’s output resolution accordingly
4. The Captions item in the TV is grayed out.
- When an external device is connected with an HDMI or Component cable, the Caption function is unavailable.
- Adjust the caption setting on the external device.
5. The TV smells of plastic.
- This smell is normal and will dissipate over time.
6. Signal Information under Self Diagnosis isn't activated.
- Verify that the current channel is a digital channel. Signal Information is only available for digital channels. -> Settings -> Support -> Self Diagnosis -> Signal Information
7. The TV is tilted to the side.
- Remove the base stand from the TV and reassemble it.
8. The stand is wobbly or crooked.
- Make sure the indicator arrows on the stand and stand holder are properly aligned.
9. The remote control and/or voice control does not work.
- The TV ships with protective stickers covering some of the sensors. Make sure all of the stickers have been removed.
10. The Broadcasting function has been deactivated.
- Broadcasting is only available when the Source is set to TV.
- Broadcasting cannot be accessed while you watch TV using a cable box or satellite box.
- Broadcasting cannot be accessed while a recording is in progress or the Timeshift function is running.
11. The settings are lost after 5 minutes or every time the TV is turned off.
- If Usage Mode is set to Retail Mode, the TV's audio and video settings are automatically reset every 5 minutes.
- Change Usage Mode to Home Mode.
- -> Settings -> General -> System Manager -> Usage Mode
12. A POP (TV’s internal banner ad) appears on the screen.
- Change Usage Mode to Home Mode. -> Settings -> General -> System Manager -> Usage Mode
13. The TV is making a popping noise.
- The expansion and contraction of the TV's outer casing may cause a popping noise.
- This does not indicate a product malfunction.
- The TV is safe to use
14. The TV is making a humming noise.
- Your TV utilizes high-speed switching circuits and high levels of electrical current. Depending on the TV's brightness level, the TV may seem slightly noisier than a conventional TV.
- Your TV has undergone strict quality control procedures that meet our demanding performance and reliability requirements.
- Some noise coming from the TV is considered normal and is not an acceptable cause for an exchange or refund.
15. The software update over the Internet has failed.
- Check the network connection status. -> Settings -> General -> Network -> Network Status
- If the TV is not connected to a network, connect it to a network.
- The upgrade stops if you already have the latest software version.