Loading ...
Loading ...
Loading ...
BDL3250EL
22
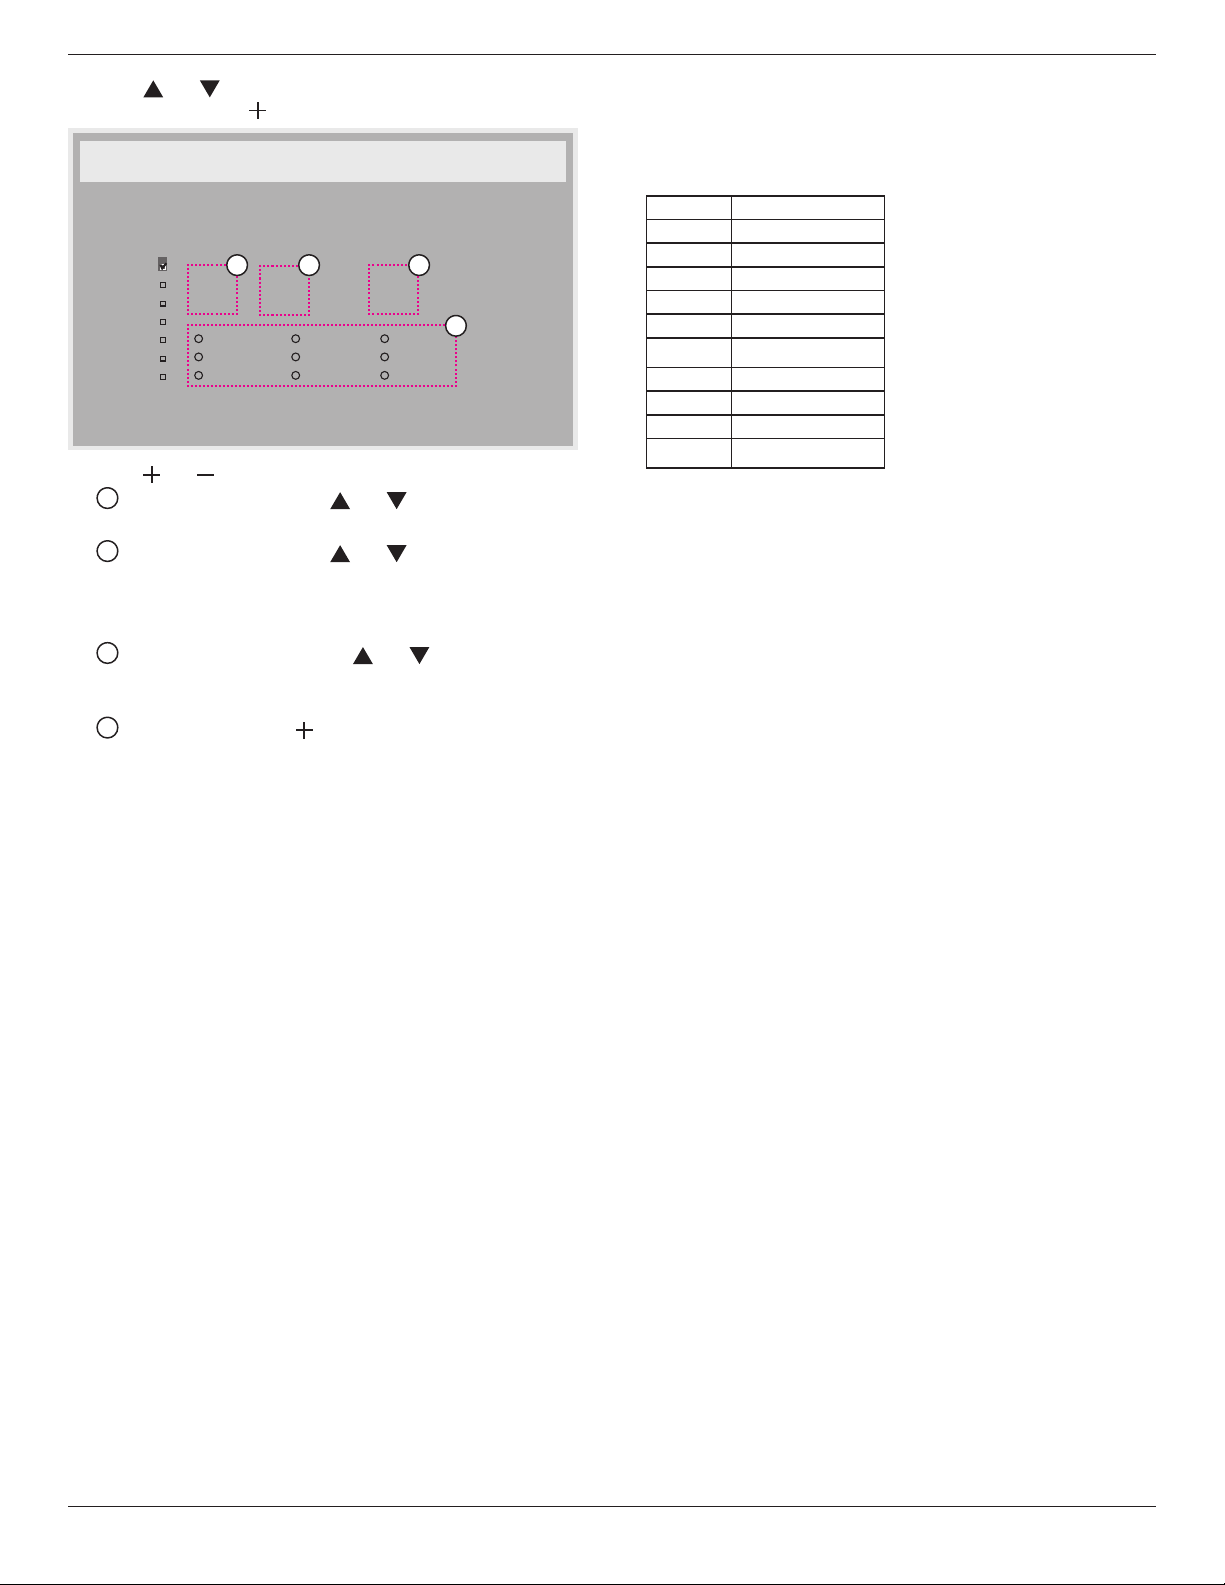
2. Press [ ] or [ ] button to select a schedule item (item number 1
~ 7), and then press [ ] button to mark it the item number.
Schedule
Today
1
2
3
4
5
7
6
2012 . 08 . 04 THU 20 : 19 : 55
On
_
:
_
_
:
_
_
Every day
Off Input
Wed
SAT
MON
THU
SUN
TUE
FRI
Every week
4
1 32
3. Press [ ] or [ ] button to select the schedule:
1
Power-on schedule: Press [ ] or [ ] button to set the hour
and minute for the display to turn on.
2
Power-off schedule: Press [ ] or [ ] button to set the hour
and minute for the display to turn off.
Select or leave an empty “__” for both the hour and minute slot if
you do not want to use this power-on or power-off schedule.
3
Input-source selection: Press [ ] or [ ] button to select an
input source. If no input source is selected, the input source
will remain the same as last selected.
4
Date schedule: Press [ ] button to select which day in a
week this schedule item will be take effect, and then press the
[SET] button.
4. For additional schedule settings, press [EXIT], then repeat the steps
above. A check mark in the box next to the number of the schedule
item indicates that the selected schedule is in effect.
NOTES:
• The {Every day} selection in a schedule item takes priority over the
other weekly schedules.
• If the schedules overlap, the scheduled power-on time takes priority
over scheduled power-off time.
• If there are two schedule items programmed for the same time, the
highest numbered schedule takes priority. For example, if schedule
items #1 and #2 both set the display to power on at 7:00 AM and
off at 5:00 PM, then only schedule item # 1 will take effect.
Monitor ID
Set the ID number for controlling the display via the RS232C
connection.EachdisplaymusthaveauniqueIDnumberwhenmultiple
sets of this display are connected. Monitor ID number range is between
1 to 26.
DDC/CI
Choose to turn on or off the DDC/CI communication function. Select
{On} for normal use.
DDC/CI(CommandInterface)speciesameansforacomputerto
send commands to the monitor, as well as receive sensor data from the
monitor, over the bidirectional link such as DDC2Ab/Bi/B+.
Speciccommandstocontrolmonitorsaredenedinaseparate
Monitor Control Command Set (MCCS) standard.
DDC/CI monitors are sometimes supplied with an external color
sensortoallowautomaticcalibrationofthemonitor’scolorbalance.
Some tilting DDC/CI monitors support an auto pivot function, where
a rotation sensor in the monitor enables the operating system to keep
the display upright as the monitor is moved between its portrait and
landscape positions.
The following DDC/CI commands should be supported via command
line:
No. Commands
1 Set Brightness
2 set Contrast
3 Set Red Gain
4 Set Green Gain
5 Set Blue Gain
6 Get Brightness
7 Get Contrast
8 Get Red Gain
9 Get Green Gain
10 Get Blue
HDMI with One Wire
CEC control.
• {Off}- Disable CEC.(Default)
• {On} - Enable CEC.
Smart power
Set the display to reduce the power consumption automatically.
The options are: {Off} / {Medium} / {High}.
Auto signal detection
Choose to let the display detect and display available signal sources
automatically.
• {Off} - Once a signal is connected, it can only be selected manually.
No signal, set the display to display the image automatically according to
the search order of each option.
The options are: {All}/{PCsourceonly}/{Videosourceonly}/
{Failover}
• {All} - Search order: DP -> DVI-> VGA -> HDMI -> Component->
Video.
• {PCsourceonly} - Search order: DP -> DVI -> VGA -> HDMI
• {Videosourceonly} - Search order: HDMI -> Component ->
Video
• {Failover}
- Failover is the function of auto switching to the backup (failover)
input in the event a failure or abnormal termination of the main
input device occurs. (PC or media player failure)
- The failover input, can be directed to any input on the display other
than the primary. (Ex, Primary = HDMI, Failover = DVI, VGA)
- With Failover activated, in the event of a main input device failure,
the display will automatically switch to the Failover input and display
the content that is being played on the backup input.
- When main input is back on, the failover mode will need to be reset
manually in order to perform the failover function again. The failover
will automatically switch off after main input has returned to normal
operating status.
- Main input(selected by user), default is HDMI. Failover input
input(selected by user), default is VGA.
NOTE:
• The main input signal to display priority, and this item is functional
for Main input signal only.
Loading ...
Loading ...
Loading ...