Loading ...
Loading ...
Loading ...
BDL3250EL
18
Main Picture
Sub Picture
Displayport
HDMI DVI-D VGA YPbPr
Video
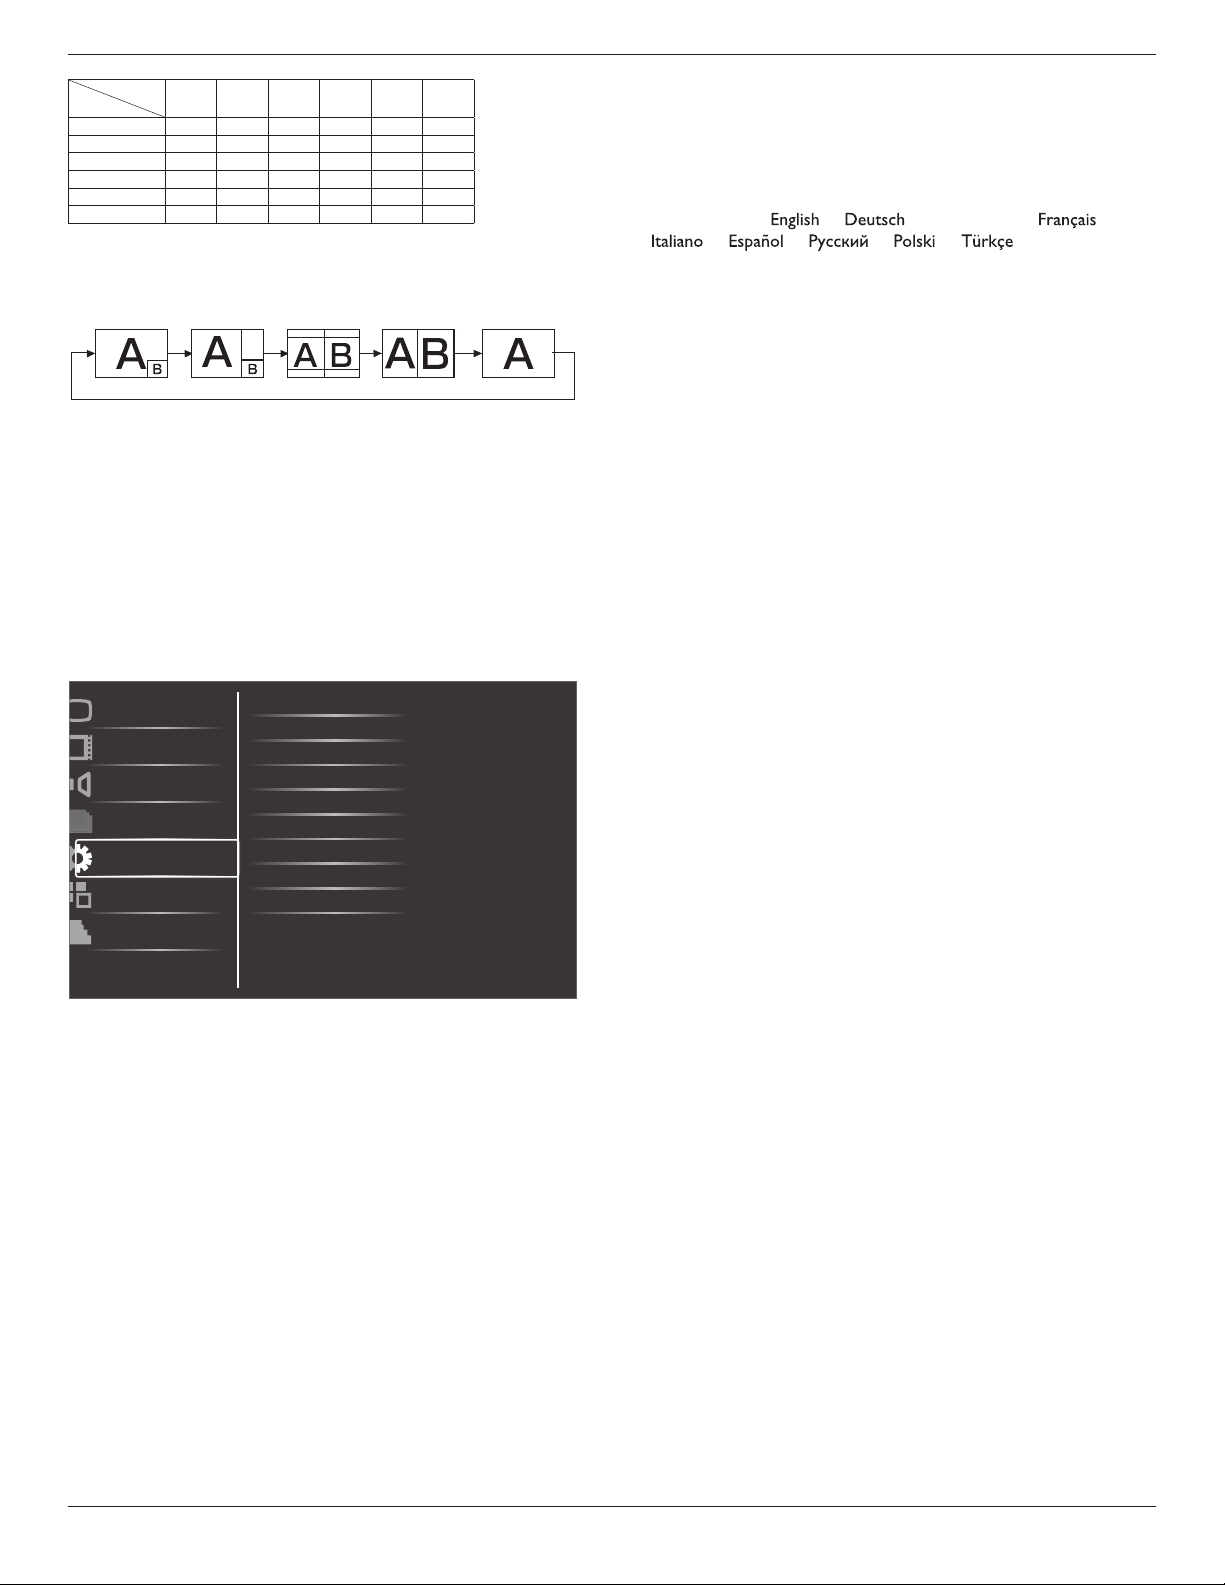
Displayport X X X O O O
HDMI X X X O O O
DVI-D X X X O O O
VGA O O O X X X
YPbPr O O O X X X
Video O O O X X X
(O: PIP function available, X: PIP function unavailable)
By pressing the [PIP ON/OFF] button on the remote control, you can
change the mode in the order shown below:
PIP POP
PBP aspect PBP full
Off
TheresolutionsinthePIPandPOPmodesareconguredasfollows:
PIP SIZE {Small} : 320 x 240 pixels
{Medium} : 480 x 320 pixels
{Large} : 640 x 480 pixels
POP SIZE : 474 x 355 pixels
NOTE: TheimagesdisplayedinthesubpicturealwaystthePIP
sizes shown above irrespective of the aspect ratio of the input
image.
4.2.5. Configuration1 menu
Switch on state
Auto adjust
Power save
Language
Color system
Picture
Screen
Audio
PIP
Configuration1
Configuration2
Advanced option
Panel saving
Network control port
Network settings
Configuration reset
Factory reset
Switch on state
Select the display status used for the next time you connect the power
cord.
• {Power off} - The display will remain off when the power cord is
connected to a wall outlet.
• {Forced on} - The display will turn on when the power cord is
connected to a wall outlet.
• {Last status} - The display will return to the previous power status
(on/off/standby) when removing and replacing the power cord.
Auto adjust
Use this function to automatically optimize the display of VGA input
image.
NOTE: This item is functional for VGA input only.
Power save
Use this setting to reduce the power automatically.
• {RGB} - Select {On} to let the display enter APM mode when no
signal is detected from the HDMI Graphic mode, HDMI, DVI-D, or
VGA inputs after three successive cycles.
• {VIDEO} - Select {On} to enter power saving mode when no signal
is detected from the HDMI Video mode or YPbPr inputs after three
successive cycles.
Language
Select the language used in the OSD menu.
The options are: { } / { } / {
简体中文
} / { } /
{ } / { } / { } / { } / { } / {
繁體中文
} .
Panel saving
Choose to enable the panel saving functions and thus reduce the risk of
“image persistence” or “ghost-imaging”.
• {Cooling Fan} - Select {On} to turn on the cooling fan all the
time. Select {Auto} to turn on/off the cooling fan according to the
display’stemperature.
NOTES:
• The default {Auto} option will start running the cooling fan
if the temperature of 60°C (140°F) is reached, and will keep
running for 30 minutes after cooling down to the temperature
of 58°C (136°F).
• A temperature-warning message will be shown on the screen if
the temperature reaches 79°C (174°F). All key functions except
[Power] key will then be disabled.
• Once the temperature reaches 80°C (176°F), the display power
will be shut down automatically.
• {Brightness} - Select {On} and the image brightness will be reduced
to an appropriate level. The Brightness setting in the Picture menu
will be unavailable when selected.
• {Pixel shift} - Select the time interval ({Auto} / {10 ~ 900} Seconds
/ {Off}) for the display to slightly expand the image size and shift
the position of pixels in four directions (up, down, left, or right).
Activating Pixel Shift will disable H Position, V Position and Zoom
Mode in the Screen Menu.
Color system
Selects the Color System depending on your input video format.
The options are: {Auto} / {NTSC} / {PAL} / {SECAM} / {4.43NTSC} /
{PAL-60}.
NOTE: This item is functional for VIDEO input only.
Network control port
Select the network control port.
Choose from: {RS232} / {LAN(RJ45)}.
NOTES:
• If {LAN(RJ45)} is selected, then {RS232} will not be activated, even
if a cable is attached, and vice versa.
Loading ...
Loading ...
Loading ...