
内容
1. 安全信息................................................................................................................2
2. 安全说明................................................................................................................4
3. 安装.......................................................................................................................5
4. 产品说明................................................................................................................8
5. 日常使用................................................................................................................9
6. 建议和提示.......................................................................................................... 12
7. 养护和清洁.......................................................................................................... 13
8. 异常处理..............................................................................................................14
9. 技术数据..............................................................................................................15
10. 能效...................................................................................................................15
11. AEG 家用电器“三包”服务指南........................................................................... 16
力求完美
感谢您选择这款 AEG 产品。我们打造这款产品,旨在多年来始终为您提供完美的性
能,其采用了普通设备上所没有的创新技术,帮助让您的生活变得更加简单。请花
几分钟时间阅读,以便充分了解该款产品的功能。
欢迎使用 AEG 产品。
访问我们的网站:
获取使用建议、手册、故障检修工具、检修信息:
www.aeg.cn
客户关怀与服务
务必使用原装备件。
当您联系授权服务中心时,请确保您可以提供以下数据:型号、产品编号、序列号。
该信息可以在标牌上找到。
警告/注意 - 安全信息
一般信息和提示
环境信息
如有更改恕不另行通知。
1. 安全信息
在安装和使用本机之前,请认真阅读随附的操作说明。对
于不当安装或使用本机而造成的任何伤害或损害,制造商
不承担任何责任。请妥善保管操作说明,并置于易于取用
的地方,供将来参考之用。
1.1 儿童及弱势群体安全
• 本机可供 8 岁及以上未成年人和肢体伤残、感官或精神
上有障碍或缺乏相关经验及知识的人士使用,前提是他
www.aeg.com2

们在使用本机时受到监督或得到安全使用指导,同时了
解使用过程中可能存在的危险。
• 3 至 8 岁的儿童以及身患大范围复杂残疾的人员应远离
本机,除非始终有人在旁监督。
• 除非有成人始终在旁监督,否则 3 岁以下的儿童应远离
本机。
• 请勿让未成年人玩弄本机。
• 所有包装物都必须远离未成年人,且予以妥善处置。
• 本机运行或冷却过程中,请让未成年人和宠物远离本机。
可触及的零件可能在使用中变烫。
• 如果本机配备未成年人安全装置,则应将其打开。
• 在无人监管的情况下,未成年人不能擅自清理和维护本
机。
1.2 一般安全信息
• 警告:使用期间,本机及其可接触部件会发热。必须格
外注意,以免碰触发热的部件。
• 警告:在使用油脂或植物油在感应炉上烹制食品时,如
果不加以看守,则存在危险,并可能导致火灾。
• 切勿用水灭火,而应关闭本机,然后用盖子或灭火毯等
盖住火焰。
• 小心:本机不得通过外部开关装置(例如定时器)供电,
也不得连接到由某一设施定期开关的电路。
• 小心:烹饪过程中必须有人看守。短时间烹饪也必须始
终有人看守。
• 警告:火灾危险:请勿在烹调表面存放物品。
• 不应将刀叉、勺子和盖子等金属物品放在感应炉表面,
因为这些物品会发烫。
• 在将本机安装到嵌入式结构中之前,请勿使用本机。
• 请勿使用蒸汽清洁器来清洁本机。
• 使用后,通过控制装置关闭感应炉元件,请勿靠在检锅
仪上。
• 如果玻璃陶瓷表面/玻璃表面出现裂缝,请关闭本机,并
断开电源连接。如果直接使用接线盒将本机与电源连
接,请取出保险丝以断开本机电源连接。无论哪种情况,
都要联系授权服务中心。
• 如果电源线受损,必须由制造商、授权维修商或具备资
质的人员进行更换,以免发生危险。
中文 3
• 警告:仅使用烹饪设备制造商设计的感应炉防护装置,
或者是本机制造商在说明书中指明适合使用的感应炉防
护装置,或者是本机随附的感应炉防护装置。防护装置
使用不当会造成意外事故。
2. 安全说明
2.1 安装
警告!
必须由具备资质的人员安装
本机。
警告!
存在人员受伤或本机受损的
危险。
• 去除所有包装物。
• 请勿安装或使用已损坏的设备。
• 按照本机附带的安装说明书操作。
• 请与其他设备和装置保持最小间距。
• 本机非常重,搬运时请注意。请始终佩
戴安全手套和配套的鞋子。
• 请使用密封剂密封切割表面,以防止因
受潮而隆起。
• 防止本机底部进入蒸汽和受潮。
• 请勿在门附近或窗户下面安装本机。
这样可以防止在打开门或窗户时,热炊
具从本机掉落下来。
• 如果将本机安装在抽屉上面,请确保本
机底部与抽屉顶部之间有充分的空气
流通空间。
• 本机底部可能发烫。请务必在本机下
面安装一个用胶合板、厨房骨架材料或
其他不易燃材料制成的隔离板,以防止
接触底部。
• 分隔板必须完全盖住感应炉下面的区
域。
• 确保在台面与下方设备前部之间留出 2
mm 的通风空间。因未留出充分的通风
空间而导致本机损坏的情况,不在保修
范围内。
2.2 电气连接
警告!
存在火灾或触电危险。
• 所有电气连接必须由具备资质的电气
技师完成。
• 电器必须接地。
• 在执行任何操作前,请确保本机已断开
电源。
• 确保铭牌上的参数与主供电电源的电
气额定值兼容。
• 确保正确安装本机。松动、不正确的电
源线或插头(如果适用)会导致端子过
热。
• 请使用正确的电源线。
• 切勿使电源线缠绕。
• 确保安装防触电保护装置。
• 在电源线上使用紧松钩。
• 在将本机连接至附近的插座时,请确保
电源线或插头(如果适用)未接触发热
的本机或热炊具。
• 请勿使用多插头扩展适配器和延长电
缆。
• 切勿损坏电源插头(如果适用)或电源
线。请联系我们的授权服务中心或电
气技师更换损坏的电源电缆。
• 带电和绝缘部件的触电保护装置必须
妥善固定,而且只能通过工具拆卸。
• 请仅在安装过程结束时将电源插头插
入电源插座。确保在安装后仍可以插
拔电源插头。
• 如果电源插座松动,切勿连接电源插
头。
• 断开设备与电源的连接时,请勿拉动电
源线,请始终拉动电源插头。
• 仅使用正确的隔离装置:线路保护断路
器、保险丝(可从保险丝座上卸下的螺
旋式保险丝)、接地保护自动断路器和
接触器。
• 进行电气安装时,务必安装隔离装置,
以便可以断开本设备与电源所有电极
的连接。隔离装置的触点开口宽度最
小要达到 3 mm。
2.3 使用
警告!
存在受伤、烧伤或触电危险。
• 首次使用之前,请去除所有包装物、标
签和保护膜(如适用)。
• 本机仅供家庭使用。
• 请勿更改本机的规格。
• 确保通风口不被堵塞。
• 本机运行时,必须有人照看。
www.aeg.com4
• 每次使用后,请将烹饪区域设置为“关
闭”。
• 请勿靠在检锅仪上。
• 切勿将餐具或锅盖放置在烹饪区域上。
它们可能会变得很烫。
• 双手潮湿或本机有水分附着时,请勿操
作本机。
• 请勿将本机用作工作台面或储存台面。
• 如果本机表面有裂纹,请立即断开电
源。以防触电。
• 植入心脏起搏器的用户在操作本机时,
必须至少与电感加热式烹饪区域相隔
30 厘米。
• 当您将食物放入热油中时,油可能会飞
溅出来。
警告!
存在火灾和爆炸危险
• 油脂和植物油在加热时会产生可燃蒸
汽。在用油脂和植物油烹制食品时,请
远离火焰或发热物体。
• 温度极高的油释放出的蒸汽可能会导
致自燃。
• 与初次使用的油相比,使用过的、可能
包含食品残渣的油在较低的温度下便
可能着火。
• 请勿将易燃品或者蘸有易燃品的物品
放在本机内部、附近或上面。
警告!
存在本机受损危险。
• 请勿在控制板上放置热炊具。
• 请勿将热锅盖放在感应炉的玻璃表面
上。
• 请不要让炊具煮干。
• 请务必小心,不要让物体或炊具砸落在
本机上。否则可能会导致表面损坏。
• 切勿在炊具内没有东西或未使用炊具
的情况下启动烹饪区域。
• 切勿将铝箔放在本机上。
• 采用铸铁、铸铝制成,或是底部损坏的
炊具均可能使玻璃/玻璃陶瓷产生刮痕。
当您必须在烹饪表面移动炊具时,请务
必将这些物品抬起来再移动。
• 本机仅用于烹饪,切勿用于其他目的,
比如房间取暖。
2.4 养护和清洁
• 定期清洁本机,以防止表面材料劣化。
• 在清洁污渍之前,请关闭本机并使其充
分冷却。
• 维修之前,请断开本机电源。
• 请勿使用喷淋水或蒸汽来清洁本设备。
• 请使用湿软布清洁本机。只可使用中
性清洁剂。请勿使用磨料制品、磨料清
洁垫、溶剂或金属物件。
2.5 维修
• 要维修本机,请联系授权服务中心。
• 仅可使用原装备件。
2.6 处置
警告!
存在人员受伤或窒息危险。
• 要了解如何正确报废本设备,请与您的
市政当局联系。
• 断开本机与电源的连接。
• 切断本机附近的电源线并将其丢弃。
3. 安装
警告!
请参阅“安全”一章。
3.1 安装前
安装感应炉前,记下铭牌上的信息。铭牌
位于感应炉底部。
序列号 ....................
3.2 内置感应炉
只有在将感应炉与符合标准的内置装置和
工作台组装之后,方可使用内置感应炉。
3.3 连接电缆
• 感应炉配有连接电缆。
• 要替换已损坏的电源电缆,请使用相同
的电源电缆类型。
• 要更换受损的电源线,请使用线缆类
型:H05V2V2-F 可经受 90 °C 或更高
的温度。请联系您当地的服务中心。
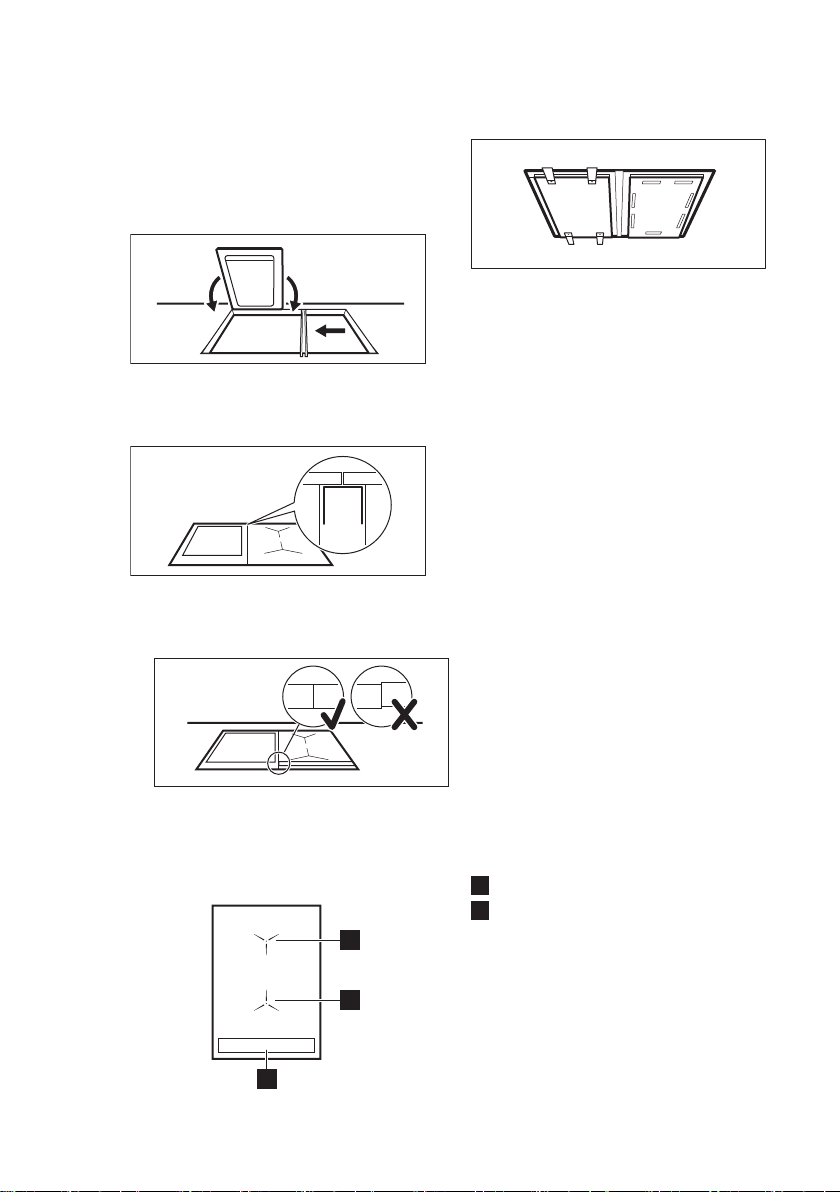
3.4 连接封口 - 顶上安装
1. 清洁开放区域周围的台面。
2. 沿着玻璃陶瓷的外边缘,将随附的 2x6
mm 封条粘在感应炉的下边缘上。 请
中文 5
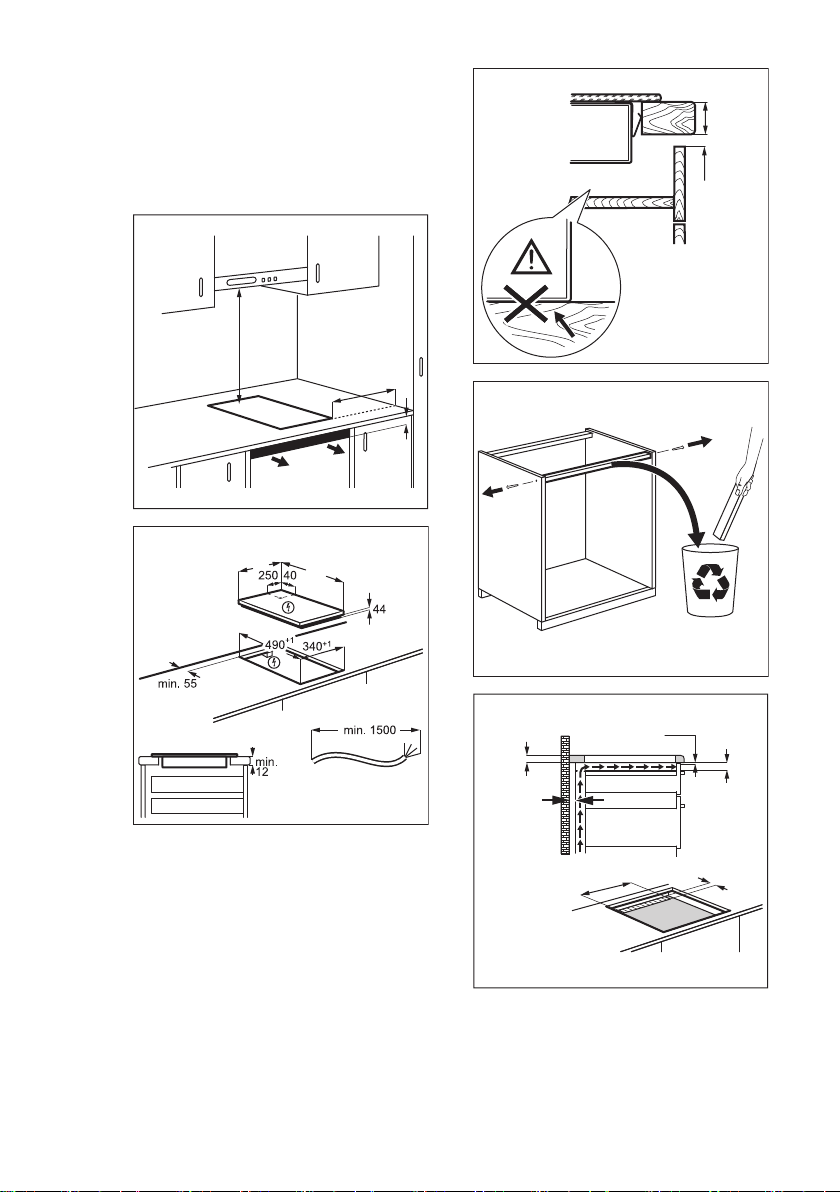
勿拉扯封条。确保封条两端位于感应
炉一侧的中间。
3. 在剪切封条时,可多留出几毫米的长
度。
4. 将封条两端连接在一起。
3.5 装配
min.
50mm
min.
500mm
min.
2mm
360
520
min.
12 mm
min.
2 mm
min. 2 mm
A
B
A
12 mm
28 mm
38 mm
B
57 mm
41 mm
31 mm
min
30 mm
min. 500 mm
< 20 mm
www.aeg.com6
> 20 mm
min. 2 mm
A
B
A
12 mm
28 mm
38 mm
B
57 mm
41 mm
31 mm
min. 500 mm
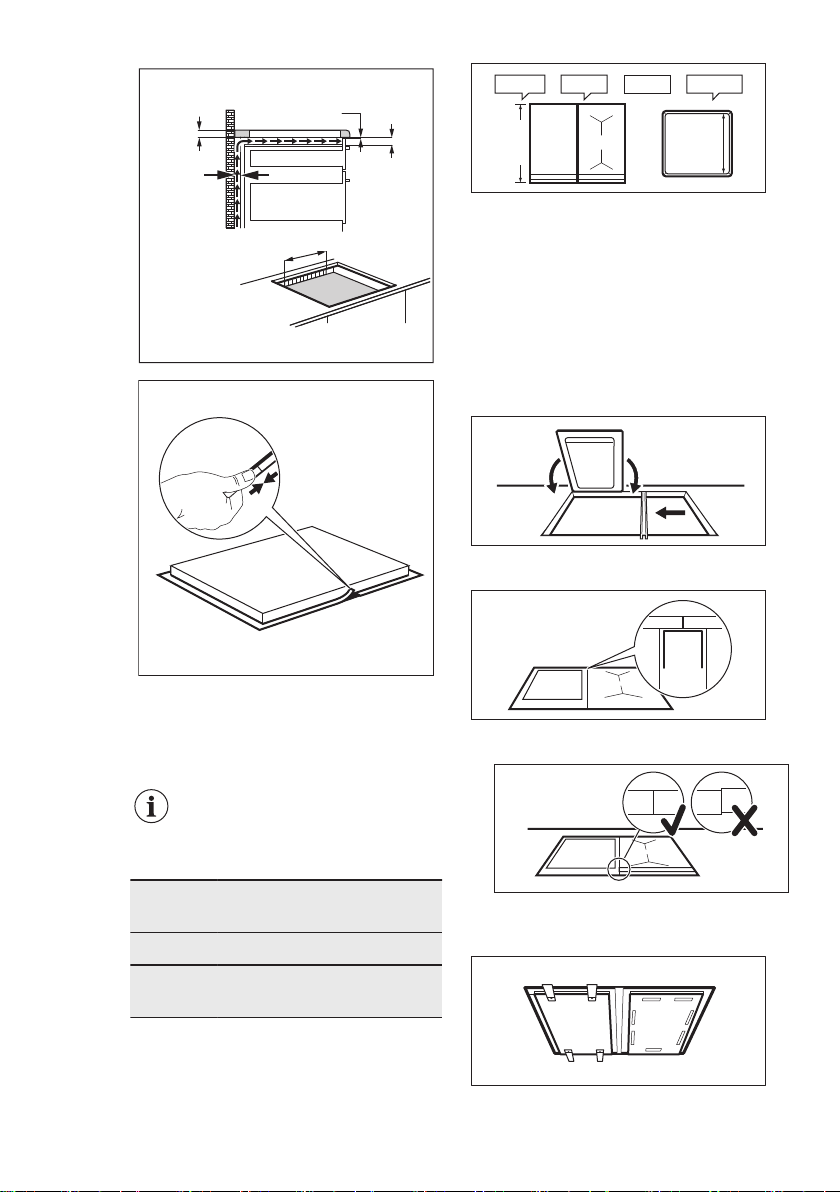
3.6 安装多个感应炉
提供的附件: 连接杆、耐热硅、橡胶成型、
密封条。
仅使用专用耐热硅。
台面开孔
与墙之间
的距离
最少 50 mm
长度 490 mm
宽度 已安装的本机的总宽度减去
20 mm
示例:
360 mm
520 mm
490 mm
360 mm
+ - =
20 mm 700 mm
装配
• 计算正确的开孔尺寸。
• 在台面上制作开孔。
• 将本机放在柔软的表面(例如毯子)
上,底面朝上。
• 如果是铁板烧,请将提供的密封条沿玻
璃陶瓷的外沿固定在它的下边缘。将
固定板轻轻拧入防护罩的孔中。
• 将第一个设备插入台面开孔内。将连
接栏安装在本机下面,让它一半的宽度
保持可见 — 这样可支撑下一个设备。
• 如果是铁板烧,请从下方将固定板松松
地拧入工作台(本机的正面和背面)
• 将下一个设备插入台面开孔内。确保
本机的前端处于同一水平。
• 利用嵌入式弹簧固定本机而不是铁板
烧。
• 最后,拧紧铁板烧的螺丝。
• 使用硅胶密封住本机之间的缝隙,以及
本机与工作台面之间的缝隙。
中文 7
• 把橡胶成型紧紧压在玻璃陶瓷上,沿着
边缘慢慢移动,挤出多余的硅胶。
• 在硅胶上涂一些肥皂水,用手指将边缘
抹平。
• 在硅胶变硬之前请勿触摸,它可持续一
天左右。
• 使用剃须刀小心去除挤出的硅胶。
• 清洁玻璃表面。
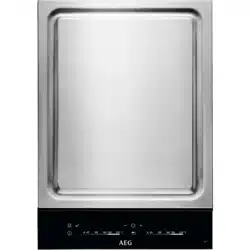
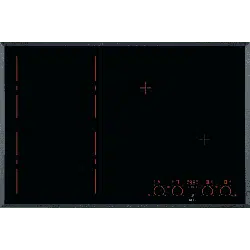
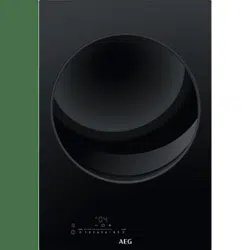
4. 产品说明
4.1 烹饪面布局
2
1
1
1
感应烹饪表面
2
控制板
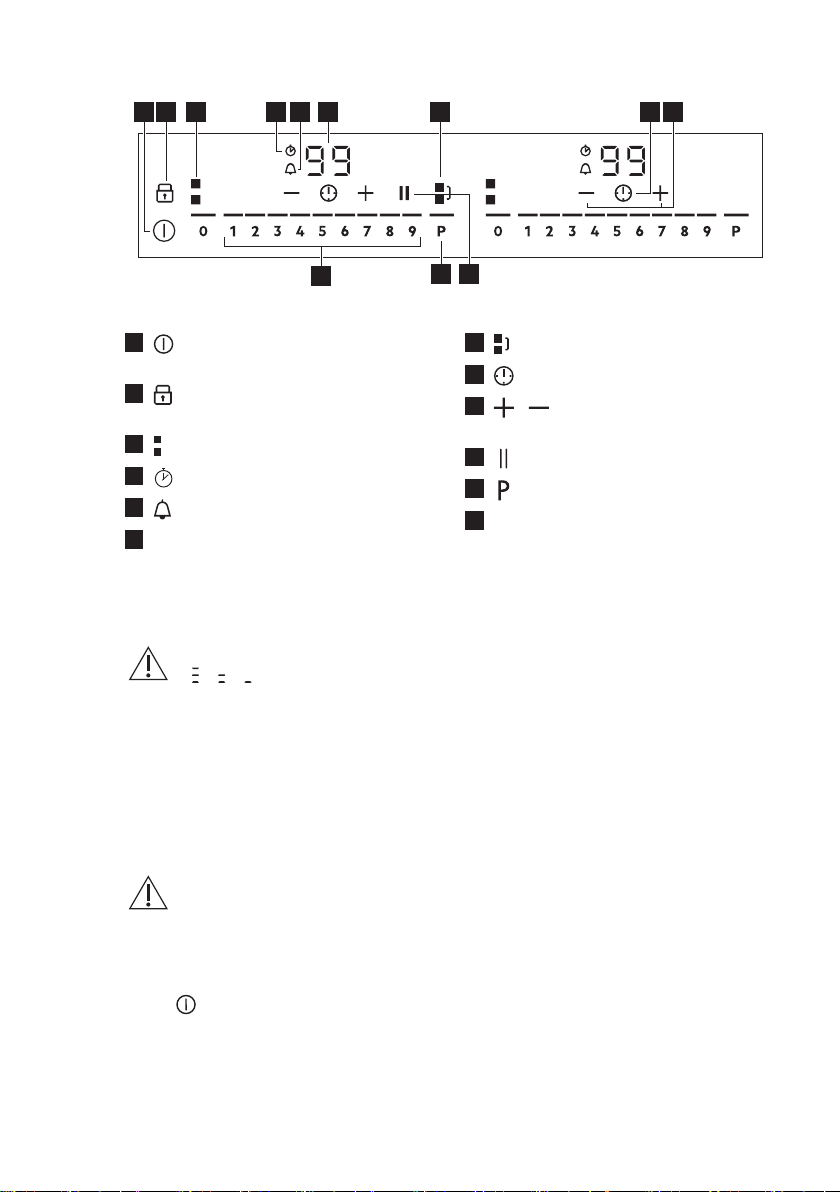
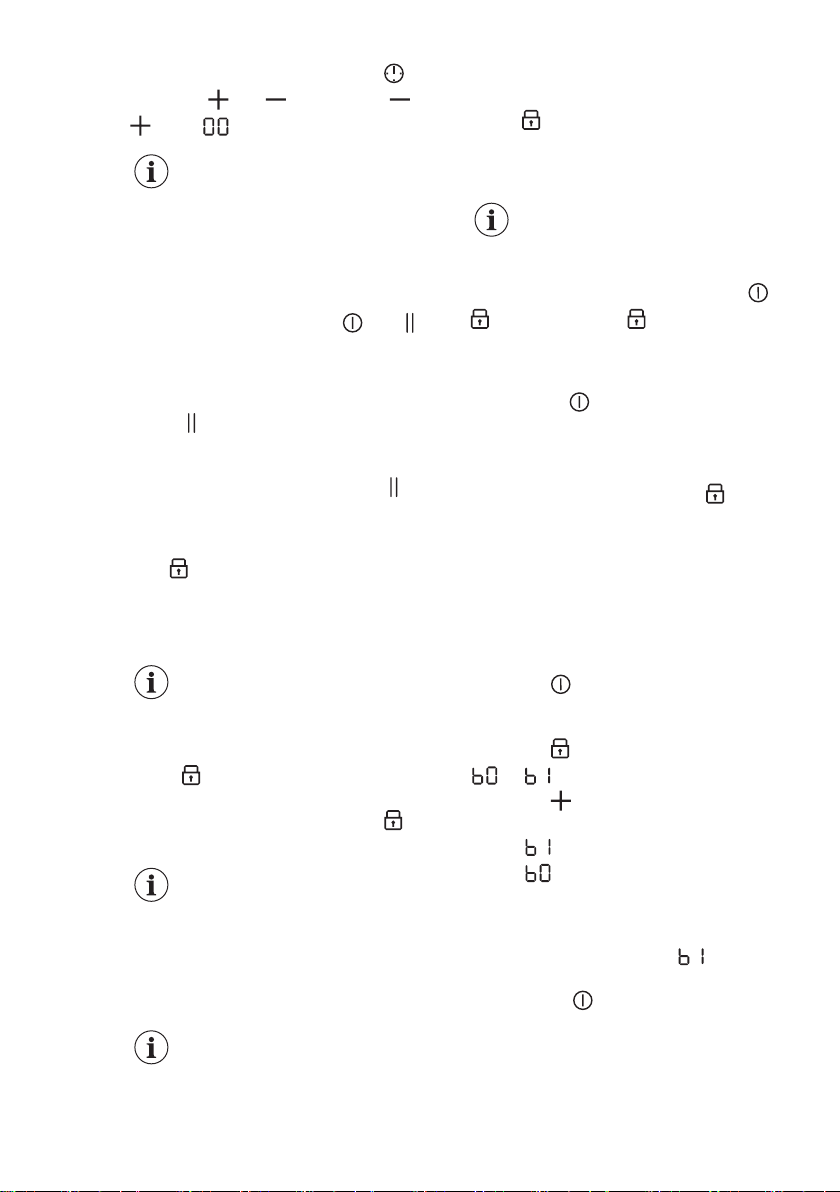
4.2 控制面板布局
1 4 852 3 6 7
10
12
9
11
1
启用和停用感应炉。
2
要启用和停用 锁定 或 儿童安全锁。
3
要显示活动区域。
4
CountUp Timer 指示灯。
5
倒计时定时器 指示灯。
6
计时器显示屏:00 - 99 分钟。
7
要启用和停用 Bridge。
8
要选择 计时器 功能。
9
/ 增加和缩短时间。
10
要启用和停用 暂停。
11
要启用 PowerBoost。
12
要设置加热设置: 0 - 9.
www.aeg.com8
4.3 OptiHeat Control (步骤 3
余热指示灯)
警告!
/ / 小心因余热烫
伤!
指示灯显示您当前正在使用的烹饪区域的
余热水平。感应炉关闭之后,指示灯仍然
可见。感应炉足够冷却之后,指示灯不再
显示。即便您没有使用旁边的烹饪区域,
旁边烹饪区域的指示灯也可能会亮起。
电感加热式烹饪区域在炊具底部直接提供
烹饪过程所需热量。玻璃陶瓷使用炊具的
热量进行加热。
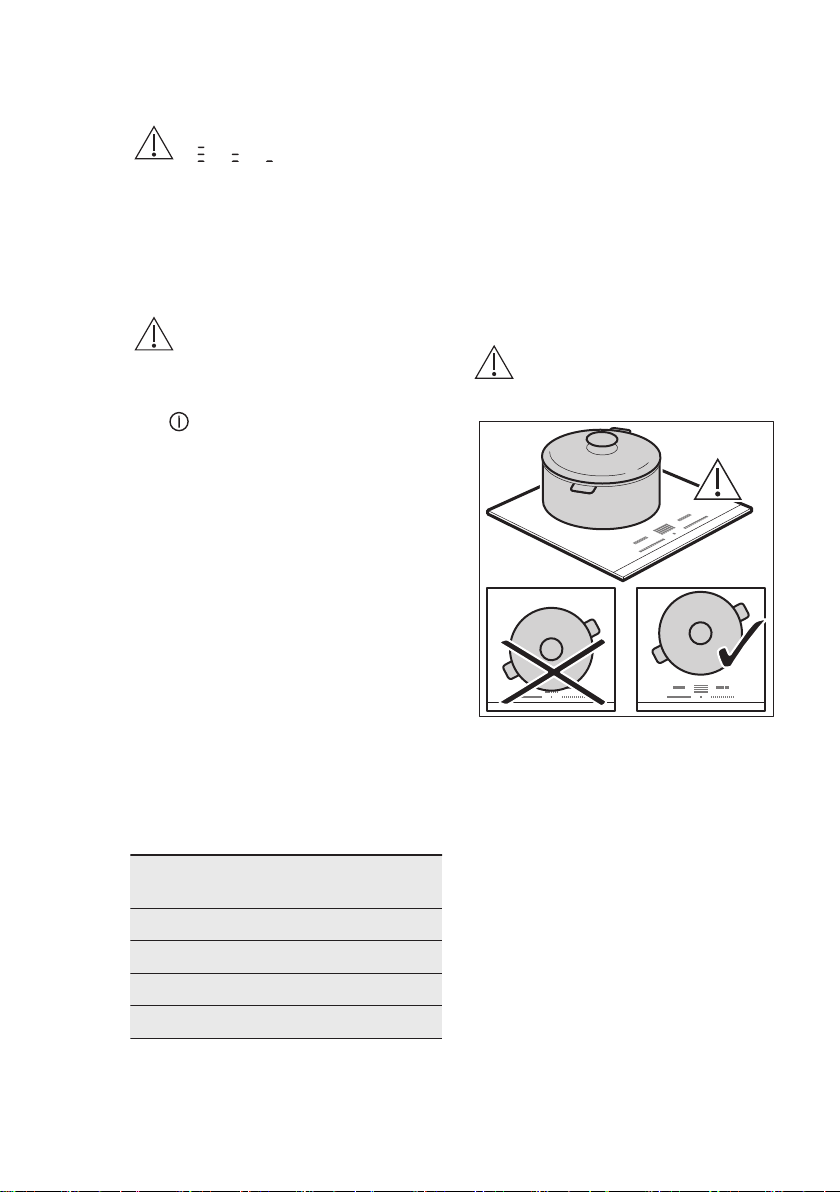
5. 日常使用
警告!
请参阅“安全”一章。
5.1 启用和停用
按触 1 秒钟以启用或停用感应炉。
控制板会在您启用感应炉时亮起,并在停
用感应炉时熄灭。
5.2 自动关机
在下列情况下,此功能会自动停用感应炉:
• 50 秒内您没有将任何炊具放在感应炉
上,
• 放置炊具 50 秒之后您没有设置加热设
置,
• 有东西溢出到控制板上或在上面放置
物品超过 10 秒钟(锅、抹布)。当您听
到声响信号时,感应炉会停用。移除物
品或者清洁控制板。
• 感应炉过热(例如,当深平底锅中的水
煮干时)。让烹饪区域冷却,然后再次
使用感应炉。
• 未停用烹饪区域或者未更改加热设置。
一段时间后,感应炉会停用。
加热设置与时间(此时间后感应炉会停用)
之间的关系:
加热设置 在下列时间后停用感
应炉
1 - 2 6 小时后
3 - 4 5 小时后
5 4 小时后
6 - 9 1.5 小时后
5.3 使用烹饪区域
警告
请勿在控制板上放置热炊具。
这样可能损坏电子部件。
将炊具放在选定区域的中央位置上。
感应烹饪区域会根据炊具底部尺寸自动进
行调整。
当您将炊具放在正确的位置上,感应炉会
识别位置并显示相应的控制栏。红色烹饪
区域指示灯显示在控制栏上方,并指明锅
的位置。
控制栏上的每一个方块都代表感应烹饪表
面上的一个烹饪区域。区域指示灯表明由
相应的控制栏控制的烹饪区域。
5.4 加热设置
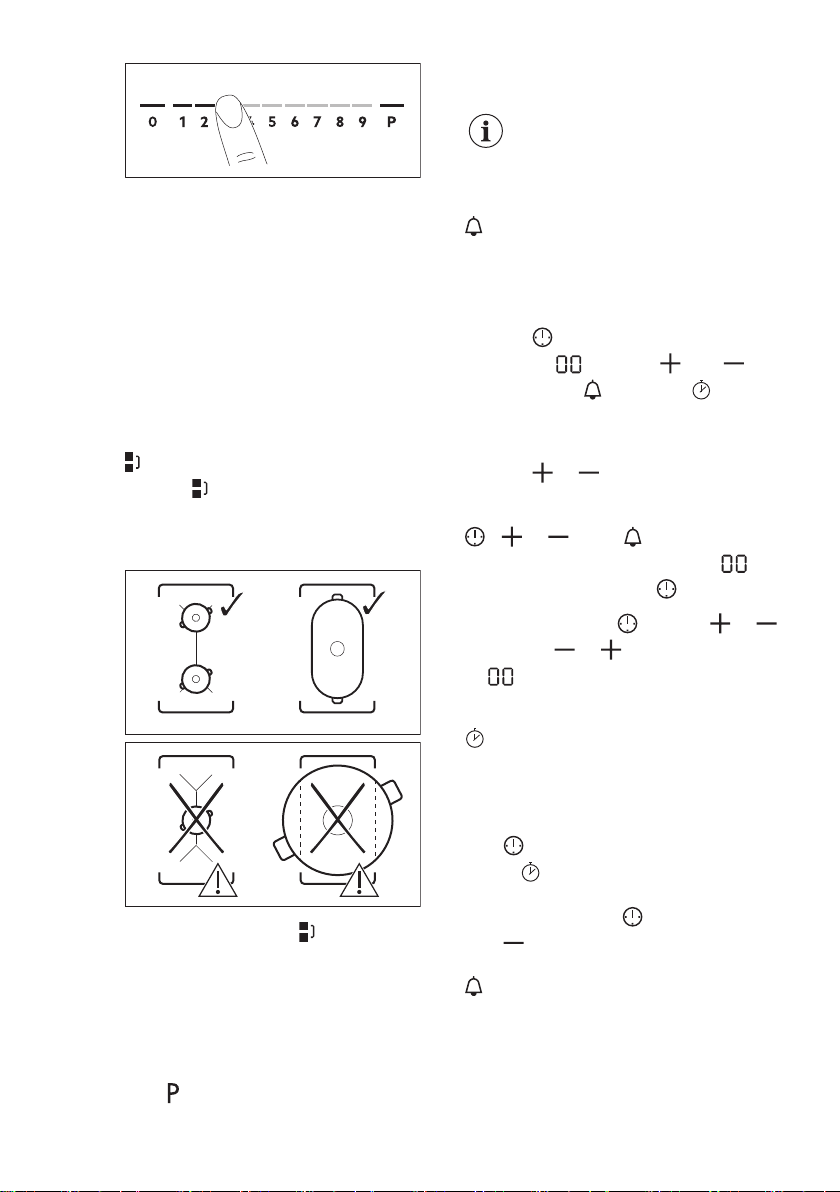
在控制栏上按触所需的加热设置,或者在
控制栏上移动手指以设置或更改烹饪区域
的加热设置。
中文 9
将锅放在烹饪区域上并设置加热设置之
后,即便您将锅拿走,它也会将相同的设
置保持 2 分钟。控制栏和烹饪区域指示灯
闪烁 2 分钟。如果您在 2 分钟内再次将锅
放到烹饪区域上,加热设置会重新激活。
否则烹饪区域会停用。
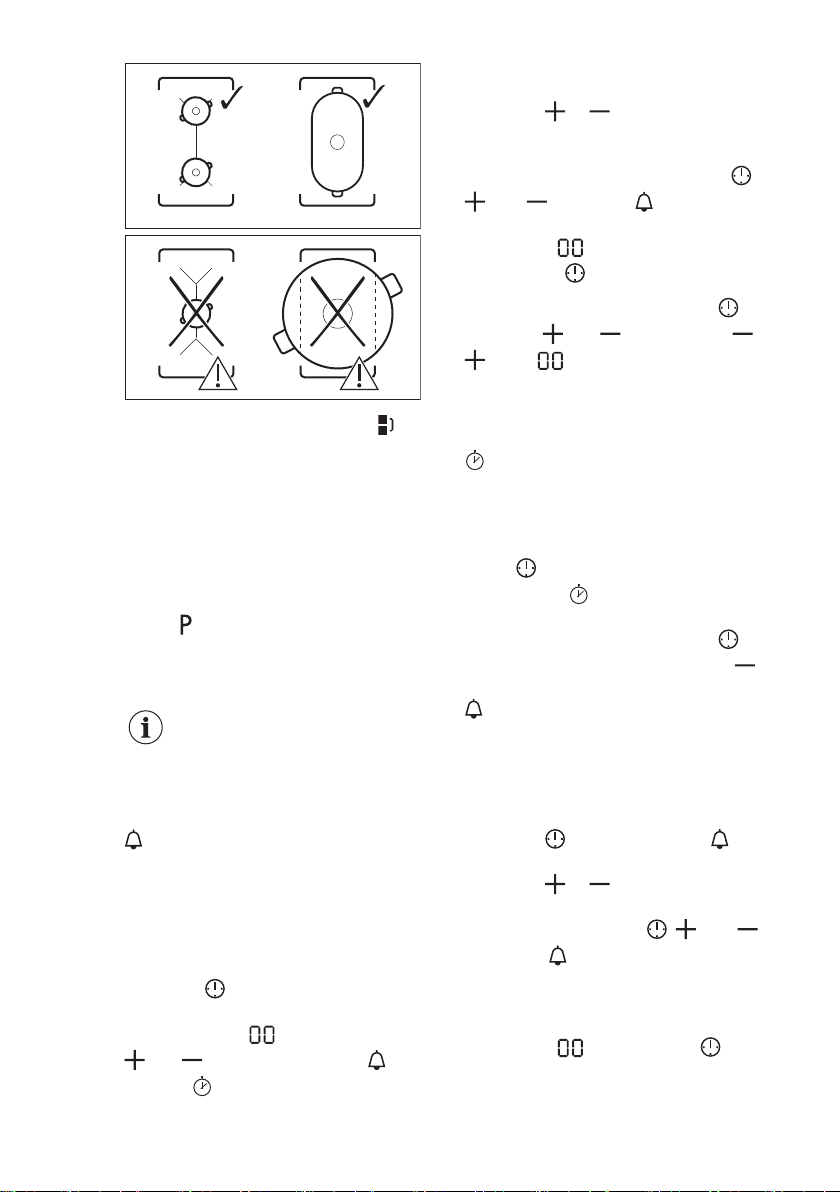
5.5 Bridge
此功能可连接两个烹饪区域,烹饪区域作
为整体运行。在使用该功能时,您可以使
用较大的炊具。
1. 将炊具放在两个烹饪区域上。炊具必
须覆盖两个区域的中心。
变成白色。
2. 按触 开启此功能。
3. 设定加热设置。
炊具必须覆盖两个区域的中心,但是不能
超出区域标记。
要停用此功能,请按触 。烹饪区域独立
运行。
5.6 PowerBoost
根据炊具的尺寸,此功能会为相应的感应
烹饪区域激活更多功耗。该功能只可激活
一段有限的时间。
按触 以激活烹饪区域的功能。
符号变成红色。
该功能自动停用。
如欲了解最大的持续时间值,
请参阅“技术数据”。
5.7 计时器
倒计时定时器
使用此功能指定在一次烹饪会话中烹饪区
域应该运作的时长。
先设置加热设置,然后设置此功能。
1. 按触 以启用该功能或更改时间。
计时器数字 和指示灯 以及 出
现在显示屏上。 变成红色, 变成白
色。
如果未设置计时器,所有指示灯将在 4 秒
钟后熄灭。
2. 按触 或 以设置时间(00 - 99 分
钟)。
3 秒钟后,计时器自动开始倒计时。指示灯
、 和 熄灭。 继续保持红色。
计时快要结束时,声响信号响起, 闪
烁。要关闭信号,请按触 。
关闭下述功能:按触 。指示灯 和
亮起。使用 或 以便在显示屏上设
置 。此外,也可将热量档位设置成 0。
因此,声音信号响起并取消计时器。
CountUp Timer(正计时定时
器)
可以使用此功能来监控烹饪区域的操作时
长。
按触 两次以启用该功能。
指示灯 变成红色,计时器自动开始计
时。
关闭下述功能:按触 。当指示灯亮起,
按触 。
分钟提示器
当感应炉已激活但烹饪区域不工作时,可
使用此功能。
要查看控制板,请将锅放在烹饪区域上。
www.aeg.com10
1. 按触 ,直到指示灯 变成红色,
可激活该功能。
2. 按触 或 设置时间。
4 秒钟后,该功能自动启动。指示灯
、
和 不再显示。 继续保持红色。
当您设置功能时,可以将锅拿下。
计时快要结束时,声响信号响起, 闪
烁。按触 可停止信号。
关闭下述功能:按触
。指示灯 和
亮起。使用 或 以便在显示屏上设
置 。
此功能对烹饪区域的运行没
有影响。
5.8 暂停
此功能会将所有可操作的烹饪区域设为最
低加热设置。
当功能处于活动状态时,可以使用
和
符号。
此功能不会停止计时器功能。
按触 开启此功能。
符号变成红色。加热设置降低至 1。
要停用此功能,请按触 。符号变成白
色。显示之前的加热设置。
5.9 锁定
可以在感应炉运作时锁定控制板。此功能
可防止加热设置意外改变。
您需要分别为各项设备激活
该功能。
先设定加热设置。
按触 开启此功能。
符号变成红色并开始闪烁。
要停用该功能,请按触 。符号变成白
色。
停用感应炉时,也会停用此功
能。
5.10 儿童安全锁
此功能可防止感应炉意外运行。
您需要分别为各项设备激活
该功能。
首先启动感应炉,但不要设置加热设置。
按触 直到它变成红色即可启用该功能。
不再显示控制栏。关闭感应炉。
关闭感应炉时,该功能仍处于
活动状态。
仅在一次烹饪时间内关闭该功能: 使用
启用感应炉。 亮起。按触 直到它变
成白色。不再显示控制栏。50 秒钟之内
设置加热设置。您可以操作感应炉。使用
停用感应炉时,该功能仍处于活动状
态。
要永久停用该功能:启用感应炉,但不设
置加热设置。按触
,直到它变成白色。
不再显示控制栏。关闭感应炉。
5.11 OffSound Control(停用和
启用声音)
先关闭感应炉。
1. 按触 3 秒钟可开启此功能。
显示屏会先显示后熄灭。
2. 按触 3 秒钟。
或 显示。
3. 按触计时器的
可选择以下其中一
项:
• - 声音关闭
• - 声音开启
4. 等到感应炉自动停用之后才可确认选
择。
如果此功能设为 ,则只有在下列情况
下才会听到声音:
• 按触
• 分钟提示器 熄灭
• 倒计时定时器 熄灭
• 在控制板上放置物品。
5.12 电源管理 功能
• 所有烹饪区域都连接至单相电。请参
阅插图。
• 如果烹饪区域的总电力负荷超过相位
的最大电力负荷,则会启用此功能。
• 此功能会在烹饪区域之间分配电力。
• 此功能会减少分配给其他烹饪区域的
电力。
中文 11
• 如果是电力减少的烹饪区域,控制板会
显示可能的最大加热设置。
• 如果较高的加热设置不可用,请先降低
其他烹饪区域的加热设置。
• 该功能的启用与锅的数量和大小相关。
6. 建议和提示
警告!
请参阅“安全”一章。
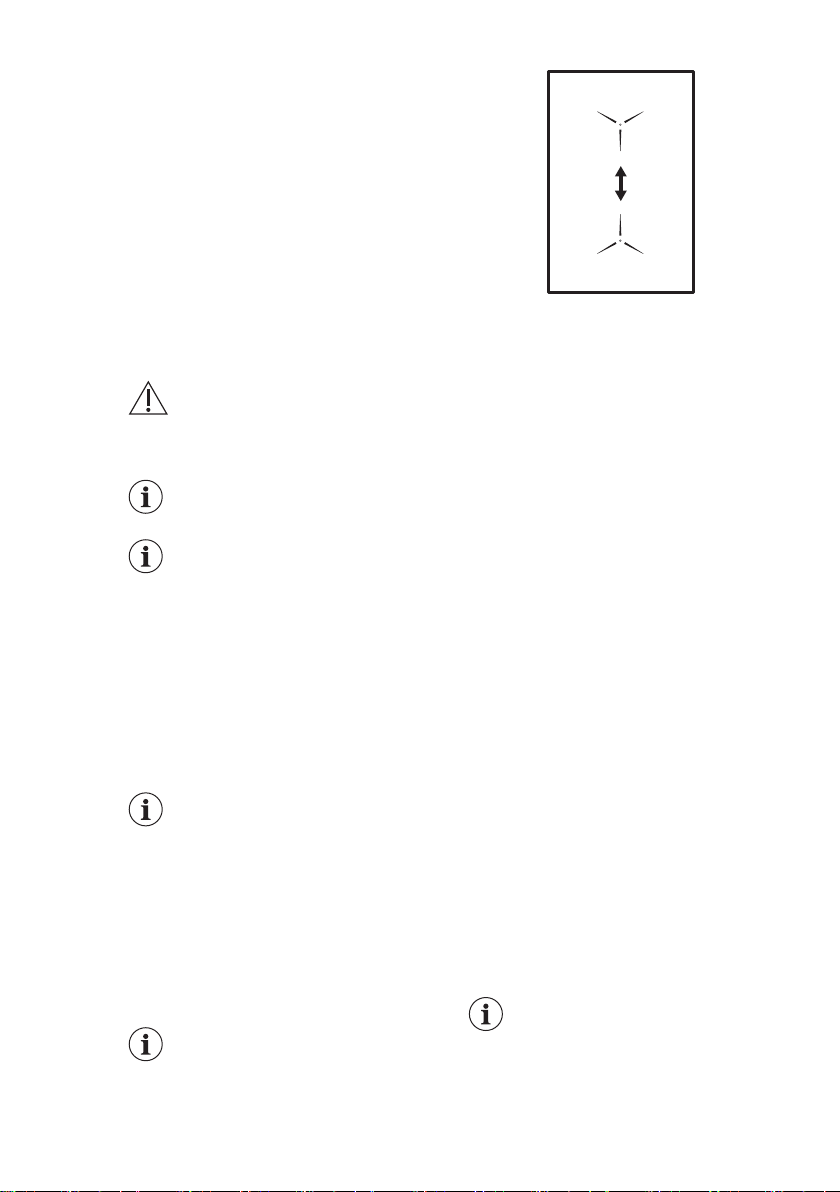
6.1 炊具
电感加热式烹饪区域强大的
电磁场可让炊具快速升温。
使用电感加热式烹饪区域时,
请配置适当的炊具。
炊具材料
• 正确: 铸铁、钢、搪瓷钢、不锈钢、多
层底(带有厂商的正确标记)。
• 不正确: 铝、铜、黄铜、玻璃、陶瓷、
瓷。
当符合下列条件时,炊具适用于感应炉:
• 在设定为最高加热设置的区域,水会很
快煮沸。
• 炊具底部可吸附磁铁。
炊具底部必须尽可能厚且平
整。
确保锅底干燥清洁,再将它放
到感应炉表面上。
炊具尺寸
电感加热式烹饪区域会根据炊具底部尺寸
自动进行调整。
烹饪区域的效率与炊具的直径有关。直径
小于最低值的炊具只能消耗烹饪区域所产
生功率的一部分。
请参阅“技术数据”一章。
6.2 运行过程中的噪音
如果您能听到:
• 爆裂噪音:则炊具采用不同材料制成
(夹心结构)。
• 汽笛声:表示您使用的是具有大功率水
平的烹饪区域,且炊具采用不同材料制
成(夹心结构)。
• 嗡嗡声:则您使用的是大功率水平。
• 滴答声:电气开关打开,。
• 嘶嘶声,嗡嗡声:则风扇正在运转。
这些噪音均为常见噪音,不代表任何故障。
6.3 节能
• 如有可能,请始终盖上炊具盖。
• 在启动本机前,请先将炊具放置在烹饪
区域上。
• 请利用余热为食物保温或融化食物。
6.4 Öko Timer (节能计时器)
为了省电,烹饪区域加热器会在倒计时定
时器发出声响之前关闭。运行时间的差异
取决于加热设置等级与烹煮操作的时间长
度。
6.5 烹饪应用实例
区域的加热设置及其功耗之间并非线性关
系。加大加热设置时,它不会与功耗的增
加值呈正比。这意味着,中等加热设置的
烹饪区域仅使用不到一半的功耗。
表中数据仅供参考。
www.aeg.com12
加热设置 用途: 时间
(分
钟)
建议
1 为煮熟的食物保温。 如有必
要
给炊具盖上盖子。
1 - 2 荷兰酸辣酱,熔化:黄油、巧
克力、明胶。
5 - 25 不时搅拌。
1 - 2 凝固:松软煎蛋卷、烤蛋。 10 - 40 烹制时盖上盖子。
2 - 3 焖米饭与奶类食品,加热速食
饭菜。
25 - 50 加入至少两倍于大米的液体,
并在中途搅拌奶类食品。
3 - 4 蒸蔬菜、鱼、肉。 20 - 45 加入数匙液体。
4 - 5 蒸土豆。 20 - 60 每 750 g 土豆最多使用 ¼ l
水。
4 - 5 烹制较多食品、炖品与汤品。 60 - 150 最多使用 3 l 液体调料外加配
料。
6 - 7 轻炒:薄肉片、蓝带烤牛肉烧
烤、厚肉片、炸肉饼/丸、香
肠、肝脏、乳酪面粉糊、蛋、
煎饼、面团。
如有必
要
中途翻面。
7 - 8 爆炒,洋葱土豆煎饼,板肉、
肉排。
5 - 15 中途翻面。
9 烧水、烹制意大利面条、烧肉(菜炖牛肉、焖炖肉块)、炸土豆片。
烧大量水。启用 PowerBoost。
7. 养护和清洁
警告!
请参阅“安全”一章。
7.1 一般信息
• 每次使用后,请清洁感应炉。
• 务必使用底部洁净的炊具。
• 表面上的划痕或暗色污渍不会对感应
炉的运行方式产生任何影响。
• 感应炉表面应使用适用的专门清洁剂。
• 使用特殊的玻璃刮刀。
7.2 对炉架的清洁
• 立即去除: 融化的塑料、塑料薄膜、糖
以及含糖的食物,否则脏污会损坏感应
炉。请小心避免烫伤。将特殊的感应
炉刮刀呈锐角放在玻璃表面上,然后在
表面上移动刀片。
• 炉架充分冷却后去除: 水垢圈、水圈、
油渍、光亮金属褪色。使用湿布和非磨
蚀性洗涤剂清洁感应炉。清洁后,用软
布擦干感应炉。
• 去除光亮金属褪色: 使用水和醋混合而
成的溶液,并用布清洁玻璃表面。
中文 13
8. 异常处理
警告!
请参阅“安全”一章。
8.1 如果出现以下情况,应该如何处理...
故障 可能的原因 补救方法
无法启动或操作感应炉。 感应炉未与电源连接或连接
有误。
检查感应炉是否正确连接到
电源。请参阅连接图。
保险丝断开。 请确认保险丝是否为故障原
因。如果保险丝屡次断开,
请联系有资质的电工。
您同时按触了 2 个或多个感
测区域。
只触摸一个感测区域。
暂停 在运行。 参考“日常使用”。
控制板上有水或油渍。 清洁控制板。
您无法为其中一个烹饪区域
选择最大加热设置。
其他区域消耗可用的最大功
率。
您的感应炉正常工作。
降低连接至同一相位的其他
烹饪区域的加热设置。
请参阅“电源管理”。
发出声响信号之后,感应炉
停止工作。
感应炉停止工作时会发出声
响信号。
您在一个或多个感测区域上
放置了物品。
移除感测区域上的物品。
感应炉关闭。
您在感测区域 上放置了物
品。
移除感测区域上的物品。
余热指示灯不亮。 此区域未变热,因为它只工
作了很短的时间,或者传感
器受损。
如果此区域已运行足够长时
间却未变热时,请联系授权
服务中心。
感测区域变热。 炊具太大或者太靠近控制装
置。
如果可能,请将大型炊具放
置在后部区域。
当您按触面板感测区域时无
声音。
声音已关闭。 激活声音。参考“日常使用”。
显示 。
儿童安全锁 或 锁定 在运行。 参考“日常使用”。
控制栏闪烁。 该区域上没有炊具,或者该
区域未完全覆盖。
将炊具放在该区域上,以便
将烹饪区域完全覆盖。
炊具不适当。 使用适当的炊具。请参阅“技
巧和提示”。
炊具的底部直径相对于烹饪
区域来说过小。
使用尺寸合适的炊具。请参
阅“技术数据”一章。
www.aeg.com14
故障 可能的原因 补救方法
显示 和数字。
感应炉出错。 关闭感应炉,30 秒之后再次
启动。如果 再次显示,请
断开感应炉电源。30 秒后,
再次连接感应炉。如果问题
仍然存在,请联系授权服务
中心。
您可以听到连续的哔哔声。 电气连接不正确。 断开感应炉电源。请具备资
质的电工来检查安装情况。
8.2 如果找不到解决方法...
如果自己找不到解决问题的方法,请联系
经销商或授权服务中心。提供铭牌上的数
据。请确认,您对感应炉的操作正确。如
果设备因人为不当操作造成故障,则即使
设备处于保修期内仍无法享受到服务技术
人员或经销商提供的免费维修服务。有关
服务中心说明与保修条件,请见保修手册。
9. 技术数据
9.1 铭牌
型号 IKE42640KB PNC 949 597 765 00
类型 61 A2A 00 AD 220 - 240 V 50 - 60 Hz
电感加热功率 3.65 kW 德国制造
序列号 ................. 3.65 kW
AEG
9.2 烹饪区域规格
烹饪区域 额定功率(最高
加热设置) [W]
PowerBoost
[W]
PowerBoost 最
大时长 [分钟]
炊具直径 [mm]
中前 2300 3200 10 145 - 265
中后 2300 3200 10 145 - 265
烹饪区域的功率可能与此表中的数据稍有
不同。它会因为炊具的材质和尺寸而发生
变化。
为达到最佳烹饪效果,请使用不超过本表
中直径的炊具。
10. 能效
10.1 根据 EU 66/2014 的产品信息
型号标识 IKE42640KB
感应炉类型 内置式感应炉
烹饪区域数量 1
中文 15
加热技术 电感
烹饪区域的长度 (L) 和宽度
(W)
中 长 36.5 cm
宽 27.5 cm
烹饪区的能耗 (EC electric
cooking)
中 182.4 Wh / kg
感应炉的能耗 (EC electric
hob)
182.4 Wh / kg
EN 60350-2 - 家用电气烹饪设备 - 第 2 部
分:感应炉 - 性能测量方法
10.2 节能
如果在日常烹调中遵循下列提示,则可以
节能。
• 需要多少开水,就烧多少水。
• 如有可能,请始终盖上炊具盖。
• 先将炊具放在烹饪区域上,再将其启
用。
• 将较小的炊具放在较小的烹饪区域上。
• 将炊具直接放在烹饪区域的中央。
• 请利用余热为食物保温或融化食物。
11. AEG 家用电器“三包”服务指南
AEG 家用电器 “三包” 标准:
为保证使用 AEG 家用电器的消费者获得
满意的售后服务,本公司将严格遵守国家
颁布的有关法律,遵照 《中华人民共和国
消费者权益保护法》 、《中华人民共和国产
品质量法》、《部分商品修理更换退货责任
规定》和有关法规制定如下 “三包” 标准。
名称 三包有效期 ( 年 ) 主要部件名称
整机 主要部件
电冰箱 1 3 压缩机、温控器、蒸发器、冷
凝器、毛细管、过滤器、主控
模块、显示模块、温度传感
器、化霜加热器、化霜保护
器、电动风门、电源模块、变
频模块、LED 灯模块、风扇电
机、电磁阀、自动制冰机
洗衣机/干衣机 1 3 电机、定时器、程控器、电容
器、主电路模块、操作电路模
块、变频模块
吸油烟机 1 3 电机、电源模块、控制模块、
操作模块、显示模块
燃气灶 1 3 燃气阀组件( 阀体 电磁安全
阀 热电偶 微动开关等)、电
源模块、控制模块、操作模
块、显示模块、玻璃台面
www.aeg.com16
嵌入式电灶 1 3 电源模块、控制模块、操作模
块、显示模块、加热丝、控温
装置、玻璃台面
微波炉 1 2 电机、磁控管、定时器、主电
源模块、显示模块
嵌入式咖啡机 1 - -
嵌入式烤箱 1 - -
嵌入式电蒸炉 1 - -
嵌入式抽屉 1 - -
吸尘器 1 3 电机
洗碗机 1 3 主电路模块、 洗涤泵、 加热
器
一、 整机免费保修壹年 ,主要部件保修期
详见上表(有效期自发票开具之日算起);
二、 对于为社会集团消费和生产消费购买
的家用电器用户,其“三包”有效期为整机保
修六个月;
三、 本公司降价销售有外观瑕疵但不影响
正常使用的家用电器,对其降价部位不再
实行“三包”责任;
四、 下列情况,不属于“三包”范畴之列,
但可实行收费修理:
• 消费者搬运、安装、使用、 维护、保管
不当而损坏的;
• 自行或非经本公司授权维修中心拆修
而造成损坏的;
• 无“三包”凭证及有效发票的;
• “三包” 凭证型号与修理产品型号不符或
涂改的;
• 因不可抗拒力造成产品损坏的。
注释:消费者是指购买、使用本公司家用
电器,并将本公司家用电器用于生活消费
的个人和进行生活消费的单位;或者在接
受本公司服务的个人和进行生活消费的单
位。
广东德易捷电器有限公司
预约安装维修服务及产品信息咨询
全国统一客户服务热线: 400 858 3388
购买日期 发票号码
顾客姓名 联系电话
顾客地址及邮编
产品名称 产品代码( PNC)
产品型号 产品机号
销售店名称 销售店电话
维修记录
维修站名称 送修日
中文 17
故障内容
故障原因
维修内容
维修技师签字 交验日期
维修站名称 送修日
故障内容
故障原因
维修内容
维修技师签字 交验日期
维修站名称 送修日
故障内容
故障原因
维修内容
维修技师签字 交验日期
12. 环保问题
回收带有该标志 的材料。把包装材料
放入适用的容器以循环利用。帮助保护环
境和人类健康,促进电气及电子产品废物
的回收再利用。请勿将带有该标志 的
电器与生活垃圾一起处理。将产品退回到
您当地的回收处,或联系您所在城市的办
事处。
www.aeg.com18

ZH
X
X
X
X
X
X
X
中文 19

CONTENTS
1. SAFETY INFORMATION...........................................................................................20
2. SAFETY INSTRUCTIONS...........................................................................................22
3. INSTALLATION..........................................................................................................25
4. PRODUCT DESCRIPTION.........................................................................................27
5. DAILY USE..................................................................................................................28
6. HINTS AND TIPS........................................................................................................32
7. CARE AND CLEANING.............................................................................................34
8. TROUBLESHOOTING............................................................................................... 34
9. TECHNICAL DATA.................................................................................................... 36
10. ENERGY EFFICIENCY.............................................................................................37
WE’RE THINKING OF YOU
Thank you for purchasing an AEG appliance. You’ve chosen a product that brings
with it decades of professional experience and innovation. Ingenious and stylish,
it has been designed with you in mind. So whenever you use it, you can be safe in
the knowledge that you’ll get great results every time. Welcome to AEG.
Visit our website:
Get usage advice, brochures, trouble shooter, service information:
www.aeg.cn
CUSTOMER CARE AND SERVICE
Always use original spare parts.
When contacting our Authorised Service Centre, ensure that you have the
following data available: Model, PNC, Serial Number.
The information can be found on the rating plate.
Warning / Caution-Safety information
General information and tips
Environmental information
Subject to change without notice.
1.
SAFETY INFORMATION
Before the installation and use of the appliance,
carefully read the supplied instructions. The
manufacturer is not responsible for any injuries or
damage that are the result of incorrect installation or
usage. Always keep the instructions in a safe and
accessible location for future reference.
www.aeg.com20

1.1 Children and vulnerable people safety
• This appliance can be used by children aged from 8
years and above and persons with reduced physical,
sensory or mental capabilities or lack of experience
and knowledge if they have been given supervision or
instruction concerning the use of the appliance in a
safe way and understand the hazards involved.
• Children between 3 and 8 years of age and persons
with very extensive and complex disabilities shall be
kept away from the appliance unless continuously
supervised.
• Children of less than 3 years of age should be kept
away from the appliance unless continuously
supervised.
• Do not let children play with the appliance.
• Keep all packaging away from children and dispose of
it appropriately.
• Keep children and pets away from the appliance when
it operates or when it cools down. Accessible parts
may become hot during use.
• If the appliance has a child safety device, it should be
activated.
• Children shall not carry out cleaning and user
maintenance of the appliance without supervision.
1.2
General Safety
•
WARNING: The appliance and its accessible parts
become hot during use. Care should be taken to
avoid touching heating elements.
• WARNING: Unattended cooking on a hob with fat or
oil can be dangerous and may result in fire.
• NEVER try to extinguish a fire with water, but switch
off the appliance and then cover flame e.g. with a lid
or a fire blanket.
• CAUTION: The appliance must not be supplied
through an external switching device, such as a timer,
ENGLISH
21

or connected to a circuit that is regularly switched on
and off by a utility.
• CAUTION: The cooking process has to be supervised.
A short term cooking process has to be supervised
continuously.
• WARNING: Danger of fire: Do not store items on the
cooking surfaces.
• Metallic objects such as knives, forks, spoons and lids
should not be placed on the hob surface since they
can get hot.
• Do not use the appliance before installing it in the
built-in structure.
• Do not use a steam cleaner to clean the appliance.
• After use, switch off the hob element by its control
and do not rely on the pan detector.
• If the glass ceramic surface / glass surface is cracked,
switch off the appliance and unplug it from the mains.
In case the appliance is connected to the mains
directly using junction box, remove the fuse to
disconnect the appliance from power supply. In either
case contact the Authorised Service Centre.
• If the supply cord is damaged, it must be replaced by
the manufacturer, an authorized Service or similarly
qualified persons in order to avoid a hazard.
• WARNING: Use only hob guards designed by the
manufacturer of the cooking appliance or indicated by
the manufacturer of the appliance in the instructions
for use as suitable or hob guards incorporated in the
appliance. The use of inappropriate guards can cause
accidents.
2.
SAFETY INSTRUCTIONS
2.1 Installation
WARNING!
Only a qualified person must
install this appliance.
WARNING!
Risk of injury or damage to
the appliance.
• Remove all the packaging.
• Do not install or use a damaged
appliance.
www.aeg.com22

• Follow the installation instructions
supplied with the appliance.
• Keep the minimum distance from
other appliances and units.
• Always take care when moving the
appliance as it is heavy. Always use
safety gloves and enclosed footwear.
• Seal the cut surfaces with a sealant to
prevent moisture to cause swelling.
• Protect the bottom of the appliance
from steam and moisture.
• Do not install the appliance adjacent
to a door or under a window. This
prevents hot cookware falling from
the appliance when the door or the
window is opened.
• If the appliance is installed above
drawers make sure that the space,
between the bottom of the appliance
and the upper drawer, is sufficient for
air circulation.
• The bottom of the appliance can get
hot. Make sure to install a separation
panel made from plywood, kitchen
carcass material or other non-
flammable materials under the
appliance to prevent access to the
bottom.
• The separation panel has to cover the
area under the hob completely.
• Make sure that the ventilation space
of 2 mm, between the worktop and
the front of the below unit, is free.
The warranty does not cover damages
caused by the lack of an adequate
ventilation space.
2.2 Electrical Connection
WARNING!
Risk of fire and electric
shock.
• All electrical connections should be
made by a qualified electrician.
• The appliance must be earthed.
• Before carrying out any operation
make sure that the appliance is
disconnected from the power supply.
• Make sure that the parameters on the
rating plate are compatible with the
electrical ratings of the mains power
supply.
• Make sure the appliance is installed
correctly. Loose and incorrect
electricity mains cable or plug (if
applicable) can make the terminal
become too hot.
• Use the correct electricity mains
cable.
• Do not let the electricity mains cable
tangle.
• Make sure that a shock protection is
installed.
• Use the strain relief clamp on the
cable.
• Make sure the mains cable or plug (if
applicable) does not touch the hot
appliance or hot cookware, when you
connect the appliance to the near
sockets.
• Do not use multi-plug adapters and
extension cables.
• Make sure not to cause damage to
the mains plug (if applicable) or to the
mains cable. Contact our Authorised
Service Centre or an electrician to
change a damaged mains cable.
• The shock protection of live and
insulated parts must be fastened in
such a way that it cannot be removed
without tools.
• Connect the mains plug to the mains
socket only at the end of the
installation. Make sure that there is
access to the mains plug after the
installation.
• If the mains socket is loose, do not
connect the mains plug.
• Do not pull the mains cable to
disconnect the appliance. Always pull
the mains plug.
• Use only correct isolation devices: line
protecting cut-outs, fuses (screw type
fuses removed from the holder), earth
leakage trips and contactors.
• The electrical installation must have
an isolation device which lets you
disconnect the appliance from the
mains at all poles. The isolation
device must have a contact opening
width of minimum 3 mm.
2.3 Use
WARNING!
Risk of injury, burns and
electric shock.
• Remove all the packaging, labelling
and protective film (if applicable)
before first use.
ENGLISH
23
• This appliance is for household use
only.
• Do not change the specification of
this appliance.
• Make sure that the ventilation
openings are not blocked.
• Do not let the appliance stay
unattended during operation.
• Set the cooking zone to “off” after
each use.
• Do not rely on the pan detector.
• Do not put cutlery or saucepan lids on
the cooking zones. They can become
hot.
• Do not operate the appliance with
wet hands or when it has contact with
water.
• Do not use the appliance as a work
surface or as a storage surface.
• If the surface of the appliance is
cracked, disconnect immediately the
appliance from the power supply. This
to prevent an electrical shock.
• Users with a pacemaker must keep a
distance of minimum 30 cm from the
induction cooking zones when the
appliance is in operation.
• When you place food into hot oil, it
may splash.
WARNING!
Risk of fire and explosion
• Fats and oil when heated can release
flammable vapours. Keep flames or
heated objects away from fats and oils
when you cook with them.
• The vapours that very hot oil releases
can cause spontaneous combustion.
• Used oil, that can contain food
remnants, can cause fire at a lower
temperature than oil used for the first
time.
• Do not put flammable products or
items that are wet with flammable
products in, near or on the appliance.
WARNING!
Risk of damage to the
appliance.
• Do not keep hot cookware on the
control panel.
• Do not put a hot pan cover on the
glass surface of the hob.
• Do not let cookware boil dry.
• Be careful not to let objects or
cookware fall on the appliance. The
surface can be damaged.
• Do not activate the cooking zones
with empty cookware or without
cookware.
• Do not put aluminium foil on the
appliance.
• Cookware made of cast iron,
aluminium or with a damaged bottom
can cause scratches on the glass /
glass ceramic. Always lift these
objects up when you have to move
them on the cooking surface.
• This appliance is for cooking
purposes only. It must not be used for
other purposes, for example room
heating.
2.4 Care and cleaning
• Clean the appliance regularly to
prevent the deterioration of the
surface material.
• Deactivate the appliance and let it
cool down before you clean it.
• Disconnect the appliance from the
electrical supply before maintenance.
• Do not use water spray and steam to
clean the appliance.
• Clean the appliance with a moist soft
cloth. Use only neutral detergents. Do
not use abrasive products, abrasive
cleaning pads, solvents or metal
objects.
2.5 Service
• To repair the appliance contact the
Authorised Service Centre.
• Use original spare parts only.
2.6 Disposal
WARNING!
Risk of injury or suffocation.
• Contact your municipal authority for
information on how to discard the
appliance correctly.
• Disconnect the appliance from the
mains supply.
• Cut off the mains electrical cable
close to the appliance and dispose of
it.
www.aeg.com24
3. INSTALLATION
WARNING!
Refer to Safety chapters.
3.1 Before the installation
Before you install the hob, write down
the information below from the rating
plate. The rating plate is on the bottom
of the hob.
Serial number ...........................
3.2 Built-in hobs
Only use the built-in hobs after you
assemble the hob into correct built-in
units and work surfaces that align to the
standards.
3.3 Connection cable
• The hob is supplied with a connection
cable.
• To replace the damaged mains cable
use the same mains cable type.
• To replace the damaged mains cable,
use the cable type: H05V2V2-F which
withstands a temperature of 90 °C or
higher. Speak to your local Service
Centre.
3.4 Attaching the seal - On-top
installation
1. Clean the worktop around the cut
out area.
2. Attach the supplied 2x6mm seal
stripe to the lower edge of the hob,
along the outer edge of the glass
ceramic. Do not stretch it. Make sure
that the ends of the seal stripe are
located in the middle of one side of
the hob.
3. Add some millimetres to the length
when you cut the seal stripe.
4. Join the two ends of the seal stripe
together.
3.5 Assembly
min.
50mm
min.
500mm
min.
2mm
360
520
min.
12 mm
min.
2 mm
ENGLISH
25
min. 2 mm
A
B
A
12 mm
28 mm
38 mm
B
57 mm
41 mm
31 mm
min
30 mm
min. 500 mm
< 20 mm
> 20 mm
min. 2 mm
A
B
A
12 mm
28 mm
38 mm
B
57 mm
41 mm
31 mm
min. 500 mm
3.6 Installation of more than
one hob
Supplied accessories: connection bar,
heat-resistant silicone, rubber shape,
sealing stripe.
Use only a special heat-
resistant silicone.
The worktop cutout
Distance
from the
wall
minimum 50 mm
Length 490 mm
Width the sum of all widths of appli-
ances that you install minus
20 mm
Example:
360 mm
520 mm
490 mm
360 mm
+ - =
20 mm 700 mm
Assembly
• Calculate correct cutout dimensions.
• Prepare the worktop cutout.
• Place the appliances on a soft surface
(e.g. a blanket) with the bottom side
up.
• In the case of the Teppan Yaki, attach
the supplied seal stripe to its lower
www.aeg.com26
edge, along the outer edge of the
glass ceramic. Loosely screw the
fixing plates into the correct holes in
the protection casing.
• Insert the first appliance into the
worktop cutout. Mount the
connection bar under the appliance
so that a half of its width is still visible
- it will support the next appliance.
• For the Teppan Yaki, loosely screw in
the fixing plates to the worktop from
below (at the front and the rear of the
appliance).
• Insert the next appliance into the
worktop cutout. Make sure that the
front edges of the appliances are on
the same level.
• Fix appliances other than Teppan Yaki
with the use of snap-in springs.
• At the end, tighten the screws of the
Teppan Yaki.
• Use silicone to seal the gaps between
the appliances and those between the
appliances and the worktop.
• Press the rubber shape firmly against
the glass ceramic and move it slowly
along the edges to squeeze out
excess silicone.
• Put some soapy water on the silicone
and smoothen out the edges with
your finger.
• Do not touch the silicone until it
hardens, it can last for about a day.
• Carefully remove the silicone
squeeze-out with a shaving razor.
• Clean the glass surface.
4. PRODUCT DESCRIPTION
4.1 Cooking surface layout
2
1
1
1
Induction cooking surface
2
Control panel
ENGLISH
27
4.2 Control panel layout
1 4 852 3 6 7
10
12
9
11
1
To activate and deactivate the
hob.
2
To activate and deactivate Lock or
Child Safety Device.
3
To show the active zone.
4
CountUp Timer indicator.
5
Count Down Timer indicator.
6
Timer display: 00 - 99 minutes.
7
To activate and deactivate Bridge.
8
To select Timer functions.
9
/ To increase and decrease the
time.
10
To activate and deactivate Pause.
11
To activate PowerBoost.
12
To set a heat setting: 0 - 9.
4.3 OptiHeat Control (3 step
Residual heat indicator)
WARNING!
/ / There is a risk of
burns from residual heat.
The indicators show the level of the
residual heat for the cooking zones you
are currently using. When the hob is
deactivated, the indicators are still
visible. When the hob is cold enough,
they disappear. The indicators may also
come on for the neighbouring cooking
zones even if you are not using them.
The induction cooking zones produce
the heat necessary for the cooking
process directly in the bottom of the
cookware. The glass ceramic is heated by
the heat of the cookware.
5. DAILY USE
WARNING!
Refer to Safety chapters.
5.1 Activating and
deactivating
Touch for 1 second to activate or
deactivate the hob.
The control panel comes on after you
activate the hob and goes off after you
deactivate the hob.
5.2 Automatic Switch Off
The function deactivates the hob
automatically if:
• you do not place any cookware on the
hob for 50 seconds,
• you do not set the heat setting for 50
seconds after you place the cookware,
• you spill something or put something
on the control panel for more than 10
seconds (a pan, a cloth). When you
hear the acoustic signal, the hob
www.aeg.com28
deactivates. Remove the object or
clean the control panel.
• the hob gets too hot (e.g. when a
saucepan boils dry). Let the cooking
zone cool down before you use the
hob again.
• you do not deactivate a cooking zone
or change the heat setting. After
some time, the hob deactivates.
The relation between the heat setting
and the time after which the hob
deactivates:
Heat setting The hob deacti-
vates after
1 - 2 6 hours
3 - 4 5 hours
5 4 hours
6 - 9 1.5 hours
5.3 Using the cooking zone
CAUTION!
Do not place hot cookware
on the control panel. There
is a risk of damage to the
electronic parts.
Place the cookware in the centre of the
selected zone.
Induction cooking zones adapt to the
dimension of the bottom of the
cookware automatically.
When you place the cookware in the
correct position, the hob recognizes it
and the appropriate control bar comes
on. A red cooking zone indicator appears
above the control bar and indicates the
position of the pot.
Each square on the control panel
represents one cooking zone on the
induction cooking surface. Zone
indicators show which cooking zone is
controlled by the appropriate control
bar.
5.4 Heat setting
Touch the control bar at the desired heat
setting or move your finger along the
control bar to set or change the heat
setting for a cooking zone.
Once you place a pot on the cooking
zone and set the heat setting, it remains
the same for 2 minutes after you remove
the pot. The control bar and the cooking
zone indicator blink for 2 minutes. If you
place the pot on the cooking zone again
within this time, the heat setting
reactivates. Otherwise the cooking zone
deactivates.
5.5 Bridge
This function connects two cooking
zones and they operate as one. You can
use the function with large cookware.
1. Place the cookware on two cooking
zones. The cookware must cover the
centres of both zones.
turns white.
2. Touch to activate the function.
3. Set the heat setting.
The cookware must cover the centres of
both zones but not go beyond the area
marking.
ENGLISH
29
To deactivate the function, touch . The
cooking zones operate independently.
5.6 PowerBoost
This function activates more power for
the appropriate induction cooking zone,
depending on the cookware size. The
function can be activated only for a
limited period of time.
Touch
to activate the function for the
cooking zone.
The symbol turns red.
The function deactivates automatically.
For maximum duration
values, refer to "Technical
data".
5.7 Timer
Count Down Timer
Use this function to specify how long a
cooking zone should operate during a
single cooking session.
First set the heat setting, then set the
function.
1. Touch
to activate the function or
change the time.
The timer digits
and the indicators
and come on the display. turns
red, and turns white.
If the timer is not set, all indicators
disappear after 4 seconds.
2. Touch or to set the time (00 -
99 minutes).
After 3 seconds, the timer starts to count
down automatically. The indicators ,
, and disappear. stays red.
When the time comes to an end, a signal
sounds and flashes. To stop the
signal, touch .
To deactivate the function: touch
. The
indicators and come on. Use or
to set on the display.
Alternatively, set the heat level to 0. As a
result, a signal sounds and the timer is
cancelled.
CountUp Timer (The count
up timer)
You can use this function to monitor how
long a cooking zone operates.
Touch twice to activate the function.
The indicator turns red, the timer
starts to count up automatically.
To deactivate the function: touch .
When the indicators light up, touch
.
Minute Minder
You can use this function when the hob is
activated but no cooking zone operates.
To see the control panel, place a pot on
a cooking zone.
1. Touch
, until the indicator turns
red, to activate the function.
2. Touch or to set the time.
The function starts automatically after 4
seconds. The indicators
, , and
disappear. stays red.
When you set the function, you can
remove the pot.
When the time comes to an end, a signal
sounds and flashes. Touch to
stop the signal.
www.aeg.com30
To deactivate the function: touch . The
indicators and light up. Use or
to set on the display.
The function has no effect
on the operation of any
cooking zone.
5.8 Pause
This function sets all cooking zones that
operate to the lowest heat setting.
When the function is active, and
symbols can be used.
The function does not stop the timer
functions.
Touch to activate the function.
The symbol turns red. The heat setting is
lowered to 1.
To deactivate the function, touch
. The
symbol turns white. The previous heat
setting comes on.
5.9 Lock
You can lock the control panel while the
hob operates. It prevents an accidental
change of the heat setting.
You need to activate the
function for each appliance
separately.
Set the heat setting first.
Touch to activate the function.
The symbol turns red and blinks.
To deactivate the function, touch . The
symbol turns white.
When you deactivate the
hob, you also deactivate this
function.
5.10 Child Safety Device
This function prevents an accidental
operation of the hob.
You need to activate the
function for each appliance
separately.
Activate the hob first and do not set the
heat setting.
Touch until it turns red to activate the
function.
The control bars disappear. Deactivate
the hob.
When you deactivate the
hob, the function is still
active.
To deactivate the function for only one
cooking time: Activate the hob with .
comes on. Touch until it turns
white. The control bars appear. Set the
heat setting within 50 seconds. You can
operate the hob. When you deactivate
the hob with
the function is still
active.
To deactivate the function
permanently: Activate the hob and do
not set the heat setting. Touch until it
turns white. The control bars appear.
Deactivate the hob.
5.11 OffSound Control
(Deactivating and activating
the sounds)
Deactivate the hob first.
1. Touch
for 3 seconds to activate
the function.
The display comes on and goes out.
2. Touch for 3 seconds.
or comes on.
3. Touch
of the timer to choose one
of the following:
• - the sounds are off
• - the sounds are on
4. Wait until the hob deactivates
automatically to confirm your
selection.
When the function is set to
you can
hear the sounds only when:
• you touch
• Minute Minder comes down
• Count Down Timer comes down
• you put something on the control
panel.
ENGLISH
31
5.12 Power management
function
• All cooking zones are connected to
one phase. See the illustration.
• The function activates when the total
electricity loading of the cooking
zones exceeds maximum electricity
loading of the phase.
• The function divides the power
between cooking zones.
• The function decreases the power to
the other cooking zones.
• For cooking zones that have a
reduced power, the control panel
shows the maximum possible heat
settings.
• If a higher heat setting is not available
reduce it for the other cooking zones
first.
• The activation of the function
depends on the number and size of
pots.
6. HINTS AND TIPS
WARNING!
Refer to Safety chapters.
6.1 Cookware
For induction cooking zones
a strong electro-magnetic
field creates the heat in the
cookware very quickly.
Use the induction cooking
zones with suitable
cookware.
Cookware material
• correct: cast iron, steel, enamelled
steel, stainless steel, multi-layer
bottom (with a correct marking from a
manufacturer).
• not correct: aluminium, copper,
brass, glass, ceramic, porcelain.
Cookware is suitable for an induction
hob if:
• water boils very quickly on a zone set
to the highest heat setting.
• a magnet pulls on to the bottom of
the cookware.
The bottom of the cookware
must be as thick and flat as
possible.
Ensure pan bases are clean
and dry before placing on
the hob surface.
Cookware dimensions
Induction cooking zones adapt to the
dimension of the bottom of the
cookware automatically.
The cooking zone efficiency is related to
the diameter of the cookware. The
cookware with a diameter smaller than
the minimum receives only a part of the
power generated by the cooking zone.
Refer to "Technical data".
6.2 The noises during
operation
If you can hear:
• crack noise: cookware is made of
different materials (a sandwich
construction).
• whistle sound: you use a cooking
zone with a high power level and the
cookware is made of different
materials (a sandwich construction).
www.aeg.com32
• humming: you use a high power level.
• clicking: electric switching occurs.
• hissing, buzzing: the fan operates.
The noises are normal and do not
indicate any malfunction.
6.3 Energy saving
• If it is possible, always put the lids on
the cookware.
• Put cookware on a cooking zone
before you start it.
• Use the residual heat to keep the
food warm or to melt it.
6.4 Öko Timer (Eco Timer)
To save energy, the heater of the
cooking zone deactivates before the
count down timer sounds. The difference
in the operation time depends on the
heat setting level and the length of the
cooking operation.
6.5 Examples of cooking
applications
The correlation between the heat setting
of a zone and its consumption of power
is not linear. When you increase the heat
setting, it is not proportional to the
increase of the consumption of power. It
means that a cooking zone with the
medium heat setting uses less than a half
of its power.
The data in the table is for
guidance only.
Heat setting Use to: Time
(min)
Hints
1 Keep cooked food warm. as nec-
essary
Put a lid on the cookware.
1 - 2 Hollandaise sauce, melt: but-
ter, chocolate, gelatine.
5 - 25 Mix from time to time.
1 - 2 Solidify: fluffy omelettes,
baked eggs.
10 - 40 Cook with a lid on.
2 - 3 Simmer rice and milkbased
dishes, heat up ready-cooked
meals.
25 - 50 Add at least twice as much liq-
uid as rice, mix milk dishes
halfway through the proce-
dure.
3 - 4 Steam vegetables, fish, meat. 20 - 45 Add a couple of tablespoons
of liquid.
4 - 5 Steam potatoes. 20 - 60 Use max. ¼ l of water for 750 g
of potatoes.
4 - 5 Cook larger quantities of food,
stews and soups.
60 - 150 Up to 3 l of liquid plus ingredi-
ents.
6 - 7 Gentle fry: escalope, veal cor-
don bleu, cutlets, rissoles,
sausages, liver, roux, eggs,
pancakes, doughnuts.
as nec-
essary
Turn halfway through.
7 - 8 Heavy fry, hash browns, loin
steaks, steaks.
5 - 15 Turn halfway through.
9 Boil water, cook pasta, sear meat (goulash, pot roast), deep-fry chips.
ENGLISH
33
Heat setting Use to: Time
(min)
Hints
Boil large quantities of water. PowerBoost is activated.
7. CARE AND CLEANING
WARNING!
Refer to Safety chapters.
7.1 General information
• Clean the hob after each use.
• Always use cookware with a clean
base.
• Scratches or dark stains on the surface
have no effect on how the hob
operates.
• Use a special cleaner suitable for the
surface of the hob.
• Use a special scraper for the glass.
7.2 Cleaning the hob
• Remove immediately: melted plastic,
plastic foil, sugar and food with sugar,
otherwise, the dirt can cause damage
to the hob. Take care to avoid burns.
Use a special hob scraper on the glass
surface at an acute angle and move
the blade on the surface.
• Remove when the hob is sufficiently
cool: limescale rings, water rings, fat
stains, shiny metallic discoloration.
Clean the hob with a moist cloth and
a non-abrasive detergent. After
cleaning, wipe the hob dry with a soft
cloth.
• Remove shiny metallic
discoloration: use a solution of water
with vinegar and clean the glass
surface with a cloth.
8. TROUBLESHOOTING
WARNING!
Refer to Safety chapters.
8.1 What to do if...
Problem Possible cause Remedy
You cannot activate or oper-
ate the hob.
The hob is not connected to
an electrical supply or it is
connected incorrectly.
Check if the hob is correctly
connected to the electrical
supply. Refer to the connec-
tion diagram.
The fuse is blown. Make sure that the fuse is
the cause of the malfunction.
If the fuse is blown again
and again, contact a quali-
fied electrician.
You touched 2 or more sen-
sor fields at the same time.
Touch only one sensor field.
Pause operates. Refer to "Daily use".
www.aeg.com34
Problem Possible cause Remedy
There is water or fat stains
on the control panel.
Clean the control panel.
You cannot select the maxi-
mum heat setting for one of
the cooking zones.
The other zones consume
the maximum available pow-
er.
Your hob works properly.
Reduce the heat setting of
the other cooking zones
connected to the same
phase.
Refer to "Power manage-
ment".
An acoustic signal sounds
and the hob deactivates.
An acoustic signal sounds
when the hob is deactivated.
You put something on one
or more sensor fields.
Remove the object from the
sensor fields.
The hob deactivates. You put something on the
sensor field .
Remove the object from the
sensor field.
Residual heat indicator does
not come on.
The zone is not hot because
it operated only for a short
time or the sensor is dam-
aged.
If the zone operated suffi-
ciently long to be hot, speak
to an Authorised Service
Centre.
The sensor fields become
hot.
The cookware is too large or
you put it too near to the
controls.
Put large cookware on the
rear zones, if possible.
There is no sound when you
touch the panel sensor
fields.
The sounds are deactivated. Activate the sounds. Refer to
"Daily use".
comes on.
Child Safety Device or Lock
operates.
Refer to "Daily use".
The control bar blinks. There is no cookware on the
zone or the zone is not fully
covered.
Put cookware on the zone so
that it fully covers the cook-
ing zone.
The cookware is unsuitable. Use suitable cookware. Refer
to "Hints and tips".
The diameter of the bottom
of the cookware is too small
for the zone.
Use cookware with correct
dimensions. Refer to "Tech-
nical data".
ENGLISH
35

Problem Possible cause Remedy
and a number come on.
There is an error in the hob. Deactivate the hob and acti-
vate it again after 30 sec-
onds. If comes on again,
disconnect the hob from the
electrical supply. After 30
seconds, connect the hob
again. If the problem contin-
ues, speak to an Authorised
Service Centre.
You can hear a constant
beep noise.
The electrical connection is
incorrect.
Disconnect the hob from the
electrical supply. Ask a quali-
fied electrician to check the
installation.
8.2 If you cannot find a
solution...
If you cannot find a solution to the
problem yourself, contact your dealer or
an Authorised Service Centre. Give the
data from the rating plate. Make sure,
you operated the hob correctly. If not the
servicing by a service technician or
dealer will not be free of charge, also
during the warranty period. The
instructions about the Service Centre and
conditions of guarantee are in the
guarantee booklet.
9. TECHNICAL DATA
9.1 Rating plate
Model IKE42640KB PNC 949 597 765 00
Typ 61 A2A 00 AD 220 - 240 V 50 - 60 Hz
Induction 3.65 kW Made in Germany
Ser.Nr. ................. 3.65 kW
AEG
9.2 Cooking zones specification
Cooking zone Nominal power
(maximum heat
setting) [W]
PowerBoost
[W]
PowerBoost
maximum dura-
tion [min]
Cookware diam-
eter [mm]
Middle front 2300 3200 10 145 - 265
Middle rear 2300 3200 10 145 - 265
The power of the cooking zones can be
different in some small range from the
data in the table. It changes with the
material and dimensions of the
cookware.
For optimal cooking results use
cookware no larger than the diameter in
the table.
www.aeg.com36
10. ENERGY EFFICIENCY
10.1 Product information according to EU 66/2014
Model identification IKE42640KB
Type of hob Built-In Hob
Number of cooking areas 1
Heating technology Induction
Lenght (L) and width (W) of
the cooking area
Middle L 36.5 cm
W 27.5 cm
Energy consumption of the
cooking area (EC electric
cooking)
Middle 182.4 Wh / kg
Energy consumption of the
hob (EC electric hob)
182.4 Wh / kg
EN 60350-2 - Household electric cooking
appliances - Part 2: Hobs - Methods for
measuring performance
10.2 Energy saving
You can save energy during everyday
cooking if you follow below hints.
• When you heat up water, use only the
amount you need.
• If it is possible, always put the lids on
the cookware.
• Before you activate the cooking zone
put the cookware on it.
• Put the smaller cookware on the
smaller cooking zones.
• Put the cookware directly in the
centre of the cooking zone.
• Use the residual heat to keep the
food warm or to melt it.
11. ENVIRONMENTAL CONCERNS
Recycle materials with the symbol .
Put the packaging in relevant containers
to recycle it. Help protect the
environment and human health by
recycling waste of electrical and
electronic appliances. Do not dispose of
appliances marked with the symbol
with the household waste. Return the
product to your local recycling facility or
contact your municipal office.
ENGLISH
37
EN
Hazardous substances
Part Name Pb Hg Cd Cr6+ PBBs PBDEs
Mechanical structure
Working top (including glass ceramic/tempered glass/
stainless steel/enamelled steel, grids, pan supports,
hotplates, teppan yaki griddle plate and knobs)*
Heating elements (including burners, crowns, hotplates,
radiant heaters and induction coils) *
X
Gas pipe connection (including gas pipes, taps, injectors)*
X
Electric & electronic components (including spark
generators, ignition system, signal lamps, power board,
user interface and other electronic parts)*
X
Wiring & power cord
X
Fittings: brackets, gaskets, injectors & other parts needed
for installation as reported in the assembly instruction*
X
Notes:
1. This table is compiled according to SJ/T 11364-2014.
2.
means that this kind of hazardous substance content in all of the homogenous materials of this part is under the limitations
regulated in GB/T26572-2011.
3.
X
means that this kind of hazardous substance content in at least one homogenous material of this part exceeds the limitations
regulated in GB/T26572-2011.
4. For the parts with
X
in the above table, there is no replacement solution due to technological limitations in the industry, however, this
may change with technnological improvement.
5. If a part is marked with *, it means that it does not apply to all models, the actual parts depend on specifi c models.
6. Under normal usage conditions, the environment-friendly usage period is 10 years.
*
www.aeg.com38

ENGLISH
39
www.aeg.com/shop
867357981-A-022020