Home
Bookmarks
Home
Sony
Sony DAV-HDX277WC User Manual
Page 17
Sony DAV-HDX277WC Bravia Theater System With Sair Client
User Manual - Page 17
For DAV-HDX277WC.
PDF File Manual
,
124 pages
,
Read Online
|
Download pdf file
WARNING
About This Operating Instructions
About the S-AIR function
Playable Discs
Example of discs that the system cannot play
Note about CD-R/CD-RW/DVD-R/DVD-RW/DVD+R/DVD+RW
About Multi Session CD
Region code
Note about playback operations of a DVD or VIDEO CD
Copyrights
Getting Started
Unpacking
Step 1: Assembling the Speakers
Step 2: Positioning the System
Step 3: Connecting the System
1 Connecting the Speakers
2 Connecting the TV
3 Connecting the other components
4 Connecting the antenna (aerial)
5 Inserting the wireless transceiver
6 Connecting the AC power cords (mains leads)
About the demonstration
Step 4: Setting up the Wireless System
Step 5: Performing the Quick Setup
Setting the type of video output to match your TV
Step 6: Enjoying Sound from all the Speakers
Changing the input level of the sound from connected components
Sound Adjustment
Enjoying Surround Sound by Using Decoding Mode
Selecting the Sound Mode
Enjoying Multiplex Broadcast Sound
Disc
Playing a Disc
Displaying multi-angles and subtitles
Changing the sound
Checking the audio signal format
Selecting a playback area for a Super Audio CD
Playing a VIDEO CD with PBC functions (Ver.2.0)
Resuming playback from the point where you stopped the disc
Using Play Mode
Creating your own program
Playing in random order
Playing repeatedly
Searching/Selecting a Disc
Using the DVDâs menu
Selecting [ORIGINAL] or [PLAY LIST] on a DVD-VR
Searching for a title/chapter/ track/scene, etc.
Playing MP3 Files/JPEG Image Files
Selecting an MP3 file or folder
Selecting a JPEG image file or folder
Displaying the list of MP3 files/JPEG image files
Playing MP3 files and JPEG image files as a slide show with sound
Adjusting the Delay Between the Picture and Sound
Restricting Playback of the Disc
Changing the password
Using the Setup Display
Setting the display or sound track language
Settings for the display
Settings for the HDMI
Settings for the audio
Other Settings
Settings for the speakers
Tuner
Presetting Radio Stations
Listening to the Radio
Naming preset stations
Viewing the station name or frequency in the front panel display
Control for HDMI/External Audio Device
Using the Control for HDMI Function for âBRAVIAâ Sync
Preparing for the Control for HDMI function
Using the Theater Mode
Watching DVD by a single button press
Turning the system off in sync with the TV
Enjoying TV sound from the speakers in this system
Setting the Maximum Volume Level of the System
Using the DIGITAL MEDIA PORT Adapter
Playing the connected component on the system
Using an S-AIR Product
Establishing sound transmission between the unit and S-AIR sub unit (ID setting)
Enjoying the systemâs sound in another room
Enjoying the S-AIR receiver while the unit is in standby mode
Identifying the unit with a specific S-AIR sub unit (Pairing operation)
If sound transmission is unstable
Other Operations
Getting Optimal Surround Sound for a Room
Calibrating the Appropriate Settings Automatically
Controlling the TV with the Supplied Remote
Using the Sound Effect
Reinforcing bass frequencies
Enjoying the sound at low volume
Using the Sleep Timer
Changing the Brightness of the Front Panel Display
Viewing Information About the Disc
Viewing the playing time and remaining time in the front panel display
Viewing the playing time and remaining time on the TV screen
Checking the play information of the disc
Checking the date information of JPEG image file
Returning to the Default Settings
Returning the system parameters, such as preset stations, to the default settings
Returning the [SETUP] settings to the default
Additional Information
Precautions
Notes about the Discs
Troubleshooting
Self-diagnosis Function
Specifications
Glossary
Language Code List
Parental Control Area Code List
Index to Parts and Control
Front panel
Rear panel
Front panel display
Surround amplifier
Remote control
Guide to the Control Menu Display
Control Menu display
Index
Page 17/124
Page 1
Page 2
Page 3
Page 4
Page 5
Page 6
Page 7
Page 8
Page 9
Page 10
Page 11
Page 12
Page 13
Page 14
Page 15
Page 16
Page 17
Page 18
Page 19
Page 20
Page 21
Page 22
Page 23
Page 24
Page 25
Page 26
Page 27
Page 28
Page 29
Page 30
Page 31
Page 32
Page 33
Page 34
Page 35
Page 36
Page 37
Page 38
Page 39
Page 40
Page 41
Page 42
Page 43
Page 44
Page 45
Page 46
Page 47
Page 48
Page 49
Page 50
Page 51
Page 52
Page 53
Page 54
Page 55
Page 56
Page 57
Page 58
Page 59
Page 60
Page 61
Page 62
Page 63
Page 64
Page 65
Page 66
Page 67
Page 68
Page 69
Page 70
Page 71
Page 72
Page 73
Page 74
Page 75
Page 76
Page 77
Page 78
Page 79
Page 80
Page 81
Page 82
Page 83
Page 84
Page 85
Page 86
Page 87
Page 88
Page 89
Page 90
Page 91
Page 92
Page 93
Page 94
Page 95
Page 96
Page 97
Page 98
Page 99
Page 100
Page 101
Page 102
Page 103
Page 104
Page 105
Page 106
Page 107
Page 108
Page 109
Page 110
Page 111
Page 112
Page 113
Page 114
Page 115
Page 116
Page 117
Page 118
Page 119
Page 120
Page 121
Page 122
Page 123
Page 124
Contents
Table of Contents
Search
Previous
Next
Troubleshooting
Bookmarks
Loading ...
Loading ...
Loading ...
17
US
Getting Started
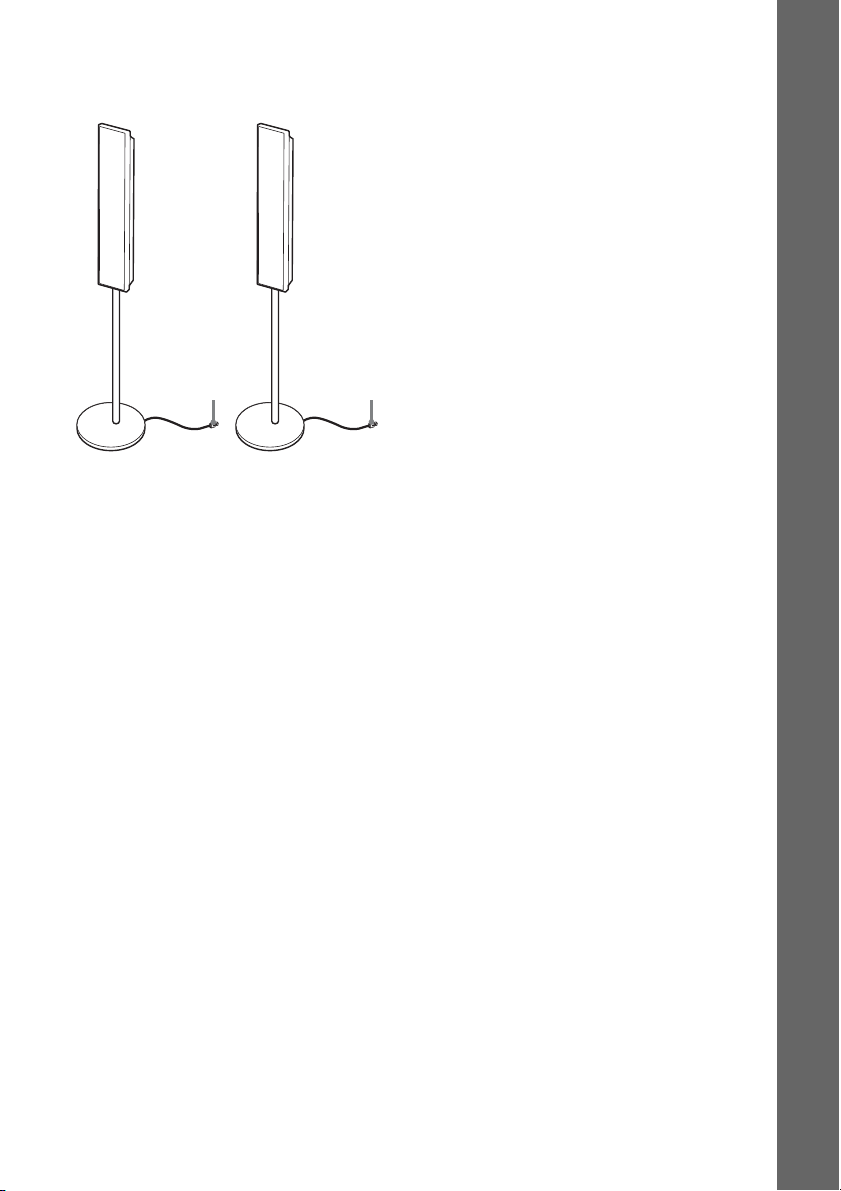
Fully-assembled illustration
White
Red
Front spea
ker (L):
White label
Front spe
aker (R):
Red label
Loading ...
Loading ...
Loading ...
File type: PDF
File name: 50722914_dav-hdx279w.pdf
File size: 2.37 MB
File Language: English
Pages: 124
Author: Sony
Published: 2021-02-13
Updated: 2023-06-08
Download File
Table of Contents
×
WARNING
2
About This Operating Instructions
4
About the S-AIR function
4
Playable Discs
6
Example of discs that the system cannot play
7
Note about CD-R/CD-RW/DVD-R/DVD-RW/DVD+R/DVD+RW
7
About Multi Session CD
8
Region code
8
Note about playback operations of a DVD or VIDEO CD
8
Copyrights
8
Getting Started
9
Unpacking
9
Step 1: Assembling the Speakers
13
Step 2: Positioning the System
18
Step 3: Connecting the System
22
1 Connecting the Speakers
25
2 Connecting the TV
28
3 Connecting the other components
31
4 Connecting the antenna (aerial)
35
5 Inserting the wireless transceiver
38
6 Connecting the AC power cords (mains leads)
40
About the demonstration
41
Step 4: Setting up the Wireless System
42
Step 5: Performing the Quick Setup
44
Setting the type of video output to match your TV
46
Step 6: Enjoying Sound from all the Speakers
47
Changing the input level of the sound from connected components
48
Sound Adjustment
49
Enjoying Surround Sound by Using Decoding Mode
49
Selecting the Sound Mode
51
Enjoying Multiplex Broadcast Sound
51
Disc
52
Playing a Disc
52
Displaying multi-angles and subtitles
54
Changing the sound
54
Checking the audio signal format
55
Selecting a playback area for a Super Audio CD
55
Playing a VIDEO CD with PBC functions (Ver.2.0)
56
Resuming playback from the point where you stopped the disc
57
Using Play Mode
58
Creating your own program
58
Playing in random order
59
Playing repeatedly
59
Searching/Selecting a Disc
60
Using the DVDâs menu
60
Selecting [ORIGINAL] or [PLAY LIST] on a DVD-VR
61
Searching for a title/chapter/ track/scene, etc.
61
Playing MP3 Files/JPEG Image Files
62
Selecting an MP3 file or folder
62
Selecting a JPEG image file or folder
63
Displaying the list of MP3 files/JPEG image files
64
Playing MP3 files and JPEG image files as a slide show with sound
64
Adjusting the Delay Between the Picture and Sound
65
Restricting Playback of the Disc
66
Changing the password
67
Using the Setup Display
68
Setting the display or sound track language
68
Settings for the display
69
Settings for the HDMI
70
Settings for the audio
72
Other Settings
72
Settings for the speakers
73
Tuner
76
Presetting Radio Stations
76
Listening to the Radio
77
Naming preset stations
77
Viewing the station name or frequency in the front panel display
78
Control for HDMI/External Audio Device
79
Using the Control for HDMI Function for âBRAVIAâ Sync
79
Preparing for the Control for HDMI function
79
Using the Theater Mode
80
Watching DVD by a single button press
80
Turning the system off in sync with the TV
80
Enjoying TV sound from the speakers in this system
81
Setting the Maximum Volume Level of the System
81
Using the DIGITAL MEDIA PORT Adapter
82
Playing the connected component on the system
82
Using an S-AIR Product
83
Establishing sound transmission between the unit and S-AIR sub unit (ID setting)
83
Enjoying the systemâs sound in another room
84
Enjoying the S-AIR receiver while the unit is in standby mode
85
Identifying the unit with a specific S-AIR sub unit (Pairing operation)
86
If sound transmission is unstable
87
Other Operations
89
Getting Optimal Surround Sound for a Room
89
Calibrating the Appropriate Settings Automatically
90
Controlling the TV with the Supplied Remote
91
Using the Sound Effect
92
Reinforcing bass frequencies
92
Enjoying the sound at low volume
92
Using the Sleep Timer
92
Changing the Brightness of the Front Panel Display
93
Viewing Information About the Disc
93
Viewing the playing time and remaining time in the front panel display
93
Viewing the playing time and remaining time on the TV screen
94
Checking the play information of the disc
94
Checking the date information of JPEG image file
95
Returning to the Default Settings
95
Returning the system parameters, such as preset stations, to the default settings
95
Returning the [SETUP] settings to the default
95
Additional Information
97
Precautions
97
Notes about the Discs
98
Troubleshooting
99
Self-diagnosis Function
107
Specifications
108
Glossary
110
Language Code List
113
Parental Control Area Code List
113
Index to Parts and Control
114
Front panel
114
Rear panel
115
Front panel display
116
Surround amplifier
117
Remote control
118
Guide to the Control Menu Display
119
Control Menu display
119
Index
122
Search:
×
Search