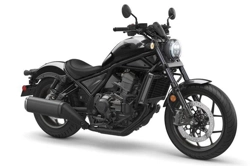
User manual Street Cruiser
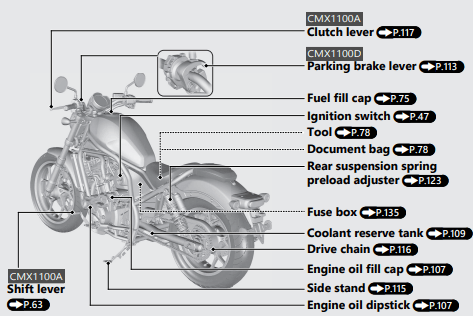
Parts Location
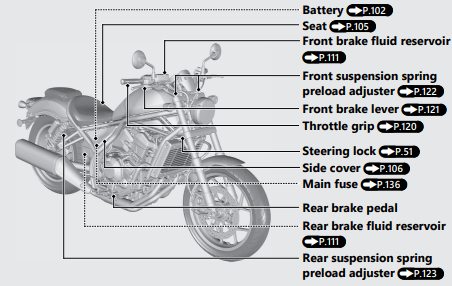
Canada model and USA model equipped with Optional Passenger Seat Kit
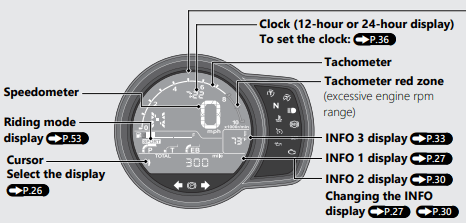
Instruments
Display Check
When the ignition switch is turned to the ON position, initial animation will show. If any part of these displays does not come on when it should, have your dealer check for problems.
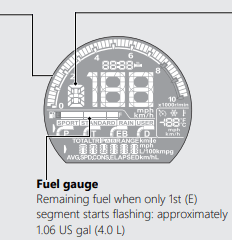

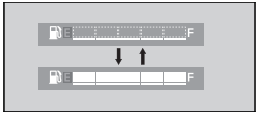
If the fuel gauge indicator flashes in a repeat pattern or turns off:(P.131)
CMX1100A
The gear position is shown in the gear position indicator.
- “-” appears when the transmission is not shifted properly.
CMX1100D
The gear position is shown in the gear position indicator when the MT MODE is selected. The indicator may flash if:
- The front wheel leaves the ground.
- You turn the wheel while the vehicle is upright on the stand.
This is normal. To operate the system again, turn the ignition switch to the OFF position, and then to the ON position again.
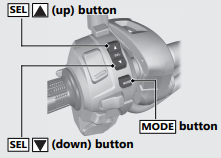
Select the display
Press the  button to move the cursor and select a display.
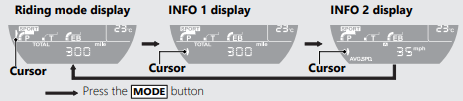
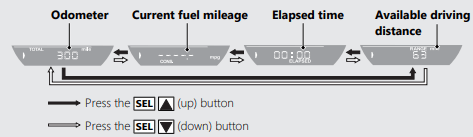
INFO 1 display
You can select the following:
- Odometer [TOTAL]
- Current fuel mileage [CONS.]
- Elapsed time [ELAPSED]
- Available driving distance [RANGE]
Changing the INFO 1 display
- Select the INFO 1 display. (P.26)
- Press the
 or the
  button until the desired indication is displayed.
- Press the button. The INFO 1 display is set, and then the display moves to the INFO 2 display. (P.30)
Display Setting
Following items can be changed sequentially.
- Time format setting
- Clock setting
- Backlight brightness adjustment
- TRIP A Auto reset
- Changing of speed and mileage unit
- Changing of temperature unit
- Changing of fuel mileage meter unit (only when km unit system is selected)
-> Press and hold the or the button and the MODE button
-> Press the  button

1 Time format setting:
You can switch the time format between 12 hour format or 24 hour format.
a. Turn the ignition switch to the ON position.
b. Press and hold the button and the button or the button, the current time format starts flashing.
c. Press the button or the button to select “12hr” or “24hr”.

d. Press the button. The time format is set, and then the display moves to the clock setting.
2 Clock setting:
a. Press the button or the button until the desired hour is displayed.
Press and hold the button or the button to advance the hour fast.

b. Press the button. The minute digits start flashing.

c. Press the button or the button until the desired minute is displayed.
Press and hold the button or the button to advance the minute fast.

d. Press the button. The clock is set, and then the display moves to the backlight brightness adjustment.
3 Backlight brightness adjustment:
You can adjust the brightness to one of five levels.
a. Press the button or the button. The brightness is switched.
b. Press the button. The backlight is set, and then the display moves to the activating/deactivating of tripmeter A, average fuel mileage A, and average speed A automatic reset mode.

4 Activating/deactivating of tripmeter A, average fuel mileage A and average speed A automatic reset mode:
You can also activate or deactivate the automatic reset mode by increasing two or more fuel gauge segments. Activation is initially set.
If the automatic reset mode is "ON"(activate), after refueling, tripmeter A, average fuel mileage A, and average speed A will automatically reset when your vehicle travels 0.06 mile (0.1 km) and the ignition switch is turned to the OFF position, and then to the ON position again.
a. Press the button or the button to select "On"(activate) or "OFF" (deactivate) in the automatic reset mode.

b. Press the button. The activation/ deactivation of automatic reset mode is set, and then the display moves to the changing of the speed and mileage unit.
5 Changing the speed and mileage unit:
c. Press the button or the button to select either “km/h” & “km” or “mph” & “mile”.
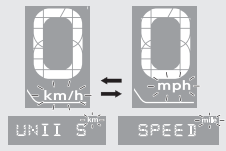
d. Press the button. The speed and mileage unit is set, and then the display moves to the changing of the temperature gauge unit.
6 Changing the temperature gauge unit:
a. Press the button or the button to select “°C” (Centigrade) or “°F” (Fahrenheit).
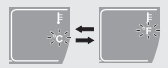
b When the “km/h” for speed and “km” for mileage are selected Press the MODE button. The temperature gauge unit is set, and then the display moves to the changing of the fuel mileage meter unit. When the “mph” for speed and “mile” for mileage are selected Press the MODE button. The temperature gauge unit is set, and then the display will return to the ordinary display.
7 Changing the fuel mileage meter unit:
a. Press the button or the button to select “L/100km” or “km/L”.
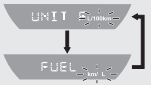
b. Press the button. The fuel mileage meter unit is set, and then the display will return to the ordinary display.
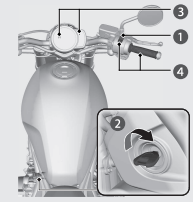
Parking Brake
CMX1100D
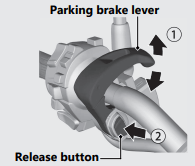
Parking brake lever and Release button
Be sure the parking brake is applied while parking and warming up the engine.
- Make sure the parking brake lever is released before riding.
Locking
Pull the parking brake lever back to lock the rear wheel.
- Be sure the release button pops out and parking brake lever is not released.
- The parking brake lock will not function if the parking brake is not adjusted properly.
Unlocking
Release the parking brake lever by lightly pulling in the lever  and pressing the release button
  .
.
- Before riding, check that the parking brake indicator is turned off and make sure that the parking brake is fully released so there is no drag on the rear wheel.
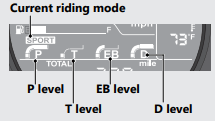
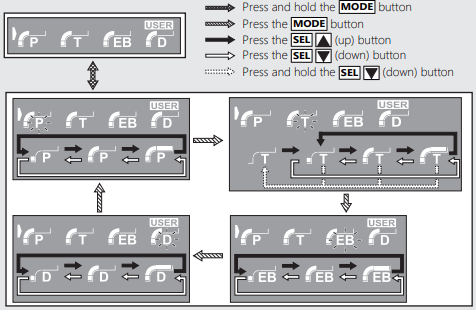
Riding mode
You can change the riding mode. The riding mode consists of the following parameters.
The level of each parameter changes according to the selected riding mode.
P: Engine output level
EB: Engine brake level
T: Torque Control level
D: DCT level
Riding mode has four modes.
Available riding mode: SPORT, STANDARD, RAIN and USER.
SPORT, STANDARD and RAIN
- SPORT: This mode is suitable for sports riding. You can feel the highest engine response.
- STANDARD: Standard, all-around mode for a variety of situations.
- RAIN: Good for stable riding on slippery surfaces such as rainy conditions.
These levels cannot be changed.
USER
Each value of initial setting can be changed.
Initial setting
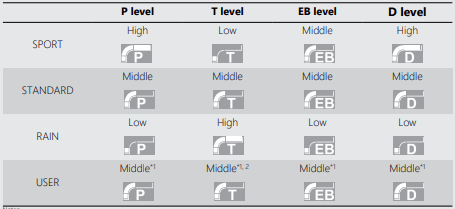
Notes:
*1 : Level can be changed.
*2 : If off is selected, the level will change to Middle the next time the ignition is turned on.
P level (Engine output level)
P level has three setting levels.
Available setting range: Low to High
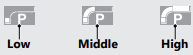
- High has the most power.
- Low has the least power.

T level (Torque control level)
T level has three setting levels or can be turned off.
Available setting range: Low to High, or Off
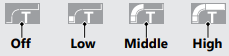
- Low is the minimum Torque Control level
- High is the maximum Torque Control level.
- Off deactivates the Torque Control.
EB level (Engine brake level)
EB level has three setting levels.
Available setting range: Low to High
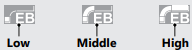
- High has the strongest engine braking effect.
- Low has the weakest engine braking effect.
D level (DCT level)
D level has three setting levels.
Available setting range: Low to High
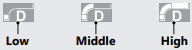
- Low has the lowest engine revolution.
- High has the highest engine revolution.
Selecting the riding mode
a. Stop the vehicle.
b. Select the riding mode display. (P.26)
c. Press the or button with the throttle fully closed.

Setting the riding mode
You can change the P, T, EB and D levels on the USER of the riding mode.
a. Stop the vehicle.
b. Select the USER in the riding mode . (P.56)
c. Press and hold the button until P display is flashed.
d. Select the desired parameter and setting level.
- To select the parameter, press the button.
- To select the setting level, press the or button.
- T level can be changed to off by pressing and holding the button while selecting the T parameter.
- T level can be changed from Off to Low by pressing the button.
You can stop setting the riding modes at any time by pressing and holding the button.
Starting the Engine
CMX1100A
Start your engine using the following procedure, regardless of whether the engine is cold or warm.
a. Make sure the engine stop switch is in the  (Run) position.
b Turn the ignition switch to the ON position.
c. Shift the transmission to Neutral  indicator comes on). Alternatively, pull in the clutch lever to start your vehicle with the transmission is in gear so long as the side stand is raised.
d. Press the  button with the throttle completely closed.
If you cannot start the engine:
With the throttle slightly open (about 1/8 in (3 mm), without freeplay), press the start button.
About 1/8 in (3 mm), without freeplay
If the engine does not start:
1. Open the throttle fully and press the button for 5 seconds.
2. Repeat the normal starting procedure.
3. If the engine starts, open the throttle slightly if idling is unstable.
4. If the engine does not start, wait 10 seconds before trying steps 1 & 2 again.
Shifting Gears
CMX1100A
Your vehicle transmission has 6 forward gears in a one-down, five-up shift pattern.
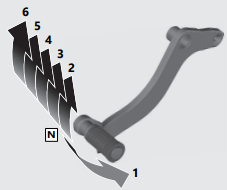
If you put the vehicle in gear with the side stand down, the engine will shut off.
NOTICE Improper shifting can damage the engine, transmission, and drive train. Also, coasting or towing the vehicle for long distances with the engine off can damage the transmission.
Shifting Gears (Continued)
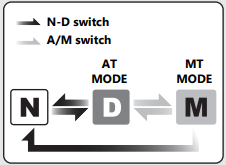
CMX1100D
Your vehicle is equipped with an automatically controlled 6-speed transmission. It can be shifted automatically (by AT MODE) or manually (by MT MODE).
NOTICE Improper shifting can damage the engine, transmission, and drive train. Also, coasting or towing the vehicle for long distances with the engine off can damage the transmission.
Dual Clutch Transmission
CMX1100D
In order to respond to rider demands in a broad range of situations, the transmission is equipped with three operating modes, AT MODE (including D mode for regular operation ); and MT MODE (MT mode for a 6-speed manual operation), which delivers the same shift feel as a manual transmission.
- Always use the recommended tires and sprockets to ensure correct Dual Clutch Transmission operation.
The Dual Clutch Transmission system runs a self check immediately after starting the engine.
"-" appears in the gear position indicator window for a few seconds, then goes out. While "-" appears, you cannot shift into gear.
Cruise Control
The cruise control system allows you to maintain a steady speed within a specified range.
The available speed setting range and operating gear are listed below:
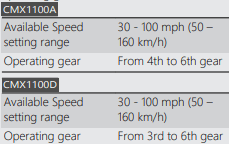
When cruise control is on, your speed will still vary slightly, particularly going up and down hills.
Cruise control is intended for use only on straight, uncongested highways. Do not use cruise control on city streets, winding roads, during bad weather, or at any other time when you need total control of the throttle.
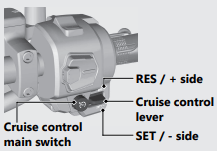
To Set Cruise Control
a. Make sure the travelling speed and operating gear are conformed to the requirements of the system.
- Any speed other than the available range will not be memorized.
b. Press the  cruise control main switch. (The cruise control main indicator will come on.)
c. Accelerate to the desired speed.
d. Push the cruise control lever to  side. (The cruise control set indicator will come on.)
- Current travelling speed is memorized, and then the set speed is displayed on the INFO 3 display

Storage Equipment
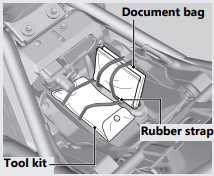
Tool/Document Bag
The tool kit and document bag are located under the seat by the rubber strap.
Maintenance
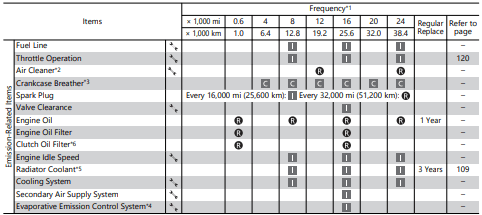
Maintenance Schedule
The maintenance schedule specifies the maintenance requirements necessary to ensure safe, dependable performance, and proper emission control.
Maintenance work should be performed in accordance with Honda's standards and specifications by properly trained and equipped technicians. Your dealer meets all of these requirements. All scheduled maintenance is considered a normal owner operating cost and will be charged to you by your dealer. Keeping an accurate maintenance record will help ensure your vehicle is properly maintained. -> P. 85
Make sure whoever performs the scheduled maintenance completes the maintenance record. Retain all service documents. If you sell your vehicle, these service documents should be transferred with the vehicle to the new owner.
 : Intermediate. We recommend service by your dealer, unless you have the necessary tools and are mechanically skilled. Procedures are provided in an official Honda Service Manual (-> P. 156).
 : Technical. In the interest of safety, have your vehicle serviced by your dealer.
Maintenance Legend
 : Inspect (clean, adjust, lubricate, or replace, if necessary
 : Replace
 : Lubricate
 : Clean
Maintenance Fundamentals
Pre-ride Inspection
To ensure safety, it is your responsibility to perform a pre-ride inspection and make sure that any problem you find is corrected. A preride inspection is a must, not only for safety, but because having a breakdown, or even a flat tire, can be a major inconvenience.
Check the following items before you get on your vehicle:
- Tire tread wear and air pressures are within limits. -> P. 98
- Lights, horn, and turn signals operate normally.
- Check the condition of the drive chain. Adjust slack and lubricate as needed. -> P. 95
Check the following items at regular intervals:
- Oil level is between the upper and lower level marks. -> P. 107
- Brake fluid level is Front: above the LOWER level mark. -> P. 111 Rear: between the UPPER and LOWER level marks. -> P. 111
- Engine coolant level is between the UPPER and LOWER level marks. -> P. 109
- Side stand functions properly. -> P. 115
- CMX1100D Parking brake works properly. -> P. 113
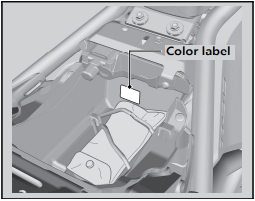
Replacing Parts
Always use Honda Genuine Parts or their equivalents to ensure reliability and safety. When ordering colored components, specify the model name, color, and code mentioned on the color label. The color label is attached to the utility box under the seat. -> P. 105
Battery
Your vehicle has a maintenance-free type battery. You do not have to check the battery electrolyte level or add distilled water. Clean the battery terminals if they become dirty or corroded.
Do not remove the battery cap seals. There is no need to remove the cap when charging.
NOTICE An improperly disposed of battery can be harmful to the environment and human health. Always confirm local regulations for proper battery disposal instruction.
What to do in an emergency
If any of the following occur, immediately see your doctor.
- Electrolyte splashes into your eyes:
Wash your eyes repeatedly with cool water for at least 15 minutes. Using water under pressure can damage your eyes.
- Electrolyte splashes onto your skin:
Remove affected clothing and wash your skin thoroughly using water.
- Electrolyte splashes into your mouth:
Rinse mouth thoroughly with water, and do not swallow.
Cleaning the Battery Terminals
1. Remove the battery. -> P. 102
2. If the terminals are starting to corrode and are coated with a white substance, wash with warm water and wipe clean.
3. If the terminals are heavily corroded, clean and polish the terminals with a wire brush or sandpaper. Wear safety glasses.
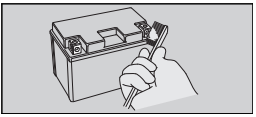
4. After cleaning, reinstall the battery.
The battery has a limited life span. Consult your dealer about when you should replace the battery. Always replace the battery with another maintenance-free battery of the same type.
Charging
If you use electrical accessories that drain the battery or you do not ride frequently, we recommend that you charge the battery every 30 days using a charger designed specifically for your Honda, which can be purchased from your dealer. Read the information that came with your battery charger and follow the instructions on the battery. Avoid using an automobile-type battery charger, as these can overheat a motorcycle battery and cause permanent damage.
Make sure the ignition switch is in the OFF position before charging the battery.
NOTICE Improper charging can damage the battery. If you can’t charge the battery or it appears unable to hold a charge, contact your dealer.
NOTICE Jump starting using an automobile battery can damage your vehicle's electrical system and is not recommended. Bump starting is also not recommended.
NOTICE Installing non-Honda electrical accessories can overload the electrical system, discharging the battery and possibly damaging the system.
Fuses
Fuses protect the electrical circuits on your vehicle. If something electrical on your vehicle stops working, check for and replace any blown fuses. -> P. 135
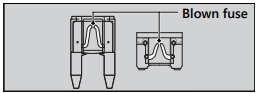
Inspecting and Replacing Fuses
Turn the ignition switch to the OFF position to remove and inspect fuses. If a fuse is blown, replace with a fuse of the same rating. For fuse ratings, see “Specifications.” -> P. 166
NOTICE Replacing a fuse with one that has a higher rating greatly increases the chance of damage to the electrical system.
If a fuse fails repeatedly, you likely have an electrical fault. Have your vehicle inspected by your dealer.
Engine Oil
Engine oil consumption varies and oil quality deteriorates according to riding conditions and time elapsed.
Check the engine oil level regularly, and add the recommended engine oil if necessary. Dirty oil or old oil should be changed as soon as possible.
Selecting the Engine Oil
For recommended engine oil, see “Specifications.” -> P. 165
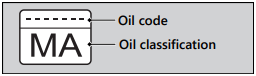
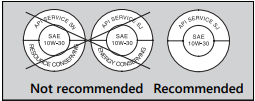
If you use non-Honda engine oil, check the label to make sure that the oil satisfies all of the following standards:
- JASO T 903 standard*1: MA
- SAE standard*2: 10W-30
- API classification*3: SG or higher
*1. The JASO T 903 standard is an index for engine oils for 4-stroke motorcycle engines. There are two classes: MA and MB. For example, the following label shows the MA classification.
*2. The SAE standard grades oils by their viscosity.
*3. The API classification specifies the quality and performance rating of engine oils. Use SG or higher oils, excluding oils marked as “Energy Conserving” or “Resource Conserving” on the circular API service symbol.
Brake Fluid
Do not add or replace brake fluid, except in an emergency. Use only fresh brake fluid from a sealed container. If you do add fluid, have the brake system serviced by your dealer as soon as possible.
NOTICE Brake fluid can damage plastic and painted surfaces. Wipe up spills immediately and wash thoroughly.
Drive Chain
The drive chain must be inspected and lubricated regularly. Inspect the chain more frequently if you often ride on bad roads, ride at high speed, or ride with repeated fast acceleration. -> P. 116
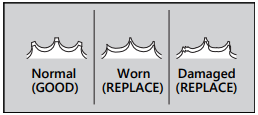
If the chain does not move smoothly, makes strange noises, has damaged rollers, has loose pins, has missing O-rings, or kinks, have the chain inspected by your dealer.
Also inspect the drive sprocket and driven sprocket. If either has worn or damaged teeth, have the sprocket replaced by your dealer.
Cleaning and Lubricating
After inspecting the slack, clean the chain and sprockets while rotating the rear wheel. Use a dry cloth with chain cleaner designed specifically for O-ring chains, or neutral detergent. Use a soft brush if the chain is dirty. After cleaning, wipe dry and lubricate with the recommended lubricant.
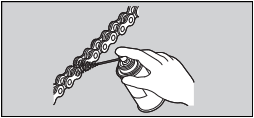
Do not use a steam cleaner, a high pressure cleaner, a wire brush, volatile solvent such as gasoline and benzene, abrasive cleaner, chain cleaner or lubricant NOT designed specifically for O-ring chains as these can damage the rubber O-ring seals.
Avoid getting lubricant on the brakes or tires. Avoid applying excess chain lubricant to prevent spray onto your clothes and the vehicle.
Recommended Coolant
Pro Honda HP Coolant is a pre-mixed solution of antifreeze and distilled water.
A concentration of antifreeze below 40% will not provide proper corrosion and cold temperature protection.
A concentration of up to 60% will provide better protection in colder climates.
NOTICE Using coolant not specified for aluminum engines or tap/mineral water can cause corrosion.
Crankcase Breather
Service more frequently when riding in rain, at full throttle, or after the vehicle is washed or overturned. Service if the deposit level can be seen in the transparent section of the drain tube.
If the drain tube overflows, the air filter may become contaminated with engine oil causing poor engine performance.
Removing & Installing Body Components
Battery
Removal
Make sure the ignition switch is in the OFF position.
- Remove the left and right side covers. -> P. 106
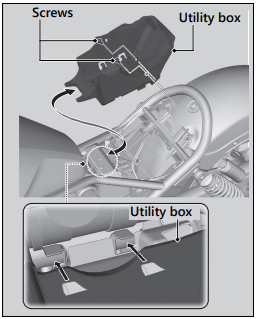
- Remove the utility box by removing the screws.
3. Disconnect the negative  terminal from the battery.
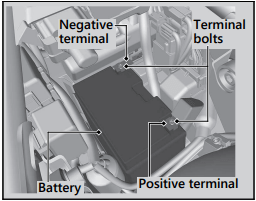
4. Disconnect the positive  terminal from the battery.
5. Remove the battery taking care not to drop the terminal nuts.
- Temporarily tighten the terminal bolt to the terminal nut when removing the battery
Installation
Install the parts in the reverse order of removal. Always connect the positive terminal first. Make sure that bolts and nuts are tight.
Make sure the clock information is correct after the battery is reconnected. -> P. 36 For proper handling of the battery, see “Maintenance Fundamentals.” -> P. 90 “Battery Goes Dead.” -> P. 134
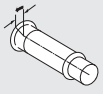
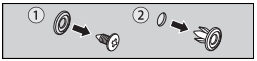
Clip
Removal
1. Remove the pin by a Phillips screwdriver.
2. Pull the clip out of the hole.
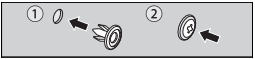
Installation
1. Insert the clip into the hole.
2. Push the pin in.
Seat
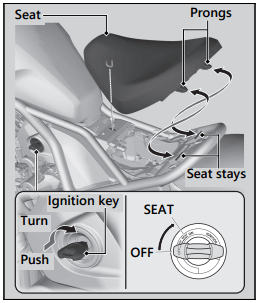
Removal
1. Push the ignition key down, and turn the ignition switch to the SEAT position.
2. Pull the seat up and forward.
Installation
1. Put the prongs under the seat stays.
2. Push the front of the seat backward and lower until it locks.
Make sure that the seat is locked securely in position by pulling it up lightly.
The seat locks automatically when closed. Take care not to lock your key in the compartment under the seat.
Side Cover
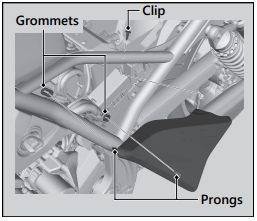
The right and left side covers can be removed in the same way.
Removal
1. Remove the seat. -> P. 105
2. Remove the clip. -> P. 104
3. Remove the prongs from the grommets.
4. Remove the side cover.
Installation
Install the parts in the reverse order of removal.
Engine Oil
Checking the Engine Oil
- If the engine is cold, idle the engine for 3 to 5 minutes.
- Turn the ignition switch to the OFF position and wait for 2 to 3 minutes.
- Place your vehicle in an upright position on a firm, level surface.
- Remove the dipstick and wipe it clean.
- Insert the dipstick until it seats, but don't screw it in.
- Check that the oil level is between the upper level and lower level marks on the dipstick.
- Securely install the dipstick.
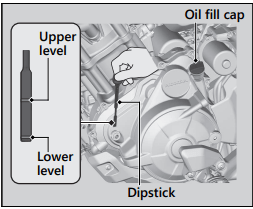
Adding Engine Oil
If the engine oil is below or near the lower level mark, add the recommended engine oil. -> P. 94, -> P. 165
1. Remove the oil fill cap. Add the recommended oil until it reaches the upper level mark.
- Place your vehicle in an upright position on a firm, level surface when checking the oil level.
- Do not overfill above the upper level mark.
- Make sure no foreign objects enter the oil filler opening.
- Wipe up any spills immediately.
2. Securely reinstall the oil fill cap.
NOTICE Overfilling with oil or operating with insufficient oil can cause damage to your engine. Do not mix different brands and grades of oil. They may affect lubrication and clutch operation.
For the recommended oil and oil selection guidelines, see “Maintenance Fundamentals.” -> P. 94
Troubleshooting
Engine Will Not Start
Starter Motor Operates But Engine Does Not Start
Check the following items:
- Check the correct engine starting sequence. -> P. 59
- Check that there is gasoline in the fuel tank.
- Check if the PGM-FI malfunction indicator lamp (MIL) is on.
If the indicator lamp is on, contact your dealer as soon as possible.
Starter Motor Does Not Operate
Check the following items:
- Check the correct engine starting sequence. -> P. 59
- Make sure engine stop switch is in the
 (Run) position. 2 P. 46
- Check for a blocwn fuse. 2 P. 135
- Check for a loose battery connection (-> P. 102) or battery terminal corrosion (-> P. 90).
- Check the condition of the battery. -> P. 134
If the problem continues, have your vehicle inspected by your dealer.
Overheating (High coolant temperature indicator is on)
The engine is overheating when the following occurs:
- High coolant temperature indicator comes on.
- Acceleration becomes sluggish. If this occurs, pull safely to the side of the road and perform the following procedure.
Extended fast idling may cause the high coolant temperature indicator to come on.
NOTICE Continuing to ride with an overheated engine can cause serious damage to the engine.
1. Stop the engine using the ignition switch, and then turn the ignition switch to the ON position.
2. Check that the radiator fan is operating, and then turn the ignition switch to the OFF position.
If the fan is not operating: Suspect a fault. Do not start the engine. Transport your vehicle to your dealer.
If the fan is operating: Allow the engine to cool with the ignition switch in the OFF position.
3. After the engine has cooled, inspect the radiator hose and check if there is a leak. -> P. 109. If there is a leak: Do not start the engine. Transport your vehicle to your dealer.
4. Check the coolant level in the reserve tank. -> P. 109. Add coolant as necessary.
5. If 1-4 check normal, you may continue riding, but closely monitor the high coolant temperature indicator.
Warning Indicators On or Flashing
Low Oil Pressure Indicator
If the low oil pressure indicator comes on, pull safely to the side of the road and stop the engine.
NOTICE Continuing to ride with low oil pressure can cause serious damage to the engine.
1. Check the engine oil level, and add oil as necessary. -> P. 107, -> P. 108
2. Start the engine.
- Only continue riding if the low oil pressure indicator goes off.
Rapid acceleration may momentarily cause the low oil pressure indicator to come on, especially if the oil is at or near the low level. If the low oil pressure indicator stays on when the oil level is at the proper level, stop the engine and contact your dealer.
If the engine oil level goes down rapidly, your vehicle may have a leak or another serious problem. Have your vehicle inspected by your dealer.
PGM-FI (Programmed Fuel Injection) Malfunction Indicator Lamp (MIL)
If the indicator comes on while riding, you may have a serious problem with the PGM-FI system. Reduce speed and have your vehicle inspected by your dealer as soon as possible.
ABS (Anti-lock Brake System) Indicator
If the indicator operates in one of the following ways, you may have a serious problem with the ABS. Reduce your speed and have your vehicle inspected by your dealer as soon as possible.
- Indicator comes on or starts flashing while riding.
- Indicator does not come on when the ignition switch is in the ON position.
- Indicator does not go off at speeds above 6 mph (10 km/h).
If the ABS indicator stays on, your brakes will continue to work as a conventional system, but without the anti-locking function.
The ABS indicator may flash if you turn the rear wheel while the rear wheel is lifted off the ground. In this case, turn the ignition switch to the OFF position, and then to the ON position again. The ABS indicator will go off after your speed reaches 19 mph (30 km/h).
Torque Control Indicator
If the indicator operates in one of the following ways, you may have a serious problem with the Torque Control. Reduce your speed and have your vehicle inspected by your dealer as soon as possible.
- Indicator comes and stays on (solid) while riding.
- Indicator does not come on when the ignition switch is turned to the ON position.
- Indicator does not go off at speeds above 3 mph (5 km/h).
Even when the Torque Control indicator is on, your vehicle will have normal riding ability without Torque Control function.
- When the indicator comes on while the Torque Control is in operation, you will have to completely close the throttle to regain normal riding ability.
The Torque Control indicator may come on if you rotate the rear wheel while your vehicle is lifted off the ground. In this case, turn the ignition switch to the OFF position, and then to the ON position again. The Torque Control indicator will go off after your speed reaches 3 mph (5 km/h).
If the “–” Indicator is Blinking in the Gear Position Window While Riding
CMX1100D
If the “–” indicator is blinking while riding, you may have a serious problem with the Dual Clutch Transmission system.
Park your vehicle in a safe place and have your vehicle inspected by dealer immediately. It may be possible to ride your vehicle by following the steps below.
1. Turn the ignition switch to the OFF position.
2. Turn the ignition switch to the ON position and start the engine.
If you cannot start the engine:
Turn the ignition switch to the OFF position and move the vehicle back and forth slightly (to disengage the gears).
Turn the ignition switch to the ON position again and start the engine.
If you still cannot start the engine:
Start the engine while applying the brake lever or pressing the brake pedal.
If you can shift from N to D mode:
When a gear position is shown in the gear position indicator, you can ride in that gear. Take your vehicle to your dealer riding at a safe speed.
If you can't shift from N to D mode and the “–” indicator is blinking:
Damage is preventing you from riding. Have your vehicle inspected by your dealer immediately
Other Warning Indications
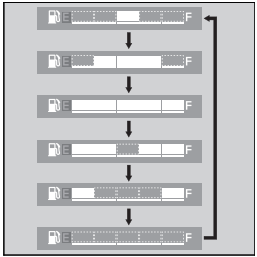
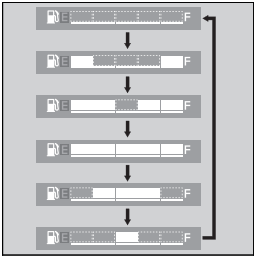
Fuel Gauge Failure Indication
If the fuel system has an error, the fuel gauge indicators will be displayed as shown in the illustrations.
If this occurs, see your dealer as soon as possible.
Tire Puncture
Repairing a puncture or removing a wheel requires special tools and technical expertise. We recommend you have this type of service performed by your dealer.
After an emergency repair, always have the tire inspected/replaced by your dealer.
Emergency Repair Using a Tire Repair Kit
If your tire has a minor puncture, you can make an emergency repair using a tubeless tire repair kit.
Follow the instructions provided with the emergency tire repair kit.
Riding your vehicle with a temporary tire repair is very risky. Do not exceed 30 mph (50 km/h). Have the tire replaced by your dealer as soon as possible.
Electrical Trouble
Battery Goes Dead
Charge the battery using a motorcycle battery charger.
Remove the battery from the vehicle before charging.
Do not use an automobile-type battery charger, as these can overheat a motorcycle battery and cause permanent damage. If the battery does not recover after recharging, contact your dealer.
NOTICE Jump starting using an automobile battery can damage your vehicle's electrical system and is not recommended. Bump starting is also not recommended.
Burned-out Light Bulb
All light bulbs on the vehicle are LEDs. If there is an LED which is not turned on, see your dealer for servicing.
Blown Fuse
Before handling fuses, see “Inspecting and Replacing Fuses.” -> P. 93
Fuse Box Fuses
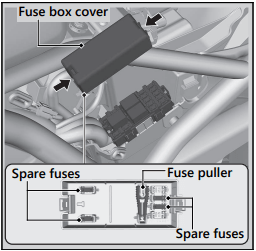
1. Remove the left side cover. -> P. 106
2. Remove the fuse box cover.
3. Pull the fuses out one by one with the fuse puller and check for a blown fuse. Always replace a blown fuse with a spare fuse of the same rating.
- Fuse puller and spare fuses are provided on back side of the fuse box cover.
4. Reinstall parts in the reverse order of removal.
Main Fuse & FI Fuse

1. Remove the utility box. -> P. 102
2. Remove the starter magnetic switch cover.
3. Remove the starter magnetic switch from the stay.
4. Pull the main fuse and FI fuse out one by one with the fuse puller and check for a blown fuse. Always replace a blown fuse with a spare fuse of the same rating.
- Spare fuses are provided in the starter magnetic switch.
- Fuse puller is provided on back side of the fuse box cover. 2 P. 135
5. Reinstall parts in the reverse order of removal.
NOTICE If a fuse fails repeatedly, you likely have an electrical problem. Have your vehicle inspected by your dealer.