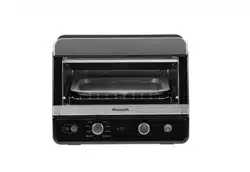
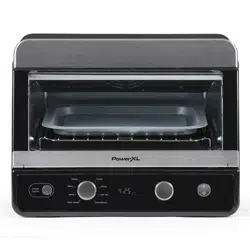
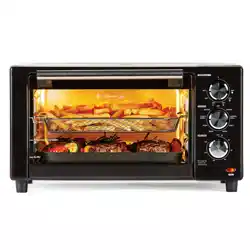
PowerXL CM-001 Power Air Fryer Oven
Product's Documents
Below are documents related to this product, you can read online or download:
- User Manual - (English) Read Online | Download pdf
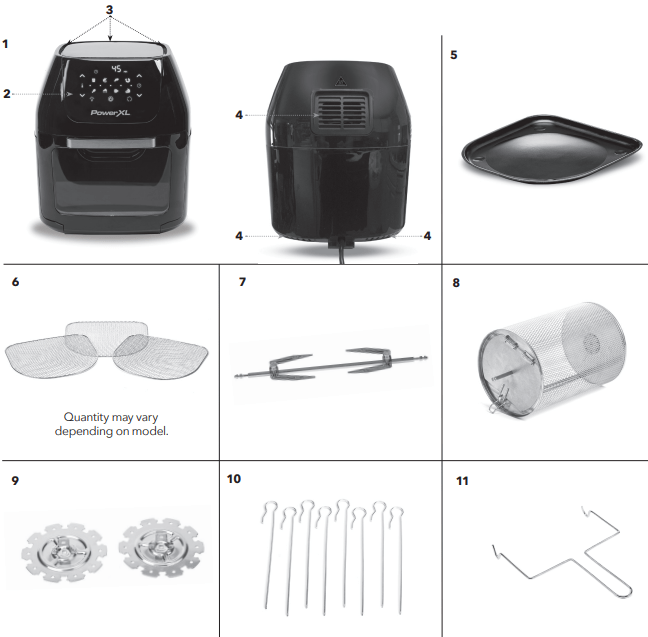
MPORTANT: Please make sure that your appliance has been shipped with the components that you ordered (some accessories may be sold separately). Check everything carefully before use. If any part is missing or damaged, do not use this product. Contact shipper using the customer service number located in the back of the owner’s manual.
*NOTE: Some accessories may be sold separately
1. Main Appliance
Cleans easily with a damp sponge or cloth and a mild detergent. Avoid harsh, abrasive cleaners. NEVER submerge this appliance in water or liquids of any kind.
2. Control Panel
Allows you to control the functions of the appliance
3. Air Intake Vents
DO NOT COVER the Air Intake Vents while the appliance is operating.
4. Hot Air Outlet Vents
DO NOT COVER the Air Outlet Vents while the appliance is operating.
DO NOT PLACE within 5 inches of other objects.
5. Drip Tray
Always cook with the Drip Pan in place for easy clean up.
6. Air Flow Racks
Can be used for dehydration, to cook crispy snacks, and reheat foods like pizza.
7. Rotisserie Shaft, Forks & Set Screws
Use for roasts and whole chicken. Slide the Shaft lengthwise through the center of the meat. Slide the Forks onto the Shaft from each end and then into the meat. Lock in place with the Set Screws. There are indentations on the Shaft for the Set Screws. You can adjust the Screws closer to the center of the Shaft if needed but never beyond the indentation.
NOTE: Ensure that the roast or chicken rotates freely within the appliance. If the item being cooked is too large, it will not rotate or cook evenly (3.5–4 lb on average). Wrap the meat with kitchen string to help with even rotation.
8. Rotating Mesh
Basket Great for fries, roasted nuts, and other snacks. Use the Rotisserie Fetch Tool when inserting or removing the Basket.
9. Adjustable Skewer Rack (2)*
Use when making kabobs. Skewer Racks fit over Shaft and lock in place with Set Screws.
10.Skewers (8)*
Great for all your kabob recipes, meat, fish or veggies.
11.Rotisserie Fetch Tool
The Rotisserie Fetch Tool should be used to insert and remove any foods prepared using the Rotisserie Shaft or Skewers. Place under the Rotisserie Shaft and lift (left side first) and then gently extract the food
* NOTE: Some accessories may be sold separately
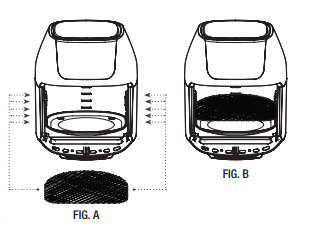
1. Insert Drip Tray into bottom of the appliance.
2. Place Air Flow Racks into appliance by sliding through the side grooves and onto the back lip (FIG. A).
3. Place Air Flow Racks closer to the top heating element for faster cooking and added crisp (FIG. B).
4. Switch the Air Flow Racks from top to bottom and vice versa to ensure even cooking
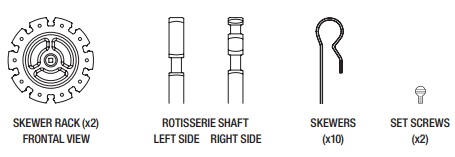
1. Place a Skewer Rack at each end of the Rotisserie Shaft. Ensure that the Set Screw box is facing the outside of the Rotisserie Shaft.
2. Slightly tighten Set Screws. Do not overtighten as you may need to adjust the tightness after you insert the Skewers.
3. Carefully slide the Skewers through food

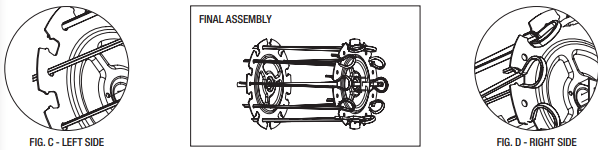
1. Insert each Skewer point through holes on the left Skewer Rack (FIG. C).
2. Squeeze the clip end of each Skewer as you insert into the opposite Skewer Rack slot to secure.
3. Release clip to securely rest in slot as shown (FIG. D).
4. Repeat steps 3–6 in a uniform manner around the Skewer Rack. Make sure Skewers are evenly spaced.
5. Ensure the Skewer Racks are inside the indentations on the Shaft, tighten the Set Screws and ensure they are securely in place.
6. Use caution while inserting the Shaft into the appliance. The Skewer ends are sharp and can poke you.
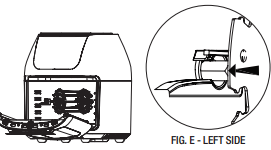
1. Insert the left side of the assembled Spit or Basket first into the Rotisserie Shaft socket. Be sure the Rotisserie Shaft is in place to engage rotation (FIG. E).
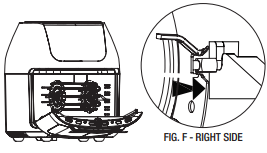
2. Place the right side onto the hanger (FIG. F)
Removing Rotisserie Spit or Rotating Basket from Appliance
1. Open appliance door to pause cooking cycle or turn appliance off by pressing the Power Button.
2. Insert Rotisserie Fetch Tool beneath the Rotisserie Shaft.
3. Using the Rotisserie Fetch Tool, lift the right side of the Shaft at a slight angle to clear the bracket. Then, shift to the right until the left side of the shaft slides out of the Rotisserie Shaft socket.
4. Carefully remove the rotisserie food from the appliance.
5. Place food on a plate, cutting board, or the Rotisserie Stand to remove food from the Shaft, Spit, or Basket.
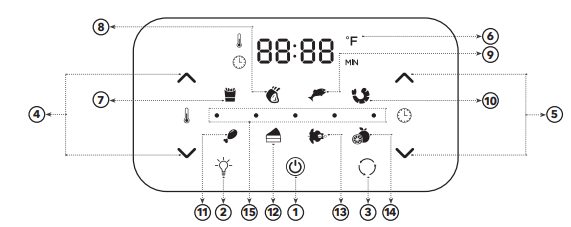
1. Power/Start–Stop
Button Once the appliance is plugged in, the Power Button will light up. Selecting the Power Button once will cause the full panel to be illuminated. Selecting the Power Button a second time will activate the cooking process at the default temperature of 370° F (190° C) and time of 15 mins. Selecting the Power Button at any time during the cooking process will shut off the appliance, causing the display to go dark immediately and the running light to go dark within 20 secs. The fan will continue running for 20 secs. to cool down the appliance.
2. Internal Light
Selecting this button will help you check cooking progress while appliance is in operation.
NOTE: Opening the door during the cooking process will pause the appliance. Internal light will illuminate if the door opens.
3. Rotation Button
Select this button when cooking anything using the Rotisserie Mode. Function can be used with any preset. The icon will blink while in use.
4. Temperature Control Buttons
These buttons enable you to raise or lower cooking temperature by 5° F (2.7° C) intervals ranging from 150° F (65° C) to 400° F (204° C). Dehydration ranges from 90° F (30° C) to 170° F (75° C).
5. Time Control Buttons
These buttons enable you to select exact cooking time to the minute, from 1 min. to 60 mins. in all modes except when dehydrating, which uses 30-min. intervals and an operating time of 2–24 hrs.
6. LED Digital Display
The Digital Numeric Display will switch between Temperature and Time Remaining during the cooking process.
7–14. Cooking Presets
Selecting any of these will set Time and Temperature to a default setting for that particular food. You may override these presets with Time and Temperature Buttons. View presets on the next page.
15. Running Lights
These lights will blink in sequence while cooking is in progress and continue blinking up to 20 secs. once you shut appliance down.
1. Read all material, warning stickers, and labels.
2. Remove all packing materials, labels, and stickers.
3. Hand-washing is recommended. Wash all parts and accessories used in the cooking process with warm, soapy water.
4. Wipe the inside and outside of the cooking appliance with a clean, moist cloth. Rinse with a warm, moist cloth.
NOTE: Never wash or submerge the cooking appliance in water.
5. Before cooking food, preheat the appliance for a few minutes to allow the manufacturer's protective coating of oil to burn off. Wipe the appliance with warm, soapy water and a dish s not a deep fryer. Do not pour oil into the appliance
1. Place the appliance on a stable, level, horizontal, and heat-resistant surface.
2. Before initial use, wipe the inside and outside of the appliance with a warm, moist cloth and mild detergent. Rinse with a warm, moist cloth. Hand wash all cooking accessories. Before cooking food, preheat the appliance for a few minutes to allow the appliance to burn off the manufacturer's protective coating of oil. Wipe the appliance with warm, soapy water and a washcloth after the burn-in cycle.
3. Select the cooking accessory for your recipe.
A Versatile Appliance
This appliance is designed to cook a wide variety of your favorite foods. The charts and tables provided within this manual and the Recipe Guide will help you get great results. Please refer to this information for proper time/temperature settings and proper food quantities.
1. Put the Air Flow Rack, Rotating Mesh Basket, or Rotisserie Spit into the unit and shut the appliance door. Plug the power cord into a 120V dedicated outlet.
2. Place the ingredients on an Air Flow Rack, on one of the Rotisserie accessories, or in the Rotating Mesh Basket.
3. When the Air Flow Rack, Rotating Mesh Basket, or Rotisserie Shaft are in place, press the Power Button once (page 10, FIG. G1).
4. Select a preset function ( FIG. G7-14) or manually set the Temperature and then the Time ( FIG. 4–5). Refer to the detailed Control Panel instructions
5. The appliance will automatically start the cooking cycle a few seconds after a preset function is selected or the Time and/or Temperature are adjusted manually. Alternatively, you can press the Power Button to begin the cooking cycle immediately once the desired cooking time and temperature have been selected. Add 3 mins. to the cooking time when starting with a cold appliance.
NOTE: You may open the appliance door to view the food at any time during the cooking process to check the progress.
NOTE: Consult the charts in this manual or the recipe books to determine the correct settings for the specific item and weight being cooked.
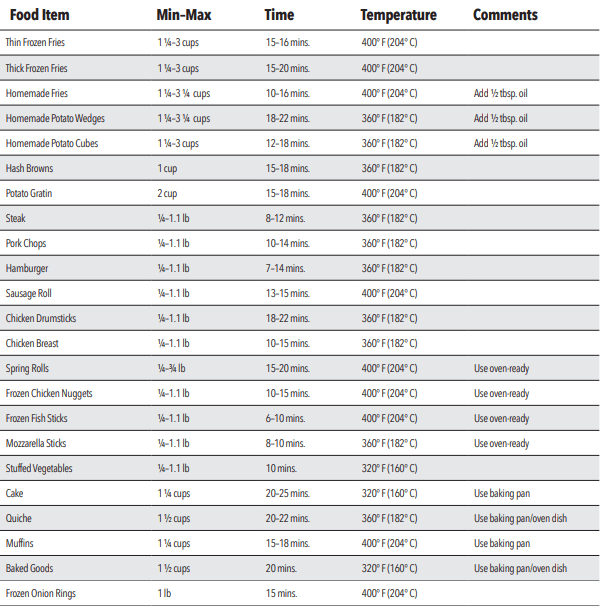
The Cooking Chart will help you select the correct temperature and time for best results. As you become more familiar with the appliance cooking process, you may adjust these settings to suit your own personal tastes.
NOTE: Keep in mind that these settings are indications. Since ingredients differ in origin, size, shape, and brand, we cannot guarantee the best settings for your ingredients.
Remove the power cord from the wall socket and be certain the appliance is thoroughly cooled before cleaning. Clean the appliance after each use. The Rotating Mesh Basket and other accessories are made of durable stainless steel and are dishwasher safe. Never use abrasive cleaning materials or utensils on these surfaces. Caked-on food should be soaked in warm, soapy water for easy removal. .
1. Wipe the outside of the appliance with a warm, moist cloth and mild detergent.
2. To clean the door, gently scrub both sides with warm, soapy water and a damp cloth. DO NOT soak or submerge the door or appliance in water or wash in the dishwasher.
3. Clean the inside of the appliance with hot water, a mild detergent, and a nonabrasive sponge. Then, rinse the appliance thoroughly with a clean, damp cloth. Do not leave standing water inside the appliance. Do not scrub the heating coils because they are fragile and may break.
4. If necessary, remove unwanted food residue with a soft nylon bristle brush.
5. Caked-on food on accessories should be soaked in warm, soapy water to remove the food easily. Hand washing is recommended.
1. Unplug the appliance and let it cool thoroughly.
2. Make sure all components are clean and dry. 3. Place the appliance in a clean, dry place.
The appliance does not work
Food not cooked
Food is not fried evenly
White smoke coming from appliance
French fries are not fried evenly
Fries are not crispy
Door came off
Display Shown E1
Display Shown E2
1 Can I prepare foods other than fried dishes with my appliance?
You can prepare a variety of dishes, including steaks, chops, burgers, and baked goods. See the PowerXL Air Fryer Oven Recipe Guide.
2 Is the appliance good for making or reheating soups and sauces?
Never cook or reheat liquids in the appliance.
3 What do I do if the appliance shuts down while cooking?
As a safety feature, the appliance has an Auto Shut-Off device that prevents damage from overheating. Unplug and allow the appliance to cool down. Plug back in and restart with the Power Button.
4 Does the appliance need time to heat up?
Preheating is needed when you are cooking from a cold start, add 3 mins. to the cook time to compensate.
5 Is it possible to shut off the appliance at any time?
Press the Power Button once or open the door.
6 Can I check the food during the cooking process?
You can check on the progress of the cooking cycle at any time. If you open the door, the cooking time and temperature should resume from where they left off when you close the door.
7 Is the appliance dishwasher safe?
Only the accessories are dishwasher safe. The appliance itself containing the heating coil and electronics should never be submerged in liquid of any kind or cleaned with anything more than a hot, moist cloth or nonabrasive sponge with a small amount of mild detergent.
8 What happens if the appliance still does not work after I have tried all the troubleshooting suggestions?
Never attempt a home repair. Contact Tristar using the contact information located on the back of this manual and follow the procedures set forth by the guarantee. Failure to do so could render your guarantee null and void.
9 Can the door come off?
Yes. Removing the door will allow you to clean the appliance and windows more easily. Open the door slightly (about 1 in./2.5 cm from the closed position), and gently lift up on the door hinge. The joints will slide out. To reattach the door, position the door to be slightly open as before. Then, align the hinge so that the joins fall into the slots. Close the door. Do not clean the door in the dishwasher.