Documents: Go to download!
User Manual
- User Manual - (English, French, Spanish)
- Energy Guide - (English)
- Warranty - (English)
- Dimension Guide - (English)
- INSTALLATION INSTRUCTIONS
- REFRIGERATOR USE
- REFRIGERATOR CARE
Table of contents
User Manual
INSTALLATION INSTRUCTIONS
Remove and Replace Refrigerator Doors
NOTE: Measure the width of your door opening to see whether or not you need to remove refrigerator doors to move refrigerator into your home. If door removal is necessary, see the following instructions.
IMPORTANT: If refrigerator was previously installed and you are moving it out of the home, turn refrigerator control off before you begin removing the doors. Unplug refrigerator or disconnect power. Remove food and adjustable door or utility bins from doors.
Gather required tools and read all instructions before removing doors.
TOOLS NEEDED: 6 mm socket wrench, 5 mm socket wrench and #2 Phillips screwdriver
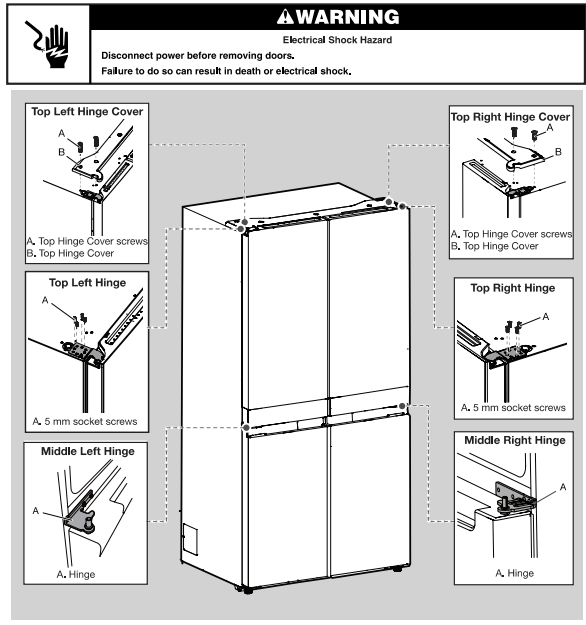
Remove Refrigerator
Remove Right-Hand Door
1. Unplug refrigerator or disconnect power.
2. Keep refrigerator doors closed until you are ready to lift them free from the cabinet.
NOTE: Provide additional support for refrigerator door while the hinges are being removed, Do not depend on the door gasket magnets to hold the door in place while you are working.
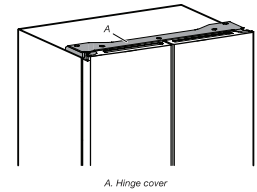
3. Using a Phillips screwdriver, remove cover from top hinge.
4. Using 5 mm socket wrench, remove four screws from top hinge and set aside.
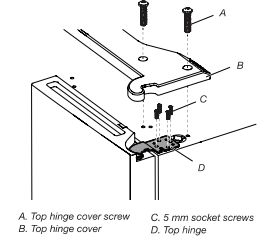
5. Lift refrigerator door from the middle hinge pin. The top hinge will come away with the door,
Remove Left-Hand Door
IMPORTANT: The wiring for UI run through left-hand door hinge, so they must be disconnected before removing the door.
1. Using a Phillips screwdriver, remove cover from top hinge.
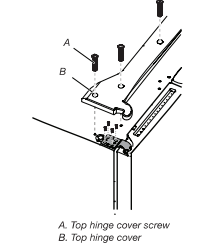
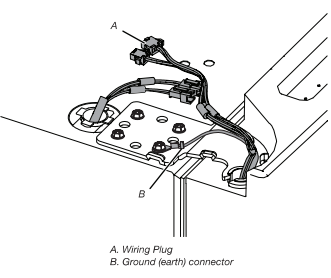
2. Disconnect two wiring plugs located on top of the door hinge.
- Grasp each side of wiring plugs. With your left thumb, press down to release the catch and pull the sections of the plugs apart,
3. Using 5 mm socket wrench, remove four internal screws from top hinge and set aside.
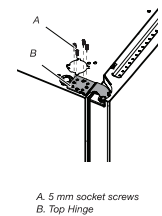
NOTE: Provide additional support for refrigerator door while hinges are being removed. Do not depend on the door gasket magnets to hold the door in place while you are working.
4. Lift refrigerator door from bottom hinge pin. The top hinge will come away with door,
NOTE: It may not be necessary to remove bottom hinges and brake feet assemblies to move the refrigerator through a doorway.
- Only if necessary, use 6 mm socket wrench and #2 Phillips screwdriver to remove middle hinge.
Replace Right-Hand Refrigerator Door
- Set right-hand door onto middle hinge pin.
- Insert top hinge pin into open hole in top of refrigerator door,
- Using four 5 mm socket screws, fasten hinge to cabinet. Do not tighten screws completely.
Replace Left-Hand Refrigerator Door
- Set left-hand door onto middle hinge pin.
- Using four 5 mm socket screws, fasten hinge to cabinet. Do not tighten screws completely.
- Reconnect electrical wiring.
- Push together two sections of wiring plug.
- Reconnect earth wire to hinge screw.
Final Steps
- Completely tighten eight 5 mm socket screws.
- Replace top hinge covers,
Remove and Replace Freezer Door
- Keep freezer doors closed until you are ready to lift them free from cabinet.
NOTE: Provide additional support for freezer door while hinges are being removed. Do not depend on door gasket magnets to hold door in place while you are working.
- Using a #2 Phillips screwdriver and 6 mm socket wrench to remove middle hinge from cabinet.
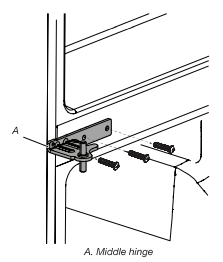
- Lift freezer door from the bottom hinge pin.
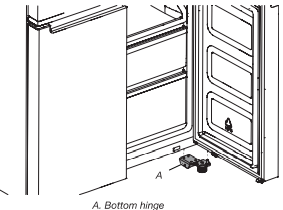
Final Steps
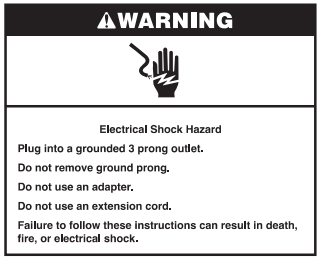
- Plug into an grounded (earthed) socket.
- Return all removable parts and food to the drawers.
Refrigerator Levelling
1. Move refrigerator to its final location.
2. Using hand, rotate the brake feet. Turn them counterclockwise until the rollers are off the floor and both brake feet are snug against the floor. This keeps refrigerator from rolling forward when opening the doors.
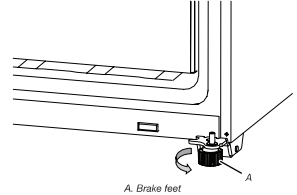
IMPORTANT: If you need to make further adjustments involving brake feet, you must turn both brake feet same amount to keep the refrigerator level.
3. Use a level to make sure refrigerator is level from side to side and front to back.
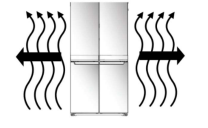
Information about heated side surfaces
- The heat felt on the left and right sides of the cabinet is normal for this cooling technology.
Water Supply Requirements
A cold water supply with water pressure between 20 psi and 145 psi (1.4 bar and 10 bar) is required to operate the water dispenser and ice maker. If you have questions about your water pressure, call a licensed, qualified plumber.
NOTE: If the water pressure is less than what is required, the flow of water from the water dispenser could decrease or ice cubes could be hollow or irregular shaped.
Reverse Osmosis Water Supply
IMPORTANT: The pressure of the water supply coming out of a reverse osmosis system and supplying the water inlet valve of the refrigerator needs to be between 20 psl and 145 psi (1.4 bar and 10 bar).
If a reverse osmosis water filtration system is connected to your home cold water supply, the water pressure to the reverse osmosis system needs to be a minimum of 40 psi to 60 psi (276 kPa to 414 kPa).
- Check to see whether the sediment filter in the reverse osmosis system is blocked. Replace the filter if necessary.
- Allow the storage tank on the reverse osmosis system to refill after heavy use. The tank capacity could be too small to keep up with the requirements of the refrigerator. NOTE: Faucet-mounted reverse osmosis systems are not recommended.
- If your refrigerator has a water filter, it may further reduce the water pressure when used in conjunction with a reverse osmosis system. Remove the water filter. See the "Water Filtration System" section.
If you have questions about your water pressure, call a licensed, qualified plumber.
Connect the Water Supply
Read all directions before you begin.
IMPORTANT:
- Connect to potable water supply only.
Do not use with water that is microbiologically unsafe or of unknown quality without adequate disinfection before or after the system. Systems certified for cyst reduction may be used on disinfected waters that may contain filterable cysts.
- Plumbing must be installed in accordance with the
- International Plumbing Code and any local codes and ordinances.
- Copper and PEX tubing connections from the household water line to the refrigerator are acceptable and will help avoid off-taste or odor in your ice or water. Check for leaks. If PEX tubing is used instead of copper, we recommend the following: 7 ft (2.14 m) jacketed PEX, 5 ft (1.52 m) PEX, or 25 ft (7.62 m) PEX.
- Install tubing only in areas where temperatures will remain above freezing.
Tools Needed:
Gather the required tools and parts before starting installation.
- Flat-blade screwdriver
- 7/16" and 1/2" open-end wrenches or 2 adjustable wrenches
- 1/4" nut driver
NOTE: Do not use a piercing-type or 3/16" (4.76 mm) saddle valve, which reduces water flow and clogs easier.
Connect to Water Line
IMPORTANT: If you have turned the refrigerator on before the water was connected, turn off the ice maker.
1. Unplug refrigerator or disconnect power.
2. Turn off main water supply. Turn on nearest faucet long enough to reduce water pressure in the water line.
3. Use a quarter-turn shut-off valve or the equivalent, served by a 1/2" household supply line.
NOTE: To allow sufficient water flow to the refrigerator, a minimum 1/2" (12.7 mm) size household supply line is recommended.
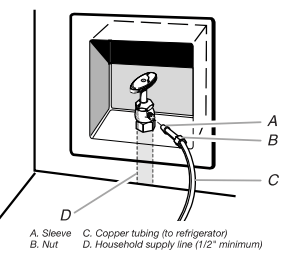
4. Now you are ready to connect the copper tubing to the shut-off valve. Use 1/4" (6,35 mm) O.D. (outside diameter) soft copper tubing to connect the shut-off valve and the refrigerator.
- Ensure that you have the proper length needed for the job. Be sure both ends of the copper tubing are cut square.
- Slip compression sleeve and compression nut onto copper tubing as shown. Insert end of tubing into outlet end squarely as far as it will go. Screw compression nut onto outlet end with adjustable wrench. Do not overtighten.
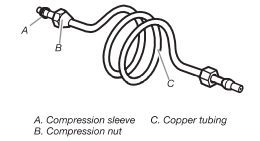
5. Place the free end of the tubing into a container or sink turn on main water supply to flush out tubing until water is clear. Turn off shut-off valve on the water pipe.
NOTE: Always drain the water line before making the final connection to the inlet of the water valve to avoid possible water valve malfunction.
6. Bend the copper tubing to meet the water line inlet, located on the back of the refrigerator cabinet as shown. Leave a coil of copper tubing to allow the refrigerator to be pulled out of the cabinet or away from the wall for service.
Connect to Refrigerator
Follow the connection instructions specific to your model.
1. Remove plastic cap from water valve inlet port. Attach the copper tubing to the valve inlet using a compression nut and sleeve as shown. Tighten the compression nut. Do not overtighten, Confirm copper tubing is secure by pulling on copper tubing.
2. Create a service loop with the copper tubing, Avoid kinks when coiling the copper tubing. Secure copper tubing to refrigerator cabinet with a "P" clamp.
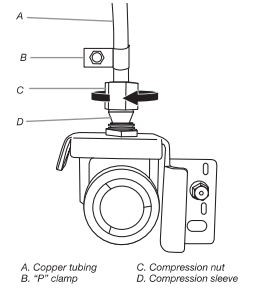
3. Turn on water supply to refrigerator and check for leaks. Correct any leaks.
4. If ice is desired, turn on the ice maker.
Note: Allow 24 hours to produce the first batch of ice. Discard the first three batches of ice produced, Allow three days to completely fill the ice storage bin.
REFRIGERATOR USE
Using the Controls
The touch-activated controls are located on the left hand refrigerator door. The control panel includes information about various buttons and indicators. Refrigerator and freezer temperature indicator shows last temperature set point.
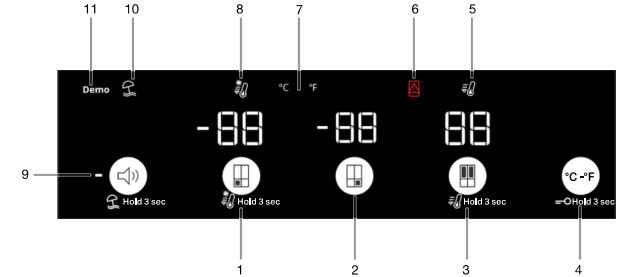
- Freezer Compartment BUTTON and INDICATOR (Hold 3 seconds to toggle Fast Freeze)
- Multi Temp Compartment BUTTON & INDICATOR
- Refrigerator Compartment BUTTON and INDICATOR (Hold 3 seconds to toggle Fast Cool)
- Lock and Celsius/Fahrenheit BUTTON (Hold 3 seconds to toggle)
- Fast Cool BUTTON and INDICATOR
- Door Open Indicator
- Celsius/Fahrenheit INDICATOR
- Fast Freeze Button and INDICATOR
- Sound Off BUTTON and INDICATOR
- Vacation Mode INDICATOR
- Demo Mode INDICATOR
The Control Panel will automatically turn off after one minute of inactivity. To turn on the control panel, press any key.
Freezer Settings

-88 Multi Temp Compartment Setting
Multi Temp Compartment function allows you to toggle preset temperature for Multi Temp Compartment.

To activate/deactivate Coolest setting (-20°C), press Multi Temp Compartment Preset Temperature Button for 3 seconds. When the Coolest setting is activated, all three icons will be lit.
Adjusting Multi Temperature Setting
- Unlock the user interface. See "Key Lock" item for details.
- Traditional freezer (0°F): Food already frozen and fresh food
- Mild freezer (10°F): Food already frozen
- Soft freezer (19°F): Food already frozen
- When Multi Temp Freezer set to 0°F or -4°F, both MultiTemp Freezer temperature and Freezer temperature would be cooled down to the colder setting whichever Freezer or MultiTemp Freezer has.
- Multi Temp Freezer compartment temperature might not be able to reach 20°F when the ambient temperature is around 50°F or colder.
When adjusting temperature set points, use the following chart as a guide:

-88 Viewing and Adjusting Temperature Set Points
Adjusting Fresh Food and Freezer Compartment Temperature:
For your convenience, your refrigerator and freezer controls are preset at the factory.
When you first install your refrigerator, make sure that the controls are still set to the recommended set points. The factory recommended set points are 37° F for the refrigerator and 0°F for the freezer.
Pressing Refrigerator or Freezer Temperature button will toggle through temperature set points in Celsius (°C).
IMPORTANT
- Wait 24 hours before you put food into refrigerator. If you add food before refrigerator has cooled completely, your food may spoil.
NOTE: Adjusting the set points to a colder-than recommended setting will not cool compartments any faster.
- If the temperature is too warm or too cold in the refrigerator or freezer, first check the air vents to be sure they are not blocked before adjusting the controls.
- The recommended settings should be correct for normal household use. The controls are set correctly when milk or juice is as cold as you like and when ice cream is firm.
NOTE: Areas such as a garage, basement or porch may have higher humidity or extreme temperatures. You may need to adjust the temperature away from the recommended settings to accommodate for these conditions.
- Wait at least 24 hours between adjustments. Recheck the temperatures before other adjustments are made.
NOTE: To toggle the temperature between degrees Celsius and Fahrenheit, touch and hold "Max Ice" and "Max cool" buttons for 3 seconds and the temperature display will change.
 Fast Cool
The Fast Cool feature assists with periods of high refrigerator use, full grocery loads, or temporarily warm room temperatures.
- Unlock the user interface. See "Key Lock" item for details.
- To turn on the Fast Cool feature, press and hold theRefrigerator Temperature button
 for 3 seconds. When feature is activated, the Fast Cool icon will be illuminated. TheFast Cool feature will remain on for 2 hours unless manually turned off.
 - To manually turn off the Fast Cool feature, press and hold theRefrigerator Temperature button
 for 3 seconds. The FastCool icon will turn off when feature is not activated.
 - Adjusting refrigerator temperature will automatically turn off the Fast Cool feature.
Door Open Alarm
- The Door Open Alarm feature sounds an alarm and blinks the "Door Open" icon
 when any of the four doors is open for 5 minutes or more.
 - The alarm will repeat every 2 minutes. Close all doors to turn it off,
NOTE: To mute audible alarm while keeping the doors open, such as while cleaning inside of refrigerator, touch any button on control panel. The alarm sound will be temporarily turned off, but the Door Open icon will still be displayed on the control panel.
Temperature Unit (°C or °F)
- Unlock the user interface. See "Key Lock" item for details.
- Press and hold buttons "C" and "F" for 3 seconds to toggle the display temperature unit between Degree Celsius and Degree Fahrenheit
 Fast Freeze
The amount of fresh food (in kg) that can be frozen in 2 hours is indicated on the appliance rating plate.
- Unlock the user interface. See "Key Lock" item for details.
- Press Freezer Temperature button for 3 seconds (until the Fast Freeze Indicator lights up), 30 hours before placing fresh food in the freezer. After placing fresh food in the freezer, 30 hours on Fast Freeze function is generally sufficient; After 50 hrs the fast freeze function automatically deactivates.
- To manually turn off the Fast Freeze feature, press and hold the Freezer Temperature button for 3 seconds. The Fast Freeze icon will turn off.
- Adjusting the freezer temperature will automatically turn off the Fast Freeze feature.
Total Coverage Cooling
Multi flow vents efficiently direct fresh, chilled air to every shelf and corner making sure that each item is cooled right, no matter where you store it
 Vacation Mode
This mode is designed to avoid your appliance from wasting energy during times when it's not in regular use (when you are on vacation for example).
By selecting this function the temperature of fresh food compartment will automatically be set to 30°F (12°C).
- Unlock the user interface. See "Key Lock" item for details.
- To use the Vacation mode, press mode button until Vacation mode indicator is lit on the display.
- To exit the Vacation mode, press the mode button until no mode icon is lit on the display.
- Adjusting the refrigerator temperature will automatically turn off the Vacation Mode feature.
IMPORTANT: If this mode is selected then all food and drinks must be removed from fresh food compartment.
Demo Mode
This mode is used when refrigerator is on display in a retail shop or if you want to turn the cooling off and deactivate all other functions (except interior lighting).
Demo mode can be used when going on extended Vacation. See the "Vacation and Moving Care" section for proper steps on leaving your refrigerator in this mode for long periods of time.
- Unlock the user interface. See "Key Lock" item for details.
- If you turn on Demo mode, the "Demo" icon will light up on the display.
- Enter or exit Demo mode by pressing and holding the Sound On or Off button and the Lock button simultaneously for 3 seconds.
 Sound ON-OFF
- Unlock the user interface. See "Key Lock" item for details.
- Press button to activate/deactivate the tones from the control buttons. This does not affect door ajar alarm.
 Key Lock
- Press and hold the Lock button for 3 seconds to activate lock feature.
- To deactivate lock, press and hold the Lock button for 3 seconds.
The lock feature will ignore all interaction with par until the user unlocks the control panel. This feature is meant to avoid unintentional changing of settings.
Lighting
The refrigerator has an interior light that comes on any time door is opened.
NOTE: The light is LED which does not need to be replaced. If the LED does not illuminate when the door is opened, call service to replace light.
Opening and Closing Doors
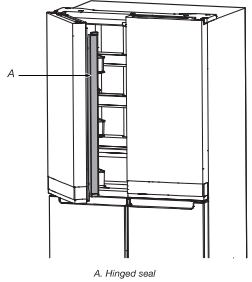
There are two fresh food compartment doors. The doors can be opened and closed either separately or together. There is a vertically hinged seal on left refrigerator door.
- When left-side door is opened, hinged seal automatically folds inward so that it is out of the way.
- When both doors are closed, the hinged seal automatically forms a seal between two doors.
NOTE: When closing the door, the hinged seal should be in correct position (be bent inside). Otherwise it will hit the right door or the fixing shaft.
The fresh food compartment door switch is located in top left and right hinge cover.
- For Freezer and Multi Temperature Compartment, door switch is located in the bottom mullion.
- The door switch uses magnet to sense door opening/closing.
- Ensure there are no magnet or electronic devices (Speaker, Coolvox etc.) within 7.62 cm of the hinge cap.
NOTE: The light will not turn on if door opening is not detected.
Ice Maker
Turn the Ice Maker On\Off
Turn on the ice maker by moving the switch to the On position.
NOTES:
- The Ice Maker switch is located at the bottom of the ice maker as shown in the picture below.
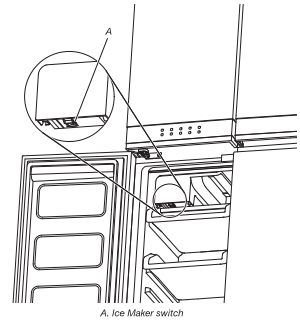
- Your ice maker has an automatic shutoff. The sensor will automatically stop ice production if the storage bin is full or the door is open. The control will remain in the On position.
- Turn off the ice maker before removing the ice storage bin to serve ice or to clean the bin. This will keep the ice cubes from dropping out of the ice maker and into the freezer compartment. After replacing the ice storage bin, turn on the ice maker.
Ice Production Rate
- Your ice maker should produce approximately 3 lbs (1.4 kg) of ice per day under normal operation.
- To increase ice production, activate "Fast Freeze" feature from the control panel. The ice maker should produce approximately 3.5 lbs (1.6 kg) of ice per day. See the "Using the Controls" section.
Shelves, Bins and Drawers
Important information to know about glass shelves and covers:
Do not clean glass shelves or covers with warm water when they are cold. Shelves and covers may break if exposed to sudden temperature changes or impact, such as bumping. Tempered glass is designed to shatter into many small, pebble-size pieces. This is normal. Glass shelves and covers are heavy. Use both hands when removing them to avoid dropping.
Shelf Height Adjustment and Shelves and Shelf Frames
Shelf height can be adjusted by changing its location from bottom support to upper support and vice versa.
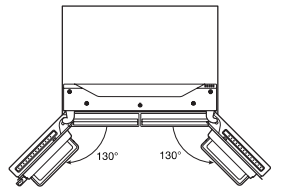
- Open the right side door and left side door to it's full opening.
- Take shelf out of refrigerator and place it to desired mounting position.
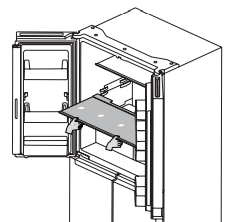
- Ensure shelf is properly seated on the shelf mounts.
The shelves in your refrigerator are adjustable to meet your individual storage needs.
Storing similar food items together in your refrigerator and adjusting the shelves to fit different heights of items will make finding the exact item you want easier. It will also reduce the amount of time the refrigerator door is open and save energy.
To remove and replace shelves:
1. Open the right side door and left side door to its full opening.
2. Remove middle shelf or top shelf by lifting it up and out of shelf supports. Then pull the shelf forward and tilt down to a vertical position. Turn shelf at an angle and pull out of the refrigerator.
3. Remove the bottom shelf by lifting it up and out of the shelf supports. Then pull the shelf forward and tilt up to a vertical position, Turn the shelf at an angle and pull out of refrigerator.
4. Replace middle and top shelves by putting shelf in the refrigerator at an angle with shelf front down. Lift front of the shelf up and slide in until the rear of shelf drops into shelf supports. Lower the front of shelf and make sure that the shelf is in position.
5. Replace bottom shelf by putting shelf in refrigerator at an angle with shelf up. Lift front of shelf down and slide in until rear shelf drops into the shelf supports. Lower front of the shelf and make sure that shelf is in position.
Crispers
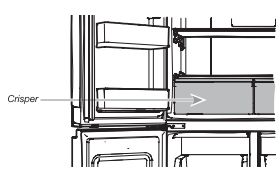
To remove and replace the Crispers:
- Open the right side door and left side door to it's full opening.
- Grasp handle of the Crisper and slide Crisper straight out to the stop. Lift the Crisper off the bottom guide.
- Replace/putting back the Crisper by placing it on bottom Crisper guide and pushing it past the Crisper stop into position.
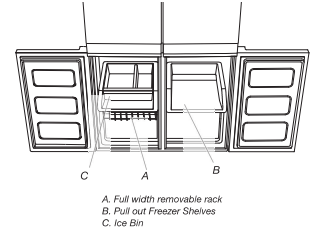
Ice Bin
Ice storage for the ice maker
Refrigerator Bins
The bin on your refrigerator door are adjustable to meet your individual storage needs.
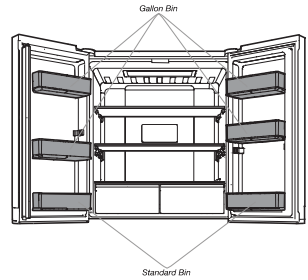
- The center bin position can be adjusted in two fixed points. To remove the bin pull it up by applying force on both bottom sides where the bin is engaged to the door lug. Install it in the other position by pressing it down until the door lug is fully engaged to the bin.
- Free up shelf space with four gallon door bins that fit items like gallon milk
Freezer Storage Compartments
Pullout Freezer Shelves and Drawers
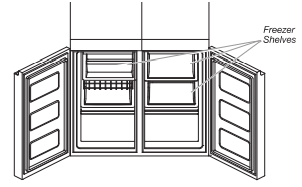
Easily store large or small items in the pull out freezer tray shelves
NOTE: To open the trays to it's full extend please refer to the space required at the refrigerator side to open the doors at the required minimum angle. Find detailed information in the "Installation Instructions",
Full width removable rack
The Full width removable rack is located in the freezer compartment below the ice bin tray.
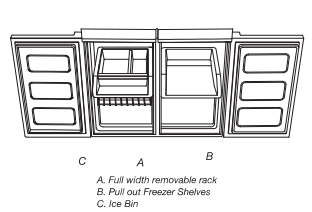
To remove the full width removable rack:
- Remove the content of the ice bin and from the full width removable track.
- Remove the ice bin from the freezer tray.
- Remove the freezer tray with bin from the freezer compartment pulling it out.
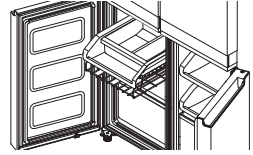
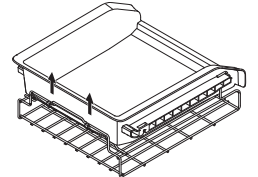
- On the back of the tray, pull the wire up and backwards to disengage the rack from the tray in the area shown in the picture below.
Freezer Drawers
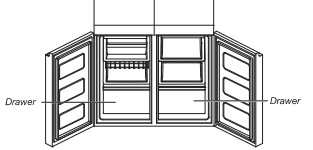
NOTE: To open the drawers to it's full extend please refer to the space required at the refrigerator side to open the doors at the required minimum angle. Find detailed information in the"Installation Instructions".
Fast Freeze compartment
- Use these drawers and shelves to freeze a bigger amount of fresh or cooked food (in the best or in the fastest way).
- Fast Freeze option allows you to store all your frozen food safely and transparently.
NOTE: Freezer temperature might be cooled down to be same as Multi Temperature Freeze Compartment temperature, whenFreezer set to warmer than Flexible Freezer compartment.
Multi Temperature Compartment
Multi Temperature Freeze Compartment allows you to select one of four freezer temperature levels: 20°F, 10°F, 0°F and -4°F to provide the best storing conditions for different types of food.
For maximum freezer capacity, you may remove the freezer drawer to expose the freezer shelf.
To remove the upper drawer:
1. Grasp handle of the drawer and slide drawer straight out to the stop. Lift drawer off the bottom guide.
2. Replace/putting back drawer by placing it on bottom drawer guide and pushing it past drawer stop into position.
Audio Reference
Tone Assignment
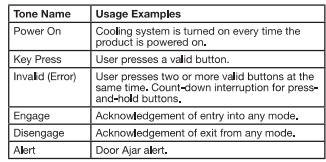
This table is for quick reference only. See corresponding sections for details. In case of inconsistency, section details will prevail.
REFRIGERATOR CARE
Cleaning
All of the Refrigerator, Freezer and Multi Temp Compartment sections defrost automatically. However, clean all the sections about once a month to avoid build-up of odours. Wipe up spills immediately.
Style 1 Fingerprint-Resistant Stainless
IMPORTANT:
- Avoid exposing stainless steel appliances to caustic or corrosive elements such as high-salt, high-moisture, or high- humidity environments. Damage due to exposure to these elements is not covered under the warranty.
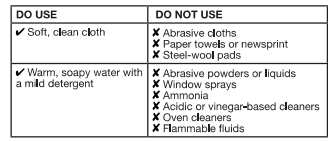
NOTES:
- If unintentional contact does occur, clean plastic part with a sponge and mild detergent in warm water. Dry thoroughly with a soft cloth.
- Just because a cleaner is a liquid does not mean it is non- abrasive. Many liquid cleansers formulated to be gentle on tile and smooth surfaces still damage stainless steel.
- Citric acid permanently discolours stainless steel.
- To avoid damaging the finish of your stainless steel refrigerator:
Do not allow these substances to remain on the finish:
X Mustard
X Citrus-based sauces
X Tomato juice
X Citrus-based products
X Marinara sauce
Interior Cleaning
IMPORTANT: Refrigerator shelves are not dishwasher safe
1. Unplug refrigerator or disconnect power.
2. Hand wash, rinse, and dry removable parts and interior surfaces thoroughly. Use a clean sponge or soft cloth and a mild detergent in warm water.
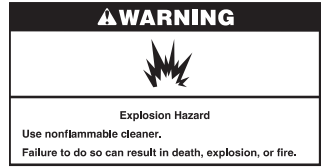
NOTE: Do not use abrasive or harsh cleaners such as window sprays, scouring cleansers, flammable fluids, cleaning waxes, concentrated detergents, bleaches, or cleansers containing petroleum products on plastic parts, interior and door liners, or gaskets.
3. Plug in refrigerator or reconnect power.
Condenser
This refrigerator has skin condenser on both sides of refrigerator. It is normal to feel warm on the sides.
Lights
The lights in both the fresh food and freezer compartments areLEDS which do not need to be replaced. If the lights do not illuminate when the door is opened, contact the dealer from whom you purchased your refrigerator.
Moving Care
Extented away
If You Choose to Leave the Refrigerator On While You'reAway:
1. Use up any perishables and freeze other items.
2. If your refrigerator has an automatic ice maker and is connected to the household water supply, turn off the water supply to the refrigerator. Property damage can occur if the water supply is not turned off.
3. If you have an automatic ice maker, turn off the ice maker.
- Press the switch to Off (O) for the door ice maker.
4. Empty the ice bin.
If You Choose to Turn Off the Refrigerator Before You Leave:
NOTE: Put refrigerator in Demo Mode while on Vacation. See the "Using the Controls" section.
1. Remove all food from the refrigerator.
2. If your refrigerator has an automatic ice maker:
- Turn off water supply to the ice maker at least 1 day ahead of time.
- When last load of ice drops, press the switch to Off (O) for display to be unlit on the top inside of the refrigerator, depending on your model.
3. Empty ice bin.
4. Turn off temperature controls. See the "Using the Controls" section.
5. Clean refrigerator, wipe it and dry well.
6. Tape rubber or wood blocks to the tops of both doors to prop them open far enough for air to get in. This stops odours and mould from building up.
Moving
When you are moving your refrigerator to a new home, follow these steps to prepare it for the move.
1. If your refrigerator has an automatic ice maker:
- Turn off water supply to the ice maker at least 1 day ahead of time.
- Disconnect water line from the back of the refrigerator.
- When last load of ice drops, press the switch to Off (O) either on the ice maker or the control, depending on your model.
2. Remove all food from refrigerator and pack all frozen food in dry ice.
3. Empty ice bin.
4. Unplug refrigerator.
5. Clean, wipe and dry thoroughly.
6. Take out all removable parts, wrap them well and tape them together so they don't shift and rattle during the move.
7. Depending on the model, raise the front of the refrigerator so it rolls more easily or raise the levelling screws so they do not scrape the floor. See the "Adjust the Doors" or "Refrigerator Levelling and Door Closing" sections.
8. Tape doors closed and tape the power cable to the back of the refrigerator.
When you get to your new home, put everything back and refer to the "Installation Instructions" section for preparation instructions. Also, if your refrigerator has an automatic ice maker, remember to reconnect the water supply to the refrigerator.
See other models: KEBC277KBL MDB4949SDB AFB2234WES GH5184XPT GH6177XPQ
