ICD-UX570 5-006-943-41(1)
IC Recorder
ICD-UX570
Operating Instructions
GB
FR
© 2019 Sony Corporation Printed in China / Imprimé en Chine
5-006-943-41(1)
Owner’s Record
The model number is located at the rear panel and the serial number is
located at the rear panel. Record these numbers in the space provided
below. Refer to these numbers whenever you call upon your Sony dealer
regarding this product.
Model No. _________________________________
Serial No. __________________________________
You are cautioned that any changes or modifications not expressly
approved in this manual could void your authority to operate this
equipment.
Refer to the Help Guide
This is the Operating Instructions, which provides you with instructions on
the basic operations of the IC recorder.
The Help Guide is an online manual.
Refer to the Help Guide when you would like to know further details,
operations and possible solutions when a problem occurs.
https://rd1.sony.net/help/icd/u57/h_uc/
Check the supplied items
• IC Recorder (1)
• Operating Instructions (this sheet)
• Warranty card (1)
• Application Software, Sound Organizer 2 (Installer file stored in the built-in
memory so that you can install it to your computer.)
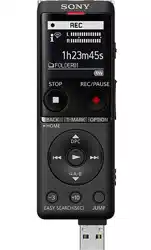
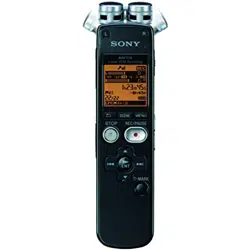
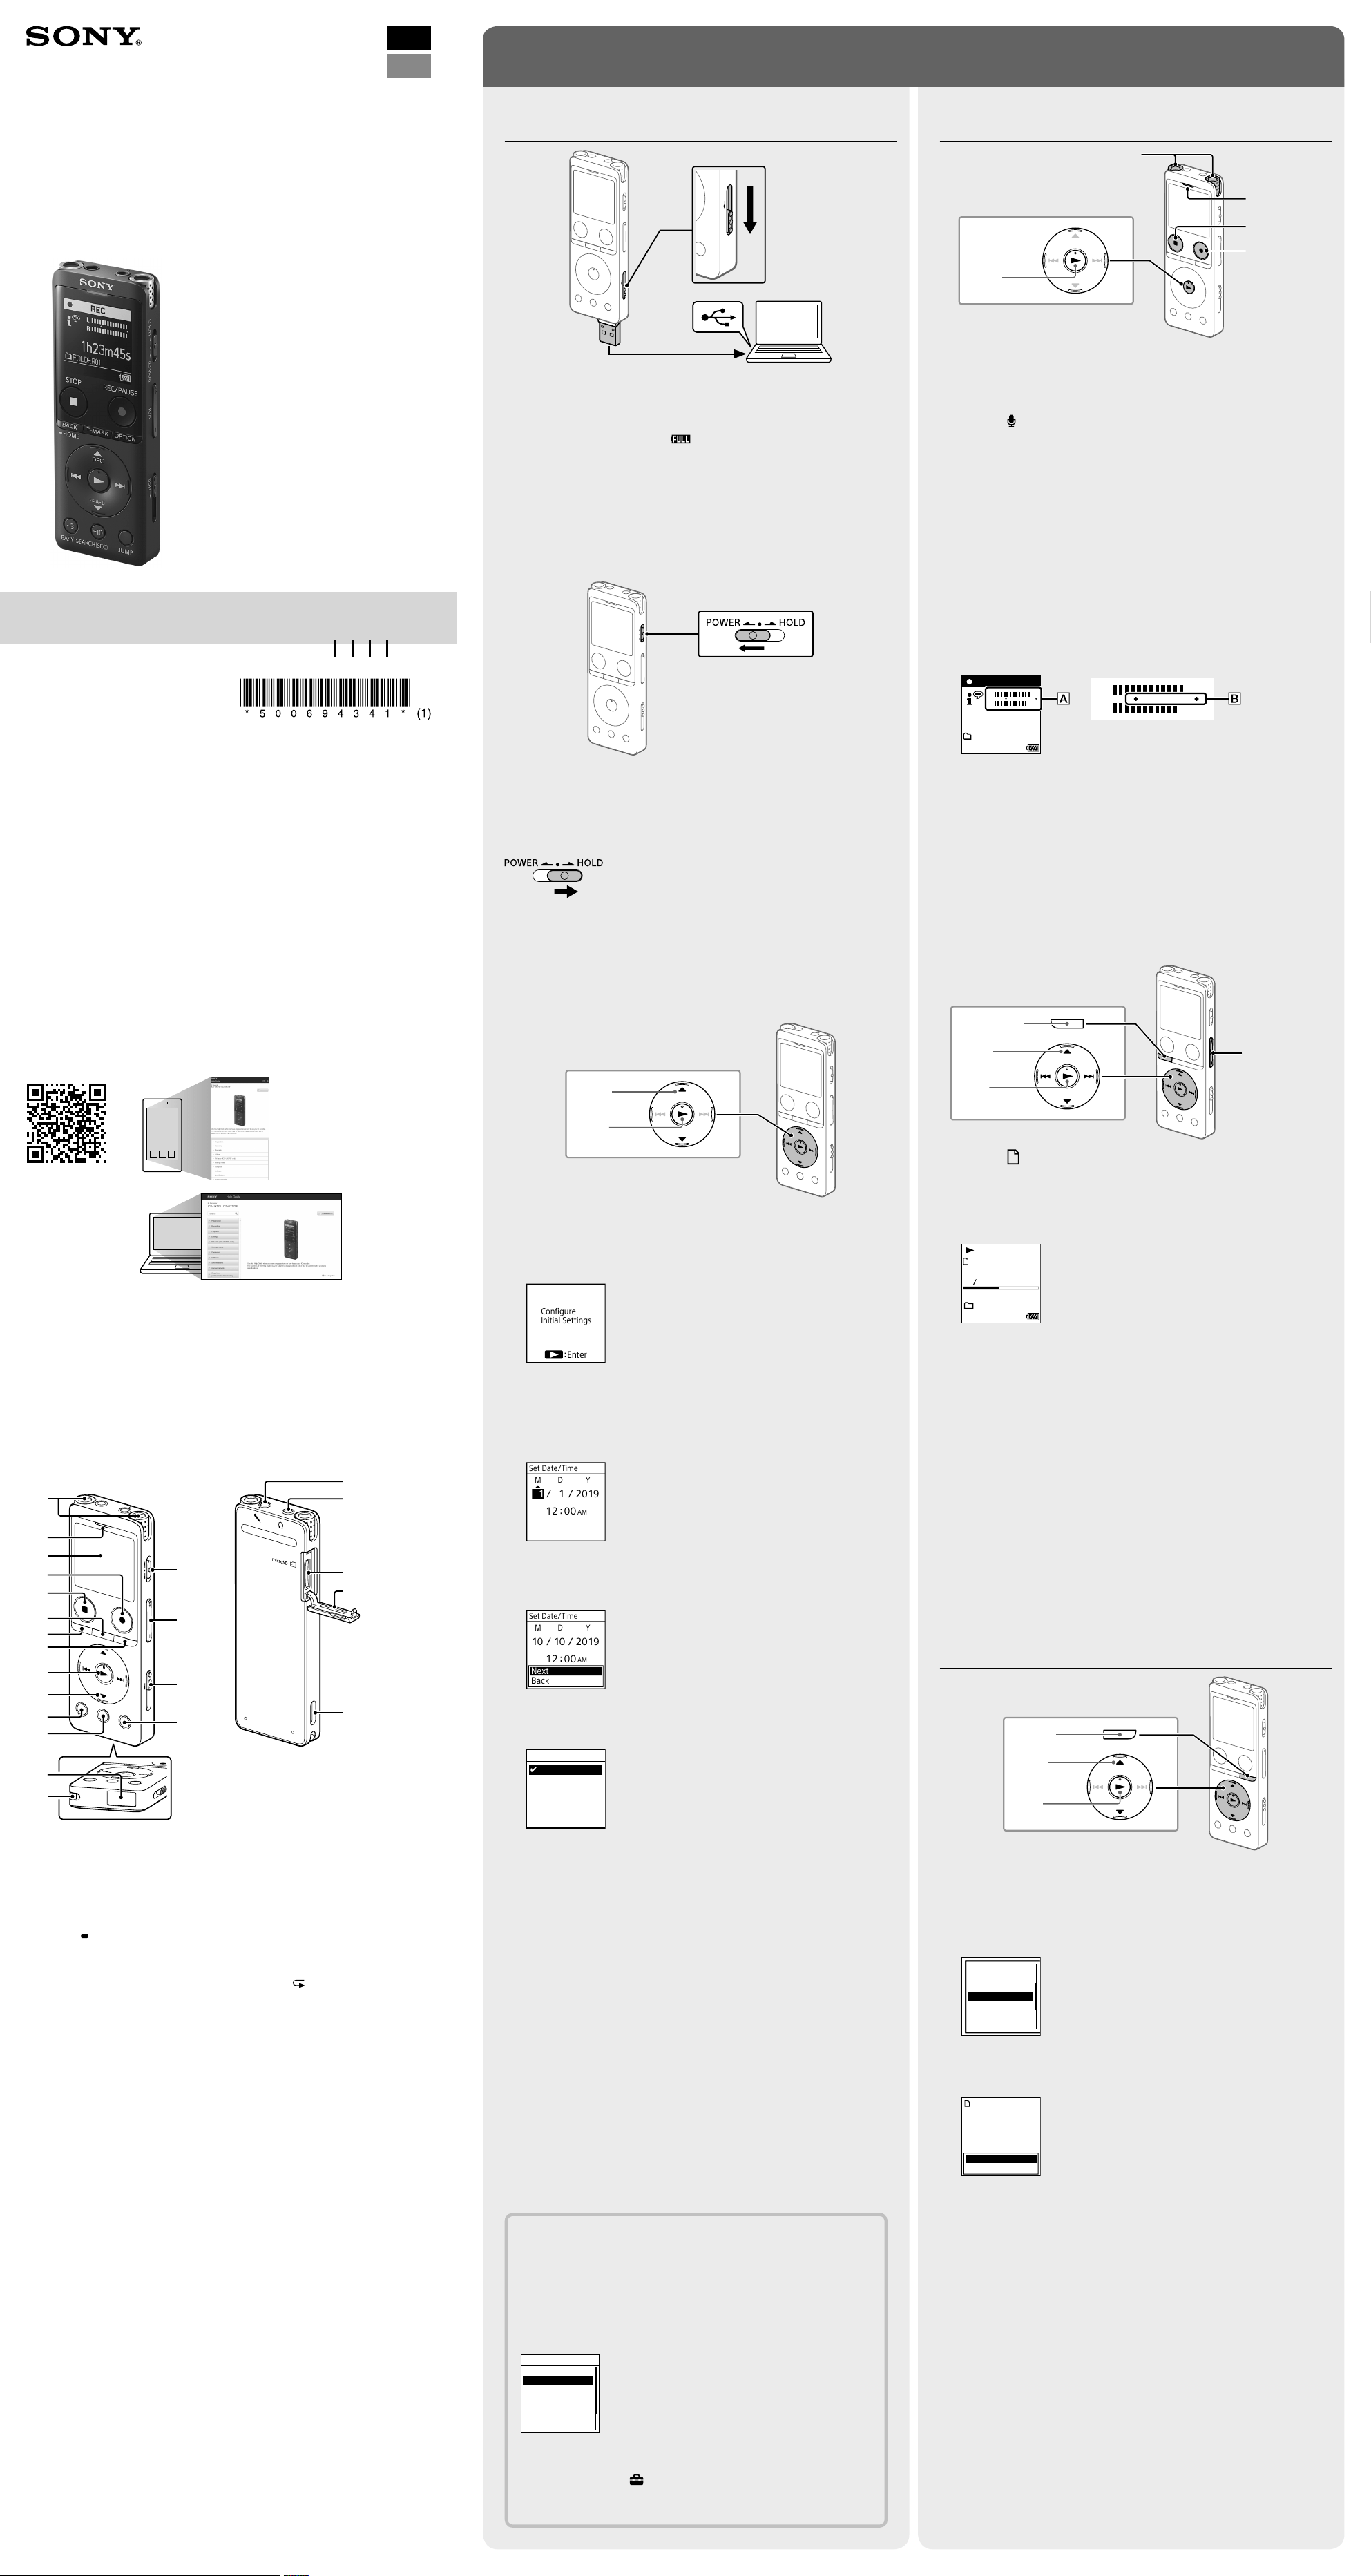
Parts and controls
Built-in microphones
Operation indicator
Display window
REC/PAUSE (record/pause) button
STOP button
T-MARK (track mark) button
BACK/
HOME button
OPTION button
(play/enter) button*
1
Control button (DPC (Digital Pitch Control), A-B (repeat A-B),
(review/fast backward), (cue/fast forward))
-3 EASY SEARCH(SEC) button
+10 EASY SEARCH(SEC) button
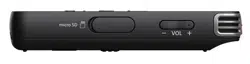
USB connector cover (You can find the USB connector retracted behind
the cover.)
Strap hole (No strap is supplied with your IC recorder.)
POWER•HOLD switch*
2
VOL –/+*
1
(volume –/+) button
USB slide lever
JUMP (time jump) button
(microphone) jack*
1
(headphones) jack
microSD card slot (The card slot is located under the cover.)
Slot cover
Built-in speaker
*
1
The (play/enter) button, VOL + (volume +) button, and (microphone) jack have a tactile
dot. Use the tactile dot as a reference when operating the IC recorder.
*
2
Sliding the POWER•HOLD switch to “POWER” and holding it for 8 seconds or longer restarts
your IC recorder. For detailed instructions, refer to the Help Guide.
Let’s try out your new IC recorder
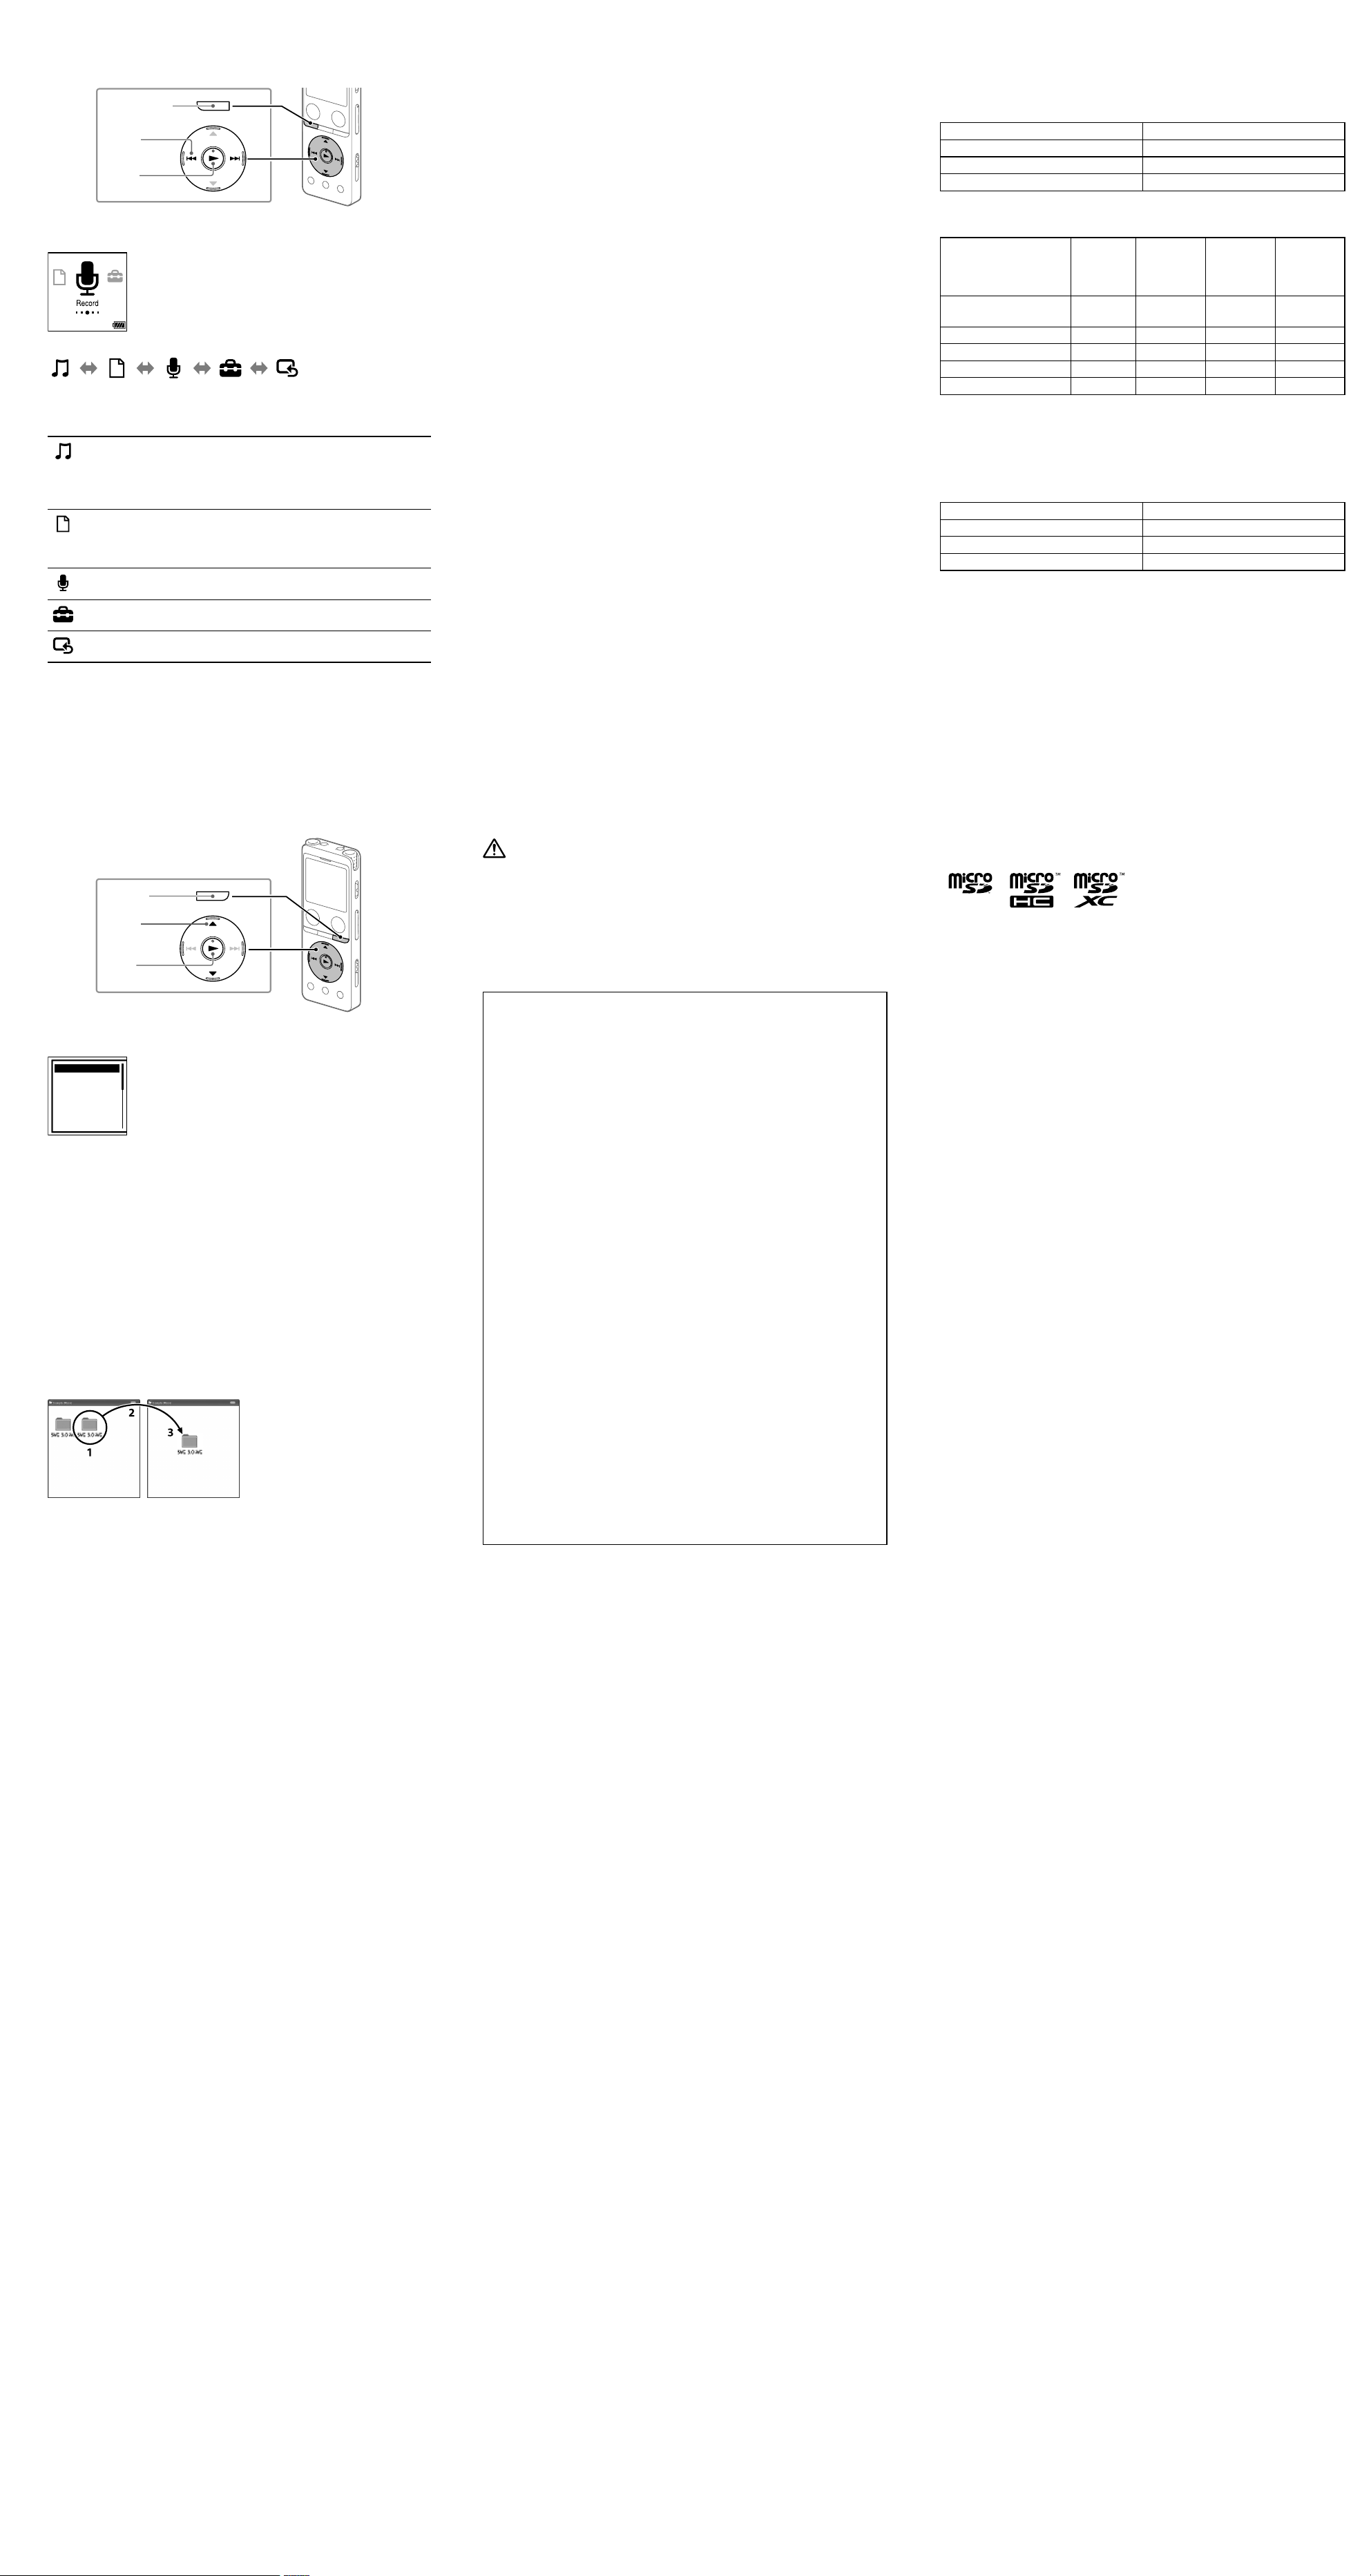
Charge
Charge the IC recorder.
Slide the USB slide lever in the direction of the arrow, and insert the
USB connector into the USB port of a running computer.
When the battery is fully charged, the battery indicator changes from
the charging animation to “
.”
Disconnect the IC recorder.
Make sure that the message “Accessing” is no longer on the display
window. Then refer to the Help Guide to remove the IC recorder
safely.
Power on
Slide and hold the POWER•HOLD switch in the direction of “POWER” until
the window display appears.
To turn the power off, slide the POWER•HOLD switch to “POWER” and
hold it until “Power Off” appears on the display window.
To prevent unintentional operations (HOLD)
Slide the POWER•HOLD switch in the direction of “HOLD.”
¼
To release the IC recorder from the HOLD status, slide the POWER•HOLD switch
towards the center.
Initial settings
Select
(/)
Enter
When you power on your IC recorder for the first time, the “Configure
Initial Settings” screen appears on the display window. You can then
select the display language, set the clock, and turn on/off the beep
sound.
Press to start the initial settings.
Configure
Initial Settings
Enter
Select the display language.
You can select from the following languages:
English*, Español (Spanish), Français (French)
* Default setting
Set the current year, month, day, hour, and minute.
Set Date/Time
1
AM
0012
1 20 19
YM D
¼
To go back to the previous clock setting item, press BACK/HOME.
Select “Next.”
Set Date/Time
AM
0012
Next
Back
10 10 20 19
YM D
Select “ON” or “OFF” to turn on or off the beep sound.
When the initial settings finish, the completion message and then the
HOME menu screen appear.
Beep
ON
OFF
Notes
• If you take 30 seconds or longer before proceeding to the next step, the
display window will turn off. To turn on the display window for continuing the
initial settings, press BACK/HOME.
• You can change any of the initial settings at any time later. For detailed
instructions, refer to the Help Guide.
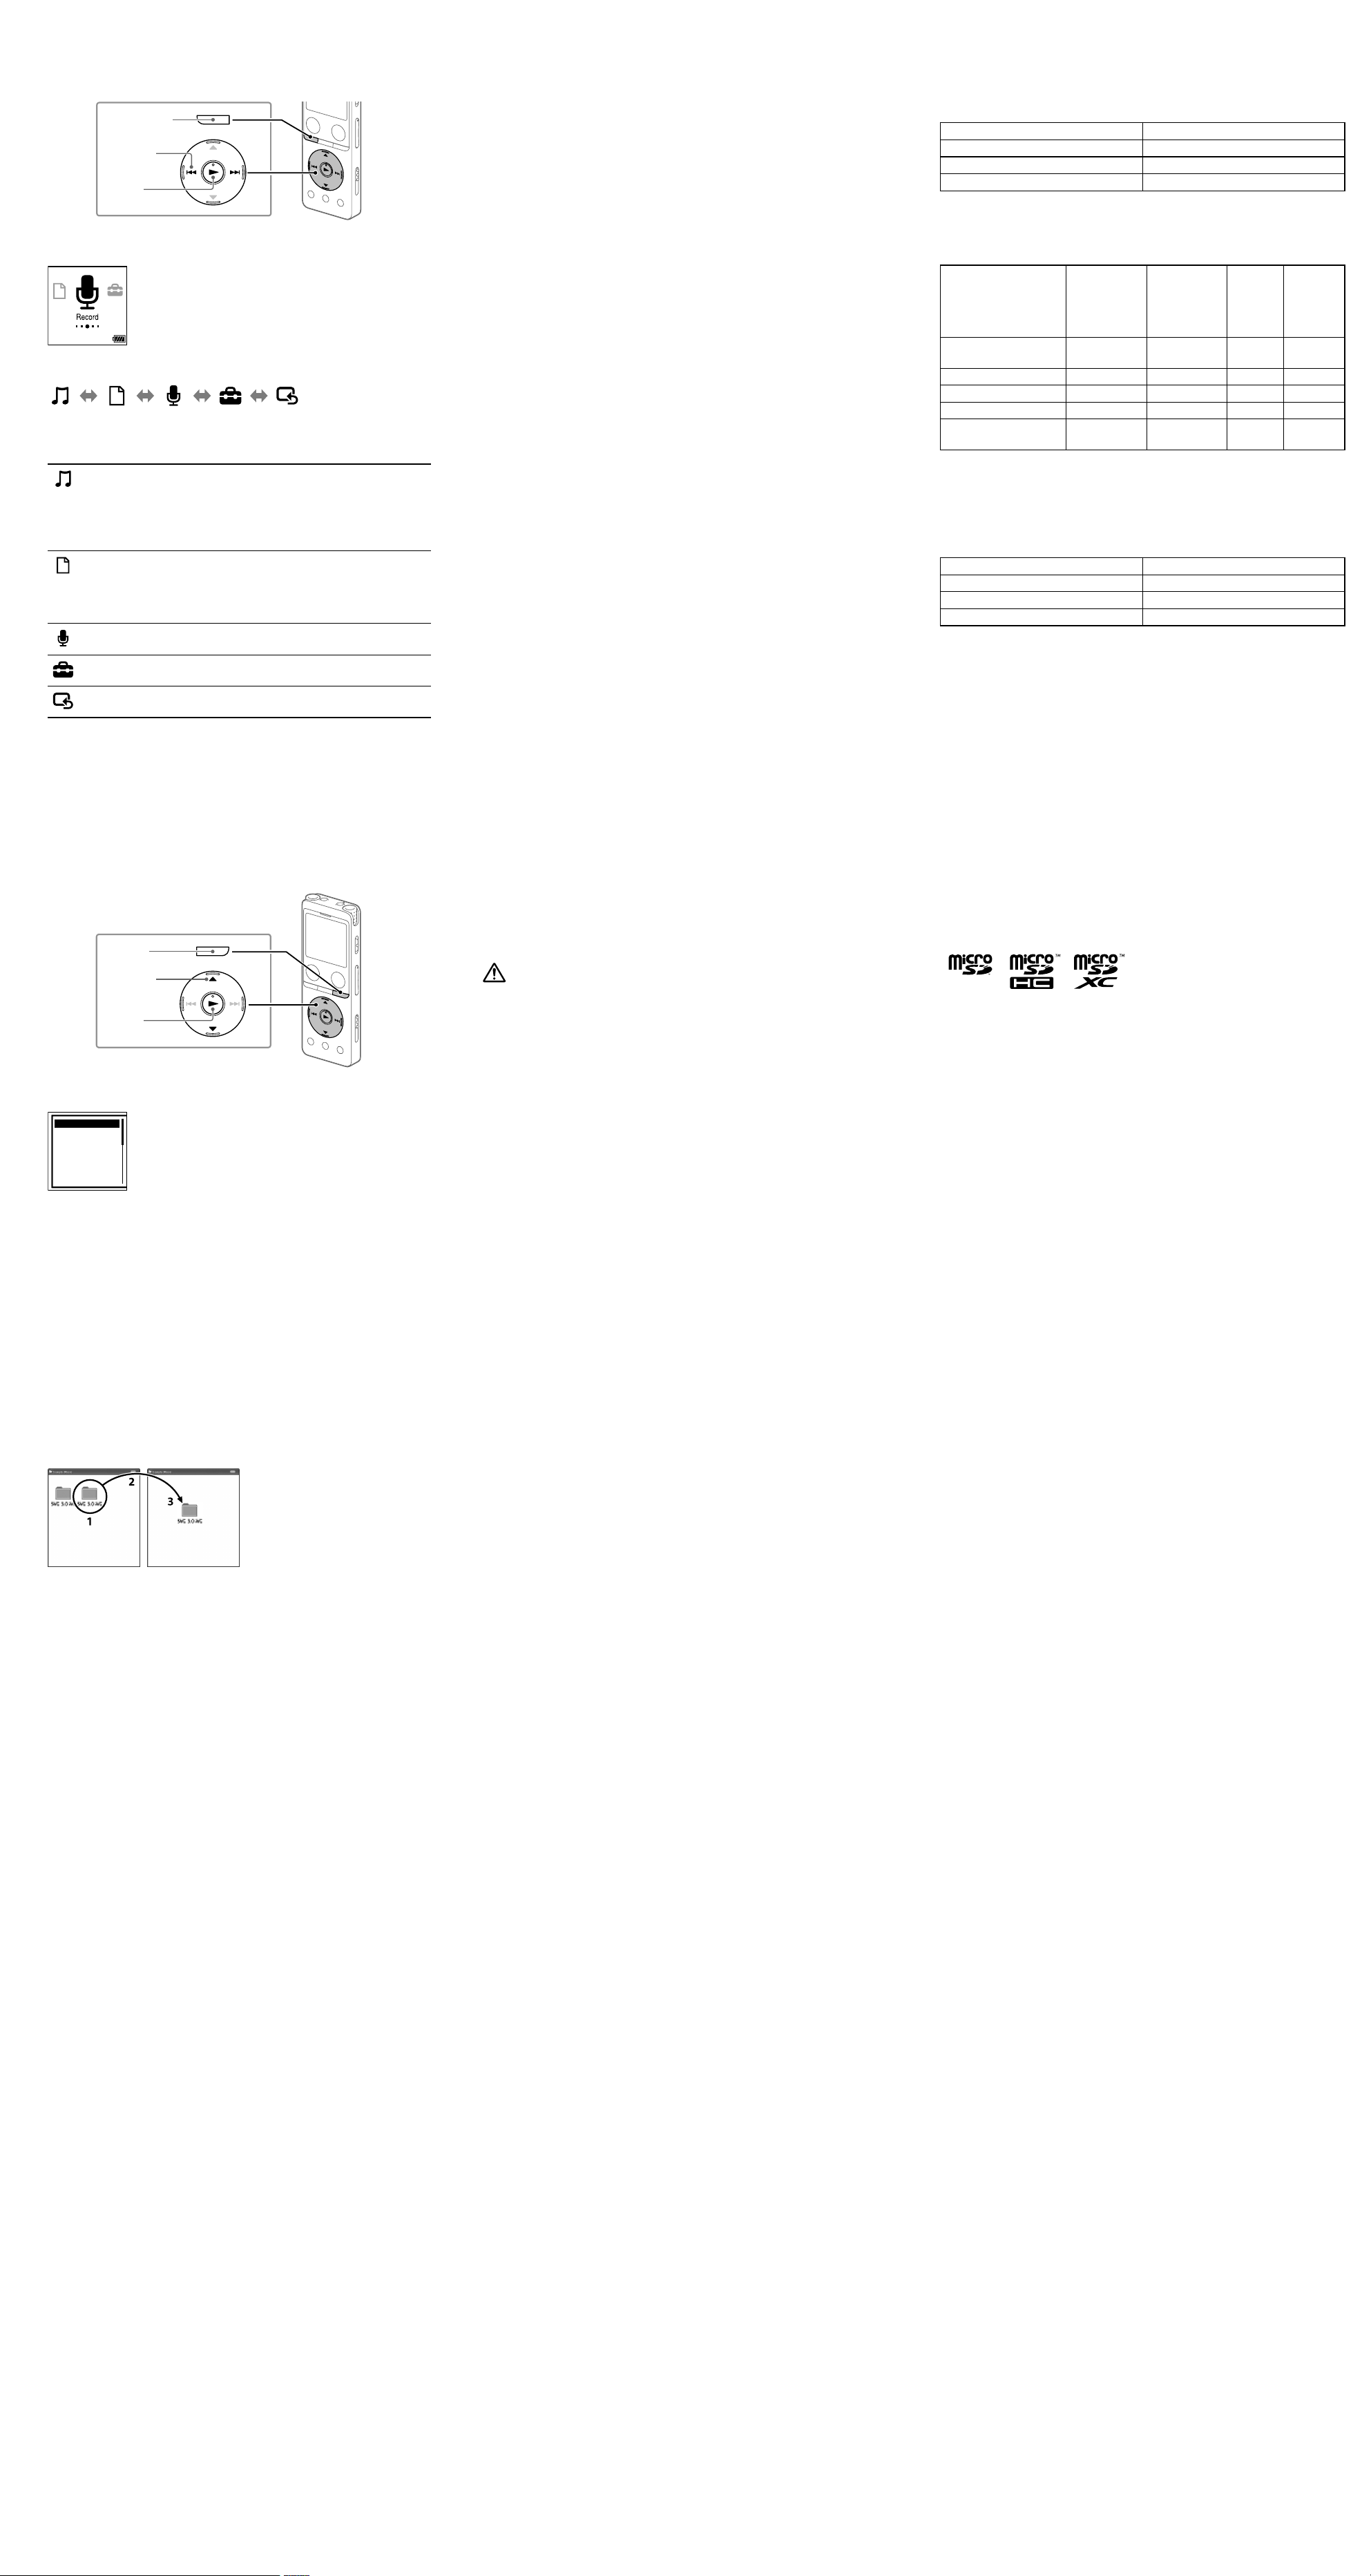
Using the HOME menu
You can use the HOME menu for a variety of operations, including locating
and playing a recorded file and changing the settings of your IC recorder.
Select
(
/
)
Enter
BACK/HOME
Press and hold BACK/HOME.
The HOME menu screen appears.
The HOME menu items are aligned in the following sequence.
Recorded
Files
Record Settings Back
to XX*
Music
Select your desired function from the following:
Music
You can select and play one of the files you have
imported from a computer. To locate a music file,
select “All Songs,” “Albums,” “Artists,” or “Folders.”
When importing files, be sure to import them into
the MUSIC folder.
Recorded Files
You can select and play one of the files you have
recorded with your IC recorder. To locate a recorded
file, select “Latest Recording,” “Search by REC Date,”
“Search by REC Scene,” or “Folders.”
Record
You can display the record standby screen, and then
start recording.
Settings
You can display the Settings menu screen and
change various settings on the IC recorder.
Back to XX*
You can go back to the screen that was displayed
before the HOME menu screen.
* The function you are currently using is displayed in “XX.”
¼
Press STOP to return to the screen displayed before you entered the HOME
menu.
Using the OPTION menu
You can use the OPTION menu to perform a variety of functions, including
changing the settings of your IC recorder.
The available items differ depending on the situation.
Enter
OPTION
Select
(/)
Select your desired function from the HOME menu, and then press
OPTION.
REC Information
Recording Folder
Create Folder
Scene Select
Recording Delay
REC Mode
Built-In Mic Sensit
Select the menu item for which you want to change the setting.
Select your desired setting option.
Copying files from your IC recorder to a
computer
You can copy the files and folders from your IC recorder to a computer to
store them.
Follow the instructions in “Charge” to connect your IC recorder to
a computer.
Drag and drop the files or folders you want to copy from
“ICRECORDER” or “MEMORY CARD” to the local disk on the
computer.
To copy a file or folder (Drag and drop)
1 Click and hold,
2 drag,
3 and then drop.
IC RECORDER or
MEMORY CARD
Your computer
Disconnect your IC recorder from the computer.
Installing Sound Organizer 2
Install Sound Organizer on your computer.
Sound Organizer allows you to exchange files between your IC recorder and
your computer.
Songs imported from music CDs and other media, MP3 and other audio
files imported to a computer can also be played and transferred to the
IC recorder.
Notes
• Sound Organizer is compatible with Windows computers only. Itis not
compatible with Mac.
• This IC recorder is compatible with Sound Organizer 2 only.
• If you format the built-in memory, all data stored there will be deleted. (The
Sound Organizer software installer will also be deleted.)
¼
• When installing Sound Organizer, log in to an account with administrator
privileges.
• The installation procedure varies depending on the Windows version. The
following procedure uses Windows 10 as an example.
Follow the instructions in “Charge” to connect your IC recorder to
a computer.
Make sure the IC recorder is successfully detected by the
computer.
“Connecting” appears and stays on the IC recorder's display window
while the IC recorder is connected to the computer.
Right-click at the bottom left corner of the desktop, and then click
[File Explorer] on the menu.
Double-click [IC RECORDER] - [FOR WINDOWS].
Double-click [SoundOrganizer_V2002] (or [SoundOrganizer_V2002.
exe]).
Follow the computer's on-screen instructions.
When the [Welcome to Sound Organizer 2 Installer] window
appears, click [Next].
Make sure that you accept the terms of the license agreement,
select [I accept the terms in the license agreement], and then click
[Next].
When the [Setup Type] window appears, select [Standard] or
[Custom], and then click [Next].
Follow the instructions on the screen and set the installation settings
when you select [Custom].
When the [Ready to Install the Program] window appears, click
[Install].
The installation starts.
When the [Sound Organizer 2 has been installed successfully.]
window appears, check [Launch Sound Organizer 2 Now], and
then click [Finish].
Note
You may need to restart your computer after installing Sound Organizer 2.
Precautions
On power
DC 3.7V : the built-in rechargeable lithium-ion battery
DC 5.0V : when charged using USB
Rated current consumption : 500mA
On handling
• Do not leave the unit in a location near heat sources, or in a place subject
to direct sunlight, excessive dust or mechanical shock.
• Should any solid object or liquid fall into the unit, remove the battery
and have the unit checked by qualified personnel before operating it any
further.
• When using your IC recorder, remember to follow the precautions below
in order to avoid warping the cabinet or causing the IC recorder to
malfunction.
– Do not sit down with the IC recorder in your back pocket.
– Do not put your IC recorder into a bag with the headphones/earphones
cord wrapped around it and subject the bag to strong impact.
• Be careful not to allow water to splash on the unit. The unit is not
waterproof. In particular, be careful in the following situations.
– When you have the unit in your pocket and go to the bathroom, etc.
When you bend down, the unit may drop into the water and may get
wet.
– When you use the unit in an environment where the unit is exposed to
rain, snow, or humidity.
– In circumstances where you get sweaty. If you touch the unit with wet
hands or if you put the unit in the pocket of sweaty clothes, the unit may
get wet.
• Listening with this unit at high volume may affect your hearing.
• For traffic safety, do not use this unit while driving or cycling.
• Do not use this unit at a place where the inability to hear surrounding
sounds may present a danger.
• You may feel pain in your ears if you use the headphones when the
ambient air is very dry.
This is not because of a malfunction of the headphones, but because of
static electricity accumulated in your body. You can reduce static electricity
by wearing non-synthetic clothes that prevent the emergence of static
electricity.
• Do not place this product close to medical devices.
This product (including accessories) has magnet(s) which may interfere
with pacemakers, programmable shunt valves for hydrocephalus
treatment, or other medical devices. Do not place this product close to
persons who use such medical devices. Consult your doctor before using
this product if you use any such medical device.
On noise
• Noise may be heard when the unit is placed near an AC power source, a
fluorescent lamp or a mobile phone during recording or playback.
• Noise may be recorded when an object, such as your finger, etc., rubs or
scratches the unit during recording.
On maintenance
To clean the exterior, use a soft cloth slightly moistened in water. Then use a
soft dry cloth to wipe the exterior. Do not use alcohol, benzine or thinner.
If you have any questions or problems concerning your unit, please consult
your nearest Sony dealer.
WARNING
Do not expose the batteries (battery pack or batteries installed) to excessive
heat such as sunshine, fire or the like for a long time.
CAUTION
Risk of explosion if battery is replaced by an incorrect type. Dispose of used
batteries according to the instructions.
FOR UNITED STATES CUSTOMERS. NOT APPLICABLE IN CANADA,
INCLUDING IN THE PROVINCE OF QUEBEC.
POUR LES CONSOMMATEURS AUX ÉTATS-UNIS. NON APPLICABLE AU
CANADA, Y COMPRIS LA PROVINCE DE QUÉBEC.
If you have any questions about this product:
Visit: https://www.sony.com/electronics/support
Contact: Sony Customer Information Service Center at 1-800-222-7669
Write: Sony Customer Information Service Center 12451 Gateway Blvd.,
Fort Myers, FL 33913
Supplier’s Declaration of Conformity
Trade Name : SONY
Model : ICD-UX570
Responsible Party : Sony Electronics Inc.
Address : 16535 Via Esprillo, San Diego, CA 92127 U.S.A.
Telephone Number : 858-942-2230
This device complies with part 15 of the FCC Rules. Operation is subject
to the following two conditions: (1) This device may not cause harmful
interference, and (2) this device must accept any interference received,
including interference that may cause undesired operation.
INFORMATION
This equipment has been tested and found to comply with the limits
for a Class B digital device, pursuant to Part 15 of the FCC Rules. These
limits are designed to provide reasonable protection against harmful
interference in a residential installation.
This equipment generates, uses and can radiate radio frequency energy
and, if not installed and used in accordance with the instructions, may
cause harmful interference to radio communications.
However, there is no guarantee that interference will not occur in a
particular installation. If this equipment does cause harmful interference
to radio or television reception, which can be determined by turning
the equipment off and on, the user is encouraged to try to correct the
interference by one or more of the following measures:
– Reorient or relocate the receiving antenna.
– Increase the separation between the equipment and receiver.
– Connect the equipment into an outlet on a circuit different from that to
which the receiver is connected.
– Consult the dealer or an experienced radio/TV technician for help.
RECYCLING RECHARGEABLE BATTERIES
Rechargeable batteries are recyclable.
You can help preserve our environment by returning your used
rechargeable batteries to the collection and recycling location nearest you.
For more information regarding recycling of rechargeable batteries, visit
https://www.sony.com/electronics/eco/environmental-management
Caution: Do not handle damaged or leaking rechargeable batteries.
Notice for users
• All rights reserved. This manual or the software described herein, in whole
or in part, may not be reproduced, translated or reduced to any machine
readable form without prior written approval from Sony Corporation.
• What you record is for personal enjoyment and use only. Copyright laws
prohibit other forms of use without the permission of the copyright
holders.
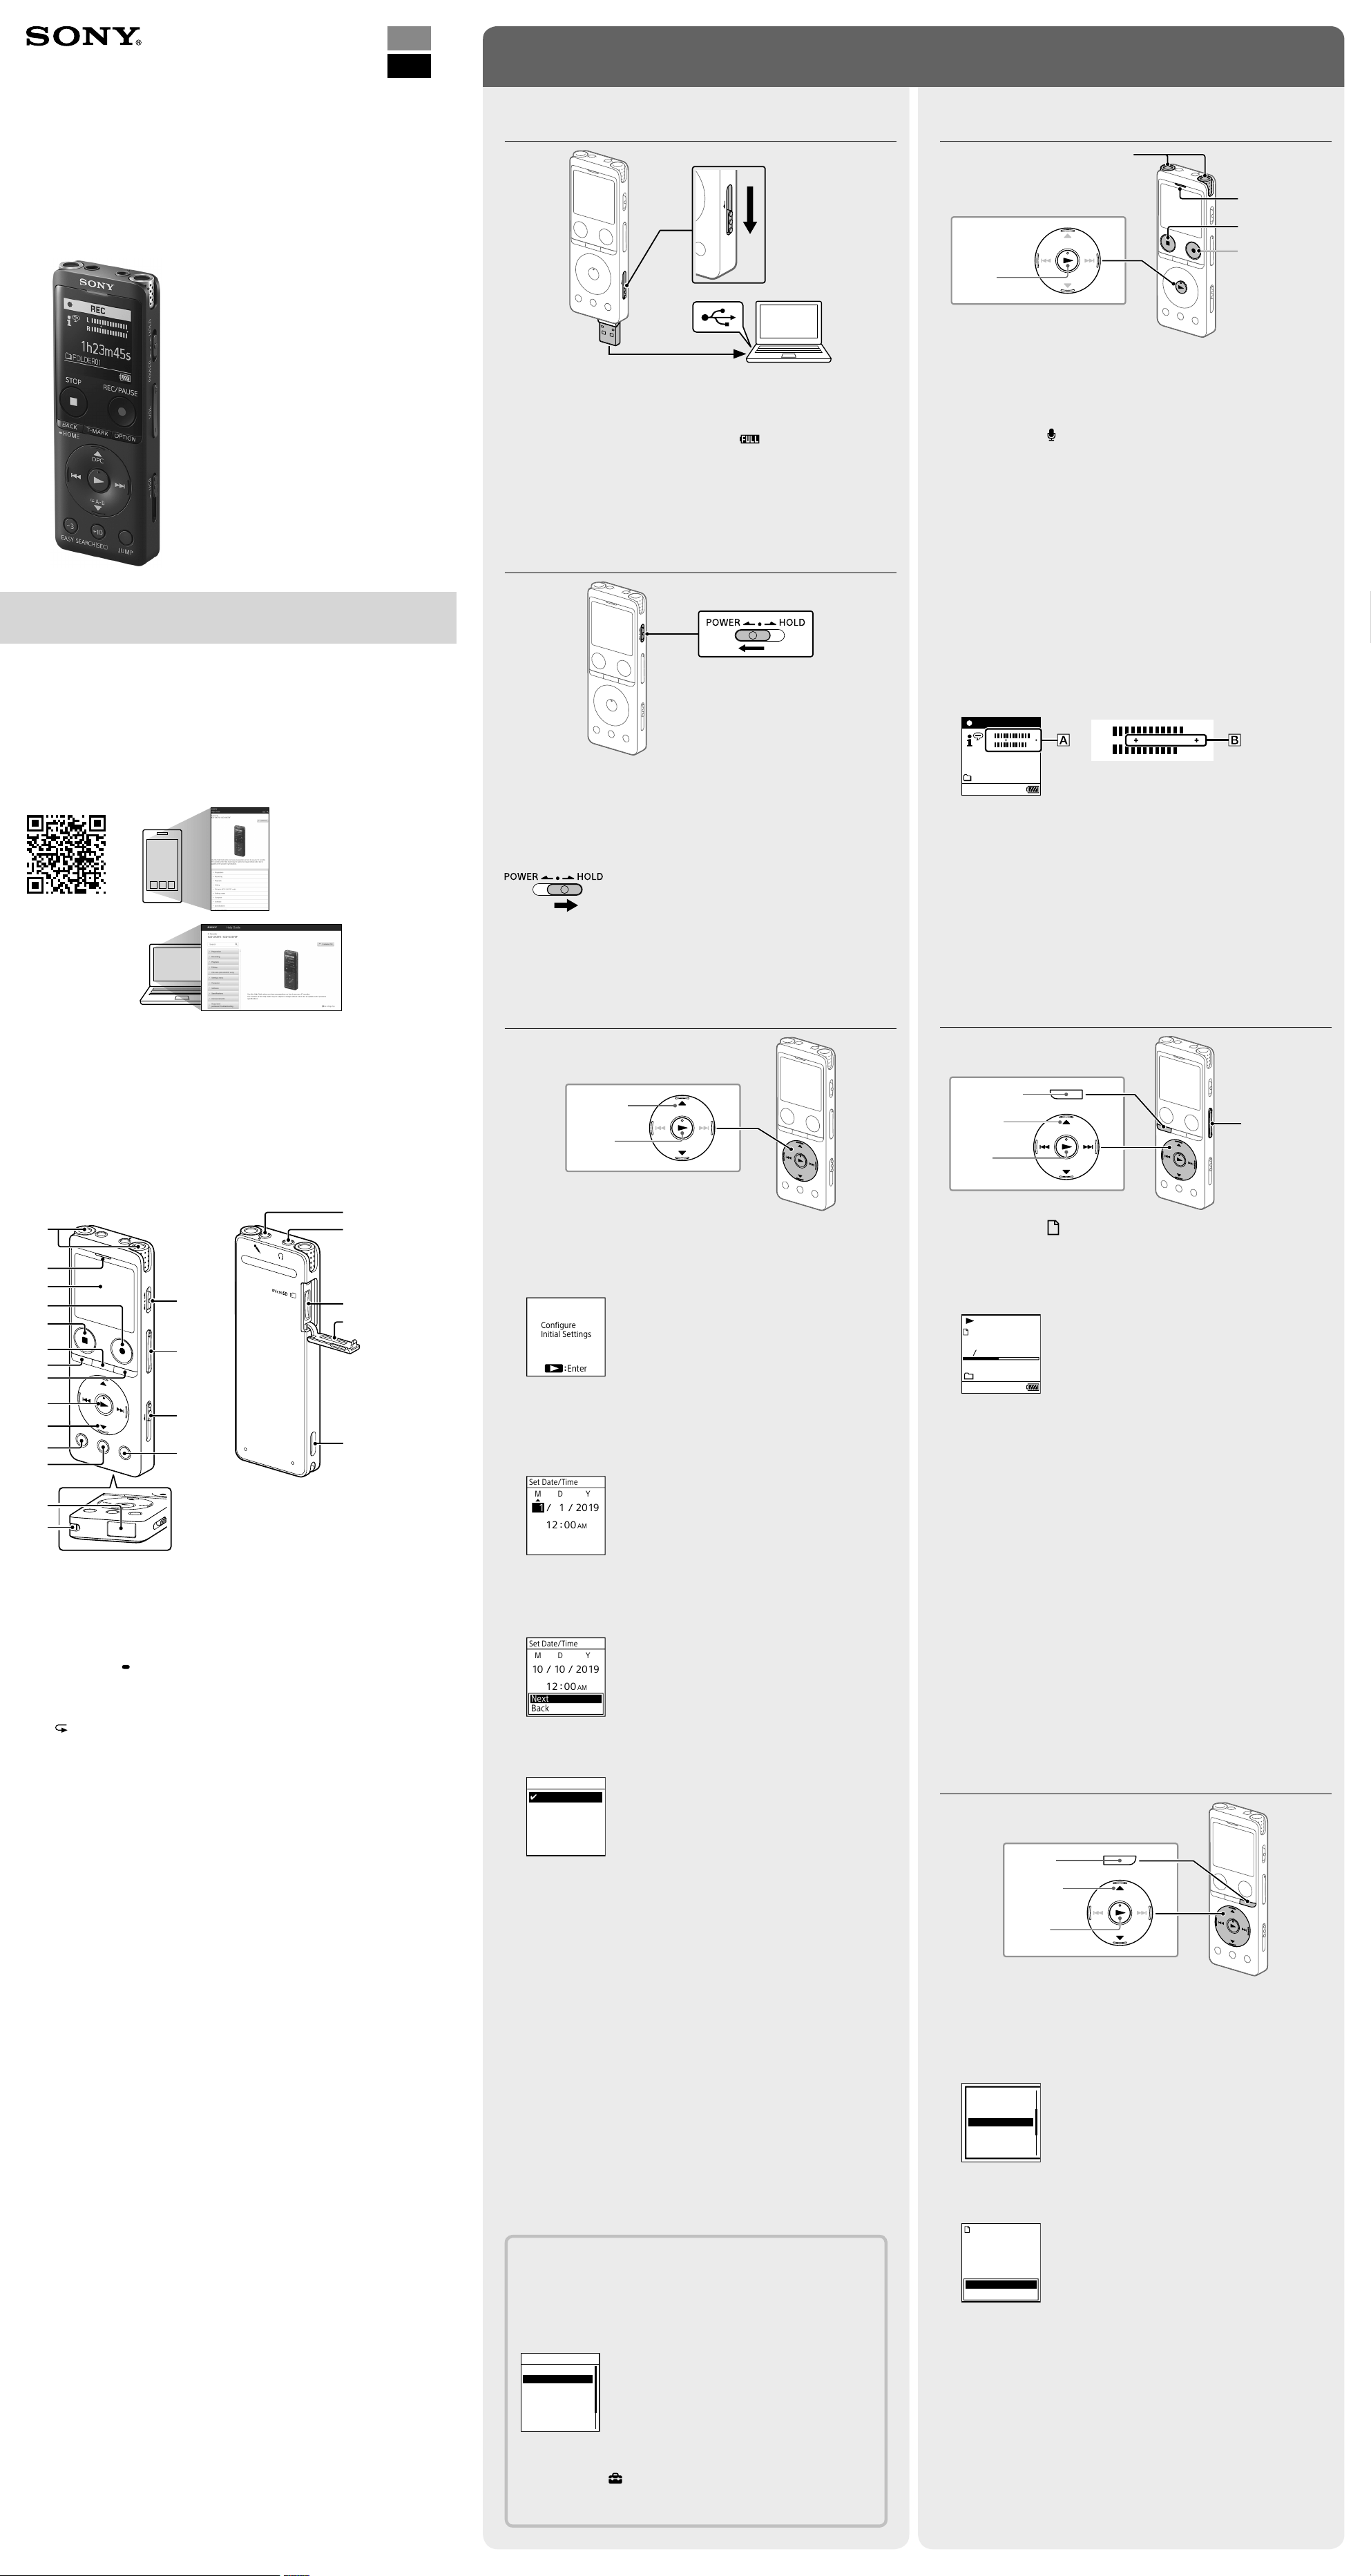
Record
Built-in microphones
STOP
REC/PAUSE
Operation
indicator
Enter
¼
• Before you start recording, make sure that the HOLD status is released.
• You can select a recording scene for each situation by selecting “Scene
Select” in the OPTION menu.
Select “ Record” from the HOME menu.
The recording standby screen appears.
Select a storage and a folder to save the recorded file.
¼
To save the recorded file on the microSD card, you need to change the file
storage destination folder. Select “Recording Folder” - “SD Card” from the
OPTION menu, and then start recording.
Turn the IC recorder so that its built-in microphones point in the
direction of the target sound source.
Press REC/PAUSE.
“REC” appears on the display window to indicate that recording has
started, and the operation indicator lights in red.
Note
If you press and hold REC/PAUSE, the IC recorder will pause. It will not
start recording.
REC
L
R
1
h
23
m
45
s
FOLDER01
L
R
The recording level guide () is displayed while recording. The
section between + and + () is the optimal input level for recording.
Please adjust the orientation of the built-in microphones, the
distance from the sound source, the microphones' sensitivity setting,
or the “Scene Select” setting so that the recording level fits within the
optimal range, as illustrated.
Press STOP to stop recording.
“Saving...” and then recording standby screen appear on the display
window.
Listen
BACK/HOME
Select
(
//
/
)
Enter
VOL –/+ button
Select “ Recorded Files” from the HOME menu.
Select “Latest Recording,” “Search by REC Date,” “Search by REC
Scene,” or “Folders.”
Select your desired file.
Playback starts and the operation indicator lights in green.
PLAY
191005
_
1230.mp3
100
122
1
h
23
m
45
s
2
h34
m
56
s
Press VOL + or VOL - to adjust the volume.
Press STOP to stop playback.
¼
Right after you stopped recording, you can press to play the file you have
just recorded.
To add a track mark
You can add a track mark at a point at which you want to divide a file later
or locate during playback. You can add a maximum of 98 track marks to
each file.
You can also add track marks during recording.
Locating the desired playback point quickly (Time Jump, Easy Search)
• Using the time jump function allows you to move to any of the 10 points
throughout the total duration of a file. You can use this function with
or in the time jump mode.
• Using the easy search function allows you to forward or reverse a fixed
number of seconds (10 seconds for forwarding, 3 seconds for reversing)
during playback.
Delete
Enter
OPTION
Select
(/)
Note
Once a file is deleted, you cannot restore it.
Select the file you want to delete from the list of recorded files
or play back the file you want to delete.
Select “Delete File” from the OPTION menu.
Equalizer
Play Mode
Playback Range
Delete File
Protect
Track Mark List
Delete Track Marks
“Delete?” appears and the selected file starts playing for your
confirmation.
Select “Yes.”
Yes
No
191010
_
1010.mp3
Delete?
“Please Wait” appears and stays until the selected file is deleted.
Specifications
Capacity (User available capacity*
1
*
2
)
4 GB (approx. 3.20 GB = 3,435,973,837 Byte)
Maximum recording time*
3
*
4
(Built-in memory)
The maximum recording time of all the folders is as follows.
LPCM 44.1 kHz/16 bit (STEREO) 5 hours 20 minutes
MP3 192 kbps (STEREO) 39 hours 45 minutes
MP3 128 kbps (STEREO) 59 hours
MP3 48 kbps (MONO) 159 hours
Battery Life (a built-in rechargeable lithium-ion battery)*
5
The battery life spans provided here are all approximate periods of time.
Recording mode Recording
Recording
(while
monitoring)
Playback
with the
built-in
speaker
Playback
with the
headphones
LPCM 44.1kHz/16bit
(STEREO)
20 hours 12 hours 5 hours 34 hours
MP3 192kbps (STEREO) 22 hours 13 hours 5 hours 47 hours
MP3 128kbps (STEREO) 22 hours 13 hours 5 hours 47 hours
MP3 48kbps (MONO) 22 hours 13 hours 5 hours 47 hours
Music file (MP3 128 kbps) - - 5 hours 47 hours
Dimensions (w/h/d) (not incl. projecting parts and controls)
Approx. 1.45 inches (36.6 mm) × 4.05 inches (102.8 mm) × 0.49 inches (12.2 mm)
Mass
Approx. 1.70 oz (48 g)
Temperature/Humidity
Operating temperature 41 °F - 95 °F (5°C - 35°C)
Operating humidity 25% - 75%
Storage temperature 14 °F - 113 °F (-10°C - +45°C)
Storage humidity 25% - 75%
Compatible memory cards
• microSDHC cards from 4 GB to 32 GB
• microSDXC cards of 64 GB or more
*
1
A small amount of the built-in memory is used for file management and therefore not
available for user storage.
*
2
When the built-in memory is formatted with the IC recorder.
*
3
The maximum recordable time in this topic is provided for your reference only.
*
4
Default settings for the recording scenes.
*
5
Measured values acquired under our measurement conditions. These values may decrease
depending on the usage conditions.
Trademarks and licenses
• Microsoft, Windows and Windows Media are registered trademarks or
trademarks of Microsoft Corporation in the United States and/or other
countries.
• macOS is a trademark of Apple Inc., registered in the U.S. and other
countries.
• microSD, microSDHC and microSDXC logos are trademarks of SD-3C, LLC.
• All other trademarks and registered trademarks are trademarks or
registered trademarks of their respective holders. Furthermore, “™” and “®”
are not mentioned in each in this manual.
• MPEG Layer-3 audio coding technology and patents licensed from
Fraunhofer IIS and Thomson.
• This product is protected by certain intellectual property rights of Microsoft
Corporation. Use or distribution of such technology outside of this product
is prohibited without a license from Microsoft or an authorized Microsoft
subsidiary.
Notes on the License
This IC recorder comes with software that are used based on licensing
agreements with the owners of that software.
Based on requests by the owners of copyright of these software
applications, we have an obligation to inform you of the following. Please
read the following sections.
Licenses (in English) are recorded in the built-in memory of your IC recorder.
Establish a Mass Storage connection between the IC recorder and a
computer to read licenses in the “LICENSE” folder.
On GNU GPL/LGPL applied software
The software that is eligible for the following GNU General Public License
(hereinafter referred to as “GPL”) or GNU Lesser General Public License
(hereinafter referred to as “LGPL”) are included in the IC recorder.
This informs you that you have a right to have access to, modify, and
redistribute source code for these software programs under the conditions
of the supplied GPL/LGPL.
Source code is provided on the web. Use the following URL to download it.
http://www.sony.net/Products/Linux/
We would prefer you do not contact us about the contents of source code.
Licenses (in English) are recorded in the built-in memory of your IC recorder.
Establish a Mass Storage connection between the IC recorder and a
computer to read licenses in the “LICENSE” folder.
The display window turns off
automatically
The “Screen Off Timer” setting on your IC recorder is set to
“30Sec” by default to save battery power. If you leave the IC
recorder untouched for 30 seconds, the display window will turn
off, but you can still perform any button operations. To turn the
display window back on, press BACK/HOME.
LED
Screen O Timer
Beep
Language
Date & Time
Sleep Timer
Auto Power O
Common Settings
¼ You can keep the display window from turning off or change the
default setting to another timer interval. Press and hold BACK/
HOME and select “
Settings” - “Common Settings” - “Screen Off
Timer,” and then select “No Auto Screen Off,” “15Sec,” “30Sec,”
“1Min,” “3Min,” or “5Min.”
ICD-UX570 5-006-943-41(1)
IC Recorder
ICD-UX570
Operating Instructions
GB
FR
© 2019 Sony Corporation Printed in China / Imprimé en Chine
5-006-943-41(1)
Owner’s Record
The model number is located at the rear panel and the serial number is
located at the rear panel. Record these numbers in the space provided
below. Refer to these numbers whenever you call upon your Sony dealer
regarding this product.
Model No. _________________________________
Serial No. __________________________________
You are cautioned that any changes or modifications not expressly
approved in this manual could void your authority to operate this
equipment.
Refer to the Help Guide
This is the Operating Instructions, which provides you with instructions on
the basic operations of the IC recorder.
The Help Guide is an online manual.
Refer to the Help Guide when you would like to know further details,
operations and possible solutions when a problem occurs.
https://rd1.sony.net/help/icd/u57/h_uc/
Check the supplied items
• IC Recorder (1)
• Operating Instructions (this sheet)
• Warranty card (1)
• Application Software, Sound Organizer 2 (Installer file stored in the built-in
memory so that you can install it to your computer.)
Parts and controls
Built-in microphones
Operation indicator
Display window
REC/PAUSE (record/pause) button
STOP button
T-MARK (track mark) button
BACK/
HOME button
OPTION button
(play/enter) button*
1
Control button (DPC (Digital Pitch Control), A-B (repeat A-B),
(review/fast backward), (cue/fast forward))
-3 EASY SEARCH(SEC) button
+10 EASY SEARCH(SEC) button
USB connector cover (You can find the USB connector retracted behind
the cover.)
Strap hole (No strap is supplied with your IC recorder.)
POWER•HOLD switch*
2
VOL –/+*
1
(volume –/+) button
USB slide lever
JUMP (time jump) button
(microphone) jack*
1
(headphones) jack
microSD card slot (The card slot is located under the cover.)
Slot cover
Built-in speaker
*
1
The (play/enter) button, VOL + (volume +) button, and (microphone) jack have a tactile
dot. Use the tactile dot as a reference when operating the IC recorder.
*
2
Sliding the POWER•HOLD switch to “POWER” and holding it for 8 seconds or longer restarts
your IC recorder. For detailed instructions, refer to the Help Guide.
Let’s try out your new IC recorder
Charge
Charge the IC recorder.
Slide the USB slide lever in the direction of the arrow, and insert the
USB connector into the USB port of a running computer.
When the battery is fully charged, the battery indicator changes from
the charging animation to “
.”
Disconnect the IC recorder.
Make sure that the message “Accessing” is no longer on the display
window. Then refer to the Help Guide to remove the IC recorder
safely.
Power on
Slide and hold the POWER•HOLD switch in the direction of “POWER” until
the window display appears.
To turn the power off, slide the POWER•HOLD switch to “POWER” and
hold it until “Power Off” appears on the display window.
To prevent unintentional operations (HOLD)
Slide the POWER•HOLD switch in the direction of “HOLD.”
¼
To release the IC recorder from the HOLD status, slide the POWER•HOLD switch
towards the center.
Initial settings
Select
(/)
Enter
When you power on your IC recorder for the first time, the “Configure
Initial Settings” screen appears on the display window. You can then
select the display language, set the clock, and turn on/off the beep
sound.
Press to start the initial settings.
Configure
Initial Settings
Enter
Select the display language.
You can select from the following languages:
English*, Español (Spanish), Français (French)
* Default setting
Set the current year, month, day, hour, and minute.
Set Date/Time
1
AM
0012
1 20 19
YM D
¼
To go back to the previous clock setting item, press BACK/HOME.
Select “Next.”
Set Date/Time
AM
0012
Next
Back
10 10 20 19
YM D
Select “ON” or “OFF” to turn on or off the beep sound.
When the initial settings finish, the completion message and then the
HOME menu screen appear.
Beep
ON
OFF
Notes
• If you take 30 seconds or longer before proceeding to the next step, the
display window will turn off. To turn on the display window for continuing the
initial settings, press BACK/HOME.
• You can change any of the initial settings at any time later. For detailed
instructions, refer to the Help Guide.
Using the HOME menu
You can use the HOME menu for a variety of operations, including locating
and playing a recorded file and changing the settings of your IC recorder.
Select
(
/
)
Enter
BACK/HOME
Press and hold BACK/HOME.
The HOME menu screen appears.
The HOME menu items are aligned in the following sequence.
Recorded
Files
Record Settings Back
to XX*
Music
Select your desired function from the following:
Music
You can select and play one of the files you have
imported from a computer. To locate a music file,
select “All Songs,” “Albums,” “Artists,” or “Folders.”
When importing files, be sure to import them into
the MUSIC folder.
Recorded Files
You can select and play one of the files you have
recorded with your IC recorder. To locate a recorded
file, select “Latest Recording,” “Search by REC Date,”
“Search by REC Scene,” or “Folders.”
Record
You can display the record standby screen, and then
start recording.
Settings
You can display the Settings menu screen and
change various settings on the IC recorder.
Back to XX*
You can go back to the screen that was displayed
before the HOME menu screen.
* The function you are currently using is displayed in “XX.”
¼
Press STOP to return to the screen displayed before you entered the HOME
menu.
Using the OPTION menu
You can use the OPTION menu to perform a variety of functions, including
changing the settings of your IC recorder.
The available items differ depending on the situation.
Enter
OPTION
Select
(/)
Select your desired function from the HOME menu, and then press
OPTION.
REC Information
Recording Folder
Create Folder
Scene Select
Recording Delay
REC Mode
Built-In Mic Sensit
Select the menu item for which you want to change the setting.
Select your desired setting option.
Copying files from your IC recorder to a
computer
You can copy the files and folders from your IC recorder to a computer to
store them.
Follow the instructions in “Charge” to connect your IC recorder to
a computer.
Drag and drop the files or folders you want to copy from
“ICRECORDER” or “MEMORY CARD” to the local disk on the
computer.
To copy a file or folder (Drag and drop)
1 Click and hold,
2 drag,
3 and then drop.
IC RECORDER or
MEMORY CARD
Your computer
Disconnect your IC recorder from the computer.
Installing Sound Organizer 2
Install Sound Organizer on your computer.
Sound Organizer allows you to exchange files between your IC recorder and
your computer.
Songs imported from music CDs and other media, MP3 and other audio
files imported to a computer can also be played and transferred to the
IC recorder.
Notes
• Sound Organizer is compatible with Windows computers only. Itis not
compatible with Mac.
• This IC recorder is compatible with Sound Organizer 2 only.
• If you format the built-in memory, all data stored there will be deleted. (The
Sound Organizer software installer will also be deleted.)
¼
• When installing Sound Organizer, log in to an account with administrator
privileges.
• The installation procedure varies depending on the Windows version. The
following procedure uses Windows 10 as an example.
Follow the instructions in “Charge” to connect your IC recorder to
a computer.
Make sure the IC recorder is successfully detected by the
computer.
“Connecting” appears and stays on the IC recorder's display window
while the IC recorder is connected to the computer.
Right-click at the bottom left corner of the desktop, and then click
[File Explorer] on the menu.
Double-click [IC RECORDER] - [FOR WINDOWS].
Double-click [SoundOrganizer_V2002] (or [SoundOrganizer_V2002.
exe]).
Follow the computer's on-screen instructions.
When the [Welcome to Sound Organizer 2 Installer] window
appears, click [Next].
Make sure that you accept the terms of the license agreement,
select [I accept the terms in the license agreement], and then click
[Next].
When the [Setup Type] window appears, select [Standard] or
[Custom], and then click [Next].
Follow the instructions on the screen and set the installation settings
when you select [Custom].
When the [Ready to Install the Program] window appears, click
[Install].
The installation starts.
When the [Sound Organizer 2 has been installed successfully.]
window appears, check [Launch Sound Organizer 2 Now], and
then click [Finish].
Note
You may need to restart your computer after installing Sound Organizer 2.
Precautions
On power
DC 3.7V : the built-in rechargeable lithium-ion battery
DC 5.0V : when charged using USB
Rated current consumption : 500mA
On handling
• Do not leave the unit in a location near heat sources, or in a place subject
to direct sunlight, excessive dust or mechanical shock.
• Should any solid object or liquid fall into the unit, remove the battery
and have the unit checked by qualified personnel before operating it any
further.
• When using your IC recorder, remember to follow the precautions below
in order to avoid warping the cabinet or causing the IC recorder to
malfunction.
– Do not sit down with the IC recorder in your back pocket.
– Do not put your IC recorder into a bag with the headphones/earphones
cord wrapped around it and subject the bag to strong impact.
• Be careful not to allow water to splash on the unit. The unit is not
waterproof. In particular, be careful in the following situations.
– When you have the unit in your pocket and go to the bathroom, etc.
When you bend down, the unit may drop into the water and may get
wet.
– When you use the unit in an environment where the unit is exposed to
rain, snow, or humidity.
– In circumstances where you get sweaty. If you touch the unit with wet
hands or if you put the unit in the pocket of sweaty clothes, the unit may
get wet.
• Listening with this unit at high volume may affect your hearing.
• For traffic safety, do not use this unit while driving or cycling.
• Do not use this unit at a place where the inability to hear surrounding
sounds may present a danger.
• You may feel pain in your ears if you use the headphones when the
ambient air is very dry.
This is not because of a malfunction of the headphones, but because of
static electricity accumulated in your body. You can reduce static electricity
by wearing non-synthetic clothes that prevent the emergence of static
electricity.
• Do not place this product close to medical devices.
This product (including accessories) has magnet(s) which may interfere
with pacemakers, programmable shunt valves for hydrocephalus
treatment, or other medical devices. Do not place this product close to
persons who use such medical devices. Consult your doctor before using
this product if you use any such medical device.
On noise
• Noise may be heard when the unit is placed near an AC power source, a
fluorescent lamp or a mobile phone during recording or playback.
• Noise may be recorded when an object, such as your finger, etc., rubs or
scratches the unit during recording.
On maintenance
To clean the exterior, use a soft cloth slightly moistened in water. Then use a
soft dry cloth to wipe the exterior. Do not use alcohol, benzine or thinner.
If you have any questions or problems concerning your unit, please consult
your nearest Sony dealer.
WARNING
Do not expose the batteries (battery pack or batteries installed) to excessive
heat such as sunshine, fire or the like for a long time.
CAUTION
Risk of explosion if battery is replaced by an incorrect type. Dispose of used
batteries according to the instructions.
FOR UNITED STATES CUSTOMERS. NOT APPLICABLE IN CANADA,
INCLUDING IN THE PROVINCE OF QUEBEC.
POUR LES CONSOMMATEURS AUX ÉTATS-UNIS. NON APPLICABLE AU
CANADA, Y COMPRIS LA PROVINCE DE QUÉBEC.
If you have any questions about this product:
Visit: https://www.sony.com/electronics/support
Contact: Sony Customer Information Service Center at 1-800-222-7669
Write: Sony Customer Information Service Center 12451 Gateway Blvd.,
Fort Myers, FL 33913
Supplier’s Declaration of Conformity
Trade Name : SONY
Model : ICD-UX570
Responsible Party : Sony Electronics Inc.
Address : 16535 Via Esprillo, San Diego, CA 92127 U.S.A.
Telephone Number : 858-942-2230
This device complies with part 15 of the FCC Rules. Operation is subject
to the following two conditions: (1) This device may not cause harmful
interference, and (2) this device must accept any interference received,
including interference that may cause undesired operation.
INFORMATION
This equipment has been tested and found to comply with the limits
for a Class B digital device, pursuant to Part 15 of the FCC Rules. These
limits are designed to provide reasonable protection against harmful
interference in a residential installation.
This equipment generates, uses and can radiate radio frequency energy
and, if not installed and used in accordance with the instructions, may
cause harmful interference to radio communications.
However, there is no guarantee that interference will not occur in a
particular installation. If this equipment does cause harmful interference
to radio or television reception, which can be determined by turning
the equipment off and on, the user is encouraged to try to correct the
interference by one or more of the following measures:
– Reorient or relocate the receiving antenna.
– Increase the separation between the equipment and receiver.
– Connect the equipment into an outlet on a circuit different from that to
which the receiver is connected.
– Consult the dealer or an experienced radio/TV technician for help.
RECYCLING RECHARGEABLE BATTERIES
Rechargeable batteries are recyclable.
You can help preserve our environment by returning your used
rechargeable batteries to the collection and recycling location nearest you.
For more information regarding recycling of rechargeable batteries, visit
https://www.sony.com/electronics/eco/environmental-management
Caution: Do not handle damaged or leaking rechargeable batteries.
Notice for users
• All rights reserved. This manual or the software described herein, in whole
or in part, may not be reproduced, translated or reduced to any machine
readable form without prior written approval from Sony Corporation.
• What you record is for personal enjoyment and use only. Copyright laws
prohibit other forms of use without the permission of the copyright
holders.
Record
Built-in microphones
STOP
REC/PAUSE
Operation
indicator
Enter
¼
• Before you start recording, make sure that the HOLD status is released.
• You can select a recording scene for each situation by selecting “Scene
Select” in the OPTION menu.
Select “ Record” from the HOME menu.
The recording standby screen appears.
Select a storage and a folder to save the recorded file.
¼
To save the recorded file on the microSD card, you need to change the file
storage destination folder. Select “Recording Folder” - “SD Card” from the
OPTION menu, and then start recording.
Turn the IC recorder so that its built-in microphones point in the
direction of the target sound source.
Press REC/PAUSE.
“REC” appears on the display window to indicate that recording has
started, and the operation indicator lights in red.
Note
If you press and hold REC/PAUSE, the IC recorder will pause. It will not
start recording.
REC
L
R
1
h
23
m
45
s
FOLDER01
L
R
The recording level guide () is displayed while recording. The
section between + and + () is the optimal input level for recording.
Please adjust the orientation of the built-in microphones, the
distance from the sound source, the microphones' sensitivity setting,
or the “Scene Select” setting so that the recording level fits within the
optimal range, as illustrated.
Press STOP to stop recording.
“Saving...” and then recording standby screen appear on the display
window.
Listen
BACK/HOME
Select
(
//
/
)
Enter
VOL –/+ button
Select “ Recorded Files” from the HOME menu.
Select “Latest Recording,” “Search by REC Date,” “Search by REC
Scene,” or “Folders.”
Select your desired file.
Playback starts and the operation indicator lights in green.
PLAY
191005
_
1230.mp3
100
122
1
h
23
m
45
s
2
h34
m
56
s
Press VOL + or VOL - to adjust the volume.
Press STOP to stop playback.
¼
Right after you stopped recording, you can press to play the file you have
just recorded.
To add a track mark
You can add a track mark at a point at which you want to divide a file later
or locate during playback. You can add a maximum of 98 track marks to
each file.
You can also add track marks during recording.
Locating the desired playback point quickly (Time Jump, Easy Search)
• Using the time jump function allows you to move to any of the 10 points
throughout the total duration of a file. You can use this function with
or in the time jump mode.
• Using the easy search function allows you to forward or reverse a fixed
number of seconds (10 seconds for forwarding, 3 seconds for reversing)
during playback.
Delete
Enter
OPTION
Select
(/)
Note
Once a file is deleted, you cannot restore it.
Select the file you want to delete from the list of recorded files
or play back the file you want to delete.
Select “Delete File” from the OPTION menu.
Equalizer
Play Mode
Playback Range
Delete File
Protect
Track Mark List
Delete Track Marks
“Delete?” appears and the selected file starts playing for your
confirmation.
Select “Yes.”
Yes
No
191010
_
1010.mp3
Delete?
“Please Wait” appears and stays until the selected file is deleted.
Specifications
Capacity (User available capacity*
1
*
2
)
4 GB (approx. 3.20 GB = 3,435,973,837 Byte)
Maximum recording time*
3
*
4
(Built-in memory)
The maximum recording time of all the folders is as follows.
LPCM 44.1 kHz/16 bit (STEREO) 5 hours 20 minutes
MP3 192 kbps (STEREO) 39 hours 45 minutes
MP3 128 kbps (STEREO) 59 hours
MP3 48 kbps (MONO) 159 hours
Battery Life (a built-in rechargeable lithium-ion battery)*
5
The battery life spans provided here are all approximate periods of time.
Recording mode Recording
Recording
(while
monitoring)
Playback
with the
built-in
speaker
Playback
with the
headphones
LPCM 44.1kHz/16bit
(STEREO)
20 hours 12 hours 5 hours 34 hours
MP3 192kbps (STEREO) 22 hours 13 hours 5 hours 47 hours
MP3 128kbps (STEREO) 22 hours 13 hours 5 hours 47 hours
MP3 48kbps (MONO) 22 hours 13 hours 5 hours 47 hours
Music file (MP3 128 kbps) - - 5 hours 47 hours
Dimensions (w/h/d) (not incl. projecting parts and controls)
Approx. 1.45 inches (36.6 mm) × 4.05 inches (102.8 mm) × 0.49 inches (12.2 mm)
Mass
Approx. 1.70 oz (48 g)
Temperature/Humidity
Operating temperature 41 °F - 95 °F (5°C - 35°C)
Operating humidity 25% - 75%
Storage temperature 14 °F - 113 °F (-10°C - +45°C)
Storage humidity 25% - 75%
Compatible memory cards
• microSDHC cards from 4 GB to 32 GB
• microSDXC cards of 64 GB or more
*
1
A small amount of the built-in memory is used for file management and therefore not
available for user storage.
*
2
When the built-in memory is formatted with the IC recorder.
*
3
The maximum recordable time in this topic is provided for your reference only.
*
4
Default settings for the recording scenes.
*
5
Measured values acquired under our measurement conditions. These values may decrease
depending on the usage conditions.
Trademarks and licenses
• Microsoft, Windows and Windows Media are registered trademarks or
trademarks of Microsoft Corporation in the United States and/or other
countries.
• macOS is a trademark of Apple Inc., registered in the U.S. and other
countries.
• microSD, microSDHC and microSDXC logos are trademarks of SD-3C, LLC.
• All other trademarks and registered trademarks are trademarks or
registered trademarks of their respective holders. Furthermore, “™” and “®”
are not mentioned in each in this manual.
• MPEG Layer-3 audio coding technology and patents licensed from
Fraunhofer IIS and Thomson.
• This product is protected by certain intellectual property rights of Microsoft
Corporation. Use or distribution of such technology outside of this product
is prohibited without a license from Microsoft or an authorized Microsoft
subsidiary.
Notes on the License
This IC recorder comes with software that are used based on licensing
agreements with the owners of that software.
Based on requests by the owners of copyright of these software
applications, we have an obligation to inform you of the following. Please
read the following sections.
Licenses (in English) are recorded in the built-in memory of your IC recorder.
Establish a Mass Storage connection between the IC recorder and a
computer to read licenses in the “LICENSE” folder.
On GNU GPL/LGPL applied software
The software that is eligible for the following GNU General Public License
(hereinafter referred to as “GPL”) or GNU Lesser General Public License
(hereinafter referred to as “LGPL”) are included in the IC recorder.
This informs you that you have a right to have access to, modify, and
redistribute source code for these software programs under the conditions
of the supplied GPL/LGPL.
Source code is provided on the web. Use the following URL to download it.
http://www.sony.net/Products/Linux/
We would prefer you do not contact us about the contents of source code.
Licenses (in English) are recorded in the built-in memory of your IC recorder.
Establish a Mass Storage connection between the IC recorder and a
computer to read licenses in the “LICENSE” folder.
The display window turns off
automatically
The “Screen Off Timer” setting on your IC recorder is set to
“30Sec” by default to save battery power. If you leave the IC
recorder untouched for 30 seconds, the display window will turn
off, but you can still perform any button operations. To turn the
display window back on, press BACK/HOME.
LED
Screen O Timer
Beep
Language
Date & Time
Sleep Timer
Auto Power O
Common Settings
¼ You can keep the display window from turning off or change the
default setting to another timer interval. Press and hold BACK/
HOME and select “
Settings” - “Common Settings” - “Screen Off
Timer,” and then select “No Auto Screen Off,” “15Sec,” “30Sec,”
“1Min,” “3Min,” or “5Min.”
ICD-UX570 5-006-943-41(1)
Enregistreur IC
ICD-UX570
Mode d’emploi
GB
FR
© 2019 Sony Corporation Printed in China / Imprimé en Chine
Consultation du Guide d’aide
Ce Mode d'emploi présente des instructions relatives au fonctionnement
général de l’enregistreur IC.
Le Guide d’aide est un manuel en ligne.
Reportez-vous au Guide d’aide pour de plus amples informations, le
fonctionnement et les solutions possibles en cas de problèmes.
https://rd1.sony.net/help/icd/u57/h_uc/
Vérification des éléments fournis
• Enregistreur IC (1)
• Mode d'emploi (cette feuille)
• Carte de garantie (1)
• Logiciel, Sound Organizer 2 (fichier d'installation enregistré en mémoire
intégrée pour pouvoir l'installer sur l'ordinateur.)
Éléments et commandes
Microphones intégrés
Indicateur de fonctionnement
Écran
Touche REC/PAUSE (enregistrement/pause)
Touche STOP
Touche T-MARK (repère de piste)
Touche BACK/
HOME
Touche OPTION
Touche (lecture/entrée)*
1
Touche de commande (DPC (Digital Pitch Control),
A-B (répétition A-B), (révision/retour rapide),
(calage/avance rapide))
Touche -3 EASY SEARCH(SEC)
Touche +10 EASY SEARCH(SEC)
Protection du connecteur USB (le connecteur USB se trouve derrière la
protection.)
Orifice de la dragonne (dragonne non fournie avec l'enregistreur IC.)
Commutateur POWER•HOLD*
2
Touche VOL–/+*
1
(volume –/+)
Levier coulissant USB
Touche JUMP (déplacement en avant ou en arrière)
Prise (microphone)*
1
Prise (casque)
Logement de carte microSD (le logement de carte se trouve derrière la
protection.)
Protection du logement
Haut-parleur intégré
*
1
La touche (lecture/entrée), la touche VOL + (volume +) et la prise (microphone)
possèdent un repère tactile. Utilisez-le comme point de référence lors du fonctionnement de
l'enregistreur IC.
*
2
Faites glisser le commutateur POWER•HOLD sur « POWER » de manière prolongée pendant
au moins 8 secondes pour redémarrer l'enregistreur IC. Pour plus d'informations, reportez-
vous au Guide d'aide.
Opérations de votre nouvel enregistreur IC
Charge
Chargez l’enregistreur IC.
Faites glisser le levier coulissant USB vers le sens de la flèche, et
branchez le connecteur USB sur le port USB d’un ordinateur allumé.
Une fois la batterie entièrement chargée, l'indicateur de batterie
passe de l'animation de chargement à «
».
Débranchez l’enregistreur IC.
Assurez-vous que le message « Accessing » ne s'affiche plus à
l'écran. Reportez-vous ensuite au Guide d'aide pour débrancher
correctement l'enregistreur IC.
Mise sous tension
Faites glisser de manière prolongée le commutateur POWER•HOLD vers
«POWER » jusqu’à ce que l'écran apparaisse.
Pour mettre l'appareil hors tension, faites glisser le commutateur
POWER•HOLD vers « POWER » de manière prolongée jusqu'à ce que
«Power Off » s'affiche à l'écran.
Prévention contre les opérations involontaires (HOLD)
Faites glisser le commutateur POWER•HOLD vers « HOLD ».
¼
Pour libérer l'enregistreur IC de l'état HOLD, faites glisser le commutateur
POWER•HOLD vers le milieu.
Paramètres initiaux
Sélection
(/)
Entrée
À la première mise sous tension de l'enregistreur IC, le message
« Configure Initial Settings » s'affiche à l'écran. Vous pouvez alors
sélectionner la langue affichée, régler l'horloge, et activer ou désactiver
le bip.
Appuyez sur pour commencer la configuration initiale.
Configure
Initial Settings
Enter
Sélectionnez la langue affichée.
Vous pouvez choisir entre les langues suivantes :
English* (Anglais), Español (Espagnol), Français
* Paramètre par défaut
Réglez l’année, le mois, le jour, l’heure et les minutes en cours.
Set Date/Time
1
AM
0012
1 20 19
YM D
¼
Pour revenir au paramètre de configuration précédent, appuyez sur BACK/
HOME.
Sélectionnez « Next ».
Set Date/Time
AM
0012
Next
Back
10 10 20 19
YM D
Sélectionnez « ON » ou « OFF » pour activer ou désactiver le bip.
Une fois la configuration initiale terminée, un message indiquant la
fin de la configuration puis le menu HOME s'affichent.
Beep
ON
OFF
Remarques
• Si vous attendez plus de 30 secondes pour passer à l'étape suivante, l'écran
s'éteindra. Pour allumer l'écran afin de continuer la configuration initiale,
appuyez sur BACK/HOME.
• Vous pouvez modifier n'importe quel paramètre initial ultérieurement. Pour
plus d'informations, reportez-vous au Guide d'aide.
Utilisation du menu HOME
Vous pouvez utiliser le menu HOME pour effectuer de nombreuses
opérations, notamment la recherche et la lecture d'un fichier enregistré ou
la modification des paramètres de l'enregistreur IC.
Sélection
(
/
)
Entrée
BACK/HOME
Appuyez de manière prolongée sur BACK/HOME.
Le menu HOME s'affiche.
Les différentes options du menu HOME s'affichent de la manière
suivante.
Recorded
Files
Record Settings Back
to XX*
Music
Sélectionnez la fonction désirée parmi les suivantes :
Music
Vous pouvez sélectionner et lire un des fichiers
importés d'un ordinateur. Pour rechercher un fichier
musical, sélectionnez « All Songs », « Albums »,
«Artists » ou « Folders ».
Lors de l'importation de fichiers, assurez-vous de les
importer dans le dossier MUSIC.
Recorded Files
Vous pouvez sélectionner et lire un des fichiers
enregistrés avec l'enregistreur IC. Pour rechercher un
fichier enregistré, sélectionnez « Latest Recording »,
« Search by REC Date », « Search by REC Scene » ou
« Folders ».
Record
Vous pouvez afficher l'écran de veille de
l'enregistrement et commencer d'enregistrer.
Settings
Vous pouvez afficher le menu de paramètres et
modifier divers paramètres de l’enregistreur IC.
Back to XX*
Vous pouvez revenir à l'écran qui était affiché avant
l'écran du menu HOME.
* La fonction que vous utilisez actuellement est affichée sous la forme « XX ».
¼
Appuyez sur STOP pour revenir à l'écran affiché avant d’avoir accédé au menu
HOME.
Utilisation du menu OPTION
Vous pouvez utiliser le menu OPTION pour effectuer de nombreuses
fonctions, notamment la modification des paramètres de l'enregistreur IC.
Les options disponibles varient selon la situation.
Entrée
OPTION
Sélection
(/)
Sélectionnez la fonction de votre choix du menu HOME, puis
appuyez sur OPTION.
REC Information
Recording Folder
Create Folder
Scene Select
Recording Delay
REC Mode
Built-In Mic Sensit
Sélectionnez l'élément de menu pour lequel vous désirez
modifier le paramètre.
Sélectionnez l'option de paramètre de votre choix.
Copie de fichiers de l'enregistreur IC vers
un ordinateur
Vous pouvez copier des fichiers et des dossiers de l'enregistreur IC vers un
ordinateur à des fins de stockage.
Suivez les instructions de la section « Charge » pour brancher
votre enregistreur IC à un ordinateur.
Faites glisser et déposez les fichiers ou dossiers à copier de
« IC RECORDER » ou « MEMORY CARD » vers le disque local de
l'ordinateur.
Copie d'un fichier ou dossier (glisser et déposer)
1 Cliquez de manière prolongée.
2 Faites glisser.
3 Déposez.
IC RECORDER ou
MEMORY CARD
Votre ordinateur
Débranchez votre enregistreur IC de l'ordinateur.
Installation de Sound Organizer 2
Installez Sound Organizer dans votre ordinateur.
Sound Organizer permet l'échange de fichiers entre votre enregistreur IC et
un ordinateur.
Les chansons importées de CD de musique ou d’autres supports, les
fichiers MP3 ou autres fichiers audio importés vers un ordinateur peuvent
également être lus et transférés vers l'enregistreur IC.
Remarques
• Sound Organizer est compatible avec les ordinateurs exécutant Windows
uniquement. Il n'est pas compatible avec un Mac.
• Cet enregistreur IC est uniquement compatible avec Sound Organizer 2.
• Si vous formatez la mémoire intégrée, toutes les données qui y sont stockées
sont supprimées. (Le programme d'installation du logiciel Sound Organizer est
également supprimé.)
¼
• Lors de l’installation de Sound Organizer, connectez-vous avec un compte ayant
des droits d’administrateur.
• Le processus d'installation varie selon la version de Windows. L'exemple ci-
dessous utilise Windows 10.
Suivez les instructions de la section « Charge » pour brancher
votre enregistreur IC à un ordinateur.
Assurez-vous que l'enregistreur IC est correctement détecté par
l'ordinateur.
« Connecting » s'affiche à l'écran de l'enregistreur IC tant que
l'enregistreur IC est branché à l'ordinateur.
Cliquez avec le bouton droit de la souris sur le coin inférieur
gauche du bureau, puis cliquez sur l'option [Explorateur de
fichiers] du menu.
Cliquez deux fois sur [IC RECORDER] - [FOR WINDOWS].
Cliquez deux fois sur [SoundOrganizer_V2002] (ou
[SoundOrganizer_V2002.exe]).
Suivez les instructions affichées à l'écran de l'ordinateur.
Lorsque la fenêtre [Welcome to Sound Organizer 2 Installer]
s'affiche, cliquez sur [Next].
Assurez-vous d'accepter les dispositions du contrat de licence en
sélectionnant [I accept the terms in the license agreement], puis
en cliquant sur [Next].
Lorsque la fenêtre [Setup Type] s'affiche, sélectionnez [Standard]
ou [Custom], puis cliquez sur [Next].
Suivez les instructions à l’écran et réglez les paramètres d’installation
lorsque vous sélectionnez [Custom].
Lorsque la fenêtre [Ready to Install the Program] s'affiche, cliquez
sur [Install].
L’installation démarre.
Lorsque la fenêtre [Sound Organizer 2 has been installed
successfully.] s'affiche, cochez la case [Launch Sound Organizer 2
Now], puis cliquez sur [Finish].
Remarque
Vous pouvez être amené à redémarrer votre ordinateur après avoir installé
Sound Organizer 2.
Précautions
Alimentation
3,7 V CC : batterie intégrée rechargeable au lithium-ion
5,0 V CC : lorsque chargée avec USB
Consommation électrique nominale : 500 mA
Manipulation
• Ne laissez pas l’appareil à proximité d’une source de chaleur ou dans un
endroit exposé au rayonnement direct du soleil, à une poussière excessive
ou à des chocs mécaniques.
• Si des éléments solides ou liquides venaient à pénétrer à l’intérieur de
l’appareil, retirez la pile ou la batterie et faites-le vérifier par un technicien
qualifié avant de le remettre en service.
• Lorsque vous utilisez votre enregistreur IC, veillez à suivre les précautions
décrites ci-dessous afin d’éviter de déformer le boîtier ou de provoquer un
dysfonctionnement de l’enregistreur IC.
– Ne vous asseyez pas après avoir placé l’enregistreur IC dans votre poche
arrière.
– Ne placez pas votre enregistreur IC dans un sac après avoir enroulé le
cordon du casque/des écouteurs autour et ne soumettez pas le sac à des
chocs violents.
• Veillez à ne pas renverser d’eau sur l’appareil. L’unité n’est pas étanche.
Soyez particulièrement prudent(e) dans les situations suivantes :
– Lorsque vous vous rendez dans la salle de bain, etc., alors que l’appareil
se trouve dans votre poche.
Si vous vous baissez, l’appareil risque de tomber dans l’eau et d’être
mouillé.
– Lorsque vous utilisez l’appareil dans un environnement dans lequel il est
exposé à la pluie, à la neige ou à l’humidité.
– Lorsque vous transpirez. Si vous touchez l’appareil alors que vos mains
sont mouillées ou si vous placez ce dernier dans la poche d’un vêtement
couvert de sueur, il risque d’être mouillé.
• Vous risquez de subir des lésions auditives si vous utilisez cet appareil à un
volume élevé.
• Pour des raisons de sécurité, n’utilisez pas cet appareil en voiture ou à
vélo.
• N'utilisez pas cette unité dans un endroit où l'incapacité d'entendre les
bruits avoisinants risque d'être dangereuse.
• Vous risquez d’avoir mal aux oreilles si vous utilisez le casque alors que
l’air ambiant est très sec. Cela n’est pas lié à un dysfonctionnement des
écouteurs mais à l’accumulation d’électricité statique dans votre corps.
Vous pouvez diminuer cette électricité statique en portant des vêtements
non synthétiques évitant son apparition.
• Ne placez pas ce produit à proximité de dispositifs médicaux.
Ce produit (y compris les accessoires) comporte un ou des aimants
susceptibles de perturber les stimulateurs cardiaques, les valves de
régulation programmables du traitement de l'hydrocéphalie ou d'autres
dispositifs médicaux. Ne placez pas ce produit à proximité de personnes
utilisant de tels dispositifs médicaux. Consultez un médecin avant de vous
servir de ce produit si vous utilisez un tel appareil médical.
Bruits
• Des bruits parasites peuvent se faire entendre si l’appareil est placé à
proximité d’une source d’alimentation secteur, d’une lampe fluorescente
ou d’un téléphone mobile durant l’enregistrement ou la lecture.
• Il se peut que des bruits parasites soient enregistrés si quelque chose
comme votre doigt par exemple, touche ou frotte accidentellement
l’appareil pendant l’enregistrement.
Entretien
Pour nettoyer l’extérieur, utilisez un chiffon doux légèrement imprégné
d’eau. Utilisez ensuite un chiffon doux sec pour essuyer l’extérieur. N’utilisez
pas d’alcool, d’essence ou de diluant.
Si vous avez des questions ou des problèmes concernant cet appareil,
consultez votre revendeur Sony.
AVERTISSEMENT
N'exposez pas les piles (pack de piles ou piles installées) à de fortes
chaleurs (rayons du soleil, feu, etc.) pendant une période prolongée.
ATTENTION
Risque d’explosion en cas de remplacement de la pile par un type incorrect.
Mettez les piles usagées au rebut conformément aux instructions.
RECYCLAGE DES ACCUMULATEURS RECHARGEABLES
Les accumulateurs rechargeables sont recyclables.
Vous pouvez contribuer à préserver l’environnement en rapportant les
piles usées dans un point de collection et recyclage le plus proche.
Pour plus d’informations sur le recyclage des accumulateurs, visitez
https://www.sony.com/electronics/eco/environmental-management
Avertissement: Ne pas utiliser des accumulateurs rechargeables qui sont
endommagées ou qui fuient.
Notice destinée aux utilisateurs
• Tous droits réservés. Le Mode d’emploi et le logiciel qui y est décrit
ne peuvent être reproduits, traduits ou réduits, en tout ou en partie,
sous quelque forme exploitable pour une machine que ce soit sans
l’autorisation écrite préalable de Sony Corporation.
• Ce que vous enregistrez est strictement réservé à un usage privé. Les lois
relatives au copyright interdisent toute autre utilisation sans l’autorisation
des détenteurs des droits d’auteur.
Enregistrement
Microphones intégrés
STOP
REC/PAUSE
Indicateur de
fonctionnement
Entrée
¼
• Avant le début d'un enregistrement, assurez-vous que l'état HOLD est
désactivé.
• Vous pouvez sélectionner une scène d'enregistrement pour chaque situation
en sélectionnant « Scene Select » dans le menu OPTION.
Sélectionnez « Record » dans le menu HOME.
L’écran de veille de l’enregistrement s'affiche.
Sélectionnez l'emplacement de stockage et le dossier du fichier
enregistré.
¼
Pour enregistrer le fichier sur la carte microSD, vous devez changer le
dossier de destination de stockage du fichier. Sélectionnez «Recording
Folder » - « SD Card » dans le menu OPTION, puis commencez
l'enregistrement.
Orientez l'enregistreur IC de manière à ce que ses microphones
intégrés soient dirigés vers la source sonore voulue.
Appuyez sur REC/PAUSE.
« REC » s’affiche à l'écran pour indiquer que l'enregistrement a
commencé, puis l'indicateur de fonctionnement s'allume en rouge.
Remarque
Si vous appuyez de manière prolongée sur REC/PAUSE, l'enregistreur IC
se met en pause. L'enregistrement ne commencera pas.
REC
L
R
1
h
23
m
45
s
FOLDER01
L
R
Le guide du niveau d’enregistrement () s'affiche pendant
l'enregistrement. La section entre + et + () représente le niveau
d'entrée optimal de l'enregistrement.
Réglez l’orientation des microphones intégrés, la distance par rapport
à la source sonore, le paramètre de sensibilité des microphones
ou le paramètre de « Scene Select » de manière à ce que le niveau
d’enregistrement corresponde à la plage optimale, comme illustré
ci-dessous.
Appuyez sur STOP pour arrêter l’enregistrement.
« Saving... » puis l'écran de mise en veille de l'enregistrement
s'affichent à l'écran.
Écoute
BACK/HOME
Sélection
(
//
/
)
Entrée
Touche VOL –/+
Sélectionnez « Recorded Files » dans le menu HOME.
Sélectionnez « Latest Recording », « Search by REC Date »,
«Search by REC Scene » ou « Folders ».
Sélectionnez le fichier de votre choix.
La lecture démarre et l’indicateur de fonctionnement s’allume en vert.
PLAY
191005
_
1230.mp3
100
122
1
h
23
m
45
s
2
h34
m
56
s
Appuyez sur VOL + ou VOL - pour régler le volume.
Appuyez sur STOP pour arrêter la lecture.
¼
Après l'arrêt de l'enregistrement, vous pouvez appuyer sur pour lire le
fichier que vous venez d'enregistrer.
Ajout d’un repère de piste
Vous pouvez ajouter un repère de piste au point auquel vous souhaiterez
diviser ultérieurement un fichier ou que vous souhaiterez localiser en
cours de lecture. Vous pouvez ajouter au maximum 98 repères à chaque
fichier.
Vous pouvez également ajouter des repères de piste pendant
l’enregistrement.
Recherche rapide de la position de lecture voulue (Time Jump, Easy
Search)
• La fonction de déplacement en avant ou en arrière (Time Jump) permet
de se déplacer vers l'un des 10 points sur toute la durée d'un fichier.
Vous pouvez utiliser cette fonction avec ou en mode de
déplacement.
• La fonction de recherche facile (Easy Search) permet d'avancer ou de
revenir d'un nombre fixe de secondes (10 secondes en avant, 3 secondes
en arrière) pendant la lecture.
Suppression
Entrée
OPTION
Sélection
(/)
Remarque
Une fois le fichier supprimé, il est impossible de le restaurer.
Sélectionnez le fichier à supprimer dans la liste des fichiers
enregistrés ou lisez le fichier à supprimer.
Sélectionnez « Delete File » dans le menu OPTION.
Equalizer
Play Mode
Playback Range
Delete File
Protect
Track Mark List
Delete Track Marks
« Delete? » s’affiche et la lecture du fichier sélectionné commence
pour confirmation.
Sélectionnez « Yes ».
Yes
No
191010
_
1010.mp3
Delete?
« Please Wait » s'affiche tant que le fichier sélectionné n'est pas
supprimé.
Caractéristiques techniques
Capacité (capacité disponible à l’utilisateur*
1
*
2
)
4 Go (environ 3,20 Go = 3 435 973 837 octets)
Temps d’enregistrement maximal*
3
*
4
(mémoire intégrée)
Le temps d’enregistrement maximal de tous les dossiers est le suivant.
LPCM 44.1 kHz/16 bit (STEREO) 5 heures 20 minutes
MP3 192 kbps (STEREO) 39 heures 45 minutes
MP3 128 kbps (STEREO) 59 heures
MP3 48 kbps (MONO) 159 heures
Autonomie de la batterie (batterie au lithium-ion rechargeable
intégrée)*
5
Les durées de vie de la batterie présentées ci-dessous sont toutes
approximatives.
Mode d’enregistrement Enregistrement
Enregistrement
(avec écoute)
Lecture
avec le
haut-
parleur
intégré
Lecture
avec le
casque
LPCM 44.1 kHz/16 bit
(STEREO)
20 heures 12 heures 5 heures 34 heures
MP3 192 kbps (STEREO) 22 heures 13 heures 5 heures 47 heures
MP3 128 kbps (STEREO) 22 heures 13 heures 5 heures 47 heures
MP3 48 kbps (MONO) 22 heures 13 heures 5 heures 47 heures
Fichier de musique
(MP3 128 kbps)
- - 5 heures 47 heures
Dimensions (l/h/p) (parties saillantes et commandes non comprises)
Environ 1,45 po (36,6 mm) × 4,05 po (102,8 mm) × 0,49 po (12,2 mm)
Poids
Environ 1,70 once (48 g)
Température/Humidité
Température de fonctionnement 41 °F - 95 °F (5 °C - 35 °C)
Humidité de fonctionnement 25 % - 75 %
Température de stockage 14 °F - 113 °F (-10 °C - +45 °C)
Humidité de stockage 25 % - 75 %
Cartes mémoire compatibles
• Cartes microSDHC de 4 Go à 32 Go
• Cartes microSDXC de 64 Go ou plus
*
1
Une petite partie de la mémoire intégrée est réservée à la gestion des fichiers et n’est donc
pas disponible pour le stockage.
*
2
Lorsque la mémoire intégrée est formatée à l’aide de l’enregistreur IC.
*
3
Le temps d’enregistrement maximal indiqué dans cette rubrique est donné à titre
d’indication uniquement.
*
4
Paramètres par défaut des scènes d’enregistrement.
*
5
Valeurs mesurées acquises dans nos conditions de mesure. Ces valeurs peuvent être
inférieures selon les conditions d'utilisation.
Marques commerciales et licences
• Microsoft, Windows et Windows Media sont des marques commerciales
ou des marques déposées de Microsoft Corporation aux États-Unis et/ou
dans d’autres pays.
• macOS est une marque commerciale d'Apple Inc., déposée aux États-Unis
et dans d'autres pays.
• Les logos microSD, microSDHC et microSDXC sont des marques
commerciales de SD-3C, LLC.
• Les autres marques commerciales et marques déposées apparaissant dans
le présent document sont des marques commerciales ou des marques
déposées de leurs propriétaires respectifs. En outre, « ™ » et « ® » ne sont
pas mentionnés dans tous les cas de ce Mode d’emploi.
• Technologie d’encodage audio MPEG Layer-3 et brevets sous licence de
Fraunhofer IIS et Thomson.
• This product is protected by certain intellectual property rights of Microsoft
Corporation. Use or distribution of such technology outside of this product
is prohibited without a license from Microsoft or an authorized Microsoft
subsidiary.
Remarques sur la Licence
Cet enregistreur IC est doté de logiciels qui sont utilisés sur la base de
contrats de licence avec les propriétaires de ces logiciels.
À la demande des détenteurs des droits d’auteur de ces applications
logicielles, nous sommes dans l’obligation de vous communiquer les
informations suivantes.
Veuillez lire les sections suivantes.
Les licences (en anglais) sont enregistrées dans la mémoire intégrée de
votre enregistreur IC.
Stockage de masse entre l’enregistreur IC et un ordinateur pour lire les
licences dans le dossier «LICENSE».
À propos des logiciels sous licence GNU GPL/LGPL
Les logiciels susceptibles d’être couverts par la GNU General Public License
(ci-après désignée par «GPL») ou la GNU Lesser General Public License (ci-
après désignée par «LGPL») sont inclus dans l’enregistreur IC.
Cette notice vous informe que vous avez un droit d’accès, de modification
et de redistribution du code source pour ces programmes logiciels
conformément aux conditions de la licence GPL/LGPL fournie.
Vous trouverez le code source sur Internet. Utilisez l’URL suivante pour le
télécharger.
http://www.sony.net/Products/Linux/
Nous préférerions que vous ne nous contactiez pas à propos du contenu du
code source.
Les licences (en anglais) sont enregistrées dans la mémoire intégrée de
votre enregistreur IC. Établissez une connexion Stockage de masse entre
l’enregistreur IC et un ordinateur pour lire les licences dans le dossier
«LICENSE».
L'écran s'éteint automatiquement
La fonction « Screen Off Timer » de votre enregistreur IC est réglée
sur « 30 Sec » par défaut pour économiser la charge de la batterie.
Si vous ne touchez pas l'enregistreur IC pendant 30 secondes,
l'écran s'éteint, mais vous pouvez quand même utiliser les
touches. Pour rallumer l'écran, appuyez sur BACK/HOME.
LED
Screen O Timer
Beep
Language
Date & Time
Sleep Timer
Auto Power O
Common Settings
¼ Vous pouvez désactiver l'extinction de l'écran ou changer la durée
de la minuterie. Appuyez de manière prolongée sur BACK/HOME et
sélectionnez «
Settings » - « Common Settings » -
«ScreenOffTimer », puis sélectionnez « No Auto Screen Off »,
«15Sec », « 30 Sec », « 1 Min », « 3 Min » ou « 5 Min ».