* Due to continuing product development, specifications and design may be subject to change without prior notice.
PARTS AND FEATURES
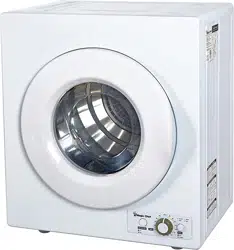
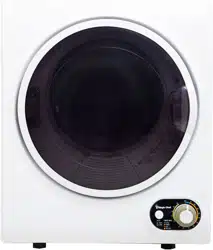
FRONT
The appearance of your model may slightly differ from the illustrations in this manual.
a. Door
b. Window
c. Door Gasket
d. Drum
e. Air Intake Shroud
f. Timer
g. Heat Setting
BACK
The appearance of your model may slightly differ from the illustrations in this manual.
a. Dryer Housing
b. Back Cover
c. Exhaust Vent
OPERATION
CONTROL PANEL
TIMER SETTING
OFF: When the ‘TIMER’ is in the ‘OFF/0’ position, power is not supplied to the unit. Turning the dial clockwise to the desired program will start the dryer.
COOL: This setting is generally used to cool items that have just been dried to help prevent creasing. It will generate cool air, instead of the motor pushing heat into the drum of the dryer
ANTI-WRINKLE: This setting is used for items that are difficult to iron (e.g. cotton shirts and linen). First set the ‘HEAT SETTING’ to ‘LOW’, then set the ‘TIMER’ by turning the dial clockwise between 30-60 minutes, depending on the amount of items inside the dryer. Once the cycle stops, the items will still contain moisture, thereby making the ironing process easier.
WARM: This setting is used to dry and cool, and depending on the material, leave items wrinkle free. First set the ‘HEAT SETTING’ to ‘HIGH’, then set the ‘TIMER’ by turning the dial clockwise between 60-150 minutes.
HOT: This setting is used for drying large quantities or bulky items (i.e. the dryer drum is more than 1/2 full). First set the ‘HEAT SETTING’ to ‘HIGH’, then set the ‘TIMER’ by turning the dial clockwise to 150+ minutes
AIR DRY: This setting is used to freshen items by letting cool air move through it (e.g. clothes that have been stored for an extended period of time).
HEAT SETTING
This dryer is designed with an automatic moisture sensor to monitor the moisture level of the clothes for optimal drying performance. The ‘HEAT SETTING’ utilizes both ‘LOW’ and ‘HIGH’ modes for automatic drying and timed drying functions, respectively.
LOW (AUTO DRY MODE): When the ‘HEAT SETTING’ is set to ‘LOW’, the dryer functions under the automatic drying mode. Setting the ‘TIMER’ to 200 minutes will begin the drying process until the moisture sensor disables the automatic drying mode. However, the dryer will continue through the wrinkle guard process until the ‘TIMER’ reaches the ‘OFF/0’ position.
NOTE: For heavy items, including jeans, blankets, covers, towels, etc., it is recommended to use the ‘HIGH’ setting to activate timed drying mode.
HIGH (TIMED DRY MODE): When the ‘HEAT SETTING’ is set to ‘HIGH’, the dryer functions under the timed dry mode (i.e. timer controlled). See the below drying time recommendations when setting the ‘TIMER’ on the dryer.
DRYING TIME REFERENCE
NOTE: Load weights and respective drying times are approximate.
SORTING AND LOADING LAUNDRY
For the best results, your laundry should be sorted properly. Separate the lint shedders (e.g. chenille and terry cloth) from the lint collectors (e.g. synthetics, flannels, velvets, and corduroys). Separate non-colorfast from light colored items, heavy fabrics from lightweight fabrics, and permanent press from heavy, bulky items.
NOTE: Before drying, check all pockets. If nails, coins, or pins remain in pockets, the objects may damage the dryer and/or clothes. Place your laundry into the dryer evenly. Uneven laundry may cause noise or vibrations.
DO NOT TUMBLE DRY: Read all permanent care labels carefully. If the care label on the garment reads “Drip Dry”, “Line Dry”, or “Dry Flat”, DO NOT dry the garments in the dryer. In addition, certain materials will melt or become dangerously flammable if heated, while other garments may lose their shape. Other items that should not be tumble dried are the following:
Garments that have been dry cleaned at home.
Garments made from wool, unless the garment manufacturer recommends it.
Garments with fiberglass materials.
Garments with laminated and/or rubber coated materials.
Garments with vinyl or plastic materials.
NOTE: DO NOT use fabric softeners or related products that help eliminate static, unless recommended by the manufacturer of the fabric softener or related products.
FABRIC CARE
DRYING TIME: The drying time depends on many factors, such as the type of fabric. In addition, the drying duration is dependent on how dry you want the laundry to be when taken out of the dryer.
SHRINKAGE: Knitted garments in particular are susceptible to shrinking. DO NOT use the ‘HIGH’ heat setting for these materials, and always stretch the garments out immediately after drying.
DRYER ADDED FABRIC SOFTENERS: Certain dryer added fabric softeners may cause damage to automatic dryers. Therefore, only use fabric softeners with written assurance from the manufacturer that their softeners can safely be used in your dryer.
SINGLE ITEMS: Use the timed drying mode when there is only one item to be dried. This is because the moisture sensor in the automatic drying mode may disable the heating element too early in the cycle, thereby failing to adequately dry the garment.
MOIST GARMENTS AFTER TUMBLE DRYING: When using the ‘LOW’ heat setting for automatic dry mode, it is possible that the laundry is not properly dried. This may result from very heavy fabrics, thick seams, or an overloaded dryer. To dry these items further, use the timed drying mode for an additional 10 minutes (or more). If the dryer is overloaded, its efficiency is lessened and the laundry may not dry evenly.
OVERDRYING GARMENTS: When using the timed drying mode, it is possible to overdry the garments, especially if the timer has been set too long. This can cause the fabrics to wrinkle, shrink, or feel harsh. Synthetic materials can also become charged with static electricity.
NOTE: Refer to the Fabric Care Chart on page 14 for commonly used fabric care symbols
FABRIC CARE CHART
CARE AND MAINTENANCE
UNIT
The dryer should be cleaned regularly, including the control panel, with a soft cloth and nonabrasive household detergents. The use of harsh detergent or abrasives is not recommended. Do not pour water on the dryer or control panel. Use a soft cloth to dry the surfaces. Failure to maintain the dryer in a clean condition could lead to deterioration of the surface which could adversely affect the life of the appliance and possibly result in a hazardous situation.
NOTE: Unplug the power cord before cleaning any part of the dryer.
LINT FILTER ASSEMBLY
The dryer should be cleaned regularly, including the lint filter assembly. Refer to the Lint Filter Assembly chart when cleaning the filter assembly.
NOTE: Unplug the power cord before cleaning any part of the dryer.
Lint Filter Assembly
1
Remove the lint filter by pulling outward using the four (4) grip holes in the filter assembly.
NOTE: The lint filter assembly must be installed when operating the dryer. The lint filter assembly must be cleaned before and after each use.
2
The lint filter assembly consists of three (3) parts: exhaust vent shroud, lint filter, and exhaust filter.
3
Separate the three (3) parts of the assembly and clean the individual pieces using a soft brush or a vacuum cleaner. Do not damage the filter assembly
4
Reassemble the filter assembly in the following order: exhaust filter - lint filter - exhaust vent shroud. Align the entire assembly with the recessed position in the back of the drum and press firmly until the entire filter assembly is secured.
AIR INTAKE FILTER
The dryer should be cleaned regularly, including the air intake filter. Refer to the Air Intake Filter chart when cleaning the filter.
NOTE: Unplug the power cord before cleaning any part of the dryer
Air Intake Filter
1
Remove the air intake filter by pulling outward while holding the filter housing by its top and bottom.
NOTE: The air intake filter must be installed when operating the dryer. The air intake filter must be cleaned before and after each use.
2
The air intake filter consists of two (2) parts: filter housing and air intake filter.
3
Remove the air intake filter inside the filter housing. Clean the filter using a soft brush or a vacuum cleaner.
4
Reassemble the air intake filter inside the filter housing, then reinstall the filter housing by pushing the housing upwards with your thumb until the latch is secured to the dryer.
TROUBLESHOOTING
Before you call for service, refer to following checklist for common problems:
The ‘TIMER' dial will not rotate
• The dryer is not plugged in.
• The circuit breaker tripped or a fuse blew. Check for a blown circuit fuse or tripped main circuit breaker in your house.
• The door is not closed.
The dryer does not operate
• The dryer is not plugged in.
• The circuit breaker tripped or a fuse blew. Check for a blown circuit fuse or tripped main circuit breaker in your house.
• The door is not closed.
The dryer drum does not rotate
• The dryer is not plugged in.
• The circuit breaker tripped or a fuse blew. Check for a blown circuit fuse or tripped main circuit breaker in your house.
• The door is not closed.
The laundry is not completely dry
• Verify the presets used for ‘HEAT SETTING’ and ‘TIMER’.
• Clean the filter.
• Reduce the laundry load in the dryer. Do not overload the dryer.
• Dry these items further in the timed drying mode for 10+ minutes.
• Ensure the items are not knotted or bulked together.
• The dryer is not located in a properly ventilated area.
NOTE: If the problem persists, contact Magic Chef® Customer Service: 1-888-775-0202 for assistance.
IMPORTANT SAFETY INSTRUCTIONS
WARNING: To reduce the risk of fire, electric shock, and/or injury to persons, basic safety precautions should always be followed when using electrical appliances.
When using electrical appliances, basic safety precautions should be followed, including the following:
Read all instructions before using the appliance.
Risk of child entrapment and suffocation; never allow children to operate, play with, or crawl inside the appliance.
This appliance must be grounded. Connect only to a properly grounded outlet. See the “GROUNDING INSTRUCTIONS” section found on page 4.
Install or locate the appliance only in accordance with the provided installation instructions.
DO NOT place the dryer in steamy rooms or where the dryer is directly exposed to rain. Moisture may destroy the electrical insulation causing an electrical shock hazard.
Use the dryer only for its intended use as described in the user guide. This type of dryer is specifically designed to dry clothes. It is not designed for industrial or laboratory use.
As with any appliance, close supervision is necessary when used around children or incapacitated persons.
DO NOT operate the dryer if it has a damaged power cord or plug, if it is not working properly, or if it has been damaged or dropped in any manner.
The dryer should be serviced only by qualified service personnel. Contact the nearest authorized service facility for examination, repair, or adjustment.
DO NOT cover or block any openings on the appliance.
DO NOT put your hand in the spin basket during operation. The spin basket is rotating at a high speed and the rotating parts may cause injury to your hand.
DO NOT immerse the power cord or plug in water.
Keep the cord away from all heated surfaces.
DO NOT store or use gasoline or any other flammable vapors and liquids in the vicinity of this or any other appliance. The fumes can create a fire hazard or explosion.
When cleaning the surfaces of the door and the frame, use only mild, nonabrasive soaps or detergents applied with a sponge or soft cloth. Never clean appliance parts with flammable fluids. The fumes can create a fire hazard or explosion.