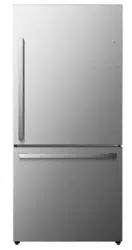
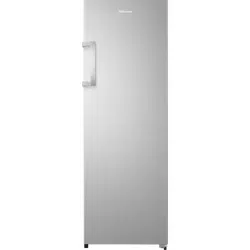
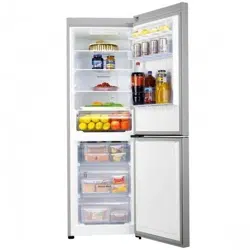
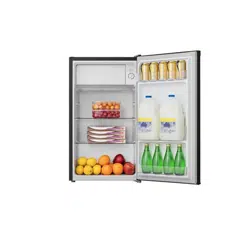
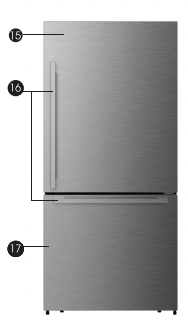
Refrigerator Overview

 Display panel
 Air Duct
 Glass shelf
 Crisper cover
 Crisper Drawer
 Ice maker ( optional )
 Ice bucket ( inside/optional )
 Upper freezer drawer
 Lower freezer drawer
 Adjustable bottom feet
 Half Width Door Bin (x4)
 Door Gasket
 Full Width Door Bin
 Roll wheel
 Fridge door
 Freezer door
 NOTE
NOTE
- Due to unceasing modification of our products. your refrigerator may be slightly different from this instruction manual. but its functions and using methods remain the same.
- To get the best energy efficiency of this product. please place all shelves. drawers and baskets on their original position as the illustration above.
Installing Your New Appliance
Before using the appliance for the first time. you should be informed of the following tips.
WARNING
For proper installation. this refrigerator must be placed on a level surface of hard material that is the same height as the rest of the flooring. This surface should be strong enough to support a fully loaded refrigerator.
The rollers. which are not castors. should be only used for forward or backward movement.
Moving the refrigerator sideways may damage your floor and the rollers.
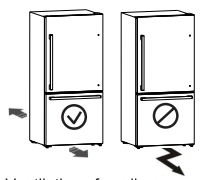
Ventilation of appliance
In order to improve efficiency of the cooling system and save energy. it is necessary to maintain good ventilation around the appliance for the dissipation of heat. For this reason. sufficient clear space should be available around the refrigerator.
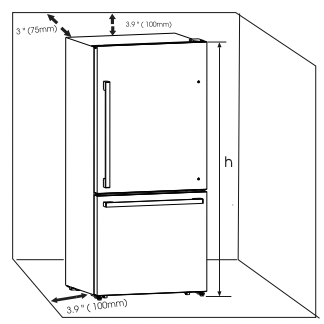
Suggestion
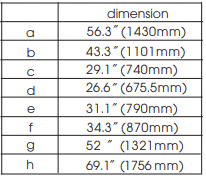
It is advisable for there to be at least 3 inches (75mm) of clearance from the back of the fridge to the wall. atleast 3.9 inches (100mm) of clearance from its top. at least 3
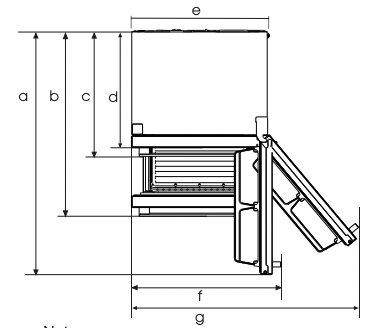
3.9inches (100mm)from its side to the wall and aclear space in front to allow the doors to open 130°. As shown in following diagrams.
Note:
- This appliance performs well with ambient temperature between 55°F (12.8°C) to 110°F (43.3°C ). The appliance may not work properly if left at a temperature above or below the indicated range.
- Stand your appliance in a dry place to avoid high moisture.
- Keep the appliance out of direct sunlight. rain or frost. Stand the appliance away from heat sources such as stoves. fires or heaters.
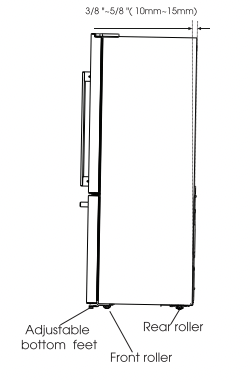
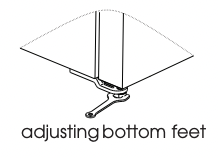
Leveling of appliance
- For sufficient leveling and air circulating in the lower rear section of the appliance. he bottom feet may need to be adjusted. You can adjust them manually by hand or by using a suitable tool.
- To allow the doors to self-close. tilt the top backwards by 3/8~5/8 inches (10-15mm).
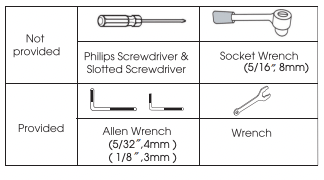
Tools you may need
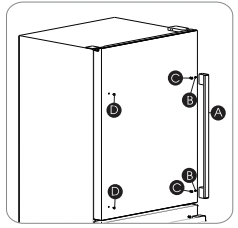
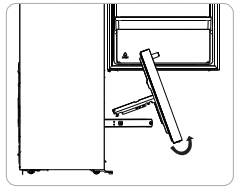
Installing the handles
Before you use the appliance. you have to install the handles provided in the fridge chamber.
The longer one is fridge door handle. the shorter one is freezer door handle.
Please follow procedures below fo install and reverse the handle.
- Take out the screw hole covers on the doors. install the handle supports(C). Place the handle (A) on the door by fitting the handle over the handle supports (C). then fasten the screws (B) with 3mm Allen wrench (provided in plastic bag).
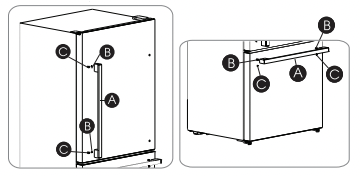
- When you reverse the fridge door. lease move the handle (A). the screws (B) and the handle supports (C) to the right side. Move the screw hole covers (D) to the left side.
Reversing the fridge door
The side at which the door opens can be changed. from the right side (as supplied) to the left side. if the installation site requires.
WARNING
When reversing the door. the appliance must not be connected to the mains. Ensure that the plug is removed from the mains socket..
Note:
When required. tilt the refrigerator back in order to gain access to the base. you should rest the appliance on soft foam packaging or similar material to avoid damaging the backboard of the refrigerator. To reverse the door. the following steps are generally recommended.
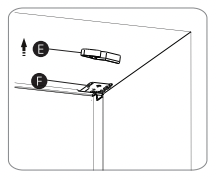
1. Stand the refrigerator upright. Open the upper door to take out all door racks (to avoid racks damaged) and then close the door.
2. With the door closed. remove the upper hinge cover (E) (you can pry it up with slotted screw driver) on the top right side of appliance and remove 3 special flange screws (F) with Socket Wrench. Keep the upper hinge cover for future reference.
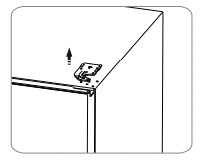
3. Remove the upper hinge (Please hold upper door by hand when installing). Keep it for future reference.
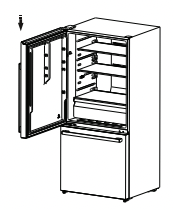
4. Use your both hands to open the door more than 90°. Lift it uo and take it off.
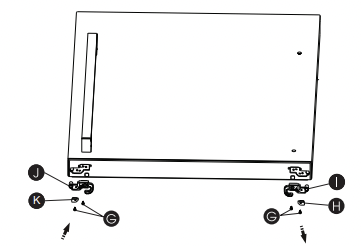
5. Loosen the two screws(G) on the right bottom of the fridge door. hen take out the right stopper block(H) and the right door stopper(l).Then install the left stopper block(K) and the left door stopper(J) (provided in the plastic bag)
6. Open the freezer door. then loosen 2 screws (& with 4mm Allen Wrench (provided in plastic) and remove middle hinge (M). Keep the middle hinge (w) for future reference.
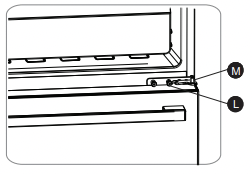
7. Change screw hole covers on middle cover plate from left to right.
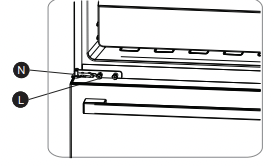
8. Put out the left middle hinge (N) (provided in plastic). Then screw it with 2 screws (L) from right side.
9. Close the freezer door, Refer to step 4. put the fridge door back on the other side. then close the fridge door and move it to an appropriate position.
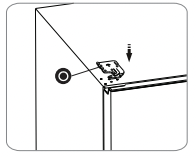
10. Put out the left upper hinge (0) from plastic bag provided.Then put it on the top left side refer to step 3.
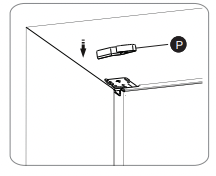
11. Put out the left hinge cover (P ) from plastic bag provided. install them refer to step 2.
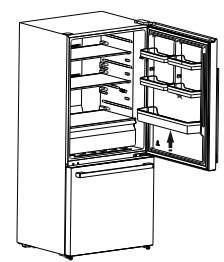
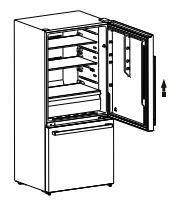
Freezer Door Removal
In case your home access door is too narrow for the refrigerator to pass through. remove the refrigerator doors and drawers as follows.
1. Firstly, open the upper door, then pull out the freezer door and upper freezer drawer to the final position.
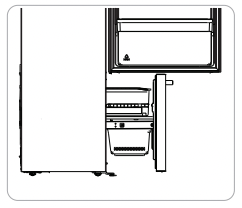
2. Take out the upper freezer drawer by lifting it up from the rail system, then push the rail system back.
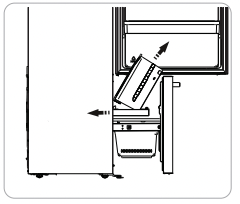
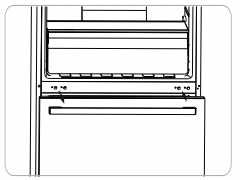
3. Remove the lower freezer drawer by lifting it up.
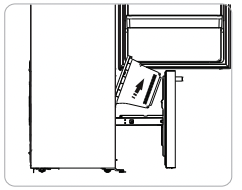
4. Remove the 2 screws attached to the supporting frame.
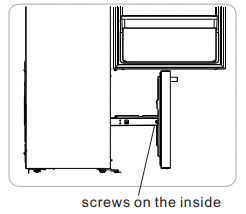
5. Pull out the freezer door and lift it up in the direction of the arrow.
Re-assembling the freezer door
To reattach the drawer after you moved the appliance to its final location. assemble the parts in reverse order.
Installing the water lines
In order for the ice maker to operate properly. a water line is required.
You may need to purchase a water purifying system to do that.
The water connection must be made by a qualified plumber.
If the refrigerator is installed in an area with low water pressure (below 30psi/207KPa). you can install a booster pump to compensate for the low pressure.
- the maximum inlet water pressure is 101.5psi/700kPa;
- the minimum inlet water pressure is 30psi/207kPa.
Important: Operation outside the water pressure range may cause malfunction and severe. amaging water leaks.
Note :!f the water pressure is less than what is required, ice cubes could be hollow or irregularly shaped.
(1)Connect Water Line to Household Water
Following are two methods of connecting to your household water supply. Use the instructions specific to your installation.
IMPORTANT: Turn off main water supply. Turn on nearest faucet long enough to clear the line of water.
You will need the following tools(not supplied).
 Phillips screwdriver
 Flat-blade screwdriver
 1/2" or adjustable wrench
 Drill and 1/4" drill bit
 Quarter-turn shutoff valve 1 PCS
 1/4" shutoff valve with saddle clamp 1 PCS
 Ferrule (sleeve) 2 PCS
 1/4" compression nut 2 PCS
 1/4" waterline 1 PCS
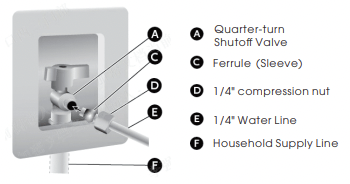
Method 1: Quarter-turn Shutoff Valve
Gather the required tools and parts before starting installation.
1. Use a quarter-turn shutoff valve or the equivalent served by a household supply line.
NOTE: To allow sufficient water flow to the refrigerator. a minimum 1/2" household supply line is recommended.
2. Using the ferrule (sleeve) and 1/4" compression nut. connect the 1/4" water line to the quarter-turn shutoff valve.
NOTE: Do not overtighten.
3. Place the free end of the 1/4" water line into an empty container or sink.
4. Turn on main water supply and open quarter-turn shutoff valve to flush the 1/4" water line of any contaminants. Run water until it is clear.
Method 2: Shutoff Valve With Saddle clamp
NOTE: Do not use a piercing-type or 3/16" (4.76 mm) saddle valve which reduces water flow and clogs easier.
1. Find a 1/2" to 11/4" (12.7 mm to 31.8 mm) vertical water inlet near the refrigerator
IMPORTANT:
- Make sure it is a cold household supply line.
- Horizontal pipe will work. but the following procedure must be followed: Drill on the top side of the pipe. not the bottom. This will help keep water away from the drill. This also keeps normal sediment from collecting in the valve.
2. Determine the length of 1/4" water line you need. Measure from the connection on the rear of the refrigerator to the water pipe. Add 7 ft (2.1 m)to allow for cleaning. Use 1/4" (6.35 mm) O.D. (outside diameter) water line
3. Using acordless drill. drill a 1/4" hole in the household supply line you have selected.
4. Fasten the 1/4"shutoff valve to the household supply line with the saddle clamp.Be sure the outlet solidly in the end is 1/4" drilled hole in the household supply line and that the washer is under the saddle clamp.
Tighten the packing nut. Tighten the saddle clamp screws slowly and evenly so the washer makes a watertight seal. Do not overtighten.
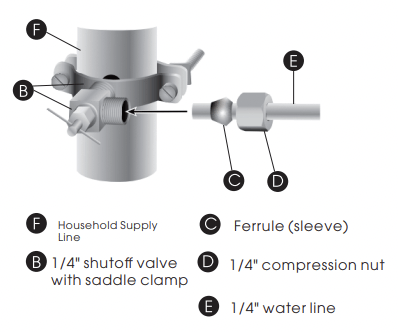
5. Slip the ferrule(sleeve) and 1/4" compression nut on the 1/4" water line as shown. Insert the end of the tubing into the outlet end squarely as far as it will go. Screw 1/4" compression nut onto outlet end with adjustable wrench. Do not overrighten or you may crush the 1/4" waterline.
6. Place the free end of the 1/4" water line into an empty container or sink.
7. Turn on main water supply and open shutoff valve to flush the 1/4" water line of any contaminants. Run water until it is clear.
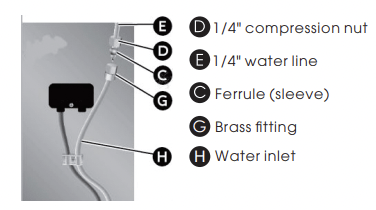
(2) Connect Water Line to Refrigerator
IMPORTANT: If you turn the refrigerator on before the water is connected. turn off the ice maker.
1. Unplug refrigerator or disconnect power.
2. Close shutoff valve.
3. Thread a 1/4" compression nut and ferrule (sleeve) onto the free end of the 1/4" water line.

4. Insert the free end of the 1/4" water line into the brass fitting attached to the water inlet on the back of the refrigerator.
5. Slide the 1/4" compression nut over the ferrule (sleeve) and screw the 1/4" compression nut onto the brass ftting.
6. Confrm 1/4" water line is secure by gently pulling on it.
7. Turn on water supply and check for leaks. Correct any leaks.
Display Controls
Please use the instructions and images below as a reference when using your appliance. Your exact model may be slightly different than the image below.
Models with ice maker

Models without ice maker

Controlling the temperature
We recommend that when you start your refrigerator for the first time. the temperature for the refrigerator is set to 39°F(4°C) and the freezer is set to O°F(-18°C). If you want to change the temperature. follow the instructions below.
Caution! When you set a temperature. you set an average temperature for the whole refrigerator cabinet. Temperatures inside each compartment may vary from the temperature displayed on the panel. depending on how much food you store and where you place them. Ambient temperature may also affect the actual temperature inside the appliance.
1.°F /°C 
To toggle between Celsius and Fahrenheit on the display. press and hold the “TEMP.” button for three seconds.
2. Fridge 
Press the “ZONE” button until the “Fridge” icon lights up. then press the “TEMP.” button to select a temperature setting.
If you have set the temperature type to Fahrenheit. the temperature settings cycle from 44°F to 34°F.

If you have set the temperature type to Celsius. the temperature settings cycle from 7°C to 1°C.

3. Freezer 
Press the “ZONE” button until the “Freezer” icon lights up. then press the “TEMP.” button to select a temperature setting.
If you have set the temperature type to Fahrenheit. the temperature settings cycle from 7°F to -11°F.

If you have set the temperature type to Celsius. the temperature settings cycle from -14°C to -24°C.

4. Super Cool 
Super Cool can refrigerate the food quicker and keep food fresh for a longer period. This is useful to activate before inserting a large amount of warm/room temperature food.
- Press the “MODE” button to activate this function. The “Super Cool” icon will be illuminated and the fridge temperature indicator will display 34°F (1°C).
- Super Cool will automatically turn off after 3 hours.
- When super Cool function is on you can turn it off by pressing the “MODE” or setting fridge temperature. To manually turn off the Super Cool function. the fridge temperature setting will revert back to the previous setting.
5. Energy saving 
Press the “MODE” button to turn on the energy saving function. the “Energy saving” icon will be illuminated.
- When the energy saving function is on. the temperature of fridge is automatically switched to 43°F (6°C) and the temperature of freezer is automatically switched to 1°F(-17°C).
- When energy saving function is on youcan switch it off by pressing the “MODE” or “TEMP.” button and the refrigerator temperature setting will revert back to the previous setting.
6. Super Freeze 
Super Freeze will quickly lower the temperature within the freezer so food will freeze faster than usual. This feature also helps to keep vitamins and nutrition of fresh food fresh for longer period.
- Press the “MODE” button to activate this function. The “Super Freeze” icon will be illuminated and the temperature for the freezer is set to -11°F (-24°C).
- Super freezer will automatically turn off after 52 hours.
- When Super Freeze function is on you can turn it off by pressing by pressing the “MODE” or setting freezer temperature. To manually turn off the Super freezer function. the freezer temperature setting will revert back to the previous setting.
NOTE: When you selecting the Super Freeze function. ensure there are no bottled or canned drinks (especially carbonated drinks) in the freezer compartment. Bottles and cans may explode.
7. ICE(models with ice maker)
The ice maker is located inside the freezer compartment. near the top of the compartment.
When the ice maker makes ice. the ice is stored in ice storage box inside the upper freezer drawer.
- Press the “ICE” button to turn the ice maker on or off. When the ice maker is turned on. the
 icon lights.
- To use ice. open the freezer compartment door. then pull open the upper freezer drawer and remove ice from the storage box.
8. POWER 
Press and hold the “POWER” button for three seconds to turn the power function on or off.
When the power function is on. the  icon lights and the display board will show “OF”.
NOTE:
When the power function is on. the refrigerator is stopped cooling.
9. Door Alarm
- When the door of fridge or freezer is open over 2 minutes. the control panel will show"dr* The door alarm wil turn off about 8 minutes later.
- To save energy. don’t keep the door open for along time when using refrigerator. In case of door alarm. it can clear door alarm by closing the doors.
10. Demo mode
- Demo Mode is for store displaying only.
- In this mode. the light and the display operation is normal. but the refrigerator is not cooling. When the refrigerator is in the Demo Mode. if consumers open the door or no keys operation for 30 seconds with the door opened. the temperature control panel will show as follow from A to F.

- To exit this mode. you could press the leftmost key and the rightmost key at the same time for 3 seconds. hen you can see the whole control panel light up for 1 second.
NOTE:The Demo Mode stays on even if the refrigerator powers off.If the consumers enter the mode with unintentional operation. ou should exit it as soon as possible. ince the refrigerator will not coolin this mode. hich will cause the food going bad.
Using your Refrigerator
This section tells you how to use most of the useful features.We recommend that you read through them carefully before using the appliance.
1. Using your refrigerator compartment
The refrigerator compartment is suitable for storage of vegetables and fruit. Food inside should be packed to store in order to avoid losing moisture or flavor permeating into other foods.
CAUTION
Never close the refrigerator door while the shelves. crisper and/or telescopic slides are extended. It may damage both them and the refrigerator.
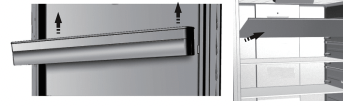
Glass shelves and Door racks
The refrigerator compartment is provided with several glass shelves and several different door racks. which are suitable for the storage of eggs. canned liquid. bottled drinks and packed food. They can be placed at different heights according to your need. However. do not place too many heavy things in racks.
Before you lift up the door bin vertically. please take the food out.
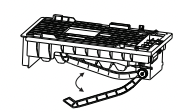
Drawer
This is suitable for storage of fruits and vegetables. And it can be taken out to be cleaned. To take it out. open the door to the final location first. Then pull out the drawer and tilt up the front of the crisper after moving slightly in the direction.
2. Using the freezer compartment
The freezer compartment is provided with an upper drawer and a lower drawer. To remove alll of them. refer to page 9 for disassembly instrution.
3. Automatic icemaker (Models with Ice Maker)
Icemaker makes Ice automatically.
Note:
- When the ice maker dumps ice into the ice box. any sounds are part of normal operation.
- If ice is not dispensed for along period of time. it may clump in the Ice box. If this occurs. please remove all the ice and empty the box.
- Incase of prolonged absence and the ice maker is not used. close the water valve to prevent leaks. It is recommended that the first several ice charges be discarded to ensure highest quality of Ice. Do not store cans or containers that will burst when frozen.
CAUTION
Do not allow your children to touch the ice maker. This could cause injury.
Cleaning and Care
For hygienic reasons the appliance (including exterior and interior accessories) should be cleaned at least every two months.
CAUTION
The appliance must not be connected to the wall outlet during cleaning. Danger of electrical shock! Before cleaning. switch the appliance off and remove the plug from the wall outlet socket.
Exterior cleaning
To maintain good appearance of your appliance. you should clean it regularly.
Spray water onto a cleaning cloth instead of spraying directly on the surface of the appliance. This helps ensure an even distribu tion of moisture to the surface.
Clean the doors. handles and cabinet surfaces with a mild detergent and then wipe dry with a soft cloth.
CAUTION
Dont use sharp objects to clean with. as they are likely to scratch the surface.
Dont use Thinner. Car detergent. bleach. ethereal oil. abrasive cleansers or organic solvent such as Benzene for cleaning. They may damage the surface of the appliance and may cause fire.
Interior cleaning
You should clean the appliance interior regularly. It will be easier to clean when food stocks are low. Wipe the inside of the fridge freezer with a weak solution of backing soda and water. and then rinse with warm water using a wrung-out sponge or cloth. Wipe completely dry before replacing the shelves and baskets. Thoroughly dry all surfaces and removable parts before putting them back into place. Although this appliance automatically
defrosts. a layer of frost may occur on the freezer compartments interior walls if the freezer door is opened frequently or kept open too long. If the frost is too thick. choose a time when the freezer is nearly empty and proceed as follows:
1. Remove existing food and accessories baskets. unplug the appliance from the main power and leave the doors open. Ventilate the room thoroughly to accelerate the process.
2. When defrosting is completed. clean your freezer as described above.
WARNING
Do not use sharp objects to remove frost from the freezer compartment. Only after the interior is completely dry should the appliance be switched back on and plugged back into the main socket.
Door gasket cleaning
Take care to keep door gasket clean. Sticky food and drinks can cause gasket to stick to the cabinet and tear when you open the door. Wash gasket with a mild detergent and warm water. Rinse and dry it thoroughly after cleaning.
CAUTION
Only after the door seals are completely dry should the appliance be powered on
Replacing the LED light
Warning: The LED light must be replaced by a competent person. If the LED light is damaged. follow the steps below:
- 1. Unplug your appliance.
- 2. Remove light cover by rising up and pulling out the LED light.
- 3. Hold the LED light with one hand and pull it with the other hand while pressing the connector latch.
- 4. Replace LED light and snap it correctly in place and recover the light cover.
Helpful Hints and Tips
Energy Saving Tips
We recommend that you follow the tips below to save energy.
Try to avoid keeping the door open for long periods in order to conserve energy. Ensure the appliance is away from any sources of heat (direct sunlight. electric oven or cooker etc.)
Don' t set the temperature colder than necessary.
Don' t store warm food or evaporating liquid in the appliance.
Place the appliance in a well ventilated. humidity free. room. Please refer to Installing your New Appliance chapter.
If the diagram shows the correct combination for the drawers. crisper and shelves. do not adjust the combination as this is designed to be the most energy efficient configuration.
Hints for fresh food refrigeration
Do not place hot food directly into the refrigerator or freezer. the internal temperature will increase resulting in the compressor having to work harder and will consume more energy.
Do cover or wrap the food. particularly if it has a strong flavor.
Place food properly so that air can circulate freely around it.
Hints for refrigeration
For Meat: (all types) wrap in cling wrap and place on the glass shelf above the vegetable drawer. Always follow food storage times and use by dates suggested by manufacturers.
Cooked food. cold dishes. etc.: They should be covered and placed on any shelf.
Fruit and vegetables: They should be stored in the special drawer provided.
Butter and cheese: Should be wrapped in airtight foil or plastic film wrap.
Milk bottles: Should have a lid and be stored in the door racks.
Hints for freezing
When first starting-up or after a period out of use. let the appliance run at least 2 hours on the higher settings before putting food in the compartment.
Prepare food in small portions to enable it to be rapidly and completely frozen and to make it possible to subsequently thaw only the quantity required.
Wrap up the food in aluminum foil or cling wraps which are airtight.
Do not allow fresh. unfrozen food to touch the food which is already frozen to avoid tempera ture rise of the latter. iced products. (ice cubes. popsicles): if consumed immediately after removal from the freezer compartment. will probably cause frost burns to the skin.
It is recommended to label and date each frozen package in order to keep track of the storage time.
Hints for the storage of frozen food
Ensure that frozen food has been stored correctly by the food retailer
Once defrosted. food will deteriorate rapidly and should not be re-frozen. Do not exceed the storage period indicated by the food manufac turer.
Switching off your appliance
If the appliance needs to be switched off for an extended period. the following steps should be taken prevent mold on the appliance.
- 1. Remove all food.
- 2. Remove the power plug from the main socket.
- 3. Clean and dry the interior thoroughly.
- 4. Ensure that all the doors are wedged open slightly to allow air to circulate
Troubleshooting
If you experience a problem with your appliance or are concerned that the appliance is not functioing correctly. you can carry out some easy checks before calling for service. please see below.
WARNING
1. Dont try to repair the appliance yourself. If the problem persists after you have made the checks mentioned below. contact a qualified electrician. authorized service engineer or the shop where you purchased the product.
2. Achild entrapment warning statement is included in either the operating instructions or in a use and care manual provided with each refrigerator.
Appliance is not working correctly
- Check whether the power cord is plugged into the power outlet properly.
- Check the fuse or circuit of your power supply. replace if necessary.
- The ambient temperature is too low. Try setting the chamber tempera ture to a colder level to solve this problem.
- It is normal that the freezer is not operating during the defrost cycle. or for a short time after the appliance is switched on to protect the compressor.
Odours from the compartments
- The interior may need to be cleaned
- Some food. containers or wrapping Cause odours.
Noise from the appliance
- The sounds below are quite normal:
Compressor running noises.
Air movement noise from the small fan motor in the freezer compartment or other compartments.
Gurgling sound similar to water boiling.
Popping noise during automatic defrosting.
Clicking noise before the compressor starts.
Clicking noise when you get the water.
The motor running noises when you get ice.
- Other unusual noises are due to the reasons below and may need you to check and take action:
The cabinet is not level.
The back of appliance is touching the wall.
Bottles or containers have fallen or are rolling.
The motor runs continuously
- It is normal to frequently hear the sound of the motor. it will need to run more when in following circumstances:
Temperature setting is set colder than necessary
Large quantity of warm food has recently been stored within the appliance.
The temperature outside the appliance is high.
Doors are kept open too long or too often.
After installing the appliance or it has been switched off for a long time.
A layer of frost occurs in the compartment
- Check that the air outlets are not blocked by food and ensure food is placed within the appliance to allow sufficient ventilation. Ensure that door is fully closed. To remove the frost. please refer to the Cleaning and Care chapter.
Temperature inside is too warm
- You may have left the doors open too long or too frequently; or the doors are kept open by some obstacle; or the appliance is located with insufficient clearance at the sides. back and top
Temperature inside is too cold
- Increase the temperature by following the Display Controls chapter.
Doors cant be closed easily
- Check whether the top of the refrigerator is titted back by 10-15mm to allow the doors to self-close. or if something inside is preventing the doors from closing.
The light is not working
- The LED light may be damaged. Refer to replace LED lights in Cleaning and Care chapter.
- The control system has disabled the lights due to the door being kept open too long. Close and reopen the door to reactivate the lights.
Hear water bubbling in the refrigerator
- This is normal. The bubbling comes from the refrigerant coolant liquid circulating through the refrigerator.
About the ice maker
The ice maker is not producing ice] enough ice. or cubes are hollow.
Ice maker is not turned on
- Press and hold "ICE" key on the panel to turn On/Off the ice maker. See “Display Controls.”
New installation
- Wait 24 hours after installation for ice production to begin.
Kink in the water line
- Straighten the water supply line.
Inadequate water pressure
- Contact a licensed. qualified plumber.