
DETAILED
INSTRUCTIONS
FOR USE OF THE BUILT
IN ELECTRIC DOUBLE
OVEN
GB
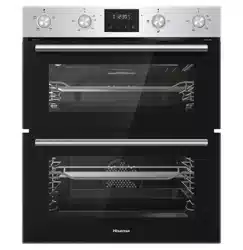
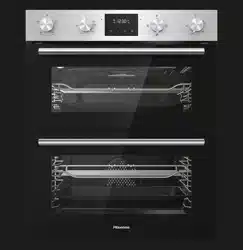
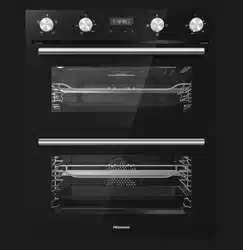
BID75211XUK
BID95211XUK
BID75211BGUK
BID95211BGUK

CONTENTS & INTRODUCTION
CONTENTS
• SAFETY
•
USING THE PRODUCT
•
ClEAN
ING
•
INSTAllATION INSTRUCTI
ONS
INTRODUCTION
Thank you for buying this
appliance from us.
This guide book is designed to help you
through each step of owning your new
oven
, from installation to use. please
read it carefully before you start using
your product, as we have endeavored
to answer as many questions as
possible, and provide you with as much
support as we can.
Alternatively, general information,
spares and service information are
available from our website. The address
is located on the back page of this book.
WARRANTY
Your new appliance comes with our 12-
month guarantee, protecting you against
electrical and mechanical breakdown.
For full terms & conditions of the manu-
facturer’s guarantee.
In addition, you may wish to purchase an
extendedwarranty.Aleafletexplaining
how to do this is included with your
appliance.
our policy is one of constant
development and improvement, therefore
we cannot guarantee the strict accuracy
of all of our illustrations and
specifications-changesmayhavebeen
made subsequent to publishing.

Safety
BEFORE USING THE PRODUCT
Make sure that you have removed all
packaging and wrapping. Some of the
items inside this appliance may have
additional wrapping.
GENERAL
WARNING! - The
appliance and its
accessible parts become
hot during use. c are
should be taken to
avoid touching heating
elements. c hildren less
than 8 years of age shall
be kept away unless
continously supervised.
This appliance can
be used by children
aged from 8 years and
above and persons with
reduced physical sensory
or mental capabilities or
lack of experience and
knowledge if they have
been given supervision
or instruction concerning
the use of the appliance
in a safe way and
understand the hazards
involved. c hildren
shall not play with the
appliance. c leaning and
user maintenance shall
not be made by children
without supervision.
WARNING! -
Unattended cooking on
a hob with fat or oil can
be dangerous and may
resultinfi e.
NEVEr try to extinguish
afi ewithwater,but
switch off the appliance
andthencovertheflam
with a lid or damp cloth.
WARNING! - danger of
fi e:Donotstoreitems
on the cooking surfaces.
WARNING! - Servicing
should be carried out
only by authorised
personnel.
• The appliance must
never be disconnected
from the mains
supply during use,
as this will seriously
affect the safety
2

Safety
and performance,
particularly in
relation to surface
temperatures
becoming hot and gas
operated parts not
workingefficientl .
The cooling fan (if
fi ted)isdesigned
to run on after the
control knob has been
switched off.
• do not spray aerosols
in the vicinity of this
appliance while it is in
operation.
• do not store or use
flammabl liquidsor
items in the vicinity of
this appliance.
• do not modify this
appliance.
CAUTION:Theuseof
a gas cooking appliance
results in the production
of heat, moisture and
products of combustion
in the room in which it is
installed. Ensure that the
kitchen is well ventilated
especially when the
applianceisinuse:
prolonged intensive use
of the appliance may call
for additional ventilation,
for example opening
of a window, or more
effective ventilation, for
example increasing the
level of mechanical
ventilation where
present.
Excess spillage must be
removed before cleaning.
During pyrolytic cleaning,
accessible parts may
become hotter than
normal. Young children
should be kept away.
WARNING! -
do not operate the
appliance without the
glass door correctly
closed.
3

Safety
W
ARNING! -
The top element gets
extremely hot when in
W
ARNING! -
do not modify the outer
panels of this appliance
in any way.
WARNING! -
This appliance must be
earthed.
WARNING! -
Always allow the product
to cool down before you
change a bulb.There is a
risk of electric shock, so
always make sure you
have turned off and
unplugged your
appliance before starting.
WARNING! - do not
use harsh abraisive
cleaners or sharp metal
scrapers to clean the
ovendoor glass since
they can scratch the
surface, which may well
result in shattering of the
glass.
CAUTION: This
appliance is for cooking
purposes only. It must
not be used for other
purposes, for example
room heating.
WARNING! -
Never put items directly
on the base of the oven
or cover the oven base
with foil, as this can
cause the base element
to overheat.
use, so take extra care
to avoid touching it.
WARNING! -
If the supply cord is
damaged, it must be
replaced by the
manufacturer, its service
agent or similarly
qualified persons in order
to avoid a hazard.
4

Safety
stable and can lead to spillage or
injury.
• Always use the Minute Minder (if
fi ted)ifyouareleavingtheoven
unattended - this reduces the risk of
food burning.
Do Not
• Never place items on the door while
it is open.
• Never wrap foil around the oven
shelvesorallowfoiltoblocktheair flue.
• Never drape tea towels near the oven
whileitison;thiswillcauseafi e
hazard.
• Never pull heavy items, such as
turkeys or large joints of meat, out
from the oven on the shelf, as they
may overbalance and fall.
OVEN / GRILL
Do
• Always take care when removing food
from the oven as the area around the
cavity may be hot.
• Always use oven gloves when
handling any utensils that have been
in the oven as they will be hot.
• Always make sure that the oven
shelves are resting in the correct
position between two runners. do
not place the oven shelves on top
of the highest runner, as this is not
WARNING! -
The steam cleaner is not
to be used.
WARNING! -
The appliance must not
be installed behind a
decorative door in order
to avoid overheating.
5
USING THE GRILL - ELECTRIC
Caution: Accessible parts may be
hot when the grill is used - young
children should be kept away.
If cleaning the grill pan when it is hot, use
oven gloves to move it.
Food for grilling should be positioned
centrally on the trivet.
Using the TOP Oven grill
Important: The grill door must be fully
open when the grill is used.
open the gri ll door. Turn the control knob
to the required setting. For best cooking
results, we recommend that you preheat
the single grill for 5 minutes.
push the grill pan towards the back of the
shelf, to position it under the grill.
Turn the temperature knob to the MAX
position or by selecting a higher or lower
shelf position. For toast-ing, and for
grilling foods such as bacon, sausages or
steaks, use a higher shelf position. For
thicker foods such as chops or chicken
joint pieces, use a middle to low shelf
position.
To switch off, turn the control knob to the
off position.
Using aluminium foil
Using aluminium foil to cover the grill pan,
or putting items wrapped in foil under the
grillcreatesarehazard.
The cooling fan
When the grill is switched on, the cool-
ing fan comes on to keep the fascia and
control knobs cool during grilling.
during use the fan may cycle on and off,
this is normal.
Grill
6

USING THE TOP OVEN - ELECTRIC (if tted)
When you are cooking keep children
away from the vicinity of the oven.
Caution: The top element gets
extremely hot when in use, so
take extra care to avoid touch-
ing it.
The top oven is a conventional oven.
Note:Thetopovenisnotcontrolled
bytheprogrammer(iffitted).
To turn on the top oven
Turn the temperature control knob until
the required temperature is selected.
The red thermostat indicator will come on
until the selected temperature is reached,
and then go off; it will turn on and off
periodically as the thermostat operates to
maintain the selected temperature.
To switch off, return the top oven control
knob to the off position.
Important: Never put items directly on
the base of the oven, or cover the oven
base with foil, as this may cause the ele-
ment to overheat. Always position items
on the shelf.
The cooling fan
When the top oven is switched on, you
will hear the cooling fan come on - this
keeps the fascia and control knobs of the
appliance cool during cooking.
Preheating
The oven must be preheated when cook-
ing frozen or chilled foods, and we rec-
ommend preheating for yeast mixtures,
batters,soufflés,andwhiskedsponges.
preheat the oven until the indicator light
switchesoffforthersttime,thiswill
take up to 15 minutes depending on the
temperature selected.
If you are not preheating the oven, the
cooking times in the following guide may
need to be extended, as they are based
on a preheated oven.
Shelf positions
There are 3 shelf positions which are
counted from the bottom of the oven up-
wards, so shelf position 1 is the lowest.
When cooking frozen or chilled food, use
the highest possible shelf position, while
allowing some clearance between the
food and the top element.
The oven shelf must be positioned with
the up-stand at the rear of the oven and
facing up. position baking trays and roast-
ing tins on the middle of the shelves, and
leave one clear shelf position between
shelves, to allow for circulation of heat.
When using the top oven
Whenopeningtheovendoor,care should
be taken to avoid any possible contact
with potentially hot air, since this may
cause discomfort to people with sensitive
skin. We recommend that you hold the
underneath of the oven door handle.
7

USING THE TOP OVEN - ELECTRIC (if tted)
TOP OVEN BAKING GUIDE
Cooking times
These times are based on cooking in a
preheated oven.
These cooking times are approximate,
because the size and type of cooking dish
willinfluenc timeaspersonalprefer-
ences.
Shelf positions
As a general guide, when cooking frozen
or chilled food, use the highest pos-
sible shelf position, while allowing some
clearance between the food and the top
element. Follow the instructions given on
packaging.
Item Temperature
(°C)
Shelf
Position
Approximate cooking time
Small cakes
Victoria sandwich
(2x180mm/7”)
Swiss roll
Semi rich fruit cake
(180mmx7”)
Scones
Meringues
160 - 170
160
200
140
215
90 - 100
1
1
1
1
1
20 - 25 mins
20 - 25 mins
8 - 12 mins
2¼ - 2¾ hours
10 - 15 mins
2 - 3 hours
Shortcrust pastry
Puff/flak pastry
c houx pasrty
200 - 210
200 - 210
200 - 210
1
1
1
depends on size & type of cook-
ingdish&alsothelling
Biscuits
Sponge pudding
Milk pudding
160 - 200
150
140
2
1
1
10 - 20 mins
30 - 45 mins
2 - 2½ hours
Cooking temperatures
The temperature settings and time given
in the Baking Guides are based on dishes
made with block margarine. If soft tub
margarine is used, it may be necessary
to reduce the temperature setting. If a
recipe gives a different temperature set-
ting to that shown in the guide, the recipe
instruction should be followed.
Because the top oven is more compact,
it may be necessary to reduce cooking
temperaturesspecifie inrecipesbyupto
20°c .
Use the baking guide as a reference for
determining which temperatures to use.
2
8

USING THE MAIN OVEN - ELECTRIC
Accessible parts may be
hot when the oven is used.
Young children should be
kept away.
To switch on the oven
Turntheovencontrolknob(s)tothe
required setting.
Theredthermostatindicator(iffi ted)will
come on until the selected temperature
is reached and then go off; it will turn
on and off periodically as the thermostat
operates to maintain the selected tem-
perature.
To switch off, return the control knob to
the off position.
When using the oven
As part of the cooking process, hot air
is expelled through a vent in the oven.
When opening the oven door, care should
be taken to avoid any possible contact
with potentially hot air, since this may
cause discomfort to people with sensitive
skin. We recommend that you hold the
underneath of the oven door handle.
PREHEATING
Fanned oven
When cooking sensitive items such as
souffl andYorkshirepuddingsor,when
cooking bread, we recommend that the
oven is preheated until the neon switches
offforthefirs time.Foranyothertypes
of cooking, a preheat may not be re-
quired.
Conventional oven
preheating is always required
Manual Operation (fanned only)
The cooling fan
The cooling fan may operate when the
main oven is on and may continue to op-
erate for a period after the oven has been
switched off.
OVEN FURNITURE
Oven shelves
The oven shelf must be positioned with
the upstand at the rear of the oven and
facing upwards.
position baking trays and roasting tins on
the middle of the shelves.
Baking tray and roasting tins
For best cooked results and even brown-
ing, the recommended size baking trays
and roasting tins that should be used are
as follows;
Baking tray 473mm x 370mm
We recommend that you use good quality
cookware. poor quality trays and tins may
warp when heated, leading to uneven
baking results.
9

USING THE MAIN OVEN - ELECTRIC
Aluminium foil
Use foil only to cover food or cooking
dishes, using foil to cover the shelves or
ovenbasecreatesafi ehazard.
Cooking with a fanned oven
As this is a high efciency oven,
you may notice the emission of
steam from the oven when the door
is opened. Please take care when
opening the door.
If you are used to cooking with a conven-
tionalovenyouwillfin anumberofdif
-
ferences to cooking with a fan oven which
willrequireadifferentapproach:
There are no zones of heat in a fan oven
as the convection fan at the back of
the oven ensures an even temperature
throughout the oven.
This makes it ideal for batch baking - eg;
when planning a party as all the items will
be cooked within the same length of time.
Foods are cooked at a lower temperature
than a conventional oven, so conven-
tional recipe temperature may have to be
reduced.
please refer to the conversion
chart.
preheating is generally not necessary as a
fan oven warms up quickly.
When batch baking foods that will rise
during cooking - eg; bread - always
ensure that enough space has been left
between the shelves to allow for the rise.
Notes:
When 2 or more shelves are being used, it
may be necessary to increase the cooking
time slightly.
Because the 2 oven shelves are wider
than in many ovens, it is possible to cook
2 items per shelf - eg; 2 victoria sand-
wiches or 2 casseroles.
Although you need to keep in mind the
points ‘To help the air circulate freely’
with careful choice of dishes and tins, it
is possible to cook a complete meal, and
perhaps something else for the freezer, in
the oven at the same time.
When roasting meats, you will notice that
fat splashing is reduced, which is due in
part to the lower oven temperatures, and
will help keep cleaning of the oven to a
minimum.
Because a fan oven has an even tem-
perature throughout the oven, there is no
need to follow the shelf positions given in
the baking guide.
10

USING THE MAIN OVEN - ELECTRIC
There is no need to interchange dishes
onto different shelves part way through
cooking, as with a conventional oven.
To help the air circulate freely
position the shelves evenly within the
oven and maintain a clearance from the
oven roof and base.
If more than one cooking dish or bak-
ing tray is to be used on a shelf, leave a
gap of at least 25mm between the items
themselves and the oven interior.
Defrosting and cooling in the
main oven
To defrost frozen foods, turn the main
oven control to the defrost position, place
the food in the centre of the oven and
close the door.
To cool foods after cooking prior to refrig-
erating or freezing, turn the main oven
control to the defrost position and open
the door.
Defrosting times
Smallorthinpiecesoffrozenfis ormeat
- eg;fis lets,prawns&mincewilltake
approximately 1 - 2 hours.
placing the food in a single layer will
reduce the thawing time.
A medium sized casserole or stew will
take approximately 3 - 4 hours.
A 1½kg/3lb oven ready chicken will take
approximately 5 hours, remove the giblets
as soon as possible.
Be safe
do not defrost stuffed poultry using this
method.
do not defrost larger joints of meat and
poultry over 2kg/4lb using this method.
Never place uncooked food for defrosting
next to cooked food which is to be cooled,
as this can lead to cross contamination.
Defrostingmeat,poultry,andfis canbe
accelerated using this method but make
sure they are completely thawed before
cooking thoroughly. place meat and poul-
try on a trivet in a meat tin.
MAIN OVEN BAKING GUIDE
Cooking times & temperatures
The temperature settings and times given
in the baking guide are based on dishes
made with block margarine. If soft tub
margarine is used it may be necessary to
reduce the temperature setting.
Allow enough space between shelves for
food that will rise during cooking.
do not place items on the oven base as
this will prevent air circulating freely.
11
USING THE MAIN OVEN - ELECTRIC
Note:Thisisahighefficienc oven,there-
fore some adjustment will have to be
made to conventional cooking tempera-
tures. The table below shows conven-
tionalcookingtemperatures,‘A’efficienc
temperatures and gas marks. For opti-
mum results,
conventional temperatures need to be
convertedto‘A’efficienc temperatures.
For example, an item which would nor-
mally cook at a conventional temperature
of 180 °c , will now cook at the ‘A’ ef-
ficienc temperatureof160°C.
Conventional temperature
(°C)
‘A’ Efciency Oven
(°C)
100
110
130
140
150
160
180-190
200
220
230
250
100
110
120
130
140
150
160
170
180
190
200
Food Type Temperature
settings (°C)
Time
Approx.
Shelf
Position
c akes
Small cakes
Victoria sandwich
Semi rich fruit cake
c hristmas cake
Conv
170
180
150
150
Fanned
160
160
125
125
15 - 25
20 - 30
2.5
Hr S - 3Hr S
2.5Hr S - 3Hr S
3
3
2
2
puddings
Bread and butter pud-
ding
Fruit crumble
170
200
150
175
45 - 1hr
40 - 1hr
3
3
Miscellaneous
Yorkshirepudding:
large
small
Shortcrust pastry
220
220
200
200
200
180
40 - 48
15 - 20
depends on
lling
4 - 5
4 - 5
4 - 5
12

USING THE MAIN OVEN - ELECTRIC
Traditional fruit cakes
It should be remembered that ovens can
vary over time, therefore cooking times
canvary,makingitdifficu ttobeprecise
when baking fruit cakes.
It is necessary therefore, to test the cake
beforeremovalfromtheoven.Useafin
warmed skewer inserted into the centre of
the cake. If the skewer comes out clean,
then the cake is cooked.
• Follow the temperatures suggested
in the recipe and then adjust accord-
ingly to the conversion table.
• do not attempt to make c hristmas
cakes larger than the oven can cope
with, you should allow at least 25mm
(1”)spacebetweentheovenwalls
and the tin.
• Always follow the temperatures rec-
ommended in the recipe.
• To protect a very rich fruit cake dur-
ing cooking, tie 2 layers of brown
paper around the tin.
• We recommend that the cake tin is
not stood on layers of brown paper,
as this can hinder effective circulation
of air.
• do not use soft tub margarine for
richfruitcakes,unlessspecifie in
the recipe.
• Always use the correct size and
shape of tin for the recipe quantities.
Roast turkey
r oasting turkey involves cooking two
different types of meat - the delicate light
breast meat, which must not be allowed
to dry out, and the darker leg meat,
which takes longer to cook.
The turkey must be roasted long enough
for the legs to cook, so frequent bast-
ing is necessary. The breast meat can be
covered once browned.
• Always make sure that the turkey is
completely thawed and that the gib-
lets are removed before cooking.
• Turkey should be roasted at 160°c
- 180°C(fanned)or180°C-200°C
(conventional)for20minutesper
450g(1lb),plus20minutes,unless
packaging advises otherwise.
• The turkey can be open roasted,
breast side down, for half of the cook
time, and then turned over for the
remainder of the cooking time.
• If the turkey is stuffed, add 5 minutes
per450g(1lb)tothecookingtime.
• If roasting turkey covered with foil,
add5minutesper450g(1lb)tothe
cooking time.
To test if the turkey is cooked, push a
fin skewerintothethickestpartofthe
thigh. If the juices run clear, the turkey
is cooked. If the juices are still pink, the
turkey will need longer cooking.
13

USING THE MAIN OVEN - ELECTRIC
Roasting guide
The times given in the roasting guide
are only approximate, because the size
andageofthebirdwillinfluenc cooking
times as will the shape of a joint and the
proportion of the bone.
Frozen meat should be thoroughly thawed
before cooking. For large joints it is advis-
able to thaw over night.
Frozen poultry should be thoroughly
thawed before cooking. The time required
depends on the size of the bird - eg; a
large turkey may take up to 48 hours to
thaw.
Use of a trivet with a roasting tin will
reduce fat splashing and will help to keep
the oven interior clean. Alternatively, to
help reduce fat splashing, potatoes or
other vegetables can be roasted around
the meat/poultry.
Notes:
• When cooking stuffed meat or poultry
calculate the cooking time from the
total weight of the meat plus the
stuffing
• For joints cooked in foil or covered
roasters, and for lidded casseroles,
add5minutesper450g(1lb)tothe
calculated cooking time.
• Smaller joints weighing less than
1.25kg(2½lb)mayrequire5minutes
per450g(1lb)extracookingtime.
• position the oven shelf so that the
meat or poultry is in the centre of the
oven.
• It is recommended that the appliance
is cleaned after open roasting.
Cook in main oven at:
160°C - 180°C (fanned)
180°C - 200°C (conventional)
Approximate Cooking Time
(preheated oven)
Beef
Medium
Well done
20minutesper450g(1lb),plus20minutes
25minutesper450g(1lb),plus25minutes
30minutesper450g(1lb),plus30minutes
Lamb
Medium
Well done
25minutesper450g(1lb),plus25minutes
30minutesper450g(1lb),plus30minutes
Pork
35minutesper450g(1lb),plus35minutes
Poultry
20minutesper450g(1lb),plus20minutes
rare
14
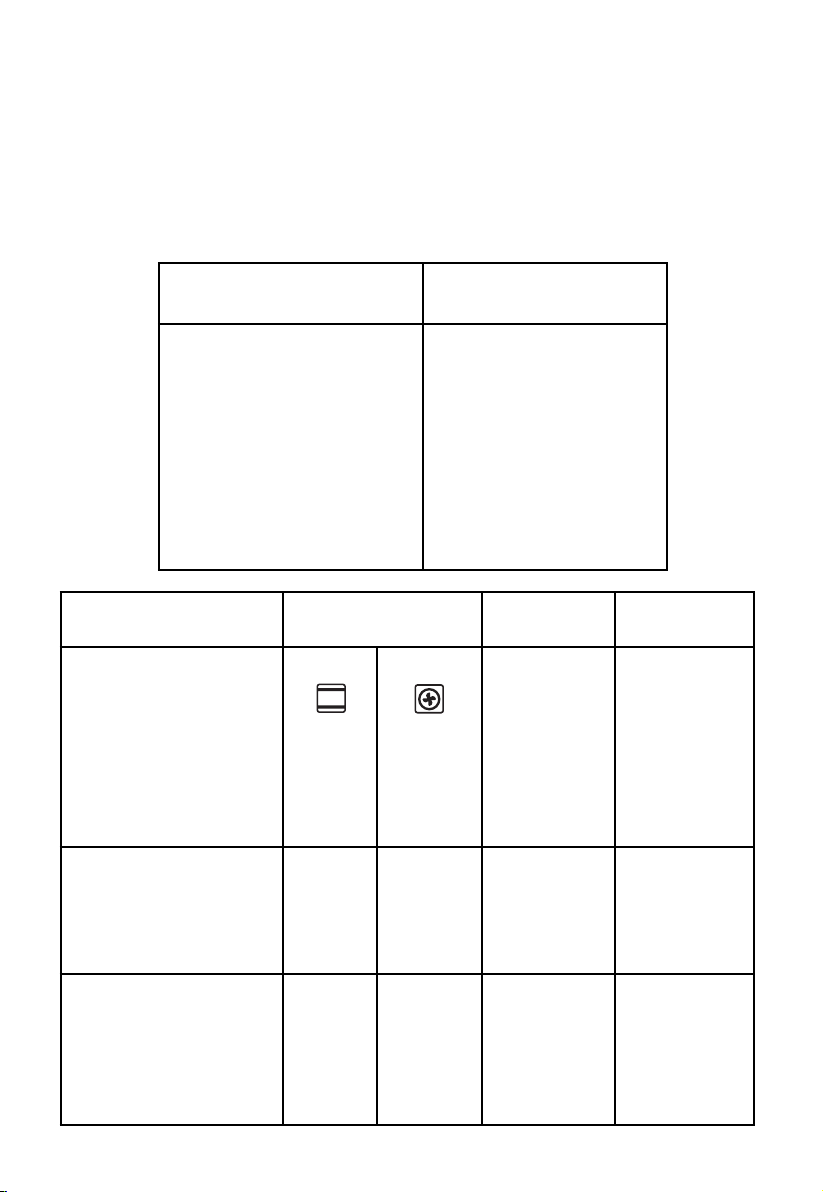
using the OVen/gRiLL - muLti-functiOn
o ven & Grill Functions
The chart below details all of the functions which are available. Your oven may not
have all of the functions shown here.
Symbol Function /
Feature
Recommended Uses
Grill, small area
For grilling small amounts of steaks, sausages, toast
and pieces of fish. The centre part of the grill heating
element becomes hot.
Fanned Grill
The fan allows heat to circulate around the food. Ideal
for
thinnerfoodssuchasbacon,fis andgammon
steaks. Foods do not require turning. Use with the oven
door closed
Conventional Grill
This function is ideal for traditional roasting. The meat is
placed in the middle of the oven, roast potatoes towards
the top.
Bake only
The base heat can be used to provide additional brown-
ing for pizzas, pies and quiche. Use this function towards
the end of cooking.
Fanned o ven
The even temperature in the oven makes this function
suitable for batch baking, or batch cooking foods.
Intensive Bake
Suitable for food with a high moisture content, such as
quiche, bread and cheese cake. It also eliminates the
need for baking pastry blind.
Defrosting and cool-
ing
To defrost foods, such as cream cakes/gateaux, use with
the oven door closed. For cooling dishes prior to refrig-
eration, leave the door open.
Oven Temperature
control
Use to select the oven temperature.
L
ights only
Use when the oven is switched off and cold to aid
cleaning the oven.
Grill, large area
For grilling steaks, sausages, toast and pieces of fish. The
whole area below the grill heating element becomes hot.
15

GRILLING IN THE MAIN OVEN
The main oven grill & fanned grill are
fi edsettingsusingtheinnerelement
only. Make sure that the programmer is
set to manual before grilling. When using
either grill function, invert the grill pan
trivet and preheat for 5minutes.
Grill, small area
The door must be closed when the grill
is used for grill, small area.
(i) Turntheselectorcontrolknobto
the conventional grill setting.
(ii) Turnthe
oventemperaturecontrol
knob to the full on setting.
Fanned grill
The door must be closed when the
fanned grill is used.
When opening the door, take care to
avoid skin contact with any steam
which may escape from the cooking.
(i)
Turntheselectorcontrolknobto
the fan grill setting.
(ii)
Turntheoventemperaturecontrol
knob to the desired temperature setting.
When the fanned grill is selected, only
the inner element will come on.
Caution: Accessible parts may
be hot when the ovens are
used, young children should be
kept away.
The main oven is a multi-function oven,
and may be used as a conventional
oven or a fanned oven. It may also be
used as a grill, or with one of the other
oven functions.
Manual operation
The programmer must be set to manual
operation before the main oven or grill
functionscanbeused.
To turn on the main oven
Step 1 - Select the function
Turn the selector control knob in either
direction, until the function you require
appears in the window.
Step 2 - Set the main oven control If
you have selected an oven cooking
function, then simply turn the main oven
temperature control knob to the required
temperature - this brings on the neon
indicator light, which will stay on until the
oven reaches the required temperature.
T
o switch off the main oven, return the
control knob to the off position.
Automatic operation
See ‘programmer / clock’ section.
USING THE OVEN/GRILL - MULTI-FUNCTION
The door must be closed when the
large area grilling is used.
When opening the door, take care to
avoid skin contact with any steam
which may escape from the cooking.
(i) Turntheselectorcontrolknobto
the grill, large area se tting.
(ii) Turntheoventemperaturecontrol
knob to the desired temperature setting.
When the large area grilling is selected,
only
the inner element will come on.
Grill,,,,
,
large area
16

Manual operation
Set the programmer to manual operation.
See ‘
programmer / clock’ section. Turn
the selector control knob to the symbol
for the desired oven function. Turn the
main oven temperature control knob to
the desired temperature. The red thermo-
stat indicator neon will come on and off
until the selected temperature is reached
and then go off; it will turn on and off
periodically as the thermostat operates to
maintain the selected temperature.
To switch off the main oven, return the
main oven control knob to the off
position.
Automatic operation
See ‘programmer / clock section.
Preheating
Always use the fan oven setting for
preheating to save time and electricity.
After the oven has been preheated on the
fan oven setting, turn the selector control
knob to the oven setting you require. The
oven must be preheated when cooking
frozen or chilled food, and we recommend
preheating for yeast mixtures, batters,
soufflé andwhiskedsponges,otherwise
preheating is not necessary as a fan oven
warms up quickly.
preheat the oven until
the indicator neon switches off for the
firs time;thiswilltakebetween5-15
minutes, depending on the temperature
selected.
To help the air circulate freely
• position the shelves evenly within the
oven and maintain a clearance from
the oven roof and base.
• If more than one cooking dish or
baking tray is to be used on a shelf,
leave a gap of at least 25mm be-
tween the items themselves and the
oven interior.
• Allow enough space between shelves
for food that will rise during cooking.
• do not place items on the oven base
as this will prevent air from circulat-
ing freely.
Main oven functions
Conventional oven
(i)
Turntheselectorcontrolknobtothe
conventional oven symbol.
(ii) Turnthemainovencontrolknobto
the required temperature.
The temperature you select corresponds
to the temperature in the middle of the
oven. The top heat comes from the outer
element of the grill, and the base heat is
under the oven base.
Base heat only
(i)
Turntheselectorcontrolknobtothe
base heat symbol.
(ii) Turnthemainovencontrolknobto
the required temperature.
USING THE OVEN/GRILL - MULTI-FUNCTION
Using the main oven
Caution:
Accessible parts may
be hot when the appliance is in
use - keep children away from
the vicinity of the oven.
Never put items directly on the base of
the oven or cover the oven base with foil,
as this can cause the base element to
overheat.
17
Fan oven
(i)
Turntheselectorcontrolknobtothe
fan oven symbol.
(ii) Turnthemainovencontrolknobto
the required temperature.
The fan oven comes on when the oven is
switched on and circulates the air around
the oven to give a fairly even temperature
throughout the oven.
Intensive bake
(i)
Turntheselectorcontroltothe
intensive bake symbol.
(ii) Turnthemainovencontroltothe
required temperature.
Defrosting and cooling
(i)
Turntheselectorcontrolknobto
defrost
(ii)
Turntheovencontroltothelight
symbol.
To defrost frozen foods, place food in the
centre of the oven and close
the door.
To cool foods after cooking prior to
refrigeration or freezing, place food in the
centre of the oven with the door open.
Be safe
•
do not defrost stuffed poultry using
this method.
• do not defrost larger joints of meat
or poultry over 2kg / 4lb using this
method.
• Never place uncooked food which is
to be defrosted next to cooked food
which is to be cooled, as this can lead
to cross contamination.
please refer to the cooking Guide for
more information on using the defrost
function.
USING THE OVEN/GRILL - MULTI-FUNCTION
18
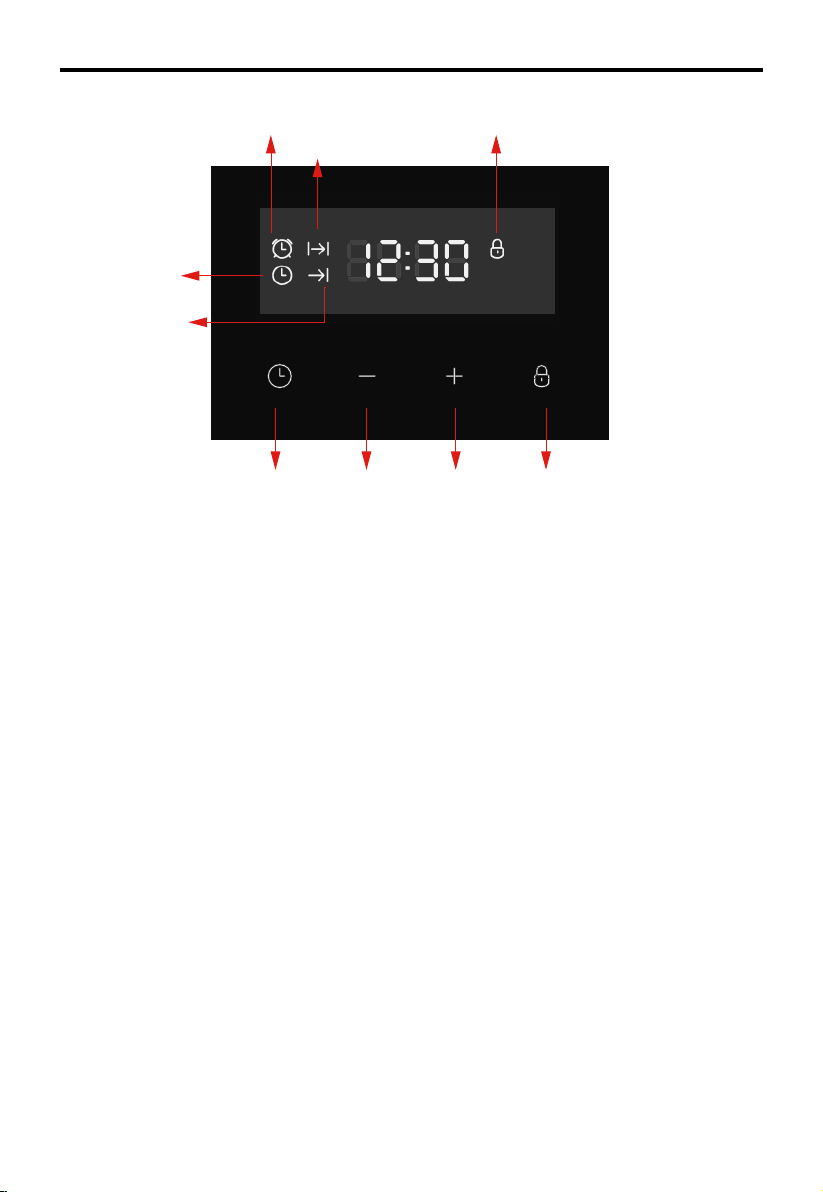
UsInG tHe clock/pRoGRaMMeR-elec
End time
Clock
Alarm
D
uration
Lock
Function Minus
Plus
Lock
After power on, ‘0:00’and the clock icon
will flash on the screen, press any button
to quit.
Button 1:*clock→alarm setting→duration
setting→end time setting→clock
setting→*clock(*:default)
Button 2: minus(-)
Button 3: plus
Button 4: Lock
1、Set alarm
1) Press button 1, alarm icon flashing
means alarm function chosen. “0:00”will
display. Press button 2 and 3 to set
alarm time. Time adjust range is
“0:01~23:59”. Press once to plus or
minus 1, and hold for 3 seconds for
quick-adjust. Waiting for 5 seconds to
confirm setting, the alarm icon will be
display, alarm tim
e will be shown and
alarm starts. After the count down,
“0:00”will display, buzzing starts 4 times
every 5 seconds. Press any button to
stop.
2) If there’s no operation for 2 minutes,
buzzing will stop.
2、Duration setting
1) Press button 1, choose ‘duration’
function, duration icon will flash, “0:00”
will display. Press button 2 and 3 to set
duration time, adjusting range is
“0:01~23:59”. Press once to plus or
minus 1, hold for 3 seconds for quick-
adjust. The flashing will last for 5
seconds, so the settings must be done
within this time frame or the time of day
will show again. After setting, th
e
duration icon will display, counting down
starts. When counting down stops,
power will turn off, ‘Duration’ icon will
flash, “0:00” will display, buzzing will
starts for twice every 5 seconds. Press
any
button to stop buzzing, and press
button 1 to show the time of day.
2) During the cooking duration, press
button 1 can check and change the
cooking time.
19

USING THE CLOCK/PROGRAMMER-ELEC
3) After counting down stopping, if
there’s no operation for 2 minutes,
buzzing will stop.
4) If set duration time before end time,
end time can only be added, not
decreased. (The max time added can be
after 23h 59m. When end time is longer
than duration time+ current time, end
time can be decreased by pressing
button 2. It will be decreased until end
time equals to duration time+ current
time+ 1 minute). If end time is longer
than duration time+ current time, power
will be off, end time icon will display.
When end time equals to duration time+
current time, power will be on again, end
time icon will turn off.
3、time function
1) Press button 1 to choose time
function. Time icon will flash, press
button 2 or 3 to set time. The range is
24hrs. Press once to plus or minus 1,
hold for 3 seconds for quick-adjust. No
operation for 5 seconds, the time of day
will show, time icon will turn off.
2) If time setting is changed after
setting alarm, duration and end time,
the alarm will not be changed, and
duration and end time will reset.
4、lock function.
Press lock button for 3 seconds any
time, the lock function will active, and
lock icon will display. Press lock button
for 3 seconds again, it will be unlock.
The icon turns off.
During the lock condition, press button
will cause buzzing, meanwhile the lock
icon will flash for 3 seconds.
5、Other notification
1) If setting alarm, duration time and end
time, alarm time will display, and alarm,
duration, end time icons will display.
2) After setting alarm, duration, and end
time, Button 1 can be pressed to check
and change alarm time, duration time,
end time and day time.
3) If duration time is later than alarm
time, there will be only buzzing for
alarm. If duration is earlier than alarm
time, there will be only buzzing for
alarm.
20

cleaning
General
• It is important to clean the product
regularly as a build up of fat can af-
fect its performance or damage it and
may invalidate your guarantee.
• Always switch off your appliance
and allow it to cool down before you
clean any part of it.
• do not use undiluted bleaches,
products containing chlorides, wire
wool or abrasive cleaners on alu-
minium, stainless steel, or plastic/
painted parts as they can damage
the appliance. Nylon pads can also be
unsuitable.
• Take extra care when cleaning over
symbols on fascia panels. Excessive
cleaning can lead to the symbols
fading.
• Ifyourproductisfi tedwithstainless
steel cladded stips. You may notice
a small white residue on the outer
edges, this can be removed with a
non abrasive wipe.
Painted & Plastic parts
• o nly use a clean cloth wrung out in
hot soapy water.
• do not use abrasive cleaners, wire or
nylon cleaning pads on these parts.
Stainless steel & Aluminium surfaces
• o nly use a clean cloth wrung out in
hot soapy water, and dry with a soft
cloth.
• Stubborn marks can be removed us-
ing a stainless steel cleaner. Supplies
can be purchased from the customer
c are c entre.
• Sharp objects can mark the surface
of stainless steel, but will become
less noticeable with time.
• Wipe any spillage immediately, taking
care to avoid burning your hands
• Some foods are corrosive eg; vinegar,
fruit juices and especially salt - they
can mark or damage the metal if they
are left on the surface.
• Baby oil can be used to restore stain-
lesssteelfinishe -butonlyusea
few drops. don’t use cooking oils
as they can contain salts, which will
damage the metal.
• do not use steam cleaners.
Enamel surfaces & parts
• c lean with warm, soapy water and a
clean cloth.
• If larger splashes of fat do not readily
disappear, you can use a mild cream
cleaner to remove them. More stub-
born marks can be removed using a
soaplledpad.
• r inse well and dry with a soft clean
towel or cloth.
• do not use steam cleaners.
Glass parts
WARNING:- do not use harsh
abrasive cleaners or sharp
metal scrapers to clean the
oven door glass since they can
scratch the surface, which may
result in shattering of the glass.
• o nly use a clean cloth wrung out in
hot soapy water, or a specialist glass
cleaner.
r inse away any excess cleaner and dry
with a soft cloth.
Chrome plated parts
• Useamoistsoapfi ledpad,orplace
in a dishwasher
21
CLEANING
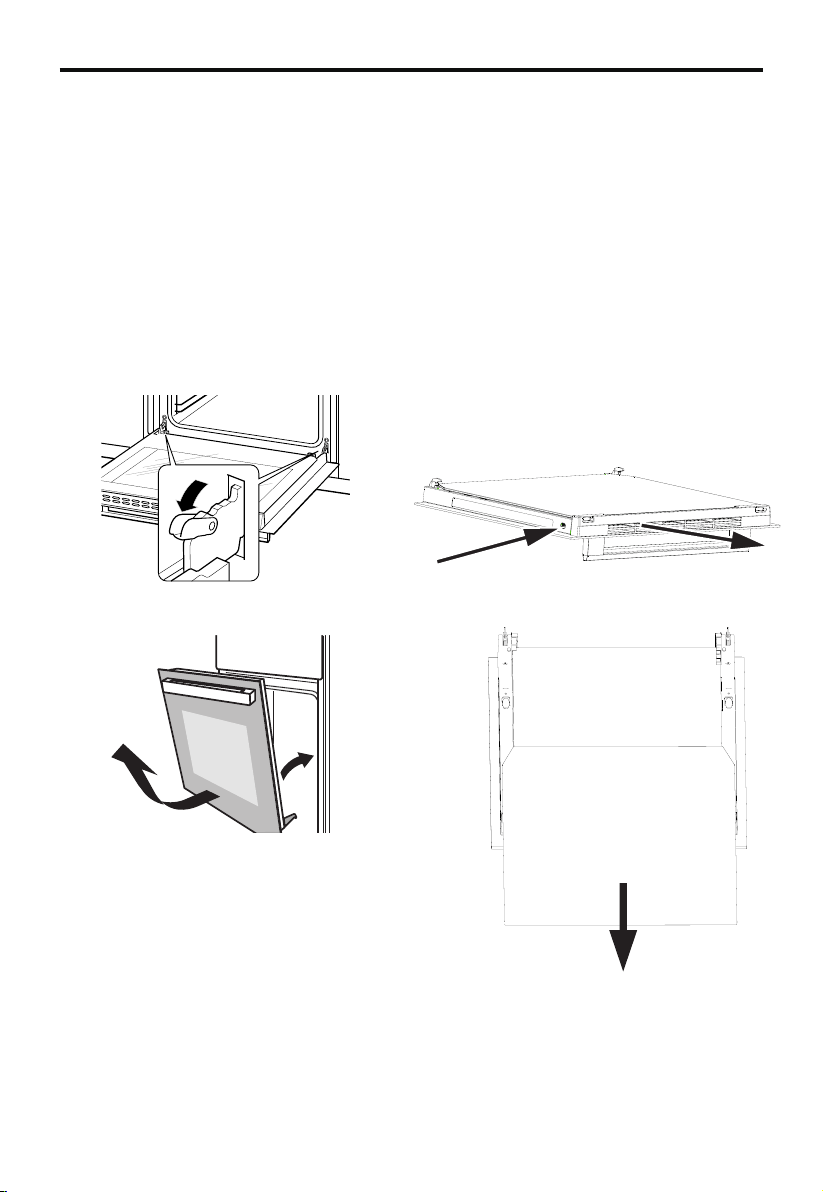
REMOVING OVEN PARTS FOR
CLEANING
•
The inner door glass panel can be
removed for cleaning but it must be
replaced the right way up. If there is
any writing on the glass, you must be
able to read it clearly when the cavity
doors are open.
• Always make sure that the glass is
pushed fully into the Stop position.
• To remove the glass panel, open the
door wide, push the clips on the left
and right sides of door bracket. Then
remove the plastic top cover. Hold the
glass and slide it out along the door
bracket.
1. PUSH
2. PULL OUT
Glass
To remove the door, open the door to
the maximum angle.Then pull the
buckle at the door hinge backward.
Close the door to an angle
approximately 30°. Hold the door with
one hand on each side.
Lift up and slowly pull the door out from
the oven.
•
30˚
22
•
Warning: Do not operate
the appliance without the
glass panel correctly fitted.
• For your safety, glass door panels are
made of toughened glass. This en-
sures that, in the unlikely event that a
panel breaks, it does so into small
fragments to minimise the risk of in-
jury. Please take care when handling,
using or cleaning all glass panels, as
any damage to the surfaces or edges
may result in the glass breaking
without warning or apparent cause at
a later date. Should any glass panel
be damaged, we strongly recommend
that it is replaced immediately.
Shelf Runners
• Shelf runners can be removed to
enable you to clean them thoroughly.
Make sure they are cool to touch and
then grasp the runners and slide out
of their hanging holes.
Pull out to clean
CLEANING
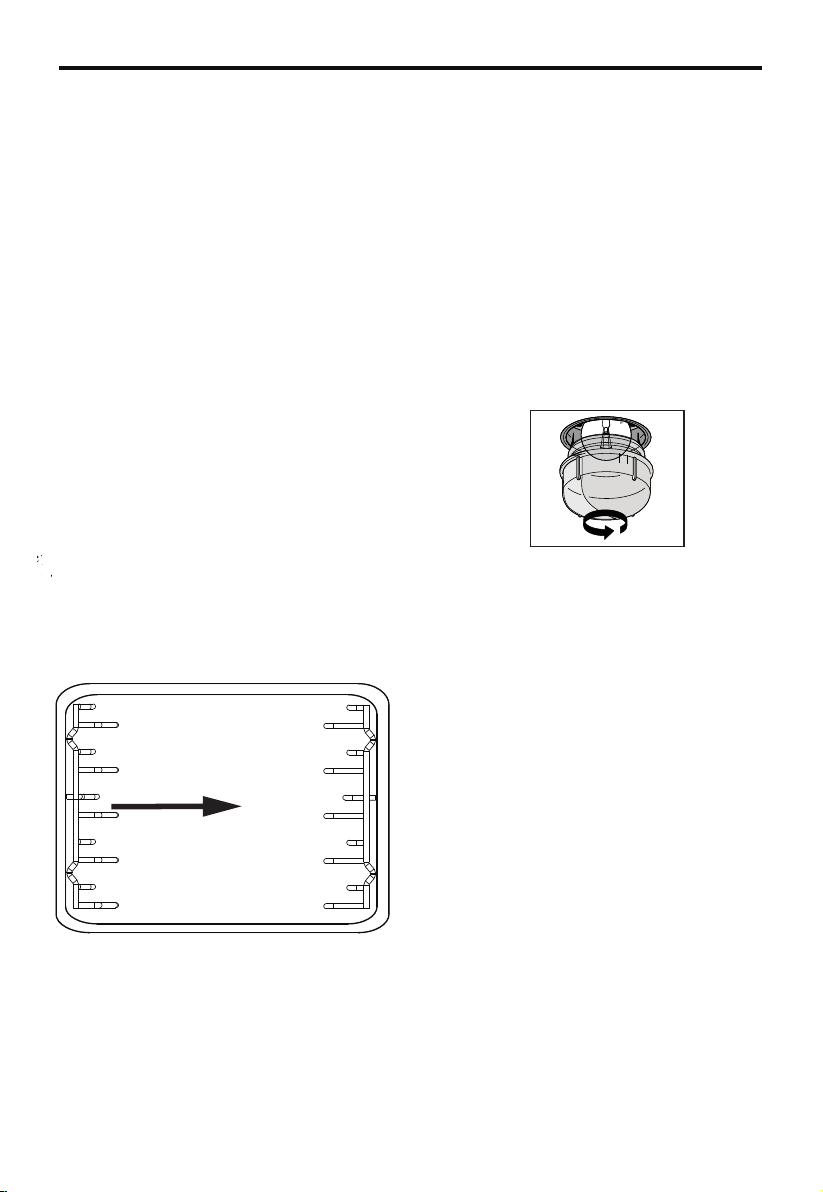
BULB REPLACEMENT
For replacement, process as follows:
1.
Disconnect power from the mains outlet or
switch off the circuit breaker of the unit's
mains outlet.
2.
Unscrew the glass lamp cover by turning
it counter-clockwise (note, it may be stiff)
and replace the bulb with a new one of
the same type.
3. Screw the glass lamp cover back in place.
NOTE: Only use 25-40W/220V-240V , T300°C
halogen lamps.
23
installation
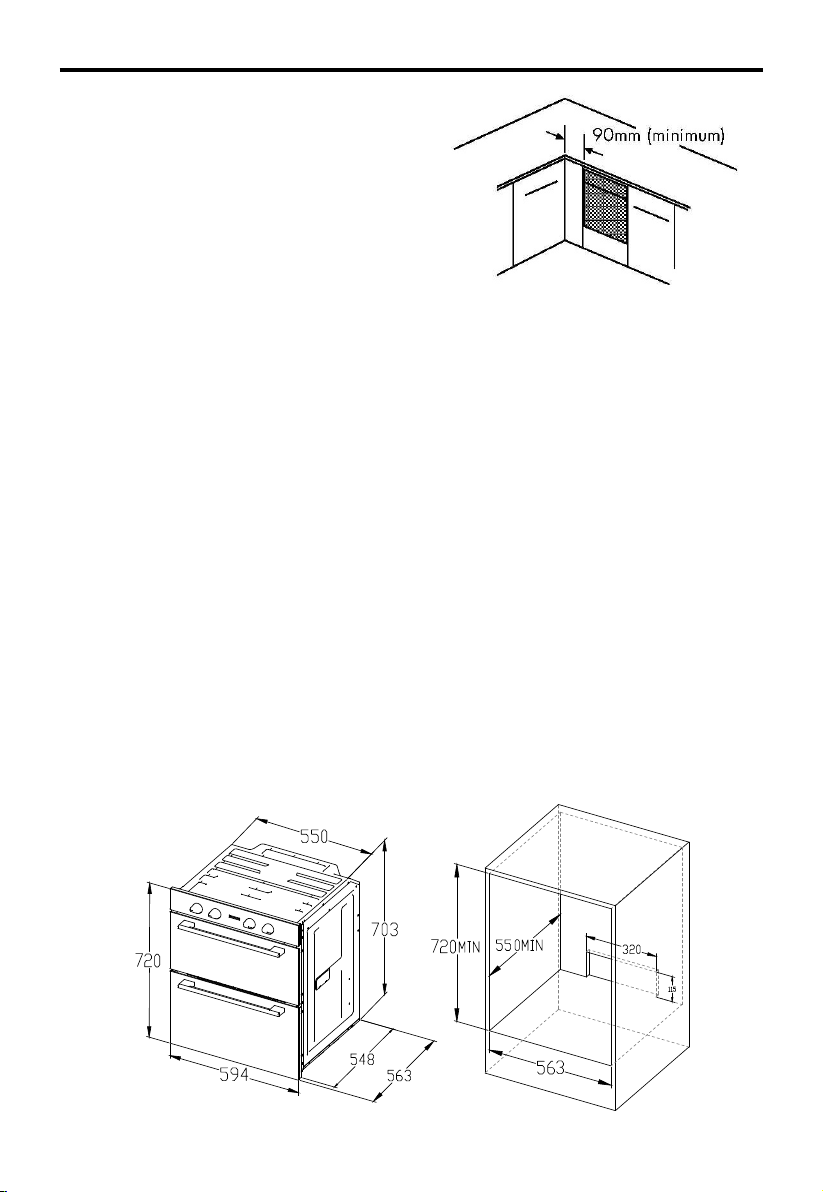
Housing dimensions
Theapplianceisdesignedtofit intoa
standard 600mm wide housing unit with
minimum internal dimensions as shown.
590mm is to the underside of the worktop
when the appliance is built under, or to
the underside of the panel above, when
the appliance is installed into a tall
housing unit.
do not lift the appliance by the door
handle.
Whilst every care is taken to elimi-
nate burrs and raw edges from this
product,please take care when handling -
we recommend the use of protective
gloves during installation.
please note that the weight of this
appliance is approximately
45
kg
(unpacked).Takecarewhenliftingit into
the housing unit - always use an
appropriate method of lifting.
Leave the fixing screws in the base tray
packaging until you are ready to install it.
If this appliance is to be installed near to
a corner where the adjacent cabinets run
at right angles forward of the appliance,
there must be a gap of at least 90 mm
between the appliance and the cabinets,
to prevent overheating of the cabinets.
1. Fix the two brackets to each side of the
cabinet with screws provided. Please
setting leading edge of the brackets 50mm
from the front edge of the furniture.
Please setting face A of the brackets
720mm from top of the furniture as
illustrated by below picture.
2. Lift and slide the oven onto position on
the brackets face A.
24
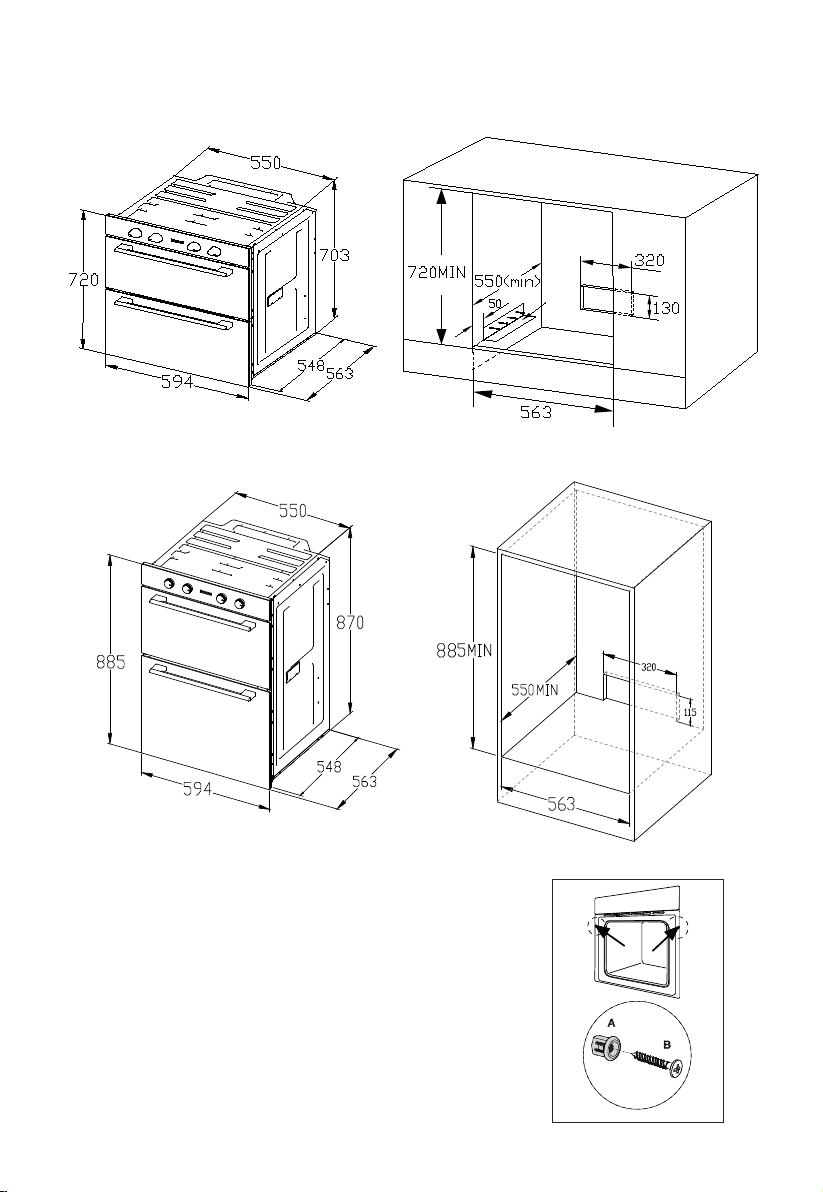
SECURING THE OVEN TO THE CABINET
1. Fit oven into the cabinet recess.
2. Open the oven door.
3. Secure the oven to the kitchen cabinet with two distance
holders " A " which fit the holes in the oven frame and fit
the two screws " B ".
A
Installation with bracket
25
( if fied)
Front clip
Rear clip
Le is shown,mark L; Right is mirrored, mark R.
Step 1
Put the Rear clip at any positon on
the outer wire.
Step 2
PUSH
Tilt inward to push the telescopic runner ,
stuck into the horizontal wire
put into the outer and inner wire.
the rear clip is
of the outer wire ,while the front
clip is
Step 3
Press
down
Press down on the end of the telescopic runner ,
while the boss is
The telescopic is installed.
and let the
front clip hook be hung on the inner
wire ,
stuck into the outer wire.
26
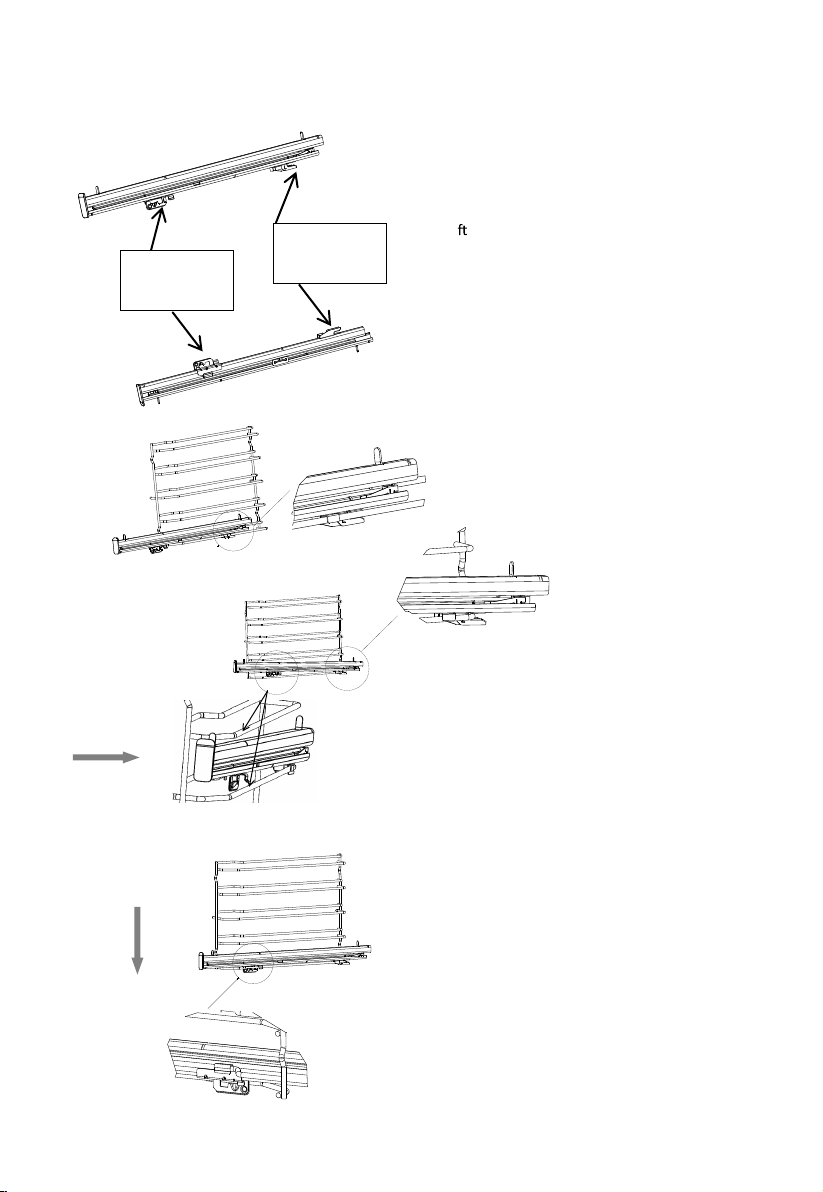
Fix the telescopic runners ( if fied)
Step 1
Press bu on
Press the front clip bu on to remove the boss off the
outer wire.
Step 2
Pull back
Li
up
One hand finger is pressed the bu on of
the front clip ,
another hand holds the
telescopic runner front end to li
up first ,
then pull it back . It’s easy to remove .
27
Remove the telescopic runners
( if fied)
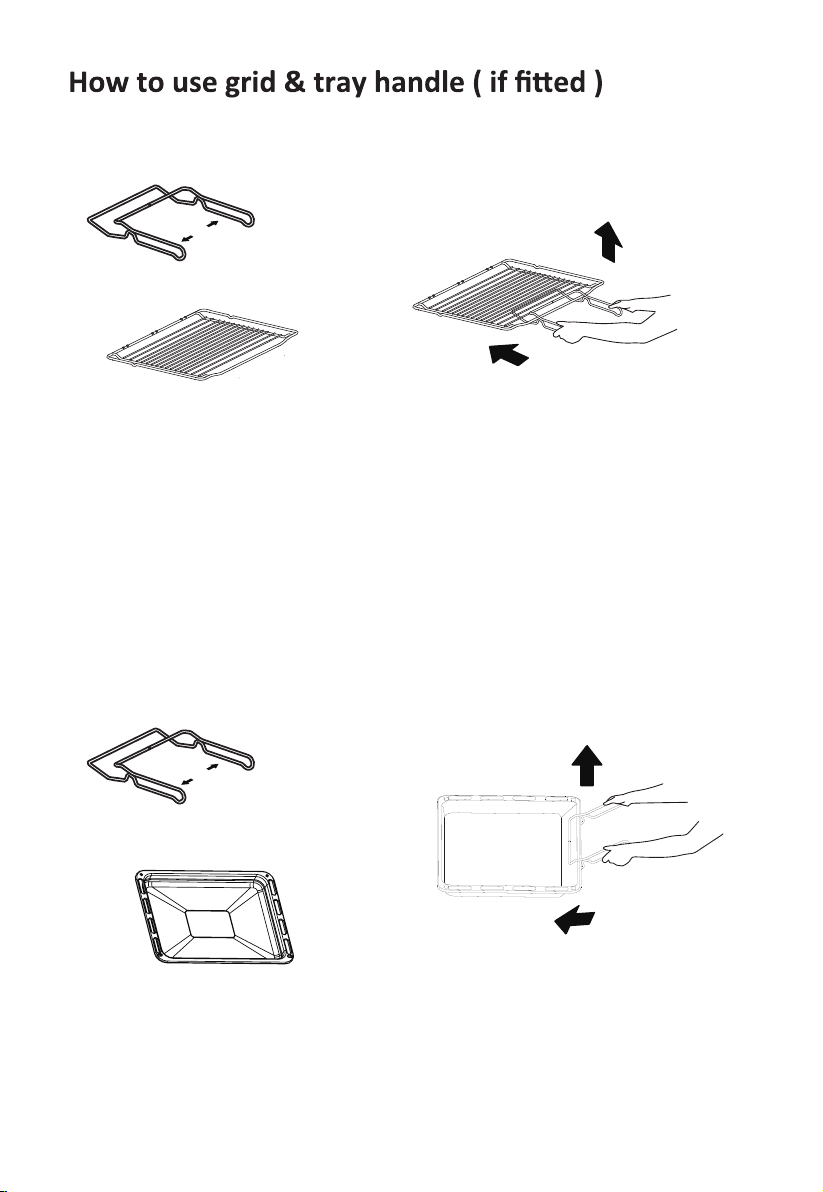
Grid
Bake tray
A
B
B
28
A
Please use both hands to hold the holding parts(A).
Then move it along the direcon B unl it reaches the
posion like the picture showing. Finally, li the racks up to move.
Please use both hands to hold the holding parts(A).
Then move it along the direcon B unl it reaches the
posion like the picture showing. Finally, li the racks up to move.
This
appliance
is
marked according to
the European directive 2012/19/EU on Waste Electrical and
Electronic Equipment (WEEE).
By ensuring this product is disposed correctly, you will help prevent potential negative
consequences for the environment and human health, which could otherwise be caused by
inappropriate waste handling of this product. The symbol on the product indicates that this product
may not be treated as household waste. Instead it shall be handed over to the applicable collection
point for the recycling of electrical and electronic equipment. Disposal must be carried out in
accordance with local environmental regulations for waste dispoasl. For more detailed information
about treatment, recovery and recycling of this product, please contact your local city office, your
household waste disposal service or the shop where you purchased the product.
CONNECTION OF THE OVEN
29