
www.bodum.com
GUARANTEE SERVICE FOR USACANADA
For more information or questions, guarantee claim and return authorization
FREE CALL 1.800.23.BODUMWARRANTYBODUM.COM
GUARANTEE CLAIM CAN NOT BE DONE WITHOUT PROOF OF PURCHASE.
The guarantee certiicate must be completed by the seller at the time of purchase.
You must present the guarantee certiicate to obtain guarantee services. Should
your BODUM® product require guarantee service, please contact your BODUM® retailer,
a BODUM® store, your country’s BODUM® distributor, or visit www.bodum.com.
2 YEARS LIMITED GUARANTEE CERTIFICATE.
CERTIFICAT DE GARANTIE LIMITÉE DE 2 ANS.
CERTIFICADO DE GARÁNTÍA LIMITADA DE 2 AÑOS.
11744//Printed in Chin.
BODUM® is a registered trademark of Pi-Design AG, Switzerland.
Proof of purchase
Cachet du revendeur
Sello de la empresa
Date
Date
Fecha
11744 ePEBO Vacuum Coffee Maker
GUARANTEE CERTIFICATE GUARANTEE: 2 YEARS. Vacuum Coffee Maker
CERTIFICAT DE GARANTIE GARANTIE: 2 ANS. Cafetière à Dépression
CERTIFICADO DE GARANTIA GARANTÍA: 2 AÑOS. Cafetera Alambique
11744//Printed in Chin.
BODUM® is a registered trademark of Pi-Design AG, Switzerland.
11744 ePEBO
Vacuum Coee
Maker
Vacuum Coffee Maker Instruction for use ENGLISH
Cafetière à Dépression Mode d’emploi FRANÇAIS
Cafetera Alambique Instrucciones De Uso ESPAÑOL
Welcome to BODUM®
Please read these instructions carefully before using. ENGLISH
Veuillez lire attentivement ces instructions avant l’utilisation. FRANÇAIS
Lea cuidadosamente estas instrucciones antes de utilizar el producto. ESPAÑOL
Congratulations! You are now the proud owner of the
BODUM® ePEBO Vacuum Coee Maker
1
10
11
5
12
1
15
Illustration 2
Illustration 1
2
3
4
7
8
9
14
13
6

EN VACUUM COFFEE MAKER
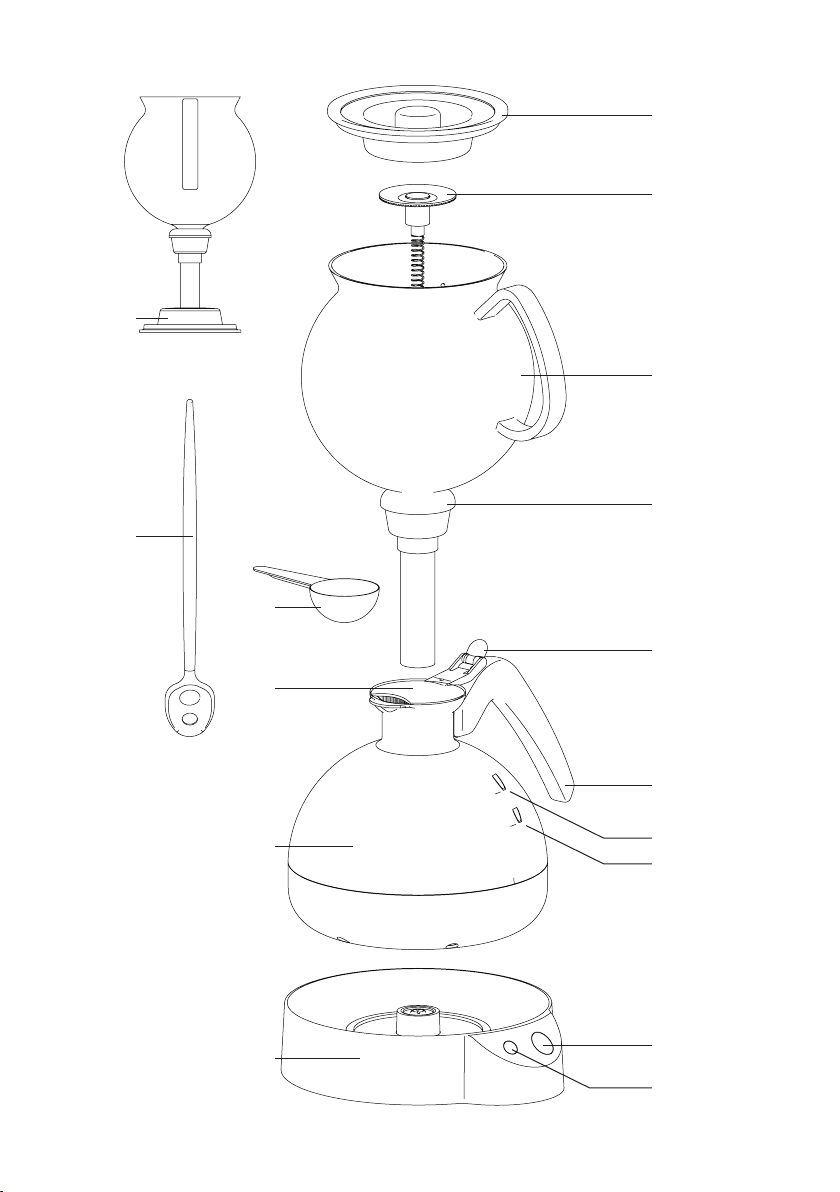
Description of appliance
1 Funnel Lid
2 Filter
3 Funnel
4 Funnel Gasket
5 Jug Lid
6 Lid Knob
7 Jug Handle
8 ON/OFF Button
9 KEEP WARM Button
10 Base
11 Jug
12 Measuring Spoon
13 MAX Water Level Indicator
14 MIN Water Level Indicator
15 Stirring spoon
FR CAFETIÈRE À DÉPRESSION
Description de l'appareil
1 Couvercle de l'Entonnoir
2 Filtre
3 Entonnoir
4 Joint de l'Entonnoir
5 Couvercle du Bol
6 Bouton de Couvercle
7 Poignée du Bol
8 Bouton MARCHE/ARRÊT
9 Bouton KEEP WARM
("MAINTENIR CHAUD")
10 Base
11 Bol
12 Cuillère Doseur
13 Indicateur du niveau MAX d'eau
14 Indicateur du niveau MIN d'eau
15 X
ES CAFETERA ALAMBIQUE
Descripción del aparato
1 Tapa del embudo
2 Filtro
3 Embudo
4 Junta del embudo
5 Tapa de la jarra
6 Pomo de la tapa
7 Mango de la jarra
8 Botón Encendido/Apagado
9 Botón MANTENER CALIENTE
10 Base
11 Jarra
12 Cuchara medidora
13 Indicador de nivel de agua MÁX
14 Indicador de nivel de agua MÍN
15 X


4
EN
Instructions for use
When using electrical appliances, basic safety precautions
should always be followed, including the following:
Read all of the information before you use the appliance for the
irst time. Failure to adhere to the instructions and safety infor-
mation may lead to hazardous situations.
After unpacking the appliance check it for damage. If you are
unsure as to whether the appliance is damaged, do not use it
and instead contact your dealer.
Keep the packaging material (cardboard, plastic bag, etc) out of
reach of children (risk of suocation or injury).
Do not use appliance other than intended use.
This Vacuum Coee Maker is designed for indoor domestic use
only. Do not use it outdoors.
The coee maker is only to be used with the stand provided.
Do not place the appliance on or in close proximity to a hot gas
or electric hob that is switched on, or in a preheated oven.
WARNING! Misuse will cause potential injury!
The manufacturer shall not be responsible for damage or inju-
ries that arise as a result of misuse or unintended use.
Congrtultions! You re now the proud owner of BODUM®
ePEBO Vcuum Coee Mker. Plese red these instructions
crefully before you use your device for the irst time.
ENGLISH
IMPORTANT SAFEGUARDS

Vacuum Coee Maker
5
Use the appliance exclusively for the purpose intended.
Do not allow children to play with the appliance.
When using the appliance in close proximity to children or per-
sons who are unfamiliar with it ensure close supervision at all
times.
This appliance must not be used by persons (including children)
who are restricted in terms of their physical, sensory or mental
faculties or who lack the requisite experience or knowledge,
unless such persons receive instructions regarding its use from
a person who is responsible for their safety and who supervises
them whilst using the appliance. Children must be supervised, in
order to ensure that they do not play with the appliance.
This appliance can be used by children aged from 8 years
and above if they have been given supervision or instruction
concerning use of the appliance in a safe way and if they under-
stand the hazards involved. Cleaning and user maintenance
shall not be made by children unless they are older than 8 and
supervised. Keep the appliance and its cord out of reach of chil-
dren aged less than 8 years.
Do not allow the appliance to come into contact with damp or
wet hands. Do not touch the mains cable or the plug with wet
hands.
Do not touch any hot surfaces. Hold the glass jug and the ilter
holder by the handle only.
Do not use any accessories that have not been recommended
by the appliance manufacturer. This can lead to ires, electric
shocks or injuries.
For USACanada: This appliances has a polarized plug (one
blade is wider than the other). To reduce the risk of electric
shock, this plug will it in a polarized outlet only one way. If the
plug does not it fully in the outlet, reverse the plug. If it still does

6
EN
Instructions for use
not it, contact a qualiied electrician. Do not modify the plug in
any way.
The appliance must not be switched on without water.
Do not ill the jug (11) above the MAX line (13).
Avoid contact with the steam that is generated during the brew-
ing process. Therefore do not open the funnel lid (1) during this
process. Otherwise there is a risk of scalding.
Scalding may occur if the funnel lid is removed during the brew-
ing cycles.
Boiling water can cause burns.
Ensure that the On/O button (8) remains easily accessible at all
times.
CAUTION: To prevent damage to the appliance do not use alka-
line cleaning agents when cleaning use a soft cloth and a mild
detergent.
Never immerse the appliance in water. Remember that this is an
electrical appliance.
Only clean the jug (11) with a damp cloth.
Push the On/O button (8) and pull the plug out of the socket in
order to switch the appliance o.
Always apply pressure to the plug rather than the cable when
unplugging the appliance from the mains.
Do not allow the power cable to hang over the edges of tables
or worktops or permit it to come into contact with hot surfaces.
Unplug the plug from the socket if the coee machine is not in
use or prior to cleaning it. Allow the appliance to cool prior to
cleaning it or before putting on or taking o parts.
Never put an electrical appliance into operation if the power
cable or plug is damaged, after malfunctions have occurred or

Vacuum Coee Maker
7
if the appliance itself has been damaged in any way. In such
instances take the appliance to the nearest authorized service
center for inspection, repairs or adjustment.
Never attempt to replace the power cable on the appliance.
Special tools are required for this purpose. Only have the appli-
ance repaired or the power cable exchanged by a service center
approved by the manufacturer, in order to ensure that the appli-
ance remains safe.
WARNING! Avoid any spillage on the connector.
Do not immerse the cable, plug or appliance in water or other
liquids because this may cause a ire, electric shock or injuries.
Ensure that the surface upon which the appliance is placed is
dry prior to use.
Always put the funnel lid (1), funnel (3) with its gasket (4) and
coee ilter (2) on the appliance during operation.
Do not leave the empty jug (11) on the base (10) when the appli-
ance is turned ON. This can result in damage to the jug.
The container is designed for use with this appliance. It must
never be used on a range top.
Do not set a hot container on a wet or cold surface.
Do not use a cracked container or a container having a loose or
weakened handle.
Do not clean container with cleansers, steel wool pads, or other
abrasive material.
The heating element surface is subject to residual heat after use.
INSTALLATION
• Place the appliance on a stable, level surface that is neither
hot nor in close proximity to a source of heat. The surface must
be dry. Keep the appliance and the power cable out of the reach
of children.

8
EN
Instructions for use
• When using the Vacuum Coee Maker never place the jug (11)
on a metal tray or any other metal surface.
• Check that the type plate on the appliance indicates a voltage
in keeping with the mains voltage in your region. Whilst using
the appliance it is necessary that the socket remain easily
accessible in case of emergencies. The manufacturer shall not
be liable for any accidents that arise due to deicient or defec-
tive grounding of the appliance.
• If the socket is not suitable for the plug on your appliance,
you will need to have the socket replaced by an approved
electrician.
Retain these user
instructions for future
reference.
HOUSEHOLD USE ONLY
DESCRIPTION OF
APPLIANCE
1 Funnel Lid 9 KEEP WARM Button
2 Filter 10 Base
3 Funnel 11 Jug
4 Funnel Gasket 12 Measuring Spoon
5 Jug Lid 13 MAX Water Level Indicator
6 Lid Knob 14 MIN Water Level Indicator
7 Jug Handle 15 Stirring spoon
8 ON/OFF Button

Vacuum Coee Maker
9
IMPORTANT
INFORMATION
Power Cable
The appliance is supplied with a short power cable in order
to reduce the risk of persons becoming entangled or tripping
over a long cable.
Whilst exercising the requisite caution it is possible to use an
extension cable.
In the event that an extension cable is used the nominal val-
ues quoted for the extension cable must comply with those
of the appliance as a minimum. If the appliance is grounded
then the extension cable must be a three-conductor, earthed
cable. The longer cable must be laid such that it does not
hang over the edges of tables or the corners of worktops, so
that children cannot pull on it and such that it is not possible
for persons to trip over it.
Switching O The Vacuum Coee Maker
Using the ON/OFF button (8) it is possible to switch the
Vacuum Coee Maker o at any time.
Prior To Using The Vacuum Coee Maker
Clean the appliance prior to irst use. In order to do so ill the
jug (11) with water to the MAX line (13) and allow the appli-
ance to run with the funnel lid (1), funnel (3) and its gasket (4)
and ilter (2) in place but without ground coee. Afterwards
simply tip the water away. Wait at least 10 minutes before
starting to use the appliance regularly.
HOW TO USE THE
VACUUM COFFEE
MAKER
Open the jug lid (5) and ill the jug (11) with the desired vol-
ume of cold water. However, do not ill beyond the MAX (13)
and below the MIN (14) line on the jug (11).
1
st
Brewing suggestion
STEP 1 Fill the jug with the required amount of water (6 to 8
cups) and place on its base.
STEP 2 Secure ilter to the funnel by pulling ilter chain
through glass tube and fasten the metal hook onto tube end.
Place the funnel into the jug. Make sure it has a complete
seal. Add the required amount of ground coee into the fun-
nel. Place the lid on top of funnel.
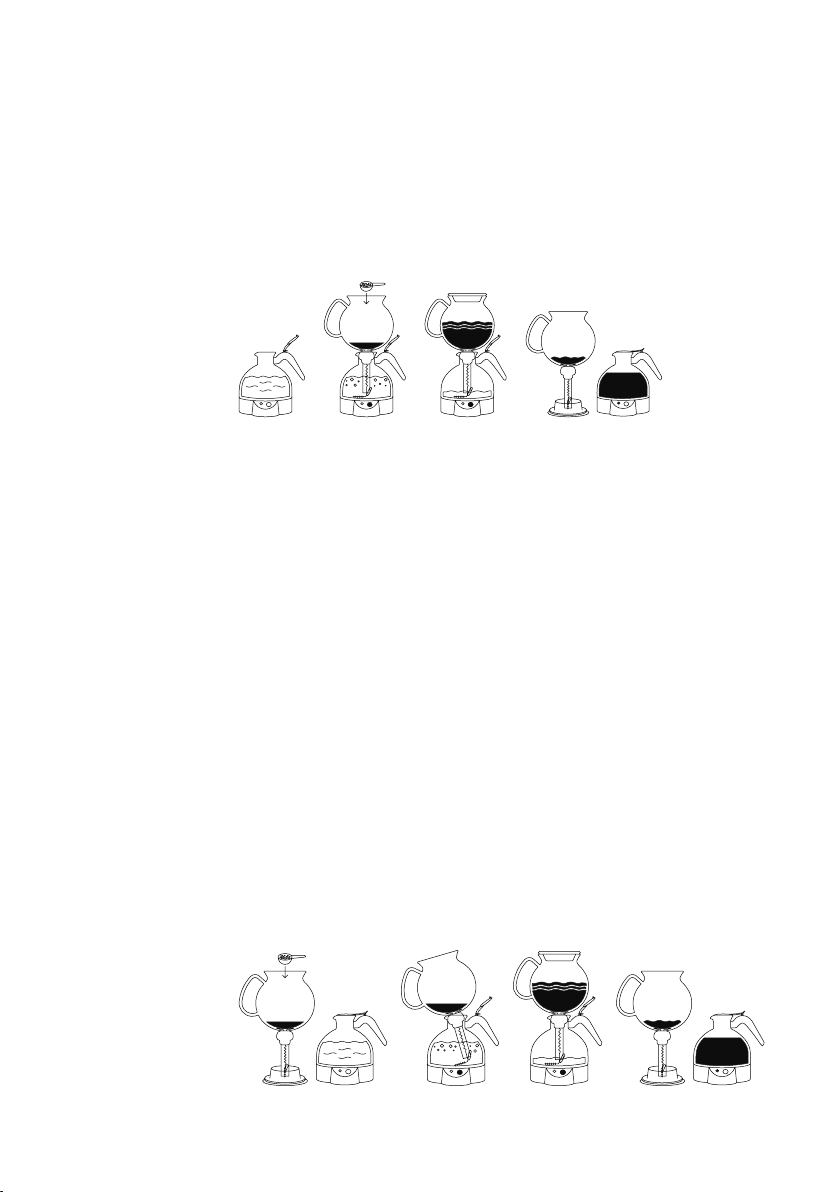
10
EN
Instructions for use
STEP 3 Press the ON/OFF button. The water will rise through
the funnel, where it will brew for 4 minutes. The ePEBO will
automatically turn o, and the brewed coee will low back
into the jug.
STEP 4 Remove funnel and pull on ilter chain to release hook
from the glass tube. Place the funnel on the up-side down
funnel lid. Now enjoy your coee.
STEP 1 STEP 2 STEP 3 STEP 4
2
nd
Brewing suggestion
STEP 1 Prepare funnel by pulling on ilter chain to release
hook from the glass tube end and place the funnel on the
up-side down funnel lid. Add the required ground coee
amount to funnel. Fill jug with the required amount of water
(6 to 8 cups) and place the jug on its base.
STEP 2 Secure ilter to the funnel by pulling ilter chain
through glass tube and fasten the metal hook onto tube end.
Then place funnel on jug and make sure it is tilted and press
ON/OFF button.
STEP 3 Wait until the water boils and then place the funnel
into jug. Make sure it has a complete seal. Place funnel lid
on funnel. The water will rise through the funnel, where it will
brew for 4 minutes. The e.PEBO will automatically turn o,
and the brewed coee will low back into the jug.
STEP 4 Remove funnel and pull on ilter chain to release
hook from the glass tube end. Place the funnel on the up-side
down funnel lid. Now enjoy your coee.
STEP 1 STEP 2 STEP 3 STEP 4

Vacuum Coee Maker
11
Note: If the jug (11) is empty appliance will not switch on for
safety reasons, in order to prevent the heating element from
running whilst dry.
WARNING: Only top up the jug (11) with cold, clear water. Do
not add any milk or other liquids to the jug.
To make a pot of coee ill the funnel (3) with a maximum
8 level BODUM® measuring spoons, of ilter ground coee.
When making a smaller quantity of coee you will require
proportionally less ground coee.
CAUTION: Only use the coee ilter (2) supplied with the
appliance. Never use paper ilters.
3
rd
Brewing suggestion
STEP 1 Fill the jug with the required amount of water (6 to
8 cups) and place on its base. Secure ilter to the funnel by
pulling ilter chain through glass tube and fasten the metal
hook onto tube end. Place the funnel into the jug. Make sure
it has a complete seal.
STEP 2 Press the ON/OFF button and place lid on top of
funnel.
STEP 3 The water will rise through the funnel, and once all
the water has risen to the funnel, simply remove the lid and
add the required amount of ground coee. Ensure all the
grounds are completely saturated by giving it a gentle stir
with the included plastic spoon. Place the lid back on to
funnel.
STEP 4 The ePEBO will automatically turn o after 4 minutes,
and the brewed coee will low back into the jug.
STEP 5 Remove funnel and pull on ilter chain to release hook
from the glass tube. Place the funnel on the up-side down
funnel lid. Now enjoy your coee.
STEP 1 STEP 2 STEP 3 STEP 4 STEP 5

12
EN
Instructions for use
Press the On/O button (8) once to start the brewing pro-
cess. The On/O button will begin to illuminate blue.
After a few minutes the water starts to low through the tube
into the funnel (3) and subsequently there for four minutes.
This process requires approx. 10 minutes for a jug of coee.
Note: Do not open the funnel lid (1) during the brewing pro-
cess. Scalding may occur if the lid is removed during the
brewing cycles.
Once the brewing process is complete, the ePEBO will switch
o automatically.
It is possible to switch the KEEP WARM function on and o
during or after the whole brewing process (to keep the coee
warm for an additional 30 minutes. After 30 minutes, the
KEEP WARM function will automatically turn o).
If the KEEP WARM switch is on, the button will be illuminated
in red.
KEEP WARM function process takes 30 minutes and will turn
o automatically.
After the cycle that funnel (3) can be taken o and placed
on funnel lid (1) like shown on the illustration 2; upside down
position.
Before placing the funnel (3) on the lid funnel (1) please
release the ilter (2) by pulling its chain.
Note: Clean the coee ilter (2) and funnel (3) thoroughly
after every use.
CLEANING THE
MACHINE
When cleaning the Vacuum Coee Maker never use any
chemicals, steel wool or abrasive cleaners. Only clean the
jug (11) with a damp cloth.
Never immerse the jug in water. Remember that this is an
electrical appliance.
Note: Always disconnect the Vacuum Coee Maker from the
mains prior to cleaning the appliance.
Clean the Vacuum Coee Maker after every use. The follow-
ing parts are dishwasher safe:
1 Funnel Lid 4 Funnel Gasket

Vacuum Coee Maker
13
MAINTENANCE
AND CARE
De-Scaling The Vacuum Coee Maker
To guarantee that the Vacuum Coee Maker works correctly,
you have to ensure that the machine is kept free of lime-
scale. The optimum cycle is dependent on the hardness
of the water which is dierent from country to country. We
would advise de-scaling the machine after every 100 uses.
Important: If you do not de-scale the Vacuum Coee Maker
then this can lead to damage!
Regular de-scaling can increase the service life of the prod-
uct and guarantees its faultless functionality. Furthermore,
regular de-scaling will result in less steam forming, faster
brewing times and energy savings.
Deposits should be removed with a commercially available
de-scaling solution for coee machines or with a solution
of vinegar and water (20% vinegar and 80% water). When
using commercially available de-scaling solutions ensure
that these are suitable for use with heating elements made
of copper as well as silicone materials. (Carefully check the
speciications and dosage instructions of the manufacturer).
Fill the jug (11) with descaling solution or a vinegar and water
solution (do not ill above the MAX line(13)) and leave it for a
while.
Then rinse the jug thoroughly with cold, clear water and at
least twice.
Any other servicing should be performed by an authorized
service facility.
STORAGE
Always disconnect the Vacuum Coee Maker from the mains
when it is not in use.
2 Filter 12 Measuring Spoon
3 Funnel
Ensure that no ground coee remains in the ilter (2) before
putting it in the dishwasher.
Wash the jug under warm and clear running water. Then
scrub the inside of the jug with a soaped kitchen brush. Rinse
it well.
14
EN
Instructions for use
TECHNICAL SPECIFICATIONS
TECHNICAL DATA
EU mains voltage 220240 V~ 5060 Hz
USA mains voltage 120 V~ 60 Hz
EU nominal power 1000 W
USA nominal power 1000 W
Cable length approx. 95 cm / 37.5 in
Volumetric capacity 1.0 liter/34 l. oz
Test marks GS, CE, ETL, CETL
ENVIRONMENTALLY ACCEPTABLE DISPOSAL
This marking indicates that this product should not be
disposed with other household wastes throughout the
EU. To prevent possible harm to the environment or
human health from uncontrolled waste disposal, recy-
cle it responsibly to promote the sustainable reuse of
material resources. To return your used device, please
use the return and collection systems or contact the
retailer where the product was purchased. They can
take this product for environmentally safe recycling.
MANUFACTURER GUARANTEE FOR THE USA & CAN, THE EU AND CH.
Gurntee: BODUM® AG, Switzerlnd, gurntees the PEBO Vcuum
Coee Mker for period of two yers from the dte of originl purchse
ginst fulty mterils nd mlfunctions tht cn be trced bck to defects
in design or mnufcturing. Repirs re crried out free of chrge if ll
gurntee conditions re met. Refunds re not vilble.
Gurntor: BODUM® (Schweiz) AG, Kntonsstrsse 100, Postfch 463, 6234
Triengen.
Gurntee conditions: The gurntee certiicte must be completed by the
seller t the time of purchse. You must present the gurntee certiicte to
obtin gurntee services. Should your BODUM® product require gurntee
service, plese contct your BODUM® retiler, BODUM® store, your
country’s BODUM® distributor, or visit www.bodum.com.
BODUM® will not provide wrrnty for dmge resulting from inpproprite
use, improper hndling, norml wer nd ter, indequte or incorrect
mintennce or cre, incorrect opertion or use of the pplince by
unuthorized persons.
This Mnufcturer Gurntee does not ect your sttutory rights under
pplicble ntionl lws in force, nor your right ginst the deler rising
from their sles/purchse contrct.