April 2018
Arlo Technologies, Inc.
2200 Faraday Ave. Suite 150
Carlsbad, CA 92008 USA
202-11684-06
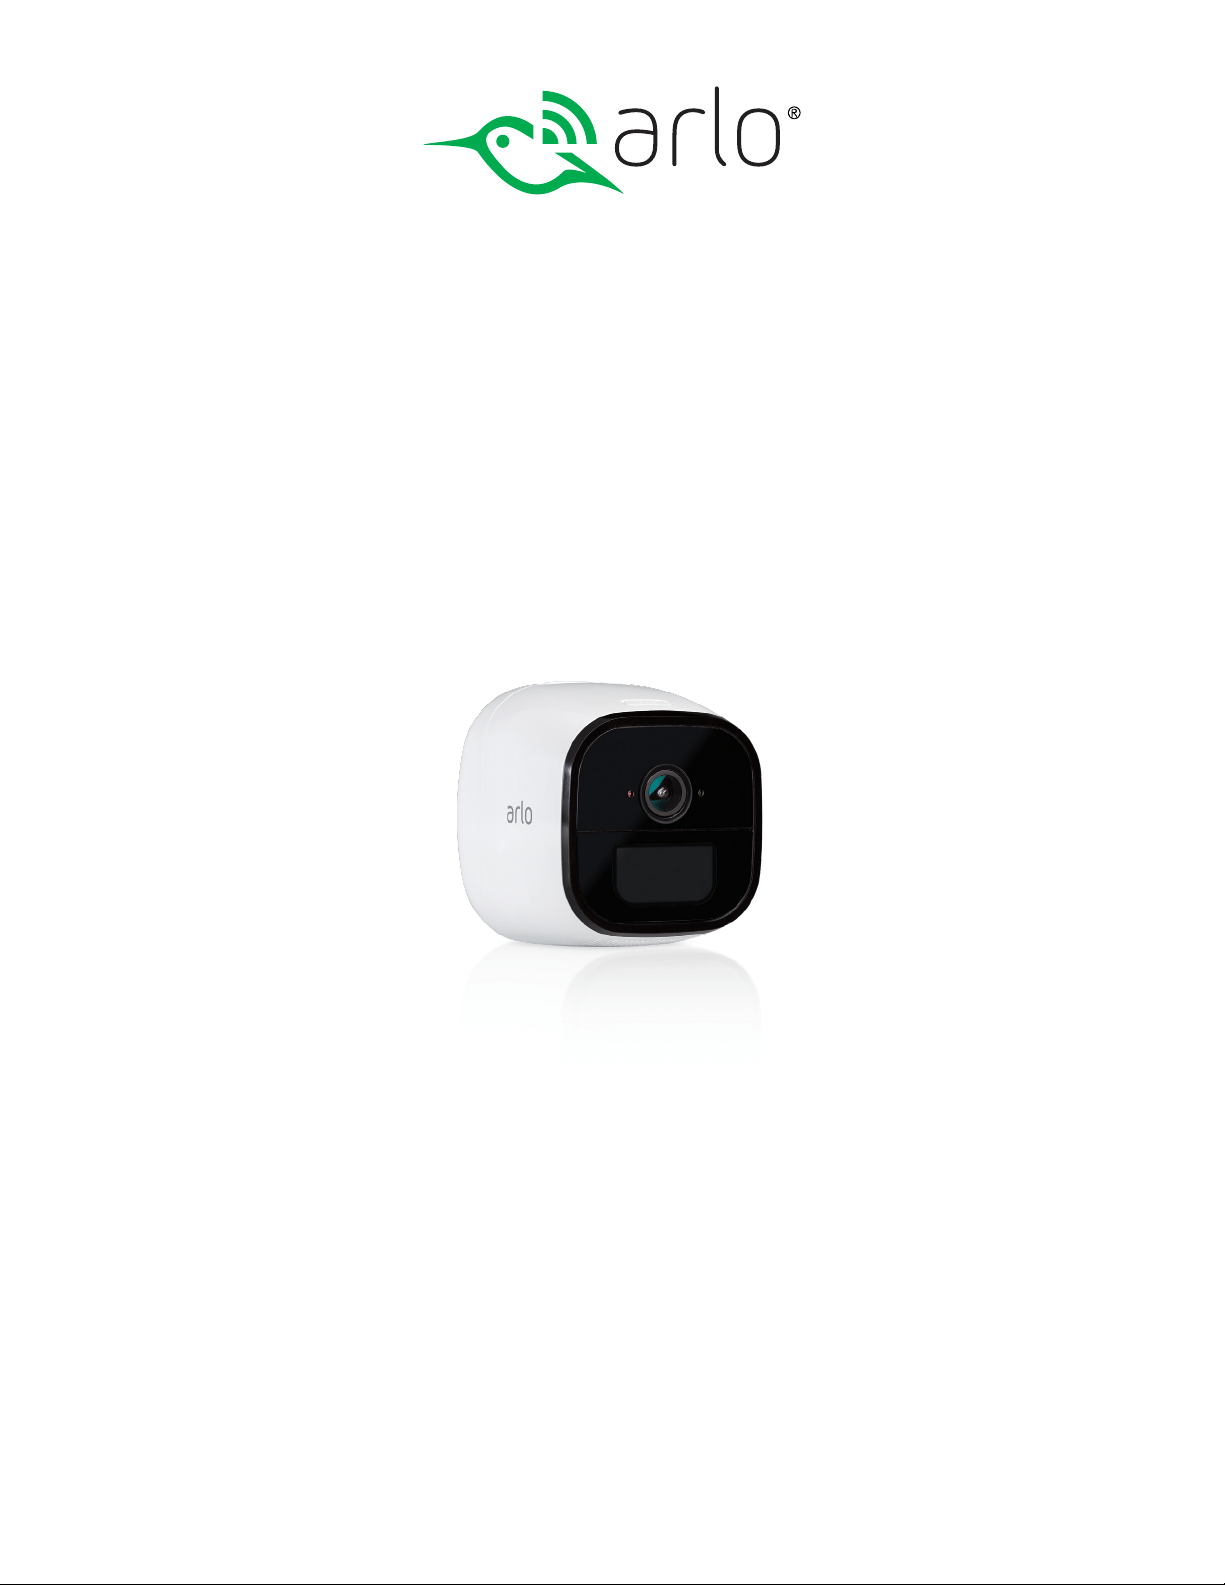
User Manual
Arlo Go
Mobile HD Security Camera

2
Support
For product updates and web support, visit http://www.arlo.com/en-us/support/.
Trademarks
©2018 Arlo Technologies, Inc., Arlo, Arlo logo, and Every Angle Covered are trademarks of Arlo Technologies, Inc. App Store is a
service mark of Apple Inc., registered in the U.S. and other countries. Google Play and the Google Play logo are trademarks of
Google Inc. Amazon, Alexa and all related logos are trademarks of Amazon.com, Inc. or its aliates. Other trademarks are for
reference purposes only.
Compliance
For the current EU Declaration of Conformity, visit
http://support.netgear.com/app/answers/detail/a_id/11621/.
For regulatory compliance information, visit
http://www.netgear.com/about/regulatory/.
See the regulatory compliance document before connecting the power supply.

3
Contents
1. Set Up Your System 6
What You Need to Install and Use Your Arlo Go Camera 6
Activate a SIM Card ..........................................................................................................................................................................6
Insert a SIM Card Into Your Arlo Go Camera ....................................................................................... 7
Insert the Battery Into Your Arlo Go Camera...................................................................................7
Get the Arlo App .................................................................................................................................................................................... 8
Set Up Your Arlo Go Camera ............................................................................................................................................ 8
Camera LED Guide .......................................................................................................................................................................... 10
Place Your Camera ........................................................................................................................................................................11
Arlo Go Access and Cloud Storage ...................................................................................................................12
Arlo Go Camera Position ......................................................................................................................................................13
Charge Your Arlo Go Camera ......................................................................................................................................13
2. View Your Content 15
View the Devices Page ...........................................................................................................................................................15
View the Camera Feeds .......................................................................................................................................................16
Record Clips From Live Video .....................................................................................................................................16
Talk and Listen ...................................................................................................................................................................................... 17
Control the Camera Feed Image ..........................................................................................................................17
Cloud Recording ................................................................................................................................................................................. 19
View Recordings.................................................................................................................................................................................19
Share and Manage Library Recordings ....................................................................................................21
3. Use an SD Card With Arlo Go 25
Supported SD Card Format ...........................................................................................................................................25
Insert an SD Card .............................................................................................................................................................................25
View the SD Card Status ....................................................................................................................................................26
Turn SD Card Recording O and On ............................................................................................................... 27

4
View Videos Saved on an SD Card ......................................................................................................................27
Change the SD Card Overwrite Setting..................................................................................................28
Format an SD Card ........................................................................................................................................................................29
Safely Remove an SD Card ..............................................................................................................................................30
4. Personalize Your Camera 31
Name Your Camera .......................................................................................................................................................................31
Profile Settings .....................................................................................................................................................................................31
Grant Access to Friends ...................................................................................................................................................... 33
5. Modes, Rules, and Smart Alerts 36
Select a Mode ......................................................................................................................................................................................... 36
Change Motion Sensitivity ...............................................................................................................................................37
Change Audio Sensitivity .................................................................................................................................................... 38
Manage Alerts ........................................................................................................................................................................................ 39
Create a Schedule .......................................................................................................................................................................... 40
Add a Mode ..................................................................................................................................................................................................41
6. Settings 43
View Device Information .....................................................................................................................................................43
Turn O the Camera LED ..................................................................................................................................................43
Change the Time Zone ............................................................................................................................................................ 44
Change the Video Resolution ..................................................................................................................................... 45
Turn Night Vision On and O .......................................................................................................................................46
Turn the Microphone O and On ......................................................................................................................... 46
Change the Speaker Settings ................................................................................................................................... 47
Specify Power Management ........................................................................................................................................48
Update the Firmware ...............................................................................................................................................................48
View or Change Cellular Network Settings .....................................................................................49
Restart the Camera.....................................................................................................................................................................50
Reset the Camera to Its Factory Settings .........................................................................................51
Remove a Camera From Your Account ...................................................................................................... 52

5
7. Manage Your Subscription Plan 53
Subscription Plans .........................................................................................................................................................................53
Upgrade to a Paid Subscription Plan ............................................................................................................53
8. Arlo Connect 54
Use Arlo With IFTTT ......................................................................................................................................................................54
9. Troubleshooting 55
Check Arlo Go’s Mobile Network Signal Strength 55
Check Arlo Go’s Battery Level .................................................................................................................................. 55
Optimize Motion Detection ............................................................................................................................................ 56
Arlo Go Is Not Streaming on a Mobile Device ................................................................................56
Cannot View Arlo Live Streaming in a Web Browser 57
Troubleshoot an Oine Arlo Go Camera ...............................................................................................57
Condensation on the Camera Lens ................................................................................................................. 59
Not Receiving Push Notifications .......................................................................................................................59
10. Rechargeable Battery Safety 61
Safety Rules for Arlo Go Rechargeable Batteries 61
Safety Rules for the Arlo Go Charging Station .........................................................................62

6
1. Set Up Your System
Setting up your Arlo
®
Go camera involves a few simple steps. Your Arlo account lets
you view videos from any Internet-connected computer or mobile device. You can use
the same Arlo app to set up and manage Arlo Go and other Arlo cameras.
What You Need to Install and Use Your Arlo Go
Camera
You need the following to activate your Arlo Go camera:
• A computer or mobile device with Internet access
• An activated SIM card with a data plan
• If you are using a computer, you also need a supported web browser. The
following browsers are qualified to work with the Arlo web application:
• Internet Explorer 10 or later
• Microsoft Edge
• Firefox 3.5 or later
• Safari 3 or later (only with Mac OS X)
• Chrome (latest version)
• If you are using a mobile device, you need the Arlo app, which requires iOS 8 or
later or Android 4.1 or later. To download the mobile app for your smartphone or
tablet, visit your device’s app store and search for Arlo.
During activation, your Arlo Go camera must be in a location with mobile
network data coverage.
Activate a SIM Card
The Arlo Go camera uses the mobile network to send video to your Arlo account in
the cloud. To do this, the Arlo Go camera uses an activated SIM card installed inside
the camera.
For information about how to activate SIM cards, see the instructions from your
SIM service provider.
7
Set Up Your System
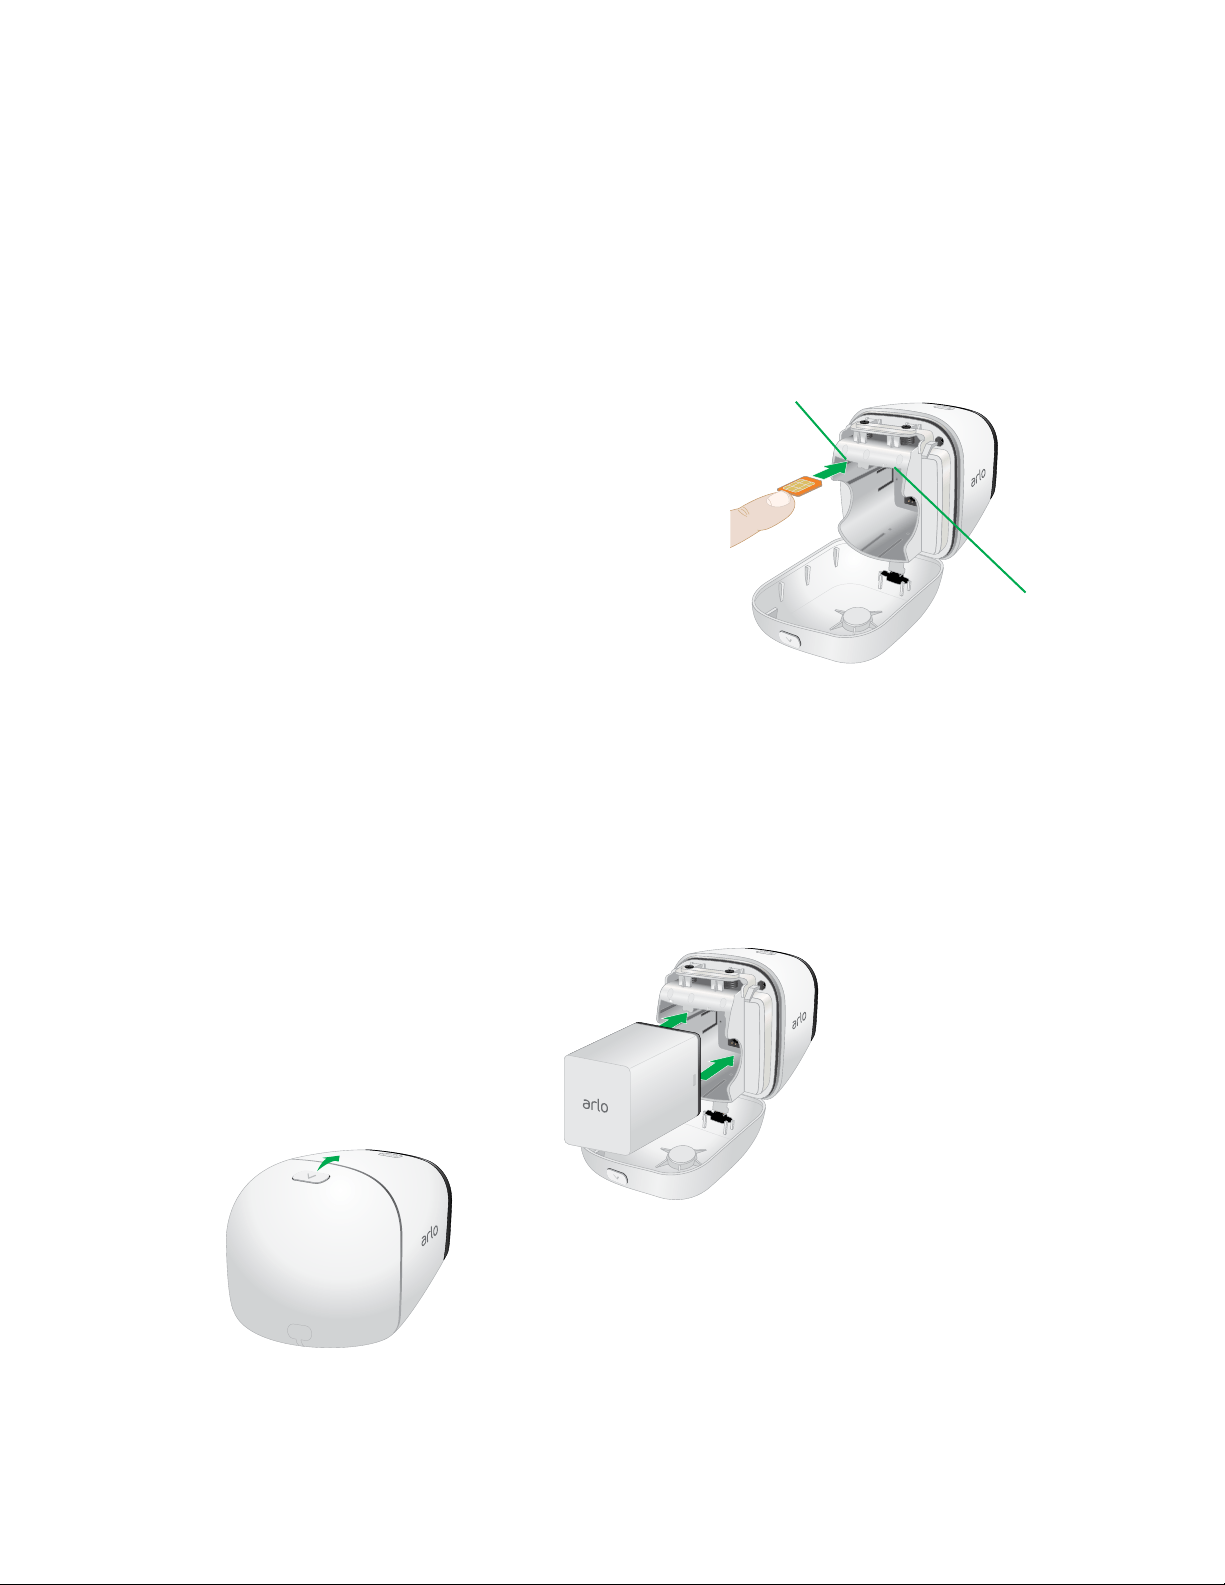
Insert a SIM Card Into Your Arlo Go Camera
Your Arlo Go camera might include a preinstalled SIM card, or you might need to
insert a SIM card into the Arlo Go camera. Make sure the SIM card is activated
before you insert it.
¾ To insert a SIM card:
1. Unlock the battery compartment by
pressing and holding the latch.
2. Gently pull the battery door back to open
the compartment.
3. Align the SIM with the gold contacts facing
up.
4. Insert the SIM card into the SIM card slot.
Note: If you plan to store video recordings on an
optional SD card (sold separately), insert the SD
card now.
Insert the Battery Into Your Arlo Go Camera
If power is available, you can plug your camera in and use it indoors in powered
mode. We recommend that you insert the battery into your Arlo Go camera even if
you plan to power the camera using the power adapter.
¾ To insert the battery:
1. Align the battery contacts.
2. Insert the battery.
3. Close the battery door.
The Arlo Go camera plays a chime when it boots.
Note: The Arlo Go battery is partially charged when it leaves the factory.
SIM card slot
SD card slot
8
Set Up Your System
Get the Arlo App
For the best experience, download the Arlo app by scanning this QR code or
searching for Arlo in the app store.
Note: If you already use the Arlo app, make sure that you are using the latest version. To
find out if an update is available, go to the app store and search for Arlo.
Set Up Your Arlo Go Camera
Use the Arlo app and your Arlo account to set up your Arlo Go camera. If you
already set up an Arlo account, you can add the Arlo Go camera to your account.
During setup, your Arlo Go camera must be connected to the mobile network. This
requires that you are using a version of the camera that is compatible with an
activated mobile service plan. Additional restrictions and data charges might apply.
Coverage and service are not available everywhere.
After you add your Arlo Go camera to your Arlo account, you can place the Arlo Go
camera anywhere in your mobile network coverage area.
To set up your Arlo Go camera:
1. Place the Arlo Go camera in a location with good cellular network coverage.
2. If your mobile network provider requires you to activate the SIM card, make
sure that you activated the SIM card and it is inserted in the Arlo Go camera.
For more information about SIM cards, see Activate a SIM Card on page 6
and Insert a SIM Card Into Your Arlo Go Camera on page 7.
3. Tap the Arlo icon
on your mobile device..
If you are using a computer, enter arlo.netgear.com in the address bar of a
browser.
4. If you already set up an Arlo account, log in, and tap or click Add Device.
5. If you are setting up a new Arlo account, tap or click New to Arlo?.

9
Set Up Your System
6. Select Arlo Go.
The How to Sync page displays.
7. Press the Sync button on the camera.
You hear a click.
8. Tap or click Continue.
The Scan QR Code page displays.
9. Hold the QR code that the app displays 4 to 8 inches (10 to 20 cm) in front of
the camera until you hear a chime sound.
10. If you heard a chime sound, tap or click Yes, I heard a chime.
The Discover Device page displays.
11. Tap or click Continue.
Arlo discovers your Arlo Go camera.
12. If you hear a buzz or your camera LED blinks amber, the camera is not
connected to the cloud. Tap or click Did your hear a buzz or is your camera
LED blinking amber?
a. If the Unable to find page displays, tap or click Edit APN Information.
Follow the prompts. Contact your service provider for details.
b. If the Arlo Go Setup page displays, make sure that the SIM card was
activated and then tap or click Continue.
13. If the Account Setup page displays, do the following:
a. Enter your account settings and tap or click Continue.
b. When prompted, select a service plan.
Note: For more information, see Subscription Plans on page 53.
Your Arlo Go camera is set up.
10
Set Up Your System
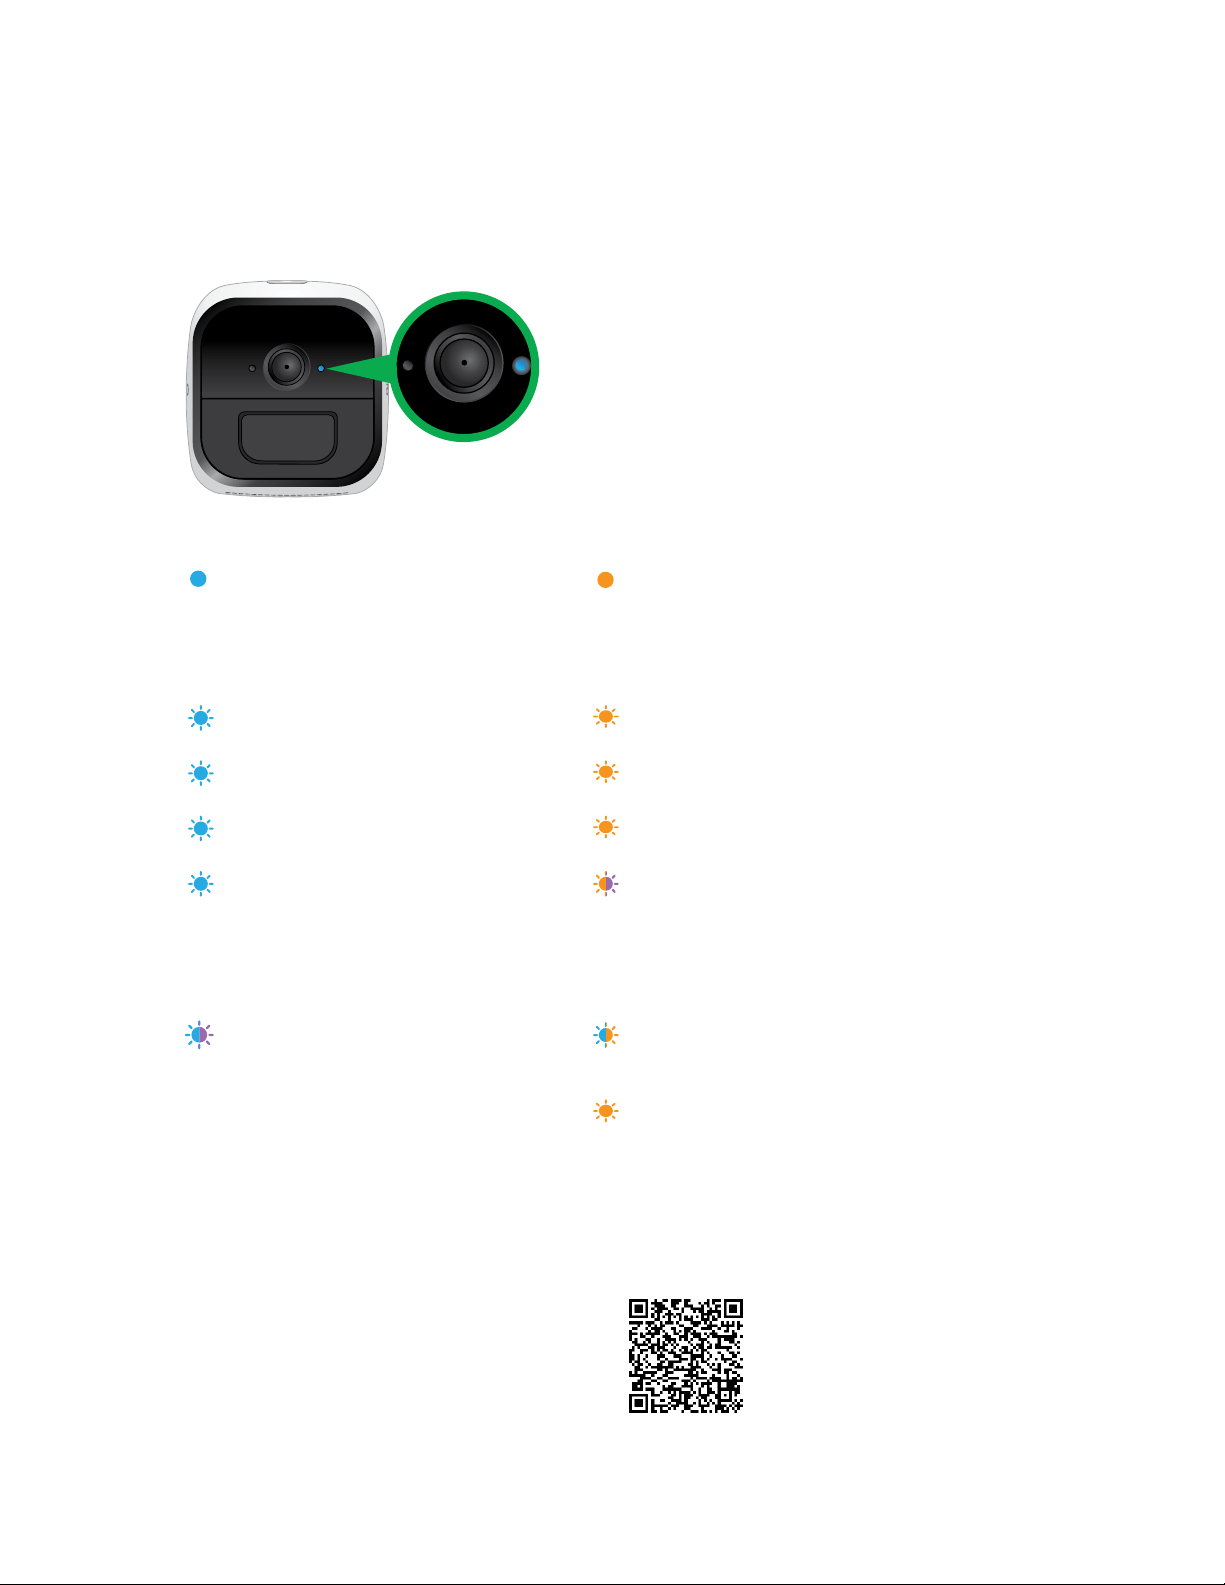
Camera LED Guide
The Arlo Go camera LED lights in dierent colors to indicate how the camera is
operating.
Camera LED
Solid blue
The camera is registered and is connected to
the mobile network.
Solid amber
No SIM card is inserted or the SIM card is damaged or not
active.
During a sync, the battery charge is low.
During the motion detection test, motion is detected.
Very slow blinking blue
The camera is powering on.
Blinking amber
Mobile network coverage is not available.
Slow blinking blue
The camera is ready to scan the QR code.
Slow blinking amber
The battery level is low.
Blinking blue
The camera is scanning the QR code.
Double blinking amber
The battery level is so low that it is critical.
Fast blinking blue
The camera is connected to the cloud.
During charging, blinking for three seconds
indicates that charging started and blinking
for two seconds indicates that charging is
complete.
Blinking amber and purple
The SD card type is invalid.
Blinking blue and purple
The camera is connecting to the network and
the cloud.
Blinking amber and blue
The camera is receiving a firmware upgrade.
Fast blinking amber
The camera connected to the cellular network but it
cannot connect to the cloud.
During a QR code scan, the scan failed.
During battery charging, the charge failed.
For more information about connecting to the cloud,
visit tinyurl.com/h8csb5a or scan this QR code:
11
Set Up Your System
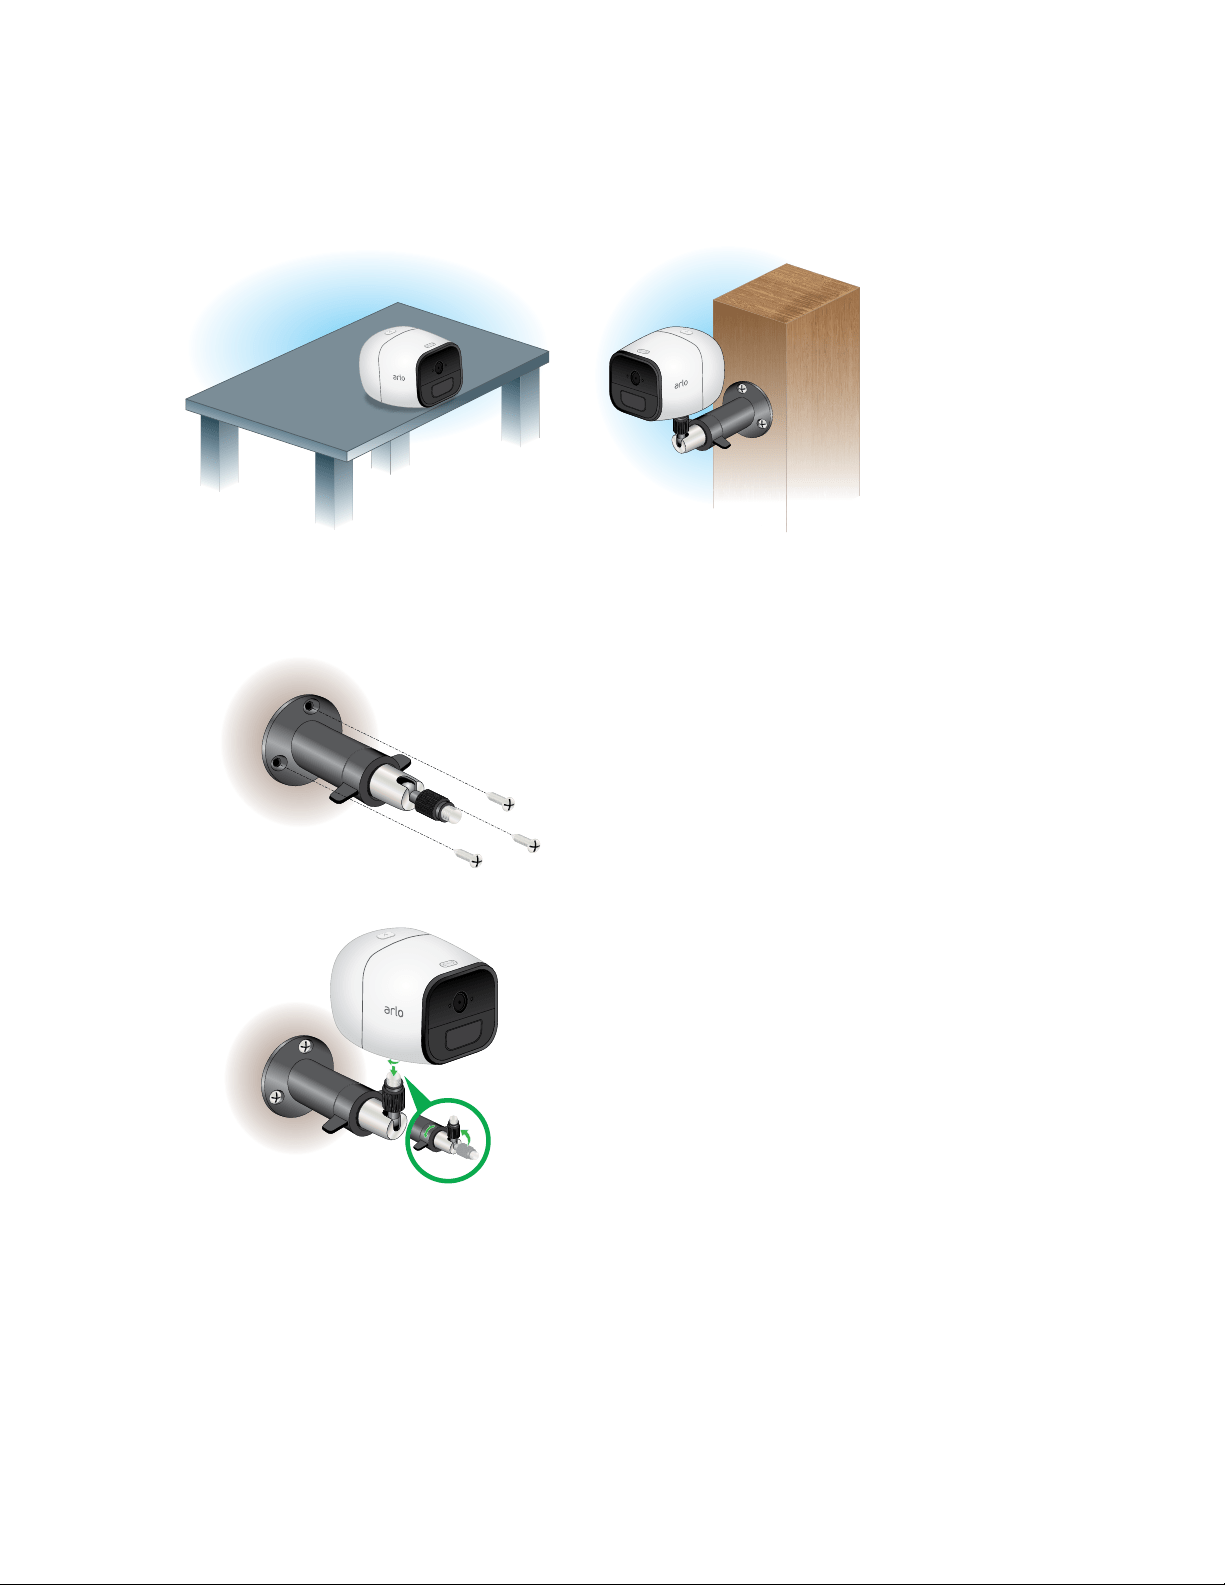
Place Your Camera
You can place your camera on a flat surface or mount it.
¾ To mount the camera on a wall:
1. Place the wall plate and secure it with three screws.
2. Attach the camera to the wall plate.
If you’re mounting the camera to drywall or plasterboard, be sure to use the
included plastic wall anchors.
Note: Other mounts are available. To learn more, visit
arlo.com/en-us/products/default.aspx.
12
Set Up Your System
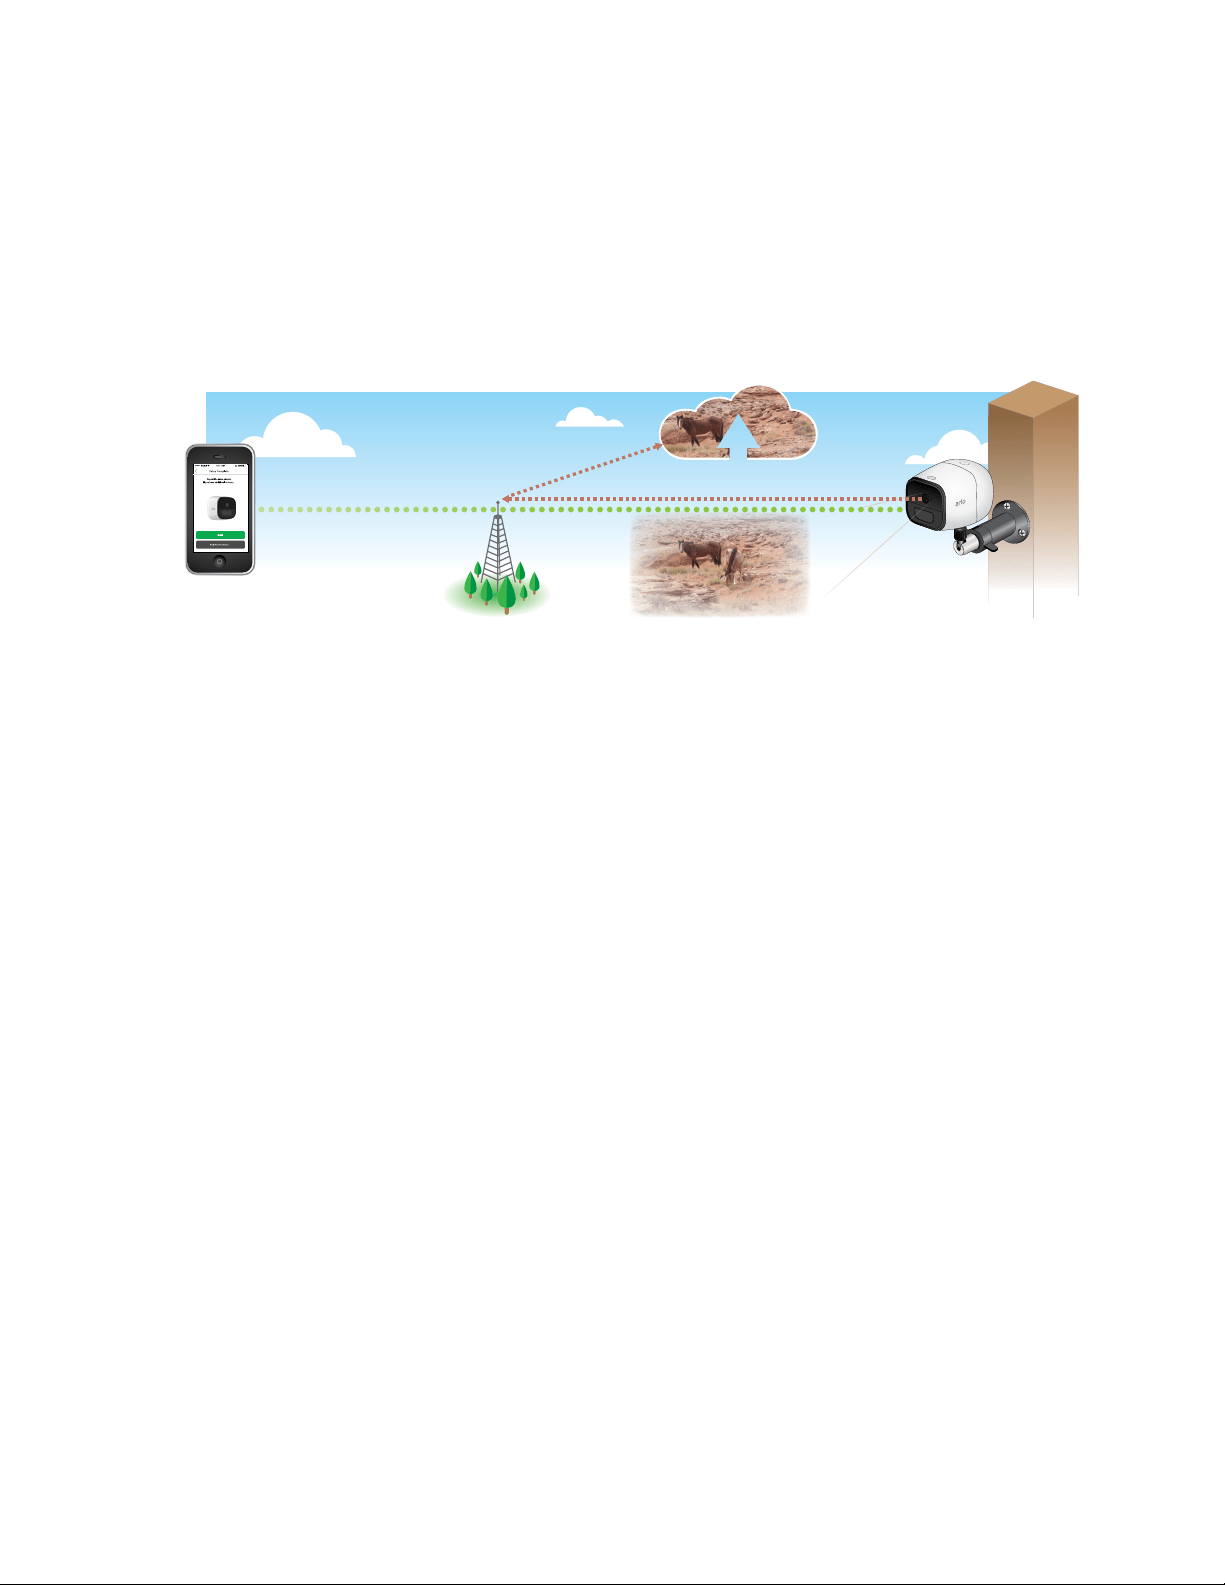
Arlo Go Access and Cloud Storage
The Arlo Go camera is designed to connect to the cellular network. During setup,
the Arlo app uses the cellular network to find your Arlo Go camera so that you can
add the camera to your Arlo account.
After setup, the Arlo Go camera uses the cellular network to send recordings to
the cloud storage associated with your Arlo account.
For best results, we recommend placing your Arlo Go camera in a location where
the Arlo app displays at least three bars of mobile network signal strength. If your
Arlo Go camera is in an area with consistently low signal strength (two bars or
less), you might experience these problems:
• You are sometimes unable to view your camera live, or the video stream
fluctuates.
• You are sometimes unable to watch recorded videos right away.
• Notifications are sometimes delayed.
• Your battery depletes more quickly than usual because your camera spends so
much time attempting to reconnect to the network.
Optimize Mobile Network Connectivity
¾ To optimize mobile network connectivity for your Arlo Go camera:
1. Check your mobile network coverage map for the area in which you want to
use your Arlo Go camera.
Note: Cellular coverage fluctuates based on network trac and weather
conditions. If you place your Arlo Go camera near the edge of a coverage area,
your connection weakens or drops whenever the mobile network is carrying a
lot of trac in that area. Heavy rain, thunderstorms, and high humidity can also
weaken your Arlo Go’s mobile network connection.

13
Set Up Your System
2. Check the mobile network signal strength in the place where you want to put
your Arlo Go camera.
The easiest way to do this is to go there and check the signal strength on an
mobile phone that uses the same mobile network service. If the signal strength
is good enough, you can set up your Arlo Go camera and then look at your Arlo
Go’s signal strength in the camera’s settings.
Arlo Go Camera Position
When placing your Arlo Go camera, keep these tips in mind:
• Avoid placing the camera in an area that gets a lot of light shining directly into
the camera lens.
• You can move and zoom the field of view.
• Keep active locations in the camera’s field of view.
Arlo Go provides a 130-degree viewing angle. Position your camera so that the
space you want to monitor is within the camera’s field of view.
• Aim with the cloud.
To help with placing your camera, do a live stream from the Arlo Go camera.
Aim the camera while watching the video feed on your Arlo smartphone app to
make near-real-time adjustments to the camera’s position.
For more information, see the online video How to Install Arlo Go Smart Home
Security Cameras at https://www.youtube.com/watch?v=gI-Mk9FOmoQ.
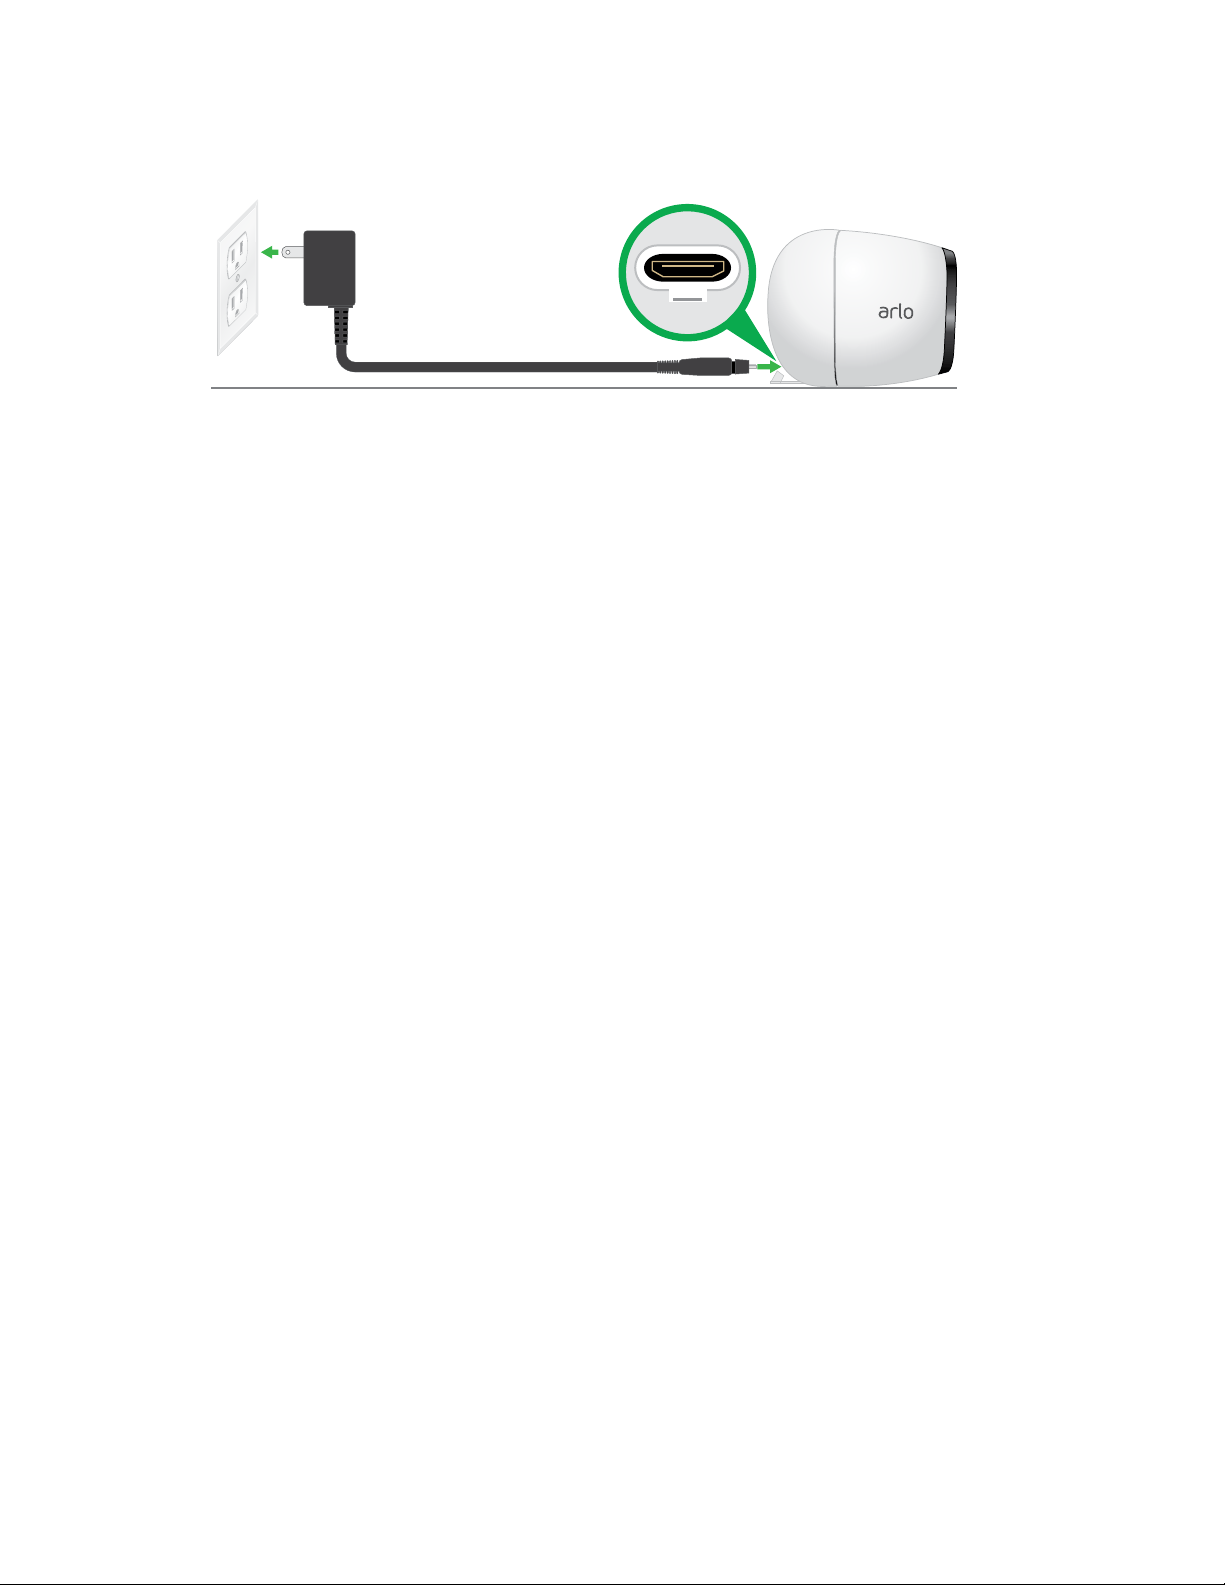
Charge Your Arlo Go Camera
The Arlo Go battery is 80 percent charged when it leaves the factory. You can
charge your Arlo Go camera battery indoors using the included charging cable.
Note: For safety reasons, your Arlo Go battery cannot charge at temperatures below
freezing (32°F, 0°C).
¾ To charge the battery:
1. Connect the power adapter to the camera.
Caution: You must use an Arlo Go power adapter to charge the battery. Do not try to
power the camera or charge the battery with any power adapter other than the one
provided with the Arlo Go camera. Do not use the Arlo Go power adapter with any
other device. Do not use the Arlo Go power adapter to power the camera or charge the
battery outdoors.
14
Set Up Your System
2. Plug the power adapter into an electrical outlet.
The LED blinks fast blue for three seconds when the power adapter is
connected. When the camera battery is fully charged, the LED blinks fast blue
for two seconds.
Note: You can buy spare Arlo Go rechargeable batteries and charge them in the Arlo
Charging Station (sold separately). For information about Arlo accessories, visit
arlo.com/en-us/products/default.aspx. For uninterrupted Arlo Go camera use, we
recommend that you keep a fully charged spare battery on hand.
15
2. View Your Content
Videos recorded by your Arlo Go camera are stored in a library. You can view your
recordings, mark them as favorites, and search using the filter.
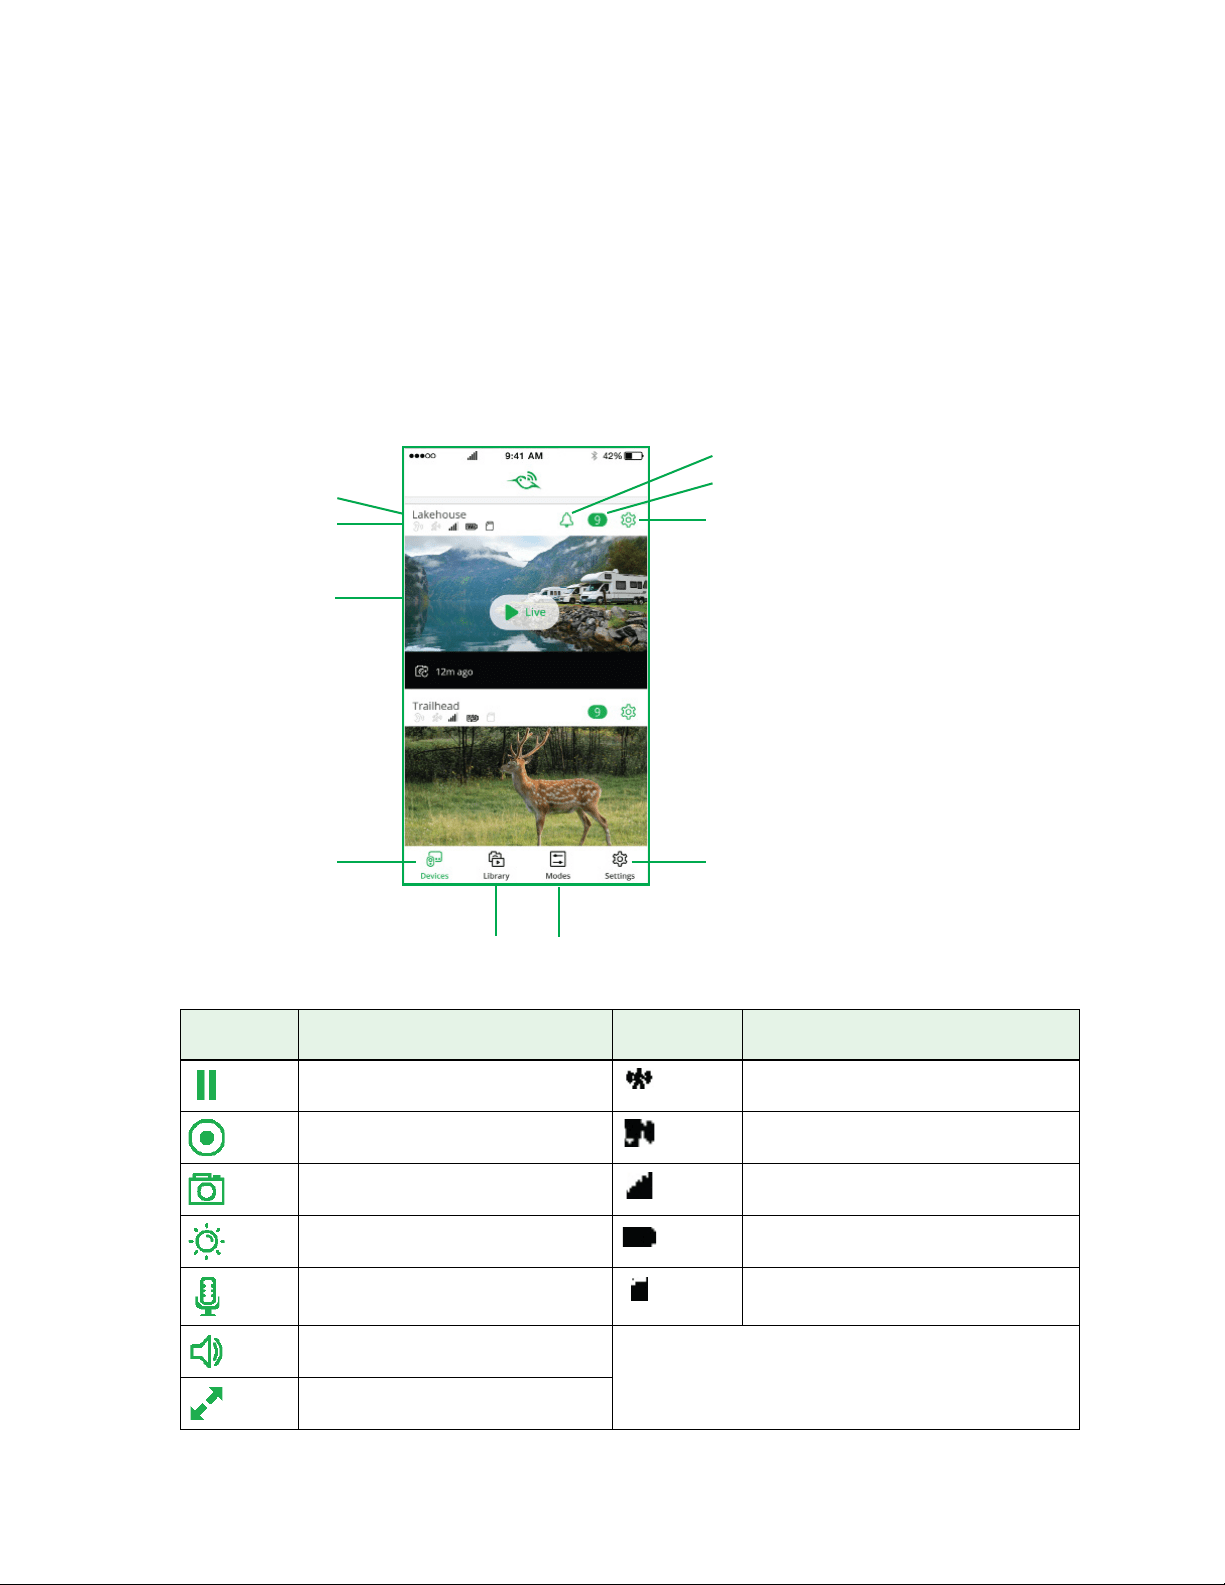
View the Devices Page
When you launch the Arlo app, the Devices page displays.
Live Feed
Icon
Tap or click Live to display Camera Icon Display is based on the mode and
camera setup
Pause. Motion detection is on.
Record video manually. Sound detection is on.
Snapshot Mobile network signal.
Brightness. Battery.
Microphone. Start using Talk and Listen. SD card.
Speaker. Mute the audio.
Full screen.
Camera name
Camera feed
Camera icons
Select devices
Unviewed recordings
Recordings
library
Detection
modes
Settings
Alarm
Settings

View Your Content
16
View the Camera Feeds
You can view your Arlo Go camera feed at any time.
¾ To view camera feeds:
1. Tap the Arlo icon on your mobile device.
If you are using a computer, enter arlo.netgear.com in the address bar of a
browser.
The Devices page displays. The icons above each camera feed depend on the
rules in the currently selected mode. For information about these icons, see
View the Devices Page on page 15.
2. To view and listen to a live feed, tap or click Live on the camera feed image.
A row of live feed icons displays below the live stream image for the camera.
3. To stop viewing and listening to the live feed, tap or click Pause.
Record Clips From Live Video
¾ To record clips from live video:
1. Tap the Arlo icon
on your mobile device.
If you are using a computer, enter arlo.netgear.com in the address bar of a
browser.
The Devices page displays.
2. Tap or click Live in the camera feed image.
The camera feed icons display at the bottom of the camera feed image.
3. Tap or click Record Video
.
This icon turns red to indicate that you are recording the live feed.
4. To stop recording, tap or click Record Video
.

View Your Content
17
Talk and Listen
¾ To talk and listen:
1. Tap the Arlo icon
on your mobile device.
If you are using a computer, enter arlo.netgear.com in the address bar of a
browser.
The Devices page displays.
2. Tap or click Live in the camera feed image.
3. Tap or click Microphone
.
A microphone button displays.
4. Wait for the button to turn bright green.
This can take up to five seconds. When the button is bright green, Talk and
Listen is ready.
5. Tap and hold or click and hold the microphone button and speak.
Control the Camera Feed Image
If you use more than one camera, you can change the order in which the camera feeds
are displayed on the Devices page. You can also zoom, invert, or rotate the camera
feed image.
Change the Camera Order
¾ To change the camera order on the Devices page:
1. Tap the Arlo icon
on your mobile device.
If you are using a computer, enter arlo.netgear.com in the address bar of a
browser.
The Devices page displays.
2. Tap or click Settings.
The Settings page displays.
3. Under System, tap or click Camera Order.

View Your Content
18
A list of cameras displays in the order that they display on the Devices page.
4. Tap or click Edit at the top of the page.
A list icon displays.
5. Tap and hold or right-click the list icon and drag the camera to the correct
position on the list.
6. Tap or click Done.
Your settings are saved.
Zoom a Camera Image
To zoom a camera image:
1. Tap the Arlo icon
on your mobile device.
If you are using a computer, enter arlo.netgear.com in the address bar of a
browser.
The Devices page displays.
2. Tap or click Settings > My Devices.
A list of cameras displays.
3. Tap or click the camera.
The camera settings display.
4. Tap or click Video Settings.
5. Tap or click Zoom
.
6. Resize and position the image box as necessary.
Rotate a Camera Feed
You can invert the video feed image.
¾ To rotate the video display:
1. Tap the Arlo icon on your mobile device.
If you are using a computer, enter arlo.netgear.com in the address bar of a
browser.

View Your Content
19
The Devices page displays.
2. Tap or click Settings.
The Settings page displays.
3. Tap or click My Devices.
A list of cameras displays.
4. Tap or click the camera.
The settings for the camera display.
5. Tap or click Video Settings.
The Video Settings page displays.
6. Tap or click Rotate Image.
The camera feed image rotates.
Cloud Recording
With cloud recording, everything the Arlo Go cameras record is sent to the cloud
for secure storage in your library. You can access these recordings from anywhere
you are using a mobile device, or on a Windows or Mac computer. All recordings
are encrypted with the user name and password that you create. No one else can
access your recordings.
We provide free cloud storage for the life of the Arlo Go cameras. We store a rolling
7 days of recordings that are created when the Arlo Go camera detects motion or
sound. You can pay to store recordings in the cloud for the last 14 days or 30 days.
You can download recordings and save them to your mobile device or computer for
long-term storage.
View Recordings
Your Arlo Go camera stores recordings in the library. You can use the filter and the
calender to find and view specific recordings.
Use the Library
You can use the library to find and view recordings based on the date.
¾ To use the library:
1. Tap the Arlo icon on your mobile device.
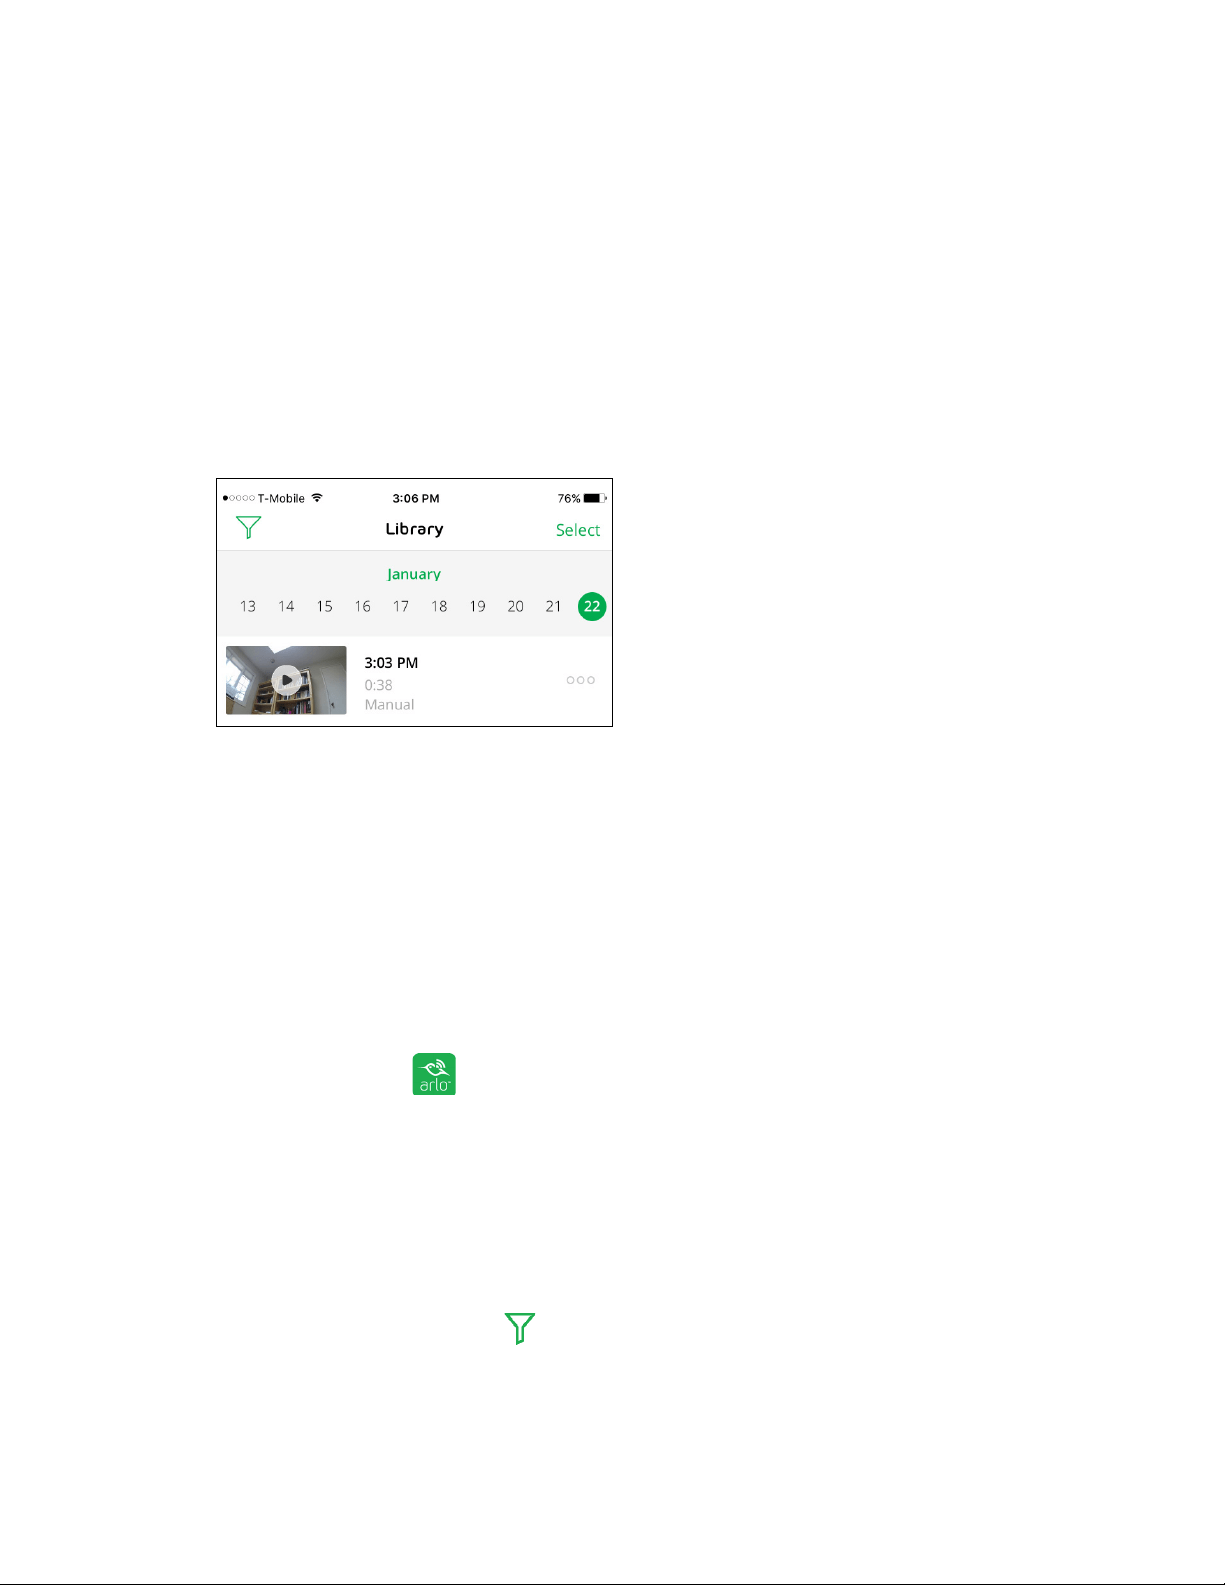
View Your Content
20
If you are using a computer, enter arlo.netgear.com in the address bar of a
browser.
The Devices page displays.
2. Tap or click Library.
The calendar displays on the top of the page.
3. If it is more than one month since you started recording, use the arrows on
either side of the month to choose a month to view.
Days on which a video clip was recorded are indicated with a green circle.
4. Tap or click a highlighted date.
Recordings from that date display below the calendar.
Use the Filter
You can use the filter to find and view recordings based on criteria that you select.
¾ To use the filter to view your library:
1. Tap the Arlo icon on your mobile device.
If you are using a computer, enter arlo.netgear.com in the address bar of a
browser.
The Devices page displays.
2. Tap or click Library.
3. Tap or click the Filter icon
in the upper left corner of the page.
The filter page displays.

View Your Content
21
4. Tap or click the filtering criteria that you want to use.
5. To remove filtering, tap or click Reset.
6. Tap or click Done.
The Filter icon
becomes solid green to show that you are using filtering.
Recordings that match your filter selections display. Dates with recordings are
highlighted in dark green.
Turn O the Filter
The Filter icon on the Library page is solid green when you are using filtering.
When filtering is used, only the recordings in your library that match your filter
criteria display. You can turn o filtering.
¾ To turn o filtering for your library:
1. Tap the Arlo icon
on your mobile device.
If you are using a computer, enter arlo.netgear.com in the address bar of a
browser.
The Devices page displays.
2. Tap or click Library.
3. Tap or click the Filter icon
in the upper left corner of the page.
The Filter page displays.
4. Tap or click Reset at the bottom of the page.
Filtering is turned o. The Filter icon
becomes an outline to show that
filtering is not in use.
Share and Manage Library Recordings
You can download recordings, make them favorites, share them, and donate them.
Download Recordings
¾ To download a clip from the library:
1. Tap the Arlo icon
on your mobile device.
If you are using a computer, enter arlo.netgear.com in the address bar of a
browser.

View Your Content
22
The Devices page displays.
2. Tap or click Library.
The Library page displays.
3. Tap or click a snapshot or video.
4. Tap or click
.
5. Tap or click OK to confirm.
The file you selected is downloaded.
Add a Recording to Your Favorites
¾ To add a recording to your favorites:
1. Tap the Arlo icon
on your mobile device.
If you are using a computer, enter arlo.netgear.com in the address bar of a
browser.
The Devices page displays.
2. Tap or click Library.
The Library page displays.
3. Tap or click a snapshot or video.
4. Tap or click
.
Share Recordings
¾ To share a recording:
1. Tap the Arlo icon
on your mobile device.
If you are using a computer, enter arlo.netgear.com in the address bar of a
browser.
The Devices page displays.
2. Tap or click Library.
The Library page displays.

View Your Content
23
3. Tap or click a snapshot or video.
4. Tap or click
.
5. Share the file.
Donate Recordings for Research
You can donate video or snapshot files to NETGEAR Arlo to use for research and
development of Arlo products.
¾ To donate recordings:
1. Tap the Arlo icon
on your mobile device.
If you are using a computer, enter arlo.netgear.com in the address bar of a
browser.
The Devices page displays.
2. Tap or click Library.
The Library page displays.
3. Tap or click a snapshot or video.
4. Tap or click
.
5. Tap or click OK to confirm.
The file is sent to NETGEAR Arlo.
Delete Recordings
¾ To delete recordings:
1. Tap the Arlo icon
on your mobile device.
If you are using a computer, enter arlo.netgear.com in the address bar of a
browser.
The Devices page displays.
2. Tap or click Library.
The Library page displays.
3. Tap or click a snapshot or video.

View Your Content
24
4. Tap or click .
5. Tap or click OK to confirm.
The file is deleted.

25
3. Use an SD Card With Arlo Go
All Arlo video recordings are stored to the cloud, but you can insert a micro SD card
into your Arlo Go camera and use the SD card as a second location to store Arlo Go
recordings locally.
If you connect an SD card, the camera records to both the cloud and the SD card.
If the camera is powered on but its mobile network connection drops, the camera
continues to record to the SD card.
The Arlo app notifies you if the SD card is low on storage space or is full. If you
select automatic overwrite, the oldest recordings are automatically deleted when
available storage on the SD card is below 20 percent. Unrelated files that are not
in the Arlo folder are not deleted by automatic overwrite.
The following hardware is required:
• An Arlo Go camera
• An SDHC or SDXC micro SD card with at least 200 MB of available space.
If you are using best quality video settings, one hour of recordings is approximately
180 MB. You need more storage space if your Arlo Go is in a high-trac area, your
camera is set to record long video segments, or you do not want to use automatic
overwrite. For more information about SD card types, see Supported SD Card
Format on page 25.
Supported SD Card Format
Your Arlo Go camera accepts micro SD cards, SDHC or SDXC only, with up to 32 GB
capacity, file format FAT32. For best performance, we recommend using class 4 or
higher cards.
If your micro SD card is not formatted or is formatted with an incompatible file
system, your Arlo Go can format the SD card to FAT32 for you. See Format an SD
Card on page 29.
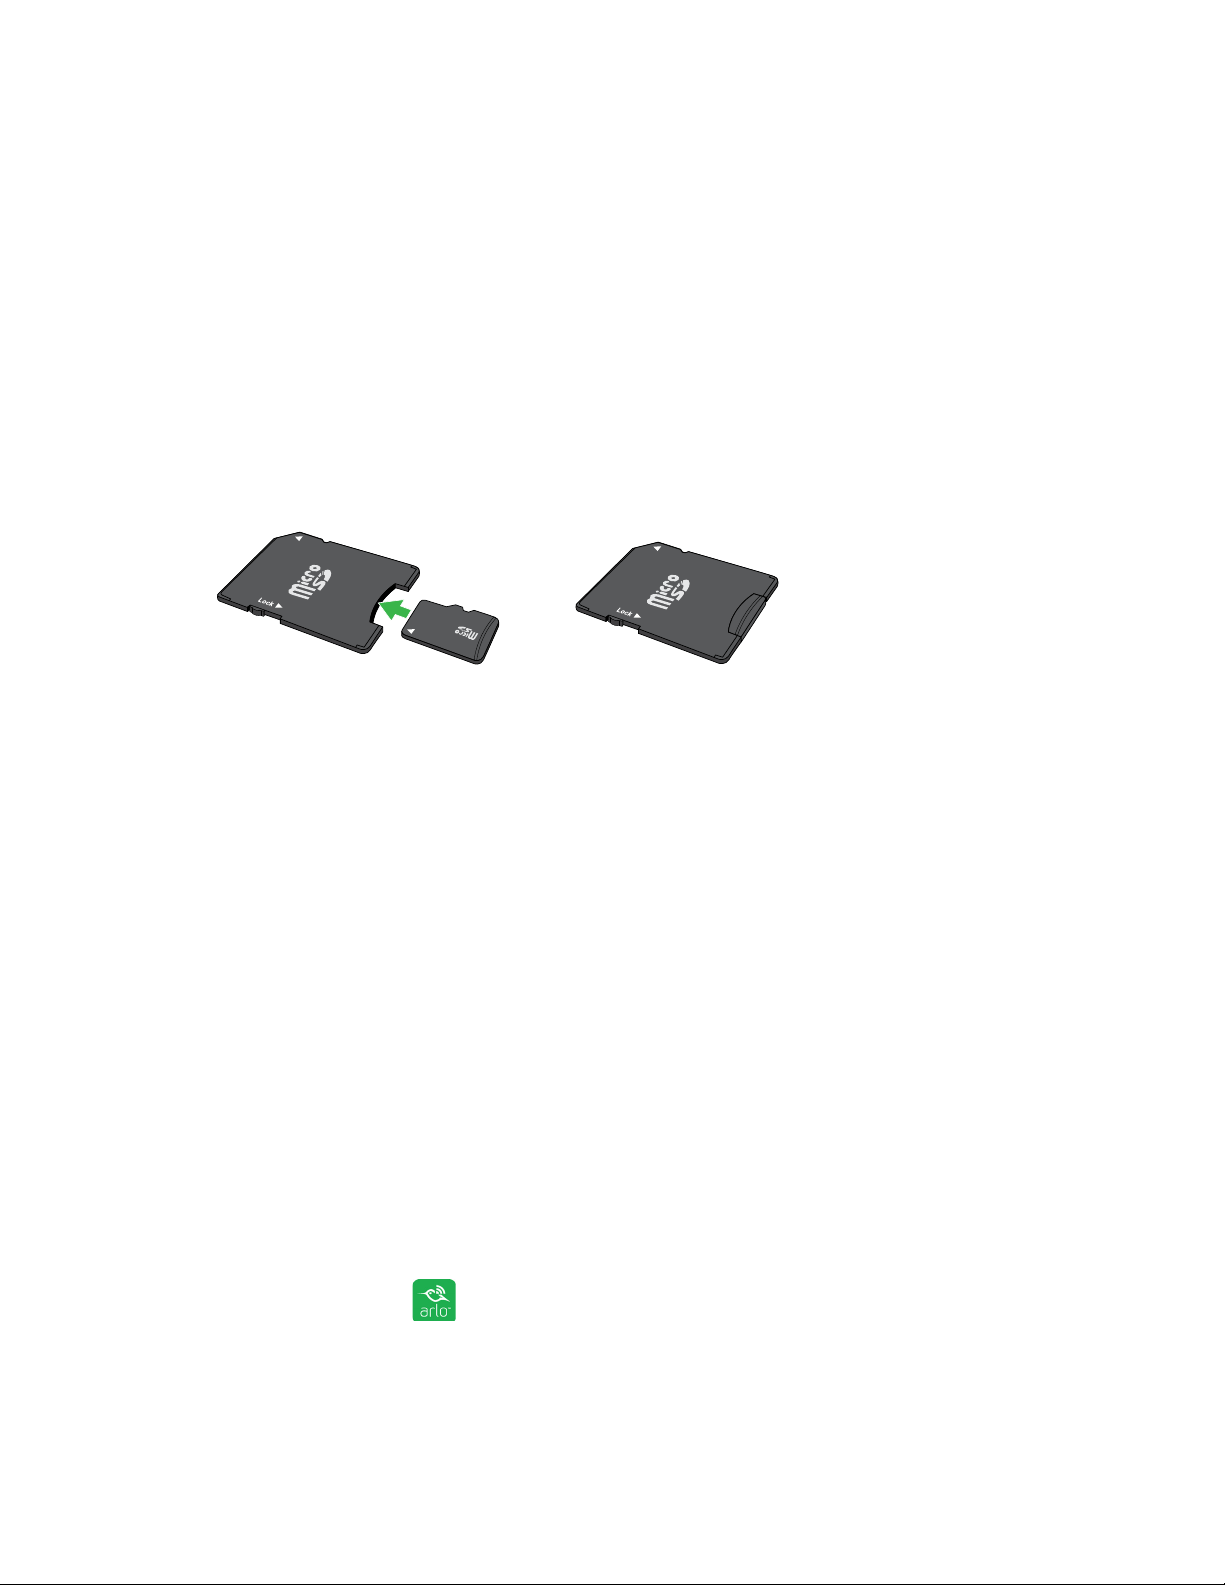
Insert an SD Card
¾ To insert an SD card in an Arlo Go camera:
1. Unlock the battery compartment by pressing and holding the latch.
2. Gently pull the battery door back to open the compartment.

26
Use an SD Card With Arlo Go
3. Insert the SD card into the SD card slot on the camera.
4. Press the edge of the SD card until it is completely seated in the slot.
5. Close the battery door.
6. Reboot the Arlo Go camera.
You must reboot the Arlo camera after installing an SD card.
View the SD Card Status
The Arlo app notifies you if the SD card is getting full or if the SD card is not the
correct format. You can also use the Arlo app to view the SD card status.
¾ To view the status of the SD card for a camera:
1. Tap the Arlo icon
on your mobile device.
If you are using a computer, enter arlo.netgear.com in the address bar of a
browser.
The Devices page displays.
2. Tap or click Settings > Local Storage.
The Local Storage page displays.
3. Tap or click the camera.
The camera settings display.
4. In the Storage section, tap or click SD Card.
The SD Card Status shows whether the SD card is ready, needs to be formatted,
or is full.
SD card slot

27
Use an SD Card With Arlo Go
Turn SD Card Recording O and On
¾ To turn SD card recording o and on:
1. Insert the SD card into the SD slot on the Arlo Go camera.
For more information, see Insert an SD Card on page 25.
2. Tap the Arlo icon
on your mobile device.
If you are using a computer, enter arlo.netgear.com in the address bar of a
browser.
The Devices page displays.
3. Tap or click Settings > Local Storage.
The Local Storage page displays.
4. Tap or click the camera.
The camera settings display.
5. Select Local Storage > SD Card.
The SD Card page displays.
6. Tap or click SD Card Recording.
SD card recording toggles o and on. If the slider is all the way to the right
against a green background, SD card recording is enabled. If the slider is all the
way to the left against a white background, SD card recording is disabled.
View Videos Saved on an SD Card
To view videos saved on a local storage SD card, you must remove the SD card
from your Arlo Go camera. Cloud recording is still enabled, but SD card recording is
disabled as soon as you remove the SD card.
To view the files on your SD card, you need an SD card reader, often called a
memory card reader. Most computers do not come equipped with an SD card
reader, but many inexpensive readers are available with standard USB or micro USB
connectors. If you purchase an SD card reader, make sure that you choose one that
can read micro SD cards.
28
Use an SD Card With Arlo Go
¾ To view video clips on an SD card:
1. Safely eject the SD card.
For more information, see Safely Remove an SD Card on page 30.
Wait for the Unmounting SD card progress message to close, then remove the
SD card from your Arlo Go camera.
WARNING: Do not interrupt power to the camera or remove the SD card while the SD
card is being unmounted.
2. Insert the SD card into the micro SD card slot in your card reader.
3. Wait for the SD card to appear in the list of available drives on your computer,
and then open the drive folder to view the files on your SD card.
4. Open the Arlo folder.
Recorded videos are saved in this folder in MP4 format. Video files are named
according to this system: camera serial number_video number_date_video clip
tag. Dates are in the format YYYYMMDD.
Note: If you are unable to play MP4 files on your computer, update your media player
soware to the latest version and try again. You can also download a free universal
multimedia player, such as VLC.
Change the SD Card Overwrite Setting
By default, if the SD card fills up, the oldest recording is erased to make room for
new recordings. You can change this setting if you want.
¾ To change the SD card overwrite setting:
1. Tap the Arlo icon
on your mobile device.
If you are using a computer, enter arlo.netgear.com in the address bar of a
browser.

29
Use an SD Card With Arlo Go
The Devices page displays.
2. Tap or click Settings > Local Storage.
The Local Storage page displays.
3. Tap or click the camera.
The camera settings display.
4. In the Storage section, tap or click SD Card.
The SD Card page displays.
5. Tap or click Automatic Overwrite.
Automatic Overwrite toggles o and on.
Format an SD Card
Your Arlo Go camera accepts micro SD cards, SDHC or SDXC only, with up to 32 GB
capacity, file format FAT32.
The Arlo app displays a pop-up message to let you know if it is necessary to format
the SD card. The camera can format the SD card.
¾ To format an SD card:
1. Insert the SD card into the SD slot on the Arlo Go camera.
For more information, see Insert an SD Card on page 25.
2. Tap the Arlo icon
on your mobile device.
If you are using a computer, enter arlo.netgear.com in the address bar of a
browser.
The Devices page displays.
3. Tap or click Settings > Local Storage.
The Local Storage page displays.
4. Tap or click the camera.
The camera settings display.
5. In the Storage section, tap or click SD Card.

30
Use an SD Card With Arlo Go
The SD Card page displays.
6. Tap or click Format SD Card.
The SD card is formatted.
Safely Remove an SD Card
It’s important to safely remove the SD card from your Arlo Go camera. If you remove
an SD card while information is being recorded on it, the SD card might become
permanently unusable or the files on the card might be corrupted.
If you remove the SD card that is connected to your Arlo Go camera, SD card
recording is disabled until you insert another SD card.
¾ To safely remove an SD card from your camera:
1. Tap the Arlo icon
on your mobile device.
If you are using a computer, enter arlo.netgear.com in the address bar of a
browser.
The Devices page displays.
2. Tap or click Settings > Local Storage.
The Local Storage page displays.
3. Tap or click the camera into which your SD card is inserted.
4. Select Local Storage.
5. Tap or click > next to SD Card.
Note: If you named your SD card using a computer, the name displays instead.
6. Tap or click Safely Eject SD Card.
7. Wait for the Unmounting SD Card progress message to close, and then remove
the SD card from your camera.
WARNING: Do not interrupt power to the camera or remove the SD card while the SD card
is being unmounted.

31
4. Personalize Your Camera
You can customize Arlo Go settings such as the camera name to make it easier to
manage. You can grant access to friends and set up cloud recording.
Name Your Camera
You can easily customize your Arlo Go camera by renaming it.
¾ To rename your Arlo Go camera:
1. Tap the Arlo icon on your mobile device.
If you are using a computer, enter arlo.netgear.com in the address bar of a
browser.
The Devices page displays.
2. Tap or click Settings.
The Settings page displays.
3. Tap or click My Devices.
A list of Arlo Go cameras displays.
4. Tap or click the Arlo Go camera.
5. In the Name field, delete the current name and enter a new name that reminds
you of the camera’s location, such as Garage or Front Door.
Camera names are limited to 32 characters.
6. Tap or click Save.
Your settings are saved.
Profile Settings
When you use New Setup, the email address and password that you enter are
saved as your profile. You can change the password and the user name. In the
mobile app, you are automatically logged in when you launch the Arlo app, but you
can turn Auto Login o and on.

Personalize Your Camera
32
Change Your Password and User Name
¾ To change your password and user name:
1. Tap the Arlo icon
on your mobile device.
If you are using a computer, enter arlo.netgear.com in the address bar of a
browser.
The Devices page displays.
2. Tap or click Settings > My Devices.
A list of cameras displays.
3. Select a camera.
The camera settings page displays.
4. Under Account, tap or click Profile.
The Profile page displays.
5. If you are using a smartphone, tap Edit at the top of the page.
The Profile page displays.
6. Type the new entries in the password and name fields.
7. Tap or click Done.
Your settings are saved.
Turn Auto Login On or O for a Smartphone
When Auto Login is turned on, launching the Arlo app on your smartphone
automatically logs you in with the email address and password you used the last
time you logged in.
¾ To turn Auto Login on your smartphone on or o:
1. Tap the Arlo icon
on your mobile device.
If you are using a computer, enter arlo.netgear.com in the address bar of a
browser.
The Devices page displays.

Personalize Your Camera
33
2. Tap or click Settings > My Devices.
A list of cameras displays.
3. Select a camera.
The camera settings page displays.
4. Under Account, tap or click Profile.
The Profile page displays.
5. Tap Auto Login.
Your settings are saved.
Grant Access to Friends
You can add friends to your Arlo account. Friends can view live streams from your
cameras, record video clips, and view, share, mark as favorite, and delete clips
from your library. Friends are granted limited access to some of the settings and
features of your Arlo account. You can select which cameras friends can see and
what administrative rights are available to them.
Add a Friend
¾ To add a friend to your Arlo Account:
1. Tap the Arlo icon
on your mobile device.
If you are using a computer, enter arlo.netgear.com in the address bar of a
browser.
The Devices page displays.
2. Tap or click Settings > My Devices.
A list of cameras displays.
3. Select a camera.
The camera settings page displays.
4. Under Account, tap or click Grant Access.
5. Tap or click Add or the + symbol.

Personalize Your Camera
34
6. Enter the first name, last name, and email address of the person that you want
to add as a friend.
7. Tap or click the cameras that you want the friend to be able to access.
8. Tap or click Send Invite.
An email is sent inviting the friend to create an Arlo account. This friend’s name
is displayed with the status Pending. When the friend accepts your invitation,
the status changes to Accepted.
Edit a Friend’s Access Privileges
¾ To edit a friend’s access privileges:
1. Tap the Arlo icon
on your mobile device.
If you are using a computer, enter arlo.netgear.com in the address bar of a
browser.
The Devices page displays.
2. Tap or click Settings > My Devices.
A list of cameras displays.
3. Select a camera.
The camera settings page displays.
4. Under Account, tap or click Grant Access.
A list of your friends displays with the status of their accounts.
5. Tap or click the friend, and tap or click Edit
.
The Edit page displays.
6. Tap or click cameras to select or deselect them.
7. Tap or click Allow Access Rights.
Selecting the Allow Access Rights allows this friend to change your account
and camera settings.
8. Tap or click Done.
Your settings are saved.

Personalize Your Camera
35
Delete a Friend
¾ To delete a friend’s privileges:
1. Tap the Arlo icon
on your mobile device.
If you are using a computer, enter arlo.netgear.com in the address bar of a
browser.
The Devices page displays.
2. Tap or click Settings > My Devices.
A list of cameras displays.
3. Select a camera.
The camera settings page displays.
4. Under Account, tap or click Grant Access.
A list of your friends displays with the status of their accounts.
5. Select the friend, and tap or click Edit
.
The Edit page displays.
6. Tap or click Delete Friend.
7. Tap or click Yes.
The friend is deleted.

36
5. Modes, Rules, and Smart Alerts
Modes let you use rules to set and control automated actions. With modes, Arlo Go can
be on the lookout for you, even when you are not using the Arlo app.
Arlo Go comes with the following modes:
Armed. Detection is on for this camera.
Disarmed. Detection is o for this camera.
Schedule. Manage detection based on a schedule.
If you add new modes, each new mode is listed in the Arlo app with the Custom Mode
icon
.
You can customize the Armed and Schedule modes and you can add new modes. You
might want to create a mode in which some motion sensors and cameras are active
but others are not. For example, when you are sleeping, you might want your exterior
cameras to be active, but your interior cameras to be inactive.
Note: You can create dierent modes for the same camera, but the camera can use only
one mode at a time.
Select a Mode
You can turn modes on and o manually or set modes to activate according to a
schedule. Use the following method when you are not using a schedule to control a
mode or to override an existing schedule. You must use at least one mode. The Arlo
Go camera is always in a mode, even if that mode is set to do nothing.
¾ To select a mode for a camera:
1. Tap the Arlo icon
on your mobile device.
If you are using a computer, enter arlo.netgear.com in the address bar of a
browser.
2. Tap or click Mode.
A list of cameras displays.
37
Modes, Rules, and Smart Alerts
3. Tap or click the Arlo Go camera.
The Mode page displays.
4. Tap or click a mode to activate it.
The mode that you selected turns on immediately. The mode stays active until
you change it.
When you view the camera feeds, the icons that display at the top of each the
camera feed are based on the currently selected mode. One or both of the
following icons display:
Motion. Motion detection is on.
Sound. Audio detection is on.
Change Motion Sensitivity
You can easily change the sensitivity level for Arlo Go cameras.
¾ To change the sensitivity level for a camera:
1. Tap the Arlo icon on your mobile device.
If you are using a computer, enter arlo.netgear.com in the address bar of a
browser.
The Devices page displays.
2. Tap or click Mode.
A list of cameras displays.
3. Tap or click the Arlo Go camera.
The Mode page displays.
4. Tap or click Edit
next to the mode.
The Edit Rule page displays.
5. Tap or click Edit
next to the rule that you want to edit.
38
Modes, Rules, and Smart Alerts
6. Under If the following, tap or click Edit next to Motion is detected.
The Motion detection settings page displays.
7. Move the slider to adjust the sensitivity level for motion detection for this
camera.
If you used a mobile device to specify the settings, your settings are saved.
8. If you used a browser to specify the settings, click Save.
Your settings are saved.
Change Audio Sensitivity
¾ To change audio sensitivity for a camera:
1. Tap the Arlo icon
on your mobile device.
If you are using a computer, enter arlo.netgear.com in the address bar of a
browser.
The Devices page displays.
2. Tap or click Mode.
A list of cameras displays.
3. Tap or click the Arlo Go camera.
A list of modes displays.
4. Tap or click Edit
next to Armed.
The Edit Rule page displays.
5. Tap or click Edit
next to the rule.
6. Under If the following, tap or click Edit next to Audio is detected.
7. Move the slider to the desired level of audio detection.

39
Modes, Rules, and Smart Alerts
If you used a mobile device to specify the settings, your settings are saved.
8. If you used a browser to specify the settings, click Save.
Your settings are saved.
Manage Alerts
Arlo can push notifications to your smartphone, send you email alerts, or do both. To
receive Arlo notifications on your phone, you must get the Arlo app.
Note: If you log out of the Arlo app on your smartphone or mobile device, you will stop
receiving push notifications.
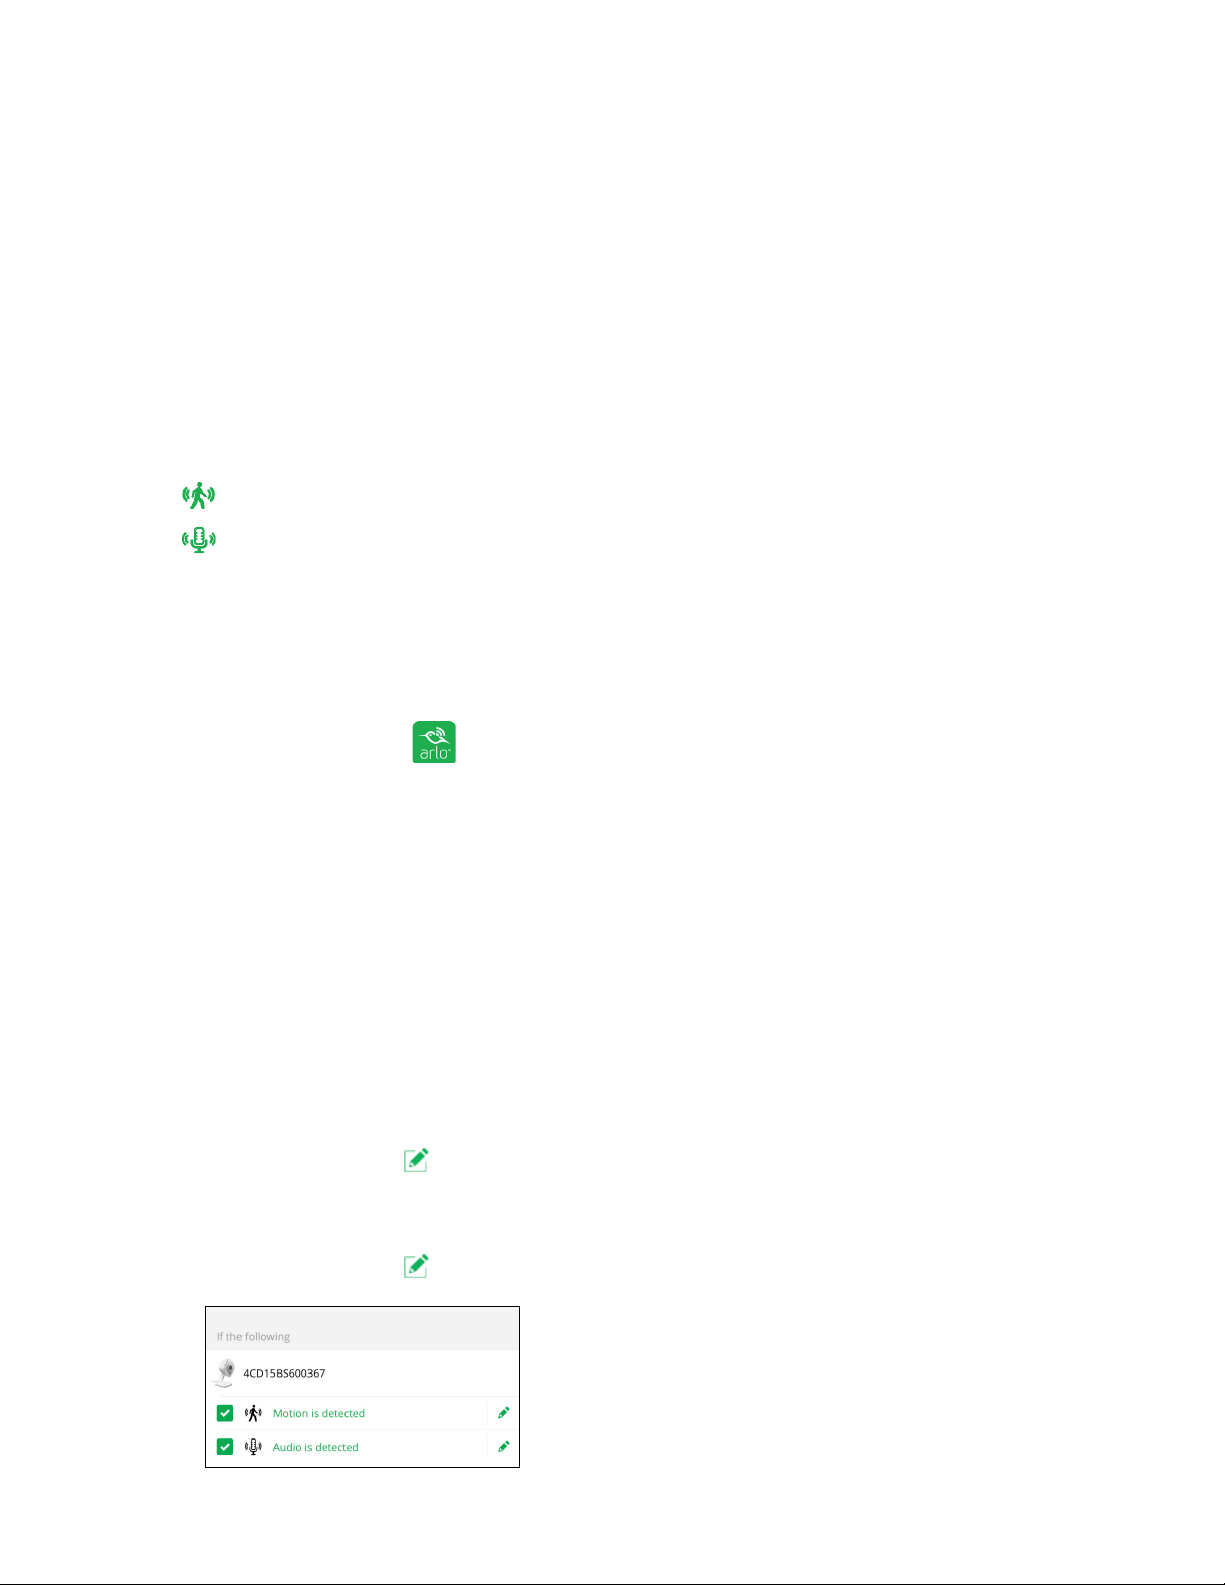
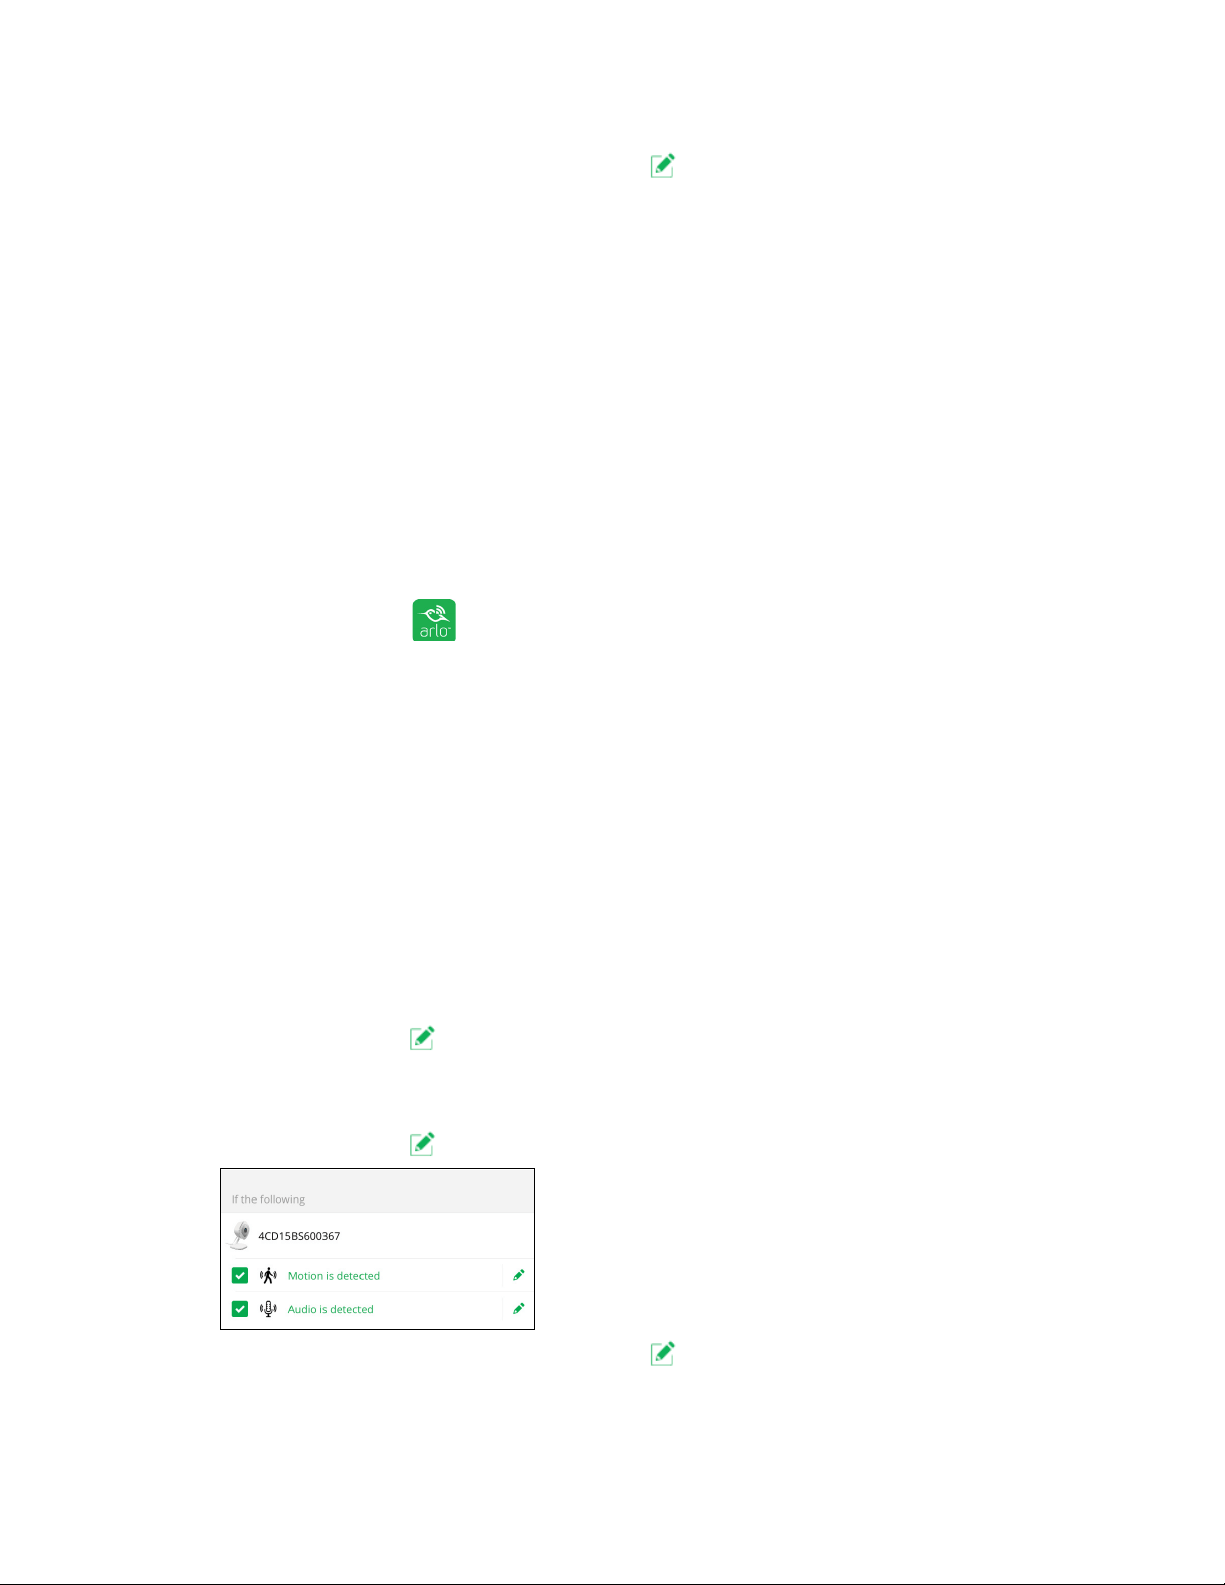
¾ To change the alert settings for a camera:
1. Tap the Arlo icon
on your mobile device.
If you are using a computer, enter arlo.netgear.com in the address bar of a
browser.
The Devices page displays.
2. Tap or click Mode.
A list of cameras displays.
3. Tap or click the Arlo Go camera.
A list of modes displays.
4. Tap or click Edit
next to Armed or your custom mode.
The Edit Rule page displays.
5. Under If the following, specify the motion detection and audio detection
settings.
6. Under Then do the following, specify the settings for Arlo Go to respond to
motion or sound detection by recording video.
7. Under Alert, tap or click Push Notification to turn alerts on and o for your
mobile device.
8. For email notifications, make sure that the Email Alerts check box is selected.
9. To specify an email address, tap or click Edit
next to Email Alerts and enter
the email address.
40
Modes, Rules, and Smart Alerts
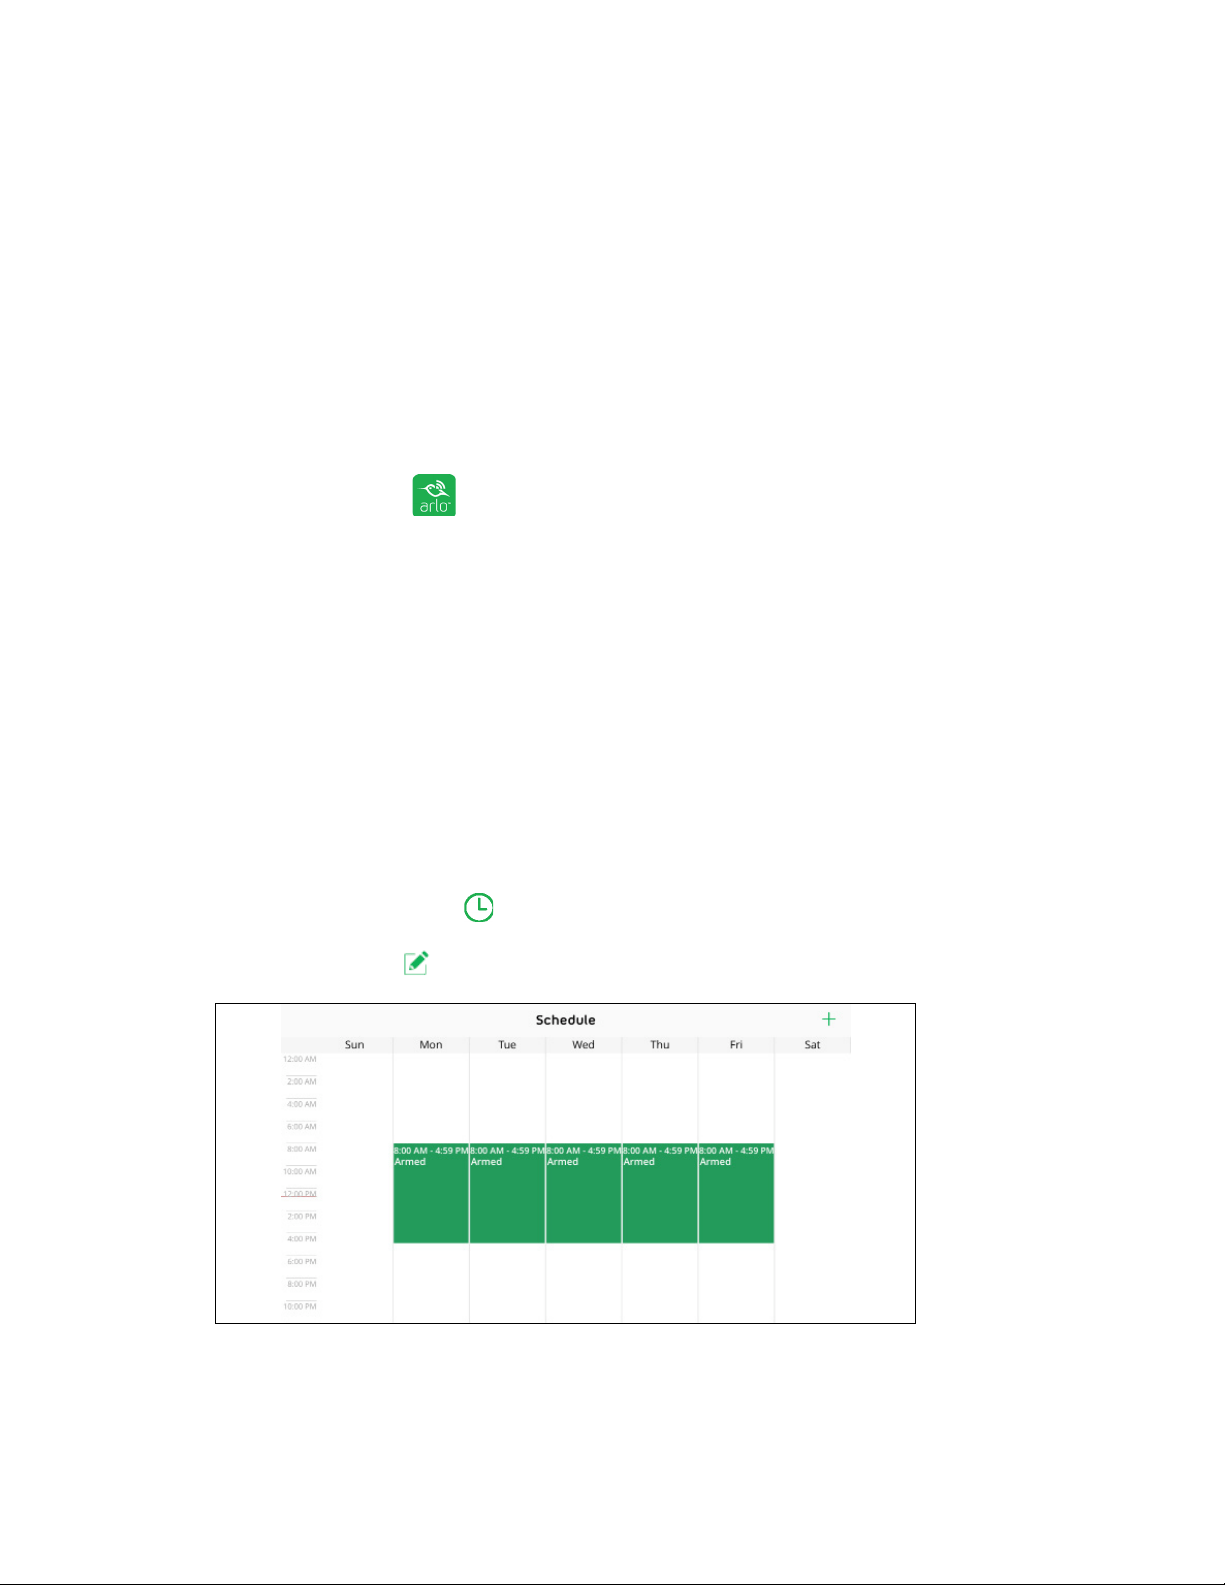
Create a Schedule
You can set a schedule to activate and deactivate cameras automatically. Schedules
recur weekly. For example, the schedule for Tuesday is repeated every Tuesday
as long as the schedule is turned on. Arlo Go is preconfigured with the following
schedule:
• Monday through Friday, 8:00 a.m. to 5:00 p.m. All motion sensors are on.
• All other times. All motion sensors are o.
¾ To set a schedule for a camera:
1. Tap the Arlo icon
on your mobile device.
If you are using a computer, enter arlo.netgear.com in the address bar of a
browser.
The Devices page displays.
2. Tap or click Mode.
A list of cameras displays.
3. Tap or click the Arlo Go camera.
A list of available modes displays.
4. Tap or click Schedule
.
5. Tap or click Edit
next to Schedule.
6. Drag the dividers to change the start and stop times.

41
Modes, Rules, and Smart Alerts
Add a Mode
You can add new modes to tell your Arlo Go camera what to do in certain
situations. For example, you can set your Arlo Go camera to record videos when the
motion sensor is activated and to alert you with an email message.
You can use the rules you create within modes and schedules to customize your
Arlo Go camera. With Arlo Go cameras, you can create one rule for each mode.
¾ To add a mode for a camera:
1. Tap the Arlo icon
on your mobile device.
If you are using a computer, enter arlo.netgear.com in the address bar of a
browser.
The Devices page displays.
2. Tap or click Mode.
A list of cameras displays.
3. Tap or click the camera.
4. Tap or click Add a Mode.
The New Mode page displays.
5. Enter a name for the mode and tap or click Next.
The Trigger Device page displays.
6. Tap or click a device to select it and then tap or click Next.
Note: If you only use one device, your device is preselected.
7. If you want the selected device to perform an action only when motion is
detected, tap or click Next.
Otherwise, select the check box for each trigger that you want to use and tap
or click Next.
8. Set the motion sensitivity and audio detection sensitivity using the sliders and
tap or click Next.
If you are using the Arlo mobile app, the Motion Sensitivity and Audio

42
Modes, Rules, and Smart Alerts
Detection Sensitivity sliders are on separate pages.
You can use the sliders to adjust the sensitivity of the motion sensor:
• Raise the sensitivity percentage to increase the number of videos that the
Arlo Go camera captures.
• Lower the sensitivity percentage to decrease the number of videos that the
Arlo Go camera captures.
Note: If you’re not sure what motion sensitivity to use, you can use the motion detection
test aer you finish creating the mode. Go to your camera’s settings to turn on the motion
detection test.
9. Select the device that you want to record video when motion or audio is
detected and tap or click Next.
If you only use one device, your device is preselected.
10. Specify what you want your device to do when motion or audio is detected.
You can select Record video or Do nothing.
11. If you want to turn on the Arlo Go alarm when the device detects motion or
sound, select the Turn Alarm ON check box.
12. Tap or click Next.
13. If you selected Record video, use the slider to specify how long you want your
device to record when motion or audio is detected and tap or click Next.
14. If you selected Turn Alarm ON, set the sliders for Alarm Duration (in seconds)
and Alarm Loudness and tap or click Next.
15. Select the notifications that you want to receive.
16. If you are using the Arlo mobile app, tap Next.
17. If you selected Send email alert, enter the email addresses that you want to
receive alerts.
18. If you are using the Arlo mobile app, tap Next.
If you are using a web browser, click Finish.
19. Review the summary of your settings and tap or click Save.
Your new mode is saved. You can now select it from the mode menu.

43
6. Settings
You can view and change the Arlo Go settings.
View Device Information
¾ To view device information:
1. Tap the Arlo icon
on your mobile device.
If you are using a computer, enter arlo.netgear.com in the address bar of a
browser.
The Devices page displays.
2. Tap or click Settings.
The Settings page displays.
3. Tap or click My Devices.
A list of cameras displays.
4. Tap or click the camera.
The settings for the camera display.
5. Scroll down to the Version heading and view the firmware version, hardware
version, and the serial number.
Turn O the Camera LED
The Arlo Go LED indicates the status of the camera. The LED can be useful during
setup and is helpful when you are troubleshooting. You can turn the LED o and
on. We recommend that you wait until your camera is streaming before turning o
the LED.
If you turn o your camera’s LED, the LED remains o until you turn it back on. If
you remove and replace your Arlo Go’s battery while the camera is not plugged in,
The LED lights as usual while the camera is powering up, and then it turns o again
as soon as the camera is done powering up.
¾ To turn o the LED:
1. Tap the Arlo icon
on your mobile device.

Settings
44
If you are using a computer, enter arlo.netgear.com in the address bar of a
browser.
The Devices page displays.
2. Tap or click Settings.
The Settings page displays.
3. Tap or click My Devices.
A list of cameras displays.
4. Tap or click the camera.
The settings for the camera display.
5. Tap or click Camera LED.
The Camera LED setting toggles on or o.
Change the Time Zone
¾ To change the time zone:
1. Tap the Arlo icon
on your mobile device.
If you are using a computer, enter arlo.netgear.com in the address bar of a
browser.
The Devices page displays.
2. Tap or click Settings.
The Settings page displays.
3. Tap or click My Devices.
A list of cameras displays.
4. Tap or click the camera.
The settings for the camera display.
5. Tap or click Time Zone.
The Time Zone page displays.
6. Tap or click a time zone.

Settings
45
7. Tap or click Done.
Your settings are saved.
Change the Video Resolution
The default video resolution is optimized. You can change this setting to a higher or
lower resolution. Decreasing the resolution of Arlo Go videos reduces the required
bandwidth.
¾ To change the video resolution:
1. Tap the Arlo icon
on your mobile device.
If you are using a computer, enter arlo.netgear.com in the address bar of a
browser.
The Devices page displays.
2. Tap or click Settings.
The Settings page displays.
3. Tap or click My Devices.
A list of cameras displays.
4. Tap or click the camera.
The settings for the camera display.
5. Tap or click Video Settings.
The Video Settings page displays.
6. Tap or click Power Management.
The Power Management page displays.
7. Select a setting:
• Best Video. This setting might reduce the battery life.
• Optimized. This setting balances video quality and battery life.
• Best Battery Life. This setting might reduce the video quality.
8. Tap or click Done.
Your settings are saved.

Settings
46
Turn Night Vision On and O
We recommend that you turn o night vision if the Arlo Go camera is facing
reflective surfaces, such as windows.
¾ To turn night vision on and o:
1. Tap the Arlo icon
on your mobile device.
If you are using a computer, enter arlo.netgear.com in the address bar of a
browser.
The Devices page displays.
2. Tap or click Settings.
The Settings page displays.
3. Tap or click My Devices.
A list of cameras displays.
4. Tap or click the camera.
The settings for the camera display.
5. Tap or click Video Settings.
The Video Settings page displays.
6. Tap or click Night Vision.
The night vision setting toggles on or o.
Turn the Microphone O and On
¾ To turn the microphone o and on:
1. Tap the Arlo icon
on your mobile device.
If you are using a computer, enter arlo.netgear.com in the address bar of a
browser.
The Devices page displays.
2. Tap or click Settings.
The Settings page displays.

Settings
47
3. Tap or click My Devices.
A list of cameras displays.
4. Tap or click the camera.
5. Tap or click Audio Settings.
The Audio Settings page displays.
6. Tap or click Microphone.
The microphone setting toggle on or o.
Change the Speaker Settings
You can turn the speaker o and on and you can control the volume on your
speakers.
¾ To change the speaker settings:
1. Tap the Arlo icon
on your mobile device.
If you are using a computer, enter arlo.netgear.com in the address bar of a
browser.
The Devices page displays.
2. Tap or click Settings.
The Settings page displays.
3. Tap or click My Devices.
A list of cameras displays.
4. Tap or click the camera.
5. Tap or click Audio Settings.
The Audio Settings page displays.
6. To turn the speaker o and on, tap or click Speaker.
The speaker toggles on or o.
7. To change the speaker volume, move the Speaker Volume slider.
Your settings are saved.

Settings
48
Specify Power Management
You can choose power management settings to optimize battery life, video quality, or
a balance of both.
Note: In addition to these settings, usage also aects battery life. The following factors
can reduce battery life:
• Extremely cold temperatures (below 32°F or 0°C)
• Low lighting
• Frequent motion triggering
• Longer video recordings
• Low mobile network signal strength
¾ To change your power management settings:
1. Tap the Arlo icon
on your mobile device.
If you are using a computer, enter arlo.netgear.com in the address bar of a
browser.
The Devices page displays.
2. Tap or click Settings > My Devices.
The My Devices page displays.
3. Select the camera whose power management settings you want to change.
4. Tap or click Video Settings.
5. Under POWER MANAGEMENT, select a power setting:
• To extend your battery life, select Best Battery Life. This setting reduces
video quality but improves battery life.
• For the best video quality, select Best Video. This setting reduces battery
life but provides the best video quality.
• To balance battery life and video quality, select Optimized.
Update the Firmware
Firmware updates are released automatically to all connected Arlo devices.
Automatic updates happen between 3:00 a.m. and 5:00 a.m. to minimize camera
downtime. If the firmware update is a major one, you might be unable to stream
from your camera until your firmware is updated.

Settings
49
You can wait until the update happens automatically between 3:00 a.m. and 5:00
a.m., or you can update your firmware manually.
Note: Even when you cannot view your camera live, motion and sound detection still work
and your camera still records based on the currently selected mode.
¾ To update your Arlo Go firmware manually:
1. Tap the Arlo icon
on your mobile device.
If you are using a computer, enter arlo.netgear.com in the address bar of a
browser.
The Devices page displays.
2. Tap or click Settings > My Devices.
The My Devices page displays.
3. Select the Arlo Go camera that you want to update.
4. Tap or click Device Info > Firmware > Update.
WARNING: Do not disconnect your camera, open the battery door, or remove the
battery while the firmware update is in progress.
5. Wait for the firmware update to complete.
The camera’s LED blinks amber and blue while the firmware is downloading and
installing. After the firmware is installed, the camera reboots and the LED is o.
When the LED lights again and the pattern stops changing, your camera is available
to stream.
View or Change Cellular Network Settings
¾ To view or change cellular network settings:
1. Tap the Arlo icon
on your mobile device.
You can also enter arlo.netgear.com in the address bar of a browser.
The Devices page displays.
2. Tap or click Settings.
The Settings page displays.
3. Select the Arlo Go camera.

Settings
50
The My Devices page displays.
4. Scroll down to the NETWORK section.
This section displays technical information about the Arlo Go camera’s cellular
network connection settings.
5. To view or change APN settings, tap or click APN Settings.
If the camera is oine, a QR code displays. Otherwise, the Edit APN page
displays.
Changing the APN might cause your camera to be unreachable to the network.
Do not change these settings unless instructed to do so by network support.
6. If a QR code displays, aim the camera at the QR code, and follow the onscreen
instructions.
7. To change the network mode from the Edit APN page, select Auto, LTE Only, or
HSPA/HSPA+ Only.
This setting is not available for all Arlo Go cameras.
Restart the Camera
¾ To restart the camera:
1. Tap the Arlo icon
on your mobile device.
If you are using a computer, enter arlo.netgear.com in the address bar of a
browser.
The Devices page displays.
2. Tap or click Settings.
The Settings page displays.
3. Tap or click My Devices.
A list of cameras displays.
4. Tap or click the camera.
The settings for the camera display.
5. Scroll down and tap or click Restart.
The camera restarts.

51
Reset the Camera to Its Factory Settings
Resetting the camera to its factory settings erases the camera’s current settings
and removes the camera feed from your Arlo app.
WARNING: If you use an Arlo Mobile plan and you reset your Arlo Go camera or remove it from
your account, you forfeit all prepaid Arlo Mobile service for that monthly billing period.
The easiest way to reset your Arlo Go camera is to remove it from your account. If
your Arlo Go camera is not in network coverage or is not connected to the cloud,
you must scan a QR code to reset it. To continue using your Arlo Go camera after
you reset it, you must complete the new system setup process again.
Reset Arlo Go While It Is Connected to the Cloud
¾ To reset the Arlo Go camera while it is connected to the cloud:
1. Tap the Arlo icon
on your mobile device.
If you are using a computer, enter arlo.netgear.com in the address bar of a
browser.
The Devices page displays.
2. Tap or click Settings.
The Settings page displays.
3. Select the Arlo Go camera.
The My Devices page displays.
4. Scroll down to the bottom of the page.
5. Tap or click Remove Device.
6. Tap or click Yes.
7. Follow the onscreen instructions to display a QR code and to position it in front
of the Arlo Go camera.
8. When the Arlo Go camera makes a chime sound, tap or click Yes.
The camera resets to its factory settings and the camera feed no longer
displays in your Arlo app.
52
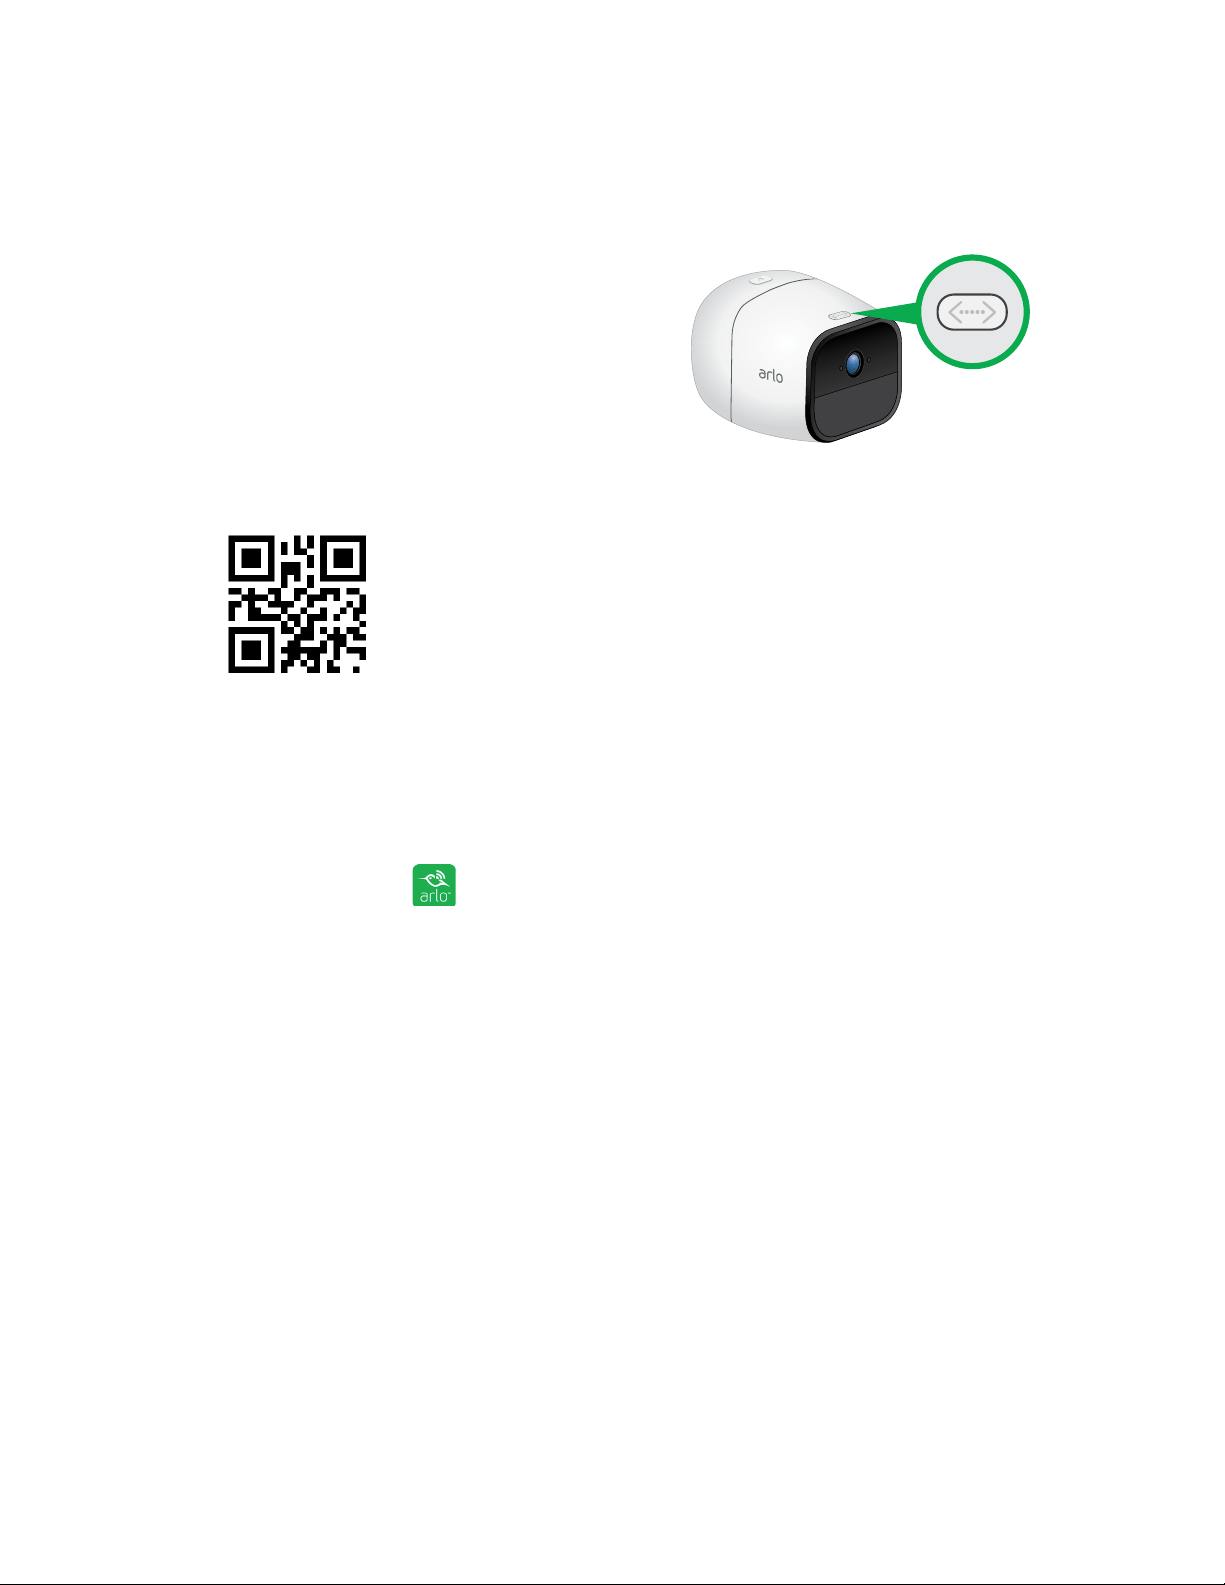
Reset Arlo Go When It Is Not Connected to the Cloud
¾ To reset Arlo Go:
1. Press and release the Sync button on
the top of the camera.
You hear a click.
2. Hold the camera about 8 inches in front of this QR code until you hear a chime.
Your Arlo Go camera is reset to factory default settings.
Remove a Camera From Your Account
¾ To remove a camera from your account:
1. Tap the Arlo icon
on your mobile device.
If you are using a computer, enter arlo.netgear.com in the address bar of a
browser.
The Devices page displays.
2. Tap or click Settings.
The Settings page displays.
3. Tap or click My Devices.
A list of cameras displays.
4. Tap or click the camera.
The settings for the camera display.
5. Scroll down and click Remove Device.
The camera is removed from your account and its settings are deleted.

53
7. Manage Your Subscription Plan
Every Arlo Go camera includes free Basic service that oers basic features and
functionality. When activating your Arlo Go camera, you select your service plan.
Subscription Plans
Upgrading to a paid service level gives you the ability to increase the uses of
your camera to suit your specific needs. Depending on your service level, you can
add cameras or cloud storage and share recordings with friends and family. For
information about service plans, visit bit.ly/1AQGR9k.
Upgrade to a Paid Subscription Plan
¾ To select a paid subscription plan:
1. On your mobile device or computer, launch a browser and enter
arlo.netgear.com.
The Devices page displays.
2. Tap or click Settings.
The Settings page displays.
3. Under Account, tap or click Subscription.
The Subscription page displays.
4. Tap or click Upgrade Now.
The Subscription Plan page displays retail and business options.
5. Tap or click SELECT under the plan.
6. Follow the onscreen instructions to change your subscription.
After your payment is processed, your service level information is updated on
the Subscription page.

54
8. Arlo Connect
Arlo Connect is a simple way to integrate Arlo devices into other smart home
platforms using standard and secure cloud integration.
Use Arlo With IFTTT
You can use the Arlo app with IFTTT (If This Then That), a free cloud-based service
that connects smart home devices and applications.
To add Arlo to your IFTTT app, visit ifttt.com/arlo.
To learn more about Arlo and IFTTT, visit arlo.com/community.

55
9. Troubleshooting
Check Arlo Go’s Mobile Network Signal Strength
¾ To check your Arlo Go’s mobile network signal strength:
1. Tap the Arlo icon
on your mobile device.
If you are using a computer, enter arlo.netgear.com in the address bar of a
browser.
The Devices page displays.
2. Find your Arlo Go camera.
3. Tap or click Settings.
The Settings page displays.
4. Scroll down to the NETWORK section.
The mobile network signal strength displays in this section.
5. If your camera signal strength is displayed as zero, one, or two bars, consider
moving your Arlo Go camera to a location with better signal strength.
If the signal strength for your camera normally displays at least three bars, bad
weather or heavy mobile network usage might be weakening your camera’s
mobile connection. Wait 30–60 minutes and check again to see if coverage
improves. If coverage is consistently bad for two or more days, consider moving
your Arlo Go camera to a location with better signal strength.
Check Arlo Go’s Battery Level
¾ To check your Arlo Go’s battery level:
1. Tap the Arlo icon
on your mobile device.
If you are using a computer, enter arlo.netgear.com in the address bar of a
browser.
The Devices page displays.
2. Find your Arlo Go camera.

56
Troubleshooting
If the Battery icon is yellow or red, recharge your Arlo Go camera’s battery or
insert a fully charged battery. If the Battery icon is black, the battery level is
not low enough to cause streaming problems.
Optimize Motion Detection
The following factors can aect Arlo Go camera motion detection:
• Battery level. If your camera battery is at 25 percent capacity or less,
recording delays might occur when your camera detects motion. The battery
icon in the Devices tab turns yellow when your camera battery drops to 25
percent capacity. For more information about battery life and battery icons,
see Check Arlo Go’s Battery Level on page 55.
• Camera position. Mount your Arlo camera at least 7 feet (2.1 meters) above
the floor or ground, angle it slightly downward, and place it within 10 to 15 feet
(3.0 to 4.6 meters) of where motion is expected.
Make sure that side-to-side trac crosses the camera’s field of view. The
camera’s motion sensor is more sensitive to side-to-side movement across its
field of view than to movement directly toward or away from the camera. The
best area for motion detection is 5 to 20 feet (1.5 to 6 meters) from the camera
position. For more information about camera positioning, see Place Your Camera
on page 11.
• Signal strength. If an Arlo Go camera’s connection to the mobile network
is weak, recording delays might occur when motion is detected. If your Arlo
Go camera regularly shows fewer than three bars of mobile network signal
strength, move your camera to a location with better signal strength. For more
information about mobile network connections, see Check Arlo Go’s Mobile
Network Signal Strength on page 55.
Arlo Go Is Not Streaming on a Mobile Device
¾ To troubleshoot problems with your Arlo Go video stream:
1. Make sure that network signal strength is good for your mobile device.
If your Arlo Go’s LEDs light amber and blink rapidly, your Arlo Go is in a mobile
network coverage area but can’t connect to the Arlo cloud. See Troubleshoot
an Oine Arlo Go Camera on page 57.
If your Arlo Go’s LEDs light amber and blink slowly, the camera is outside of the
mobile network coverage area.

57
Troubleshooting
For more information about your Arlo Go’s LED behavior, see Camera LED Guide
on page 13.
2. Move your Arlo Go camera to an area with better mobile network coverage.
3. Make sure that the signal strength for your Arlo Go camera is at least three
bars.
Low signal strength can cause the camera to stream intermittently. See Check
Arlo Go’s Mobile Network Signal Strength on page 55.
4. Make sure that your Arlo Go camera is at least 6½ feet (2 meters) away from
any WiFi enabled devices, major electrical equipment, large metal or concrete
objects, or other sources of signal interference.
5. Make sure that your Arlo Go’s battery is not low.
A low battery can cause the camera to stream intermittently. See Cannot View
Arlo Live Streaming in a Web Browser on page 57.
6. If you still cannot see Arlo Go video streams after completing these
troubleshooting steps, contact Arlo support to speak to an expert.
Cannot View Arlo Live Streaming in a Web Browser
Your Arlo Go camera, your computer, your web browser, or your Internet network
might be causing the streaming problem.
The Arlo web client uses the Adobe Flash plug-in to display your camera streams
in a browser. Make sure that your browser is not blocking the plug-in and that you
are using the latest version of Adobe Flash.
Your router might be blocking the ports to which Arlo sends data. To ensure that
Arlo can stay connected, you must keep the ports 443 and 80 open on your router:
Troubleshoot an Oine Arlo Go Camera
¾ To troubleshoot when your Arlo Go camera is oine:
1. Unplug your Arlo Go camera, remove the battery, reinsert the battery, and
notice the camera LED behavior when the door is closed.
• If the LED does not light, check to make sure that the battery is installed in
the correct orientation and that the battery is not dead.
If the battery is low or dead, plug in the camera or insert a fully charged
battery.

58
Troubleshooting
• If the LED blinks blue very slowly, the camera is starting.
Wait 20–30 seconds, until the LED pattern stops changing.
2. Note the LED behavior after the camera is done starting:
• The LED blinks blue rapidly. The camera is connected to the cloud.
Log out of the Arlo app on your mobile device or web browser and log back in
again. If your camera still appears oine in the Arlo app, contact Arlo support to
speak to an expert.
• The LED blinks blue and purple. The camera is connecting to the network
and the cloud.
Wait for the LED behavior to stop changing and check it again.
• The LED lights solid blue. The camera is not connected to an Arlo account.
Complete the new camera setup process.
• The LED lights solid amber. No SIM card is inserted or the SIM card is
damaged.
Contact your mobile service provider for a new SIM card.
• The LED blinks amber. Mobile network coverage is not available.
Move the camera to an area with mobile network coverage.
• The LED blinks amber rapidly. The camera is connected to the cellular
network, but it cannot connect to the cloud.
• The LED blinks amber and blue. The camera is receiving a firmware upgrade.
Do not open the battery compartment or unplug the camera until the upgrade
is complete and the camera is done rebooting. Wait for the LED to turn o for
several seconds, turn back on again, slowly blink blue for 20–30 seconds, and
settle into a new behavior.
Note: If the LED blinks blue slowly during the startup process and then shows a dierent color briefly
before it turns o, the LED might be turned o in your settings. If your camera is still oine and you
missed the behavior that the LED was showing right before it turned o, repeat steps 1 and 2 and pay
close attention to the LED.
3. If your camera is still oine, visit Arlo support to speak with an expert.

59
Troubleshooting
Condensation on the Camera Lens
Condensation can reduce picture quality for Arlo Go cameras that are used
outdoors or in a wet indoor area. If your Arlo Go camera’s picture quality is aected
by condensation, the best solution is to purchase a camera skin with a built-in
shade. The shade helps to keep condensation o the camera lens.
To purchase a camera skin with a built-in shade, visit
arlo.com/en-us/products/arlo-go/skin.aspx.
Not Receiving Push Notifications
You must be logged in to the Arlo app to receive Arlo alerts on your smartphone or
mobile device. Arlo registers your device for push notification when you log in. If
you used the logout option instead of simply exiting the app, you must log back in
to the app. You receive Arlo alerts even if your device is sleeping.
If you did all of the following and are still not getting Arlo Go alerts, contact
NETGEAR support.
Check the Rules Settings for Armed Modes
Check the rules in your modes. Make sure that push notification is enabled in the
Armed mode or in a custom mode if you created one.
¾ To check push notification in the Armed mode setting:
1. Tap the Arlo icon
on your mobile device.
If you are using a computer, enter arlo.netgear.com in the address bar of a
browser.
The Devices page displays.
2. Tap or click the Mode button.
A list of cameras displays.
3. Select the Arlo Go camera.
A list of modes displays.
4. Tap or click the Edit icon
next to Armed.
The Edit Rule page displays.
5. Under Alert, make sure that the Push Notification check box is selected.

60
Troubleshooting
6. Save your changes.
Check the Arlo App Settings on an iOS Device
Make sure that you allow the Arlo app to receive push notifications. The Arlo app
push notifications can be disabled on iOS and Android devices.
¾ To allow Arlo push notifications on iOS devices:
1. Tap the Settings icon for your iOs device.
2. Select Notifications > Arlo.
The Arlo notification settings display.
3. Make sure that Allow Notification is selected.
Check the Arlo App Settings on an Android Device
¾ To allow Arlo push notifications on Android devices:
1. Tap the Settings icon for your Android device.
2. Select Application Manager > Arlo.
The Arlo notification settings display.
3. Make sure that the Show Notifications setting is enabled.
If You Said No to Push Notifications at Installation
When you install the Arlo app for the first time, to receive alerts, you must
select Allow when asked if you want Arlo to send you push notifications. For
iOS apps, after you respond to this alert, it is not presented again unless the
device is restored to default settings or the app is uninstalled for at least a day.
If you said no on an iOS device, uninstall the app, wait for a day, and then
reinstall it, and allow notifications. If you do not want to wait a day before you
reinstall the app, you can use the system clock on your device to simulate a day.
Set the system clock forward a day or more, turn your device o, and then turn
the device back on. After you reinstall the app, return the system clock to the
correct setting.

61
10. Rechargeable Battery Safety
Safety Rules for Arlo Go Rechargeable Batteries
Arlo Go Wire-Free HD Security Cameras use rechargeable batteries and can go
wherever you need them. But ALL batteries can EXPLODE, CATCH FIRE, and CAUSE
BURNS if disassembled, punctured, cut, crushed, short-circuited, incinerated, or
exposed to water, fire, or high temperatures, so you must handle them with care.
To use Arlo Go rechargeable batteries safely, follow these guidelines:
• ALWAYS store spare batteries in a cool, dry, ventilated area.
• ALWAYS make sure that the battery compartment is clean and free of any
debris before inserting new batteries.
• ALWAYS make sure the battery contacts are aligned.
• ALWAYS keep all batteries away from children.
• ALWAYS follow local waste and recycling laws when throwing used batteries
away.
• ALWAYS use an Arlo Go power adapter or an Arlo Go Charging Station (sold
separately) to charge Arlo Go rechargeable batteries.
• NEVER place Arlo Go rechargeable batteries in a pocket, purse, or other
receptacle, especially those containing metal objects.
• NEVER store Arlo Go rechargeable batteries with hazardous or combustible
materials.
• NEVER let an Arlo Go rechargeable battery or battery compartment get
wet—before, during, or after installation. (Remember, your camera itself is
weatherproof, but its interior battery compartment and batteries aren’t.)
• NEVER disassemble, cut, crush, puncture, short-circuit, dispose of batteries in
fire or water, or expose your Arlo Go rechargeable battery to temperatures
above 60°C (140°F).

62
Rechargeable Battery Safety
Safety Rules for the Arlo Go Charging Station
The Arlo Go Charging Station is sold separately. You can use the charging station
to charge one or two Arlo Go rechargeable batteries. For more information about
the Arlo Go Charging Station, see the instructions that are included in the Arlo Go
Charging Station package.
When using the Arlo Go Charging Station, follow these guidelines to avoid personal
injury and property damage from, but not limited to, the risk of electric shock or
fire:
• Charge only Arlo Go rechargeable batteries compatible with the Arlo Go
Charging Station. Charging other batteries might cause them to leak, rupture,
or explode.
• Use the charger only in dry locations. Keep away from rain, snow, or excessive
moisture.
• Do not operate the charging station if it or its cord is damaged.
• Do not disassemble, modify, or attempt to use the charging station as a power
source.
• Do not disassemble the battery, dispose of the battery in fire, put the battery in
backward, mix it with used or other battery types, or short-circuit the battery.
The battery might ignite, explode, leak, or get hot, causing injury.
Your Arlo Wire-free HD Security Camera has been specifically designed for use only
with Arlo rechargeable batteries. Therefore, only use Arlo rechargeable batteries
with Arlo cameras.
ALWAYS REMEMBER that poor quality or mishandled batteries can damage your
cameras, cause a fire, or result in personal injury. NETGEAR is not responsible for
any failure to follow these battery usage guidelines.