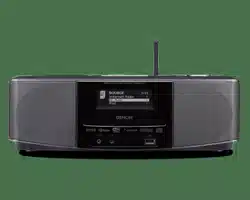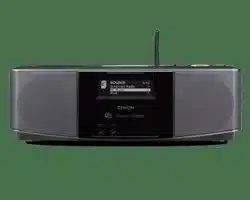

WIRELESS NETWORK MUSIC SYSTEM
S-32
Owner’s Manual
Manuel de l’Utilisateur
Manual del usuario
I
n
SAFETY PRECAUTIONS
CAUTION
RISK OF ELECTRIC SHOCK
DO NOT OPEN
CAUTION:
TO REDUCE THE RISK OF ELECTRIC SHOCK, DO NOT REMOVE
COVER (OR BACK). NO USER-SERVICEABLE PARTS INSIDE.
REFER SERVICING TO QUALIFIED SERVICE PERSONNEL.
The lightning flash with arrowhead symbol, within an equilateral
triangle, is intended to alert the user to the presence of
uninsulated “dangerous voltage” within the product’s enclosure
that may be of sufficient magnitude to constitute a risk of electric
shock to persons.
The exclamation point within an equilateral triangle is intended
to alert the user to the presence of important operating
and maintenance (servicing) instructions in the literature
accompanying the appliance.
WARNING:
TO REDUCE THE RISK OF FIRE OR ELECTRIC SHOCK, DO NOT
EXPOSE THIS APPLIANCE TO RAIN OR MOISTURE.
IMPOTANT SAFETY
INSTRUCTIONS
1. Read these instructions.
2. Keep these instructions.
3. Heed all warnings.
4. Follow all instructions.
5. Do not use this apparatus near water.
6. Clean only with dry cloth.
7. Do not block any ventilation openings.
Install in accordance with the manufacturer’s instructions.
8. Do not install near any heat sources such as radiators, heat registers, stoves,
or other apparatus (including amplifiers) that produce heat.
9. Do not defeat the safety purpose of the polarized or grounding-type plug. A
polarized plug has two blades with one wider than the other. A grounding
type plug has two blades and a third grounding prong. The wide blade or the
third prong are provided for your safety. If the provided plug does not fit into
your outlet, consult an electrician for replacement of the obsolete outlet.
10. Protect the power cord from being walked on or pinched particularly at
plugs, convenience receptacles, and the point where they exit from the
apparatus.
11. Only use attachments/accessories specified by the manufacturer.
12. Use only with the cart, stand, tripod, bracket, or table
specified by the manufacturer, or sold with the apparatus.
When a cart is used, use caution when moving the cart/
apparatus combination to avoid injury from tip-over.
13. Unplug this apparatus during lightning storms or when
unused for long periods of time.
14. Refer all servicing to qualified service personnel.
Servicing is required when the apparatus has been damaged in any way,
such as power-supply cord or plug is damaged, liquid has been spilled or
objects have fallen into the apparatus, the apparatus has been exposed to
rain or moisture, does not operate normally, or has been dropped.
15. Batteries shall not be exposed to excessive heat such as sunshine, fire or
the like.
n
Copyrights / Droits d’auteur / Derechos de Autor
• It is prohibited by law to reproduce, broadcast, rent or play discs in
public without the consent of the copyright holder.
• La reproduction, la diffusion, la location, le prêt ou la lecture
publique de ces disques sont interdits sans le consentement du
détenteur des droits d’auteur.
• De acuerdo con las leyes está prohibido reproducir, emitir, alquilar
o interpretar discos en público sin la autorización del propietario de
los derechos de autor.
ESPAÑOLENGLISH FRANCAIS
CAUTION:
• The ventilation should not be impeded by covering the ventilation
openings with items, such as newspapers, tablecloths, curtains,
etc.
• No naked flame sources, such as lighted candles, should be
placed on the unit.
• Observe and follow local regulations regarding battery disposal.
• Do not expose the unit to dripping or splashing fluids.
• Do not place objects filled with liquids, such as vases, on the
unit.
ATTENTION:
• La ventilation ne doit pas être gênée en recouvrant les ouvertures
de la ventilation avec des objets tels que journaux, rideaux, tissus,
etc.
• Aucune flamme nue, par exemple une bougie, ne doit être placée
sur l’appareil.
• Veillez à respecter les lois en vigueur lorsque vous jetez les piles
usagées.
• L’appareil ne doit pas être exposé à l’eau ou à l’humidité.
• Ne pas poser d’objet contenant du liquide, par exemple un vase,
sur l’appareil.
PRECAUCIÓN:
• La ventilación no debe quedar obstruida por haberse cubierto las
aperturas con objetos como periódicos, manteles, cortinas, etc.
• No debe colocarse sobre el aparato ninguna fuente inflamable sin
protección, como velas encendidas.
• A la hora de deshacerse de las pilas, respete la normativa para el
cuidado del medio ambiente.
• No exponer el aparato al goteo o salpicaduras cuando se utilice.
• No colocar sobre el aparato objetos llenos de líquido, como
jarros.
CAUTION:
To completely disconnect this product from the mains, disconnect
the plug from the wall socket outlet.
The mains plug is used to completely interrupt the power supply to
the unit and must be within easy access by the user.
PRECAUTION:
Pour déconnecter complètement ce produit du courant secteur,
débranchez la prise de la prise murale.
La prise secteur est utilisée pour couper complètement
l’alimentation de l’appareil et l’utilisateur doit pouvoir y accéder
facilement.
PRECAUCIÓN:
Para desconectar completamente este producto de la alimentación
eléctrica, desconecte el enchufe del enchufe de la pared.
El enchufe de la alimentación eléctrica se utiliza para interrumpir por
completo el suministro de alimentación eléctrica a la unidad y debe
de encontrarse en un lugar al que el usuario tenga fácil acceso.

II
FCC Information (For US customers)
1. COMPLIANCE INFORMATION
Product Name: Wireless Network Music System
Model Number: S-32
This product contains FCC ID: BV2- MPGBR052.
This product complies with Part 15 of the FCC Rules. Operation is subject to the following two conditions: (1) this
product may not cause harmful interference, and (2) this product must accept any interference received, including
interference that may cause undesired operation.
Denon Electronics (USA), LLC
100 Corporate Drive, Mahwah, NJ 07430-2041
Tel. 201-762-6500 (Main)
2. IMPORTANT NOTICE: DO NOT MODIFY THIS PRODUCT
This product, when installed as indicated in the instructions contained in this manual, meets FCC requirements.
Modification not expressly approved by DENON may void your authority, granted by the FCC, to use the product.
3. CAUTION
• To comply with FCC RF exposure compliance requirement, separation distance of at least 20 cm must be
maintained between the antenna of this product and all persons.
• This product and its antenna must not be co-located or operating in conjunction with any other antenna or
transmitter.
4. NOTE
This product has been tested and found to comply with the limits for a Class B digital device, pursuant to Part 15
of the FCC Rules. These limits are designed to provide reasonable protection against harmful interference in a
residential installation.
This product generates, uses and can radiate radio frequency energy and, if not installed and used in accordance
with the instructions, may cause harmful interference to radio communications. However, there is no guarantee
that interference will not occur in a particular installation. If this product does cause harmful interference to radio or
television reception, which can be determined by turning the product OFF and ON, the user is encouraged to try to
correct the interference by one or more of the following measures:
• Reorient or relocate the receiving antenna.
• Increase the separation between the equipment and receiver.
• Connect the product into an outlet on a circuit different from that to which the receiver is connected.
• Consult the local retailer authorized to distribute this type of product or an experienced radio/TV technician for
help.
IC Information (For Canadian customers)
1. PRODUCT
This product contains IC 6963A-MPGBR052.
This product complies with RSS-210 of Industry Canada. Operation is subject to the following two conditions:
(1) this product may not cause harmful interference, and (2) this product must accept any interference received,
including interference that may cause undesired operation.
This Class B digital apparatus complies with Canadian ICES-003.
APPAREIL
Cet appareil contiens IC 6963A- MPGBR052.
Cet appareil est conforme à la norme CNR-210 du Canada. L
’utilisation de ce dispositif est autorisée seulement
aux deux conditions suivantes : (1) il ne doit pas produire de brouillage, et (2) l’utilisateur du dispositif doit être
prêt à accepter tout brouillage radioélectrique reçu, même si ce brouillage est susceptible de compromettre le
fonctionnement du dispositif.
Cet appareil numérique de la classe B est conforme à la norme NMB-003 du Canada.
2. CAUTION
To reduce potential radio interference to other users, the antenna type and its gain should be so chosen that the
equivalent isotropically radiated power (e.i.r.p.) is not more than that permitted for successful communication.
ATTENTION
Afin de réduire le risque d’interférence aux autres utilisateurs, il faut choisir le type d’antenne et son gain de façon à
ce que la puissance isotrope rayonnée équivalente (p.i.r.e.) ne soit pas supérieure au niveau requis pour l’obtention
d’une communication satisfaisante.
ENGLISHFRANCAISESPAÑOL
III
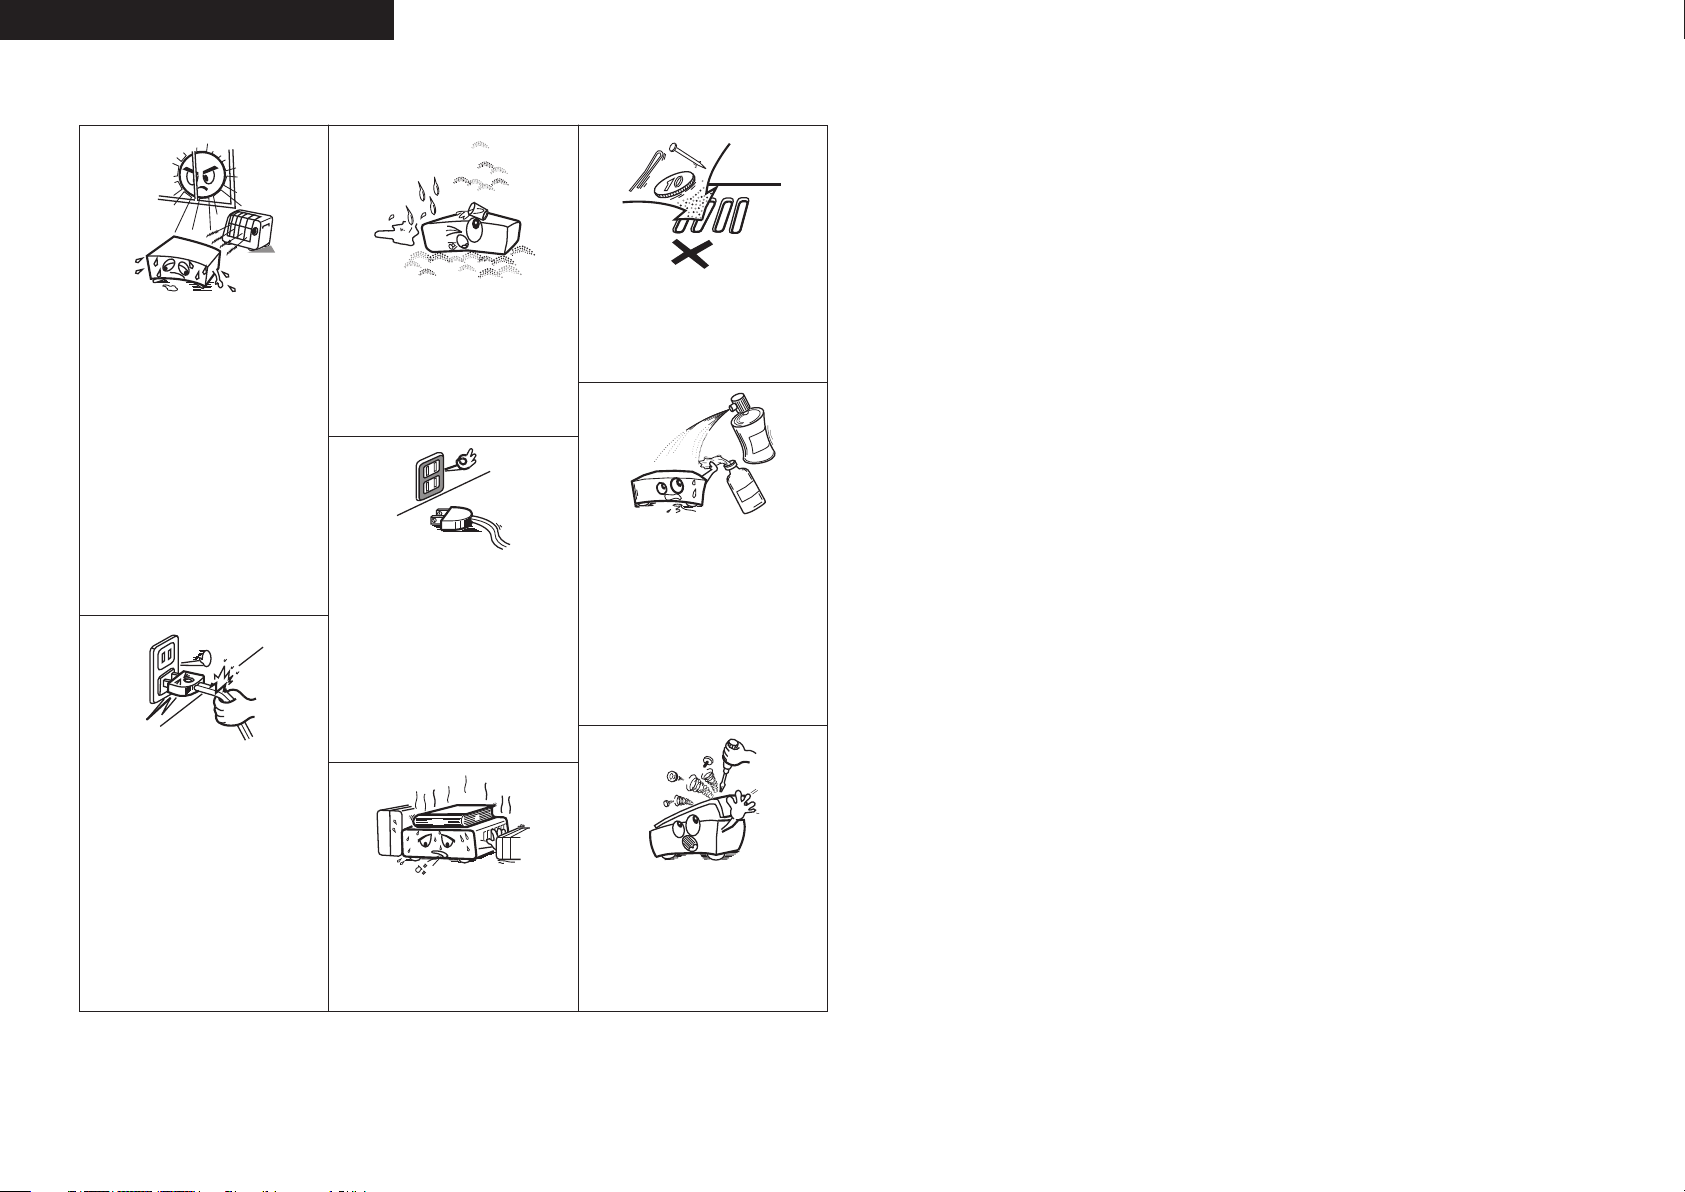
• Avoid high temperatures.
Allow for sufficient heat dispersion when
installed in a rack.
• Eviter des températures élevées.
Tenir compte d’une dispersion de chaleur
suffisante lors de l’installation sur une
étagère.
• Evite altas temperaturas.
Permite la suficiente dispersión del calor
cuando está instalado en la consola.
• Handle the power cord carefully.
Hold the plug when unplugging the cord.
• Manipuler le cordon d’alimentation avec
précaution.
Tenir la prise lors du débranchement du
cordon.
• Maneje el cordón de energía con cuidado.
Sostenga el enchufe cuando desconecte el
cordón de energía.
• Keep the unit free from moisture, water,
and dust.
• Protéger l’appareil contre l’humidité, l’eau
et la poussière.
• Mantenga el equipo libre de humedad,
agua y polvo.
• Unplug the power cord when not using the
unit for long periods of time.
• Débrancher le cordon d’alimentation
lorsque l’appareil n’est pas utilisé pendant
de longues périodes.
• Desconecte el cordón de energía cuando
no utilice el equipo por mucho tiempo.
* (For apparatuses with ventilation holes)
• Do not obstruct the ventilation holes.
• Ne pas obstruer les trous d’aération.
• No obstruya los orificios de ventilación.
• Do not let foreign objects into the unit.
• Ne pas laisser des objets étrangers dans
l’appareil.
• No deje objetos extraños dentro del
equipo.
• Do not let insecticides, benzene, and
thinner come in contact with the unit.
• Ne pas mettre en contact des insecticides,
du benzène et un diluant avec l’appareil.
• No permita el contacto de insecticidas,
gasolina y diluyentes con el equipo.
• Never disassemble or modify the unit in
any way.
• Ne jamais démonter ou modifier l’appareil
d’une manière ou d’une autre.
• Nunca desarme o modifique el equipo de
ninguna manera.
n
NOTE ON USE / OBSERVATIONS RELATIVES A L’UTILISATION / NOTAS
SOBRE EL USO
ESPAÑOLENGLISH FRANCAIS
Connections Setup Playback Information Troubleshooting
ENGLISH
Accessories ······················································································1
Cautions on Handling ·····································································2
Cautions on Installation ·································································2
About the Remote Control Unit ····················································2
Inserting the Batteries ····································································2
Operating Range of the Remote Control Unit ································2
Part Names and Functions ·····························································3
Top Panel ························································································3
Front Panel ·····················································································3
Rear Panel ······················································································4
Remote Control Unit ······································································4
Getting Started
Connections
Contents
Preparations ····················································································5
Cables Used for Connections ························································5
Connecting the Playback Components ········································5
iPod
®
·····························································································5
Connections to Other Devices ·······················································5
Antenna Terminals ······································································5, 6
Connection to a Subwoofer ···························································6
Network Audio ···········································································6, 7
Connecting the Power Cord ···························································7
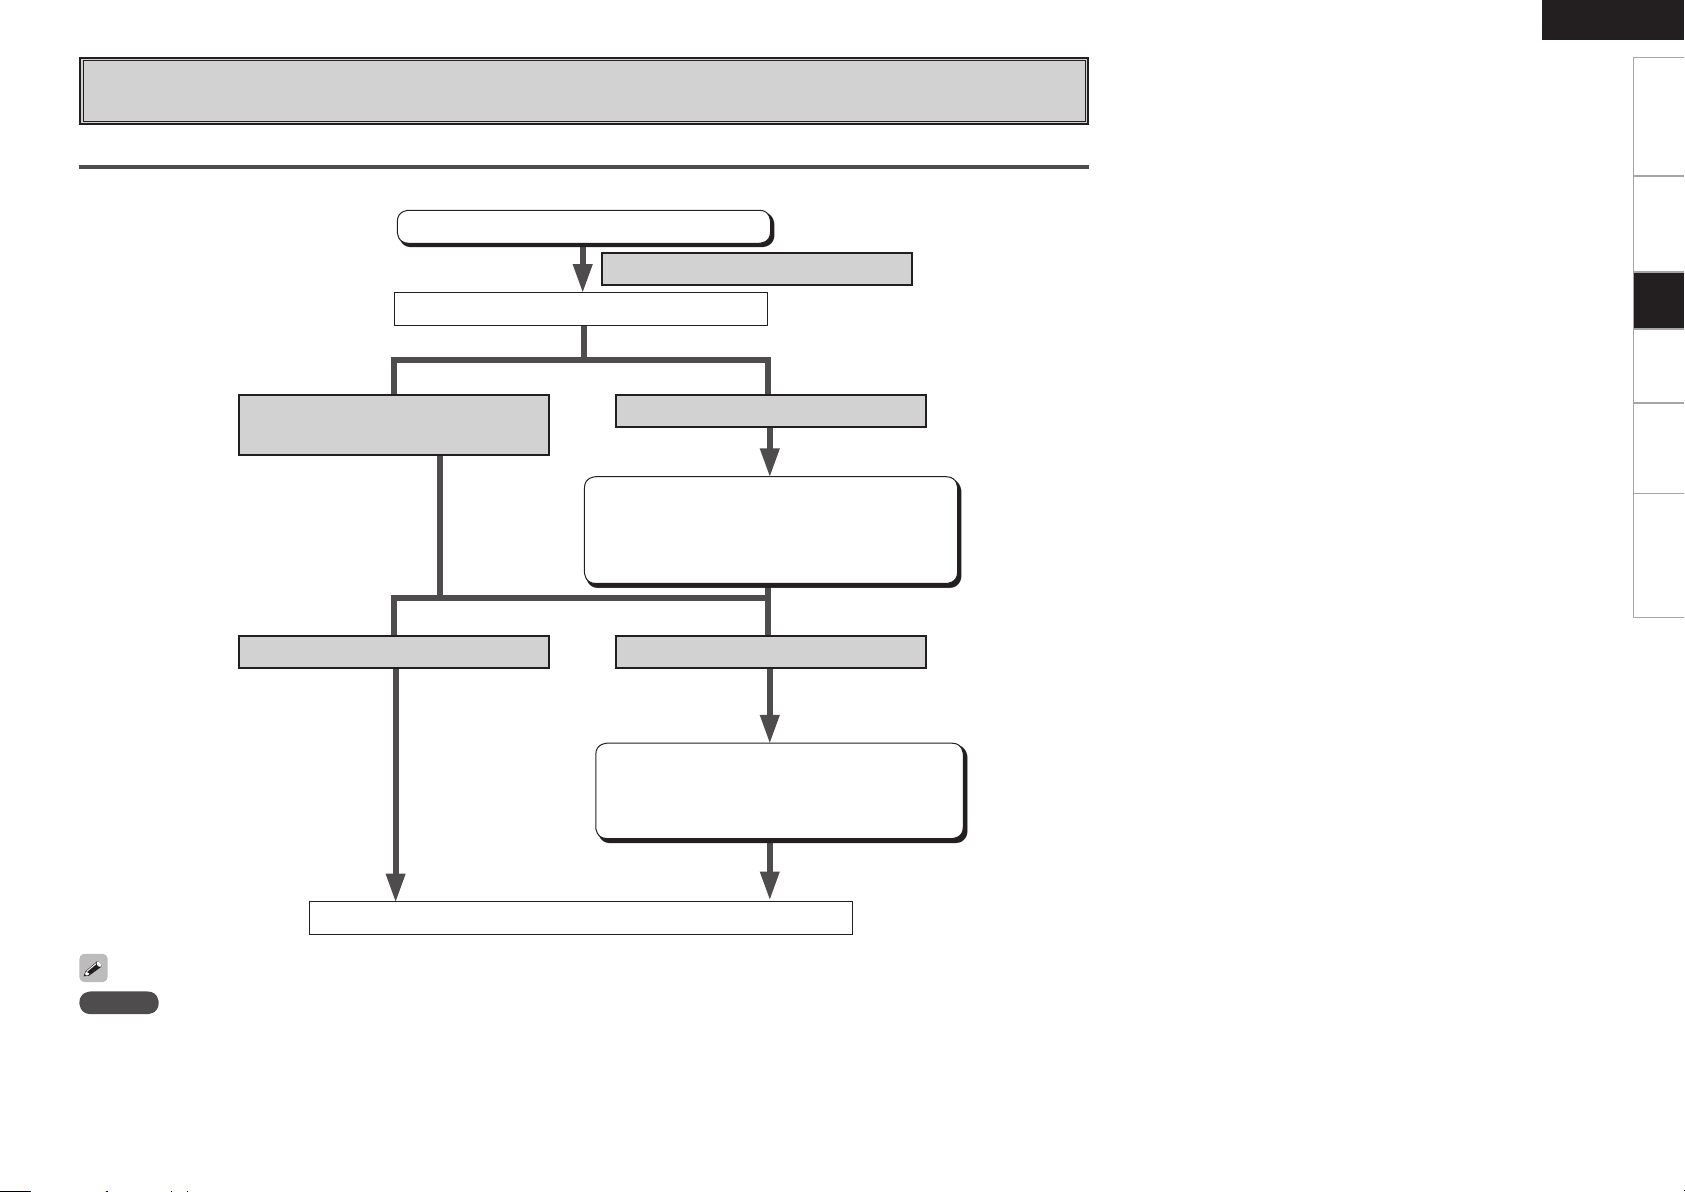
Menu Operations
Operations ·······················································································8
Menu Map ·······················································································8
Setup
SETUP ······························································································8
a Clock ·························································································8
s Network Setting ································································9 ~ 11
d Firmware Update ···································································· 11
Preparations ·················································································· 12
Turning the Function ON and OFF ················································12
Input Source Switching ·······························································12
Adjusting the Master Volume ······················································ 12
Switching the Display ·································································· 13
Switching the Display’s Brightness ············································ 13
Listening with Headphones ························································· 13
Playing Network Audio································································· 13
Listening to Internet Radio ··························································14
Tuning in Broadcast Stations ························································ 14
Listening to PC Music···································································15
Playing Files Stored on a Computer ············································· 15
Listening to Rhapsody ·································································16
About Rhapsody ··········································································· 16
Listening to Rhapsody ································································· 16
Enter a Character Search For the Track You Want to Listen to ······ 16
Search From Rhapsody Latest Information ···························· 16, 17
Registering Tracks in My Library ··················································· 17
Listening to Tracks Registered In My Library ······························· 17
Displaying the Search Menu During Play ····································· 17
Listening to iPod ··········································································· 17
iPod
®
Playback ············································································· 17
Listening to Music ······································································· 17
Listening to FM/AM ·····································································18
Tuning in Broadcast Stations ························································ 18
Presetting Radio Stations (Preset Memory) ·································18
Naming Preset Broadcast Stations ·············································· 19
Listening to Preset Stations ························································· 19
Listening to AUX ··········································································· 19
Playing a Portable Audio ······························································ 19
Favorite ·························································································· 19
Playback
Advanced Operation
Alarm Setting ················································································20
Setting the Sleep Timer ·······························································21
Convenient Functions ··································································21
Personal Memory Plus Function ··················································21
Last Function Memory ·································································21
Backup Memory ···········································································21
Auto Power On ·············································································21
Resetting the Microprocessor ······················································21
Troubleshooting ····································································· 24, 25
Specifications ··············································································· 26
Other Information ·································································· 22, 23
w e
u
y
q
r t
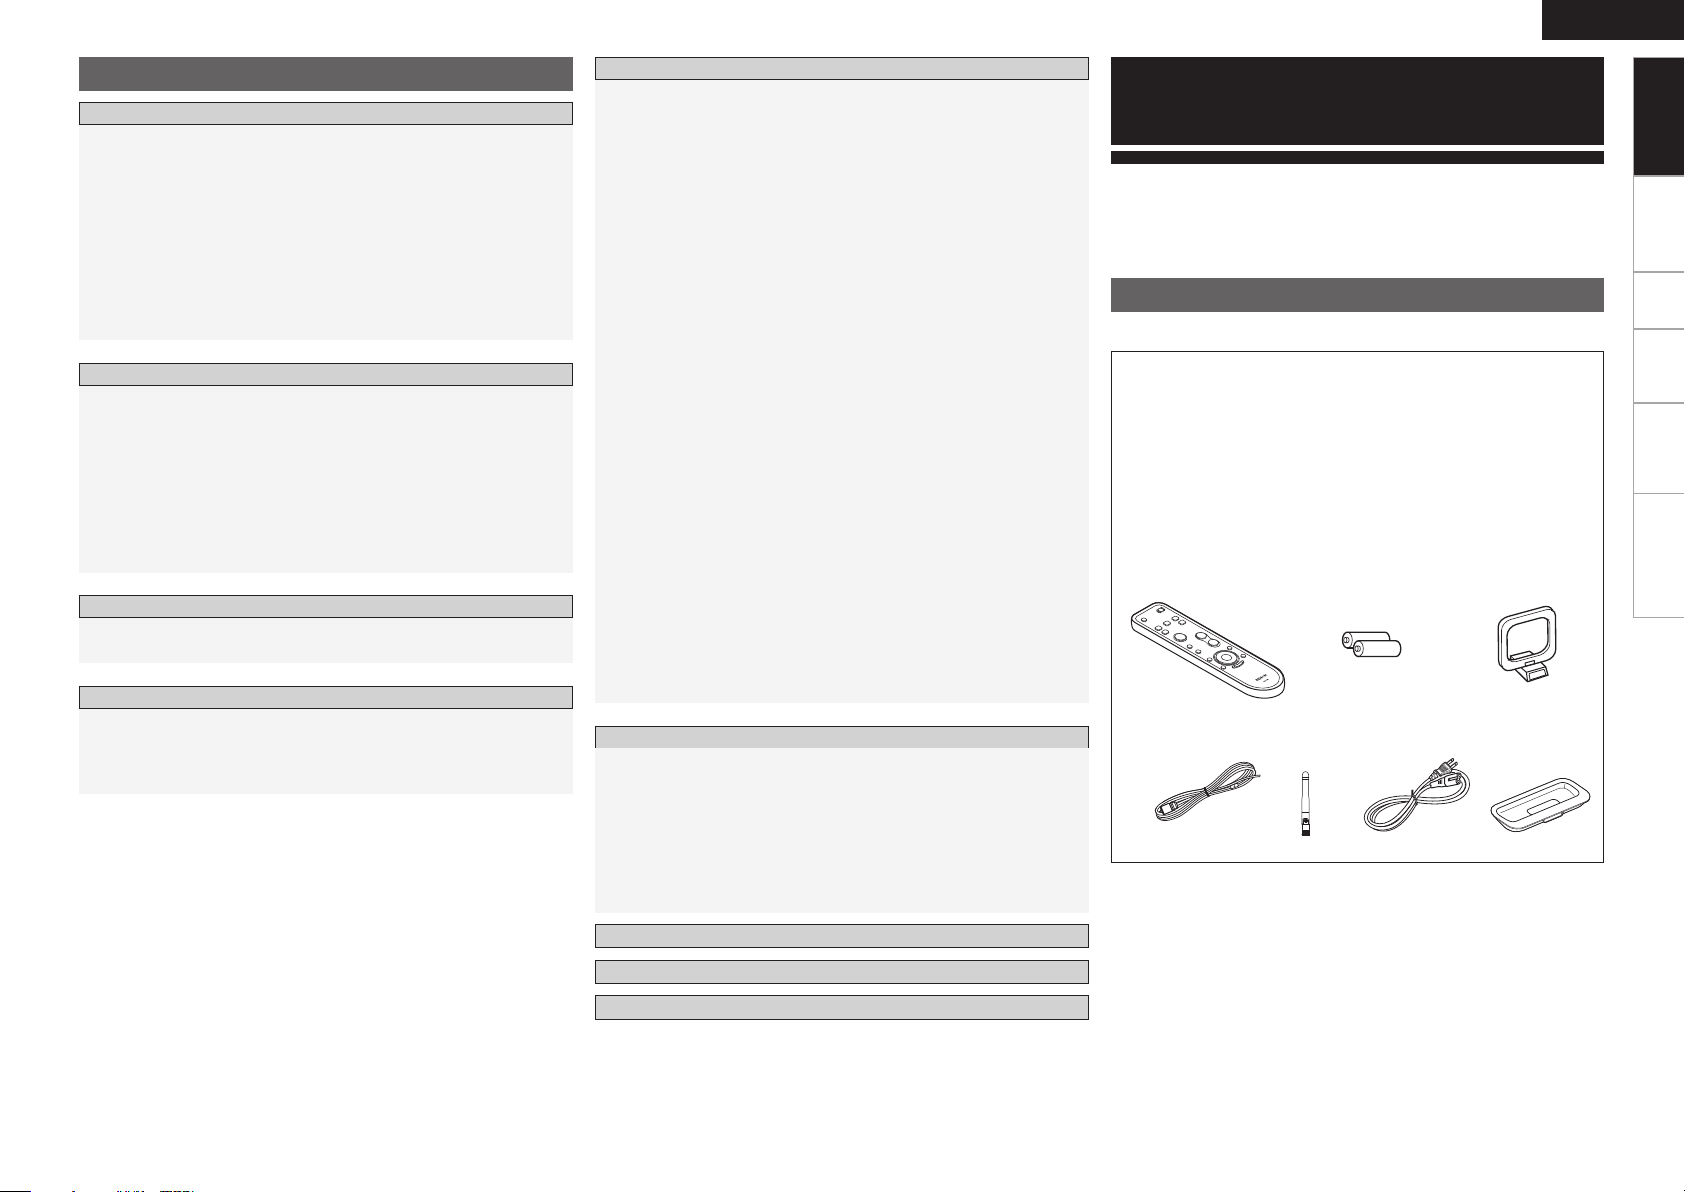
Check that the following parts are supplied with the product.
q Remote control (RC-1089) .......................................................1
w R03/AAA batteries ..................................................................2
e AM loop antenna ..................................................................... 1
r FM indoor antenna ..................................................................1
t Rod antenna for wireless LAN ................................................. 1
y Power cord (Cord length: Approx. 6 ft / 2 m) ........................... 1
u Universal Adapter (3 types) .............................................1 each
i Owner’s manual ......................................................................1
o Warranty (for North America model only) ................................ 1
Q0 Service station list ................................................................... 1
Thank you for purchasing this DENON product. To ensure proper
operation, please read this owner’s manual carefully before using the
product.
After reading them, be sure to keep them for future reference.
Getting Started
Accessories
Getting Started
Connections Setup Playback Information Troubleshooting
ENGLISH
• Before turning the power switch on
Check once again that all connections are correct and that there are
no problems with the connection cables.
•
Power is supplied to some of the circuitry even when the unit is
set to the standby mode. When traveling or leaving home for long
periods of time, be sure to unplug the power cord from the power
outlet.
• About condensation
If there is a major difference in temperature between the inside of
the unit and the surroundings, condensation (dew) may form on
the operating parts inside the unit, causing the unit not to operate
properly.
If this happens, let the unit sit for an hour or two with the power
turned off and wait until there is little difference in temperature
before using the unit.
• Cautions on using mobile phones
Using a mobile phone near this unit may result in noise. If so, move
the mobile phone away from this unit when it is in use.
• Moving the unit
Turn off the power and unplug the power cord from the power
outlet.
Next, disconnect the connection cables to other system units before
moving the unit.
•
Note that the illustrations in these instructions may differ from the
actual unit for explanation purposes.
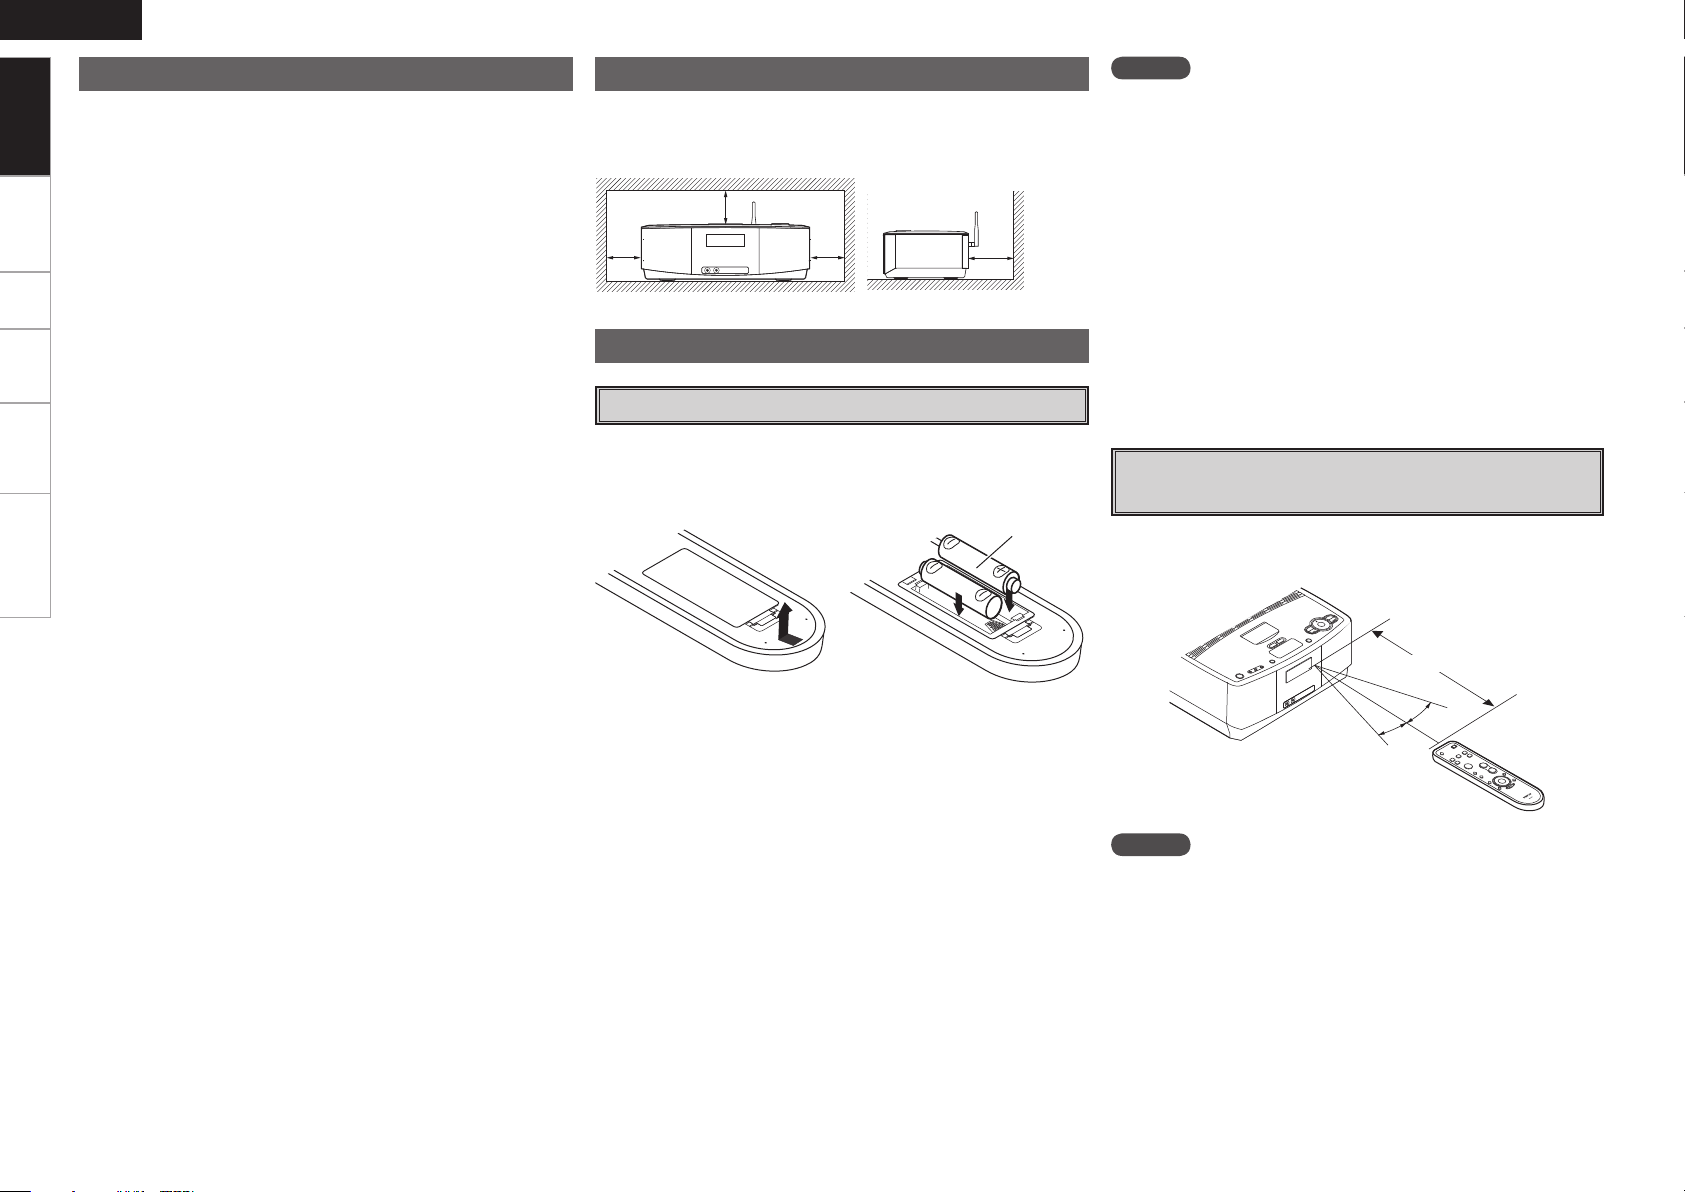
Cautions on Handling
Note:
For proper heat dispersal, do not install this unit in a confined
space, such as a bookcase or similar enclosure.
Cautions on Installation
b Note
b b b
Wall
Getting Started
Inserting the Batteries
About the Remote Control Unit
q Slide the rear lid in the
direction of the arrow and
remove it.
w Load the two batteries properly
as indicated by the marks in the
battery compartment.
e Put the rear cover back on.
NOTE
• Replace the batteries with new ones if the set does not operate even
when the remote control unit is operated close to the unit.
• The supplied batteries are only for verifying operation.
• When inserting the batteries, be sure to do so in the proper direction,
following the “q” and “w” marks in the battery compartment.
• To prevent damage or leakage of battery fluid:
• Do not use a new battery together with an old one.
• Do not use two different types of batteries.
• Do not attempt to charge dry batteries.
• Do not short-circuit, disassemble, heat or dispose of batteries in
flames.
• If the battery fluid should leak, carefully wipe the fluid off the inside
of the battery compartment and insert new batteries.
• Remove the batteries from the remote control unit if it will not be in
use for long periods.
• When replacing the batteries, have the new batteries ready and
insert them as quickly as possible.
Point the remote control unit at the remote sensor when operating it.
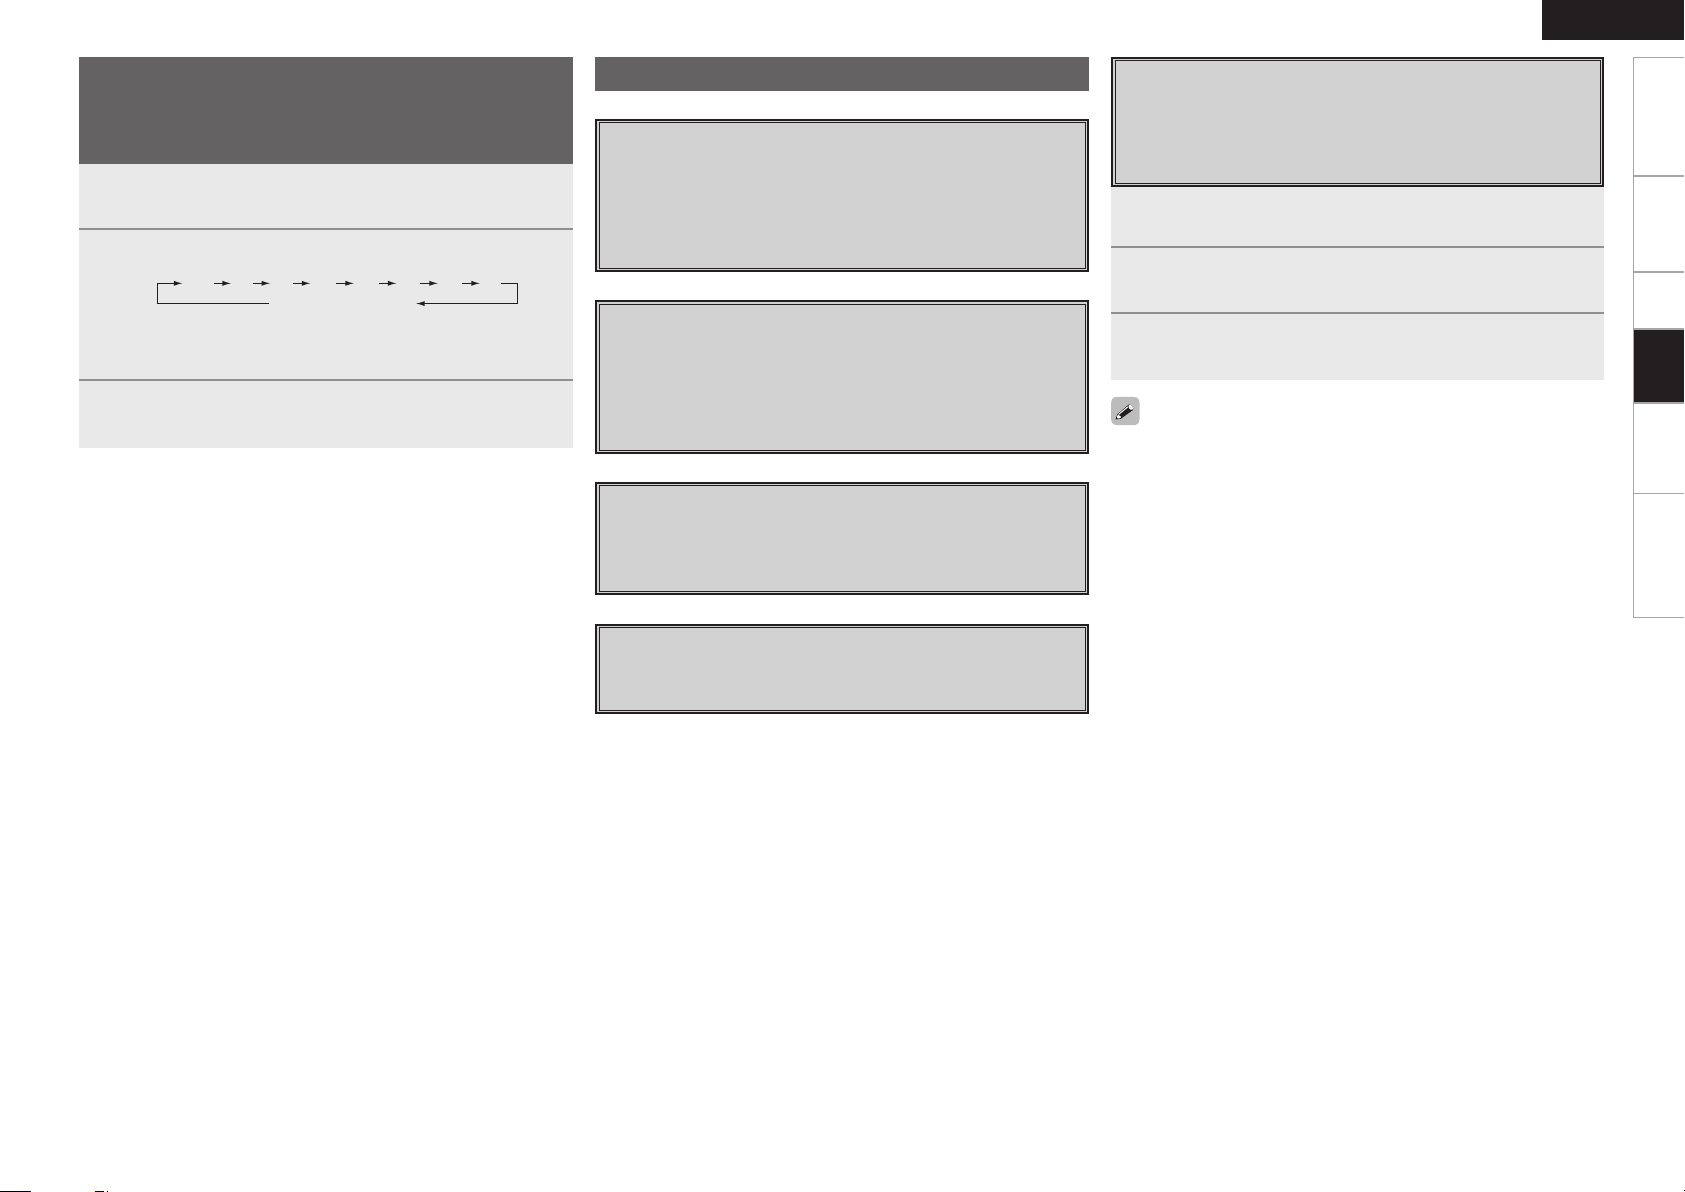
Operating Range of the Remote Control
Unit
30°
30°
Approx. 23 feet / 7 m
NOTE
The set may function improperly or the remote control unit may not
operate if the remote control sensor is exposed to direct sunlight,
strong artificial light from an inverter type fluorescent lamp or infrared
light.
R03/AAA
Connections Setup Playback Information Troubleshooting
ENGLISH
Q8 AUX IN jack ················································ (19)
Q9 Headphones jack ( ) ································(13)
W0 Remote control sensor ································(2)
W1 Display
For buttons not explained here, see the page indicated in parentheses ( ).
Part Names and Functions
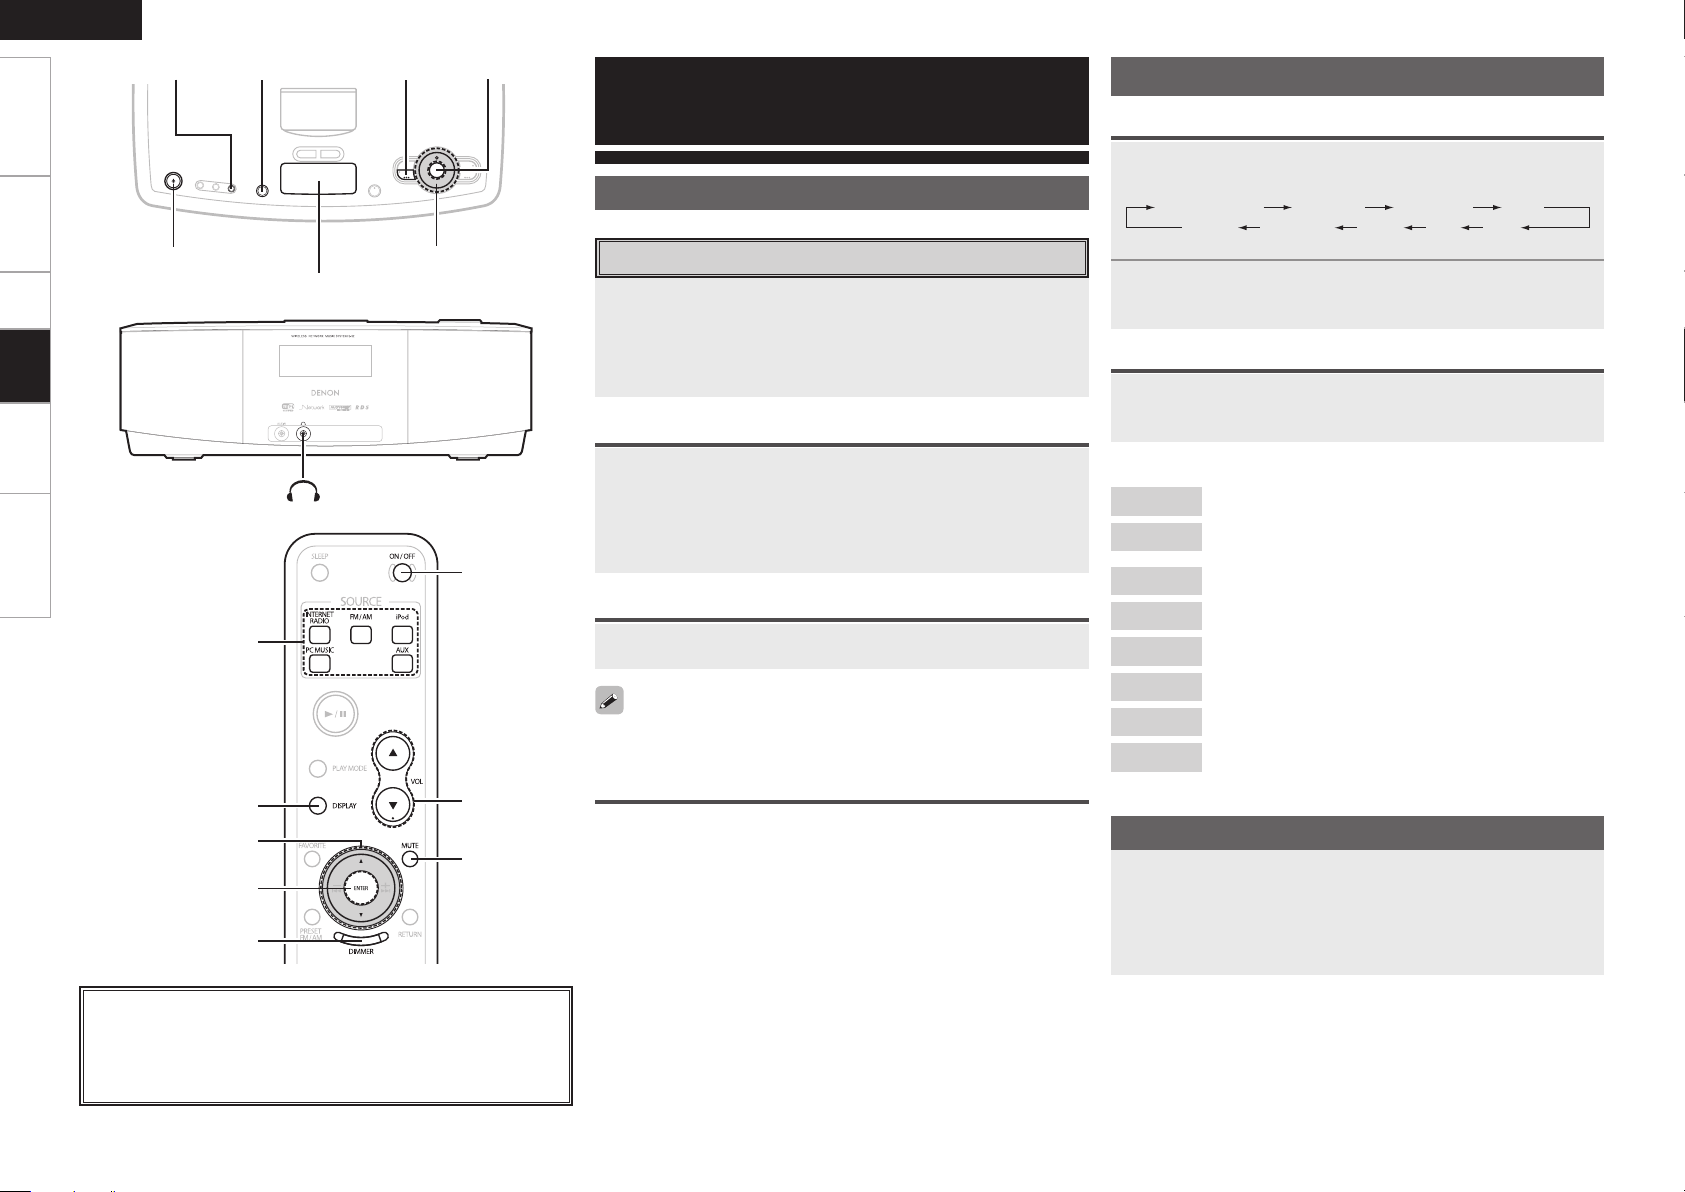
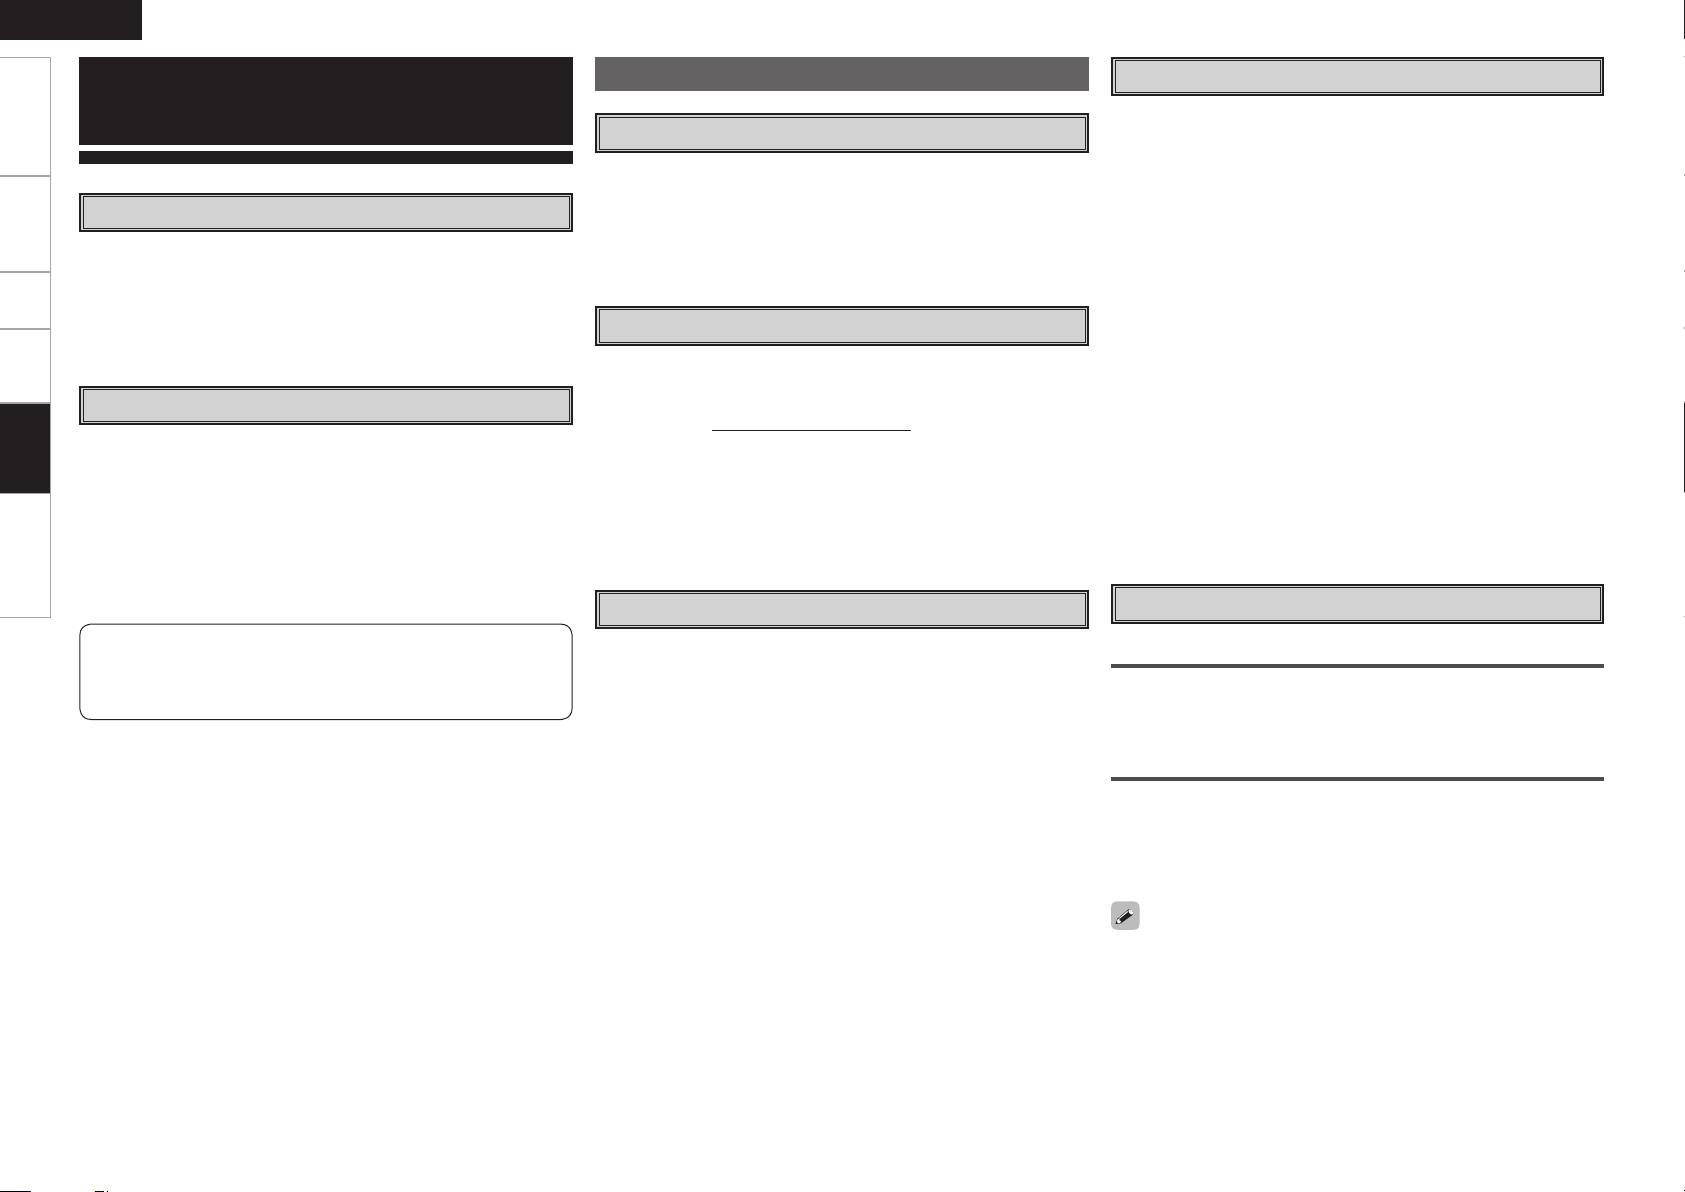
Top Panel
q Power operation button
(FUNCTION ON / OFF) ····························· (12)
w ALARM SETTING button·························· (20)
e SLEEP button ············································ (21)
r DIMMER button ········································ (13)
t DISPLAY button ········································ (13)
y ALARM1, 2 ON / OFF buttons ················· (20)
u MUTE / SNOOZE button ···················· (12, 20)
i PLAY / PAUSE button (1/3) ···················· (17)
o SOURCE indicator ···································· (12)
Q0 SOURCE button ·········································· (8)
Front Panel
Q1 ENTER button ·············································(8)
Q2 RETURN button ···········································(8)
Q3 RETURN indicator······································(12)
Q4 Forward-skip /
Fast-forwarding button (9) ·················· (15)
TUNING + button·······································(18)
Q5 Multi jog dial /
Master volume control ··························(8, 12)
Q6 Reverse-skip /
Fast-reversing button (8) ····················· (15)
TUNING – button ·······································(18)
Q7 Dock for iPod ················································(5)
Getting Started
RETURN
FUNCTION
ON / OFF
ALARM
SETTING
SLEEP
DIMMER
iPod
PLAY/PAUSE
SOURCE
MUTE / SNOOZE
ALARM ON OFF
ALARM
1
ALARM
2
DISPLAY
q wer t u o Q0
Q6
Q2
Q4
Q3
Q7
Q1iy
Q5
Q8 Q9 W0 W1
Connections Setup Playback Information Troubleshooting
ENGLISH
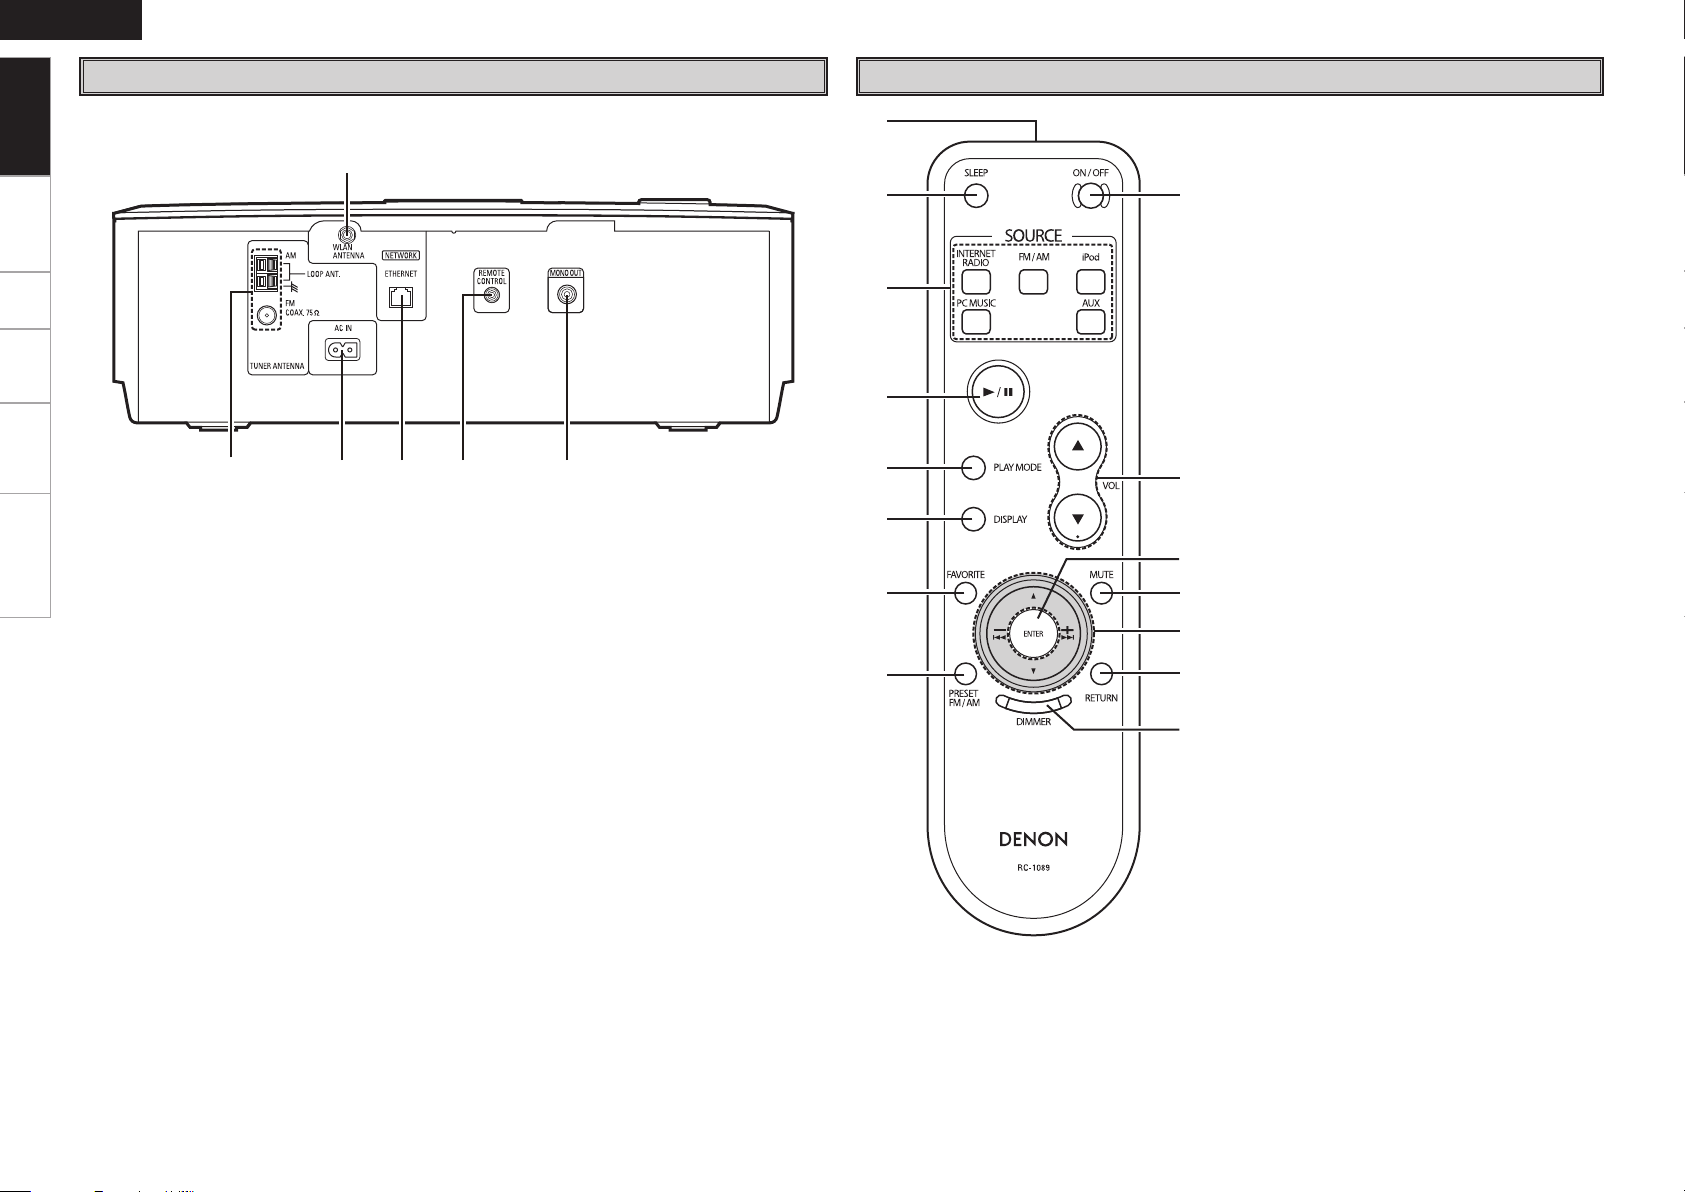
Rear Panel Remote Control Unit
q
FM/AM antenna terminals
(TUNER ANTENNA) ······································ (5)
w AC inlet (AC IN) ············································· (7)
e ETHERNET connector ··································· (6)
r REMOTE CONTROL jack
This jack will be used in the future for additional
functions.
t Monaural audio connector (MONO OUT) ······ (6)
y WLAN ANTENNA terminal ··························· (6)
q Remote control signal transmitter ·············· (2)
w SLEEP button ·············································· (21)
e SOURCE select buttons ····························· (12)
r Play / Pause button (1/3) ·························· (17)
t PLAY MODE button ···································· (17)
y DISPLAY button ·········································· (13)
u FAVORITE button ········································ (19)
i PRESET FM/AM button ····························· (18)
o Function ON / OFF button ························· (12)
Q0 Master volume control buttons (VOL) ······ (12)
Q1 ENTER button ··············································· (8)
Q2 Muting button (MUTE) ······························· (12)
Q3 Cursor (ui) / Skip (8 9) /
TUNING + – buttons ························· (8, 15, 18)
Q4 RETURN button ············································ (8)
Q5 DIMMER button ·········································· (13)
Getting Started
q w re
y
t
w
o
Q0
Q2
Q1
Q4
Q3
Q5
e
r
t
y
u
i
q
Getting Started Setup Playback Information Troubleshooting
ENGLISH
NOTE
• Do not plug in the power cord until all connections have been
completed.
• When making connections, also refer to the owner’s manual of the
other components.
Connections
Connections for all compatible audio signal formats are described
in these operating instructions. Please select the types of
connections suited for the equipment you are connecting.
With some types of connections, certain settings must be made
on the S-32. For details, refer to the instructions for the respective
connection items below.
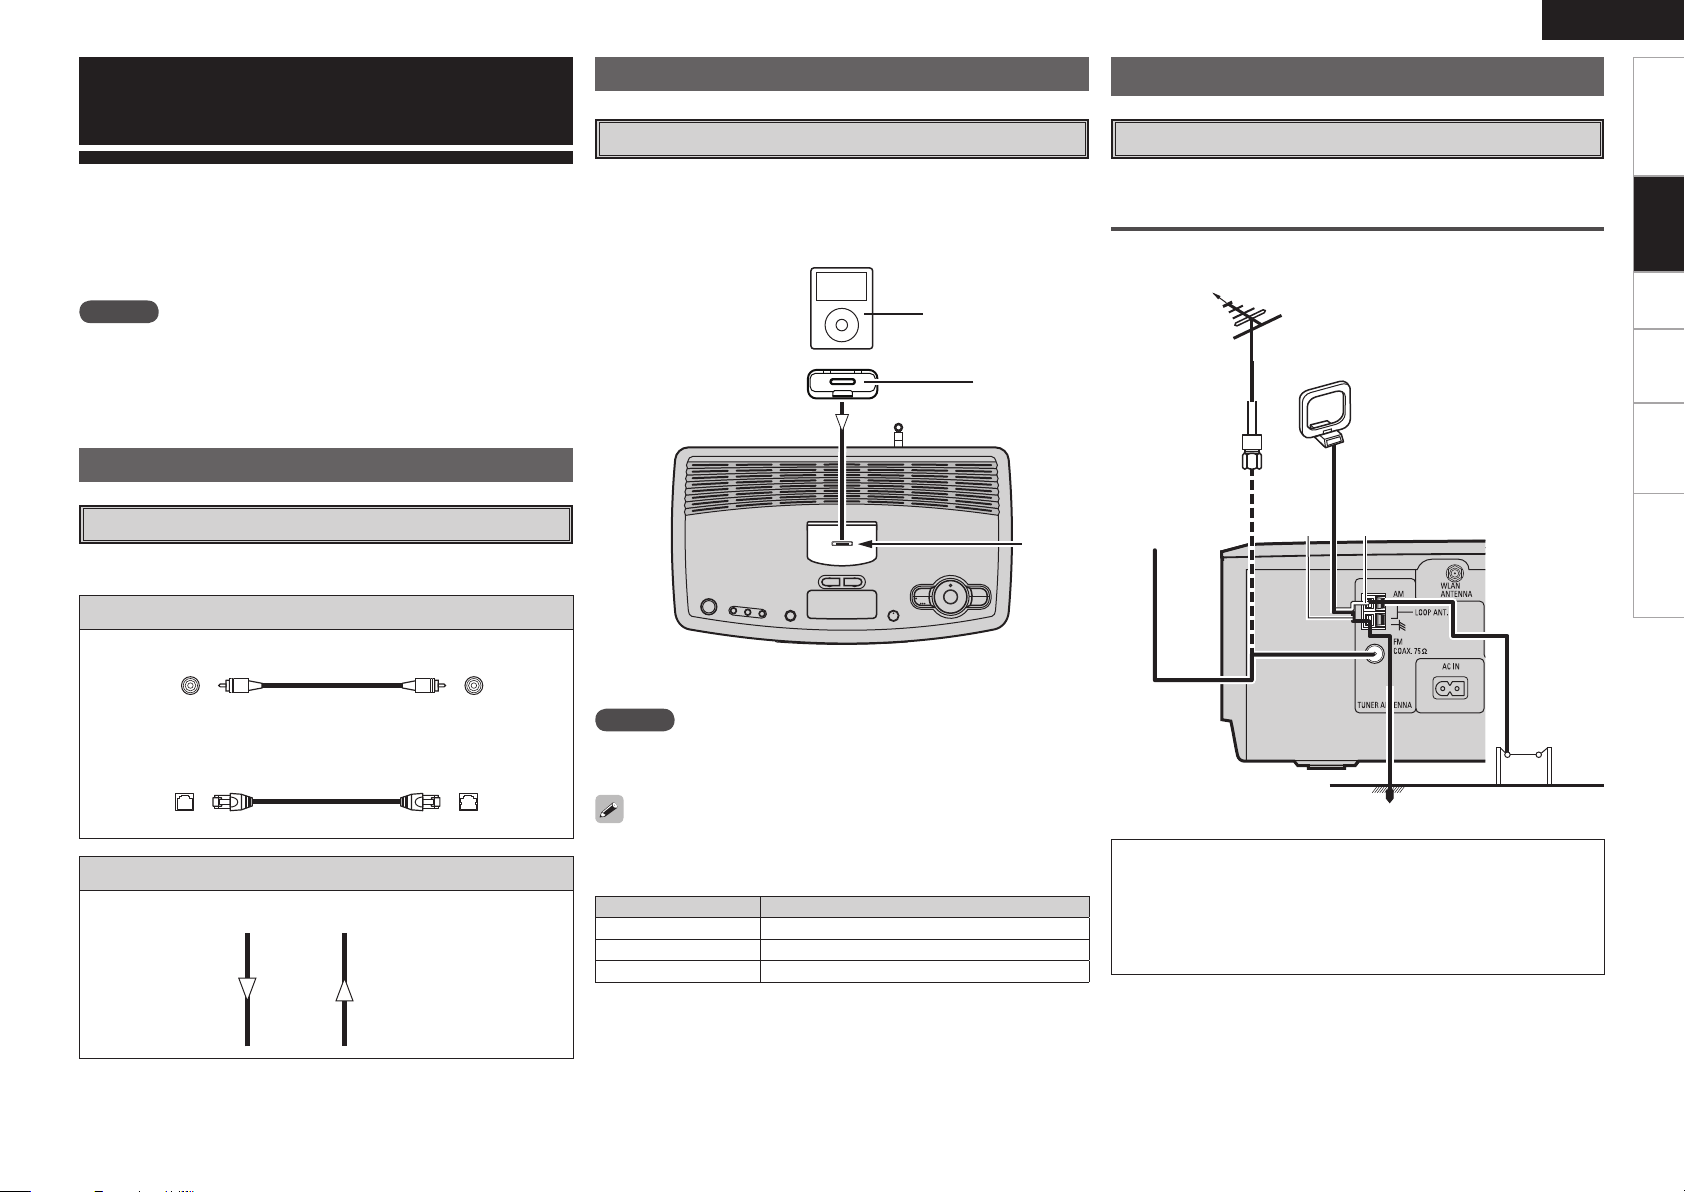
Select the cables according to the equipment being connected.
Preparations
Cables Used for Connections
Audio cables
Analog connections (Subwoofer)
(Black)
Pin - plug cable
Network connections (Wired LAN)
LAN cable
Signal direction
Audio signal:
Output
Input
Input
Output
NOTE
Note that leaning the iPod forward or backward when connecting it to or
disconnecting it from the dock for iPod may damage the connector.
Keep the dock for iPod’s lid closed when your iPod is not connected to
prevent any foreign objects from getting inside.
iPod
Adapter
Open the lid and mount the adapter suited for your iPod onto the S-
32’s adapter insertion slot.
Connector
Connecting the Playback Components
iPod
®
Connections to Other Devices
An FM antenna cable plug can be connected directly.
AM/FM
Direction of broadcasting station
Antenna Terminals
FM antenna
AM loop antenna
(Supplied)
Black White
75 Ω/ ohms
Coaxial cable
FM indoor
antenna
(Supplied)
Ground
AM outdoor antenna
Stamped indication iPod connectable to the S-32
mini iPod mini
Photo 20, 30GB iPod Photo 30GB/iPod 20GB with color display
Photo 60GB iPod Photo 60GB/iPod 40GB with color display
Connections
Note to CATV system installer:
This reminder is provided to call the CATV system installer’s
attention to Article 820-40 of the NEC which provides guidelines for
proper grounding and, in particular, specifies that the cable ground
shall be connected to the grounding system of the building, as
close to the point of cable entry as practical.
Getting Started Setup Playback Information Troubleshooting
ENGLISH
AM loop antenna assembly
Remove the vinyl tie and take out the connection
line.
Connect to the AM antenna terminals.
Bend in the reverse direction.
a. With the antenna on top any stable
surface.
Mount
b. With the antenna attached to a wall.
Installation hole Mount on wall, etc.
Connection of AM antennas
1. Push the
lever.
2. Insert the
conductor.
3. Return the
lever.
NOTE
• Do not connect two FM antennas simultaneously.
• Even if an external AM antenna is used, do not disconnect the AM
loop antenna.
• Make sure the AM loop antenna lead terminals do not touch metal
parts of the panel.
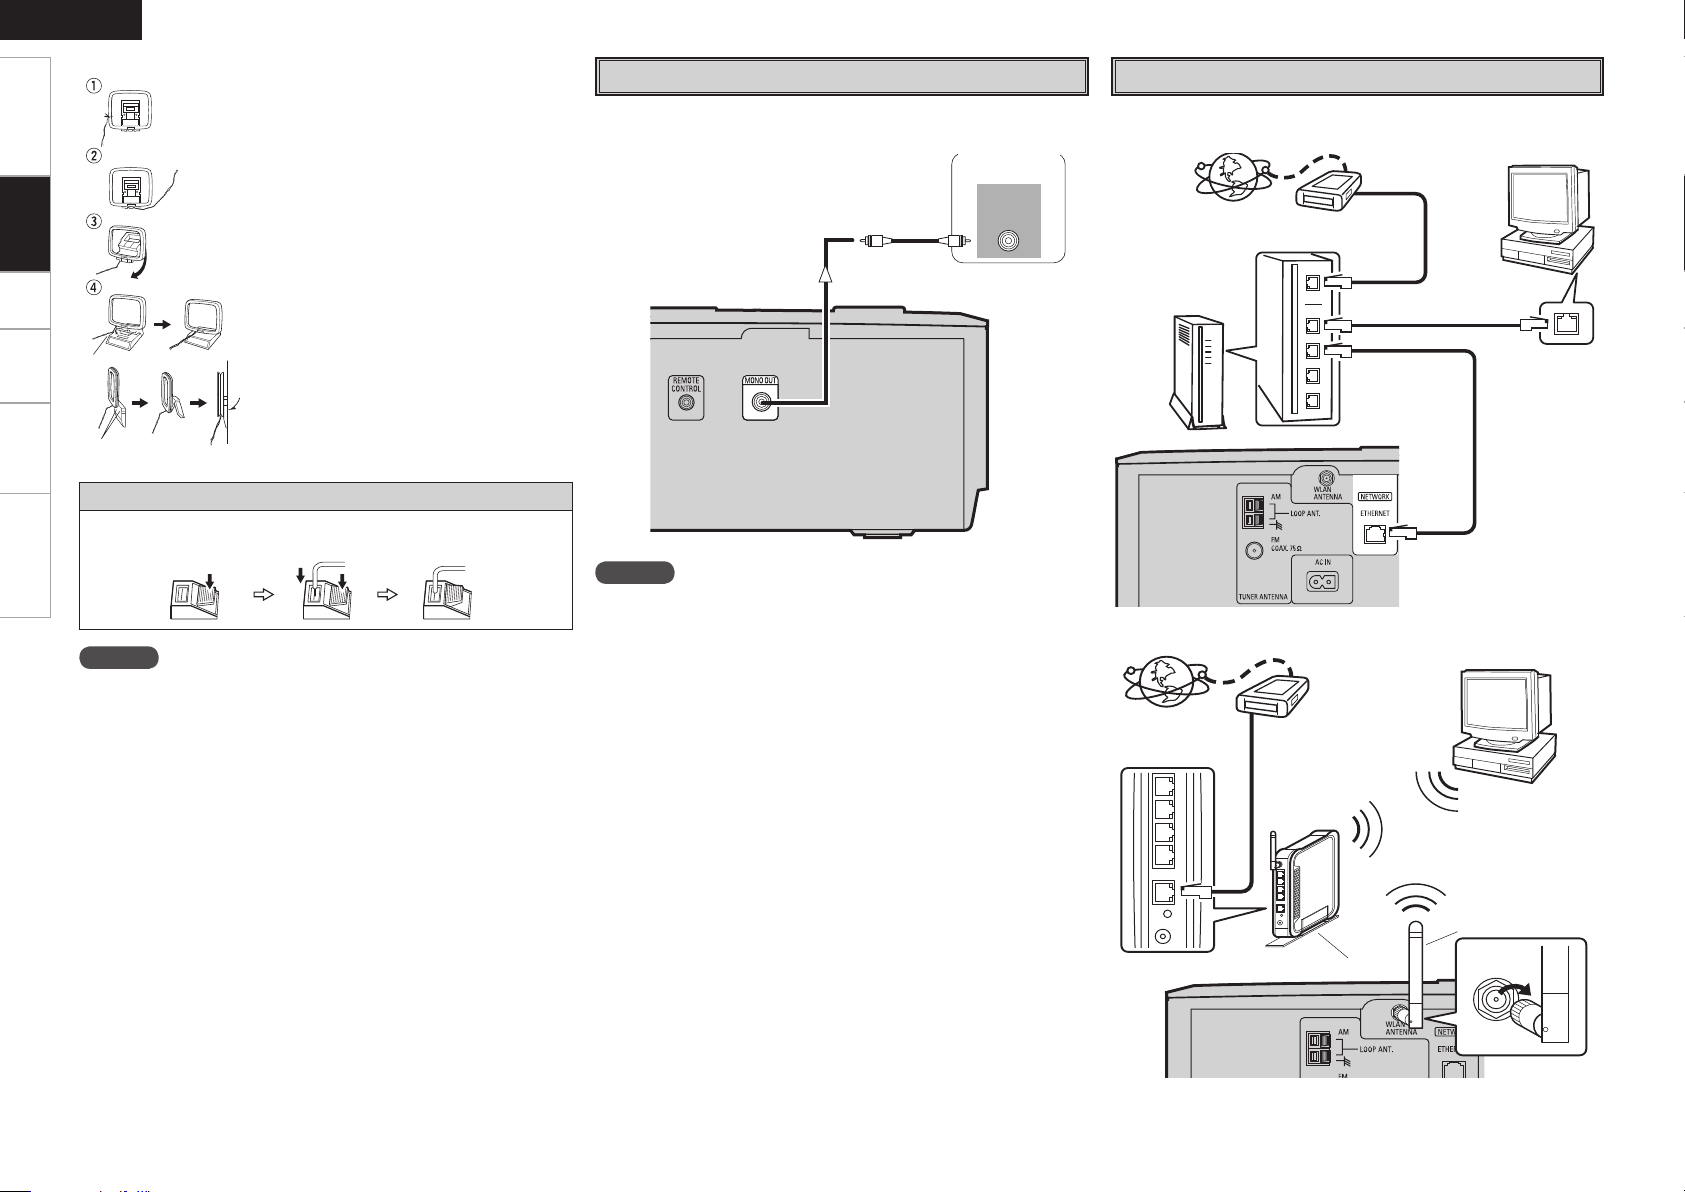
Use connected to a subwoofer.
46#800'&3
*/
Subwoofer
Connection to a Subwoofer
NOTE
When turning the power ON/OFF:
ON: First turn on the power to the main unit, then turn on the power
to the subwoofer.
OFF: First turn off the power to the subwoofer, then turn off the power
to the main unit.
Connections
[Wired LAN]
Network Audio
To WAN side
Internet radio
Router
Computer
To LAN port
To LAN port
LAN port/
Ethernet port
Modem
[Wireless LAN]
To WAN side
Internet radio
Modem
Computer
Wireless LAN rod
antenna (Supplied)
Turn clock
wise
Router with access point
Getting Started Setup Playback Information Troubleshooting
ENGLISH
Format Bit rate Per minute Per hour
MP3 / WMA
MPEG-4 AAC
128 kbps Approx. 1 MB Approx. 60 MB
192 kbps Approx. 1.5 MB Approx. 90 MB
256 kbps Approx. 2 MB Approx. 120 MB
392 kbps Approx. 3 MB Approx. 180 MB
WAV (LPCM) 1400 kbps Approx. 10 MB Approx. 600 MB
FLAC 1080 kbps Approx. 7.7 MB Approx. 464 MB
(1 MB = 10
6
bytes)
Required System
n Broadband Internet Connection
A broadband line connection to the Internet is required in order to
use the S-32’s Internet radio function.
n Modem
This is a device that is connected to the broadband line to
communicate with the Internet.
n Router
When using the S-32, we recommend you to use a router equipped
with the following functions:
• Built-in DHCP (Dynamic Host Configuration Protocol) server
This function automatically assigns IP addresses on the LAN.
• Built-in 100 BASE-TX switch
When connecting multiple devices, we recommend a switching
hub with a speed of 100 Mbps or greater.
n Ethernet Cable (CAT-5 or greater recommended)
The S-32 does not come with an Ethernet cable.
Purchase a cable of the required length.
n Computer
A computer with the following specifications is required to operate
the music server:
• OS
Windows® XP Service Pack2, Windows Vista
• Software
.NET Framework 1.1, Windows Media Connect (Windows XP),
Windows Media Player Ver.11
• Internet browser
Microsoft Internet Explorer 5.01 or later
• LAN port
• 300 MB or more free disk space
b Free space is required to save music files. The following sizes are
approximate.
• Depending on the server, video files may be displayed, but they
cannot be played on the S-32.
• For connections to the Internet, contact an ISP (Internet Service
Provider) or a computer shop.
• The types of routers that can be used depend on the ISP. Contact an
ISP (Internet Service Provider) or a computer shop for details.
NOTE
A contract with an ISP is required to connect to the Internet.
No additional contract is needed if you already have a broadband
connection to the Internet.
n Others
• If you have an ISP contract for a line on which network settings are
made manually, make the settings at “Network Setting” (vpage
9, 10).
• When using a broadband router (DHCP function), the S-32 makes
the network settings automatically, so there is no need to make
them yourself.
• If connecting the S-32 to a network with no DHCP function, make
the settings at “Network Setting” (vpage 9, 10).
• The S-32 is not compatible with PPPoE. A PPPoE-compatible router
is required if you have a contract for a line of the type with which
the PPPoE is set.
• Depending on the ISP with which you have your contract, it may
be necessary to make proxy server settings to use the Internet
radio function. If you made proxy server settings on the computer
to connect to the Internet, make the same proxy server settings on
the S-32.
• The S-32 uses the DHCP and Auto IP functions to make the network
settings automatically.
n Ethernet Cable (CAT-5 or greater recommended)
No Ethernet cable is included with the S-32. Procure a cable with
the necessary length.
NOTE
Be sure to use a shielded type cable for Ethernet connections.
Depending on the connected computer/router, there may be much
noise generated from the cable.
Connections
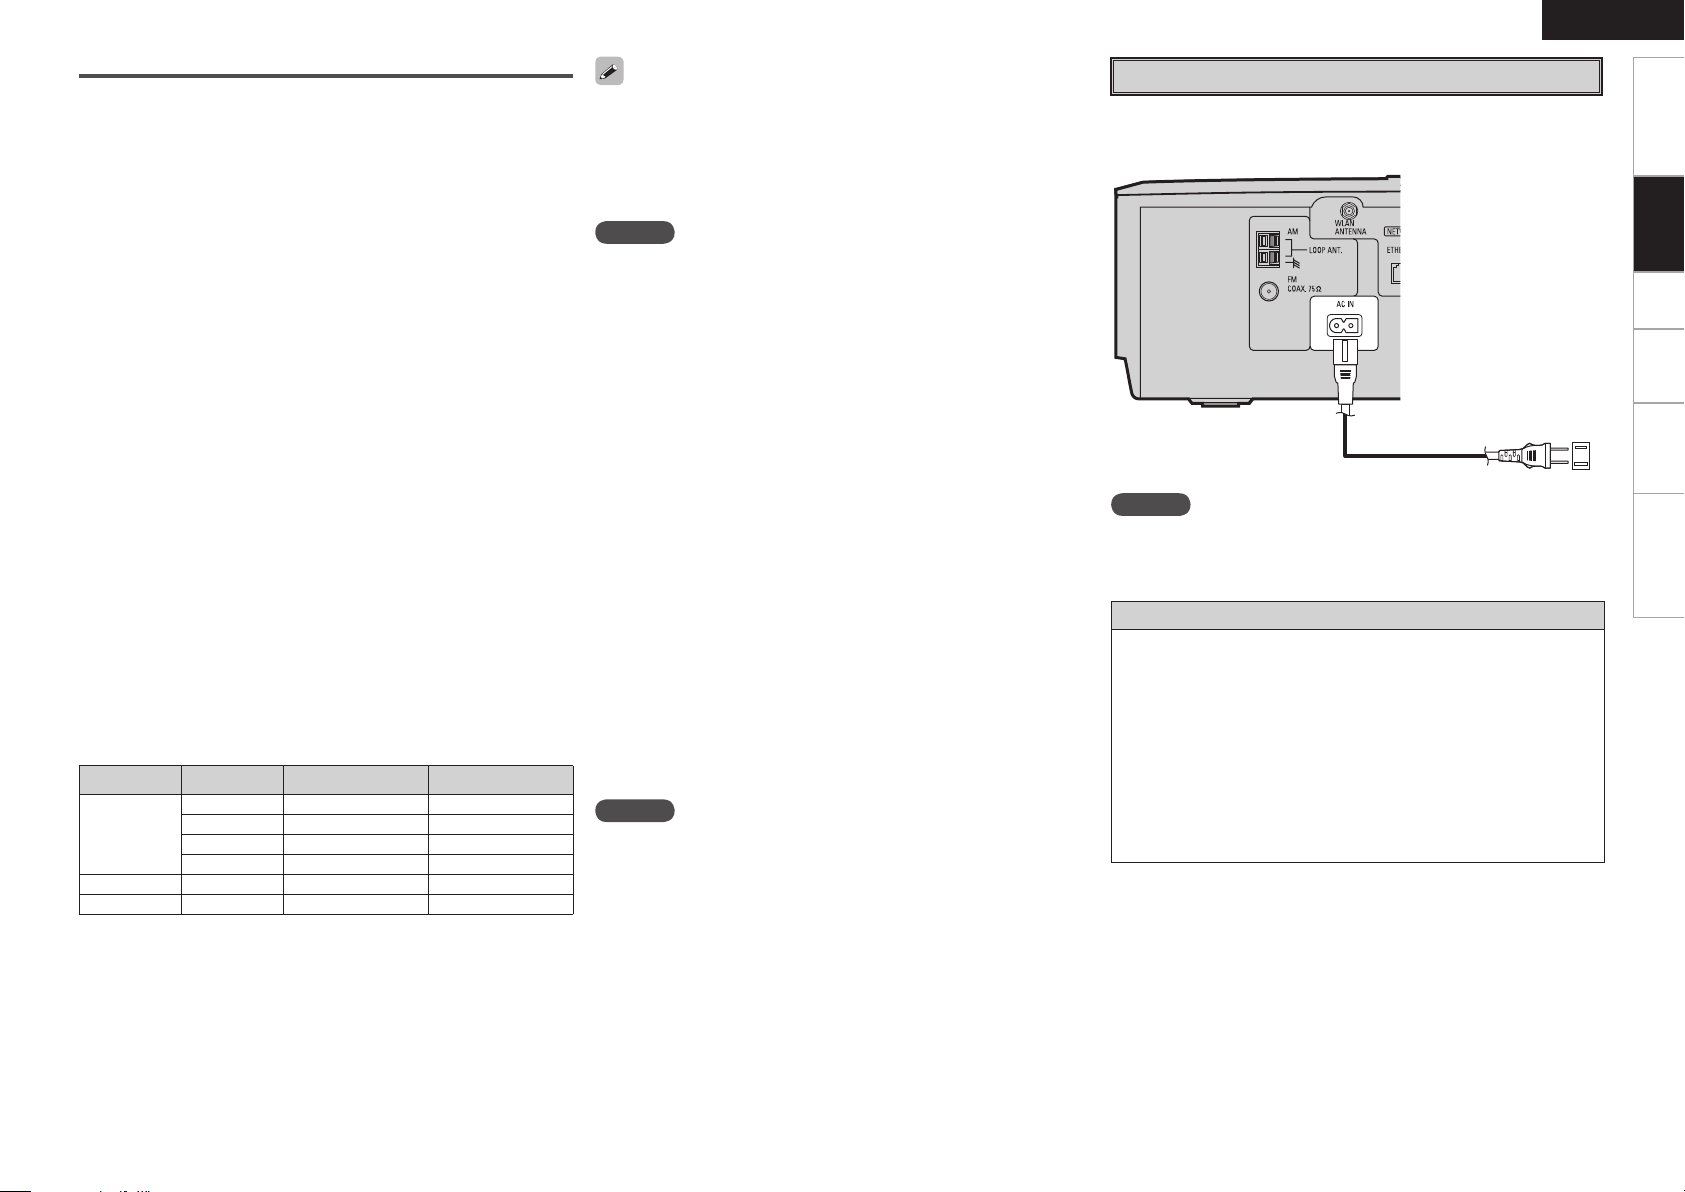
Power cord (Supplied)
To household power outlet
(AC 120 V, 60 Hz)
Connecting the Power Cord
NOTE
• Only use the supplied power cord.
• Be sure the power cord is unplugged from the power outlet before
connecting or disconnecting it to the AC inlet.
Protector circuit
The protection circuit will be activated in the following cases:
• When the temperature around the set is extremely high
• When the set is used for long periods of time with a high output
and the internal temperature rises
Speaker output is suspended when the protector circuit operates.
In this case, remove the power cord, make sure there is adequate
ventilation and wait for the main unit to cool down. Afterwards, re-
insert the power cord.
If the protection circuit is activated again even though there are no
problems with the wiring or the ventilation around the unit, switch off
the power and contact a DENON service center.
Getting Started Playback Information Troubleshooting
ENGLISH
Connections
Time Zone
: Choose the region in which the set is installed in order
to correct for the time difference.
DST
: Make the daylight saving time setting.
With the S-32, settings and operations for most functions can be
performed by operating while looking at the menu displayed on the
display.
Menu Operations
1
Press <SOURCE>.
The menu is displayed.
2
Turn <Multi Jog> or press 8 9 to select
“SETUP”, then press ENTER.
3
Turn <Multi Jog> or press [ui] to select the menu
to be set or operated.
b To return to the previous item, press
RETURN
.
4
Press ENTER to enter the setting.
Operations
Menu Map
Setup
a
Clock
Use this procedure to set the time.
Auto Adjust
Connect to the network to set the current time automatically.
[Selectable items]
NOTE
Network connections are required.
Manual Adjust
Set the current time manually.
When setting the time, turn <Multi Jog> on the main unit clockwise
to move the time forward, counterclockwise to move the time
backward.
12H/24H
Choose whether to display the time in the 12-hour or 24-hour mode.
<Multi Jog>
<SOURCE>
ENTER
8 9
RETURN
[
ui
]
8, 9
ENTER
RETURN
About the button names in these explanations
< > : Buttons on the main unit
[ ] : Buttons on the remote control unit
Button name only:
Buttons on the main unit and remote control unit
Setup
SETUP
Use the procedures described below to make various
settings.
F Menu tree F
SETUP
a Clock
s Network Setting
d Firmware Update
n SETUP
• Clock
· Auto Adjust
Time Zone
DST
· Manual Adjust
· 12H/24H
12H
24H
• Network Setting
Network Setting
Others
Network Info
Rhapsody Setting
• Firmware Update
SETUP
Getting Started Connections Playback Information Troubleshooting
ENGLISH
Setup
s
Network Setting
Make settings for wired or wireless LAN.
Wired LAN
Make settings for wired LAN.
If a Ethernet cable is connected
To acquire the IP address automatically
using the DHCP function
To enter the IP address manually
Turn on the S-32’s power.
At the menu “SETUP” – “Network Setting”
– “Network Setting” – “Detail” setting, set
“DHCP” to “Off” and enter the IP Address,
Subnet Mask, Gateway, Primary DNS and
Secondary DNS.
To not pass through the proxy server To connect via proxy server
This setting is required when the network
is established via proxy servers.
Recheck the connections and settings if you cannot connect to the Internet (vpage 6).
The mode automatically switches to “Wired”.
This completes the setting.
NOTE
Knowledge about networks is required to make the IP Address and Proxy settings. For details, consult a network administrator.
At the menu “SETUP” –“Network Setting” –
“Network Setting” – “Detail” – “Proxy” setting,
set “Proxy” to “On” and enter the address or
domain name and port numbers.
0
Getting Started Connections Playback Information Troubleshooting
ENGLISH
Setup
Wireless LAN Settings
Make settings for wireless LAN.
z: This is the flow for infrastructure type communications. For ad-hoc communications, set “Mode” at
the “Detail” settings to “Ad-hoc”.
The mode automatically switches to “Wireless”.
If no Ethernet cable is connected
Turn on the S-32’s power.
Display menu “SETUP” – “Network Setting” – “Network Setting”.
To search for the network automatically
Access point settings
Search
Select the access point to
be set.
Without security With security
Input the encryption key.
For WEP, also input the
default key.
Connection (continued on right page)
If searching is not possible
To set manually
z
q Input the SSID.
w If there is security, select
the encryption method.
e Input the encryption key.
r If “WEP” was selected in
step w, select the default
key.
Normally select “1”.
“Detail” setting
If searching is possible, the
access points are displayed.
Make the SSID setting at
“Manual”.
To enter the IP Address manually
Connection
To acquire the IP Address
automatically using the DHCP function
At the menu “SETUP” – “Network Setting”
– “Network Setting” – “Detail” setting, set
“DHCP” to “Off” and enter the IP Address,
Subnet Mask, Gateway, Primary DNS and
Secondary DNS.
This completes the setting.
This setting is required
when the network is
established via proxy
servers.
At the menu “SETUP” –“Network Setting” –
“Network Setting” – “Detail” – “Proxy” setting,
set “Proxy” to “On” and enter the address or
domain name and port numbers.
To connect via proxy serverTo not pass through the proxy server
NOTE
Knowledge about networks is required to make the IP Address and Proxy settings. For details,
consult a network administrator.
Getting Started Connections Playback Information Troubleshooting
ENGLISH
Setup
Normally there is no need to use this function, aside from the cases
described below.
• The Firmware Update function is only used for updating the firmware
via the Internet, for example for the purpose of adding functions to
the S-32 in the future.
• Information regarding the Firmware Update function will be
announced on the DENON web site each time related plans are
defined.
• A broadband connection to the Internet is required to use this
function (v page 9).
• Even with a broadband connection to the Internet, approximately
30 minutes is required for the updating procedure to be completed.
Once updating starts, normal operations on the S-32 cannot be
performed until updating is completed.
Furthermore, updating the firmware may reset the backup data for
the parameters, etc., set for the S-32.
d
Firmware Update
Update the firmware.
NOTE
• Connection to the network and specific settings are required to
update the firmware. For details, see page 6, 9.
• Do not turn off the power until updating is completed.
Other
Make setting for computer language environment.
n PC Language
Select computer environment language.
[Selectable items]
ara
chi (smpl)
chi (trad)
cze
dan
dut
eng
fin
fre
ger
gre
heb
hun
ita
jpn
kor
nor
pol
por
por (BR)
rus
spa
swe
tur
Network Information
Display network information.
[Items to be checked]
n Default Language
Select the language you want to display Internet Radio
information.
[Selectable items]
English
German
French
Italian
Spanish
Nederlandish
Swedish
<Multi Jog>
ENTER
8 9
[
ui
]
8, 9
ENTER
About the button names in these explanations
< > : Buttons on the main unit
[ ] : Buttons on the remote control unit
Button name only:
Buttons on the main unit and remote control unit
n How to Enter Characters
1
Either turn <Multi Jog> or press [ui] to choose the
letter to be inserted.
2
Use 8 9 to choose the cursor position.
b Repeat operation 1.2.
3
Once you are nished inputting, press ENTER.
Rhapsody Setting
Set or change Username and Password.
“Listening to Rhapsody” (v page 16)
DHCP= On or Off
MAC Address
IP Address
Subnet Mask
Gateway
SSID
Key
Default Key
Getting Started Connections Information Troubleshooting
ENGLISH
Setup
Internet Radio
:
You can listen to the Internet radio.
PC Music
:
You can listen to music files stored on a computer
(music server).
Rhapsody
:
You can listen to the Rhapsody.
iPod
:
You can listen to music stored on an iPod.
FM, AM
:
You can listen to AM or FM broadcasts.
AUX
:
You can listen to the sound of an AUX IN jack.
Favorite
:
You can register and call out your favorites.
Setup
:
You can set the time and network.
About the button names in these explanations
< > : Buttons on the main unit
[ ] : Buttons on the remote control unit
Button name only:
Buttons on the main unit and remote control unit
Playback
Preparations
Turning the Function ON and OFF
Press FUNCTION ON/OFF.
ON : Power ON, Function ON
OFF : Power ON, Function OFF
• The time is displayed.
• An iPod can be charged and the alarm can be operated.
Setting the Power to the Standby Mode
Press FUNCTION ON/OFF and hold it in for at least two
seconds.
Standby : Low power consumption mode
(Power consumption: 0.4 W)
• The alarm can be operated.
Turning the Sound Off Temporarily (Muting)
Press <MUTE / SNOOZE> or [MUTE].
To cancel, either press <MUTE/SNOOZE> or [MUTE] again or adjust the
volume using <VOLUME> or [VOL df].
Viewing Information During Playback
During playback, press ENTER to display the playback information.
Either turn <Multi Jog> or press [ui] to select the information.
b Information is only displayed when it is available.
n Canceling track information
Press ENTER again to return to the previous display.
b Information is only displayed when it is available.
Input Source Switching
Operation on the Main Unit
Operation on the Remote Control Unit
1
Press <SOURCE>.
The “SOURCE” indicator lights.
iPodPC Music RhapsodyInternet Radio
FM
AM
AUXSetup Favorite
2
Turn <Multi Jog> to select the input source, then press
ENTER.
Press [INTERNET RADIO], [PC MUSIC], [iPod], [FM/AM]
or [AUX] to select the input source.
[Selectable items]
Adjusting the Master Volume
Either turn <VOLUME> or press [VOL df].
The volume level is displayed.
b Operate <Multi Jog> while the “SOURCE” and “RETURN”
indicators are off to adjust the sound.
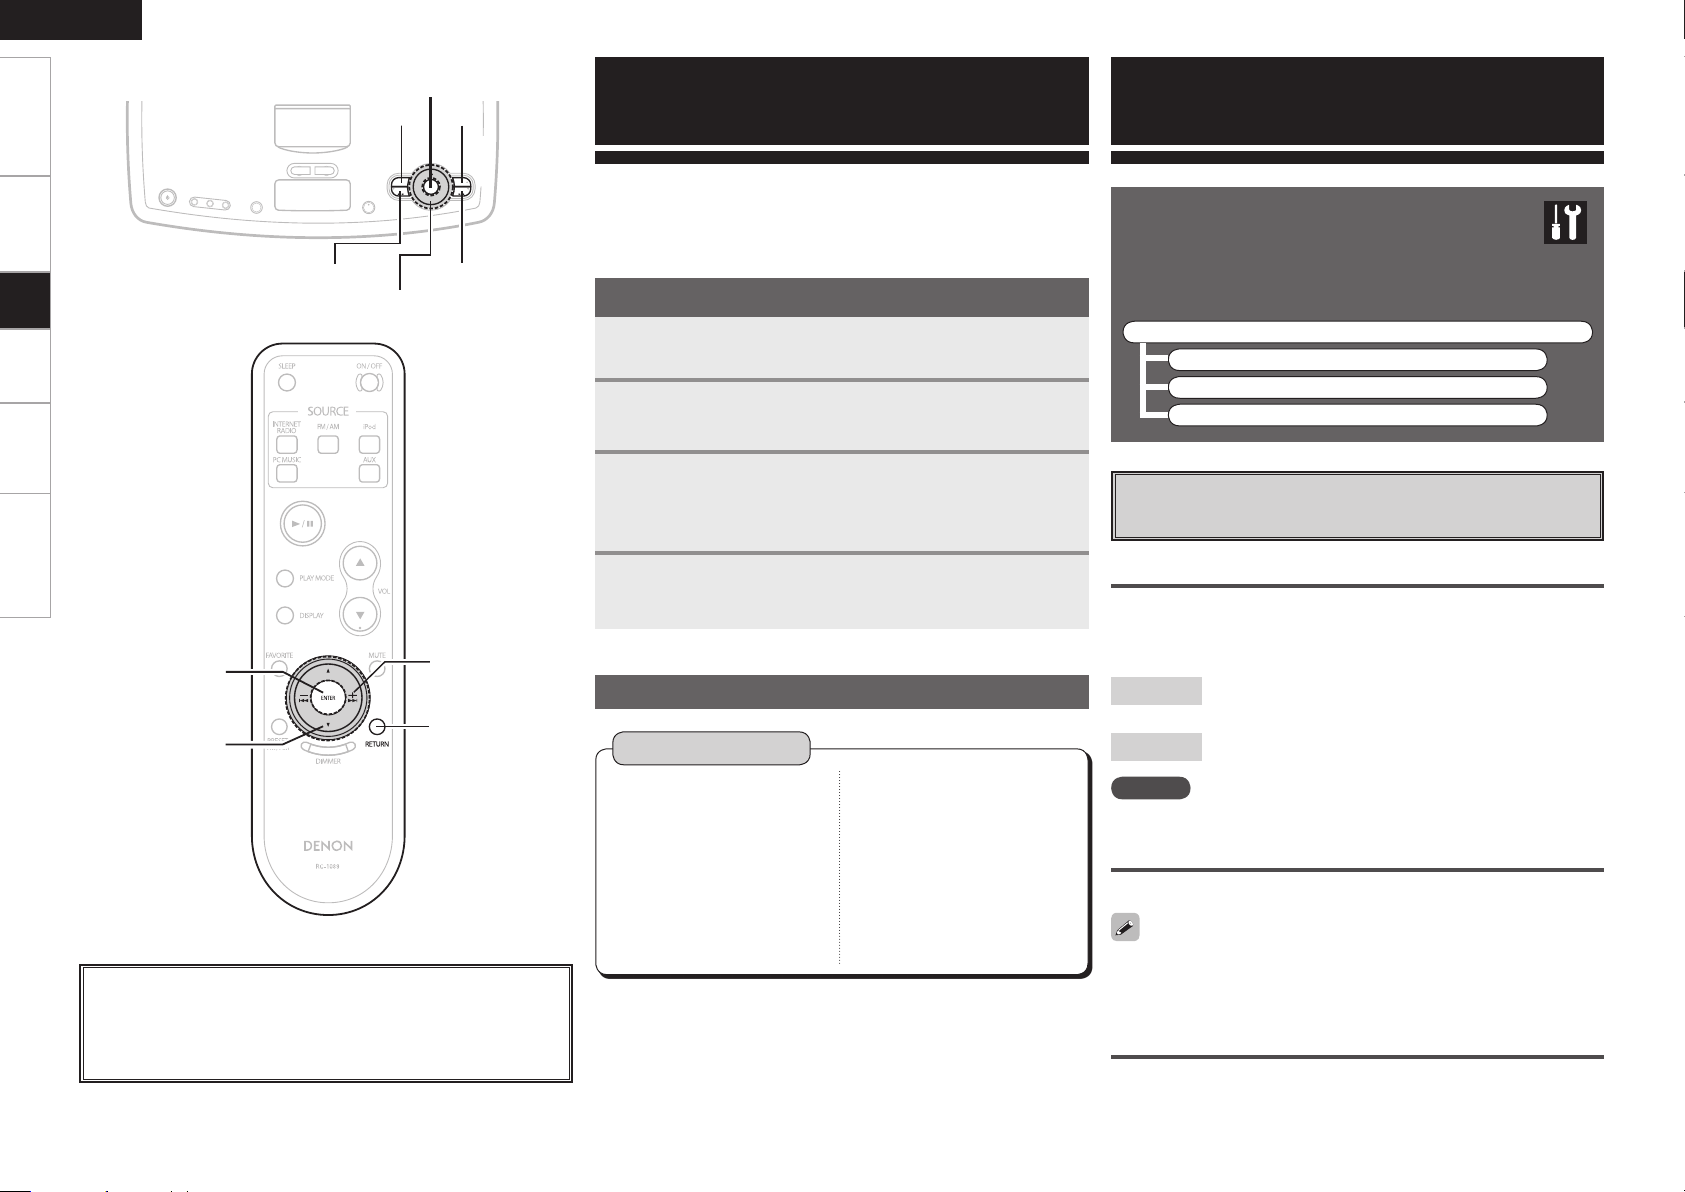
FUNCTION ON/OFF
<MUTE/SNOOZE>
<Multi Jog/VOLUME>
<SOURCE>DISPLAYDIMMER
ENTER
[VOL df]
[MUTE]
FUNCTION
ON/OFF
[INTERNET RADIO],
[PC MUSIC], [iPod],
[FM/AM], [AUX]
ENTER
[
ui
]
DIMMER
DISPLAY
< >
Playback
Getting Started Connections Setup Information Troubleshooting
ENGLISH
Playback
Switching the Display’s Brightness
Press DIMMER.
The brightness switches each time this is pressed.
Dark
Medium
Bright
Switching the Display
Press DISPLAY.
During playback, the time is displayed. The time is also displayed
when the power is turned on.
Listening with Headphones
Plug the headphones (sold separately) into < >.
b The sound from the speakers is automatically cut off.
NOTE
Be careful not to set the volume too high when using headphones.
Playing Network Audio
This procedure can be used to play Internet radio stations or
music stored on a computer.
n About the Internet radio function
• Internet radio refers to radio broadcasts distributed over the
Internet. Internet radio stations from around the world can be
tuned in.
The S-32 is equipped with the following Internet radio functions:
· Stations can be selected by genre and region.
· Internet radio stations can be preset.
· Internet radio stations in MP3 and WMA (Windows Media Audio)
format can be listened to.
· Your favorite radio stations can be registered by accessing an
exclusive DENON Internet radio URL from a Web browser on a
computer.
b The function is managed for individual users, so you must
provide your MAC or e-mail address.
Exclusive URL: http://www.radiodenon.com
b The radio station database service may be suspended without
notice.
• The S-32’s Internet radio station list is created using a radio station
database service (vTuner). This database service provides a list
edited and created for the S-32.
vTuner services may be discontinued without notice.
n Music server
This function lets you play music files and playlists (m3u, wpl)
stored on a computer (music server) connected to the S-32 via a
network.
With the S-32’s network audio playback function, connection to the
server is possible using one of the technologies below.
· Windows Media Player Network Sharing Service
· Windows Media DRM10
Installing Windows Media Player ver. 11
q If Windows XP Service Pack 2 has not yet been installed, either
download it free of charge from Microsoft or install it via a
Windows update installer.
w Download the latest version of Windows Media Player ver.
11, either directly from Microsoft or using a Windows update
installer.
b When using Windows Vista, there is no need to download a new
version of Windows Media Player.
[Compatible formats]
Internet radio
Music server
b
WMA (Windows
Media Audio)
S S
MP3 (MPEG-1 Audio
Layer-3)
S S
WAV
z
–
S
MPEG-4 AAC
–
S
z
FLAC (Free Lossless
Audio Codec)
–
S
z: Only files that are not protected by copyright can be played on the
S-32.
b Contents downloaded from pay sites on the Internet are copyright
protected. Also, files encoded in WMA format when ripped from
a CD, etc., on a computer may be copyright protected, depending
on the computer’s settings.
• The S-32 is compatible with MP3 ID3-Tag (Ver. 2) standards.
• The S-32 is compatible with WMA META tags.
[Playable formats]
Sampling
frequency
Bit rate Extension
WMA (Windows
Media Audio)
32/44.1/48 kHz 48~192 kbps .wma
MP3 (MPEG-1
Audio Layer-3)
32/44.1/48 kHz 32~320 kbps .mp3
WAV 32/44.1/48 kHz – .wav
MPEG-4 AAC 32/44.1/48 kHz 16~320 kbps .aac/.m4a/.mp4
FLAC (Free
Lossless Audio
Codec)
32/44.1/48 kHz – .flac
WAV format Quantization bit rate: 16 bits.
NOTE
The S-32 connects to the network when the power is turned on and
when the input is switched to a network audio source (“Internet
Radio”, “PC Music” or “Rhapsody”).
Depending on the network connection environment and the load on
the server being accessed, some time may be required to connect to
the network.
Getting Started Connections Setup Information Troubleshooting
ENGLISH
Playback
About the button names in these explanations
< > : Buttons on the main unit
[ ] : Buttons on the remote control unit
Button name only:
Buttons on the main unit and remote control unit
<Multi Jog>
RETURN
<SOURCE>
ENTER1/3
8 9
[
ui
]
8 9
[PC MUSIC]
[INTERNET RADIO]
RETURN
ENTER
1/3
Tuning in Broadcast Stations
1
Either turn <Multi Jog> or press 8 9 after
pressing <SOURCE> to select “Internet Radio” then
press the ENTER, or press [INTERNET RADIO].
b The display changes as follows each time you press a remote control
button.
RhapsodyInternet Radio
2
Either turn <Multi Jog> or press [ui] to select the
item you want to play, then press ENTER.
The station list is displayed.
A “ ” mark is indicated in front of stations that can be played.
3
Either turn <Multi Jog> or press [ui] to select the
station, then press ENTER.
Playback starts once buffering reaches “100%”.
To stop
During the play or pause mode, press and hold in 1/3 for at least 2
seconds.
• Before listening to Internet radio
•
Check the network environment, then turn on the S-32’s power.
(“Turning the Function ON and OFF” (vpage 12), “Network
Audio” (vpage 6).)
•
If settings are required, make the network settings.
(“Network Setting” ( vpage 9, 10).)
• There are many Internet radio stations on the Internet, and the
quality of the programs they broadcast as well as the bit rate of the
tracks varies widely.
Generally, the higher the bit rate, the higher the sound quality, but
depending on the communication lines and server traffic, the music
or audio signals being streamed may be interrupted.
Inversely, lower bit rates mean a lower sound quality but less
tendency for the sound to be interrupted.
• “Server Full” or “Connection Down” is displayed if the station is
busy or not broadcasting.
• On the S-32, folder and file names can be displayed as titles. Any
characters that cannot be displayed are replaced with “ . (period)”.
Registering Internet Radio Stations as Your
Favorites
Internet Radio stations can be stored in the favorites and played.
“Favorite” (vpage 19)
Listening to Internet Radio
Getting Started Connections Setup Information Troubleshooting
ENGLISH
Playback
Playing Files Stored on a Computer
Use this procedure to play music files or playlists.
1
Either turn <Multi Jog> or press 8 9 after
pressing <SOURCE> to select “PC Music” then press
ENTER, or press [PC MUSIC].
2
Either turn <Multi Jog> or press [ui] to select the
host name of the computer on which the music le you
want to play is located, then press ENTER.
3
Either turn <Multi Jog> or press [ui] to select the
search item or folder, then press ENTER.
b When a folder is selected and 1/3 is pressed, playback of the files in
the folder begins.
4
Either turn <Multi Jog> or press [ui] to select the
le, then press ENTER.
b During playback, press 1/3 to pause. Press 1/3 again to resume
playback.
b Press RETURN during playback to return to the previous menu
screen.
b Press ENTER during play to change to Artist display or Album display.
Selecting tracks
During playback, either press 8 (reverse track) or 9 (forward
track).
• Connections to the required system and specific settings must be
made in order to play music files (vpage 7).
• Before starting, you must launch the computer’s server software
and set the files as server contents. For details, see the operating
instructions of your server software.
Registering PC Music as Your Favorites
Music files can be stored in the favorites and played.
“Favorite” (vpage 19)
NOTE
• Favorites are erased by overwriting them.
• When the operation described below is performed, the music
server’s database is updated and it may no longer be possible to play
or registering music files.
•
When you quit the music server and then restart it.
•
When music files are deleted or added on the music server.
Listening to PC Music
PC
MUSIC
Getting Started Connections Setup Information Troubleshooting
ENGLISH
About the button names in these explanations
< > : Buttons on the main unit
[ ] : Buttons on the remote control unit
Button name only:
Buttons on the main unit and remote control unit
<Multi Jog>
RETURN
<SOURCE>
ENTER1/3
8 9
[
ui
]
[PLAY MODE]
ENTER
1/3
[INTERNET RADIO]
RETURN
8 9
[iPod]
If the latest information is available, it is updated automatically. Do not
turn off the power during updating. The Rhapsody Top Menu is displayed
after the update is completed.
Listening to Rhapsody
About Rhapsody
Rhapsody is a paid music broadcast service of
RealNetworks.
Listening to Rhapsody
When you first listen to Rhapsody, take advantage of the
“30-day free trial”. When the free trial period has expired,
it is necessary to subscribe to a Rhapsody account at the
Rhapsody homepage and register this machine. See the
Rhapsody homepage for details.
1
Either turn <Multi Jog> or press 8 9 after
pressing <SOURCE> to select “Rhapsody” then press
ENTER, or press [INTERNET RADIO].
b The display changes as follows each time you press a remote control
button.
RhapsodyInternet Radio
2
Either turn <Multi Jog> or press [ui] to select
“Start 30-day free trial” or “I have a Rhapsody
account”, then press ENTER.
3
q When selecting “Start 30-day free trial”
Select “Accept” and press ENTER.
b To cancel, either press RETURN or select “Reject”, then press
ENTER.
w When selecting “I have a Rhapsody account”
Enter Username and Password.
b “How to Enter Characters ” for how to enter and change
(vpage 11).
NOTE
• The password should be no longer than 99 characters.
• The password may not contain underscores ( _ ).
Enter a Character Search For the Track
You Want to Listen to
1
Either turn <Multi Jog> or press 8 9 after
pressing <SOURCE> to select “Rhapsody” then press
ENTER, or press [INTERNET RADIO].
2
Either turn <Multi Jog> or press [ui] to select
“Search”, then press ENTER.
3
Either turn <Multi Jog> or press [ui] to select the
search item, then press ENTER.
The search display appears.
b You can search by artist name, album name or track name.
4
Enter the characters.
b “How to Enter Characters ” for how to enter (vpage 11).
Search From Rhapsody Latest Information
1
Either turn <Multi Jog> or press 8 9 after
pressing <SOURCE> to select “Rhapsody” then press
ENTER, or press [INTERNET RADIO].
2
Either turn <Multi Jog> or press [ui] to select
“Rhapsody Music Guide”, then press ENTER.
3
Either turn <Multi Jog> or press [ui] to select the
information for track selection, then press ENTER.
After selecting, the information is displayed.
4
Either turn <Multi Jog> or press [ui] to select the
track, then press ENTER.
Playback
User name:
Password:
Getting Started Connections Setup Information Troubleshooting
ENGLISH
iPod
®
Playback
You can listen to music on an iPod. It is also possible to
operate the iPod from the main unit or remote control unit.
b The iPod may only be used to copy or play contents that are not
copyrighted or contents for which copying or playback is legally
permitted for your private use as an individual. Be sure to comply
with applicable copyright legislation.
NOTE
• DENON will accept no responsibility whatsoever for any loss of iPod
data.
• Depending on the type of iPod and the software version, some
functions may not operate.
Listening to Music
1
Load the iPod on the set.
2
Either turn <Multi Jog> or press 8 9 after
pressing <SOURCE> to select “iPod” then press
ENTER, or press [iPod].
3
Press 1/3.
Playback starts.
b Also read the iPod’s operating instructions.
b Press ENTER during play to change to Artist display or Album display.
iPod is a trademark of Apple Inc., registered in the U.S.
and other countries.
Repeat and Random Playback
n REMOTE mode:
Repeat playback
Control with the iPod main unit.
Random playback
Control with the iPod main unit.
n BROWSE mode:
Repeat playback
q Press [PLAY MODE].
w Either turn <Multi Jog> or press [ui] to select “Repeat”.
e Press ENTER to switch the repeat mode between “Off”, “Repeat 1”
and “Repeat All”.
Random playback
q Either turn <Multi Jog> or press [ui] to select “Random”.
w Press ENTER to switch the random mode between “Off”, “Song”
and “Album”.
Remote control and iPod Button Relations
Remote control
unit buttons
iPod buttons Operation on the S-32
1/3 13
Play the track/Pause the track.
b Play/Pause in remote mode
8, 9
8, 9
Play the track from the beginning/
Play the next track.
6, 7
Fast-reverse the track/Fast-for-
ward the track.
u, i
Click Wheel
Select an item.
ENTER Select
Enter the selection or plays the
track.
iPod –
Switch between the browse
mode and the remote mode.
PLAY MODE
–
Switch the repeat function.
Switch the random function.
(Browse mode only)
RETURN MENU
Display the menu or return to the
previous menu.
The mode switches between iPod remote mode and iPod browse
mode each time [iPod] is pressed.
Listening to iPod
Search From the Rhapsody Internet Radio Station
1
Either turn <Multi Jog> or press 8 9 after
pressing <SOURCE> to select “Rhapsody” then press
ENTER, or press [INTERNET RADIO].
2
Either turn <Multi Jog> or press [ui] to select
“Rhapsody Channels”, then press ENTER.
3
Either turn <Multi Jog> or press [ui] to select
radio station, then press ENTER.
Registering Tracks in My Library
1
Press ENTER while the track you wish to register is
playing.
“Exit” is displayed.
2
Either turn <Multi Jog> or press [ui] to select
“Add to my library”, then press ENTER.
The track is entered in the Library.
Listening to Tracks Registered In My
Library
1
Either turn <Multi Jog> or press 8 9 after
pressing <SOURCE> to select “Rhapsody” then press
ENTER, or press [INTERNET RADIO].
2
Either turn <Multi Jog> or press [ui] to select My
Library, then press ENTER.
3
Either turn <Multi Jog> or press [ui] to select the
information or track, then press ENTER.
After selecting, the information is displayed.
Displaying the Search Menu During Play
1
Press ENTER during playback.
“Exit” is displayed.
2
Either turn <Multi Jog> or press [ui] to select the
search item, then press ENTER.
Playback
Getting Started Connections Setup Information Troubleshooting
ENGLISH
Tuning in Broadcast Stations
1
Either turn <Multi Jog> or press 8 9 after
pressing <SOURCE> to select “FM or AM” then press
ENTER, or press [FM/AM].
b The display changes as follows each time you press a remote control
button.
FM AM
2
Press 8 or 9 to select the reception frequency.
GTo tune in automatically (Auto Tuning)H
q Press [PLAY MODE].
w Either turn <Multi Jog> or press [ui] to select “Mode”, then press
ENTER.
e Either turn <Multi Jog> or press [ui] to select “Auto”, then press
ENTER.
Auto :
Tuning stops once a broadcast is found.
GTo tune in manually (Manual Tuning)H
q Press [PLAY MODE].
w Either turn <Multi Jog> or press [ui] to select “Mode”, then press
ENTER.
e Either turn <Multi Jog> or press [ui] to select “Manual”, then
press ENTER.
Automatically Presetting FM Stations (Auto preset)
q Either turn <Multi Jog> or press 8 9 after pressing <SOURCE>
to select “FM” then press ENTER.
w Press [PLAY MODE].
e Either turn <Multi Jog> or press [ui] to select “Auto Preset”, then
press ENTER.
r Either turn <Multi Jog> or press [ui] to select “Start”, then press
ENTER.
(Scanning starts and broadcast stations are automatically preset.)
b
Press RETURN to stop the auto preset operation before it is
finished.
Listening to FM/AM
Presetting Radio Stations
(Preset Memory)
Your favorite broadcast stations can be preset so that you
can tune them in easily. Up to 56 stations can be preset.
1
Tune in the broadcast station you want to preset.
2
Press [PRESET FM/AM].
3
Either turn <Multi Jog> or press [ui] to select
“Add to Preset”, then press ENTER.
Select a number that has not be registered automatically and
display it.
4
Either turn <Multi Jog> or press [ui] to choose the
number to be registered, then press ENTER.
To preset other stations, repeat steps 1 to 4.
NOTE
Preset stations are erased by overwriting them.
About the button names in these explanations
< > : Buttons on the main unit
[ ] : Buttons on the remote control unit
Button name only:
Buttons on the main unit and remote control unit
<Multi Jog>
<SOURCE>
ENTER
8 9
RETURN
[
ui
]
[PLAY MODE]
[FM/AM]
[FAVORITE]
[PRESET
FM/AM]
ENTER
RETURN
8 9
[AUX]
Playback
Getting Started Connections Setup Information Troubleshooting
ENGLISH
Naming Preset Broadcast Stations
Names can be registered for AM analog broadcast stations
only. Up to 8 characters can be input.
1
Press [PRESET FM/AM] to select “Add to Preset”,
then press ENTER.
2
Either turn <Multi Jog> or press [ui] to choose the
number to be registered.
3
Press and hold in ENTER for at least 2 seconds.
4
Either turn <Multi Jog> or press [ui] to choose the
letter to be inserted.
5
Use 8 9 to choose the cursor position.
6
Once you are nished inputting, press ENTER.
Listening to Preset Stations
1
Press [PRESET FM/AM].
2
Either turn <Multi Jog> or press [ui] or 8
9 to choose the station to be registered, then press
ENTER.
b Press [ui] to enable selection of the following preset numbers.
A1 A2 A3 A7··· ···A8 B1 G7 G8
Press 8 9 to enable selection of the following preset
numbers.
A1 B1 C1 D1 E1 F1 G1
Listening to FM/AM Stations Registered Your
Favorites
FM/AM stations can be stored in the favorites and played.
“Favorite” (vpage 19)
"6%*0-*/&
065
Playing a Portable Audio
Your portable audio player can be connected to the S-32’s
AUX IN jack to play tracks on the portable audio player.
1
Either turn <Multi Jog> or press 8 9 after
pressing <SOURCE> to select “AUX” then press
ENTER, or press [AUX].
2
Play the portable audio player.
The Portable Audio are output.
b Also read the portable audio player’s operating instructions.
Portable
Connect the S-32 and portable audio player using a separately sold
mini-stereo audio cable.
Listening to Radio Stations and PC Music Registered
in Your Favorites
1
Press [FAVORITE] while the radio station or PC music
you want to register is playing.
2
Either turn <Multi Jog> or press [ui] to select
“Add to Favorite”, then press ENTER.
“Complete!!” is displayed once registration is finished.
Registering Radio Stations and PC Music as Your
Favorites
NOTE
If more than 50 stations are already registered, the oldest data is
deleted.
1
Press [FAVORITE].
2
Either turn <Multi Jog> or press [ui] to choose the
radio station or PC Music to be registered, then press
ENTER.
Press and hold in [FAVORITE] for at least 1 second to store in
“Favorite”.
Listening to AUX
Favorite
Your favorite Internet radio stations, PC Music and broadcast
stations can be registered in your favorites so that you can
tune them in easily. Up to 50 data can be registered.
Playback
0
Getting Started Connections Setup Information Troubleshooting
ENGLISH
• When the input source is “Internet Radio”, “PC Music”, or “iPod”, if
music does not play when the alarm on time is reached, a Beep will
sound.
• Alarms 1 and 2 operate separately.
• If the set is not operated for 60 minutes after alarm playback starts,
playback stops and the power turns off (The Beep sound stops after
5 minutes).
• When you want alarm playback of an iPod recording, set iPod while
pausing the track you want to play.
n Pausing alarm playback (snooze function)
Press <MUTE / SNOOZE> during alarm playback.
Alarm playback resumes 5 minutes after it was stopped.
n Stopping alarm playback
Either press <ALARM1> or <ALARM2> on the main unit to turn the
alarm off, or press the main unit’s <FUNCTION ON/OFF>.
If there is a power failure
n When connected to a network
When the power comes back on, the set automatically connects
to an SNTP (Simple Network Time Protocol) server and the current
time is adjusted automatically. Once the zone, daylight saving time
and alarm time have been set, they are stored in the memory, so
there is no need to set them again.
n When unconnected to a network
When the power comes back on, the clock resumes from the time
the power turned off. If the time is way off, turn the power on and
reset the current time. If the alarm time has been set, it is stored in
the memory, so there is no need to set it again.
Alarm Setting
Set the alarm time, source and volume.
1
Press <ALARM SETTING> to set the alarm.
2
GAlarm number selectionH
Turn <Multi Jog> to select “ALARM1” or
“ALARM2”, then press ENTER.
The time display flashes.
3
GAlarm time settingH
Select time with <Multi Jog>, then press ENTER to
set.
b Turn <Multi Jog> clockwise to increment the set value, and counter-
clockwise to decrement it.
4
GAlarm source settingH
Select alarm source with <Multi Jog>, then press
ENTER to set.
5
GAlarm volume level settingH
Select alarm volume level with <Multi Jog>, and
press ENTER to set.
6
Press <ALARM1> or <ALARM2>, and set the alarm
on.
About the button names in these explanations
< > : Buttons on the main unit
[ ] : Buttons on the remote control unit
Button name only:
Buttons on the main unit and remote control unit
Advanced Operation
<ALARM SETTING>
<ALARM1>
<ALARM2> <Multi Jog>
<MUTE / SNOOZE>
SLEEP
ENTER
<1/3> <9>
DISPLAY
<FUNCTION ON/OFF>
DIMMER
DISPLAY
SLEEP
ENTER
DIMMER
Playback
Getting Started Connections Setup Information Troubleshooting
ENGLISH
Personal Memory Plus Function
This function sets the settings last selected for the
individual input sources.
When you switch to an input source, the settings are
automatically set to the ones that were set the last time
that input source was used.
Convenient Functions
Last Function Memory
This stores the settings as they were directly before the
standby mode was set.
When the power is turned back on, the settings are
restored to as they were directly before the standby mode
was set.
Backup Memory
The various settings are backed up for about 1 week,
even if the power is turned off or the power cord is
disconnected.
Auto Power On
When the power is in the standby mode, the power turns
on simply by pressing <1/3>.
Resetting the Microprocessor
Perform this procedure if the display is abnormal or if
operations cannot be performed.
When the microprocessor is reset, all the settings are
reset to their default values.
1
Remove the power plug.
2
While pressing <9> and <MUTE / SNOOZE>
simultaneously, plug the power cord into a power outlet.
3
When “INITIALIZE” is displayed, release your
ngers from the two buttons.
When “INITIALIZE” is not displayed in step 3, repeat operations from
step 1.
1
Set the current time (vpage 8).
2
During playback, use SLEEP to select the time.
120 90 60 50 40 30 20 10
b After about 5 seconds, the previous display reappears and the
timer starts.
3
The power is set to the function off mode after the set
amount of time.
Off
Setting the Sleep Timer
Use this function to automatically switch the power to
the function off mode after a specific amount of time
(minutes).
Canceling the sleep timer
Press SLEEP, select “Off” from the sleep timer time display.
Checking the time remaining until the sleep timer
starts
Press SLEEP.
Checking the current time
Press DISPLAY or hold down DIMMER for 2 seconds or more.
The time is displayed.
Playback
Getting Started Connections Setup Playback Troubleshooting
ENGLISH
Audyssey Dynamic EQ.
Audyssey Dynamic EQ. is a technology that automatically corrects the
tonal balance of an audio system when the volume is changed. It
is based on psychoacoustic research that better matches to human
perception than other loudness compensation that was used before.
The tonal balance is adjusted continuously with variation in both
program material and volume setting.
Audyssey BassXT
Audyssey BassXT is a solution to extend bass performance to lower
frequencies without increasing cabinet size, driver size or weight.
BassXT actively monitors the incoming low frequency signal and
drives subwoofers to their maximum capability at all volumes, thereby
producing deeper bass at all volume levels. This allows the subwoofer
to play low bass content when it can and protects it only for the few
times when it can’t. It is not like simple bass boost or tone control
as the system is fully customized for each speaker design by DSP
processing and works in real time.
Manufactured under license from Audyssey Laboratories, Inc.
U.S. and foreign patents pending.
Audyssey BassXT™ and Audyssey Dynamic EQ™ are trademarks
of Audyssey Laboratories, Inc.
Windows Media Player Ver.11
vTuner
This is a free online contents server for Internet radio. Note that usage
fees are included in upgrade costs.
For inquiries about this service, visit the vTuner site below.
vTuner website: http://www.radiodenon.com
This product is protected by certain intellectual property rights of
Nothing Else Matters Software and BridgeCo. Use or distribution of
such technology outside of this product is prohibited without a license
from Nothing Else Matters Software and BridgeCo or an authorized
subsidiary.
About Networks
This is a media player distributed free of charge by Microsoft
Corporation.
It can be used to play playlists created with Windows Media Player
Ver. 11 as well as files in such formats as WMA, DRM WMA, MP3
and WAV.
DLNA
• DLNA and DLNA CERTIFIED are trademarks and/or service marks of
Digital Living Network Alliance.
• Some contents may not be compatible with other DLNA CERTIFIED™
products.
Other Information
Windows Media DRM
A copyright-protected technology developed by Microsoft.
• Windows Vista and the Windows logo are trademarks of the
Microsoft group of companies.
• The PlaysForSure logo, Windows Media and the Windows logo are
trademarks or registered trademarks of Microsoft Corporation in the
United States and/or other countries.
• Content providers are using the digital rights management technology
for Windows Media contained in this device (WM-DRM) to protect
the integrity of their content (Secure Content) so that their intellectual
property, including copyright, in such content is not misappropriated.
This device uses WM-DRM software to play Secure Content (WM-
DRM Software). If the security of the WM-DRM Software in this
device has been compromised, owners of Secure Content (Secure
Content Owners) may request that Microsoft revoke the WM-DRM
Software’s right to acquire new licenses to copy, display and/or play
Secure Content. Revocation does not alter the WM-DRM Software’s
ability to play unprotected content. A list of revoked WM-DRM
Software is sent to your device whenever you download a license
for Secure Content from the Internet or from a PC. Microsoft may,
in conjunction with such license, also download revocation list onto
your device on behalf of Secure Content Owners.
About Wireless LAN
Wi-Fi
®
Wi-Fi Certification assures tested and proven interoperability by the
Wi-Fi Alliance, a group certifying interoperability among wireless LAN
devices.
IEEE 802.11b
This is one wireless LAN standard set by the 802 working group
that establishes LAN technology standards at the IEEE (Institute of
Electrical and Electronics Engineers) of the United States. It uses the
2.4 GHz band usable freely without a radio frequency license (ISM
band), enabling communications at a maximum speed of 11 Mbps.
The value indicated above is the maximum theoretical value for the
wireless LAN standard, and does not indicate the actual data transfer
rate.
Information
Getting Started Connections Setup Playback Troubleshooting
ENGLISH
IEEE 802.11g
This is another wireless LAN standard set by the 802 working group
that establishes LAN technology standards at the IEEE (Institute of
Electrical and Electronics Engineers) of the United States, and is
compatible with IEEE 802.11b. It also uses the 2.4 GHz band, but
enables communications at a maximum speed of 54 Mbps.
Infrastructure Communications
“Infrastructure Communications” refers to networks using wireless
LAN access points.
This function can be used to connect to the Internet or a wired LAN
via a wireless LAN access point. Wireless LAN access points include
wireless broadband routers.
Ad-hoc Communications
Signal transfer through wireless interconnection of computers is referred
to as “ad hoc communications”. With such ad hoc communications
there is no connection to the Internet. Ad hoc communications are
suited for establishing simple temporary networks.
The value indicated above is the maximum theoretical value for the
wireless LAN standard, and does not indicate the actual data transfer
rate.
Network Names (SSID: Security Set Identifier)
When forming wireless LAN networks, groups are formed to prevent
interference, data theft, etc. This grouping is done by “SSID” or
“Security Set Identifiers”. For further security, a WEP key is set and
signal transfer is not possible unless the SSID and WEP key match.
WEP Key (Network Key)
This is key information used for encrypting data when conducting data
transfer. On the S-32, the same WEP key is used for data encryption
and decryption, so the same WEP key must be set on both devices in
order for communications to be established between them.
WPA (Wi-Fi Protected Access)
This is a security standard established by the Wi-Fi Alliance. In addition
to the conventional SSID (network name) and WEP key (network key),
it also uses a user identification function and encrypting protocol for
stronger security.
WPA2 (Wi-Fi Protected Access 2)
This is a new version of the WPA established by the Wi-Fi Alliance,
compatible with more secure AES encryption.
WPA-PSK/WPA2-PSK (Pre-shared Key)
This is a simple authentication system for mutual authentication when
a preset character string matches on the wireless LAN access point
and client.
Passphrase
This refers to the code key used for WPA-PSK/WPA2-PSK authentication,
a WPA authentication method.
TKIP (Temporal Key Integrity Protocol)
This is a network key used for WPA. The encryption algorithm is RC4,
the same as for WEP, but the security level is increased by changing
the network key used for encryption for each packet.
AES (Advanced Encryption Standard)
This is a next generation standard encryption method replacing the
current DES and 3DES, and because of its high security it is expected to
be applied widely to wireless LANs in the future. It uses the “Rijndael”
algorithm developed by two Belgian cryptographers to divide the data
into blocks of fixed lengths and encrypt each block. It supports data
lengths of 128, 192 and 256 bits and key lengths of 128, 192 and 256
bits as well, offering extremely high encryption security.
Information

Getting Started Connections Setup Playback Information
ENGLISH
If a problem should arise, first check the following:
1. Are the connections correct?
2. Is the set being operated as described in the owner’s manual?
3. Are the other components operating properly?
If this unit does not operate properly, check the items listed in the table below. Should the problem persist,
there may be a malfunction.
In this case, disconnect the power immediately and contact your store of purchase.
Troubleshooting
Symptom Cause Countermeasure Page
Display not lit
and sound not
produced when
power switch set
to on.
• Power cord not plugged in
securely.
• Plug the power cord into the wall
power outlet.
7
Display lit but
sound not
produced.
• Device you want to play and set
input source do not match.
• Volume control set to minimum.
• MUTING is on.
• Select an appropriate input
source.
• Turn volume up to suitable level.
• Switch off MUTING.
12
12
12
Display is dim. • Dimmer function is on. • Turn the dimmer function off by
pressing the DIMMER button.
13
GGeneralH
GRemote Control UnitH
Symptom Cause Countermeasure Page
Set does not work
properly when
remote control
unit operated.
• Batteries are worn.
• You are operating outside of the
specified range.
• Obstacle between main unit and
remote control unit.
• The batteries are not inserted in
the proper direction, as indicated
by the polarity marks in the
battery compartment.
• The set’s remote control sensor
is exposed to strong light (direct
sunlight, inverter type fluorescent
bulb light, etc.).
• Replace with new batteries.
• Operate within the specified
range.
• Remove the obstacle.
• Insert the batteries in the
proper direction, following the
polarity marks in the battery
compartment.
• Move the set to a place in which
the remote control sensor will
not be exposed to strong light.
2
2
2
2
2
Symptom Cause Countermeasure Page
iPod cannot be
played.
• Input source is not right.
• iPod is not properly mounted in
dock for ipod.
• Select an appropriate input
source.
• Remount the iPod.
17
5
GiPodH
Troubleshooting
Symptom Cause Countermeasure Page
The file names
are not displayed
properly (“...”, etc.).
• Characters that cannot be
displayed are used.
• This is not a malfunction. On
this set, characters that cannot
be displayed are replaced with a
“ . (period)”.
–
Files stored on a
computer cannot
be played.
• Files are stored in a non-
compatible format.
• You are attempting to play a file
that is copyright protected.
• Record in a compatible format.
• Files that are copyright protected
cannot be played on this set.
13
13
Internet radio
cannot be played.
• Ethernet cable is not properly
connected or network is
disconnected.
• Program is being broadcast in
non-compatible format.
• The computer’s or router’s
firewall is activated.
• Radio station is not currently
broadcasting.
• IP address is wrong.
• Check the connection status.
• Only Internet radio programs in
MP3 and WMA can be played on
this set.
• Check the computer’s or router’s
firewall settings.
• Choose a radio station that is
currently broadcasting.
• Check the set’s IP address.
6
–
–
14
9, 10
Server is not
found, or it is
not possible to
connect to the
server.
• The computer’s or router’s
firewall is activated.
• Computer’s power is not turned
on.
• Server is not running.
• Set’s IP address is wrong.
• Check the computer’s or router’s
firewall settings.
• Turn on the power.
• Launch the server.
• Check the set’s IP address.
–
–
–
9, 10
Cannot connect to
preset or favorite
radio stations.
• Radio station is not currently
broadcasting.
• Radio station is not currently in
service.
• Wait a while before trying again.
• It is not possible to connect to
radio stations that are no longer
in service.
–
–
GNETH

Getting Started Connections Setup Playback Information
ENGLISH
Troubleshooting
Symptom Cause Countermeasure Page
For some
radio stations,
“Server Full”
or “Connection
Down” is
displayed and
station cannot be
connected to.
• Station is congested or not
currently broadcasting.
• Wait a while before trying again. –
Sound is broken
during playback.
• Network’s signal transfer speed
is slow or communications lines
or radio station is congested.
• This is not a malfunction. When
playing broadcast data with a
high bit rate, the sound may
be broken, depending on the
communications conditions.
–
Sound quality is
poor or played
sound is noisy.
• File being played has a low bit
rate.
• This is not a malfunction. –
Symptom Cause Countermeasure Page
Continuous noise
is heard when
receiving FM
programs
• Antenna cable is not properly
connected.
• Connect the antenna cable
properly.
• Connect an outdoor antenna.
5
5
Hissing or
continuous noise
is heard when
receiving AM
programs
• This may be noise from a TV or
interference from a radio station.
• Turn off the TV.
• Change the position and direction
of the AM loop antenna.
–
–
GTunerH
GWireless LANH
Symptom Cause Countermeasure Page
Cannot connect
to network.
• The settings of the SSID
and network key (WEP) are
incorrect.
• The reception is poor and the
signals cannot be received.
• There are multiple networks and
the usable channels overlap.
• Match the network settings with
the S-32’s settings.
• Shorten the distance from the
wireless LAN’s access point,
remove any obstacles and
otherwise improve visibility, then
try reconnecting. Also install
away from microwave ovens
and the access points of other
networks.
• Set the access point’s channel
settings away from the channels
used for other networks.
Alternatively, connect using a
network cable.
6
–
–
Played sound is
interrupted or
sound cannot be
played.
• There are multiple networks and
the usable channels overlap.
• Set the access point’s channel
settings away from the channels
used for other networks.
Alternatively, connect using a
network cable.
–

Getting Started Connections Setup Playback Information
ENGLISH
Specifications
n
Audio section
Power amplifer
Rated output:
10 W + 10 W (4 Ω/ohms, 1 kHz, T.H.D. 10 %)
n
Tuner section
Reception frequency range: FM: 87.5 MHz ~ 107.9 MHz AM: 520 kHz to 1710 kHz
Receiving sensitivity: FM: 1.5 μV/75 Ω/ohms AM: 20 μV
FM stereo separation:
35 dB (1 kHz)
n
Clock/Timer section
Clock method: Power line frequency synchronized method (± 30 seconds)
n
General
Power supply: AC 120 V, 60 Hz
Power consumption:
37 W
0.4 W (standby)
Maximum external dimensions:
360 (W) x 126 (H) x 226 (D) mm (14-11/64” x 4-61/64” x 8-57/64”)
(including system cable)
Weight:
6 kg (13 lbs 3 oz)
n
Remote control unit (RC-1089)
Remote control method: IR pulse method
Power supply:
R03/AAA Type (two batteries)
Maximum external dimensions:
48.5 (W) x 185 (H) x 19 (D) mm (1-29/32” x 7-9/32” x 47/64”)
Weight: 105 g (Approx 3 oz) (including batteries)
n
Wireless LAN
Network type (wireless LAN standards) :
Conforming to IEEE 802.11b
Conforming to IEEE 802.11g
(Conforming to Wi-Fi
®
)
z
Transfer rate: DS-SS: 11 / 5.5 / 2 / 1 Mbps (Automatic switching)
OFDM: 54 / 48 / 36 / 24 / 18 / 12 / 9 / 6 Mbps (Automatic switching)
Security:
SSID (Network name)
WEP key (network key) (64/128 bits)
WPA-PSK (TKIP/AES)
WPA2-PSK (TKIP/AES)
Used frequency range:
2,412 MHz ~ 2,462 MHz
No. of channels:
Conforming to IEEE 802.11b : 11ch (DS-SS) (Of which 1 channel used)
Conforming to IEEE 802.11g : 11ch (OFDM) (Of which 1 channel used)
z Wi-Fi
®
conformity indicates tested and proven interoperability by the “Wi-Fi Alliance”, a group certifying interoperability
among wireless LAN devices.
b
For purposes of improvement, specifications and design are subject to change without notice.
b
This product incorporates copyright protection technology that is protected by method claims of certain U.S. patents
and other intellectual property rights owned by Macrovision Corporation and other rights owners. Use of this copyright
protection technology must be authorized by Macrovision Corporation, and is intended for home and other limited
viewing uses only unless otherwise authorized by Macrovision Corporation. Reverse engineering or disassembly is
prohibited.
Troubleshooting

www.denon.com
Denon Brand Company, D&M Holdings Inc.
Printed in China 00D 511 4691 009A