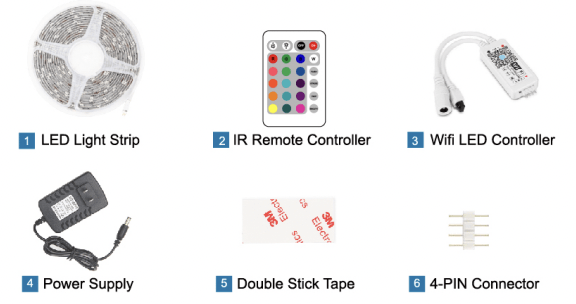
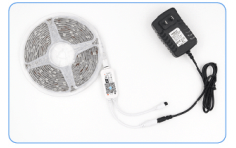
Step 1 : Connect LED Controller with LED Light Strip.
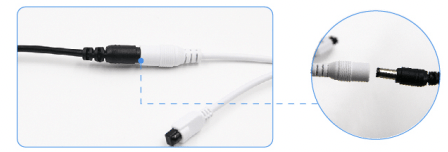
Step 2: Connect the LED Controller with power supply.
Step 3 : Plug in the power supply. Choose one of control methods to operate the lights.
CONTROL METHODS
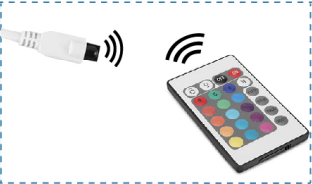
Control with IR Remote Controller
For controllers with infrared function to operate the lights.
24 KEY
1. LED brightness adjustment button (up).
2. LED brightness adjustment button (down).
3. OFF button.
4. ON button.
5. LED color buttons (16 colors): Static red/ Static green/ Static blue/ Static white Static orange/ Static pea green/ Static dark blue Static dark yellow/ Static cyan/ Static brown Static yellow/ Static light blue/ Static pink Static straw yellow/ Static sky blue/ Static purple
6. Flash button: Flash on and off.
7. Strobe button: Fast change LED colors in every 3 seconds.
8. Fade button: Fade out the current LED color and fade in to the next LED color in every 3 seconds.
9. Smooth button: Fade out the current LED color and fade in to the next LED color in every 0.5 seconds.
Please pull out the transparent chip from the bottom of the IR remote to ensure that the battery is powered properly.
Make sure the IR remote aims at the IR receiver within the sensing distance. The angle of the IR receiver is 120° and the sensing distance is 8 meters. Please remotely control within the sensing range.
Control with App on Your smartphone
Install the App on your Smartphone
For iOS
Method 1: Download the APP by searching “Magic Home Pro” in App Store.
Method 2: Scan the below QR code and switch to App Store to download.
For Android
Method 1: Download the APP by searching “Magic Home Pro" in Google Play Store or from browsers.
Method 2: Scan the below QR code and download.
Choose One of Three Control Modes
There are three different ways to connect the LED controller after it has been connected to the power supply.
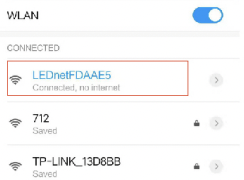
a) 1 to 1 Mode: Open mobile Wi-Fi network signal, find “LEDnet******” signal and connect, then open Magic Home Pro APP.
If the network connected successfully, you can enter the APP for operation.
b) Wi-Fi mode: This mode needs register and login after complete 1 to 1 Mode. Make sure the controller has been powered and never been set, please operate as below steps.
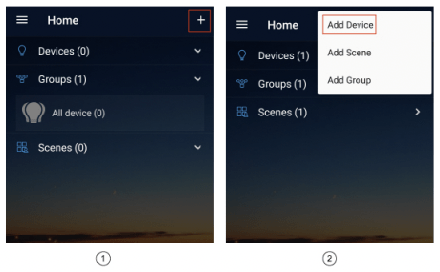
Step 1 : Click"+" in the upper right comer and click "add device"
Step 2 : Register and login account
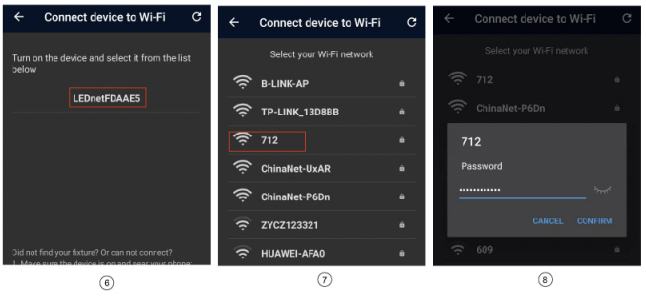
Step 3: Connect the device to the router
Make sure the device is connected to the 2.4GHZ ( 5GHZ NOT SUPPORTED) Wi-Fi band and is broadcasting. Besides, the router can not be set to hidden.
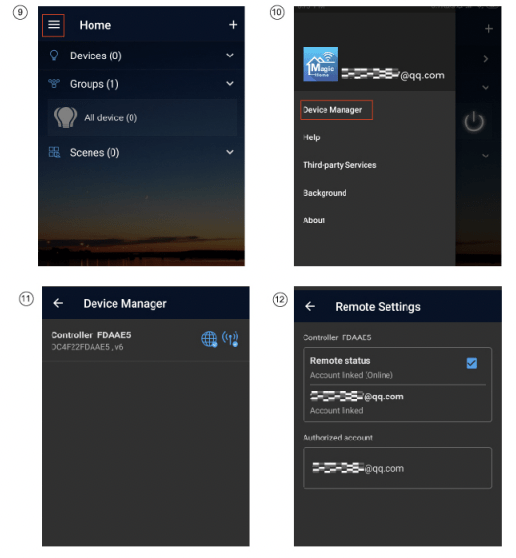
c) Remote control via Internet
Here you can locate the Wi-Fi controller via the internet from anywhere in the world in Wi-Fi mode. Keep the Wi-Fi router online, no matter where you are, you still can control your lights with APP as long as there's Wi-Fi/3G/4G internet for your smartphone.
Work with Google Assistant
Step 1: Create your Magic Home cloud account
In order to control your smart light with the Google Assistant or control them remotely. You need to create a Magic Home cloud account and sign in.
Step 2: Add your light and modify the name
Make sure there is at least one smart light in device list, and enable your lights for remote control. On “Home'' page, long press the light to rename.
Step 3: Add Home Control Action
Click “Home control” on “Home” APP. Select “Magic Home WiFi" The account and password must be same as the one you created in Magic Home Pro APP.
Step 4: Login with your app account
Enter your app account and password to finish the account linking. (Use the Magic Home cloud account you used on step 1). Your lights will be listed on “Home Control” interface.
Step 5: Control your light
Here, you finish all setups. You can now control your lights by issuing voice commands.
Supported Command
• Say "Ok Google" or "Hey Google", then ..
• Turn on <light name>
• Dim <light name>
• Brighten <light name>
• Set <light name> to [50%]
• Dim/Brighten <light name> by [50%]
• Turn <light name> [color]
• Turn on/off all the lights
• Is <light name> on?
Changing Colors on Your Lights
Color Options for Google Home control of your smart device:
Work with Amazon Alexa
Step 1: Create your Magic Home cloud account
In order to control your smart light with the Amazon Echo or control them remotely, you need to create a Magic Home cloud account and sign in.
Step 2: Add your light and modify the name
Make sure there is at least one smart light in device list, and enable your lights for remote control. On "Home" page, long press light to rename.
Step 3: Enable Alexa Skill
The next step is to download the Amazon Alexa app, open the Amazon Alexa app and under the skills section, search for the “Magic Home” skill. The account and password must be same as you created in Magic Home Pro APP.
Step 4: Login and Discover Devices
Use your Magic Home cloud account you created in step 1 to sign in to "Magic Home” Skill. The next step is to discover your smart lights from Alexa app. You can say “Alexa, discover devices". Once Alexa has completed discovering your smart lights, they will be shown in the Smart Home section in Alexa app.
Step 5: Control your light
Here, you finish all setups. You can now control your lights by issuing voice commands.
Supported Command
Alexa. set [light name] to [0-100%]
Alexa. dim/brighten [light name]
Alexa. set the [light name] light to red]
Alexa. make the [light name] warm white
Alexa. set the [light name] to daylight
Alexa. tum [light name] on/off
Alexa. increase/decrease [light name]
Alexa. change the [light name] to the color blue
Alexa. change the [light name] to the cool white
Changing Colors on Your Lights
Color Options for Google Home control of your smart device:
APPENDIX A
APPENDIX B
SAFETY TIPS
1.Please ensure the power is off before wiring and installation.
2.Supply voltage of this product is DC 12V never connect to DC 24V or AC 220V.
3. Never connect two wires directly in case of short circuit.
4. Please connect several strip lights in parallel and choose a multi-ports adapter if you want to use several strip lights together.
5. To ensure normal work of the strip, please use the voltage indicated on the packing.
6.If the power supply is damaged, do not attempt to repair it yourself. Please leave it to a professional technician to deal with.
7. Please don’t light the strip on for over 5s when they are rolled on the plastic reel.
8. Please do not use this product in the open air or under humid environment.
9. To avoid any damage to the strip, please do not use chemical solvent during routine maintenance.
#1 Can I use one remote for both strips? if they are the same thing or how do I connect to the same source?
There should be a connection cable on each side of he strip lights. And yes once you connect the light together you can use the same remote.
#2 What connectors have you used to connect multiple rolls?
I used the white square connectors that amazon recommended with the purchase. It was counter intuitive the way I had to snap them closed. The picture looked to me like you install them backwards from the way you actually snap them in.
You have to follow these steps: 1) cut along a “cut section” 2) peel back the gel coating far enough to fully expose the 4 leads 3) lay the connector in a flat surface with both the left and the right side of the snaps open. 4) place the first exposed side with the paper/sticker toward the flat surface and the gel peeled leads up. Align the leads on top of the spikes before closing the left hand lid down, smashing the leads into the spikes. Now do the same to the right side with the strand you want to connect.
We successfully connected 3 strands and patched a damaged section with the snaps. HOWEVER, the color is not exactly the same throughout the 3x length. We are frustrated about this. It is most obvious on the warmer colors.
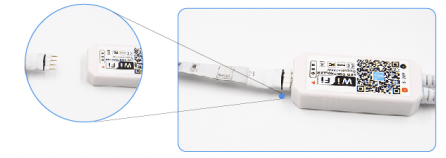

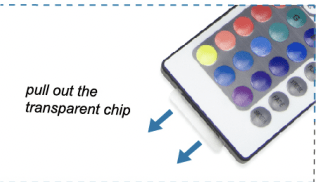
 Please pull out the transparent chip from the bottom of the IR remote to ensure that the battery is powered properly.