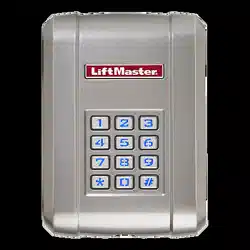
Wireless Commercial Keypads are security keypads and should be programmed to ONE operator.
The Wireless Commercial Keypad comes with one 9V Lithium battery, instructions, and two keys. A wireless signal is transmitted when a valid 4-digit PIN and the # key is pressed. A long tone will sound. The keypad backlight will illuminate for 15 seconds when any key is pressed. If an invalid PIN or partial PIN is accidentally entered, an error tone will sound. The Wireless Commercial Keypad is compatible with the brands of commercial door and gate operators listed in the table below.
FREQUENCY AND ENCRYPTION
PIN CAPACITY
LiftMaster Security+ 2.0® Default
Tri-band 390 MHz, 315 MHz, and 310 MHz
LiftMaster Security+® 315 MHz
LiftMaster Security+® 390 MHz
Linear Multi-Code 300 MHz
Up to 250 permanent PINs and
Up to 10 unique temporary PINS
Specifications
INSTALLATION
Choose a mounting location suitable for your application such as a wall, flat surface, or a pedestal with a 3" x 3" mounting pattern (LiftMaster gooseneck pedestal post models PED42 or PED64). Locate the keypad at least 6 feet (1.8 m) away from any moving part of the gate and where the user cannot reach over, under, around or through the gate to operate the controls. The mounting location needs to be in line of sight of the moving gate.
Unlock and remove the faceplate from the mounting plate.
Mount the mounting plate to the desired surface and secure with 1/4" screws or bolts (not provided).
Remove the battery cover using a Phillips screw driver. Install the battery (provided) and re-install inner cover.
Reattach the faceplate to the mounting plate and lock with the key.
BASIC PROGRAMMING
The Wireless Commercial Keypad must be put into programming mode prior to any of the programming steps below unless otherwise indicated. The keypad backlight will remain on if the product is in programming mode. While in programming mode, if an invalid code is entered, an error tone will sound, but the keypad will remain in programming mode. After 60 seconds of inactivity, the keypad will exit the programming mode. The 6-digit Master Code is used to prevent unauthorized access to the system. A Master Code is required (factory default code: 888888) to operate the Wireless Commercial Keypad. It is highly recommended to change and record your unique Master Code.
Set Master Code
Program a PIN
NOTE: An error tone will sound if the maximum number of PINs is exceeded or if user tries to program a PIN already programmed in the memory.
PROGRAM TO OPERATOR
Program to LiftMaster Operator
NOTE: The Master Code and a PIN need to be set before the gate operator can be programmed. See Basic Programming.
The frequency and encryption are set at the factory for LiftMaster Security+ 2.0 (tri-band 310, 315, and 390 MHz) operators. Proceed fo Step 4.
For LiftMaster Security+ (315 MHz or 390 MHz), the frequency and encryption need to be set. Proceed fo Step 1.
1. Enter program mode: * (Master Code) #. 2. Set frequency and encryption (KPW250 only):
LiftMaster Security+ 315 MHz - Press 03 # 2 #. A long tone will sound.
LiftMaster Security+ 390 MHz - Press 03 # 3 #. A long tone will sound.
To reset factory default - Press 03 # 1 #. Along tone will sound.
3. Exit Program Mode: * * #. 4. Press the Learn Button on the operator. 5. Within 30 seconds - Enter a valid 4-digit PIN then press #. A long tone will sound.
Program to Linear Multi-Code Receiver
1. Locate the DIP switch sequence on the operator and record it. If DIP switch is in the “up” or “on” (CLOSED) position place a1, “down” or “off” (OPEN) position place a 0 in the corresponding box in the chart below.
2. Enter program mode: * (Master Code) #. A long tone will sound.
3. Set Linear Multi-Code frequency and encryption: Press 03 # 4 #. A long tone will sound.
4. Enter the DIP Switch sequence (Use ONLY 1 and 0). Press #. A long tone will sound.
5. Exit Program Mode: * % #.
6. Press the Learn Button on the operator.
7. Within 30 seconds - Enter a valid 4-digit PIN then press #. A long tone will sound.
NOTE: When entering the DIP Switch sequence 3 beeps will sound if an incorrect number of entries is input. Once an operator has been programmed, enter a valid 4-digit PIN and the # key to activate the operator.
ADDITIONAL PROGRAMMING
The Wireless Commercial Keypad must be put into programming mode prior to any of the programming steps below unless otherwise indicated.
Set Temporary PIN
A temporary 4-digit PIN can be programmed to allow access to visitors (maximum of 9 uses). The temporary PIN cannot be the same as any previously programmed PIN. The keypad will store up to 10 unique temporary PINs.
Delete Permanent and Temporary PIN
Reset Master Code
Resetting the Master Code will not remove PINs or temporary PINs from memory and will not change the frequency and encryption type. After resetting the Master Code, the keypad will not operate any previously programmed operators until they are reprogrammed. To reset the Master Code to the factory default (888888):
Unlock and remove the faceplate.
Press and hold the RESET button on the control board for 6 seconds, a long tone sounds indicating the Master Code has been reset.
Reset Keypad
Resetting the keypad will erase the Master Code, all permanent PINs, all temporary PINs, and frequency and encryption settings. All settings will be set to factory default. After resetting, the keypad will not operate the previously programmed operators until they are reprogrammed. To reset the keypad:
Unlock and remove the faceplate.
Press and hold RESET button on the control board for 6 seconds until a long tone sounds then release.
Press and hold RESET button on the control board for 15 seconds, 3 long tones will sound indicating the keypad has been reset.
Lockout Mode (Default is ON)
If the keypad receives five consecutive invalid PINS, the keypad will enter lockout mode and will not accept any keypad inputs for 30 seconds. After 30 seconds, the keypad will begin accepting new inputs.
Constant Pressure Override (CPO)
The Constant Pressure Override feature is intended to temporarily override a fault in the entrapment protection system, in order to operate the gate until the external entrapment protection device is realigned or repaired. Use the feature only in line of sight of the gate when no obstructions to travel are present. External entrapment protection devices include LiftMaster monitored photoelectric sensors and LiftMaster monitored wired and wireless safety edge sensors. Be sure to repair or replace these devices promptly if they are not working properly.
CPQ is only compatible with LiftMaster UL 325 Compliant Gate Operators (with burgundy boards) that require monitored entrapment protection.
To use Constant Pressure Override:
Enter a valid 4-digit PIN.
Press and hold # for 5 seconds to enter CPO. Continue to hold # to keep the operator in motion. A continuous tone will sound until limit is met and/or # is released.
The operator will stop when either the operator reaches a limit or the user releases #.
Party Mode (Gate Hold Open Feature)
Party mode can now be enabled from a model KPW5 or KPW250 wireless keypad.
Simply program the keypad into the receiver. When the gate is in the open position and the timer is running, enter a valid 4-digit PIN. The operator will chirp indicating the timer is canceled.
To restart the gate, either re-enter the 4-digit PIN, activate a hard input or a programmed remote control.
NOTE: Party Mode is only compatible with LiftMaster UL 325 Compliant Gate Operators (burgundy boards, with operator firmware version 4.2 or higher).
BATTERY
The 9V Lithium battery should produce power for up to 5 years. To replace the battery:
1. Unlock and remove the faceplate from the mounting plate.
2. Remove the battery cover using a Phillips screw driver.
3. Remove the old battery and install new 9V Lithium battery. Re-install inner cover.
4. Reattach the faceplate to the mounting plate and lock with the key.
5. Dispose of old battery properly.
TROUBLESHOOTING
SYMPTOM
CAUSE
SOLUTION
The keypad will not program to the operator.
The keypad is programmed to the wrong frequency and encryption.
Program the keypad to match the operator's frequency and encryption (see page 3).
The backlight and tone on the keypad no longer work.
Battery may be dead.
Replace battery v/ith 9V Lithium battery.
Key press turns on backlight but no beep.
Stuck button.
Check that all buttons are not stuck.
PIN won't learn.
PIN already learned.
Learn a new PIN. Exit Learn.
PIN won't learn.
Memory full.
Erase a PIN to add a new pin. Perform Factory Reset to erase all PINs.
ONE YEAR LIMITED WARRANTY
LiftMaster warrants to the first consumer purchaser of this product that it is free from defect in materials and/or workmanship for a period of 1 year from the date of purchase.
NOTICE: This device complies with Part 15 of the FCC rules and Industry Canada's license-exempt RSSs. Operation is subject to the follov/ing two conditions: (1) this device may not cause harmful interference, and (2) this device must accept any interference received, including interference that may cause undesired operation. Any changes or modifications not expressly approved by the party responsible for compliance could void the user's authority to operate the equipment.
This device has been tested and found to comply v/ith the limits for a Class B digital device, pursuant to part 15 of the FCC rules and Industry Canada ICES standard. These limits are designed to provide reasonable protection against harmful interference in a residential installation. This equipment generates, uses and can radiate radio frequency energy and.
if not installed and used in accordance with the instructions, may cause harmful interference to radio com muni cab on s. However, there is no guarantee that interference will not occur in a particular installation. If this equipment does cause harmful interference to radio or television reception, which can be determined by turning the equipment off and on. the user is encouraged to try to correct the interference by one or more of the following measures:
Reorient or relocate the receiving antenna.
Increase the separation between the equipment and receiver.
Connect the equipment into an outlet on a circuit different from that to which the receiver is connected.
Consult the dealer or an experienced radio/TV technician for help.