The induction cooking system is based on the physical phenomenon of magnetic induction. The main characteristic of this system is the direct transfer of energy from the generator to the pot.
Advantages:
When compared to electric hobs, your induction hob is:
Safer: lower temperature on the glass surface.
Faster: shorter food heating times.
More accurate: the hob immediately reacts to your commands
More efficient: 90% of the absorbed energy is transformed into heat. Moreover, once the pot is removed from the hob, heat transmission is immediately interrupted, avoiding unnecessary heat losses.
Cooking containers
Use only pots bearing the symbol
Important:
to avoid permanent damage to the hob surface, do not use:
- containers with less than perfectly flat bottoms.
- metal containers with enamelled bottoms.
- containers with a rough base, to avoid scratching the hob surface.
- never place hot pots and pans on the surface of the hob's control panel.
Pre-existing containers
Induction cooking uses magnetism to generate heat. Containers must therefore contain iron. Check if the pot material is magnetic using a magnet. Pots are not suitable if they are not magnetically detectable.
Recommended pan bottom diameters
IMPORTANT: if the pots are not correctly sized, the cooking zones will not turn on.
For details of the minimum pot diameter that needs to be used on each zone, see the illustrated part of this manual.
Energy saving
Recommendations for best results:
Use pots and pans with a bottom diameter equal to that of the cooking zone.
Use only pots and pans with flat bottoms.
Where possible, keep the lid on pots during cooking
Cook vegetables, potatoes, etc. with a small amount of water to reduce cooking time.
Use a pressure cooker, it further reduces the energy consumption and cooking time
Place the pot in the centre of the cooking zone drawn on the hob.
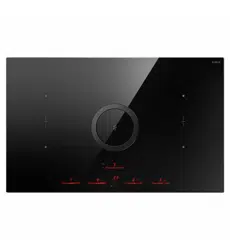
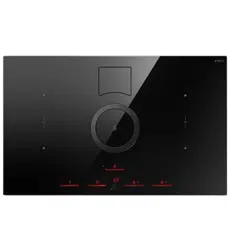
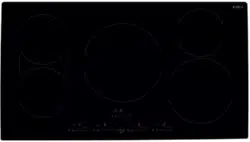
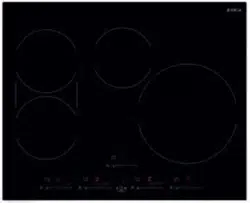
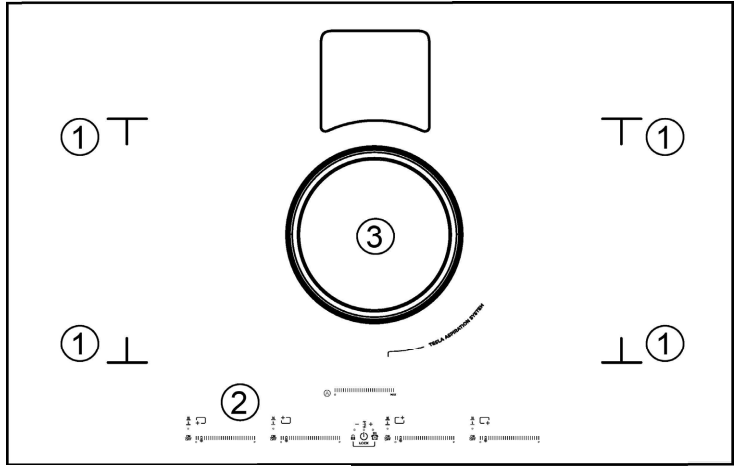
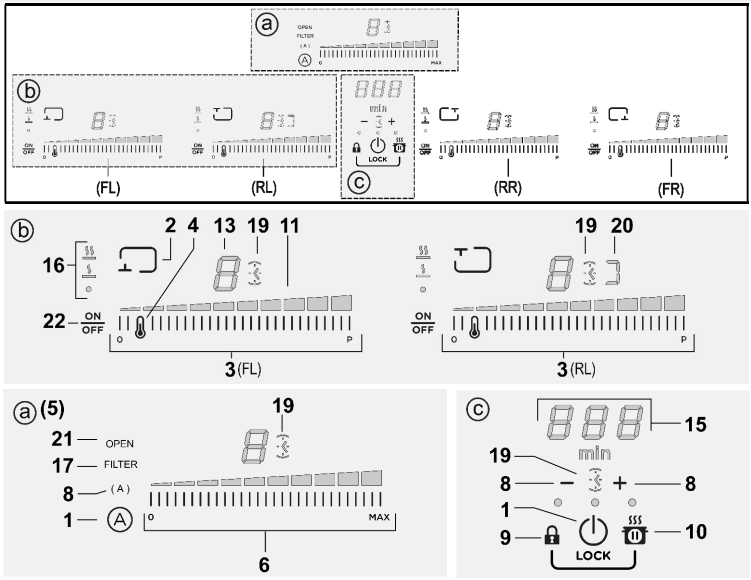
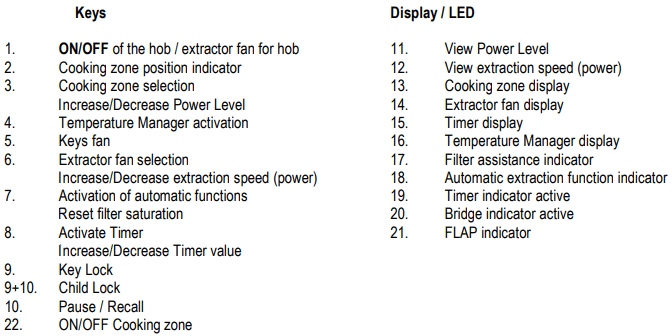
Description of the hood & Controls
1 - Cooking zones
2 - Control Panel
3 - Extractor fan
Controls
Control panel
Note: To select the commands, simply touch (press) the symbols representing them
USING THE HOB
Before you begin, it is important to know:
All functions of this hob are designed in order to comply with the most stringent safety regulations.
For this reason:
Some functions will not be activated, or will be automatically deactivated, in the absence of pots on the burners or when they are poorly positioned.
In other cases the activated functions will be automatically deactivated after a few seconds when the specific function requires a further setting that has not been selected (e.g.: “Turn the hob on” without “Selecting the cooking zone” and the “Operating temperature”, or the “Lock Function” or the “Timer” function).
Warning! In the case (for example) of prolonged use, the cooking zone may not immediately shut down because it is in the cooling phase; the "" symbol will appear on the cooking zone display to indicate the execution of this phase. Wait for the display to turn off before approaching the cooking zone.
Cooking zone display
the cooking area display indicates:
Hob characteristics
Safe Activation
The product is activated only in the presence of pots on the cooking zone: the heating process does not start or is interrupted if there are no pots, or if these are removed.
Pot Detector
The product automatically detects the presence of pots on the cooking zones.
Safety Shut Down
For safety reasons, each cooking zone has a maximum operating time, which depends on the maximum power level set.
Residual Heat Indicator
When one or more cooking zones shut down, the presence of residual heat is indicated by a visual signal on the corresponding zone display, by way of the "" symbol. .
Operation
Note: Before activating any functions, the desired zone must be activated.
Power-on
Press (touch) ON/OFF hob/ extractor
The indicator light will turn on to indicate that the hob/extractor is ready for use
Press again to turn off
Note: This function has priority over the others.
Selecting the cooking zone
Touch ON/OFF(22), press the Selection bar (3) corresponding to the desired cooking zone.
9 Power Levels
The hob features 9 power levels
Touch and scroll along the Selection bar (3):
to the right to increase the level of power;
to the left to decrease the level of power.
Power Booster
The product features a supplementary power level (after level ), which remains active for 10 minutes, after which the temperature returns to the previously set value.
Touch and scroll along the Selection bar (3) (after level ) and activate the Power Booster
The Power Booster level is shown on the display of the selected zone with the symbol "”.
Bridge Zones
Thanks to the Bridge function, the cooking zones are able to work in a combined manner, creating a single zone with the same power level. This function allows evenly distributed cooking with large-sized pots and pans.
The front “Master” cooking zone can be used in combination with the corresponding “Secondary” cooking zone at the back (to check which zones are equipped with this function, see the illustrated part of this manual).
To activate the Bridge Function:
- simultaneously select the two cooking zones you want to use
- the Bridge indicator (20) of the “Secondary” cooking zone lights up “”
- by means of the Selection bar (3) of the “Master" cooking zone it will be possible to set the operating level (Power)
- to deactivate the Bridge Function simply repeat the same activation procedure
Temperature Manager
Temperature Manager is a function that allows to set the most suitable pre-set temperature to achieve the desired result (see the Temperature Manager table at the end of this chapter).
Select the desired cooking zone.
Press once or multiple times (4) to choose the most suitable level among the ones available:
* See the Temperature Manager at the end of this chapter.
Press again to turn it off.
The following symbol appears on the display of the zone working in Temperature Manager mode .
Key Lock
The Key Lock allows to block the settings of the hob to prevent accidental tampering, leaving the functions that have already been set active.
Activation:
• press (9)
• The LED over the button will turn on, to indicate that it has been activated
Repeat the operation to deactivate.
Child Lock
The Child Lock makes it possible to prevent children from accidentally accessing the cooking zone and extraction zone, preventing the activation of any functions.
The Child Lock can only be activated when the product is on, but with the cooking zones (and extraction zone) off.
Activation:
• remove any pots from the hob
• simultaneously press and hold (9) and (10), an acoustic signal indicates that the function is active,and a appears on display (13) and (14). Repeat the operation to deactivate.
Timer
The Timer function is a countdown, which can be set for each cooking zone (and extraction zone), even simultaneously.
Note: the timer is a simple warning buzzer, which at the end of the set minutes DOES NOT turn off the cooking zone
Activation/Regulation of hob Timer function
• Select the cooking zone (power ¹ 0).
• Press (8) to access the Timer function
• Regulate the duration of the Timer:
press the selector , to increase the automatic shut-down time press the selector , to decrease the automatic shut-down time If desired, repeat the operation for the other cooking zones.
Note: Each cooking zone can have a different Timer set; on the display, (15), the countdown of the last selected hob will be shown for 10 seconds, after which the countdown with the least remaining time will be shown.
When the timer has finished the countdown, there is an acoustic signal (for 2 minutes, or it will stop when one of the buttons on the hob is pressed), while the display (15) will flash, with the symbol .
Note: on the side of the display of the cooking zone, the following symbol will appear (19)
To switch off the Timer:
• select the cooking zone
• set the value of the timer to , by means of Not: the function remains active if no other key is pressed in the meantime.
Egg Timer
The Egg Timer function is a countdown independent of the cooking zones (and the extraction zone). The Egg Timer is activated by pressing (8).
Note: to regulate the Egg Timer function, follow the same procedure as for the Timer function.
When the timer has finished the countdown, there is an acoustic signal (for 2 minutes, or it will stop when one of the buttons on the hob is pressed), while the display (15) will flash, with the symbol .
Pause
The Pause function allows to suspend any function active on the hob, bringing the cooking power to zero.
Activation:
• press (10)
• a is displayed (13).
To deactivate the function:
Note: this operation restores the hob settings to those prior to the pause.
• press (10)
• within 10 seconds scroll to the right along the Selection bar (3), relating to the cooking zone 2 (FIG.19);
Note: if the operation is not performed within this time the pause function will remain active.
Note: if after 10 minutes, the Pause Function is not deactivated, the hob will turn off automatically.
Recall
The Recall function allows to recover all the hob settings, in case of accidental shut-down.
Activation:
• turn the hob back on within 6 seconds after shutdown
• press within the next 6 seconds
Automatic Heat UP
The Automatic Heat UP function allows to reach the set power faster; with this function it is possible to cook food faster, but without the risk of burning it, because the temperature does not exceed the set level.
This function is available for the levels of power 1 -8 .
Activation:
• press and hold, on the Selection bar (3), the desired power
• a is displayed (13).
USING THE EXTRACTOR FAN
Power-on
Press (touch) ON/OFF(1) hob/ extractor
The indicator light will turn on to indicate that the hob/extractor is ready for use
Press again to turn off
Note: This function has priority over the others.
Switching on the extractor fan:
Touch (press) the Selection bar (6) to activate the extractor fan
Extraction speed (power):
Touch and scroll along the Selection bar (6):
to the right to increase the speed (power) of the extractor fan (0-4);
to the left to decrease the speed (power) of the extractor fan (4-0);
Timer
Activation/Regulation of Timer function for the extractor fan
Select the extractor fan (speed ¹ 0).
Press (8) to access the Timer function (from any speed)
Regulate the duration of the Timer: press the selector , to increase the automatic shut-down time press the selector , to decrease the automatic shut-down time the display (15) will show the countdown,
Note: on the side of the display of the extractor fan, with the Timer in use, the following symbol will appear (19)
When the timer has finished the countdown, there is an acoustic signal (for 2 minutes, or it will stop when one of the buttons on the hob is pressed), while the display (15) will flash, with the symbol .
To switch off the Timer:
• select the cooking zone
• set the value of the timer to , by means of Not: the function remains active if no other key is pressed in the meantime.
Filter saturation indicator
The hood indicates when filter maintenance is needed:
Grease filter the “”(17) LED lights up
Activated carbon odour filter the “”(17) LED flashes
Reset filter saturation
After carrying out maintenance on the filters (grease and/or activated carbon) hold down the key; the “” LED turns off and the count restarts.
Activation of activated carbon odour filter saturation indicator
This indicator is normally deactivated.
To activate it, proceed as follows:
- turn on the aspiration hob by pressing ;
- with the aspiration motor and cooking zones off, press and hold ;
- “” turns on, then off to indicate successful activation.
Deactivation of activated carbon odour filter saturation indicator
repeat the activation steps described above “” flashes, then turns off to indicate successful deactivation.
Automatic mode
The hood will turn on at the most suitable speed, adapting the extraction capacity to the maximum cooking level used in the cooking zone.
Once the hob is turned off, the hood adapts its aspiration speed, gradually decreasing it, so as to eliminate residual vapours and odours
To activate this function:
Briefly press (7), the LED "" (18) will light up to indicate that the hood is working in this mode.
Open FLAP indicator
The suction area is equipped with a mechanical rotating FLAP. To activate the product you have to switch on the hood and open the flap. The hood is equipped with a sensor that, when the suction function is activated and with the FLAP completely closed, stops the motor automatically. The suction function restarts only when the FLAP is reopened.
- when switching on the fan, the motor does not start if the FLAP is closed: the LED “OPEN” (23) lights up, a long beep will be emitted every 5 seconds. the display (12) flashes.
- if you close the FLAP when the motor is running, the latter stops: the LED “OPEN” (23) lights up, a long beep will be emitted every 5 seconds. the display (12) flashes.
User Servicing and Maintenance Instructions
Hob maintenance
Caution! Before any cleaning or maintenance, make sure the cooking zones are switched off and the heat indicator has turned off.
Cleaning
The hob must be cleaned after each use.
Important:
Do not use abrasive sponges, scouring pads. Their use, over time, may ruin the glass.
Do not use chemical irritants, such as oven sprays or stain removers.
After each use, leave the hob to cool and clean it to remove deposits and stains caused by food residue.
Sugar or food with a high sugar content damages the hob and must be immediately removed.
Salt, sugar and sand may scratch the glass surface.
Use a soft cloth, paper towel or specific products to clean the hob (follow the Manufacturer's instructions).
DO NOT USE STEAM JET CLEANERS!!!
Important:
If liquids accidentally or excessively leak out of the pots, the drain valve located on the lower part of the product can be opened so as to remove any residue and be able to clean in conditions of maximum hygiene. Fig. 14
For a more complete and in-depth clean, the lower tray can be completely removed. Fig. 14.1 → 14.5
Extractor fan maintenance
Cleaning
For cleaning, use ONLY a cloth moistened with neutral liquid detergents. DO NOT USE CLEANING UTENSILS OR TOOLS!
Avoid the use of products containing abrasives.
DO NOT USE ALCOHOL!
Grease Filter
Grease filter
Traps grease particles generated by cooking.
Must be cleaned once per month (or when the filter saturation indication system indicates this need), with non-aggressive detergents, either manually or in the dishwasher at a low temperature and in a short cycle.
When cleaned in the dishwasher, the metal grease filter may discolour, but its filtering characteristics remain unchanged. Fig. 13 → 13.1
Charcoal Filter
Activated Carbon Filter - Ceramic (Only for Filtration Version)
Traps unpleasant odours generated by cooking.
The product is equipped with four filter packs that trap odours thanks to the activated carbons.
The activated carbons are incorporated into a ceramic structure, making them easily and completely accessible by impurities, thus creating a large absorption surface.
The ceramic activated carbon filters will become saturated after a more or less prolonged period of use, depending on the type of cooking and frequency with which the grease filters are cleaned.
These odour filters can be thermally regenerated every 2/3 months in an oven preheated to 200°C for 45 minutes.
Regeneration allows a maximum filter lifespan of 5 years. Fig. 15 → 15.12
Troubleshooting
INFORMATION CODE
DESCRIPTION
POSSIBLE CAUSES
SOLUTION
E2
The command zone switches off due to an excessively high temperature
The temperature inside the electronic parts is too high
Wait for the hob to cool before reusing it
ERR03 + acoustic signal
Continuous (permanent) key activation is detected. The interface switches off after 10 seconds.
Water, pots or kitchen tools are on top of the user interface.
Clean the surface, remove any objects from the surface.

 Warning! In the case (for example) of prolonged use, the cooking zone may not immediately shut down because it is in the cooling phase; the "" symbol will appear on the cooking zone display
  to indicate the execution of this phase. Wait for the display to turn off before approaching the cooking zone.
 ON/OFF hob/ extractor
 ), which remains active for 10 minutes, after which the temperature returns to the previously set value.
 ”.
”. ”
” (4) to choose the most suitable level among the ones available:
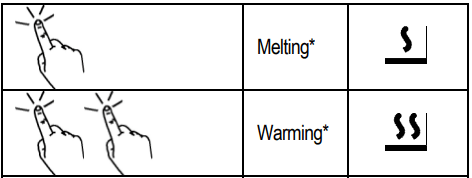
 .
. (9)
(9) (10), an acoustic signal indicates that the function is active,and a
  appears on display (13) and (14). Repeat the operation to deactivate.
 (8) to access the Timer function
 .
. (19)
(19) , by means of
  (10)
(10) is displayed (13).
 within 6 seconds after shutdown
 is displayed (13).
 (touch) ON/OFF(1) hob/ extractor
 (19)
(19) .
. ”(17) LED lights up
 ” LED turns off and the count restarts.
 ;
; " (18) will light up to indicate that the hood is working in this mode.