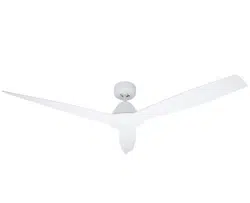
132cm DC Ceiling Fan
Operating Instructions
Model: GPCF300B/W


General Care and Safety Guide
Thank you for choosing this Goldair product. This Goldair appliance has been designed
and manufactured to high standards of engineering and with proper use and care, as
described in this leaflet, will give you years of useful service. Please read these
instructions carefully and keep them for future reference.
1. This appliance is not intended for use by persons (including children) with reduced
physical, sensory or mental capabilities, or lack of experience and knowledge,
unless they have been given supervision or instruction concerning use of the
appliance by a person responsible for their safety.
2. Children should be supervised to ensure that they do not play with the appliance.
3. If the supply cord is damaged, it must be replaced by the manufacturer, its service
agent or similarly qualified persons in order to avoid a hazard.
4. Ensure that the fan is switched off from the supply mains before removing the
guard.
5. Use only the voltage specified on the rating plate of the appliance.
6. Keep all objects at least 1 Metre from the front, sides and rear of the appliance
7. This appliance is intended for household use only and not for commercial or
industrial use.
8. Use this appliance only as described in this manual. Any other use is not
recommended by the manufacturer and may cause fire, electric shock or injury.
9. The common cause of overheating is deposits of dust or fluff in the appliance.
Ensure these deposits are removed regularly by unplugging the appliance and
vacuum cleaning the air vents and grills.
10. Always unplug appliance when not in use.
11. When the appliance has been unpacked, check it for transport damage and ensure
all parts have been delivered. If parts are missing or the appliance has been
damaged, contact the Goldair Customer Services Team.
12. If your appliance does not work, or is not working properly, contact the place of
purchase. Repair work on the appliance by unqualified persons can cause serious
risk to the user.
13. Ensure hands are dry before handling the plug or the main unit.
14. Carry out regular checks of the supply cord to ensure no damage is evident.
15. Ensure that the cord is fully extended (not coiled) while in use.
16. Avoid contact with the moving parts. Keep hands, hair, clothing, away from blade
of the fan during operation to reduce the risk of injury to person and/or damage
to the unit.
17. Switch off and use handles provided when moving.
18. It is recommended that this fan is plugged directly into the wall socket.
19. A correctly specified, undamaged extension cord may be used with this fan
provided it is used in a safe manner.

General Care and Safety Guide
20. Never place appliance close to radiant heat source.
21. Never operate in areas where petrol, paint or other flammable liquids are used or
stored.
22. Never use the appliance to dry clothes.
23. Never insert or allow foreign objects to enter any ventilation or exhaust opening,
as this may cause an electric shock, fire or damage to the appliance.
24. Never use abrasive cleaning products on this appliance. Clean with a damp cloth
(not wet) rinsed in hot soapy water only. Always remove plug from the mains
supply before cleaning.
25. Never connect the appliance to mains supply until completely assembled and
adjusted.
26. Never remove plug from power socket until the appliance has been switched off.
27. Never remove plug from power socket by pulling cord – always grip plug.
28. Never twist, kink or wrap the cord around the appliance, as this may cause the
insulation to weaken and split. Always ensure that all cord has been removed from
any cord storage area and is unrolled before use.
29. Never use this appliance in the immediate surrounds of a bath, a shower, or a
swimming pool or other liquids. The appliance must not be immersed in any
liquids.
30. Due to the risk of injury, never use this appliance for any purpose other than its
intended use. This appliance is intended for use in household and similar
applications such as staff kitchen areas in shops, offices and other working
environments; farm houses, by clients in hotels, motels, bed and breakfast type
environments and other residential type environments
31. Never use this appliance outdoors.
32. Never operate the appliance with a damaged cord or plug, after it malfunctions, or
if it has been damaged in any manner. Have the appliance checked and repaired
by a qualified electrician if repair is necessary.
33. Never place the unit in wardrobes or other enclosed spaces as this may cause fire
hazards.
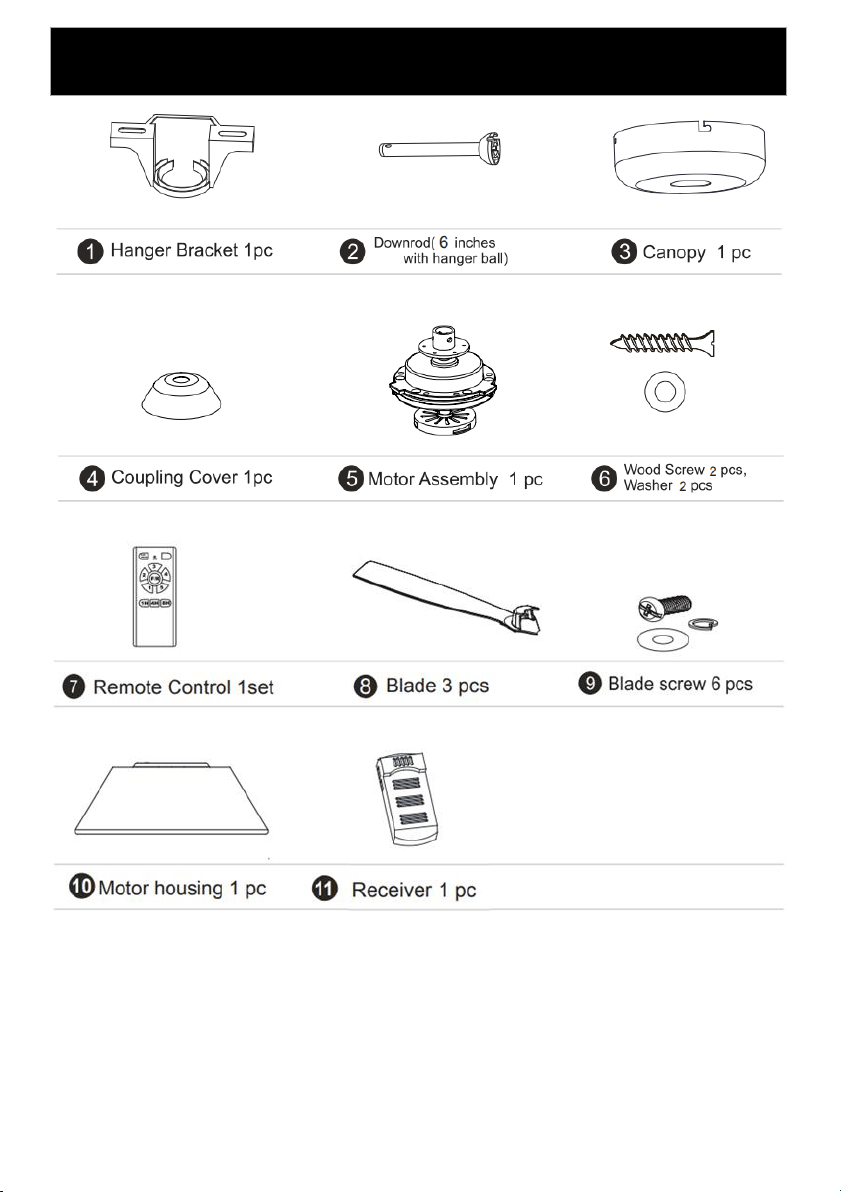
Components

Installing your Appliance
NOTE: Before using this appliance, it must be ceiling mounted. The screw
pack to mount the appliance to the wall will be available in the box.
NOTE: Your Goldair Ceiling Fan should be installed with at least 2.1m
clearance from the floor and 1.5m from the wall to the blade.
WARNING: If unusual oscillating movement is observed, immediately
stop using the ceiling fan and contact the manufacturer, its service agent or
suitably qualified persons
CEILING FANS ARE ONLY TO BE MOUNTED ON WALLS THAT COMPLY
WITH CURRENT AS/NZS SPECIFICATIONS & BUILDING REGULATIONS.
Safety Precautions
1. Installation must be carried out by a qualified installer.
2. Turn off power before assembly & disassembly.
3. Ensure that all screws are tight throughout the course of installation.
4. Ensure that blades are not obstructed by other objects and are able to turn freely.
5. The electrical supply must include an isolation switch providing at least 3mm
contact separation on all live conductors.
6. Do not connect the ceiling fan to any dimmer switch or regulator.
7. Do not place any objects in the path of the blades
8. Do not install near any of the below:
1. Flammable areas such as a gas cooker
2. Oily Areas
3. Wet and high humidity areas such as a bathroom
4. Areas that are continuously exposed to the wind
Installing your Appliance
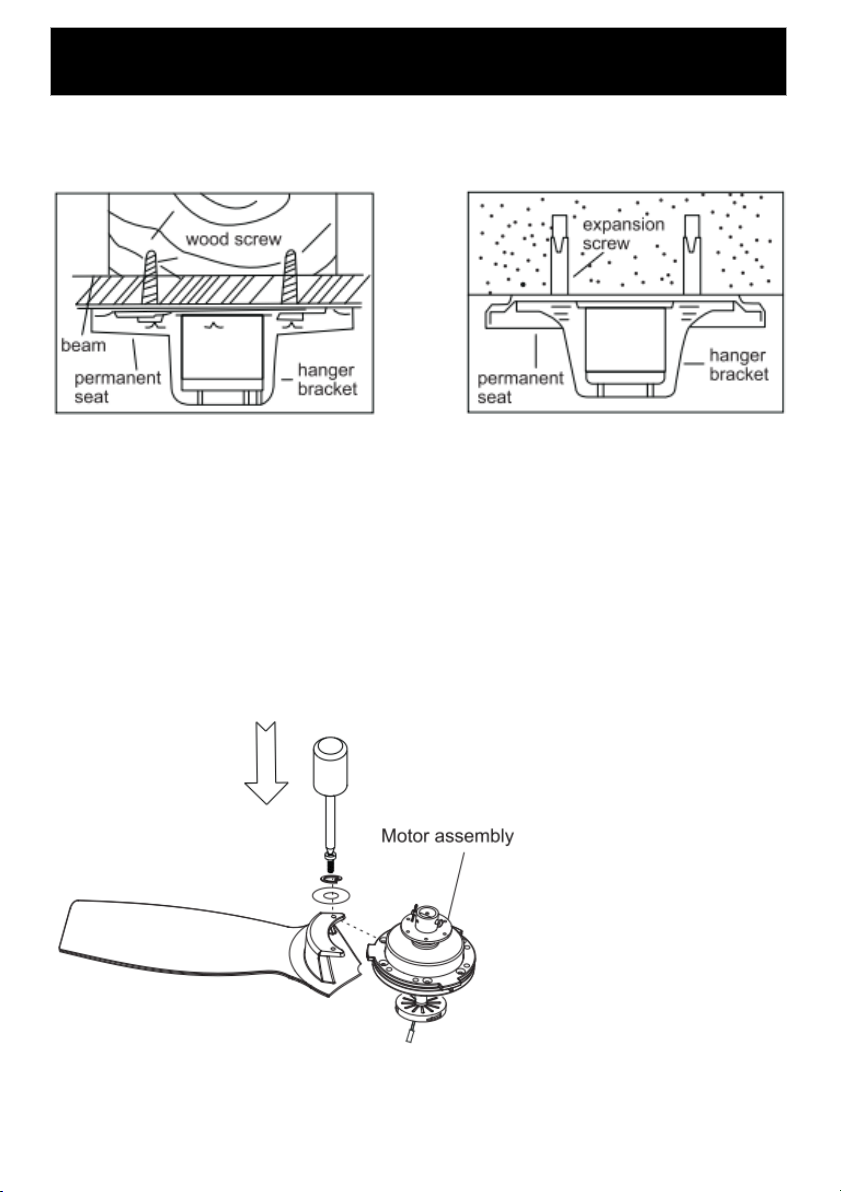
1. Fixing the Hanging Bracket
A. For GIB ceilings you will need to
locate a wooden beam in the
ceiling to secure the screws.
Note: Your installer may need to
add a suitable piece of timber in
the ceiling
B. For concrete ceilings, drill a 8mm
hole to the length of the expansion
plugs. Then fix the hanger bracket
to the ceiling with the expansion
plugs and screws.
2. Assembling the Blade
Insert the 3 blades into the upper
aligning plate and secure with 6
screws and washers.
Installing your Appliance
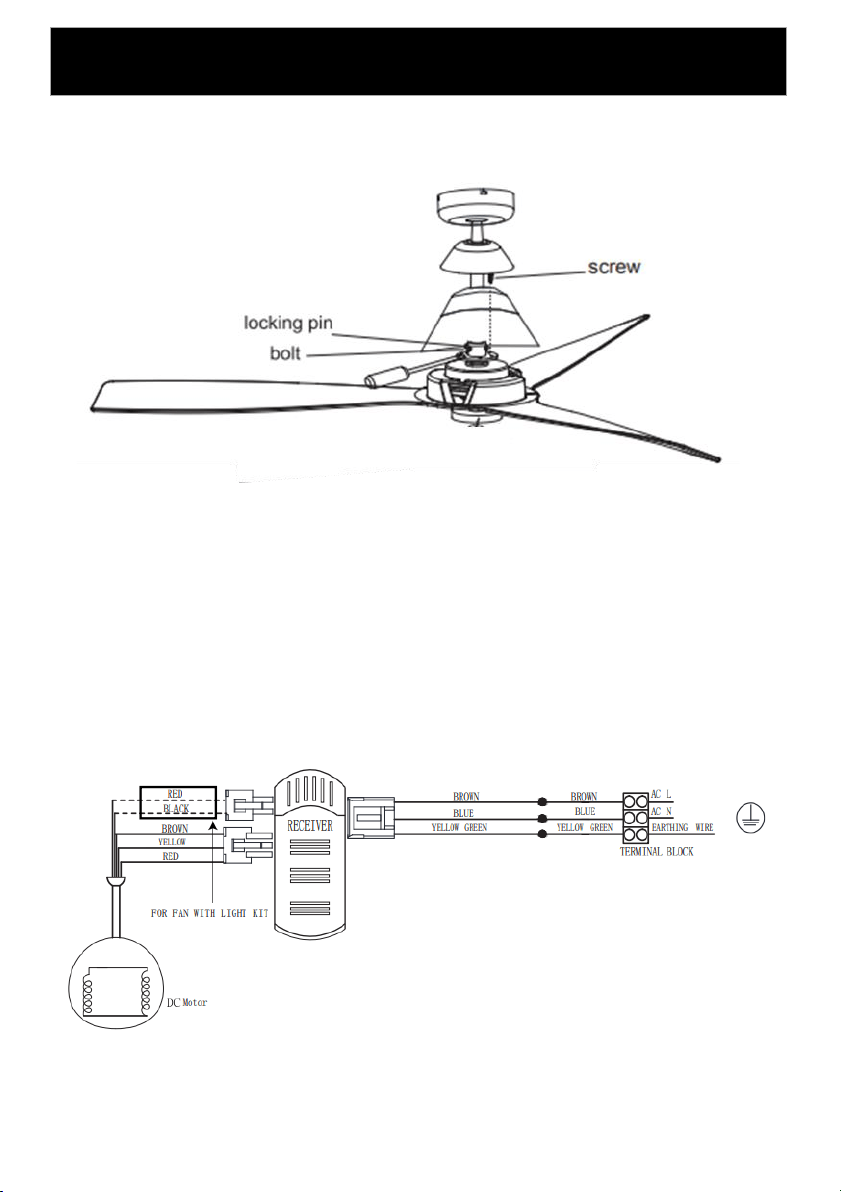
3. Assembling the Motor Housing, Down Rod, Coupling
Cover and Canopy
A. Put the motor housing through the coupler and secure this with 3 screws
B. Remove the hanger ball from the down rod. Thread the wiring from the fan motor
through the down rod.
C. Put the down rod into the coupler and insert the bolt and locking pin. Lock the
down rod screw and cover the coupler with the coupling cover.
D. Put the canopy through the down rod. Place the hanging ball on top of the down
rod and secure it with a screw.
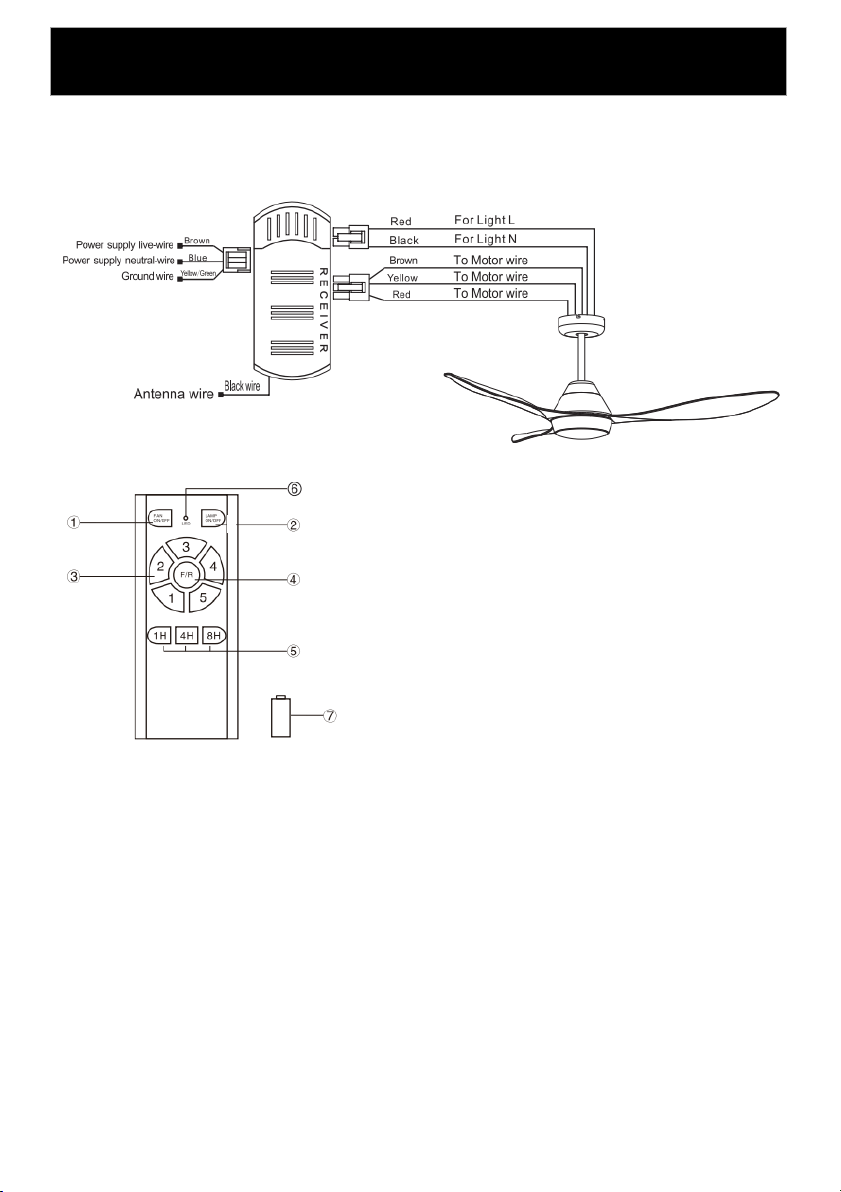
4. Connecting the Power Supply Wire
For your convenience and to assist
in easy installation & cleaning, your
ceiling fan is connected with a quick
connect system. Simply connect the
male and female couplings.
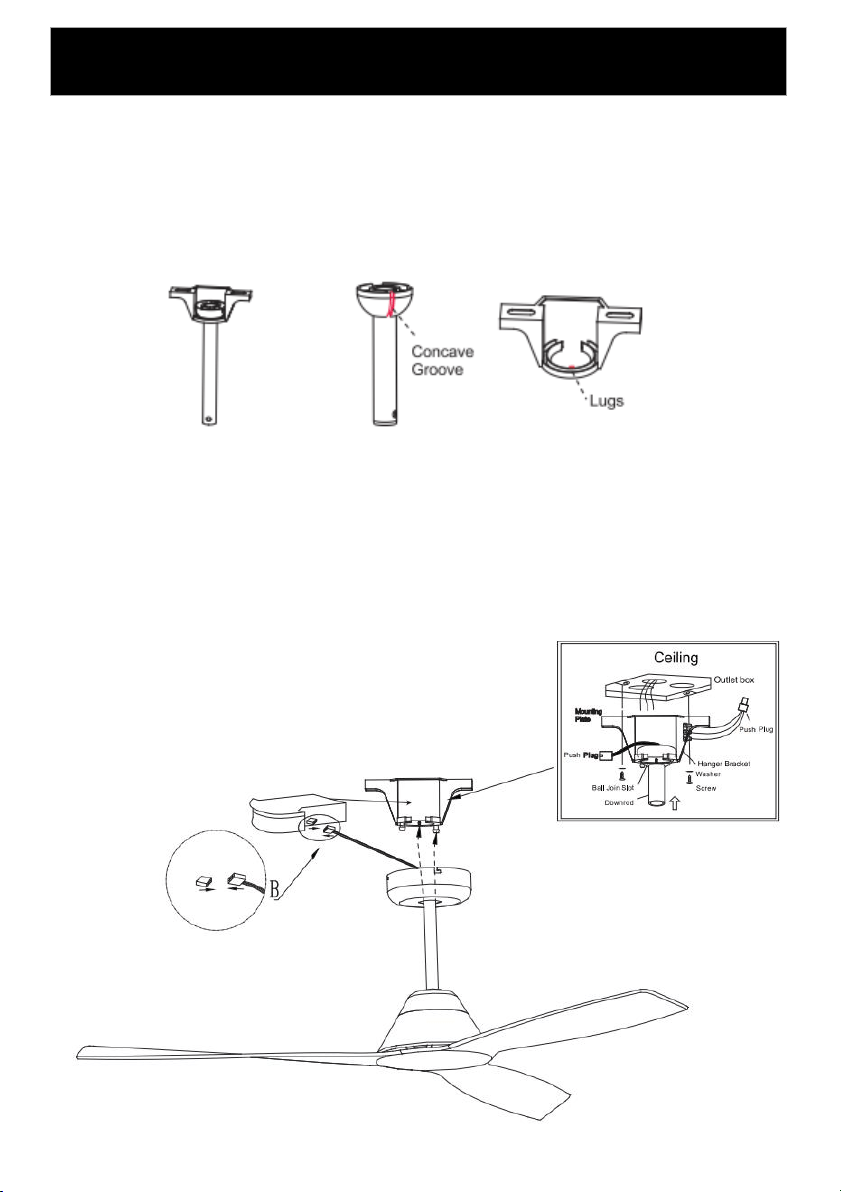
Installing your Appliance
5. Mounting the Ceiling Fan
A. Put the hanger ball into the hanger bracket, turn the down rod and let the
concave groove of the hanger ball locate into the lugs of the hanger ball plate (in
the hanger bracket).
B. Put the receiver on top of the hanger ball and connect the quick connect plug of
the wires from the hanger bracket to the quick connect plug from the receiver.
C. Connect the quick connect plug of the wires from the fan to the quick connect
plug of the receiver.
D. Unscrew the top two canopy fixing screws attached halfway at the bottom of the
mounting bracket. Slide the top canopy up the down rod and onto the mounting
bracket. Turn the canopy until the fixing screws lock into position and then fasten
the screws.
Installing your Appliance
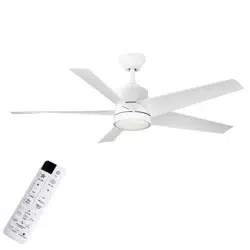
6. Remote Control Operation
1. Fan ON/OFF
2. Light ON/OFF (only works for models with light)
3. Speed Settings (1 low speed – 5 high speed)
4. Summer/Winter Switch
5. Timer
6. Power Indicator Light
7. 1x A23 Battery Included
Pairing Remote Control
The process is as follows:
• Turn ON the wall power switch.
• Within 30 seconds, press the remote “FAN ON/OFF” button for 5 seconds, a long
“beep” will be heard.
• The new remote is now 'paired' with the fan.
The previous remote is now deactivated from the fan.

Operating Your Appliance
Cleaning and Maintenance
Care and Cleaning
Periodic cleaning of your ceiling fan is the only maintenance that is needed. Use a
soft brush or lint free cloth to avoid scratching the finish.
• Do not use water when cleaning your ceiling fan, it could damage the motor or the
blades and create the possibility of an electrical shock.
• Motor has permanently lubricated ball bearings. No need to oil.
• This fan is not intended for use by young children or infirm persons without
supervision.
• Do not allow young children to play with the fan.
Wobble
• Ceiling fans tend to move during operation due to the fact that they are not
generally rigidly mounted - if they were, they could generate excessive ceiling
vibration and stress on their mountings.
• Movement of a couple of centimetres is quite OK and does not suggest the fan will
fall down.
• Ceiling fans are mounted very securely on steel brackets with rubber cushioning or
with ball joints to allow free movement.
• Please note that all ceiling fans are not the same, even in the same model - some
may move more or less than others.
The following procedures should eliminate any wobble. Check for wobble after each
step. It is impossible to eliminate wobble completely.
• Check that all blade brackets are tightened securely.
• Most wobble problems result from inconsistent blade level. To check blade level,
measure the distance from each blade tip to the ceiling. If measurements are
inconsistent, adjustments of brackets will be required.
• Wobble problem could also result from deviations in distance from blade to
blade. To check blade separation, measure the distance from blade tip to blade
tip. Should measurements vary, loosen screws connecting blades and brackets
(one at a time) then shift blade to proper position and re-tighten screws.
Normal Wear and Tear
Threaded components working slightly loose or blade carriers even slightly bent due
to vigorous cleaning or bumping can cause extra wobble and noise.
This is not covered under warranty - but a little care and maintenance can reduce or
prevent this problem.
SUPPORT AND TECHNICAL ADVICE
Goldair – New Zealand
Monday – Friday 8am-5pm
Phone +64 (0)9 917 4000
Phone 0800 232 633
Goldair – Australia
Monday – Friday 8am-5pm
Phone +61 (0)3 9365 5100
Phone 1300 465 324
Operating Your Appliance
TECHNICAL SPECIFICATION
Model No: GPCF300B/W
Supply: 220-240VAC 50/60Hz
Wattage: 45W
PROOF OF PURCHASE
To receive warranty retain receipt as proof of purchase.
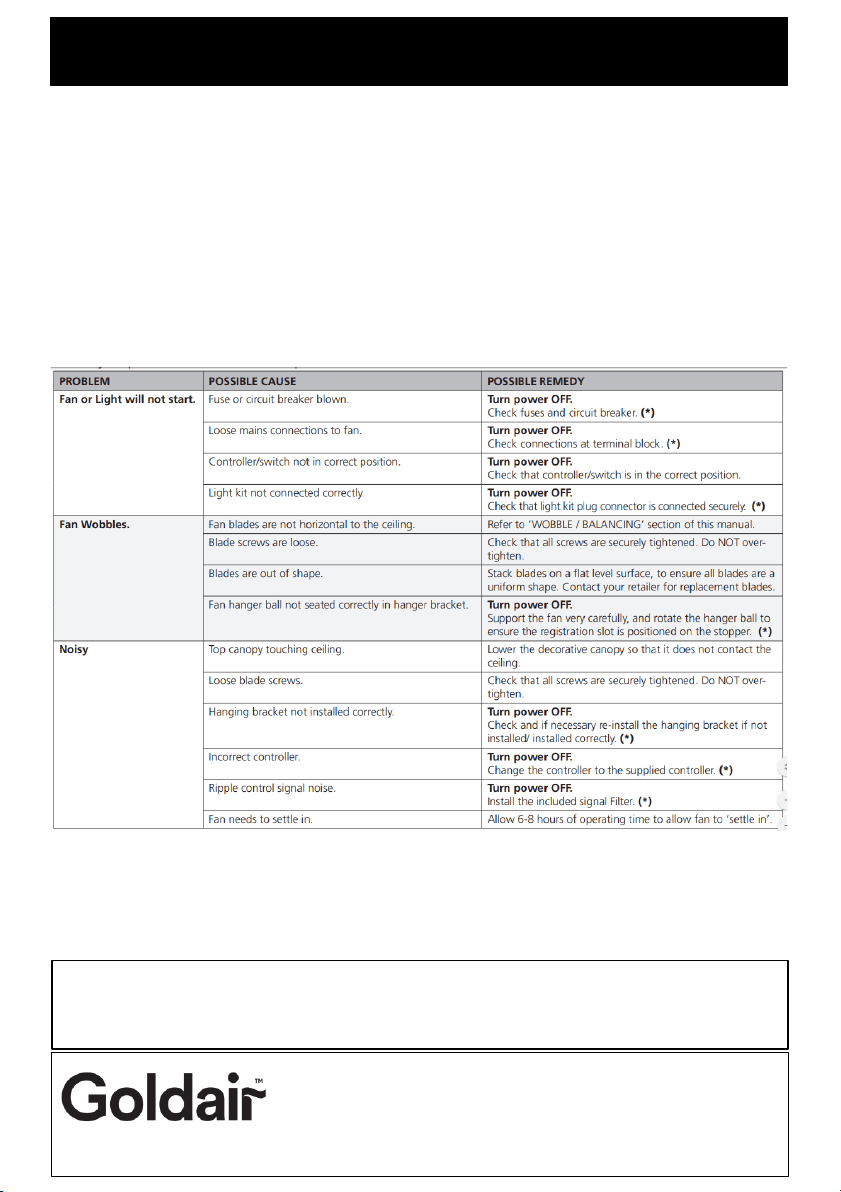
Trouble Shooting
Bumps-in-the-night
This is the biggest cause for service calls which are outside the manufacturer’s warranty.
If a fan has a fault, it will be noticeable at all times. Naturally when everything is quiet at
night, you will be more inclined to hear small noises which may not be noticeable at
other times. Even slight power fluctuations, and mains frequency signals superimposed
in your electricity supply for off-peak hot water control may cause a change in fan motor
noise. This is normal.
Thank you for purchasing this Goldair Platinum product. Your product is warranted against faults and manufacture when used in
normal domestic use for a period of two years. In non-domestic use Goldair limits the voluntary warranty to three months.
Goldair undertake to repair or replace this product at no charge if found to be defective due to a manufacturing fault during the
warranty period.
This warranty excludes damage caused by misuse, neglect, shipping accident, incorrect installation, or work carried out by anyone
other than a qualified electrical service technician.
PLEASE KEEP YOUR RECEIPT AS THIS WILL HELP VERIFY YOUR WARRANTY.
The benefits given to you by this warranty are in addition to other rights and remedies available to you under law in relation to the
goods or services to which this warranty relates.
In Australia, our goods come with guarantees that cannot be excluded under the Australian Consumer Law. You are entitled to a
replacement or refund for a major failure and compensation for any other reasonably foreseeable loss or damage. You are also
entitled to have the goods repaired or replaced if the goods fail to be of acceptable quality and the failure does not amount to a
major failure.
In New Zealand this warranty is additional to the conditions and guarantees of the Consumers Guarantee Act (1993).
Two Year Warranty
Goldair Two Year Warranty (IMPORTANT: Please complete and retain this warranty card)
Name
Address
Place Of Purchase Date Of Purchase
Name Of Product Model Number
Attach a copy of the purchase receipt to this warranty card
Due to continual design improvements, the product illustrated in this User Manual may differ slightly from the actual product.
Goldair – New Zealand
CDB Goldair
PO Box 100-707
N.S.M.C
Auckland
Phone +64 (0)9 917 4000
Phone 0800 232 633
www.goldair.co.nz
Goldair – Australia
CDB Goldair Australia Pty
PO Box 574
South Morang
Victoria, 3752
Phone +61 (0)3 9365 5100
Phone 1300 GOLDAIR (1300 465 324)
www.goldair.com.au


New Zealand
PO Box 100707,
North Shore Mail Centre,
Auckland, 0745
www.goldair.co.nz
Australia
PO Box 574,
South Morang,
Victoria, 3752
www.goldair.com.au