Loading ...
Loading ...
Loading ...

10
Installation Instructions
Installing the Burner Assemblies
WARNING
• Never use the cooktop if any burner parts are removed.
• The burners’ air-mixture settings.
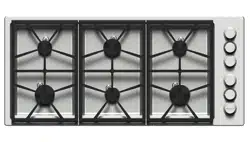
1. Remove the burner heads, burner rings, burner caps,
and grates from their shipping packages.
2. Install the burners as shown. (Twist each piece back
and forth slightly until it drops fully into place; the burn-
ers will not operate properly unless each piece is prop-
erly seated.)
3. Gently seat each grate’s rubber feet in their dimples on
the spill tray (graphic, Step 1).
Verifying the Correct Setup
WARNING
• Before proceeding, ensure power to the electrical outlet
is turned off at the circuit-breaker panel or fuse box and
the gas is turned off at the gas-supply valve.
• The cooktop must be properly grounded at all times
when electrical power is applied.
• Before using the cooktop, carefully read the accompa-
nying Use and Care Manual.
Running the Ignition Test
This test verifies the proper function of each burner and its
corresponding control knob.
1. Ensure all cooktop burner controls are turned OFF, and
plug in the cooktop power cord.
OFF
Knob
Selector
High
Flame
Control
Low
Flame
Flame
Burner
indicator
2. Turn power on at the outlet, circuit breaker, or fuse box.
3. Press down on a burner control knob, and turn it slowly
counterclockwise to the HIGH flame mark.
A rapid clicking sound indicates the burner is trying to
ignite. (Ignition may take 4-5 seconds; the clicking ends
when the burner ignites.)
WARNING
If the burner does not ignite within 5 seconds, turn off the
knob, and wait at least 5 minutes for any gas to dissipate,
then repeat the test.
4. Verify that the correct burner igniter sparks, then turn
the knob clockwise OFF.
5. Repeat Steps 4-5 for the remaining knobs.
6. If all knobs function properly, turn on the gas-supply
valve. If not, review Troubleshooting (next page).
7. When the burner lights, turn the control knob from
HIGH to LOW to adjust the flame height.
Loading ...
Loading ...
Loading ...