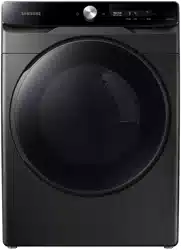
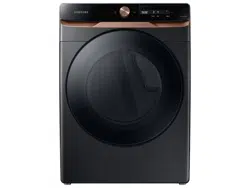
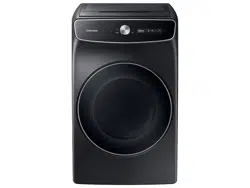
Here are a few things you should know before starting your dryer.
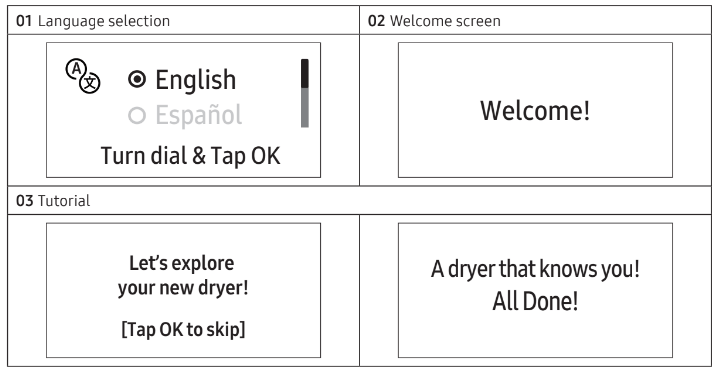
Initial setup
When you turn on your dryer for the first time, the screen shows the initial setup process. Follow the on-screen instructions to complete it.
If you complete the initial setup and operate a cycle for more than a minute, the initial setup will not appear again.
The initial setup includes language selection and a brief tutorial.
When tapping a button, tap exactly over the text.
Operating the washing machine and dryer at the same time may result in a loss of power depending on where they are installed and your electrical power status.
Sort and load
Put one wash load in the dryer at a time.
Do not mix heavy and lightweight items together.
To improve drying efficiency for one or two items, add a dry towel to the load.
For best results, untangle items before inserting them into the dryer. Tangled items may degrade the drying efficiency or cause the door to open.
Overloading reduces the tumbling action, resulting in uneven drying and wrinkling.
Unless recommended on the care label, do not dry woolens or fiberglass items.
Avoid drying unwashed items.
Do not dry items soiled with oil, alcohol, gasoline, etc.
Functional prerequisite
Lint filter
To prevent a risk of fire, make sure to clean the lint filter before or after every load.
Turn off the dryer.
Open the door and pull out the lint filter (A) from inside the drum.
Open the lint filter by separating it at the top. Remove the lint, and then clean the lint filter.
Close the lint filter, reinsert the lint filter into the dryer, and then close the dryer door.
CAUTION
Do not operate the dryer without the lint filter in place.
Do not use a damaged or broken lint filter. This may reduce performance and/or cause fire.
Operations
WARNING : To reduce the risk of fire, electric shock, or injury, read the “Safety information” before operating this appliance.
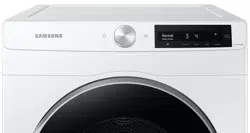
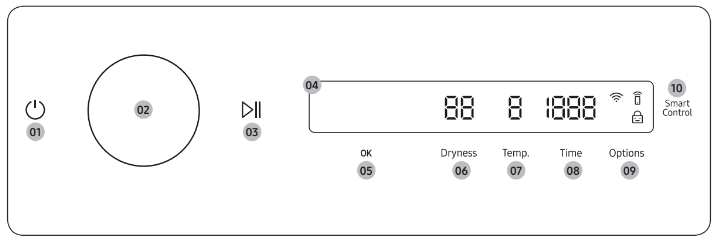
Control panel
01 Power
Tap to turn the dryer on or off.
If you do not manipulate the control panel for 10 minutes after the dryer is turned on, the dryer automatically turns off.
The dryer automatically turns off when the drying completes.
CAUTION : Do not tap to turn the dryer off while the drying is in progress. Tap and hold to pause the cycle first, and then tap to turn the dryer off.
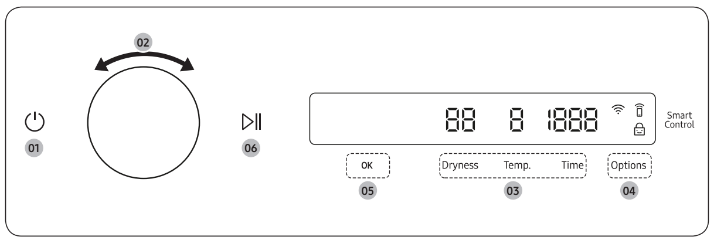
02 Navigation dial
Turn the Navigation dial left or right to navigate through cycles and functions. When you turn the Navigation dial, the display shows your selection (such as cycle, additional features, and system functions).
03 Start/Pause
Tap and hold to start or pause an operation.
04 Display
The display shows the current cycle, estimated time remaining, cycle options, and other useful or alert messages.
05 OK
Tap to confirm your selection of function or setting.
06 Dryness
Tap to change the dry level for the selected cycle. You can select from level 1 to 5, but available level depends on the selected cycle.
4 or 5: Suitable for large and thick items.
3: Standard drying level.
2: The Damp dry level is designed to partially dry items. Use for items that lay flat or hang to dry.
1: Gently dries items to protect fabric. Suitable for delicate items or items you want to naturally dry (by hanging or laying flat on drying rack) while they are damp.
07 Temp.
Temperature can only be adjusted in Time Dry cycle. Tap to change the temperature of the current cycle.
08 Time
Tap to select the cycle time for Small Load, Time Dry, Rack Dry, Air Fluff or Wrinkle Away. You can set the drying time between 10 minutes and 90 minutes.
Available drying time depend on the selected cycle.
09 Options
Tap to enter the Options menu.
Tap and hold for 3 seconds to enter the System Functions menu.
After connecting the Tumble Dryer to your home network using the SmartThings app, you can control or monitor the dryer remotely. When started, the Smart Control (Smart Monitor) indicator turns on. The dryer enters waiting mode and waits for remote commands.
Icon description
Wi-Fi
This icon indicates that the dryer is connected to Wi-Fi.
Smart Control
This icon indicates that Smart Control is on. For more information on "Smart Control”, see page 50.
Child Lock
This icon indicates that Child Lock is on.
For more information on “Child Lock”, see page 47.
Operating a cycle
Tap to turn on the dryer.
Turn the Navigation dial to select the cycle you want. For more information on “Cycle overview”, see page 43.
Tap Dryness, Temp., or Time to change the default cycle settings.
Tap Options, and then turn the Navigation dial to select additional function. For more information on "Options”, see page 45.
Tap OK to change the settings for selected additional function. Not all cycles have additional features available.
Tap and hold to start operation. Once you set the cycle you want, the screen displays a brief cycle description, and cycle time. You can also check the cycle progress, remaining cycle time, and information codes.
Cycle overview
NOTE : Other cycles can be used after adding them to your cycle list using the My Cycles function. For more information, see the “My Cycles” section on page 47.
Cycle
Description
Normal
For most fabrics including cottons and linens.
SuperSpeed
Fast & effective for synthetic fabrics.
Small Load
Timed cycle for small load items. The default cycle time is 30 minutes. However, you may manually change the cycle time if necessary.
Eco Normal
For reducing energy usage. This cycle adjusts the cycle time and temperature for increased efficiency.
Heavy Duty
For drying items made out of heavy fabrics, such as jeans, corduroys, or work clothes, with high temperature heat.
Towels
Use to dry loads such as bath towels.
Activewear
For exercise wear and outdoor wear such as sports jerseys, training pants, water-repellent jackets, and other performance clothing. Thick fabrics like a zipper or velcro closure of a jacket, or training socks may not be completely dried.
Bedding
For bulky items such as blankets, sheets, comforters, and light duvets.
Shirts
Use to quickly dry a few items such as a shirt.
Delicates
For heat-sensitive items at a low drying temperature.
Wool
For machine washable and tumble dryable wool only.
For best results, turn laundry inside out before drying.
Denim
Use a stepped drying temperature for removing moisture of Jeans and denims.
Use to sanitize items by applying steam and high-temperature heat to the fabric. This cycle can make items soft and reduce smells. Confirm that the laundry load is wet or partially wet before starting this cycle.
Steam Refresh (Manual Dry)
Use to smooth out wrinkles and reduce odors in loads of one to four items. With this cycle selected, a small amount of water is sprayed into the dryer drum after several minutes of tumbling with heat. Confirm that the laundry load is dry.
Wrinkle Away (Manual Dry)
For best results, load 2-3 items at once. You can extend the drying time by a minute unit (starting from a minimum of 20 minutes), depending on the item type or load. Confirm that the laundry load is dry.
Time Dry
You can specify a cycle time by a 10-minute unit.
Rack Dry
Timed cycle for items that need to be dried on a drying rack. Turn Navigation dial to select Rack Dry and tap Time to set the drying time between 10 minutes and 90 minutes.
Air Fluff
Tumbles the load in room temperature air.
Options
Using Options
Tap Options.
Turn the Navigation dial to select the desired additional function.
Tap OK to change the selected function’s settings or start the function.
NOTE
To return to the main screen, tap Options again or turn the Navigation dial to select Back and tap OK.
If the selected function is not supported, the "Currently not supported" message is displayed, and the OK button is not activated.
When you select an additional function, a brief help message appears for the first ten times of use.
If you do not manipulate the control panel for 7 seconds after entering the Options menu, the display returns to the main screen.
Wrinkle Prevent
Reduces wrinkles by rotating the drum intermittently after completing the dry cycle. Wrinkle Prevent provides approximately 180 minutes. The load is dry and can be removed at any time during the Wrinkle Prevent cycle.
Tap Options.
Turn the Navigation dial to select Wrinkle Prevent, and then tap OK.
Tap OK to select On or Off.
Damp Alert
This function alerts you when shirts and other items that require ironing are dry enough to be suitable for ironing.
1. Select a cycle and change the cycle settings as necessary.
- This function is available for Normal, Heavy Duty, Bedding, Delicates, Perm Press, Towels and Denim with Dryness set to 2-5.
2. Tap Options.
3. Turn the Navigation dial to select Damp Alert, and then tap OK.
4. Tap OK to select On or Off.
Alarm during drying:
1. Tap and hold to pause the cycle.
2. Open the door and take out the items you want to iron.
3. Close the door, and then tap and hold to dry the remaining items.
AntiStatic
Reduces static electricity that occurs from clothing friction. This is done by spraying steam in a later stage of the drying cycle. The AntiStatic function is only available with Normal, Heavy Duty, Perm Press, Delicates, and Time Dry. In the Sensor Dry cycle, you can use this function if the dryness setting is 3 or higher.
Tap Options.
Turn the Navigation dial to select AntiStatic, and then tap OK.
Tap OK to select On or Off.
Eco Dry
With the Eco Dry activated, drying takes a longer time but power consumption is reduced. This function is available with Normal and Time Dry.
Tap Options.
Turn the Navigation dial to select Eco Dry, and then tap OK.
Tap OK to select On or Off.
NOTE: The drying time can be extended by up to 3 times normal depending on the temperature and load. The Eco Dry function is enabled by default.
My Cycles
Add or remove cycles to create a personal cycle list.
1. Tap Options.
2. Turn the Navigation dial to select My Cycles, and then tap OK.
- You can only edit a cycle to create a personal cycle when the dryer is not operating.
3. Turn the Navigation dial to select a desired cycle.
4. Tap OK to add or remove the selected cycle.
- Addition and removal of a cycle is saved automatically.
5. Tap Options or select Back to finish My Cycles setting.
NOTE : The Normal cycle cannot be removed from the cycles list.
Drum Light
You can turn the drum light on or off.
1. Tap Options.
2. Turn the Navigation dial to select Drum Light, and then tap OK.
3. Tap OK to select On or Off.
The drum light turns on even when the dryer is off. (If the dryer is plugged into a power outlet.)
When the dryer door opens, the drum light automatically turns on and automatically turns off after minutes.
Child Lock
To prevent children or infants from accidentally starting or setting the dryer, Child Lock locks all buttons except for and Options.
Close the door.
Tap Options.
Turn the Navigation dial to select Child Lock, and then tap OK.
Tap OK to select On or Off.
The Child Lock icon turns on when the function is on. You cannot turn on Child Lock with the door open. If you get the "Door is open" message on the display while you try to turn on Child Lock, close the door and try again.
NOTE
When Child Lock is on, all buttons are disabled except for and Options.
It you tap a button with Child Lock on, an alarm triggers with the “Child Lock on” message.
If you open and close the door with Child Lock on, an alarm triggers with the “Open door & check inside” and “Child Lock on” message.
To dismiss a notification message, turn off Child Lock or the power.
System functions
Using System Functions
Tap and hold Options for 3 seconds.
Turn the Navigation dial and select the desired system function, and then tap OK.
Tap OK to change the selected function’s settings or start the function.
NOTE
To return to the main screen, tap Options again or turn the Navigation dial to select Back and tap OK.
If you do not manipulate the control panel for 7 seconds after entering the System Functions menu, the display returns to the main screen.
AI Pattern
This function saves your frequently used cycles and settings.
Tap and hold Options for 3 seconds.
Turn the Navigation dial to select AI Pattern, and then tap OK.
Tap OK to select On or Off.
The default setting is On. Set it to Off if you do not want to use this function.
When you turn the function on, the dryer remembers frequently used cycles and their settings (Dry Level Dryness, Time Time) and save them in frequently used order.
When you turn off the function, all the saved data resets.
Alarm
You can enable/disable alarm sounds.
Tap and hold Options for 3 seconds.
Turn the Navigation dial to select Alarm, and then tap OK.
Tap OK to select On or Off.
The default setting is On.
NOTE: The setting remains unchanged even if you restart the dryer.
Wi-Fi
You can turn the dryer's Wi-Fi on or off.
Tap and hold Options for 3 seconds.
Turn the Navigation dial to select Wi-Fi, and then tap OK.
Tap OK to select On or Off.
The dryer's Wi-Fi is off as a factory default setting. However, the dryer's Wi-Fi turns on automatically when you turn on the dryer for the first time. Then, the final Wi-Fi setting maintains regardless of the dryer power status. Once you turn on the dryer's Wi-Fi and connect to a network, the dryer remains connected to the network even when you turn off the power. The Wi-Fi indicates that the dryer is connected to the router through the Wi-Fi connection.
Language
You can change the system language.
Tap and hold Options for 3 seconds.
Turn the Navigation dial to select Language, and then tap OK.
Turn the Navigation dial to select the desired language, and then tap OK.
Vent Blockage Test
Detects the status of the ducts and reports any blockage or problems.
Tap and hold Options for 3 seconds.
Turn the Navigation dial to select Vent Blockage Test, and then tap OK. Vent Blockage Test starts immediately.
Factory Reset
You can reset your dryer.
Tap and hold Options for 3 seconds.
Turn the Navigation dial to select Factory Reset, and then tap OK.
Your dryer resets to the factory setting.
Special features
Smart Control
You can connect to the SmartThings app and control your dryer remotely. (Smart Control for electric model, Smart Monitor for gas model)
Connecting your dryer
Download and open the SmartThings app on your mobile device
Tap to turn on the dryer.
Tap and hold Smart Control / Smart Monitor on the dryer.
a. The dryer enters AP mode and connects to your mobile device.
b. Tap Smart Control / Smart Monitor to authenticate your dryer on your mobile device.
c. Once the authentication process is complete, your dryer is successfully connected to the app. Use various features available in the SmartThings app.
NOTE
If your dryer fails to connect with the SmartThings app, try again.
Check your router if you experience any Internet connection problem after connecting your dryer with the SmartThings app.
If the Wi-Fi is off, tap and hold Options for 3 seconds to navigate to System Functions, select Wi-Fi and tap OK to turn it on.
Turning the dryer's Wi-Fi on allows you connect to the dryer via SmartThings app on your smartphone regardless of the power status of the dryer. However, the dryer appears offline on the SmartThings app if the dryer's Wi-Fi is off.
Close the door before starting the Smart Control function.
If you use the dryer 20 times without being connected to SmartThings, the next time you turn the dryer on, a pop-up about Smart Control connection will appear for 3 seconds.
If the dryer's Wi-Fi is not connected to an AP (access point), the Wi-Fi will turn off when you turn of the power.
Stay Connect
Set up the Stay Connect function in your SmartThings app. Your dryer stays connected to the app so you can use the dryer when you are away from home.
1. If you turn on the Stay Connect function on the SmartThings app, the dryer will stay in standby power saving mode after completing a cycle.
The Stay Connect function will remain active for up to 24 hour if the door remains closed.
2. When the Stay Connect function is active, the Smart Control and Wi-Fi turn on your dryer display.
3. Conveniently control your dryer using the SmartThings app
NOTE: The dryer switches to standby power saving mode when operation is paused even if the machine is not connected to the SmartThings app.
SmartThings
Wi-Fi connection
On your smartphone, go to Settings and turn on the wireless connection and select an AP (Access Point).
This appliance supports the Wi-Fi 2.4 GHz protocols.
Download
On an app market (Google Play Store, Apple App Store, Samsung Galaxy Apps), find the SmartThings app by searching for “SmartThings”. Download and install the app on your device.
NOTE: The app is subject to change without notice for improved performance. In addition, the further updates on app or the function in the app may stop due to usability and security reasons, even if updates are currently supported on your OS.
Log in
You must first log into SmartThings with your Samsung account. To create a new Samsung account, follow the instructions on the app. You don’t need a separate app to create your account.
NOTE: If you have a Samsung account, use the account to log in. A registered Samsung smartphone user automatically logs in.
To register your appliance to SmartThings
Make sure your smartphone is connected to a wireless network. If not, go to Settings and turn on the wireless connection and select an AP (Access Point).
Open SmartThings on your smartphone.
If you see the message “A new device is found.”, select Add.
If no message appears, select + and select your appliance in a list of devices available. If your appliance is not listed, select Device Type > Specific Device Model, and then add your appliance manually.
Register your appliance to the SmartThings app as follows.
a. Add your appliance to SmartThings. Make sure your appliance is connected to SmartThings.
b. When registration is complete, your appliance appears on your smartphone.
Drying guide
The best way to dry items is to follow the instructions on the care label. If no drying instructions are provided, see the following table for reference.
Items
Description
Bedspreads & Comforters
Follow the care label instructions or dry using Bedding.
Make sure the item is thoroughly dry before using or storing.
May require repositioning in the drum to ensure even drying.
Blankets
Use Normal and dry only one blanket at a time for best tumbling action.
Make sure blankets are thoroughly dry before using or storing.
Curtains & Draperies
Use PERM PRESS and the medium low temperature setting to help minimize wrinkling.
Dry curtains and draperies in small loads for best results and remove as soon as possible after the cycle is complete.
Cloth Diapers
Use Normal and the Medium temperature setting for soft, fluffy diapers.
Use TIME DRY and the Low temperature settings depending on the care label instructions.
WARNING
Do not dry:
Fiberglass items (curtains, draperies, etc.)
Woolens, unless recommended on the label
Items spotted or soaked with vegetable or cooking oils
Maintenance
Keep the dryer clean for best performance and to lengthen its life cycle.
WARNING
Certain internal parts are intentionally not grounded and may present a risk of electric shock only during servicing.
Service Personnel - Do not contact the following parts while the appliance is energized: Control board and inlet valve.
Cleaning
Control panel
Clean with a soft, damp cloth. Do not use abrasive substances.
Do not spray liquid cleaning agents directly onto the dryer display.
Some laundry pre-treatment soil and stain removers may damage the control panel.
When using liquid cleaning agents, apply them to the cleaning cloth. Do not apply them directly to the dryer. Wipe up any spills or overspray immediately.
Drum
Remove any stains from the drum with an all-purpose cleaner.
Tumble old towels or rags to remove any remaining stains or cleaning substances. Stains may still be visible, but will not affect subsequent loads.
Powder coated drum
To clean the powder coated drum, use a damp cloth with a mild, non-abrasive cleaner suitable for easily marred surfaces.
Remove cleaner residue and dry with a clean cloth.
Dryer exterior
Clean with a soft, damp cloth. Do not use abrasive substances.
Protect the surface from sharp objects.
Do not place any heavy or sharp objects or a detergent container on the dryer. They can scratch or damage the top cover of the dryer.
The dryer has a high-gloss finish on the entire surface. Be careful not to scratch or damage the surface.
Exhaust system
Check and clean the exhaust system on a regular basis to maintain optimum performance.
The external exhaust hood must be cleaned frequently to ensure proper air flow.
Troubleshooting
Checkpoints
If you encounter a problem with the dryer, first check the table below and try the suggestions.
Problem
Action
Dryer does not start.
Make sure the dryer is plugged in.
Make sure the door is properly closed.
Check the fuse or reset the circuit breaker.
If you opened the door during a cycle, tap and hold again.
Clean the filter.
Make sure Child Lock is not activated.
The dryer does not warm up.
Check your home’s circuit breakers or fuses.
Some cycles do not require heat. Check the selected cycle again.
For a gas dryer, make sure the gas supply is on.
Clean the lint filter and exhaust duct.
The dryer may have moved into the cool-down phase of the cycle.
Turn off the Eco Dry option for the Normal or Time Dry cycles. When the Eco Dry option is on, the dryer performs an air dry process in the beginning of the cycle to reduce energy consumption. The air dry process does not use heated air, so you may feel that the dryer is not being heated, but this is normal.
Items are not dried.
Check all of the above. Additionally:
Make sure the exhaust hood outside your home can open and close freely.
Check the exhaust system for lint buildup. Ducting should be inspected and cleaned annually.
Use a 4” rigid metal exhaust duct.
Do not overload. 1 wash load = 1 dryer load.
Dry heavy items and light weight items separately.
Large, bulky items, such as blankets or comforters, may require repositioning to ensure even drying.
Make sure that your washer is draining properly and extracting adequate water from the load.
The load may be too small to tumble properly. Add a few towels and restart the dryer.
The load may be too large to tumble properly. Remove some items and restart the dryer.
Clean the lint filter.
The dryer is too loud.
Look for coins, loose buttons, nails, and other objects and remove them immediately.
Check the lint filter. Remove any items stuck inside the lint filter.
Make sure the dryer is level and standing firmly on the floor.
The dryer may hum due to air moving through the drum and fan. This is normal.
It is normal to hear the dryer gas valve or heating element cycle on and off during the drying cycle.
Items are not dried evenly.
Seams, pockets, and other parts of clothing are harder to dry than others. This is normal.
Sort heavy and light items separately.
There is a smell coming from the dryer.
The smell of paint, varnish, cleaning agents, and other household items could have circulated in the air and entered the dryer. If you notice such a smell, ventilate completely before using the dryer.
If drying in an enclosed area, the dryer could cause the ambient temperature to rise. Accordingly, make sure to open a window and ventilate the area.
Do not attempt to dry wet items after leaving them in the washing machine or dryer for a long time.
The dryer turns off before the items are dry.
The load is too small. Throw in few additional items like towels and try drying again.
The clothes have lint on them.
Always make sure the lint filter is clean before putting items into the dryer. When drying items that generate a large amount of lint, you may need to clean the lint filter in the middle of a cycle.
Some fabrics (such as white towels) causes more lint and should be dried separately from fabrics that lint attaches easily (such as black linen pants).
Check the inside of the pockets to make sure they are empty before drying.
Items still wrinkled after Wrinkle Prevent (Wrinkle Away, Wrinkle Release).
Small loads of 1 to 4 items work best.
Load fewer items. Load similar-type items.
Take out the items immediately after drying is complete.
Water drips from the nozzle when the Steam cycles starts.
This is steam condensation. The dripping water will stop after a short time.
Sprayed water is not visible during Steam cycles.
Sprayed water is difficult to see when the door is closed.
Extended time.
Sensor Dry automatically senses the moisture in the load and shuts the dryer off when the selected dryness level is reached. The drying time can change according to the type and amount of laundry. See the cycle chart for reference.
If a problem persists, contact a local Samsung service center.
Information codes
If the dryer fails to operate, you may see an information code on the display panel. To determine what you should do, check the list of codes in the table below, and then try the suggested actions.
Information code
Meaning
Action
Door is open
Operating the dryer with the door open.
Make sure the door is properly closed.
Make sure laundry is not caught in the door
FC
Invalid power source frequency.
Try restarting the cycle.
If this information code remains, contact a Samsung service center.
AC
Electronic control problem (Invalid Communication).
Contact a Samsung service center.
HC
High temperature heating check.
Clean the lint filter.
If this information code remains, contact a Samsung service center.
9C1
The electronic control needs to be checked.
Check if power cord is connected properly.
Check if the electrical outlet is working properly.
If the information code remains, contact a Samsung service center.
tC
The Thermistor1 resistance is very low or high.
Check for a clogged lint screen.
Check if the vent system is restricted.
If this information code remains, contact a Samsung service center.
tC5
The Thermistor2 resistance is very low or high.
Check for a clogged lint screen.
Check if the vent system is restricted.
If this information code remains, contact a Samsung service center.
dF
Incorrect door switch.
Contact a Samsung service center.
3C
The PBA needs to be checked.
Unplug the power plug and contact a Samsung service center.
If any information code keeps appearing on the display, contact a Samsung service center.
#1 Why is the door latch loose on my washing machine?
Don't worry if the door latch on your washing machine seems loose, this is normal. The door latch is designed to move so that the locking mechanism in the washer can grab onto the latch.If the latch were rigid, the lock mechanism would not be able to grab the latch properly, causing check code dC/DC. Don't book a repair or service for a loose latch unless you are experiencing another issue or check code.
#2 How to resolve a 5E or 5C error code on a washing machine?
A 5E or 5C error code indicates that the washing machine has detected a drainage issue. The most common reason for this error is a blocked filter or a kinked drain hose. You should also check that the drain hose has been installed properly and clean the hose thoroughly to remove any blockages that may be preventing your washing machine from draining properly.
Eco Drum Clean is an eco-friendly cleaning cycle designed to remove detergent residue and build up. The Eco Drum Clean cycle should be run every 40 washes or sooner if your washing machine indicates that it is required. Follow the steps below to start an Eco Drum Clean cycle. 1.Press the Power button to switch your washing machine on. 2.Turn the cycle selector round to select "Eco Drum Clean". 3.Press the Start/Pause button to start the cycle.


 to turn on the dryer.
 to start operation. Once you set the cycle you want, the screen displays a brief cycle description, and cycle time. You can also check the cycle progress, remaining cycle time, and information codes.
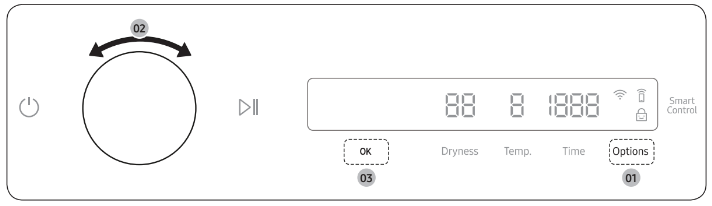
 and Options.
 icon turns on when the function is on. You cannot turn on Child Lock with the door open. If you get the "Door is open" message on the display while you try to turn on Child Lock, close the door and try again.
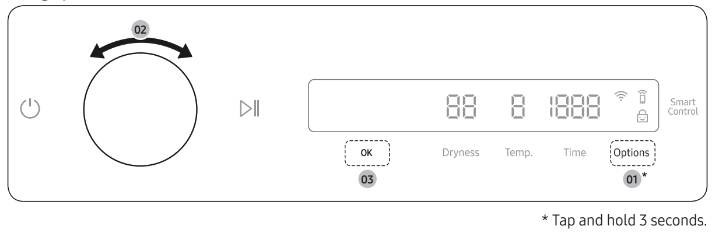
 indicates that the dryer is connected to the router through the Wi-Fi connection.
 to turn on the dryer.