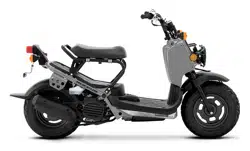
Honda 2022 ADV150 Street Scooter
Product's Documents
Below are documents related to this product, you can read online or download:
- Owner's manual - (English) Read Online | Download pdf
User Manual Street Scooter
Instruments
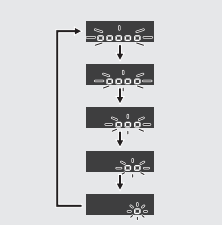
Display Check
When the ignition switch is turned to the ON position, initial animation will show. If any part of the display does not come on when it should, have your dealer check for problems.
Instruments (Continued)

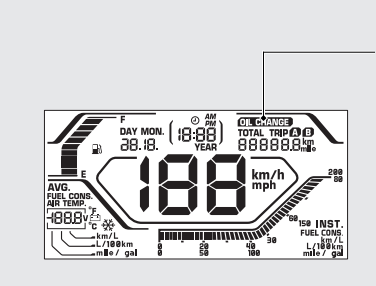
The indicator is turned on whenever the running distance reaches the programmed oil change interval. When the running distance reaches about 600 miles (966 km): Reset the indicator for the 1st time. When the running distance reaches about every 4,000 miles (6,440 km) after the 1st time resetting: Reset the indicator whenever it is turned on.
After changing the engine oil, be sure to reset the indicator. To reset the indicator, press and hold the SET button while turning the ignition switch to the ON position, and keep holding the SET button for more than 3 seconds.
The indicator does not go off until it is reset. If the oil is changed before the oil change indicator comes on, be sure to reset the oil change indicator after changing the oil. When resetting the indicator during no indication, the indicator will appear for 2 seconds, then disappear.
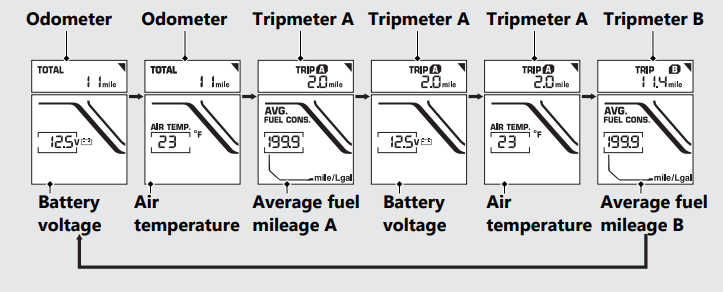
Odometer
Total distance ridden. When “------” is displayed, go to your dealer for service.
Tripmeter A/B
Distance ridden since tripmeter was reset. To reset the tripmeter, press and hold SET button while tripmeter displayed. When the tripmeter is reset, the average fuel mileage is also reset.
Air temperature gauge
Shows ambient temperature.
Display range: 14 to 122°F (−10 to 50°C)
● Below 14°F (−10°C): “---” is displayed
● Above 122°F (50°C): 122°F (50°C) flashes  comes on when air temperature is below 38°F (3°C), and goes off when air temperature reaches 41°F (5°C) after comes on.
Battery voltage
Current battery voltage.
Average fuel mileage A/B
Displays the average fuel mileage since the selected tripmeter was reset. The average fuel mileage will be calculated based on value displayed on the tripmeter (A or B) selected. When each tripmeter is reset, each average fuel mileage will also reset. Display range: 0.0 to 199.9 mile/gal (km/L) Less than 0.1 mile/gal (km/L): “0.0” is displayed More than 199.9 mile/gal (km/L): “199.9” is displayed
● When the tripmeter A or B is reset: “---.-” is displayed. When “---.-” is displayed except for the above-mentioned cases, go to your dealer for service
Switching the Display
The SEL button switches between the odometer, tripmeter A, and tripmeter B.
Also SEL button switches between the battery voltage meter, air temperature gauge, and average fuel mileage.
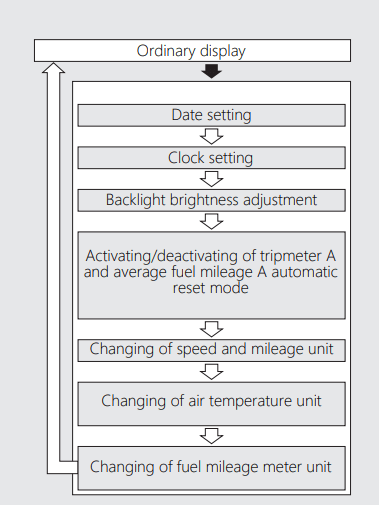
Display Setting
The following items change sequentially:
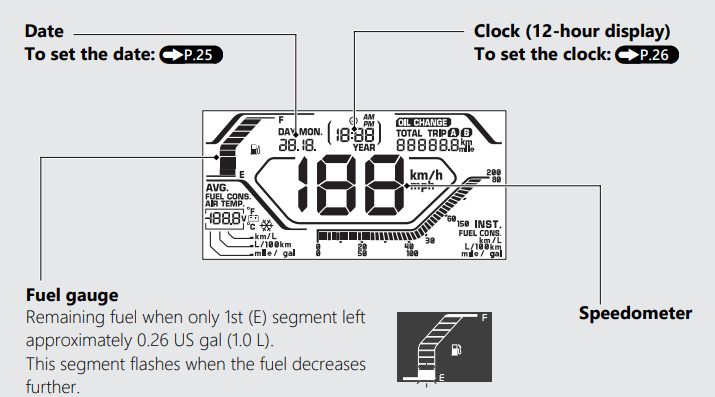
● Date setting
● Clock setting
● Backlight brightness adjustment
● Activating/deactivating of tripmeter A and average fuel mileage A automatic reset mode
● Changing of speed and mileage unit
● Changing of air temperature unit
● Changing of fuel mileage meter unit To return to the ordinary display:
● Wait 30 seconds
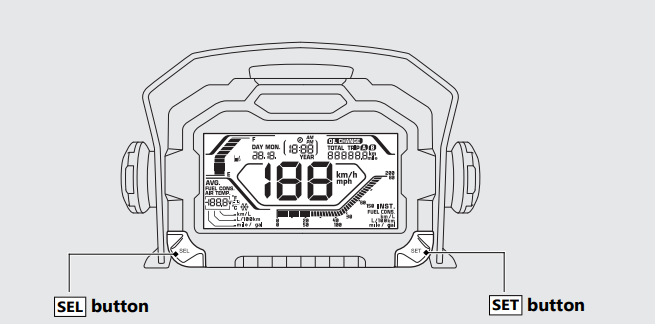
● Turn the ignition switch to the OFF position and then to the ON position To complete the setting for date and clock, it is necessary to finalize the minute in the clock setting or turn the ignition switch to the OFF position. Press and hold SEL button and SET button
Press SET button
1 Date setting:
Turn the ignition switch to the ON position.
Press and hold the SEL button and SET button, the year digits start flashing.
Press the SEL button until the desired year is displayed.

Press the SET button. The month digits start flashing.
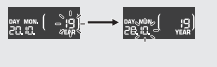
Press the SEL button until the desired month is displayed.

Press the SET button. The day digits start flashing.

Press the SEL button until the desired day is displayed.

Press the SET button. The date is set, and the display moves to the clock setting.
2 Clock setting:
Press the SEL button until the desired hour is displayed.

Press the SET button. The minute digits start flashing.
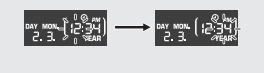
Press the SEL button until the desired minute is displayed.

Press the SET button. The clock is set, and the display moves to the backlight brightness adjustment.
3:Backlight brightness adjustment:
You can adjust the brightness to one of five levels.
Press the SEL button. The brightness is switched.
Press the SET button. The brightness level is set, and the display moves to the activating/ deactivating of tripmeter A and average fuel mileage A automatic reset mode.
4 To activate/deactivate tripmeter A and average fuel mileage A automatic reset mode:
You can activate or deactivate the automatic reset mode. Tripmeter A and average fuel mileage A are reset when the vehicle is refueled after the 1st (E) segment of the fuel gauge starts flashing. This is set to active by default.
Press the SEL button to select “ON ” (activate) or “OFF ” (deactivate) in the automatic reset mode.

Press SET button. The activation/ deactivation of automatic reset mode is set, and then the display moves to changing of speed and mileage unit..
5 Changing of speed and mileage unit:
Press SET switch, the speed and mileage unit start flashing fast.
Press SEL switch to select either “km/h” and “km” or “mph” and “mile”.
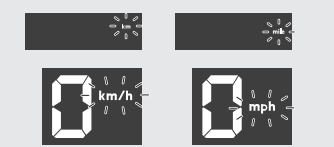
Press SET switch. The speed and mileage unit is set, and then the display moves to the changing of air temperature unit.
6 Changing of air temperature unit:
Press SET switch, the temperature unit starts flashing fast.
Press SEL switch to select “°C” and “°F”.
Press SET switch. The air temperature unit is set, and then the display moves to the changing of fuel mileage meter unit.
7 Changing of fuel mileage meter unit:
Press SET switch, the fuel mileage meter unit starts flashing fast.
When the speed and mileage unit is selecting the “km/h” and “km”. Press SEL switch to select “km/L” or “L/100km”.
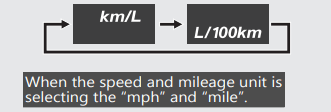
When the speed and mileage unit is selecting the “mph” and “mile”. The fuel mileage is indicated by “mile/gal”.
To end the selection, press SET switch.
The established setting can also be set by turning the ignition switch to the OFF position. The display will return to the ordinary display if the switch is not pressed for about 30 seconds. Even in this case, the setting is maintained.
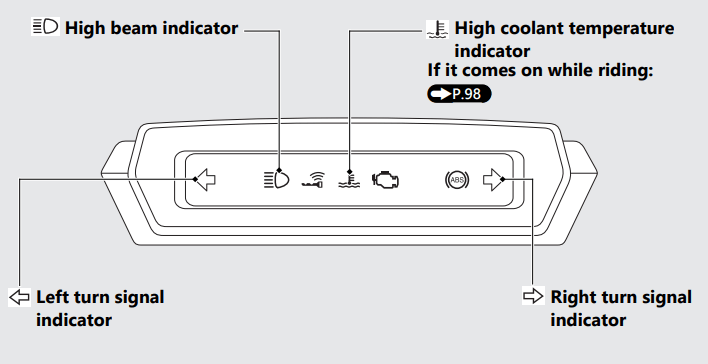
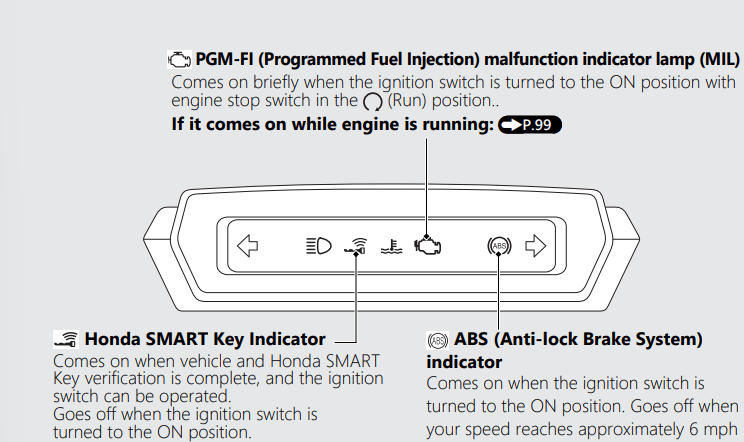
Indicators
If one of these indicators does not come on when it should, have your dealer check for problems.
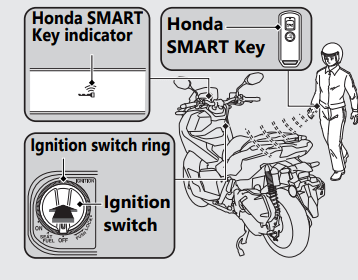
Switches

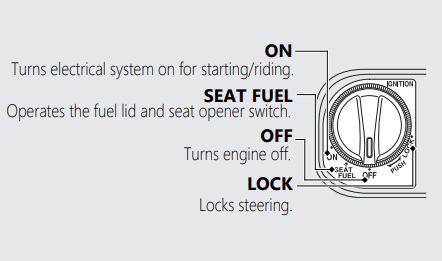
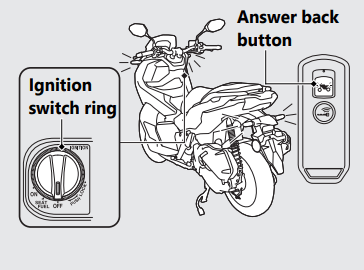
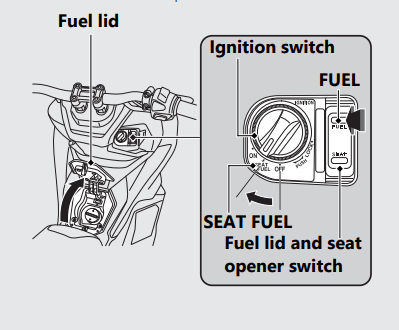
Ignition switch
Switches the electrical system on/off, locks the steering, and operates the fuel lid and seat opener switch
Steering Lock
Lock the steering when parking to help prevent theft. A U-shaped wheel lock or similar device is also recommended.
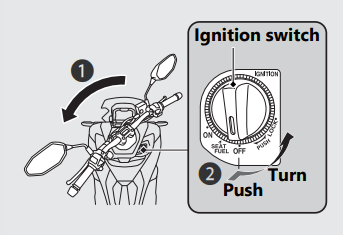
Locking
Turn the handlebar all the way to the left or right.
Push the ignition switch down, and turn it to the LOCK position.
Lock the ignition switch.
Unlocking
Push the ignition switch in, and turn it to the OFF position.
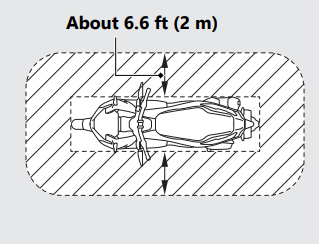
Operating Range
The operating range varies when the ignition switch is locked or unlocked.
The Honda SMART Key system uses lowintensity radio waves. Therefore, the operating range may be wider or narrower, or the Honda SMART Key system may not work properly in the following situations:
● When the Honda SMART Key battery is depleted.
● When there are facilities nearby that generate strong radio waves or noise, such as TV towers, power stations, radio stations, or airports.
● When you carry the Honda SMART Key with a laptop or wireless communication device such as a radio or mobile phone.
● When the Honda SMART Key comes into contact with or is covered by metal objects.
When the ignition switch is unlocked:
The system can be operated within the shaded area shown in the illustration.
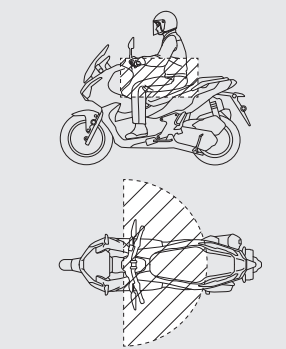
When the ignition switch is locked:
The system can be operated within the shaded area shown in the illustration
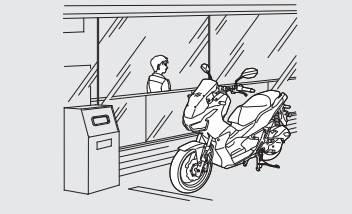
Anyone can unlock the ignition switch and start the engine if your Honda SMART Key is within operating range of your vehicle, even if you are on the other side of a wall or window. If you are away from your vehicle but your Honda SMART Key is still within operating range, deactivate the Honda SMART Key system
Anyone in possession of the Honda SMART Key can perform the following operations if the Honda SMART Key is within operating range:
● Starting the engine
● Unlocking the ignition switch
● Releasing the seat lock
● Opening the fuel lid
● Unlocking the steering lock
You should always keep the Honda SMART Key on your person after you get on and off the vehicle or while riding. Do not place the Honda SMART Key in the center compartment or front box.
If the ignition switch is in the ON position, the vehicle can be operated even by a person who does not have a verified Honda SMART Key. Whenever you leave your vehicle, lock the steering and lock the ignition switch.
Make sure the ignition switch ring goes off and all turn signals flash once at this time.
To Unlock the Ignition Switch
1 Make sure that the Honda SMART Key is activated
2 To authenticate the Honda SMART Key system, push the ignition switch.
3 Turn the ignition switch to the ON position while the Honda SMART Key indicator comes on.
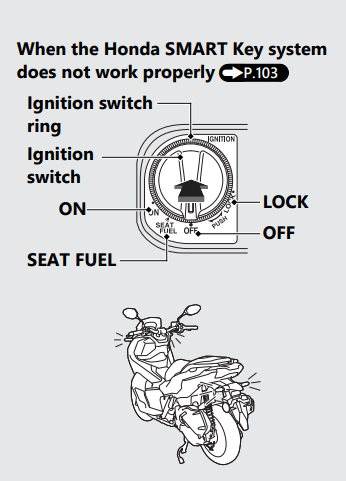
When the Honda SMART Key system does not work properly
If someone without the Honda SMART Key tries to turn the ignition switch, the ignition switch rotates freely. If you notice the ignition switch is in a different position, turn the ignition switch to the original position (OFF or LOCK).
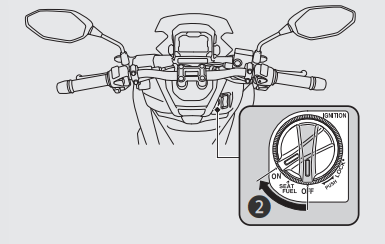
To Lock the Ignition Switch
1 Turn the ignition switch to the SEAT FUEL, OFF or LOCK position.
2 Lock the ignition switch by doing one of the following:
● Leave the operating range with the Honda SMART Key.
● Push the ignition switch.
● Wait for approximately 20 seconds after turning the ignition switch from ON to SEAT FUEL, OFF or LOCK.
● Switch the Honda SMART Key system to inactive.
3 Make sure that the Honda SMART Key indicator and ignition switch ring go off, the turn signals flash once. This indicates that the ignition switch is locked.
Answer Back System
The answer back system is a device to find the location of your vehicle. When the immobilizer is active and you press the ANSWER BACK button on the Honda SMART Key with the ignition switch in the OFF or LOCK position, the turn signals light, and the ignition switch ring lights, informing you of your vehicle's location. The ignition switch ring will light for about 1 minute. The answer back system uses low-intensity radio waves. It may affect medical equipment such as a cardiac pacemaker.
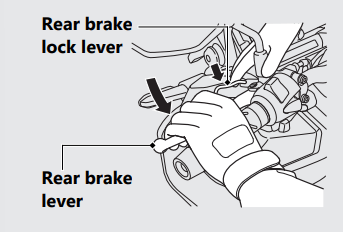
Rear Brake Lock
Be sure the rear brake lock is applied while starting and warming up the engine
Locking
Squeeze the rear brake lever and set the rear brake lock lever.
Unlocking
Squeeze the rear brake lever.

Start your engine using the following procedure, regardless of whether the engine is cold or warm.
This vehicle is equipped with a side stand ignition cut-off system
This vehicle is equipped with a Honda SMART Key system. Always keep Honda SMART Key on you when you ride the vehicle.
If the engine of this vehicle is stopped while the ignition switch is in the ON position, authentication will be disabled after a certain amount of time or if you leave the authentication range. Restart the engine by performing step 3 - 5 under the starting procedure.
NOTICE: If the engine does not start within 5 seconds, turn the ignition switch to the OFF position and wait 10 seconds before trying to start the engine again to recover battery voltage. Extended fast idling and revving the engine can damage the engine and the exhaust system. The engine will not start if the throttle is fully open. If the vehicle is over-turned, you must first turn the ignition switch to the OFF position and then inspect the vehicle carefully.
1. Place the vehicle on its center stand.
2. Turn the ignition switch to the ON position
3. Make sure the engine stop switch is in the  (Run) position.
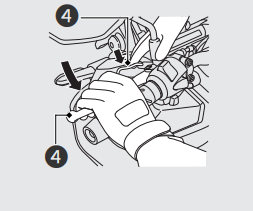
4. Lock the rear wheel by squeezing the rear brake lever and setting the rear brake lock lever.
5. With the throttle completely closed, press the start button
If you cannot start the engine:
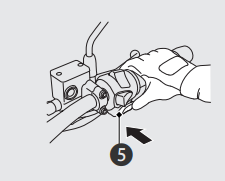
1. Place the vehicle on its center stand and squeeze the rear brake lever.
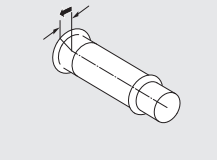
2. Open the throttle slightly (about 0.1 in (3 mm), without freeplay), press the start button.
About 0.1 in (3 mm), without freeplay
If the engine does not start:
1. Open the throttle fully and press the start button for 5 seconds.
2. Repeat the normal starting procedure.
3. If the engine starts, open the throttle slightly if idling is unstable.
4. If the engine does not start, wait 10 seconds before trying steps 1 & 2 again.
Starting the Vehicle
1 Push the vehicle forward off the center stand.
Make sure the side stand and center stand are up.
2 Get on the vehicle.
3 Release the rear brake lock.
4 Acceleration and deceleration
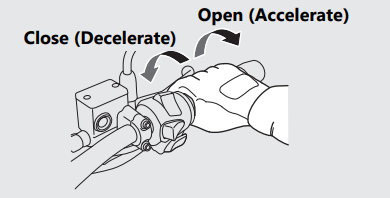
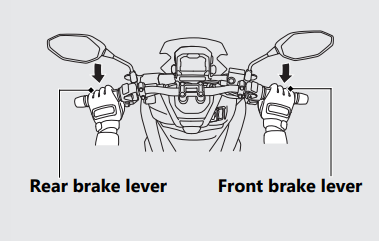
Braking
Close the throttle and apply the front and rear brake levers together.
Do not apply the brake lock while riding. It may cause the wheel to lock, reducing control of the vehicle.
Opening the Fuel Fill Cap
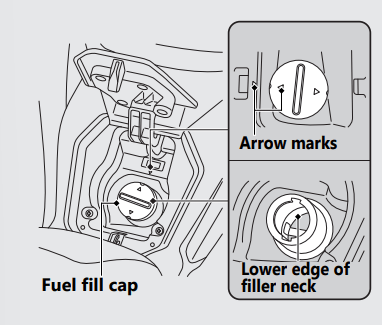
Closing the Fuel Fill Cap
Storage Equipment
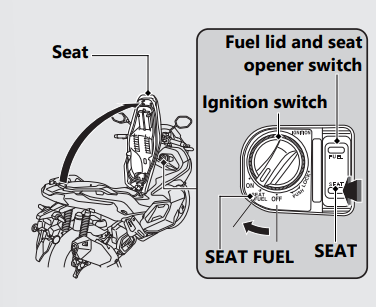
Seat Open
1 Turn the handlebar pointed straight ahead
2 Turn the ignition switch to the position of SEAT FUEL.
3 Push the SEAT side of the fuel lid and seat opener switch.
4 Open the seat.
Seat Close
Close and push down on the rear of the seat until it locks. Make sure that the seat is locked securely by pulling it up lightly. Take care not to lock your key in the compartment under the seat
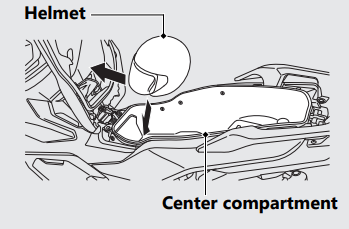
Helmet Holder

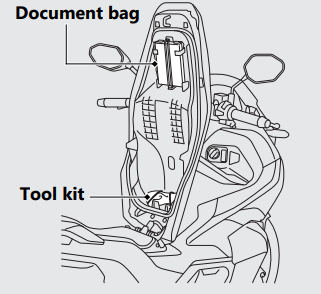
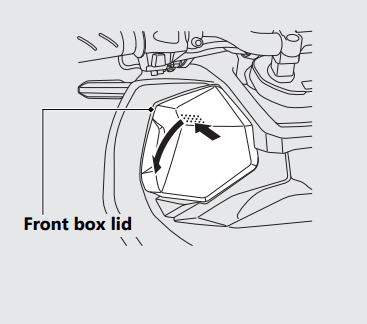
Front Box
# Open
Push the front box lid, then open the front box lid.
# Close
Close the front box lid by pressing the front box lid.
The maximum allowable load in the front box shall be no more than 2.0 lb (1.0 kg) Make sure that the front box lid is closed securely.
Importance of Maintenance
Keeping your vehicle well-maintained is absolutely essential to your safety and to protect your investment, obtain maximum performance, avoid breakdowns, and reduce air pollution. Maintenance is the owner's responsibility. Be sure to inspect your vehicle before each ride and perform the periodic checks specified in the Maintenance Schedule
Maintenance Safety
Always read the maintenance instructions before you begin each task and make sure that you have the tools, parts, and skills required. We cannot warn you of every conceivable hazard that can arise in performing maintenance. Only you can decide whether or not you should perform a given task.
Follow these guidelines when performing maintenance.
● Stop the engine and turn the ignition switch to the OFF position.
● Place your vehicle on a firm, level surface using the side stand, center stand or a maintenance stand to provide support.
● Allow the engine, muffler, brakes, and other high-temperature parts to cool before servicing as you can get burned.
● Run the engine only when instructed, and do so in a well-ventilated area
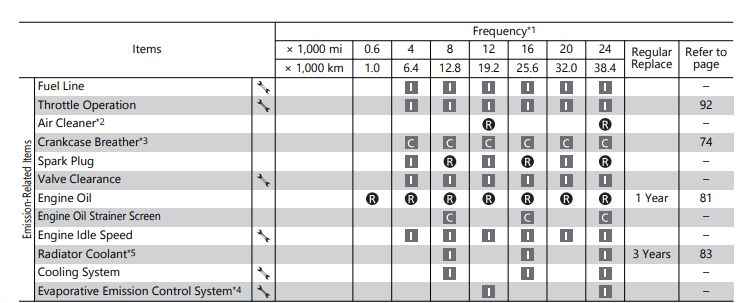
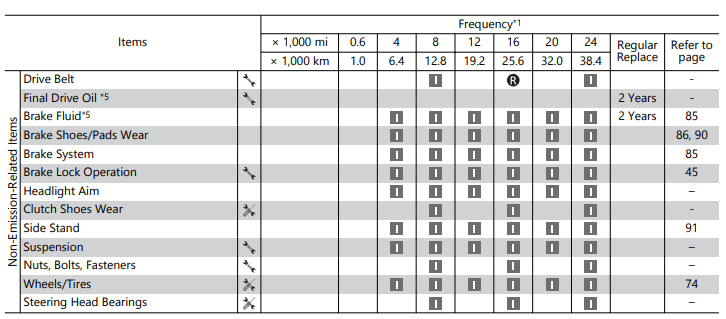
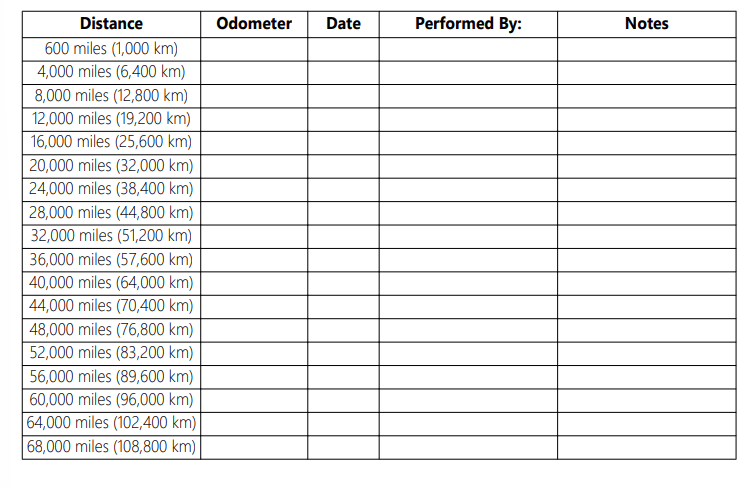
Maintenance Schedule
The maintenance schedule specifies the maintenance requirements necessary to ensure safe, dependable performance, and proper emission control.
Maintenance work should be performed in accordance with Honda's standards and specifications by properly trained and equipped technicians. Your dealer meets all of these requirements. All scheduled maintenance is considered a normal owner operating cost and will be charged to you by your dealer. Keeping an accurate maintenance record will help ensure your vehicle is properly maintained.
Make sure whoever performs the scheduled maintenance completes the maintenance record. Retain all service documents. If you sell your vehicle, these service documents should be transferred with the vehicle to the new owner.
Maintenance Level
 Maintenance Legend : Intermediate. We recommend service by your dealer, unless you have the necessary tools and are mechanically skilled.
 Technical. In the interest of safety, have your vehicle serviced by your dealer.
Maintenance Legend
 Inspect (clean, adjust, lubricate,
 replace, if necessary) Replace
 Clean
Clean
Notes:
*1 : At higher odometer reading, repeat at the frequency interval established here.
*2 : Service more frequently when riding in unusually wet or dusty areas.
*3 : Service more frequently when riding in rain or at full throttle.
*4 : 50 STATE (meets California).
*5: Replacement requires mechanical skill.
Maintenance Record
Maintenance Fundamentals
You should also perform other periodic maintenance checks at least once a month regardless of how often you ride, or more often if you ride frequently.
Other Warning Indications
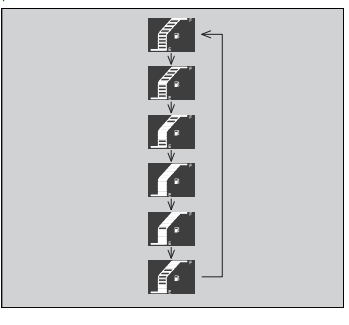
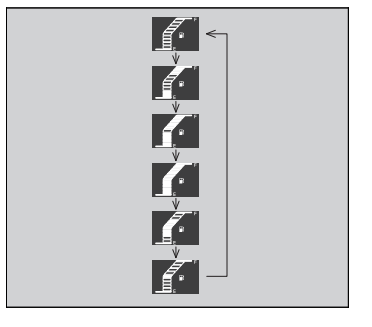
Fuel Gauge Failure Indication
If the fuel system has an error, the fuel gauge indicators will be displayed as shown in the illustrations.
If this occurs, see your dealer as soon as possible.
When the Honda SMART Key System Does Not Operate Properly
When the Honda SMART Key system does not work properly, perform the following.
● Check that the Honda SMART Key system is activated. Lightly push the ON/OFF button on the Honda SMART Key. If the LED of the Honda SMART Key is red, switch the Honda SMART Key system to activation. 2 P. 36 If the LED of the Honda SMART Key does not respond, replace the battery of the Honda SMART Key.
● Check that there is no communication failure in the Honda SMART Key system. The Honda SMART Key system uses lowintensity radio waves. The Honda SMART Key system may not work properly in the following conditions:
When there are facilities nearby that generate strong radio waves or noise such as TV towers, power stations, radio stations, or airports.
When you carry the Honda SMART Key with a laptop or wireless communication device such as a radio or mobile phone.
When the Honda SMART Key comes into contact with or is covered by metal objects.
● Check that a registered Honda SMART Key is used. Use a registered Honda SMART Key. The Honda SMART Key system cannot be activated without a registered Honda SMART Key.
● Make sure that you do not use a broken Honda SMART Key. If you use a broken Honda SMART Key, the Honda SMART Key system cannot be activated. Bring the emergency key and ID tag to your dealer.
● Check the battery condition and battery lead in your vehicle. Check the battery and battery terminals.
If the battery is weak, contact your dealer. If the Honda SMART Key system cannot be activated due to other causes, contact your dealer.
Unlock the Seat in an Emergency
Open
1. Remove the front lid.
2 Align the projection of the emergency key with the slot of the emergency seat opener, and turn the emergency key counterclockwise.
3. Open the seat and turn the emergency key clockwise
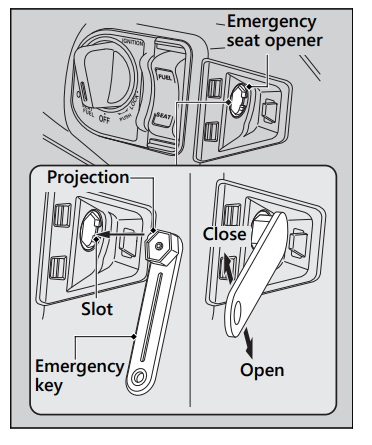
Close
1. Close and push down on the rear of the seat until it locks. Make sure that the seat is locked securely by pulling it up lightly. If the seat is not locked, turn the emergency key clockwise to lock the seat catch.
2. Install the front lid.
Unlock the Ignition Switch in an Emergency
Set up to ID number input mode
1. Use the emergency key to open the seat.
2. Remove the battery cover
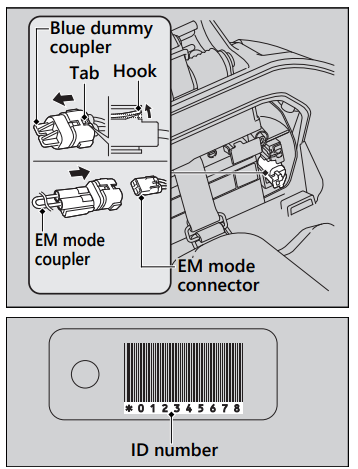
3. Pull out the EM mode connector.
4. Remove the blue dummy coupler by releasing the tab of the EM mode connector while lifting the hook of the blue dummy coupler.
5. Check the ID number on the ID tag
6. Connect the EM mode coupler provided in the tool kit to the EM mode connector.
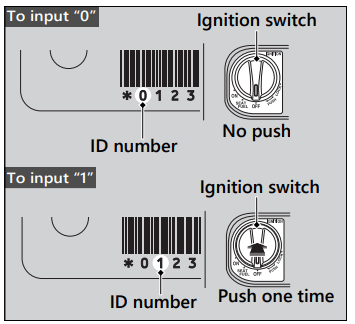
ID number input
You can input your ID number by pressing the ignition switch when the ignition switch is OFF, LOCK and SEAT FUEL position. Input the ID number on the ID tag in order from the left in turn by pressing the ignition switch. The ID number is authenticated according to the number of times the ignition switch is pushed. Push the ignition switch the desired number of times within 5 seconds when the ignition switch ring comes on. After 5 seconds, the ignition switch ring goes off and comes on again. This means that the inputted number is fixed, and you can input the next number.
Tire Puncture
Repairing a puncture or removing a wheel requires special tools and technical expertise. We recommend you have this type of service performed by your dealer. After an emergency repair, always have the tire inspected/replaced by your dealer.
Emergency Repair Using a Tire Repair Kit
If your tire has a minor puncture, you can make an emergency repair using a tubeless tire repair kit. Follow the instructions provided with the emergency tire repair kit. Riding your vehicle with a temporary tire repair is very risky. Do not exceed 30 mph (50 km/h). Have the tire replaced by your dealer as soon as possible.
Electrical Trouble
Battery Goes Dead
Charge the battery using a motorcycle battery charger. Remove the battery from the vehicle before charging. Do not use an automobile-type battery charger, as these can overheat a motorcycle battery and cause permanent damage. If the battery does not recover after recharging, contact your deale
Burned-out Light Bulb
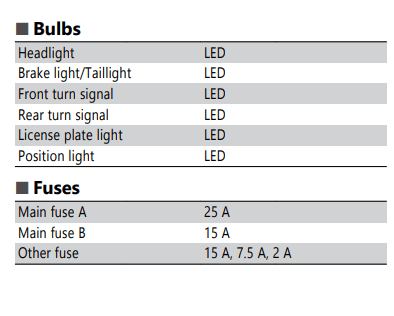
All light bulbs on the vehicle are LEDs. If there is an LED which is not turned on, see your dealer for servicing.
Blown Fuse
Fuse Box Fuses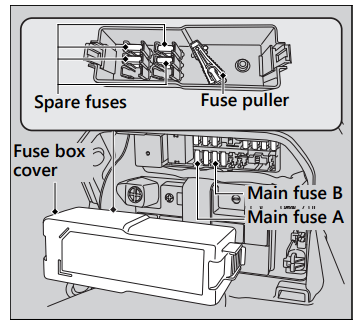
1. Remove the battery cover.
2 Open the fuse box cover.
3. Pull the main fuse and other fuses out one by one with the fuse puller located inside of the fuse box cover. Check for a blown fuse. Always replace a blown fuse with a spare fuse of the same rating.
4. Install the fuse box cover.
5. Install the battery cover
Unstable Engine Operation Occurs Intermittently
If the fuel pump filter is clogged, unstable engine operation will occur intermittently while riding. Even if this symptom occurs, you can continue to ride your vehicle. If unstable engine operation occurs even if sufficient fuel is available, have your vehicle inspected by your dealer as soon as possible