
www.philips.com/support
For support call 0800 331 60 15
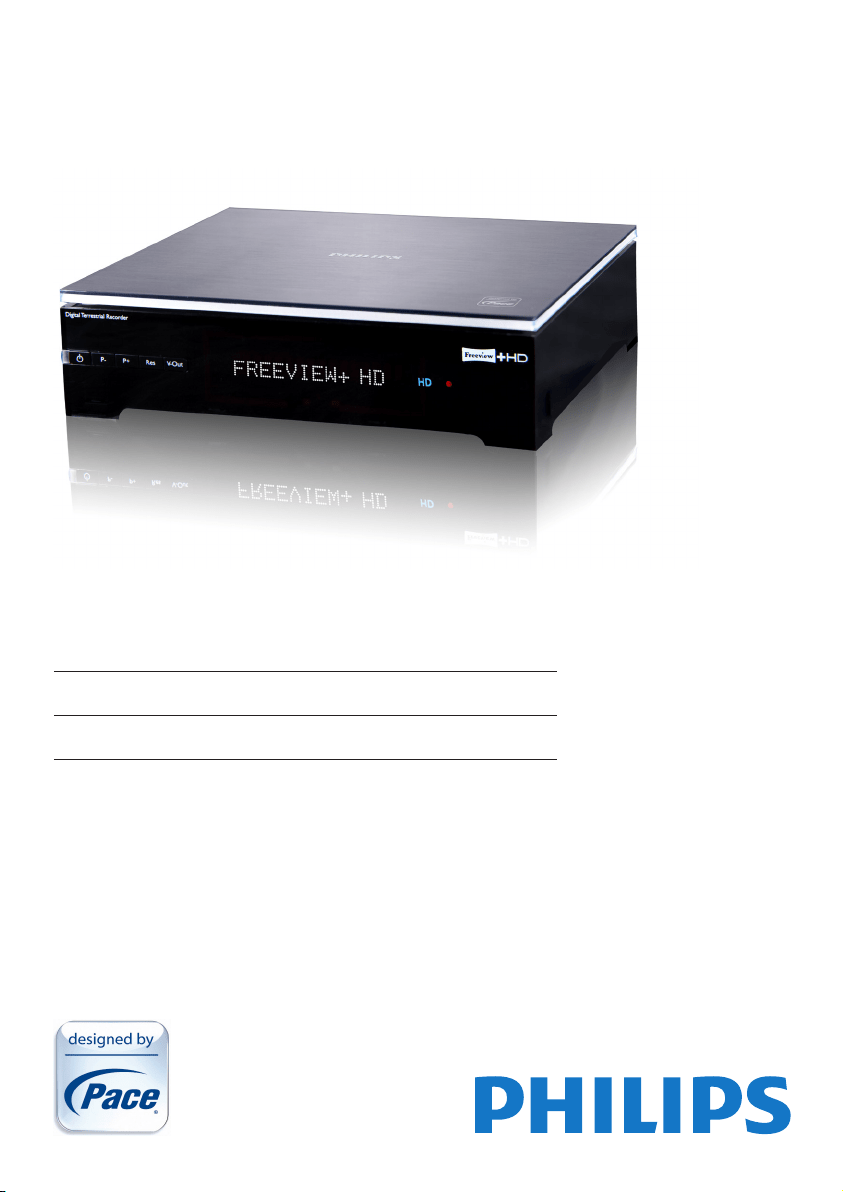
EN High-DenitionDigitalTerrestrialRecorder
HDT 8520

2

3
ENGLISH
Table of contents
1 Important 4
1.1 Safetyinformation 5
1.2 Reducingpowerconsumption 7
2 Your HD recorder 8
2.1 What’sinthebox? 8
2.2 Whatyoualsoneed(notsupplied)? 9
2.3 Overview 9
2.4 Howtoreadthismanual? 10
2.5 Howtousethemenus? 10
3 Getting started 10
3.1 Preparingyourremotecontrol 10
3.2 ConnectingyourHDTV 11
3.3 InstallingyourHDrecorder 11
3.4 Whatifnochannelsarefound? 13
4 Using your HD recorder 14
4.1 Standby/wakeup 14
4.2 Changingchannels 14
4.3 Adjustingvolume 14
4.4 Usingthechannelbanner 14
4.5 Usingchannellists 16
4.6 UsingtheTVguide 16
4.7 UsingtheToolsmenu 17
4.8 PausingliveTV 17
4.9 Recordingprogrammes 18
5 Using more of your
HD recorder 23
5.1 HDrecorder 23
5.2 Remotecontrol 24
5.3 Front-paneldisplaymessages 25
5.4 UsingtheMainmenu 27
6 Maintenance 33
6.1 Cleaning 33
6.2 Replacing 33
6.3 Disposing 33
7 Accessories and connections 34
7.1 Connectingyouraudioequipment 34
7.2 Connectingyour
standard-denitionTV 34
8 Guarantee and service 35
9 Technical data 35
10 Frequently asked questions 37
11 Glossary 40
12 Index 42
Contact information 42
Trademarks and partner logos 43
Important4
1 Important
ThankyouforpurchasingaPhilipsproduct.Taketimetoreadthisusermanualbeforeusingyour
HDrecorder.Itprovidesimportantinformationontheinstallation,operationandsafetyofyourHD
recorder.KeepthismanualnexttoyourHDrecorderforfuturereference.
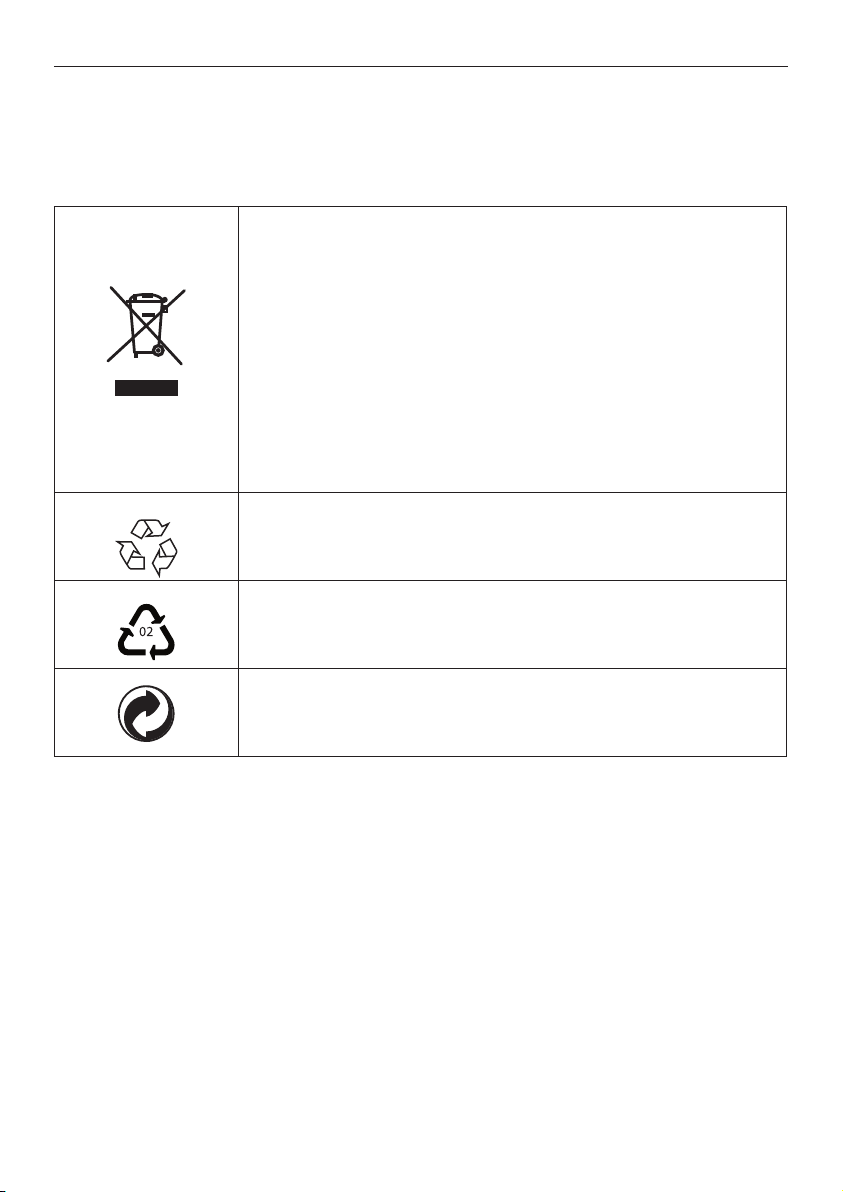
Disposalofyouroldproduct
Yourproductisdesignedandmanufacturedwithhighqualitymaterials
andcomponents,whichcanberecycledandreused.
Whenthis“crossed-outwheeledbin”symbolisattachedtoaproduct
oritspackaging,itmeansthattheproductiscoveredbytheEuropean
Directive2002/96/EC.
Pleaseinformyourselfaboutthelocalseparatecollectionprocessfor
electricalandelectronicproducts.
Pleaseactaccordingtoyourlocalrulesanddonotdisposeofyourold
productswithyournormalhouseholdwaste.Thecorrectdisposalof
youroldproductwillhelppreventpotentialnegativeconsequencesfor
theenvironmentandhumanhealth.
The“Materialrecyclability”symbolafxedonthepackagecardboardand
usermanualmeansthatthesepartsarerecyclable.
Sodonotdisposeofthemwithyournormalhouseholdwaste.
The“Materialrecyclability”symbolafxedonplasticpackagingparts
meansthatthesepartsarerecyclable.
Sodonotdisposeofthemwithyournormalhouseholdwaste.
The“GreenDot”symbolafxedonthecardboardmeansthat
themanufactureroftheproducthasnanciallycontributedtothe
“AvoidanceandRecoveryofPackagingWaste”organization.
5Important
ENGLISH
1.1 Safety information
YourHDrecorderispoweredusinga12Vpowersupplyunit.YourHDrecorderhasbeen
manufacturedtomeettheappropriatesafetystandards,butyoumustfollowthebelowinstructions
tooperateitsafely.Keeptheseinstructionsforfuturereference.
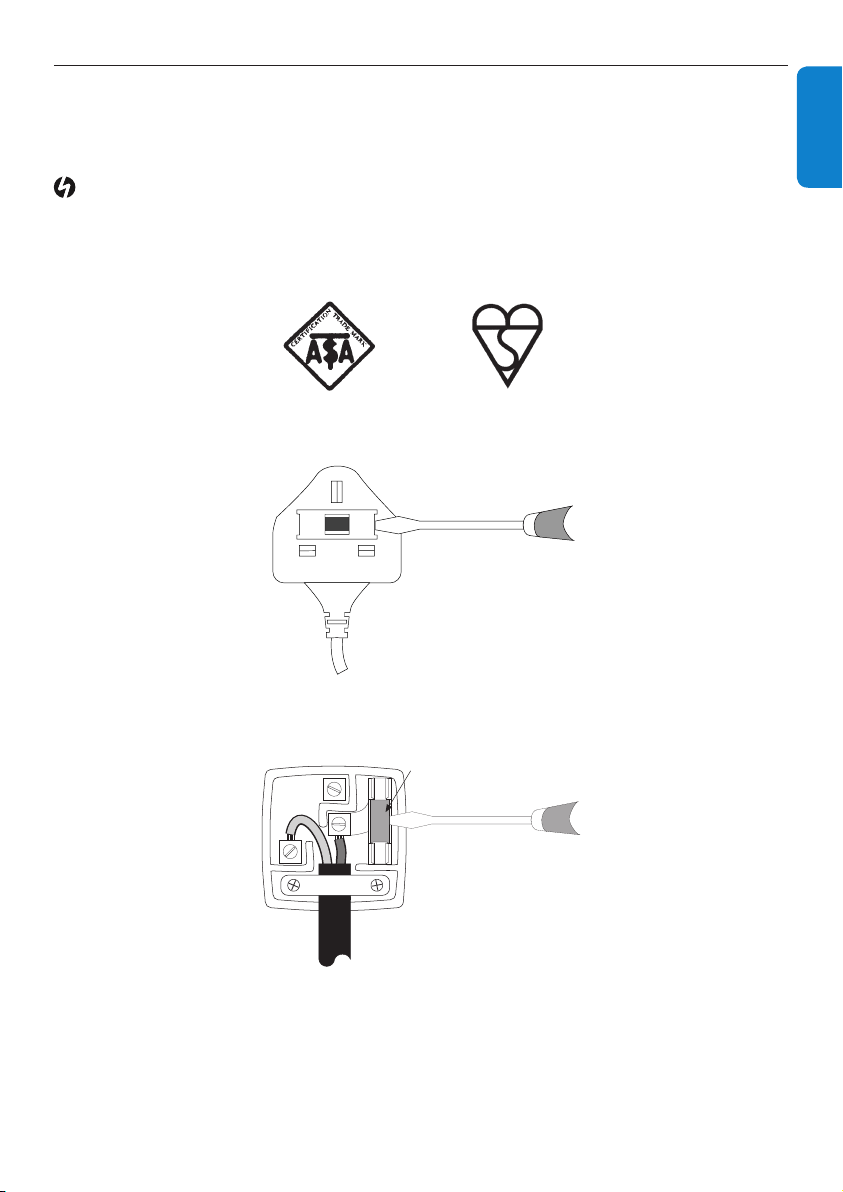
Danger
• YourHDrecorderdoesnotcontainanyuser-serviceableparts.Donotattempttoopenit.All
maintenanceworkmustbecarriedoutbyqualiedservicecentres.
• Thesuppliedmainsplugisanon-rewireabletype.Ifyouneedtoreplacethefuse,youmustusean
ASTA-orBSI-approvedBS1362fuse,ratedat3Aandmarkedasshownbelow.
Theplughasitsfusebeneathafusecoveronitsface.Useascrewdrivertoleveroffthefuse
cover,replacethefusewithanewoneandretitscover.Never use a plug if its fuse cover is
missing.
Thefuseisinsidetherewireableplug.Useascrewdrivertoremovetheplug’sbackcover.Never
put the plug into the mains socket when its cover is removed. Leveroutthefuseandreplaceitwitha
newone.Replacetheplug’sbackcover.
If the supplied mains plug is not suitable for your mains socket-outlet, DO NOT plug
it in. Remove its fuse and then cut the plug off the lead. Destroy the severed plug
immediately to avoid the shock hazard which would exist if this were to be plugged
into a mains socket. Fit an appropriate mains plug on the lead. If this plug contains
a fuse, it should be as described above. If you are using a non-fused plug, an external
fuse must not exceed 5 A.
or
AM
3 AMP
L
N
E
FUSE of correct value

Important6
Warnings
• Beforeconnectingthe12Vpowersupplyunittothemains,checkthatthemainssupplyvoltage
correspondstothevoltageprintedonit.Ifthemainsvoltageisdifferent,consultyourlocaldealer.
• The12Vpowersupplyunithasbeendesignedforindooruseonly.
• Useonlytheoriginal12Vpowersupplyunit.
• Unplugthe12Vpowersupplyunitfromthewallsocketbeforelightningstorms.
• Ensurethatthe12VpowersupplyunitiseasilyaccessibleincaseyouneedtoshutdownyourHD
recorderinanemergency.
• Topreventreorshockhazard,donotexposeyourHDrecordertorainormoisture.
• PlaceyourHDrecorderonarmsurface,anddonotcovertheventilationopeningswithitems
suchasnewspapers,tableclothes,curtains,etc.
• DonotinstallyourHDrecordernearheatsourcessuchasradiators,stovesorotherequipment
thatproduceheat.Protectitfromdirectsunlight.
• InordertoensureafreeowofairaroundyourHDrecorder,allowatleast5cmofspaceabove
andaroundit.ThispreventsoverheatingofyourHDrecorder.
• Donotplaceanycombustibleobjectssuchascandles,etc.,onyourHDrecorder.
• Neverstandobjectslledwithliquids,suchasvases,ontopofyourHDrecorder.Donotplace
anythingonyourHDrecorderthatmightdriporspillintoit.Ifthishappens,disconnectthe
12VpowersupplyunitfromthewallsocketandhaveyourHDrecordercheckedatany
authorizedservicecentre.
• Whiletheharddiskisrunning,donotmovetheproductorturnoffthepowersuddenly.The
companyshallnotbeliableforanycorruptionofdataontheharddiskcausedbythecarelessness
oformisusebyusers.
• Thebatteriesinstalledintheremotecontrolshouldnotbeexposedtoexcessiveheatsuchas
sunshine,reorthelike.
Pleasealsopayattentiontoallthewarningsandcautionslistedthroughoutthismanual.

7Important
ENGLISH
1.2 Reducing power consumption
YourHDrecorderisdesignedtoreduceitsimpactontheenvironmentandcomplieswiththe
EuropeanDirective2009/125/EC.ThisispartofPhilips’ongoingcommitmenttoleadthewayin
environmentalresponsibility.
Ithasastandbymodeofoperationthatneedsverylittlepower.Seethetablebelowandpleasenote
that:
• WhenyourHDrecorderisinthestandbymode,yousaveenergy(andthereforemoney)and
reducecarbondioxideemissionsthatdamagetheenvironment.
• YouusethestandbybuttononyourHDrecorderorremotecontroltoswitchbetweenonand
standbymodes.Inaddition,ifyourHDrecorderison,butyoudonotpressanybuttononitor
yourremotecontrolfor3hours(congurable-see‘Automaticecomode’onpage30),yourHD
recorderwillautomaticallygetintothestandbymode.
• IfyouarenotgoingtouseyourHDrecorderforseveraldays,youcancutitsenergyconsumption
tozerobyunpluggingitfromthemainswallsocket.
• Intheoffandstandbymodes,yourHDrecordercannotreceiveupdatesfromthenetwork.
However,atrecorderwake-up,youwillbepromptedbyamessageifanupdatenoticationhas
beenreceived.
Mode Front-panel standby
indicator and display
Typical power
consumption (W)
Typical annual
energy use (kWh)
Power
adaptor
unplugged
Not lit up 0 0
Standby Standbyindicatoris
red
0.31 W
22.5 *
Active
Standby
Standbyindicatoris
orange
11.5 W
On Achannelnumberis
shownonthedisplay
13.6 W
*
BasedonyourHDrecorderbeingOnfor4hoursdailyandbeinginstandbyfor20hours
.
YourHDrecorder8
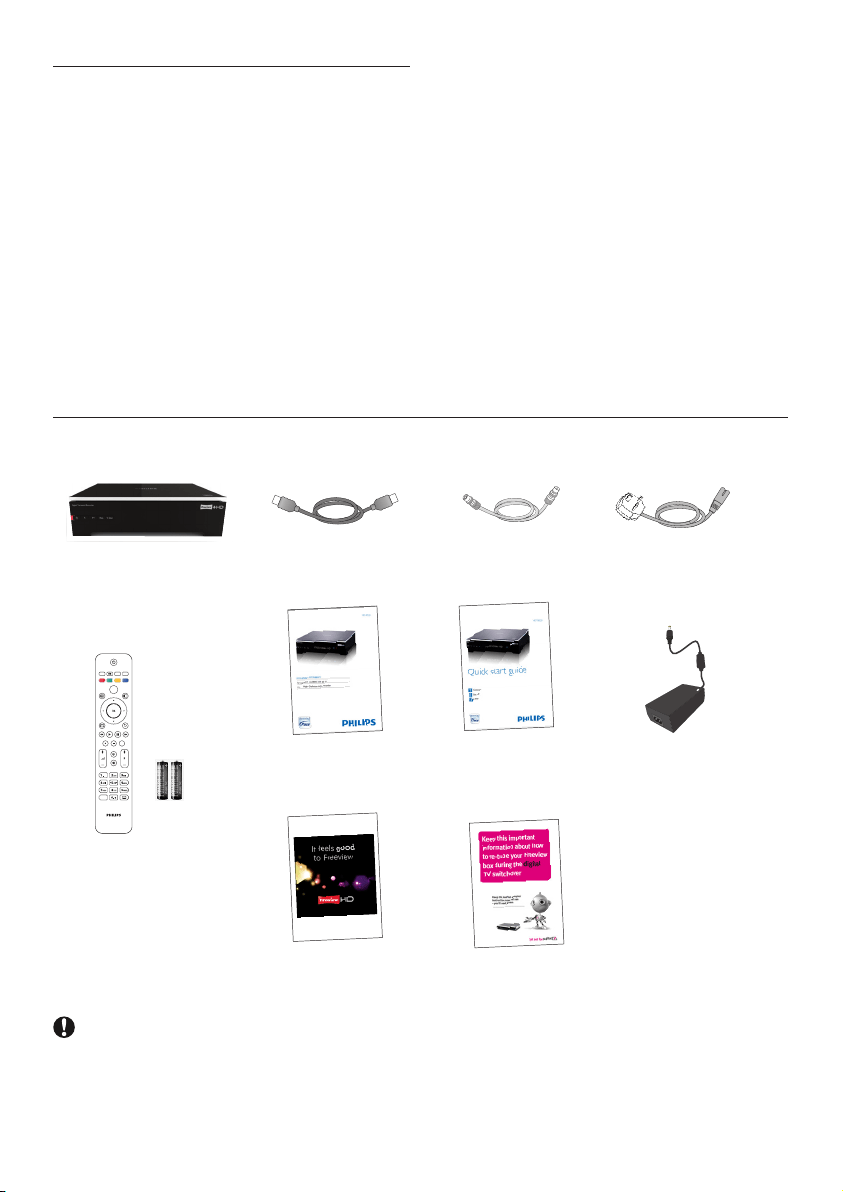
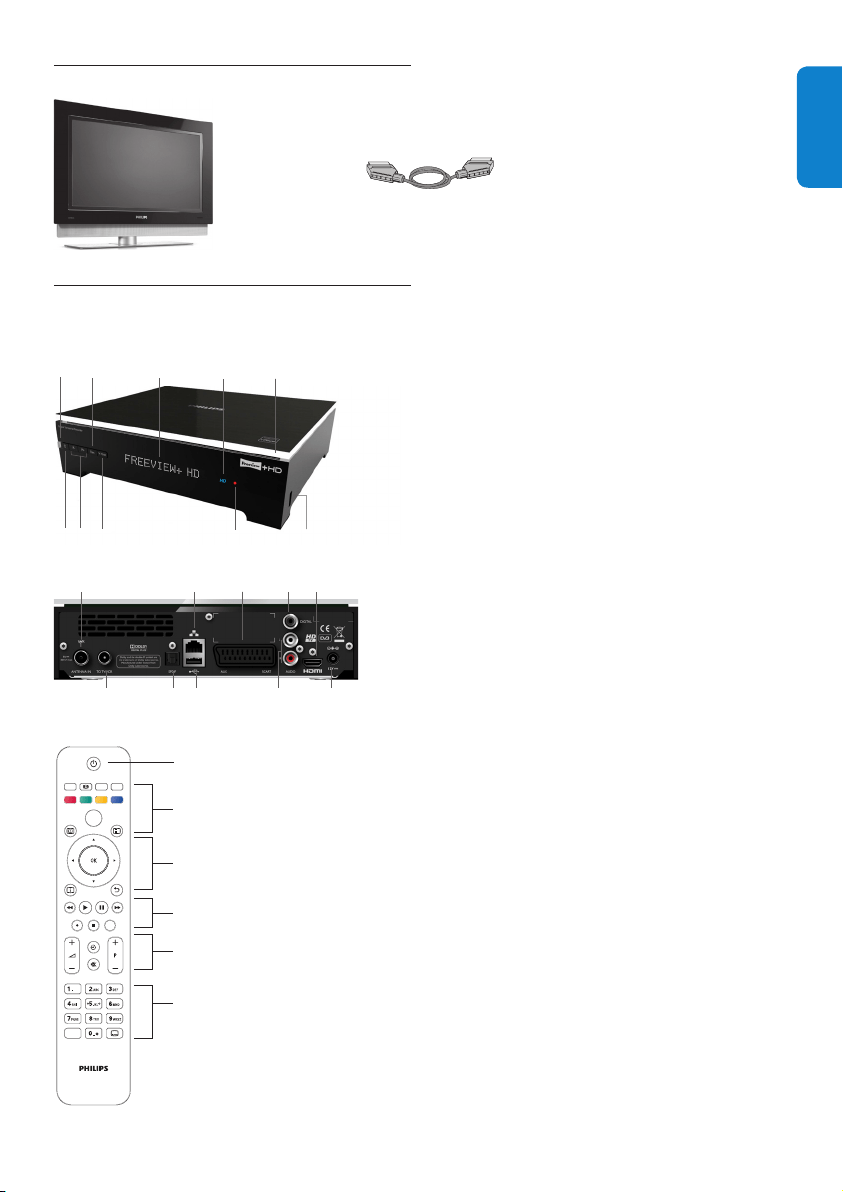
2.1 What’s in the box?
HDrecorder
Usermanual
Quickstart
guide
Mainslead
12Vpower
supplyunit
HDMIcable
RFcable
TEXT RADIO EXIT
GUIDE OPTIONS
BACKINFO
DIGITAL RECORDER
MENU
HDD
LIB
AD
Remotecontrol
and2xAAA
batteries
Retuneyer
Freeviewyer
Caution
Plasticbagscanbedangerous.
Toavoidsuffocation,keepthebagawayfrombabiesandchildren.
2 Your HD recorder
Congratulationsonyourpurchaseandwelcome
to Philips!
TofullybenetfromthesupportthatPhilips
offers,registeryourproductat
www.philips.com/welcome.
WithyourHDrecorder,youwillneverneed
toscheduleyourlifearoundyourfavouriteTV
programmes.Thankstothebuiltinhard-disk
drive(HDD)thatrecordsprogrammesasyou
watchthem,youcanpauseliveTV,orrepeata
sceneyoumissed.
Wanttorecordaprogrammesothatyoucan
watchitlater?Justpresstherecordbutton.
Onceyoubegintorecord,youarefreetowatch
otherrecordedprogrammes.Youcanevenwatch
theprogrammethatyouarerecordingfromthe
startwithoutdisruptingtherecording,orrecord
twochannelsatthesametime.
Needtoschedulearecordinginadvance?
SimplyaccesstheTVGuide,whichliststheTV
programmescheduleforthenextsevendays.
Andyoucandomuchmorethanjustrecordon
thisrecorder.
9YourHDrecorder
ENGLISH
2.2 What you also need (not supplied)?
2.3 Overview
Front panel
5
2 3
8
9
1
6
4
7
10
Rear panel
9
1
2 3 4
5 6 7 8
10
Remote control
TEXT RADIO EXIT
GUIDE OPTIONS
BACKINFO
DIGITAL RECORDER
MENU
HDD
LIB
AD
1
2
6
4
5
3
Front Panel
1 Standbyindicator
2 Standbybutton
3 Programme+/-buttons
4 Resolutionbutton
5 V-Outbutton
6 Display
7 HDindicator
8 Recordindicator
9 USB2.0connector
10 Toplighting
Rear Panel
1 AntennaIN
*
2 AntennaoutputtoTV/VCR(antennasignal)
*
3 OpticalS/PDIFaudioout(digital)
*
4 USB2.0connector
*
5 RJ45Ethernetconnector
*
6 AUXSCARTconnector
*
7 DIGITALaudioout(digital)
*
8 L/Raudioout(analogue)
*
9 HDMI™connector
*
10 12Vpowerconnector
*
*
Safeextralowvoltage
Remote control
1 Standby
2 Text,Pictureformat,Radio,Exit,TVguide,
Menu,Options
3 Up/Down,Left/Right,OK,Info,Back
4 Recorderfunctions
5 Volumecontrol,Mute,Programme+/-
6 Alphanumerickeypad,Audiodescription,
Subtitles
TV
SCARTcable
(requiredonlyifyouhavea
standard-denitionTV)
Gettingstarted10
3 Getting started
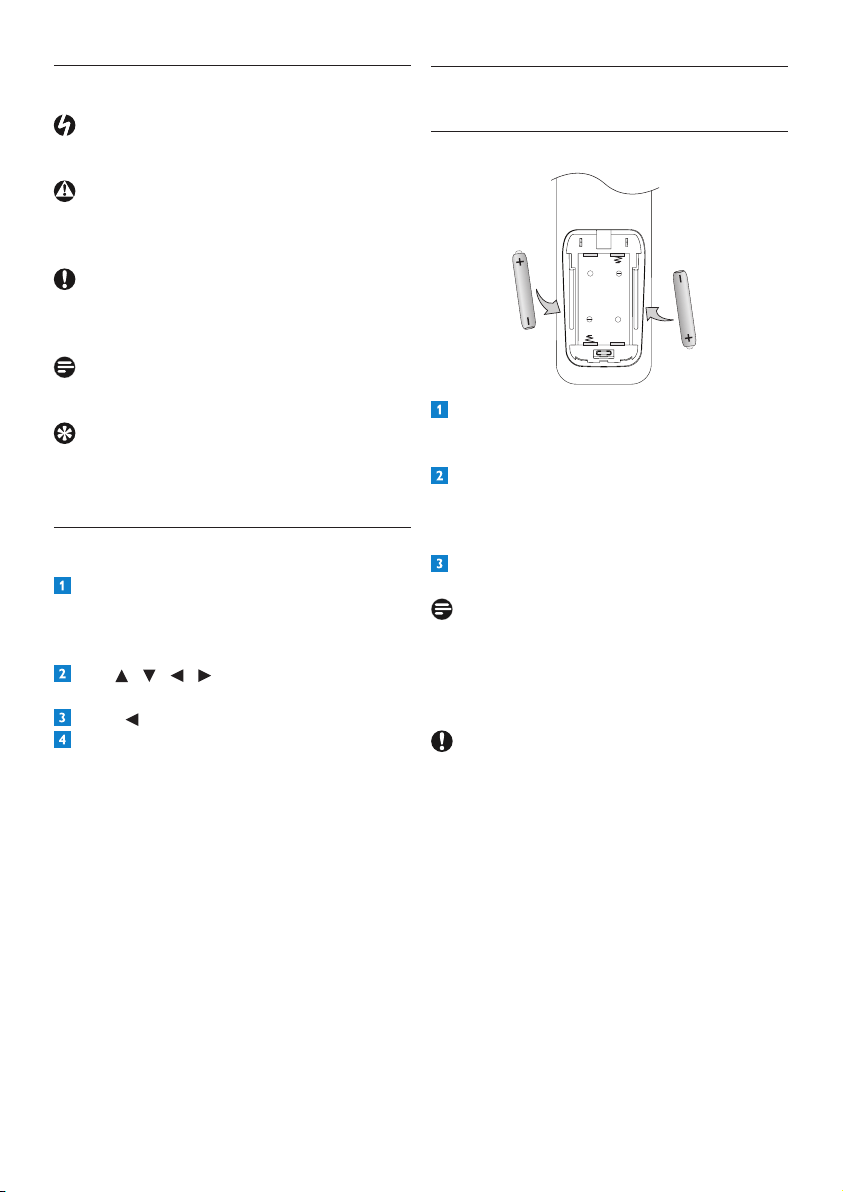
3.1 Preparing your remote control
Removethebatterycoverbygentlypressing
downinthesmallcircleonthecoverand
slidingitdownwards.
InsertthetwoAAAbatteriesasshown.Be
suretomatchthe+and-marksonthe
batteriestotheirrespectivemarksinsidethe
batterycompartment.
Replacethebatterycover.
Note
Forbetterreception,pointyourremotecontrol
directlyatthefrontpanelofyourHDrecorder
whilepressinganybutton.
Caution
Donotleavebatteriesinyourremotecontrolfor
longperiodsoftimewithoutuse.Replaceboth
batteriesatthesametime.Donotdisposeof
usedbatterieswithyourdomesticwaste.Used
batteriesshouldberecycledattheendoftheir
usefullife.Donotdisposeofbatteriesinare.
2.4 How to read this manual?
Danger
Describessituationsofinjuryorlossoflife.
Warning
Describesactionsthatmaycausedamageto
theproduct.
Caution
Describesactionsthatarerequiredtoavoid
dangerousorillegalsituations.
Note
Additionalinformation.
Tip
Informationthatisusefultoknowbut
notessentialtothetask.Forexample,
informationaboutalternativeuse.
2.5 How to use the menus?
Press MENU,GUIDE,OPTIONS or
INFOonyourremotecontroltodisplay
the Mainmenu,TV guide, Toolsmenuor
channelbannerrespectively.
Use / / / tonavigatethroughthe
menusandchangeanysetting.
Press or OKtoconrmyourchoice.
Press EXITtoremovethemenu.
Formoreinformation,seepages14to33.
+
+
11Gettingstarted
ENGLISH
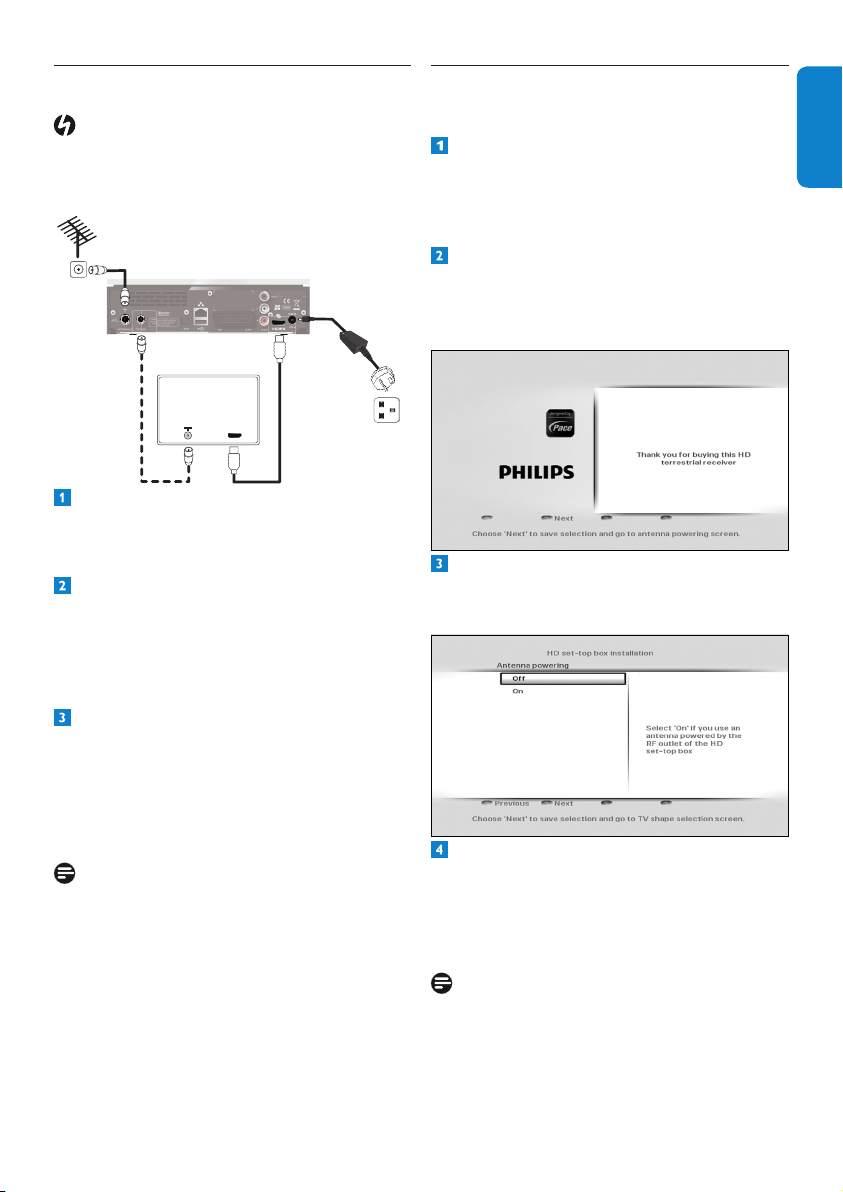
3.2 Connecting your HDTV
Danger
Riskofelectricshock!
Beforemakinganyconnections,ensurethatyour
equipmentisdisconnectedfromthemains.
HD recorder
Aerial wall
socket
1
2
Mains wall
socket
TV
HDMI
Connecttheaerialcable(notsupplied)from
theaerialwallsockettotheAntenna IN
connectorontherearpanelofyourHD
recorder.
UsethesuppliedHDMIcabletoconnectthe
HDMIconnectorontherearpanelofyour
HDrecordertotheHDMIinputconnector
ofyourTV.Forthenextstep,notethe
chosenHDMIinputofyourTV(e.g.‘HDMI
1’).
ConnectyourTVtothemainsandselectthe
correctA/VsourceonyourTV.Thisshould
correspondtotheHDMIinputconnector
towhichyourHDrecorderisconnected.If
necessary,refertoyourTV’susermanualfor
instructions.
Notes
•Optionally,youcanalsousethesupplied
RFcabletoconnecttheRFoutput
connector (labelledTo TV/VCR) of your
HDrecordertotheRFinputconnectorof
yourTV.
•ToconnectyourHDrecordertoyour
standard-denitionTV,seepage34.
3.3 Installing your HD recorder
Beforeyoustartinstallation,makesureyouhave
madealltherequiredconnections.
Insertthetwo-wayconnectoronthe
suppliedmainsleadintothe12Vpower
supplyunit.Connectthe12Vpowersupply
unittothe12Vpowerconnectoronthe
rearpanelofyourHDrecorder.
Connectthemainsplugtothemainswall
socket.
YourHDrecorderdisplaysawelcome
messageafterafewseconds.
Press the greenbuttontostartthe
installation.
TheAntenna poweringmenuappears.
Let the Antenna poweringsettingbeOff
unlessyouuseanindoorantennathatcan
bepoweredbythecoaxialcableconnected
to the Antenna INsocketofyourHD
recorder(seenote).
Note
YourHDrecordercanonlydeliver50mA
currentunder5V,sorefertoyourindoor
antenna’susermanualtocheckifitspower
requirementtsthecapabilityofyourHD
recorder.
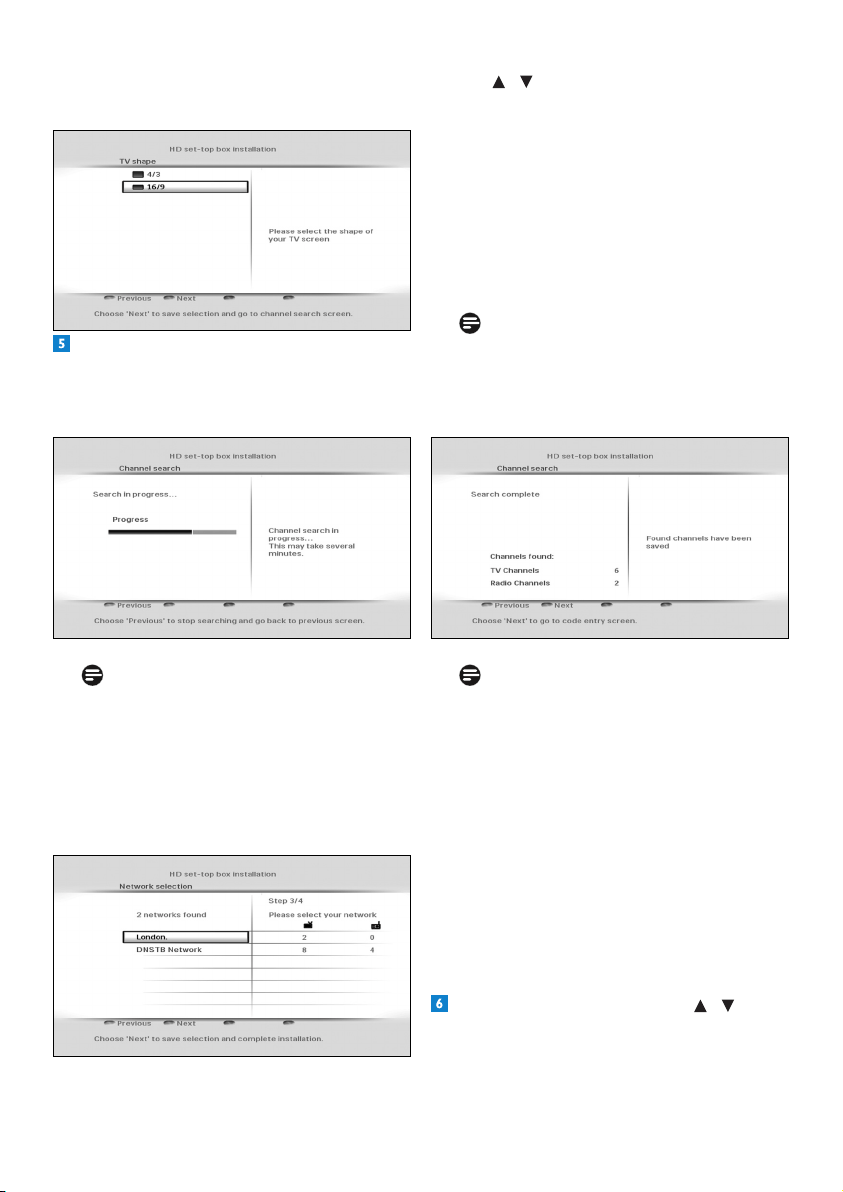
Gettingstarted12
Use / tohighlightthenetworkthatyou
wanttoinstallandpressthegreenbutton.
Aprogressscreendisplaystoconrmthat
thesearchistakingplace.
Whenthesearchiscomplete,ascreendisplays
thenumberofTVandradiochannelsthatyour
HDrecorderhasfound.YourHDrecorder
automaticallysavesthesechannels.Press the
greenbuttontogotothenextstep.
Note
IncaseyourHDrecorderdoesnotndany
channels,seethe‘Whatifnochannelsare
found?’sectiononpage13.
Note
Digitalterrestrialbroadcastingisprogressing
throughouttheUK.Pleasenotethatthe
receptionofdigitalsignalsmayneedtobe
veriedasitcanbeadverselyaffectedby
physicalelements,suchasmountainous
areas,highbuildings,etc.Whenanalogue
broadcastinginyourregionisswitchedoff,
thereshouldbeaqualityimprovementin
digitalbroadcasting.Asdigitalswitchover
happens,thenumberofdigitalchannels
availableineachregionmayalsoincrease.
Pleasevisitthiswebsitetondoutwhenthe
digitalswitchoverisscheduledforyourarea:
www.digitaluk.co.uk
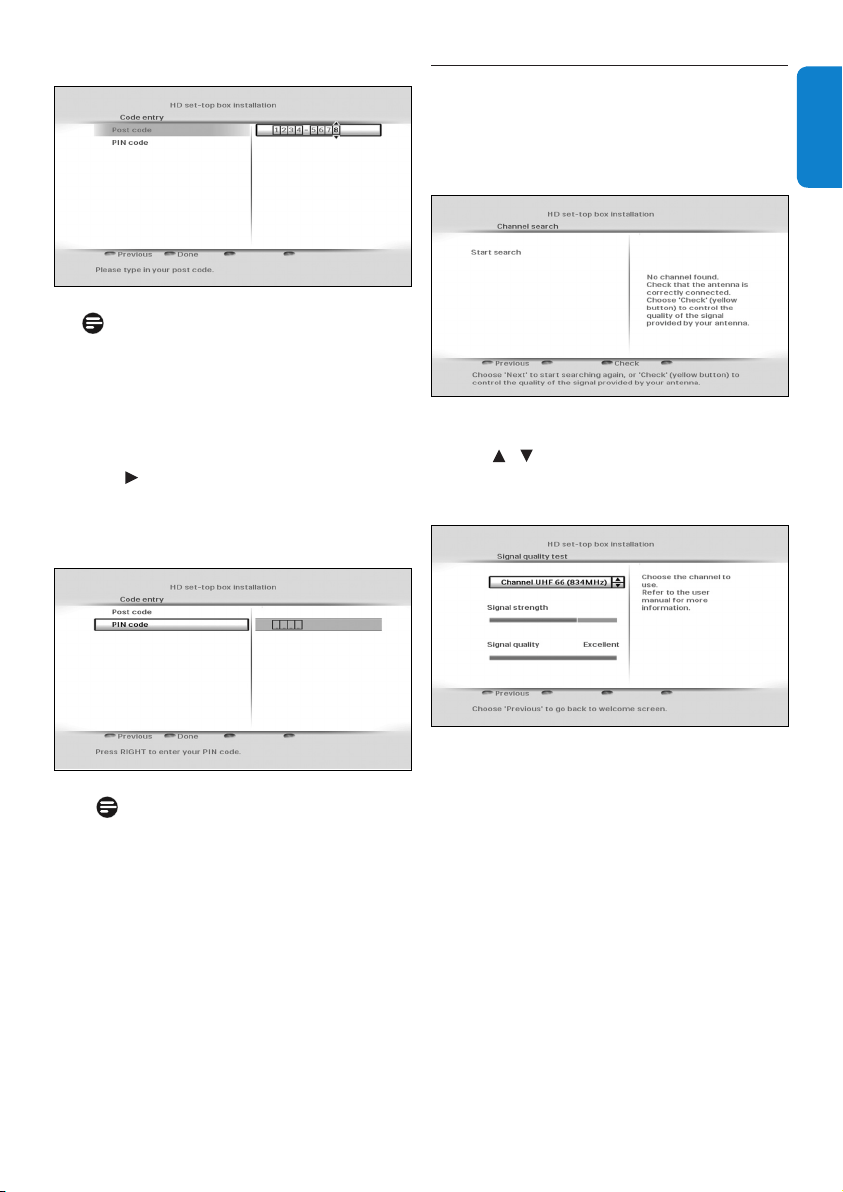
OntheCode entry menu,use / or the
numberbuttonstoenteryourarea’spostal
code,andthenpressOK to highlight PIN
code.
Press the greenbuttontoconrm.
TheTV shapemenuappears.
Let the TV shapesettingbe16:9 if you use
anHDMIconnectiontoyourTV.Press the
greenbuttontoconrmandstartscanning
fortheavailablechannels.
Note
Ifyouareinanareathatreceivessignals
frommorethanonenetworkandpossibly
variantofthesamechannel(e.g.BBC1,
BBC1Scotland),thenyourHDrecorder
willpromptyoutoselectthenetworkand
channelvariantthatyouwantintheAll TV
andAll Radio lists.
13Gettingstarted
ENGLISH
Note
Enteringyourpostalcodeismandatory.
Youwillnotbeabletocompletetherst
installationsetupwithoutenteringyour
postalcode.
TochangethedefaultPINcode(0000),
press andusethenumberbuttonsto
enteryounewPINcode.Youwillthenbe
promptedtore-enteryourPINcodeto
conrm.
Note
YournewPINcodecanbeany4-digit
numberotherthanthedefaultPINcode
(0000).
Press the greenbuttontoconrmyour
choiceandcompletetheinstallation.
YoucannowstartusingyourHDrecorder.
3.4 What if no channels are found?
IncaseyourHDrecorderdoesnotndany
channels,checkyourconnections(seepages
11and34)andpressthered buttontostart
therstinstallationsetupagain.
IfyourHDrecorderisstillnotabletond
anychannels,presstheyellowbutton.
Use / tomanuallycheckthequality
andstrengthofthesignalsreceivedbyyour
antennainvariouschannelfrequencies.
If the Signal strengthbarisgreen,then
yourantennaandHDrecorderareproperly
connected.Ifitisred,thenyouneedtorst
checkyourconnection.IftheSignal quality
barisgreen,thenyoucanbesurethatyou
arereceivingdigitalbroadcastsignals.If
yourreceptionisnotoptimal(fewchannels
or“blocky”image),youmustcheckyour
antennainstallationasitmayneedtobe
realignedorxed.
UsingyourHDrecorder14
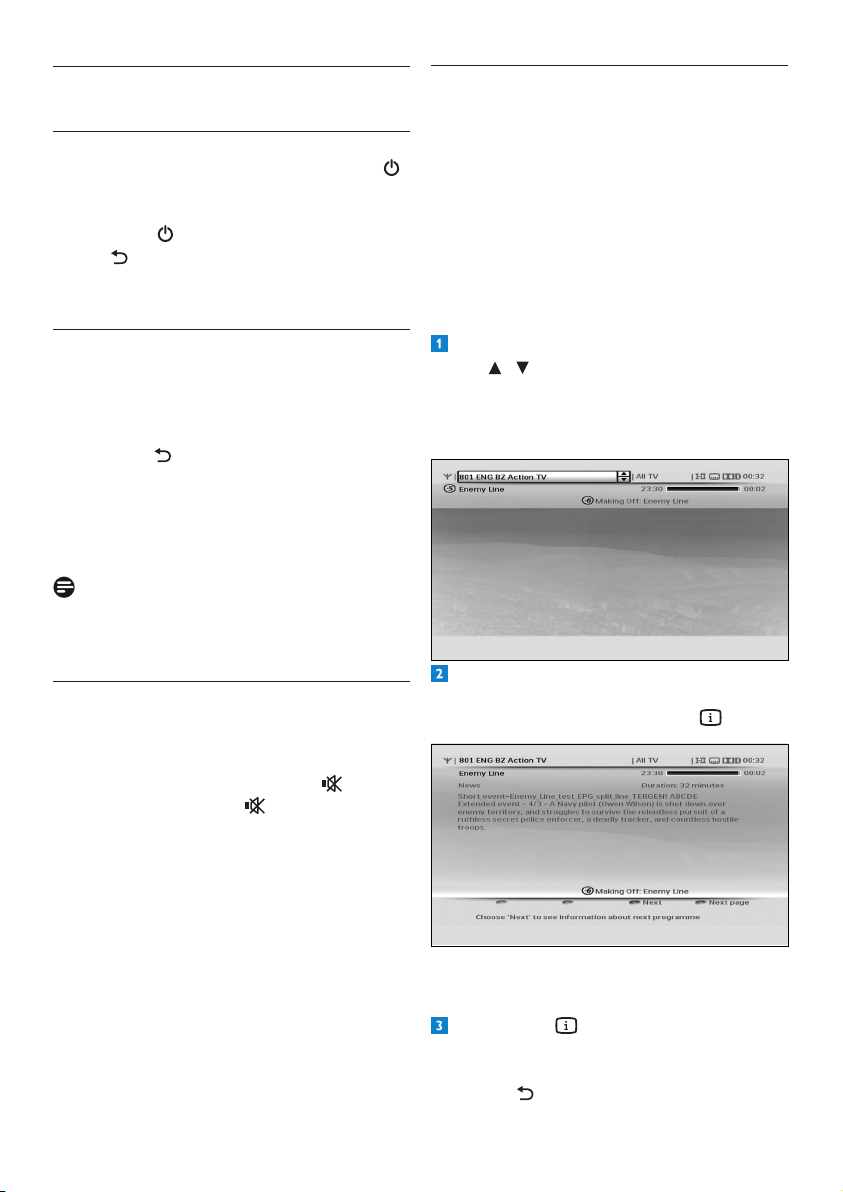
4.4 Using the channel banner
Channel information
Whenyouchangeachannel,thechannelbanner
appearsbrieytoshowinformationaboutthe
currentprogramme.Bydefault,itappearsfor
5seconds.Tosetthelengthoftimethatthe
channelbannerremainson-screen,seepage29.
Changing channel
Tochangethechannel,displaythechannel
bannerbypressingINFO.
Whenthechannelbannerison-screen,
use / to see what programmes are
currentlyshowingonotherchannels.Ifyou
seeaprogrammeyouwanttowatch,
press OK.
Todisplaymoreinformationaboutthe
currentprogrammeonthechannellistedin
thechannelbanner,pressINFO again.
Todisplaywhatprogrammeisonnext(on
thechannellistedinthechannelbanner),
press the yellowbutton.
Press INFO athirdtime,orpressEXIT
toremovethechannelbannerwithout
changingthechannel.Alternatively,press
BACK toreturntothechannelbanner.
4 Using your HD recorder
4.1 Standby/wake up
ToputyourHDrecorderintostandby,press
onyourHDrecorder’sfrontpanelorremote
control.TotakeyourHDrecorderoutof
standby,press again.Youcanalsopress
BACK ,P+/P- or anynumberbuttonon
yourremotecontroltowakeupyourHD
recorder.Seepage7formoreinformation.
4.2 Changing channels
Tochangechannels,usetheP+/P-onyour
remotecontroloryourHDrecorder’sfront
panel.Youcanalsousethenumberbuttonson
yourremotecontrol.
Press BACK toswitchtothelastchannel
youwerewatching.
Youcanalsousetheon-screenchannellistsor
channelbannertochangechannels(seesections
4.4and4.5).
Note
Initially,HDprogrammesareavailableon
channels50and51.Switchtothesechannelsto
watch HD programmes.
4.3 Adjusting volume
Toincreaseordecreasethevolume,press
VOL+/VOL-.Thevolumelevelisshownbriey
onyourTV.
Tomuteorrestorethesound,press .When
youmuteyoursound,the iconisshown
inthetoprightcornerofyourTV.Thisicon
disappearsafterafewseconds.
15UsingyourHDrecorder
ENGLISH
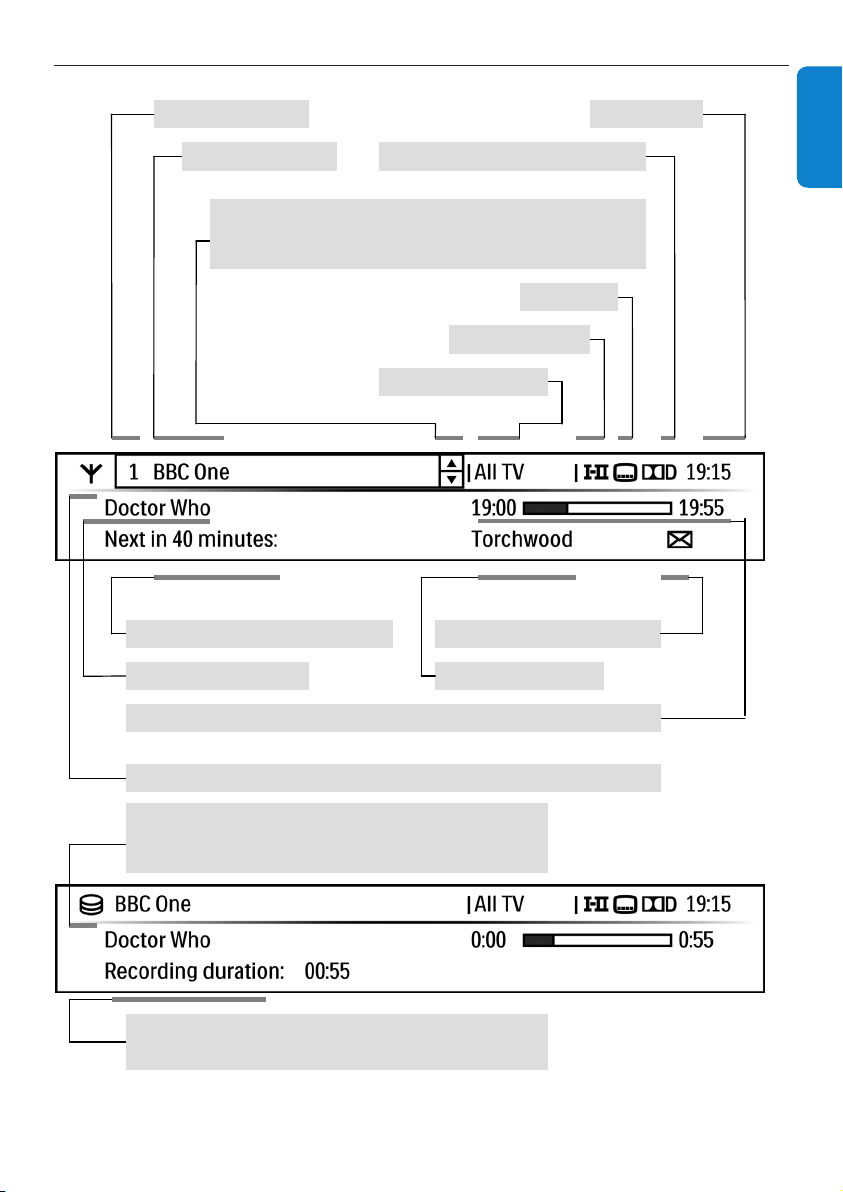
4.4.1 More about the channel banner content
Multi
-
channel digital audio output
Channel number
Channel n
ame
C
urrent time
Subtitle(s)
Audio languages
Select and watch a program among those broadcast now
• Press / to choose desired program
• Press OK to watch the selected program
Current channel list
Current program name
Time before next program
starts
Next program name
Network change information
Start time / End time / progress
status of
current program
Banner for the
reception of a
broadcast
program
Banner for a
playback
of:
- Either an HDD library program
- Or a paused program
“
Recording duration
” for a playback from HDD library
Or “Live on - Program name:” from a paused program
UsingyourHDrecorder16
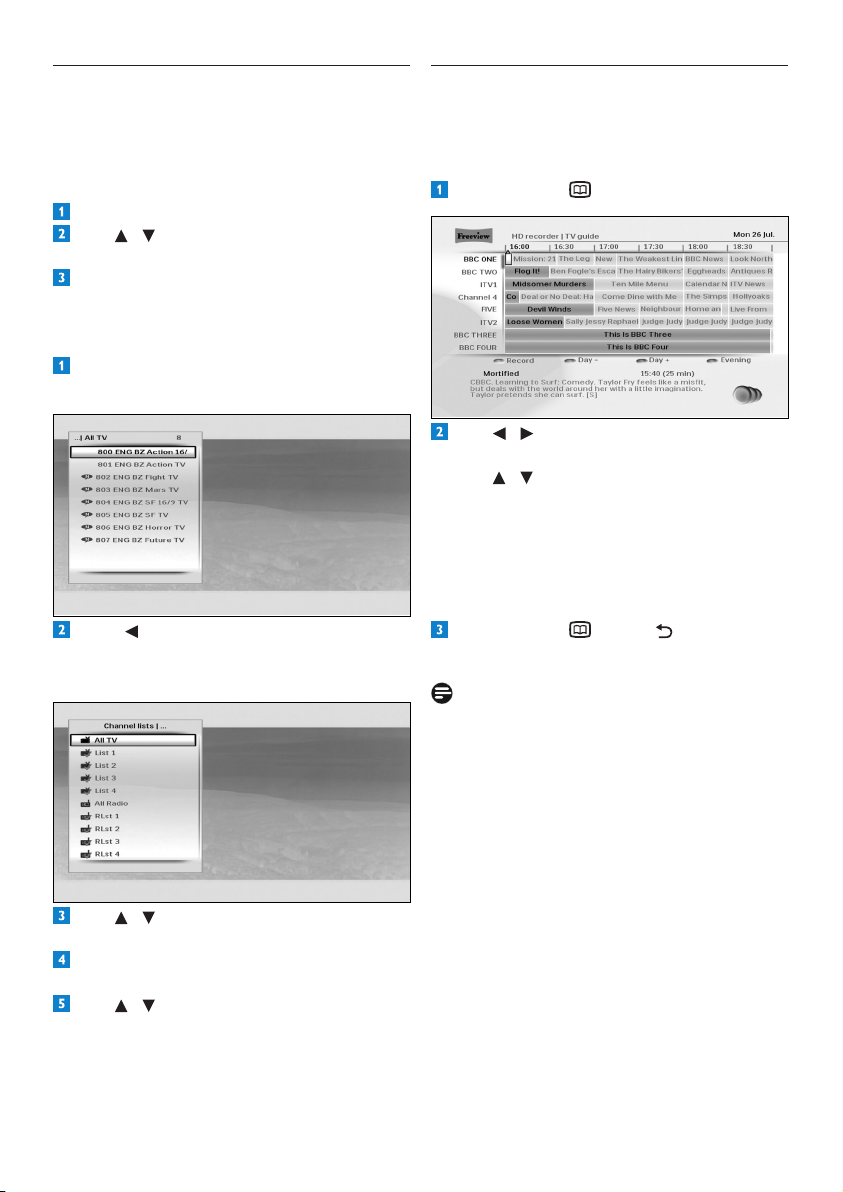
4.6 Using the TV guide
TheTV guideprovidesyouwithalistingof
allprogrammesavailableonallchannelsfor
uptoeightdays,makingiteasytondthe
programmesyouwanttowatch.
Press GUIDE todisplaytheTV guide.
Use / toseewhatprogrammesareon
atdifferenttimesonachannel.
Use / to move through the list of
channels.
Use the yellow(+1day)andgreen(-1day)
buttonstomoveforwardandbackwardsby
adaythroughthelistings.
Use the bluebuttontoswitchbetweenthe
eveningandcurrent-timeTVguideviews.
Press GUIDE ,BACK or EXIT to
remove the TV guide.
Notes
•Youcanalsoschedulearecordingusingthe
TV guide(seepage19).
•Somechannelsmaynotofferanextensive
TV guide.
4.5 Using channel lists
Youusethechannellistmenutoswitchtoany
TVorradiochannelfromtheAll TV or
All Radiochannellist,oryourfavouritelists.
Changing channel
Press OK todisplaythecurrentchannellist.
Use / toselectthechannelyouwantto
watch.
Press OKtopreviewthechannel;pressOK
againtowatchit.
Changing current channel list
Press OK todisplayallthechannelsofthe
currentchannellist.
Press todisplayalltheavailablechannel
andfavouritelists.Tocreatenewfavourite
lists,seepage27.
Use / tohighlightthelistyouwantto
use.
Press OKtoconrmanddisplayallthe
channelsoftheselectedlist.
Use / tohighlightachannelandpress
OK to preview it. Press OKagaintowatch
thechannelorpressEXIT to remove the
channellistmenuwithoutchangingthe
channel.

17UsingyourHDrecorder
ENGLISH
4.7 Using the Tools menu
You use the Toolsmenutodisplaysubtitles,
changetheaudiolanguage,controlaudio
descriptionandsynchroniseaudiowithvideo.
Press OPTIONS todisplaytheTools
menu.
Use / tohighlightthesettingyouwant
tochange.
Press or OK andthenpress / to
selectanoptionfromthelistthatappears
ontheright.Youcanchangethesesettings
usingtheToolsmenu:
Settings Options
Subtitleslanguage On
Off(default)
Audiolanguage Availablelanguages
dependonthe
broadcast
programme.
Audiodesc.level Settheaudio
descriptionvolume.
(Availableif
‘Audiodescription’
isturnedonand
broadcast.)
Lipsync Set the DIGITAL
audiooutputdelayto
synchroniseaudio
withvideo.
Press tosaveyourchangesandreturnto
thetoolsmenu.
Press OPTIONS ,BACK or EXIT
toremovethetoolsmenu.
4.8 Pausing live TV
Whenyouswitchtoachannel,yourHD
recorderautomaticallystartsrecordingthe
programmethatisbeingplayedandstoresit
temporarilyinthetime-shiftbuffer.Whenyou
switchtoadifferentchannel,yourHDrecorder
discardsthepreviouslyrecordedprogramme,
andstartsrecordingthecurrentprogramme.
Thisfeatureenablesyoutopausealive
programmeatanymomentandlatercontinue
watchingitfromthatpoint,orinstantlyrewind
andwatchwhatyouhaveseen(ormissed)inthe
lastfewseconds.
Note
• YourHDrecorderstoresupto3hoursof
liveTVcontentinthetime-shiftbuffer.At
theendof3hours,theoldestpartofthe
recordingisoverwritten.
• YourHDrecorderemptiesthecontentsof
thetime-shiftbufferwhenyouchangethe
channel,orturnoffyourHDrecorderor
putitinstandby.
TopauseanyliveTVprogramme,press
pause K.Thetime-shiftbarappears.
Tostartplayback,pressplay .
TostopplaybackandreturntoliveTV,press
stop L.Inthemenuthatpopsup,make
sure that Back to live ...ishighlightedand
press stop Lagain.Ifyoudonothing,this
menudisappearsafterabout5seconds.
UsingyourHDrecorder18
Inthemenuthatpopsup,use / to
highlightyourchoiceandpressOK to
conrm.
Topauseplaybackatanymoment,press
pause K.Torestartplayback,pressplay .
High-speed playback
Torewindattwicethespeed(x2),press
rewind duringplayback.
Toincreasethespeed,pressrewind
again,upto3times(x4,x32,x128).
Todecreasethespeed,press
fast forward .
Toreturntonormalspeedplayback,press
play .
Youcanfastforwardinthesamewayas
yourewind,justpressfast forward to
increasethefastforwardspeed,andrewind
todecreasethefastforwardspeed.
Slow-motion playback
Torewindorforwardinslowmotion,press
pause K andthenrewind or fast
forward tochoosethespeedyouwant
(x1/2orx1/4).
Toreturntonormalspeedplayback,press
play .
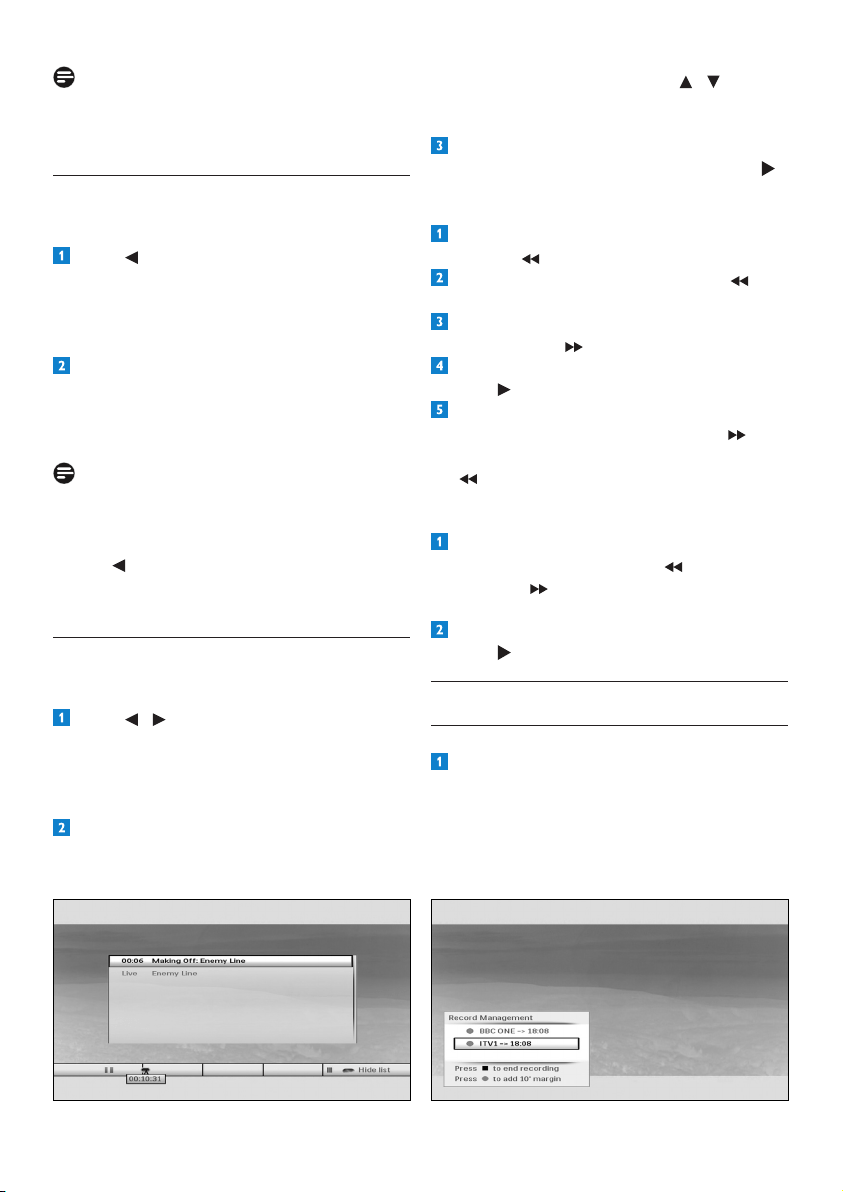
4.9 Recording programmes
4.9.1 Instant recording
Toinstantlystartrecordingaprogramme
thatyouarewatching,pressrecord l.
Amessageappearsconrmingthatthe
programmeisbeingrecordedtoyourHD
recorder’sharddisk.Therecord indicator
onthefrontpanelalsolightsup.
Note
UntilyoureturntoliveTVviewing,youwillnot
beabletouseanyotherfunctionofyourHD
recorder.
4.8.1 Instant replay
Youcaninstantlyreplaywhatyouhaveseen(or
missed)duringthelastfewseconds.
Press whilewatchingliveTV.
Thetime-shiftbarappearsandyouaretaken
back15seconds,bydefault.Toincreasethis
time,seetheInstant Replay duration
settingonpage29.
ToreturntoliveTV,pressstopL.Inthe
menuthatpopsup,makesurethatBack to
live ...ishighlightedandpressstopLagain.
Alternatively,youcanpressP+/-.
Note
Ifyouhavejustswitchedtoachannelandhave
beenwatchingaprogrammeonitforlessthan30
seconds(ortheInstant Replay duration youset),
pressing takesyoubacktothetimeyoustarted
watchingtheprogrammeinsteadof30seconds(or
the Instant Replay durationyouset.)
4.8.2 Moving through the time-shift bar
Whileplayingbackprogrammestemporarily
storedinthetime-shiftbuffer:
Press / tomovetoback15secondsor
forward30seconds(bydefault).Tochange
thistime,seetheInstant Replay duration
andCommerical Skip durationsettings
onpage29.
Press the yellowbuttontojumptothetime
youstartedwatchingtheprogrammeorto
returntoliveTV.
19UsingyourHDrecorder
ENGLISH
Bydefault,theinstantrecordingfeatureis
designedtorecordonlythenexttwohours
oftheselectedprogramme.Theendtime
isshownaftertheprogrammenameinthe
Record Management pop-upmenu.
Toincreasethistimeby10seconds,press
record lwhentheRecord Management
menuison-screen.Bypressingrecord l
multipletimes,youcontinuetoincrement
theendtimeby10seconds.Youcanalso
changethisendtimeusingtheScheduled
recordings menu(seepage21).
Torecordacompleteprogrammeorseries,
use the TV guide.Seethenextsection.
Ifyoutrytorecordaprogrammewhen
twootherprogrammesarealreadybeing
recorded,theConict - check guide
messageisdisplayedintheRecord
Management pop-upmenu.
Tostoprecording,pressstop L.Inthe
Record Management menuthatpopsup,
use / to highlight the programme you
nolongerwanttorecordandpressstopL
again.
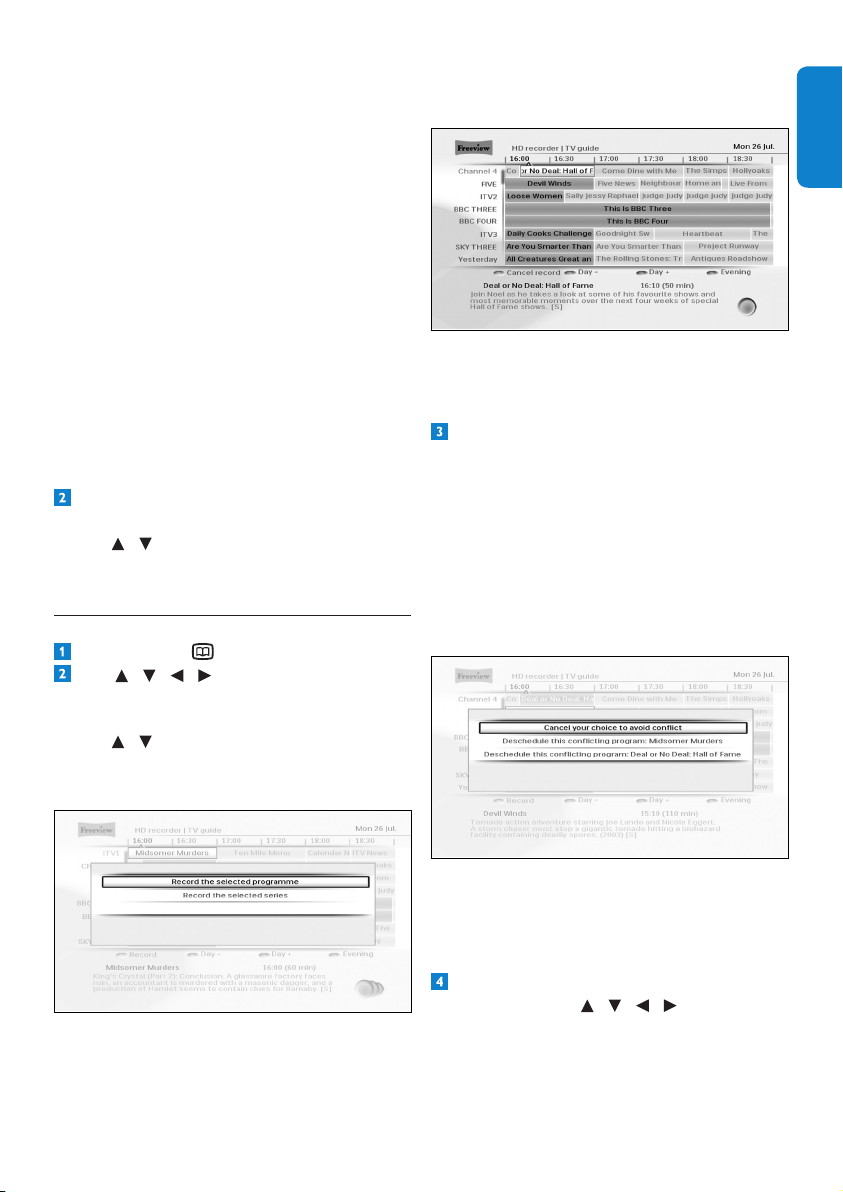
4.9.2 Scheduling recordings
Press GUIDE todisplaytheTV guide.
Use / / / to highlight the
programmeyouwanttorecord,andpress
the red button.Inthemenuthatpopsup,
use / to highlight Record the selected
programme or Record the selected
seriesandpressOKtoconrm.
Iftheprogrammeisonnow,yourHD
recorderstartsrecordinginstantly.Ifitis
onatalatertime,yourHDrecorderwill
recordtheprogrammewhenitstarts.The
programmeishighlightedinredintheTV
guide.
YoucanalsousetheScheduled
recordingsmenutoviewallthe
programmesyouhaveselectedforrecording
(seepage21).
Whenyouselectaprogrammetorecord,
yourHDrecordercheckswhetheritison
atthesametimeasanyotherprogrammes
youhavepreviouslyselectedforrecording.
Ifmorethantwoselectedprogrammesare
onatthesametime,thiscreatesaconict.
YourHDrecorderletsyouknowabout
theconictandshowswhichpreviously
scheduledrecordingsyoucancancelin
ordertorecordyournewselection.
Ifaconictwascausedduetoachangein
thetimeofthebroadcastprogramme,then
you use the Scheduled recordings menu
toviewandresolvesuchconicts
(seepage21).
Tocancelthescheduledrecordingofa
programme,use / / / to highlight
theprogrammeintheTV guide,andpress
OK.
UsingyourHDrecorder20
Note
Whenyouselectaprogrammetorecord,yourHDrecordercheckswhetherthereisenough
diskspacetorecordit.Ifthediskisnearlyfull,yourHDrecorderwillautomaticallydeletesome
ofyouroldandunprotectedprogrammestomakespaceforthenewprogramme.
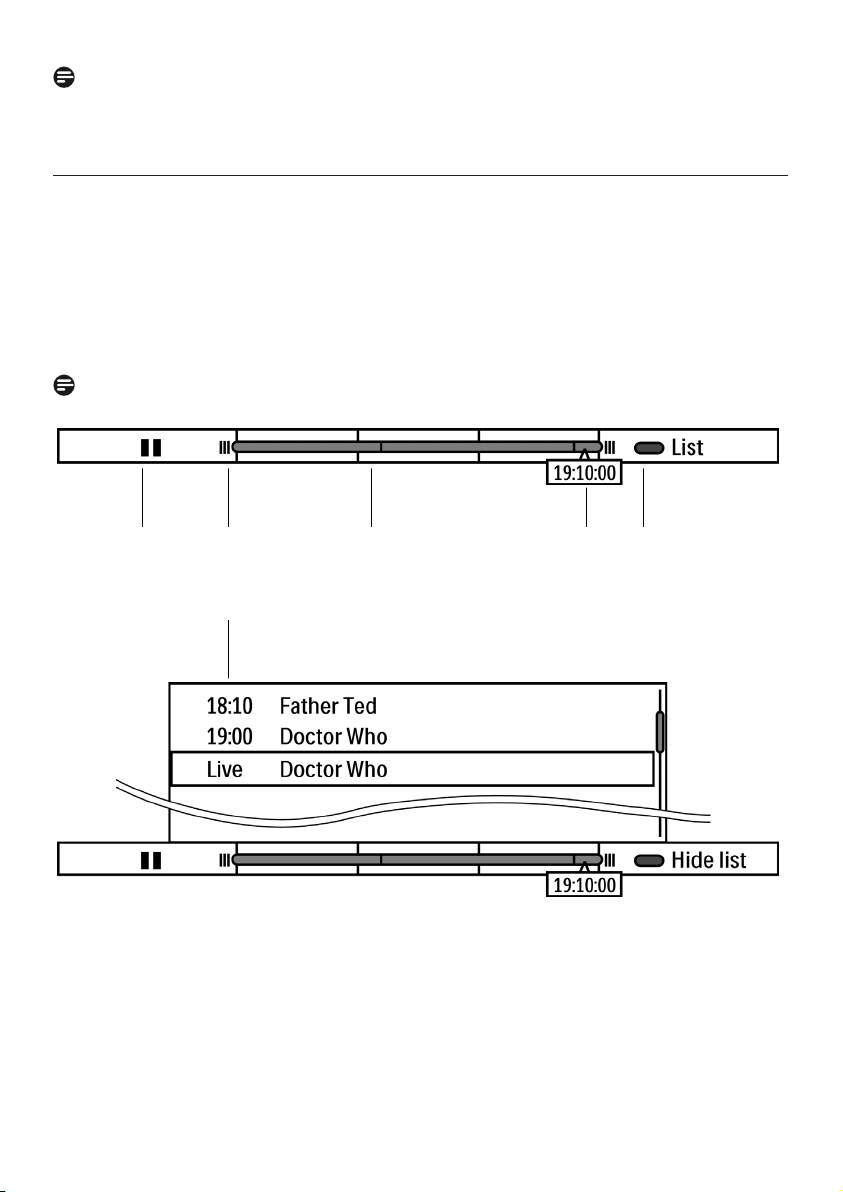
4.9.3 Time-shift bar for a paused programme
YourHDrecorderautomaticallyrecordstheprogramyouarewatching.
Thisrecordingmayllinabufferforamaximumof3hours.
Youcan:
-PauseliveTVwhileyourHDrecorderkeepsonrecordingtheliveprogramme.
-Restartwatchingfromthepause.
-GotoliveTVoranyprogramsequenceinbetween.
Thetime-shiftbarhelpsyouwatchpausedliveTVfromthebuffer.
Note
Thecontentsofthebufferareushedwhenyouchangethechannel.
xedni emiT 4 edom yalP 1
2 Full buffer indicator (3 hours) 5 Open/Close the buffer program list
3 Buffer progress bar 6 List of program in the buffer
5 4 3 2 1
6
21UsingyourHDrecorder
ENGLISH
4.9.4 Controlling playback and recording
Instant
Replay
Commercial
skip
Pause
Open / Close
HDD Library
In Play mode
One Touch Recording
In EPG
Schedule a recording
Stop playback
or stop recording
or return to live TV
on selected program
Play
In
play mode
:
Fast Rewind
(x2, x4, x32, x128)
In Pause mode
Slow backward
(x1/2, x1/4)
In
play mode
:
Fast Forward
(x2, x4, x32, x128)
In Pause mode
Slow forward
(x1/2, x1/4)
4.9.5 Viewing scheduled recordings
Press todisplaytheScheduled
recordingsmenu.Youcanalsoaccessthis
menufromtheMainmenu(MENU >
TV guide & scheduling > Scheduled
recordings)
TheScheduled recordingsmenuappears,
which shows all the programmes you have
selectedtorecord.
Tocancelthescheduledrecordingofa
programme,use / tohighlightitand
press the redbutton.
Tochangetheendtimeofaninstant
recording,use / to highlight End time
andpresstheOKbutton.Inthemenuthat
appears,use / / / tochangetheend
time.
Anyscheduledrecordingconicts,which
arecausedduetoachangeinthetimeof
thebroadcastprogramme,areindicatedby
awarningsymbolnexttotheprogramme
name.Toresolvesuchconicts,selecta
programmethatyounolongerwantto
recordandpresstheredbuttontocancelit.
Press EXIT to remove the Mainmenu.
UsingyourHDrecorder22
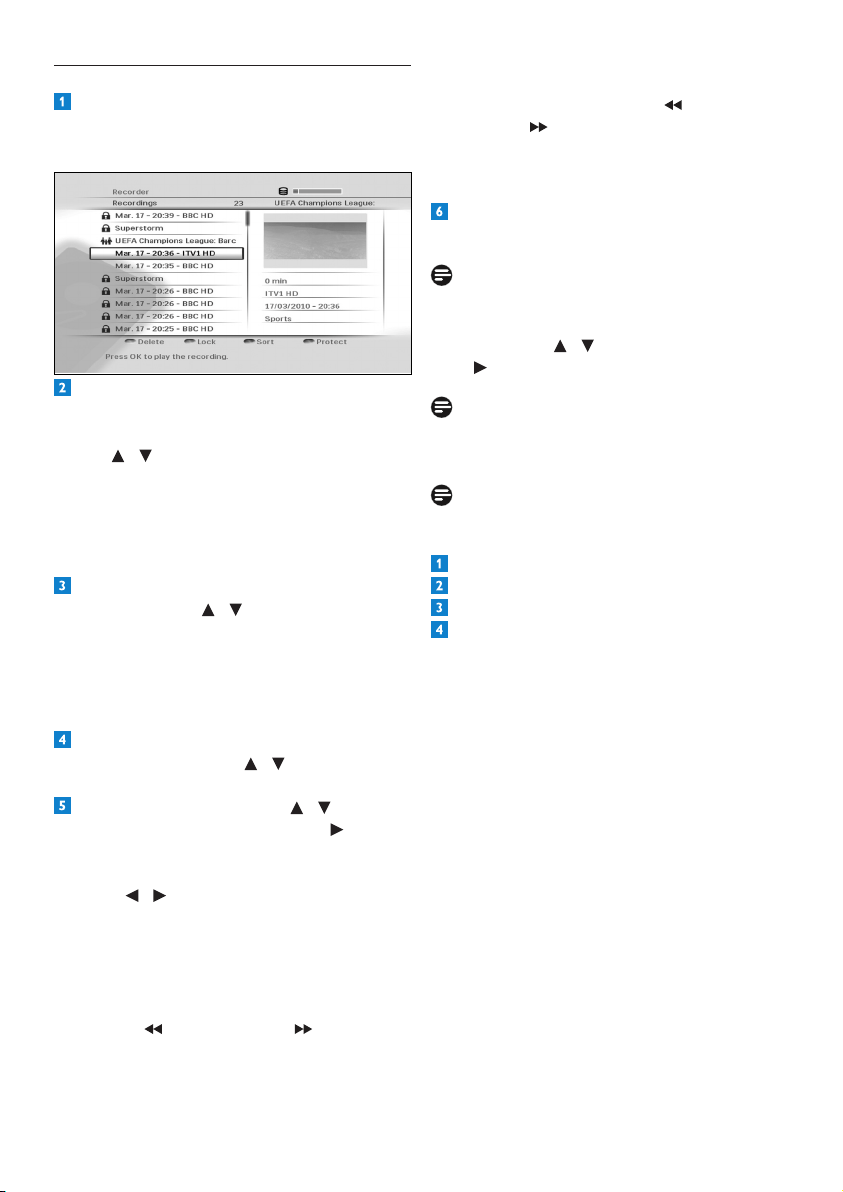
4.9.6 Watching recorded programmes
Toviewalltherecordedprogrammes,press
HDD (LIB).
TheRecordingsmenuappears.
Allrecordedprogrammesareprotectedby
defaulttopreventyoufromdeletingthem
accidentally.Todeleteaprotectedrecording,
use / tohighlightit,press the blue
buttontounprotectit,andthenpressthe
redbuttontodeleteit.Amessageappears
askingyoutoconrm.Ifyouaresure,press
the greenbutton;ifnot,pressthered
button.
Tolockarecordingandsetviewing
restrictions,use / to highlight the
recordingandpress the greenbutton. Note
that if the Parental control limits is set
to off(seepage30),yourHDrecorderwill
letyouwatchalockedrecordingwithout
enteringyourPINcode.
Tosortthelist,presstheyellowbutton.In
thepop-upmenu,use / to highlight how
youwouldliketosortthelistandpressOK.
Toplaybackarecording,use / to
highlightitandpressOK or play .
Topauseplaybackatanymoment,press
pause K.
Press / tomovetoback15secondsor
forward30seconds(bydefault).Tochange
thistime,seetheInstant Replay duration
andCommerical Skip durationsettings
onpage29.
Torewindorforwardathighspeed,press
rewind or fast forward ,during
playback,upto4timestochoosethespeed
(x2,x4,x32orx128).
Torewindorforwardinslowmotion,press
pause K andthenrewind or fast
forward tochoosethespeedyouwant
(x1/2orx1/4).
Tostopplaybackandreturntothe
Recordings menu,pressstop L twice.
Press EXIT to remove the Recordings
menuandreturntoliveTV.
Note
YoucanalsoaccesstheRecordingsmenufrom
the Mainmenu–pressMENU to access the
Mainmenu;use / to highlight Libraryand
press or OK.
Note
Press HDD (LIB)tocheckthefreediskspace
availableforrecording.
Note
Youcanalsochecktheavailablerecordingtime
onyourharddisk:
Press Menu.
Highlight SettingsandpressOK.
Highlight Set-upandpressOK.
Highlight Hard disk drive information.
Theavailablerecordingtimeisshownonthe
rightsideofthescreen.
23UsingmoreofyourHDrecorder
ENGLISH
5 Using more of your
HD recorder
5.1 HD recorder
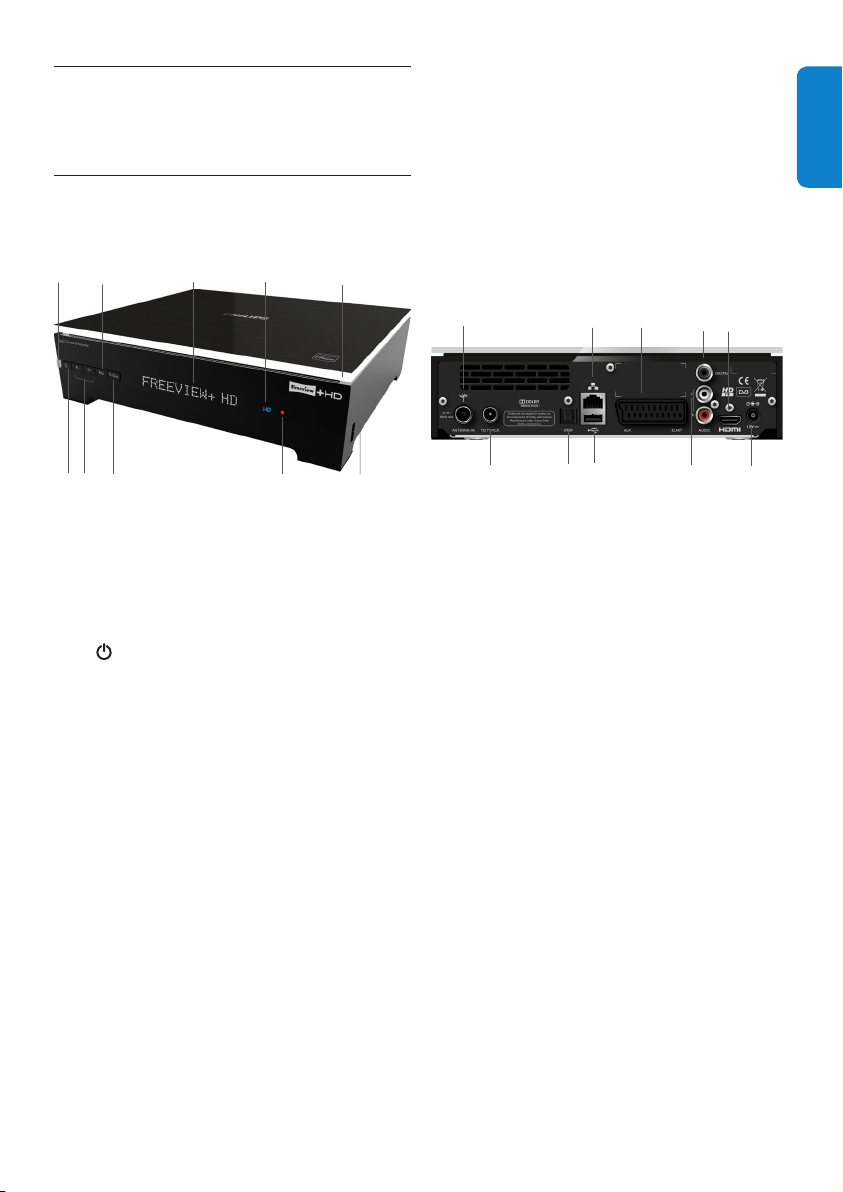
Front panel
1 Standby indicator:
Red:initialisationmodeandstandby
mode
Orange:active-standbymode
2 standby button: Switches your HD
recorderintooroutofstandby
3 P+ & P- buttons:Tochangechannelup
ordown
4 Res button:TochangetheHDMIoutput
resolutiontoAuto(default),576i,
576p,1080i or 1080p
5 V-Out button:Tochangetheactivevideo
output to HDMI(default)orSCART
6 Display: 16-digitalphanumericdisplay
7 HD indicator:Lightsupwhen
youarewatchinganHDchannel
8 Record indicator:Lightsupwhenyour
HDrecorderisrecording
a programme
9 USB 2.0*:UniversalSerialBusport
10 Top lighting
*Safeextralowvoltage
Rear panel
9
1
2
3
4
5 6 7 8
10
1 Antenna IN
*
:Toconnectyouraerial
cablefromthewallsocket
2 To TV/VCR
*
: AntennaoutputtoTV/VCR
(antennasignal)
3 SPDIF audio out
*
:Toconnectanoptical
cabletoanhi-amplier
4 USB 2.0
*
:UniversalSerialBusport
5 Ethernet
*
: ToconnectyourHDrecorder
toanInternetaccesspoint
6 AUX SCART
*
: Toconnecttothe
SCARTconnectoronyourstandard-
denitionTV
7 DIGITAL audio out
*
: Toconnectan
hi-amplier
8 HDMI
*
:ToconnecttotheHDMIinput
connectoronyourhigh-denitionTV
9 AUDIO L + R
*
: Toanhi-amplier
10 Power*:Toconnectthe12Vpowersupply
unit
5
2
3
8
9
1 6
4
7
10
UsingmoreofyourHDrecorder24
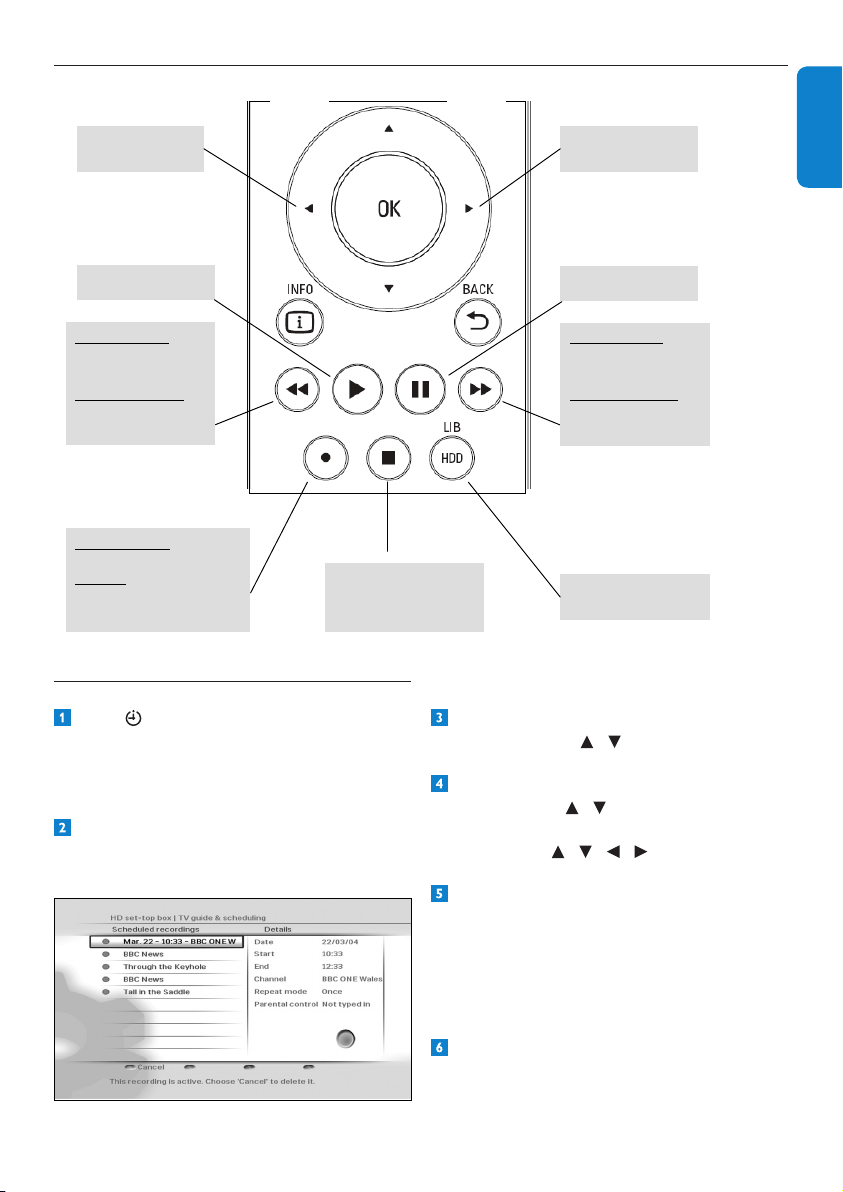
5.2 Remote control
TEXT RADIO EXIT
GUIDE OPTIONS
BACKINFO
DIGITAL RECORDER
MENU
HDD
LIB
AD
1
8
9
10
6
5
7
11
12
13
1427
26
25
20
18
16
4
15
3
21
22
23
24
17
19
2
1 Switchtostandbyorwake
upfromstandby
2 RADIO Switchbetweenradioand
TVchannels
3 EXIT Removemenus,channel
bannerandchannellists
4 Colourbuttons Usedincontextualmenus
andMHEGapplications
5 Open/close‘Tools’menu
6 U,D,L, R Moveup/down/left/right
withinlistsormenus
7 Returntotheprevious
channelormenuscreen
8 K PauseliveTV
9 F Fastforward
10 HDD(LIB) Open/close‘Recordings’
menu
11 Open/close‘Scheduled
recordings’menu
12 P+/- Changechannelup/down
13 Numberbuttons Alphanumerickeypad
14 Turnsubtitleson/off
15 Changepictureformat
16 TEXT Open/closeMHEG
applications
17 MENU Open/close‘Main’menu
18 Open/close‘TVguide’
19 OK Conrmselectioninmenu
or list.
Open/closechannellist
20 Open/closechannelbanner
21 R Play
22 G Rewind
23 L Stop
24 l Startinstantrecording
25 VOL+/- Turnvolumeup/down
26 Mute/restoresound
27 AD TurnAudioDescriptionon/off
25UsingmoreofyourHDrecorder
ENGLISH
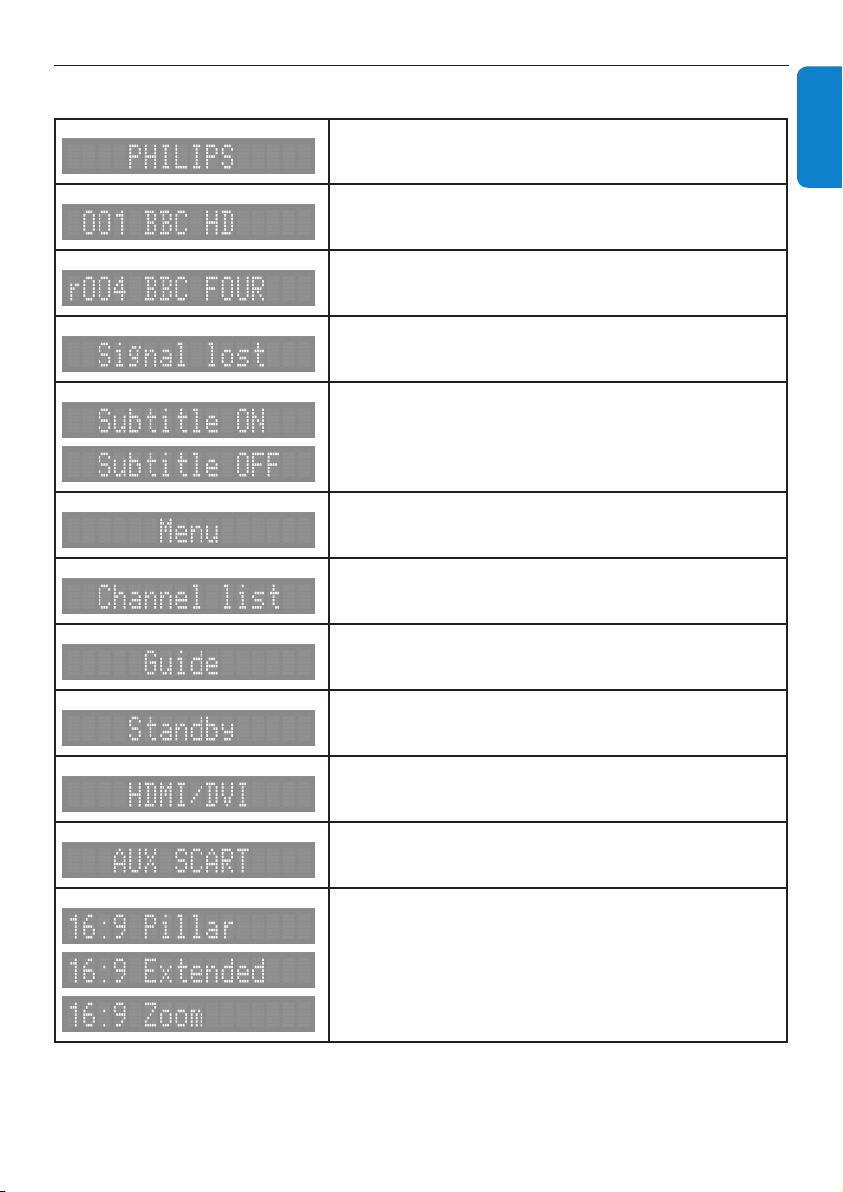
5.3 Front-panel display messages
YourHDrecorderisstartingup
YourHDrecorderistunedtoTVchannel1
YourHDrecorderistunedtoradiochannel4
Antennasignalisnotavailable
Subtitleon
Subtitleoff
Mainmenuisopen
Channellistisopen
TVguideisopen
YourHDrecorderisinthestandbymode
HDMIistheactiveA/Voutput(recommended)ofyour
HDrecorder
AUXSCARTistheactiveA/VoutputofyourHDrecorder
Pictureformatis4:3withblackbars
Pictureformatis4:3stretchedto16:9
Pictureformatis4:3zoomedintothescreenwidth
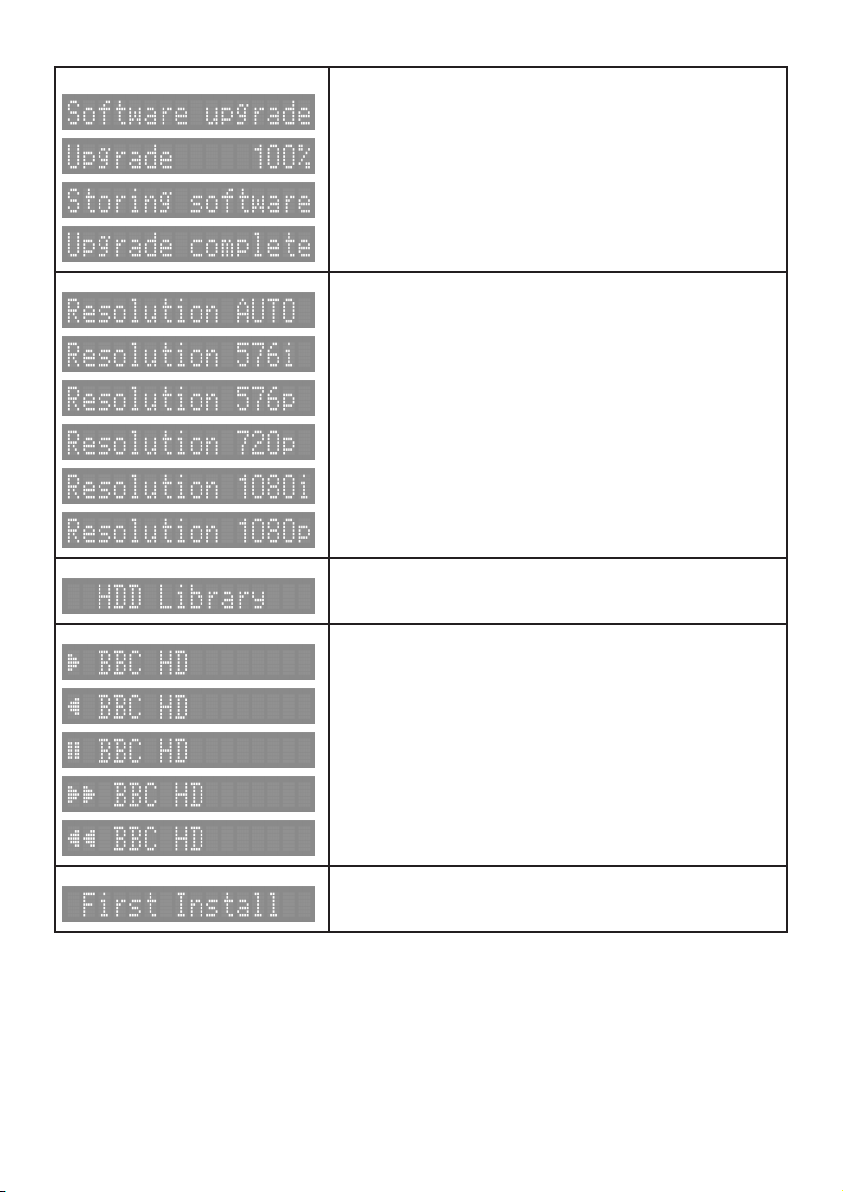
UsingmoreofyourHDrecorder26
Softwareupdateisstarting
Softwareisbeingloaded
Softwareisbeingsaved
Successfulupdate
Automaticresolutionadjustment(recommended)
Resolutionissetto576i
Resolutionissetto576p
Resolutionissetto720p
Resolutionissetto1080i
Resolutionissetto1080p
Recordinglibraryisopen
Play
Rewind
Pause
Fastforward
Fastrewind
YourHDrecorderisintherstinstallationsetup
27UsingmoreofyourHDrecorder
ENGLISH
5.4 Using the Main menu
Press MENUtodisplaytheMainmenu.
Use / tohighlightasetting.
Press or OKtoconrmyourchoice.
Press BACK toreturntotheMain
menu.PressBACK again,MENU or
EXIT to remove the Mainmenu.
Note
Use the colourbuttonstoperformcontextual
actions,whicharedescribedatthebottomof
thescreen.
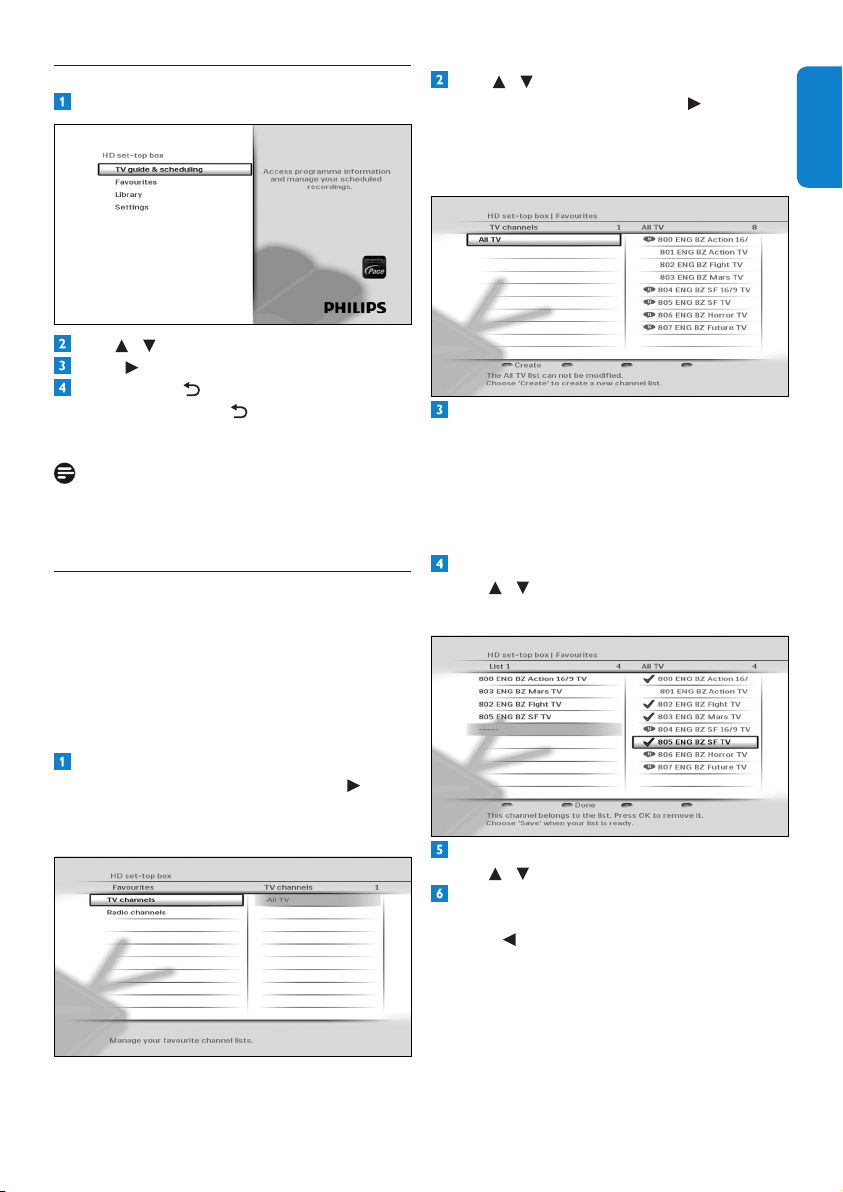
5.4.1 Managing favourite lists
YourHDrecorderallowsyoutocreate
favouriteliststhatincludethechannelsyou
watchthemost.Thisletsyouaccessyour
favouritechannelsquicklyinsteadofscrolling
throughtheentirelist.
Creating a favourite list
OntheMainmenu,makesurethat
Favouritesishighlightedandpress or
OK.
TheFavouritesmenuappears.
Use / to highlight either TV channels
or Radio channels,andpress or OK.
Themenunowdisplaystheselectedfull
channellist(All TV or All Radio)andthe
existingfavouritelists.
Press the redbuttontocreateanew
favouritelist.YourHDrecorder,bydefault,
namesthenewfavouritelistasList1(forTV
channels)orRLst1(forradiochannels).You
cancreateuptofourseparateTVandradio
favouritelists.Torenametheselists,see
page 28.
Toaddachanneltoyourfavouritelist,
use / tohighlightachanneland
press OK.
Toremoveachannelfromyourfavouritelist,
use / tohighlightitandpressOK.
Whenyouarenishedaddingallyour
channels,pressthegreenbutton.
Press toreturntotheFavouritesmenu.
UsingmoreofyourHDrecorder28
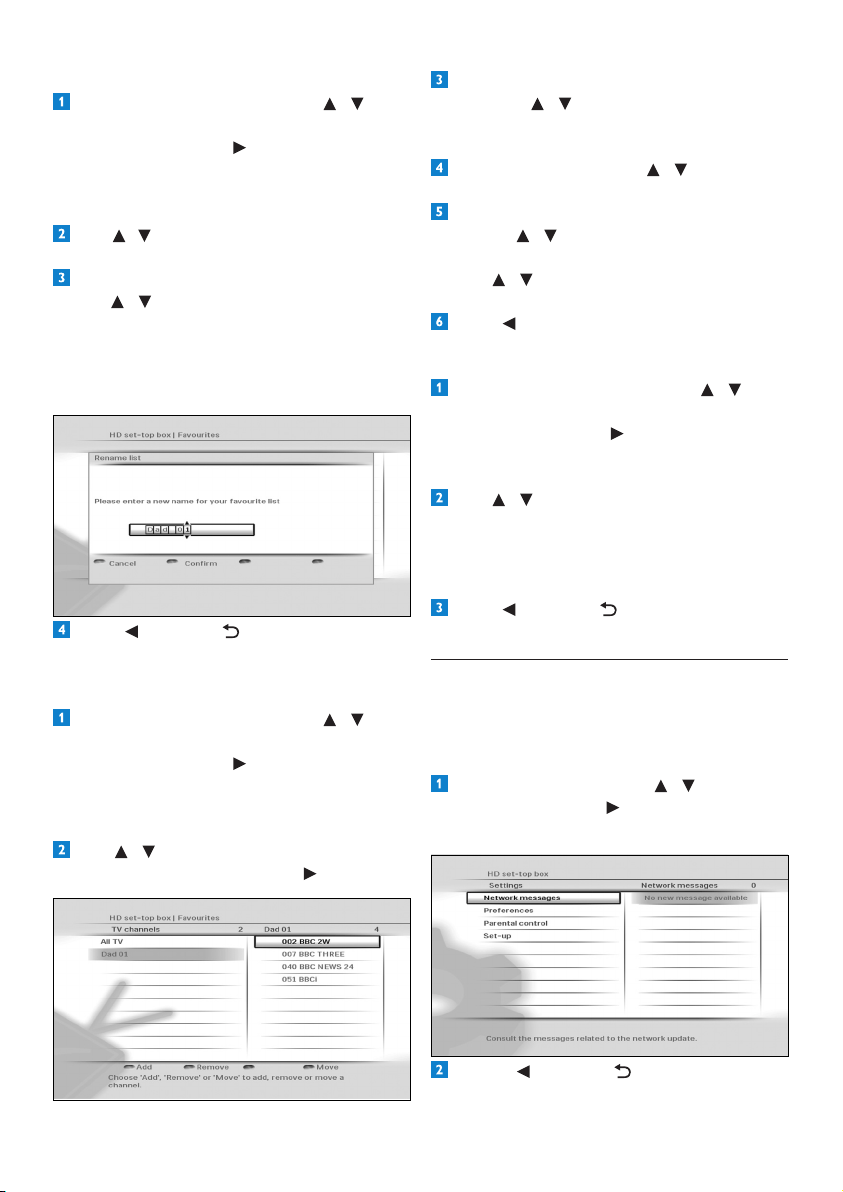
Renaming favourite lists
From the Favouritesmenu,use / to
highlight either TV channels or Radio
channelsandpress or OK.
Themenunowdisplaysthedefaultchannel
list(All TV or All Radio)andanyexisting
favourite lists.
Use / to highlight the favourite list that you
wanttorename,andpressthebluebutton.
IntheRename listmenuthatpopsup,
use / or the numberbuttonsto
renameyourfavouritelist.Pressthegreen
buttontoconrmorpresstheredbutton
toreturntothepreviousmenuwithout
savinganychanges.
Press or BACK toreturntothe
Favouritesmenu.
Modifying/Editing favourite lists
From the Favouritesmenu,use / to
highlight either TV channels or Radio
channelsandpress or OK.
Themenunowdisplaysthedefaultchannel
list(All TV or All Radio)andanyexisting
favourite lists.
Use / to highlight the favourite list that
youwanttomodify,andpress or OK.
Toaddachannel,presstheredbutton.
Thenuse / tohighlightthechannelyou
wanttoaddandpressOK. Press the green
buttontosaveyourchanges.
Toremoveachannel,use / to highlight
itandpressthegreenbutton.
Toreorderthechannelsinyourfavourite
list,use / tohighlightachannelyouwant
tomoveandpressthebluebutton.
Use / tomovethechannelupordown
andpressOK.
Press toreturntotheFavouritesmenu.
Deleting favourite lists
From the Favouritesmenu,use / to
highlight either TV channels or Radio
channelsandpress or OK.Themenu
nowdisplaysthedefaultchannellist(All TV
or All Radio)andanyexistingfavouritelists.
Use / to highlight the favourite list that
youwanttodelete,andpressthegreen
button.Amessageappearsaskingyouto
conrm.Ifyouaresure,pressthegreen
button;ifnot,presstheredbutton.
Press or BACK toreturntothe
Favouritesmenu.
5.4.2 Using the Settings menu
You use the Settingsmenutocustomiseyour
HDrecorder.Forexample,youcanlockcertain
channels,changedisplaysettings,etc.
Accessing the Settings menu
From the Mainmenu,use / to highlight
Settingsandpress or OK.
TheSettingsmenuappears.
Press or BACK toreturntothe
Mainmenu.
29UsingmoreofyourHDrecorder
ENGLISH
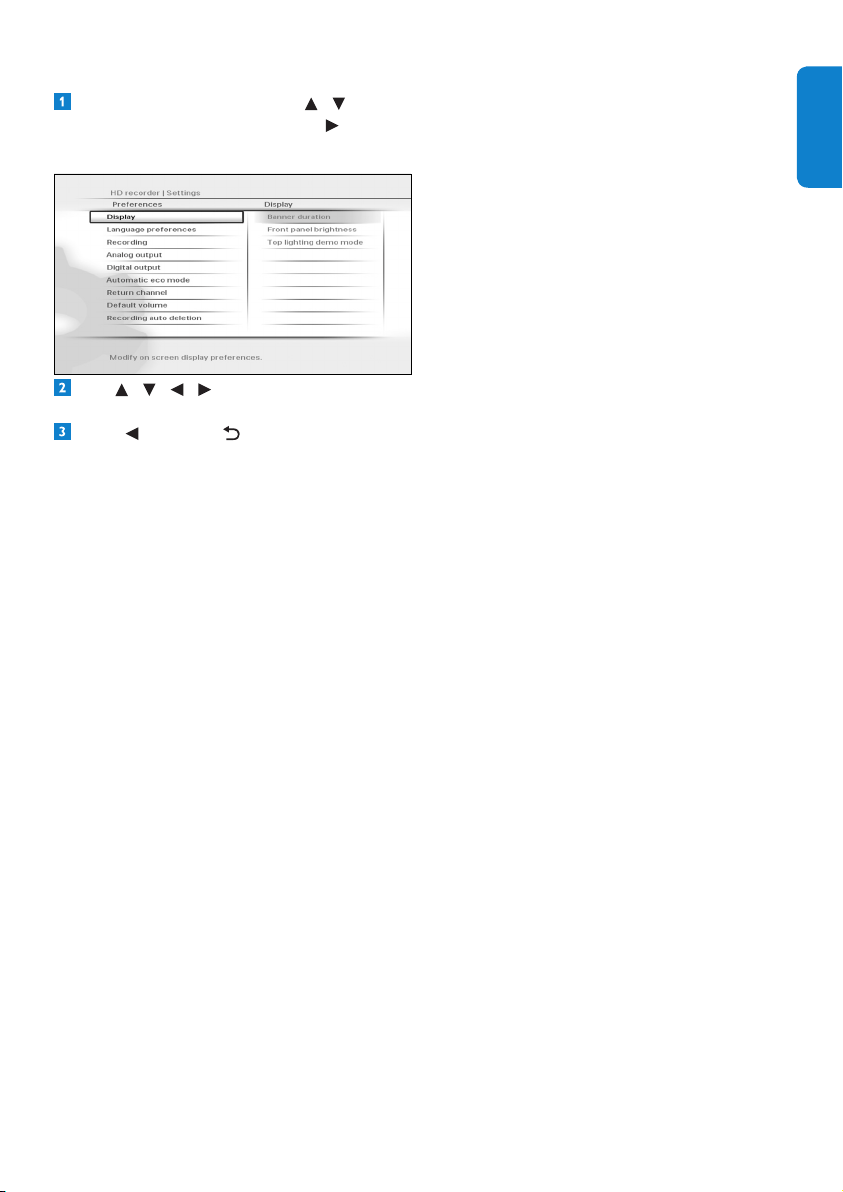
Setting your preferences
From the Settingsmenu,use / to
highlight Preferencesandpress or OK.
ThePreferencesmenuappears.
Use / / / / OK tonavigatethrough
thesettingsandoptions,andmakechanges.
Press or BACK tosaveyourchanges
andreturntothepreviousmenu.
You use the Preferencesmenutochange
thesesettings:
Display
• Banner duration - Use this to set the
lengthoftime(3to10seconds)thatthe
channelbannerremainson-screenwhen
youchangechannel.Bydefault,itissetto
5 seconds.
• Front panel brightness - Use this to set the
brightnessofthefront-paneldisplay.Youcan
set this to Low,Medium (default)orHigh.
• Top lighting demo mode - Use this to
turnonoroff(default)thelightingaround
thetop-panelofyourHDrecorder.
Language preferences
• Information language - Use this to
setyourpreferredlanguagefordisplaying
programmeinformationtoEnglish
(default),Gaelic,Welsh or Irish.
• Audio language - Use this to set your
preferredaudiolanguagetoEnglish
(default),Gaelic,Welsh or Irish.
• Default subtitles mode - Use this to
sethowyouprefertodisplaysubtitles.You
cansetthistoActivated,Not activated,
Auto when no correct audio(default),
Auto when audio is muted or For
hearing-impaired.
• Subtitles language - Use this to set your
preferredlanguageforsubtitlestoEnglish
(default),Gaelic,Welsh or Irish.
Recording
• Instant replay duration - Use this to set
theinstantreplayduration(seepage18).
Itisalsousedwhilemovingthroughthe
time-shiftbar(seepage18)orarecording
(seepage22).Youcansetthisto15
seconds (default),30 seconds,1 minute,
2 minutes or 5 minutes.
• Commercial skip duration -
Usethistosetthetypicaldurationof
commercialsinbetweenprogrammes.You
usethiswhilemovingthroughthetime-
shiftbar(seepage18)orarecording(see
page22).Youcansetthisto15 seconds,
30 seconds (default),1 minute,2
minutes or 5 minutes.
Analog output
• Video on AUX - Use this to set the type
ofanaloguevideosignalsthatareoutput
ontheAUX SCART connectorofyour
HDrecorder.YoucansetthistoRGB
(defaultwhenV-OutissettoAV)orCVBS
(defaultwhenV-OutissettoHDMI).
• Audio on AUX -Thissettingapplies
whenyourHDrecorderisconnectedvia
aSCARTCabletoastandard-denition
TV.Usethistosetthetypeofanalogue
audiosignalsthatareoutputontheAUX
SCART connectorofyourHDrecorder.
YoucansetthistoMono or Stereo
(default).
• TV format - Use this to set the format
oftheanaloguevideothatisoutputonthe
AUX SCART connectorofyourHD
recorder.Youcansetthisto4/3 Letter Box,
4/3 Centre Cut Out or 16/9(default).The
optionsdeterminehowwidescreen(16:9)
programmesshowonastandard-denition
TVwithaspectratioof4:3.

UsingmoreofyourHDrecorder30
Digital output
• HDMI output resolution - Use this to
settheHDMIvideoresolutionto576i,
576p, 720p, 1080i, 1080p,Auto (default)
or Original.Notethatyoucanalso
changethissettingusingtheRESbutton
onthefrontpanelofyourHDrecorder.
• Audio capabilities on HDMI - Use this
tosettheHDMIaudioformattoPCM
(default)orAuto*.
• Audio capabilities on S/PDIF - Use this
tosettheS/PDIFaudioformattoPCM
(default)orDolby Digital*.Youcanalso
set this to Not connected.
• Easy Link mode - For future use.
• TV format - Use this to set the format
ofthehigh-denitionvideothatisoutput
ontheHDMI connectorofyourHD
recorder.Youcansetthisto16/9 Pillar
Box (default), 16/9 Full Screen or 16/9
Zoom.Theseoptionsdeterminehow
standard(4:3)programmesshowona
TVwithaspectratioof16:9.Notethat
youcandirectlychangethissettingusing
the picture formatbutton onyour
remotecontrol.
*TheAutoandDolby Digitalsettingson
HDMIorS/PDIFarenotrecommendeduntil
yourHDrecorderhasbeenupdatedwiththe
appropriate software.
Visitwww.philips.com/supportregularlyto
checkiftherelevantsoftwareupdateisavailable.
Automatic eco mode
Use this to set the time after which your
inactiveHDrecorderautomaticallyenters
intotheactivestandbymode.Youcanset
this to off, 3 hours (default),4 hours,
5 hours, 6 hours,7 hours or 8 hours.
Return channel
UsethistocongureyourHDrecorder
toconnecttotheinternet,whichthen
servesasareturnchanneltoyourDigital
TVserviceprovider.Thereturnchannelis
necessarytouseanyinteractiveapplications
thatyourDigitalTVserviceprovidermay
offer.Beforeconguringthereturnchannel,
besuretoconnectyourHDrecorderto
yournetworkrouterusinganEthernet
cable.ThenchooseeitherDHCP to set up
yourconnectionautomaticallyormanually
enteralltheparameterslikeIP address,
Network mask,GatewayandDNS
settingstomatchyourrouter’ssettings.
Default volume
Usethistosetthedefaultvolumeatwake-
upofyourHDrecorder.
Recording auto deletion
Whenyouselectaprogrammetorecord,
yourHDrecordercheckswhetherthere
isenoughdiskspacetorecordit.Ifthe
diskisnearlyfull,yourHDrecorderwill
automaticallydeletesomeofyouroldand
unprotectedprogrammestomakespacefor
thenewprogramme.Usethissettingtoturn
offoron(default)thisfeature.
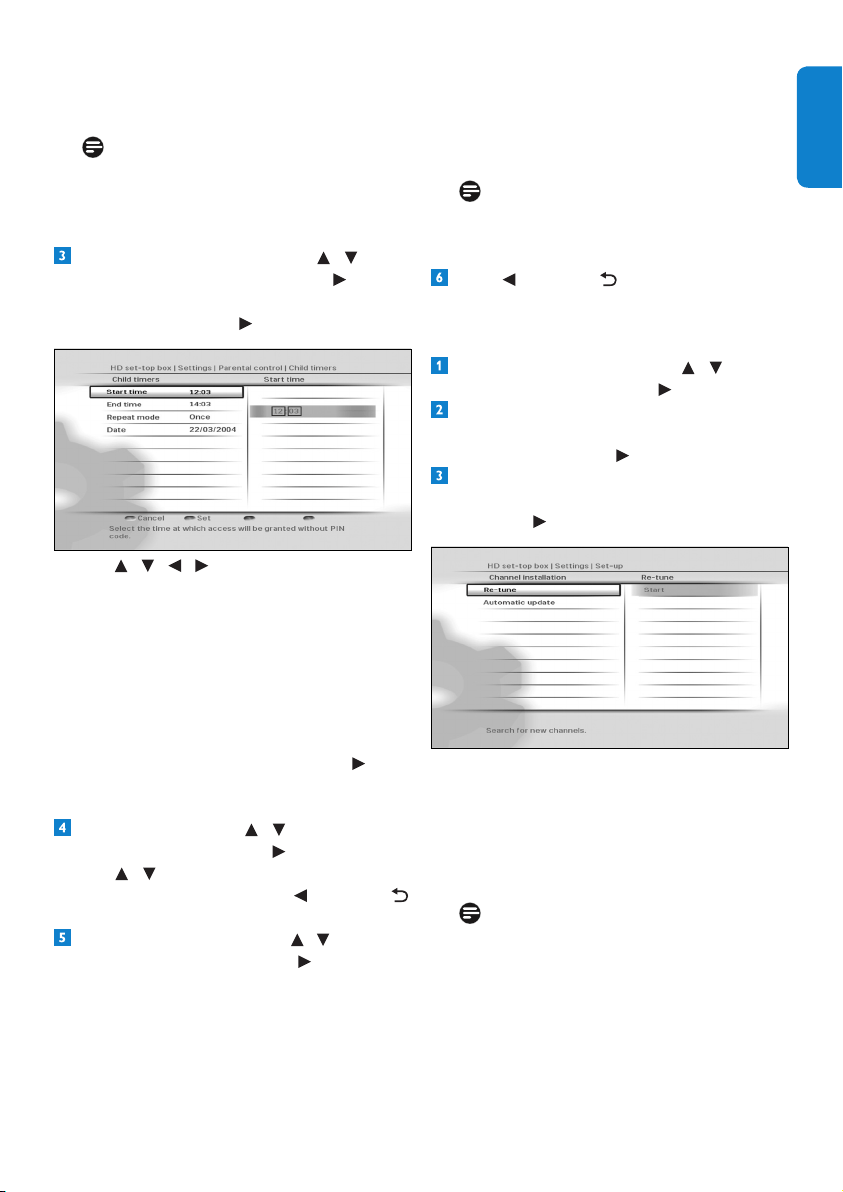
Changing parental control settings
From the Settingsmenu,use / to
highlight Parental controlandpress or
OK.TheParental controlmenuappears.
Tochangetheparentalcontrolseverity
settings,use / to highlight Parental
control limits,andpress or OK.
Use / to highlight the severity level you
wanttoset,andpress or OK to save your
changesandreturntothepreviousmenu.
Note that if you set the Parental control
limits to Off,thechildtimersandchannel
31UsingmoreofyourHDrecorder
ENGLISH
locksettings(seebelow)willnothaveany
effect.
Note
WhenParental control limits is set to
ON,menuitemslikeParental controland
Set-upwillbeprotectedbythePINcode.
Tocreateanewchildtimer,use / to
highlight Child timers,andpress or OK.
MakesurethatDene child timer is
highlightedandpress or OK.
Use / / / tosetthetimeperiod
duringwhichyouwillbeabletowatchany
unlockedchannelwithouthavingtoenter
yourPINcode.Pressthegreen buttonto
conrm.
Todeletethechildtimer,makesureModify
child timerishighlightedand press the red
button.
Tomodifythechildtimer,makesureModify
child timerishighlightedand press or
OK.Maketherequiredchangesandpress
the green buttontoconrm.
Tolockachannel,use / to highlight
Channel lock,andpress or OK.
Use / tohighlightthechannelyouwant
tolock,andpressOK. Press or BACK
toreturntothepreviousmenu.
TochangeyourPINcode,use / to highlight
Change PIN code,andpress or OK.
Use the numberbuttonstorstenter
yourcurrentPINcodeandthenenteryour
newPINcode.Usethenumberbuttons
toenteryournewPINcodeagain,for
conrmation.Ifyoucorrectlyenteredthe
PINcodes,yourHDrecorderbrieydisplays
amessageconrmingthatyourPINhasbeen
changed,andthenreturnstotheParental
Controlmenu.
Note
YournewPINcodecanbeany4-digit
numberotherthanthedefaultPINcode
(0000).
Press or BACK toreturntothe
Settingsmenu.
Retuning your HD recorder
From the Settingsmenu,use / to
highlight Set-upandpress or OK.
IntheSet-upmenuthatappears,
makesure Channel installation is
highlightedandpress or OK.
IntheChannel Installationmenuthat
appears,makesureRe-tuneishighlighted
andpress or OK.
Aprogressscreendisplaystoconrmthatthe
searchistakingplace.
Press the greenbuttontosaveanynew
channelsandreturntotheSet-upmenu.
Press the redbuttontocancelthesearchand
returntotheSet-upmenu.
Note
TheNetwork messagesmenu(underthe
Settingsmenu)alertsyouofanychanges
toyournetworksuchasrecentlyadded
channels,services,etc.Tosavetime,check
thismenubeforeretuningyourHDrecorder.
UsingmoreofyourHDrecorder32
Updating your HD recorder’s software
manually
YoucanmanuallyupdateyourHDrecorder
softwareusingaUSBmemorystick.
Downloadthelatestsoftwarelefromthe
Philipswebsite(www.philips.com/support),
unzipitandtransferittoaUSBmemory
stick.Besuretoplacethedownloadedle
inthetop-levelfolderofyourUSBmemory
stick.
ConnectyourUSBmemorysticktotheUSB
connectorontherearpanel(orontheside)
ofyourHDrecorder.
From the Settingsmenu,use / to
highlight Set-upandpress or OK.
IntheSet-upmenuthatappears,
use / to highlight Software updateand
press or OK.
YourHDrecorderlocatesthesoftware
availableonyourUSBmemorystickand
displaysaconrmationmessage.Press
the greenbuttontoinstallthesoftware
immediately.Presstheredbuttontocancel
andreturntothepreviousmenu.Ifyou
press the greenbutton,yourHDrecorder
updatesthesoftwareandrestarts.Youmay,
dependingontheupdate,thenberequired
tocompletetherstinstallationsetup
(seepage11).
Restoring factory default settings
From the Settingsmenu,use / to
highlight Set-upandpress or OK.
IntheSet-upmenuthatappears,
use / to highlight Factory resetand
press OK twice.
Amessageappearsaskingyoutoconrm.
Ifyouaresure,pressthegreenbutton,or
press the redbuttontocancelandreturn
tothepreviousmenu.Ifyoupressthe
greenbutton,yourHDrecorderrestores
thefactorydefaultsettingsandrestarts.You
willthenberequiredtocompletetherst
installationsetup(seepage11).
Note
ResettingyourHDrecordertothefactory
defaultsettingserasesallofyourpreferences
andsettings.Forexample,allofyourfavourite
listsandrecordingtimerswillbeerased.
Changing other system settings
From the Settingsmenu,use / to
highlight Set-upandpress or OK.
TheSet-upmenuappears.
Toturnonoroffthechannelupdates
thatautomaticallyhappenwhenyourHD
recorderisintheactive-standbymode,make
sure Channel installationishighlighted
andpress or OK. Press to highlight
Automatic updateandpress or OK.
Use / to highlight On or Off.

33Maintenance
ENGLISH
Press tosaveyourchangesandreturnto
thepreviousmenu.
Tocheckthesignalqualityofanychannel
thatyouarereceiving,press to highlight
Signal qualityandpress or OK.
IntheSignal quality testmenuthat
appears,use / toselectachannelthat
youwanttocheck.Press or BACK to
returntothepreviousmenu.
Toturnonoroffpoweringyouractive-
indoor antennausingtheAntenna IN
connectorontherearpanelofyourHD
recorder,press to highlight Portable
antenna poweringandpress or OK.
Use / to highlight Off or On.
Press tosaveyourchangesandreturnto
thepreviousmenu.
Note
Set Portable antenna powering to On
onlyifyouneedtopoweranactive-indoor
antennathatrequiresa5Vpowersupply
notexceeding50mAcurrentconsumption.
Besuretoreadyourindoorantenna’suser
manualbeforeturningthissettingon.
Tocontrolantennaoutput,press to
highlight Antenna outputandpress or
OK. Use / to highlight Inactive in eco
mode or Always active.
Press tosaveyourchangesandreturnto
thepreviousmenu.
Note
If Antenna output is set to Inactive
in ecomodewhilePortable antenna
powering is set to On,thedevice(s)
connectedtotheTo TV/VCR output will
notreceivetheantennasignal.
ToseeinformationaboutyourHDrecorder,
press andhighlightSystem information.
Detailssuchassoftwareversion,model
number,serialnumber,etc.,aredisplayedon
the right.
ToseetheavailablespaceonyourHD
recorder’shard-diskdrive,press and
highlight Hard disk drive information.
ToformatyourHDrecorder’sharddisk,press
to highlight Factory resetandpress
or OK. Press to highlight Format hard
diskandpressOK.Inthemenuthatpopsup,
press the greenbuttontoconrm,orthered
buttontocancelandreturntotheprevious
menu.
Press or BACK toreturntothe
Settingsmenu.
6 Maintenance
6.1 Cleaning
Forcleaning,useasoft,damp(notwet)cloth.
Neveruseanyabrasiveclothandaerosol
cleaners
6.2 Replacing
YourHDrecorderdoesnotcontainanyuser-
serviceableparts.Donotattempttoopenit.
Allmaintenanceworkmustbecarriedoutby
qualiedservicecentres.
6.3 Disposing
YourHDrecorderisdesignedandmanufactured
withhigh-qualitymaterialsandcomponents,
whichcanberecycledandreused.
Pleaseinformyourselfaboutthelocalseparate
collectionprocessforelectricalandelectronic
products.
Pleaseactaccordingtoyourlocalrulesand
donotdisposeofyouroldproductswithyour
normalhouseholdwaste.Thecorrectdisposal
ofyouroldproductwillhelppreventpotential
negativeconsequencesfortheenvironmentand
humanhealth.
Accessoriesandconnections34
7 Accessories and
connections
7.1 Connecting your audio equipment
HD recorder
Audio Equipment
L R
Digital
HDMI IN
S/PDIF
Analogue
Digital
A
C B
D
HDMI OUT
TV
HDMI
C
Option A – Optical S/PDIF connection
(Digital)
ConnecttheSPDIFaudiooutputofyourHD
recordertotherelevantaudioinputofyour
audioequipmentusinganopticalS/PDIFcable
(notsupplied).
Consulttheusermanualofyouraudio
equipmenttochoosetheproperdigitalaudio
inputs.
Option B – Electrical S/PDIF connection
(Digital)
ConnecttheDIGITALaudiooutputofyour
HDrecordertotherelevantaudioinputofyour
audioequipmentusinganelectricalS/PDIFcable
(notsupplied).
Refertotheusermanualofyouraudio
equipmenttochoosetheproperdigitalaudio
input.
Note
WithadigitalconnectionviatheDIGITAL
outputofyourHDrecorder,muteand
volumeoperationsaremanagedbyyouraudio
equipmentandnotbyyourHDrecorder.
Option C - HDMI connection (Digital)
Recentampliersarettedwithoneormore
HDMIsourceinput(s)andoneHDMIoutput.
Recommended connection
•ConnecttheHDMIoutputofyourHD
recordertoanHDMIsourceinputofyour
amplier.
•ConnecttheHDMIoutputofyour
ampliertoanHDMIinputofyourTV.
System settings
•ForyourHDrecorder,settheAudio
capabilities on HDMI setting(under
Menu > Settings > Preferences >
Digital output)toAUTO.
•SelectthecorrectA/VsourceonyourTV.
•SelectthecorrectA/Vsourceonyour
amplier.
•VolumecontrolsandnecessaryLipsync
adjustmentsareperformedbyyour
amplier.Refertoyouramplier’suser
manual.
Option D – Analogue connection
ConnecttheL/Raudiooutputstotherelevant
audioinputsofyouraudioequipmentusinga
doubleCINCHcable(notsupplied).
Refertotheusermanualofyouraudio
equipmenttochoosetheproperanalogueaudio
inputs.
7.2 Connecting your standard-
denition TV
HD recorder
Aerial wall
socket
1
2
TV
SCART
Mains wall
socket

35Guaranteeandservice
ENGLISH
Connecttheaerialcable(notsupplied)from
theaerialwallsockettotheAntenna IN
connector ontherearpanelofyourHD
recorder.
UseaSCARTcable(notsupplied)toconnect
the AUX connectorontherearpanelofyour
HDrecordertotheSCARTinputconnector
ofyourstandard-denitionTV.
ConnectyourTVtothemains.UseyourTV’s
remotecontroltoselecttheSCARTinput
connector,whichisconnectedtoyourHD
recorder,asthetheA/Vsource.Ifnecessary,
refertoyourTV’susermanual.
ConnectyourHDrecordertothemains
andwaituntilyourHDrecorderwakesup
(‘First Install’appearsonthefront-panel
display).
Press the V-Outbuttononthefrontpanel
twice.‘AUX SCART’nowappearsonthe
front-paneldisplayandthe‘Welcome’screen
appearsonyourTV.
Seesection3.3,InstallingyourHDrecorder,
onpage11forinstructionsoncompleting
therstinstallationsetupfromstep3.
Note
Optionally,youcanalsousethesuppliedRF
cabletoconnecttheRFoutputconnector
(labelledTo TV/VCR) ofyourHDrecorderto
theRFinputconnectorofyourTV.
8 Guarantee and service
ForthePhilipswarrantyapplicabletoyourHD
recorder,pleasevisitthePhilipswebsite:
www.philips.com/guarantee.
IncaseyoudonothaveanInternetconnection,
pleasecontactyourlocalPhilipsConsumerCare
Centre(seepage42).
9 Technical data
ThisproductisinconformitywithEuropean
95/47/ECand2002/21/ECdirectives.
Theproductcomplieswiththefollowing
EuropeancouncilDirectives:2006/95/EECand
2004/108/EC.
Front end
• DualfrontendDVB-T2
Video decoding
Standard denition
• MPEG2MP@ML
• MPEG4AVCMP@L3
• Videobitrate 15Mbit/s
• Resolution:576imax
720x576pixelsinterlaced
• Pictureformat4:3et16:9
High denition
• MPEG2MP@HL
• MPEG4AVCHP@L4
• Videobitrate 20Mbit/s
• Resolutionofbroadcast:720p,1080i
• Upscale up to: up to 1080p50
• Contentprotection:HDCPonHDMI
Audio Decoding
• MPEGIlayerI,II
• DolbyDigital
• HE-AACstereo/Multichannel
• DolbyDigital/HEAACtostereodown-mixing
• DolbyDigitalPlustoDolbyDigitaltranscoding
• HE-AACtoDolbyDigitaltranscoding*
*Featuresubjecttofutureproductsoftware
upgrade
Convenience
• Automaticinstallation
• HDreceptionindicator
• Recordingindicator
• Automaticchannelupdate
• TVandRadiomodes
• 4xfavoriteTVchannellists
• 4xfavoriteRadiochannellists

Technicaldata36
Rear panel connections
• RFin:typeIEC169-2female
• RFout:typeIEC169-2male
• HDMIoutput
• AUXSCARTcongurablebymenu
-SCARTVCRconguration(forrecorder)
Outputs:CVBS*,xedlevelL/Raudio
-SCARTTVconguration(foraTV)
Outputs:CVBS*orRGB/FB,xedlevel
L/Raudio,Slowblanking
• L/RanalogueAudiooutput
• Digitalaudiooutput:
CinchelectricalSPDIF
Optical SPDIF
• DCpowerinlet
• RJ45
• USB2.0(Master)
*Videostandard:PAL
Hard Disk Drive
• Capacity500GB
• Recordingtime
InMPEG2220hours
InMPEG4110hours
• DataScramblingAES
• PairingHDD/STB
• Features
Trickmodes128xto1/8x
Timeshiftbuffer3hours
Smoothtrickmodeupto4x
Antenna control for indoor aerial
• ViaRFINconnector
• DCpowering:5Volts/50mA
• Switchableviamenu:On/Off
Front-panel display / buttons
• 1xbi-colorLED&1xblueLED
• 1xRedLED
• 16digitwhiteVFDdisplay
• 5xbuttons:Standby,P+,P-,Res,V-Out
• 1xUSB(onproductside)
• Programmelistediting:Add,Move,Delete
• Parentalcontrol–Childlock
• 8daysElectronicProgrammeGuide
• Eventtimer8
• EventprogrammingviaEPG
• DVBsubtitling
• DigitalTXT/MHEGwithInteractionchannel
• VideoscalingonHDMIoutput:Auto,Original,
576i,576p,720p,1080i,1080p50
• DolbyDigital5.1audiooutput
• ECOpowermanagement
• IPaddressassignment:ManualorDHCP
• Softwareupdate:
UpdateviaOTAdownload
LocalupdateviaUSBforconsumer
• SwitchablePoweringforactiveantenna
• Watchandrecord
• Timeshiftbuffer&trickmodes
• Freeview+HDfeatures(Seriesrecording,
alternate…)
Application system resources
• ProcessorSTi7105
Reception - Demodulation
• ReceptionofDVB-Tbroadcast(EN300744)
• ReceptionofDVB-T2broadcast(acc.D-Book
6.1)
• Demodulationtype:COFDMFFT
• Inputfrequencyrange:UHFIV/V
470–862MHz
• ActiveRFLoop-through:
Bandwidth47-862MHz
Switchtopassiveloop-throughin
standbymode
• Channelbandwidth(BW)(target):8MHz
• Network:MFN/SFN

37Frequentlyaskedquestions
ENGLISH
Accessories
• Remotecontrol
Protocol:RC6
• Batteries:2x1.5VtypeAAA/R03
• Usermanual
• QSG
• Freeviewyer
• Retuneyer
• CoaxialRFcable
• HDMIcable
• AC/DCconverterincl.mainscord
Miscellaneous
• Temperaturerange(°C)
Operating+5°Cto+45°C
Storage-25°Cto+70°C
• Mains:AC230V+/-10%,50Hz
• Powerconsumption:<15W
Standby:<0.4W
• Weight:
Product:1.75Kg
Includingpackaging:2.7Kg
• Dimensions:
Product(mm)240x210x65
Packaging(mm)360x290x100
Duetocontinuedimprovements,this
informationissubjecttochangewithoutnotice.
10 Frequently asked questions
Connection
Your HD recorder does not display any
digital TV channels on your TV. You may
also see the on-screen message “Signal
lost”.
• Checkthattheaerialcablefromtheaerial
wallsocketiscorrectlyconnectedtoyour
HDrecorder(seepage11).
• Theremaybeatemporaryproblemwith
thereception,caused,forexample,bybad
weather;tryagainlater.
• Checkifthereisanynetworkmessage
relatedtothissignalloss.Youcanaccessthe
Network messages menufromMenu >
Settings > Network messages.
The time-shift bar with “Live” indication
appears when you try to change a
programme.
Repeattheprogrammechangerequesttowatch
the programme.
Setup
Your HD recorder does not seem to be
working and there are no lights on the
front panel.
Checkthatthe12Vpowersupplyunit is
correctlyconnectedtoyourHDrecorder.
Your HD recorder does not seem to be
working and a channel number is shown
on the front-panel display.
• Checkthatallconnectionsareproperly
made(seepage11).
• CheckthatyourTVispluggedintothemains
andthatitisswitchedon.
• Checkthatyouhaveselectedthecorrect
A/Vchannel/sourceonyourTVdepending
onhowyourHDrecorderisconnectedto
it(thatis,usingHDMIorSCART).Referto
yourTV’susermanualforinstructions.

Frequentlyaskedquestions38
Your HD recorder seems to be switching
off automatically after some time.
IfyourHDrecorderautomaticallygoesinto
standbymode(standbyindicatoronthefront
panellightsup),thisisduetotheEcomode.
TheEcomodeissetto3hours,bydefault
(environmentallyfriendlyproduct).Tomodify
it,gotoMenu > Settings > Preferences >
Automatic Eco mode,andchooseadifferent
value. See page 30.
Your remote control is not working.
• Makesurethatyoupointyourremote
controldirectlyatyourHDrecorderand
thatnothingisbetweenitandyourHD
recorder.ThestandbyindicatoronyourHD
recorder’sfrontpanelshouldasheachtime
youpressaremotecontrolbutton.
• Checkthebatteriesandreplacethem,if
necessary.
The picture is not displayed on your
HDTV and an HDCP authentication error
is displayed.
YourHDTVdoesnotsupportHDCP,which
allowsyourHDrecordertotransmitfull-
resolutionvideotoyourHDTV.Asaresult,the
HDMIoutputdisplaysamessagemaskingthe
video,whichasksyouforchangingtheresolution
downto576p(seepage23-Resbutton).
The picture seems to be stretched or
squashed.
ChecktheTV formatsettingunderDigital
output or Analog output(Main > Settings
> Preferences).Alternatively,pressthepicture
formatbutton onyourremotecontrolto
scrollthroughthedifferentsettings.
AlsorefertoyourTV’susermanual.
Your HD recorder displays ‘err’ on the
front-panel display when you plug in a
USB memory stick.
ReformatyourUSBmemorystickusinga
computer.EnsurethatthelesystemisFAT16or
FAT32.
You cannot nd all the channels you think
should be available.
RetuneyourHDrecorder(seepage31).
Alternatively,resetyourHDrecordertoits
factorydefaultsettings(seepage32)and
proceedwiththerstinstallationsetup.
Note
Duringtherstinstallation,yourchoiceofthe
networkmayaffectthenumberofinstalled
channels.
You cannot nd any HD channels.
Initially,HDprogrammesareavailableon
channels50and51.Switchtothesechannels.
NotethattheHDindicatoronthefrontpanel
ofyourHDrecorderlightsupwhilewatchingan
HDchannel.
Digitalterrestrialbroadcastingisprogressing
intheUK.Asdigitalswitchoverhappens,the
numberofdigitalchannelsavailableineach
regionmayalsoincrease.Pleasevisitoneofthe
followingwebsitestondoutwhenthedigital
switchoverisscheduledforyourarea:
www.digitaluk.co.uk
www.freeview.co.uk/availability(coverage
checkerforHD)
Your HD recorder seems to lock up or get
stuck while retuning it to search for new
channels.
InpartsofthecountrywheretheanalogueTV
serviceshavealreadybeenswitchedoff,thetime
takentoretunecanincrease.Thisisbecause
yourHDrecorderscansforallthetransmitters
inyourarea,whichcantakeupto15minutes.
Pleasewaitfortheretunetocomplete.Thisis
notafault.

39Frequentlyaskedquestions
ENGLISH
You cannot nd all the channels you think
should be available even after retuning
your HD recorder.
• Themissingchannelsmaynotbeavailable
inyourarea.Checkyourcoverageonthe
Freeviewwebsite:www.freeview.co.uk.
• Yourantennamayneedtobeupgraded
(signalpower,position,orientationorcabling).
• Asignalboostermaybettedonyour
antenna.Considerhavingthisremovedas
ampliersarenormallynotrequiredafter
thedigitalswitchover.Toohighasignallevel
cancauseyourHDrecordertoskipsome
channels.
• Someearlydigitalreceiversmanufactured
priorto2004supportonlythe2Kmode
ofdigitaltransmissions.Aspartofthe
digitalswitchover,theUKFreeviewTV
platformwillbeupgradedtoamorerobust
transmissionstandard.Thechangein
transmissionstandardhasbeenauthorised
byOFCOMandthenewstandardis
supportedbyproductsthathavethe“Digital
Tick”.
• IfyouhaveaSKYbox,switchittostandby
modeandthenretunetheterrestrial
receiver.Ifitthenreceivesallexpected
Freeviewchannels,thenthemodulator
needsadjustingonyourSkybox.Contact
Skytondouthowtoadjustthemodulator.
Your HD recorder found all the expected
channels after you retuned it. However,
when you turned on your HD recorder
the next day, the picture was breaking up
and some channels were missing.
YourHDrecorderhasanautomaticretuning
feature;thisallowsittokeepuptodatewith
minorservicechanges.However,whenthesignal
levelofnearbyrelaytransmittersarehighor
iftheantennasignalisbeingamplied,these
problemscanoccur.
Tosolvethisproblem:
• Turnofftheautomaticchannelupdates
featureofyourHDrecorder(seepage32).
• Removeanysignalampliersorboosters
thatarettedonyourantenna.Theseare
notrequiredafterthedigitalswitchover.
• Checkthatyourantennaisalignedproperly
andisamodeladaptedfordigitalsignal
receptioninyourarea.Ifyouarenotsure,
pleaseusetheservicesofarecognisedCAI
antennainstallationcompany.
You set a recording but your HD recorder
did not record what you wanted.
ChecktheTV guide or the Recordingsmenu
toseeifanalternateinstanceoftheprogramme
wasautomaticallyselectedduetoaconict.
Your hard disk is full with protected
recordings.
Removetheprotectiononyourrecordingsso
thatyourHDrecordercanautomaticallyfree
upsomediskspacebyerasingtherecorded
programmes.
Although you set Audio capabilities to
“Auto” for HDMI or “Dolby Digital” for
S/PDIF, your HD recorder does not deliver
Dolby Digital 5.1 multi-channel audio
output.
• YourHDrecorderneedsasoftware
upgrade.
• Visitwww.philips.com/supportregularly
tocheckiftheappropriatesoftwarefor
ugradingyourHDrecorderviaUSBis
available.
• Set the Audio capabilitiessettingtoPCM
untiltheupgradeofyourHDrecorderis
done.

Glossary40
You get a picture or a freezed picture,
a program number on the front display
and your receiver seems blocked while
not responding to the remote control
commands.
YourHDrecorderhashungup.Youhaveto
resetyourHDrecorder.Pressthestandby
buttononthefrontpaneluntilPHILIPS is
shownonthefront-paneldisplay.
Ifyouhavetriedalloftheactionssuggested
aboveandstillarenotabletoresolvethe
problem,contactyourlocalPhilipsConsumer
CareCentre(seepage42).
11 Glossary
Analogue audio
AnaloguesoundisoutputfromtheLEFT/RIGHT
audioconnectorsontherearpanelofyourHD
recorder.Theredandwhitesocketssendaudio
throughtwochannels,theleftandright.
Aspect ratio
Aspectratioreferstothelength-to-heightratio
ofTVscreens.Theaspectratioofastandard
TVis4:3,whiletheratioofahigh-denition
orwidescreenTVis16:9.Theletterboxformat
allowsyoutowatchavideowithawideraspect
ratioonastandard4:3TV.
DHCP
DynamicHostCongurationProtocol(DHCP)
isanetworkprotocolthatenablesarouteror
servertoautomaticallyassignIPaddressesto
devicesthatarepartofitsnetwork.
Digital audio
Digitalsoundisavailablewhenyouusethe
DIGITALaudioconnector(coaxialS/PDIF)
ontherearpanelofyourHDrecorder.These
socketssendaudiothroughmultiplechannels,
insteadofjusttwochannelsasanaloguedoes.,
Dolby Digital
AsurroundsoundsystemdevelopedbyDolby
Laboratoriescontaininguptosixchannelsof
digitalaudio(frontleftandright,surroundleft
andright,centreandsubwoofer).
DVB
DigitalVideoBroadcasting

41Glossary
ENGLISH
EPG
ElectronicProgrammeGuide
EasyLink
ThePhilipsEasyLink™technologyenablesyou
tocontrolmultipledevices,whichareconnected
throughstandardHDMIcables,usingasingle
remote.
HDCP
High-bandwidthDigitalContentProtection
(HDCP)isatypeofdigitalcopyprotection
system.WhenyourHDrecorderisattachedvia
anHDMIcabletoanHDCP-compliantHDTV,
theHDTVandHDrecordernegotiateasecure
link,whichallowsyourHDrecordertotransmit
fullresolutionvideotoyourHDTV.
HDD
HardDiskDrive
HDMI
High-DenitionMultimediaInterface(HDMI)is
ahigh-speeddigitalinterfacethatcantransmit
uncompressedhigh-denitionvideoanddigital
multi-channelaudio.Itdeliversperfectpicture
andsoundquality,completelyfreefromnoise.
HDMIisfullybackwardcompatiblewithDVI.
HDTV
High-DenitionTelevision
Lip Synchronisation
Settingusedtosynchroniseaudiowithvideo
incaseadelayisexperienced,inparticular,if
speechdoesnotmatchlipmovements.
MPEG
MotionPictureExpertsGroup.Acollectionof
compressionsystemsfordigitalaudioandvideo.
PIN Code
A4-digitcodeusedtopreventaccessto
inappropriateprogrammes(parentalcontrol).
SDTV
Standard-DenitionTelevision.
Surround
Asystemforcreatingthreedimensionsound
eldsfullofrealismbyarrangingmultiple
speakersaroundthelistener.
USB memory stick
Asmallsizestoragedevice,whichisusedto
updateyourHDrecorder’ssoftware(see
page32).ConnectittotheUSB 2.0
connnectorontherearpanelofyourHD
recorder.

Index42
12 Index
Changechannel,14-16
Channelbanner,14,15
Connect
HDMI,11
SCART,35
Controlvolume,14
Favourite lists
Create,27
Delete,28
Modify,28
Rename,28
Firstinstallation,11
Frontpanel,23
Indoorantenna
Powering,11,33
Rearpanel,23
Record
Instantly,18
Scheduled,19,21
Remotecontrol,24
Restorefactorysettings,32
Retune,31
Returnchannel,30
Scheduledrecordings,19,21
Softwareupdate,31
Systemsettings,32
Time-shiftbar,18,20
TVguide,16
Wake-upyourHDrecorder,14
Watchrecordedprogrammes,22
Contact information
HDT 8520/05
Serialnumber:
UNITED KINGDOM
Phone:08003316015

43Trademarksandpartnerlogos
ENGLISH
Trademarks and partner logos
ThePhilipswordmarkandthePhilipsshieldareregisteredtrademarksofKoninklijkePhilips
ElectronicsN.V.andareusedbyPaceplcunderlicensefromKoninklijkePhilipsElectronicsN.V.
ManufacturedunderlicensefromDolbyLaboratories.
“Dolby”andthedouble-DsymbolaretrademarksofDolbyLaboratories.
HDMI,theHDMIlogo,andHigh-DenitionMultimediaInterfacearetrademarksorregistered
trademarksofHDMIlicensingLLCintheUnitedStatesandothercountries.
TrademarkoftheDVBDigitalVideoBroadcastingProject(1991to1996)
TheFREEVIEWserviceissubjecttocoverage.TheFREEVIEW,FREEVIEW+,FREEVIEWHDand
FREEVIEW+HDwordsandlogosaretrademarksofDTVServicesLTD.©DTVServicesLtd2010.
The“HDTV”LogoisatrademarkofEICTA.
100%recycledpaper
Paceand aretrademarksand/orregisteredtrademarksofPaceplc.

©2010KoninklijkePhilipsElectronicsN.V.
Allrightsreserved.
Documentordernumber:502-1039801
