Subwoofer / Altavoz potenciador de graves
Precautions
Avoid installing the subwoofer in areas subject to:
high temperatures such as from direct sunlight or
hot air from a heater
dust or dirt
excessive vibration
Do not install the subwoofer in a place where it could
distract the driver from the road.
The subwoofer should be securely installed so as to
prevent injury to people in the event of sudden braking.
Before Installation
Choose the installation location carefully so that the
subwoofer will not interfere with normal driving.
Use only the supplied mounting hardware for a safe and
secure installation.
Check the underside of the mounting location (under
the car, or in the trunk) carefully to make sure there is
no fuel line, fuel tank, electric wires, etc., before drilling
installation holes.
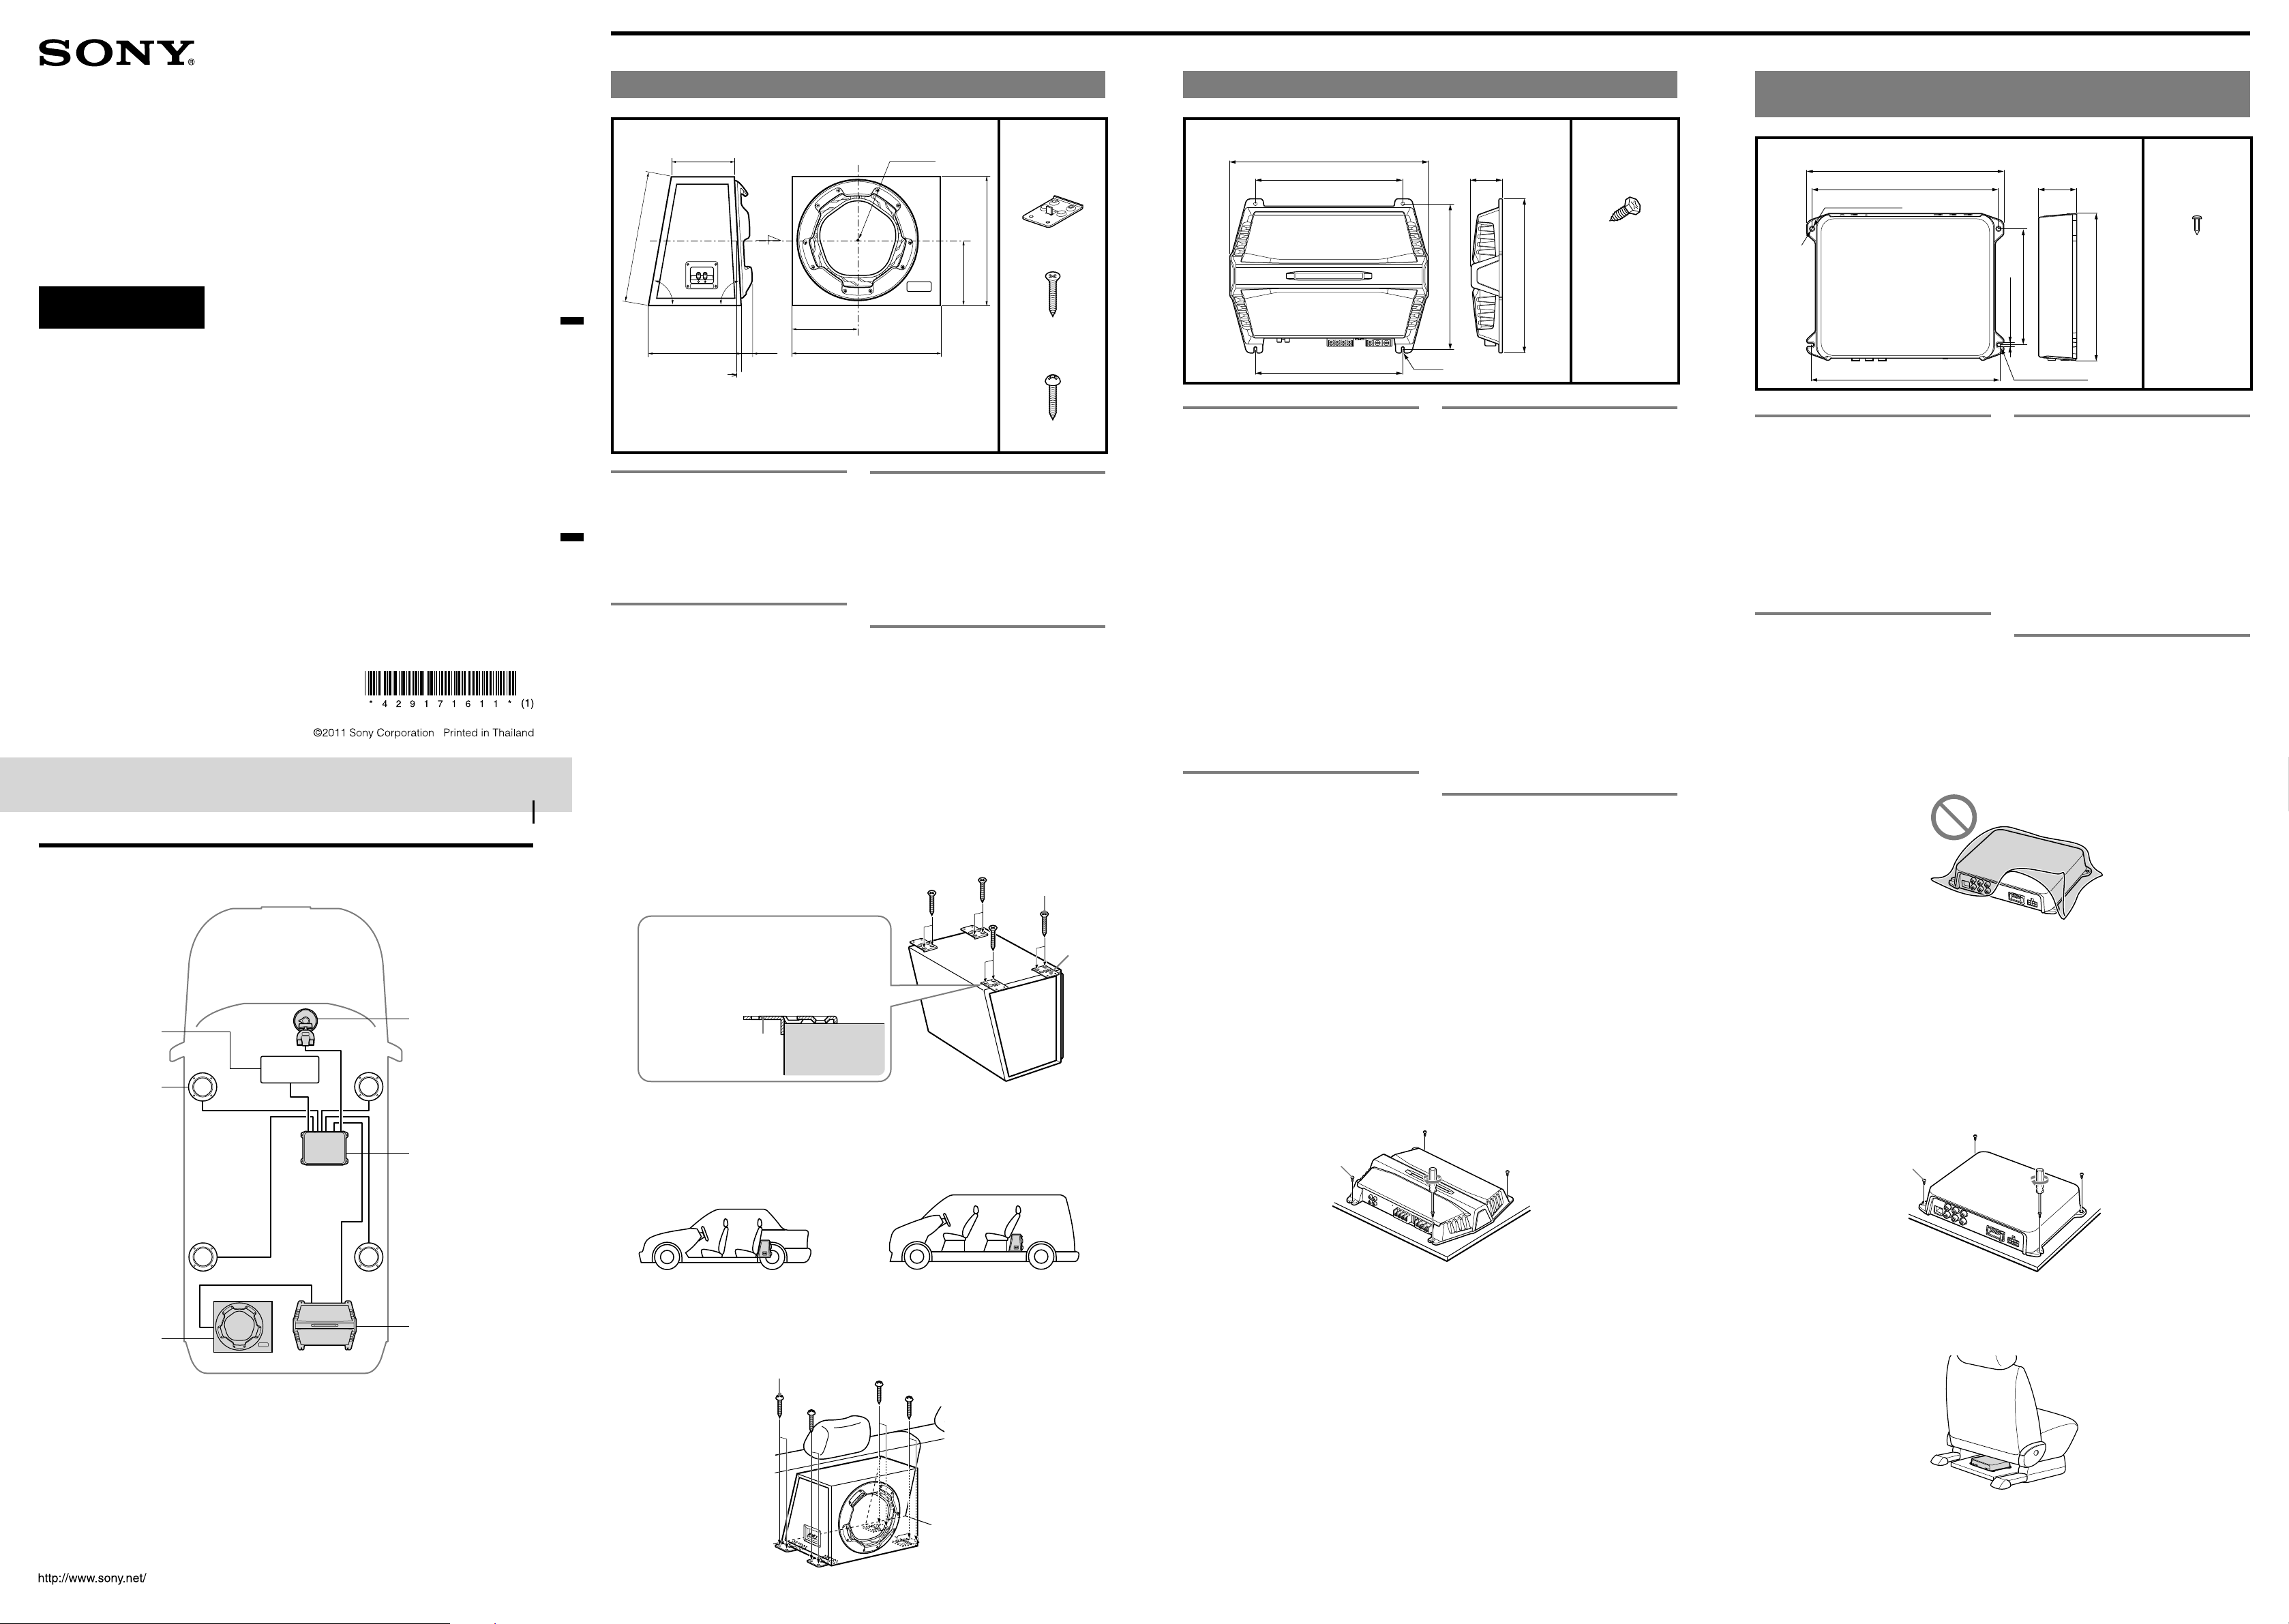
1
Fasten the metal fittings securely to the subwoofer with the screws .
Sujete cuidadosamente las piezas de metal al altavoz potenciador de graves con los
tornillos .
Place the protruding L-shaped section of against
the side of the subwoofer.
Coloque la parte saliente de en forma de L contra
el lado del altavoz potenciador de graves.
2
Place the subwoofer anywhere behind the back seat () or in the cargo area ().
Coloque el altavoz potenciador de graves en cualquier lugar detrás del asiento trasero
() o en el espacio de carga del vehículo ().
3
Mark and drill the screw holes in the car floor panel, then use the screws .
Marque y taladre los orificios para tornillos en el panel del suelo del vehículo y, a
continuación, coloque los tornillos .
Dimensions / Dimensiones
185.4 (7
3
/8)
375.7 (14
7
/
8
)
80°
87°
270 (10
3
/4)
33
(1
5
/16)
190 (7
1
/2)
430 (17)
188.7 (7
1
/2)
370 (14
5
/8)
Necessary items /
Elementos
necesarios
× 4
ø 5 × 20 mm
× 8
ø 5 × 20 mm
× 8
Reference Point
Punto de referencia
Reference Plane
Plano de referencia
Reference Axis
Eje de referencia
Amplifier / Amplificador
Precautions
Avoid installing the amplifier in areas subject to:
high temperatures such as from direct sunlight or
hot air from the heater
rain or moisture
dust or dirt
Do not install the amplifier under the floor carpet,
where the heat dissipation from the amplifier will be
considerably impaired.
If the amplifier is placed too close to the car audio unit
or antenna, interference may occur. In this case,
relocate the amplifier away from the car audio unit or
antenna.
The amplifier is a high-power unit. Therefore, it may
not perform to its full potential if used with the speaker
cords supplied with the car.
This power amplifier employs a protection circuit* to
protect its transistors and the speakers if the amplifier
malfunctions. Do not attempt to test the protection
circuits by covering the heat sink or connecting improper
loads.
* Protection circuit
The protection circuit operates in the following cases:
when the unit has overheated
when DC current is generated
when the speaker terminals are short-circuited
The color of the POWER/PROTECTOR indicator will change from green to
red, and the amplifier will shut down.
If this happens, turn off the system by pressing and holding the SOURCE/
OFF button on the cradle/remote commander more than two seconds,
and determine the cause of the malfunction. If the amplifier has
overheated, wait until the amplifier cools down before resuming use.
Before Installation
Decide the installation location: in the cargo area or
under a seat.
Choose the installation location carefully so that the
amplifier will not interfere with normal driving.
The supplied mounting screws are 15 mm (
19
/32 in)
long. Therefore, make sure that the mounting board
(not supplied) is thicker than 15 mm (
19
/32 in).
Precauciones
Evite instalar el altavoz potenciador de graves en zonas
expuestas a:
altas temperaturas, como zonas en contacto directo
con la luz solar o el aire caliente de la calefacción
polvo o suciedad
vibraciones excesivas
No instale el altavoz potenciador de graves en un lugar
donde pueda distraer al conductor.
El altavoz potenciador de graves debe instalarse
firmemente para evitar que lastime a los pasajeros en
caso de una frenada repentina.
Antes de la instalación
Elija cuidadosamente el lugar de instalación de forma
que el altavoz potenciador de graves no interfiera con
las operaciones habituales de conducción.
Para una instalación segura y fiable, utilice solamente la
ferretería de montaje suministrada.
Antes de taladrar los orificios de instalación, examine
cuidadosamente la parte inferior de la ubicación de
montaje (debajo del vehículo o en el baúl) para
asegurarse de que no haya conductos de combustible,
depósitos de gasolina, cableados eléctricos, etc.
Precauciones
Evite instalar el amplificador en zonas expuestas a:
altas temperaturas, como zonas en contacto directo
con la luz solar o el aire caliente de la calefacción
lluvia o humedad
polvo o suciedad
No instale el amplificador debajo de la alfombra del
suelo, ya que la disipación de calor se verá
considerablemente reducida.
Pueden producirse interferencias si se coloca el
amplificador demasiado cerca del sistema de audio del
vehículo o de la antena. En tal caso, aleje el
amplificador de dichos dispositivos.
Este amplificador es una unidad de alta potencia. Por lo
tanto, puede no funcionar a su máximo rendimiento si
se lo utiliza con los cables de altavoz incluidos con el
vehículo.
Este amplificador de potencia utiliza un circuito de
protección* para proteger los transistores y los altavoces
en caso de que se produzcan fallas de funcionamiento en
el amplificador. No intente poner a prueba los circuitos
de protección cubriendo el disipador de calor o
conectando cargas inadecuadas.
* Circuito de protección
El circuito de protección se activa en los siguientes casos:
Si la unidad se calienta de manera excesiva.
Si se genera corriente cc.
Si se produce un cortocircuito en los terminales del altavoz.
El color del indicador POWER/PROTECTOR cambiará de verde a rojo y el
amplificador se apagará.
Si esto ocurre, apague el sistema manteniendo presionado el botón
SOURCE/OFF del soporte o control remoto durante más de dos segundos
y averigüe qué causó la falla de funcionamiento. Si el amplificador se ha
sobrecalentado, espere hasta que se enfríe antes de volver a utilizarlo.
Antes de la instalación
Elija el lugar de instalación: en el espacio de carga del
vehículo o debajo de un asiento.
Elija cuidadosamente el lugar de instalación de forma
que el amplificador no interfiera con las operaciones
habituales de conducción.
Los tornillos de montaje suministrados tienen una
longitud de 15 mm. Por lo tanto, asegúrese de que el
grosor del tablero de montaje (no suministrado) sea
superior a los 15 mm.
Dimensions / Dimensiones
356.8 (14
1
/8)
266 (10
1
/2)
266 (10
1
/2)
ø6 (
1
/4)
260 (10
1
/4)
55 (2
1
/4)
176.8 (11)
Necessary item /
Elemento
necesario
ø 5 × 15 mm
× 4
1
Place the amplifier on a mounting board (not supplied), and mark the positions of the
four screw holes on the surface of the mounting board.
Instale el amplificador en un tablero de montaje (no suministrado) y marque sobre la
superficie la posición de los cuatro orificios para los tornillos.
2
Drill the holes approximately 3 mm (
1
/8 in) in diameter and mount the amplifier onto
the board with the supplied mounting screws .
Taladre los orificios con un diámetro de aproximadamente 3 mm y coloque el
amplificador sobre el tablero con los tornillos de montaje suministrados .
3
Place the amplifier either in the cargo area or under a seat.
Instale el amplificador ya sea en el espacio de carga del vehículo o debajo de un
asiento.
Unit: mm (in)
Unidad: mm
Unit: mm (in)
Unidad: mm
Digital Link
Sound System
Installation/Connections
Instalación/Conexiones
XDP-PK1000
4-291-716-11 (1)
Installation/ Instalación
DSP Master Unit / Unidad maestra del procesador de sonido
digital (DSP)
Precautions
Avoid installing the DSP master unit in areas subject to:
high temperatures such as from direct sunlight or
hot air from the heater
rain or moisture
dust or dirt
Do not install the DSP master unit under the floor
carpet, where the heat dissipation from the DSP master
unit will be considerably impaired ().
If the DSP master unit is placed too close to the car
audio unit or antenna, interference may occur. In this
case, relocate the DSP master unit away from the car
audio unit or antenna.
Do not use the DSP master unit on a weak battery as its
optimum performance depends on a good power
supply.
Before Installation
Install the DSP master unit under the front passenger
seat.
Choose the installation location carefully so that the
DSP master unit will not interfere with normal driving.
The supplied mounting screws are 14 mm (
9
/16 in)
long. Therefore, make sure that the mounting board
(not supplied) is thicker than 14 mm (
9
/16 in).
Precauciones
Evite instalar el la unidad maestra del DSP en zonas
expuestas a:
altas temperaturas, como zonas en contacto directo
con la luz solar o el aire caliente de la calefacción
lluvia o humedad
polvo o suciedad
No instale la unidad maestra del DSP debajo de la
alfombra del suelo, ya que la disipación de calor se verá
considerablemente reducida ().
Pueden producirse interferencias si se coloca la unidad
maestra del DSP demasiado cerca del sistema de audio
del vehículo o de la antena. En tal caso, aleje la unidad
maestra del DSP de dichos dispositivos.
No utilice la unidad maestra del DSP con una batería
que cuente con poca energía, ya que se requiere una
buena fuente de alimentación para un rendimiento
óptimo.
Antes de la instalación
Coloque la unidad maestra del DSP debajo del asiento
del acompañante.
Elija cuidadosamente el lugar de instalación de forma
que la unidad maestra del DSP no interfiera con las
operaciones habituales de conducción.
Los tornillos de montaje suministrados tienen una
longitud de 14 mm. Por lo tanto, asegúrese de que el
grosor del tablero de montaje (no suministrado) sea
superior a los 14 mm.
1
Place the DSP master unit on the mounting board (not supplied), and mark the
positions of the four screw holes on the surface of the mounting board.
Instale la unidad maestra del DSP en un tablero de montaje (no suministrado) y
marque sobre la superficie la posición de los cuatro orificios para los tornillos.
2
Drill the holes approximately 3 mm (
1
/8 in) in diameter and mount the DSP master unit
onto the board with the supplied mounting screws .
Taladre los orificios con un diámetro de aproximadamente 3 mm y coloque la unidad
maestra del DSP sobre el tablero con los tornillos de montaje suministrados .
3
Place the DSP master unit under the front passenger seat.
Coloque la unidad maestra del DSP debajo del asiento del pasajero delantero.
Dimensions / Dimensiones Necessary item /
Elemento
necesario
ø 4 × 14 mm
× 4
210.6 (8
3
/8)
199.6 (7
7
/8)
2-ø 4.4 (
3
/16)
199.6 (7
7
/8)
2- 4.4 (
3
/16)
124.4 (5)
40 (1
5
/8)
2- R 2.2 (
3
/32)
156.6 (6
1
/4)
System layout / Disposición del sistema
An example positioning of the system components is shown below.
A continuación, se muestra un ejemplo de cómo están dispuestos los componentes del sistema.
Speaker / Altavoz
Cradle / Soporte
Amplifier / Amplificador
DSP master unit /
Unidad maestra
del DSP
Car audio unit / Sistema
de audio del vehículo
Subwoofer / Altavoz
potenciador de
graves
Note
If you have any questions or problems concerning the system that are not covered in this manual, please consult your
nearest Sony dealer.
Nota
Póngase en contacto con su distribuidor Sony más cercano en caso de tener cualquier consulta o problema relativos al
sistema que no se hayan tratado en este manual.
Unit: mm (in)
Unidad: mm
Connecting the System / Conexión del sistema
Precautions
Connect the yellow and red power supply leads only
after all other leads have been connected.
Run all ground (earth) leads to a common ground
(earth) point.
Be sure to insulate any loose unconnected leads with
electrical tape for safety.
Your car audio unit may not work or a caution will
appear on its display window when you connect the
sound output of the car audio unit to the DSP master
unit. In this case, please consult your nearest Sony
dealer.
Notes on the power supply lead (yellow)
When connecting the DSP master unit in combination
with other stereo components, the amperage rating of
the car circuit to which the DSP master unit is
connected must be higher than the sum of each
components fuse amperage rating.
If none of the car circuits are rated high enough,
connect the DSP master unit directly to the battery.
Precauciones
Conecte el cable de la fuente de alimentación amarillo y
rojo sólo después de haber conectado los otros cables.
Conecte todos los cables de conexión a masa a un
punto común.
Por cuestiones de seguridad, asegúrese de aislar con
cinta aislante los cables sueltos que no estén conectados.
Puede que el sistema de audio de su vehículo no
funcione o que aparezca una advertencia en la pantalla
al conectar la salida de audio del sistema de audio a la
unidad maestra del DSP. En tal caso, póngase en
contacto con su distribuidor Sony más cercano.
Notas sobre el cable de la fuente de alimentación
(amarillo)
Cuando conecte la unidad maestra del DSP en
combinación con otros componentes estéreos, la
capacidad nominal de amperaje del circuito del
vehículo al que está conectado la unidad maestra del
DSP debe ser superior a la suma de la capacidad
nominal de amperaje de los fusibles de cada
componente.
Si no hay circuitos del vehículo con capacidad nominal
lo suficientemente alta, conecte la unidad maestra del
DSP directamente a la batería.
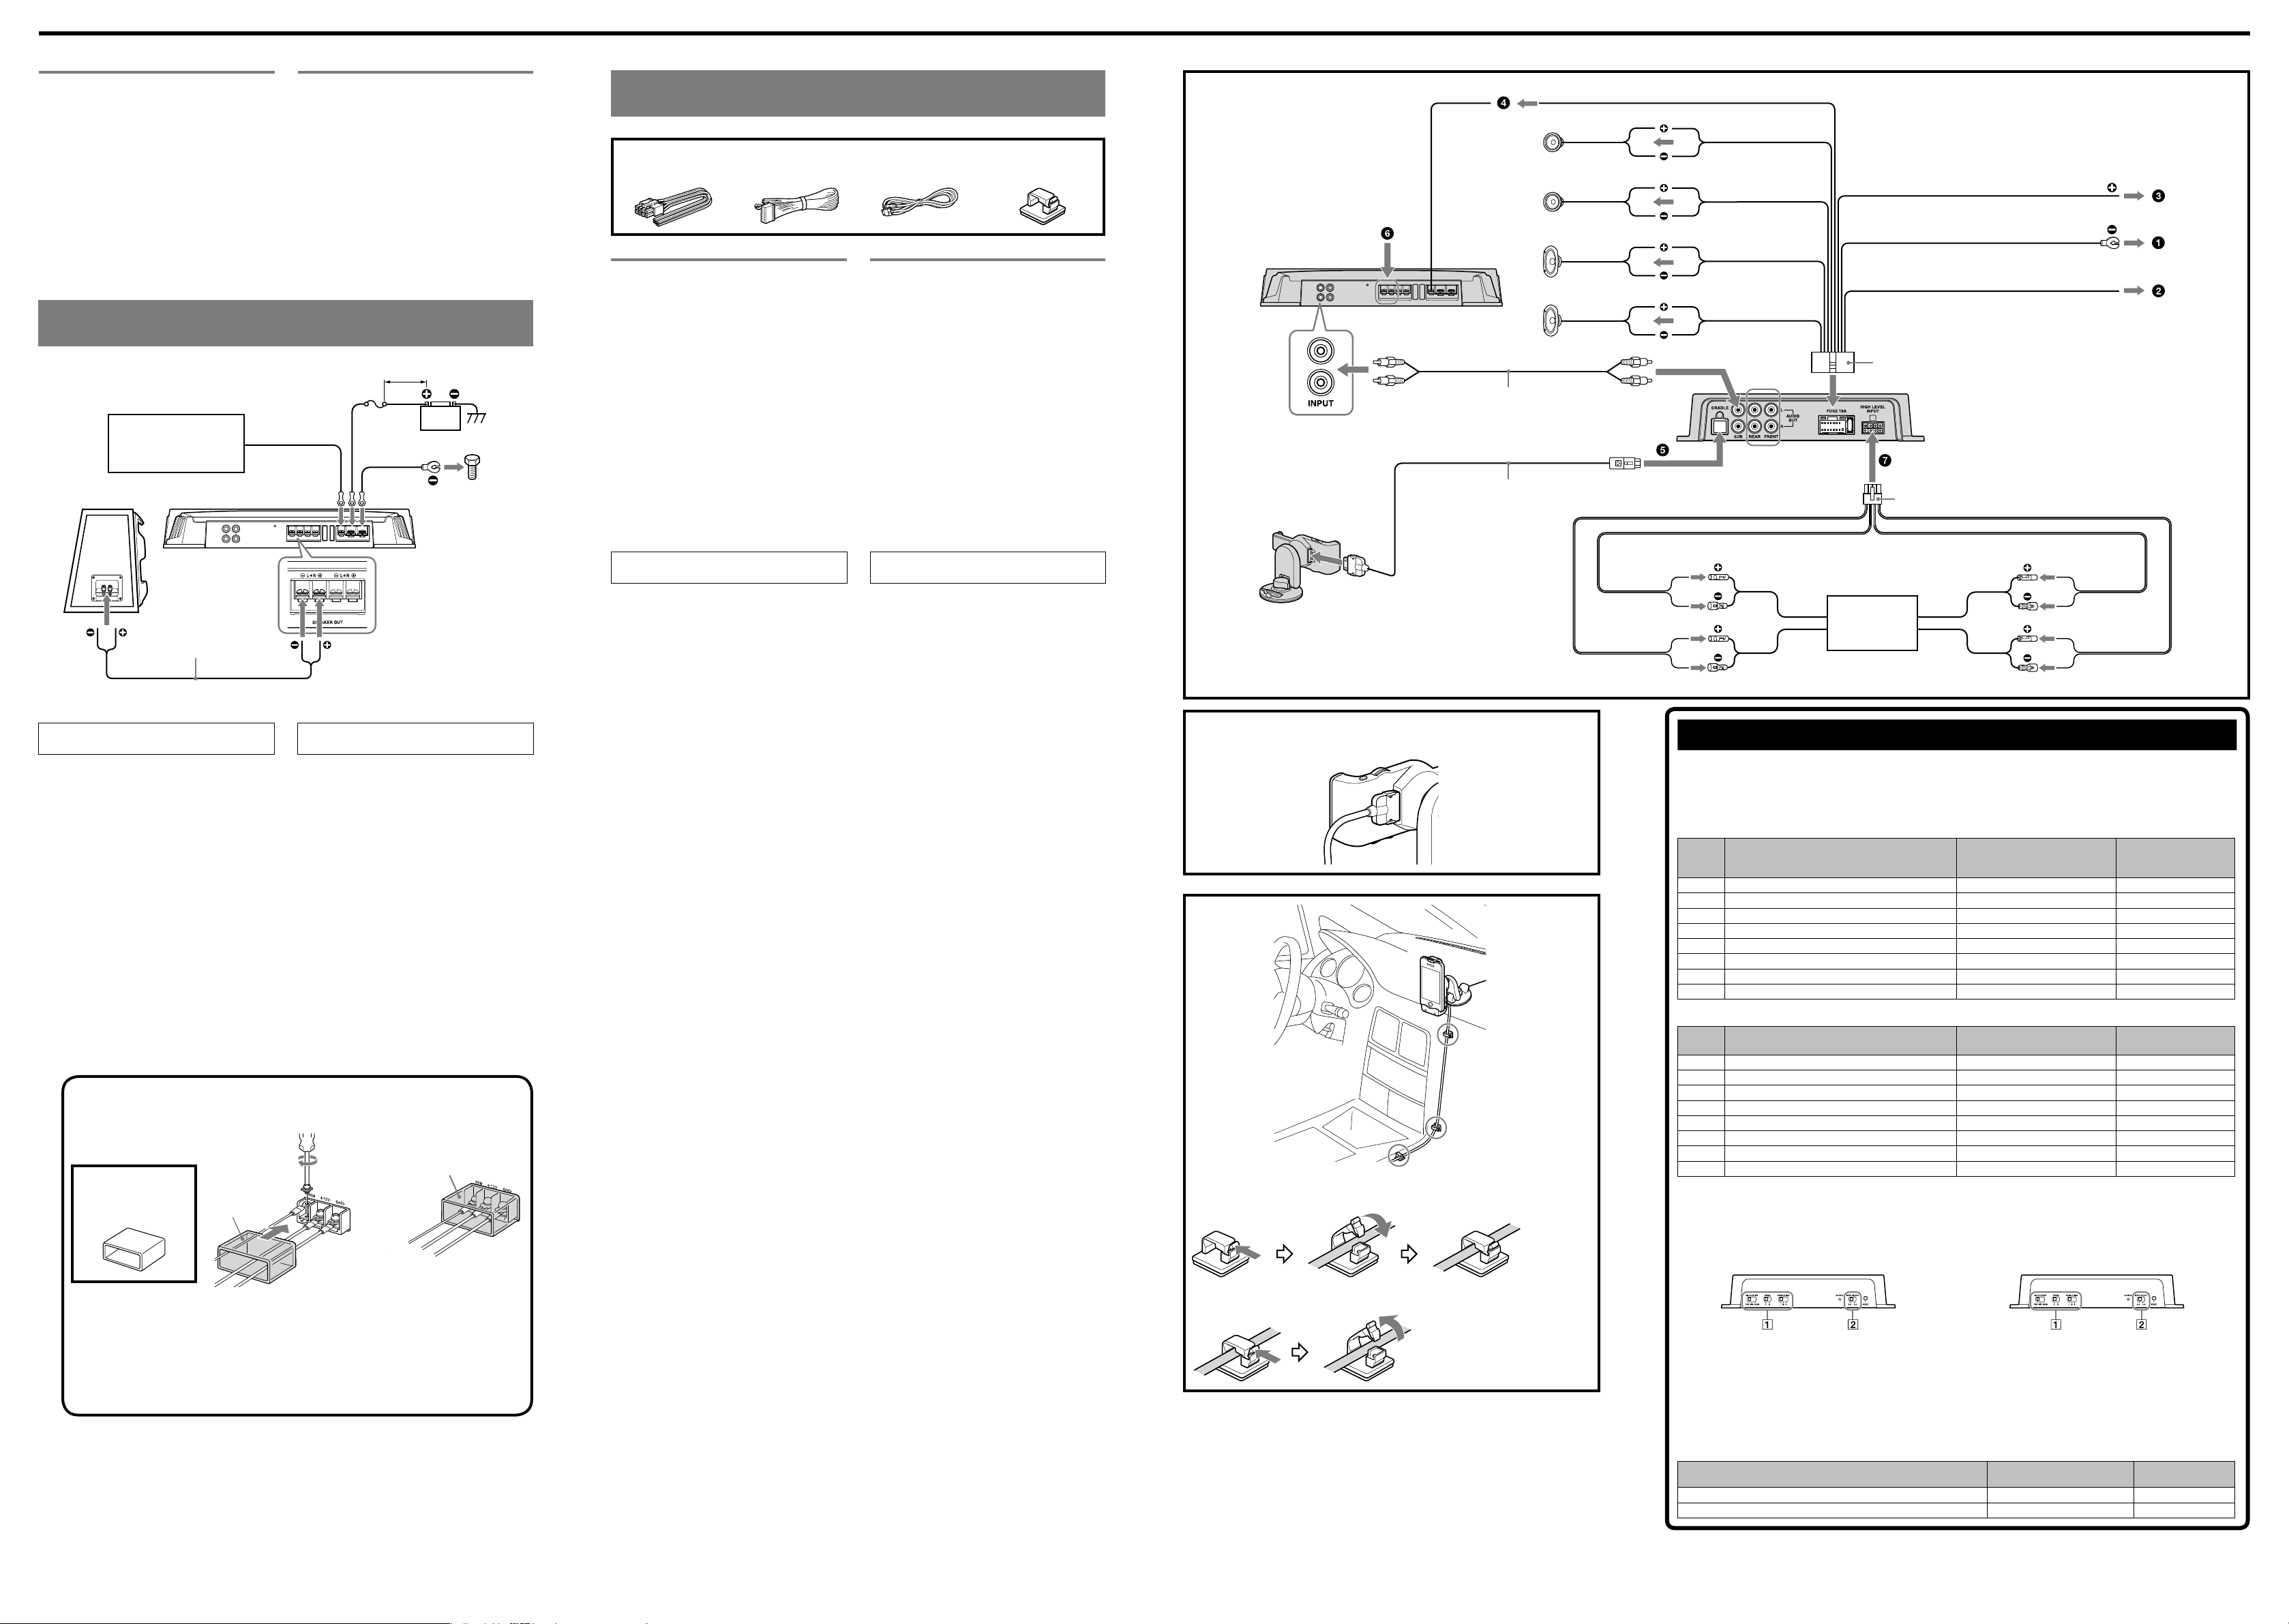
Connection diagram
To a metal surface of the car
First connect the black ground (earth) lead, then connect the yellow
and red power supply leads.
To the +12 V power terminal which is energized
at all times
Be sure to connect the black ground (earth) lead to a metal surface
of the car first.
To the +12 V power terminal which is energized
in the accessory position of the ignition switch
Notes
If there is no accessory position, connect to the +12 V power
(battery) terminal which is energized at all times.
Be sure to connect the black ground (earth) lead to a metal
surface of the car first.
If your car has a built-in FM/AM antenna (aerial) in the rear/side
glass, see “Note on the control and power supply leads.”
To the REM terminal of the amplifier
For details on this connection, see “Connecting the Subwoofer to the
Amplifier.”
To the cradle
To connect the cradle cable to the cradle, rotate the arm of the
cradle to the horizontal position.
Make sure that the cradle and the cradle cable are connected as
shown in the illustration .
Use the cord clamp to secure the cradle cable to your car ().
For details on installing the cradle on a dashboard, refer to the
Operating Instructions supplied with this system.
To the subwoofer
For details on this connection, see “Connecting the Subwoofer to the
Amplifier”.
To the car audio unit
If the car audio unit can output 4-channel sound, connect all the
Hi-level input (Car Audio In) cable () connectors to the car
audio unit.
If the car audio unit can only output 2-channel sound, connect
the front left and right speaker inputs (White, White/black striped,
Gray, Gray/black striped) of the Hi-level input (Car Audio In) cable
() to the car audio unit.
If the car audio unit has speaker outputs which can utilize
frequency band division, connect only the speaker outputs which
are capable of producing full range sound to the front left/right
speaker inputs (White, White/black striped, Gray, Gray/black
striped) of the DSP master unit.
Note on the control and power supply leads
Install input and output cords away from the power supply wire as
running them close together can generate some interference noise.
Memory hold connection
When the yellow power supply lead is connected, power will always be
supplied to the memory circuit even when the ignition switch is turned
off.
Notes on speaker connection
Before connecting the speakers, turn the DSP master unit off.
Use speakers with an impedance of 4 to 8 ohms, and with adequate
power handling capacities to avoid damage.
Do not connect the speaker terminals to the car chassis, or connect the
terminals of the right speakers with those of the left speakers.
Do not connect the ground (earth) lead of the DSP master unit to the
negative () terminal of the speaker.
Do not attempt to connect the speakers in parallel.
Connect only passive speakers. Connecting active speakers (with
built-in amplifiers) to the speaker terminals may damage the DSP
master unit.
To avoid a malfunction, do not use the built-in speaker leads installed
in your car if the DSP master unit shares a common negative () lead
for the right and left speakers.
Do not connect the DSP master unit speaker leads to each other.
Be sure to use speakers with an adequate power rating. If you use
low-power speakers, they may be damaged.
Notes on connecting the car audio unit
The bass sound may be cut if your car has equipment such as tweeters.
To avoid this, set the INPUT SELECT switch on the DSP master unit to
“2ch”. Then connect the speaker outputs which are capable of
producing full range sound to the front left/right input of the DSP
master unit.
This system is designed to turn on automatically when it detects
speaker output from the car audio unit. Detection depends on the car
audio unit. If speaker output is not detected automatically:
set the INPUT SELECT switch on the DSP master unit to “2ch”
connect the front left and right speaker inputs (White, White/black
striped, Gray, Gray/black striped) of the Hi-level input (Car Audio
In) cable () to speaker outputs of the car audio unit
connect the rear left speaker input () (green) and the rear right
speaker input () (purple/black striped) to the ACC terminal
Note on connection
If no power is being supplied to the system, check the connections.
To secure the cradle cable / Para sujetar el cable del soporte
To release the cradle cable / Para liberar el cable del soporte
Checklists / Listas de verificación
Diagrama de conexiones
A una superficie metálica del vehículo
Conecte primero el cable de conexión a masa negro y después los
cables amarillo y rojo de la fuente de alimentación.
Al terminal de alimentación de +12 V que recibe
energía sin interrupción
Asegúrese de conectar primero el cable de conexión a masa negro a
una superficie metálica del vehículo.
Al terminal de alimentación de +12 V que recibe
energía en la posición de accesorio del
interruptor de encendido
Notas
Si no se cuenta con posición de accesorio, conéctelo al terminal
de alimentación (batería) de +12 V que recibe energía sin
interrupción.
Asegúrese de conectar primero el cable de conexión a masa
negro a una superficie metálica del vehículo.
Si el vehículo cuenta con una antena de FM/AM incorporada en el
cristal trasero o lateral, consulte "Nota sobre los cables de control
y de la fuente de alimentación".
Al terminal REM del amplificador
Para obtener más información sobre esta conexión, consulte
"Conexión del altavoz potenciador de graves al amplificador".
Al soporte
Para conectar el cable del soporte al soporte, gire el brazo del
soporte hasta la posición horizontal.
Asegúrese de que el soporte y el cable del soporte estén
conectados como se muestra en la ilustración .
Utilice la pieza del sujeción de cable para sujetar el cable del
soporte al vehículo ().
Para obtener más información sobre cómo instalar el soporte en
el tablero, consulte el Manual de instrucciones suministrado con
el sistema.
Al altavoz potenciador de graves
Para obtener más información sobre esta conexión, consulte
"Conexión del altavoz potenciador de graves al amplificador".
Al sistema de audio del vehículo
Si el sistema de audio del vehículo puede producir sonido en
4 canales, conecte todos los conectores de cables de entrada de
alto nivel (entrada de audio del vehículo) () al sistema de audio
del vehículo.
Si el sistema de audio del vehículo puede producir sonido sólo en
2 canales, conecte las entradas de los altavoces derecho e
izquierdo frontales (blanco, rayado blanco y negro, gris, rayado
gris y negro) del cable de entrada de alto nivel (entrada de audio
del vehículo) () a la unidad de audio del vehículo.
Si el sistema de audio del vehículo posee salidas de altavoces que
pueden utilizar la división de las bandas de frecuencia, conecte a
las entradas de altavoz derecho e izquierdo frontal (blanco,
rayado blanco y negro, gris, rayado gris y negro) de la unidad
maestra del DSP.
Nota sobre los cables de control y de la fuente de alimentación
Instale los cables de entrada y salida alejados del cable de la fuente de
alimentación, ya que en caso contrario se puede generar ruido por
interferencias.
Conexión para protección de la memoria
Si conecta el cable de la fuente de alimentación amarillo, el circuito de la
memoria recibirá siempre alimentación, incluso cuando el interruptor de
encendido esté apagado.
Notas sobre la conexión de los altavoces
Antes de conectar los altavoces, apague la unidad maestra del DSP.
Utilice los altavoces con una impedancia de 4 a 8 ohmios y con la
capacidad de potencia adecuada para evitar que se dañen.
No conecte los terminales de altavoz al chasis del vehículo ni conecte
los terminales del altavoz derecho a los del altavoz izquierdo.
No conecte el cable de conexión a masa de la unidad maestra del DSP
al terminal negativo () del altavoz.
No intente conectar los altavoces en paralelo.
Sólo conecte altavoces pasivos. Si conecta altavoces activos (con
amplificadores incorporados) a los terminales del altavoz, puede
dañar la unidad maestra del DSP.
Para evitar fallas de funcionamiento, no utilice los cables de altavoz
incorporados que estén instalados en el vehículo si la unidad maestra
del DSP comparte un cable común negativo () con los altavoces
izquierdo y derecho.
No conecte los cables de los altavoces de la unidad maestra del DSP
entre sí.
Asegúrese de utilizar altavoces con una potencia nominal adecuada.
Si utiliza altavoces de potencia reducida, estos pueden dañarse.
Notas sobre la conexión del sistema de audio del vehículo
Los graves pueden entrecortarse si el vehículo está equipado con
altavoces de agudos.
Para evitar esto, seleccione “2ch” con el interruptor INPUT SELECT en la
unidad maestra del DSP. A continuación, conecte las salidas de los
altavoces que pueden producir una gama completa de sonidos a la
entrada izquierda y derecha frontal de la unidad maestra del DSP.
El sistema está diseñado para encenderse de manera automática
cuando detecta la salida de los altavoces del sistema de audio del
automóvil. La detección depende del sistema de audio del vehículo. Si
no se detecta de manera automática la salida de los altavoces:
ajuste el interruptor INPUT SELECT de la unidad maestra del DSP
en “2ch”
conecte las entradas de los altavoces derecho e izquierdo frontales
(blanco, rayado blanco y negro, gris, rayado gris y negro) del cable
de entrada de alto nivel (entrada de audio del vehículo) () a las
salidas de los altavoces del sistema de audio del vehículo
conecte la entrada del altavoz izquierdo posterior () (verde) y la
entrada del altavoz derecho posterior () (rayado morado y
negro) al terminal ACC
Notas sobre la conexión
Si el sistema no recibe alimentación, compruebe las conexiones.
Connecting the DSP Master Unit / Conexión de la unidad maestra
del procesador de sonido digital (DSP)
Necessary items / Elementos necesarios
Precautions
The amplifier and the DSP master unit are designed for
negative ground 12 V DC operation only.
Do not catch leads under screws or moving parts (e.g.
seat railing).
Before making connections, turn the car ignition off to
avoid short circuits.
Before making any connections, disconnect the ground
terminal of the car battery to avoid short circuits.
However, if your car is equipped with a computer
system for navigation or some other purpose, do not
remove the ground wire from the car battery. If you
disconnect the wire, the computer memory may be
erased. Disconnect the +12 V power supply wire until
all other wires have been connected to avoid short
circuits.
Connections Ą
Use the checklists below to confirm that you have made all the
input and output connections of the DSP master unit correctly.
INPUT SELECT switch Ą
Set the INPUT SELECT switch on the DSP master unit according
to the car audio unit. If the car audio unit can only output
2-channel sound, the front speakers’ sound is also output from the
rear speakers, via the DSP master unit.
Conexiones Ą
Utilice las listas de verificación que aparecen a continuación para
confirmar que realizó correctamente todas las conexiones de
entrada y salida de la unidad maestra del DSP.
Interruptor INPUT SELECT Ą
Ajuste el interruptor INPUT SELECT de la unidad maestra del
DSP según el sistema de audio del vehículo. Si el sistema de audio
del vehículo puede producir sonido sólo en 2 canales, el sonido de
los altavoces frontales también saldrá de los altavoces posteriores,
mediante la unidad maestra del DSP.
INPUT/ENTRADA
No.
N.º
Hi-level input (Car Audio In) cable
Cable de entrada de alto nivel (entrada de audio del
vehículo)
Car Audio Unit
Sistema de audio del vehículo
CHECK
VERIFICADO
1 White / Blanco FL + / IZQUIERDO FRONTAL +
2 White/black striped / Con rayas blancas y negras FL – / IZQUIERDO FRONTAL –
3 Gray / Gris FR + / DERECHO FRONTAL +
4 Gray/black striped / Con rayas grises y negras FR – / DERECHO FRONTAL –
5 Green / Verde RL + / IZQUIERDO POSTERIOR +
6 Green/black striped / Con rayas verdes y negras RL – / IZQUIERDO POSTERIOR –
7 Purple / Morado RR + / DERECHO POSTERIOR +
8 Purple/black striped / Con rayas moradas y negras RR – / DERECHO POSTERIOR –
OUTPUT/SALIDA
No.
N.º
Power supply connection cable
Cable de conexión de la fuente de alimentación
Speaker
Altavoz
CHECK
VERIFICADO
1 White / Blanco FL + / IZQUIERDO FRONTAL +
2 White/black striped / Con rayas blancas y negras FL – / IZQUIERDO FRONTAL –
3 Gray / Gris FR + / DERECHO FRONTAL +
4 Gray/black striped / Con rayas grises y negras FR – / DERECHO FRONTAL –
5 Green / Verde RL + / IZQUIERDO POSTERIOR +
6 Green/black striped / Con rayas verdes y negras RL – / IZQUIERDO POSTERIOR –
7 Purple / Morado RR + / DERECHO POSTERIOR +
8 Purple/black striped / Con rayas moradas y negras RR – / DERECHO POSTERIOR –
Precauciones
La unidad maestra del DSP y el amplificador están
diseñados para utilizarse sólo con cc de 12 V negativa a
tierra.
No aprisione los cables debajo de tornillos o partes
móviles (por ejemplo, los rieles del asiento).
Antes de realizar las conexiones, apague el vehículo
para evitar cortocircuitos.
Antes de realizar las conexiones, desconecte el terminal
de toma a tierra de la batería del vehículo para evitar
cortocircuitos. Sin embargo, si el vehículo cuenta con
un sistema informático para la navegación o para otra
finalidad, no desconecte el cable de toma a tierra de la
batería del vehículo. Si se desconecta el cable, puede
que se borre la memoria del equipo informático. Para
evitar cortocircuitos, desconecte el cable de la fuente de
alimentación de +12 V hasta haber conectado todos los
demás cables.
Connecting the Subwoofer to the Amplifier / Conexión del altavoz
potenciador de graves al amplificador
*
1
Not supplied
No suministrado
DSP master unit
Unidad maestra del DSP
Fuse (60 A)
Fusible (60 A)
less than 450 mm (18 in)
menor a 450 mm
*
1
Ground to chassis
*
1
A la masa del chasis
Connection diagram Diagrama de conexiones
To a remote output
Be sure to connect the remote control wire of the DSP master
unit to the remote terminal.
To the +12 V car battery
Connect the +12 V power supply wire only after all other wires
have been connected.
Use a power supply wire with a fuse attached (60 A).
To a metal point of the car
Be sure to connect the ground wire of the amplifier securely to a
metal point of the car. A loose connection may cause a
malfunction of the amplifier.
To the subwoofer
Cautions
Do not connect the terminal of the speaker system to the car
chassis, and do not connect the terminal of the right speaker
with that of the left speaker.
All power wires connected to the positive battery post should be
fused within 450 mm (18 in) of the battery post, and before they
pass through any metal.
Make sure that the vehicle’s battery wires connected to the vehicle
are of a wire gauge at least equal to that of the main power wire
connected from the battery to the amplifier.
Make sure that the wires to be connected to the +12 V and GND
terminals of the amplifier are at least 4-gauge (AWG-4) or have a
sectional area of more than 22.0 mm
2
(
7
/8 in
2
).
A una salida remota
Asegúrese de conectar el cable del control remoto de la unidad
maestra del DSP al terminal remoto.
A la batería del vehículo de +12 V
Conecte el cable de la fuente de alimentación de +12 V sólo
después de haber conectado los otros cables.
Utilice el cable de la fuente de alimentación con un fusible
fijado (60 A).
A un punto metálico del vehículo
Asegúrese de conectar firmemente el cable de toma a tierra del
amplificador a un punto metálico del vehículo. Una conexión
incorrecta puede causar fallas de funcionamiento al
amplificador.
Al altavoz potenciador de graves
Precauciones
No conecte el terminal del sistema de altavoces al chasis del
vehículo, ni conecte el terminal del altavoz derecho con el del
altavoz izquierdo.
Todos los cables de alimentación conectados al polo positivo de la
batería deben conectarse a un fusible dentro de los 450 mm del
polo de la batería y antes de pasar por cualquier pieza metálica.
Asegúrese de que los cables de la batería del vehículo conectados a
éste tengan un calibre al menos igual al del cable de alimentación
principal que conecta la batería con el amplificador.
Asegúrese de que los cables que se conectarán a los terminales de
+12 V y GND del amplificador sean por lo menos de calibre 4
(AWG-4) o tengan una zona de sección de más de 22,0 mm
2
.
Make the terminal connections as illustrated below.
Realice las conexiones de terminal como se ilustra a continuación.
Necessary item /
Elemento necesario
Pass the wires through the cap , connect the
wires, then cover the terminals with the cap
.
Note
When you tighten the screw, be careful not to apply too much
torque* as doing so may damage the screw.
* The torque value should be less than 1 N•m.
Pase los cables a través de la cubierta ,
conéctelos y cubra los terminales con la
cubierta .
Nota
Al apretar el tornillo, tenga cuidado de no aplicar demasiada
fuerza de torsión*, ya que puede dañarlo.
* El valor de fuerza de torsión debe ser inferior a 1 N•m.
Left
Izquierdo
White
Blanco
Blue/White striped
Con rayas azules y blancas
AMP REM
*
1
These terminals are for optional speakers.
*
2
Not supplied.
*
1
Estos terminales se utilizan para altavoces
opcionales.
*
2
No suministrado.
Red
Rojo
Black
Negro
Yellow
Amarillo
Front right speaker output
Salida del altavoz derecho
frontal
Gray
Gris
Striped
Rayado
Striped
Rayado
Striped
Rayado
Striped
Rayado
Front left speaker output
Salida del altavoz izquierdo
frontal
Car audio unit
Sistema de audio
del vehículo
Rear left speaker output
Salida del altavoz izquierdo
posterior
Green
Verde
Purple
Morado
Rear right speaker output
Salida del altavoz derecho
posterior
White
Blanco
White/black striped
Rayado blanco y negro
Gray
Gris
Gray/black striped
Rayado gris y negro
Green
Verde
Green/black striped
Rayado verde y negro
Purple
Morado
Purple/black striped
Rayado Morado y negro
Right
Derecho
Left
Izquierdo
Right
Derecho
*
2
*
1
ACC
GND
BATTERY
Note
Operate the switches on the front panel of the DSP master unit
with your fingers, not a tool.
Nota
Utilice los interruptores del panel frontal de la unidad maestra del
DSP con los dedos y no con otros objetos.
Sound setting switches
Set each switch according to your car type. For details, refer to the Operating
Instructions supplied with this system.
INPUT SELECT switch
Select “4ch” when you connect all the Hi-level input (Car Audio In) cable
connectors () to the car audio unit.
Select “2ch” when you connect only the front speakers’ inputs (No.1 to No.4 of
the INPUT table) to the car audio unit.
Interruptores de ajuste de sonido
Ajuste cada interruptor según el tipo de vehículo. Para obtener más
información, consulte el Manual de instrucciones suministrado con el sistema.
Interruptor INPUT SELECT
Elija “4ch” cuando conecte todos los conectores de cables de entrada de alto
nivel (entrada de audio del vehículo) () al sistema de audio del vehículo.
Elija “2ch” cuando conecte únicamente las entradas de los altavoces frontales
(del 1 al 4 en la tabla INPUT) al sistema de audio del vehículo.
Connected input channel
Canal de entrada conectado
INPUT SELECT switch
Interruptor INPUT SELECT
CHECK
VERIFICADO
Front and Rear / Frontal y posterior 4ch
Front / Frontal 2ch
*
1