Loading ...
Loading ...
Loading ...
Black plate (4,1)
i
DEH-X6600BS/DEH-X6600BT/DEH-X66BT/
DEH-X4600BT
Press to end a call, reject an incoming call,
or reject a call waiting while on another call.
AUDIO
DEH-X3600S
Press to select an audio function.
j
DISP/SCRL
Press to select different displays.
Press and hold to turn dimmer on or off.
k
e
Press to pause or resume playback.
l
DEH-X6600BS/DEH-X6600BT/DEH-X66BT/
DEH-X4600BT
Press to start talking to the caller while
using the phone.
FUNCTION
DEH-X3600S
Press to select functions.
m
LIST/ENTER
Press to display the list depending on the
source.
While in the operating menu, press to con-
trol functions.
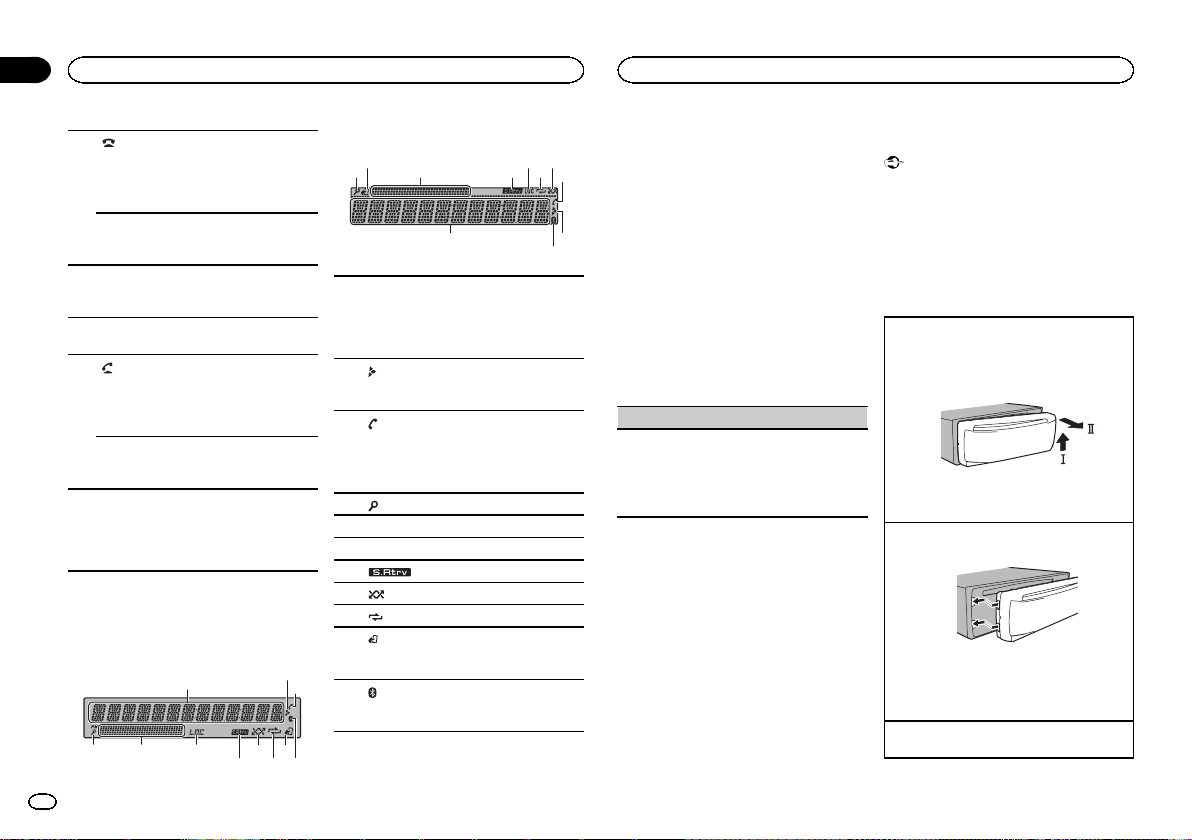
Display indication
DEH-X6600BS/DEH-X6600BT/DEH-X66BT/DEH-
X3600S
1
a8
7 9 b
65
2
3
4
DEH-X4600BT
54 97
21
a 6 8
3
b
1
Main information section
! Tuner: band and frequency
! CD player, USB storage device and iPod:
elapsed playback time and text informa-
tion
2
Appears when a lower tier of folder or menu
exists.
3
(auto answer)
DEH-X6600BS/DEH-X6600BT/DEH-X66BT/
DEH-X4600BT
Shows when the automatic answering func-
tion is on.
4
(list)
5 Sub information section
6 LOC (local seek tuning)
7
(sound retriever)
8
(random/shuffle)
9
(repeat)
a
(iPod control)
This unit’s iPod function is operated from
your iPod.
b
(Bluetooth indicator)
DEH-X6600BS/DEH-X6600BT/DEH-X66BT/
DEH-X4600BT
Set up menu
1 After installation of this unit, turn the
ignition switch to ON.
SET UP appears.
2 Turn M.C. to switch to YES.
# If you do not use the unit for 30 seconds, the set
up menu will not be displayed.
# If you prefer not to set up at this time, turn M.C.
to switch to NO.
3 Press M.C. to select.
4 Complete the procedure outlined below
to set the menu.
To proceed to the next menu option, you need to
confirm your selection.
CLOCK SET (setting the clock)
1 Turn M.C. to adjust hour.
2 Press M.C. to select minute.
3 Turn M.C. to adjust minute.
4 Press M.C. to confirm the selection.
QUIT appears.
5 To finish your settings, turn M.C. to select
YES.
# If you prefer to change your setting again, turn
M.C. to switch to NO.
6 Press M.C. to select.
Notes
! You can set up the menu options from the
system menu. For details about the settings,
refer to System menu on page 14.
! You can cancel set up menu by pressing
SRC/OFF.
Basic operations
Important
! Handle the front panel with care when re-
moving or attaching it.
! Avoid subjecting the front panel to excessive
shock.
! Keep the front panel out of direct sunlight
and high temperatures.
! To avoid damaging the device or vehicle inte-
rior, remove any cables and devices attached
to the front panel before detaching it.
Removing the front panel
1 Press the detach button to release the front
panel.
2 Push the front panel upward (M) and then pull
it toward (N) you.
3 Always store the detached front panel in a pro-
tective case or bag.
Re-attaching the front panel
1 Slide the front panel to the left.
2 Press the right side of the front panel until it is
firmly seated.
Forcing the front panel into place may result in
damage to the front panel or head unit.
Turning the unit on
1 Press SRC/OFF to turn the unit on.
Using this unit
4
Section
Using this unit
En
02
<QRD3195-A>4
Loading ...
Loading ...
Loading ...