Cybex 50L Console
Owner's Manual
Part Number
1008441-0001 AB


Corporate Headquarters
Columbia Centre III, 9525 West Bryn Mawr Avenue, Rosemont, Illinois 60018 • U.S.A.
847.288.3300 • FAX: 847.288.3703
Service phone number: 800.351.3737 (toll-free within U.S.A., Canada)
Global Website: www.cybexintl.com
International Offices
All Other EMEA Countries and Distributor Business EMEA*
Bijdorpplein 25-31
2992 LB Barendrecht
THE NETHERLANDS
Telephone: (+31) 180 646 644
United Kingdom
Life Fitness UK LTD
Queen Adelaide
Ely, Cambs, CB7 4UB
Telephone: General Office (+44) 1353.666017
Customer Support (+44) 1353.665507
AMERICAS
North America
Cybex International Inc.
Columbia Centre III
9525 West Bryn Mawr Avenue
Rosemont, IL 60018 U.S.A.
Telephone: (847) 288 3300
ASIA PACIFIC (AP)
Japan
Life Fitness Japan, Ltd
4-17-33 Minami Aoyama 1F/B1F
Minato-ku - Tokyo 107-0062
Japan
Telephone: (+81) 0120.114.482
Fax: (+81) 03-5770-5059
Germany, Austria, and Switzerland
Life Fitness Europe GMBH
Neuhofweg 9
85716 Unterschleißheim
GERMANY
Telephone:
+49 (0) 89 / 31775166 Germany
+43 (0) 1 / 6157198 Austria
+41 (0) 848 / 000901 Switzerland
Brazil
Life Fitness Brasil
Av. Rebouças, 2315
Pinheiros
São Paulo, SP 05401-300
BRAZIL
SAC: 0800 773 8282 option 2
Telephone: +55 (11) 3095 5200 option 2
Hong Kong
Life Fitness Asia Pacific LTD
32/F, Global Trade Square
21 Wong Chuk Hang Road
Hong Kong
Telephone: (+852) 2575.6262
Spain
Life Fitness IBERIA
C/Frederic Mompou 5,1º1ª
08960 Sant Just Desvern Barcelona
SPAIN
Telephone: (+34) 93.672.4660
Latin America and Caribbean*
Life Fitness, Inc.
Columbia Centre III
9525 West Bryn Mawr Avenue
Rosemont, IL 60018 U.S.A.
Telephone: (847) 288 3300
All Other Asia Pacific countries and distributor business Asia
Pacific*
32/F, Global Trade Square
21 Wong Chuk Hang Road
Hong Kong
Telephone: (+852) 2575.6262
Fax: (+852) 2575.6894
Belgium
Life Fitness Benelux NV
Parc Industrial de Petit-Rechain
4800 Verviers
BELGIUM
Telephone: (+32) 87 300 942
EUROPE, MIDDLE EAST, and AFRICA (EMEA)
Netherlands and Luxemburg
Life Fitness Atlantic BV
Bijdorpplein 25-31
2992 LB Barendrecht
THE NETHERLANDS
Telephone: (+31) 180 646 666
*Also check www.cybexintl.com for local representation or distributor/dealer
Page 3 of 32

User and Service Documents Link
Operation Manuals and other Product Information available at
https://www.lftechsupport.com/web/document-library/documents
https://www.lftechsupport.com/web/document-library/documents
https://www.lftechsupport.com/web/document-library/documents
https://www.lftechsupport.com/web/document-library/documents
https://www.lftechsupport.com/web/document-library/documents
https://www.lftechsupport.com/web/document-library/documents
Trobareu el manual de funcionament i altra informació de producte a
https://www.lftechsupport.com/web/document-library/documents
Mae Llawlyfrau Gweithredu a Gwybodaeth Arall am Beiriannau ar gael yn
https://www.lftechsupport.com/web/document-library/documents
Die Betriebsanleitung und andere Produktinformationen erhalten Sie unter
https://www.lftechsupport.com/web/document-library/documents
Encontrará el manual de funcionamiento y otra información de producto en
https://www.lftechsupport.com/web/document-library/documents
Erabiltzailearen Eskuliburua eta Beste Produktuei buruzko Informazioa eskuratu
https://www.lftechsupport.com/web/document-library/documents gunean
Käyttöoppaat ja muut tuotetiedot ovat saatavana osoitteessa
https://www.lftechsupport.com/web/document-library/documents
Les manuels d’utilisation, ainsi que d’autres informations sur les Produits, sont disponibles sur
https://www.lftechsupport.com/web/document-library/documents
Felhasználói kézikönyvek és más termékinformációk:
https://www.lftechsupport.com/web/document-library/documents
Manuali di funzionamento e altre informazioni sui prodotti disponibili su
https://www.lftechsupport.com/web/document-library/documents
Instrukcje obsługi i inne informacje o produktach dostępne na stronie
https://www.lftechsupport.com/web/document-library/documents
Manuais de Operação e Informações sobre outros produtos disponíveis em
https://www.lftechsupport.com/web/document-library/documents
https://www.lftechsupport.com/web/document-library/documents
Kullanım Kılavuzları ve Diğer Ürün Bilgileri https://www.lftechsupport.com/web/document-library/documents’da
bulunmaktadır
Page 4 of 32

Table of Contents
Getting Started
Safety Instructions........................................................................................................................8
Consignes de Sécurité...............................................................................................................10
Getting Connected......................................................................................................................12
Immobilization Method - 50L Console...................................................................................12
Operation
Console Overview - Arc Trainer................................................................................................13
Console Overview - Bike............................................................................................................15
Console Overview - Treadmill..................................................................................................17
Entertainment Rack Overview..................................................................................................19
Log In.............................................................................................................................................19
Quick Start....................................................................................................................................20
Workouts.......................................................................................................................................20
Manager Configuration
View current software version..................................................................................................24
Toggle beeps...............................................................................................................................24
Enable / Disable Wireless Connectivity..................................................................................24
Change default units..................................................................................................................24
Download usage logs.................................................................................................................24
Reboot system.............................................................................................................................24
Maintenance and Troubleshooting
Approved and Compatible Cleaners.......................................................................................25
Troubleshooting - Treadmills...................................................................................................25
Software updates via USB.........................................................................................................26
Software updates via LFconnect.............................................................................................26
Specifications
Specifications..............................................................................................................................28
Warranty
What is Covered..........................................................................................................................29
Who is Covered............................................................................................................................29
How long it is covered................................................................................................................29
Who Pays Transportation and Insurance For Service.........................................................29
What We Will Do To Correct Covered Defects.......................................................................29
What is Not Covered...................................................................................................................29
What You Must Do.......................................................................................................................29
How to Get Parts and Service...................................................................................................29
Exclusive Warranty......................................................................................................................30
Changes in Warranty Not Authorized.....................................................................................30
Effects of State Laws..................................................................................................................30
Our Pledge To You......................................................................................................................30
Warranty Information.................................................................................................................31
©
Copyright 2018, Cybex International, Inc.
Columbia Center III - 9525 West Bryn Mawr Ave, Rosemont, IL 60018 • 800-351-3737 • 847-288-3700 • FAX 800-216-8893
www.cybexintl.com • 1008441-0001 AB • 2018
Page 5 of 32

FCC Compliance Information
Before using this product, it is essential to read this ENTIRE operation manual and ALL assembly instructions. It
describes equipment setup and instructs members on how to use it correctly and safely.
Avant d’utiliser ce produit, il est indispensable de lire ce manuel d’utilisation dans son INTÉGRALITÉ, ainsi que
TOUTES les instructions d’installations. Ce manuel explique comment installer l’équipement etcomment l’utiliser
correctement et sans danger.
FCC Warning - Possible Radio / Television Interference
EN ISO 20957 Class S: Professional and / or commercial use.
NOTE: This equipment has been tested and found to comply with the limits for a Class A digital device,
pursuant to part 15 of the FCC rules. These limits are designed to provide reasonable protection against
harmful interference when the equipment is operated in a commercial environment. This equipment
generates, uses and can radiate radio frequency energy, and if not installed and used in accordance with
the instructionmanual, may cause harmfulinterference to radio communications. Operation of this equipment
in a residential area is likely to cause harmful interference in which case the user will be required to correct
the interference at his own expense.
EN ISO 20957 Class H: Home use.
NOTE: This equipment has been tested and found to comply with the limits for a Class B digital device,
pursuant to part 15 of the FCC rules. These limits are designed to provide reasonable protection against
harmful interference in a residential installation. This equipment generates, uses and can radiate radio
frequency energy, and if not installed and used in accordance with the user manual, may cause harmful
interference to radio communications. However, there is no guarantee that the interference will not occur
in aparticular installation. If this equipmentdoes cause harmful interference toradio or television reception,
which can be determined by turning the equipment off and on, the user is encouraged to try to correct the
interference by one or more of the following measures:
• Reorient or relocate the receiving antenna.
• Increase the separation between the equipment and the receiver.
• Connect the equipment into an outlet on a circuit different from that to which the receiver is connected.
• Consult the dealer or an experienced radio/TV technician for help.
CAUTION: Any changes or modifications to this equipment could void the product warranty.
Mise en garde :: tout changement ou toute modification de ce matériel peut annuler la garantie du produit.
Any service, other than cleaning or user maintenance, must be performed by an authorized service representative.
Bikes:
For EN ISO 20957-5: 2016 Class SA accuracy testing, power at the crankshaft was measured by connecting the
training equipment to a dynamometer. The crank was rotated and torque measured per EN ISO 20957-5: 2016
Class SA operating test conditions. Accuracy of the resulting watts displayed on the console and actual watts
measured by dynamometer were found to be within the tolerance of EN ISO 20957-5: 2016 Class SA (+/- 5 Watts
up to 50 Watts and +/- 10% over 50 Watts).
Arc Trainers:
For EN ISO 20957-9: 2016 Class SA accuracy testing, power at the crankshaft was measured by connecting the
training equipment to a dynamometer. The crank was rotated and torque measured per EN ISO 20957-9: 2016
Class SA operating test conditions. Accuracy of the resulting watts displayed on the console and actual watts
measured by dynamometer were found to be within the tolerance of EN ISO 20957-9: 2016 Class SA (+/- 5 Watts
up to 50 Watts and +/- 10% over 50 Watts.
Page 6 of 32

Manual Information
This Owner's Manual describes the functions of the following products:
• R Series Arc Trainer
• R Series Recumbent Exercise Bike
• R Series Upright Exercise Bike
• R Series Treadmill
See Specifications in this manual for product specific features.
Statements of Purpose:
• The Cybex Arc Trainer is an exercise machine that combines low-impact elliptical pedaling with push / pull arm
motion to provide an efficient, effective total body workout indoors.
• The Cybex Exercise Bike is a machine that simulates the movements of riding a bicycle indoors at various speeds
and levels of resistance.
• The Cybex Treadmill is an exercise machine that enables users to walk or run, in place, indoors on a moving
surface.
Page 7 of 32

Getting Started
Safety Instructions
Read all instructions before using Cybex products.
All Products
CAUTION: Any changes or modifications to this equipment could void the product warranty.
WARNING: To reduce the risk of burns, fire, electric shock, or injury, it is imperative to connect each product
to a properly grounded electrical outlet.
WARNING: Heart rate monitoring systems may be inaccurate. Over exercising may result in serious injury
or death. If you feel faint, stop exercising immediately.
DANGER: To reduce the risk of electrical shock or injury from moving parts, always unplug product before
cleaning or attempting any maintenance activity.
• Never operate theproduct if it has adamaged power cord or electrical plug,or if it has been dropped,damaged,
or even partially immersed in water. Contact Customer Support Services.
• Position the product so that the power cord plug to the wall is accessible to the user. Make sure that the power
cord is not knotted or twisted and that it is not trapped under any equipment or other objects.
• If the electrical supply cord is damaged, it must be replaced by the manufacturer, an authorized service agent,
or a similarly qualified person to avoid a hazard.
• Always follow the console instructions for proper operation.
• This appliance is not intended for use by persons (including children) with reduced physical, sensory, or mental
capabilities, or lack ofexperience or knowledge unless they have supervision or been given instruction concerning
the use of the appliance by a person responsible for their safety.
• Do not use this product outdoors, near swimming pools or in areas of high humidity.
• Never operate the product with the air openings blocked. Keep air openings free of lint, hair, or any other
obstructing material.
• Never insert objects into any opening in these products. If an object should drop inside, turn off the power,
unplug the power cord from the outlet, and carefully retrieve it. If the item cannot be reached, contact Customer
Support Services.
• Never place liquids of any type directly on the unit, except in an accessory tray or holder. Containers with lids
are recommended.
• Do not use these products in bare feet. Always wear shoes. Wear shoes with rubber or high-traction soles. Do
not use shoes with heels, leather soles, cleats or spikes. Make sure no stones are embedded in the soles.
• Keep all loose clothing, shoelaces, and towels away from moving parts.
• Do not reach into, or underneath, the unit or tip it on its side during operation.
• This equipment is not intended for use by children. Keep children under the age of 14 away from the machine.
• Do not allow other people to interfere in any way with the user or equipment during a workout.
• Use these products for their intended use as described in this manual. Do not use attachments that have not
been recommended by the manufacturer.
• Allow LCD consoles to “normalize” with respect to temperature for one hour before plugging the unit in and
using.
• Free standing equipment shall be installed on a stable and leveled surface.
• Read all warnings on each product prior to starting a workout.
• If warnings are missing or damaged, please contact Customer Support Services immediately for replacement
warning labels. Warning labels are shipped with every product and should be installed before product is used.
Cybex is not responsible for missing or damaged warning labels.
Page 8 of 32

Treadmill
CAUTION: Risk of injury to persons – to avoid injury, use extreme caution when stepping onto or off of a
moving belt. Read assembly instruction manual before using.
WARNING: Keep the area 6.5 ft. (2 m) by 3 ft. (0.9 m) behind the treadmill clear of any obstructions, including
walls, furniture,and other equipment.Contact Customer SupportServices for an optionallonger power cord
if necessary.
WARNING: Be sure the emergency stop lanyard is clipped to the user and in proper position on the treadmill
before beginning any workout.
WARNING: The belt centering adjustment must be performed if the belt is not between the marks indicating
the maximum allowed lateral positions. Refer to Treadmill Assembly Instructions.
• The product should never be left unattended when plugged in. Disconnect from the electrical outlet when not
in use, and before putting on or taking off parts. To disconnect, turn power OFF at the ON/OFF switch, then
remove plug from electrical outlet.
• Keep the power cord away from heated surfaces. Do not pull the equipment by the power cord or use the cord
as a handle.
• Handrails may be held to enhance stability as needed, but are not for continuous use.
• Never mountor dismount the treadmillwhile the running belt is moving. Usethe handrails whenever additional
stability is required. In case of an emergency, such as tripping, grasp the handrails, and place the feet on the
side platforms.
• Never walk or jog backwards on the treadmill.
• Do not use this product in areas where aerosol spray products are being used or where oxygen is being
administered. Such substances create the danger of combustion and explosion.
• In conformity with the European Union Machinery Directive 2006/42/EC, this equipment unloaded runs at sound
pressure levels below 70 dB (A) at the average operating speed of 12 km/hr. Noise emission under load is higher
than without load.
Arc Trainer
WARNING: Ensure that there is at least 1 ft. (0.3 m) of clearance in front of the Arc Trainer and at least 2 ft.
(0.6m) on the side.
WARNING: The Arc Trainer is not equipped with a free-wheeling feature. Therefore, the product cannot be
stopped immediately.
• Do not stand or sit on the rear plastic covers of the Arc Trainer.
• The individual human power required to perform an exercise may be different than the mechanical power
displayed on the Arc Trainer.
• Use caution when mounting or dismounting the Arc Trainer. Before mounting, use the moving arms to bring
the pedal nearest to you to the lowest position. Use the stationary handlebars whenever additional stability is
required. While exercising, hold onto the moving arms.
• Never face backward while using the Arc Trainer.
Bikes
WARNING: Allow a distance of 16 in. (41 cm) between the widest part of the bike and other objects on either
side. Provide at least 3 ft. (0.9 m) between the front or rear of the bike to any other objects and 2 ft. (0.6 m)
in the direction the equipment is accessed from.
• Do not stand or sit on plastic shrouds.
• Use caution when mounting or dismounting the bike. Use the stationary handlebar whenever additional stability
is required.
SAVE THESE INSTRUCTIONS FOR FUTURE REFERENCE.
Page 9 of 32

Consignes de Sécurité
Veuillez lire toutes les instructions avant d’utiliser Cybex ce produit.
Tous les équipements
Mise en garde :: Toute modification apportée à cet équipement pourrait en annuler la garantie.
AVERTISSEMENT: Pour réduire les risques de brûlures, d'incendies, de chocs électriques ou de blessures,
il est essentiel de brancher chaque appareil sur une prise électrique correctement mise à la terre.
AVERTISSEMENT: Les systèmes de surveillance de la fréquence cardiaque peuvent être inexacts. Un exercice
trop intensif peut entraîner des blessures graves, voire mortelles. Si vous ressentez une sensation de malaise,
arrêtez immédiatement l’exercice.
Danger.: Pour réduire les risques de chocs électriques ou de blessures en raison des pièces mobiles,
débranchez toujours les produits avant de les nettoyer ou de procéder aux tâches d’entretien.
• Ne faites jamais fonctionner le produit dont la fiche ou le cordon d'alimentation sont altérés, ni aucun appareil
qui serait tombé, aurait été endommagé ou même partiellement plongé dans l'eau. Contactez le Service clients.
• Placez l'appareil de façon à ce que l'utilisateur ait accès à la fiche du cordon d'alimentation. Assurez-vous que
le cordon d'alimentation n'est pas noué ou tordu et qu'il n'est pas coincé sous un autre appareil ou sous tout
autre objet.
• Si le cordon d'alimentation électrique est endommagé, il doit être remplacé par le fabricant, par un réparateur
agréé ou par une personne qualifiée afin d'éviter tout danger.
• Suivez toujours les instructions s'affichant sur la console.
• Cet appareil n'est pas destiné à être utilisé par des personnes ou des enfants présentant des capacités physiques,
sensorielles ou mentales réduites, ou un manque d'expérience et de connaissances, sauf en cas de supervision
ou d'instructions relatives à son utilisation par une personne responsable de leur sécurité.
• N'utilisez pas ce produit à l'extérieur, près d'une piscine ou dans des endroits très humides.
• Ne jamais utiliser le produit en ayant les ouvertures d'air bloquées. Maintenez les bouches d’aération exemptes
de peluches, de cheveux ou de toute autre obstruction.
• N'insérez jamais d'objet dans les ouvertures de cet appareil. Si un objet tombe dans l'appareil, mettez ce dernier
hors tension, débranchez le cordon d'alimentation et récupérez l'objet avec précaution. Si vous ne pouvez pas
l'atteindre, contactez le Service clients.
• Ne placez jamais de liquides d'aucune sorte directement sur l'appareil, sauf si vous disposez d'un support ou
d'un plateau pour accessoires.Nous vous recommandons de n'utiliser que des récipientspourvus d'un bouchon.
• N'utilisez pas l'appareil pieds nus. Portez toujours des chaussures. Portez des chaussures avec semelles en
caoutchouc ou antidérapantes. N'utilisez pas de chaussures à talon, à semelle en cuir, à crampons ou à pointes.
S’assurer qu’aucun caillou ne s’est incrusté dans les semelles.
• Éloignez les vêtements amples, les lacets de chaussure et les serviettes des parties mobiles de l'appareil.
• Ne placez pas les mains à l'intérieur ou sous l'appareil ou ne le faites pas basculer sur le côté durant son
fonctionnement.
• Cet équipement n'est pas destiné à être utilisé par les enfants. Tenez les enfants âgés de moins de 14 ans à
l'écart de la machine.
• Ne laissez aucune personne gêner l'utilisateur ou le fonctionnement de l'appareil pendant l'exercice.
• Utilisez cet équipement uniquement aux fins auxquelles il est destiné et de la manière décrite dans le présent
manuel. N'utilisez pas d'accessoires non recommandés par le fabricant.
• L'appareil utilisé de manière autonome doit être installé sur une surface stable et plane.
• Lisez les avertissements avant de commencer à vous entraîner.
• Si certaines étiquettes d'avertissement sont manquantes ou endommagées, contactez immédiatement le
Service à la clientèle. Nous vous en fournirons de nouvelles. Les étiquettes d'avertissement sont expédiées
avec les appareils et doivent être installées avant utilisation de ces derniers. Cybex n'est pas responsable des
étiquettes manquantes ou endommagées.
Page 10 of 32

Tapis de course
Mise en garde :: Risque de blessures - pour éviter toute blessure, faire preuve d'extrême prudence pour
monter sur un tapis en mouvement, ou pour en descendre. Lisez les instructions d'assemblage avant toute
utilisation.
AVERTISSEMENT: Laissez un espace de 2 m sur 0,9 m (6,5 pi. sur 3 pi.) autour de la machine. Ne placez pas
cette dernière près de murs, meubles ou autres équipements qui pourraient en obstruer l'accès. Contactez
le service à la clientèle pour obtenir un cordon plus long au besoin.
AVERTISSEMENT: Avant de commencer tout exercice, il convient de s'assurer que le cordon de sécurité est
bien fixé à l'utilisateur et correctement placé sur le tapis de course.
AVERTISSEMENT: La surface de course doit être recentrée si elle ne se situe pas entre les marques indiquant
les positions latérales maximales autorisées. Consultez les instructions d'assemblage du tapis de course.
• Ne laissez jamais l'appareil sans surveillance lorsqu'il est branché. Débranchez-le systématiquement après son
utilisation, et avant l'ajout et le retrait de pièces. Pour débrancher l'appareil, placez l'interrupteur sur ARRÊT
et ôtez la prise électrique du mur.
• Maintenez le cordon d'alimentation à l'écart des surfaces chaudes. Ne tirez pas l'appareil par son cordon et
n'utilisez pas celui-ci comme une poignée.
• Les barres d'appui latérales peuvent servir à améliorer la stabilité, le cas échéant, mais elles ne sont pas conçues
pour être utilisées de façon continue.
• Ne montez et ne descendez jamais du tapis de course lorsqu'il est en marche. Le cas échéant, utilisez les barres
latérales pour renforcer votre stabilité. En cas d'urgence, si vous trébuchez par exemple, saisissez les barres
latérales et placez les pieds sur les plates-formes latérales.
• Ne reculez jamais sur le tapis, que ce soit en marchant ou en courant.
• N'utilisez pas l'appareil en présence d'aérosols ou en cas d'administration d'oxygène. Ces substances pourraient
entraîner des risques d'incendie et d'explosion.
• Conformément à la directive machines 2006/42/CE de l'Union européenne, à vide, cet équipement fonctionne
à des niveaux de pression acoustique inférieurs à 70 dB(A) à une vitesse de fonctionnement moyenne de 12
km/h. Les émissions sonores sont plus élevées si l'appareil est sous tension qu'à l'état hors tension.
Arc Trainer
AVERTISSEMENT: Veillez à laisser un dégagement d’aumoins 30 cm (1 pi) devant l'ArcTrainer et d'au moins
60 cm (2 pi) sur les côtés.
AVERTISSEMENT: L'Arc Trainer n'est pas équipé d'une option roue libre. Par conséquent il ne peut donc
être arrêté instantanément.
• Ne vous mettez ni debout, ni assis sur les caches en plastique situés à l'arrière de l'Arc Trainer.
• La puissance nécessaire à chaque utilisateur pour effectuer un exercice peut différer de la puissance mécanique
affichée sur l'Arc Trainer.
• Montez et descendez avec précaution de l'Arc Trainer. Avant de monter, placez la pédale située de votre côté
en position basse, en vous aidant des bras mobiles. Utilisez les poignées fixes lorsque vous avez besoin de
renforcer votre équilibre. Pendant les exercices, tenez les bras mobiles.
• Ne montez jamais à l'envers sur l'Arc Trainer.
Vélos
AVERTISSEMENT: Laissez une distance de 41 cm (16 in..) entre la partie la plus large du vélo et les objets
se trouvant de part et d'autre. Laissez un dégagement d'au moins 0,9 m (3 pi.) entre l'avant et l'arrière du
vélo et les objets alentour, et d'au moins 0,6 m (2 pi.) dans la direction qui permet d'accéder à l'appareil.
• Ne vous mettez ni debout, ni assis sur les caches en plastique du vélo.
• Montez et descendez avec précaution du vélo. Utilisez le guidon fixe lorsque vous avez besoin de renforcer
votre équilibre.
CONSERVEZ PRÉCIEUSEMENT CES INSTRUCTIONS POUR CONSULTATION ULTÉRIEURE.
Page 11 of 32

Getting Connected
Connecting your product
• SSID: LFwireless
• Password: See your Cybex representative
• Authentication Method: WPA2-Personal
Registering Product with Halo
1. Go to the Halo website: https://www.halo.fitness
2. Click the Sign Up link. If you already have an account, Log In.
3. Click the Sign Up link in the Manager section.
4. Enter your information, and click Create Account to complete the process.
5. Click the Add Now button under Equipment section
6. Enter equipment serial number to add equipment. After entering one serial number, the rest of your connected
equipment will be automatically discovered.
Immobilization Method - 50L Console
The purpose of immobilizing the treadmill is to prevent unauthorized use. The system causes immobilization of
the treadmill when a pre-defined hard key sequence has been activated.
To prevent false toggling of the Immobilized feature, this sequence must be done in a 5-10 second period.
1. Press the STOP key 3 times.
2. Press the SPEED DOWN arrow key 3 times.
Page 12 of 32
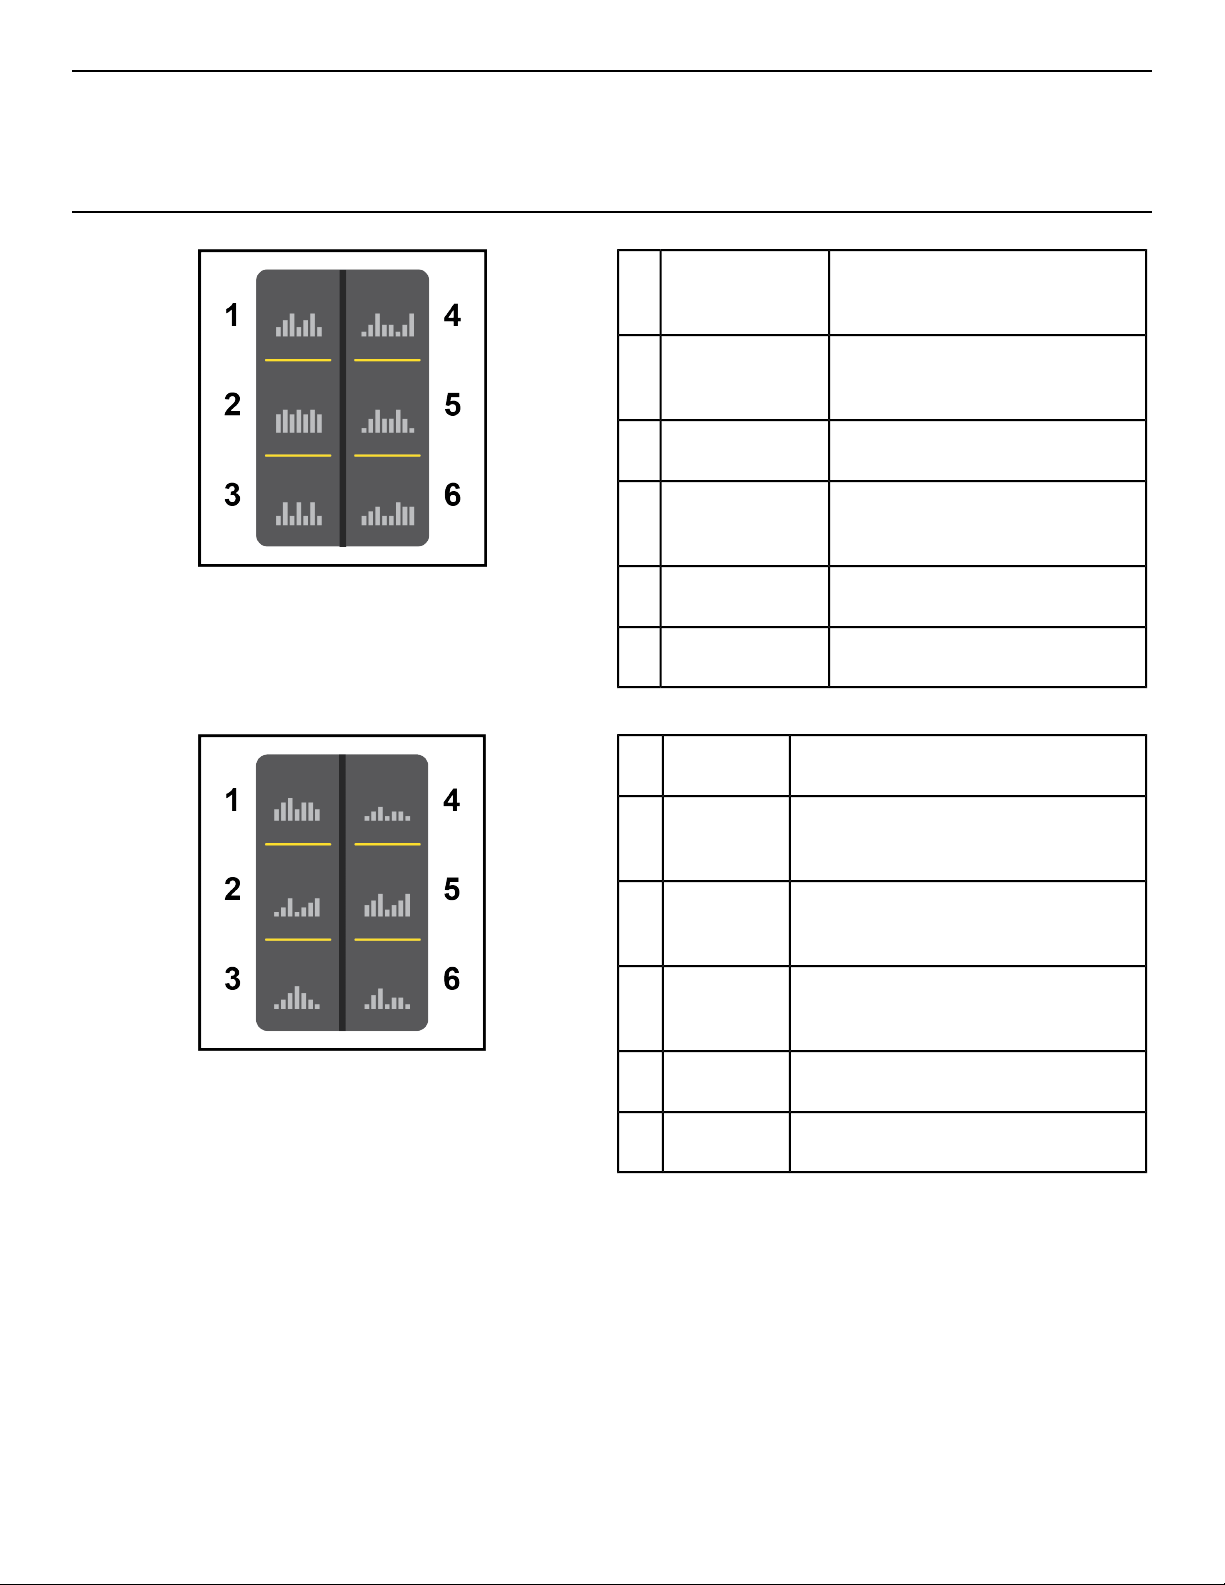
Operation
Console Overview - Arc Trainer
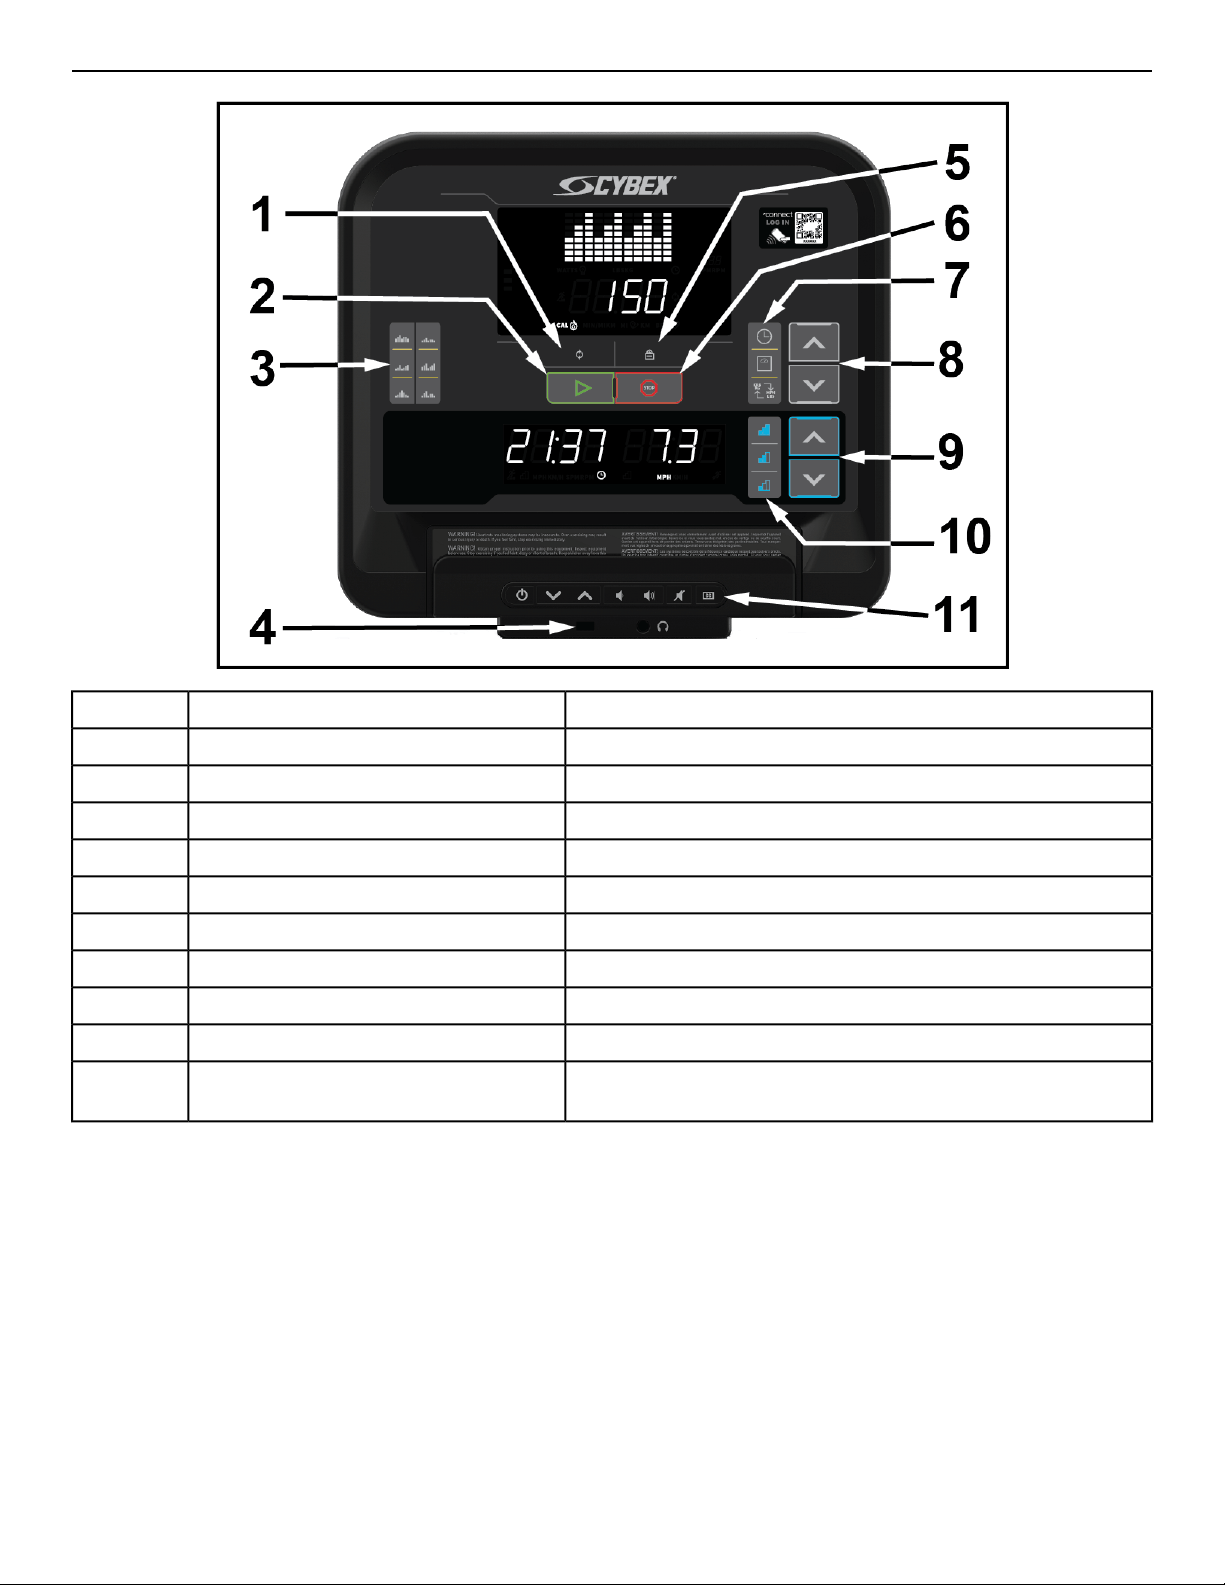
Controls
Rotate through metrics.Toggle1
Press to automatically begin a Quick Start workout.GO2
Hill Climb, Cardio Interval, Hill Interval, Wave, Target Hip,
Strength Interval.
Workouts key3
Use to increase / decrease incline.UP and DOWN arrow keys4
Preset stride levels: Glide, Stride, Climb.Quick stride keys5
Charge USB devices.USB Port6
Lock metrics shownLock7
Press to Stop a workout.STOP8
Time, Weight, Imperial/Metric.Call out buttons9
Use to adjust settings.UP and DOWN arrow keys10
Use to increase / decrease resistance.UP and DOWN arrow keys11
Place traditional reading material as well as mobile devices
and tablets in this built-in holder.
Reading Rack / Tablet Holder12
Page 13 of 32

LED's
Displays: Distance, Calories, Watts, Heart rate, Workout
profile, SPM.
Upper LED display1
Displays muscles used.Muscle map2
Displays: Time, Incline.Lower Left LED3
Displays: Resistance.Lower Right LED4
Page 14 of 32
Console Overview - Bike
Controls
Rotate through metricsToggle1
Press to automatically begin a Quick Start workout.GO2
Rollers 1, Ramps, Wave, Rollers 2, Peaks, Bursts.Workouts key3
Charge USB devices.USB Port4
Lock metrics shownLock5
Press to Stop a workout.STOP6
Time, Weight, Imperial/Metric.Call out buttons7
Use to adjust settings.UP and DOWN arrow keys8
Use to increase / decrease resistance.UP and DOWN arrow keys9
Preset resistance levelsQuick resistance keys10
Place traditional reading material as well as mobile devices
and tablets in this built-in holder.
Reading Rack / Tablet Holder11
Page 15 of 32
LED's
Displays: Distance, Calories, Watts, Heart rate, Workout
profile, RPM.
Upper LED display1
Displays: Time.Lower Left LED display2
Displays: Road Speed, Resistance.Lower Right LED3
Page 16 of 32
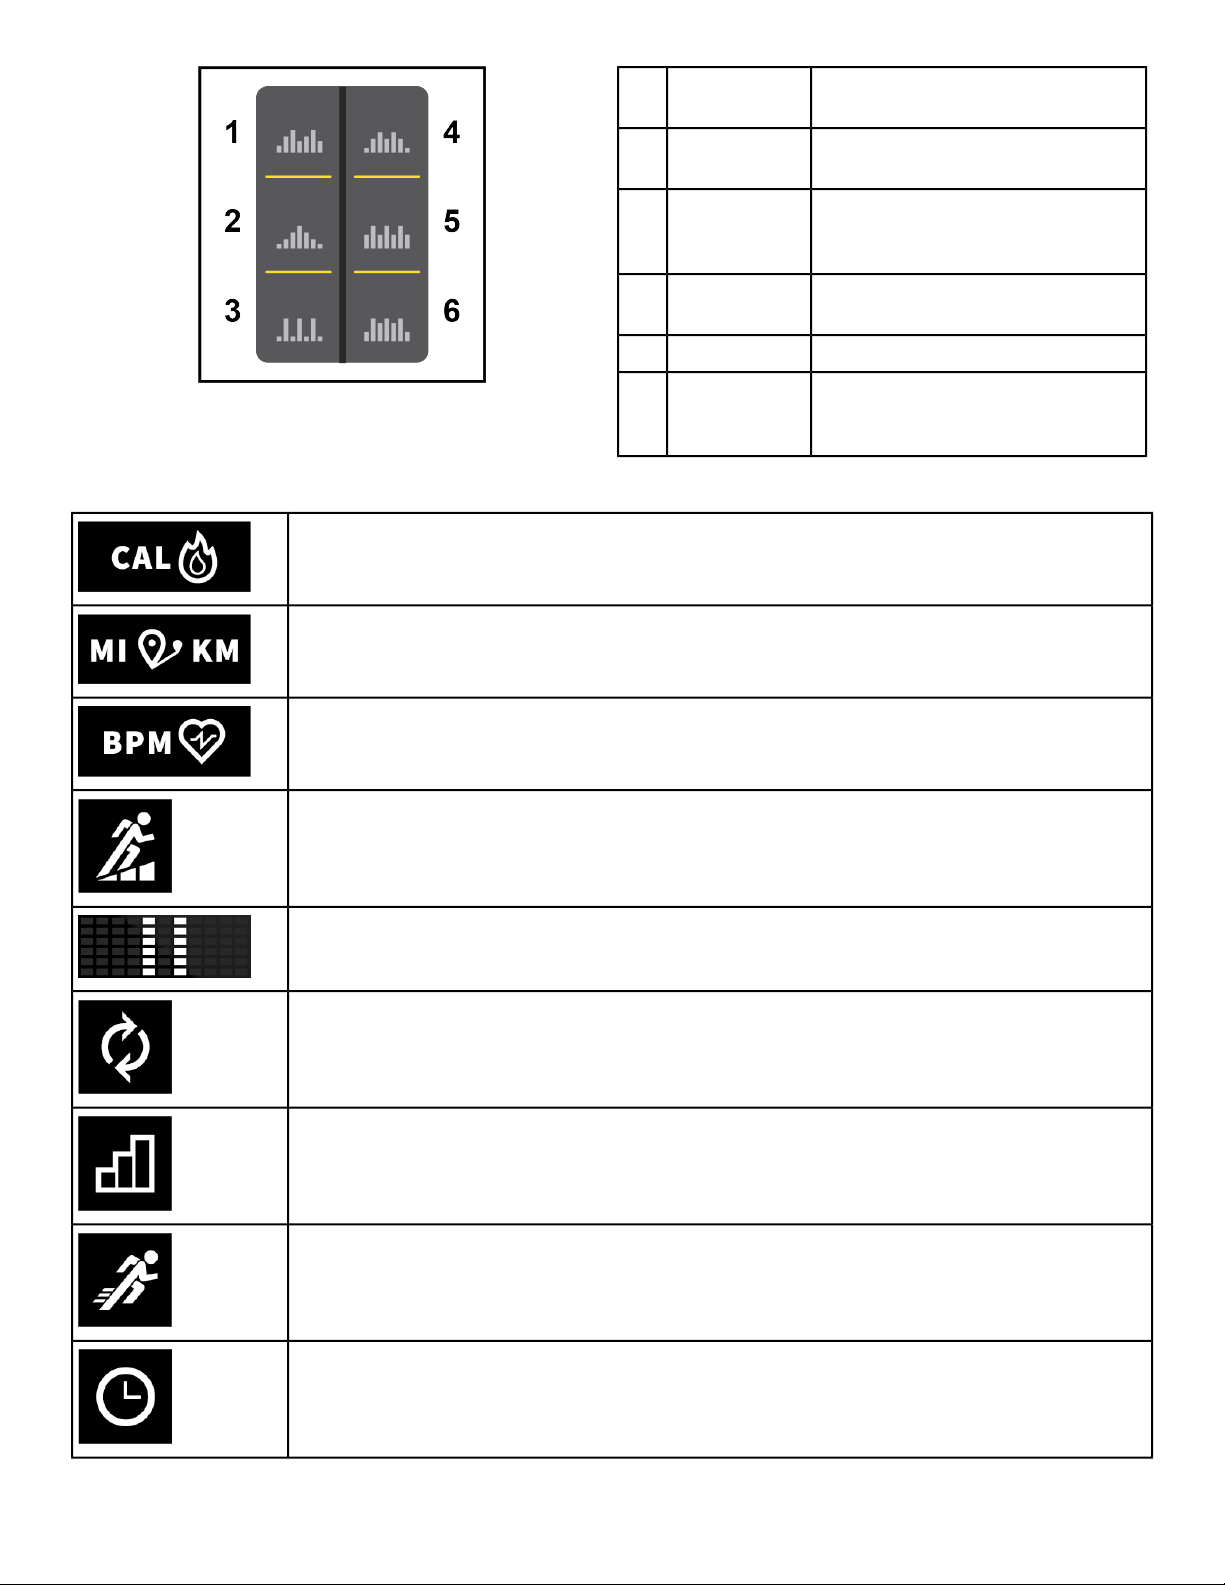
Console Overview - Treadmill
Controls
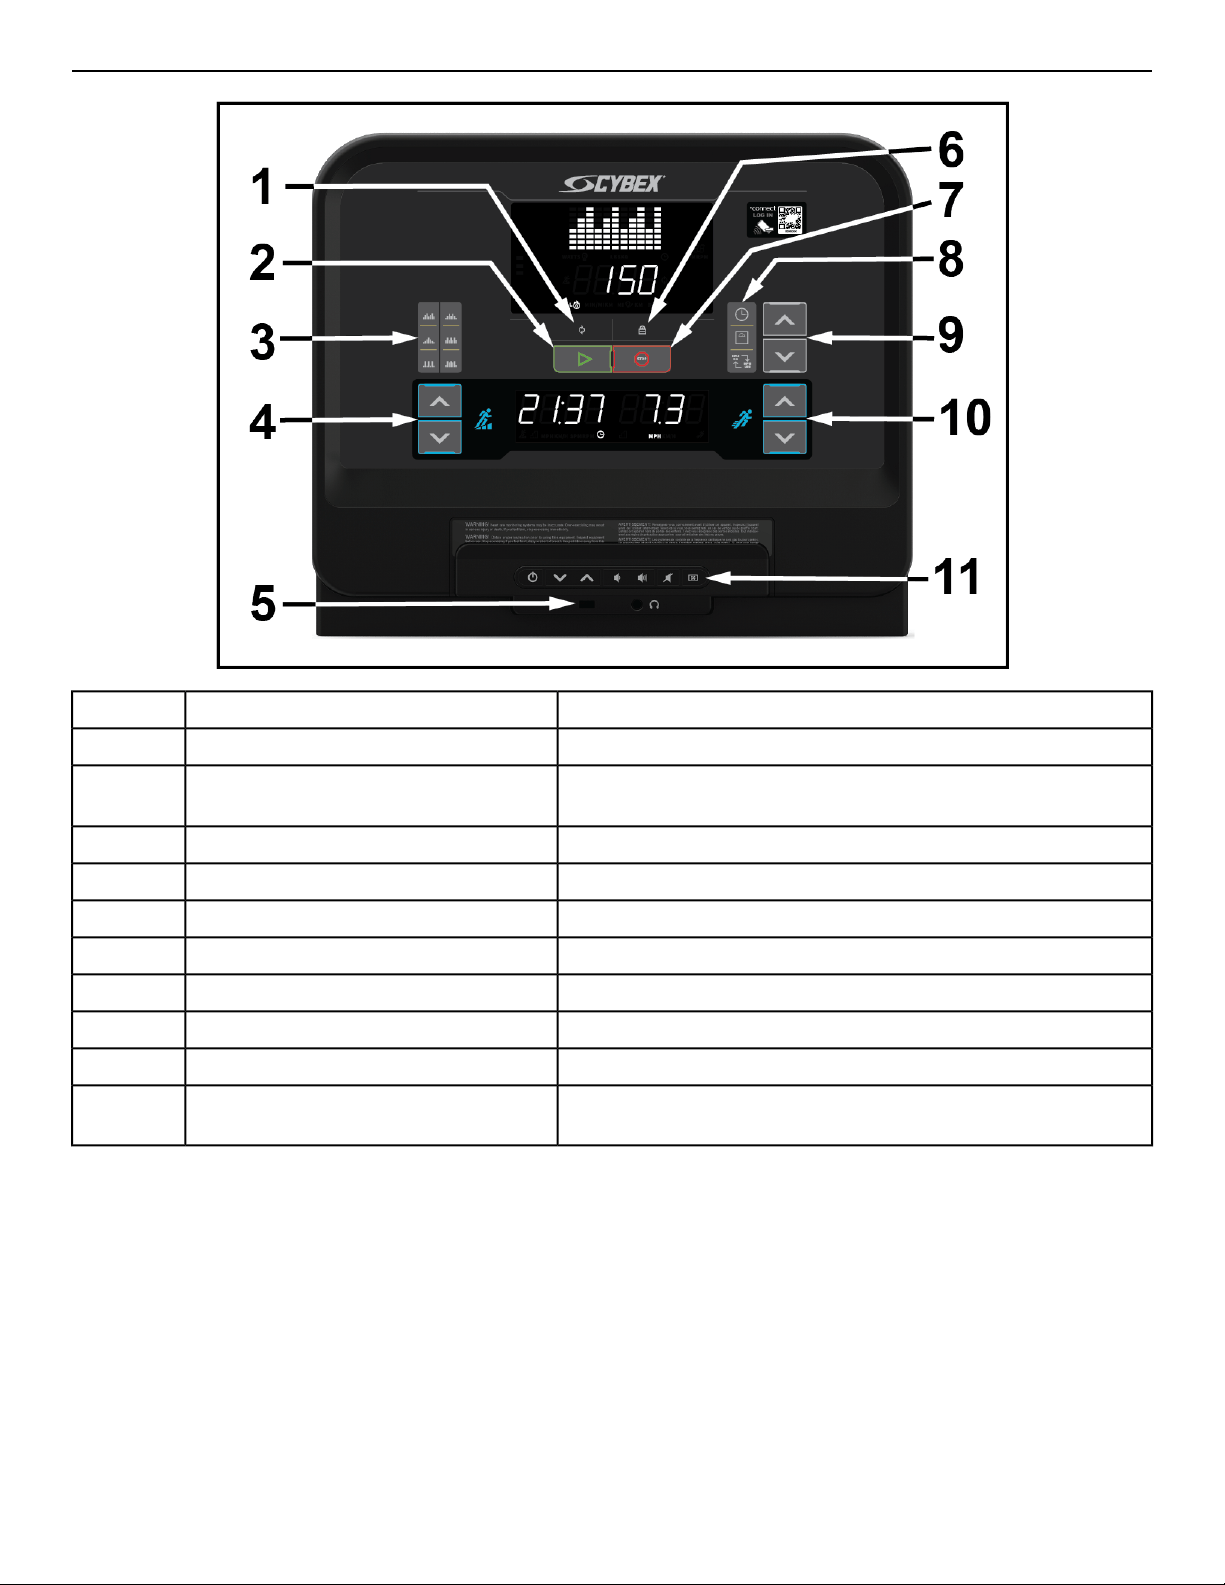
Rotate through metricsToggle1
Press to automatically begin a Quick Start workout.GO2
Speed Bump, Peaks, Hill Interval 1:2, Rollers, Hill Interval 1:1,
Interval Plus.
Workouts key3
Use to increase / decrease incline.UP and DOWN arrow keys4
Charge USB devices.USB Port5
Lock metrics shownLock6
Press to Stop a workout.STOP7
Time, Weight, Imperial/Metric.Call out buttons8
Use to adjust settings.UP and DOWN arrow keys9
Use to increase / decrease speed.UP and DOWN arrow keys10
Place traditional reading material as well as mobile devices
and tablets in this built-in holder.
Reading Rack / Tablet Holder11
Page 17 of 32
LED's
Displays: Pace, Distance, Calories, Heart rate, Workout
profile.
Upper LED display1
Displays: Time, Incline.Lower Left LED2
Displays Speed.Lower Right LED3
Page 18 of 32
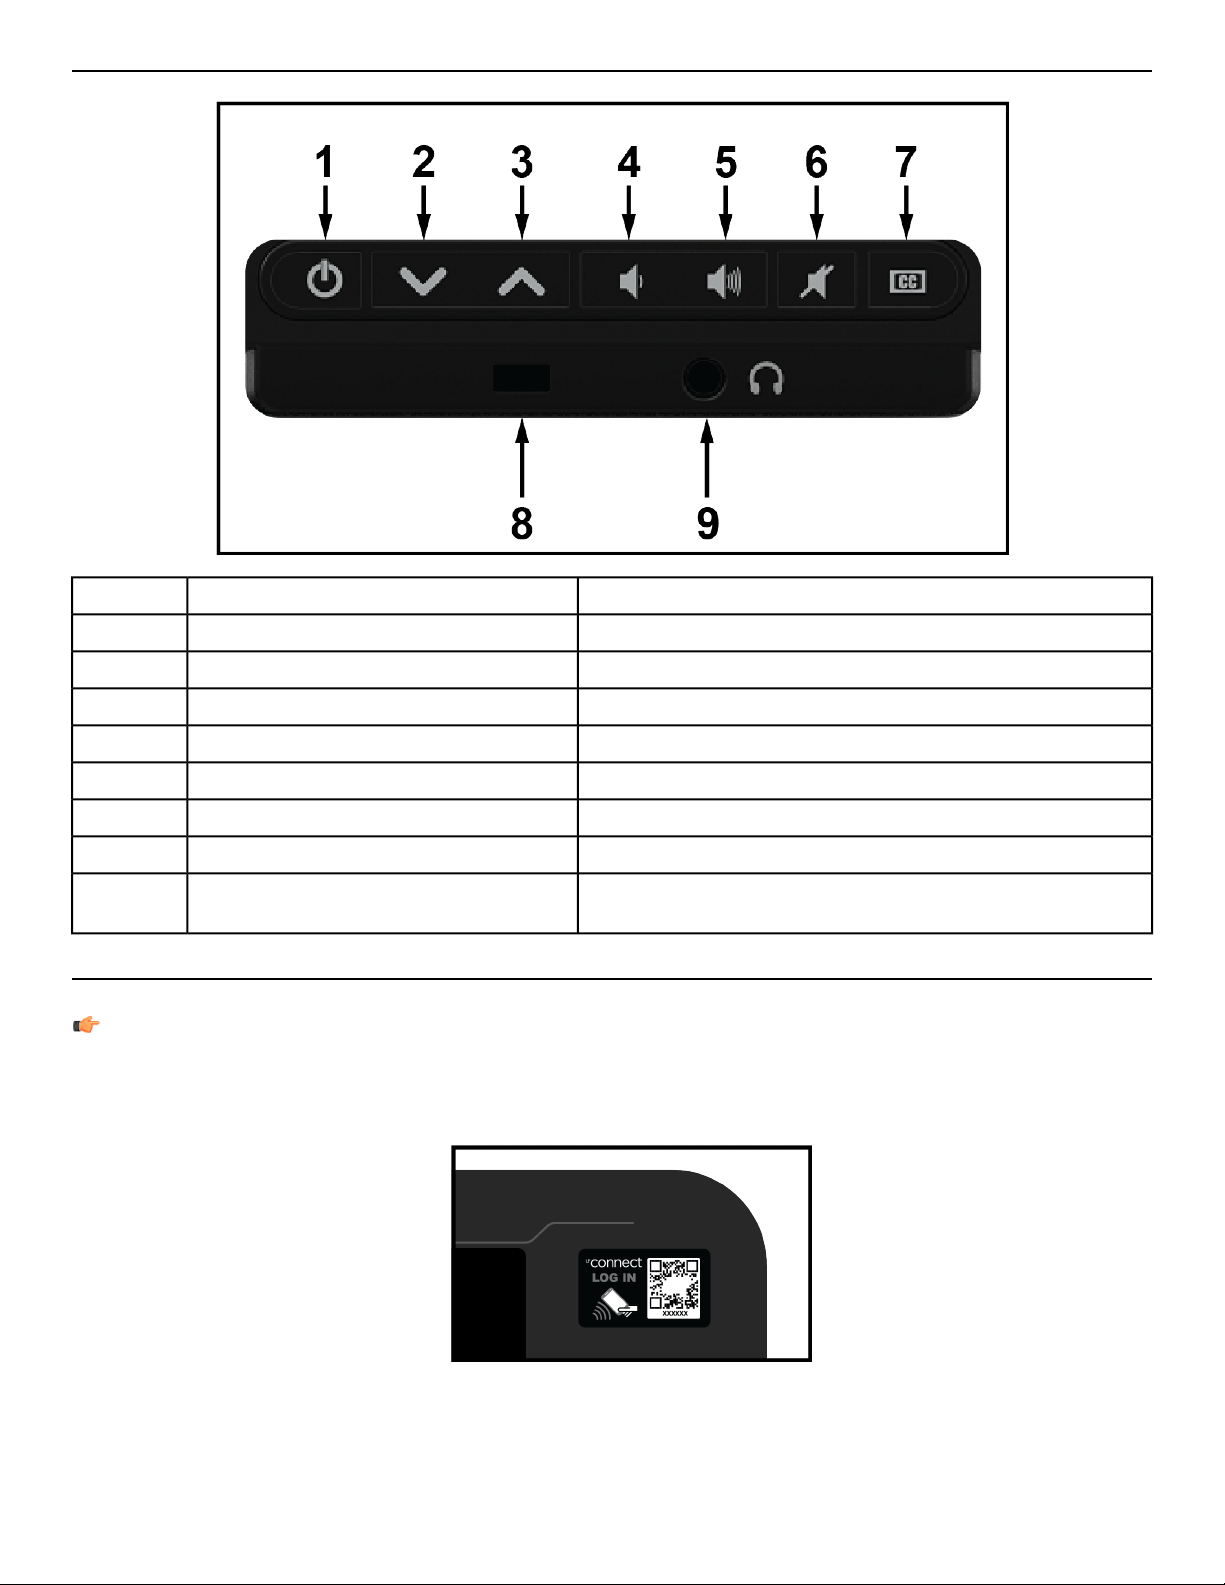
Entertainment Rack Overview
The Entertainment Rack is optional
Press to turn the TV on.Power1
Press to decrease channel.Channel Down key2
Press to increase channel.Channel Up key3
Press to decrease volume.Volume Down key4
Press to increase volume.Volume Up key5
Press to turn off sound.Mute6
Press to enable Closed Caption.Closed Caption7
Charge USB devices.USB Port8
Plug in headphones to listen to TV and entertainment
options.
Headphone Jack9
Log In
Log in to the console to track and save your workouts to the LFconnect app.
NOTE: LFconnect requires wireless connectivity to be enabled and connected.
1. Open the LFconnect app on your mobile device.
2. Select the QR code reader in the upper right hand corner.
3. Scan the QR code with your phone.
Page 19 of 32
Quick Start
1. Press GO for a Quick Start workout.
2. Enter your weight using the UP and DOWN arrow keys on the right side of the console.
Workouts
Arc Trainer
Extended gradual climbing with
steady increases in both
resistance and incline
Weight Loss -
Hill Climb
1
Alternating 2:00 intervals at
medium intensities designed to
target the glutes and hamstrings
Strength -
Target Hip
2
:30 high intensity intervals with
longer recoveries
Strength -
Interval
3
Long, gradual increases in
resistance and intensity over
3:00 intervals
Cardio - Wave4
1:30 intervals of climbing up and
climbing down
Cardio - Hill
Interval
5
Alternating 1:30 intervals of
climbs and high intensity bursts
Cardio - Interval6
Bike
A gentle calorie burner with periods
of added work and rest
Calorie
Burner
1
Enhanced calorie burn from a brief
challenge followed by moderate
work to keep the heart rate up
Advanced
Burner
2
Incline level gradually increases to a
peak, gradually decreases. Climb a
new hill every 6 minutes
Peaks3
A stepped increase in work to a peak
followed by a low intensity rest
period before it repeats
Ramps4
30 seconds high intensity followed
by 1 minute rest
Bursts5
Climb a hill at moderate to high
grade before repeating
Waves6
Page 20 of 32
Treadmill
Elevated intervals to keep the HR
up
Speed Bump1
Climb a hill at moderate to high
grade before repeating
Rollers2
Incline level gradually increases to
a peak, graduallydecreases. Climb
a new hill every 9 minutes
Peaks3
5 minutes. Take on a new hill every
10 minutes.
Hill Interval4
1:2 Incline to rest intervalsRolling Hills5
1:1 High inlcine to medium incline
intervals (4 minutes on, 4 minutes
off)
Interval Plus6
Workout Icons
Calories
Distance
Heart rate
Incline
Pause
Toggle
Resistance level
Speed
Time
Page 21 of 32
Watts
Workout profile
Select Workout
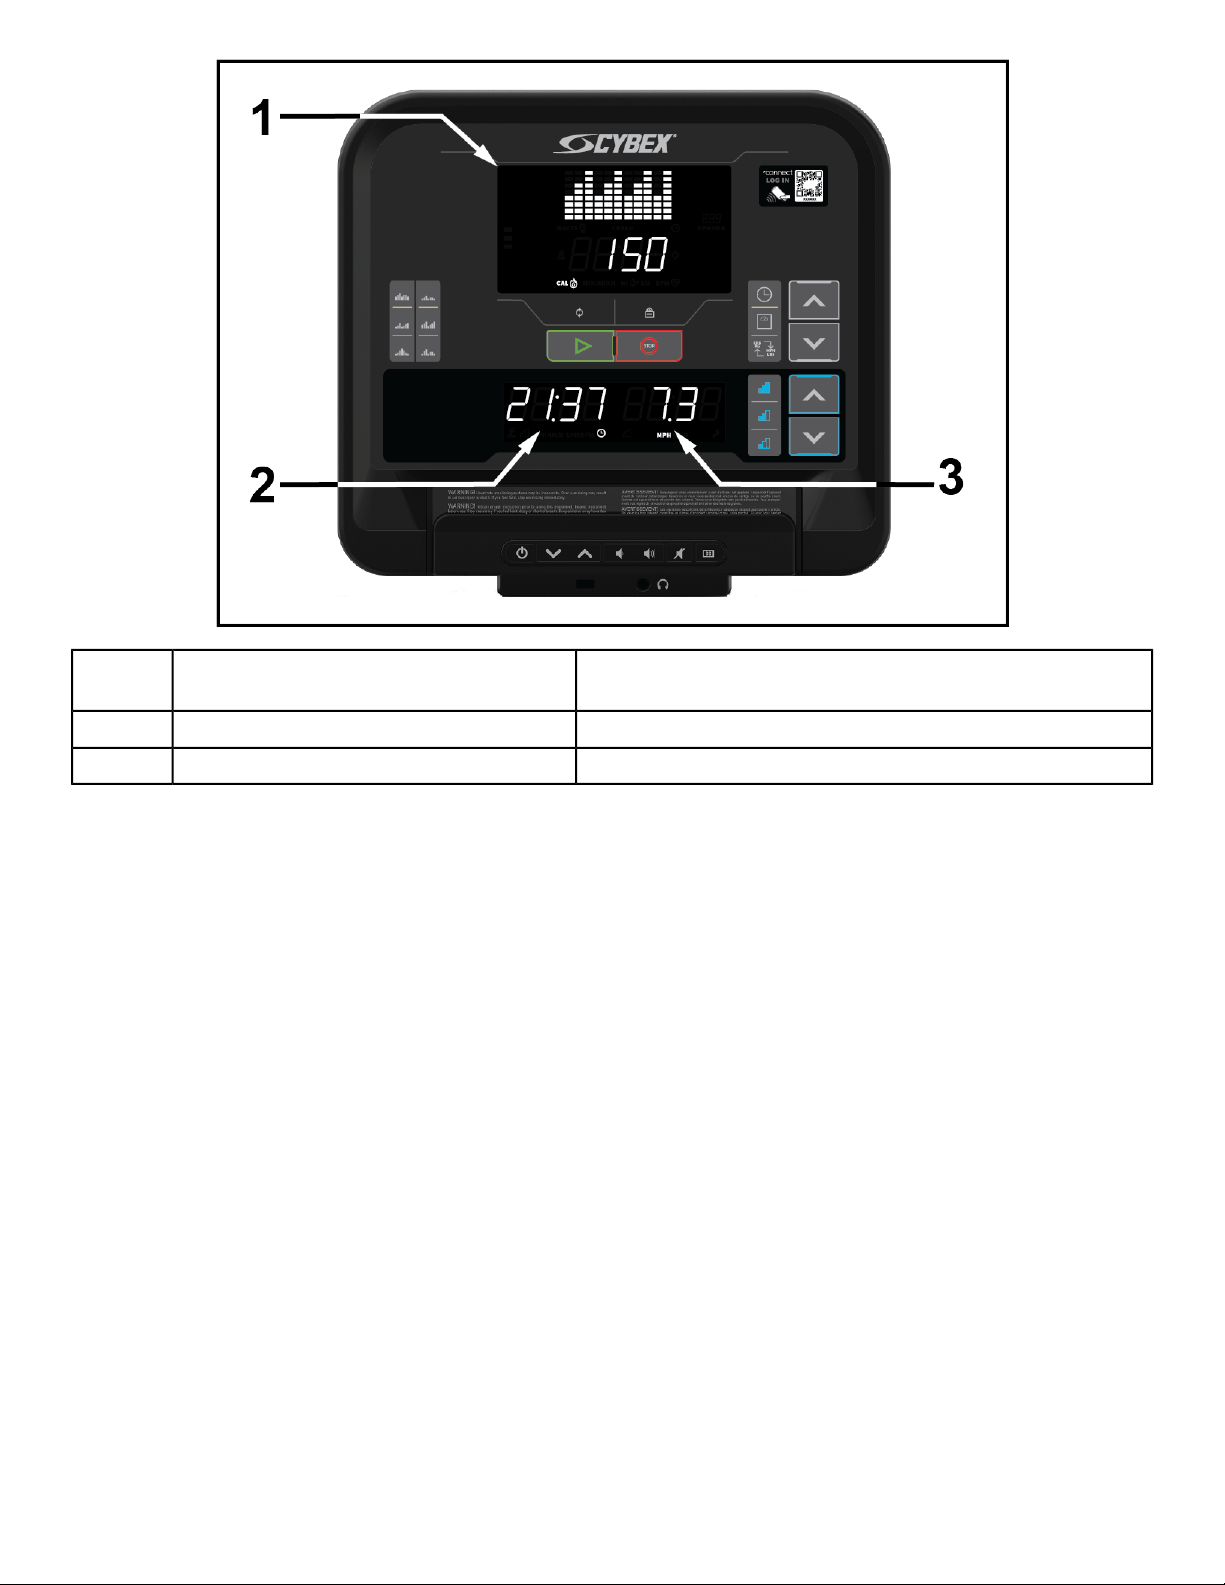
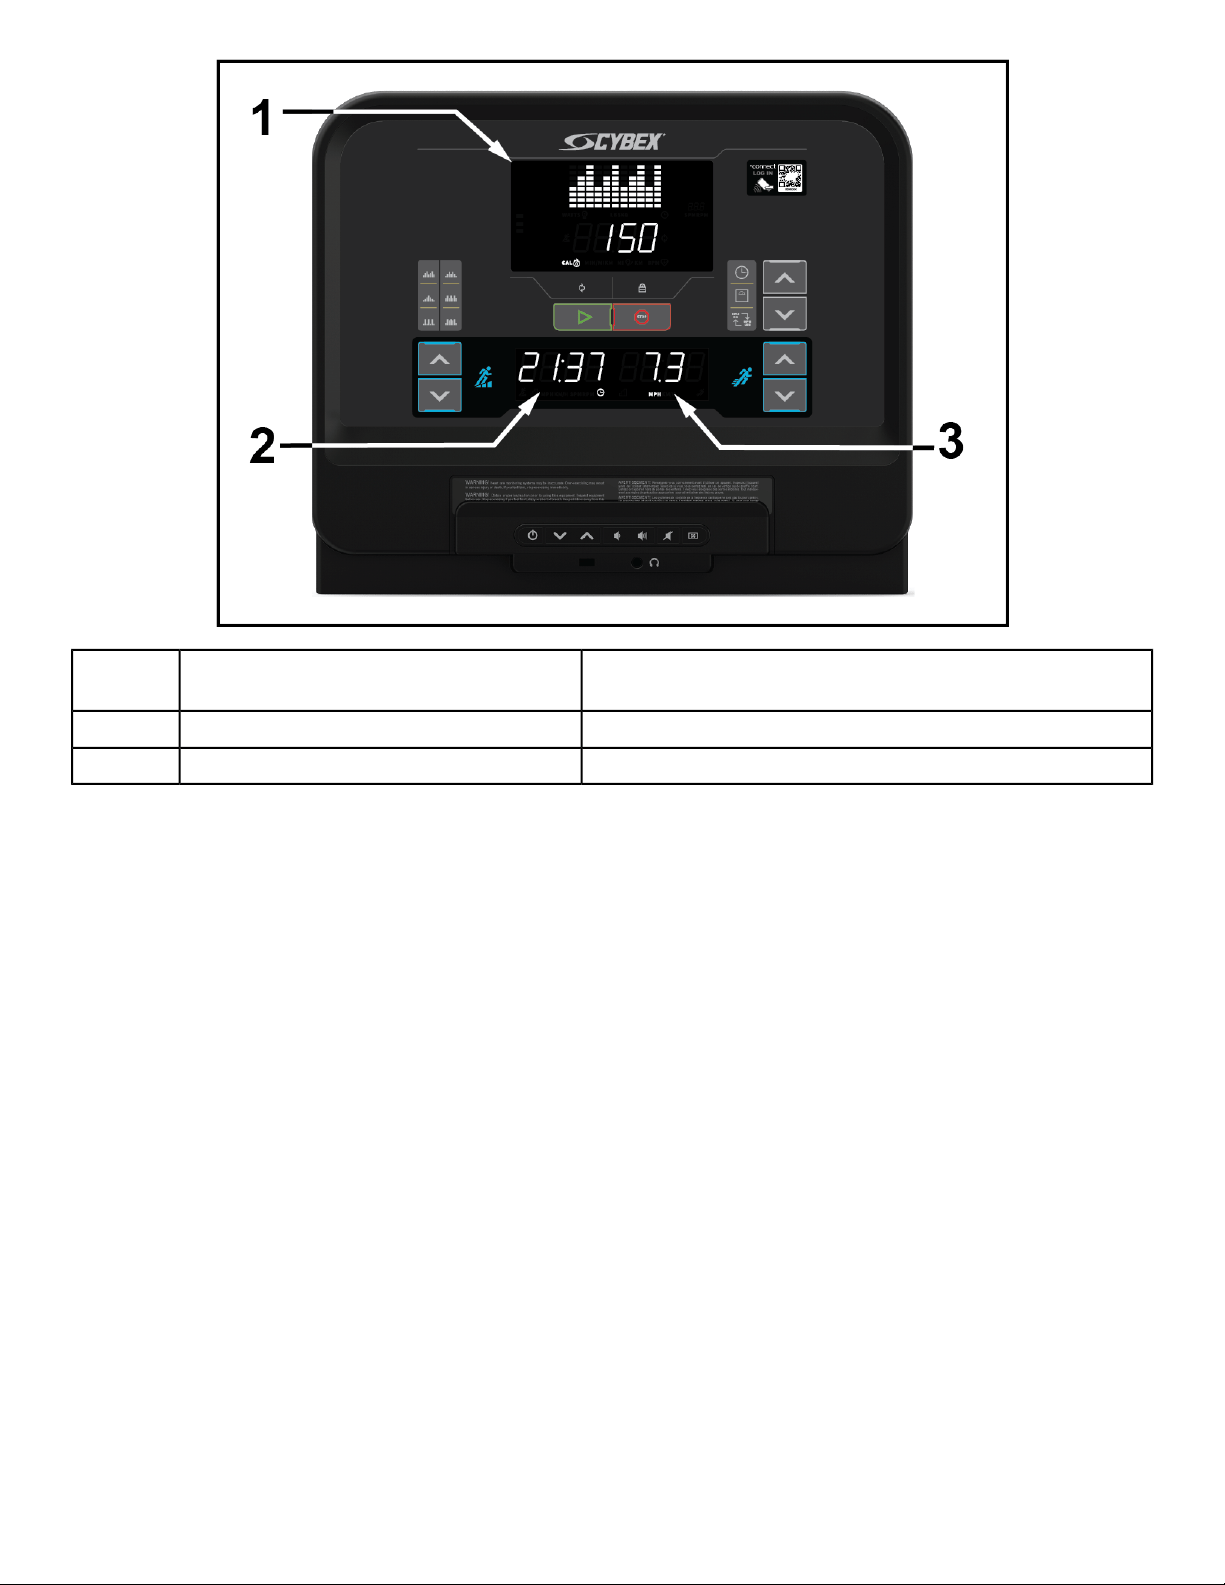
1. Select a workout by pressing one of the workout keys.
2. Adjust the Time of your workout using the right side UP and DOWN arrow keys.
3. Press GO to confirm and advance to next input.
4. If an advanced workout was selected, Adjust the Level of your workout using the right side UP and DOWN
arrow keys.
5. Press GO to confirm and advance to next input.
6. Adjust your Weight using the right side UP and DOWN arrow keys.
7.
Press GO to start your workout. Treadmills will countdown 3, 2, 1, GO before starting the running belt.
8. To end your workout, press the STOP key once to pause. Press a second time to end.
Controls during Workout
During your workout the following keys are functional.
Adjust Speed or Resistance. Display data will toggle for 10 seconds.Right arrow keys
Adjust Incline. Display data will toggle for 10 seconds.Left arrow keys
(Treadmill only)
Press onceto Pause workout.Press GO to resumeworkout, or STOPagain to end workout.STOP
Workout Summary
At the end of a workout, the summary screen is displayed.
Arc Trainer and Bike workout summary
Summary screen will toggle through total values.
Total time of workout
Total calories of workout
Total distance of workout
1
QR code. Scan code to save workout to
LFconnect
2
Page 22 of 32
Treadmill workout summary
Summary screen will toggle through total values.
Total time of workout
Total calories of workout
Total distance of workout
1
QR code. Scan code to save workout to
LFconnect
2
Page 23 of 32

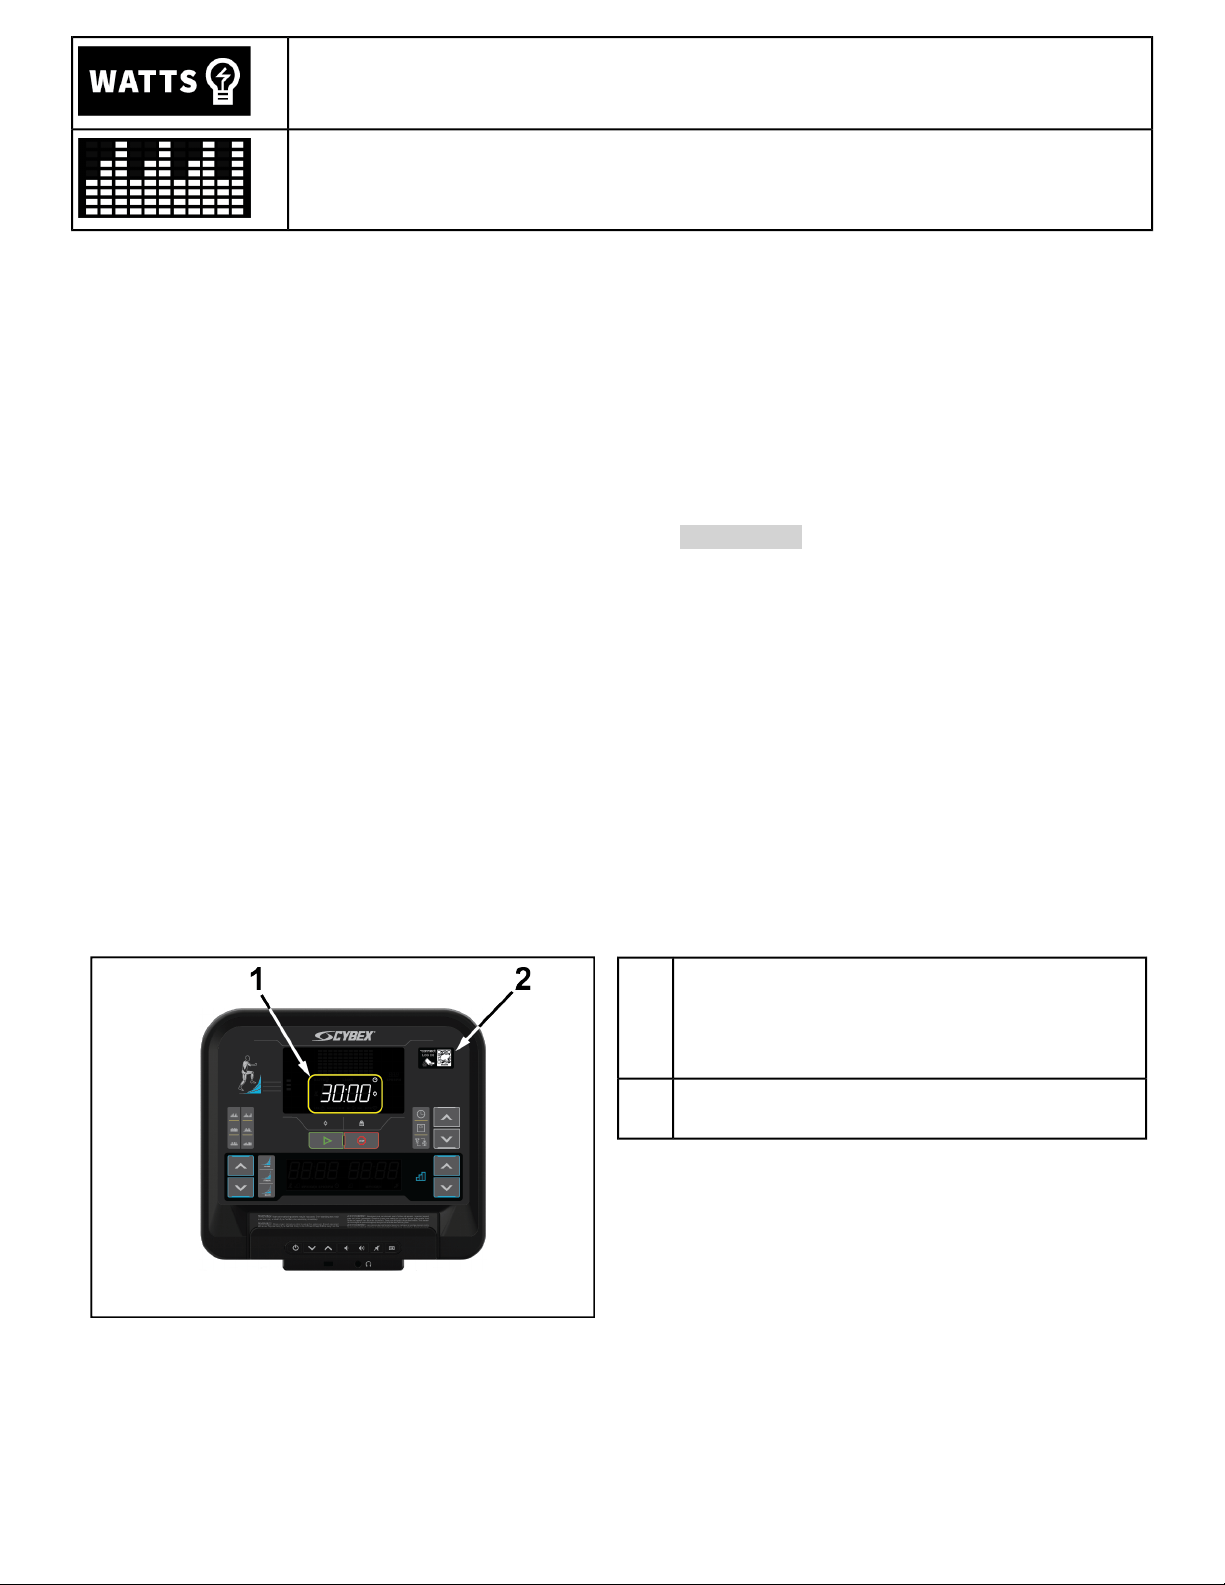
Manager Configuration
View current software version
1. Press the Weight key 5 times.
•
The current software version status displays left to right in the right, center, and left LED's (i.e 0.2 .01. 003)
and beeps once.
• After 5 seconds of displaying software version screen will return to the attract screen.
2. Press the Go key or Stop key, return to the attract screen.
Toggle beeps
1. Press the Time key 5 times, and press the Stop key once.
The current beeps status displays (light up ON or OFF) and beeps once.
2. Use the right up and down keys to change between on and off beeps.
3. Press the Go key, return to attract view and save the status as last seen on the console.
4. Press the Stop key, return to attract view.
If no interaction after 5 seconds of displaying beep status, return to attract view and save the status as last seen
on the console.
Enable / Disable Wireless Connectivity
Wireless connectivity can be enabled or disabled with the following procedure.
Use the UP and DOWN arrow keys in the lower right corner of the console.
Press a key combination of Right Up Arrow, Right Down Arrow, Right Up Arrow, Right Down Arrow, Right
Up Arrow, Right Down Arrow, Time, STOP.
Change default units
1. Press the Unit key 5 times, and press the Stop key once.
Current units displays (light up lbs & mi or kg & km) and beeps once.
2. Use the right up and down keys to change between the units (light up lbs & mi or kg & km).
3. Press the Go key, return to attract view and save the status as last seen on the console.
4. Press the Stop key, return to attract view.
If no interaction after 5 seconds of displaying beep units, return to attract view and save the status as last seen on
the console.
Download usage logs
1. Insert USB stick into USB port.
2. Press a keycombination of Right Up Arrow, Right Down Arrow, Right Up Arrow, Right Down Arrow, Weight
Button will download logs to USB stick.
Reboot system
Arc Trainer and Bikes only.
Press and hold the Go key for 10 seconds.
Page 24 of 32
Maintenance and Troubleshooting
NOTE: Safety of the equipment can be maintained only if the equipment is examined regularly for damage
or wear. Keep the equipment out of use until defective parts are repaired or replaced.
NOTE: Pour assurer la sécurité du matériel, il convient de l'inspecter régulièrement afin de déceler tout
signe d'usure ou d'endommagement. N’utilisez pas l’appareil avant d’avoir réparé ou remplacé les pièces
défectueuses.
The following preventive maintenance tips will keep the product operating at peak performance:
• Locate the product in a cool, dry place.
• Clean the display console and all exterior surfaces with an approved or compatible cleaner (see Approved and
Compatible Cleaners) and a microfiber cloth.
• Long fingernails may damage or scratch the surface of the console; use the pad of the finger to press the selection
buttons on the console.
Approved and Compatible Cleaners
Two preferred cleaners have been approved by reliability experts: PureGreen 24 and Gym Wipes. Both cleaners
will safely and effectively remove dirt, grime and sweat from equipment. PureGreen 24 and the Antibacterial Force
formula of Gym Wipes are both disinfectants that are effective against MRSA and H1N1.
PureGreen 24 is available in a spray which is convenient for gym staff to use. Apply the spray to a microfiber cloth
and wipe down the equipment. Use PureGreen 24 on the equipment for at least 2 minutes for general disinfection
purposes and at least 10 minutes for fungus and viral control.
Gym Wipes are large, durable pre-moistened wipes to use on the equipment before and after workouts. Use Gym
Wipes on the equipment for at least 2 minutes for general disinfection purposes.
Contact Customer Support Services to order these cleaners (1-800-351-3737 or email:
Mild soap and water or a mild non-abrasive household cleaner can also be used to clean the display and all exterior
surfaces. Use a soft microfiber cloth only. Apply the cleaner to the microfiber cloth before cleaning. DO NOT use
ammonia oracid based cleaners.DO NOT useabrasive cleaners. DO NOTuse paper towels.DO NOT applycleaners
directly to the equipment surfaces.
Troubleshooting - Treadmills
Possible SolutionsProbable CauseProblem
Using a voltmeter, verify power at outlet. If no power exists, reset circuit breaker
at panel.
Power source is
insufficient.
No Power.
Replace line cord. Contact Customer Support Services.Line cord is damaged.
Inspect power connection at wall outlet and at machine for proper contact.
Line cord is improperly
seated in socket.
The unit will enter Energy Saving Mode after 5 minutes ofinactivity, with a warning
at 4:45 that energy saving is about to start. To wake the console, step on the
treadmill or push the green “Go” button. When successful, a beep will be heard.
The until will take approximately 25 seconds to allow you to start a workout.
Club Series Units Only:
You may be in “Energy
Saving Mode”.
Check all electrical connections for proper attachment. Contact CustomerSupport
Services.
Loose connection at
display console or motor
control board.
Display does not
illuminate when machine
is powered on.
Check levelers and level treadmill. Check striding belt & re-tension as necessary.
Refer to Integrity Treadmill Assembly Instructions.
Floor surface is uneven.
Treadmill striding belt
slips off-center.
Page 25 of 32

Possible SolutionsProbable CauseProblem
Instruct users not to push striding belt in either direction.
User is pushing striding
belt. This occurs whenthe
runner is running faster
than the striding belt will
travel, with the result of
the striding belt being
pushed with the runner’s
feet.
Maximumtreadmillspeed
is reduced.
User is stalling striding
belt. This will occur with
heavier users at lower
striding belt speeds. The
striding belt will “stall” if
the user is traveling
slower than the striding
belt speed.
Replace belt and deck. Contact Customer Support Services.
Striding belt/deck
malfunctions. The deck
laminate is worn through
or the underside of
striding belt is glazed over
(hard, glossy).
Power source is insufficient.
Power source is
insufficient.
Inspect underneath striding belt and machine. Remove any debris or objects
that may cause interference with the treadmill.
Foreign objects may be
stuck underneath the
machine.
Rubbing sound comes
from underneath
treadmill.
Check all electrical connections for proper attachment. Contact CustomerSupport
Services.
Loose connection at
display console or motor
control board.
Display does not
illuminate when machine
is powered on.
Software updates via USB
1. Insert USB with compatible software package.
2. Press Right Up Arrow, Right Down Arrow, Right Up Arrow, Right Down Arrow, Time Button. The software
update shall begin.
•
The left LED will show the version # of the update package being used (i.e. 1.10).
•
The right LED's will show percent progress (0-100).
•
The progress indicator will flash UPD for 1 second, then appear empty for the next sequence. This flashing
shall continue until software update is complete.
A check mark appears in the progress display for 5 seconds before rebooting console.Successful update
An X appears in the progress display for 60 seconds before rebooting console.
Unsuccessfulupdate
Software updates via LFconnect
1. Push software update from LFconnect.
2. When product is not in use the software update shall begin.
• The middle LED's show the # of the update package being used (i.e. 304).
• The right LED's will show percent progress (0-100).
Page 26 of 32

• The progress indicator will flash full for 1 second, then appear empty for the next sequence. This flashing shall
continue until software update is complete.
A check mark appears in the progress display for 5 seconds before rebooting console.
Successful update
An X appears in the progress display for 60 seconds before rebooting console.
Unsuccessfulupdate
Page 27 of 32
Specifications
Specifications
LED console display
Multiple LED displaysDisplay
0°C to +40°C@ 90% RH (non-condensing)
Ambient Temperature Range:
(Operating)
-33°C to 71°C
Storage and Shipping Temperature
Range
Patented Lifepulse
™
digital contact heart rateHeart Rate Monitoring Systems
Bluetooth proximity, NFCMobile Device Compatibility
USB port available for chargingUSB Device Charging
Arc Trainer: Quick Start, Hill Climb, High Intensity Interval, Elevated Interval, Endurance, Power
Blast, Interval Burn
Bike: Quick Start, Calorie Burner, Advanced Burner, Peaks, Ramps, Bursts, Waves
Treadmill: Quick Start, Speed Bump, Rollers, Peaks, Hill Interval, Rolling Hills, Interval Plus
Workouts
Arc Trainer and Bikes
Shipped DimensionsPhysical Dimensions
8 in. (203 mm)3.7 in. (95 mm)Depth
20.9 in. (531 mm)16.5 in. (419 mm)Width
20.9 in. (532 mm)15.1 in. (384 mm)Height
14.75 lbs. (6.7 kg)10.7 lbs. (4.84 kg)Weight
Treadmill
Shipped DimensionsPhysical Dimensions
8.1 in. (206 mm)3.9 in. (99 mm)Depth
25.1 in. (638 mm)20.7 in. (525 mm)Width
22.5 in. (571 mm)17.3 in. (440 mm)Height
15.25 lbs. (6.9 kg)11.2 lbs. (5.08 kg)Weight
Page 28 of 32

Warranty
What is Covered
This CYBEX commercial exercise equipment product is warranted to be free of all defects in material and
workmanship.
Who is Covered
The original purchaser or any person receiving the product as a gift from the original purchaser. Warranty will be
voided on subsequent transfers.
How long it is covered
All coverage is provided by specific Product according to the guidelines listed in Warranty Information.
Who Pays Transportation and Insurance For Service
If the Product or any covered part must be returned to a service facility for repairs, We, Cybex, will pay all
transportation and insurance charges for the first year. You are responsible for transportation and insurance charge
after the first year.
What We Will Do To Correct Covered Defects
We will ship to you any new or rebuilt replacement part or component, or at our option, replace the Product. Such
replacement parts are warranted for the remaining portion of the original warranty period.
What is Not Covered
Any failures or damage caused by unauthorized service, misuse, accident, negligence, improper assembly or
installation, debris resulting from any construction activities in the Product’s environment, rust or corrosion as a
result of the Product’s location, alterations or modifications without our written authorization or by failure on your
part to use, operate and maintain the Product as set out in your Operation Manual (“Manual”).
One type RJ45 interchangeable Network ready and Fitness Entertainment port is supplied with the Product. This
port complies with the FitLinxx CSAFE specification dated August 4, 2004 stating: 4.75VDC to 10VDC; maximum
current of 85mA. Any Product damage caused by a load exceeding this FitLinxx CSAFE specification is not covered
by warranty.
All terms of this warranty are void if this product is moved beyond the continental borders of the United States of
America (excluding Alaska, Hawaii and Canada) and are then subject to the terms provided by that country’s local
authorized Cybex representative.
What You Must Do
Retain proof of purchase. use, operate and maintain the Product as specified in the Manual; notify the place of
purchase of any defect within 10 days after discovery of the defect; if instructed, return any defective part for
replacement or, if necessary, the entire Product for repair. Cybex reserves the right to decide whether or not a
product is to be returned for repair.
How to Get Parts and Service
Refer to the Corporate Headquarters section of this manual for your local service contact information. Reference
your name, address and the serial number of your Product (consoles and frames may have different serial numbers).
They will tell you how to get a replacement part, or, if necessary, arrange for service where your Product is located.
Page 29 of 32

Exclusive Warranty
THIS LIMITED WARRANTY IS IN LIEU OF ALL OTHER WARRANTIES OF ANY KIND EITHER EXPRESSED OR IMPLIED,
INCLUDINGBUT NOTLIMITED TOTHE IMPLIEDWARRANTIES OFMERCHANTABILITY ANDFITNESS FORA PARTICULAR
PURPOSE, AND ALL OTHER OBLIGATIONS OR LIABILITIES ON OUR PART. We neither assume nor authorize any
person to assure for us any other obligation or liability concerning the sale of this Product. Under no circumstances
shall we be liable under this warranty, or otherwise, of any damage to any person or property, including any lost
profits or lost savings, for any special, indirect, secondary, incidental or consequential damages of any nature
arising out of the use of or inability to use this Product. Some states do not allow the exclusion or limitation of
implied warranties or of liability for incidental or consequential damages, so the above limitations or exclusions
may not apply to you. Warranty coverages and terms may differ outside the United States. Please contact the
Cybex office servicing your country (contact information found at the front of this manual) or visit the applicable
local Cybex website to receive the specific warranty information for your country.
Changes in Warranty Not Authorized
No one is authorized to change, modify or extend the terms of this limited warranty.
Effects of State Laws
This warranty gives you specific legal rights, and you may have other rights which vary from state to state and
country by country.
Our Pledge To You
Our Products are designed and manufactured to the highest standards. We want you to be completely satisfied
with our Products and will do everything possible under the terms of this warranty to keep you secure in knowing
you have bought the best!
Page 30 of 32

Warranty Information
6 Months1 Year2 years3 years7 years10 yearsLifetime
Overlay,
Headphone
Jack, and USB
Port
Labor
Electrical and
Mechanical
Parts
Console
Mechanical
Components
and Labor
Electrical
Components
Frame,
Lifespring™
Shock
Absorbers, and
Motor
Treadmill
Labor
Electrical and
Mechanical
Parts
Arc Trainer
Labor
Electrical and
Mechanical
Parts
Recumbent Bike
Labor
Electrical and
Mechanical
Parts
Upright Bike
Page 31 of 32

Columbia Center III - 9525 West Bryn Mawr Ave, Rosemont, IL 60018 • 800-351-3737 • 847-288-3700 • FAX 800-216-8893
www.cybexintl.com