
WARNING: This product contains chemicals known to the State of California to cause cancer and birth defects or other
reproductive harm. Wash hands after handling.

2
ENG
ENGLISH
TABLE OF CONTENTS
CONTENTS
4 LICENSES
5 ASSEMBLING AND
PREPARING
5 Accessories
6 Parts
7 STORAGEMETHODFORPANEL
PROTECTION
7 - CorrectMethod
7 - IncorrectMethod
8 Installingonawall
9 EXTERNALEQUIPMENTSETUP
9 - IRRECEIVER
10 REMOTE CONTROL
12 Displayingthedevicenameconnectedto
aninputport
13 USING THE MONITOR SET
13 ConnectingtoaPC
13 - RGBconnection
14 - DVIconnection
14 - HDMIconnection
15 - DisplayPortconnection
15 - IRReceiverconnection
16 Adjustingthescreen
16 - Selectinganimagemode
16 - Customizingimageoptions
17 - CustomizingPCdisplayoptions
17 Adjustingthesound
17 - Selectingansoundmode
18 - Customizingsoundoptions
18 Usingadditionaloptions
18 - Adjustingaspectratio
20 - Usingtheinputlist
21 ENTERTAINMENT
21 - Connectingtoawirednetwork
22 - NetworkStatus
23 - ConnectingUSBstoragedevices
24 - Browsingfiles
26 - Viewingmovies
29 - Viewingphotos
32 - Listeningtomusic
34 - ViewingtheContentsList
35 - DivX®VODGuide
36 - UsingPIP/PBP
37 CUSTOMIZING SETTINGS
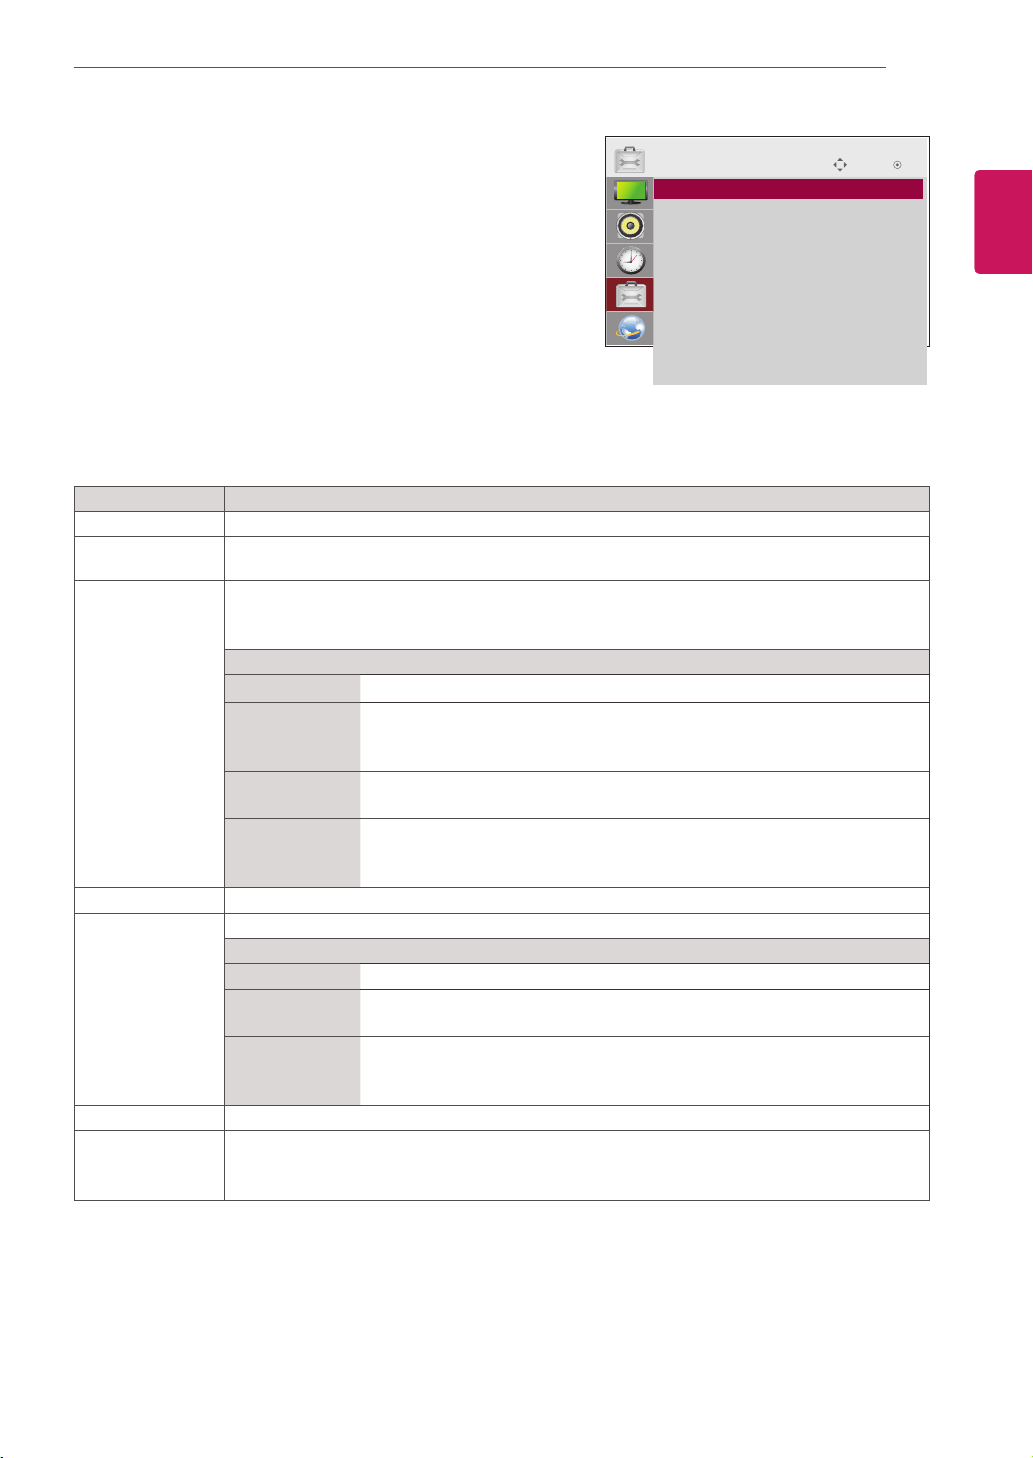
37 Accessingthemainmenus
38 - PICTUREsettings
41 - AUDIOsettings
42 - TIMEsettings
43 - OPTIONsettings
46 PictureID
47 - NETWORKsettings
48 MAKING CONNECTIONS
49 ConnectingtoaHDreceiver,DVD,
Camcorder,CameraorGamingDevice
49 - DVIconnection
49 - HDMIconnection
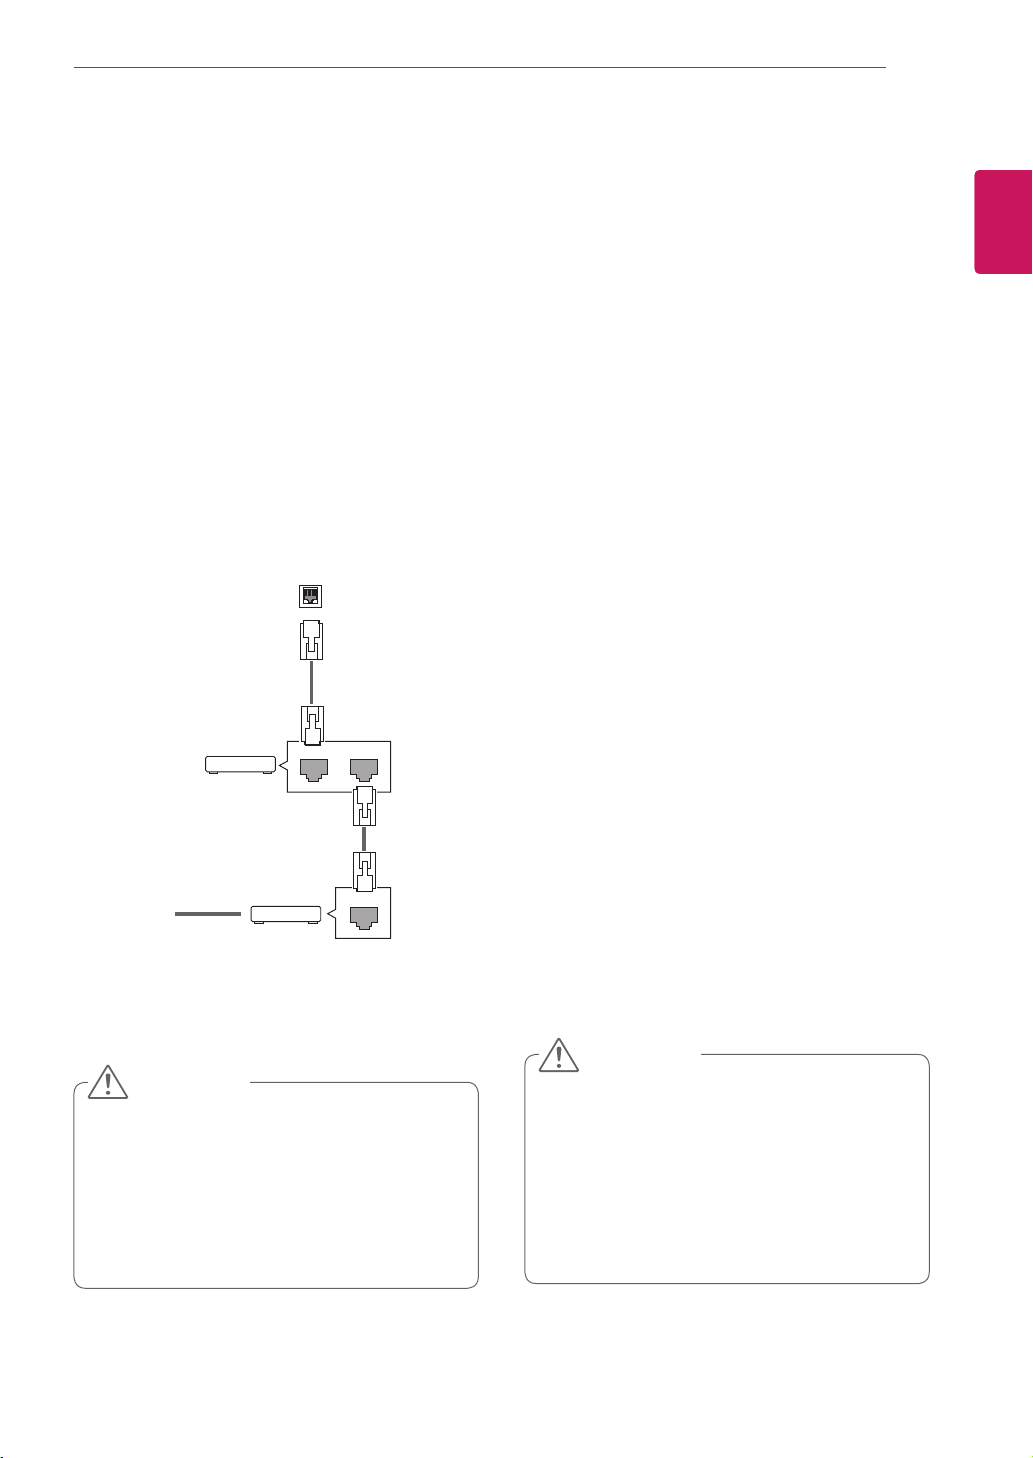
50 ConnectingtotheLAN
50 - LANconnection
50 ConnectingtoaUSB
51 DaisyChainMonitors
51 - RGBCable
51 - DVICable
52 TROUBLESHOOTING
55 SPECIFICATIONS


ENGLISH
4
LICENSES
LICENSES
Supportedlicensesmaydifferbymodel.Formoreinformationofthelicenses,visitwww.lg.com.
HDMI,theHDMIlogoandHigh-DefinitionMultimediaInterfacearetrademarks
orregisteredtrademarksofHDMILicensingLLC.
ABOUTDIVXVIDEO:DivX isadigitalvideoformatcreatedbyDivX,LLC,a
subsidiaryofRoviCorporation.ThisisanofficialDivXCertified devicethat
playsDivXvideo.Visitdivx.comformoreinformationandsoftwaretoolsto
convertyourfilesintoDivXvideos.
ABOUTDIVXVIDEO-ON-DEMAND:ThisDivX
Certified devicemustberegisteredinordertoplaypurchasedDivXVideo-
on-Demand(VOD)movies.Toobtainyourregistrationcode,locatethe
DivXVODsectioninyourdevicesetupmenu.Gotovod.divx.comformore
informationonhowtocompleteyourregistration.
DivXCertified toplayDivX videouptoHD1080p,includingpremium
content.
DivX ,DivXCertified andassociatedlogosaretrademarksofRovi
Corporationoritssubsidiariesandareusedunderlicense.
CoveredbyoneormoreofthefollowingU.S.patents:7,295,673;7,460,668;
7,515,710;7,519,274
ManufacturedunderlicensefromDolbyLaboratories.Dolbyandthedouble-D
symbolaretrademarksofDolbyLaboratories.
5
ENG
ENGLISH
ASSEMBLING AND PREPARING
Theaccessoriessuppliedwithyourproductmayvarydependingonthemodel.
Productspecificationsorcontentsinthismanualmaybechangedwithoutpriornoticeduetoupgrade
ofproductfunctions.
ASSEMBLING AND PREPARING
Accessories
Checkyourproductboxforthefollowingitems.Ifthereareanymissingaccessories,contactthelocal
dealerwhereyoupurchasedyourproduct.Theillustrationsinthismanualmaydifferfromtheactualproduct
andaccessories.
Donotuseanypirateditemstoensurethesafetyandproductlifespan.
Anydamagesorinjuriesbyusingpirateditemsarenotcoveredbythewarranty.
CAUTION
NOTE
P
A
G
E
INPUT
ENERGY
SAVING
MARK
ARC
ON
OFF
. , !
ABC
DEF
GHI
JKL
MNO
PQRS
TUV
1/a/A
- * #
WXYZ
CLEAR
MONITOR
PSM
AUTO
MUTE
BRIGHT
NESS
MENU
POWER
OK
S.MENU
ID
BACK
TILE
ON
OFF
EXIT
Remote Control
and Batteries
Power Cord
IR Receiver
CD (Owner's Manual,
SuperSign Elite-w Program/
SuperSign Manual) / Card
RGB Cable
6
ENG
ENGLISH
ASSEMBLING AND PREPARING
Screen Marks
Screen Buttons
Parts
Connection panel
Power Indicator
LEDOn:Powerison
LEDOff:Powerisoff
Screen Marks Description
INPUT Changestheinputsource.
MENU Accessesthemainmenus,orsavesyourinputandexitsthemenus.
Adjusttheupanddown.
Adjuststhevolumelevel.
AUTO/SET Displaysthecurrentsignalandmode.
Pressthisbuttontoadjustthescreenautomatically(availableonlyinRGBmode)
Turnsthepoweronoroff.
PowerIndicator ThisIndicatorlightsupredwhenthedisplayoperatesnormally(onmode).Ifthedisplay
Insleepmode(InPowerSavingmode),thisindicatorcolorchangestoamber.
YoucansetthePowerindicatortoonoroffbyselectingOPTIONinthemainmenu.
NOTE
7
ENG
ENGLISH
ASSEMBLING AND PREPARING
Correct Method Incorrect Method
Storage Method for Panel Protection
Iftheproductneedstobesetupright,holdboth
sidesoftheproduct,andtiltbackwardcarefully
for.Donotletthepanelnottotouchthefloor.
Whenlayingdowntheproduct,layacushionona
flatfloor.Puttheproductonitwiththepanelof
theproductfacingdown.
Ifthereisnotacushionavailable,ensuretheflooris
cleanandthenlaytheproductdowncarefullywiththe
panelfacingeitherupwardordownward.
Atthistime,
becarefulforobjectsnottofallonthepanel.
Iftheproductistiltedontothebezel,thebottomof
thepanelmaybedamaged.
Iftheproductistiltedontotheedgeofthe panel,
thepanelmaybedamaged.
Panel
Panel
Panel
Panel
Cushion
Panel
8
ENG
ENGLISH
ASSEMBLING AND PREPARING
Disconnectthepowercordfirst,andthen
moveorinstalltheMonitorset.Otherwise
electricshockmayoccur.
IfyouinstalltheMonitorsetonaceilingor
slantedwall,itmayfallandresultinsevere
injury.
Donotovertightenthescrewsasthismay
causedamagetotheMonitorsetandvoid
yourwarranty.
Usethescrewsandwallmountsthat
meettheVESAstandard.Anydamages
orinjuriesbymisuseorusinganimproper
accessoryarenotcoveredbythewarranty.
CAUTION
NOTE
Donotinstalltheproductinaplacewith
noventilation(e.g.,onabookshelforina
closet)oronacarpetorcushion.Ifthereis
nootheroptionbuttomounttheproducton
thewall,makesurethatsufcientventilation
isprovidedbeforeinstallation.
-Failuretodosomayresultinaredueto
theincreaseintheinternaltemperature.
Installthemonitoratleast10cmawayfromthe
wallandleaveabout10cmofspaceateachside
ofthemonitortoensuresufficientventilation.
Usethewallmountplateandscrewsthatcomply
withtheVESAstandard.
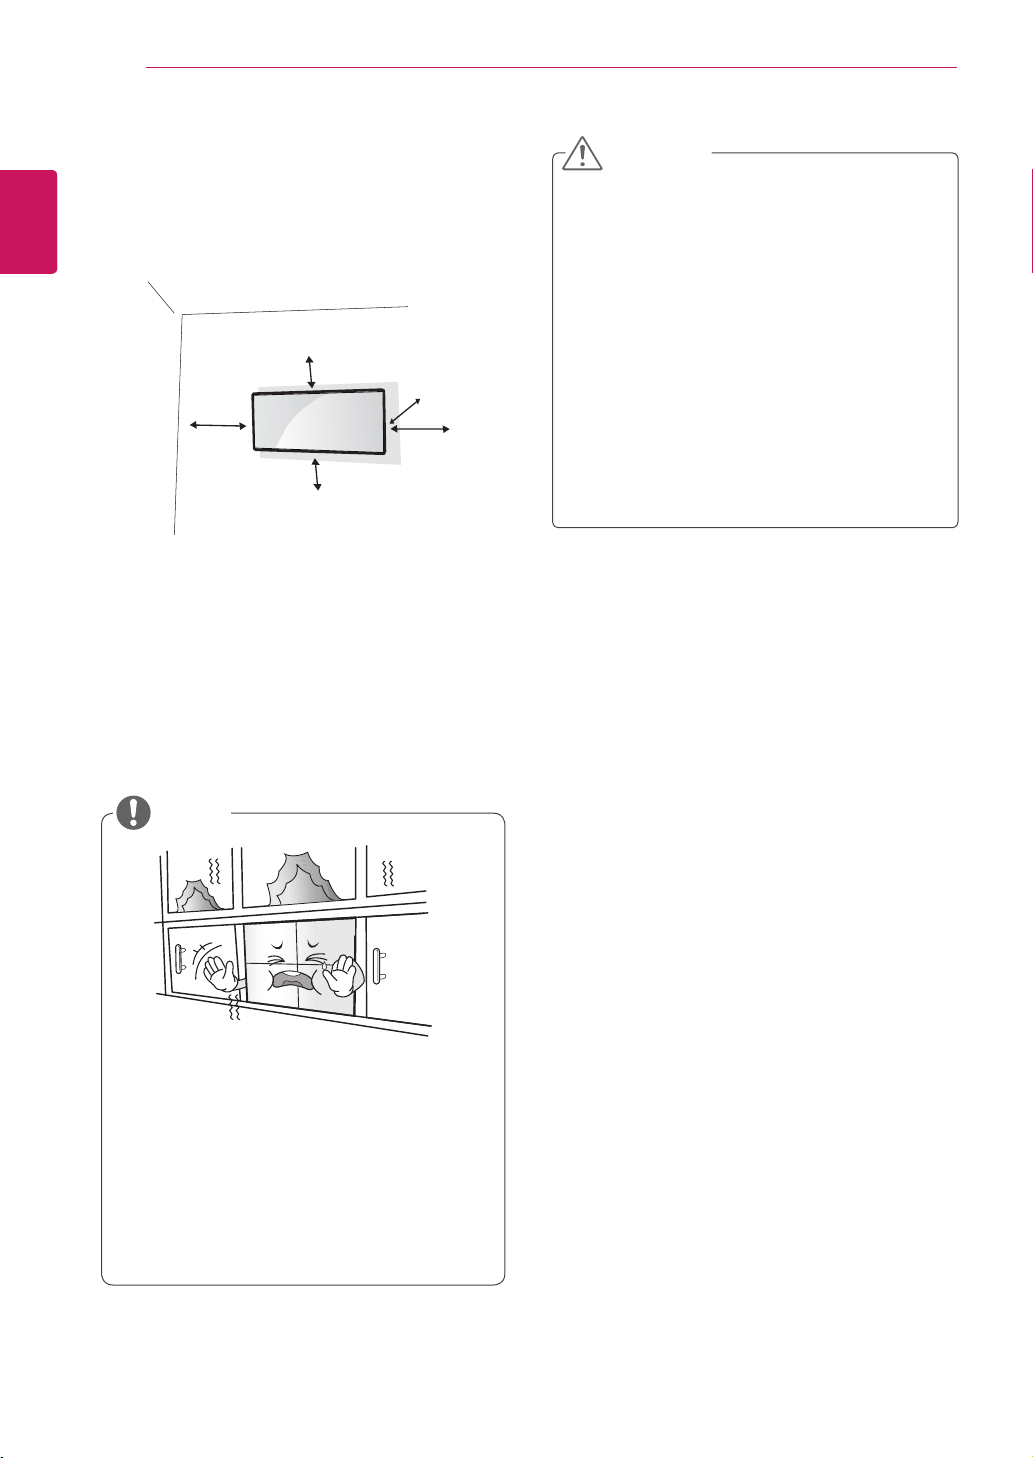
Installing on a wall
ToinstalltheMonitoronawall(Optional),usethe
VESAscrews(notincluded)tofastenit.
10cm
10cm
10cm
10cm
20cm
9
ENG
ENGLISH
ASSEMBLING AND PREPARING
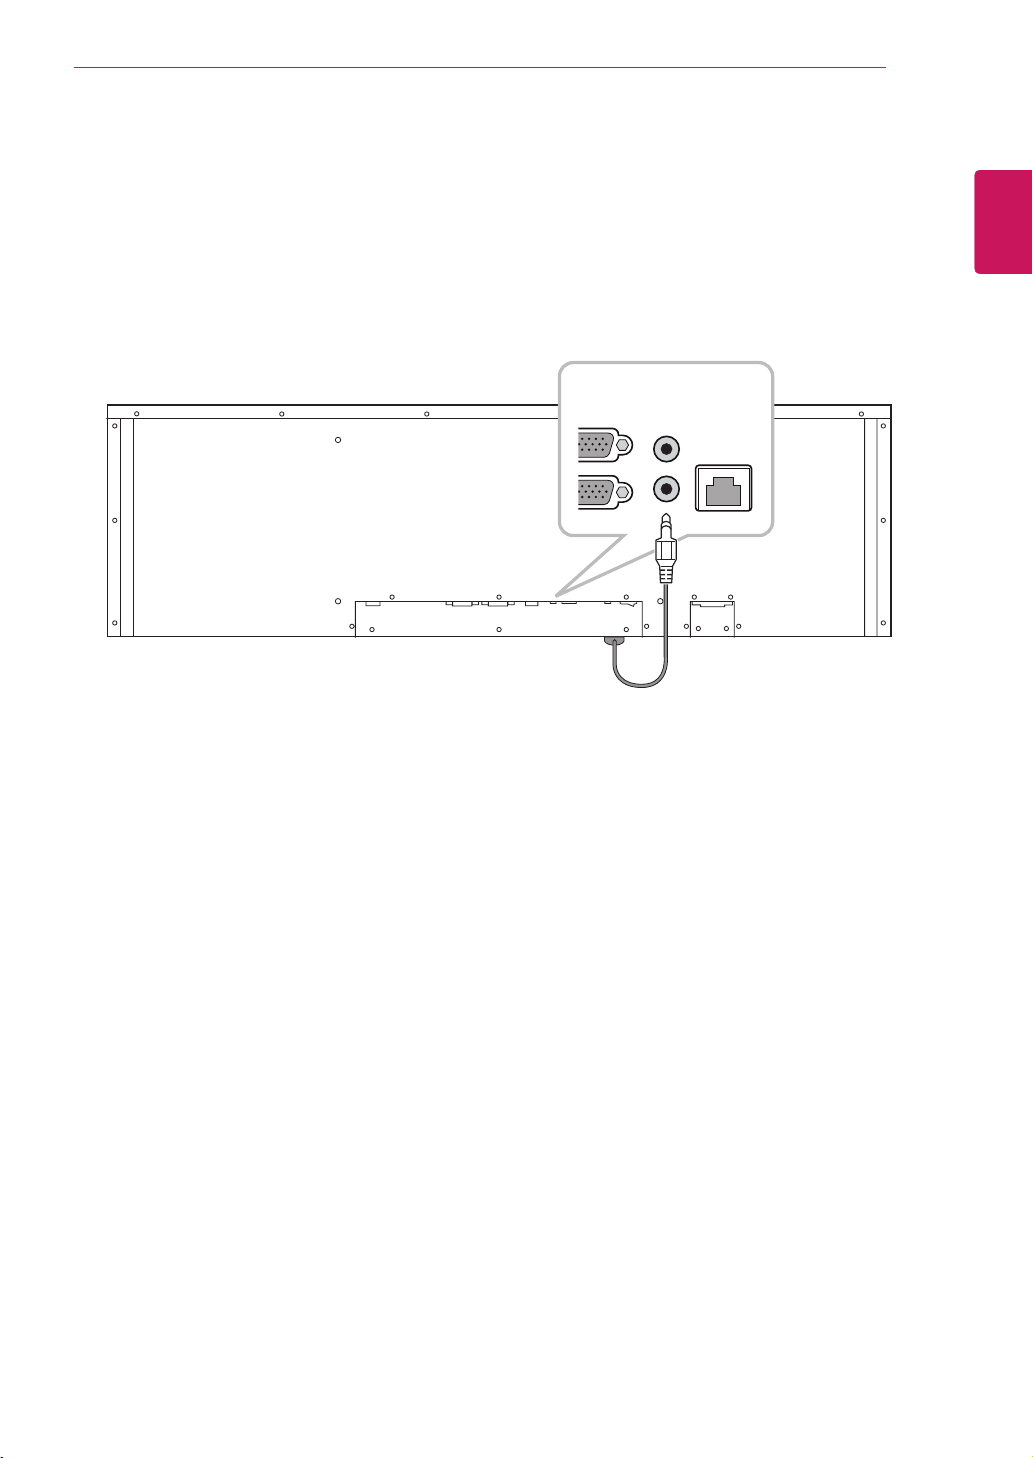
EXTERNAL EQUIPMENT SETUP
IR RECEIVER
Thisallowsaremotecontrolsensortobeplacedinacustomlocation.Thenthatdisplaycancontrolother
displaysviaanRS-232Ccable.
GB OUT
GB IN
AUDIO IN
REMOTE
S
S
LAN
10
ENG
ENGLISH
REMOTE CONTROL
REMOTE CONTROL
P
A
G
E
INPUT
ENERGY
SAVING
MARK
ARC
ON
OFF
1
. , !
2
ABC
3
DEF
4
GHI
5
JKL
6
MNO
7
PQRS
8
TUV
9
1/a/A
0
- * #
WXYZ
CLEAR
OK
S.MENU
MONITOR
PSM
AUTO
MUTE
BRIGHT
NESS
MENU
ID
BACK
TILE
ON
OFF
EXIT
POWER
P
A
G
E
INPUT
ENER
GY
SAVING
MARK
ARC
1
.
,
!
2
ABC
3
D
E
F
4
G
HI
5
J
K
L
6
M
N
O
7
PQ
R
S
7
7
8
T
U
V
9
1/a/A
0
- * #
WXYZ
C
LEA
R
ON
OF
F
MONITOR
MONITOR
PSM
MU
T
E
BRI
G
H
T
NESS
PO
WE
R
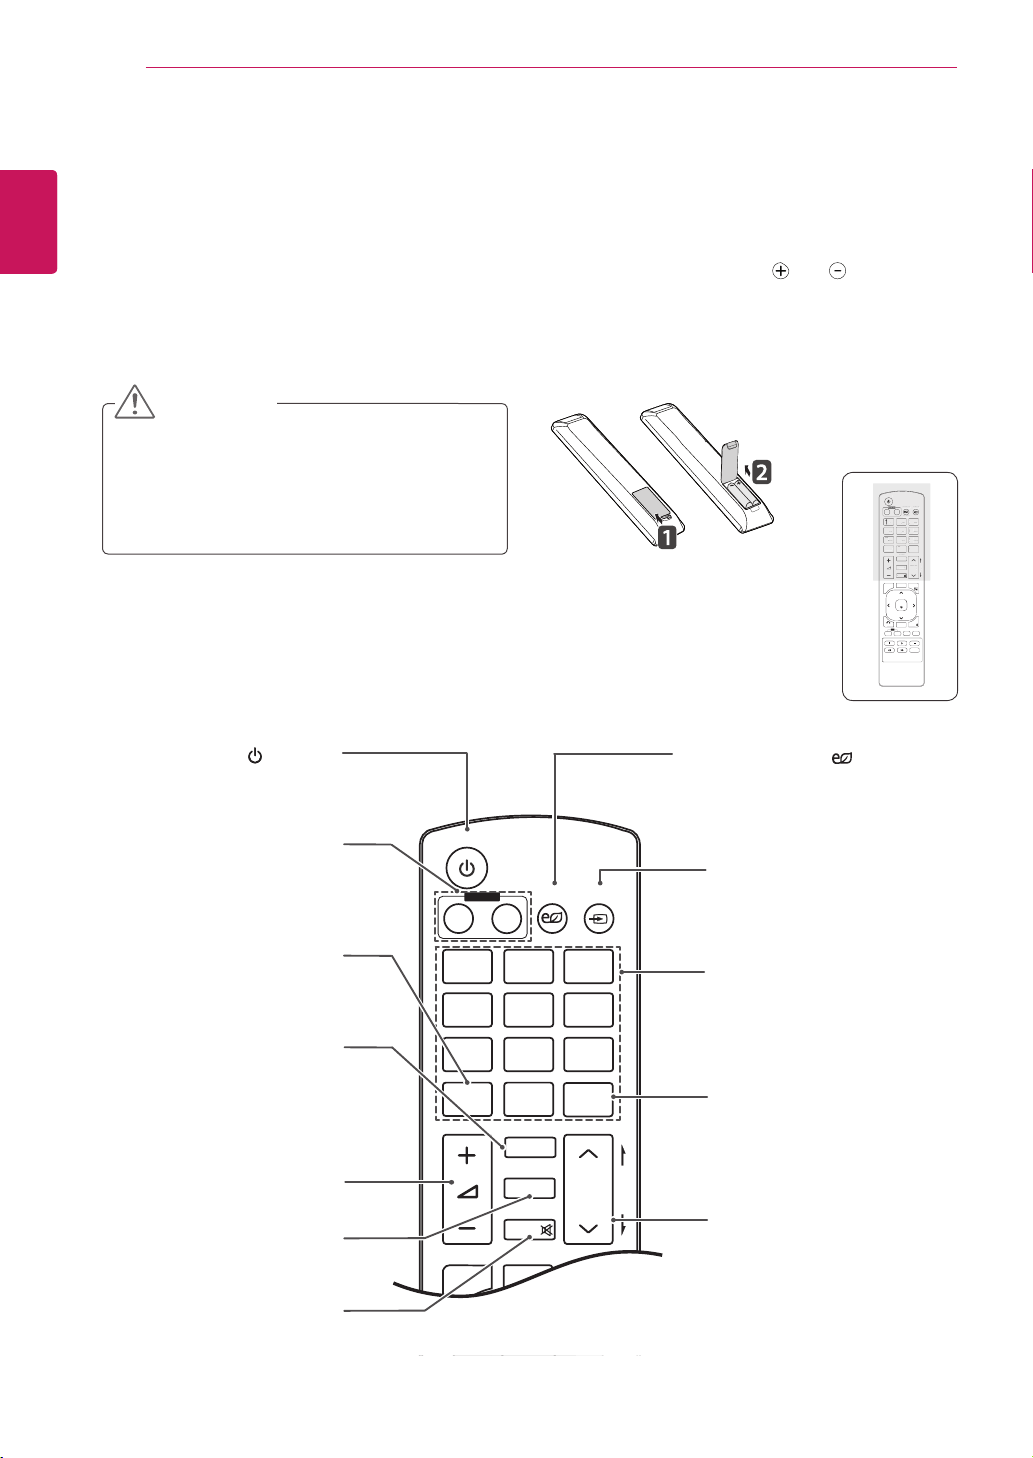
Thedescriptionsinthismanualarebasedonthebuttonsoftheremotecontrol.Pleasereadthismanual
carefullyandusetheMonitorsetcorrectly.
Toreplacebatteries,openthebatterycover,replacebatteries(1.5VAAA)matching and endstothe
labelinsidethecompartment,andclosethebatterycover.
Toremovethebatteries,performtheinstallationactionsinreverse.
Donotmixoldandnewbatteries,asthis
maydamagetheremotecontrol.
Makesuretopointtheremotecontroltothe
remotecontrolsensorontheMonitorset.
CAUTION
P
A
G
E
INPUT
ENERGY
SAVING
MARK
ARC
ON
OFF
. , !
ABC
DEF
GHI
JKL
MNO
PQRS
TUV
1/a/A
- * #
WXYZ
CLEAR
OK
S.MENU
MONITOR
PSM
AUTO
MUTE
BRIGHT
NESS
MENU
ID
BACK
TILE
ON
OFF
EXIT
POWER
(POWER)
TurnstheMonitorsetonoroff.
Monitor On / Off
Turnoffthemonitorandthen
turnitbackon.
1/a/A Button
Togglesbetweennumerical
andalphabetical.
ENERGY SAVING( )
Adjuststhebrightnessof
thescreentoreduceenergy
consumption.
INPUT
Selectstheinputmode.
Number and Alphabet buttons
Entersnumericaloralphabetical
charactersdependingonthe
setting.
CLEAR
Deletestheenterednumerical
oralphabeticalcharacter.
PSM
SelectsthePictureStatus
Mode.
MUTE
Mutesallsounds.
Volume Up / Down
Adjuststhevolumelevel.
Brightness Key
Adjustthebrightnessby
pressingtheUpandDown
buttonsontheremotecontrol.
InUSBmode,theOSDmenu
hasthePagefunctionto
movetothenextfilelist.
ARC
SelectstheAspectRatio
Mode.
MARK
Selectsaspecificfileinthe
USBmode.
11
ENG
ENGLISH
REMOTE CONTROL
P
A
G
E
INPUT
ENERGY
SAVING
MARK
ARC
ON
OFF
. , !
ABC
DEF
GHI
JKL
MNO
PQRS
TUV
1/a/A
- * #
WXYZ
CLEAR
OK
S.MENU
MONITOR
PSM
AUTO
MUTE
BRIGHT
NESS
MENU
ID
BACK
TILE
ON
OFF
EXIT
POWER
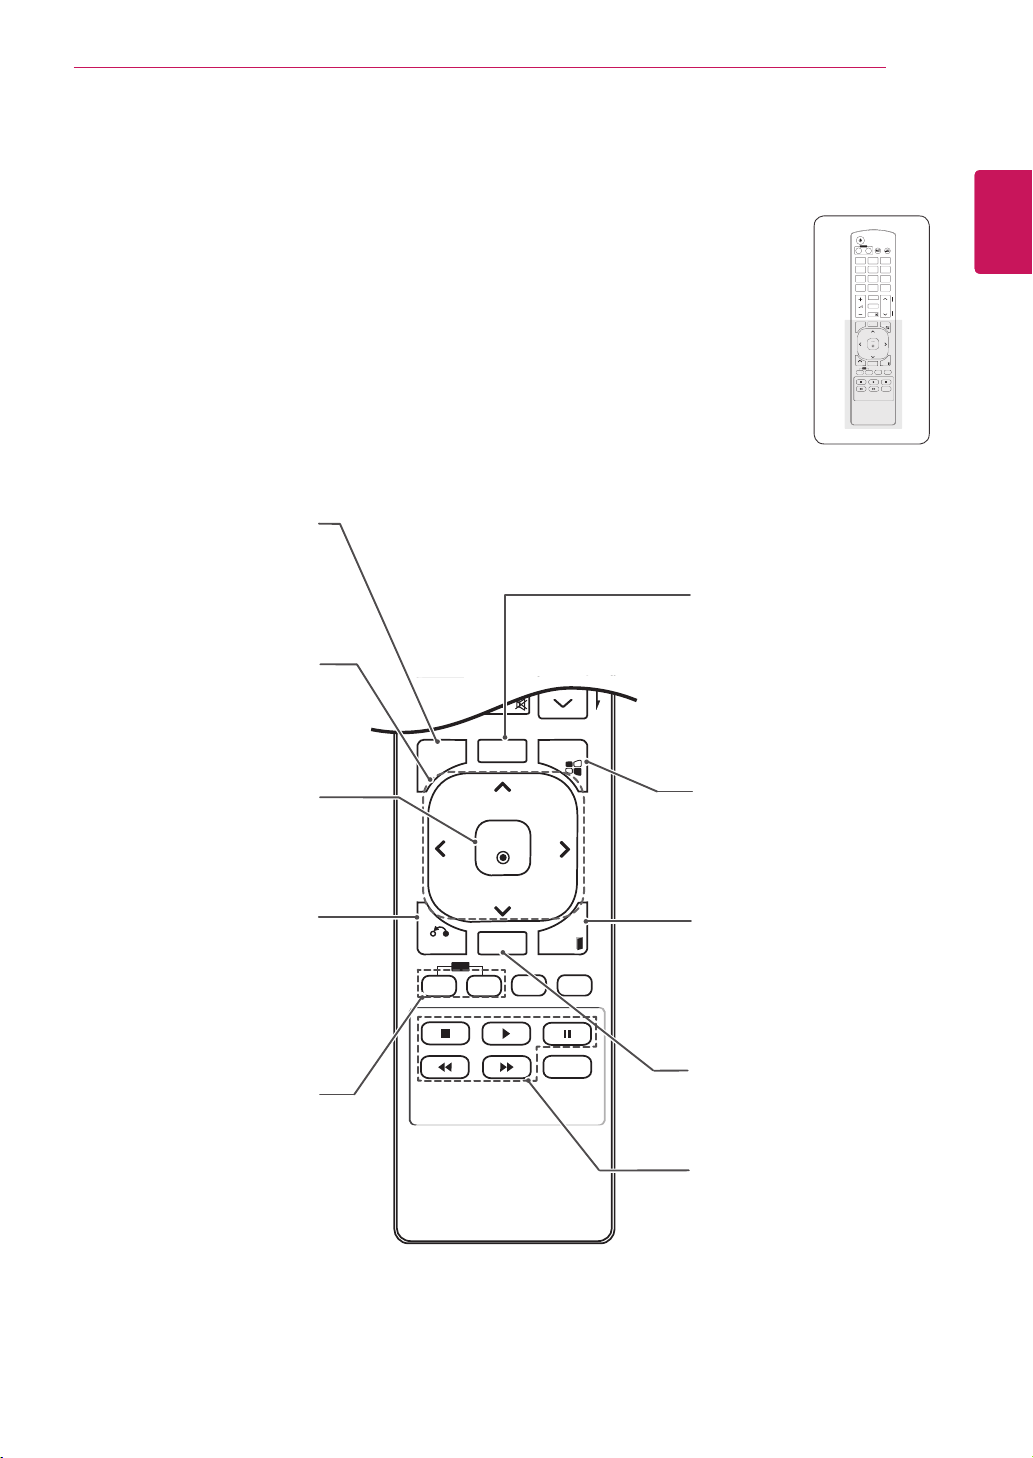
S.MENU
(SuperSignMenuKey)
Thisbuttonselectionisnot
applicable.
EXIT
Clearsallon-screendisplays
andreturnstoMonitorset
viewingfromanymenu.
TILE
Thecurrentmodeldoesnot
supportthisfunction.
MENU (Seep.37)
Accessesthemainmenus
orsavesyourinputandexit
menus.
Navigation buttons
Scrollsthroughmenusor
options.
OK
Selectsmenusoroptionsand
confirmsyourinput.
BACK
Allowstheusertomoveback
onestepinuserinteraction
function.
USB Menu control buttons
Controlsmediaplayback.
ID ON/OFF
WhenthenumberofPicture
IDisequaltoSetIDyoucan
controlthemonitorwhich
youwantinthemultidisplay
condition.
AUTO
Automaticallyadjustspicture
positionandminimizesimage
instability.(RGBinputonly)
P
A
G
E
INPUT
ENERGY
SAVING
MARK
ARC
ON
OFF
1
. , !
2
ABC
3
DEF
4
GHI
5
JKL
6
MNO
7
PQRS
8
TUV
9
1/a/A
0
- * #
WXYZ
CLEAR
OK
S.MENU
MONITOR
PSM
AUTO
MUTE
BRIGHT
NESS
MENU
ID
BACK
TILE
ON
OFF
EXIT
POWER
OK
S
.MEN
U
A
U
T
O
MEN
U
ID
BA
C
K
T
IL
E
ON
O
FF
E
XIT
12
ENG
ENGLISH
REMOTE CONTROL
Displaying the device name connected to an input port
Display whichdevices are connectedto which
externalinputports.
P
A
G
E
INPUT
ENERGY
SAVING
MARK
ARC
ON
OFF
. , !
ABC
DEF
GHI
JKL
MNO
PQRS
TUV
1/a/A
- * #
WXYZ
CLEAR
OK
S.MENU
MONITOR
PSM
AUTO
MUTE
BRIGHT
NESS
MENU
ID
BACK
TILE
ON
OFF
EXIT
POWER
P
A
G
E
INPUT
ENERGY
SAVING
MARK
ARC
ON
OFF
. , !
ABC
DEF
GHI
JKL
MNO
PQRS
TUV
1/a/A
- * #
WXYZ
CLEAR
OK
S.MENU
MONITOR
PSM
AUTO
MUTE
BRIGHT
NESS
MENU
ID
BACK
TILE
ON
OFF
EXIT
POWER
1 AccesstheInputlistscreenandpresstheblue
(inputlabel)buttonontheremotecontrol.
2 Youcanassignaninputlabelforeveryinput
exceptUSB.
Externalinputssupported:HDMI,DVI-D,
DisplayPort
Labelsavailable:DTV,PC
TheinputlabelsaredisplayedontheInput
Labelscreenoratthetopleftofthescreen
whenyouchangetheexternalinputsetting.
ForDTV/PC-compatiblesignals,suchas
1080p60Hz,thescreensettingsmay
changeaccordingtotheinputlabel.TheJust
ScanoptionisavailableifaPCisconnected
asanexternaldevice.
NOTE
InputLabel
Close
HDMI
DVI-D
DisplayPort

13
ENG
ENGLISH
USING THE MONITOR SET
USING THE MONITOR SET
Connecting to a PC
Your Monitor set supports the Plug & Play* feature.
* Plug & Play: A PC will have a built-in driver for
the monitor, no extra software is needed.
Connect the signal
input cable and tighten
it by turning the screws
clockwise.
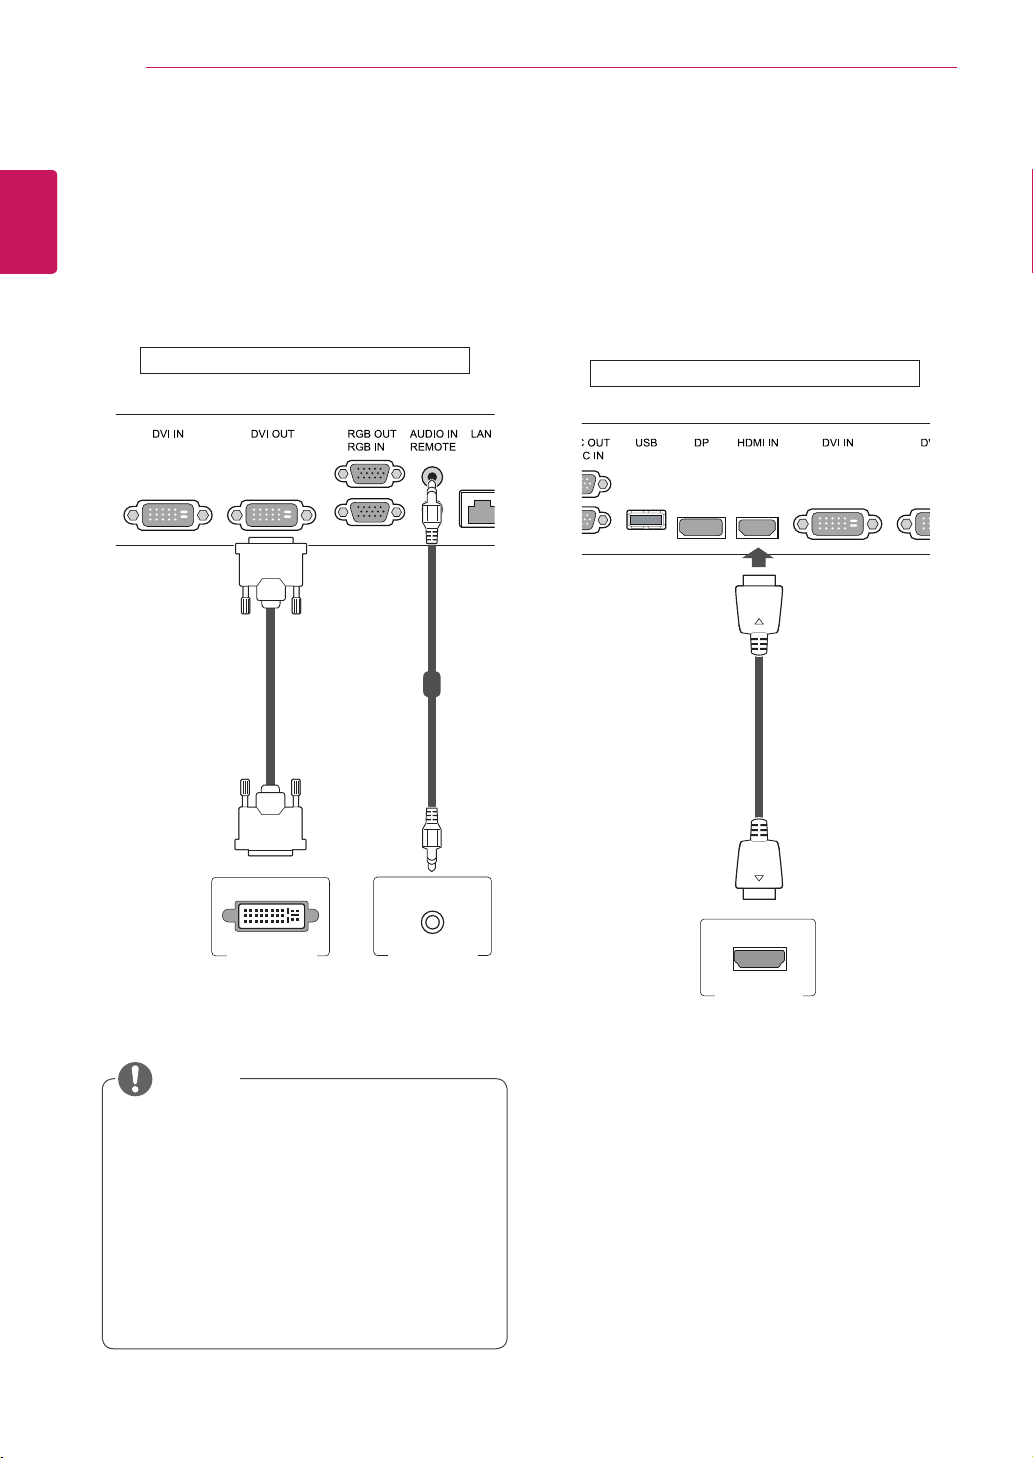
RGB connection
Transmits the analog video signal from your PC to
the Monitor set. Connect the PC and the Monitor
set with the 15 pin signal cable as shown the
following illustrations.
Select RGB input.
NOTE
It is recommended to use the Monitor set
with the HDMI connection for the best image
quality.
To comply with the specifications of the
product, use a shielded interface cable with
ferrite core, such as D-sub 15 pin cable and
DVI/HDMI cable provided with the product.
If you turn the Monitor set on when the set
becomes cold, the screen may flicker. This is
normal.
Some red, green, or blue spots may appear
on the screen. This is normal.
Do not press the screen with your finger for
a long time as this may result in temporary
distortion on the screen.
Avoid displaying a fixed image on the
screen for a long period of time to prevent
image burn. Use a screensaver if possible.
CAUTION
Use the standard Macintosh
adapter since an incompatible
adapter is available in the
market. (Different signaling
system)
Apple computers may require an adapter to
connect to this monitor. Call or visit their web
site for more information.
NOTE
PC
Macintosh Adapter
(not included)
PC/MAC
(not included)
Back of the product.
14
ENG
ENGLISH
USING THE MONITOR SET
DVI connection
TransmitsdigitalvideosignalfromyourPCto
theMonitorset.ConnectthePCandtheMonitor
setwiththeDVIcableasshownthefollowing
illustrations.
SelectDVIinput.
HDMI connection
Transmitsdigitalvideoandaudiosignalsfromyour
PCtotheMonitorset.ConnectthePCandthe
MonitorsetwiththeHDMIcableasshowninthe
followingillustrations.
SelectHDMIinput
UseaHighSpeedHDMI™Cable.
PleasecheckthePCenvironmentifyou
cannothearthesoundinHDMImode.
SomePCsrequireyoutomanuallychange
thedefaultaudiooutputtoHDMI.
IfyouwanttouseHDMI-PCmode,you
mustsettheinputlabeltoPCmode.
WhenHDMIPCisused,acompatiblity
problemcouldoccur.
NOTE
(notincluded) (notincluded)
PC PC
(notincluded)
PC
Backoftheproduct.
Backoftheproduct.
15
ENG
ENGLISH
USING THE MONITOR SET
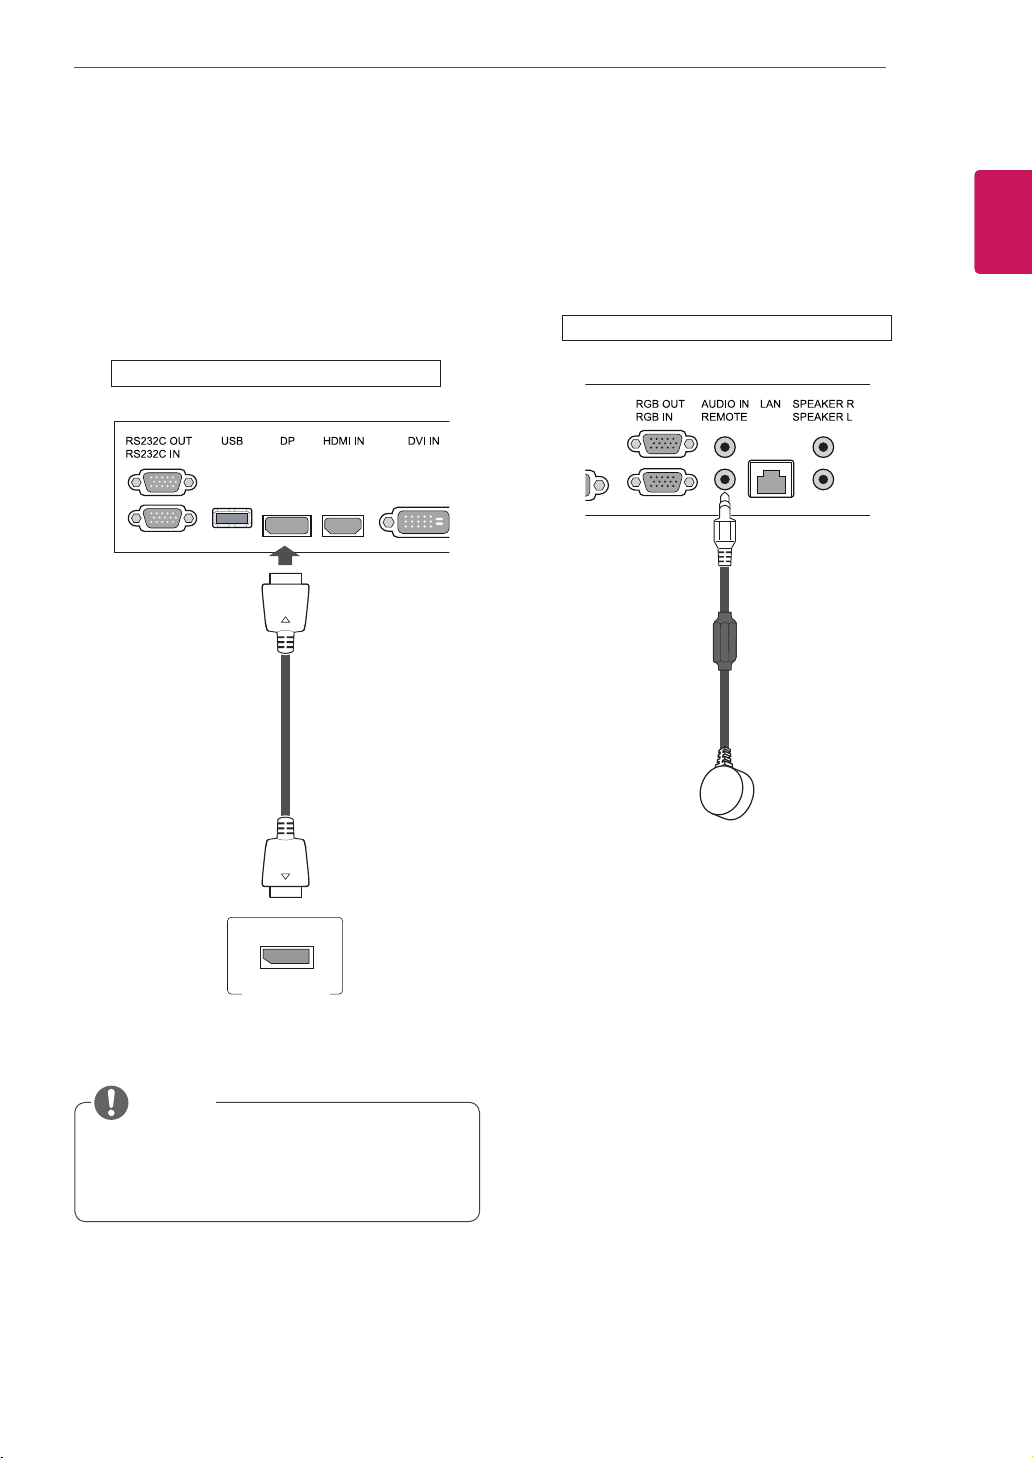
IR Receiver connection
AllowstheuseofawiredremoteorIRreceiver
extension.
Display Port connection
Transmitsdigitalvideoandaudiosignalsfrom
yourPCtotheMonitor.ConnectthePCandthe
MonitorwiththeDisplayPortcableasshownin
thefollowingillustrations.
SelectDisplayPortinputsource.
Soundmaynotbeavailabledependingon
theDPversionofyourPC.
NOTE
(notincluded)
PC
Backoftheproduct.
Backoftheproduct.

16
ENG
ENGLISH
USING THE MONITOR SET
Adjusting the screen
Selecting an image mode
Displayimagesinitsoptimizedsettingsby
selectingoneofthepresetimagemodes.
1
PressMENUtoaccessthemainmenus.
2
PresstheNavigationbuttonstoscrollto
PICTUREandpressOK.
3
PresstheNavigationbuttonstoscrollto
Picture ModeandpressOK.
4
PresstheNavigationbuttonstoscrolltoan
imagemodeyouwantandpressOK.
Customizing image options
Customizebasicandadvancedoptionsofeach
imagemodeforthebestscreenperformance.
1
PressMENUtoaccessthemainmenus.
2
PresstheNavigationbuttonstoscrollto
PICTUREandpressOK.
3
PresstheNavigationbuttonstoscrollto
Picture ModeandpressOK.
4
PresstheNavigationbuttonstoscrolltoan
imagemodeyouwantandpressOK.
5
Selectandadjustfollowingoptions,andthen
pressOK.
Mode Description
Vivid Adjuststhevideoimagefortheretail
environmentbyenhancingthecontrast,
brightness,color,andsharpness.
Standard Adjuststheimageforthenormal
environment.
Cinema Optimizesthevideoimageforacinematic
looktoenjoymoviesasifyouareina
movietheater.
Sport Optimizesthevideoimageforhighand
dynamicactionsbyemphasizingprimary
colorssuchaswhite,grass,orskyblue.
Game Optimizesthevideoimageforafast
gamingscreensuchasPCsorgames.
5
Whenyouarefinished,pressEXIT.
Whenyoureturntothepreviousmenu,press
BACK.
Option Description
Backlight Adjuststhebrightnessofthescreen
bycontrollingtheLCDbacklight.If
youdecreasethebrightnesslevel,
thescreenbecomesdarkerandthe
powerconsumptionwillbereduced
withoutanyvideosignalloss.
Contrast Increasesordecreasesthegradient
ofthevideosignal.Youmayuse
Contrastwhenthebrightpartofthe
pictureissaturated.
Brightness Adjuststhebaselevelofthesignalin
thepicture.YoumayuseBrightness
whenthedarkpartofthepictureis
saturated.
Sharpness Adjuststhelevelofcrispnessinthe
edgesbetweenthelightanddark
areasofthepicture.Thelowerthe
level,thesoftertheimage.
Color Adjustsintensityofallcolors.
Tint Adjuststhebalancebetweenredand
greenlevels.
Color Temp. SettowarmtoenhancehotterColors
suchasred,orsettocooltomake
picturebluish.
Advanced
Control
Customizestheadvancedoptions.
RefertotheAdvancedimageoptions.
Picture Reset Restorestheoptionstothedefault
setting.
6
Whenyouarefinished,pressEXIT.
Whenyoureturntothepreviousmenu,press
BACK.

17
ENG
ENGLISH
USING THE MONITOR SET
Customizing PC display options
Customizeoptionsofeachimagemodeforthe
bestimagequality.
Thisfunctionworksinthefollowingmode:
RGB[PC]mode.
1
PressMENUtoaccessthemainmenus.
2
PresstheNavigationbuttonstoscrollto
PICTUREandpressOK.
3
PresstheNavigationbuttonstoscrollto
ScreenandpressOK.
4
Selectandadjustfollowingoptions,andthen
pressOK.
Option Description
Resolution Selectsaproperresolution.See
“CustomizingPCdisplayoptions”.
Auto
Config.
Setstoadjustthescreenposition,clock,
andphaseautomatically.
Thedisplayedimagemaybeunstablefor
afewsecondswhiletheconfigurationis
inprogress.
Position/
Size/Phase
Adjuststheoptionswhenthepictureis
notclear,especiallywhencharactersare
shaky,aftertheautoconfiguration.
Reset Restorestheoptionstothedefault
setting.
5
Whenyouarefinished,pressEXIT.
Whenyoureturntothepreviousmenu,press
BACK.
Adjusting the sound
Selecting an sound mode
Playthesoundinitsoptimizedsettingsby
selectingoneofthepresetsoundmodes.
1
PressMENUtoaccessthemainmenus.
2
PresstheNavigationbuttonstoscrollto
AUDIOandpressOK.
3
PresstheNavigationbuttonstoscrolltoSound
ModeandpressOK.
4
PresstheNavigationbuttonstoscrolltoa
soundmodeyouwantandpressOK.
Mode Description
Standard Selectwhenyouwantstandard-quality
sound.
Music Selectwhenyoulistentomusic.
Cinema Selectwhenyouwatchmovies.
Sports Selectwhenyouwatchsportsevents.
Game Selectwhenyouplaygames.
5
Whenyouarefinished,pressEXIT.
Whenyoureturntothepreviousmenu,press
BACK.
18
ENG
ENGLISH
USING THE MONITOR SET
Customizing sound options
Customizeoptionsofeachsoundmodeforthe
bestsoundquality.
1
PressMENUtoaccessthemainmenus.
2
PresstheNavigationbuttonstoscrollto
AUDIOandpressOK.
3
PresstheNavigationbuttonstoscrolltoSound
ModeandpressOK.
4
PresstheNavigationbuttonstoscrolltoa
soundmodeyouwantandpressOK.
5
Selectandadjustfollowingoptions,andthen
pressOK.
Option Description
Infinite
Sound
LG'sInfinitySoundoptionprovides5.1
channelstereosoundqualityfromtwo
speakers.
Treble Increasestheintensityofthehigh
frequencypartofaudio.
Bass Increasestheintensityofthelow
frequencypartofaudio.
Reset Resetsthesoundmodetothedefault
setting.
6
Whenyouarefinished,pressEXIT.
Whenyoureturntothepreviousmenu,press
BACK.
Using additional options
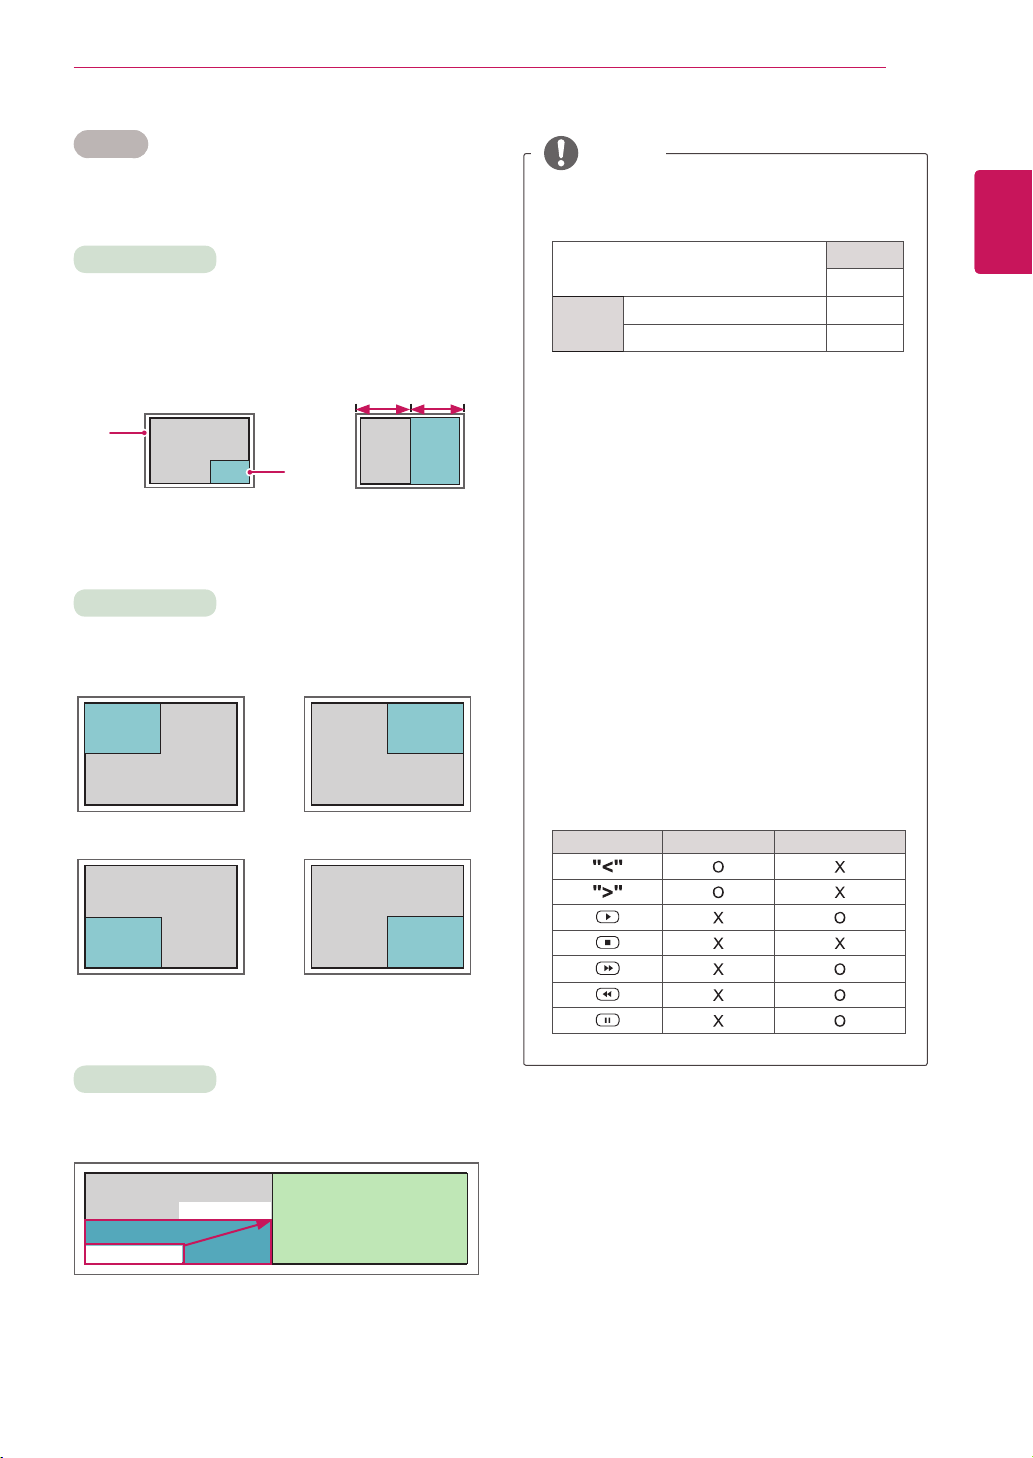
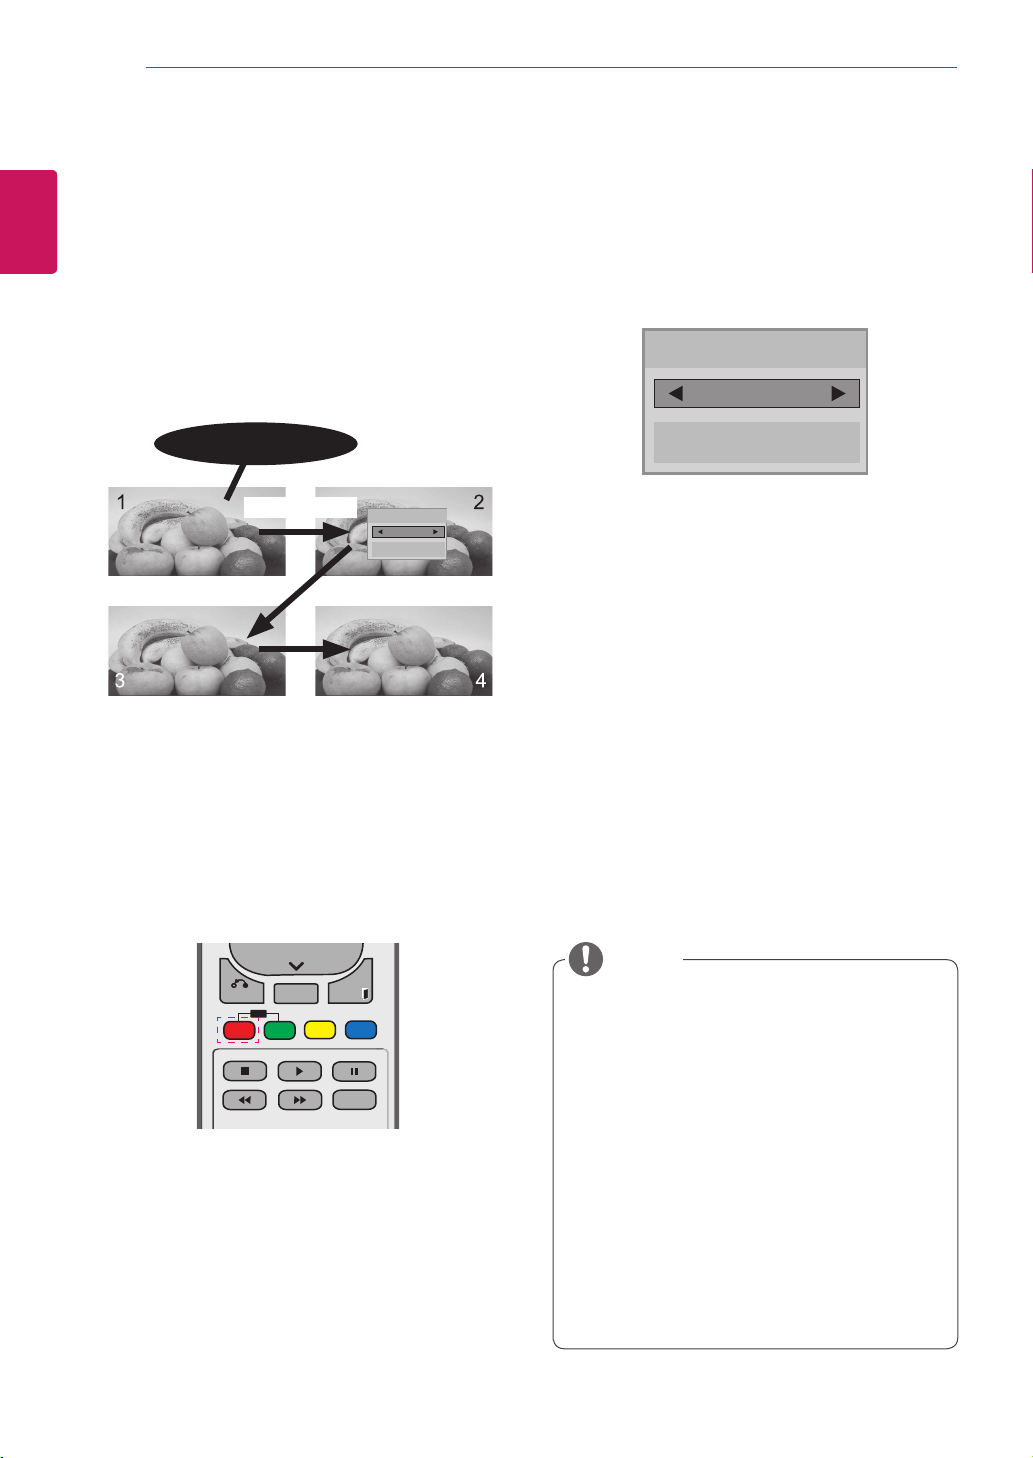
Adjusting aspect ratio
Resizetheimagetoviewtheimageatitsoptimal
sizebypressingARC whileyouarewatching
Monitorset.
Ifafixedimagedisplaysonthescreenfor
alongperiodoftime,itcouldbeimprinted
andbecomeapermanentdisfigurementon
thescreen.Thisis“imageburn”or“burn-in”
andnotcoveredbythewarranty.
Iftheaspectratioissetto4:3foralong
periodoftime,imageburnmayoccuron
theletterboxedareaofthescreen.
CAUTION
Youcanalsochangetheimagesizeby
accessingthemainmenus.
NOTE
MODE
ARC
RGB Display
Port
DVI-D HDMI
PC DTV PC PC DTV PC
16:4 o o o o o o
Just Scan x o x x o x
1:1 o x o o x o
4:3 o o o o o o
TOP o o o o o o
19
ENG
ENGLISH
USING THE MONITOR SET
-4:3 :Thisselectionwillallowyoutoviewa
picturewithanoriginal4:3aspectratio,black
barswillappearonboththeleftandrightofthe
screen.
-TOP :Thisselectionwillallowyoutodisplayonly
theupperpartofthevideoinput.
-16:4 :Thisselectionwillallowyoutoadjustthe
picturehorizontally,inlinearproportion,tofillthe
entirescreen(usefulforviewing4:3formatted
DVDs).
-Just Scan :ThisSelectionwillallowyouview
thepictureofbestqualitywithoutlossoforiginal
pictureinhighresolutionimage.Note:Ifthereis
noiseinoriginalPicture,Youcanseethenoise
attheedge.
-1:1 :Theaspectratioisnotadjustedfromthe
original.(OnlyDisplayPortPC,HDMIPC,
DVI-DPC,RGBPC)
Just Scan

20
ENG
ENGLISH
USING THE MONITOR SET
Using the input list
Selecting an input source
1
PressINPUTtoaccesstheinputsourcelist.
2
PresstheNavigationbuttonstoscrolltooneof
theinputsourcesandpressOK.
Input source Description
RGB ViewaPCdisplayonthescreen
DVI-D ViewaPCdisplayonthescreen
HDMI WatchcontentsfromaPC,DVD
ofDigitalset-topboxotherhigh
definitiondevices
Display Port WatchcontentsinaPC,DVD
ofDigitalset-topboxotherhigh
definitiondevices
USB Playsthemultimediafilesavedin
theUSB.
21
ENG
ENGLISH
ENTERTAINMENT
ENTERTAINMENT
Connecting to a wired network
Connectthedisplaytoalocalareanetwork(LAN)
viatheLANportasshownonthefollowingillustra-
tionandsetupthenetworksettings.
Onlysupportswirednetworkconnection.
Aftermakingaphysicalconnection,asmall
numberofnetworksmayrequirethedisplaynet-
worksettingstobeadjusted.Formostnetworks,
thedisplaywillconnecttoautomaticallywithout
anyadjustments.
Fordetailinformation,contactyourinternetpro-
viderorroutermanual.
Tosetupthenetworksettings:(Evenifyourdis-
playhasalreadyconnectedautomatically,running
setupagainwillnotharmanything),
1 PressMENUtoaccessthemainmenus.
2 PresstheNavigationbuttonstoscrolltoNET-
WORKandpressOK.
3 PresstheNavigationbuttonstoselectNet-
work SettingandpressOK.
4 IfyoualreadysetNetworkSetting,select
Resetting.Thenewconnectionsettingsresets
thecurrentnetworksettings.
5 SelectIP Auto SettingorIP Manual Setting.
-IfselectingIP Manual Setting,pressthe
NavigationandNumberbuttons.IPaddress-
eswillneedtobeinputmanually.
-IP Auto Setting:Selectthisifthereisa
DHCPserver(Router)onthelocalareanet-
work(LAN)viawiredconnection,thedisplay
willautomaticallybeallocatedanIPaddress.
Ifyou’reusingabroadbandrouterorbroad-
bandmodemthathasaDHCP(Dynamic
HostConfigurationProtocol)serverfunction.
TheIPaddresswillautomaticallybedeter-
mined.
6 Whenyouarefinished,pressEXIT.
LAN
Router
LAN WAN
Cable modem
ETHERNET
@
Internet
Internet
Cablemodem
Router
Networksettingmenuwillnotbeavail-
ableuntilthedisplayconnectedtophysical
network.
Sincetherearevariousconnectionmeth-
ods,pleasefollowthespecificationsofyour
telecommunicationcarrierorinternetservice
provider.
CAUTION
Donotconnectamodularphonecabletothe
LANport.
Sincetherearevariousconnectionmeth-
ods,pleasefollowthespecificationsofyour
telecommunicationcarrierorinternetservice
provider.
CAUTION

22
ENG
ENGLISH
ENTERTAINMENT
Tips for Network setting
UseastandardLANcablewiththisdisplay.
Cat5orbetterwithaRJ45connector.
Manynetworkconnectionproblemsduringset
upcanoftenbefixedbyre-settingtherouter
ormodem.Afterconnectingthedisplaytothe
network,quicklypoweroffand/ordisconnect
thepowercableofthenetworkrouterorcable
modem.Thenpoweronand/orconnectthe
powercableagain.
Dependingontheinternetserviceprovider
(ISP),thenumberofdevicesthatcanreceive
internetservicemaybelimitedbytheapplica-
bletermsofservice.Fordetails,contactyour
ISP.
LGisnotresponsibleforanymalfunctionofthe
displayand/ortheinternetconnectionfeature
duetocommunicationerrors/malfunctionsas-
sociatedwithyourinternetconnection,orother
connectedequipment.
LGisnotresponsibleforproblemswithinyour
internetconnection.
Youmayexperienceundesiredresultsifthe
networkconnectionspeeddoesnotmeetthe
requirementsofthecontentbeingaccessed.
Someinternetconnectionoperationsmaynot
bepossibleduetocertainrestrictionssetby
theInternetserviceprovider(ISP)supplying
yourInternetconnection.
AnyfeeschargedbyanISPincluding,without
limitation,connectionchargesareyourrespon-
sibility.
A10Base-Tor100Base-TXLANportis
requiredwhenusingawiredconnectiontothis
display.Ifyourinternetservicedoesnotallow
forsuchaconnection,youwillnotbeableto
connectthedisplay.
ADSLmodemisrequiredtouseDSLservice
andacablemodemisrequiredtousecable
modemservice.Dependingontheaccess
methodofandsubscriberagreementwithyour
ISP,youmaynotbeabletousetheinternet
connectionfeaturecontainedinthisdisplayor
youmaybelimitedtothenumberofdevices
youcanconnectatthesametime.(IfyourISP
limitssub-scriptiontoonedevice,thisdisplay
maynotbeallowedtoconnectwhenaPCis
alreadyconnected.)
Theuseofa“Router”maynotbeallowedorits
usagemaybelimiteddependingonthepoli-
ciesandrestrictionsofyourISP.Fordetails,
contactyourISPdirectly.
Network Status
1 PressMENUtoaccessthemainmenus.
2 PresstheNavigationbuttonstoscrolltoNET-
WORKandpressOK.
3 PresstheNavigationbuttonstoselectNet-
work Status.
4 PressOKtocheckthenetworkstatus.
5 Whenyouarefinished,pressEXIT.
Option Description
Setting Returntothenetworksettingmenu.
Test
Testthecurrentnetworkstatusafterset-
tingthenetwork.
Close Returntothepreviousmenu.
IfyouwanttoaccesstheInternetdirectlyon
yourdisplay,theinternetconnectionshould
alwaysbeon.
IfyoucannotaccesstheInternet,check
thenetworkconditionsfromaPConyour
network.
WhenyouuseNetwork Setting,checkthe
LANcableorcheckifDHCPintherouteris
turnedon.
Ifyoudonotcompletethenetworksettings,
thenetworkmaynotworkproperly.
NOTE
23
ENG
ENGLISH
ENTERTAINMENT
Tips for using USB storage devices
OnlyaUSBstoragedeviceisrecognizable.
IftheUSBstoragedeviceisconnected
throughaUSBhub,thedeviceisnotrecog-
nizable.
AUSBstoragedeviceusinganautomatic
recognitionprogrammemaynotberecog-
nized.
AUSBstoragedevicewhichusesitsown
drivermaynotberecognized.
TherecognitionspeedofaUSBstorage
devicemaydependoneachdevice.
Pleasedonotturnoffthedisplayorunplug
theUSBdevicewhentheconnectedUSB
storagedeviceisworking.Whensuchdevice
issuddenlyseparatedorunplugged,the
storedfilesortheUSBstoragedevicemay
bedamaged.
PleasedonotconnecttheUSBstorage
devicewhichwasartificiallymaneuveredon
thePC.Thedevicemaycausetheproductto
malfunctionorfailtobeplayed.Neverforget
touseonlyaUSBstoragedevicewhichhas
normalmusicfiles,imagefilesormoviefiles.
PleaseuseonlyaUSBstoragedevicewhich
wasformattedasaFAT32filesystem,NTFS
filesystemprovidedwiththeWindowsop-
eratingsystem.Incaseofastoragedevice
formattedasadifferentutilityprogramwhich
isnotsupportedbyWindows,itmaynotbe
recognized.
PleaseconnectpowertoaUSBstorage
device(over0.5A)whichrequiresanexternal
powersupply.Ifnot,thedevicemaynotbe
recognized.
PleaseconnectaUSBstoragedevicewith
thecableofferedbythedevicemaker.
SomeUSBstoragedevicesmaynotbesup-
portedoroperatedsmoothly.
FilealignmentmethodofUSBstorage
deviceissimilartoWindowXPandfilename
canrecognizeupto100Englishcharacters.
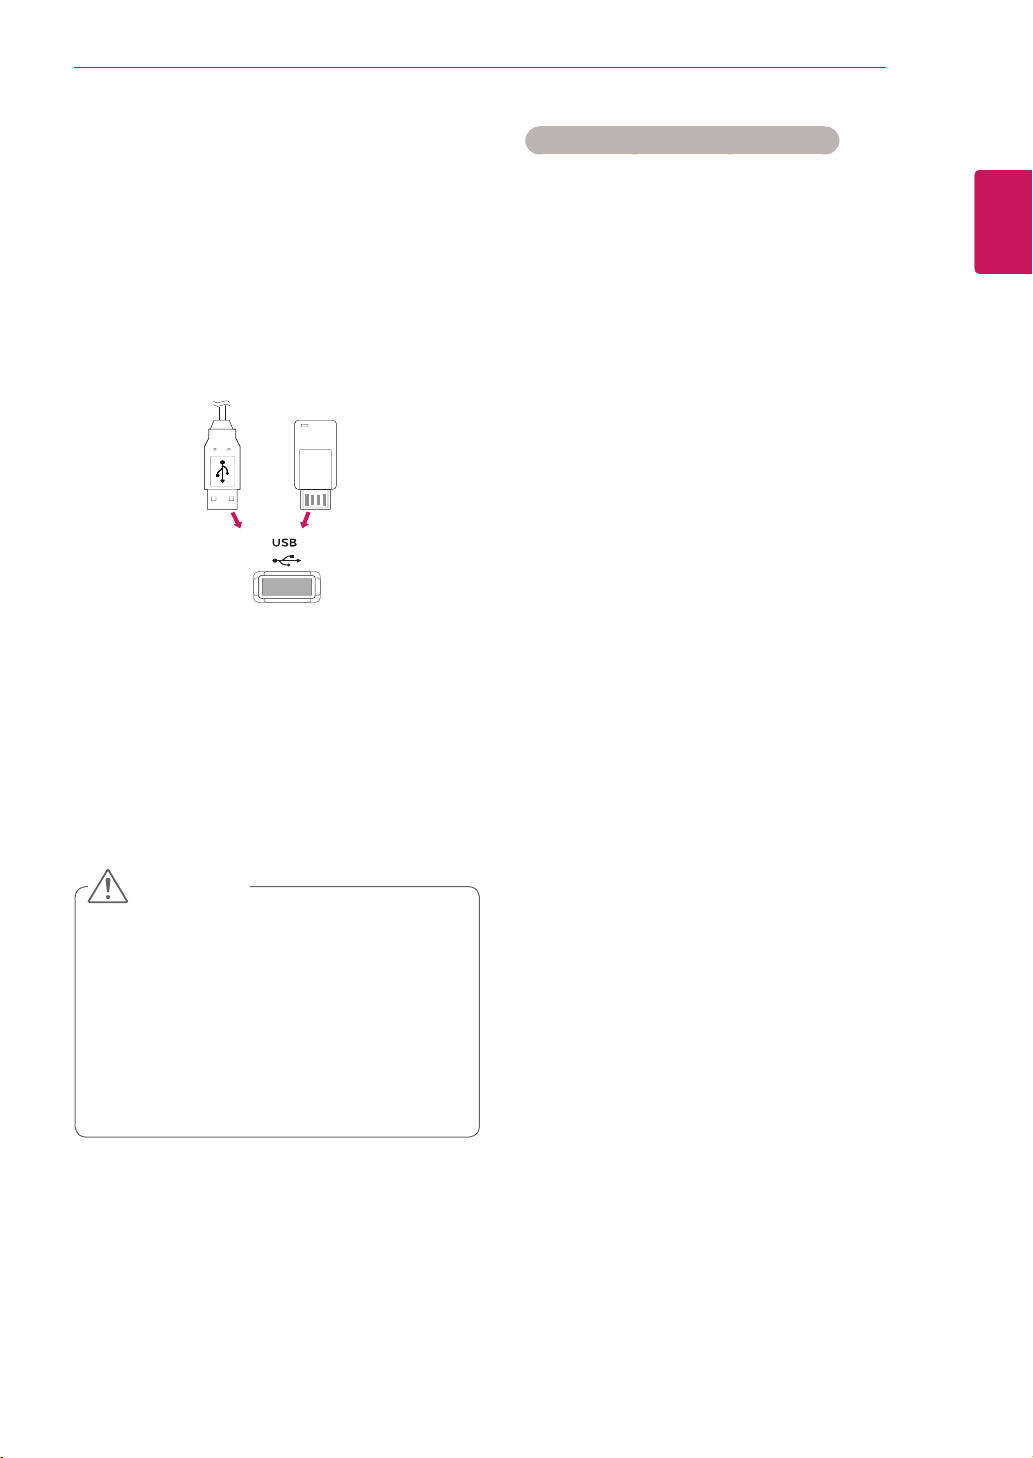
Connecting USB storage devices
ConnectUSBstoragedevicessuchasaUSB
flashmemory,externalharddrivetothedisplay
andusemultimediafeatures(See"Browsingfiles"
onpage24).
ConnectaUSBflashmemoryorUSBmemory
cardreadertotheDisplayasshownonthefollow-
ingillustration.TheMymediascreenappears.
or
DonotturnthedisplayofforremoveaUSB
storagedevicewhileEMF(mymedia)Menu
isactivated,asthiscouldresultinlossof
filesordamagetotheUSBstoragedevice.
BackupyourfilessavedonaUSBstorage
devicefrequently,asyoumayloseordam-
agethefilesandthismaybenotcoveredby
thewarranty.
CAUTION
(notincluded) (notincluded)
24
ENG
ENGLISH
ENTERTAINMENT
Besuretobackupimportantfilessincedata
storedinaUSBmemorydevicemaybe
damaged.Wewillnotberesponsibleforany
dataloss.
IftheUSBHDDdoesnothaveanexternal
powersource,theUSBdevicemaynotbe
detected.Sobesuretoconnecttheexternal
powersource.
-Pleaseuseapoweradaptorforanexternal
powersource.WedonotguaranteeanUSB
cableforanexternalpowersource.
IfyourUSBmemorydevicehasmultiple
partitions,orifyouuseaUSBmulti-card
reader,youcanuseupto4partitionsorUSB
memorydevices.
IfaUSBmemorydeviceisconnectedtoa
USBmulti-cardreader,itsvolumedatamay
notbedetected.
IftheUSBmemorydevicedoesnotwork
properly,disconnectandreconnectit.
HowfastaUSBmemorydeviceisdetected
differsfromdevicetodevice.
IftheUSBisconnectedinStandbyMode,
specificharddiskwillautomaticallybe
loadedwhenthedisplayisturnedon.
Therecommendedcapacityis1TBorless
foraUSBexternalharddiskand32GBor
lessforUSBmemory.
Anydevicewithmorethantherecommended
capacitymaynotworkproperly.
IfaUSBexternalharddiskwitha“Energy
Saving”functiondoesnotwork,turnthe
harddiskoffandonagaintomakeitwork
properly.
USBstoragedevicesbelowUSB2.0are
supportedaswell.Buttheymaynotwork
properlyinthemovielist.
Maximumof999foldersorfilescanberec-
ognizedunderonefolder.
AUSB3.0storagedevicemaynotwork.
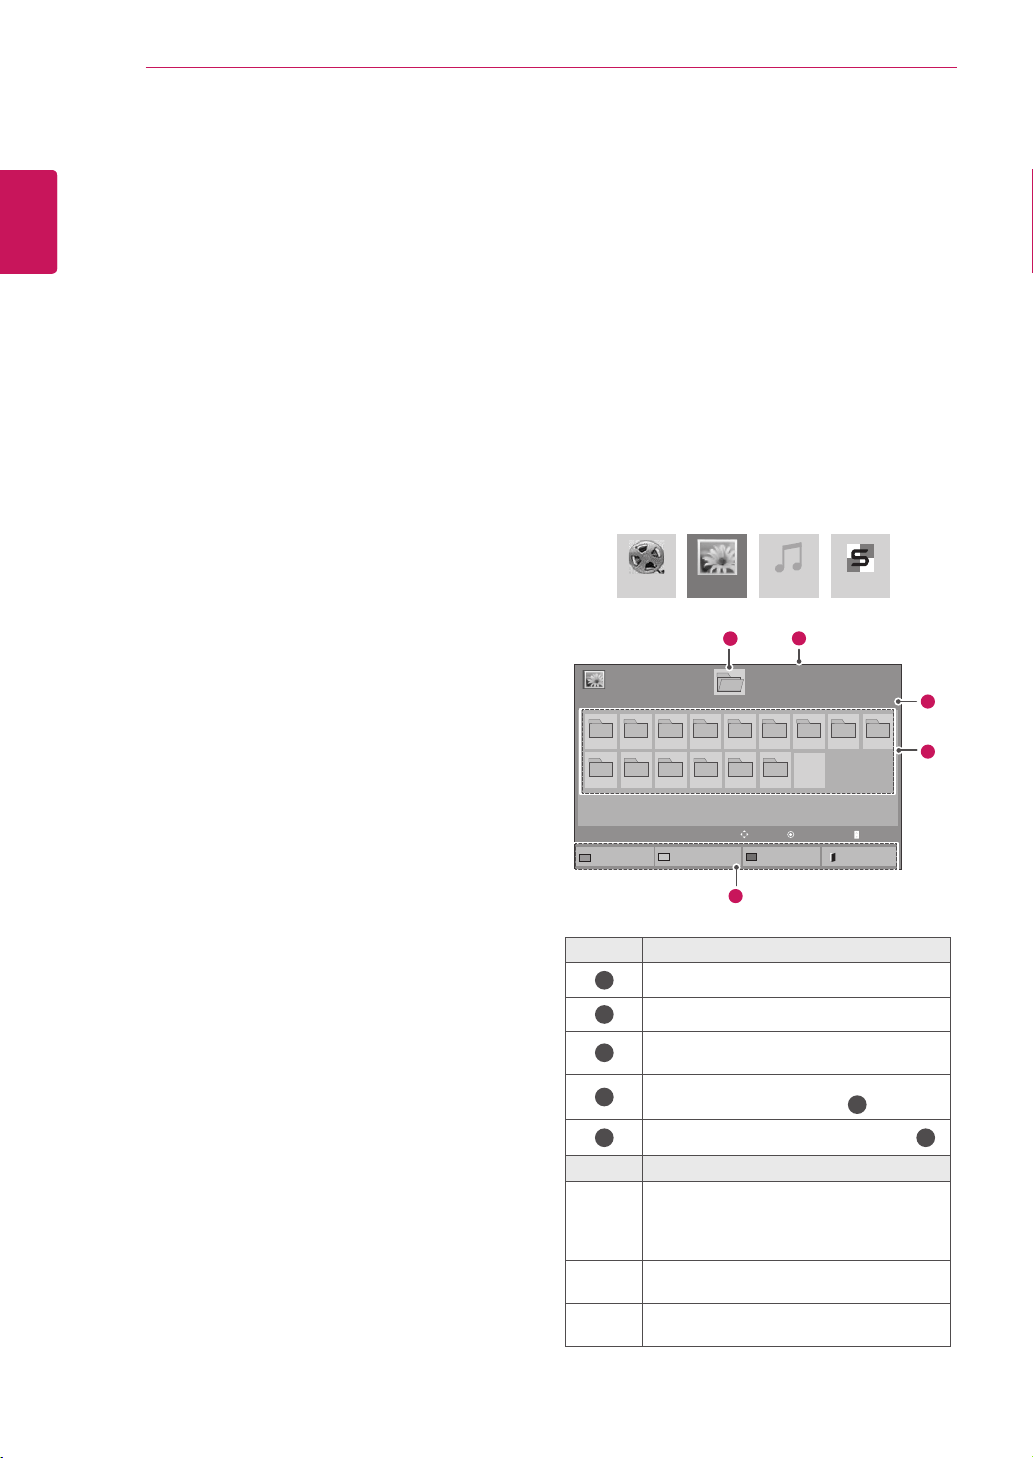
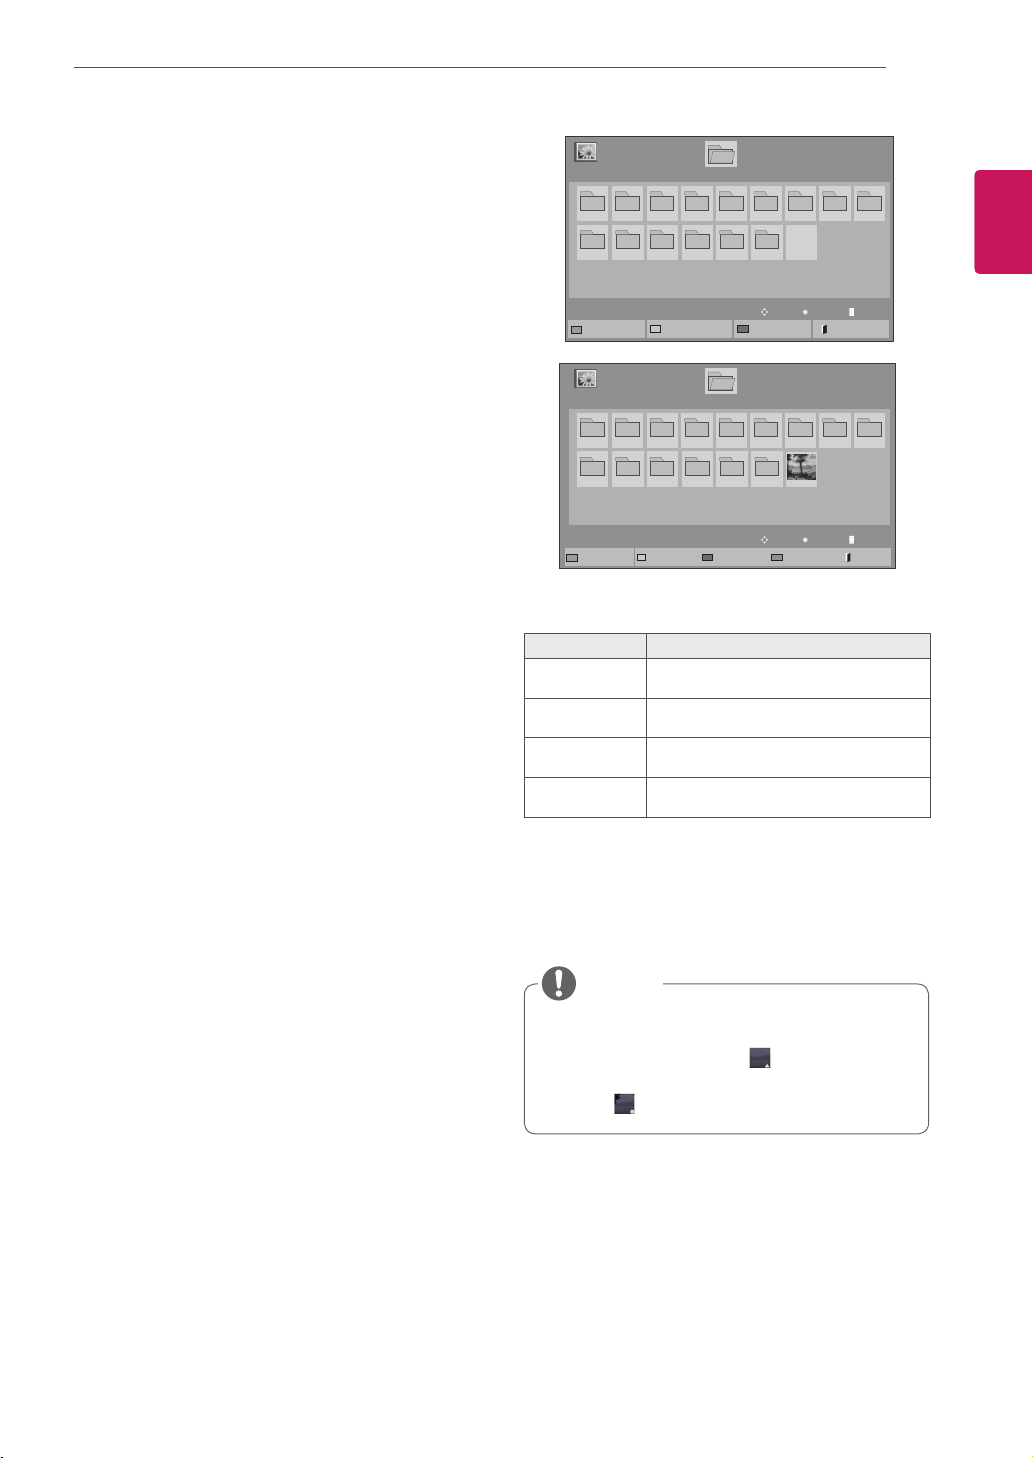
Browsing files
Accessthephoto,music,ormovielistsandbrowse
files.
1
ConnectaUSBstoragedevice.
2
PressMENUtoaccessthemainmenus.
3
PresstheNavigationbuttonstoscrolltoMy
MediaandpressOK.
4
PresstheNavigationbuttonstochoose
fromMovie List, Photo List,Music Listor
Contents ListandpressOK.
No. Description
1
Movestoupperlevelfolder
2
Currentpage/Totalpages
3
Correspondingbuttonsonthe
remotecontrol
4
Current page/ totalpages of contents
underthefolderfocusedon
1
5
Contentsunderthefolderfocusedon
1
Buttom Description
Green
button
Pressthegreenbuttontotogglebetween
Photo List -> Music List,Music List ->
Contents List,Contents List -> Movie
List or Movie List -> Photo List.
Yellow
button
Amethodtoviewin5largethumbnailor
simplelist.
Blue
button
ConverttoMarkMode.
MovieList
MusicList
PhotoList
ContentsList
Page1/1
PhotoList
Drive1
Page1/1
USBExternal
001
010 011 012 013 014 015
002 003 004 005 006 007
008
009
ToMusicList
ChangeNumbers
MarkMode
Exit
View
Move
11
2
3
4
5
P PageChange
25
ENG
ENGLISH
ENTERTAINMENT
Supported file format
Type Supported file format
Movie DAT,MPG,MPEG,VOB,AVI,DIVX,MP4,MKV,TS,T
RP,TP,ASF,WMV,FLV)
Movie(*.mpg/*.mpeg/*dat/*.ts/*.trp/*.tp/*.vob/*.
mp4/*.mov/*.mkv/*.divx/*.avi/*.asf/*.wmv/*.flv/*.
avi(motion-jpeg)/*.
mp4(motion-jpeg)/*.mkv(motion-jpeg))supporting
file
Video format:DivX3.11,DivX4,DivX5.DivX6
Xvid1.00,Xvid1.01,Xvid1.02,Xvid1.03,Xvid1.10
beta-1/beta-2,
Mpeg-1,Mpeg-2,Mpeg-4,H.264/AVC,VC1,
JPEG,SorensonH.263
Audio format:DolbyDigital,AAC,Mpeg,MP3,
LPCM,HE-AAC,ADPCM,WMA
Bit rate:within32kbpsto320kbps(MP3)
External Subtitle format:*.smi/*.srt/*.sub
(MicroDVD,Subviewer1.0/2.0)/*.ass/*.ssa/*.
txt(TMPlayer)/*.psb(PowerDivX)
Internal Subtitle format :only,XSUB(Itisthe
subtitleformatusedinDivX6files)
Photo JPEG
Baseline:64x64to15360x8640
Progressive:64x64to1920x1440
YoucanplayJPEGfilesonly.
Non-supportedfilesaredisplayedintheform
ofpredefinedicon.
Only 3D Models
File
Extensions
Item Profile
2D jpeg
jpg
jpe
supported
fileformat
SOF0:baseline
SOF1:Extend
Sequential
SOF2:
Progressive
photosize Min:64x64
Max-Normal
Type:
15360(W)x
8640(H)
Progressive
Type:
1920(W)x
1440(H)
3D mpo supported
fileformat
mpo
photosize 4:3size:
3,648x2,736
2,592x1,944
2,048x1,536
3:2size:
3,648x2,432
Music MP3
Bitrate32to320
SamplingrateMPEG1Layer3:32kHz,44.1
kHz,48kHz
SamplingrateMPEG2Layer3:16kHz,22.05
kHz,24kHz
SamplingrateMPEG2.5Layer3:8kHz,
11.025kHz,12kHz
Content
(when
using
SuperSign
Manager)
FileExtensions:*.cts/*.cse
Movie
File Extensions:*.mpg/*.mpeg/*.dat/*.ts/*.
trp/*.tp/*.vob/*.mp4/*.mov/*.mkv/*.avi/*.asf/*.
wmv/*.avi(motionJPEG)/*.mp4(motionJPEG)/*.
mkv(motionJPEG)
Video format:MPEG1,MPEG2,MPEG4,H.264/
AVC,DivX3.11,DivX4,DivX5.DivX6
Xvid1.00,Xvid1.01,Xvid1.02,Xvid1.03,Xvid
1.10-beta1/2,JPEG,VC1(WVC1/WMV3)
Audio format:MP2,MP3,DolbyDigital,LPCM,
AAC,HE-AAC,LPCM,ADPCM,WMA,MP3
File
Extensions
Item Profile
Photo JPEG
JPG
PNG
BMP
supported
fileformat
SOF0:baseline
SOF1:Extend
Sequential
SOF2:
Progressive
Photosize Min:64x64
MaxType:
1366x768
Music MP3 Bitrate 32kbpsto320
kbps
Sampling
rate
32kHz,44.1
kHz,48kHz
(MPEG1L3)
16kHz,22.05
kHz,24kHz
(MPEG2L3)
8kHz,11.025
kHz,12kHz
(MPEG2.5L3)
26
ENG
ENGLISH
ENTERTAINMENT
Viewing movies
Playvideofilesondisplay.Yourdisplayshowsall
ofthevideofilessavedinaUSBstoragedeviceor
sharedfolderonaPC.
1 PresstheNavigationbuttonstoscrolltoMy
MediaandpressOK.
2 PresstheNavigationbuttonstoscrolltoMovie
ListandpressOK.
3 PresstheNavigationbuttonstoscrolltoa
folderyouwantandpressOK.
4 PresstheNavigationbuttonstoscrolltoafile
youwantandpressOK.
Menu Description
Play Marked Playtheselectedmoviefile.
Onceamoviefilefinishesplaying,
thenextselectedonewillbeplayed
automatically.
Mark All Markallmoviefilesonthescreen.
Unmark All Deselectallmarkedmoviefiles.
Exit Mark
Mode
ExittheMarkMode.
5 Playamovie.
6 Controlplaybackbyusingthefollowingbuttons.
Button Description
r
Stopstheplayback
s
Playsavideo
t
Pausesorresumestheplayback
v
Scansbackwardinafile
w
Scansforwardinafile
MENU ShowtheOptionmenu.
HIDE Hidethemenuonthefull-sizedscreen.
EXIT ReturntoMovie List.
< or >
Skipstospecificpointsinafiledur-
ingplayback.Thetimeofaspecific
pointwillappearonthestatusbar.In
somefiles,thisfunctionmaynotwork
properly.
ENERGY
SAVING( )
PresstheENERGY SAVINGbutton
repeatedlytoincreasethebrightness
ofyourscreen.
Page1/1
MovieList
USB1USBDrive
Drive1
Page1/1
ToPhotolist
ChangeNumbers
MarkMode
Exit
003
001 002
004
005 006
Play
Move
Page ChangeP
01:02:30/02:30:25
Option
MENU
Hide
Exit
Non-supportedfilesaredisplayedthepreview
imagebyicononly .
Abnormal files are displayed in the form of
bitmap .
NOTE
Page1/1
MovieList
USB1USBDrive
Drive1
Page1/1
PlayMarked
MarkAll
UnmarkAll
Exit
003
001 002
004
005 006
MarkMode
ExitMarkMode
051.Apple_......
02:30:25
Mark
Move
Page ChangeP

27
ENG
ENGLISH
ENTERTAINMENT
Video options
1 PressMENUtoaccessthePop-Upmenus.
2 PresstheNavigationbuttonstoscrolltoSet
Video Play., Set Video. or Set Audio. and
pressOK.
Tips for using playing video files
Someuser-createdsubtitlesmaynotwork
properly.
Somespecialcharactersarenotsupported
insubtitles.
HTMLtagsarenotsupportedinsubtitles.
Subtitlesinlanguagesotherthanthesup-
portedlanguagesarenotavailable.
Thescreenmaysuffertemporaryinterrup-
tions(imagestoppage,fasterplayback,etc.)
whentheaudiolanguageischanged.
Adamagedmoviefilemaynotbeplayed
correctly,orsomeplayerfunctionsmaynot
beusable.
Moviefilesproducedwithsomeencoders
maynotbeplayedcorrectly.
Ifthevideoandaudiostructureofrecorded
fileisnotinterleaved,eithervideooraudiois
outputted.
Videoswithresolutionshigherthan
1920X1080@25/30Pmaynotworkproperly
dependingontheframe.
Moviefilesotherthanthespecifiedtypesand
formatsmaynotworkproperly.
Maxbitrateofplayablemoviefileis20Mbps.
(only,MotionJPEG:10Mbps)
Wedonotguaranteesmoothplaybackof
profilesencodedlevel4.1orhigherinH.264/
AVC.
DTSAudiocodecisnotsupported.
Amoviefilemorethan30GBinfilesizeis
notsupportedforplayback.
ADivXmoviefileanditssubtitlefilemustbe
locatedinthesamefolder.
Avideofilenameanditssubtitlefilename
mustbeidenticalforittobedisplayed.
PlayingavideoviaaUSBconnectionthat
doesn’tsupporthighspeedmaynotwork
properly.
FilesencodedwithGMC(GlobalMotion
Compensation)maynotbeplayed.
WhenyouarewatchingthemoviebyMovie
Listfunction,youcanadjustanimageby
EnergySavingkeyontheremotecontrol.
Usersetupforeachimagemodedoesnot
operate.
OptionvalueschangedinMovie Listdoes
notaffectPhoto ListandMusic List.
OptionvaluechangedinPhoto ListandMu-
sic ListarechangedlikewiseinPhoto List
andMusic ListexcludingMovie List.
Whenreplayingthevideofileafterstopping,
youcanplayfromwhereitstoppedprevi-
ously.
NOTE
28
ENG
ENGLISH
ENTERTAINMENT
Code Page Support Language
Latin1 English,Spanish,French,
German,Italian,Portuguese,
Danish,Romanian,Norwegian,
Albanian,Gaelic,Welsh,Irish,
Catalan,Valencian
Latin2 Bosnian,Polish,Croatian,Czech,
Slovak,Slovenian,Serbian,
Hungarian
Latin4 Estonian,Latvian,Lithuanian
Cyrillic Bulgarian,Macedonian,Russian,
Ukrainian,Kazakh
Greek Greek
Turkish Turkish
Korean Korean
WhenyouselecttheSet Video Play,
1 PresstheNavigationbuttonstoscrolltoshow
thePicture Size, Audio Language, Subtitle
LanguageorRepeat.
2 PresstheNavigationbuttonstoscrolltomake
appropriateadjustments.
Menu Description
Picture Size Selectsyourdesiredpicture
formatduringmovieplay.
Audio
Language
ChangestheLanguageGroupofthe
audioduringmovieplay.Files
withasingleaudiotrackcannotbe
selected.
Subtitle
Language
Turnon/offthesubtitle.
Language ActivatedforSMIsubtitleand
canselectthelanguagewithinthe
subtitle.
Code Page Canselectthefontforsubtitle.
Whensettodefault,samefontas
generalmenuwillbeused.
Sync Adjuststhetimesynchronisationof
thesubtitlefrom-10secsto+10secs
bystepsof0.5secsduringmovie
play.
Position Changesthepositionofthe
subtitleeitherupordownduring
movieplay.
Size SelectsyourdesiredSubtitlesize
duringmovieplay.
Repeat Turnon/offrepeatfunctionof
movieplayback.Whenturnedon,the
filewithinthefolderwillbeplayed
backrepeatedly.Evenwhenthe
repeatedplayback
isturnedoff,itcanruntheplaybackif
thefilenameissimilartotheprevious
file.
Only10,000ofsyncblockscanbesupported
withinthesubtitlefile.
Whenplayingavideo,youcanadjustthe
PictureSizebypressingtheARCbutton.
Subtitlesinyourlanguageareonlysup-
portedwhentheOSDmenuisalsointhis
language.
Thecodepageoptionsmaybedisabledde-
pendingonthelanguageofthesubtitlefiles.
Selecttheappropriatecodepageforthe
subtitlefiles.
NOTE
29
ENG
ENGLISH
ENTERTAINMENT
WhenyouselecttheSet Video,
1 PresstheNavigationbuttonstoscrolltomake
appropriateadjustments.
WhenyouselecttheSet Audio,
1 PresstheNavigationbuttonstoscrolltoshow
theSound Mode, Clear Voice II orBalance.
2 PresstheNavigationbuttonstoscrolltomake
appropriateadjustments.
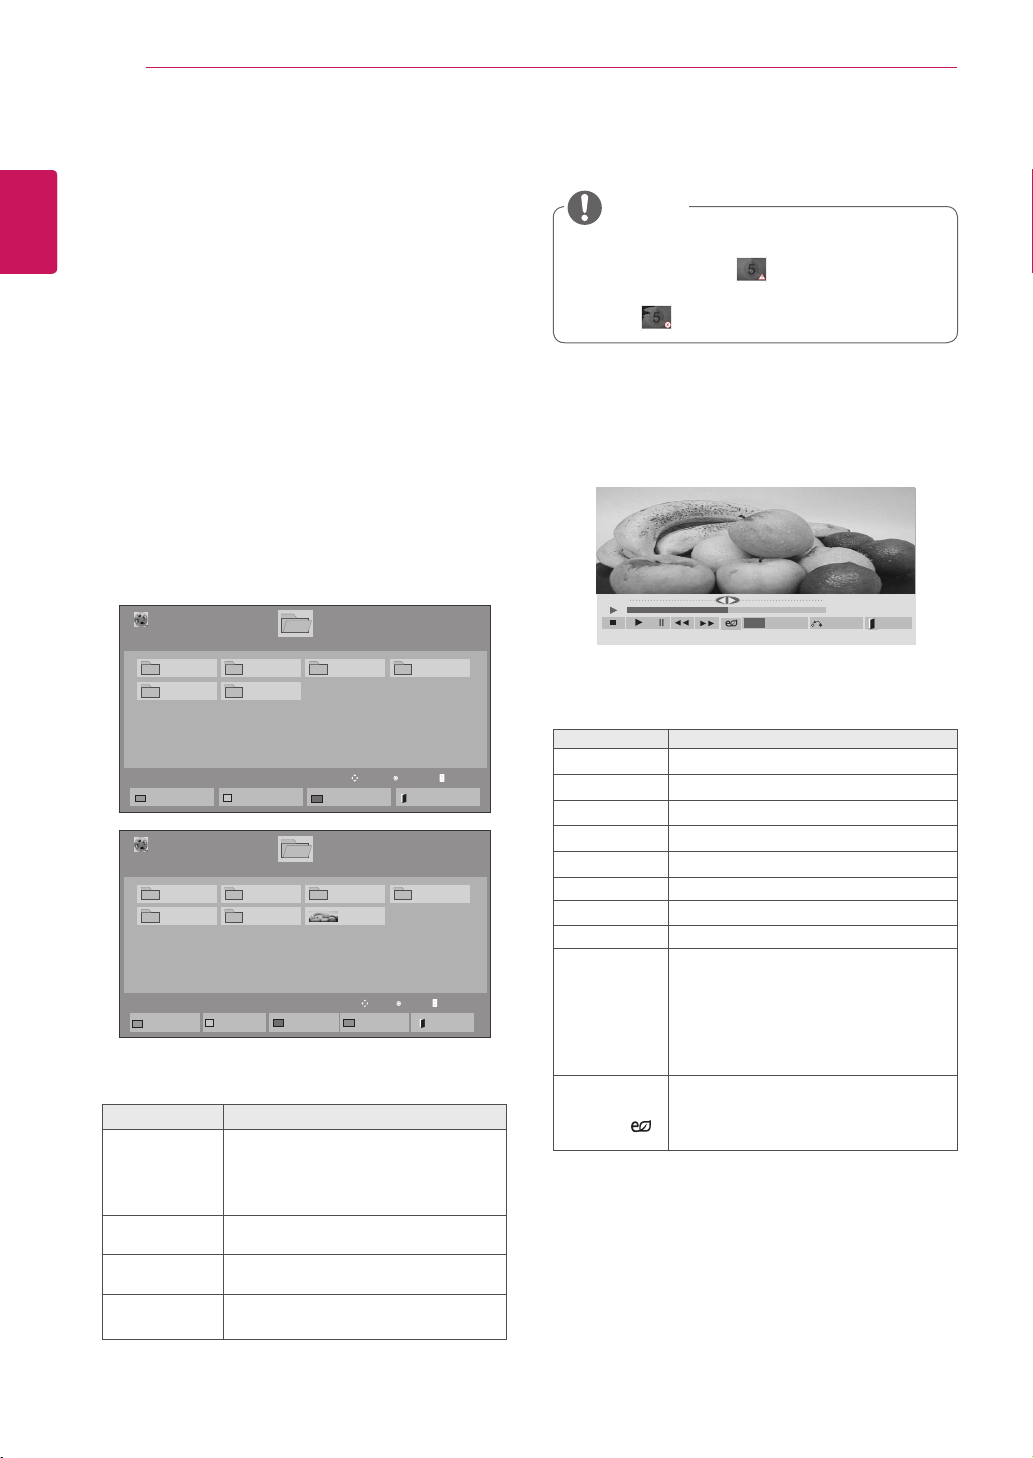
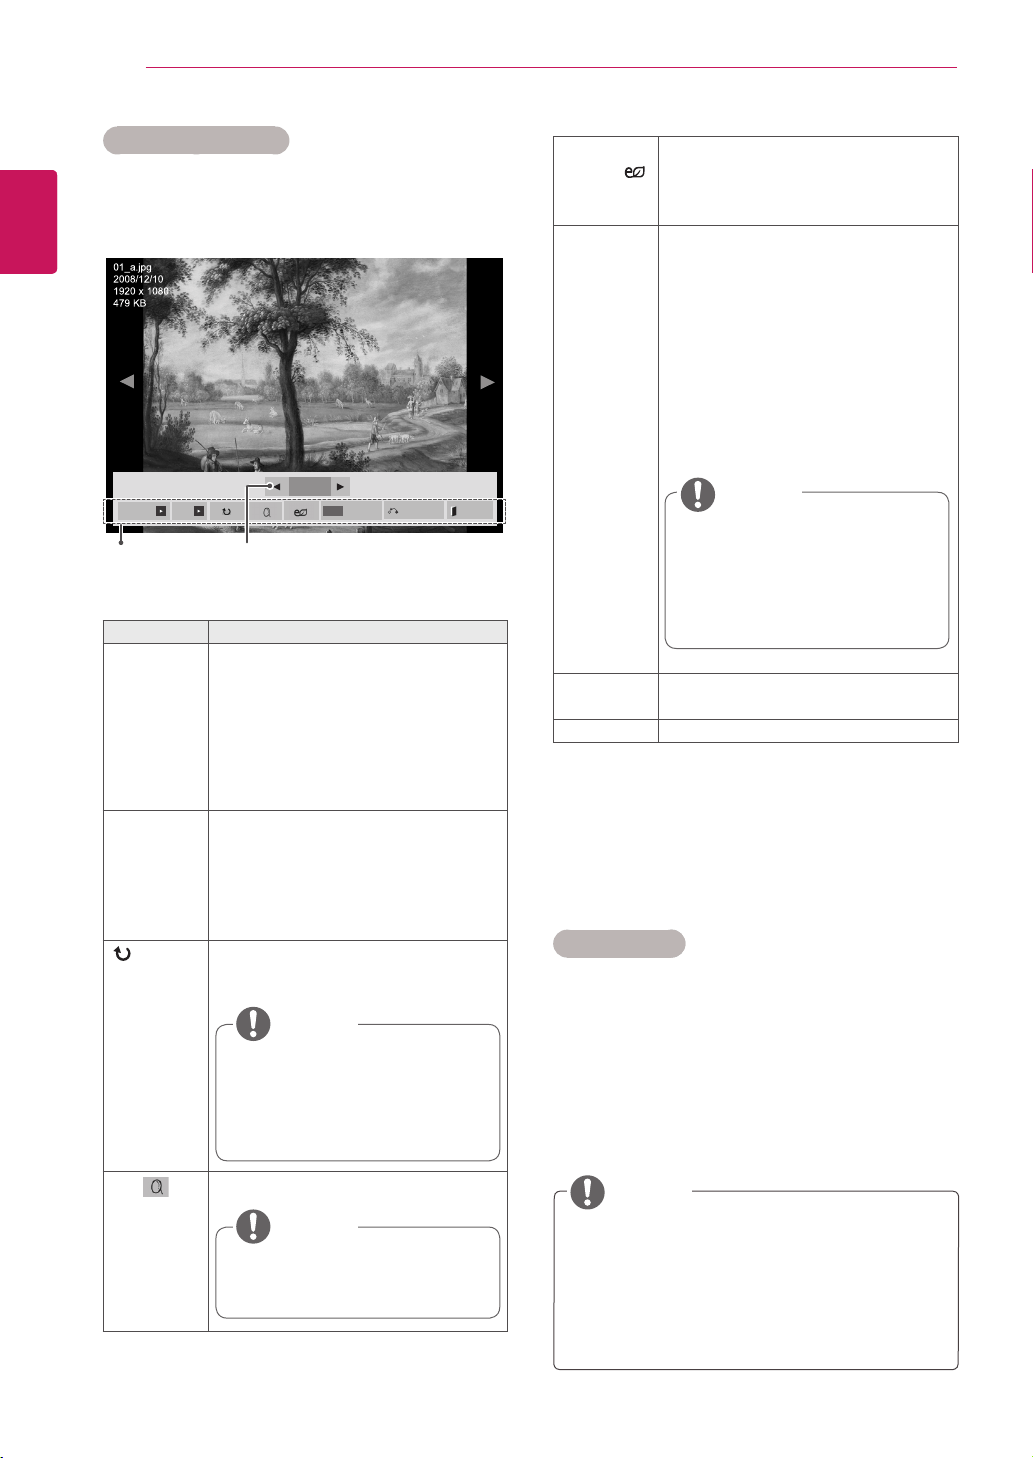
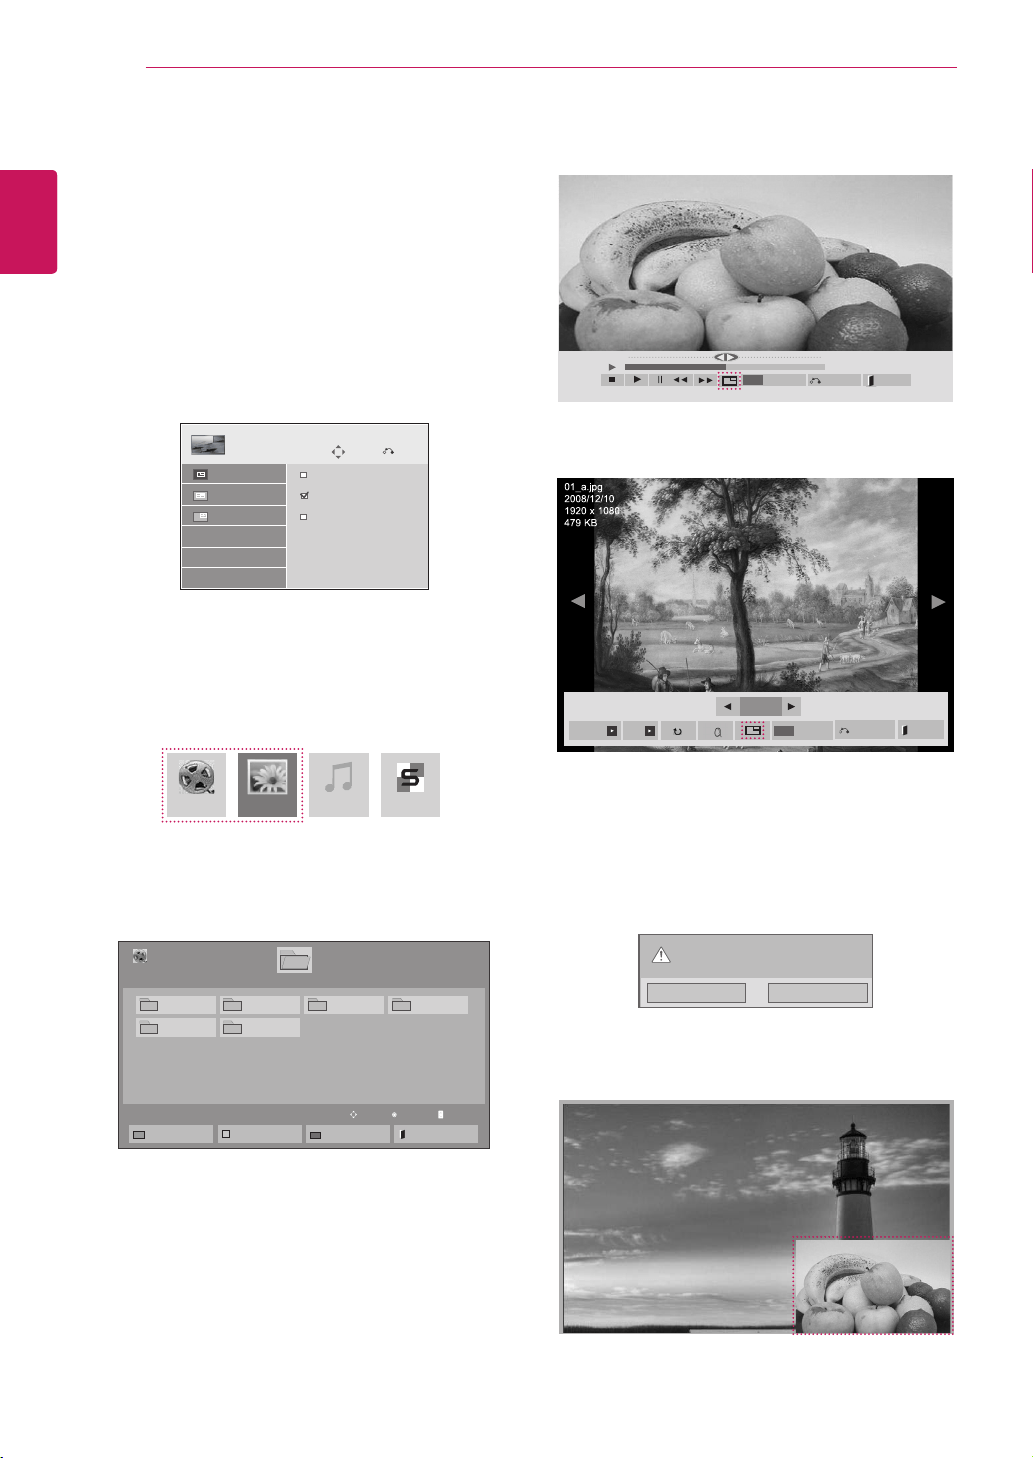
Viewing photos
ViewimagefilessavedinaUSBstoragedevice.
Thedisplaysonthescreenmaydifferfromthe
model.
1 PresstheNavigationbuttonstoscrolltoMy
MediaandpressOK.
2 PresstheNavigationbuttonstoscrolltoPhoto
ListandpressOK.
3 PresstheNavigationbuttonstoscrolltoa
folderyouwantandpressOK.
4 PresstheNavigationbuttonstoscrolltoafile
youwantandpressOK.
5 Viewphotos.
Menu Description
View Marked Displaytheselectedphotofile.
Mark All Markallphotofilesonthescreen.
Unmark All Deselectallmarkedphotofiles.
Exit Mark Mode ExittheMarkMode.
Non-supportedfilesaredisplayedthepre-
viewimagebyicononly .
Abnormalfilesaredisplayedintheformof
bitmap .
NOTE
Page1/1
PhotoList
Drive1
Page1/1
USB1USBDrive
001
010 011 012 013 014 015
002 003 004 005 006 007
008
009
ToMusicList
ChangeNumbers
MarkMode
Exit
Page1/1
PhotoList
Drive1
Page1/1
USB1USBDrive
001
010 011 012 013 014 015
002 003 004 005 006 007
008
009
MarkMode
ViewMarked
MarkAll
UnmarkAll
Exit
ExitMarkMode
View
Move
Page ChangeP
Mark
Move
Page ChangeP
30
ENG
ENGLISH
ENTERTAINMENT
ENERGY
SAVING( )
PresstheENERGY SAVINGbutton
repeatedlytochangethebrightnessof
yourscreen.
Option Slide Speed:Selectsaslideshow
speed(Fast,Medium,Slow).
TransitionEffect: Settheviewmode
oftheslideshow.
BGM:Selectsamusicfolderfor
thebackgroundmusic.Pressthe
Navigationbuttonstoscrolltoselect
theRepeatorRandom.Pressthe
Navigationbuttonstoscrolltomake
appropriateadjustments.
Hide Hidestheoptionwindow.
Todisplaytheoptions,pressOK.
EXIT ReturntoPhoto List.
Photo options
1 PressMENUtoshowtheOptionmenus.
2 Press the Navigation buttons to scroll to Set
Photo View, Set Video or Set Audio andpress
OK.
Option Description
Slideshow Startsorstopsaslideshowwithselected
photos.
Iftherearenoselectedphotos,allpho-
tossavedinthecurrentfolderdisplay
duringaslideshow.
Tosetaslideshowspeed,selectOp-
tion.
BGM Turnsthebackgroundmusiconoroff.
Tosetthebackgroundmusicfolder,
selectOption.
YoucanadjustOptionbyMENUbutton
ontheremotecontrol.
(Rotate)
Rotatesphotosclockwise(90°,180°,
270°,360°).
Viewthephotobyzoomin2,4times.
NumberofselectedphotosOptions
Using photo options
Usethefollowingoptionswhileviewingphotos.
The supported photo size is
limited. You cannot rotate a
photo if the resolution of the
rotatedwidthislargerthanthe
supportedresolutionsize.
NOTE
Photoswitharesolutionof
960x540orlesscannotbe
enlarged.
NOTE
Youcannotchangethemusic
folder while the background
musicisplaying.
You can only select the MP3
foldersavedonthedevicethat
currentlydisplaysthephoto.
NOTE
Option values changed in Movie List does
notaffectPhoto ListandMusic List.
OptionvaluechangedinPhoto ListandMu-
sic Listarechangedlikewise inPhoto List
andMusic ListexcludingMovie List.
NOTE
2/13
Slideshow BGM
Hide
Option
MENU
Exit
31
ENG
ENGLISH
ENTERTAINMENT
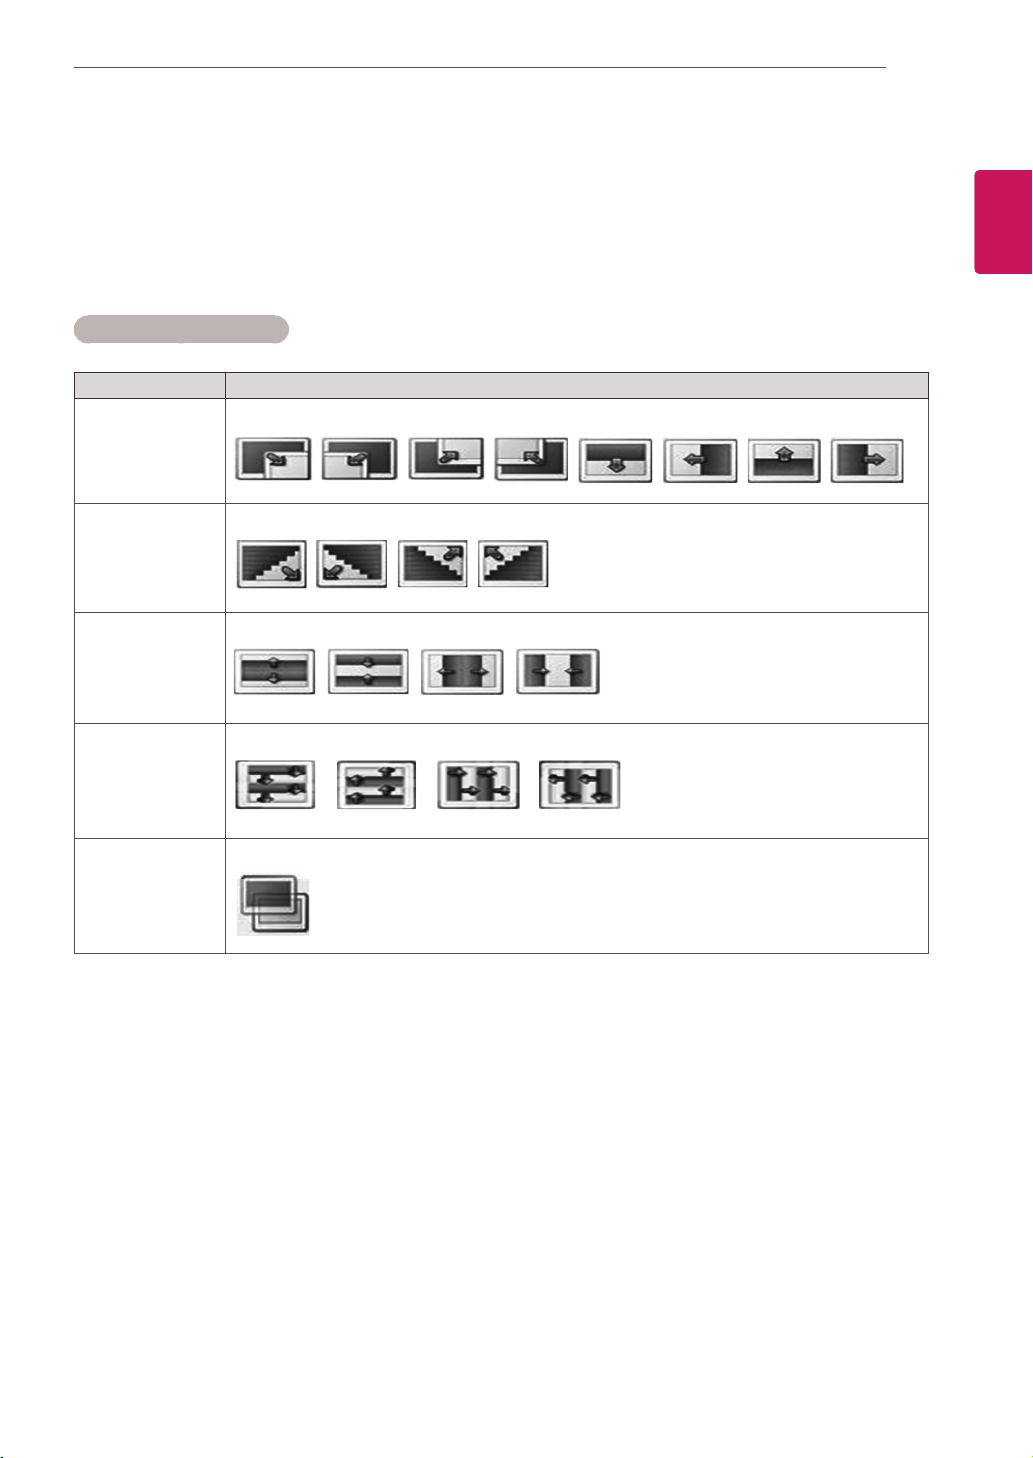
WhenyouselecttheSet Photo View,
1 PresstheNavigationbuttonstoscrolltoselectSlide Speed,Transition Effect or BGM.
2 PresstheNavigationbuttonstoscrolltomakeappropriateadjustments.
Transition Effect Option
Option Description
Sliding Pushesthecurrentslideoutofviewasitplaystothenextslide.
Stairs Pushesthecurrentslideinastaircaseshapeasitplaystothenextslide.
DoorOpen
/Close
Pushesthecurrentslidelikeopeningorclosingthedoorasitplaystothenextslide.
Shutter Pushesthecurrentslidelikedrawingorpullingdowntheblindasitplaystothenextslide
FadeIn Fadestheslideoutslowlybeforeplayingtothenextslide.
32
ENG
ENGLISH
ENTERTAINMENT
WhenyouselecttheSet Video,
1 PresstheNavigationbuttonstoscrolltomake
appropriateadjustments.
WhenyouselecttheSet Audio,
1 PresstheNavigationbuttonsto scrolltoshow
theSound Mode, Clear Voice II orBalance.
2 PresstheNavigationbuttonstoscrolltomake
appropriateadjustments.
5 Playmusic.
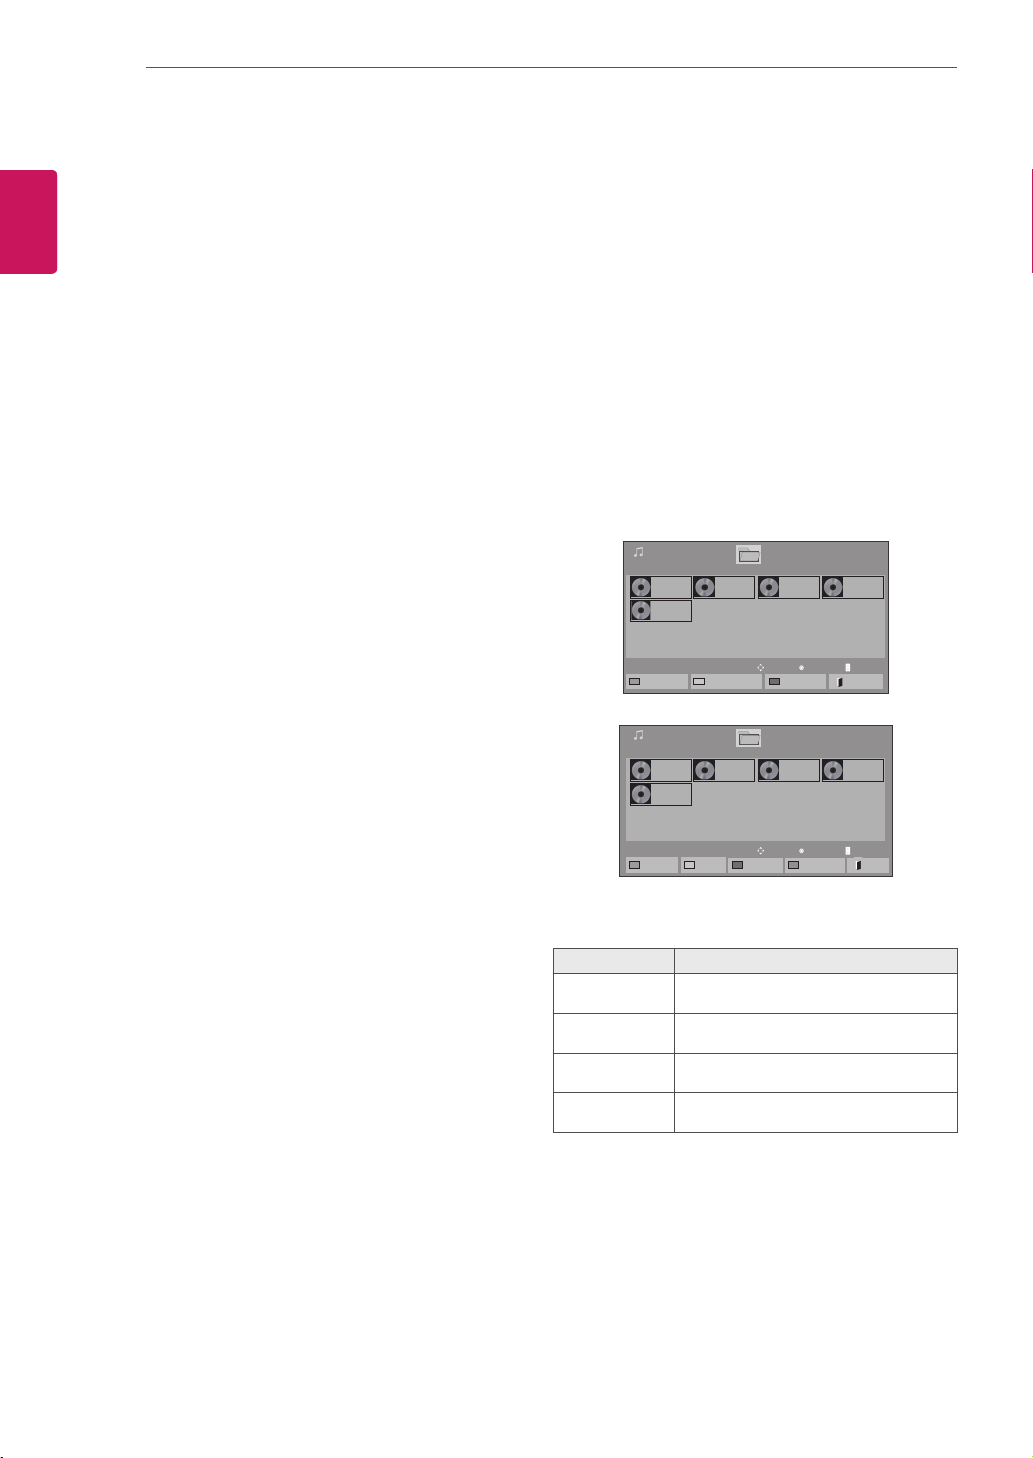
Listening to music
1 PresstheNavigationbuttonstoscrolltoMy Me-
diaandpressOK.
2 PresstheNavigationbuttonstoscrolltoMusic
ListandpressOK.
3 PresstheNavigationbuttonstoscrolltoafolder
youwantandpressOK.
4 Pressthe Navigation buttons to scrollto a file
youwantandpressOK.
Menu Description
Play Marked Displaytheselectedmusicfile.
Mark All Markallmusicfilesonthescreen.
Unmark All Deselectallmarkedmusicfiles.
Exit Mark Mode ExittheMarkMode.
Page1/1
MusicList
Drive1
Page1/1
001.-B01.mp3
00:00
002.-B02.mp3
00:00
003.B03.mp3
00:00
004.-B04.mp3
00:00
005.-B05.mp3
00:00
USB1USBDrive
ToMovieList
ChangeNumbers
MarkMode
Exit
Page1/1
MusicList
Drive1
Page1/1
001.-B01.mp3
00:00
002.-B02.mp3
00:00
003.B03.mp3
00:00
004.-B04.mp3
00:00
005.-B05.mp3
00:00
USB1USBDrive
PlayMarked
MarkAll
UnmarkAll
Exit
MarkMode
ExitMarkMode
Play
Move
Page ChangeP
Mark
Move
Page ChangeP
33
ENG
ENGLISH
ENTERTAINMENT
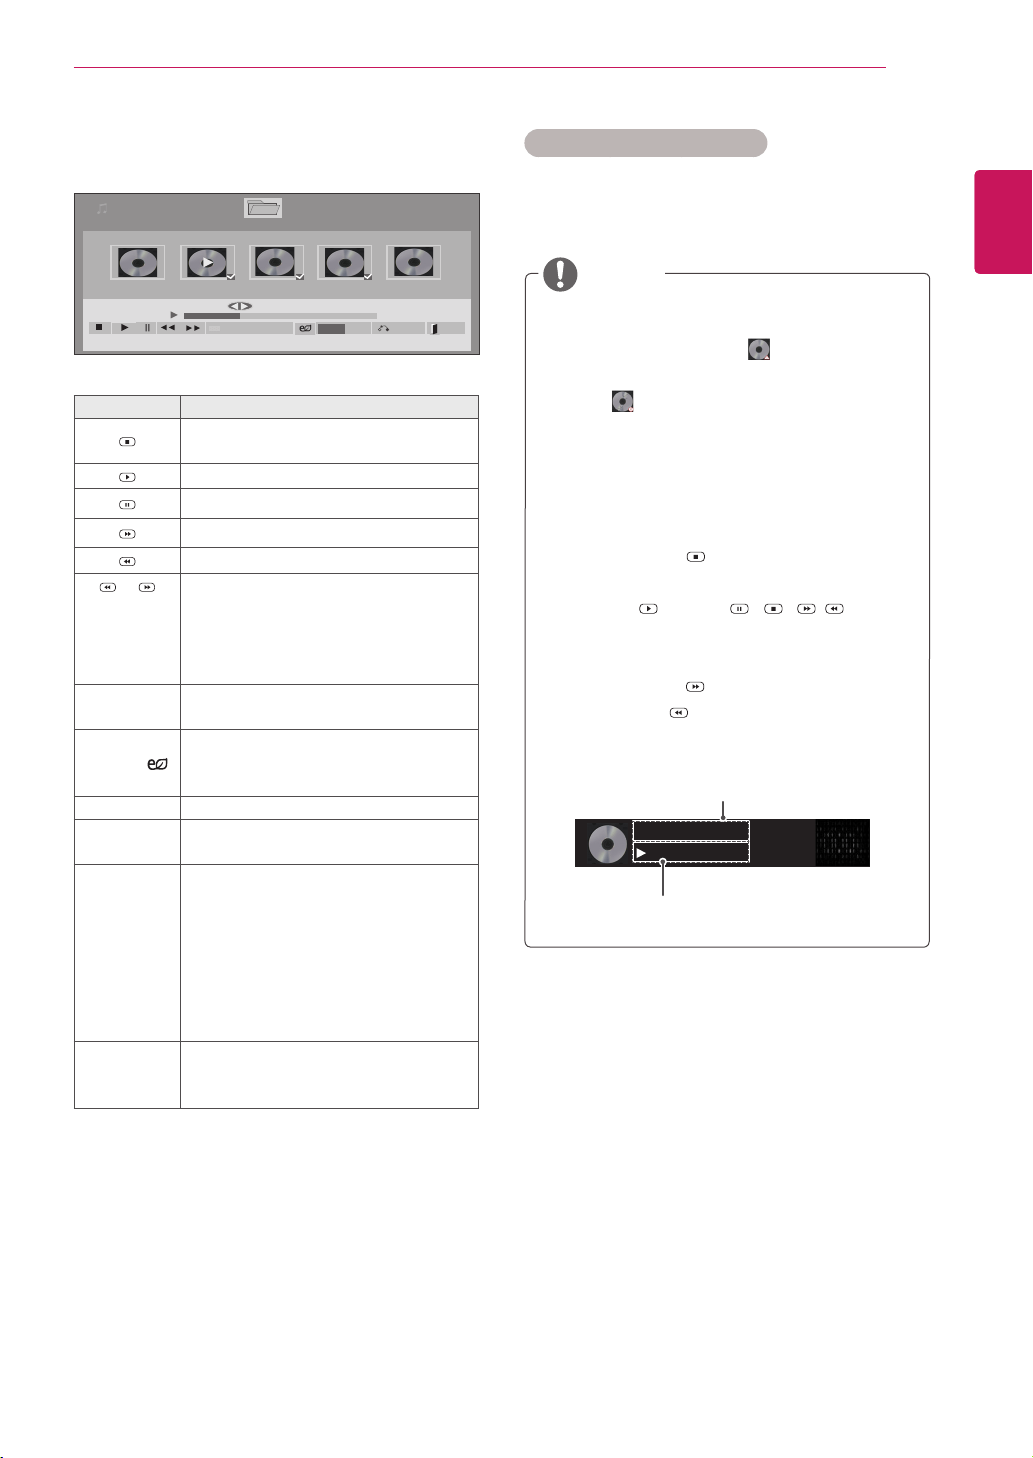
6 Controlplaybackbyusingthefollowingbuttons.
Page1/1
MusicList
Drive1 Page1/1
3file(s)Marked
004.-B04.mp3
00:00
005.-B05.mp3
00:00
006.-B06.mp3
00:00
007.-B07.mp3
00:00
008.-B08.mp3
00:00
005.-B05.mp3
02:30/03:25
Hide Exit
Option
MENU
PlaywithPhoto
Button Description
Stopsplayingbackthefileandmoves
backtothemusiclist.
Playsamusicfile
Pausesorresumesplayback
Skipstothenextfile
Skipstothepreviousfile
or
Whenplaying,
Whenyoupressthevbutton,theprevi-
ousmusicfilewillbeplayed.
Whenyoupressthewbutton,thenext
musicfilewillbeplayed.
Green
button
Startplayingtheselectedmusicfilesand
thenmovetothePhoto List.
ENERGY
SAVING( )
Press the ENERGY SAVING button re-
peatedly to change the brightness of
yourscreen.
MENU ShowtheOptionmenu.
Hide
Hidestheoptionwindow.
Todisplaytheoptions,pressOK.
EXIT
When you press the EXIT button while
the Music player is displayed, only the
musicwillbestoppedandtheplayerwill
notreturntonormalviewing.
When you press the EXIT button while
themusicisstoppedorwhilethemusic
playerishidden,theplayerwillreturnto
normalviewing.
< or >
When using the < or > button during
playbackacursorindicatingtheposition
canbeplayed.
Tips for playing music files
ThisunitcannotsupporttheID3Tag
embeddedMP3files.
Timeelapsed/Duration
002.B02.mp3
00:31/04:04
filename
Non-supportedfilesaredisplayedthepre-
viewimagebyicononly .
Abnormalfilesaredisplayedintheformof
bitmap .
Adamagedorcorruptedmusicdoesnotplay
butdisplays00:00inplaytime.
Amusicdownloadedfromapaidservicewith
copyrightprotectiondoesnotstartbutdis-
playsinappropriateinformationinplaytime.
IfyoupressOK, buttons,screensaveris
stopped.
ThePLAY( ),Pause( ), , , buttons
ontheremotecontrolarealsoavailablein
thismode.
Youcanusethe buttontoselectthenext
musicandthe buttontoselecttheprevi-
ousmusic.
NOTE
34
ENG
ENGLISH
ENTERTAINMENT
1 PressMENUtoaccessthePop-Upmenus.
2 PresstheNavigationbuttonstoscrolltoSet Au-
dio Play or Set Audio andpressOK.
Music options
WhenyouselecttheSet Audio Play,
1 PresstheNavigationbuttonstoscrolltoselect
theRepeatorRandom.
2 PresstheNavigationbuttonstoscrolltomake
appropriateadjustments.
WhenyouselecttheSet Audio,
1 PresstheNavigationbuttonstoscrolltoselect
theSound Mode, Clear Voice II orBalance.
2 PresstheNavigationbuttonstoscrolltomake
appropriateadjustments.
Option values changed in Movie List does
notaffectPhoto ListandMusic List.
OptionvaluechangedinPhoto ListandMu-
sic Listarechangedlikewise inPhoto List
andMusic ListexcludingMovie List.
NOTE
WhileplayingmediafilesfromContentsList,
onlytheBACK,EXITorVolumebuttonare
available.SelectingtheBACKorEXITbutton
stopsplayingmediafilesandreturnstothe
screenviewmode.
IfthereistheAutoPlayfolderintheUSB
deviceanditsfilesareinsupportedformats,
theycanbeplayedbackautomaticallywhen
theUSBdeviceisconnectedtothemonitor.
NOTE
Viewing the Contents List
PlaysbackthestoredfilesusingtheExportoption
inSuperSignManager.
1 PresstheNavigationbuttonstoscrolltoMy
MediaandpressOK.
2 PresstheNavigationbuttonstoscrolltoCon-
tents ListandpressOK.
3 PresstheNavigationbuttonstoscrolltoa
folderyouwantandpressOK.
4 PresstheNavigationbuttonstoscrolltoafile
youwantandpressOK.
Page1/1
ContentsList
Drive1
Page1/1
test1.cts
07/01/2011
test2.cts
07/01/2011
test3.cts
07/01/2011
test4.cts
07/01/2011
test5.cts
07/01/2011
USB1USBDrive
ToMovieList
ChangeNumbers
Exit
Play
Move
Page ChangeP
35
ENG
ENGLISH
ENTERTAINMENT
DivX® VOD Guide
DivX® VOD Registration
In order to play purchased or rented DivX® VOD
contents, you should register your device with 10
digit DivX registration code from your device at
www.divx.com/vod.
1 PressMENUtoaccessthemainmenus.
2 Press the Navigation buttons to scroll to MY
MEDIAandpressOK.
3 PresstheBluebutton.
4 Pressthe Navigation buttons toscroll to DivX
Reg. CodeandpressOK.
5 Viewtheregistrationcodeofyourdisplay.
6 Whenyouarefinished,press EXIT.
When you return to the previous menu, press
BACK.
Youmustregisteryourdeviceto
playDivX protectedvideos.
Registrationcode:**********
Registerathttp://vod.divx.com
Close
Whileyouarecheckingtheregistration
code,somebuttonsmaynotwork.
IfyouusetheDivXregistrationcodeofan-
otherdevice,youcannotplaytherentedor
purchasedDivXfile.Makesuretousethe
DivXregistrationcodeassignedtoyourTV.
Thevideooraudiofilesthatarenotcon-
vertedbythestandardDivXcodecmaybe
corruptedornotbeplayed.
TheDivXVODcodeallowsyoutoactivate
upto6devicesunderoneaccount.
NOTE
DivX® VOD Deregistration
Youshouldderegisteryourdevicewith8digitDivX
deregistrationcodefromyourdeviceatwww.divx.
com/vod.
1 PressMENUtoaccessthemainmenus.
2 Press the Navigation buttons to scroll to MY
MEDIAandpressOK.
3 PresstheBluebutton.
4 PresstheNavigationbuttonstoscrolltoDeacti-
vationandpressOK.
5 Press the Navigation buttons to select Yes to
confirm.
Deregistrationcode:
********
Deregisterathttp://vod.divx.com
Continuewithregistration?
Yes No
6 Whenyouarefinished,press EXIT.
When you return to the previous menu, press
BACK.
Oncethederegistrationisexecuted,you
mustregisteryourdeviceagaintosee
DivX®VODcontents.
NOTE
36
ENG
ENGLISH
ENTERTAINMENT
Using PIP/PBP
DisplaysvideosorphotosstoredonaUSBdevice
onasinglemonitorbydividingitintothemainand
subscreens.(Seep.45)
1 PresstheMENUbuttontomovetoOPTION
andpressOK.
2 PressPIP/PBPtoselectPIPorPBPandthen
pressOK.
3 SelectMovieListorPhoto ListfromMy
Media.(WithPIP/PBPselected,theMusic
ListandContents Listaredeactivated.)
Move
PIP/PBP
Off
PIP
PBP
Pre.
Mode
Position
Size
4 SelectafileyouwantandthenpressOK.
5 SelectthePIPorPBPiconfromtheplaylist.
01:02:30 / 02:30:25
Option
MENU
Hide
Exit
< Movie List >
< Photo List >
6 SelecteitherMainorSubforsound.Youmust
toselecttheoutputsoundbeforerunningthe
PIPorPBPfunction.
7 Thesubscreenisdisplayedonthemain
screen.
Selectthesoundpath.
Main Sub
MovieList MusicListPhotoList ContentsList
Page1/1
MovieList
USB1USBDrive
Drive1
Page1/1
ToPhotolist
ChangeNumbers
MarkMode
Exit
003
001 002
004
005 006
Play
Move
Page ChangeP
2/13
Slideshow BGM
Hide
Option
MENU
Exit
37
ENG
ENGLISH
CUSTOMIZING SETTINGS
CUSTOMIZING SETTINGS
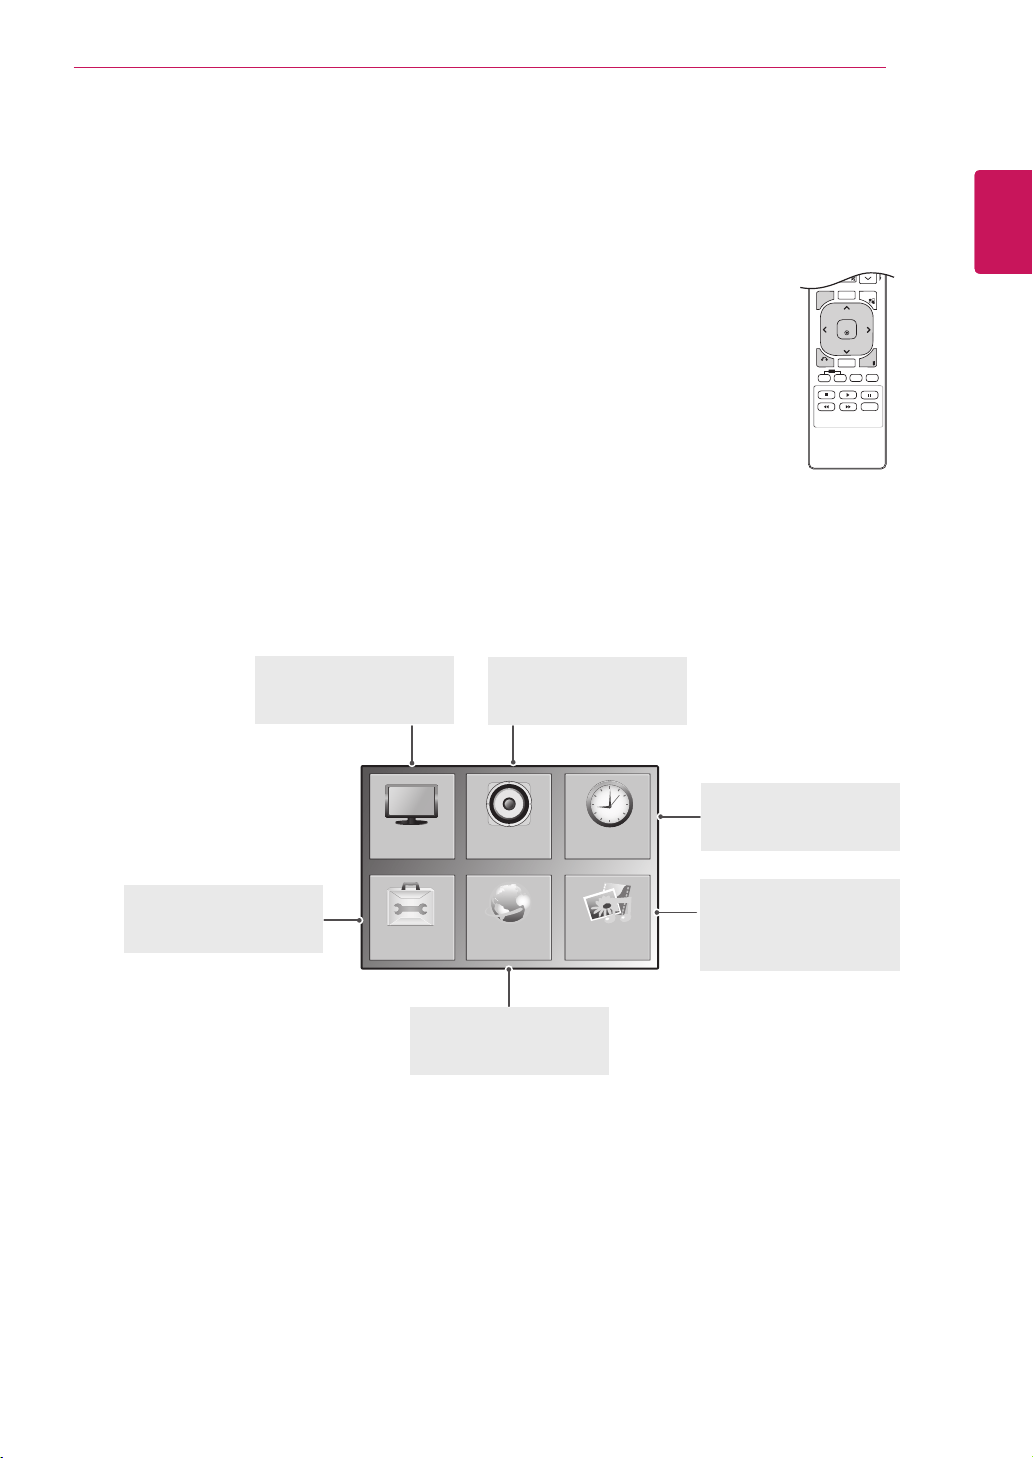
Accessing the main menus
1
PressMENUtoaccessthemainmenus.
2
PresstheNavigationbuttonstoscrolltooneofthefollowingmenusand
pressOK.
3
PresstheNavigationbuttonstoscrolltothesettingoroptionyouwant
andpressOK.
4
Whenyouarefinished,pressEXIT.
Whenyoureturntothepreviousmenu,pressBACK.
P
A
G
E
MARK
ARC
OK
S.MENU
PSM
AUTO
MUTE
BRIGHT
NESS
MENU
ID
BACK
TILE
ON
OFF
EXIT
OPTION
PICTURE
NETWORK
AUDIO TIME
MY MEDIA
PICTURE (Seep.38)
Adjuststheimagesize,
quality,oreffect.
AUDIO(Seep.41)
Adjuststhesoundquality,
effect,orvolumelevel.
NETWORK(Seep.47)
Setsupthenetwork
setting.
OPTION (Seep.43)
Customizesthegeneral
settings.
TIME(Seep.42)
Setsthetime,date,or
Timerfeature.
MY MEDIA(Seep.23)
Displayandplaymovie,
photoandmusiccontent
storedonyourUSB.
38
ENG
ENGLISH
CUSTOMIZING SETTINGS
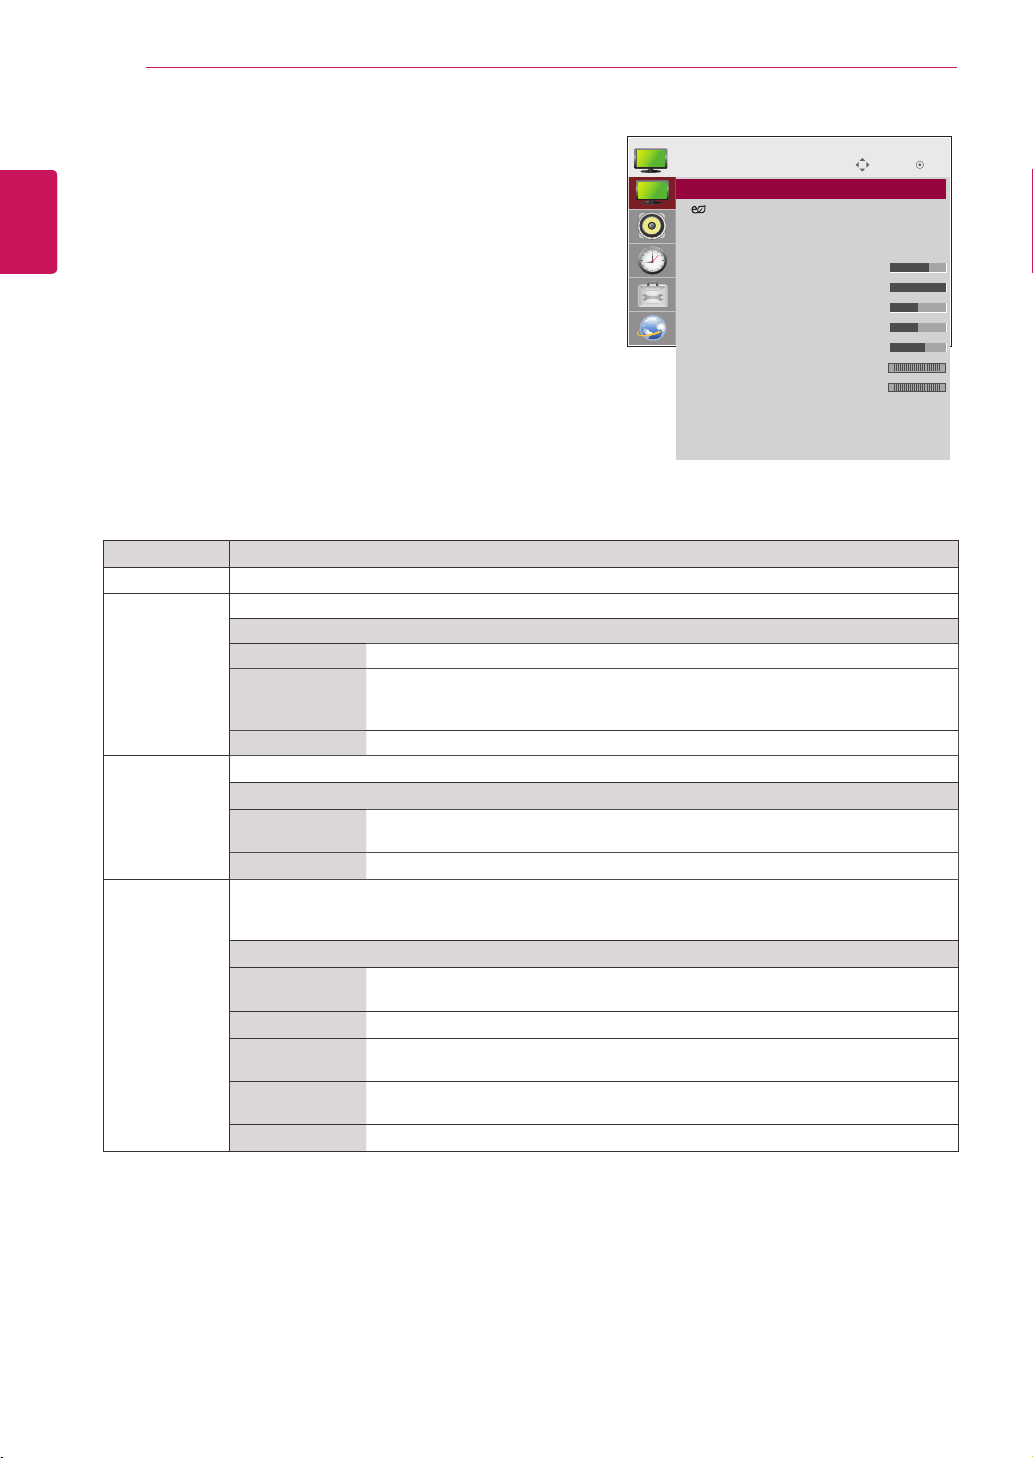
PICTURE settings
1
PressMENUtoaccessthemainmenus.
2
PresstheNavigationbuttonstoscrolltoPICTUREand
pressOK.
3
PresstheNavigationbuttonstoscrolltothesettingor
optionyouwantandpressOK.
-Toreturntothepreviouslevel,pressBACK.
4
Whenyouarefinished,pressEXIT.
Whenyoureturntothepreviousmenu,press
BACK.
Theavailablepicturesettingsaredescribedinthefollowing:
Setting Description
Aspect Ratio
Changestheimagesizetoviewimagesatitsoptimalsize(Seep.18).
Energy Saving Setstoautomaticallyadjustthescreenbrightnesscorrespondingtothesurroundings.
Level
Off
DisablesEnergySavingfunction.
Minimum/
Medium/
Maximum
Selectsthebrightnesslevelofthebacklight.
ScreenOff Thescreenturnsoffin3seconds.
Smart Energy
Saving
Adjuststhebacklightandcontrastdependingonthescreenbrightness.
Level
On
EnablestheSmartEnergySavingfunctiontosavepowerconsumptionasmuch
asthevaluesetinthesmartenergysavingrate.
Off DisablestheSmartEnergySavingfunction.
Picture Mode SelectsoneofthepresetimageorcustomizesoptionsineachmodeforthebestMonitorsetscreen
performance.Youarealsoabletocustomizeadvancedoptionsofeachmode.
TheavailablepresetpicturemodesvarydependingontheMonitorset.
Mode
Vivid
Adjuststhevideoimagefortheretailenvironmentbyenhancingthecontrast,
brightness,Color,andsharpness.
Standard Adjuststheimageforthenormalenvironment.
Cinema Optimizesthevideoimageforacinematiclooktoenjoymoviesasifyouareina
movietheater.
Sport Optimizesthevideoimageforhighanddynamicactionsbyemphasizingprimary
Colourssuchaswhite,grass,orskyblue.
Game OptimizesthevideoimageforafastgamingscreensuchasPCsorgames.
Move
OK
PICTURE
ꔋ
•AspectRatio :16:4
•
EnergySaving :Off
•SmartEnergySaving :Off
•PictureMode :Standard
•Backlight 70
•Contrast 100
•Brightness 50
•Sharpness 50
•Color 60
•Tint 0
•ColorTemp. 0
•AdvancedControl
•PictureReset
•Screen
R G
W C
39
ENG
ENGLISH
CUSTOMIZING SETTINGS
Basic image options
Setting Description
Backlight AdjuststhebrightnessofthescreenbycontrollingtheLCDbacklight.Ifyoudecreasethe
brightnesslevel,thescreenbecomesdarkerandthepowerconsumptionwillbereduced
withoutanyvideosignalloss.
Contrast Increasesordecreasesthegradientofthevideosignal.YoumayuseContrastwhenthe
brightpartofthepictureissaturated.
Brightness Adjuststhebaselevelofthesignalinthepicture.YoumayuseBrightnesswhenthedarkpart
ofthepictureissaturated.
Sharpness Adjuststhelevelofcrispnessintheedgesbetweenthelightanddarkareasofthepicture.
Thelowerthelevel,thesoftertheimage.
Color Adjustsintensityofallcolors.
Tint Adjuststhebalancebetweenredandgreenlevels.
Color Temp . SettowarmtoenhancehotterColorssuchasred,orsettocooltomakepicturebluish.
Advanced Control Customizestheadvancedoptions.RefertotheAdvancedimageoptions.(Seep.40).
Picture Reset Restorestheoptionstothedefaultsetting.
Setting Description
SCREEN
(In RGB
Mode Only)
CustomizesthePCdisplayoptionsinRGBmode.
Option
Resolution Selectsaproperresolution.See“CustomizingPCdisplayoptions”.
AutoConfigure Setstoadjustthescreenposition,clock,andphaseautomatically.
Thedisplayedimagemaybeunstableforafewsecondswhiletheconfigurationis
inprogress.
Position/Size/
Phase
Adjuststheoptionswhenthepictureisnotclear,especiallywhencharactersare
shaky,aftertheautoconfiguration.
Reset Restorestheoptionstothedefaultsetting.
Ifthe'Picture Mode'settinginthePicturemenuissettoVivid, Standard, Cinema, SportorGame
thesubsequentmenuswillbeautomaticallyset.
YoucannotadjustcolorandtintintheRGB-PC/DVI-D-PC(DTV)/HDMI-PCmode.
WhenusingtheSmartEnergySavingfunction,thescreenmaylooksaturatedinthewhiteareaofa
stillimage.
IfEnergySavingissettoMinimum,Medium,orMaximum,theSmartEnergySavingfunctionis
disabled.
NOTE

40
ENG
ENGLISH
CUSTOMIZING SETTINGS
Setting Description
Dynamic
Contrast
(Off/High/
Medium/Low)
Adjuststhecontrasttokeepitatthebestlevelaccordingtothebrightnessofthescreen.The
pictureisimprovedbymakingbrightpartsbrighteranddarkpartsdarker.
(Thecurrentmodeldoesnotsupportthisfunction.)
Dynamic Color
(Off/High/Low)
AdjustsscreenColorssothattheylooklivelier,richerandclearer.Thisfeatureenhances
hue,saturationandluminancesothatred,blue,greenandwhitelookmorevivid.
(Thecurrentmodeldoesnotsupportthisfunction.)
Clear White
(Off/High/Low)
Makethewhiteareaofscreenbrighterandmorewhite.
Skin Color
(-5 to 5)
Itdetectstheskinareaofvideoandadjustsittoexpressanaturalskincolor.
Noise
Reduction
(Off/High/
Medium/Low)
Reducesscreennoisewithoutcompromisingvideoquality.
(Thecurrentmodeldoesnotsupportthisfunction.)
Digital Noise
Reduction
(Off/High/
Medium/Low)
Thisoptionreducesthenoiseproducedwhilecreatingdigitalvideosignals.
Gamma
(High/Medium/
Low)
Setyourowngammavalue.Onthemonitor,highgammavaluesdisplaywhitishimagesandlow
gammavaluesdisplayhighcontrastimages.
Black Level
(High/Low)
Low:Thepictureofthescreengetsdarker.
High:Thepictureofthescreengetsbrighter.
Setblacklevelofthescreentoproperlevel.
(Functionworksinthefollowingmode-HDMI-DTV)
Advanced Control
41
ENG
ENGLISH
CUSTOMIZING SETTINGS
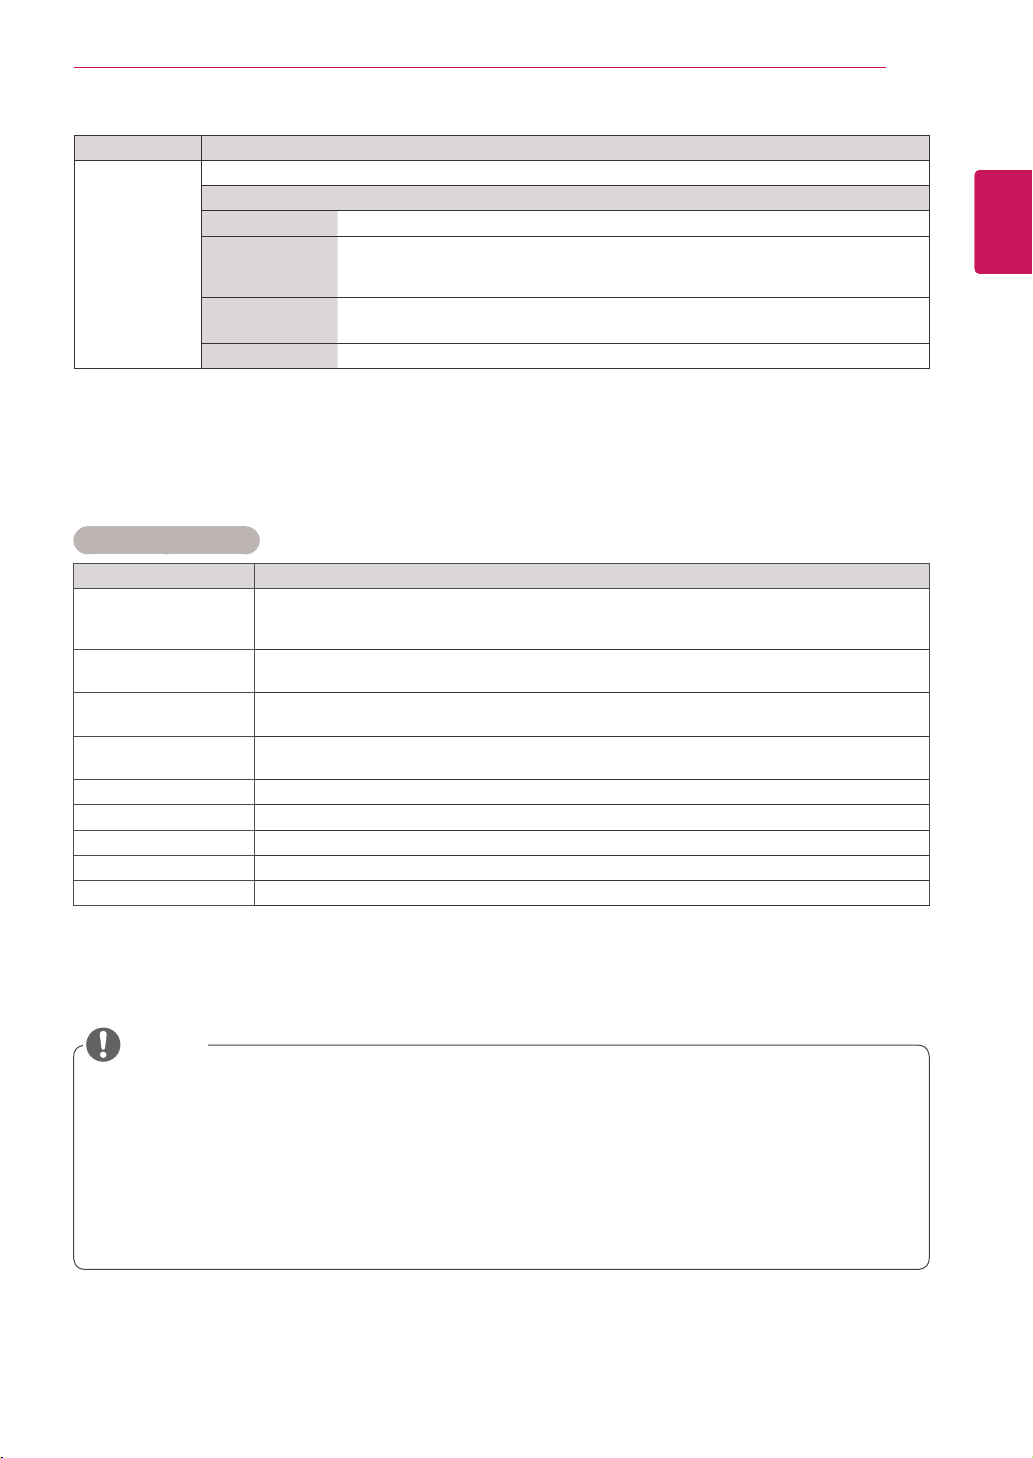
AUDIO settings
1
PressMENUtoaccessthemainmenus.
2
PresstheNavigationbuttonstoscrolltoAUDIOandpress
OK.
3
PresstheNavigationbuttonstoscrolltothesettingor
optionyouwantandpressOK.
-Toreturntothepreviouslevel,pressBACK.
4
Whenyouarefinished,pressEXIT.
Whenyoureturntothepreviousmenu,pressBACK.
Theavailableaudiooptionsaredescribedinthefollowing:
Move OK
AUDIO
ꔋ
• Clear Voice II : Off
• Balance 0
• Sound Mode : Standard
• Infinite Sound: Off
• Treble 50
• Bass 50
• Reset
• Digital Audio Input : Audio In
• Speaker : Off
L R
Setting Description
Clear Voice ll Bydifferentiatingthehumansoundrangefromothers,ithelpsusersmakedialogmoreclear.
Balance Adjustsbalancebetweentheleftandrightspeakersaccordingtoyourroomenvironment.
Sound Mode Thebestsoundtonequalitywillbeselectedautomaticallydependingonthevideotypethatyou're
currentlywatching.
Mode
Standard Themostcommandingandnaturalaudio.
Music Selectthisoptiontoenjoytheoriginalsoundwhenlisteningtothemusic.
Cinema Selectthisoptiontoenjoysublimesound.
Sport Selectthisoptiontowatchsportsbroadcasting.
Game Toenjoydynamicsoundwhenplayingagame.
Option
InfiniteSound LG'sInfinitySoundoptionprovides5.1channelstereosoundfromtwo
speakers.
Treble Controlsthedominantsoundsintheoutput.Whenyouturnupthetreble,it
willincreasetheoutputtothehigherfrequencyrange.
Bass Makestheoutputsoundsofter.Whenyouturnupthebass,itwillincrease
theoutputtothelowerFrequency.
Reset Resetsthesoundmodetothedefaultsetting.
Digital Audio
Input
HDMI/DisplayPort:OutputsthesoundofdigitalsignalfromHDMIanddisplayportsthroughthe
monitorspeaker.
Audio In:OutputsthesoundthroughthemonitorspeakerbyconnectingHDMIanddisplayports
totheAudioInport.
Speaker ON:Enablessoundtothemonitorspeaker.(*Themonitorspeakerissoldseparately.)
OFF:Disablessoundtothemonitorspeaker.Usethisoptionwhenusinganexternalsounddevice.
NOTE
Ifsound qualityorvolumeisnotatthelevelyouwant,itisrecommendedtouseaseparate
hometheatersystemorampliertocopewithdifferentuserenvironments.
42
ENG
ENGLISH
CUSTOMIZING SETTINGS
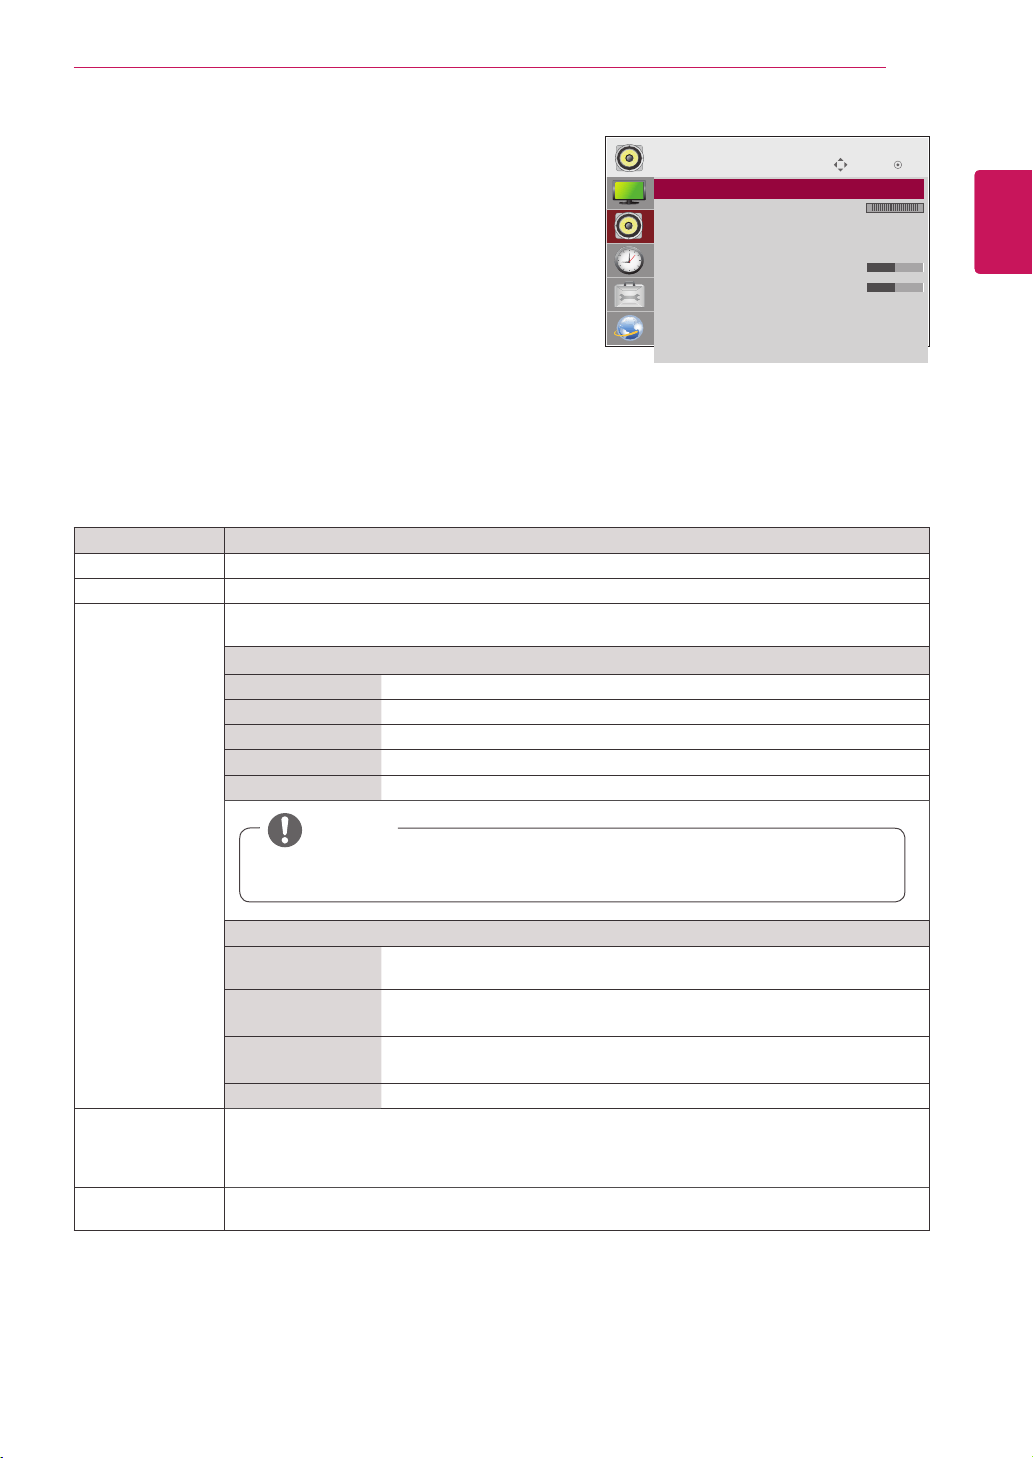
TIME settings
1
PressMENUtoaccessthemainmenus.
2
PresstheNavigationbuttonstoscrolltoTIMEandpress
OK.
3
PresstheNavigationbuttonstoscrolltothesettingoroption
youwantandpressOK.
-Toreturntothepreviouslevel,pressBACK.
4
Whenyouarefinished,pressEXIT.
Whenyoureturntothepreviousmenu,pressBACK.
Theavailabletimesettingsaredescribedinthefollowing:
Setting Description
Clock Setsthetimefeature.
On/Off Time SetsthetimetoturnonorofftheMonitorset.
Sleep Timer SetsthelengthoftimeuntiltheMonitorsettoturnsoff.WhenyouturntheMonitorsetoffandturn
itonagain,theSleepTimerwillbesettooff.
Power on delay Whenconnectingmultiplemonitorsandturningthepoweron,themonitorsareturnedonindividually
topreventoverload.
Auto off IfAutooffisactiveandthereisnoinputsignal,thesetswitchestooffmodeautomaticallyafter15
minutes.
Automatic
Standby
Ifyoudonotusethemonitorformorethan4hours,itwillbeinstandbymodeautomatically.
Oncetheonorofftimeisset,thesefunctionsoperatedailyatthepresettime.
Thescheduledpower-offfunctionworksproperlyonlywhenthedevicetimeissetcorrectly.
Whenthescheduledpower-onandpower-offtimesarethesame,thepower-offtimehaspriorityoverthepower-ontime
ifthesetisturnedon,andviceversaifthesetisturnedoff.
NOTE
Move OK
TIME
ꔋ
• Clock
• Off Time : Off
• On Time : Off
• Sleep Timer : Off
• Power On Delay : Off
• Auto Off : 15 min.
• Automatic Standby : 4hours
43
ENG
ENGLISH
CUSTOMIZING SETTINGS
Setting Description
Language Tochoosethelanguageinwhichthecontrolnamesaredisplayed.
Power Indicator UsethisfunctiontosetthepowerindicatoronthefrontsideoftheproducttoOnorOff.
(Thepowerindicatorislocatedonthebottomoftheproduct.)
ISM Method AfrozenorstillpicturefromaPC/Videogamedisplayedonthescreenforprolongedperiods
couldresultinaghostimageremainingevenwhenyouchangetheimage.Avoidallowingafixed
imagetoremainonthescreenforalongperiodoftime.
Setting
Normal Leaveonnormalifyoudon'tforeseeimageburninbeingaproblem.
Orbiter Mayhelpprevent ghostimages. However,itisbestnot toallowanyfixed
image toremainonthe screen.To avoidapermanentimageonthe screen,
thescreenwillmoveevery2minutes.
Inversion This function inverts the panel color of the screen.The panel color is
automaticallyinvertedevery30minutes.
WhiteWash Whitewashfillsthescreen withsolidwhite.Thishelpsremoves permanent
imagesburnedintothescreen.Apermanentimagemaybeimpossibletoclear
entirelywithwhitewash.
DPM Select Ausercanchoosetoturnthepowersavingmodeon/off.
Fail Over Ifthereisnoinputsignal,itautomaticallyswitchestoanotherinputwithsignal.
Setting
Off Stopsautoswitchoftheinputsource.
Auto Switchestoanotherinputsourcewithvideosignalifnovideosignalcomes
fromthecurrentinputsource.
Manual Selectsthepriorityofinputsourceforautoswitch.
Whenseveralinputsourcesarefound,theinputsourcewithahigherpriority
willbeselected.
Factory Reset Selectthisoptiontoreturntothedefaultfactorysettings.
Set ID YoucanassignauniqueSetIDNO(nameassignment)toeachproductwhenseveralproducts
areconnectedfordisplay.Specifythenumber(1to255)usingthebuttonandexit.Usethe
assignedSetIDtoindividuallycontroleachproductusingtheProductControlProgram.
OPTION settings
1
PressMENUtoaccessthemainmenus.
2
PresstheNavigationbuttonstoscrolltoOPTIONandpress
OK.
3
PresstheNavigationbuttonstoscrolltothesettingoroption
youwantandpressOK.
-Toreturntothepreviouslevel,pressBACK.
4
Whenyouarefinished,pressEXIT.
Whenyoureturntothepreviousmenu,pressBACK.
Theavailableoptionsettingsaredescribedinthefollowing:
Move OK
OPTION
ꔋ
• Language
• Power Indicator
• ISM Method : Normal
• DPM Select : On
• Fail Over : Off
• Factory Reset
• Set ID : 1
• PIP/PBP
• Key Lock
• Product/Service Info.

44
ENG
ENGLISH
CUSTOMIZING SETTINGS
Setting Description
PIP/PBP DisplaysvideosorphotosstoredintheUSBdeviceonasinglemonitorbydividingitintothemain
andsubscreens.
Option
Mode Setsthetypeofsecondaryscreen.
*OFF:Disablesthesecondaryscreen.
*PIP (Picture In Picture):Displaysthesecondaryscreeninthemainscreen.
*PBP (Picture By Picture):Displaysthesecondaryscreennexttothemain
screen.
Position Adjuststhepositionofthesubscreen(topleft,bottomleft,topright,bottom
right)
Thedefaultvalueisthebottomright.
Size Adjuststhesizeofthesubscreen(Size0to10).
ThedefaultsizeofPIP(Size:0)is480x240;themaximumsize10is960x540.
Key Lock Keyinputdoesnotwork.Thispreventsinvalidkeyinput.
Product/Service
Info.
Displaysthemodelname,softwareversion,serialnumber,IPaddress,MACaddressandhome
page.
NOTE
ThePositionandSizeoptionsareenabledonlyinPIPmode.
45
ENG
ENGLISH
CUSTOMIZING SETTINGS
PIP/PBP
DisplaysvideosorphotosstoredintheUSBdeviceon
asinglemonitorbydividingitintothemainandsub
screens.(Seep.36)
Position
Mode
Size
top left top right
bottom left bottom right
*PIP(Picture In Picture):DisplaystheSubscreen
inthemainscreen.
*PBP(Picture By Picture):DisplaystheSub
screennexttothemainscreen.
Adjuststhepositionofthesubscreen(topleft,
bottomleft,topright,bottomright)
Adjuststhesizeofthesubscreen(Size0-10).
Thesubscreenisonlysupportedwhenusingthe
USBdevice.
Sub
USB
Main
RGB O
HDMI/DVI-D/Display Port O
YoucanonlychangethesizeandpositioninPIP
mode.
WithPBPselected,theAspectRatiooptioninthe
PICTUREmenuisdisabled(Fixedas16:4).
Youmustselecttheoutputsoundbeforerunning
thePIPorPBPfunctions.(SelecteitherMainor
Sub.)
IfyoufailtoselectMainorSubfromthesound
selectionbox,andiftheOSDdisappearsafter
eitheraperiodoftimeorwhentheExitorBack
keyispressed,thePIP/PBPsubscreenisnot
activated.
Youcannotchangethesoundwhilerunningthe
PIPorPBPfunctions.Ifyouwanttochangethe
sound,pleaserestartPIP/PBP.
Thepicturequalityofthesubscreenisset
accordingtothevaluesselectedinthemainmenu,
nottheUSBdevice.
IfyouplayvideosyouselectedinPIP/PBPmode,
thevideoswillplaybackrepeatelyinsuccession.
ThebuttonsbelowworkinPIPmode.
Button Photo Movie
NOTE
Main
screen
Sub
screen
PIP
PBP
< 1920x502 >
PBP
960x502
0 : 180x120
PIP
10 : 420x250
46
ENG
ENGLISH
CUSTOMIZING SETTINGS
Picture ID
1 PresstheredONbuttonontheremotecontrol
toassignthePictureID.
2 Ifyoupresstheleft/rightbuttonsorpressthe
ONbuttonrepeatedly,thePictureIDcycles
throughOFFand1to4.AssigntheIDyou
want.
IfyouassigntheSetIDtoeachsetwith
multi-vision,andthenassignthePictureID
usingtheredbuttonontheremotecontrol,
thekeycommandisdisplayedfortheset
withthesameSetIDandPictureID.Aset
withdifferentSetIDsandPictureIDscannot
becontrolledbyIRsignals.
Formoreinformationonhowtoassignthe
SetID,see"SetID"onpage43.
ThemaximumvalueofthePictureIDcanbe
setintheTotalSetIDmenu.
PleaserefertotheInstallationManualfor
moreinformationonTotalSetIDassignment.
P
A
G
E
INPUT
ENERGY
SAVING
MARK
ARC
ON
OFF
. , !
ABC
DEF
GHI
JKL
MNO
PQRS
TUV
1/a/A
- * #
WXYZ
CLEAR
OK
S.MENU
MONITOR
PSM
AUTO
MUTE
BRIGHT
NESS
MENU
ID
BACK
TILE
ON
OFF
EXIT
POWER
P
A
G
E
INPUT
ENERGY
SAVING
MARK
ARC
ON
OFF
. , !
ABC
DEF
GHI
JKL
MNO
PQRS
TUV
1/a/A
- * #
WXYZ
CLEAR
OK
S.MENU
MONITOR
PSM
AUTO
MUTE
BRIGHT
NESS
MENU
ID
BACK
TILE
ON
OFF
EXIT
POWER
Forexample,ifthePictureIDisassigned
to2,theupperrightdisplay(SetID:2)can
becontrolledbyIRsignals.
Foreachset,youcanchangethe
settingsforthePICTURE,AUDIO,TIME,
NETWORKandMYMEDIAmenusorthe
hotkeysontheremotecontrol.
IfyoupressthegreenOFFbuttonfor
PictureIDs,thePictureIDsforallsetsare
turnedoff.Ifyouthenpressanybutton
ontheremotecontrol,allsetswillstart
workingagain.
PictureIDwillbedisabledwhileusingthe
MYMEDIAmenu.
NOTE
PictureID
Close
Off
Whenusingthe4Set(TotalSetID:4)
SetIDsareassignedasshowninthepicture.
PictureIDisusedtochangethesettingsof
aspecicsetusingasingleIRreceiver.The
setreceivingtheIRsignalcommunicateswith
anothersetviaanRS232Cconnection.Eachset
isidentiedbyaSetID.IfyouassignthePicture
IDusingtheremotecontrol,onlydisplayswith
thesamePictureIDandSetIDcanbecontrolled
remotely.
IR Receiver
RS232C cable
PictureID
Close
Off
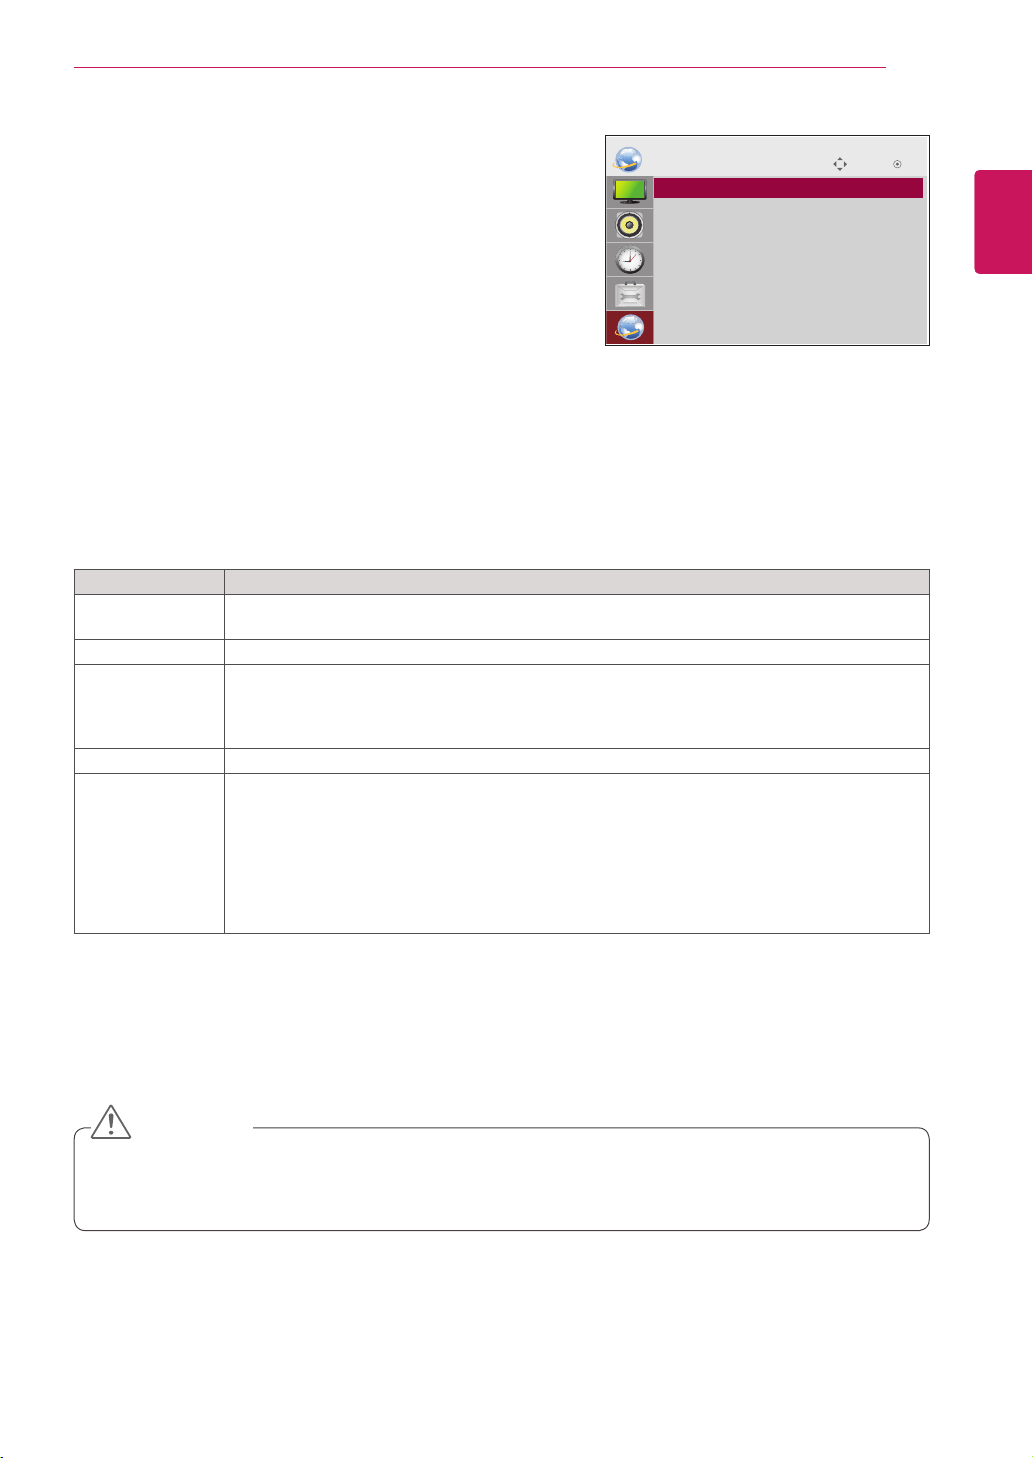
47
ENG
ENGLISH
CUSTOMIZING SETTINGS
Setting Description
Player Name
Setting
SetstheplayernameusedinSuperSignManager.(Upto20characters)
Network Setting Configurethenetworksettings.
Network Status
Displaythenetworkstatus.
-Internetisconnected:Extermallyconnected
-Networkisconnected:Onlyinternallyconnected
-Notconnected:Whenthereisnonetworkconnection
Server IP Setting SetstheIPaddressofthecomputer(server)onwhichSuperSignManagerisinstalled.
Server IP Status Displaystheconnectionstatuswiththeserver.
-Notconnected:WhenthereisnonetworkconnectionwithSuperSignserver
-Waitingforapproval:WhennetworkconnectionwithSuperSignserverhasbeenmade,but
accesstoserverhasnotbeenapprovedbytheserver
-Rejected:WhennetworkconnectionwithSuperSignserverhasbeenmade,butaccessto
serverhasbeenrejectedbytheserver
-Internetisconnected:WhennetworkconnectionwithSuperSignserverhasbeenmadeand
accesstoserverhasalsobeenapprovedbytheserver
NETWORK settings
1
PressMENUtoaccessthemainmenus.
2
PresstheNavigationbuttonstoscrolltoNETWORKand
pressOK.
3
PresstheNavigationbuttonstoscrolltothesettingoroption
youwantandpressOK.
-Toreturntothepreviouslevel,pressBACK.
4
Whenyouarefinished,pressEXIT.
Whenyoureturntothepreviousmenu,pressBACK.
Theavailableoptionsettingsaredescribedinthefollowing:
Move OK
NETWORK
ꔋ
• Player Name Setting
• Network Setting : None
• Network Status : Not connected
• Server IP Setting
• Server IP Status : Not connected
WhensettingthePlayerName,inputdelaymayoccurifyoupressthebuttonsontheremotecontrol
continuously.
CAUTION
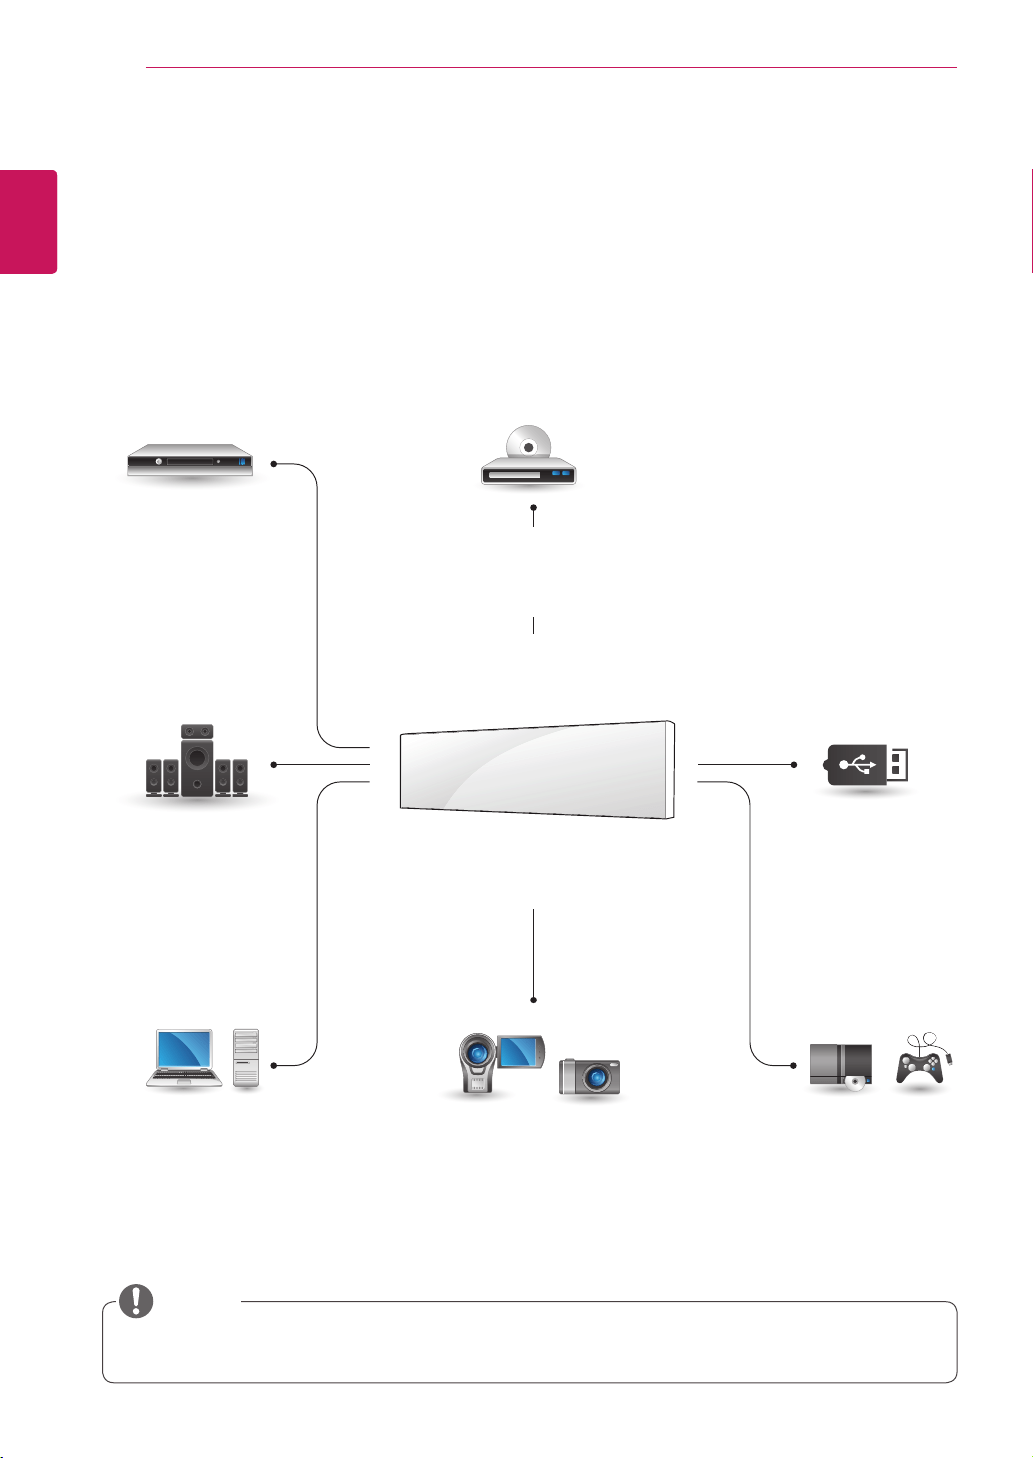
48
ENG
ENGLISH
MAKING CONNECTIONS
MAKING CONNECTIONS
ConnectvariousexternaldevicestotheportsontheMonitorset’sbackpanel.
1
FindanexternaldeviceyouwanttoconnecttoyourMonitorsetshownonthefollowingillustration.
2
Checktheconnectiontypeoftheexternaldevice.
3
Gototheappropriateillustrationandchecktheconnectiondetails.
IfyouconnectagamingdevicetotheMonitorset,usethecablesuppliedwiththegamingdevice.
NOTE
HDMI-Seep.49
DVI-Seep.49
HDMI-Seep.14
DVI-Seep.14
RGB-Seep.13
LAN-Seep.50
DisplayPort-Seep.15
HDMI-Seep.49
DVI-Seep.49
HDMI-Seep.49
DVI-Seep.49
HDMI-Seep.49
Memorystorage
–Seep.23
HD Receiver DVD
USB
PC Camcorder/ Camera Gaming device
Speaker
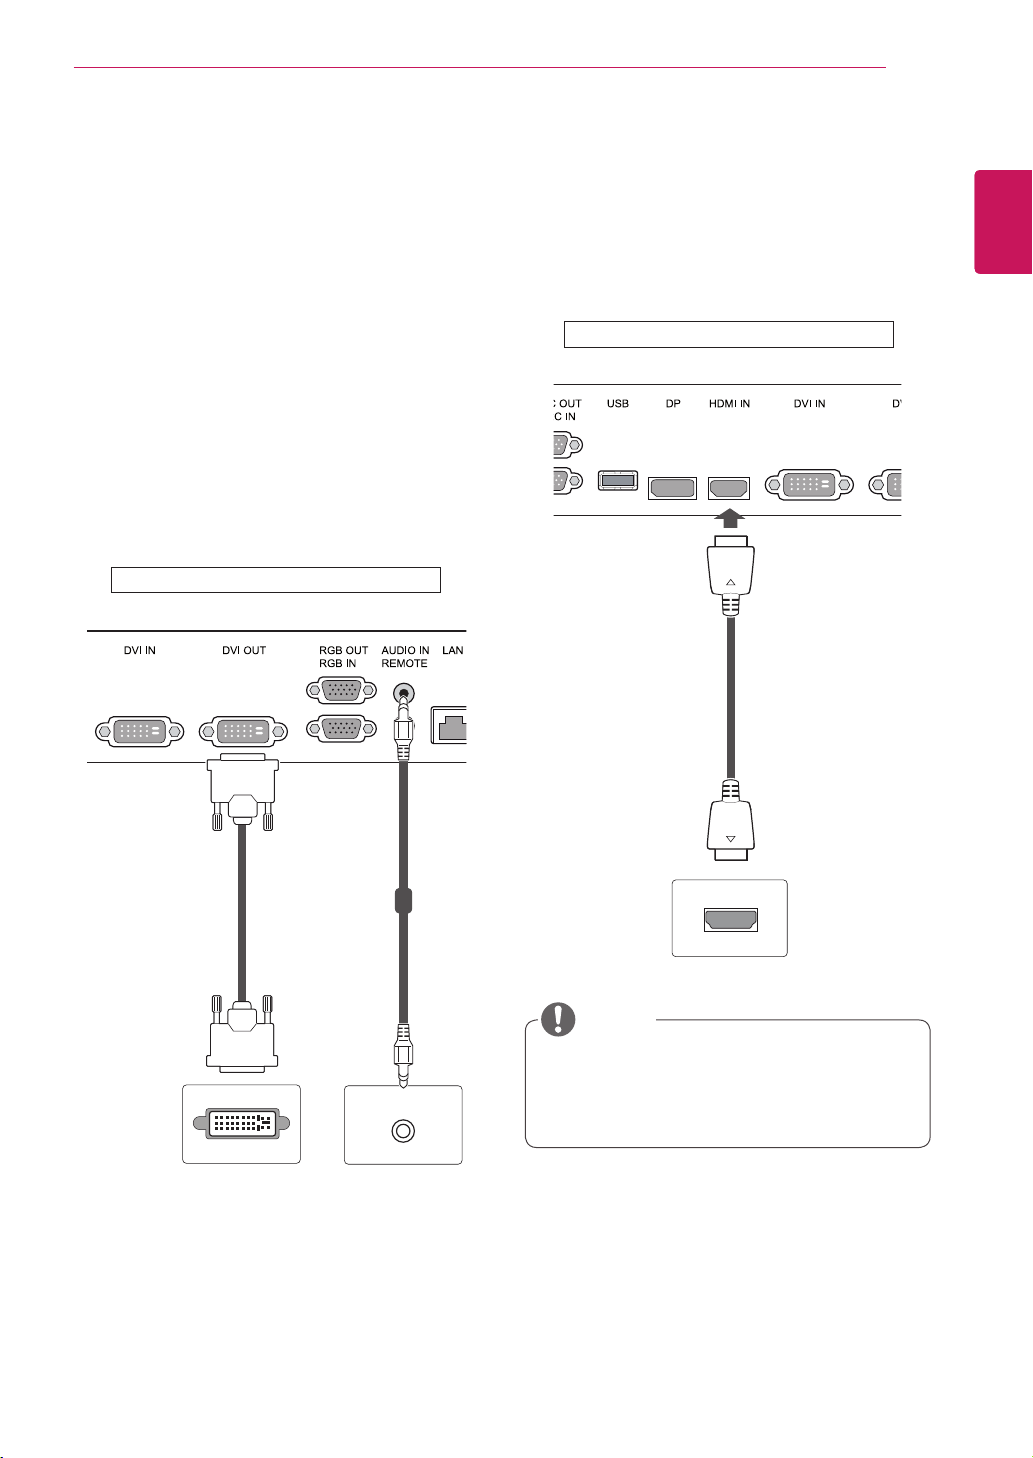
49
ENG
ENGLISH
MAKING CONNECTIONS
Connecting to a HD receiver,
DVD, Camcorder, Camera or
Gaming Device
ConnectaHDreceiver,DVD,orVCRplayertothe
Monitorsetandselectanappropriateinputmode.
HDMI connection
Transmitsthedigitalvideoandaudiosignalsfrom
anexternaldevicetotheMonitorset.Connectthe
externaldeviceandtheMonitorsetwiththeHDMI
cableasshownonthefollowingillustration.
UseaHighSpeedHDMI™Cable.
HighSpeedHDMI™Cablesaretestedto
carryanHDsignalupto1080pandhigher.
NOTE
DVI connection
Transmitsthedigitalvideosignalfromanexternal
devicetotheMonitorset.Connecttheexternal
deviceandtheMonitorsetwiththeDVIcableas
showninthefollowingillustration.Totransmitan
audiosignal,connectanoptionalaudiocable.
(notincluded) (notincluded)
Backoftheproduct.
(notincluded)
Backoftheproduct.
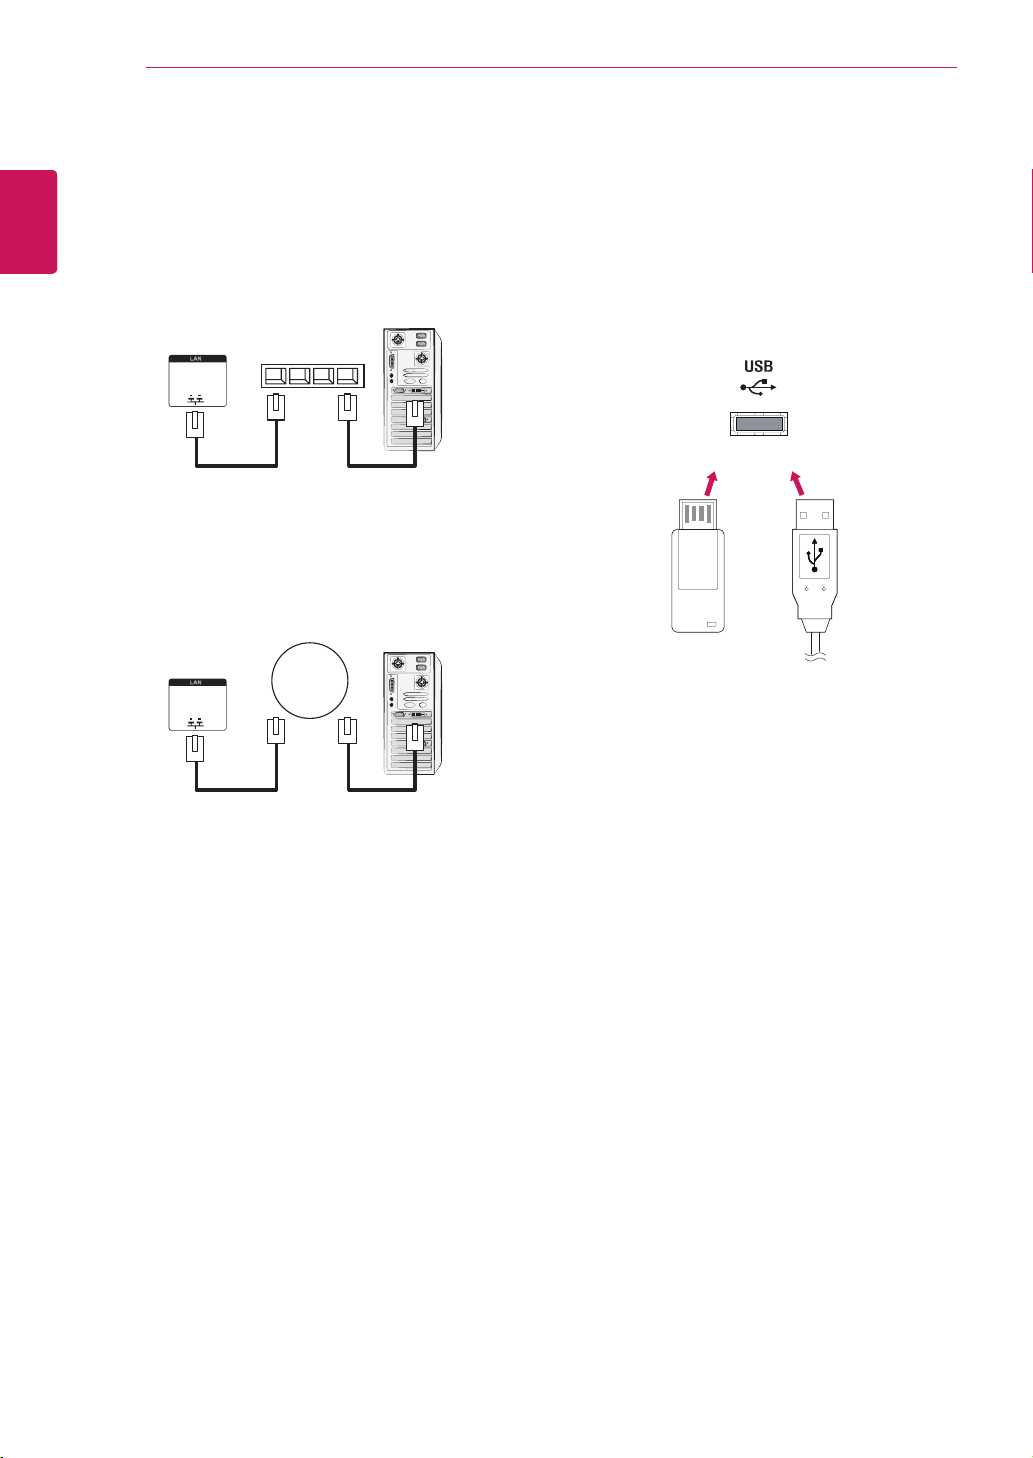
50
ENG
ENGLISH
MAKING CONNECTIONS
Connecting to the LAN
LAN connection
A
Usingarouter(Switch)
MonitorSet
Network
PC
LAN
Switch
MonitorSet
Network
PC
LAN
B
UsingtheInternet.
Connecting to a USB
ConnectaUSBstoragedevicesuchassUSB
flashmemory,externalharddrive,MP3playeror
aUSBmemorycardreadertotheMonitorsetand
accesstheUSBmenutousevariousmultimedia
files.
or
(notincluded)
(notincluded) (notincluded)
(notincluded)
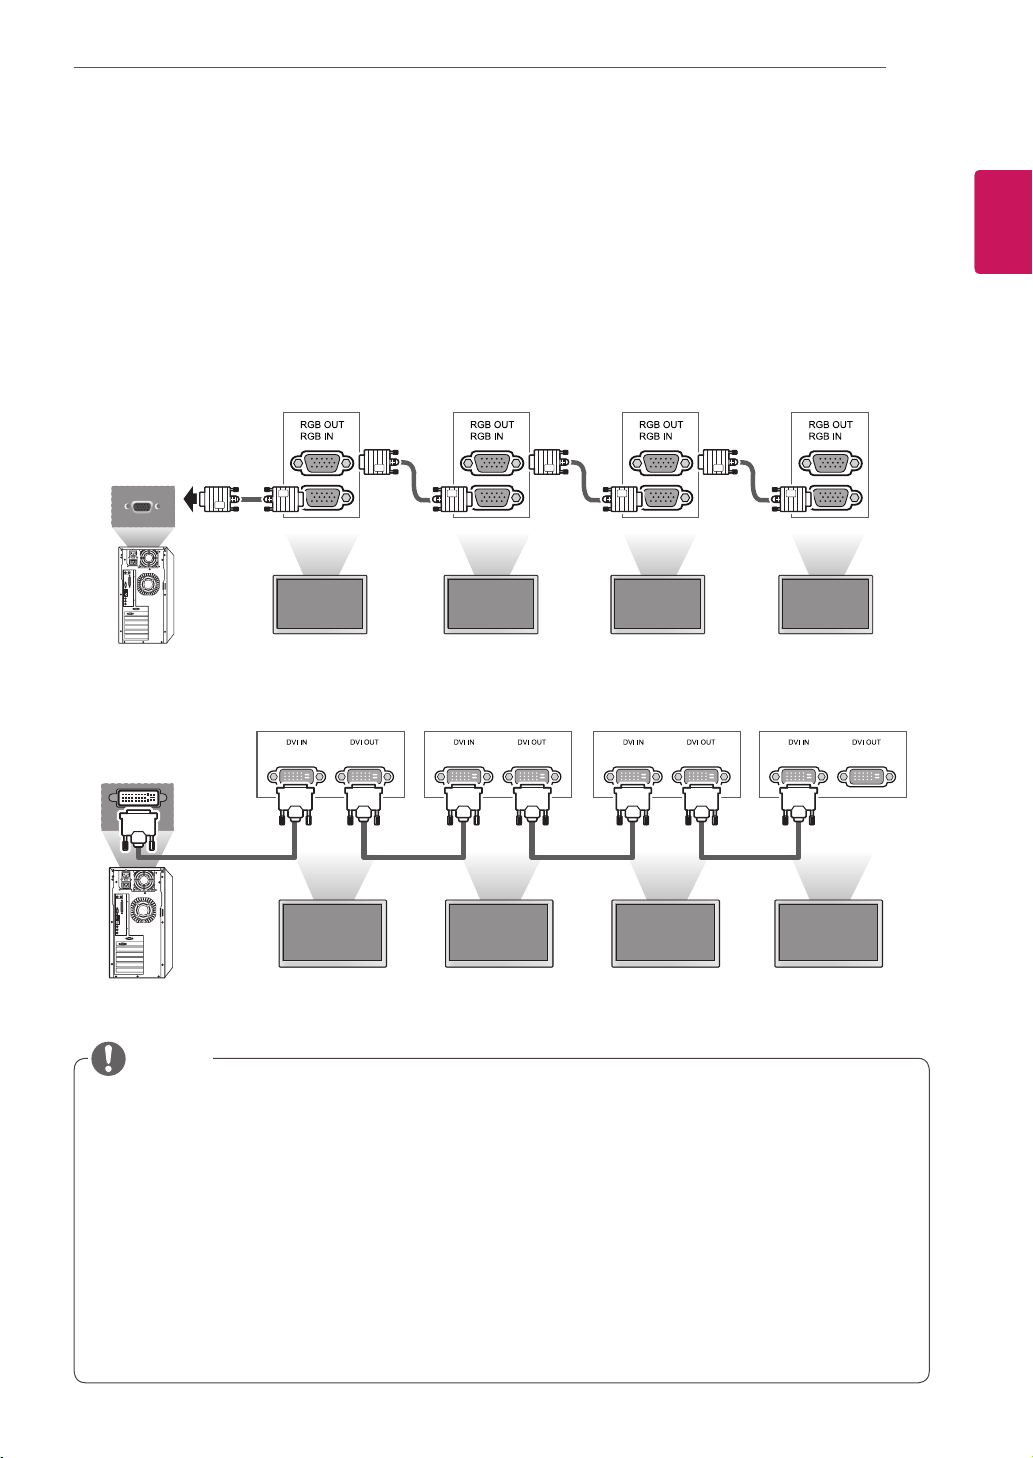
51
ENG
ENGLISH
MAKING CONNECTIONS
Daisy Chain Monitors
Use this function to share the RGB video signal with other monitors without having to use a separate signal
splitter box.
• To use different products connected to each other Connect one end of the signal input cable (15-pin
D-Sub Signal Cable) to the RGB OUT connector of product 1 and connect the other end to the RGB IN
connector of other products.
RGB Cable
Monitor 1 Monitor 2 Monitor 3 Monitor 4
15-pin D-Sub Signal Cable
(Max 3m)
DVI Cable
DVI Cable
(Max 3m)
(not included)
Monitor 1 Monitor 2 Monitor 3 Monitor 4
When multiple monitors are connected in RGB input, it is recommended to use a distributor to avoid
signal degradation and cable loss.
For DVI, in general, up to 12 monitors can be connected via the DVI Out port (at the recommended
resolution) if the signal is stable and there is no cable loss.If you want to connect more than this
number of monitors, we recommended that you use a distributor.
When multiple monitors are connected via DVI, the HDCP-encrypted content can be normally played
only on the monitor that receives the first signal.(The DVI Out port does not support HDCP.)
If the signal cable between the product and your PC is too long, make sure to use the DVI (RGB)
booster or DVI (RGB) optical cable.
If input signals are received through the HDMI/DP cable, multiple monitors cannot be connected via
the DVI Out port.
NOTE

52
ENG
ENGLISH
TROUBLESHOOTING
TROUBLESHOOTING
No image is displayed
Problem Resolution
Istheproductpowercord
connected?
Seeifthepowercordisproperlyconnectedtotheoutlet.
Isthepowerindicatorlighton?
Seeifthepowerswitchisturnedon.
Mayneedservice.
Powerisonbutthescreen
appearsextremelydark.
Adjustbrightnessandcontrastagain.
Backlightmayneedrepair.
Thepowerindicatoramber?
Iftheproductisinpowersavingmode,movethemouseorpressany
key.
Turnbothdevicesoffandthenbackon.
Doesthe'InvalidFormat'
messageappear?
ThesignalfromthePC(videocard)isoutoftheverticalorhorizontal
frequencyrangeoftheproduct.Adjustthefrequencyrangeby
referringtotheSpecificationsinthismanual.
*Maximumresolution
RGB:1920x1080@60Hz
HDMI/DVI/DP:1920x1080@60Hz
Doesthe'Nosignal'message
appear?
ThesignalcablebetweenPCandproductisnotconnected.Check
thesignalcable.
Pressthe'INPUT'menuintheremoteControltochecktheinput
signal.
'Unknown Product' message appears when the product is connected.
Problem Resolution
Didyouinstallthedriver?
Seeiftheplug&playfunctionissupportedbyreferringtothevideo
cardusermanual.
'Key Lock On' message appears.
Problem Resolution
The'KeyLockOn'message
appearswhenpressingthe
Menubutton.
TheLockfunctionpreventstheOSDsettingsfrombeingchanged
inadvertently.Toreleasethelock,gotoMenuandOptionanddisable
theKeyLockoption.

53
ENG
ENGLISH
TROUBLESHOOTING
The screen image looks abnormal.
Problem Resolution
Isthescreenpositionwrong?
D-Subanalogsignal-Pressthe"AUTO"buttonintheremotecontrol
toautomaticallyselecttheoptimalscreenstatusthatfitsintothe
currentmode.Ifadjustmentisnotsatisfactory,usethePositionOSD
menu.
Seeifthevideocardresolutionandfrequencyaresupportedbythe
product.Ifthefrequencyisoutofrange,settotherecommended
resolutionintheControlPanel"Display"Settingmenu.
Dothinlinesappearonthe
backgroundscreen?
D-Subanalogsignal-Pressthe"AUTO"buttonintheremotecontrol
toautomaticallyselectanoptimalscreenstatusthatfitsintothe
currentmode.Ifadjustmentisnotsatisfactory,usetheClockOSD
menu.
Horizontalnoiseappearsorthe
characterslookblurred.
D-Subanalogsignal-Pressthe"AUTO"buttonintheremotecontrol
toautomaticallyselectanoptimalscreenstatusthatfitsintothe
currentmode.Ifadjustmentisnotsatisfactory,usethePhaseOSD
menu.
Thescreenisdisplayed
abnormally.
Theproperinputsignalisnotconnectedtothesignalport.Connect
thesignalcablethatmatcheswiththesourceinputsignal.
After-image appears on the product.
Problem Resolution
After-imageappearswhenthe
productisturnedoff.
Ifyouuseafixedimageforalongtime,thepixelsmaybedamaged
quickly.Usethescreen-saverfunction.
The audio function does not work.
Problem Resolution
Nosound?
Seeiftheaudiocableisconnectedproperly.
Adjustthevolume.
Seeifthesoundissetproperly.
Soundistoodull.
Selecttheappropriateequalizesound.
Soundistoolow.
Adjustthevolume.

54
ENG
ENGLISH
TROUBLESHOOTING
Screen color is abnormal.
Problem Resolution
Screenhaspoorcolorresolution
(16colors).
Setthenumberofcolorstomorethan24bits(truecolor)Select
ControlPanel-Display-Settings-ColorTablemenuinWindows.
Screencolorisunstableor
mono-colored.
Checktheconnectionstatusofthesignalcable.Or,re-insertthePC
videocard.
Doblackspotsappearonthe
screen?
Severalpixels(red,green,whiteorblackcolor)mayappearonthe
screen,whichcanbeattributabletotheuniquecharacteristicsofthe
LCDpanel.ItisnotamalfunctionoftheLCD.
The operation does not work normally.
Problem Resolution
Thepowersuddenlyturnedoff.
Isthesleeptimerset?
Checkthepowercontrolsettings.Powerinterrupted.
55
ENG
ENGLISH
SPECIFICATIONS
SPECIFICATIONS
LCD Panel Screen Type 38" class (38.0" diagonal) TFT (Thin Film Transistor)
LCD (Liquid Crystal Display) Panel.
Visible diagonal size : 961.5 mm
Pixel Pitch 0.4845 mm (H) x 0.4845 mm (V)
Video Signal Max. Resolution RGB : 1920 x 1080 @ 60 Hz
HDMI/DVI/DP : 1920 x 1080 @ 60 Hz
- It may not be supported depending on the OS or video
card type.
Recommended Resolution RGB : 1920 x 502 @ 60 Hz
HDMI/DVI/DP : 1920 x 502 @ 60 Hz
- It may not be supported depending on the OS or video
card type.
Horizontal Frequency RGB : 30 kHz to 68 kHz
HDMI/DVI/DP : 30kHz to 68 kHz
Vertical Frequency RGB : 56 Hz to 75 Hz
HDMI/DVI/DP : 56 Hz to 60 Hz
Synchronization Type Separate Sync, Composite(AV) Sync, Digital, SOG
Input Connector 15-pin D-Sub type (RGB), HDMI/DVI/DP(digital),
RS-232C, LAN, USB, PC Audio, IR Receiver
Output Connector RGB, DVI, RS-232C, Speaker Out L/R
Power Rated Voltage AC 100-240 V~, 50 / 60 Hz 1.3 A
Power Consumption On Mode : 90 W Typ.
Smart Energy Saving Mode : 80 W Typ.
Off Mode : ≤ 1 W
Dimensions
(Width x Height x
Depth) / Weight
973.6 mm X 287.8 mm X 59 mm / 12.5 Kg
Environmental
conditions
Operating Temperature
Operating Humidity
0 °C to 40 °C
10 % to 80 %
Storage Temperature
Storage Humidity
-20 °C to 60 °C
5 % to 95 %
* Applicable only for models that support the speakers
Audio RMS Audio Output 10 W + 10 W (R + L)
Input Sensitivity 0.7 Vrms
Speaker Impedance 8 Ω
Product specifications shown above may be changed without prior notice due to upgrade of product
functions.
H
W
D
* Wall Bracket available VESA
400 x 200

56
ENG
ENGLISH
SPECIFICATIONS
RGB (PC) supported mode
Resolution
Horizontal
Frequency(kHz)
Vertical
Frequency(Hz)
720x400
31.468 70.8
640x480
31.469 59.94
800x600
37.879 60.317
832x624
49.725 74.55
1024x768
48.363 60
1280x720
44.772 59.855
1366x768
47.7 60
1280x1024
63.981 60.02
1920x502
31.25 59.981
1920x1080
67.5 60
HDMI/DVI/Display Port(PC) supported mode
Resolution
Horizontal
Frequency(kHz)
Vertical
Frequency(Hz)
640x480
31.469 59.94
800x600
37.879 60.317
1024x768
48.363 60
1280x720
44.772 59.855
1366x768
47.7 60
1280x1024
63.981 60.02
1920x502
31.25 59.981
1920x1080
67.5 60
DTV Mode
Resolution HDMI Display Port
480i x x
576i x x
480p o o
576p o o
720p o o
1080i o o
1080p o o
Power Indicator
Mode Product
OnMode Red
SleepMode Amber
OffMode -
PCresolutionsavailableastheinputlabel
optioninRGBandHDMI/DVIinputmode:
640x480/60Hz,1280x720/60Hz,1920
x1080/60HzandDTVresolutions:480p,
720p,1080p.
NOTE
Verticalfrequency:Toenabletheuserto
watchtheproductdisplay,screenimage
shouldbechangedtensoftimesevery
secondlikeafluorescentlamp.Thevertical
frequencyorrefreshrateisthetimesof
imagedisplaypersecond.TheunitisHz.
Horizontalfrequency:Thehorizontalinterval
isthetimetodisplayoneverticalline.When
1isdividedbythehorizontalinterval,the
numberofhorizontallinesdisplayedevery
secondcanbetabulatedasthehorizontal
frequency.TheunitiskHz.
NOTE
57
ENG
ENGLISH
IR CODES
Code (Hexa) Function Note
95 Energy Saving (
) R/C BUTTON
08
POWER
R/C BUTTON (ON/OFF)
0B INPUT R/C BUTTON
C4 Monitor On R/C BUTTON
C5 Monitor Off R/C BUTTON
43 MENU R/C BUTTON
40 Up (
) R/C BUTTON
41 Down (
) R/C BUTTON
07 Left (
) R/C BUTTON
06 Right (
) R/C BUTTON
44 OK(
) R/C BUTTON
28
BACK(
)
R/C BUTTON
5B EXIT R/C BUTTON
4D PSM R/C BUTTON
02
Volume
R/C BUTTON
03
Volume
R/C BUTTON
09 MUTE R/C BUTTON
E0 Bright
(Page UP) R/C BUTTON
E1 Bright
(Page Down) R/C BUTTON
10 to 19 Number Key 0 to 9 R/C BUTTON
72 Red Key (ID ON) R/C BUTTON
71 Green Key (ID OFF) R/C BUTTON
63 Yellow Key R/C BUTTON
61 Blue Key R/C BUTTON
76 ARC (4:3) R/C BUTTON
77 ARC (16:4) R/C BUTTON
79 ARC (MARK) R/C BUTTON
99 Auto Config. R/C BUTTON
B1
R/C BUTTON
B0
R/C BUTTON
BA
R/C BUTTON
8F
R/C BUTTON
8E
R/C BUTTON
IR CODES
All models do not support the HDMI/USB function.
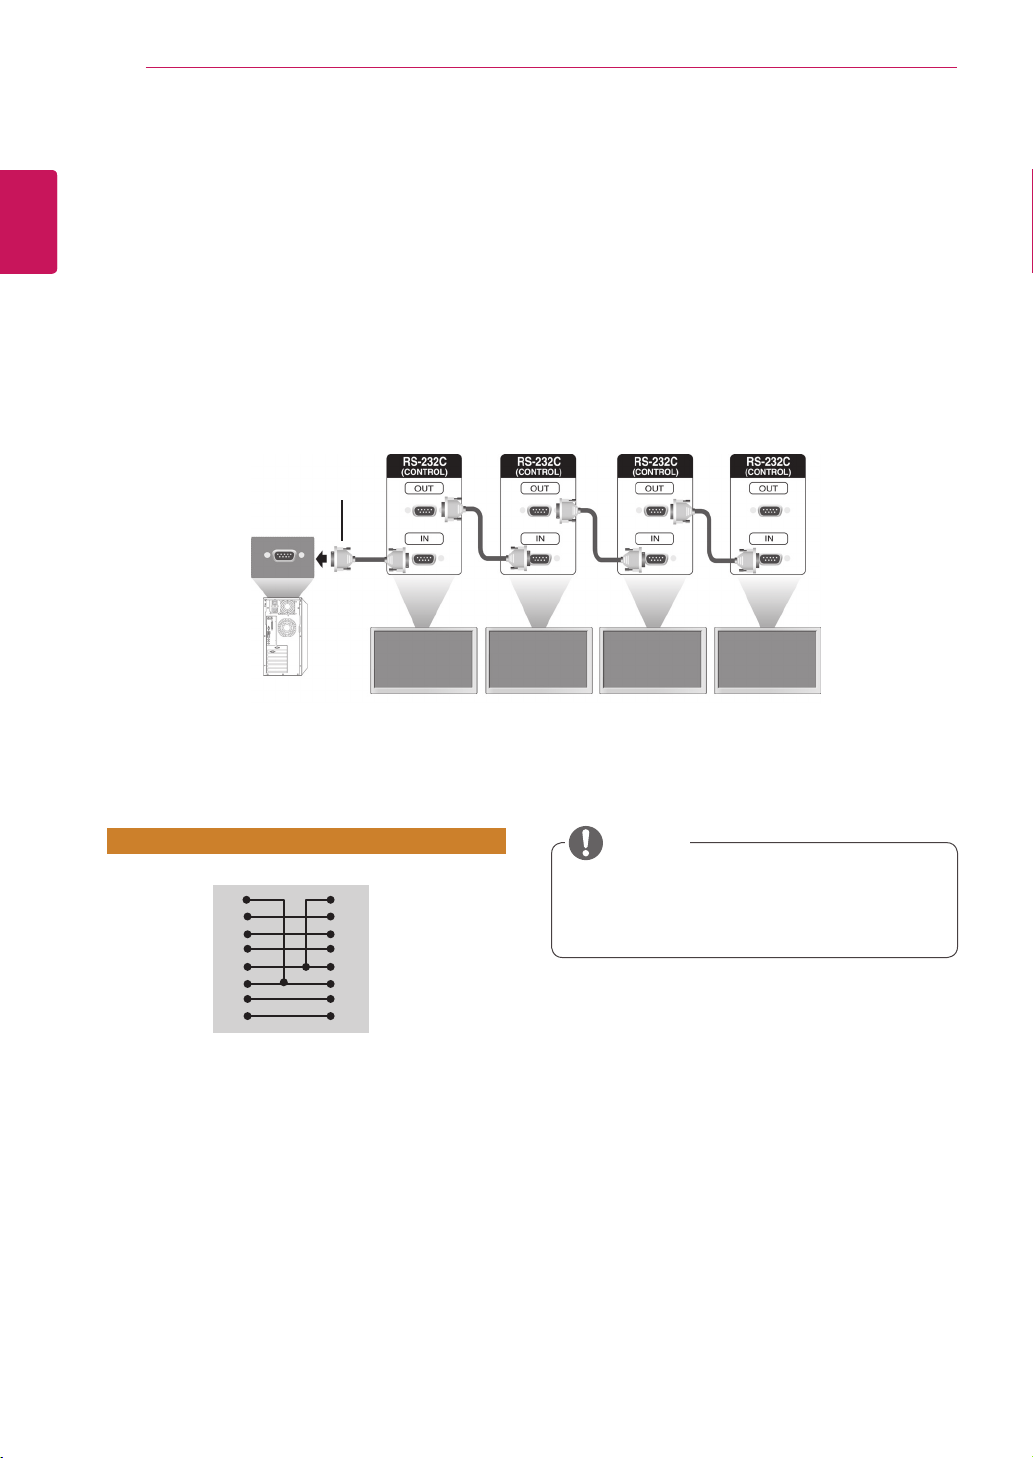
58
ENG
ENGLISH
CONTROLLING THE MULTIPLE PRODUCT
CONTROLLING THE MULTIPLE PRODUCT
UsethismethodtoconnectseveralproductstoasinglePC.Youcancontrolseveralproductsatone
timebyconnectingthemtoasinglePC.
IntheOptionmenu,SetIDmustbebetween1and255withoutbeingduplicated.
Connecting the cable
ConnecttheRS-232Ccableasshowninthepicture.
TheRS-232CprotocolisusedforcommunicationbetweenthePCandproduct.Youcanturnthe
producton/off,selectaninputsourceoradjusttheOSDmenufromyourPC.
Communication Parameter
MonitorSet1 MonitorSet2 MonitorSet3 MonitorSet4
PC
RS-232CCable
(notincluded)
BaudRate:9600buadRate(UART)
DataLength:8bit
ParityBit:None
StopBit:1bit
FlowControl:None
CommunicationCode:ASCIIcode
Useacrossed(reverse)cable
Whenusing3-wireconnections(non-
standard),anIRdaisychaincannotbeused.
NOTE
RS-232C Configurations
8-WireConfigurations(Cross-overRS-232Ccable)
PC Set
D-Sub9D-Sub9
(Female)(Female)
DCD
RXD
TXD
GND
DTR
DSR
RTS
CTS
DCD
TXD
RXD
GND
DSR
DTR
CTS
RTS
1
2
3
5
4
6
7
8
1
3
2
5
6
4
8
7

59
ENG
ENGLISH
CONTROLLING THE MULTIPLE PRODUCT
Command reference list
COMMAND
DATA
(Hexadecimal)
1 2
01.Power k a 00Hto01H
02.InputSelect x b Referto‘02.InputSelect’
03.AspectRatio k c Referto‘03.AspectRatio’
04.EnergySaving j q Referto‘04.EnergySaving’
05.Picturemode d x 00Hto04H
06.Contrast k g 00Hto64H
07.Brightness k h 00Hto64H
08.Sharpness k k 00Hto64H
09.Color k i 00Hto64H
10.Tint k j 00Hto64H
11.ColorTemperature x u 00Hto64H
12.HPosition f q 00Hto64H
13.VPosition f r 00Hto64H
14.HSize f s 00Hto64H
15.Autoconfiguration j u 01H
16.Balance k t 00Hto64H
17.Soundmode d y 01Hto05H
18.Treble k r 00Hto64H
19.Bass k s 00Hto64H
20.Speaker d v 00Hto01H
21.VolumeMute k e 00Hto01H
22.VolumeControl k f 00Hto64H
23.Time1(Years/Months/Days) f a Referto‘23.Time1’
24.Time2(Hours/Minutes/Seconds) f x Referto‘24.Time2’
25.OffTimer(Repeatmode/Time) f e Referto‘25.OffTimer’
26.OnTimer(RepeatMode/Time) f d Referto‘26.OnTimer’
27.OnTimerInput f u Referto‘27.OnTimerInput’
28.SleepTime f f 00Hto08H
29.PowerOnDelay f h 00Hto64H
30.AutomaticStandby m n 00Hto01H
31.AutoOff f g 00Hto01H
32.Language f i Referto‘32.Language’
33.PowerIndicator(StandbyLight) f o 00Hto01H
34.PowerIndicator(PowerLight) f p 00Hto01H
35.ISMmode j p Referto‘35.ISMMethod’
36.FailOverSelect m i 00Hto02H

60
ENG
ENGLISH
CONTROLLING THE MULTIPLE PRODUCT
COMMAND
DATA
(Hexadecimal)
1 2
37.FailOverInputSelect m j Referto‘37.FailOverInputSelect’
38.Reset f k 00Hto03H
39.DPMSelect f j 00Hto01H
40.TemperatureValue d n FFH
41.RemoteLock/keyLock k m 00Hto01H
42.Key m c Referto‘42.Key’
43.OSDSelect k l 00Hto01H
44.Elapsedtimereturn d l FFH
45.SerialNo.Check f y FFH
46.S/WVersion f z FFH
47.WhiteBalanceRedGain j m 00HtoFEH
48.WhiteBalanceGreenGain j n 00HtoFEH
49.WhiteBalanceBlueGain j o 00HtoFEH
50.Backlight
m
g 00Hto64H
Note:DuringUSBoperationssuchasDvixorEMF,allcommandsexceptPower(ka)andKey(mc)are
notexecutedandtreatedasNG.

61
ENG
ENGLISH
CONTROLLING THE MULTIPLE PRODUCT
Transmission / Receiving protocol
Transmission
[Command1][Command2][][SetID][][Data][Cr]or
[Command1][Command2][][SetID][][Data1][][Data2][][Data3][Cr]
*[Command1]:Firstcommandtocontroltheset.
*[Command2]:Secondcommandtocontroltheset.
*[SetID]:SetIDwithwhichyouwanttocommunicate.Etner[SetID]=‘00(0x00’tocommunicatewithall
setsregardlessoftheirSetIDnumbers.
*[Data]:Informationpassedtotheset.
*[Data1]:Informationpassedtotheset.
*[Data2]:Informationpassedtotheset.
*[Data3]:Informationpassedtotheset.
*[Cr]:CarriageReturn.ASCIIcode‘0x0D’.
*[]:ASCIIcodespace‘0x20’
Acknowledgement
[Command2][][SetID][][OK/NG][Data][x]or
[Command2][][SetID][][OK/NG][Data1][Data2][Data3][x]
*Inalikemanner,ifotherfunctionstransmit‘FF’databasedonthisformat,Acknowledgementdata
feedbackpresentsstatusabouteachfunction.
*Note:Inthismode,displaywillsendtheacknowledgementafterpoweronprocessingcompletion.
Theremightbeatimedelaybetweencommandandacknowledgement.
*Noacknowledgementsignalwillbesentfromdisplay,ifSetIDintransmissionsignalissetto‘00’(=0x00).

62
ENG
ENGLISH
CONTROLLING THE MULTIPLE PRODUCT
04. Energy Saving (Command: j q)
Tocontroltheenergysavingfunction.
Transmission
[j][q][][SetID][][Data][Cr]
Data 00:Off
01:Minimum
02:Medium
03.Maximum
05.ScreenOff
Acknowledgement
[q][][SetID][][OK/NG][Data][x]
05. Picture Mode (Command: d x)
Toselectthepicturemode.
Transmission
[d][x][][SetID][][Data][x]
Data 00:Vivid
01:Standard
02.Cinema
03.Sport
04:Game
Acknowledgement
[x][][SetID][][OK/NG][Data][x]
06. Contrast (Command: k g)
Toadjustscreencontrast.
Transmission
[k][g][][SetID][][Data][Cr]
Data 00to64:Contrast0to100
Acknowledgement
[g][][SetID][][OK/NG][Data][x]
01. Power (Command: k a)
TocontrolpowerOn/Offthedisplay.
Transmission
[k][a][][SetID][][Data][Cr]
Data00:PowerOff
01:PowerOn
FF:Checkstatus
Acknowledgement
[a][][SetID][][OK/NG][Data][x]
*Inalikemanner,ifotherfunctionstransmit‘FF’
databasedonthisformat,Acknowledgementdata
feedbackpresentsstatusabouteachfunction.
*Note:Inthismodes,displaywillsendthe
acknowledgementafterpoweronprocessing
completion.Theremightbeatimedelaybetween
commandandacknowledgement.
*Theremightbesometimedelaysbetween
commandandacknowledgement.
02. Input Select (Command: x b)
Toselectinputsourcefordisplay.
Transmission
[x][b][][SetID][][Data][Cr]
Data 60:RGBPC
70:DVI-D
90:HDMI(DTV)
A0:HDMI(PC)
C0:DisplayPort(DTV)
D0:DisplayPort(PC)
Acknowledgement
[b][][SetID][][OK/NG][Data][x]
03. Aspect Ratio (Command: k c)
Toadjustthescreenformat.
Transmission
[k][c][][SetID][][Data][Cr]
Data 01:4:3
09:Justscan(720pormore)
(HDMI/DisplayPortDTV)
*RGB,DVI-D,HDMI/DisplayPortPCmode
(1:1)
27:Top
29:16:4
Acknowledgement
[c][][SetID][][OK/NG][Data][x]

63
ENG
ENGLISH
CONTROLLING THE MULTIPLE PRODUCT
07. Brightness (Command: k h)
Toadjustscreenbrightness.
Transmission
[k][h][][SetID][][Data][Cr]
Data 00to64:Brightness0to100
Acknowledgement
[h][][SetID][][OK/NG][Data][x]
08. Sharpness (Command: k k) (Video input only)
Toadjustscreensharpness.
Transmission
[k][k][][SetID][][Data][Cr]
Data 00to64:Sharpness0to100
Acknowledgement
[k][][SetID][][OK/NG][Data][x]
09. Color (Command: k i) (Video input only)
Toadjustscreencolor.
Transmission
[k][i][][SetID][][Data][Cr]
Data 00to64:Color0to100
Acknowledgement
[i][][SetID][][OK/NG][Data][x]
10. Tint (Command: k j) (Video input only)
Toadjustscreentint.
Transmission
[k][j][][SetID][][Data][Cr]
Data 00to64:Tint0to100(R50toG50)
Acknowledgement
[j][][SetID][][OK/NG][Data][x]
11. Color Temperature (Command: x u)
Toadjustcolortemperature.
Transmission
[x][u][][SetID][][Data][Cr]
Data 00to64:Warm50toCool50
Acknowledgement
[u][][SetID][][OK/NG][Data][x]
12. H Position (Command: f q)
TosettheHorizontalposition.
*Theoperationalrangevariesdependingonthe
RGBinputresolution.
*OnlyavailableforRGBinput.
Transmission
[f][q][][SetID][][Data][Cr]
Data 00to64:Left-50toRight50
Acknowledgement
[q][][SetID][][OK/NG][Data][x]

64
ENG
ENGLISH
CONTROLLING THE MULTIPLE PRODUCT
13. V Position (Command: f r)
TosettheVerticalposition.
*Theoperationalrangevariesdependingonthe
RGBinputresolution.
*OnlyavailableforRGBinput.
Transmission
[f][r][][SetID][][Data][Cr]
"0-64:min.-50(bottom)tomax.50(top)
Acknowledgement
[r][][SetID][][OK/NG][Data][x]
14. H Size (Command: f s)
TosettheHorizontalsize.
*Theoperationalrangevariesdependingonthe
RGBinputresolution.
*OnlyavailableforRGBinput.
Transmission
[f][s][][SetID][][Data][Cr]
Data 00to64:Size-50to50
Acknowledgement
[s][][SetID][][OK/NG][Data][x]
15. Auto Configuration (Command: j u)
Toadjustpicturepositionandminimizeimage
shakingautomatically.
*OnlyavailableforRGBinput.
Transmission
[j][u][][SetID][][Data][Cr]
Data01:Set
Acknowledgement
[u][][SetID][][OK/NG][Data][x]
16. Balance (Command: k t)
Toadjustbalance.
Transmission
[k][t][][SetID][][Data][Cr]
Data 00to64:Left50toRight50
Acknowledgement
[t][][SetID][][OK/NG][Data][x]
17. Sound Mode (Command: d y)
Toselectthesoundmode.
Transmission
[d][y][][SetID][][Data][x]
Data 01:Standard
02:Music
03:Cinema
04:Sport
05.Game
Acknowledgement
[y][][SetID][][OK/NG][Data][x]
18. Treble (Command: k r)
Toadjusttreble.
Transmission
[k][r][][SetID][][Data][Cr]
Data 00to64:Treble0to100
Acknowledgement
[r][][SetID][][OK/NG][Data][x]

65
ENG
ENGLISH
CONTROLLING THE MULTIPLE PRODUCT
22. Volume Control (Command: k f)
Toadjustvolume.
Transmission
[k][f][][SetID][][Data][Cr]
Data 00to64:Volume0to100
Acknowledgement
[f][][SetID][][OK/NG][Data][x]
23. Time 1(Year/ Month/ Day) (Command: f a)
TosettheTime1(Year/Month/Day)values.
Transmission
[f][a][][SetID][][Data1][][Data2][][Data3][Cr]
Data100to14:2010to2030
Data201to0C:JanuarytoDecember
Data301to1F:1to31
*Enter“fa[SetID]ff”forcheckingTime1(Year/
Month/Day)values.
Acknowledgement
[a][][SetID][][OK/NG][Data1][Data2][Data3][x]
24. Time 2(Hour/ Minute/ Second) (Command: f x)
TosettheTime2(Hour/Minute/Second)values.
Transmission
[f][x][][SetID][][Data1][][Data2][][Data3][Cr]
Data1 00to17:00to23hours
Data2 00to3B:00to59minutes
Data3 00to3B:00to59seconds
*Enter“fx[SetID]ff”forcheckingTime2(Hour/
Minute/Second)values.
**Thiscommandwon’tworkifTime1(Year/Month/
Day)hasnotbeensetinadvance.
Acknowledgement
[x][][SetID][][OK/NG][Data1][Data2][Data3][x]
19. Bass (Command: k s)
Toadjustbass.
Transmission
[k][s][][SetID][][Data][Cr]
Data 00to64:Bass0to100
Acknowledgement
[s][][SetID][][OK/NG][Data][x]
20. Speaker (Command: d v)
Toselectspeakeron/off.
Transmission
[d][v][][SetID][][Data][x]
Data00:SpeakerOff
01:SpeakerOn
Acknowledgement
[v][][SetID][][OK/NG][Data][x]
21. Volume Mute (Command: k e)
Toselectscreenmuteon/off.
Transmission
[k][e][][SetID][][Data][Cr]
Data00:VolumeMuteOn(VolumeOff)
01:VolumeMuteOff(VolumeOn)
Acknowledgement
[e][][SetID][][OK/NG][Data][x]
Data00:VolumeMuteOn(VolumeOff)
01:VolumeMuteOff(VolumeOn)

66
ENG
ENGLISH
CONTROLLING THE MULTIPLE PRODUCT
25. Off Timer(Repeat Mode/ Time) (Command: f e)
TosettheOffTimer(Repeatmode/Time)function.
Transmission
[f][e][][SetID][][Data1][][Data2][][Data3][Cr]
Data100:RepeatOff
01:RepeatOnce
02.RepeatDaily
03:RepeatfromMondaytoFriday
04:RepeatfromMondaytoSaturday
05:RepeatfromSaturdaytoSunday
06.RepeatonSunday
Data200to17:00to23Hours
Data300to3B:00to59Minutes
*Enter“fe[SetID]ff”forcheckingOffTimer(Repeat
mode/Time)values.
*CheckifTime1(Year/Month/Day)andTime
2(Hour/Minute/Second)havebeensetbefore
settingthisfunction.
Acknowledgement
[e][][SetID][][OK/NG][Data1][Data2][Data3][x]
26. On Timer(Repeat Mode/ Time) (Command: f d)
TosettheOnTimer(Repeatmode/Time)function.
Transmission
[f][d][][SetID][][Data1][][Data2][][Data3][Cr]
Data100:RepeatOff
01:RepeatOnce
02.RepeatDaily
03:RepeatfromMondaytoFriday
04:RepeatfromMondaytoSaturday
05:RepeatfromSaturdaytoSunday
06.RepeatonSunday
Data200to17:00to23Hours
Data300to3B:00to59Minutes
*Enter“fd[SetID]ff”forcheckingOnTimer(Repeat
mode/Time)values.
*CheckifTime1(Year/Month/Day)andTime
2(Hour/Minute/Second)havebeensetbefore
settingthisfunction.
Acknowledgement
[d][][SetID][][OK/NG][Data1][Data2][Data3][x]
27. On Timer Input (Command: f u)
TosettheOnTimerInputfunction.
Transmission
[f][u][][SetID][][Data][Cr]
Data60.RGB
90:HDMI
70:DVI
*CheckifTime1(Year/Month/Day)andTime
2(Hour/Minute/Second)andOnTimer(Repeat
Mode/Time)functionshavebeensetbeforesetting
thisfunction.
Acknowledgement
[u][][SetID][][OK/NG][Data][x]
28. Sleep Time (Command: f f)
Tosetsleeptime.
Transmission
[f][f][][SetID][][Data][Cr]
Data 00:Off
01:10min.
02:20min.
03:30min.
04:60min.
05:90min.
06:120min.
07:180min.
08:240min.
Acknowledgement
[f][][SetID][][OK/NG][Data][x]
29. Power On Delay (Command: f h)
Tosetthescheduledelaywhenthepoweristurned
on(unit:second).
Transmission
[f][h][][SetID][][Data][Cr]
Data 00to64:0to100sec.
Acknowledgement
[h][][SetID][][OK/NG][Data][x]

67
ENG
ENGLISH
CONTROLLING THE MULTIPLE PRODUCT
30. Automatic Standby (Command: m n)
TosettheAutomaticStandbyfunction.
Transmission
[m][n][][SetID][][Data][Cr]
Data 00:AutomaticStandbyOff
01:AutomaticStandbyOn(4hours)
Acknowledgement
[n][][SetID][][OK/NG][Data][x]
31. Auto Off (Command: f g)
TosettheAutoOfffunction.
Transmission
[f][g][][SetID][][Data][Cr]
Data 00:AutoOffOff
01:AutoOffOn(15min.)
Acknowledgement
[g][][SetID][][OK/NG][Data][x]
32. Language (Command: f i)
TosetlanguageforOSD.
Transmission
[f][i][][SetID][][Data][Cr]
Data 00:Czech
01:Danish
02:German
03:English
04:Spanish(EU)
05:Greek
06:French
07:Italian
08:Dutch
09:Norwegian
0A:Portuguese
0B:Protuguese(BR)
0C:Russian
0D:Finnish
0E:Swedish
0F:Korean
10:Chinese(Mandarin)
11:Japanese
12:YueChinese(Cantonese)
Acknowledgement
[i][][SetID][][OK/NG][Data][x]
33. Power Indicator(Standby Light) (Command: f o)
TosetthePowerIndicator(StandbyLight)function.
Transmission
[f][o][][SetID][][Data][Cr]
Data 00:StandbyLightOff
01:StandbyLightOn
Acknowledgement
[o][][SetID][][OK/NG][Data][x]
34. Power Indicator(Power Light) (Command: f p)
TosetthePowerIndicator(PowerLight)function.
Transmission
[f][p][][SetID][][Data][Cr]
Data 00:PowerLightOff
01:PowerLightOn
Acknowledgement
[p][][SetID][][OK/NG][Data][x]
35. ISM mode (Command: j p)
ToselectISMmethodforavoidinghavingafixed
imageremainonscreen.
Transmission
[j][p][][SetID][][Data][Cr]
Data 01:Inversion
02:Orbiter
04:WhiteWash
08.Normal
Acknowledgement
[p][][SetID][][OK/NG][Data][x]

68
ENG
ENGLISH
CONTROLLING THE MULTIPLE PRODUCT
36. Fail Over Select (Command: m i)
TosettheFailOverfunction.
Transmission
[m][i][][SetID][][Data][Cr]
Data 00:Off
01:Auto
02:Manual
Acknowledgement
[i][][SetID][][OK/NG][Data][x]
37. Fail Over Input Select (Command: m j)
Toselectfailovermode.
*OnlyavailableinFailOvermanualmode.
Transmission
[m][j][][SetID][][Data1][][Data2][][Data3][Cr]
[][Data4][Cr]
Data1to4(Priority1to4)
60:RGB
70:DVI-D*
90:HDMI**
C0:DisplayPort***
*Use0x70asdataforDVI-Dinput,regardlessDVI-
D(PC)orDVI-D(DTV).
**Use0x90asdataforHDMIinput,regardless
HDMI-DTVorHDMI-PC
***Use0xC0asdataforDisplayPortinput,
RegardlessDisplayPort(DTV)orDisplayPort(PC)
Acknowledgement
[j][][SetID][][OK/NG][Data1][Data2][Data3][Data4]
[x]
Data 1to4(Priority1to4)
60:RGB
70:DVI-D****
90:HDMI*****
C0:DisplayPort******
****Returns0x70asDataforDVI-Dport,regardless
DVI-D(PC)orDVI-D(DTV).
*****Returns0x90asDataforHDMIport,regardless
HDMI-DTVorHDMI-PC.
******Returns0xC0asDataforDisplayPort,
regardlessDisplayPort(DTV)orDisplayPort(PC).
38. Reset (Command: f k)
ToexecutethePicture,Screen,AudioandFactory
resetfunction.
Transmission
[f][k][][SetID][][Data][Cr]
Data 00:PictureReset
01:ScreenReset(OnlyavailableforRGB
input.)
02:FactoryReset
03:AudioReset
Acknowledgement
[k][][SetID][][OK/NG][Data][x]
39. DPM Select (Command: f j)
TosettheDPM(DisplayPowerManagement)
function.
Transmission
[f][j][][SetID][][Data][x]
Data 00:DPMSelectOff
01:DPMSelectOn
Acknowledgement
[j][][SetID][][OK/NG][Data][x]
40. Temperature Value (Command: d n)
Toreadtheinsidetemperatureofthedisplay.
Transmission
[d][n][][SetID][][Data][Cr]
DataFF:Datashouldbe alwaysffinhexadecimal.
Acknowledgement
[n][][SetID][][OK/NG][Data][x]

69
ENG
ENGLISH
CONTROLLING THE MULTIPLE PRODUCT
41. Remote Controller Lock/ Key Lock
(Command: k m)
Tolocktheremotecontrolandthefrontpanelcontrol
keysonthedisplay.
Transmission
[k][m][][SetID][][Data][Cr]
Data 00:Lockoff
01:Lockon
*Ifyouareintendednottousetheremotecontroller
andfrontpanelcontrolkeysonthedisplayforkindof
reasons,usethismode.RemotecontrollerLock/Key
Lockwillbereleasedautomaticallyafterdisplayis
rebooted.
*Displaywillnotbeturnedonbypoweronkeyof
remotecontrollerandfrontpanelcontrolkeys,ifkey
islockedoninstandbymode.
Acknowledgement
[m][][SetID][][OK/NG][Data][x]
42. Key (Command: m c)
TosendIRremotecontrolcode.
Transmission
[m][c][][SetID][][Data][Cr]
Data IR_KEY_CODE
Acknowledgement
[c][][SetID][][OK][Data][x]
Whendisplayisinthestandbymode,displaywillturn
onbyPowerbuttonofremotecontrolonly.
43. OSD Select (Command: k l)
ToselectOSD(OnScreenDisplay)on/off
Transmission
[k][l][][SetID][][Data][Cr]
Data 00:OSDOff
01:OSDOn
Acknowledgement
[l][][SetID][][OK/NG][Data][x]
44. Elapsed time return (Command: d l)
Toreadthepanelusedtime.
Transmission
[d][l][][SetID][][Data][x]
Data FF:Datashouldbealwaysffinhexadecimal.
Acknowledgement
[l][][SetID][][OK/NG][Data][x]
*Returneddatameansusedhoursinhexadecimal.
45. Serial No.Check (Command: f y)
Toreadtheserialnumbers.
Transmission
[f][y][][SetID][][Data][Cr]
Data FF:Datashouldbealwaysffinhexadecimal.
Acknowledgement
[y][][SetID][][OK/NG][Data][x]
46. S/W Version (Command: f z)
Toreadthesoftwareversion.
Transmission
[f][z][][SetID][][Data][Cr]
Data FF:Datashouldbealwaysffinhexadecimal.
Acknowledgement
[z][][SetID][][OK/NG][Data][x]

70
ENG
ENGLISH
CONTROLLING THE MULTIPLE PRODUCT
47. White Balance Red Gain (Command: j m)
Toadjustwhitebalanceredgain.
Transmission
[j][m][][SetID][][Data][Cr]
Data 00toFE:Redgain0to254
Acknowledgement
[m][][SetID][][OK/NG][Data][x]
48. White Balance Green Gain (Command: j n)
Toadjustwhitebalancegreengain.
Transmission
[j][n][][SetID][][Data][Cr]
Data 00toFE:Greengain0to254
Acknowledgement
[n][][SetID][][OK/NG][Data][x]
49. White Balance Blue Gain (Command: j o)
Toadjustwhitebalancebluegain.
Transmission
[j][o][][SetID][][Data][Cr]
Data00toFE:Bluegain0to254
Acknowledgement
[o][][SetID][][OK/NG][Data][x]
50. Backlight (Command: m g)
Toadjustscreenbacklight.
Transmission
[m][g][][SetID][][Data][Cr]
Data 00to64:Backlight0to100
Acknowledgement
[g][][setID][][OK/NG][Data][x]

Make sure to read the Safety Precautions
before using the product.
Keep the Owner's Manual(CD) in an accessible
place for future reference.
The model and serial number of the SET is
located on the back and one side of the SET.
Record it below should you ever need service.
MODEL
SERIAL
TemporarynoiseisnormalwhenpoweringONor
OFFthisdevice.
As an ENERGY STAR Partner LGE U. S. A.,Inc. has
determined that this product meets the ENERGY
STAR guidelines for energy efficiency.
EN E RGY STAR is a set of pow e r-
saving guidelines issued by the U.S.
Environmental Protection Agency(EPA).
Declaration of Conformity
Trade Name: LG
Model: 38WR50MS
Responsible Party: LG Electronics Inc.
Address: 1000 Sylvan Ave.
Englewood Cliffs NJ 07632
U.S.A
TEL: 201-266-2534
To obtain the source code under GPL, LGPL,
MPL and other open source licenses, that is
contained in this product, please visit http://
opensource.lge.com.
In addition to the source code, all referred
license terms, warranty disclaimers and
copyright notices are available for download.
LG Electronics will also provide open source
code to you on CD-ROM for a charge covering
the cost of performing such distribution (such
as the cost of media, shipping and handling)
upon email request to opensource@lge.com.
This offer is valid for three (3) years from the
date on which you purchased the product.

P/NO : 3840TRL098E (0801-REV00)
www.lge.com