
Washing Machine
User manual
WW9*K5*****/WW8*K5*****/WW7*K5*****
Untitled-5 1 12/12/2017 12:41:43 PM

English2
Contents
Contents
Safety information 4
What you need to know about the safety instructions 4
Important safety symbols 4
Important safety precautions 5
Critical installation warnings 6
Installation cautions 8
Critical usage warnings 8
Usage cautions 10
Critical cleaning warnings 13
Installation 14
What’s included 14
Installation requirements 16
Step-by-step installation 18
Before you start 25
Initial settings 25
Laundry guidelines 25
Detergent drawer guidelines 28
Operations 32
Control panel 32
Simple steps to start 34
Cycle overview 35
Special features 38
Settings 40
Maintenance 41
Eco drum clean 41
Smart Check 42
Emergency drain 43
Cleaning 44
Recovery from freezing 48
Care against an extended time of disuse 48
Untitled-5 2 12/12/2017 12:41:44 PM
English4
Safety information
Congratulations on your new Samsung washing machine. This manual contains important
information on the installation, use and care of your appliance. Please take some time to
read this manual to take full advantage of your washing machine’s many benets and
features.
What you need to know about the safety instructions
Please read this manual thoroughly to ensure that you know how to safely and efciently
operate the extensive features and functions of your new appliance. Please store the
manual in a safe location close to the appliance for future reference. Use this appliance
only for its intended purpose as described in this instruction manual.
Warnings and Important Safety Instructions in this manual do not cover all possible
conditions and situations that may occur. It is your responsibility to use common sense,
caution and care when installing, maintaining and operating your washing machine.
Because the following operating instructions cover various models, the characteristics of
your washing machine may differ slightly from those described in this manual and not
all warning signs may be applicable. If you have any questions or concerns, contact your
nearest service centre or nd help and information online at www.samsung.com.
Important safety symbols
What the icons and signs in this user manual mean:
WARNING
Hazards or unsafe practices that may result in severe personal injury, death and/or
property damage.
CAUTION
Hazards or unsafe practices that may result in personal injury and/or property damage.
NOTE
Indicates that a risk of personal injury or material damage exists.
Safety information
Untitled-5 4 12/12/2017 12:41:44 PM

English 5
Safety information
These warning signs are here to prevent injury to yourself and others.
Please follow them explicitly.
After reading this manual, store it in a safe place for future reference.
Read all instructions before using the appliance.
As with any equipment that uses electricity and moving parts, potential hazards exist.
To safely operate this appliance, familiarize yourself with its operation and exercise care
when using it.
Important safety precautions
WARNING
To reduce the risk of re, electric shock, or injury to persons
when using your appliance, follow basic precautions, including the
following:
1. This appliance is not to be used by persons (including children)
with reduced physical, sensory or mental capabilities, or lack
of experience and knowledge, unless they have been given
supervision or instruction concerning use of the appliance by a
person responsible for their safety.
2. For use in Europe: This appliance can be used by children aged
from 8 years and above and persons with reduced physical,
sensory or mental capabilities or lack of experience and
knowledge if they have been given supervision or instruction
concerning use of the appliance in a safe way and understand
the hazards involved. Children shall not play with the appliance.
Cleaning and user maintenance shall not be made by children
without supervision.
3. Children should be supervised to ensure that they do not play with
the appliance.
Untitled-5 5 12/12/2017 12:41:44 PM

Safety information
English6
Safety information
4. If the supply cord is damaged, it must be replaced by the
manufacturer, its service agent or similarly qualied persons in
order to avoid a hazard.
5. The new hose-sets supplied with the appliance are to be used and
old hose-sets should not be reused.
6. For appliances with ventilation openings in the base, a carpet must
not obstruct the openings.
7. For use in Europe: Children of less than 3 years should be kept
away unless continuously supervised.
8. CAUTION: In order to avoid a hazard due to inadvertent resetting
of the thermal cut-out, this appliance must not be supplied through
an external switching device, such as a timer, or connected to a
circuit that is regularly switched on and off by the utility.
Critical installation warnings
WARNING
The installation of this appliance must be performed by a qualied technician or service
company.
• Failure to do so may result in electric shock, re, an explosion, problems with the
product, or injury.
The appliance is heavy, therefore take care when lifting it.
Plug the power cord into a wall socket that meets local electrical specications. Use the
socket for this appliance only, and do not use an extension cord.
• Sharing a wall socket with other appliances using a power strip or extending the power
cord may result in electric shock or re.
• Ensure that the power voltage, frequency, and current are the same as those of the
product specications. Failure to do so may result in electric shock or re. Plug the
power plug into the wall socket rmly.
Remove all foreign substances such as dust or water from the power plug terminals and
contact points using a dry cloth on a regular basis.
• Unplug the power plug and clean it with a dry cloth.
Untitled-5 6 12/12/2017 12:41:44 PM

English 7
Safety information
• Failure to do so may result in electric shock or re.
Plug the power plug into the wall socket so that the cord is running towards the oor.
• If you plug the power plug into the socket in the opposite direction, the electric wires
within the cable may be damaged and this may result in electric shock or re.
Keep all packaging materials out of the reach of children as these may be dangerous.
• If a child places a bag over its head, it may suffocate.
When the appliance, power plug or power cord is damaged, contact your nearest service
centre.
This appliance must be properly grounded.
Do not ground the appliance to a gas pipe, plastic water pipe, or telephone line.
• This may result in electric shock, re, an explosion, or problems with the product.
• Never plug the power cord into a socket that is not grounded correctly and make sure
that it is in accordance with local and national regulations.
Do not install this appliance near a heater or any inammable material.
Do not install this appliance in a humid, oily or dusty location, or in a location exposed to
direct sunlight or water (rain drops).
Do not install this appliance in a location exposed to low temperatures.
• Frost may cause the tubes to burst.
Do not install this appliance in a location where gas may leak.
• This may result in electric shock or re.
Do not use an electric transformer.
• This may result in electric shock or re.
Do not use a damaged power plug, damaged power cord, or loose wall socket.
• This may result in electric shock or re.
Do not pull or excessively bend the power cord.
Do not twist or tie the power cord.
Do not hook the power cord over a metal object, place a heavy object on the power cord,
insert the power cord between objects, or push the power cord into the space behind the
appliance.
• This may result in electric shock or re.
Do not pull the power cord when unplugging the power plug.
• Unplug the power plug by holding the plug.
• Failure to do so may result in electric shock or re.
Untitled-5 7 12/12/2017 12:41:44 PM

Safety information
English8
Safety information
This appliance should be positioned so that the power plug, the water supply taps, and the
drain pipes are accessible.
Installation cautions
CAUTION
This appliance should be positioned in such a way that the power plug is easily accessible.
• Failure to do so may result in electric shock or re due to electric leakage.
Install your appliance on a solid, level oor that can support its weight.
• Failure to do so may result in abnormal vibrations, movement, noise, or problems with
the product.
Critical usage warnings
WARNING
If the appliance is ooded, turn off the water & power supplies immediately and contact
your nearest service centre.
• Do not touch the power plug with wet hands.
• Failure to do so may result in electric shock.
If the appliance generates a strange noise, a burning smell, or smoke, unplug the power
plug immediately and contact your nearest service centre.
• Failure to do so may result in electric shock or re.
In the event of a gas leak (such as propane gas, LP gas, etc.), ventilate immediately
without touching the power plug. Do not touch the appliance or power cord.
• Do not use a ventilating fan.
• A spark may result in an explosion or re.
Do not let children play in or on the washing machine. In addition, when disposing of the
appliance, remove the washing machine door lever.
• If trapped inside the product, children may suffocate to death.
Make sure to remove the packaging (sponge, styrofoam) attached to the bottom of the
washing machine before using it.
Do not wash items contaminated with gasoline, kerosene, benzene, paint thinner, alcohol
or other inammable or explosive substances.
• This may result in electric shock, re, or an explosion.
Untitled-5 8 12/12/2017 12:41:44 PM

English 9
Safety information
Do not open the washing machine door by force while it is operating (high-temperature
washing/drying/spinning).
• Water owing out of the washing machine may result in burns or cause the oor to be
slippery. This may result in injury.
• Opening the door by force may result in damage to the product or injury.
Do not insert your hand under the washing machine while an operation is in progress.
• This may result in injury.
Do not touch the power plug with wet hands.
• This may result in electric shock.
Do not turn the appliance off by unplugging the power plug while an operation is in
progress.
• Plugging the power plug into the wall socket again may cause a spark and result in
electric shock or re.
Do not let children or the inrm use this washing machine without proper supervision. Do
not let children climb in or onto the appliance.
• This may result in electric shock, burns or injury.
Do not insert your hand or a metal object under the washing machine while it is operating.
• This may result in injury.
Do not unplug the appliance by pulling the power cord. Always grip the plug rmly and
pull it straight out of the outlet.
• Damage to the power cord may cause a short-circuit, re and/or electric shock.
Do not attempt to repair, disassemble, or modify the appliance yourself.
• Do not use a fuse (such as copper, steel wire, etc.) other than a standard fuse.
• When the appliance needs to be repaired or reinstalled, contact your nearest service
centre.
• Failure to do so may result in electric shock, re, problems with the product, or injury.
If the water supply hose comes loose from the water tap and oods the appliance, unplug
the power plug.
• Failure to do so may result in electric shock or re.
Unplug the power plug when the appliance is not being used for long periods of time or
during a thunder or lightning storm.
• Failure to do so may result in electric shock or re.
If any foreign substance enters into the appliance, unplug the power plug and contact
your nearest Samsung Customer Service.
• This may result in electric shock or re.
Untitled-5 9 12/12/2017 12:41:44 PM

Safety information
English10
Safety information
Do not let children (or pets) play in or on your washing machine. The washing machine
door does not open easily from the inside and children may be seriously injured if trapped
inside.
Usage cautions
CAUTION
When the washing machine is contaminated by a foreign substance such as detergent,
dirt, food waste, etc., unplug the power plug and clean the washing machine using a damp,
soft cloth.
• Failure to do so may result in discolouration, deformation, damage, or rust.
The front glass may be broken by a strong impact. Take care when using the washing
machine.
• If the glass is broken, it may result in injury.
After a water supply failure or when reconnecting the water supply hose, open the water
tap slowly.
Open the water tap slowly after a long period of non-use.
• The air pressure in the water supply hose or the water pipe may damage a product
part or result in a water leak.
If a draining error occurs during an operation, check if there is a draining problem.
• If the washing machine is used when it is ooded because of a draining problem, it
may result in electric shock or re.
Insert the laundry into the washing machine completely so that the laundry does not get
caught in the door.
• If laundry gets caught in the door, it may result in damage to the laundry or the
washing machine, or result in a water leak.
Turn the water supply off when the washing machine is not being used.
• Ensure that the screws on the water supply hose connector are properly tightened.
Ensure that the rubber seal and front door glass are not contaminated by a foreign
substance (e.g. waste, thread, hair, etc.).
• If a foreign substance is caught in the door or the door is not completely closed, it may
cause a water leak.
Open the water tap and check if the water supply hose connector is rmly tightened and
that there is no water leak before using the product.
Untitled-5 10 12/12/2017 12:41:44 PM

English 11
Safety information
• If the screws on the water supply hose connector are loose, it may result in a water
leak.
The product you have purchased is designed for domestic use only.
Using the product for business purposes qualies as a product misuse. In this case, the
product will not be covered by the standard warranty provided by Samsung and no
responsibility can be attributed to Samsung for malfunctions or damages resulting from
such misuse.
Do not stand on the appliance or place objects (such as laundry, lighted candles, lighted
cigarettes, dishes, chemicals, metal objects, etc.) on the appliance.
• This may result in electric shock, re, problems with the product, or injury.
Do not spray volatile material such as insecticide onto the surface of the appliance.
• As well as being harmful to humans, this may result in electric shock, re or problems
with the product.
Do not place objects that generate electromagnetic elds near the washing machine.
• This may result in injury due to a malfunction.
Water drained during a high-temperature wash or drying cycle is hot. Do not touch the
water.
• This may result in burns or injury.
If the water temperature is high before drain, it take time until the temperature goes
down, and it can be different depending on internal temperature.
Do not wash, spin, or dry water-proof seats, mats, or clothing (*) unless your appliance has
a special cycle for washing these items.
(*): Woollen bedding, rain covers, shing vests, ski pants, sleeping bags, diaper covers,
sweat suits, and bicycle, motor cycle and car covers, etc.
• Do not wash thick or hard mats even if the washing machine mark is on the care label.
This may result in injury or damage to the washing machine, walls, oor, or clothing
due to abnormal vibrations.
• Do not wash throw rugs or doormats with rubber backing. The rubber backing may
come off and stick to inside the drum, and this may result in malfunction such as a
drainage error.
Do not operate the washing machine when the detergent drawer is removed.
• This may result in electric shock or injury due to a water leak.
Do not touch the insides of the drum during or just after drying as it is hot.
• This may result in burns.
Untitled-5 11 12/12/2017 12:41:44 PM

Safety information
English12
Safety information
Do not insert your hand into the detergent drawer.
• This may result in injury as your hand may be caught by the detergent input device.
• The liquid detergent guide (applicable models only) is not used for powder detergent.
Remove the guide when using powder detergent.
Do not place any objects (such as shoes, food waste, animals) other than laundry into the
washing machine.
• This may result in damage to the washing machine, or injury and death in the case of
pets due to the abnormal vibrations.
Do not press the buttons using sharp objects such as pins, knifes, ngernails, etc.
• This may result in electric shock or injury.
Do not wash laundry contaminated by oils, creams or lotions usually found in skincare
shops or massage clinics.
• This may cause the rubber seal to become deformed and result in a water leak.
Do not leave metal objects such as safety pins, hair pins or bleach in the drum for long
periods of time.
• This may cause the drum to rust.
• If rust starts appearing on the surface of the drum, apply a (neutral) cleansing agent to
the surface and use a sponge to clean it. Never use a metal brush.
Do not use dry cleaning detergent directly and do not wash, rinse, or spin laundry
contaminated by dry cleaning detergent.
• This may result in spontaneous combustion or ignition due to the heat from the
oxidation of the oil.
Do not use water from water cooling/heating devices.
• This may result in problems with the washing machine.
Do not use natural hand-washing soap for the washing machine.
• If it hardens and accumulates inside the washing machine, it may result in problems
with the product, discolouration, rust, or bad odours.
Place socks and brassieres in a washing net and wash them with the other laundry.
Do not wash large laundry items such as bedding in the washing net.
• Failure to do so may result in injury due to abnormal vibrations.
Do not use hardened detergent.
• If it accumulates inside the washing machine, it may result in a water leak.
Make sure that the pockets of all the clothing items to be washed are empty.
Untitled-5 12 12/12/2017 12:41:45 PM

English 13
Safety information
• Hard, sharp objects such as coins, safety pins, nails, screws, or stones can cause
extensive damage to the appliance.
Do not wash clothing with large buckles, buttons or other heavy metal objects.
Sort the laundry by colour on the basis of its colorfastness and select the recommended
cycle, water temperature and additional functions.
• This may result in discolouration or fabric damage.
Take care that children’s ngers are not caught in the door when you close it.
• Failure to do so may result in injury.
Critical cleaning warnings
WARNING
Do not clean the appliance by spraying water directly onto it.
Do not use a strong acidic cleaning agent.
Do not use benzene, thinner or alcohol to clean the appliance.
• This may result in discolouration, deformation, damage, electric shock or re.
Before cleaning or performing maintenance, unplug the appliance from the wall socket.
• Failure to do so may result in electric shock or re.
Untitled-5 13 12/12/2017 12:41:45 PM
English14
Installation
Follow these instructions carefully to ensure proper installation of the washing machine
and to prevent accidents when doing laundry.
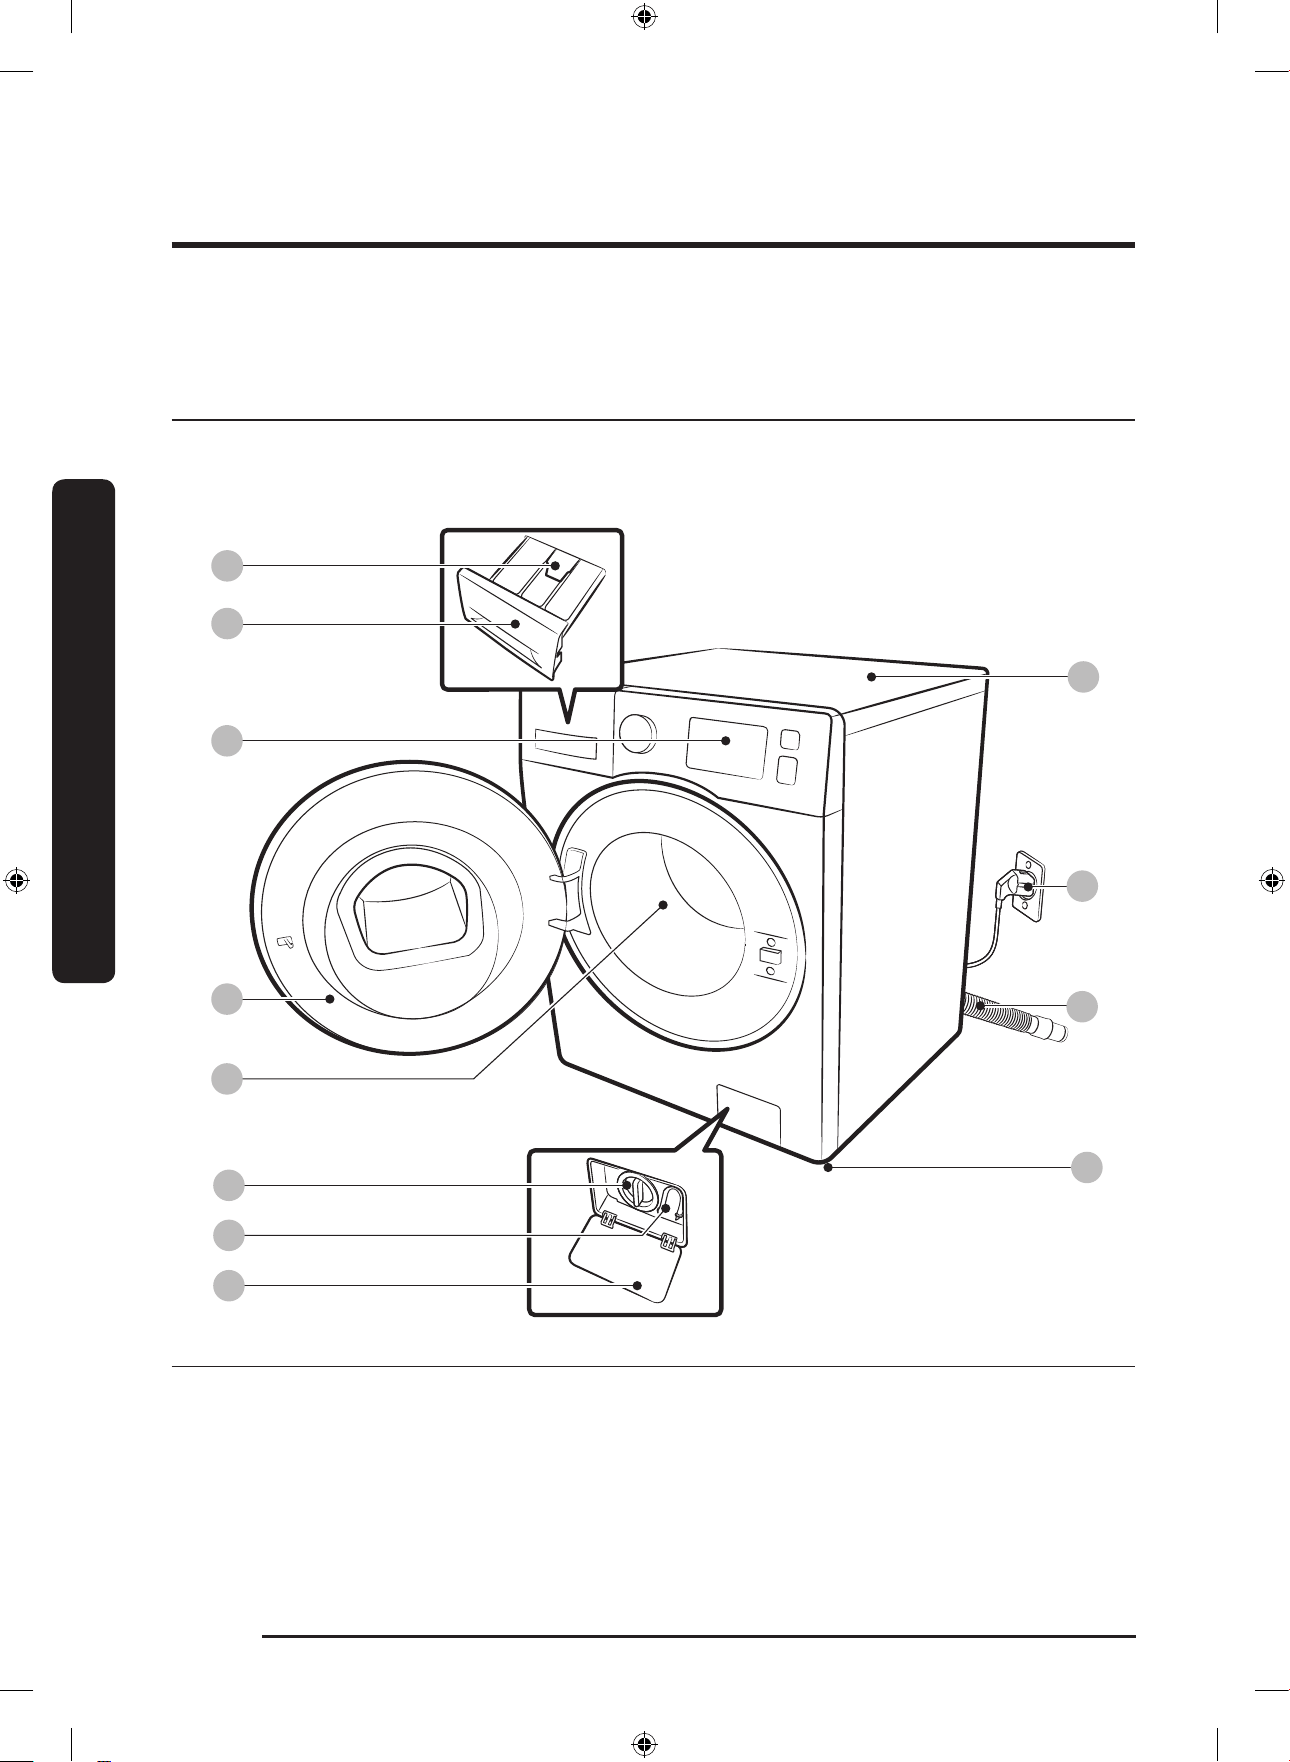
What’s included
Make sure all the parts are included in the product package. If you have a problem with
the washing machine or the parts, contact a local Samsung customer centre or the retailer.
06
08
07
01
02
03
04
05
12
09
10
11
01 Release lever 02 Detergent drawer 03 Control panel
04 Door 05 Drum 06 Pump lter
07 Emergency drain tube 08 Filter cover 09 Worktop
10 Power plug 11 Drain hose 12 Levelling feet
Installation
Untitled-5 14 12/12/2017 12:41:45 PM

English 15
Installation
Spanner Bolt caps Hose guide
Cold water hose Hot water hose Liquid detergent guide
NOTE
• Bolt caps: The provided number (3 to 6) of bolt caps depends on the model.
• Hot water hose: Applicable models only.
• Liquid detergent guide: Applicable models only.
Untitled-5 15 12/12/2017 12:41:46 PM
Installation
English16
Installation
Installation requirements
Electrical supply and grounding
• AC 220-240 V / 50 Hz fuse or circuit
breaker is required.
• Use an individual branch circuit specic
to the washing machine.
To ensure proper grounding, the washing
machine comes with a power cord
featuring a three-prong grounding plug for
use in a properly installed and grounded
outlet.
Check with a qualied electrician or
service person if you are not sure about
the grounding.
Do not modify the provided plug. If it does
not t the outlet, call a qualied electrician
to install a proper outlet.
WARNING
• Do NOT use an extension cord.
• Use only the power cord that comes
with the washing machine.
• Do NOT connect the ground wire to
plastic plumbing, gas lines, or hot water
pipes.
• Improperly connected grounding
conductors may cause electric shock.
Water supply
A proper water pressure for this washing
machine is between 50 kPa and 800 kPa.
Water pressure less than 50 kPa may
cause the water valve not to close
completely. Or, it may take longer to ll
the drum, causing the washing machine
to turn off. Water taps must be within
120 cm from the rear of the washing
machine so that the provided inlet hoses
reach the washing machine.
To reduce the risk of leaks:
• Make sure water taps are easily
accessible.
• Turn off the taps when the washing
machine is not in use.
• Check for any leaks at the water inlet
hose ttings on a regular basis.
CAUTION
Before using the washing machine for
the rst time, check all connections at the
water valve and taps for any leaks.
Drain
Samsung recommends a standpipe in
height of 60-90 cm. The drain hose must
be connected through the hose clip to the
standpipe, and the standpipe must fully
cover the drain hose.
Untitled-5 16 12/12/2017 12:41:46 PM
English 17
Installation
Flooring
For best performance, the washing
machine must be installed on a solid oor.
Wood oors may need to be reinforced
to minimize vibration and/or unbalanced
loads. Carpeting and soft tile surfaces are
not a good resistance to vibrations and
may cause the washing machine to move
slightly during the spin cycle.
CAUTION
Do NOT install the washing machine on a
platform or a poorly supported structure.
Water temperature
Do not install the washing machine in
areas where water may freeze as the
washing machine always retains some
water in its water valves, pumps, and/or
hoses. Frozen water left in the connection
parts may cause damage to belts, the
pump, and other components of the
washing machine.
Alcove installation
Minimum clearance for stable operation:
Sides 25 mm
Top 25 mm
Rear 50 mm
Front 550 mm
If both the washing machine and a dryer
are installed in the same location, the front
of the alcove must have at least a 550 mm
unobstructed air opening. Your washing
machine alone does not require a specic
air opening.
Untitled-5 17 12/12/2017 12:41:46 PM
Installation
English18
Installation
Step-by-step installation
STEP 1 Select a location
Location requirements:
• Solid, level surface without carpeting or ooring that may obstruct ventilation
• Away from direct sunlight
• Adequate room for ventilation and wiring
• The ambient temperature is always higher than the freezing point (0 °C)
• Away from a heat source
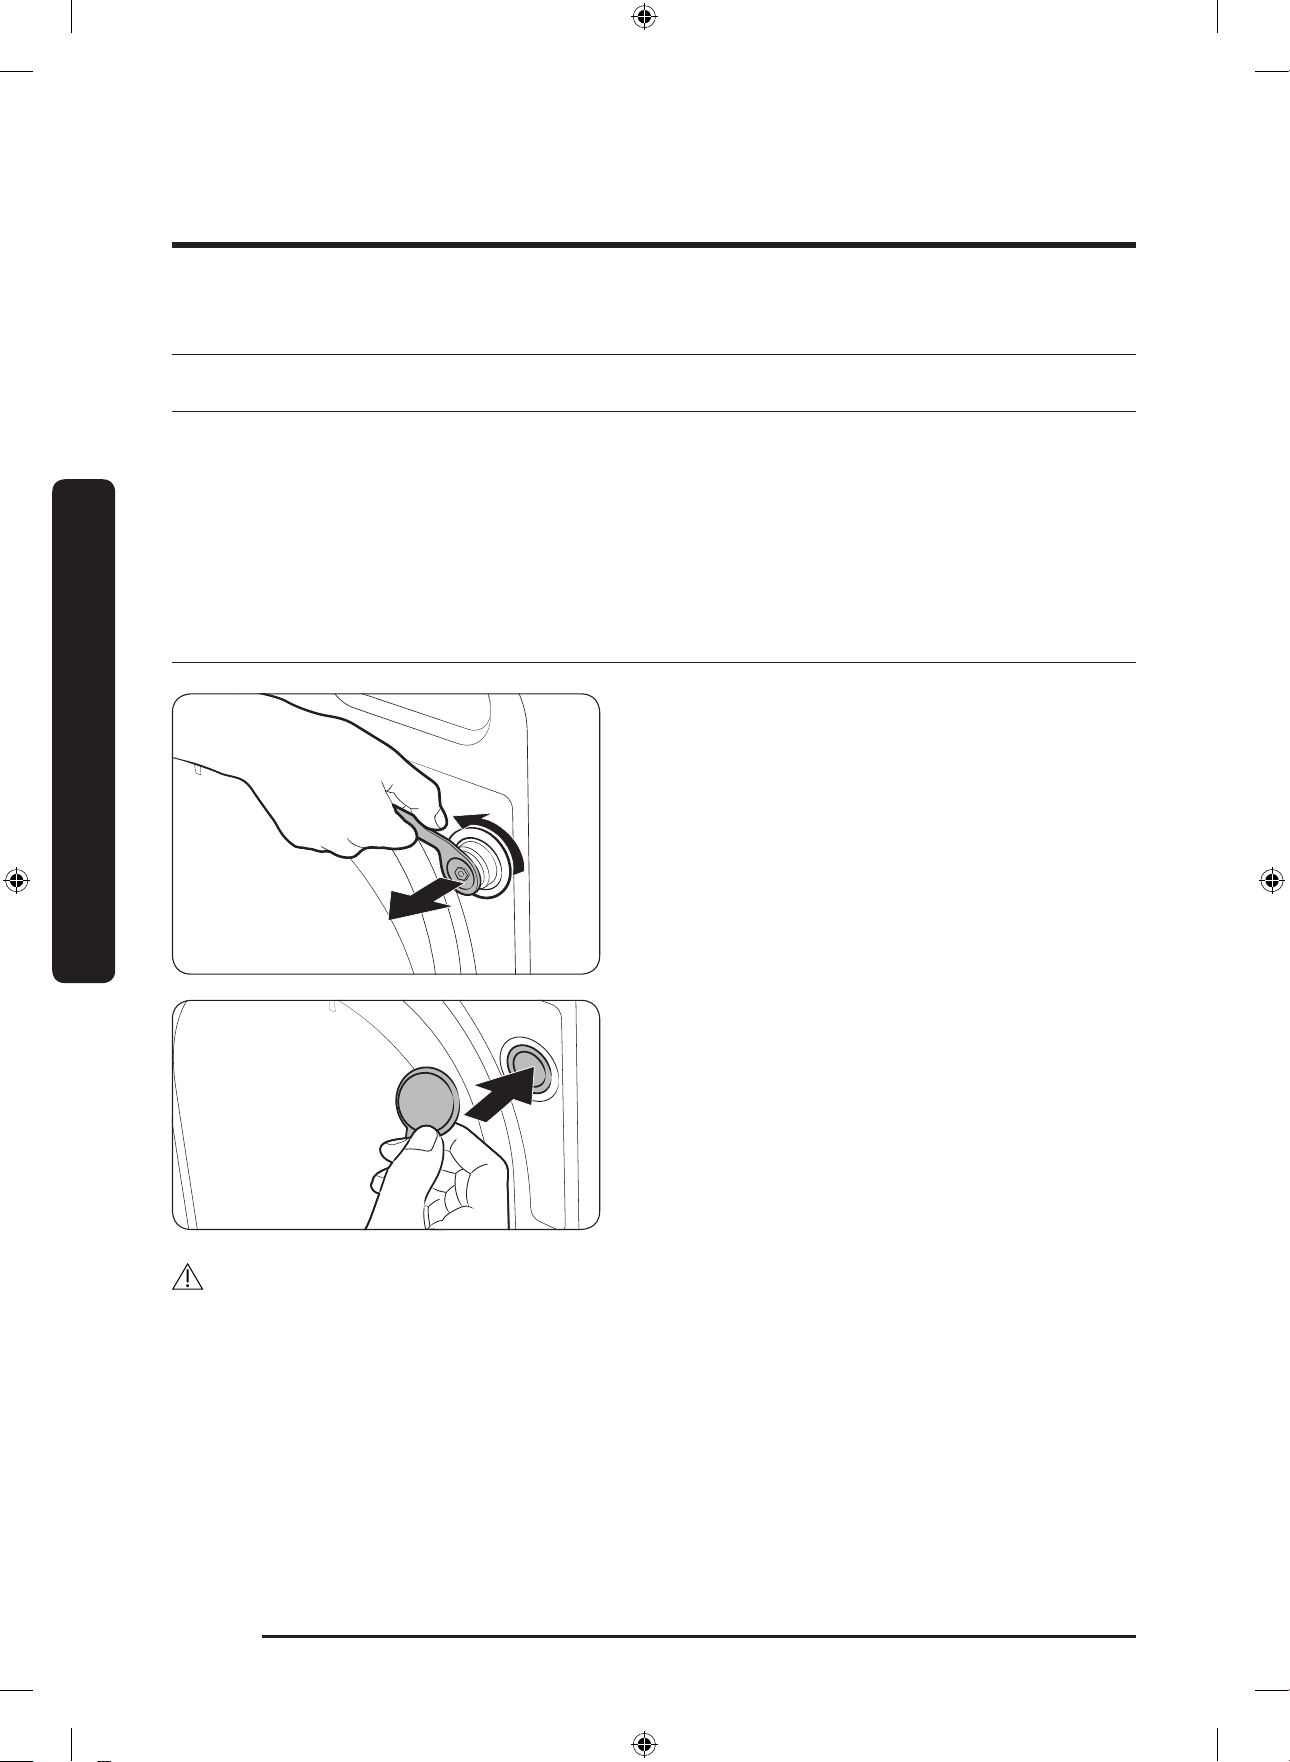
STEP 2 Remove the shipping bolts
Unpack the product package and remove
all shipping bolts.
1. Loosen all shipping bolts on the rear of
the machine using the supplied spanner.
2. Fill the holes with the supplied plastic
bolt caps.
Keep the shipping bolts for future use.
WARNING
Packaging materials can be dangerous to children. Dispose all packaging material (plastic
bags, polystyrene, etc.) out of children’s reach.
Untitled-5 18 12/12/2017 12:41:47 PM
English 19
Installation
STEP 3 Adjust the levelling feet
1. Gently slide the washing machine into
position. Excessive force may damage
the levelling feet.
2. Level the washing machine by manually
adjusting the levelling feet.
3. When levelling is complete, tighten the
nuts using the spanner.
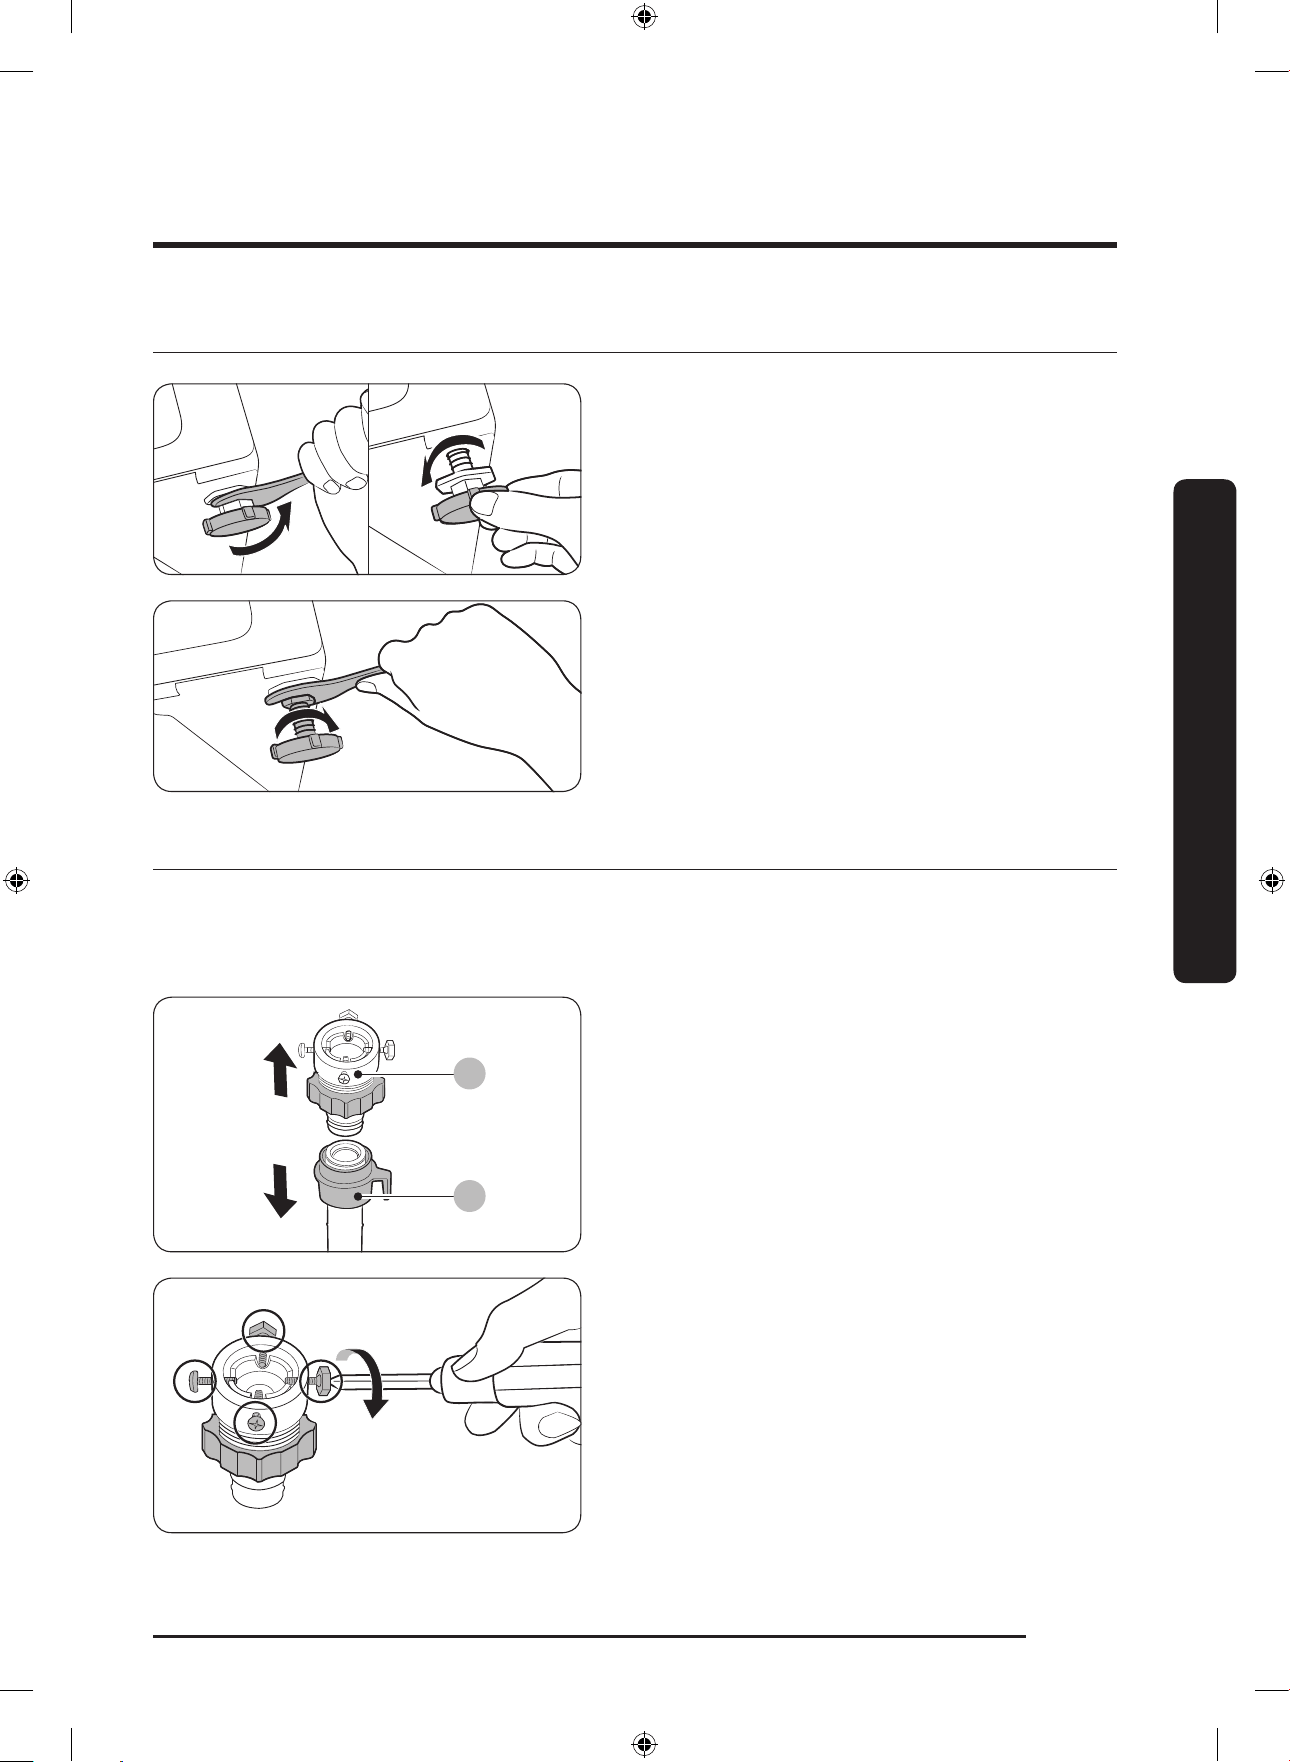
STEP 4 Connect the water hose
The provided hose adaptor may differ with the model. This step guides you through
connecting the connector-type adaptor. If you are provided with the screw-type adaptor,
go to 7.
A
B
Connect the water hose to the water tap.
1. Remove the adaptor (A) from the water
hose (B).
2. Use a Philips screwdriver to loosen four
screws on the adaptor.
Untitled-5 19 12/12/2017 12:41:47 PM
Installation
English20
Installation
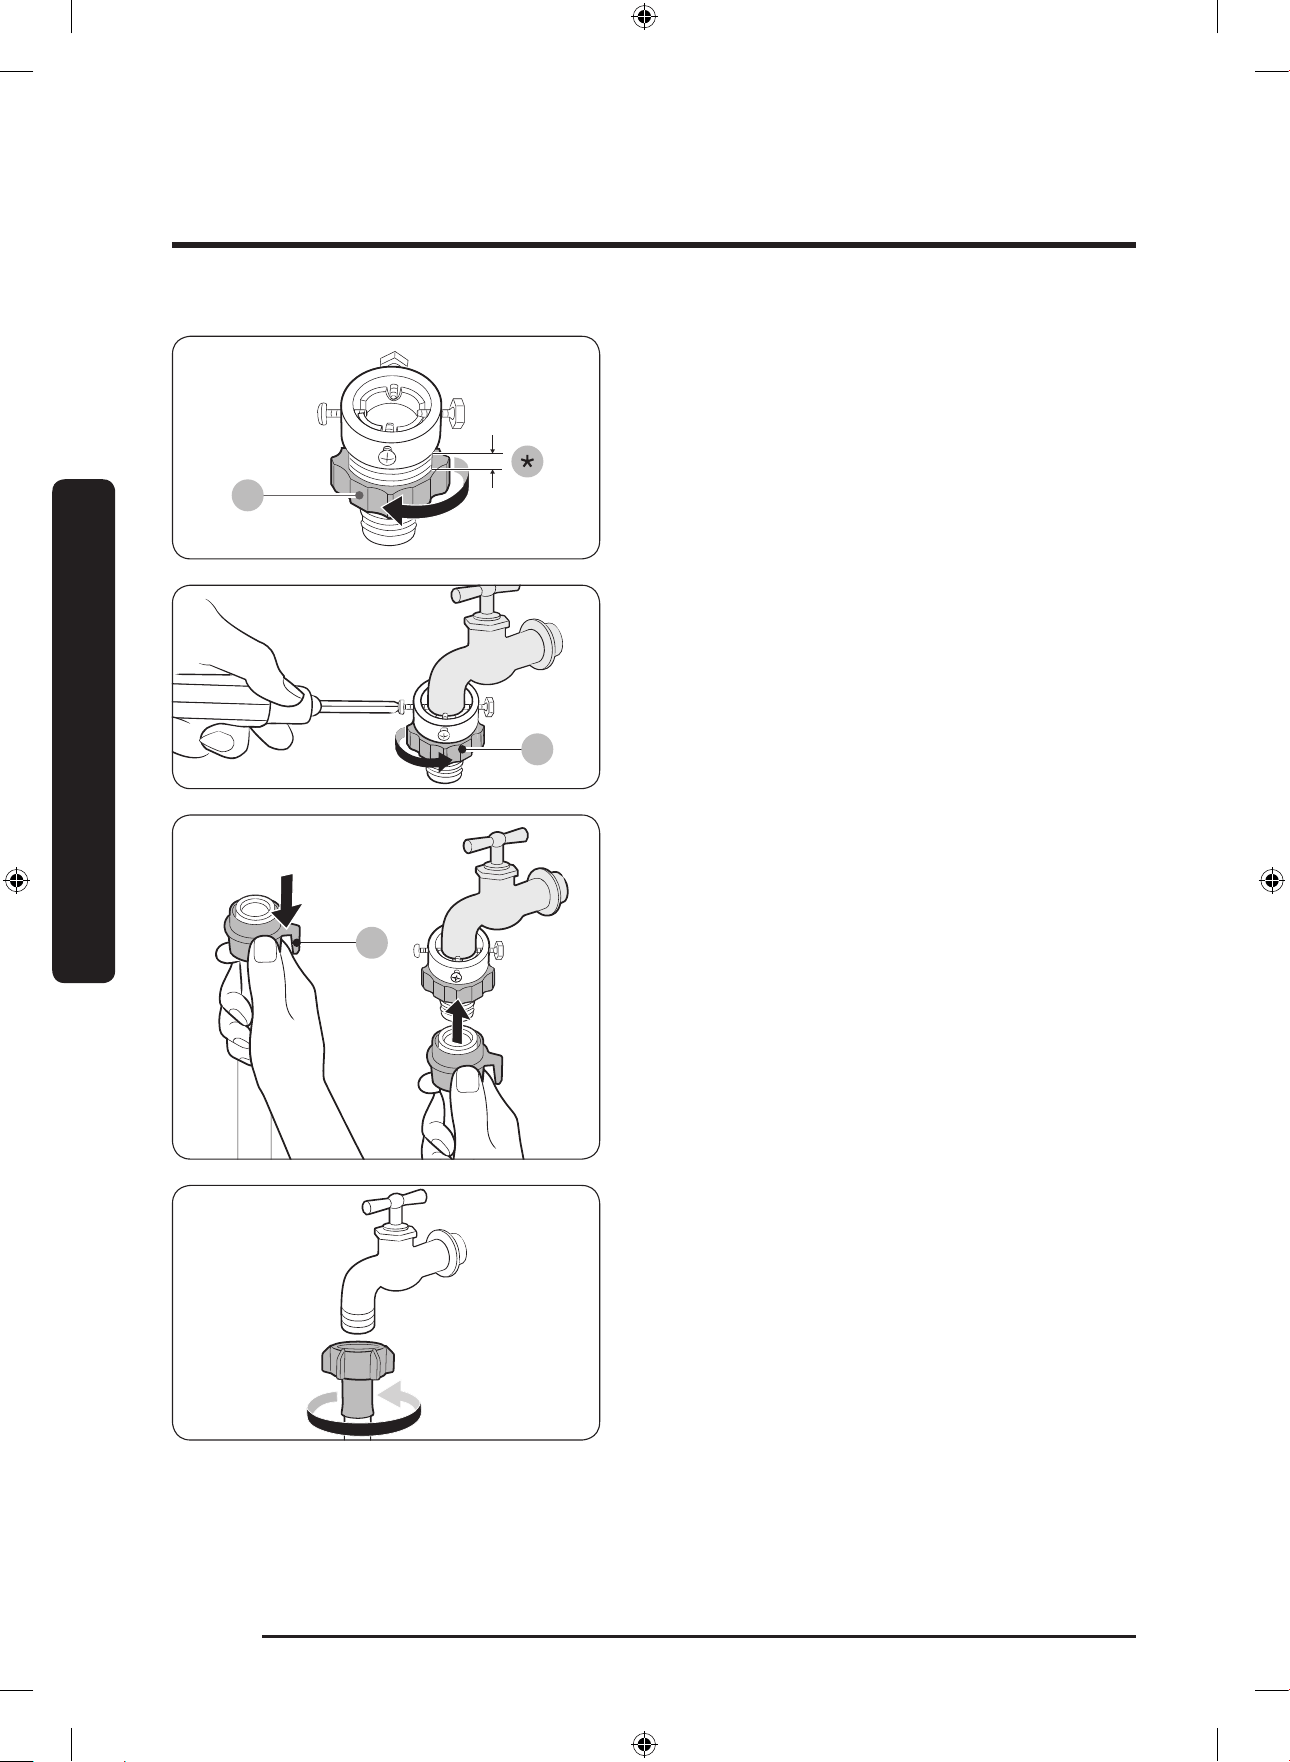
C
3. Hold the adaptor and turn part (C) in
the arrow direction to loosen it by
5 mm (*).
C
4. Insert the adaptor into the water tap,
and tighten the screws while lifting up
the adaptor.
5. Turn part (C) in the arrow direction to
tighten it.
D
6. While holding down part (D), connect
the water hose to the adaptor. Then,
release part (D). The hose ts into the
adaptor with a clicking sound.
7. If you are using a screw type of water
tap, use the provided screw-type
adaptor to connect to the water tap as
shown.
Untitled-5 20 12/12/2017 12:41:48 PM
English 21
Installation
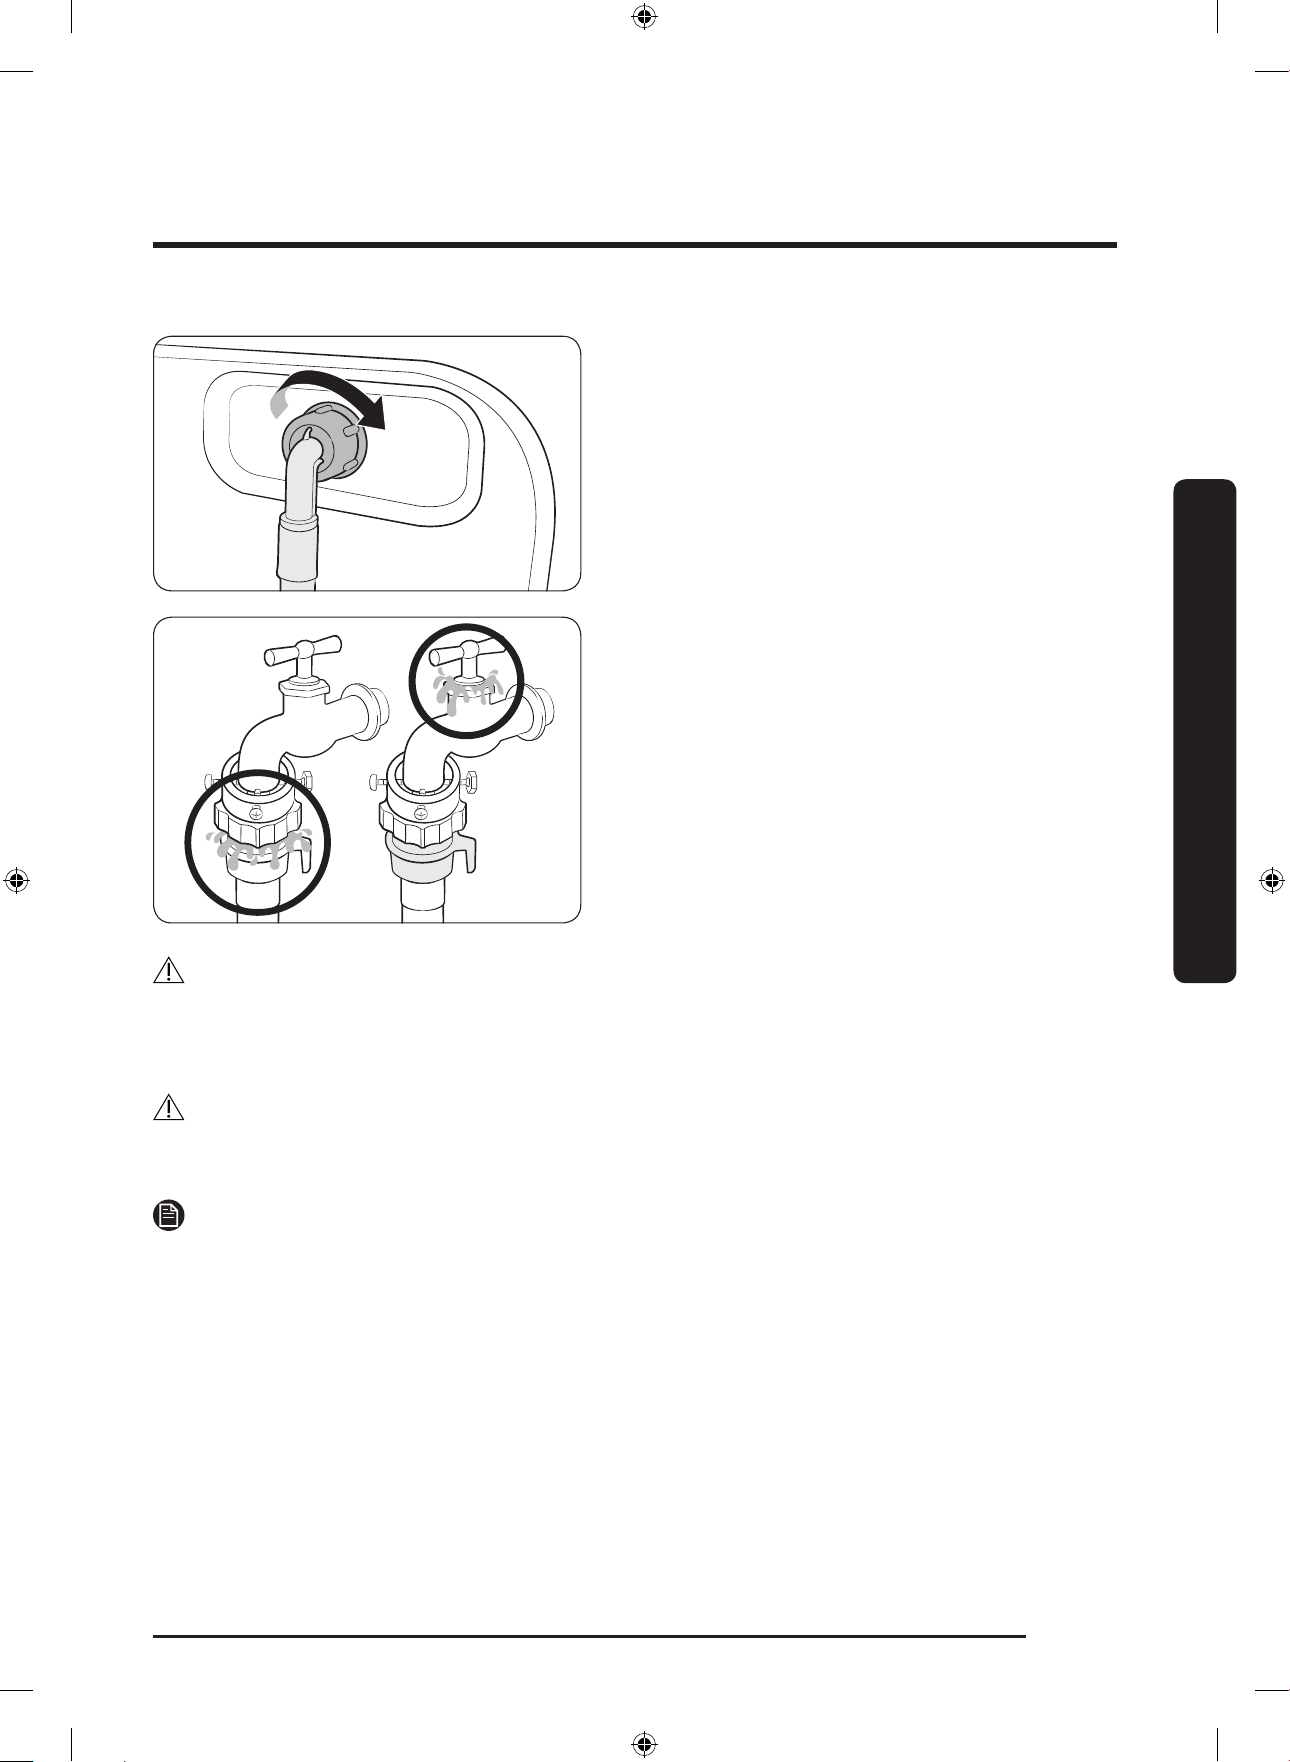
8. Connect the other end of the water
hose to the inlet valve on the back of
the washing machine. Turn the hose
clockwise to tighten.
9. Open the water tap and check if there
are any leaks around the connection
areas. If there are water leaks, repeat
the steps above.
WARNING
If there is a water leak, stop operating the washing machine and disconnect from the
electrical supply. Then, contact a local Samsung service centre. Otherwise, this may cause
electric shock.
CAUTION
Do not stretch the water hose by force. If the hose is too short, replace the hose with a
longer, high-pressure hose.
NOTE
• After connecting the water hose to the adaptor, check if it is connected properly by
pulling the water hose downwards.
• Use a popular type of water taps. If the tap is square-shaped or too big, remove the
spacer ring before inserting the tap into the adaptor.
Untitled-5 21 12/12/2017 12:41:48 PM

Installation
English22
Installation
For models with an additional hot water inlet:
1. Connect the red end of the hot water
hose to the hot water inlet on the back
of the machine.
2. Connect the other end of the hot water
hose to the hot water tap.
Aqua stop hose (applicable models only)
A
The aqua stop hose alerts users of a risk
of water leaks. It senses the water ow
and turns red on the centre indicator (A) in
case of a leak.
NOTE
The end of the aqua stop hose must be tted to the water tap and not the machine.
Untitled-5 22 12/12/2017 12:41:49 PM
English 23
Installation
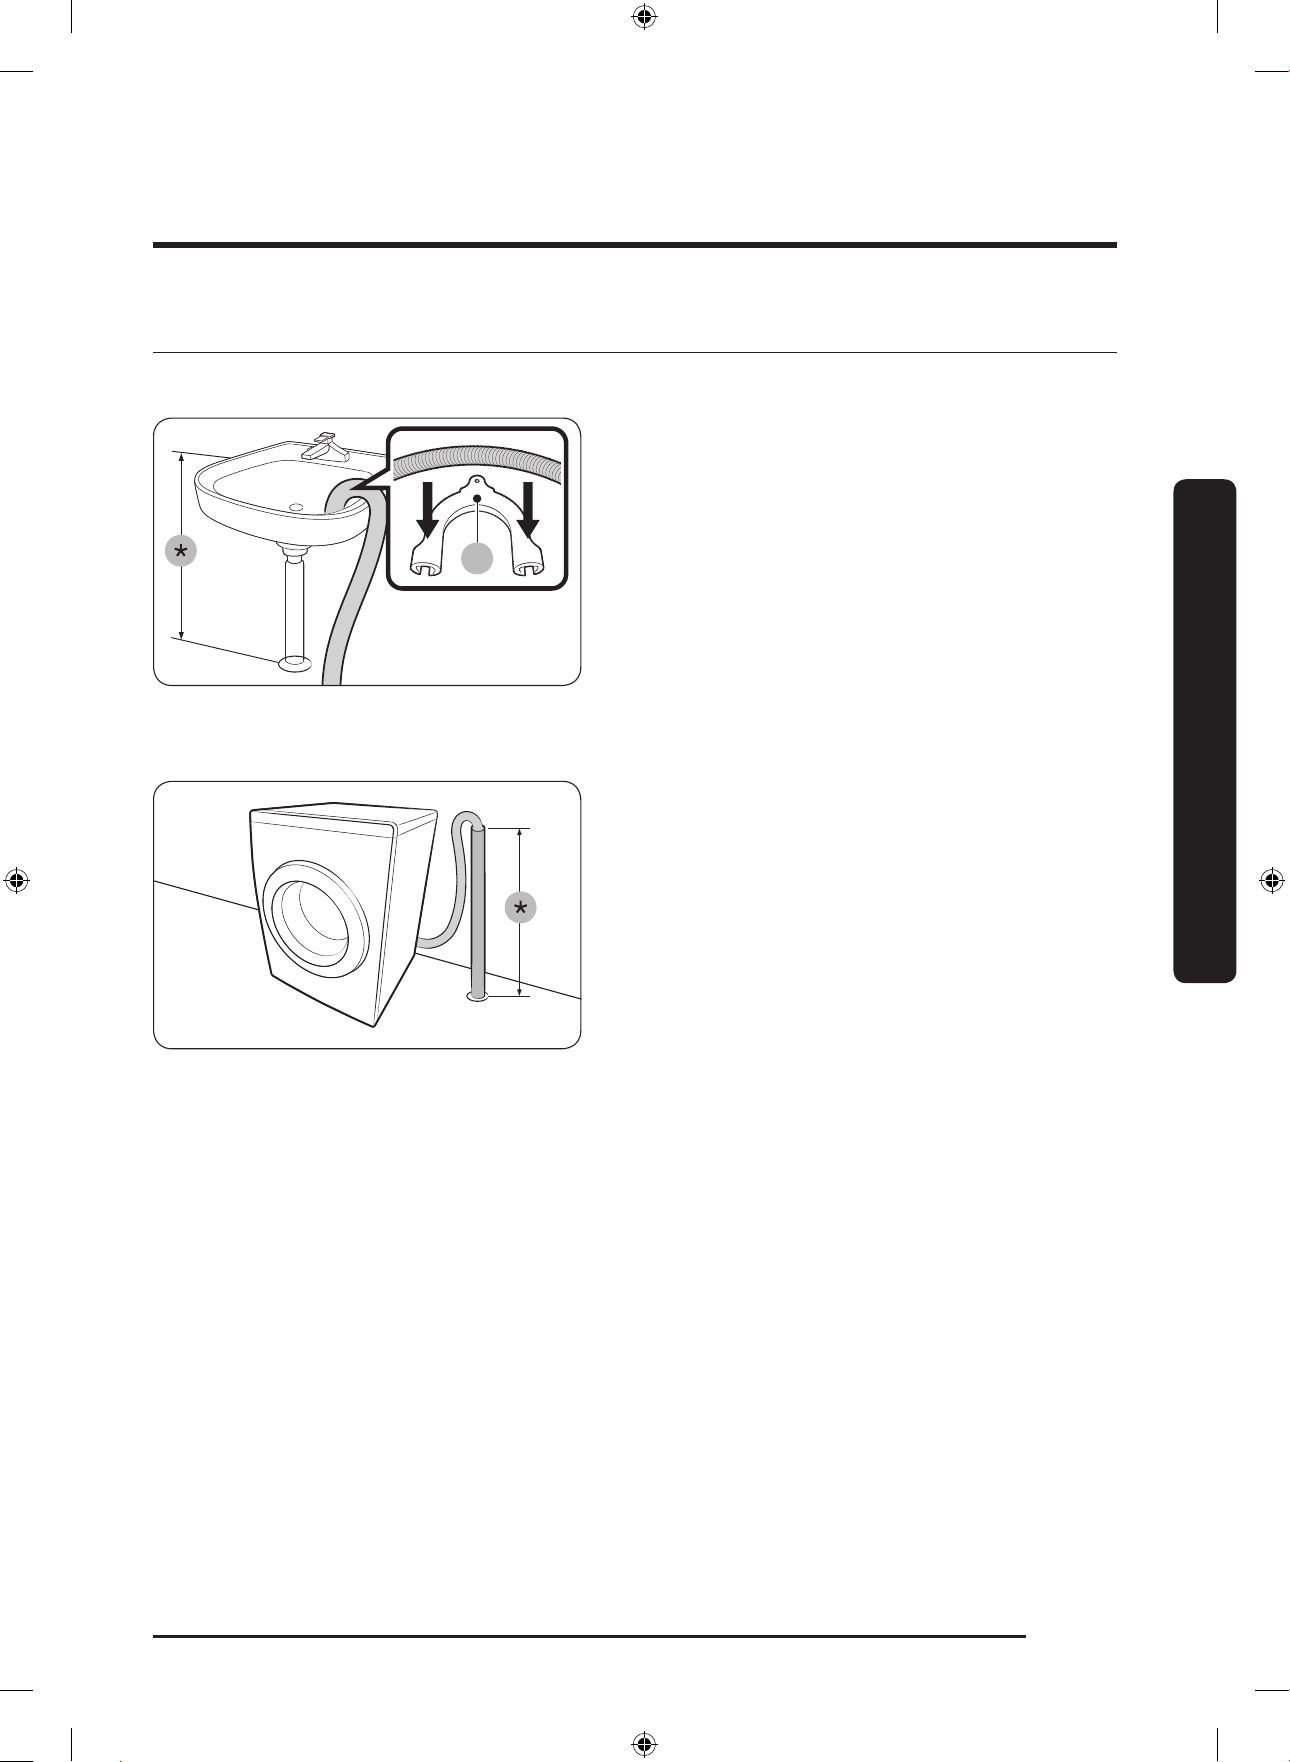
STEP 5 Position the drain hose
The drain hose can be positioned in three ways:
A
Over the edge of a wash basin
The drain hose must be placed at a height
of between 60 cm and 90 cm (*) from the
oor. To keep the spout of the drain hose
bent, use the supplied plastic hose guide
(A). Secure the guide to the wall using a
hook to ensure stable drainage.
ln a sink drain pipe
The drain pipe must be above the sink
siphon so that the end of the hose is at
least 60 cm above the oor.
ln a drain pipe
The drain pipe should be between 60 cm
and 90 cm high (*). It is advisable to use
a 65 cm high vertical pipe. Make sure the
drain hose is connected to the stand pipe
at a slant.
Drain standpipe requirements:
• Minimum diameter of 5 cm
• Minimum carry-away capacity of
60 litres per minute
Untitled-5 23 12/12/2017 12:41:49 PM

Installation
English24
Installation
CAUTION
Do not put the drain hose in places of
stagnant water or ponding. The water may
ow back to the washing machine.
STEP 6 Power on
Plug the power cord into a wall socket featuring an AC 220-240 V / 50 Hz approved
electrical outlet protected by a fuse or circuit breaker. Then, press Power to turn on the
washing machine.
Untitled-5 24 12/12/2017 12:41:49 PM
English 25
Before you start
Initial settings
Run Calibration (recommended)
Calibration ensures accurate weight detection by the washing machine. Make sure the
drum is empty before running Calibration.
1. Power off, and then power on the washing machine.
2. Hold down Temp. and Delay End simultaneously for 3 seconds to enter
Calibration mode. The “Cb” message appears.
3. Press Start/Pause to run the Calibration cycle.
4. The drum will rotate for about 3 minutes. (The direction of the drum rotation may
differ depending on the model.)
5. When the cycle is complete, “0” appears on the display and the washing machine will
turn off automatically.
6. The washing machine is now ready for use.
Laundry guidelines
STEP 1 Sort
Sort the laundry according to these criteria:
• Care Label: Sort the laundry into cottons, mixed bres, synthetics, silks, wools, and
rayon.
• Colour: Separate whites from colours.
• Size: Mixing different sized items together in the drum improves the washing
performance.
• Sensitivity: Wash delicate items separately for pure, new woollen items, curtains, and
silk items. Check the labels on the items.
NOTE
Make sure to check the care label on the clothing, and sort them accordingly before
starting the wash.
Before you start
Untitled-5 25 12/12/2017 12:41:50 PM
Before you start
English26
Before you start
STEP 2 Empty pockets
Empty all the pockets of your laundry items
• Metal objects such as coins, pins, and buckles on clothing may damage other laundry
items as well as the drum.
Turn clothing with buttons and embroideries inside out
• If trousers or jacket zippers are open while washing, the drum may be damaged.
Zippers should be closed and xed with a string.
• Clothing with long strings may become entangled with other clothes. Make sure to tie
the strings before starting the wash.
STEP 3 Use a laundry net
• Brassieres (machine washable) must be placed in a laundry net. Metal parts of the
brassieres may break through and tear other laundry items.
• Small, light clothing such as socks, gloves, stockings, and handkerchiefs may become
caught around the door. Place them inside a ne laundry net.
• Do not wash the laundry net by itself without other laundry. This may cause abnormal
vibrations that could move the washing machine and result in injury.
STEP 4 Prewash (if necessary)
Select the Prewash option for the selected cycle if the laundry is heavily soiled. When
selecting the Prewash option, make sure to put powder-type detergent into the main wash
compartment.
STEP 5 Determine the load capacity
Do not overload the washing machine. Overloading may cause the washing machine to
not wash properly. For the load capacity for the type of clothing, see page 35.
NOTE
When washing bedding or bedding covers, the wash time may be lengthened or the spin
efciency may be reduced. For bedding or bedding covers, the recommended maximum
spin cycle speed is 800 rpm, and the load capacity is 2.0 kg or less.
CAUTION
If the laundry is unbalanced and the “Ub” information code is displayed, redistribute the
load. Unbalanced laundry may reduce the spinning performance.
Untitled-5 26 12/12/2017 12:41:50 PM
English 27
Before you start
STEP 6 Apply a proper detergent type
The type of detergent depends on the type of fabric (cotton, synthetic, delicate items,
wool), colour, wash temperature, and degree of soiling. Make sure to use the laundry
detergent that is designed for automatic washing machines.
NOTE
• Follow the detergent manufacturer’s recommendations based on the weight of the
laundry, the degree of soiling, and the hardness of the water in your local area. If you
are not sure about the water hardness, contact a local water authority.
• Do not use detergent that tends to be hardened or solidied. This detergent may
remain after the rinse cycle, blocking the drain outlet.
CAUTION
When washing wool using the WOOL cycle, use only a neutral liquid detergent. If used
with the WOOL cycle, powder detergent may remain on the laundry and discolour the
laundry.
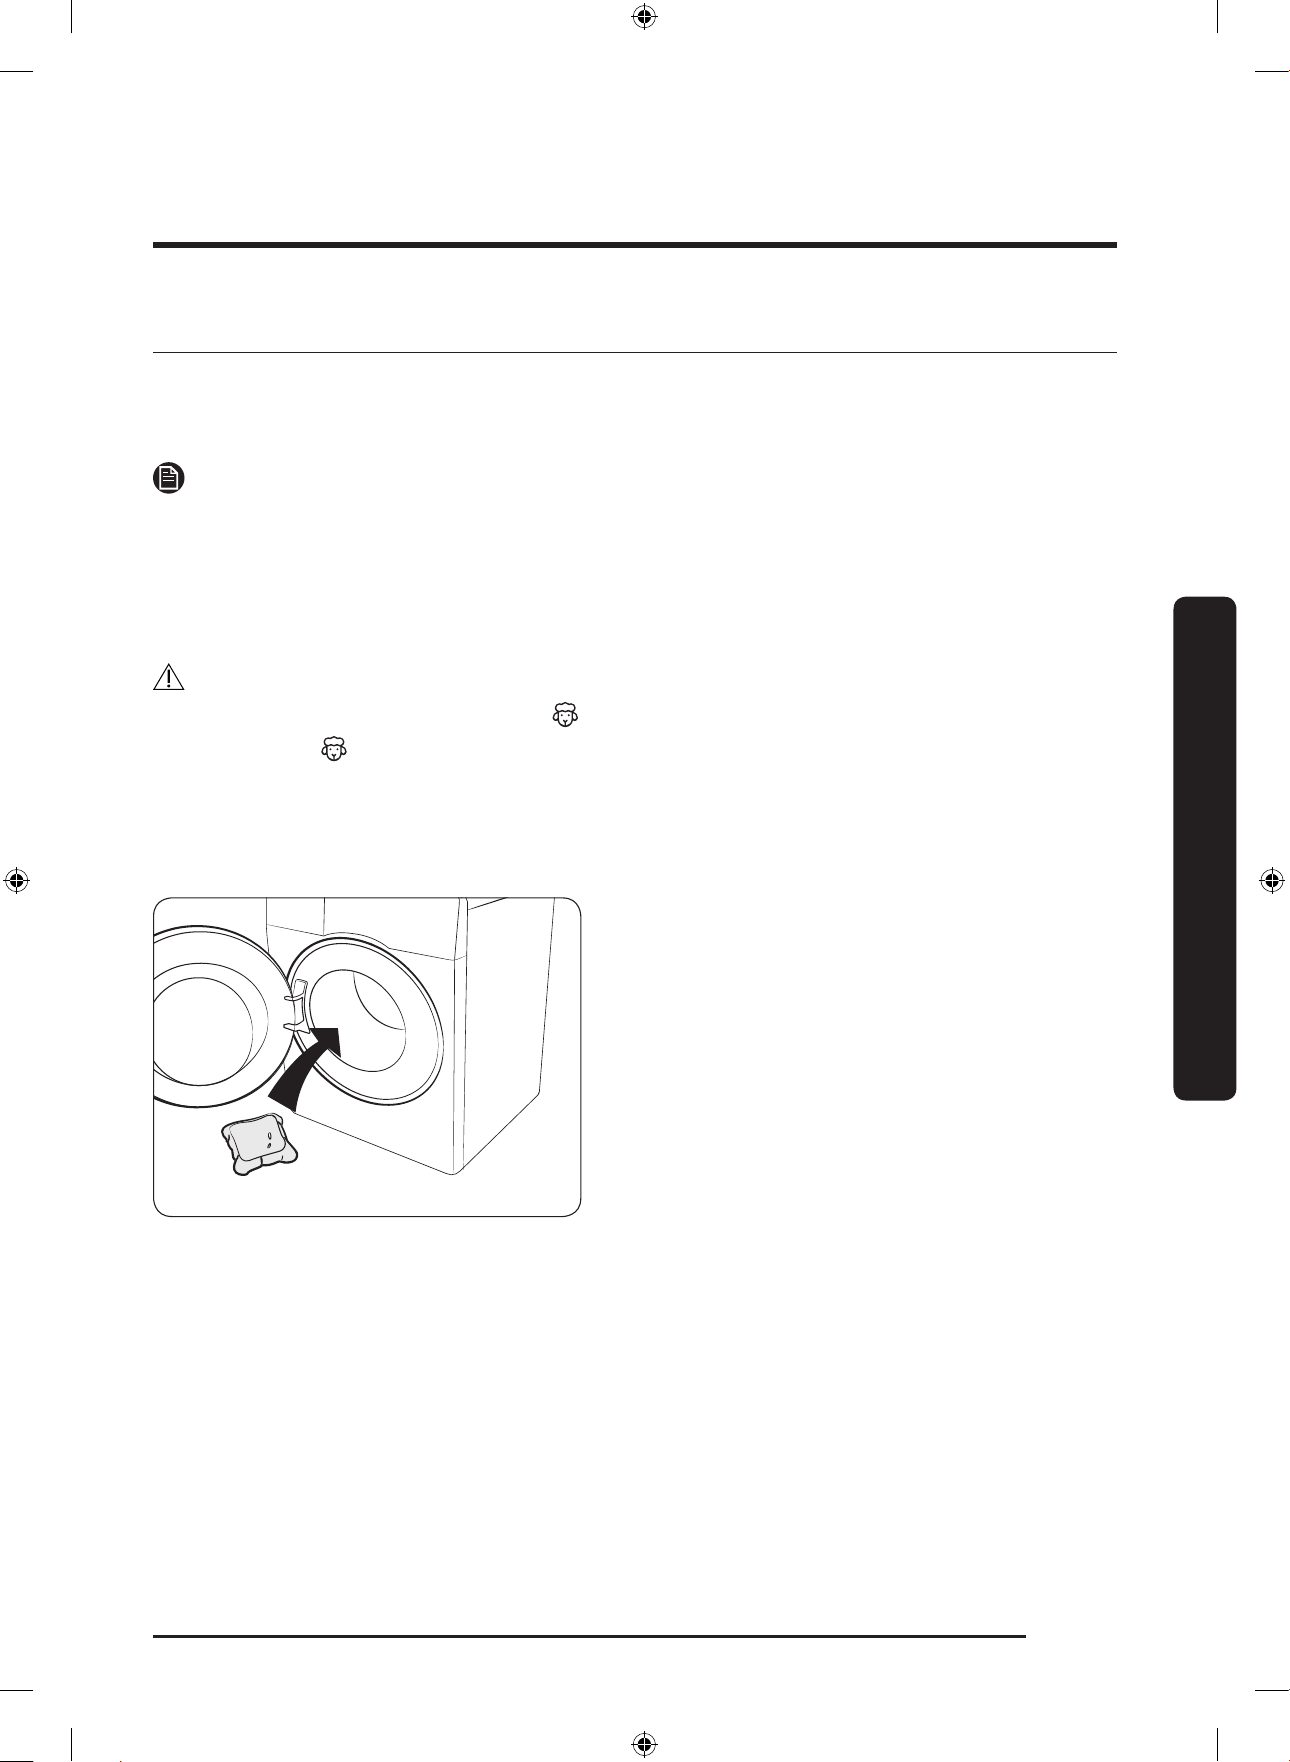
Laundry capsules
To get the best results from using laundry capsules, please follow these instructions.
1. Put the capsule in the bottom of the
empty drum towards the rear.
Untitled-5 27 12/12/2017 12:41:50 PM

Before you start
English28
Before you start
2. Put the laundry in the drum on top of
the capsule.
CAUTION
For cycles using cold water or cycles that complete in less than one hour, it is
recommended to use a liquid detergent. Otherwise, the capsule may not dissolve
completely.
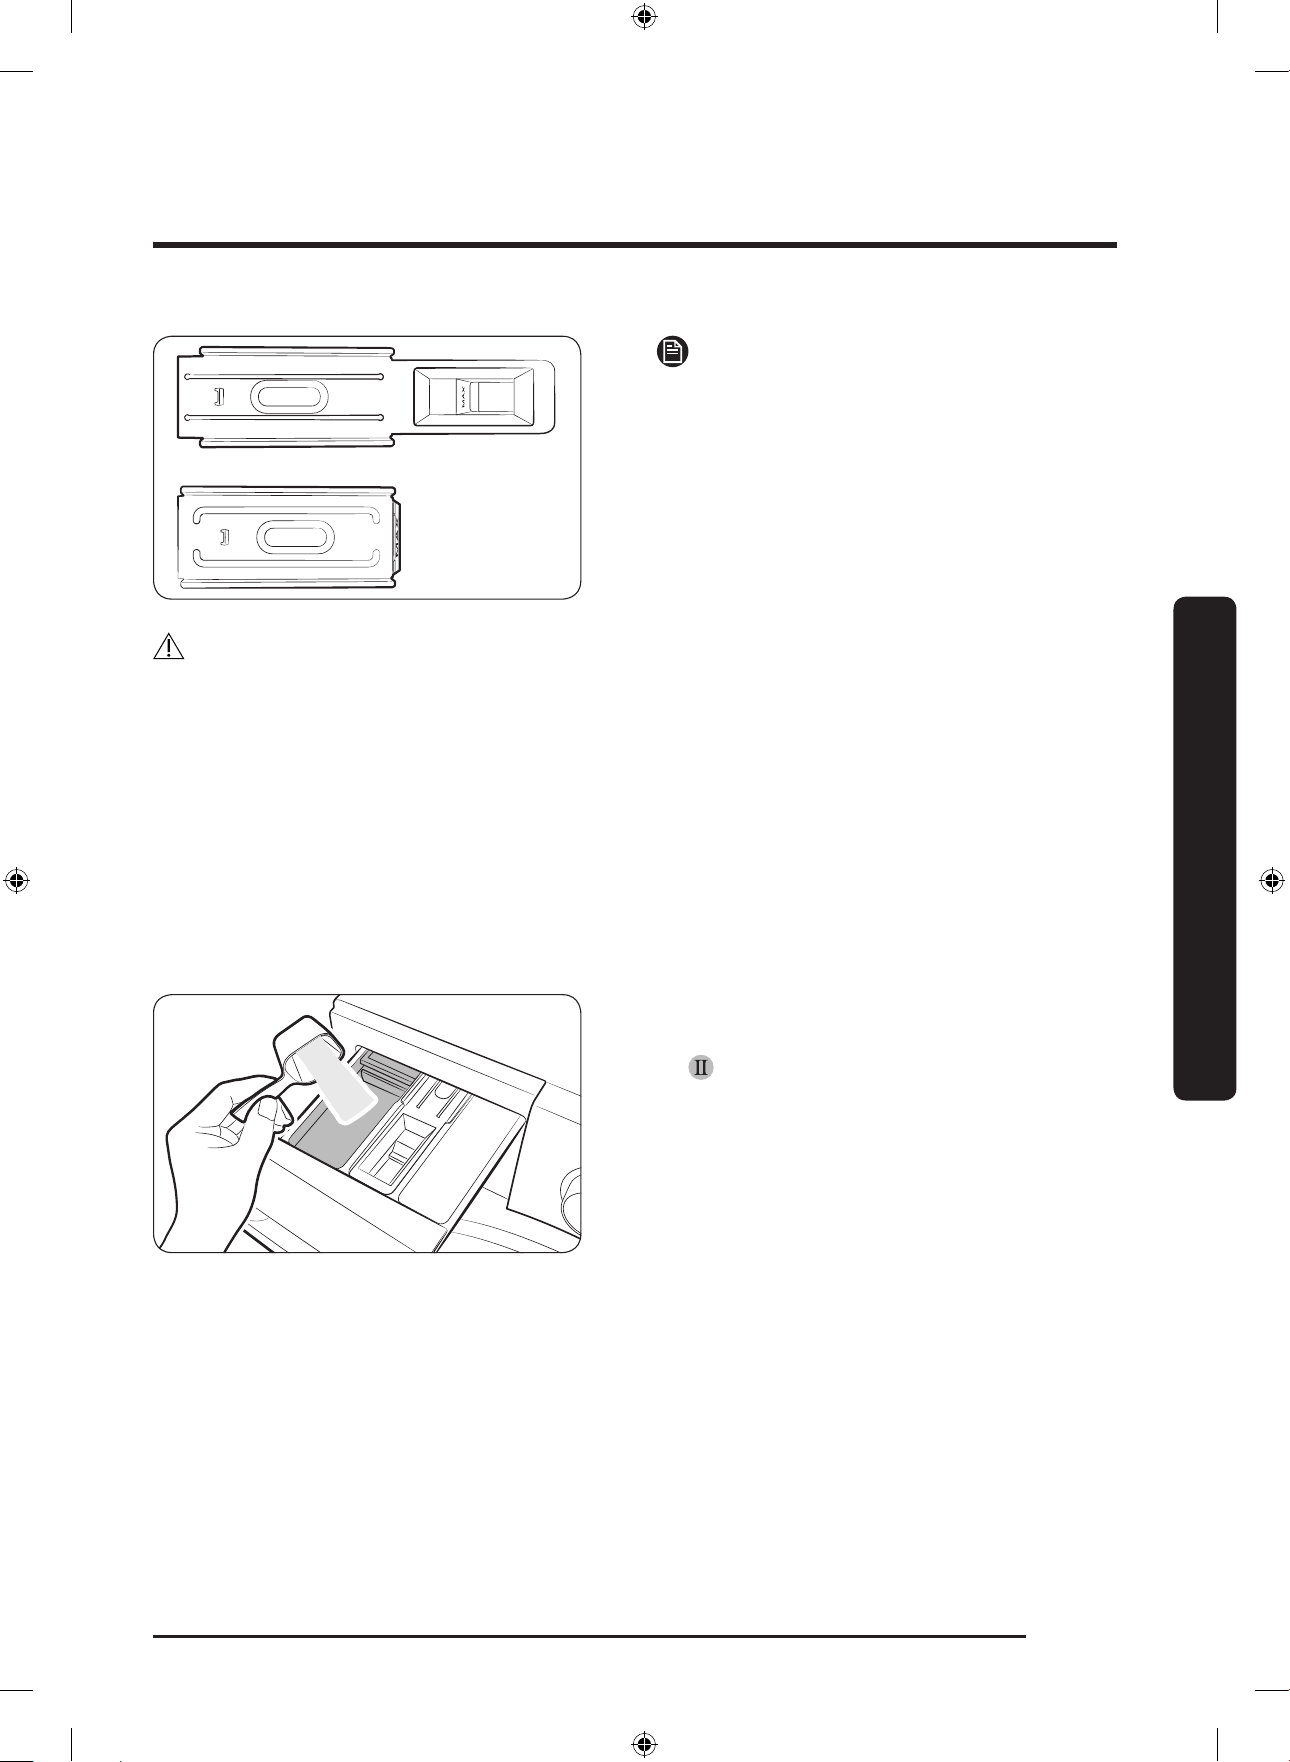
Detergent drawer guidelines
The washing machine provides a three-compartment dispenser: the left compartment for
the main wash, the front-right for fabric softeners, and the rear-right for the preliminary
wash.
A
1. Prewash compartment: Apply
prewash detergent.
2. Main-wash compartment: Apply
main-wash detergent, water softener,
soaking detergent, bleach, and/or stain
removers.
3. Softener compartment: Apply
additives such as fabric softener. Do not
exceed the max line (A).
Untitled-5 28 12/12/2017 12:41:51 PM
English 29
Before you start
NOTE
The actual appearance of the softener
guide may differ with the model.
CAUTION
• Do not open the detergent drawer while the washing machine is operating.
• Do not use the following types of detergent in the drawer:
- Tablet or capsule types
- Ball or net types
• To prevent the compartment from clogging, concentrated or highly-enriched agents
(fabric softener or detergent) must be diluted with water before being applied.
• When Delay End is selected, do not apply detergent directly into the drum. Otherwise,
this may discolour the laundry. Use the detergent drawer when Delay End is selected.
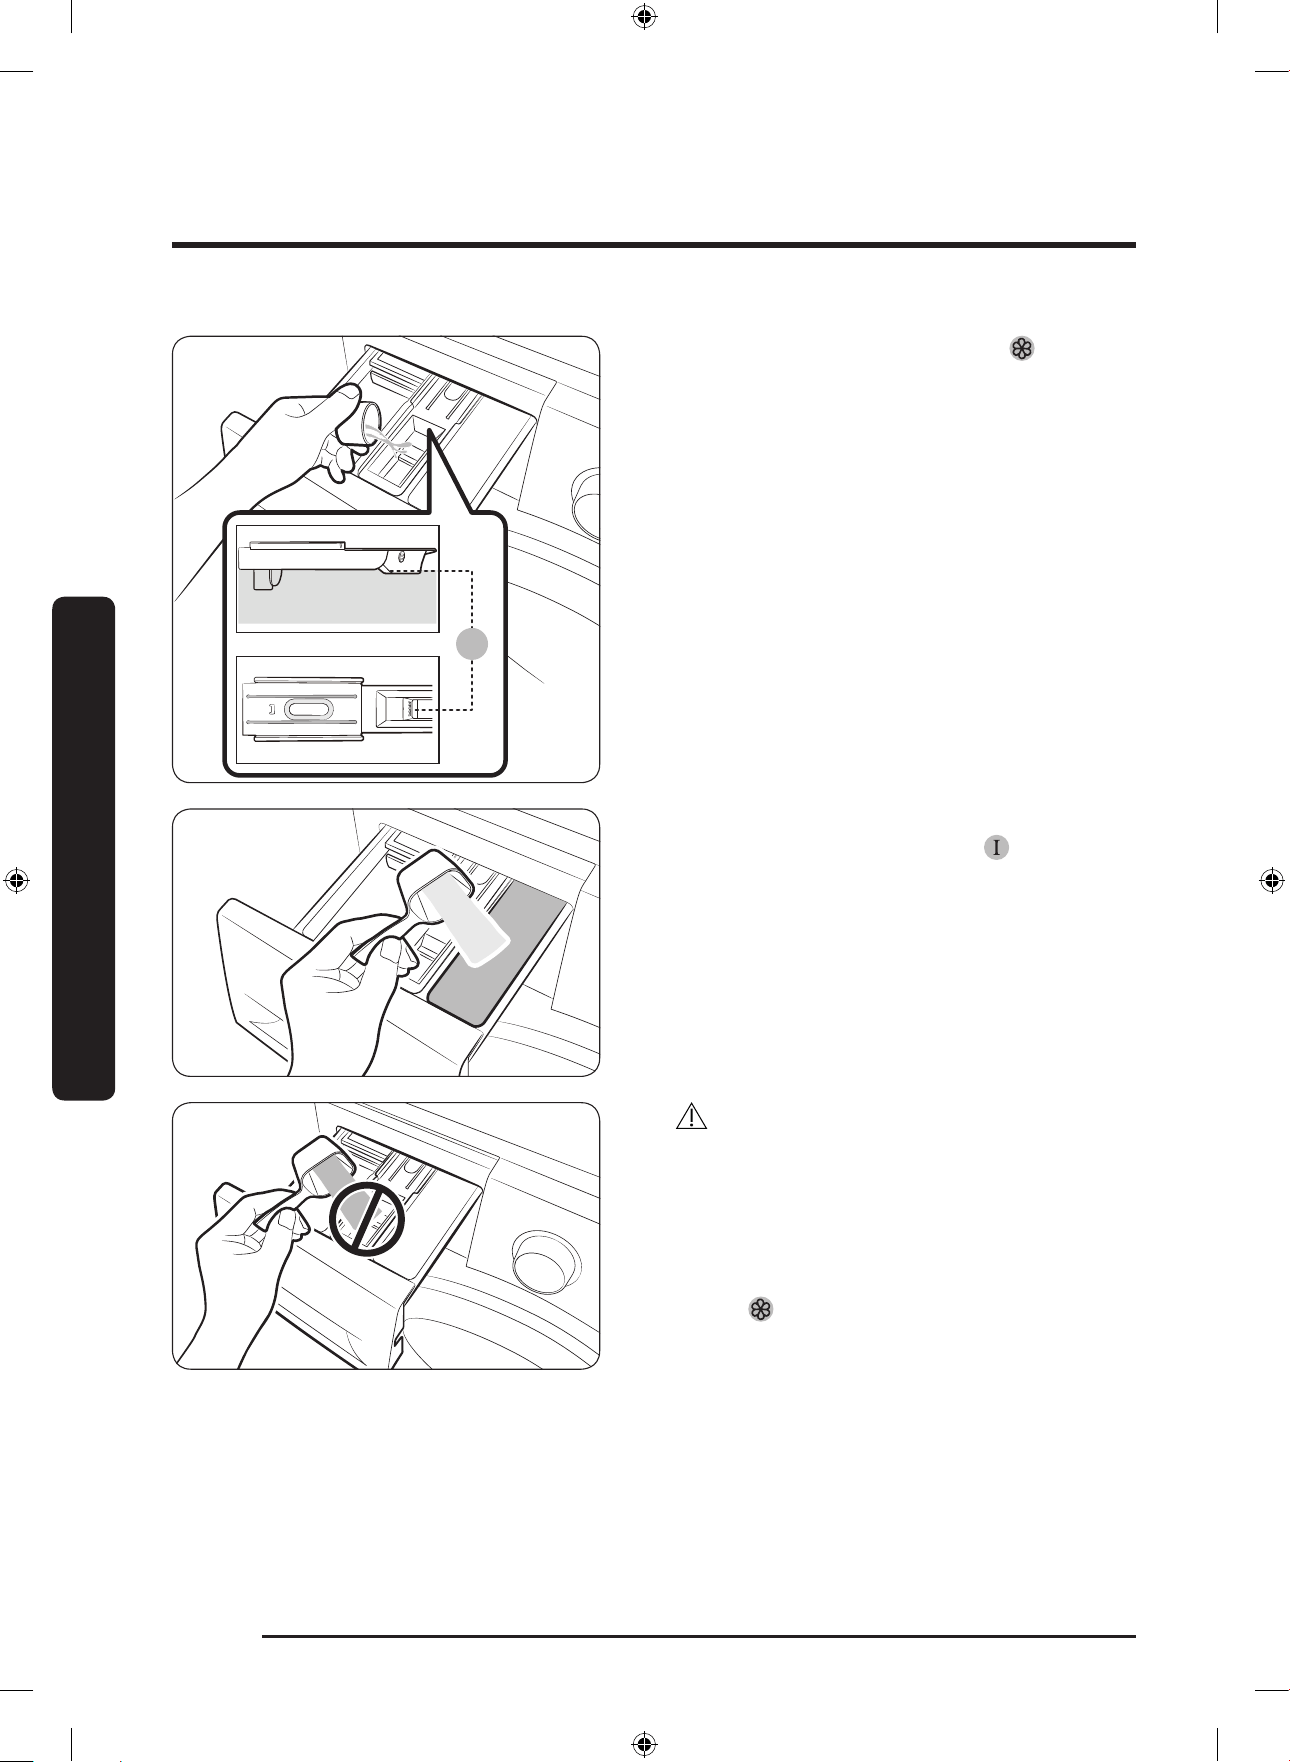
To apply washing agents to the detergent drawer
1. Slide open the detergent drawer.
2. Apply laundry detergent to the
main-wash compartment as
instructed or recommended by the
manufacturer. To use liquid detergent,
see page 31.
Untitled-5 29 12/12/2017 12:41:52 PM
Before you start
English30
Before you start
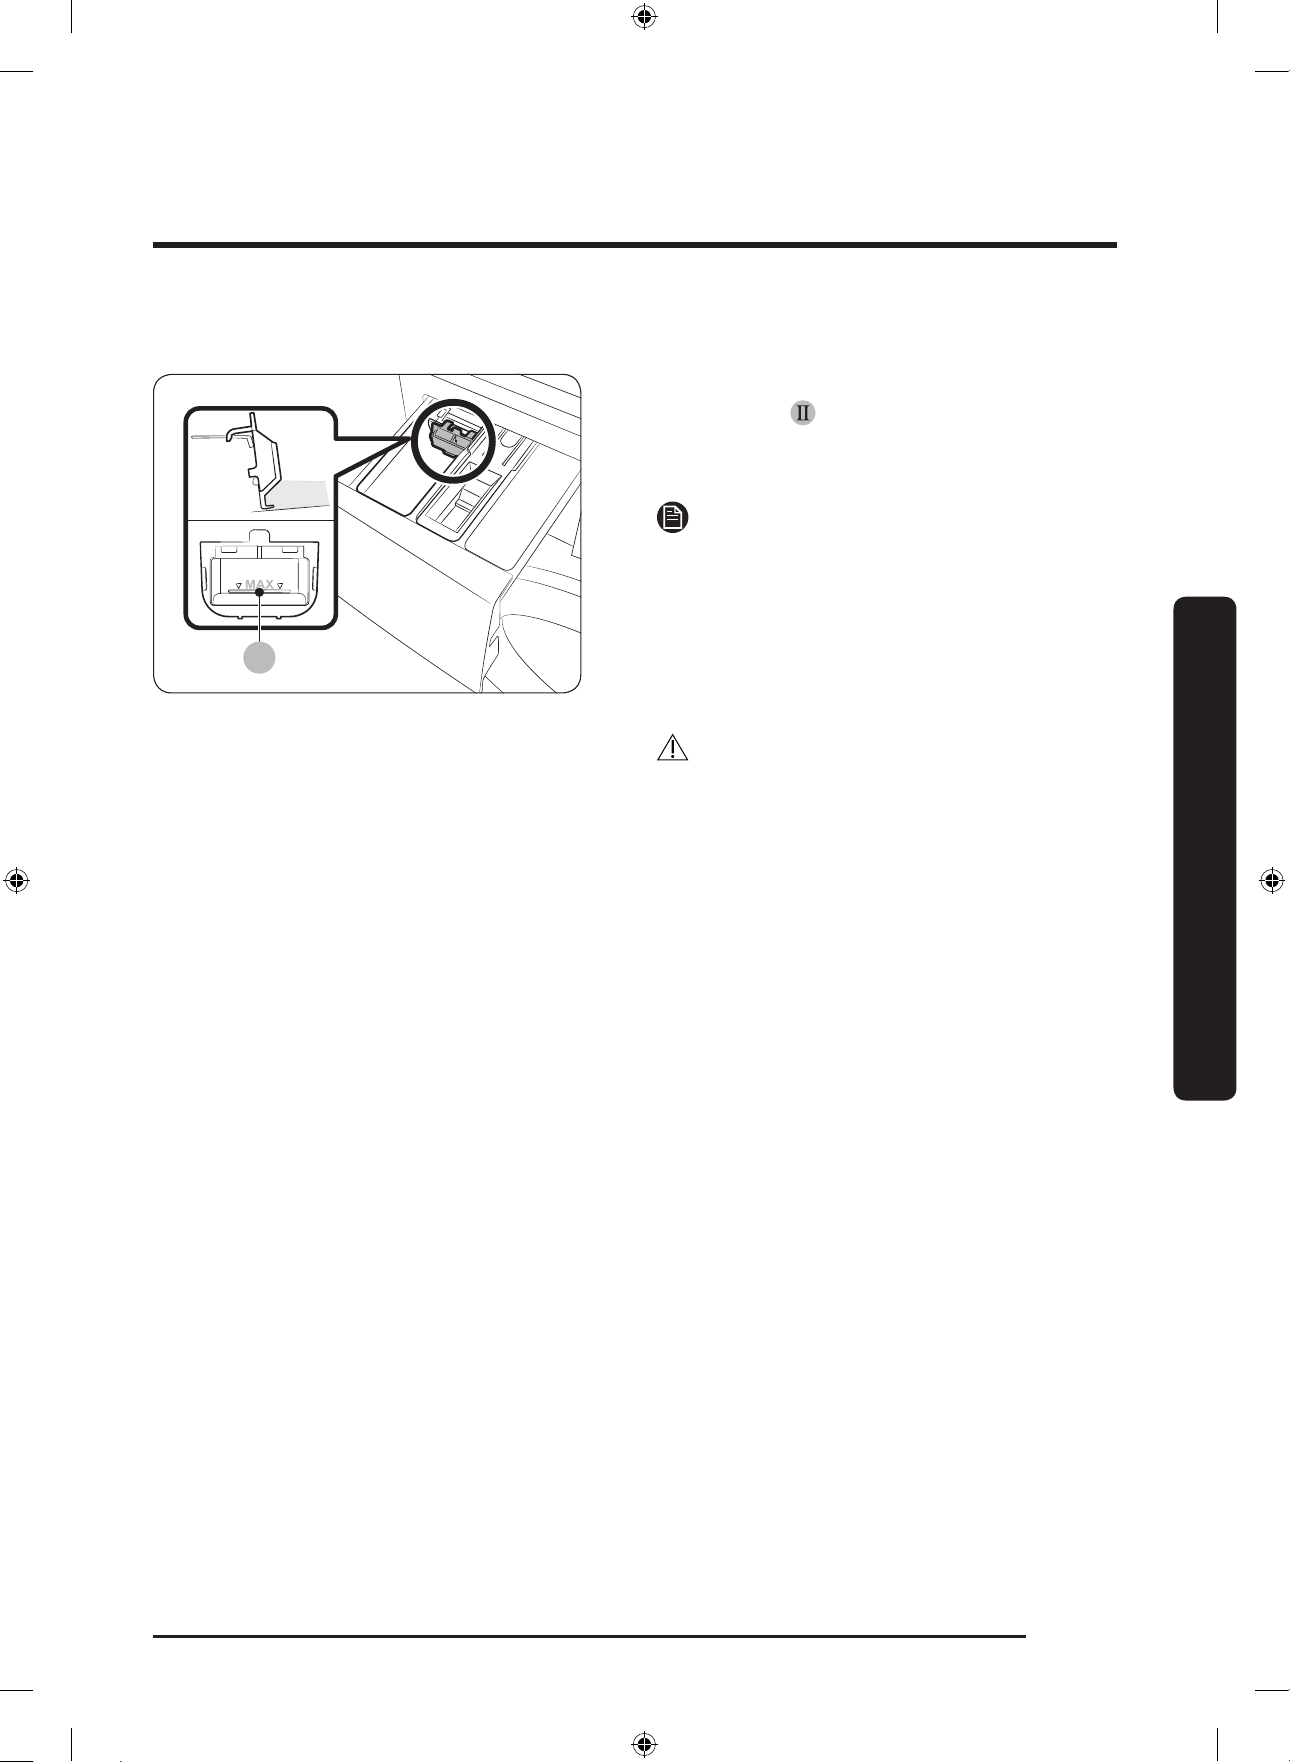
A
3. Apply fabric softener to the softener
compartment. Do not exceed the max
line (A).
Softener is dispensed into the wash
during the nal rinse.
4. If you want to prewash, apply
prewash detergent to the prewash
compartment as instructed or
recommended by the manufacturer.
5. Close the detergent drawer.
CAUTION
• Do not apply powder detergent to the
liquid detergent guide.
• Concentrated fabric softener must be
diluted with water before applied.
• Do not apply main-wash detergent to
the softener compartment.
Untitled-5 30 12/12/2017 12:41:52 PM
English 31
Before you start
To use liquid detergent (applicable models only)
A
First insert the provided liquid detergent
guide in the main-wash compartment.
Then, apply liquid detergent to the guide
below the marked max line (A).
NOTE
• Insert the liquid detergent guide only
after you remove the detergent drawer
from the washing machine by pressing
release lever (A).
• After a wash, some liquid detergent
may remain in the detergent drawer.
CAUTION
• Do not use the Prewash function when
you use liquid detergent.
• Remove the liquid detergent guide
when you use powder detergent.
Untitled-5 31 12/12/2017 12:41:52 PM
English32
Operations
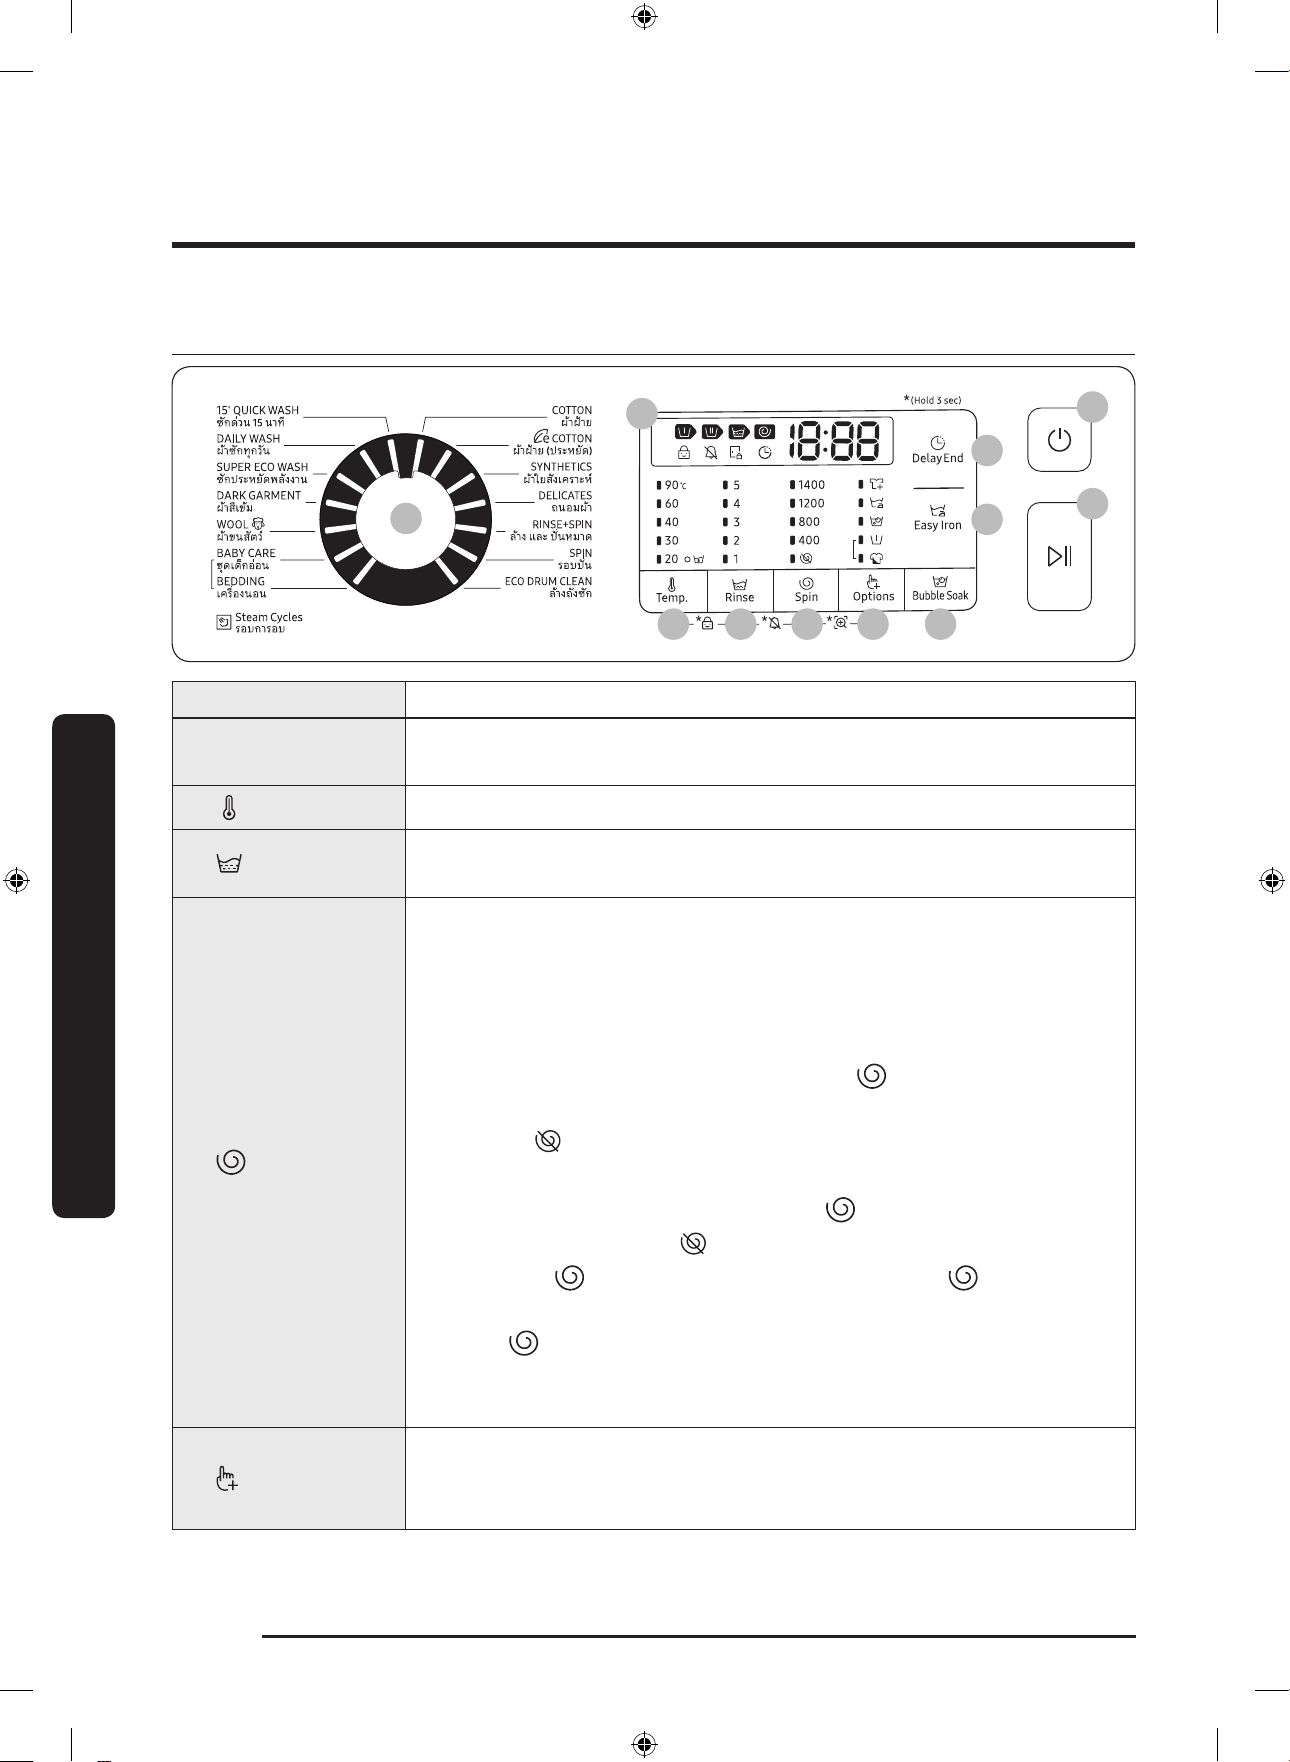
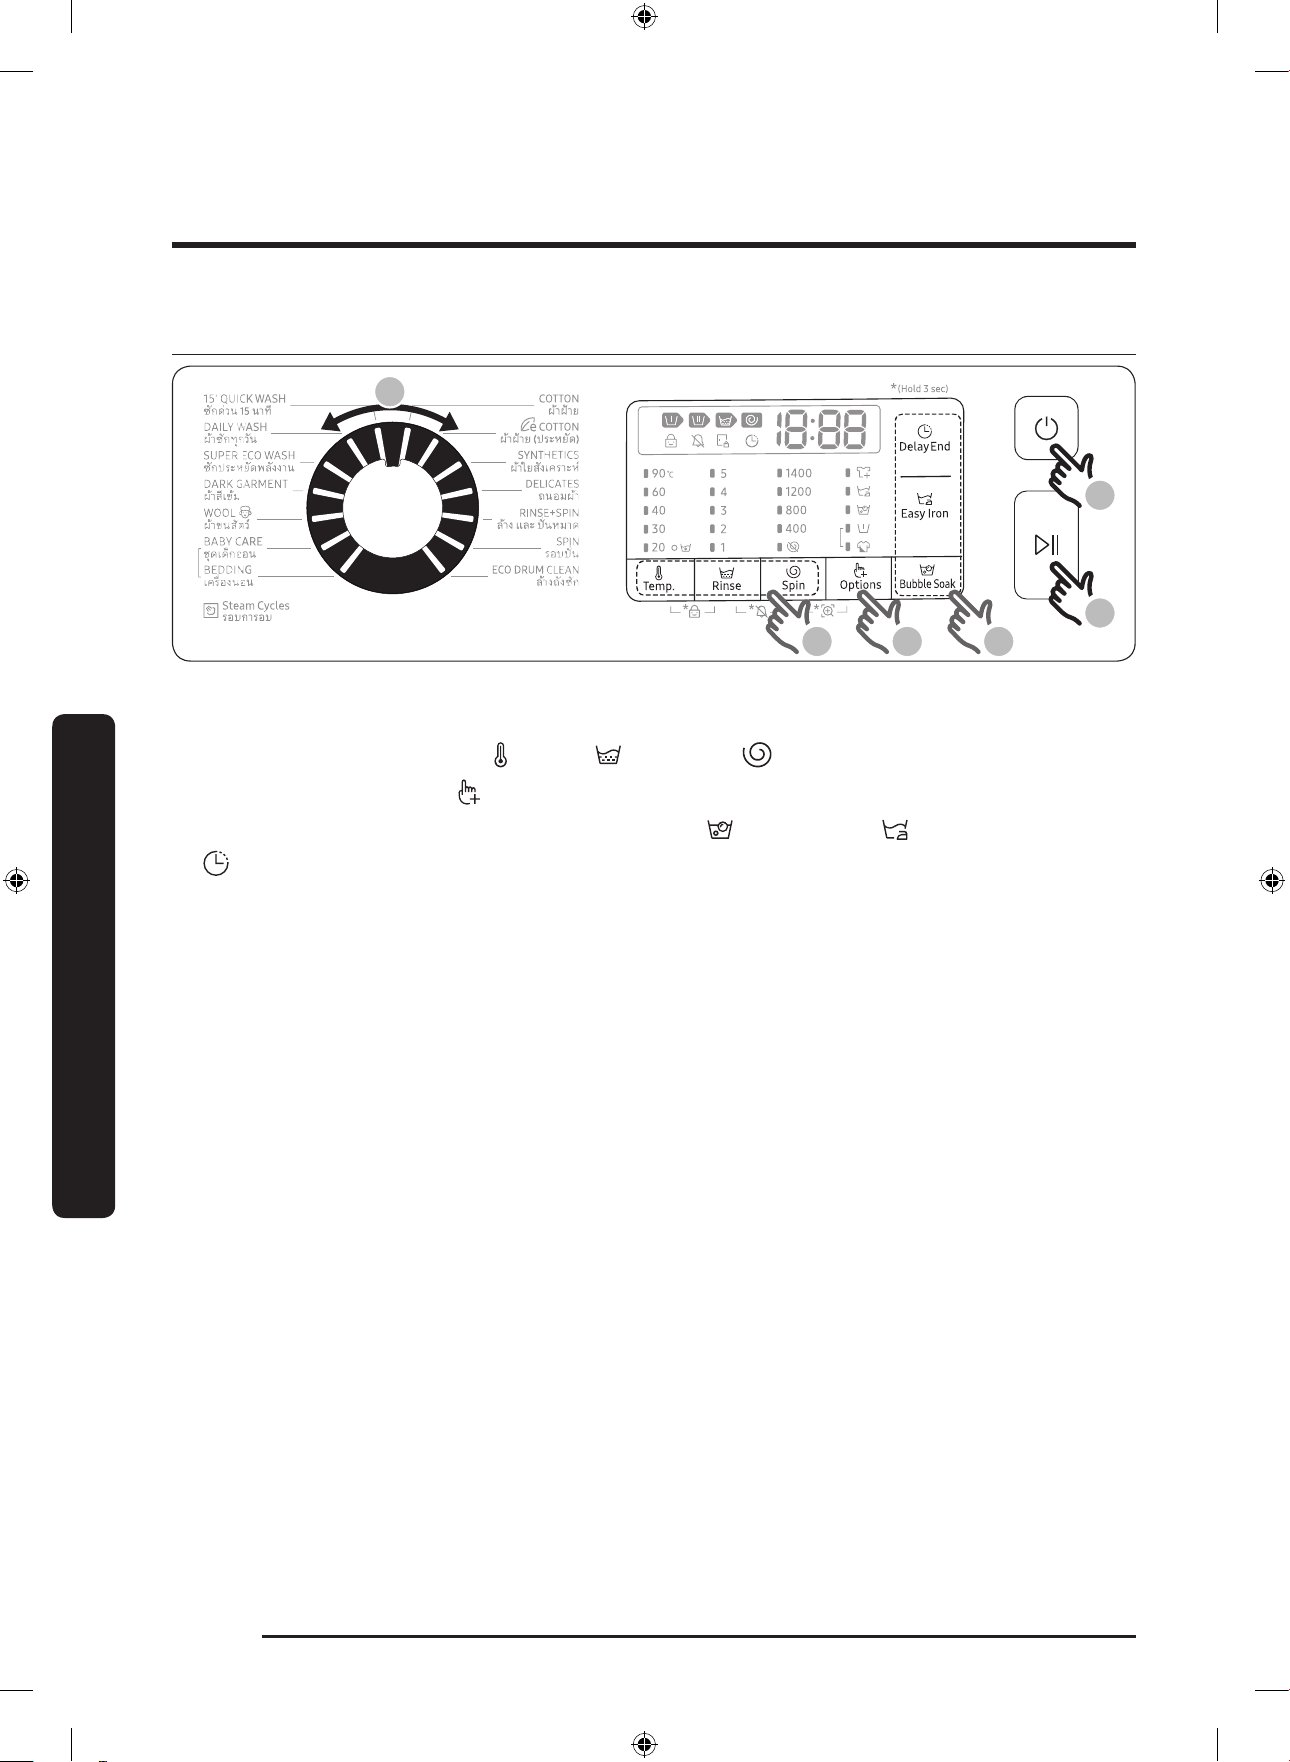
Control panel
01
02
03 04 05 06 07
08
09
11
10
01 Cycle Selector Turn the dial to select a cycle.
02 Display
The display shows current cycle information and estimated time
remaining, or an information code when a problem occurs.
03 Temp.
Press to change the water temperature for the current cycle.
04 Rinse
Press to change the rinse count for the current cycle. You can set
the rinse count to a max of 5, depending on the cycle.
05 Spin
Press to change the spinning speed for the current cycle. The
revolutions per minute (RPM) differs with the model.
• Rinse Hold: The nal rinse process is suspended so that the
laundry remains in the water. To unload the laundry, run a
drain or spin process.
- To use the Rinse Hold option, press Spin repeatedly until
all the Spin option indicators turn off.
• No Spin : The drum does not rotate after the nal drain
process.
- To use the No Spin option, press Spin repeatedly until the
No Spin indicator ( ) turns on.
• Spin Only : To run the Spin Only cycle, press Spin for
3 seconds. When the cycle time and spinning speed appear,
press Spin repeatedly until a desired spinning speed
is selected. Then, press Start/Pause to start the cycle. The
spinning time depends on the selected cycle.
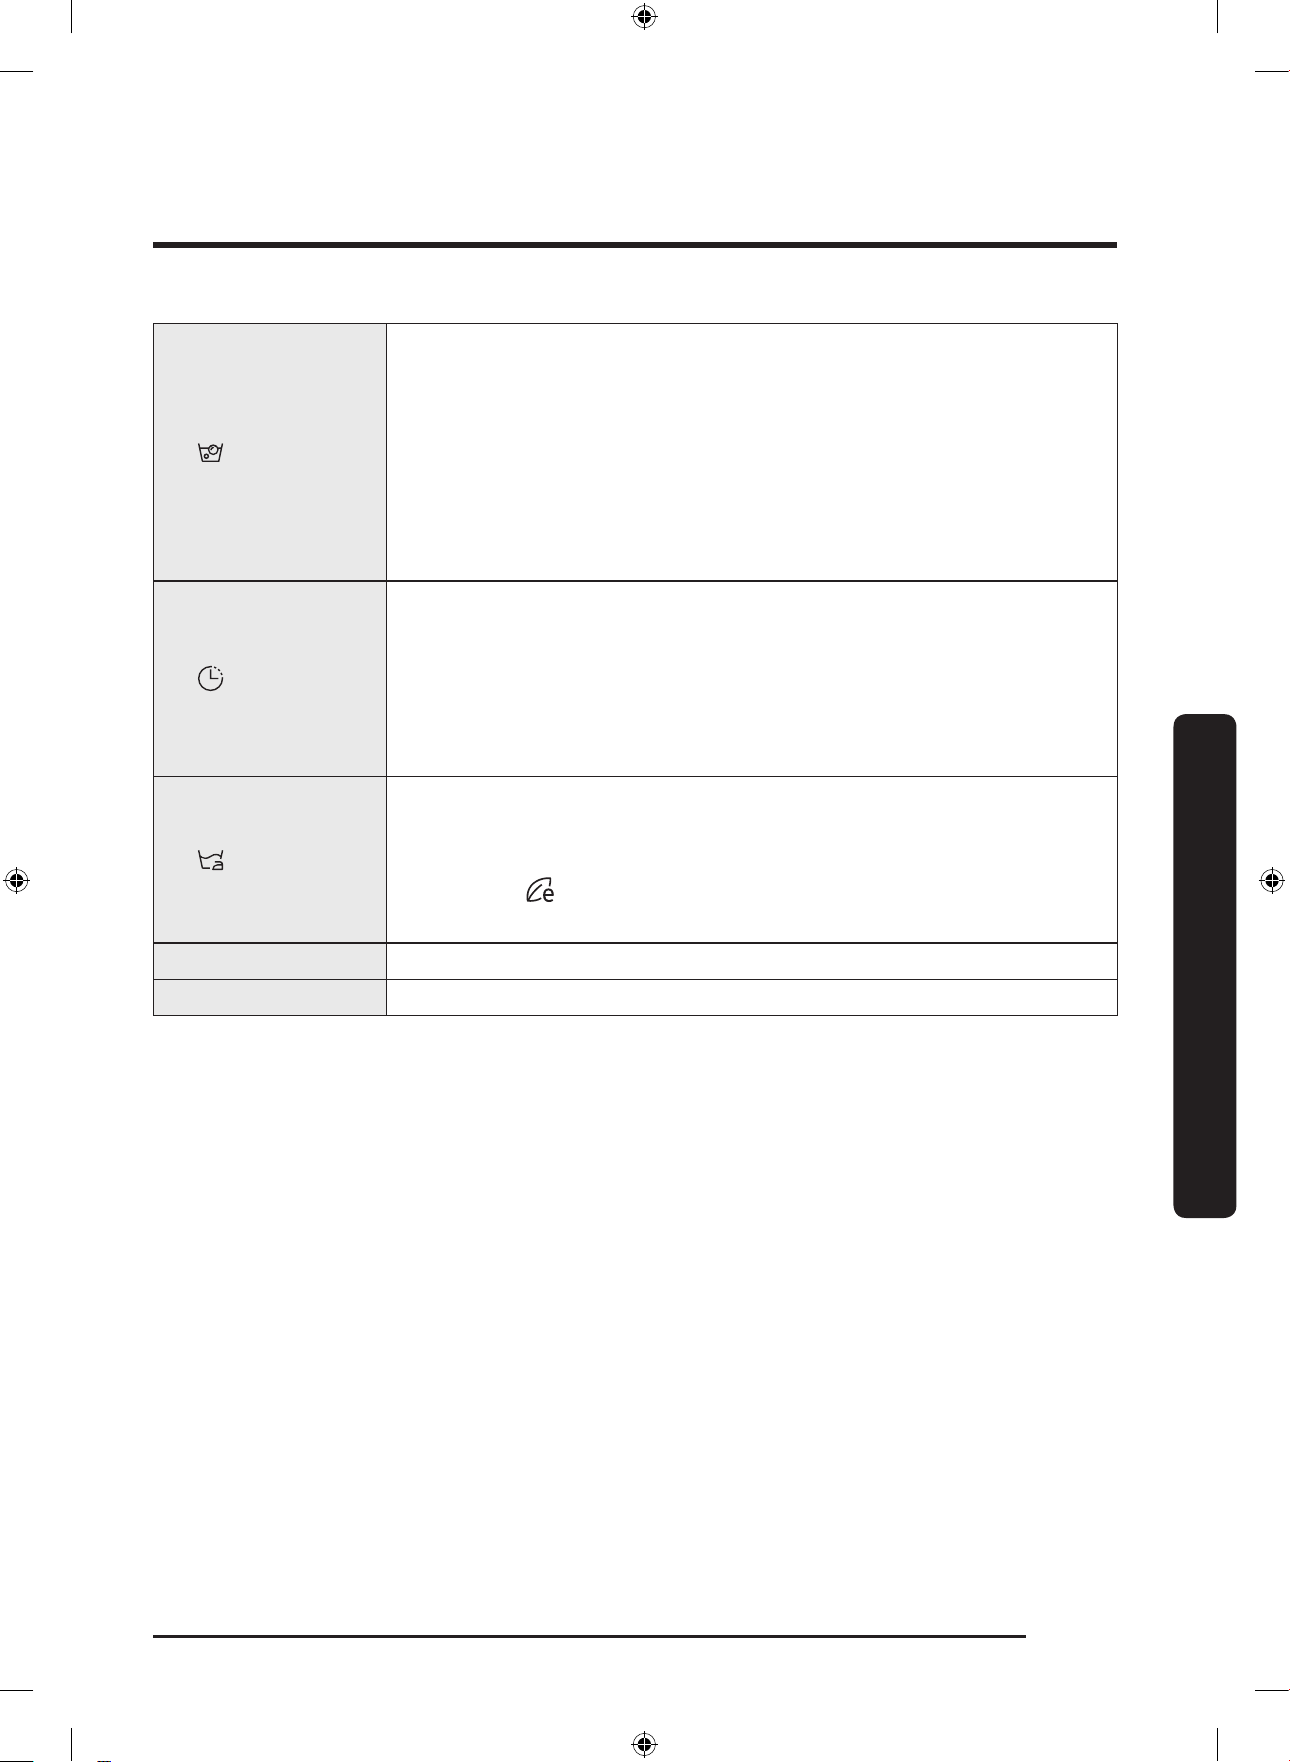
06 Options
Press to select an option from Intensive, and Pre Wash. Press
again to deselect.
• Availability of the options depends on the cycle.
Operations
Untitled-5 32 12/12/2017 12:41:53 PM
English 33
Operations
07 Bubble Soak
Press to activate/deactivate the Bubble Soak function. This
function helps remove a wide variety of stubborn stains.
• Bubble Soak helps remove a variety of stubborn stains.
• With Bubble Soak selected, laundry is thoroughly soaked in
water bubbles for effective washing.
• Bubble Soak is available with and adds up to 30 minutes to 5
cycles: COTTON, SYNTHETICS, DAILY WASH, BABY CARE, and
BEDDING.
08 Delay End
Delay End lets you set the end time of the current cycle. Based
on your settings, the start time of the cycle will be determined
by the machine’s internal logic. For example, this setting is useful
for programming your machine to nish a wash at the time you
normally return home from work.
• Press to choose a preset unit of hours.
09 Easy Iron
Press to prepare your laundry so that it can be easily ironed by
reducing the wrinkles during the spin cycle.
• Easy Iron is only available for the following wash cycles:
COTTON, COTTON, SYNTHETICS, DAILY WASH, SUPER ECO
WASH, DARK GARMENT, BABY CARE, and BEDDING.
10 Power Press to turn on/off the washing machine.
11 Start/Pause Press to start or stop operation.
For more information on the options, see the “Special features” section.
*(Hold 3 sec) : Press and hold for 3 seconds.
Untitled-5 33 12/12/2017 12:41:54 PM
Operations
English34
Operations
Simple steps to start
1
4
6
2
53
1. Press Power to turn on the washing machine.
2. Turn the Cycle Selector to select a cycle.
3. Change the cycle settings ( Temp., Rinse, and Spin) as necessary.
4. To add an option, press Options. Use the button again to choose a preferred item.
5. The machine provides 3 respective buttons for Bubble Soak, Easy Iron, and
Delay End for easy access. If you want to use one of these options, press the
corresponding button.
6. Press Start/Pause.
To change the cycle during operation
1. Press Start/Pause to stop operation.
2. Select a different cycle.
3. Press Start/Pause again to start the new cycle.
Untitled-5 34 12/12/2017 12:41:54 PM
English 35
Operations
Cycle overview
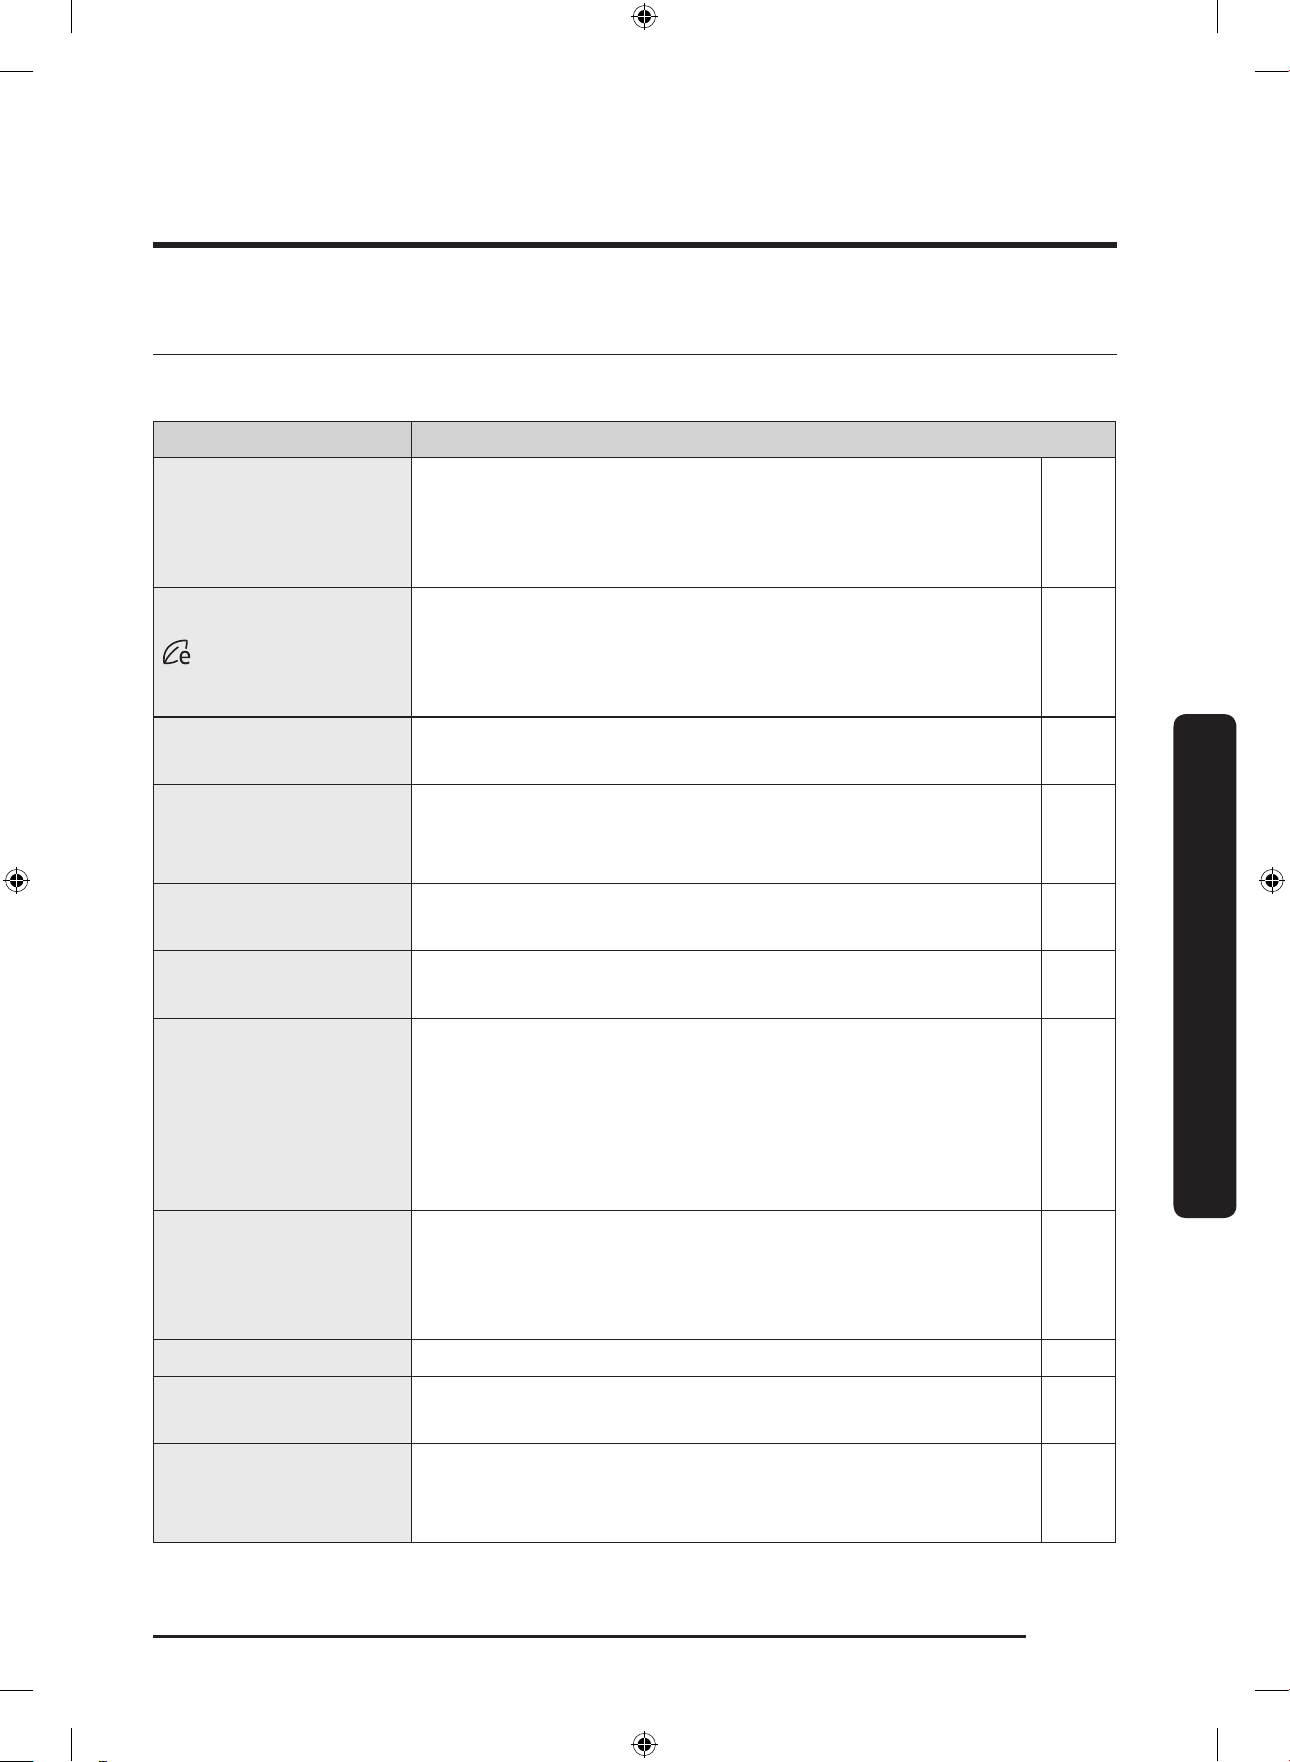
Standard cycles
Cycle Description & Max load (kg)
COTTON
• For cottons, bed linens, table linens, underwear,
towels, or shirts. The washing time and the rinse
count are automatically adjusted according to the
load.
Max
COTTON
• Optimal performance with lower energy for cotton
fabrics, bed linens, table linens, underwear, towels,
or shirts. For energy saving, the actual washing
temperature may be lower than specied.
Max
SYNTHETICS
• For blouses or shirts that are made of polyester
(diolen, trevira), polyamide (perlon, nylon), or the like.
4
DELICATES
• For sheer fabrics, bras, lingerie (silk), and other
handwash-only fabrics.
• For best performance, use liquid detergent.
2
RINSE+SPIN
• Featuring an additional rinse process after applying
fabric softener to the laundry.
-
SPIN
• Featuring an additional spin process to effectively
remove moisture from laundry.
-
ECO DRUM CLEAN
• Cleans the drum by removing dirt and bacteria from
the drum.
• Perform once every 40 washes with no detergent or
bleach applied.
• Make sure the drum is empty.
• Do not use any cleaning agents for cleaning the drum.
-
15' QUICK WASH
• For lightly soiled garments that you want to wash
quickly.
• Use less than 20 g of detergent. Using more than 20 g
of detergent may leave detergent residue.
2
DAILY WASH • For everyday items such as underwear and shirts. 4
SUPER ECO WASH
• Low temperature ecobubble cycle helps reduce power
consumption.
4
DARK GARMENT
• Featuring additional rinses and reduced spinning to
ensure that the laundry is washed gently and rinsed
thoroughly.
4
Untitled-5 35 12/12/2017 12:41:54 PM
Operations
English36
Operations
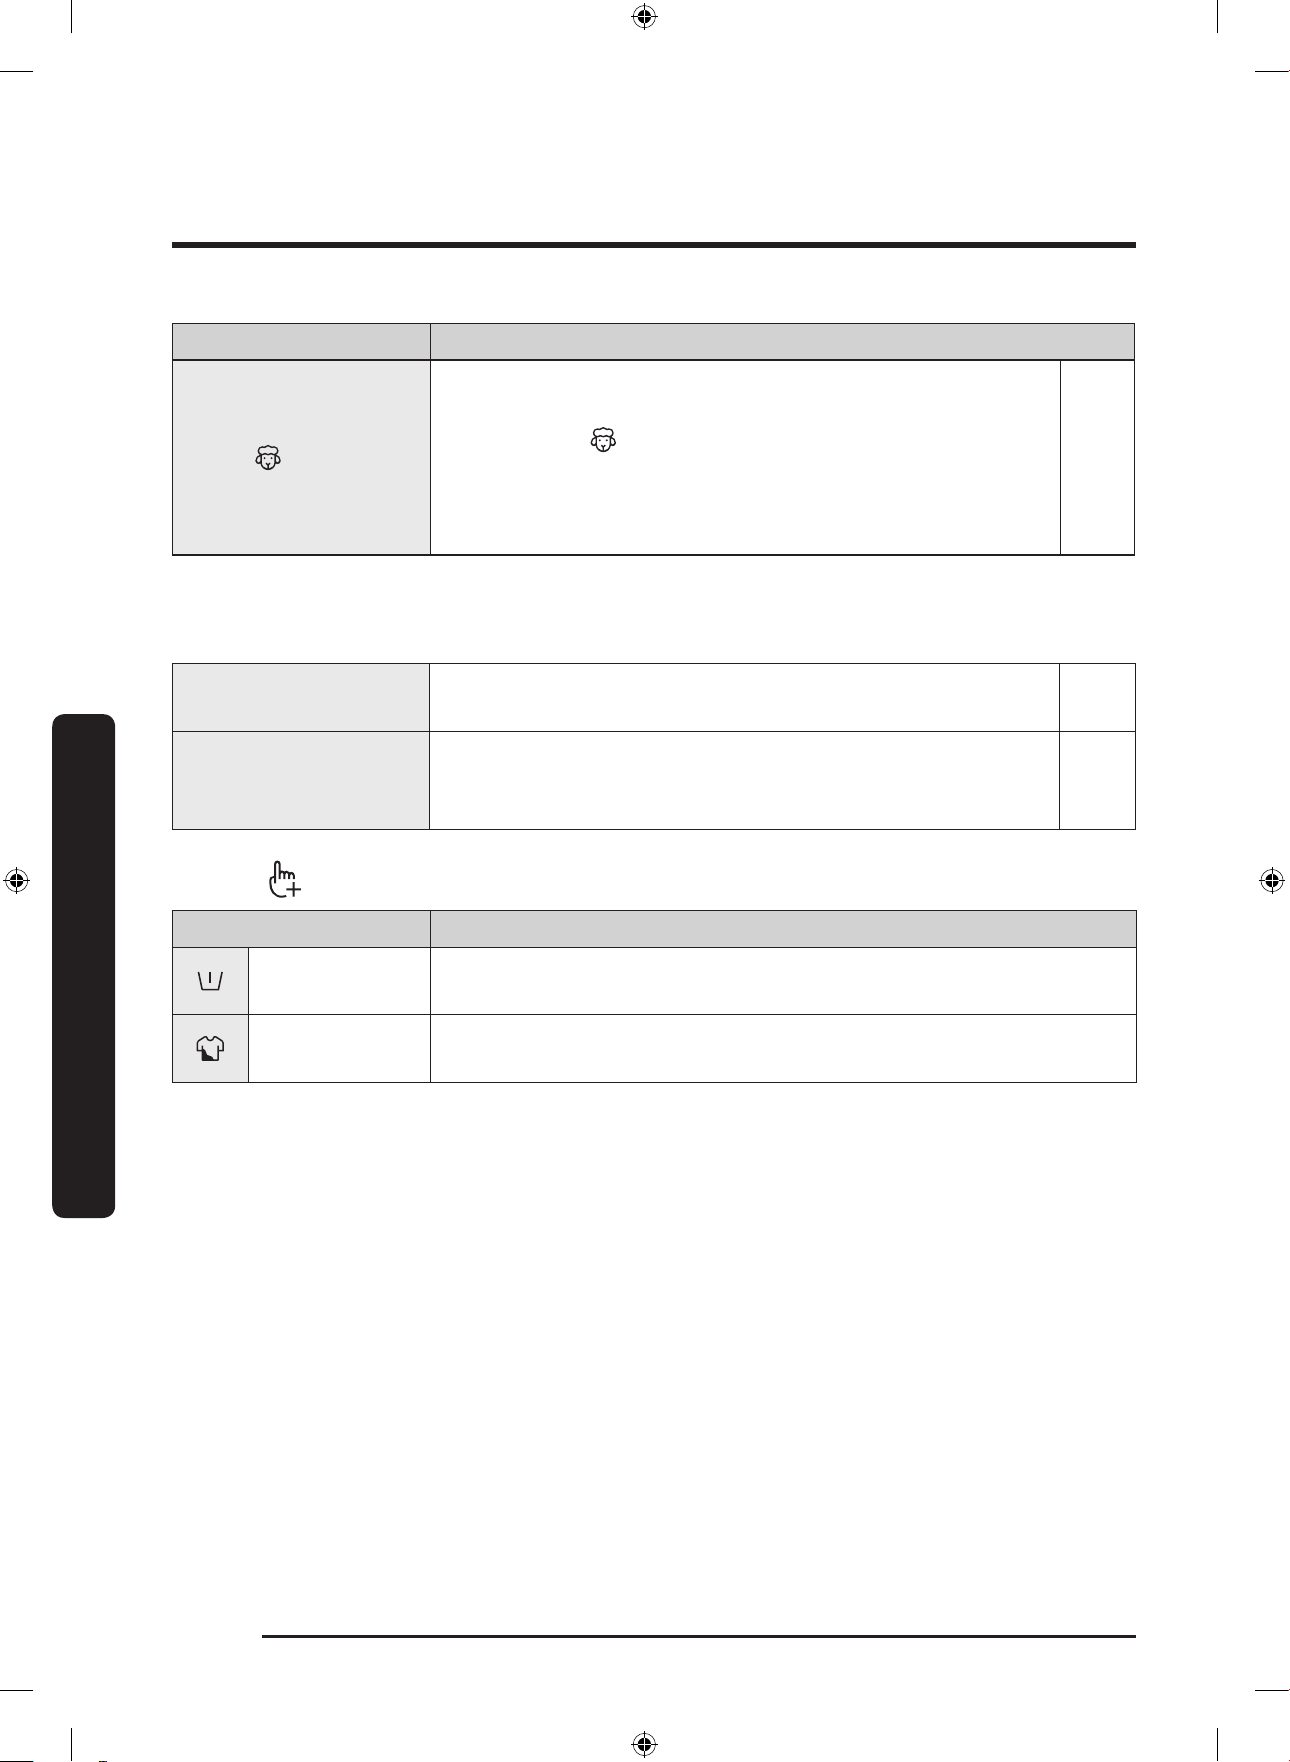
Cycle Description & Max load (kg)
WOOL
• Specic for machine-washable wool for loads less
than 2.0 kg.
• The WOOL cycle features gentle cradling and
soaking to protect the wool bres from shrinkage/
distortion.
• A neutral detergent is recommended.
2
Steam cycles
Steam may not be visible or present during the cycle. This is normal.
BABY CARE
• Featuring a high-temperature wash and extra rinses
to help remove the remaining detergent effectively.
4
BEDDING
• For bed spreads, bed sheets, bedding covers, etc.
• For best results, wash only 1 type of bedding and
make sure the load weighs less than 2.0 kg.
2
Options
Option Description
Pre Wash
• This will add a preliminary washing cycle before the main
wash cycle.
Intensive
• For badly soiled laundry. The operation time for each cycle is
longer than normal.
Untitled-5 36 12/12/2017 12:41:55 PM
English 37
Operations
Delay End
You can set the washing machine to nish your wash automatically at a later time,
choosing a delay of between 1 to 24 hours (in 1 hour increments). The hour displayed
indicates the time the wash will nish.
1. Select a cycle. Then change the cycle settings if necessary.
2. Press Delay End repeatedly until a desired end time is set.
3. Press Start/Pause.
The Delay End indicator blinks and the washing machine tumbles the drum to sense the
weight of the load if you have selected the COTTON or COTTON cycle. Load sensing
is preset and enabled only in these 2 cycles. When complete, the machine displays your
set time and the timer starts ticking.
4. To cancel the Delay End, restart the washing machine by pressing Power.
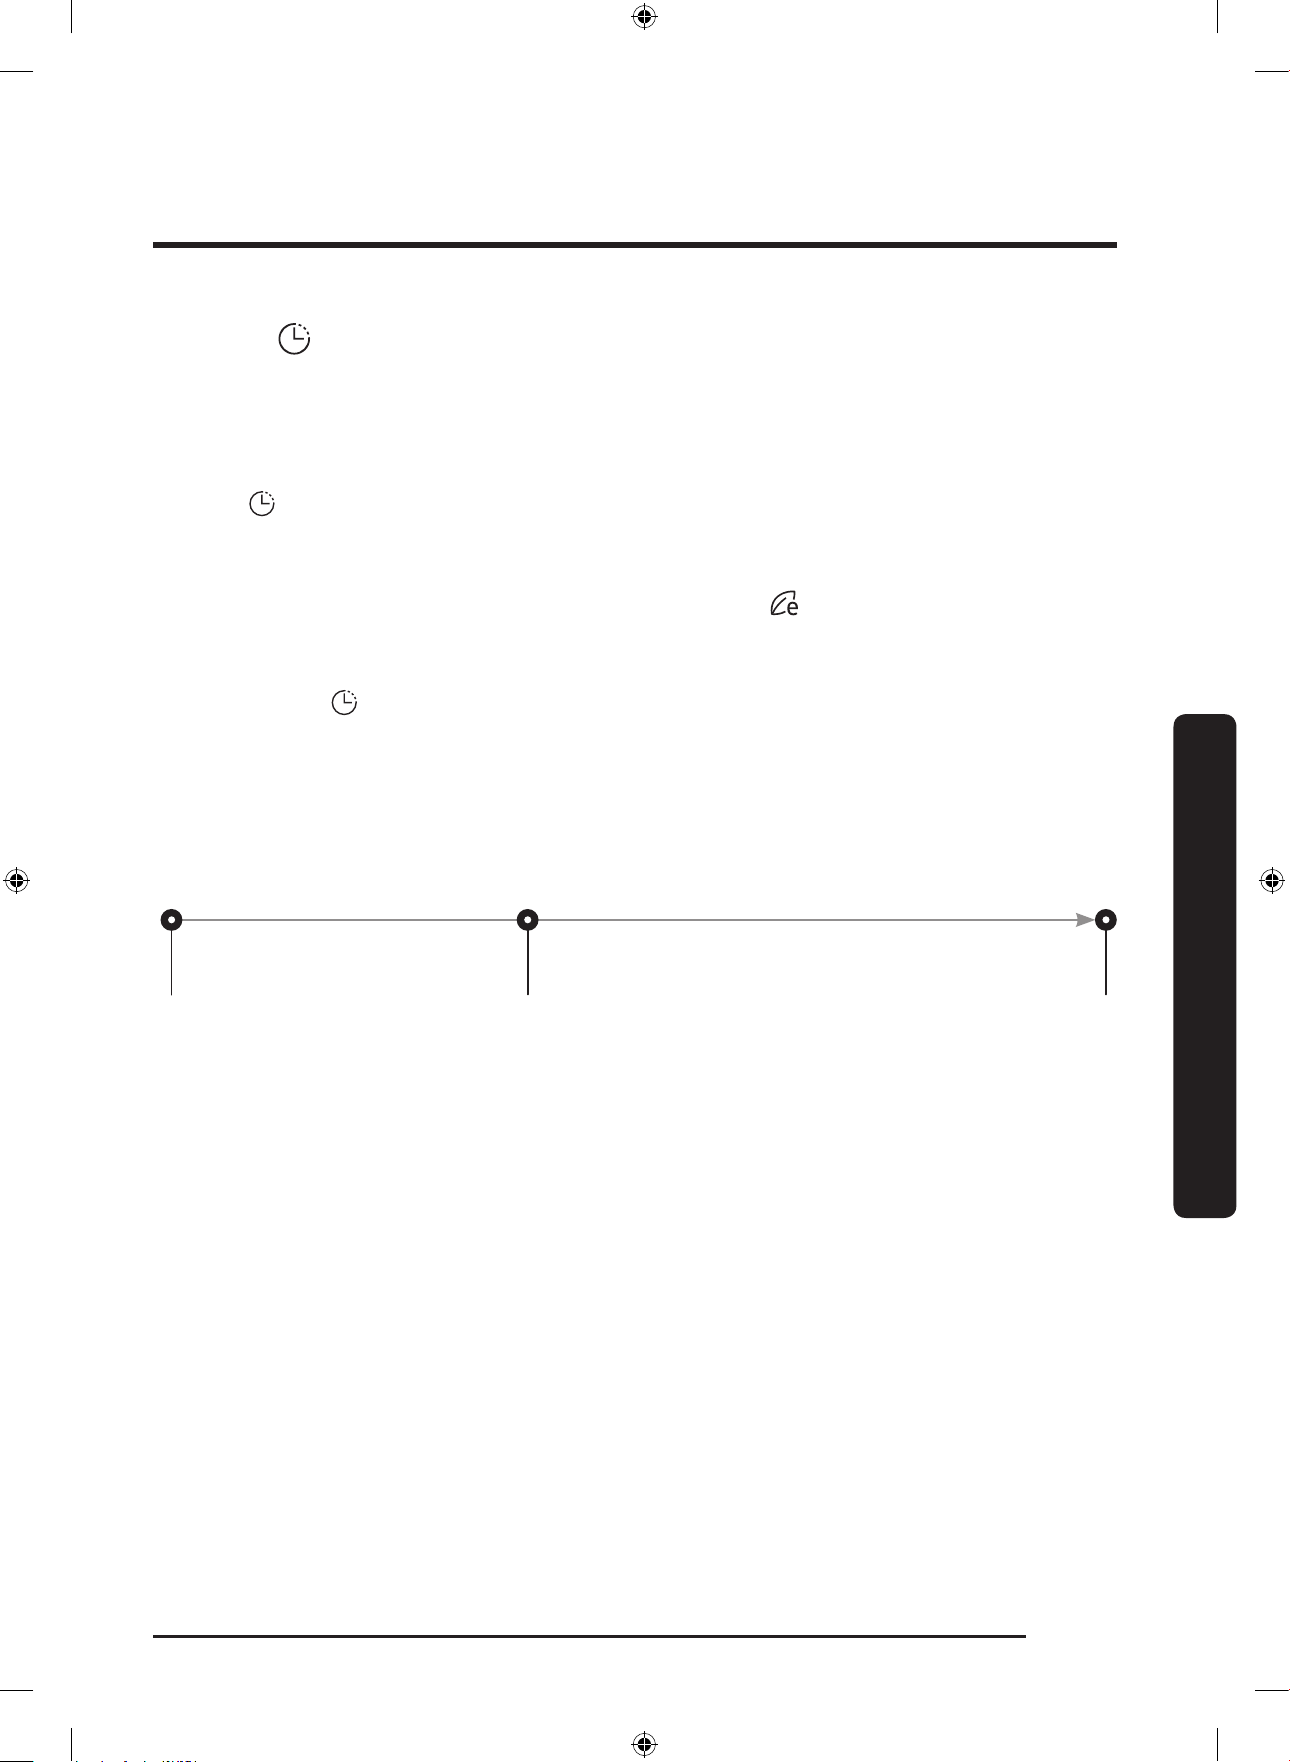
Real-life case
You want to nish a two-hour cycle 3 hours later from now. For this, you add the Delay
End option to the current cycle with the 3-hour setting, and press Start/Pause at 2:00 p.m.
Then, what happens? The washing machine starts operating at 3:00 p.m., and ends at 5:00
p.m. Provided below is the time line for this example.
2:00 pm
Set the Delay End to 3 hours
3:00 pm
Start
5:00 pm
End
Untitled-5 37 12/12/2017 12:41:55 PM
Operations
English38
Operations
Special features
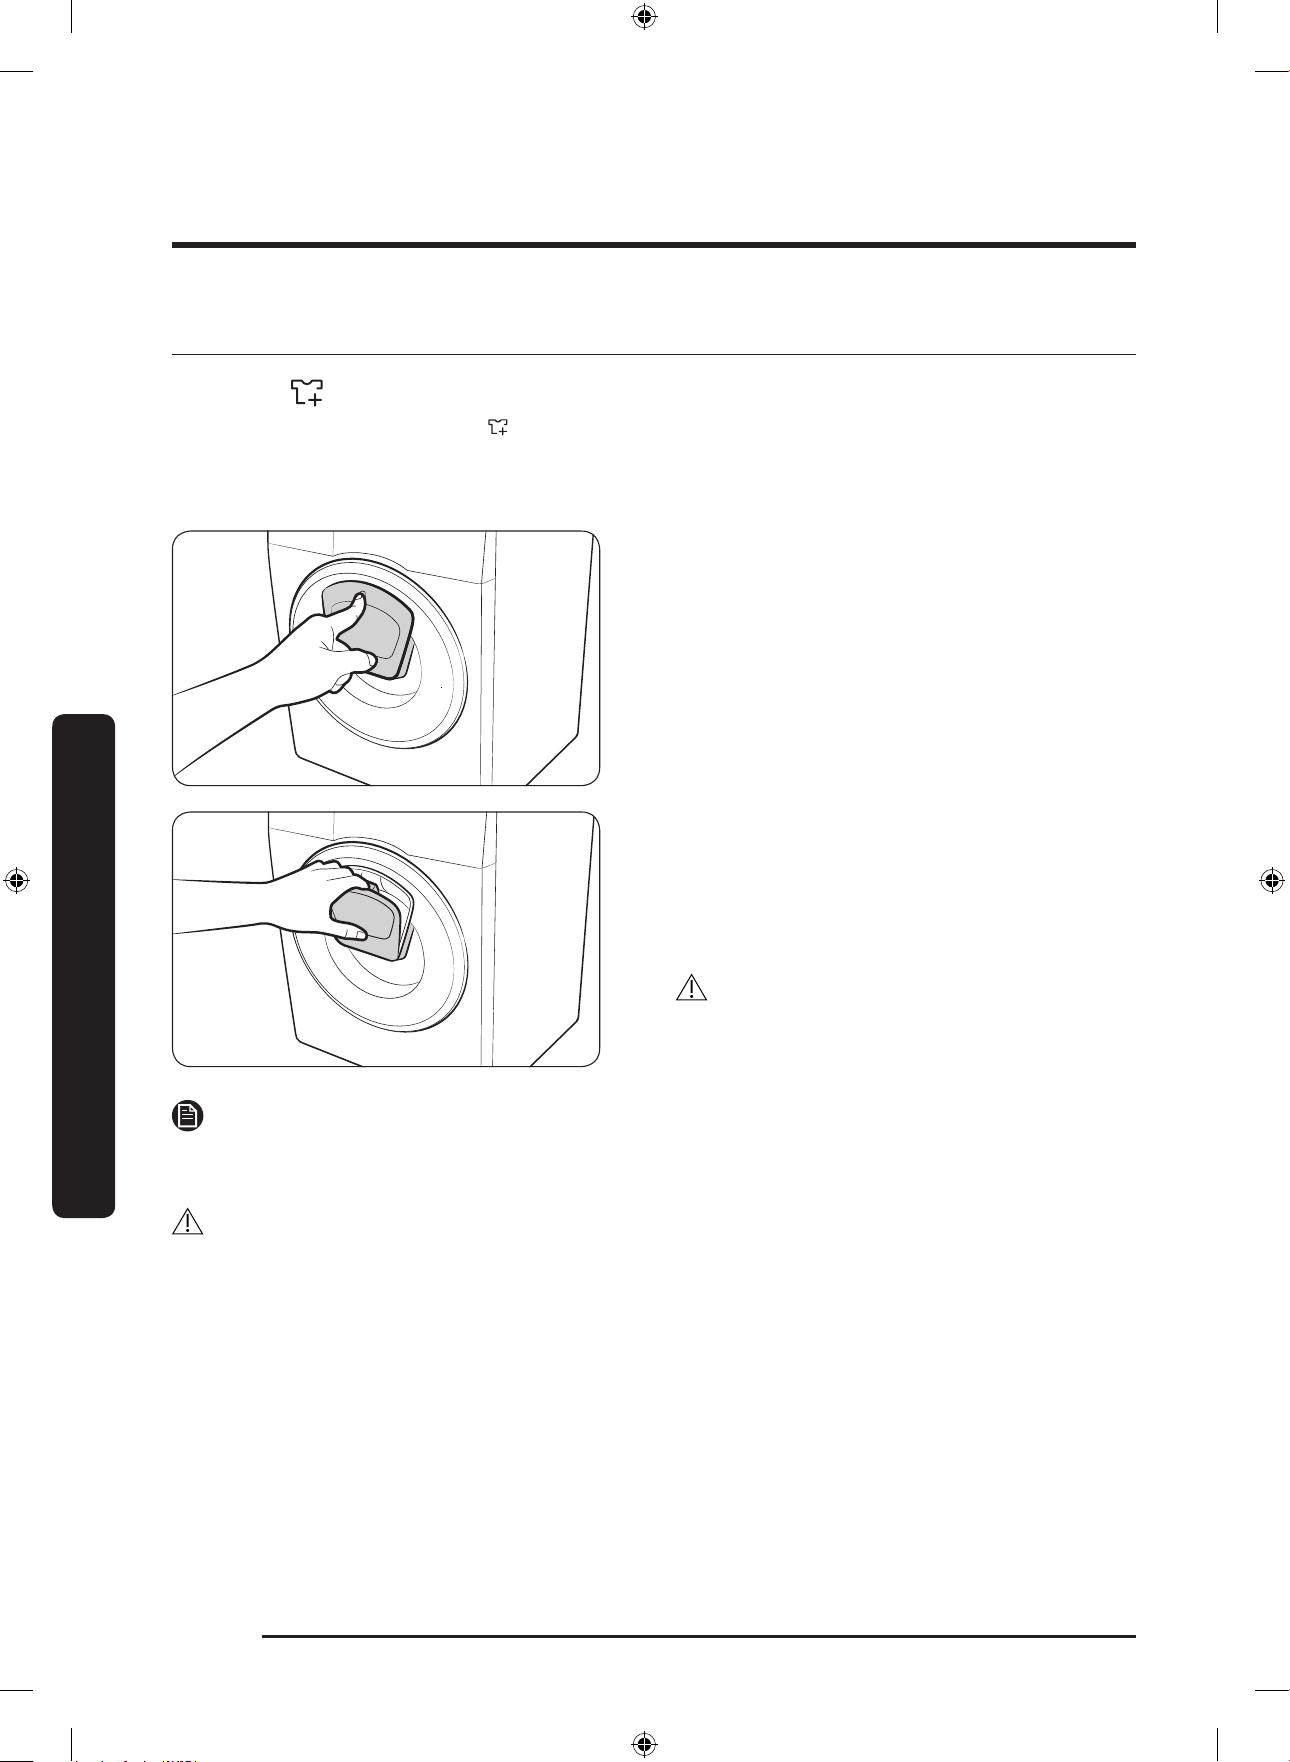
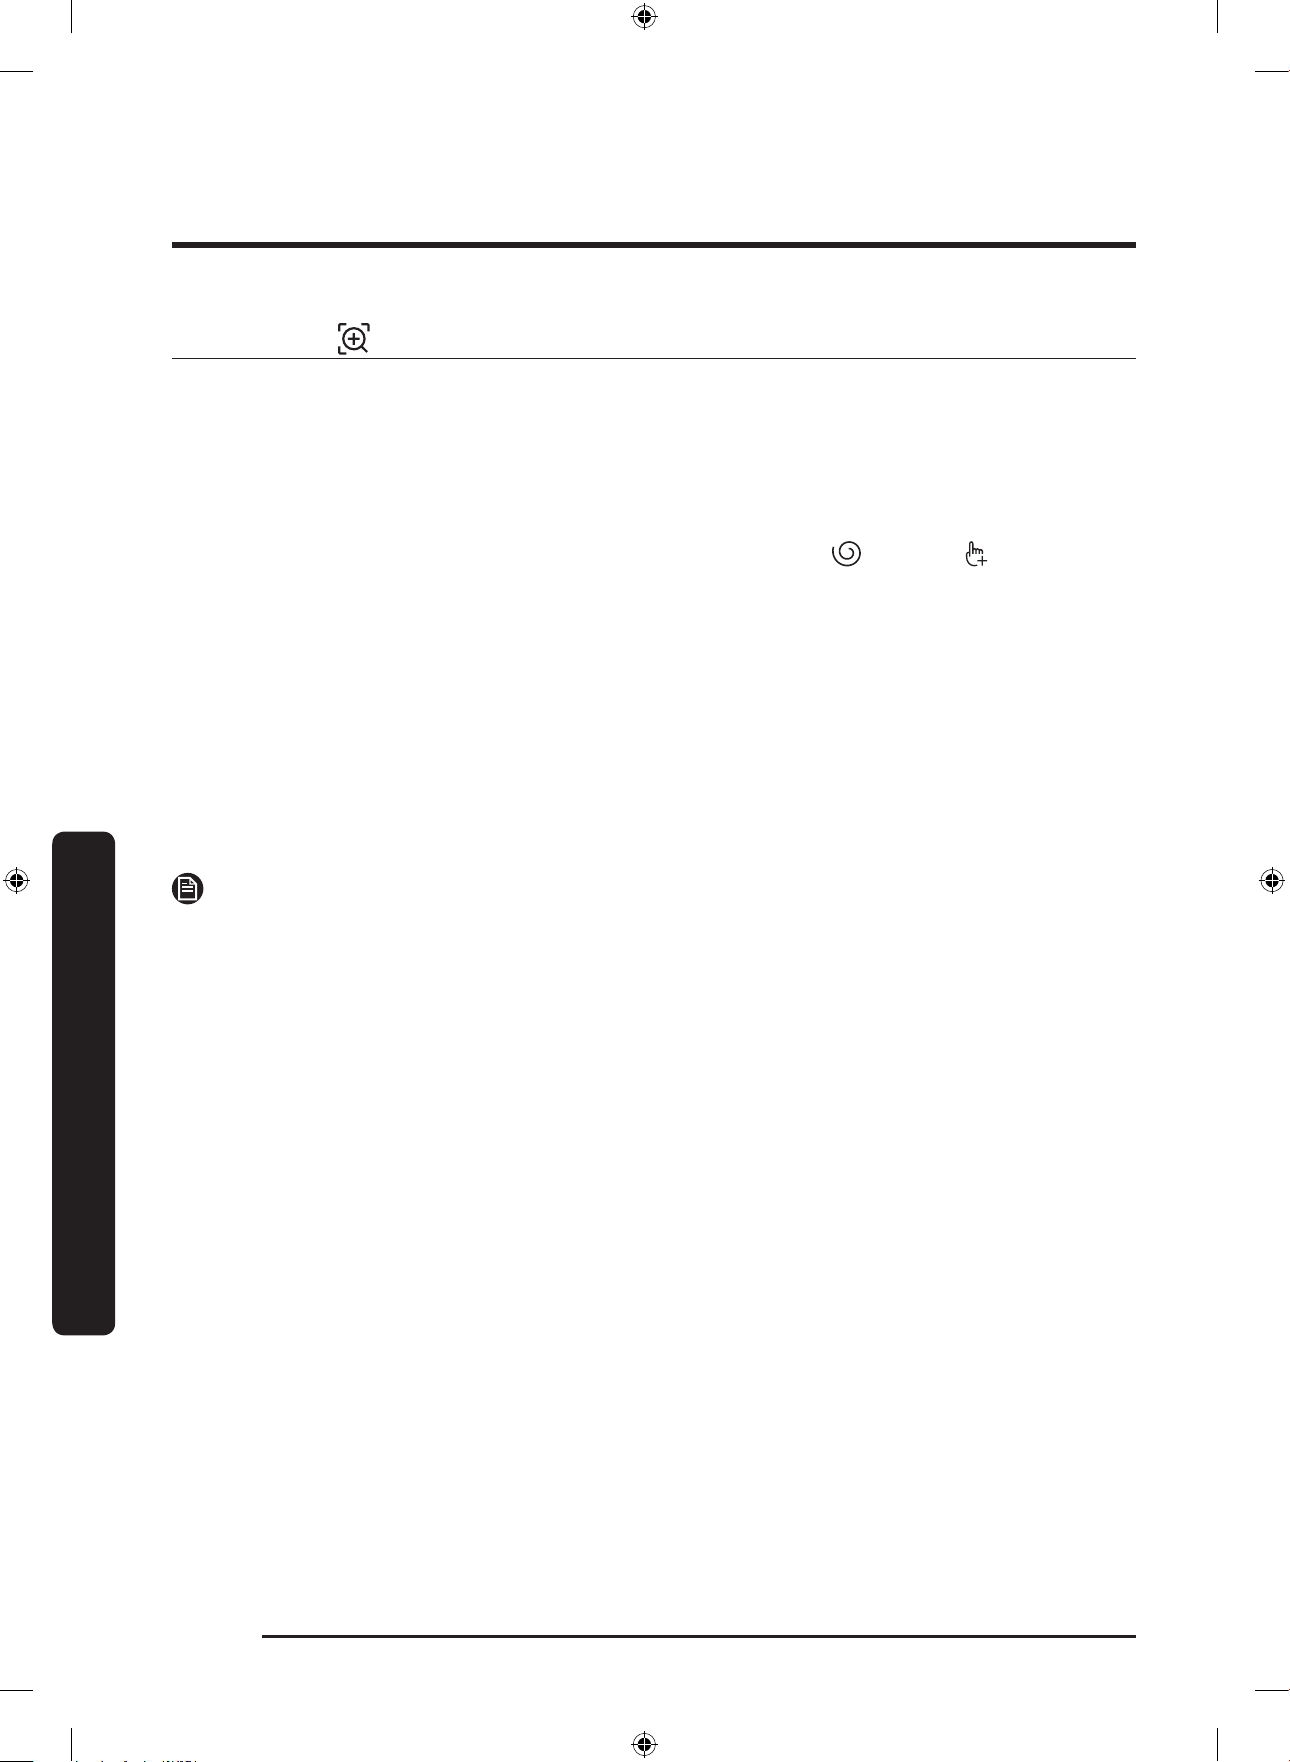
AddWash
When the AddWash indicator is on, you can stop operation of the machine and put
additional laundry or softener into the drum. The Add Door opens by more than 130° for
easy access.
1. Press Start/Pause to stop operation.
2. Press the upper area of the Add Door
until you hear a clicking sound to
unlock. Pull the handle of the Add Door
to open.
3. Open the Add Door and put additional
laundry or softener into the drum.
4. Push the Add Door until you hear a
clicking sound to close.
5. Press Start/Pause to resume operation.
CAUTION
Do not put excessive force on the Add
Door. It may break.
NOTE
The water inside the drum will not leak if the Add Door is closed properly. Water drops
may form around the door, but they will not leak from inside the drum.
CAUTION
• Do not open the Add Door if suds have formed inside the drum that rise above the
level of the Add Door.
• Do not attempt to open the Add Door while the machine is operating without rst
pressing Start/Pause. Please note that the Add Door can be opened unintentionally
(without pressing Start/Pause) when the wash is complete.
• Do not add an excessive load through the Add Door. Performance may be degraded.
• Do not use the lower area of the Add Door as a handle. Your ngers may be caught.
• Make sure that no laundry is caught in the Add Door.
• Keep your pets out of the washing machine, especially the Add Door.
Untitled-5 38 12/12/2017 12:41:56 PM

English 39
Operations
• When using hot water for the wash, the Add Door may appear to leak water after
opening and closing the Add Door. This is normal, simply because steam emerging from
the open Add Door has cooled and formed water drops on the surface.
• When the Add Door closes, the door seals up and no water can leak. However, you
may encounter what appears to be water leak around the door - some residual water
remaining around the Add Door may form water drops. This is normal.
• Neither the main door or the Add Door can be opened when the water temperature
is over 50 °C. If the water level inside the drum is over a certain point, the main door
cannot be opened.
• If an information code of ddC appears on the display, see the “Information codes”
section for further actions.
• Keep the Add Door and its surroundings clean at all times. Debris or detergents on or
around the seals of the Add Door may cause a leak.
Untitled-5 39 12/12/2017 12:41:56 PM
Operations
English40
Operations
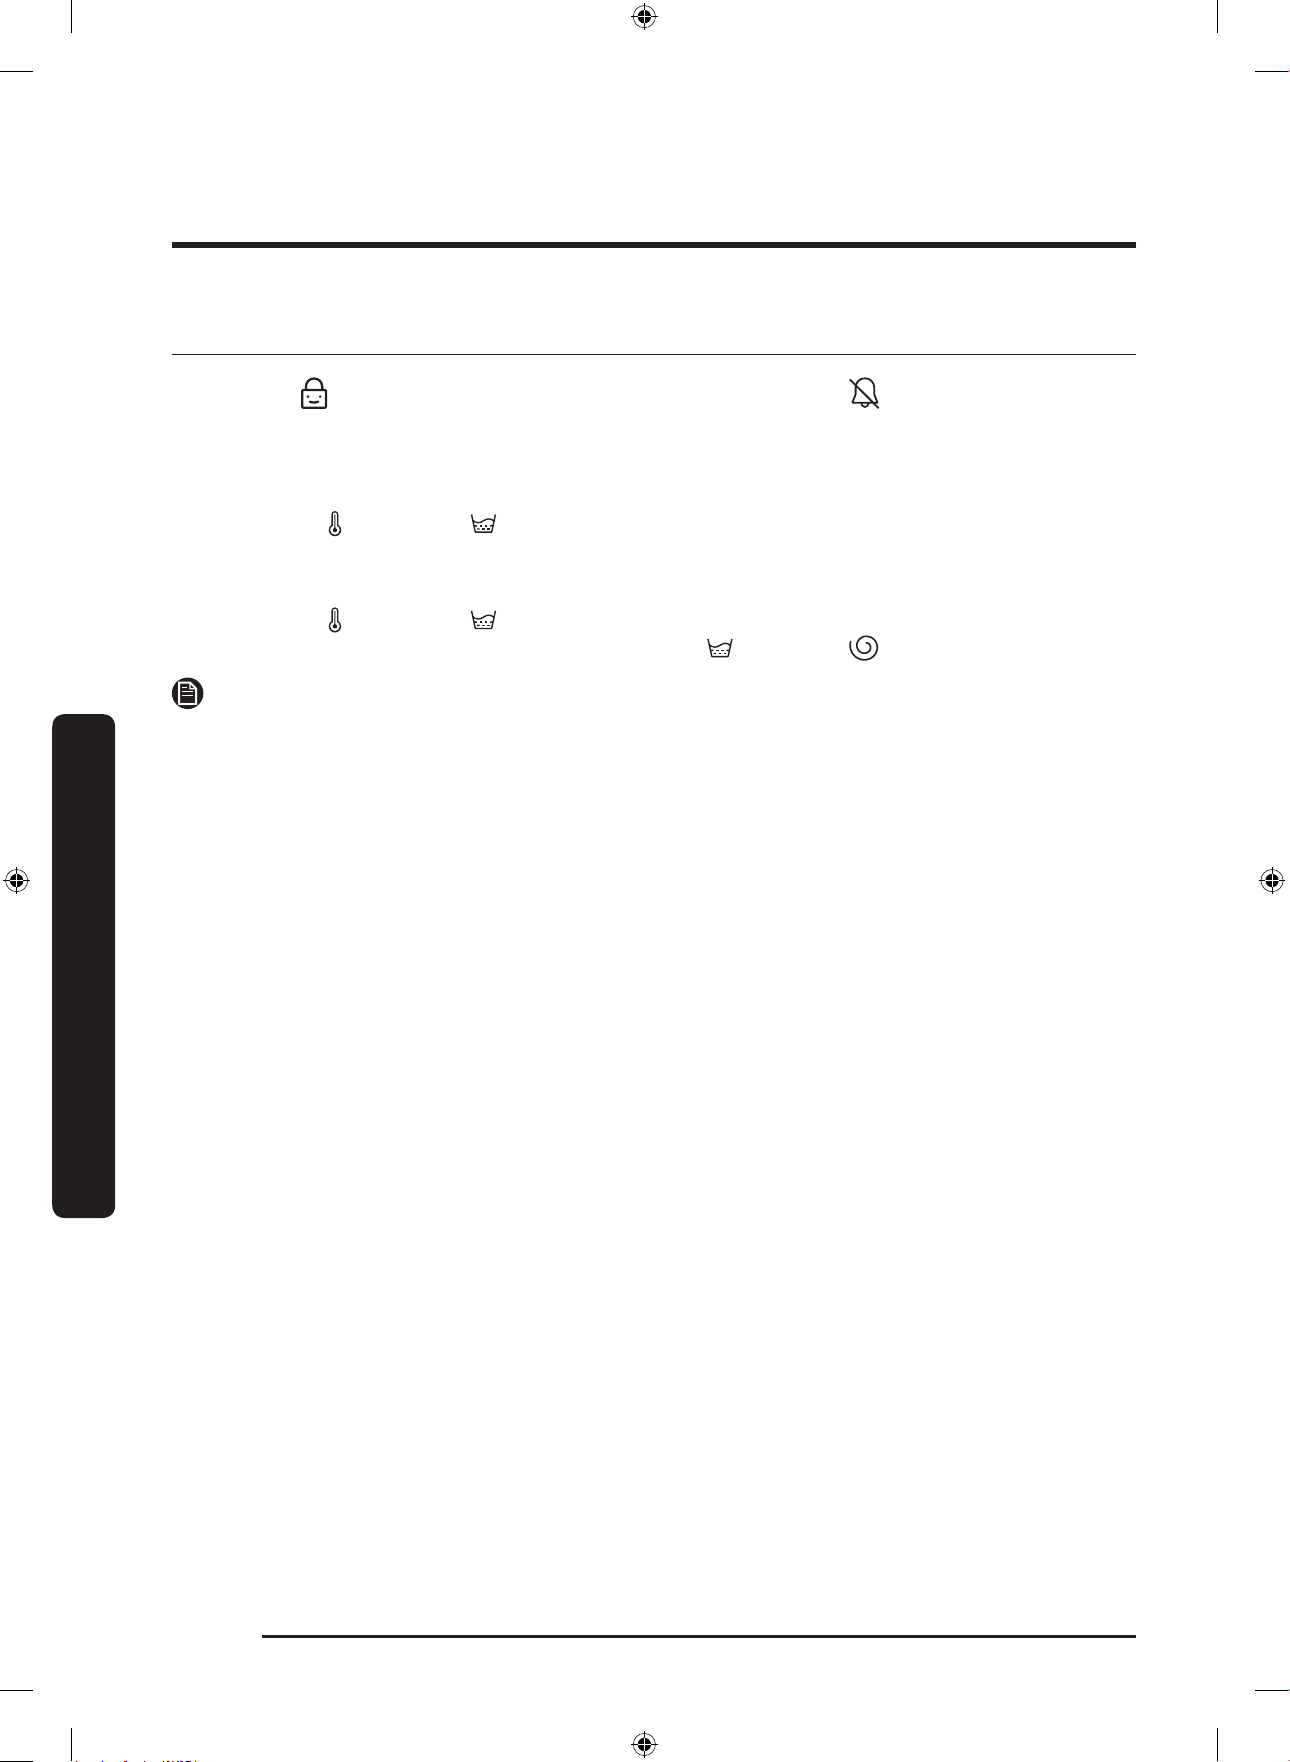
Settings
Child Lock
To prevent accidents by children, Child
Lock locks all buttons except for Power.
• To set the Child Lock function,
hold down Temp. and Rinse
simultaneously for 3 seconds.
• To release the Child Lock function,
hold down Temp. and Rinse
simultaneously for 3 seconds.
NOTE
• In the Child Lock state, you must rst
release the Child Lock if you want to
add detergent or laundry.
• Your setting will be kept even after
restarting the machine.
Sound On/Off
You can turn on or off the sound from the
washing machine. When this function is set
to Off, the AddWash alarm, the melody of
cycle completion, and the power-off beep
will not sound. However, the other sounds
stay active.
• To mute the sound, press and hold
Rinse and Spin for 3 seconds.
• To unmute the sound, press and hold
again for 3 seconds.
• Your setting will be kept even after
restarting the machine.
Untitled-5 40 12/12/2017 12:41:56 PM

English 41
Maintenance
Keep the washing machine clean to prevent deteriorated performance and to preserve its
life cycle.
Eco drum clean
Perform this cycle regularly to clean the drum and to remove bacteria from it.
1. Press Power to turn on the washing machine.
2. Turn the Cycle Selector to select ECO DRUM CLEAN.
3. Press Start/Pause.
NOTE
• The water temperature for ECO DRUM CLEAN is set to 70 °C, which cannot be changed.
• It is recommended to run the ECO DRUM CLEAN cycle once every 40 washes.
CAUTION
Do not use any cleaning agents for cleaning the drum. Chemical residue in the drum
deteriorates the washing performance.
ECO DRUM CLEAN reminder
• The ECO DRUM CLEAN reminder appears on the main screen once every 40 washes. It
is advisable to perform the ECO DRUM CLEAN regularly.
• When you rst see this reminder, you can ignore the reminder for 6 consecutive
washes. From the 7
th
wash, the reminder no longer appears. However, it appears again
on the next 40
th
wash.
Maintenance
Untitled-5 41 12/12/2017 12:41:56 PM
Maintenance
English42
Maintenance
Smart Check
To enable this function, you must rst download the Samsung Smart Washer app at the
Play Store or the App Store, and install it on a mobile device featuring a camera function.
The Smart Check function has been optimized for Galaxy & iPhone series (applicable
models only).
1. When the washing machine detects an issue to check, an information code appears
on the display. To enter Smart Check mode, press and hold Spin and Options
simultaneously for 3 seconds.
2. The washing machine starts the self-diagnosis procedure and displays an information
code if a problem is detected.
3. Run the Samsung Smart Washer app on your mobile device, and tap Smart Check.
4. Put the mobile device close to the washing machine’s display so that the smartphone
camera and the washing machine face each other. Then, the information code will be
recognized automatically by the app.
5. When the information code is recognized correctly, the app provides detailed
information about the problem with applicable solutions.
NOTE
• The function name, Smart Check, may differ depending on the language.
• If there is strong reected light on the washing machine display, the app may fail to
recognize the information code.
• If the app fails to recognize the Smart Check code consecutively, enter the information
code manually onto the app screen.
Untitled-5 42 12/12/2017 12:41:57 PM
English 43
Maintenance
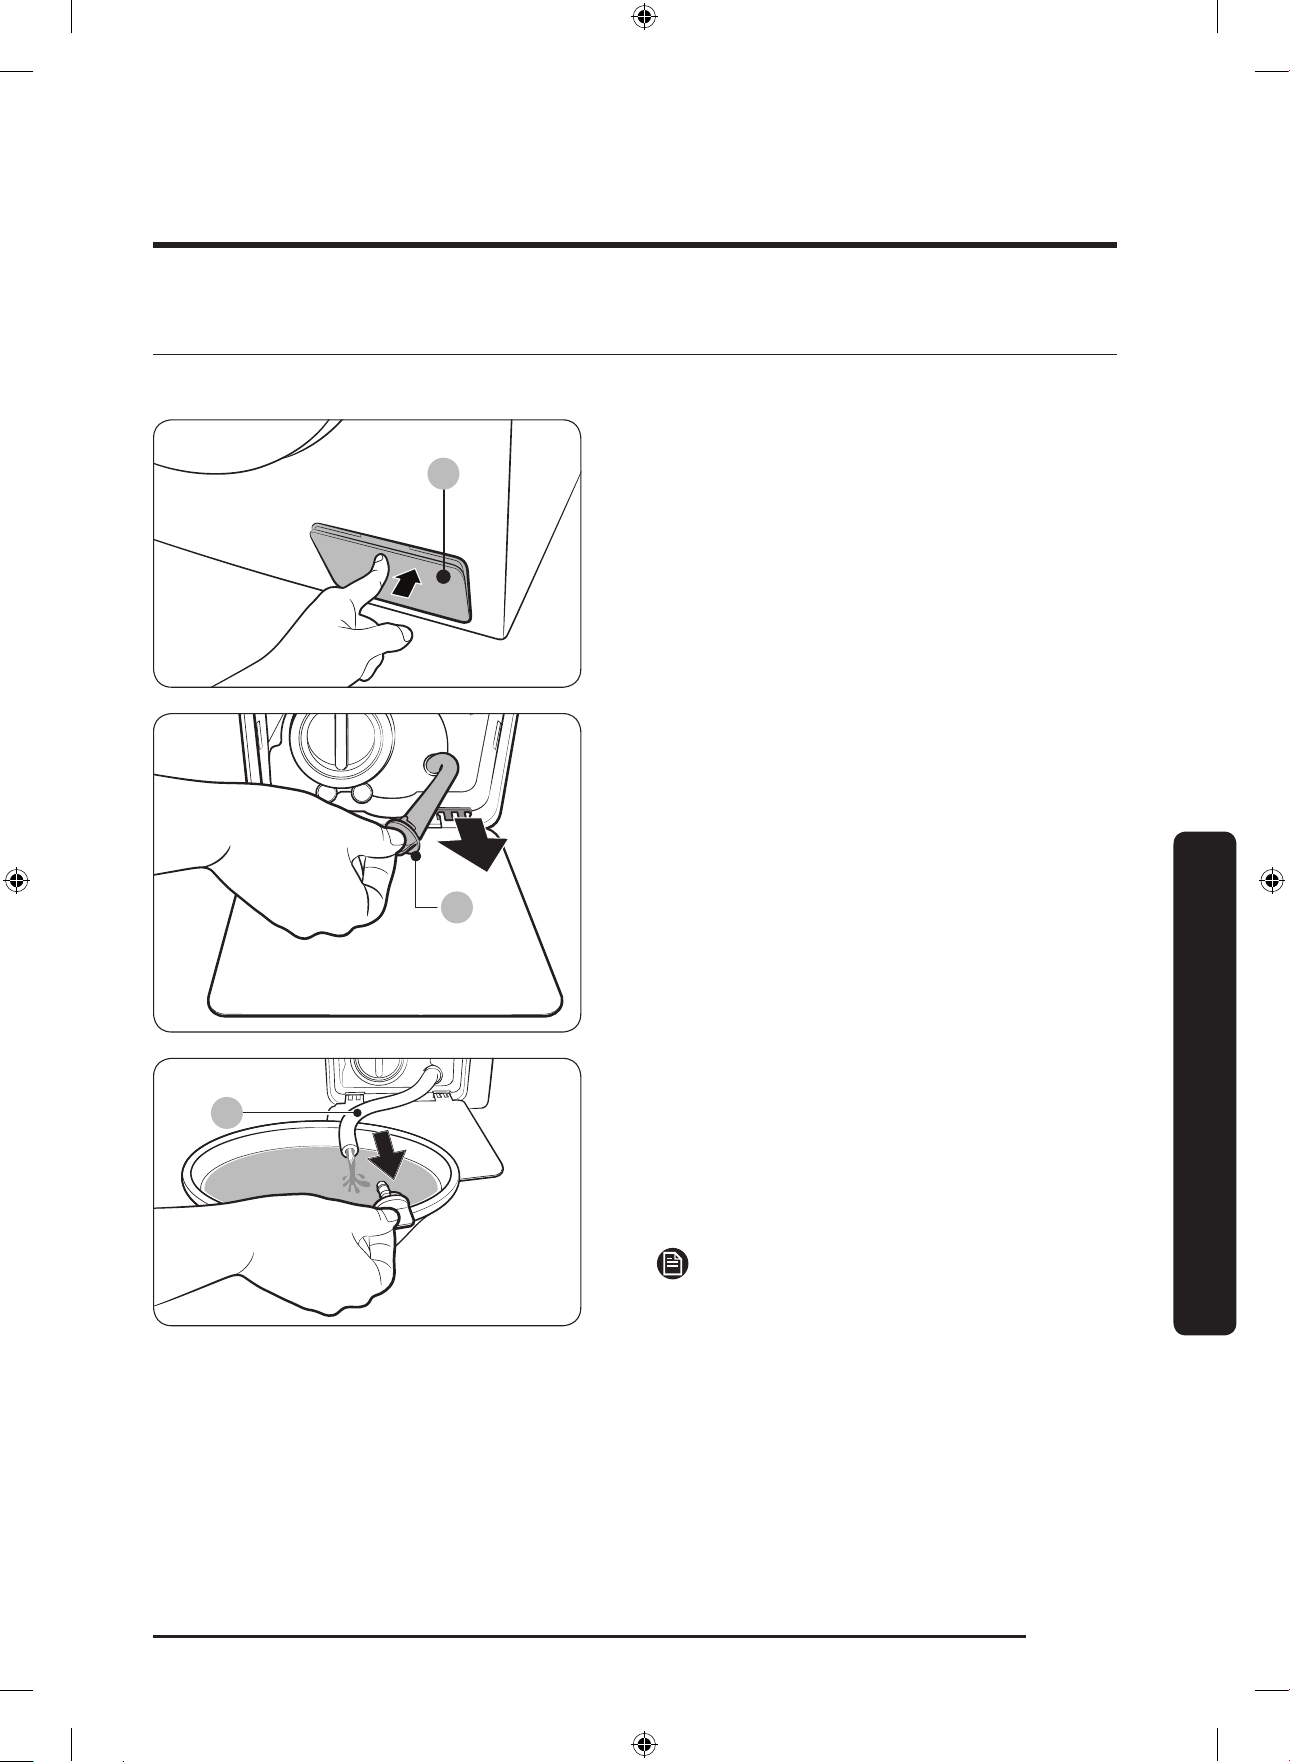
Emergency drain
In case of a power failure, drain the water inside the drum before taking out the laundry.
A
1. Power off and unplug the washing
machine from the electrical outlet.
2. Gently press the top area of the lter
cover (A) to open.
B
3. Put an empty, spacious container
around the cover, and stretch the
emergency drain tube to the container
while holding the tube cap (B).
C
4. Open the tube cap and let water in the
emergency drain tube (C) ow into the
container.
5. When done, close the tube cap, and
reinsert the tube. Then, close the lter
cover.
NOTE
Use a spacious container because the
water in the drum may be more than
expected.
Untitled-5 43 12/12/2017 12:41:57 PM
Maintenance
English44
Maintenance
Cleaning
Surface of the washing machine
Use a soft cloth with a nonabrasive household detergent. Do not spray water onto the
washing machine.
Add Door
A
1. Open the Add Door.
2. Use a wet cloth to clean the Add Door.
- Do not use cleaning agents.
Discolouration may occur.
- Use caution when cleaning the
rubber packing and the locking
mechanism (A).
- Dust off the door area regularly.
3. Wipe up and close the Add Door until
you hear a clicking sound.
CAUTION
• Do not apply force on the Add Door. It may break.
• Do not leave the Add Door open while the machine is operating.
• Do not put heavy objects on the Add Door at any time.
• To prevent physical injury, do not touch the Add Door while the drum is rotating.
• Do not open the Add Door while the machine is operating. This may cause physical
injury.
• Do not manipulate the feature panel while the Add Door is open. This may cause
physical injury or system failure.
• Do not input objects other than laundry.
• Do not input bulky items to the drum through the Add Door.
• Do not pull out the rubber packing of the Add Door when cleaning. This may cause
damage.
Untitled-5 44 12/12/2017 12:41:57 PM
English 45
Maintenance
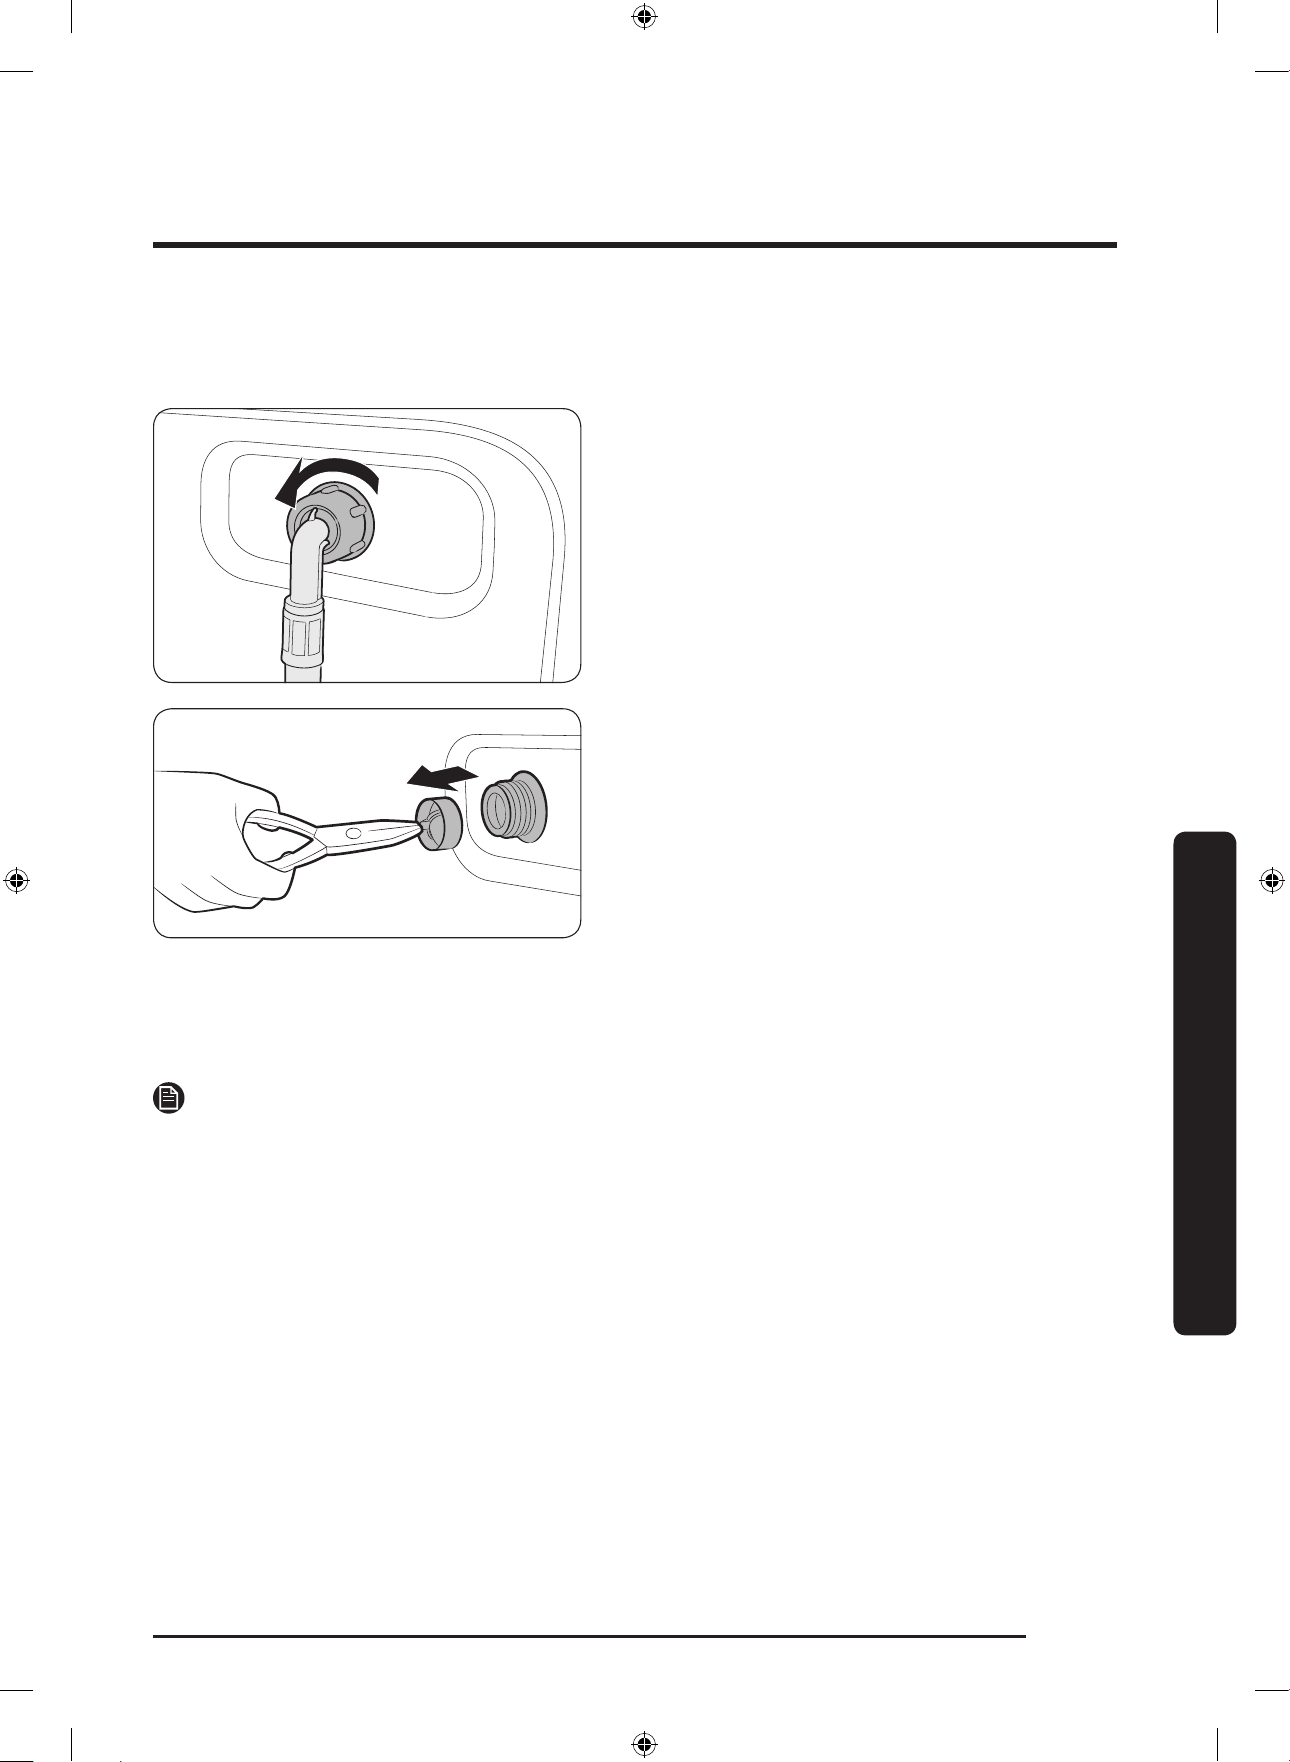
Mesh lter
Clean the mesh lter of the water hose once or twice a year.
1. Turn off the washing machine, and
unplug the power cord.
2. Close the water tap.
3. Loosen and disconnect the water hose
from the back of the washing machine.
Cover the hose with a cloth to prevent
water from gushing out.
4. Use pliers to pull out the mesh lter
from the inlet valve.
5. Submerge the mesh lter deeply in
water so that the threaded connector is
also submerged.
6. Dry the mesh lter completely in the
shade.
7. Reinsert the mesh lter into the inlet
valve, and reconnect the water hose to
the inlet valve.
8. Open the water tap.
NOTE
If the mesh lter is clogged, an information code of “4C” appears on the screen.
Untitled-5 45 12/12/2017 12:41:58 PM
Maintenance
English46
Maintenance
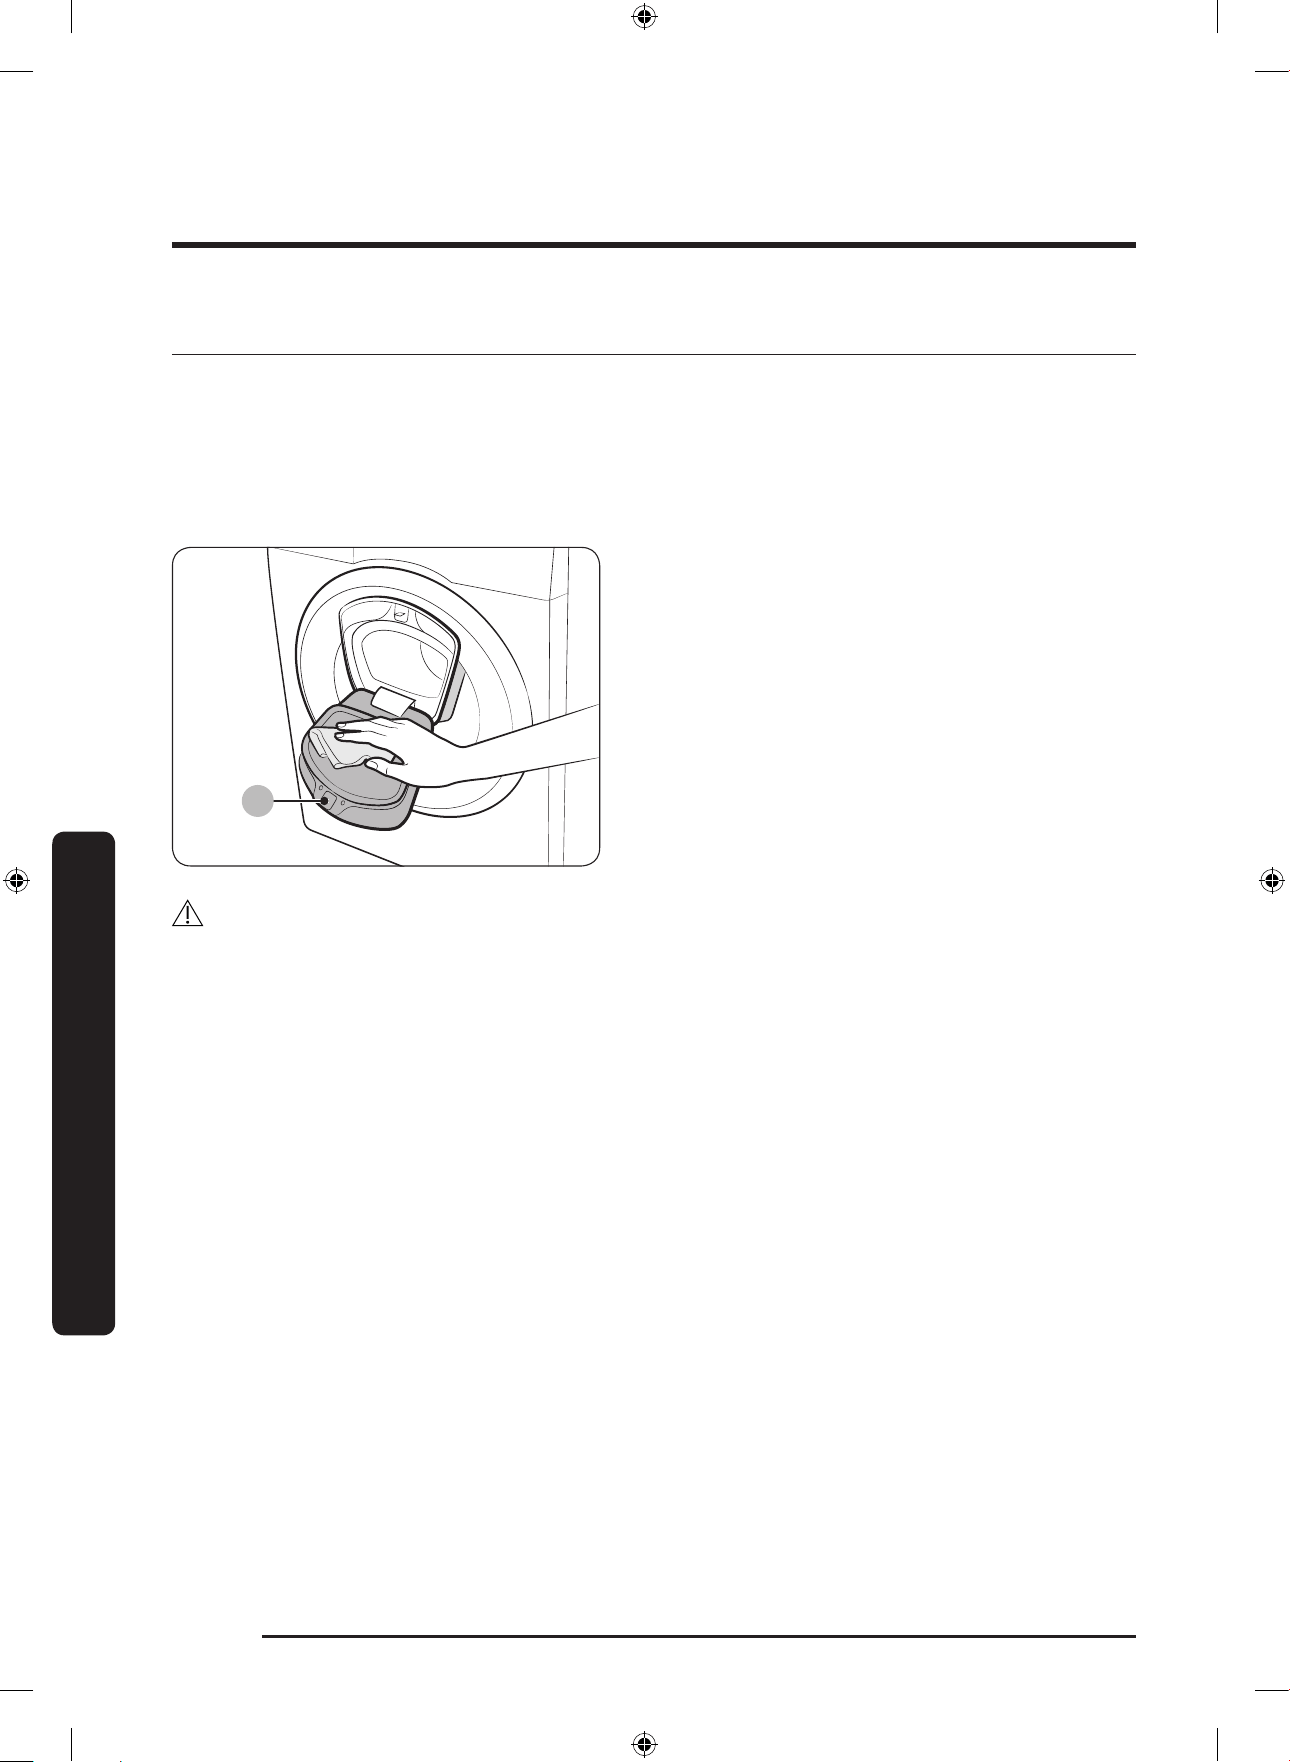
Pump lter
It is advisable to clean the pump lter 5 or 6 times a year to prevent its clogging. A
clogged pump lter may reduce the bubble effect.
1. Turn off the washing machine, and
unplug the power cord.
2. Drain the remaining water inside
the drum. See the “Emergency drain”
section.
3. Gently press the top area of the lter
cover to open.
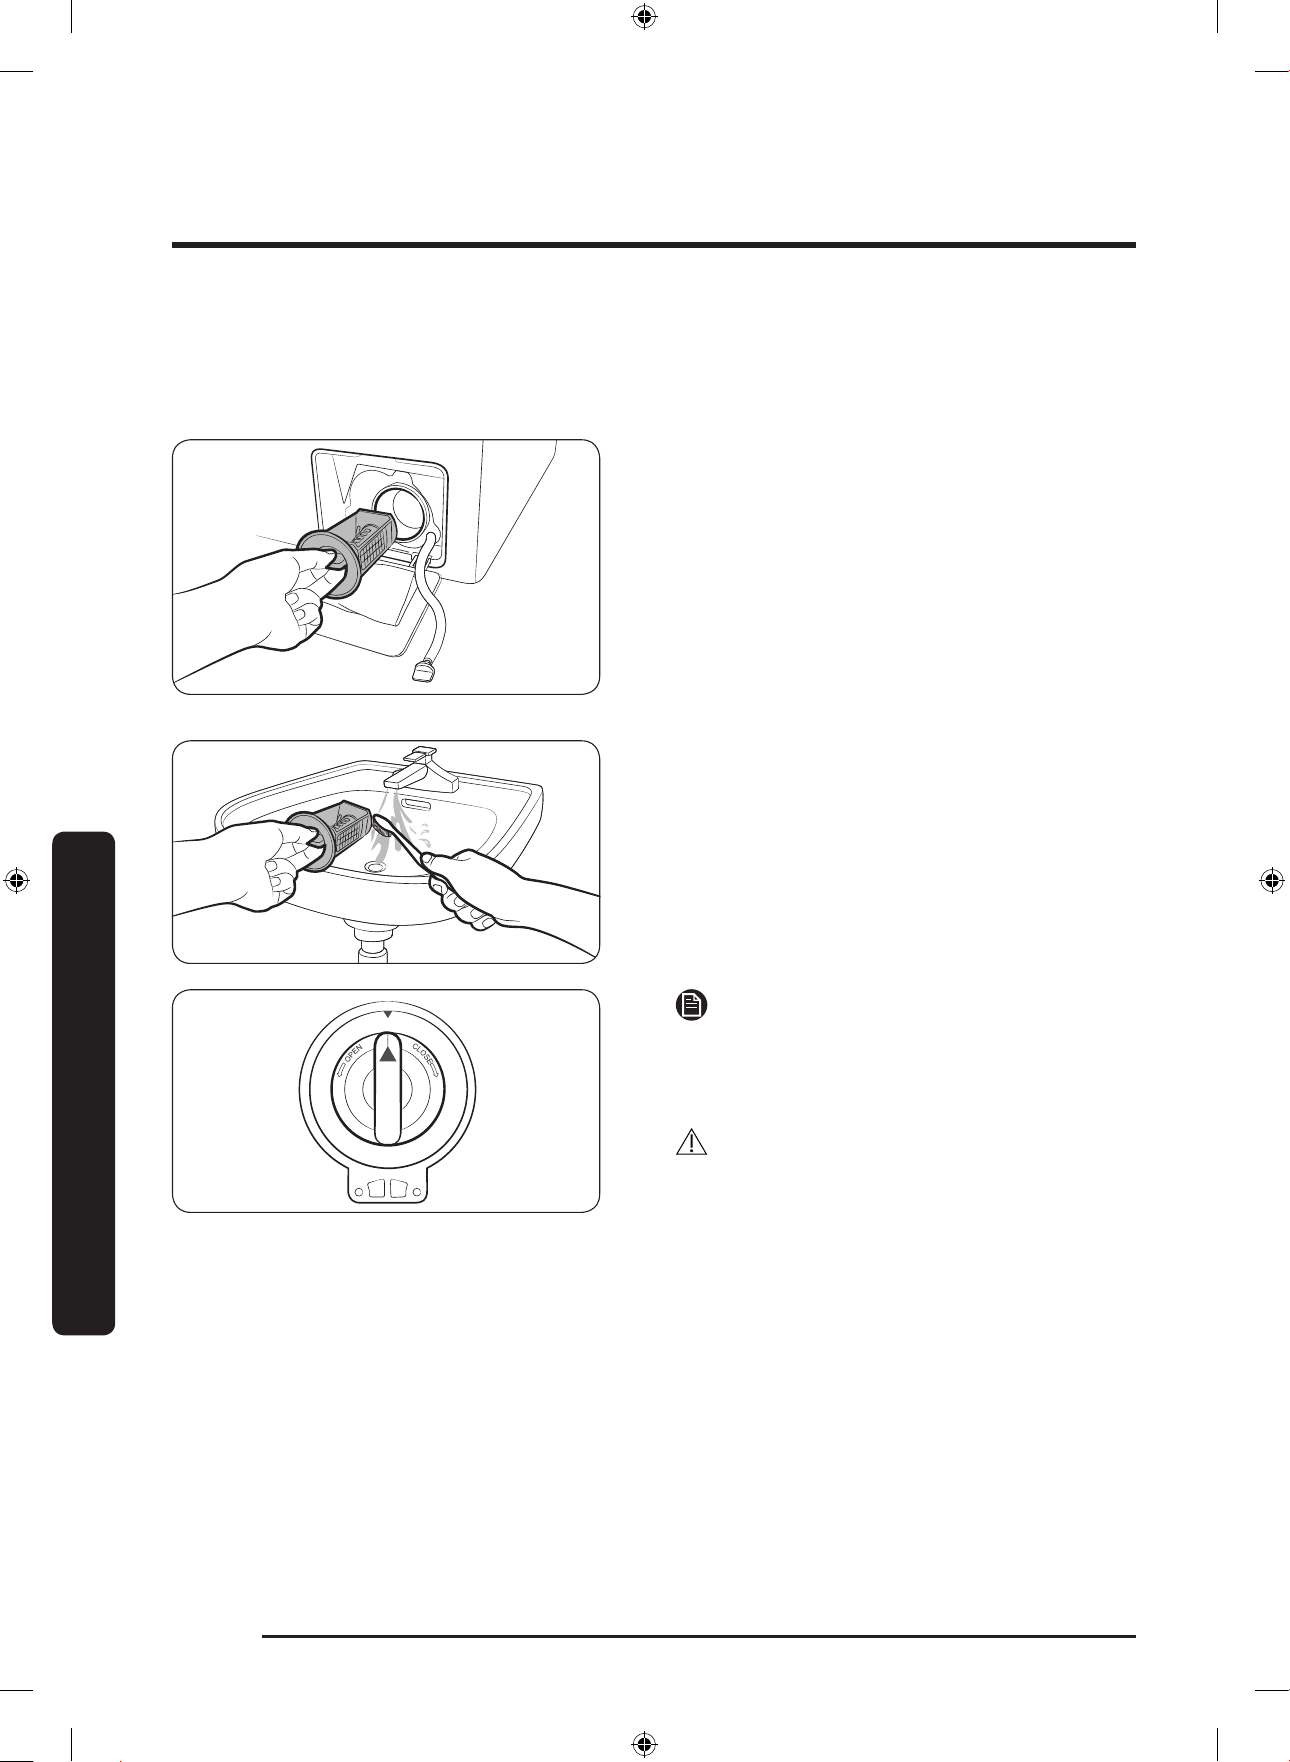
4. Turn the pump lter knob to the left,
and drain off the remaining water.
5. Clean the pump lter using soft
brushes. Make sure the drain pump
propeller inside the lter is unclogged.
6. Reinsert the pump lter, and turn the
lter knob to the right.
NOTE
If the pump lter is clogged, an
information code of “5C” appears on the
screen.
CAUTION
• Make sure the lter knob is closed
properly after cleaning the lter.
Otherwise, this may cause a leak.
• Make sure the lter is inserted properly
after cleaning it. Otherwise, this may
cause an operational failure or a leak.
Untitled-5 46 12/12/2017 12:41:59 PM
English 47
Maintenance
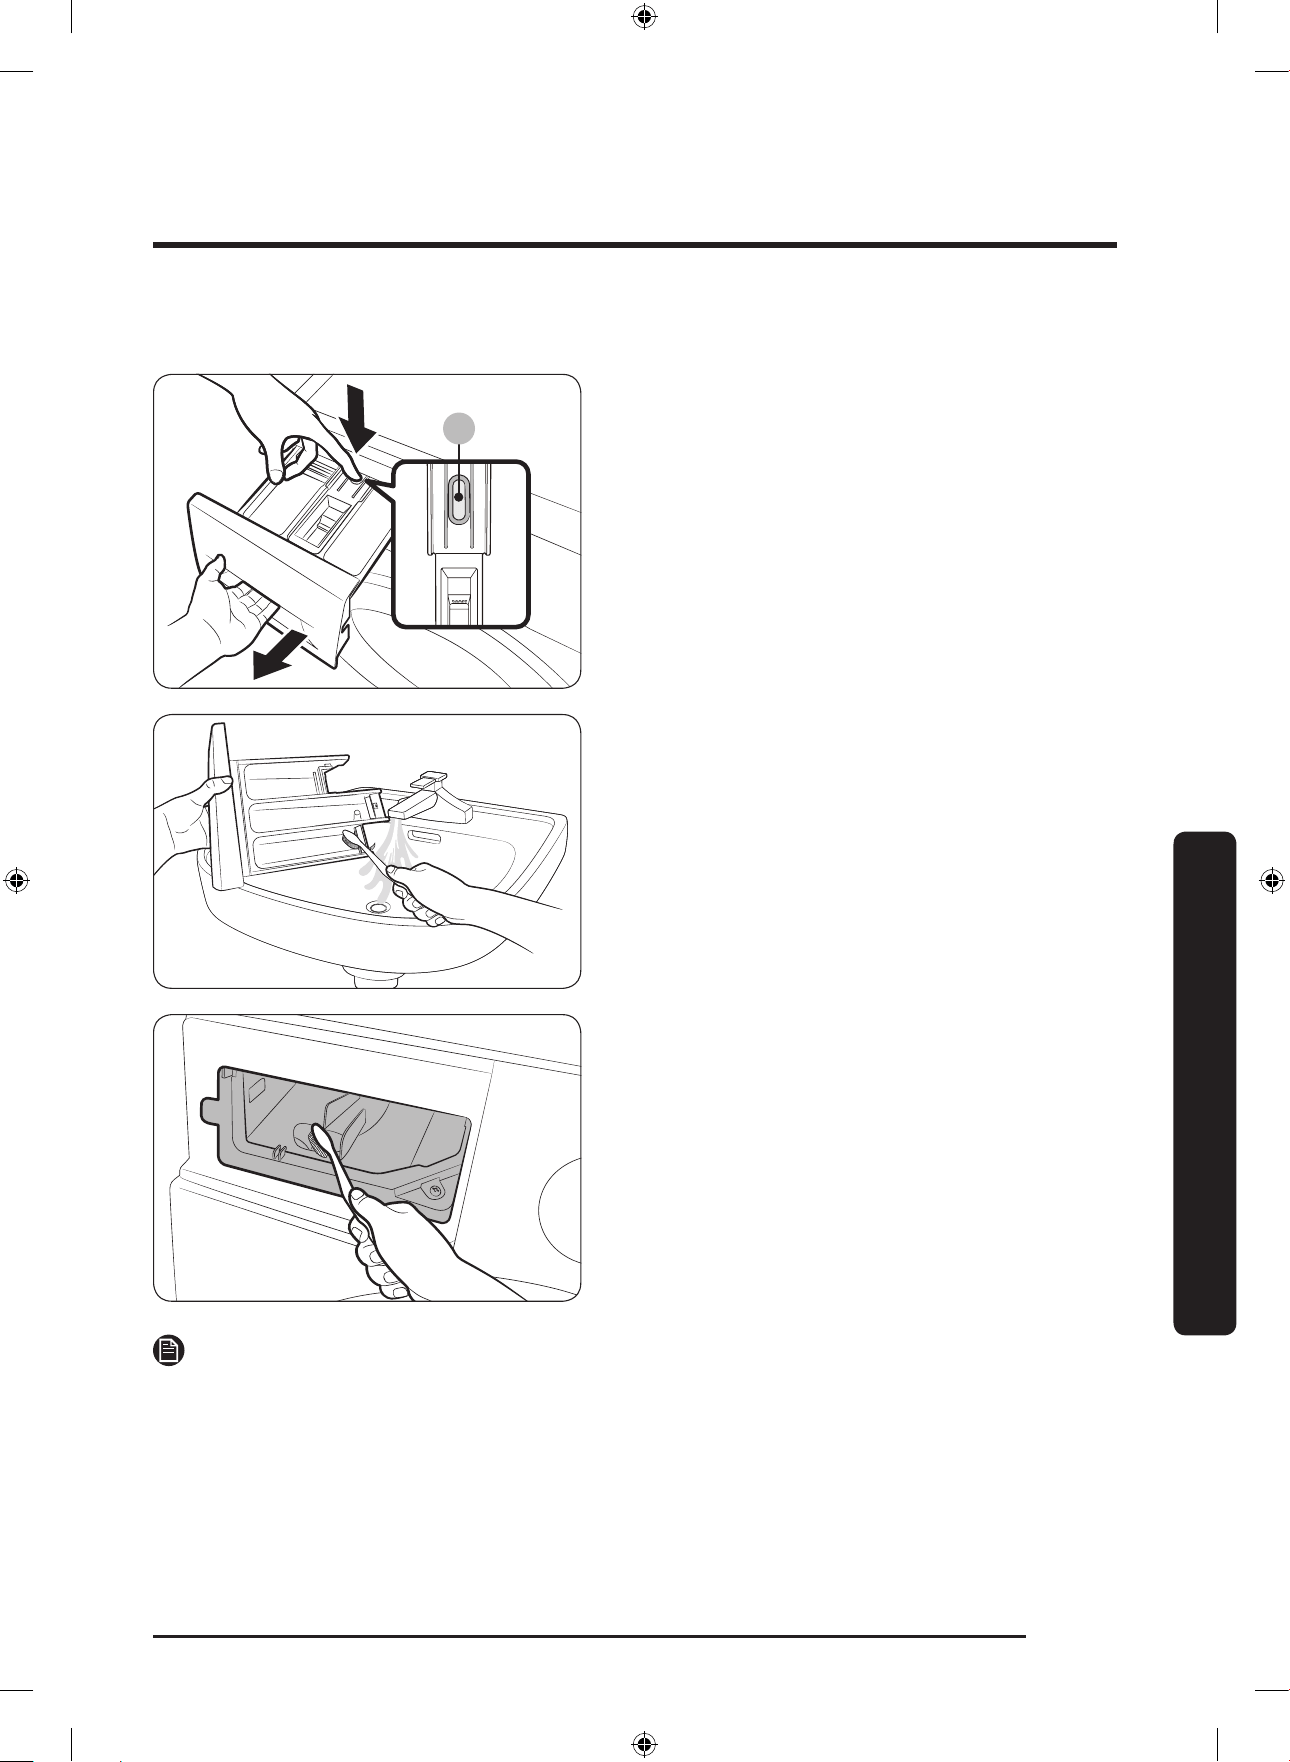
Detergent drawer
A
1. While holding down the release lever
(A) inside the drawer, slide open the
drawer.
2. Remove the release lever and the liquid
detergent guide from the drawer.
3. Clean the drawer components in
owing water using a soft brush.
4. Clean the drawer recess using a soft
brush.
5. Reinsert the release lever and the liquid
detergent guide to the drawer.
6. Slide the drawer inward to close it.
NOTE
To remove remaining detergent, perform the RINSE+SPIN cycle with the drum being
empty.
Untitled-5 47 12/12/2017 12:41:59 PM
Maintenance
English48
Maintenance
Recovery from freezing
The washing machine may freeze when it drops below 0 °C.
1. Turn off the washing machine, and unplug the power cord.
2. Pour warm water over the water tap to loosen the water hose.
3. Disconnect the water hose, and soak it in warm water.
4. Pour warm water into the drum and leave it for about 10 minutes.
5. Reconnect the water hose to the water tap.
NOTE
If the washing machine still doesn’t operate normally, repeat the above steps until it
operates normally.
Care against an extended time of disuse
Avoid leaving the washing machine unused for an extended time. If this is the case, drain
the washing machine and unplug the power cord.
1. Turn the Cycle Selector to select RINSE+SPIN.
2. Empty the drum, and press Start/Pause.
3. When the cycle is complete, close the water tap and disconnect the water hose.
4. Turn off the washing machine, and unplug the power cord.
5. Open the door to let air circulate through the drum.
Untitled-5 48 12/12/2017 12:41:59 PM
English 49
Troubleshooting
Checkpoints
If you encounter a problem with the washing machine, rst check the table below and try
the suggestions.
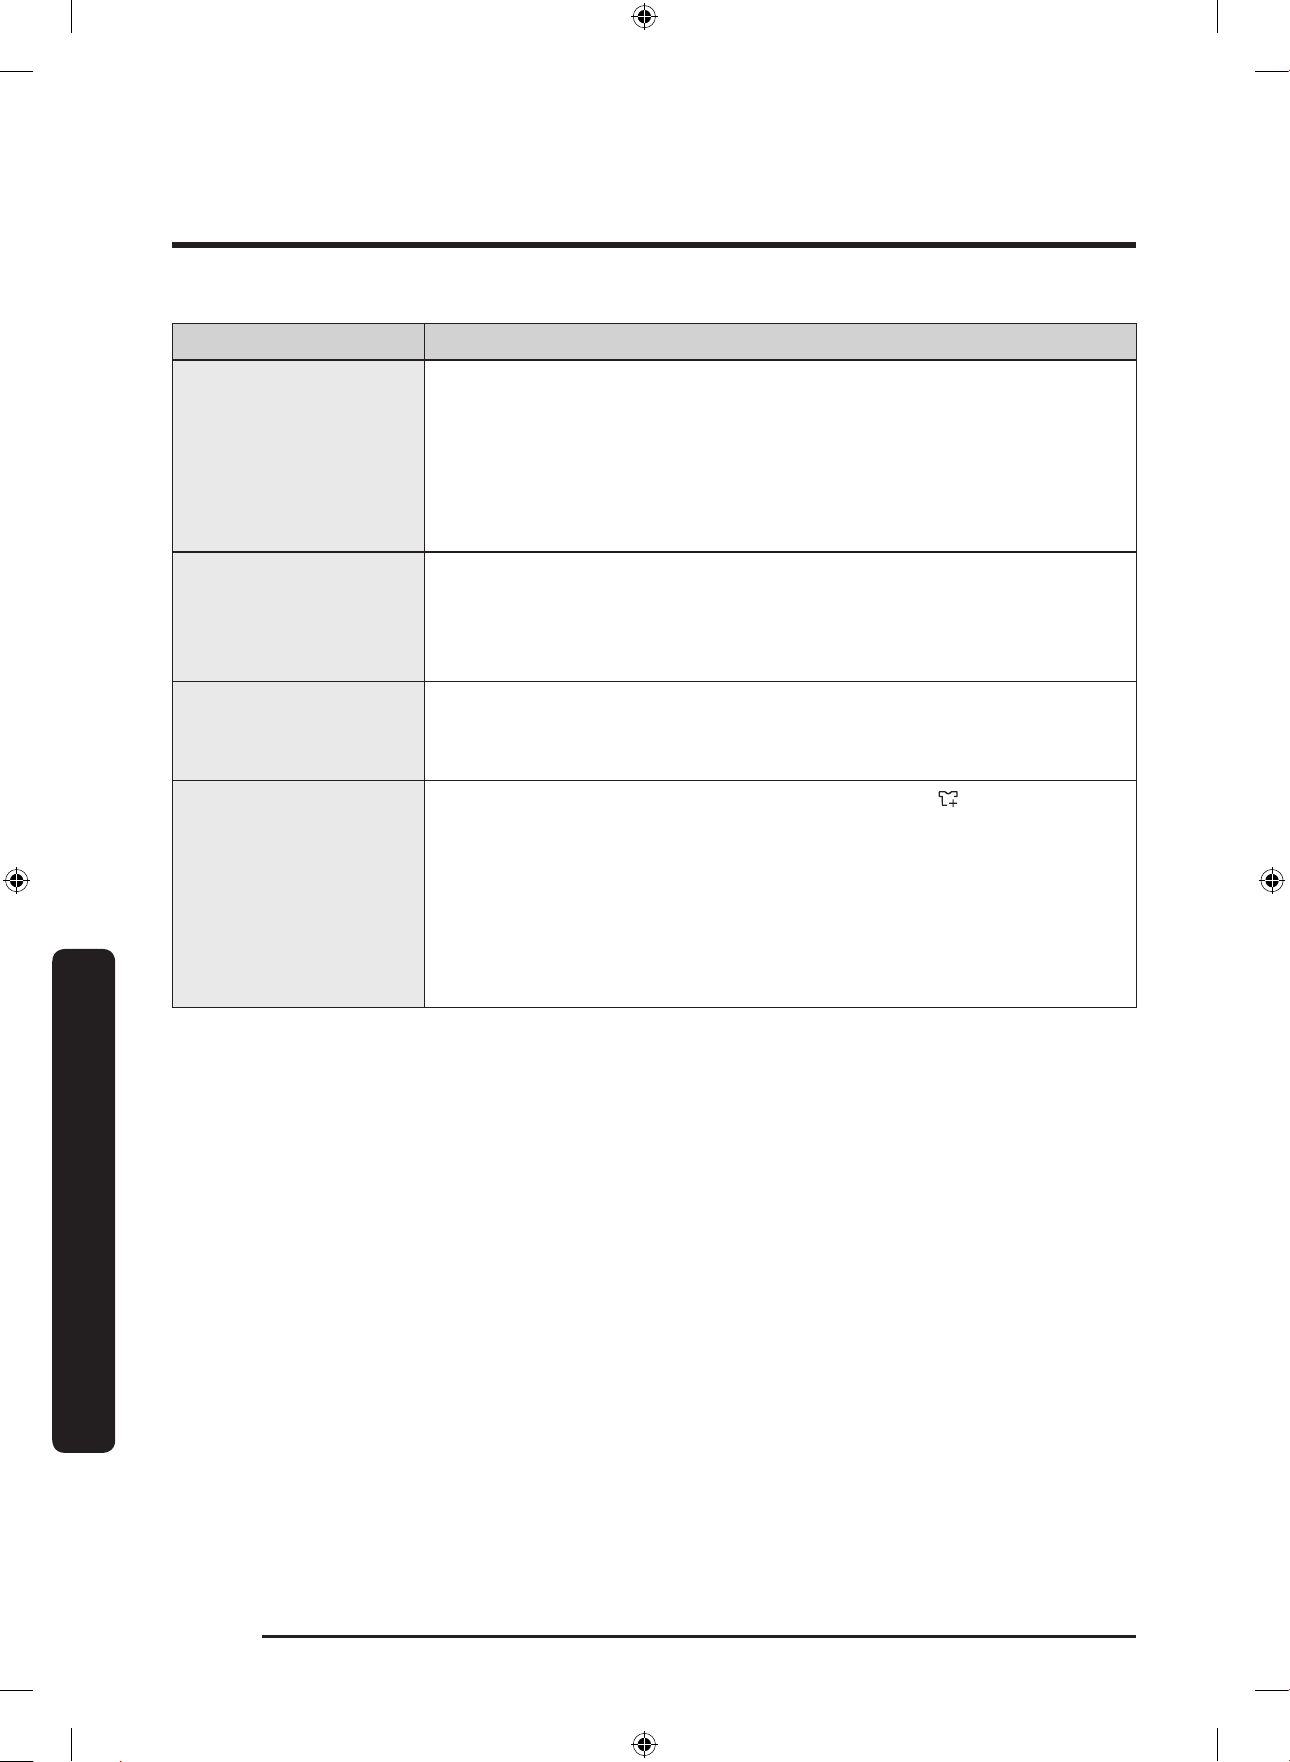
Problem Action
Does not start.
• Make sure the washing machine is plugged in.
• Make sure the door is properly closed.
• Make sure the water taps are open.
• Press or tap Start/Pause to start the washing machine.
• Make sure Child Lock is not activated.
• Before the washing machine starts to ll, it will make a series
of clicking noises to check the door lock and does a quick
drain.
• Check the fuse or reset the circuit breaker.
Water supply is
insufcient, or no
water is supplied.
• Fully open the water tap.
• Make sure the door is properly closed.
• Make sure the water supply hose is not frozen.
• Make sure the water supply hose is not kinked or clogged.
• Make sure there is sufcient water pressure.
After a cycle,
detergent remains
in the detergent
drawer.
• Make sure the washing machine is running with sufcient
water pressure.
• Make sure the detergent is added to the centre of the
detergent drawer.
• Make sure the rinse cap is inserted properly.
• If using granular detergent, make sure the detergent selector
is in the upper position.
• Remove the rinse cap and clean the detergent drawer.
Excessive vibrations
or makes noise.
• Make sure the washing machine is installed on a level, solid
oor that is not slippery. If the oor is not level, use the
levelling feet to adjust the height of the washing machine.
• Make sure the shipping bolts are removed.
• Make sure the washing machine is not contacting any other
object.
• Make sure the laundry load is balanced.
• The motor can cause noise during normal operation.
• Overalls or metal-decorated clothes can cause noise while
being washed. This is normal.
• Metal objects such as coins can cause noise. After washing,
remove these objects from the drum or lter case.
Troubleshooting
Untitled-5 49 12/12/2017 12:41:59 PM

Troubleshooting
English50
Troubleshooting
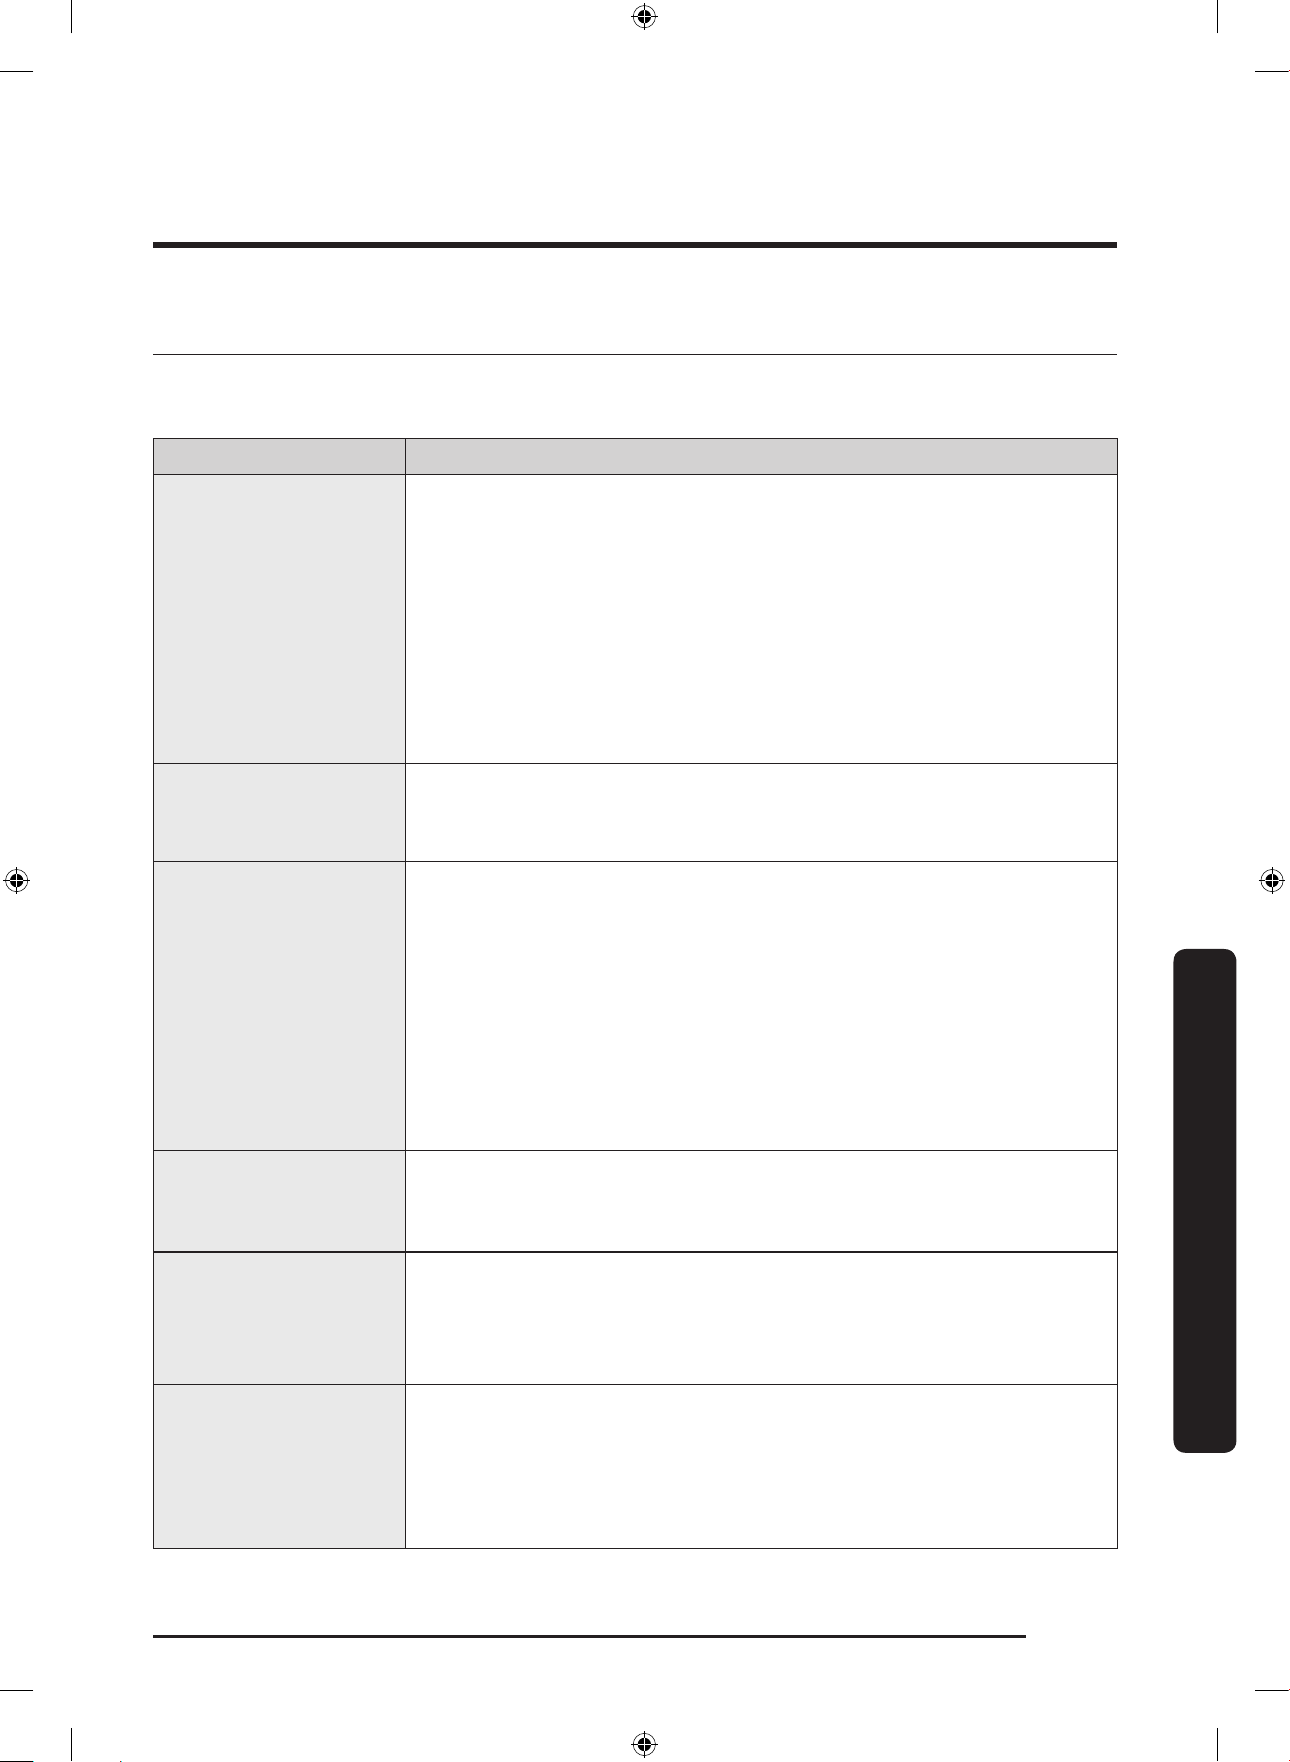
Problem Action
Does not drain and/
or spin.
• Make sure the drain hose is straightened all the way to the
drain system. If you encounter a drain restriction, call for
service.
• Make sure the debris lter is not clogged.
• Close the door and press or tap Start/Pause. For your safety,
the washing machine will not tumble or spin unless the door
is closed.
• Make sure the drain hose is not frozen or clogged.
• Make sure the drain hose is connected to a drain system that
is not clogged.
• If the washing machine is not supplied with sufcient power,
the washing machine temporarily will not drain or spin. As
soon as the washing machine regains sufcient power, it will
operate normally.
The door does not
open.
• Press or tap Start/Pause to stop the washing machine.
• It may take a few moments for the door lock mechanism to
disengage.
• The door will not open until 3 minutes after the washing
machine has stopped or the power turned off.
• Make sure all the water in the drum is drained.
• The door may not open if water remains in the drum. Drain
the drum and open the door manually.
• Make sure the door lock light is off. The door lock light turns
off after the washing machine has drained.
Excessive suds.
• Make sure you use the recommended types of detergent as
appropriate.
• Use high efciency (HE) detergent to prevent oversudsing.
• Reduce the detergent amount for soft water, small loads, or
lightly soiled loads.
• Non-HE detergent is not recommended.
Cannot apply
additional detergent.
• Make sure the remaining amount of detergent and fabric
softener is not over the limit.
Untitled-5 50 12/12/2017 12:41:59 PM
English 51
Troubleshooting
Problem Action
Stops.
• Plug the power cord into a live electrical outlet.
• Check the fuse or reset the circuit breaker.
• Close the door and press Start/Pause to start the washing
machine. For your safety, the washing machine will not
tumble or spin unless the door is closed.
• Before the washing machine starts to ll, it will make a series
of clicking noises to check the door lock and does a quick
drain.
• There may be a pause or soak period in the cycle. Wait briey
and the washing machine may start.
• Make sure the mesh lter of the water supply hose at the
water taps is not clogged. Periodically clean the mesh lter.
• If the washing machine is not supplied with sufcient power,
the washing machine temporarily will not drain or spin. As
soon as the washing machine regains sufcient power, it will
operate normally.
Fills with the wrong
water temperature.
• Fully open both taps.
• Make sure the temperature selection is correct.
• Make sure the hoses are connected to the correct taps. Flush
water lines.
• Make sure the water heater is set to supply a minimum 120
°F (49 °C) hot water at the tap. Also, check the water heater
capacity and recovery rate.
• Disconnect the hoses and clean the mesh lter. The mesh
lter may be clogged.
• While the washing machine lls, the water temperature may
change as the automatic temperature control feature checks
incoming water temperature. This is normal.
• While the washing machine lls, you may notice just hot and/
or just cold water going through the dispenser when cold or
warm temperatures are selected. This is a normal function
of the automatic temperature control feature as the washing
machine determines the water temperature.
Load is wet at the
end of a cycle.
• Use the High or Extra High spin speed.
• Use high efciency (HE) detergent to reduce oversudsing.
• Load is too small. Small loads (one or two items) may become
unbalanced and not spin completely.
• Make sure the drain hose is not kinked or clogged.
Untitled-5 51 12/12/2017 12:42:00 PM
Troubleshooting
English52
Troubleshooting
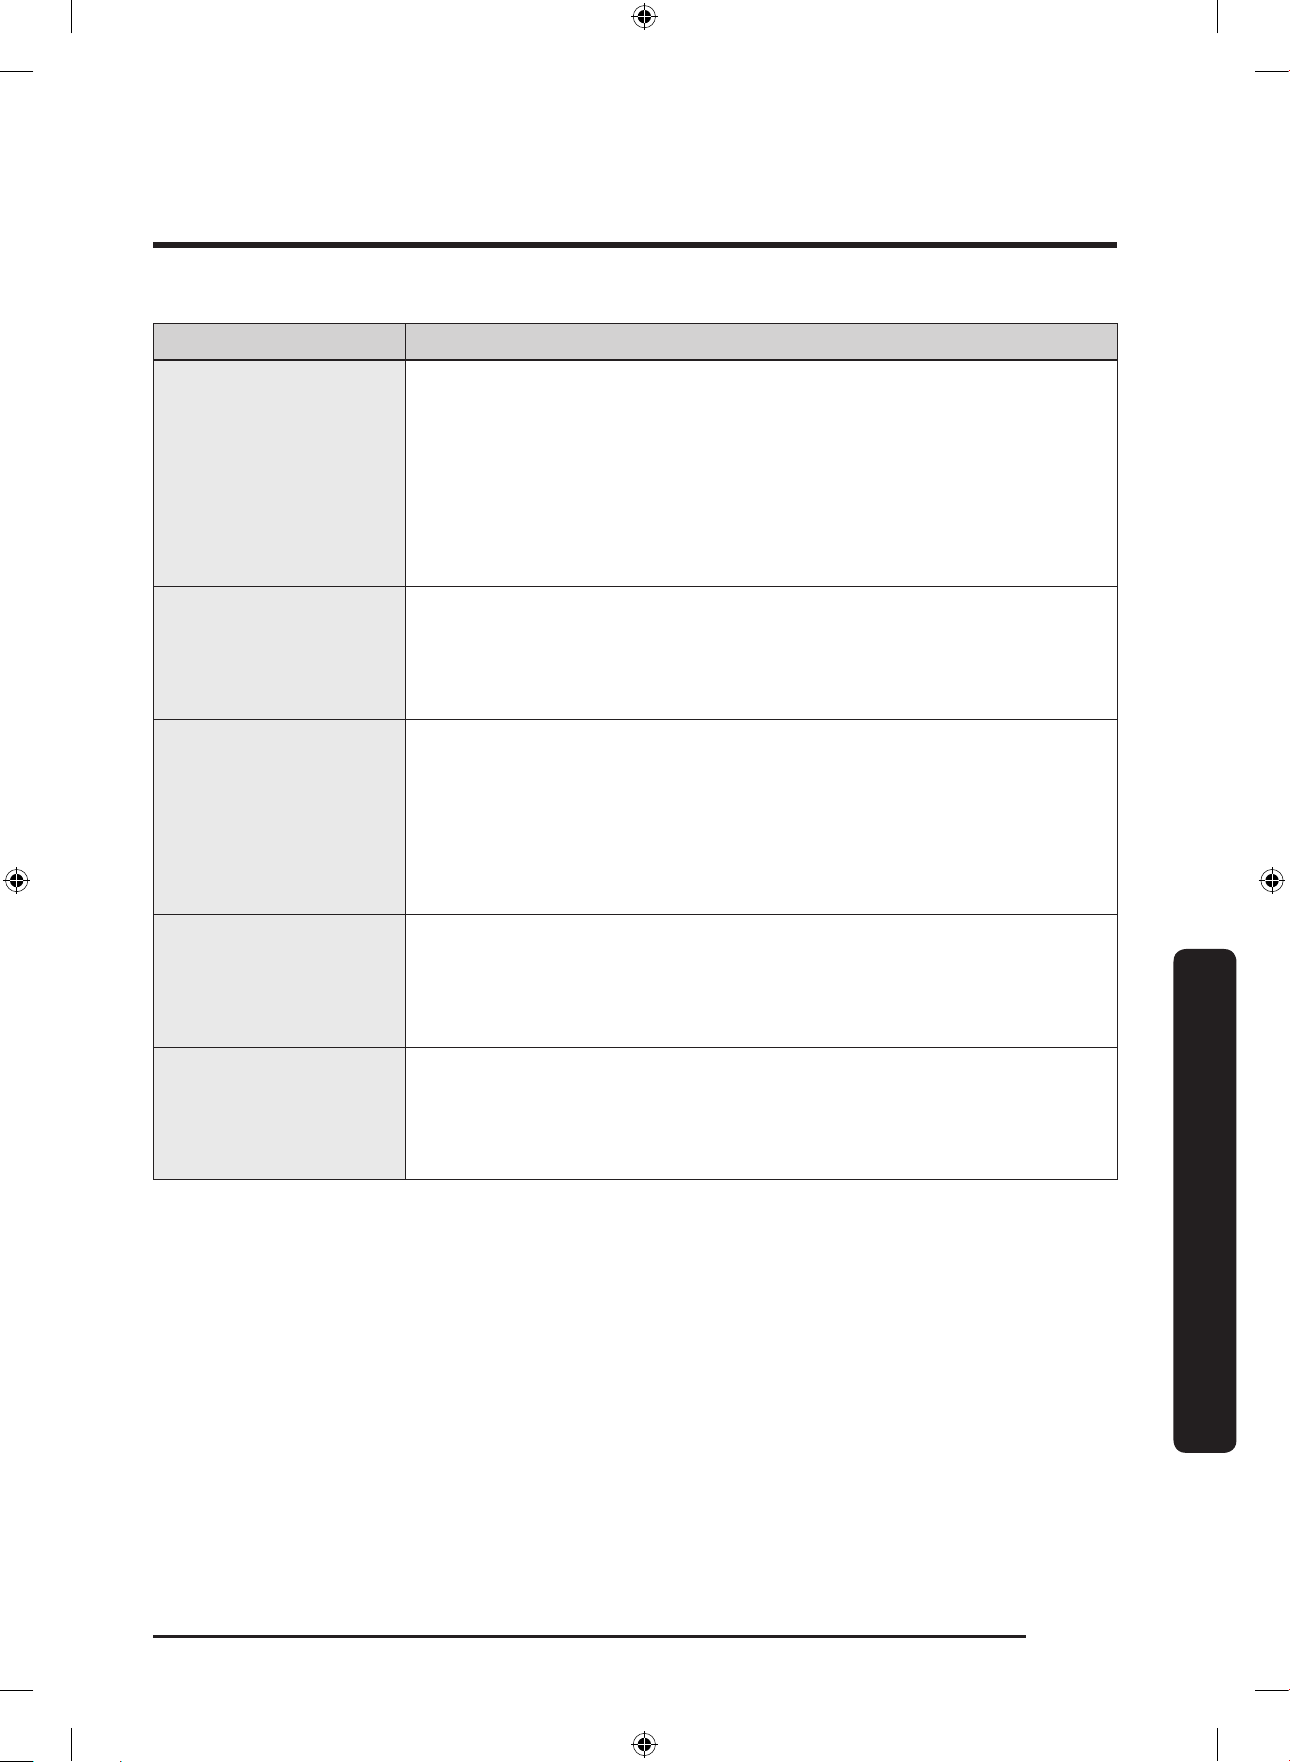
Problem Action
Leaks water.
• Make sure the door is properly closed.
• Make sure all hose connections are tight.
• Make sure the end of the drain hose is correctly inserted and
secured to the drain system.
• Avoid overloading.
• Use high efciency (HE) detergent to prevent oversudsing.
Has odours.
• Excessive suds collect in recesses and can cause foul odours.
• Run cleansing cycles to sanitize periodically.
• Clean the door seal (diaphragm).
• Dry the washing machine interior after a cycle has nished.
No bubbles are seen
(Bubbleshot models
only).
• Overloading may screen bubbles.
• Severely contaminated laundry may not generate bubbles.
Can I open the Add
Door at any time?
• The Add Door can be opened only when the indicator
appears. However, it does not open in the following cases:
- When the boiling or drying process is running and the
internal temperature becomes high.
- If you set the Child Lock for safety reasons.
- When the drum wash or drum drying cycle is running that
does not involve additional laundry.
If a problem persists, contact a local Samsung service centre.
Untitled-5 52 12/12/2017 12:42:00 PM
English 53
Troubleshooting
Information codes
If the washing machine fails to operate, you may see an information code on the screen.
Check the table below and try the suggestions.
Code Action
4C
Water is not supplied.
• Make sure the water taps are open.
• Make sure the water hoses are not clogged.
• Make sure the water taps are not frozen.
• Make sure the washing machine is operating with sufcient
water pressure.
• Make sure that the cold water tap and the hot water tap are
properly connected.
• Clean the mesh lter as it may be clogged.
4C2
• Make sure the cold water supply hose is rmly connected to
the cold water tap. If it is connected to the hot water tap, the
laundry may be deformed with some cycles.
5C
Water is not draining.
• Make sure the drain hose is not frozen or clogged.
• Make sure the drain hose is positioned correctly, depending
on the connection type.
• Clean the debris lter as it may be clogged.
• Make sure the drain hose is straightened all the way to the
drain system.
• If the information code remains, contact a customer service
centre.
dC
Operating the washer with the door open.
• Make sure the door is properly closed.
• Make sure laundry is not caught in the door.
OC
Water has overowed.
• Restart after spinning.
• If the information code remains on the display, contact a local
Samsung service centre.
LC, LC1
Check the drain hose.
• Make sure the end of the drain hose is not placed on the oor.
• Make sure the drain hose is not clogged.
• If the information code remains, contact a customer service
centre.
Untitled-5 53 12/12/2017 12:42:00 PM

Troubleshooting
English54
Troubleshooting
Code Action
Ub
Spinning does not work.
• Make sure laundry is spread out evenly.
• Make sure the washing machine is on a at, stable surface.
• Redistribute the load. If only one item of clothing needs
washing, such as a bathrobe or pair of jeans, the nal spin
result might be unsatisfactory, and an “Ub” check message
will be shown in the display.
3C
Check the motor for operation.
• Try restarting the cycle.
• If the information code remains, contact a customer service
centre.
UC
The electronic control needs to be checked.
• Check if power is supplied properly.
• If the information code remains, contact a customer service
centre.
Low voltage detected.
• Check if the power cord is plugged in.
• If the information code remains, contact a customer service
centre.
HC
High temperature heating check.
• If the information code remains, contact a customer service
centre.
1C
The Water Level sensor is not working properly.
• Turn the machine off, and restart the cycle.
• If the information code remains, contact a customer service
centre.
AC
Check communications between main and sub PBAs.
• Turn the machine off, and restart the cycle.
• If the information code remains, contact a customer service
centre.
Untitled-5 54 12/12/2017 12:42:00 PM
English 55
Troubleshooting
Code Action
DDC, ddC
This message appears when you open the Add Door without
pressing Start/Pause. If this happens, do one of the following:
• Press the Add Door to close properly. Then, press Start/Pause
and try again.
• To add laundry, open the Add Door and input laundry. Close
the Add Door properly. Then, press Start/Pause to resume
operation.
8C
The MEMS sensor is not working properly.
• Turn the machine off, and restart the cycle.
• If the information code remains, contact a local Samsung
service centre.
AC6
Check communications between the main and the inverter PBAs.
• Depending on the state, the machine may automatically
returns to normal operation.
• Turn the machine off, and restart the cycle.
• If the information code remains, contact a local Samsung
service centre.
DC1
The Main Door lock/unlock is not working properly.
• Turn the machine off, and restart the cycle.
• If the information code remains, contact a local Samsung
service centre.
DC3
The Add Door lock/unlock is not working properly.
• Turn the machine off, and restart the cycle.
• If the information code remains, contact a local Samsung
service centre.
If any information code keeps appearing on the screen, contact a local Samsung service
centre.
Untitled-5 55 12/12/2017 12:42:00 PM
English56
Specications
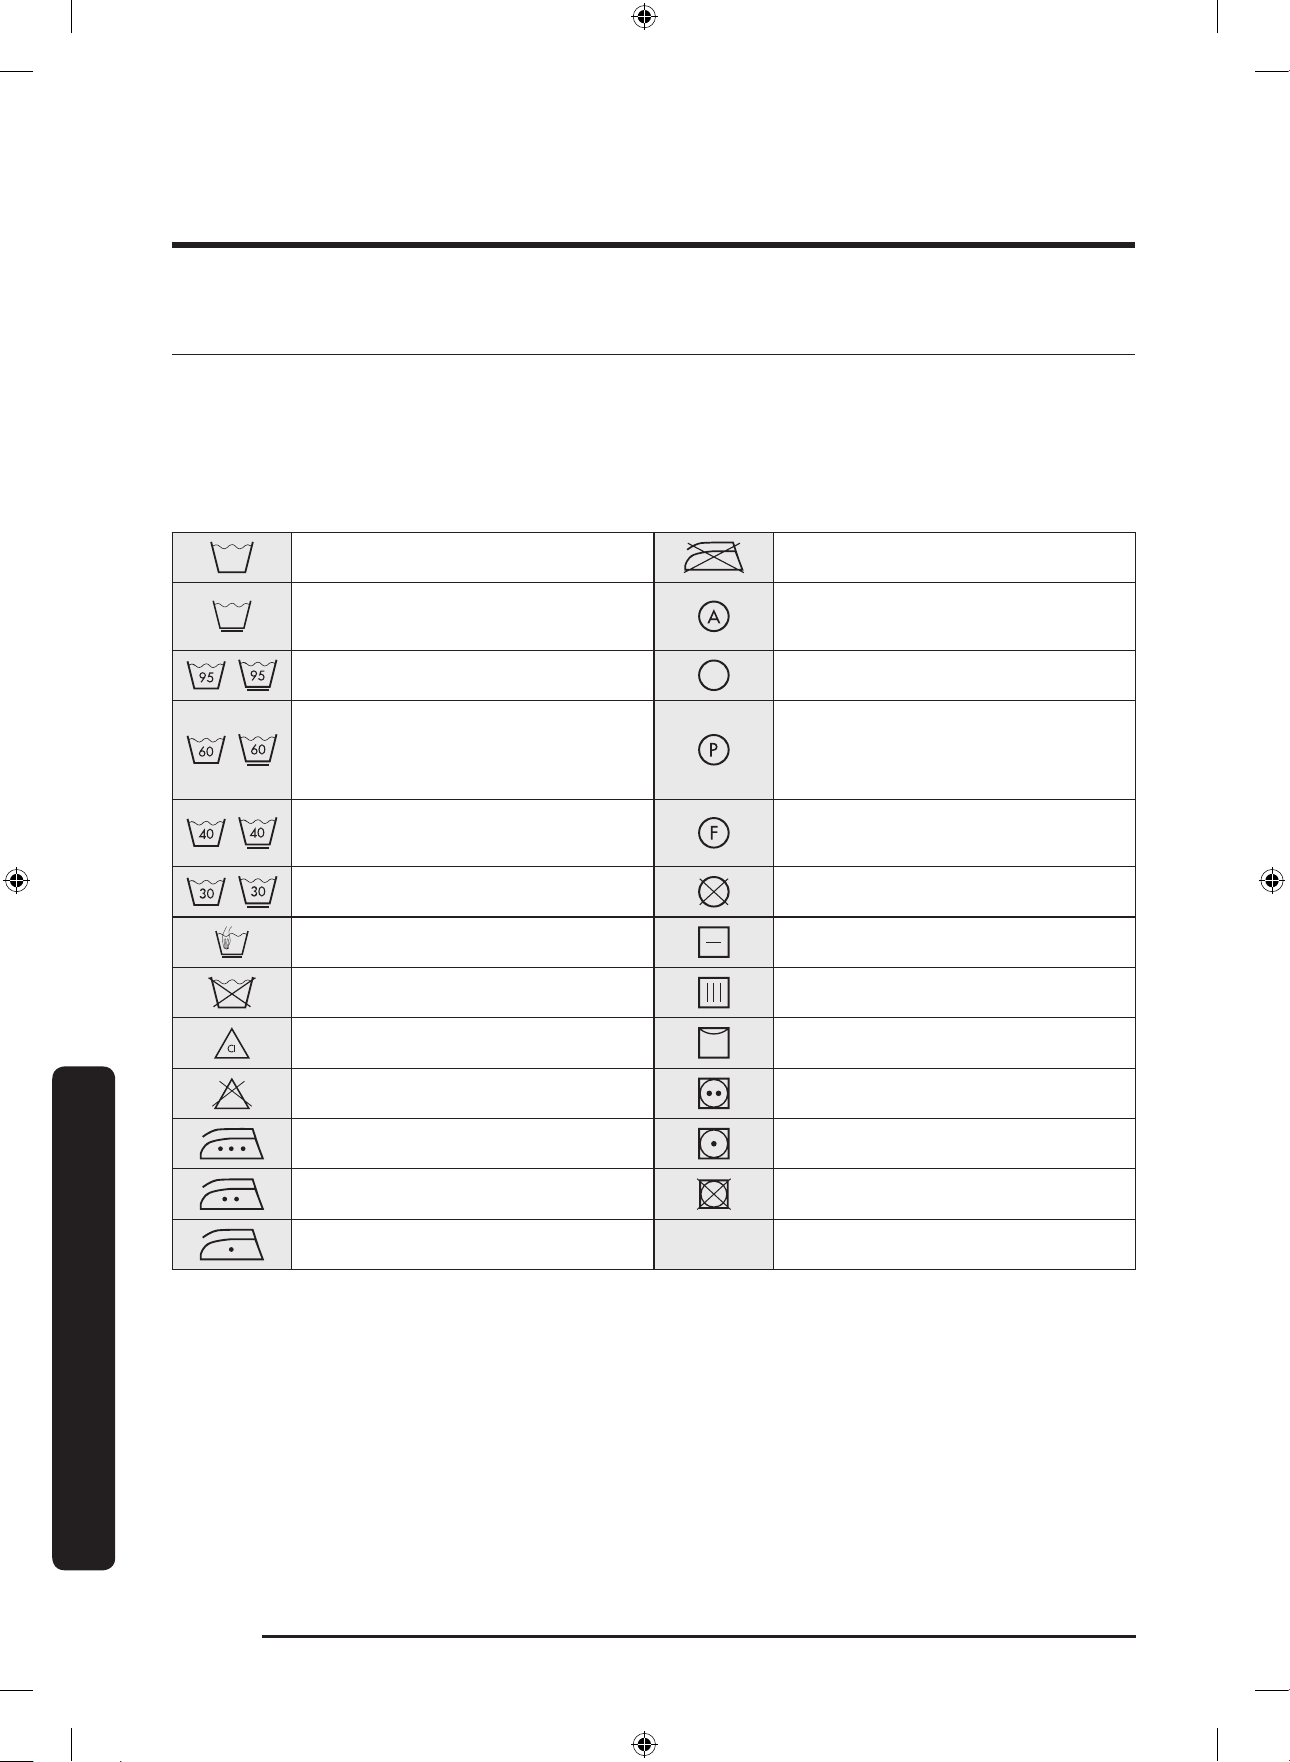
Fabric care chart
The following symbols provide garment care directions. The care labels include four
symbols in this order: washing, bleaching, drying and ironing (and dry cleaning when
necessary). The use of symbols ensures consistency among garment manufacturers of
domestic and imported items. Follow the care label directions to maximise garment life
and reduce laundry problems.
Resistant material Do not iron
Delicate fabric
Can be dry cleaned using any
solvent
Item can be washed at 95 °C Dry clean
Item can be washed at 60 °C
Dry clean with perchloride,
lighter fuel, pure alcohol or
R113 only
Item can be washed at 40 °C
Dry clean with aviation fuel,
pure alcohol or R113 only
Item can be washed at 30 °C Do not dry clean
Hand wash only Dry at
Dry clean only Can be hung to dry
Can be bleached in cold water Dry on clothes hanger
Do not bleach Tumble dry, normal heat
Can be ironed at 200 °C max Tumble dry, reduced heat
Can be ironed at 150 °C max Do not tumble dry
Can be ironed at 100 °C max
Specications
Untitled-5 56 12/12/2017 12:42:03 PM

English 57
Specications
Protecting the environment
• This appliance is manufactured from recyclable materials. If you decide to dispose of
this appliance, please observe local waste disposal regulations. Cut off the power cord
so that the appliance cannot be connected to a power source. Remove the door so that
animals and small children cannot get trapped inside the appliance.
• Do not exceed the detergent quantities recommended in the detergent manufacturer’s
instructions.
• Use stain removal products and bleaches before the wash cycle only when strictly
necessary.
• Save water and electricity by only washing full loads (the exact amount depends upon
the cycle used).
Untitled-5 57 12/12/2017 12:42:03 PM
Specications
English58
Specications
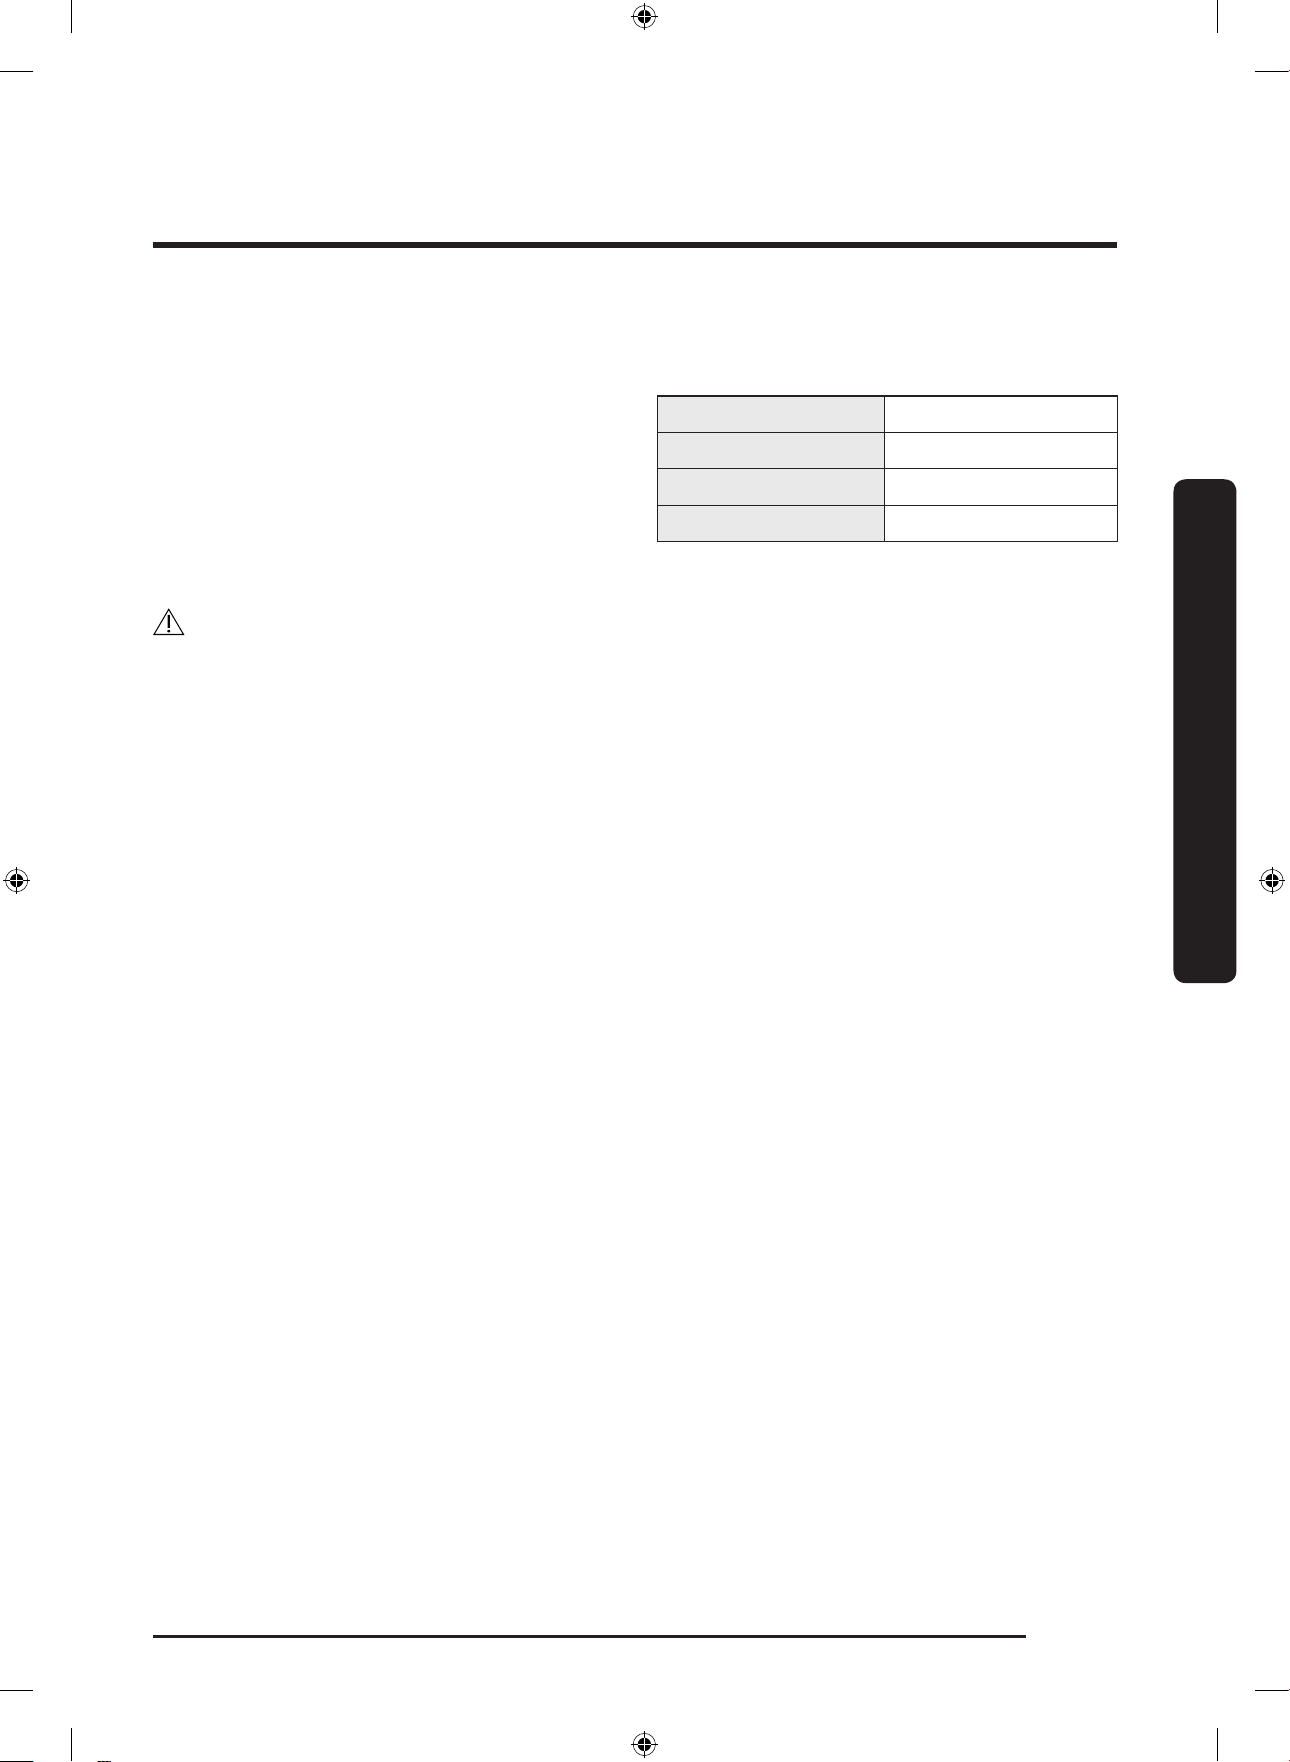
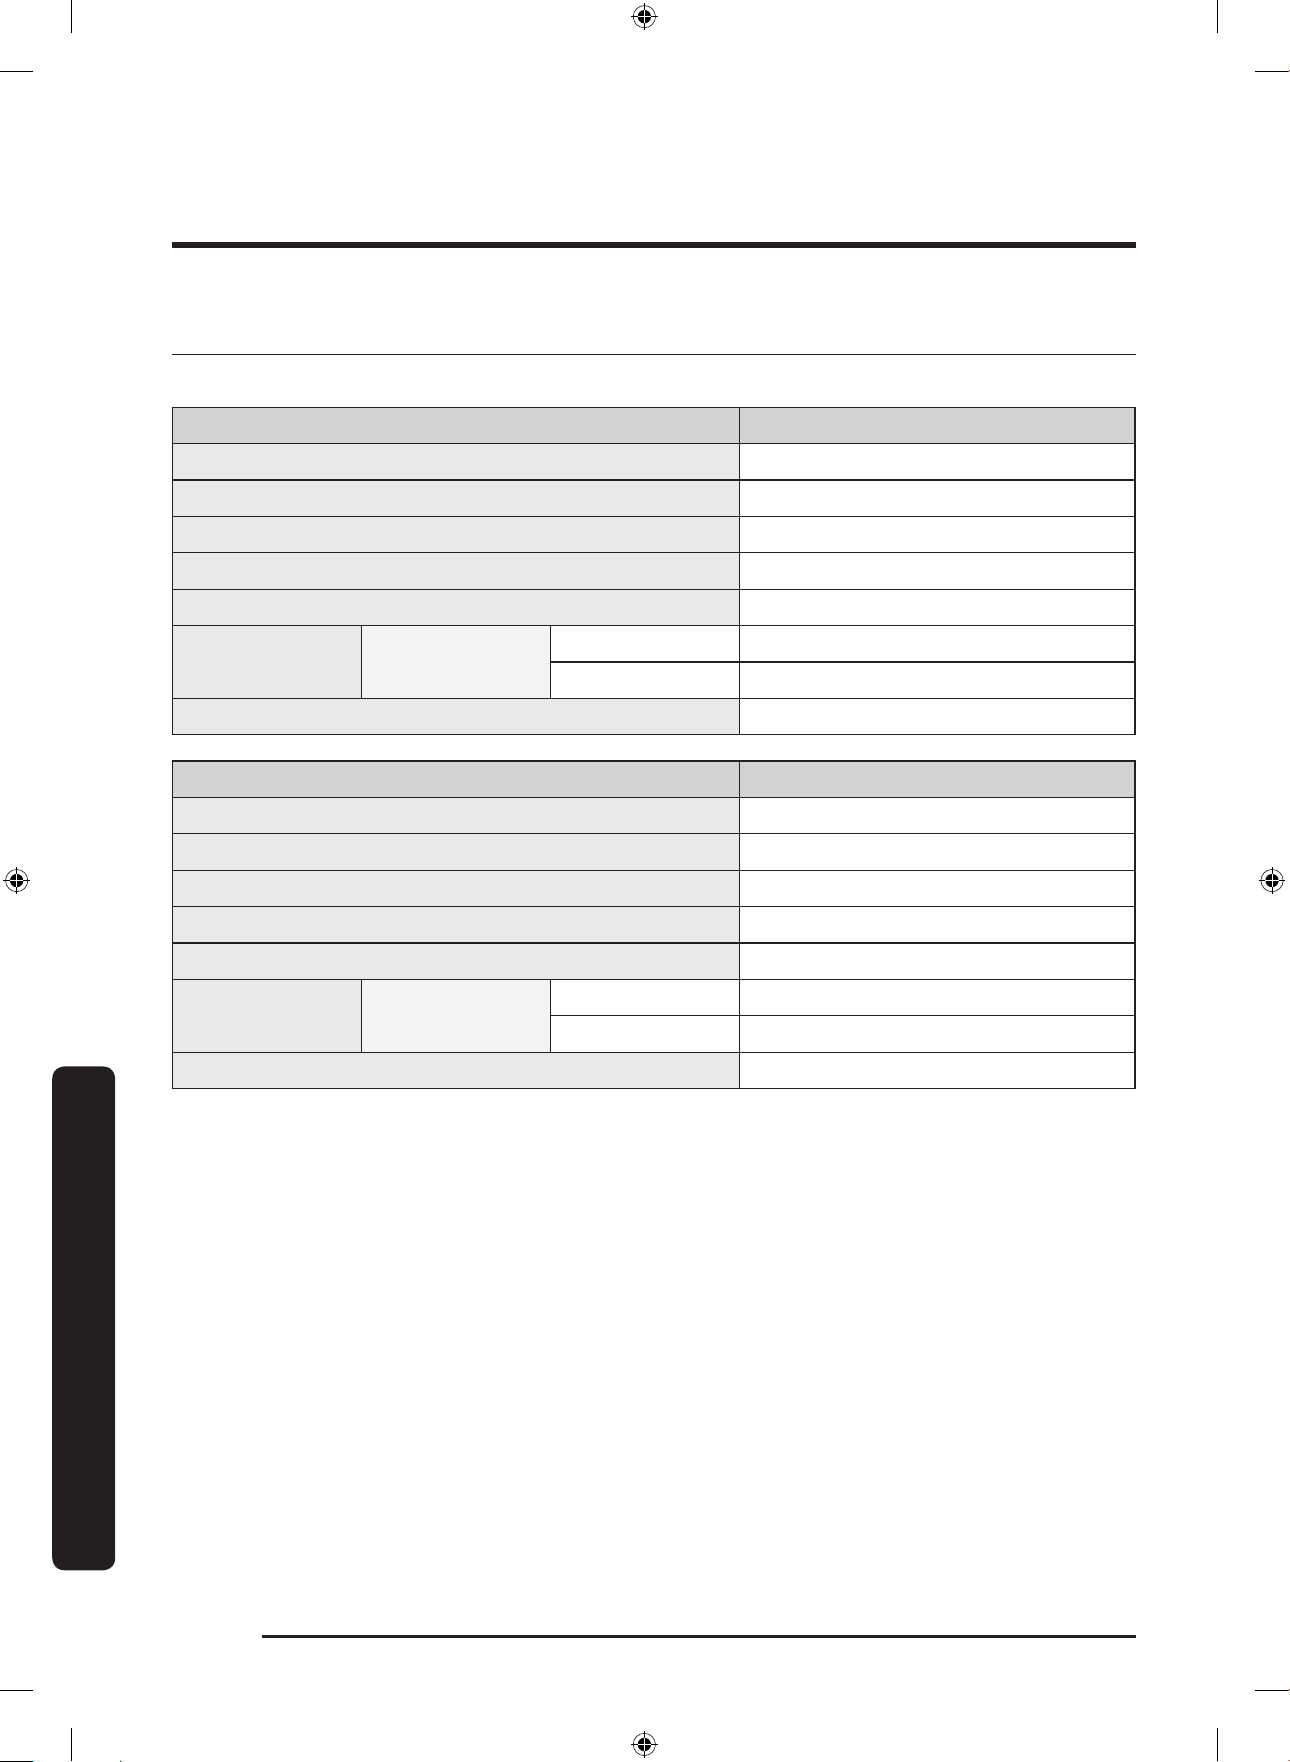
Specication sheet
“*” Asterisk(s) means variant model and can be varied (0-9) or (A-Z).
Type Front loading washing machine
Model name WW9*K5*****
Dimensions W 600 x D 550 x H 850 (mm)
Water pressure 50-800 kPa
Net weight 63.0 kg
Wash and spin capacity 9.0 kg
Power
consumption
Washing and
heating
220 V 2000 W
240 V 2400 W
Spin revolutions 1400 rpm
Type Front loading washing machine
Model name WW8*K5*****
Dimensions W 600 x D 550 x H 850 (mm)
Water pressure 50-800 kPa
Net weight 63.0 kg
Wash and spin capacity 8.0 kg
Power
consumption
Washing and
heating
220 V 2000 W
240 V 2400 W
Spin revolutions 1400 rpm
Untitled-5 58 12/12/2017 12:42:04 PM
English 59
Specications
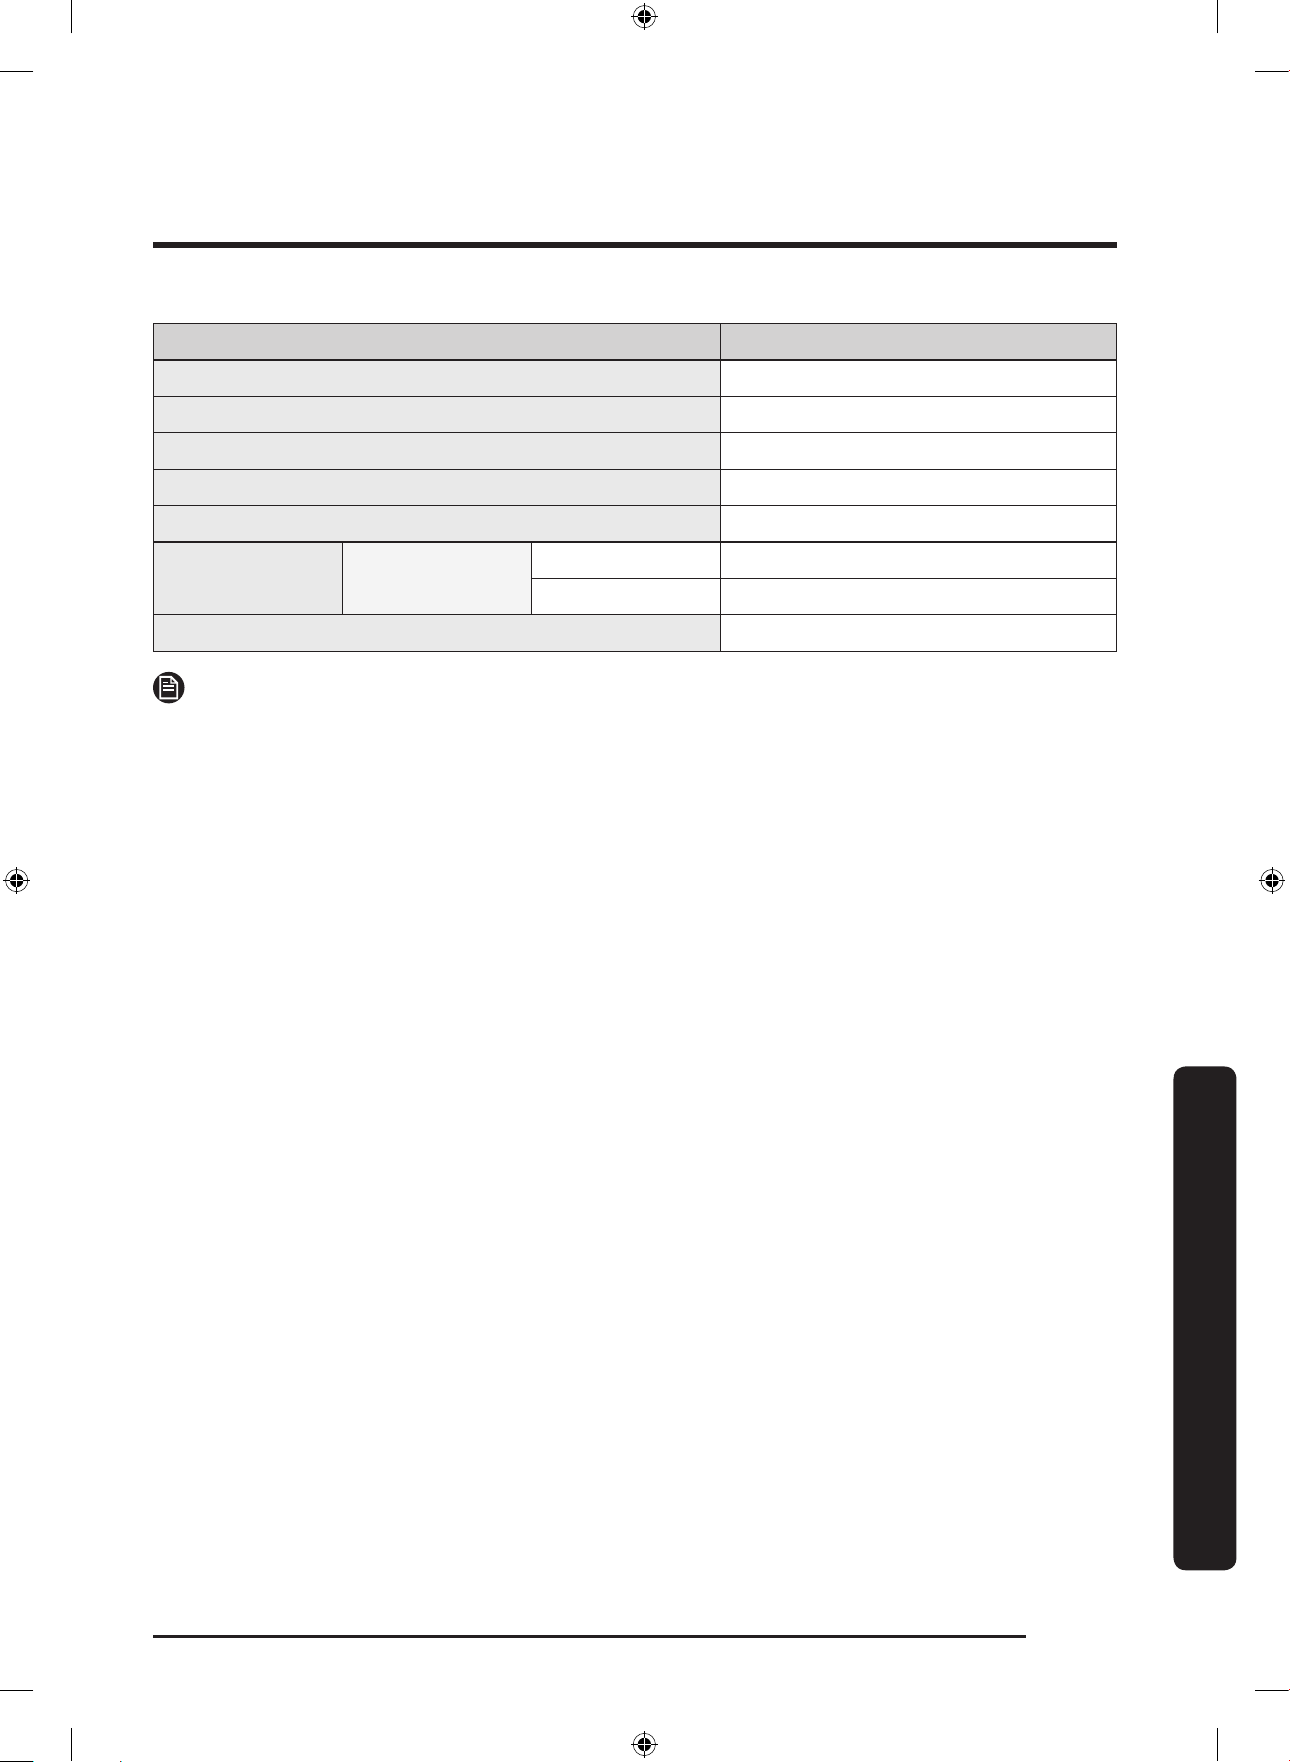
Type Front loading washing machine
Model name WW7*K5*****
Dimensions W 600 x D 550 x H 850 (mm)
Water pressure 50-800 kPa
Net weight 63.0 kg
Wash and spin capacity 7.0 kg
Power
consumption
Washing and
heating
220 V 2000 W
240 V 2400 W
Spin revolutions 1400 rpm
NOTE
The design and specications are subject to change without notice for quality
improvement purposes.
Untitled-5 59 12/12/2017 12:42:04 PM
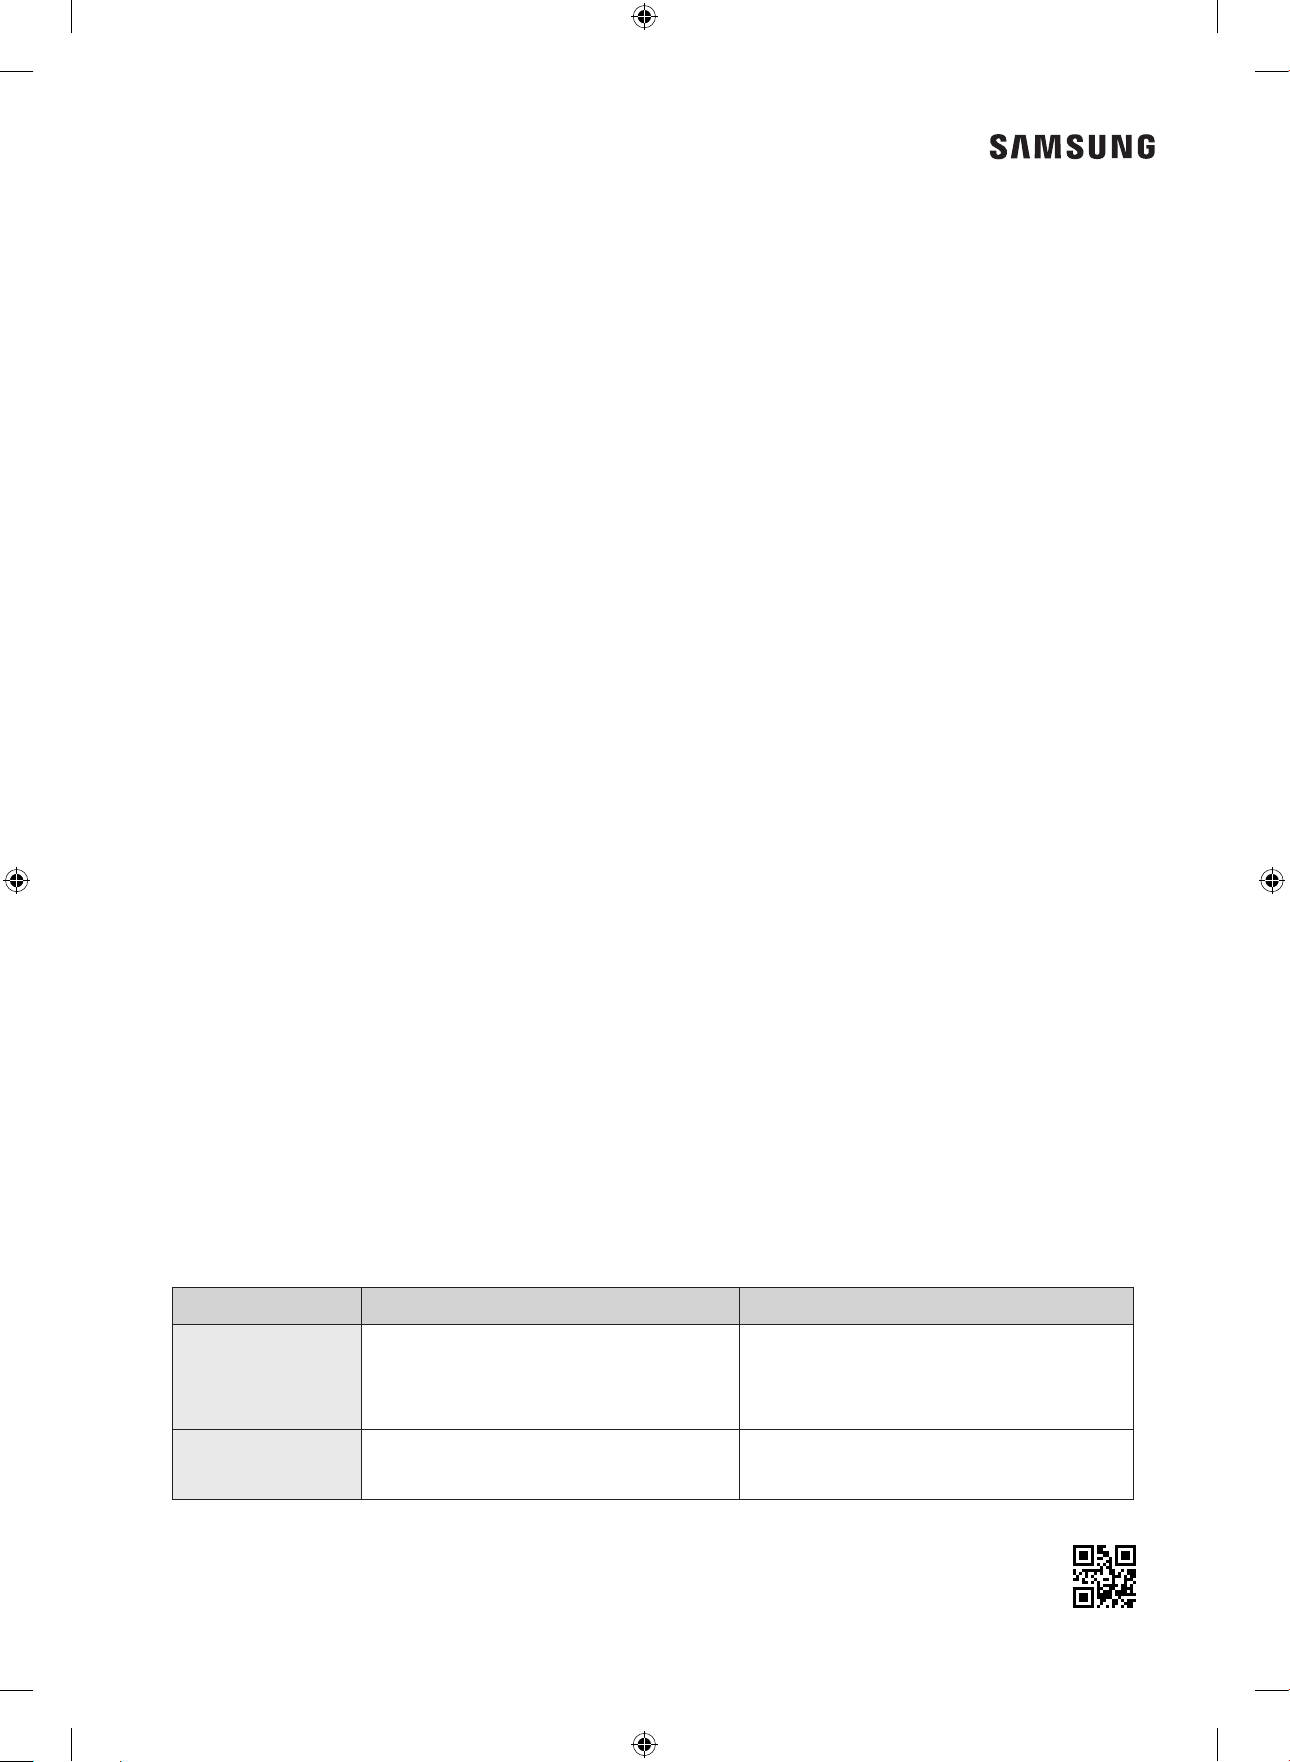
QUESTIONS OR COMMENTS?
COUNTRY CALL OR VISIT US ONLINE AT
THAILAND
0-2689-3233 (only for HHP)
0-2689-3232 (OTH products)
1800-29-3232 (Toll free)
www.samsung.com/th/support
MYANMAR
+95-1-2399-888
VIP HHP +95-1-2399-990
www.samsung.com/th/support
DC68-03886A-00
Untitled-5 60 12/12/2017 12:42:04 PM
เครื่องซักผ้า
คู
่
มือผู้ใช้
WW9*K5*****/WW8*K5*****/WW7*K5*****
Untitled-6 1 2017-12-15 11:43:22
ไทย
2
สารบัญ
สารบัญ
ข้อมูลเกี่ยวกับความปลอดภัย 4
ส
ิ่
งที่คุณต้องทราบเกี่ยวกับค�าแนะน�าเพื่อความปลอดภัย 4
ข้อมูลส�าคัญเพื่อความปลอดภัย 4
ข้อควรระวังเพื่อความปลอดภัยที่ส�าคัญ 5
ค�าเตือนที่ส�าคัญส�าหรับการต
ิ
ดตั้ง 6
ข้อควรระวังในการต
ิ
ดตั้ง 7
ค�าเตือนที่ส�าคัญส�าหรับการใช้งาน 7
ข้อควรระวังในการใช้งาน 8
ค�าเตือนที่ส�าคัญส�าหรับการท�าความสะอาด 11
การต
ิ
ดตั้ง 12
มีช
ิ้
นส
่
วนใดบ้าง 12
ข้อก�าหนดในการต
ิ
ดตั้ง 14
การต
ิ
ดตั้งทีละขั้นตอน 16
ก
่
อนการเร
ิ่
มต้น 23
การตั้งค
่
าเร
ิ่
มต้น 23
ค�าแนะน�าของผ้า 23
ค�าแนะน�าส�าหรับช
่
องใส
่
น�้ายาซักผ้า 26
การท�างาน 29
แผงควบคุม 29
ขั้นตอนง
่
ายๆในการเร
ิ่
มต้น 31
ภาพรวมของโปรแกรม 32
คุณสมบัต
ิ
พ
ิ
เศษ 35
การตั้งค
่
า 37
การบ�ารุงรักษา 38
ล้างถังซัก 38
SmartCheck 39
ทางระบายน�้าฉุกเฉ
ิ
น 40
การท�าความสะอาด 41
การคืนสภาพจากการเป็นน�้าแข็ง 45
การดูแลเมื่อไม
่
ได้ใช้งานเป็นเวลานาน 45
Untitled-6 2 2017-12-15 11:43:22


ไทย
4
ข้อมูลเกี่ยวกับความปลอดภัย
ขอแสดงความยินดีกับเครื่องซักผ้า Samsung เครื่องใหม่ของคุณ คู่มือนี้มีข้อมูลที่ส�าคัญเกี่ยวกับการติดตั้ง การใช้งานและการบ�ารุงรักษาเครื่องซักผ้า Samsung
เครื่องใหม่ของคุณ โปรดสละเวลาเพื่ออ่านคู่มือนี้ เพื่อใช้ประโยชน์สูงสุดจากคุณสมบัติและคุณประโยชน์มากมายของเครื่องซักผ้า
ส
ิ่
งที่คุณต้องทราบเกี่ยวกับค�าแนะน�าเพื่อความปลอดภัย
โปรดอ่านคู่มือให้ละเอียดเพื่อให้ทราบถึงวิธีใช้อุปกรณ์อย่างปลอดภัยและสามารถใช้คุณลักษณะและการท�างานขั้นสูงต่างๆ อย่างมีประสิทธิภาพ โปรดเก็บคู่มือ
ไว้ในที่ปลอดภัยใกล้กับเครื่อง เพื่อใช้อ้างอิงในอนาคต ใช้อุปกรณ์นี้เพื่อวัตถุประสงค์ที่อธิบายในคู่มือค�าแนะน�านี้เท่านั้น
ค�าเตือนและค�าแนะน�าเพื่อความปลอดภัยในคู่มือนี้ไม่ได้ครอบคลุมถึงสภาวะและสถานการณ์ทั้งหมดที่สามารถเกิดขึ้นได้ คุณมีหน้าที่จะต้องใช้สามัญส�านึก
ความระมัดระวัง และใส่ใจกับการติดตั้ง บ�ารุงรักษา และใช้งานเครื่องซักผ้า
เนื่องจากค�าแนะน�าในการใช้งานต่อไปนี้ใช้ส�าหรับหลายรุ่น ลักษณะของเครื่องซักผ้าของคุณอาจแตกต่างจากที่อธิบายในคู่มือนี้ และสัญญาณค�าเตือนบางอย่าง
อาจไม่มีผล ถ้าคุณมีข้อซักถามหรือข้อกังวลใด โปรดติดต่อศูนย์บริการที่ใกล้ที่สุด หรือหาความช่วยเหลือและข้อมูลออนไลน์ได้ที่ www.samsung.com
ข้อมูลส�าคัญเพื่อความปลอดภัย
ความหมายของสัญลักษณ์และเครื่องหมายในคู
่
มือผู้ใช้นี้:
ค�าเตือน
อันตรายหรือการกระท�าที่ไม่ปลอดภัยที่อาจท�าให้เกิดการบาดเจ็บร้ายแรง และ/หรือทรัพย์สินเสียหาย
ข้อควรระวัง
อันตรายหรือการกระท�าที่ไม่ปลอดภัยที่อาจท�าให้เกิดการบาดเจ็บหรือท�าให้สิ่งของเสียหาย
หมายเหตุ
แสดงว่ามีความเสี่ยงที่จะเกิดการบาดเจ็บหรือสิ่งของเสียหาย
ข้อมูลเกี่ยวกับความปลอดภัย
Untitled-6 4 2017-12-15 11:43:23

ไทย
5
ข้อมูลเกี่ยวกับความปลอดภัย
สัญลักษณ์ค�าเตือนเหล
่
านี้มีให้เพื่อป้ องกันการบาดเจ็บของตัวคุณเองและบุคคลอื่น
โปรดปฏ
ิ
บัต
ิ
ตามอย
่
างเคร
่
งครัด
หลังจากอ
่
านคู
่
มือนี้แล้วโปรดเก็บไว้เพื่อน�ามาอ้างอ
ิ
งในภายหลัง
อ่านค�าแนะน�าทั้งหมดก่อนที่จะใช้อุปกรณ์
เช่นเดียวกับอุปกรณ์ทุกชนิดที่ใช้ไฟฟ
้
าและมีชิ้นส่วนที่เคลื่อนไหว อุปกรณ์นี้อาจมีอันตรายได้ ในการใช้อุปกรณ์นี้อย่างปลอดภัย โปรดท�าความเข้าใจกับ
การท�างานและใช้ความระมัดระวังขณะใช้งาน
ข้อควรระวังเพื่อความปลอดภัยที่ส�าคัญ
ค�าเตือน
ในการลดความเสี่ยงจากไฟการระเบ
ิ
ดไฟฟ้ าช็อตหรือการบาดเจ็บขณะใช้อุปกรณ์โปรดปฏ
ิ
บัต
ิ
ตามข้อควรระวัง
เพื่อความปลอดภัยต
่
อไปนี้:
1. อุปกรณ์นี้ไม่เหมาะส�าหรับบุคคลที่มีสภาพร่างกาย ประสาทสัมผัสหรือจิตที่ไม่ปกติ รวมถึงเด็กหรือบุคคลที่ขาด
ประสบการณ์ ความรู้ ยกเว้นจะได้รับการดูแลหรือได้รับค�าแนะน�าในการใช้งานโดยบุคคลที่รับหน้าที่ดูแล โปรดระวัง
มิให้เด็กเล่นกับอุปกรณ์นี้
2. ส�าหรับใช้ในยุโรป: อุปกรณ์นี้สามารถใช้งานโดยเด็กที่มีอายุ 8 ปีขึ้นไปและบุคคลที่มีสมรรถภาพร่างกาย ประสาท
สัมผัส หรือสภาพจิตไม่เป็นปกติ หรือขาดประสบการณ์หรือความรู้ ถ้าได้รับการดูแลหรือได้รับค�าแนะน�าในการใช้งาน
โดยบุคคลที่รับหน้าที่ดูแล ห้ามเด็กเล่นกับอุปกรณ์นี้ ห้ามเด็กท�าความสะอาดหรือบ�ารุงรักษาอุปกรณ์โดยไม่มีการดูแล
3. โปรดดูแลไม่ให้เด็กเล่นกับอุปกรณ์นี้
4. กรณีที่ปลั๊กไฟของเครื่องใช้ไฟฟ
้
านี้เกิดเสียหาย ต้องให้ผู้ผลิต ตัวแทนให้บริการ หรือผู้ที่มีความช�านาญเป็นผู้เปลี่ยน
สายไฟ เพื่อไม่ให้เกิดอันตราย
5. โปรดใช้ชุดท่อใหม่ที่มาพร้อมกับอุปกรณ์ และไม่ควรใช้ชุดท่อเดิม
6. ส�าหรับอุปกรณ์ที่มีช่องระบายอากาศที่ฐาน โปรดอย่าให้พรมปิดกั้นช่องนี้
7. ส�าหรับใช้ในยุโรป: ห้ามเด็กอายุต�่ากว่า 3 ขวบใช้อุปกรณ์ ยกเว้นกรณีที่มีผู้ดูแลอย่างต่อเนื่อง
8. ข้อควรระวัง: เพื่อป
้
องกันอันตรายจากการรีเซ็ตอุปกรณ์ตัดความร้อนโดยไม่ตั้งใจ ห้ามจ่ายไฟให้กับอุปกรณ์นี้ผ่าน
อุปกรณ์สวิตช์ภายนอก เช่น เครื่องตั้งเวลา หรือต่อกับวงจรที่มีการปิดเปิดสวิตช์เป็นประจ�าโดยหน่วยงานผู้จ่ายไฟ
Untitled-6 5 2017-12-15 11:43:23
ข้อมูลเกี่ยวกับความปลอดภัย
ไทย
6
ข้อมูลเกี่ยวกับความปลอดภัย
ค�าเตือนที่ส�าคัญส�าหรับการต
ิ
ดตั้ง
ค�าเตือน
การติดตั้งอุปกรณ์นี้ต้องกระท�าโดยช่างเทคนิคที่ได้รับการรับรอง หรือบริษัทผู้ให้บริการ
• มิฉะนั้นอาจท�าให้เกิดไฟฟ
้
าช็อต เพลิงไหม้ การระเบิด ป
ั
ญหากับผลิตภัณฑ์ หรือการบาดเจ็บ
อุปกรณ์นี้มีน�้าหนักมาก โปรดใช้ความระมัดระวังเมื่อยก
ต่อสายไฟเข้ากับเต้ารับไฟฟ
้
าที่ผนังตามข้อก�าหนดทางไฟฟ
้
าของพื้นที่ ใช้เต้ารับส�าหรับอุปกรณ์นี้เท่านั้น และโปรดอย่าใช้สายไฟส�าหรับต่อ
• การใช้เต้ารับไฟฟ
้
าที่ผนังร่วมกับอุปกรณ์อื่นโดยผ่านสายไฟส�าหรับต่อ หรือแถบปลั๊กไฟ อาจท�าให้เกิดไฟฟ
้
าช็อตหรือเพลิงไหม้
• ตรวจสอบว่าแรงดันไฟฟ
้
า ความถี่ และกระแสไฟฟ
้
าตรงกับในข้อมูลจ�าเพาะของผลิตภัณฑ์ มิฉะนั้นอาจท�าให้เกิดไฟฟ
้
าช็อต เพลิงไหม้ ต่อสายไฟ
เข้ากับเต้ารับไฟฟ
้
าที่ผนังอย่างแน่นหนา
น�าสิ่งแปลกปลอมทั้งหมด เช่น ฝุ
่
นละอองหรือน�้าออกจากขั้วของปลั๊กไฟและหน้าสัมผัสเป็นประจ�า โดยใช้ผ้าแห้ง
• ถอดปลั๊กไฟและท�าความสะอาดด้วยผ้าแห้ง
• มิฉะนั้นอาจท�าให้เกิดไฟฟ
้
าช็อต เพลิงไหม้
ต่อปลั๊กไฟเข้ากับเต้ารับโดยให้สายไฟพาดไปทางพื้น
• ถ้าคุณต่อปลั๊กไฟกับเต้ารับในทางตรงกันข้าม ลวดน�าไฟฟ
้
าภายในสายไฟอาจเสียหายและท�าให้เกิดไฟฟ
้
าช็อตหรือเพลิงไหม้
เก็บวัสดุบรรจุภัณฑ์ทั้งหมดให้พ้นมือเด็กเนื่องจากอาจเป็นอันตรายได้
• ถ้าเด็กน�าถุงพลาสติกมาสวมศีรษะ อาจท�าให้หายใจไม่ออก
เมื่ออุปกรณ์ ปลั๊กไฟหรือสายไฟเสียหาย โปรดติดต่อศูนย์บริการใกล้บ้านคุณ
อุปกรณ์นี้ต้องได้รับการลงกราวด์อย่างเหมาะสม
ห้ามลงกราวด์อุปกรณ์กับท่อก๊าซ ท่อน�้าพลาสติก หรือสายโทรศัพท์
• มิฉะนั้นอาจท�าให้เกิดไฟฟ
้
าช็อต เพลิงไหม้ การระเบิด หรือป
ั
ญหากับผลิตภัณฑ์
• ห้ามต่อปลั๊กไฟฟ
้
ากับเต้ารับไฟฟ
้
าที่ไม่ได้ลงกราวด์อย่างถูกต้อง และโปรดตรวจสอบว่าเป็นไปตามข้อก�าหนดของท้องถิ่นและของประเทศ
ห้ามติดตั้งอุปกรณ์นี้ใกล้เครื่องท�าความร้อน วัตถุไวไฟ
ห้ามติดตั้งอุปกรณ์นี้ในที่ชื้น มีน�้ามัน หรือมีฝุ
่
นมาก ในต�าแหน่งที่ได้รับแสงแดดหรือน�้า (น�้าฝน) โดยตรง
ห้ามติดตั้งอุปกรณ์นี้ในต�าแหน่งที่มีอุณหภูมิต�่า
• น�้าที่แข็งตัวจะท�าให้ท่อต่างๆ ระเบิด
ห้ามติดตั้งอุปกรณ์นี้ในต�าแหน่งที่อาจมีก๊าซรั่วไหล
• การท�าเช่นนี้อาจท�าให้เกิดไฟฟ
้
าช็อตหรือเพลิงไหม้
ห้ามใช้เครื่องแปลงไฟฟ
้
า
• การท�าเช่นนี้อาจท�าให้เกิดไฟฟ
้
าช็อตหรือเพลิงไหม้
ห้ามใช้ปลั๊กไฟที่เสียหาย สายไฟ หรือเต้ารับไฟฟ
้
าที่เสียหาย หลวม
• การท�าเช่นนี้อาจท�าให้เกิดไฟฟ
้
าช็อตหรือเพลิงไหม้
ห้ามดึงหรือหักงอสายไฟมากเกินไป
Untitled-6 6 2017-12-15 11:43:23
ไทย
7
ข้อมูลเกี่ยวกับความปลอดภัย
ห้ามบิดหรือผูกสายไฟเป็นปม
อย่าเกี่ยวสายไฟไว้กับวัตถุที่เป็นโลหะ วางของหนักบนสายไฟ สอดสายไฟไว้ระหว่างสิ่งของ หรือดันสายไฟไว้ในช่องด้านหลังของอุปกรณ์
• การท�าเช่นนี้อาจท�าให้เกิดไฟฟ
้
าช็อตหรือเพลิงไหม้
ห้ามดึงสายไฟเพื่อถอดปลั๊กไฟออกจากเต้ารับ
• ถอดปลั๊กไฟด้วยการจับที่ตัวปลั๊ก
• มิฉะนั้นอาจท�าให้เกิดไฟฟ
้
าช็อต เพลิงไหม้
ควรจัดวางอุปกรณ์นี้เพื่อให้สามารถเข้าถึงปลั๊กไฟ ก๊อกน�้าและท่อระบายน�้าได้โดยง่าย
ข้อควรระวังในการต
ิ
ดตั้ง
ข้อควรระวัง
อุปกรณ์นี้ควรอยู่ในต�าแหน่งที่สามารถเอื้อมถึงปลั๊กไฟได้ง่าย
• มิฉะนั้นอาจท�าให้เกิดไฟฟ
้
าช็อต เพลิงไหม้เนื่องจากไฟฟ
้
ารั่ว
ติดตั้งและปรับระดับเครื่องบนพื้นที่มั่นคง สามารถรับน�้าหนักได้
• มิฉะนั้นอาจท�าให้มีการสั่นสะเทือนผิดปกติ มีการเคลื่อนที่ เสียงรบกวน หรือมีป
ั
ญหากับผลิตภัณฑ์
ค�าเตือนที่ส�าคัญส�าหรับการใช้งาน
ค�าเตือน
ถ้าอุปกรณ์มีน�้าท่วม ให้ตัดไฟฟ
้
าและการจ่ายน�้าทันที และติดต่อศูนย์บริการใกล้บ้าน
• ห้ามสัมผัสปลั๊กไฟด้วยมือที่เปียก
• มิฉะนั้นอาจท�าให้เกิดไฟฟ
้
าช็อต
ถ้าอุปกรณ์มีเสียงผิดปกติ มีควันหรือกลิ่นไหม้ ให้ถอดปลั๊กทันที และติดต่อศูนย์บริการใกล้บ้าน
• มิฉะนั้นอาจท�าให้เกิดไฟฟ
้
าช็อต เพลิงไหม้
ถ้ามีก๊าซรั่ว (เช่น ก๊าซโพรเพน ก๊าซหุงต้ม ฯลฯ) ให้ระบายอากาศทันที โดยไม่สัมผัสกับปลั๊กไฟ ห้ามสัมผัสกับอุปกรณ์หรือสายไฟ
• ห้ามใช้พัดลมไฟฟ
้
า
• อาจเกิดประกายไฟที่ท�าให้ระเบิดหรือเพลิงไหม้
อย่าให้เด็กเล่นบนเครื่องซักผ้าหรือในเครื่องซักผ้า นอกจากนี้ เมื่อทิ้งอุปกรณ์ ให้ถอดก้านล็อคประตูเครื่องซักผ้าออก
• ถ้าติดอยู่ภายใน เด็กอาจอาจหายใจไม่ออกจนกระทั่งเสียชีวิต
โปรดน�าบรรจุภัณฑ์ (ฟองน�้า โฟม) ที่ด้านล่างของเครื่องซักผ้าออกก่อนที่จะใช้งาน
ห้ามซักผ้าที่เปื้อนน�้ามันเชื้อเพลิง น�้ามันก๊าด เบนซิน ทินเนอร์ แอลกอฮอล์ หรือสารไวไฟหรือสารระเหยชนิดต่างๆ
• อาจท�าให้เกิดไฟฟ
้
าช็อต ไฟไหม้หรือระเบิดได้
ห้ามเปิดประตูเครื่องโดยใช้แรงขณะที่เครื่องท�างาน (การซัก/อบแห้ง/ป
ั่
นหมาดขณะอุณหภูมิสูง)
Untitled-6 7 2017-12-15 11:43:23

ข้อมูลเกี่ยวกับความปลอดภัย
ไทย
8
ข้อมูลเกี่ยวกับความปลอดภัย
• น�้าที่ไหลออกจากเครื่องซักผ้าอาจท�าให้ร้อนลวกหรือท�าให้พื้นลื่น อาจท�าให้เกิดการบาดเจ็บได้
• การใช้แรงเปิดประตูอาจท�าให้ผลิตภัณฑ์เสียหายหรือท�าให้เกิดการบาดเจ็บ
อย่าสอดมือใต้เครื่องซักผ้าขณะที่เครื่องท�างานอยู่
• อาจท�าให้เกิดการบาดเจ็บได้
ห้ามสัมผัสปลั๊กไฟด้วยมือที่เปียก
• อาจท�าให้เกิดไฟฟ
้
าช็อตได้
ห้ามปิดเครื่องด้วยการถอดปลั๊กไฟ ขณะที่เครื่องก�าลังท�างานอยู่
• การต่อปลั๊กไฟเข้ากับเต้ารับไฟฟ
้
าอีกครั้งอาจท�าให้เกิดประกายไฟและท�าให้เกิดไฟฟ
้
าช็อตหรือเพลิงไหม้
อย่าปล่อยให้เด็กหรือคนที่ไม่แข็งแรงใช้เครื่องซักผ้าโดยไม่มีบุคคลดูแลอย่างเหมาะสม อย่าให้เด็กเข้าสู่ภายในหรือด้านบนของอุปกรณ์
• อาจท�าให้เกิดไฟฟ
้
าช็อต ร้อนลวกหรือบาดเจ็บได้
โปรดอย่าสอดมือหรือโลหะเข้าใต้เครื่องซักผ้าขณะที่เครื่องก�าลังท�างาน
• อาจท�าให้เกิดการบาดเจ็บได้
อย่าถอดปลั๊กไฟด้วยการดึงที่สายไฟ ให้จับที่ตัวปลั๊กอย่างมั่นคงและดึงออกจากเต้ารับโดยตรง
• ความเสียหายที่เกิดขึ้นกับสายไฟอาจท�าให้เกิดการลัดวงจร เพลิงไหม้ และ/หรือไฟฟ
้
าช็อต
โปรดอย่าซ่อมแซม ถอดประกอบ หรือดัดแปลงเครื่องด้วยตนเอง
• ห้ามใช้ฟิวส์ (เช่น สายทองแดง ลวดโลหะ ฯลฯ) นอกเหนือจากฟิวส์มาตรฐาน
• เมื่ออุปกรณ์หรือสายไฟเสียหายและจ�าเป็นต้องซ่อมหรือเปลี่ยนใหม่ โปรดติดต่อศูนย์บริการใกล้บ้านคุณ
• มิฉะนั้นอาจท�าให้เกิดไฟฟ
้
าช็อต เพลิงไหม้ ป
ั
ญหากับผลิตภัณฑ์ หรือการบาดเจ็บ
เมื่อท่อจ่ายน�้าหลวมหลุดออกจากก๊อกและท�าให้น�้าท่วมอุปกรณ์ ให้ถอดปลั๊กไฟ
• มิฉะนั้นอาจท�าให้เกิดไฟฟ
้
าช็อต เพลิงไหม้
ถอดปลั๊กไฟเมื่อไม่ได้ใช้อุปกรณ์เป็นเวลานาน หรือระหว่างพายุฝนฟ
้
าคะนอง
• มิฉะนั้นอาจท�าให้เกิดไฟฟ
้
าช็อต เพลิงไหม้
ถ้ามีสิ่งแปลกปลอมเข้าเครื่อง ให้ถอดปลั๊กไฟและติดต่อศูนย์บริการ Samsung ที่อยู่ใกล้ที่สุด
• การท�าเช่นนี้อาจท�าให้เกิดไฟฟ
้
าช็อตหรือเพลิงไหม้
อย่าให้เด็ก (หรือสัตว์เลี้ยง) เล่นบนเครื่องซักผ้าหรือในเครื่องซักผ้า ประตูเครื่องซักผ้านั้นไม่สามารถเปิดได้โดยง่ายจากภายใน และเด็กอาจได้รับบาดเจ็บร้ายแรง
ถ้าติดอยู่ภายใน
ข้อควรระวังในการใช้งาน
ข้อควรระวัง
เมื่อเครื่องซักผ้าเปื้อนสิ่งแปลกปลอมเช่น สารซักฟอก สิ่งสกปรก เศษอาหาร ฯลฯ ให้ถอดปลั๊กไฟและท�าความสะอาดเครื่องด้วยผ้านุ่มชุบน�้าหมาดๆ
• มิฉะนั้นอาจท�าให้ผลิตภัณฑ์เปลี่ยนสี เปลี่ยนรูป เสียหาย หรือเกิดสนิม
กระจกด้านหน้าสามารถแตกได้เมื่อกระแทกแรงๆ โปรดใช้ความระมัดระวังเมื่อใช้เครื่องซักผ้า
Untitled-6 8 2017-12-15 11:43:23

ไทย
9
ข้อมูลเกี่ยวกับความปลอดภัย
• ถ้ากระจกแตก อาจท�าให้เกิดการบาดเจ็บได้
หลังจากไม่มีการจ่ายน�้าหรือเมื่อต่อท่อจ่ายน�้าใหม่ ให้ค่อยๆ เปิดก๊อกน�้าช้าๆ
เปิดก๊อกน�้าช้าๆ หลังจากไม่ได้ใช้งานเป็นเวลานาน
• แรงดันอากาศในท่อจ่ายน�้าหรือท่อน�้าประปาอาจท�าให้ชิ้นส่วนผลิตภัณฑ์เสียหายหรือท�าให้น�้ารั่ว
ถ้าเกิดข้อผิดพลาดในการระบายน�้าระหว่างการท�างาน ให้ตรวจสอบว่ามีป
ั
ญหาของการระบายน�้าหรือไม่
• ถ้าใช้เครื่องซักผ้าเมื่อมีน�้าท่วม เนื่องจากป
ั
ญหาการระบายน�้า อาจท�าให้เกิดไฟฟ
้
าช็อตหรือเพลิงไหม้
ใส่ผ้าในเครื่องซักผ้าโดยระวังอย่าให้ผ้าติดอยู่ที่ประตู
• ถ้าผ้าติดอยู่ที่ประตู อาจท�าให้ผ้าเสียหายหรือเครื่องซักผ้าเสียหาย หรือท�าให้น�้ารั่ว
ปิดการจ่ายน�้าเมื่อไม่ได้ใช้เครื่องซักผ้า
• ตรวจสอบว่าสกรูของข้อต่อท่อจ่ายน�้านั้นมีการขันไว้อย่างถูกต้อง
โปรดระมัดระวังอย่าให้ซีลยางและกระจกด้านหน้ามีสิ่งแปลกปลอมติดอยู่ (เช่น สิ่งสกปรก เส้นด้าย ผม ฯลฯ)
• ถ้ามีสิ่งแปลกปลอมติดอยู่ในประตู หรือประตูไม่ปิดสนิท อาจท�าให้น�้ารั่ว
เปิดก๊อกและตรวจสอบว่าข้อต่อของท่อจ่ายน�้ามีการขันไว้อย่างแน่นหนาแล้วหรือไม่ และไม่มีน�้ารั่ว ก่อนที่จะใช้ผลิตภัณฑ์
• ถ้าสกรูหรือข้อต่อท่อจ่ายน�้าหลวม อาจท�าให้น�้ารั่ว
ผลิตภัณฑ์ที่คุณซื้อนี้ได้รับการออกแบบมาส�าหรับใช้ในครัวเรือนเท่านั้น
การใช้เพื่อธุรกิจจะถือเป็นการใช้ผิดวัตถุประสงค์ ในกรณีนี้ ผลิตภัณฑ์จะไม่ได้รับความคุ้มครองตามการรับประกันมาตรฐานที่มาจาก Samsung
และ Samsung จะไม่มีส่วนรับผิดชอบต่อการท�างานผิดปกติหรือความเสียหายที่เกิดจากการใช้ผิดวัตถุประสงค์ดังกล่าว
อย่ายืนบนอุปกรณ์หรือวางสิ่งของ (เช่น ผ้า เทียนที่จุดไฟแล้ว บุหรี่ที่ติดไฟ จาน สารเคมี วัตถุที่เป็นโลหะ ฯลฯ) บนอุปกรณ์
• มิฉะนั้นอาจท�าให้เกิดไฟฟ
้
าช็อต เพลิงไหม้ หรือป
ั
ญหากับผลิตภัณฑ์
ห้ามพ่นสารระเหย เช่น ยาฆ่าแมลงบนพื้นผิวผลิตภัณฑ์โดยตรง
• นอกจากจะเป็นอันตรายต่อมนุษย์แล้ว ยังอาจท�าให้เกิดไฟฟ
้
าช็อต เพลิงไหม้ หรือเกิดป
ั
ญหากับผลิตภัณฑ์ได้
อย่าวางสิ่งของที่ท�าให้เกิดสนามแม่เหล็กไฟฟ
้
าใกล้กับเครื่องซักผ้า
• อาจท�าให้เกิดการบาดเจ็บเนื่องจากการท�างานผิดปกติได้
น�้าที่ระบายออกระหว่างการซักผ้าด้วยน�้าร้อนหรือโปรแกรมอบผ้านั้นมีความร้อนสูง โปรดอย่าสัมผัสน�้าโดยตรง
• อาจท�าให้เกิดการลวกหรือบาดเจ็บได้
ถ้าน�้ามีอุณหภูมิสูงก่อนการระบายน�้าออก เครื่องจะใช้เวลารอจนกว่าอุณหภูมิจะลดลง ซึ่งแตกต่างกันไปตามอุณหภูมิภายใน
ห้ามซัก ป
ั่
น หรืออบแห้งเบาะรองนั่ง เบาะ หรือเสื้อผ้า (*) ที่กันน�้า ยกเว้นอุปกรณ์ของคุณมีโปรแกรมพิเศษส�าหรับซักสิ่งของเหล่านี้
(*): เครื่องนอนขนสัตว์ เสื้อกันฝน เสื้อชูชีพ กางเกงเล่นสกี ถุงนอน ผ้าปิดผ้าอ้อม ชุดกันลม และผ้าคลุมจักรยาน จักรยานยนต์ รถยนต์ ฯลฯ
• อย่าซักเบาะที่หนาและแข็ง แม้ว่าจะมีสัญลักษณ์เครื่องซักผ้าบนป
้
ายดูแลผ้าก็ตาม อาจท�าให้เกิดการบาดเจ็บหรือท�าให้เครื่องซักผ้า ผนัง พื้น
หรือผ้าเสียหาย เนื่องจากการสั่นสะเทือนมากเกินไป
• อย่าซักพรมปูพื้นหรือพรมเช็ดเท้าที่มีด้านหลังเป็นยางหรือปุ
่
มยาง ยางด้านหลังอาจหลุดออกและติดอยู่กับด้านในถังซัก และอาจท�าให้เกิดการท�างาน
ผิดปกติ เช่น การระบายน�้าไม่ท�างาน
Untitled-6 9 2017-12-15 11:43:23

ข้อมูลเกี่ยวกับความปลอดภัย
ไทย
10
ข้อมูลเกี่ยวกับความปลอดภัย
อย่าใช้เครื่องซักผ้าขณะที่ถอดลิ้นชักใส่น�้ายาซักผ้าออก
• อาจท�าให้ไฟฟ
้
าช็อตหรือเกิดการบาดเจ็บเนื่องจากน�้ารั่ว
อย่าสัมผัสภายในของถังซักระหว่างหรือหลังจากการอบแห้ง เนื่องจากจะร้อนจัด
• อาจท�าให้เกิดการร้อนลวกได้
โปรดอย่าสอดมือเข้าสู่ช่องใส่น�้ายาซักผ้า
• อาจท�าให้เกิดการบาดเจ็บ เนื่องจากมืออาจติดอยู่ในช่องใส่น�้ายาซักผ้า
• ตัวบอกระดับน�้ายาซักผ้า (เฉพาะรุ่น) ไม่ใช่ส�าหรับผงซักฟอกแบบผง น�าตัวบอกออกเมื่อใช้ผงซักฟอก
อย่าวางวัตถุใดๆ (เช่น รองเท้า เศษอาหาร สัตว์) นอกเหนือจากเสื้อผ้าในเครื่องซักผ้า
• อาจท�าให้เกิดความเสียหายกับเครื่องซักผ้า หรือเกิดการบาดเจ็บหรือเสียชีวิตในกรณีของสัตว์เลี้ยง เนื่องจากการสั่นสะเทือนมากกว่าปกติ
อย่ากดปุ
่
มต่างๆ ด้วยของแหลม เช่น หมุด มีด เล็บ ฯลฯ
• อาจท�าให้เกิดไฟฟ
้
าช็อตหรือบาดเจ็บได้
ห้ามซักผ้าที่เปื้อนน�้ามัน ครีม หรือโลชั่นทั่วไปที่ใช้ในร้านดูแลผิวหรือร้านนวด
• อาจท�าให้ซีลยางเสื่อมสภาพและท�าให้น�้ารั่ว
อย่าทิ้งโลหะ เช่น เข็มกลัดหรือกิ๊บติดผมหรือสารซักฟอกไว้ในถังซักเป็นเวลานาน
• อาจท�าให้ถังซักขึ้นสนิม
• หากถังซักเริ่มมีลักษณะเป็นสนิมที่พื้นผิว ให้ใช้สารท�าความสะอาด (ไม่เป็นกรดหรือด่าง) กับพื้นผิว และใช้ฟองน�้าท�าความสะอาด ห้ามใช้แปรงขนลวด
เด็ดขาด
ห้ามใช้สารท�าความสะอาดแบบซักแห้งโดยตรงและห้ามซัก ล้าง หรือป
ั่
นหมาดผ้าที่เปื้อนสารซักแห้ง
• อาจท�าให้เกิดการติดไฟขึ้นในทันทีเนื่องจากความร้อนของการออกซิเดชันของน�้ามัน
ห้ามใช้น�้าจากอุปกรณ์ท�าน�้าร้อน/น�้าเย็น
• อาจท�าให้เครื่องซักผ้าเกิดป
ั
ญหา
ห้ามใช้สบู่ล้างมือแบบธรรมชาติกับเครื่องซักผ้า
• ถ้ามีการแข็งตัวและสะสมอยู่ในเครื่องซักผ้า อาจท�าให้เกิดป
ั
ญหากับผลิตภัณฑ์ ท�าให้สีเปลี่ยน ขึ้นสนิม หรือท�าให้มีกลิ่นอับ
ใส่ถุงเท้าและเสื้อชั้นในลงในถุงซักผ้าและซักร่วมกับผ้าอื่นๆ
ห้ามซักผ้าชิ้นใหญ่เช่นผ้าปูที่นอนในถุงซักผ้า
• มิฉะนั้นอาจเกิดการบาดเจ็บเนื่องจากการสั่นสะเทือนผิดปกติ
ห้ามใช้สารซักฟอกแบบก้อน
• ถ้ามีการสะสมในเครื่อง อาจท�าให้เกิดน�้ารั่ว
ตรวจสอบว่าไม่มีสิ่งใดอยู่ในกระเป
๋
าเสื้อผ้าที่จะซัก
• ของแข็ง ของมีคม เช่น เหรียญ เข็มกลัด ตะปู ตะปูควง หรือก้อนหินอาจท�าให้เกิดความเสียหายแก่อุปกรณ์ได้
ห้ามซักผ้าที่มีหัวเข็มขัด กระดุม หรือโลหะหนักติดอยู่
แยกผ้าตามสีโดยแยกผ้าสีตกออกจากผ้าสีไม่ตก และเลือกโปรแกรมซักที่แนะน�า ตลอดจนอุณหภูมิและฟ
ั
งก์ชันเพิ่มเติม
Untitled-6 10 2017-12-15 11:43:23

ไทย
11
ข้อมูลเกี่ยวกับความปลอดภัย
• อาจท�าให้ผ้าสีตกหรือเนื้อผ้าเสียหาย
ระวังอย่าให้นิ้วมือเด็กถูกประตูหนีบเมื่อคุณปิดประตู
• มิฉะนั้นอาจท�าให้เกิดการบาดเจ็บ
ค�าเตือนที่ส�าคัญส�าหรับการท�าความสะอาด
ค�าเตือน
ห้ามท�าความสะอาดอุปกรณ์ โดยฉีดน�้าใส่ตัวเครื่องโดยตรง
ห้ามใช้สารท�าความสะอาดที่เป็นกรดรุนแรง
ห้ามใช้น�้ามันเบนซิน, ทินเนอร์ หรือแอลกอฮอล์ เพื่อท�าความสะอาดอุปกรณ์
• อาจท�าให้สีเปลี่ยน เสื่อมสภาพ เสียหาย เกิดไฟฟ
้
าช็อตหรือไฟไหม้
ก่อนที่จะท�าความสะอาดหรือดูแลรักษาเครื่อง โปรดถอดปลั๊กของเครื่องออกจากแหล่งจ่ายไฟ หรือปิดเครื่องที่ปุ
่
มเปิด/ปิด
• มิฉะนั้นอาจท�าให้เกิดไฟฟ
้
าช็อต เพลิงไหม้
Untitled-6 11 2017-12-15 11:43:23

ไทย
12
การต
ิ
ดตั้ง
โปรดด�าเนินการตามค�าแนะน�าเหล่านี้ด้วยความรอบคอบเพื่อให้แน่ใจว่าสามารถติดตั้งเครื่องซักผ้าได้อย่างถูกต้องและเพื่อป
้
องกันอุบัติเหตุเมื่อเริ่มซักผ้า
มีช
ิ้
นส
่
วนใดบ้าง
โปรดตรวจสอบว่าชิ้นส่วนทั้งหมดนี้อยู่ในบรรจุภัณฑ์ของผลิตภัณฑ์ ถ้าคุณพบป
ั
ญหากับเครื่องซักผ้าหรือชิ้นส่วน โปรดติดต่อศูนย์บริการลูกค้าของ Samsung
ในพื้นที่หรือผู้ขายปลีก
06
08
07
01
02
03
04
05
12
09
10
11
01 คันปลด 02 ช่องใส่น�้ายาซักผ้า 03 แผงควบคุม
04 ประตู 05 ถังซัก 06 ตัวกรองป
ั๊
ม
07 ท่อทิ้งน�้าฉุกเฉิน 08 ที่ปิดตัวกรอง 09 ด้านบน
10 ปลั๊กไฟ 11 ท่อน�้าทิ้ง 12 ขาตั้งปรับระดับ
การต
ิ
ดตั้ง
Untitled-6 12 2017-12-15 11:43:24
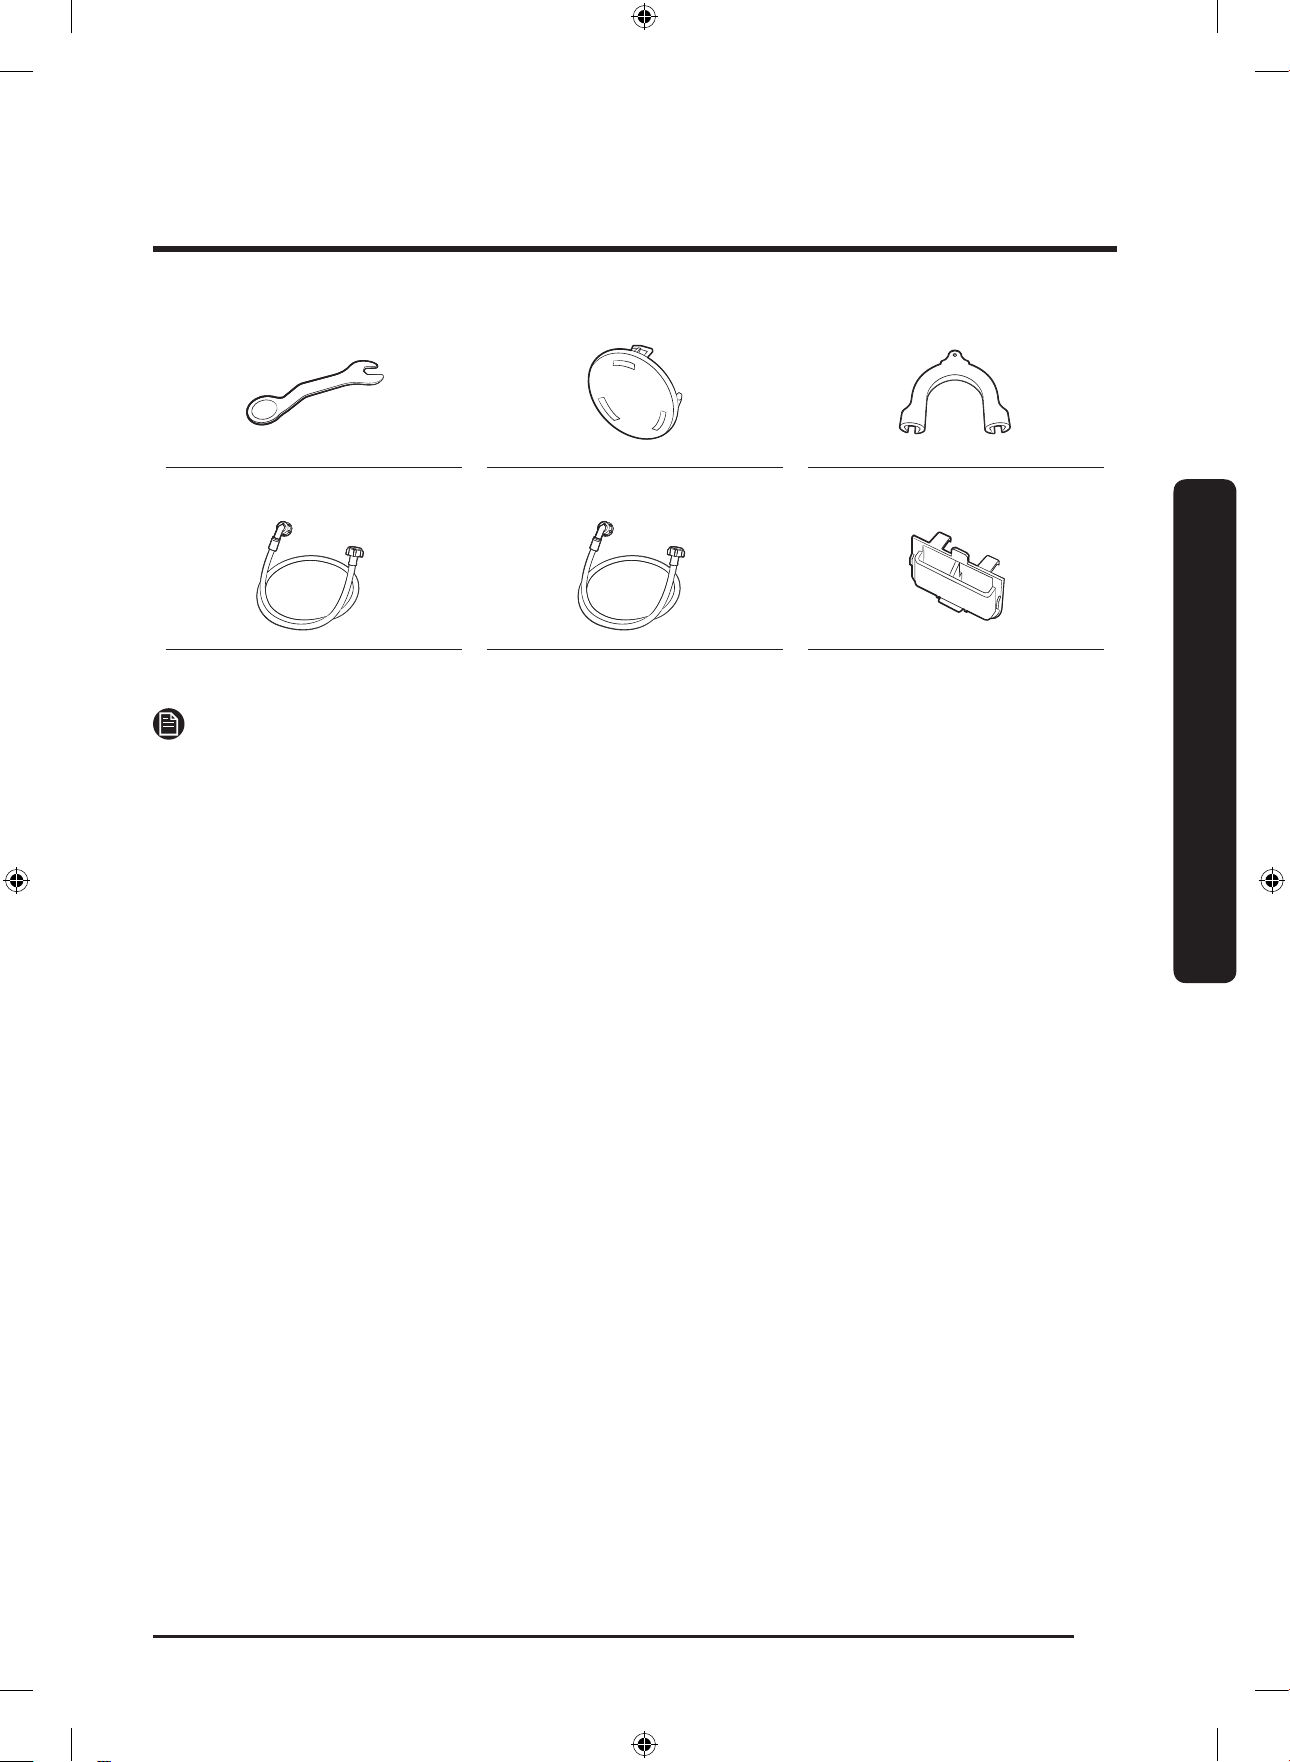
ไทย
13
การต
ิ
ดตั้ง
ประแจ ฝาครอบน็อต ตัวน�าท่อ
ท่อน�้าเย็น ท่อน�้าร้อน ที่ใส่น�้ายาซักผ้า
หมายเหตุ
• ฝาครอบน็อต: จ�านวนฝาครอบน็อต (3 ถึง 6 ชิ้น) ที่มีให้จะขึ้นอยู่กับแต่ละรุ่น
• ท่อน�้าร้อน: เฉพาะรุ่นที่ใช้ได้เท่านั้น
• ที่ใส่น�้ายาซักผ้า เฉพาะรุ่นที่ใช้ได้เท่านั้น
Untitled-6 13 2017-12-15 11:43:25
การต
ิ
ดตั้ง
ไทย
14
การต
ิ
ดตั้ง
ข้อก�าหนดในการต
ิ
ดตั้ง
ค�าเตือนเกี่ยวกับไฟฟ้ าและการลงกราวด์
• ต้องใช้ฟิวส์หรือเบรกเกอร์วงจร AC 220-240 V / 50 Hz
• โปรดใช้วงจรสาขาแยกส�าหรับเครื่องซักผ้าโดยเฉพาะ
เพื่อให้แน่ใจว่าลงกราวด์ได้อย่างถูกต้อง เครื่องซักผ้าจึงมาพร้อมกับสายไฟที่
มีปลั๊กลงกราวด์สามขาส�าหรับใช้กับเต้ารับไฟฟ
้
าที่ติดตั้งและลงกราวด์อย่าง
เหมาะสม
โปรดติดต่อช่างไฟฟ
้
าหรือช่างซ่อมบ�ารุงที่มีความช�านาญ ถ้าคุณไม่แน่ใจ
เกี่ยวกับการลงกราวด์
ห้ามดัดแปลงปลั๊กที่มีให้ ถ้าไม่สามารถใช้ร่วมกับเต้ารับได้ โปรดให้ช่าง
ที่มีความช�านาญเป็นผู้ติดตั้งเต้ารับที่เหมาะสม
ค�าเตือน
• ห้ามใช้สายไฟส�าหรับต่อ
• ใช้สายไฟที่มากับเครื่องซักผ้าเท่านั้น
• ห้ามต่อสายกราวด์เข้ากับท่อพลาสติก ท่อก๊าซ หรือท่อน�้าร้อน
• หัวต่อลงกราวด์ที่เชื่อมต่อที่ไม่เหมาะสมอาจท�าให้เกิดไฟฟ
้
าช็อต
การจ
่
ายน�้า
แรงดันน�้าที่เหมาะสมส�าหรับเครื่องซักผ้าจะอยู่ระหว่าง 50 kPa ถึง 800 kPa
แรงดันน�้าที่ต�่ากว่า 50 kPa จะท�าให้วาล์วน�้าไม่สามารถปิดได้สนิท หรืออาจ
ใช้เวลานานขึ้นในการเติมน�้าลงในถังซัก ซึ่งท�าให้เครื่องซักผ้าปิดระบบ ก๊อก
น�้าต้องห่างไม่เกิน 120 ซม. จากด้านหลังของเครื่องซักผ้า เพื่อให้ท่อจ่ายน�้า
เข้าที่มีให้นั้นต่อถึงเครื่องซักผ้าได้
ในการลดความเสี่ยงที่จะเกิดการรั่วไหล:
• โปรดตรวจสอบว่าก๊อกน�้าอยู่ในระยะที่เอื้อมถึงได้ง่าย
• ปิดก๊อกเมื่อไม่ได้ใช้งานเครื่องซักผ้า
• ตรวจสอบรอยรั่วที่ข้อต่อของท่อจ่ายน�้าเข้าเป็นประจ�า
ข้อควรระวัง
ก่อนที่จะใช้เครื่องซักผ้าเป็นครั้งแรก โปรดตรวจสอบการเชื่อมต่อวาล์ว
จ่ายน�้าและก๊อกทั้งหมดเพื่อหารอยรั่ว
ระบายน�้าออก
Samsung ขอแนะน�าให้ใช้ท่อตั้งที่มีความสูง 60 - 90 ซม. ท่อระบายน�้าต้อง
เชื่อมต่อผ่านคลิปท่อไปยังท่อตั้งดังกล่าว และท่อตั้งต้องครอบท่อระบายน�้า
ได้ทั้งหมด
Untitled-6 14 2017-12-15 11:43:25
ไทย
15
การต
ิ
ดตั้ง
พื้น
เพื่อให้ได้ประสิทธิภาพสูงสุด โปรดติดตั้งเครื่องซักผ้าบนพื้นที่แข็งแรงมั่นคง
พื้นไม้อาจต้องมีการเสริมความแข็งแรงเพื่อลดการสั่นสะเทือน และ/หรือการ
รับน�้าหนักที่ขาดสมดุล พื้นผิวที่ปูพรมและวัสดุอ่อนนุ่มอาจไม่มั่นคงเมื่อเกิด
การสั่นสะเทือน และอาจท�าให้เครื่องซักผ้าเคลื่อนตัวเล็กน้อยระหว่างรอบ
การป
ั่
นหมาด
ข้อควรระวัง
ห้ามติดตั้งเครื่องซักผ้าบนที่ยกพื้นหรือโครงสร้างที่ไม่แข็งแรง
อุณหภูม
ิ
ของน�้า
ห้ามติดตั้งเครื่องซักผ้าในพื้นที่ซึ่งน�้าอาจเป็นน�้าแข็งได้ เนื่องจาก
เครื่องซักผ้าจะมีน�้าอยู่ในวาล์วน�้า ป
ั๊
ม และ/หรือท่อเสมอ น�้าที่แข็งตัวซึ่ง
หลงเหลืออยู่ในส่วนเชื่อมต่ออาจท�าให้สายพาน ป
ั๊
ม และองค์ประกอบอื่นๆ
ของเครื่องซักผ้าเสียหาย
การต
ิ
ดตั้งในซุ้มเก็บ
ระยะห่างต�่าสุดเพื่อให้ท�างานได้อย่างมั่นคง:
ด้านข้าง 25 มม.
ด้านบน 25 มม.
ด้านหลัง 50 มม.
ด้านหน้า 550 มม.
ถ้าติดตั้งทั้งเครื่องซักผ้าและเครื่องอบผ้าไว้ในบริเวณเดียวกัน ด้านหน้าของ
ซุ้มหรือตู้จะต้องมีช่องเปิดที่ไม่มีสิ่งกีดขวางอย่างน้อย 550 มม. เครื่องซักผ้า
เพียงอย่างเดียวจะไม่ต้องมีช่องเปิดส�าหรับอากาศโดยเฉพาะ
Untitled-6 15 2017-12-15 11:43:25
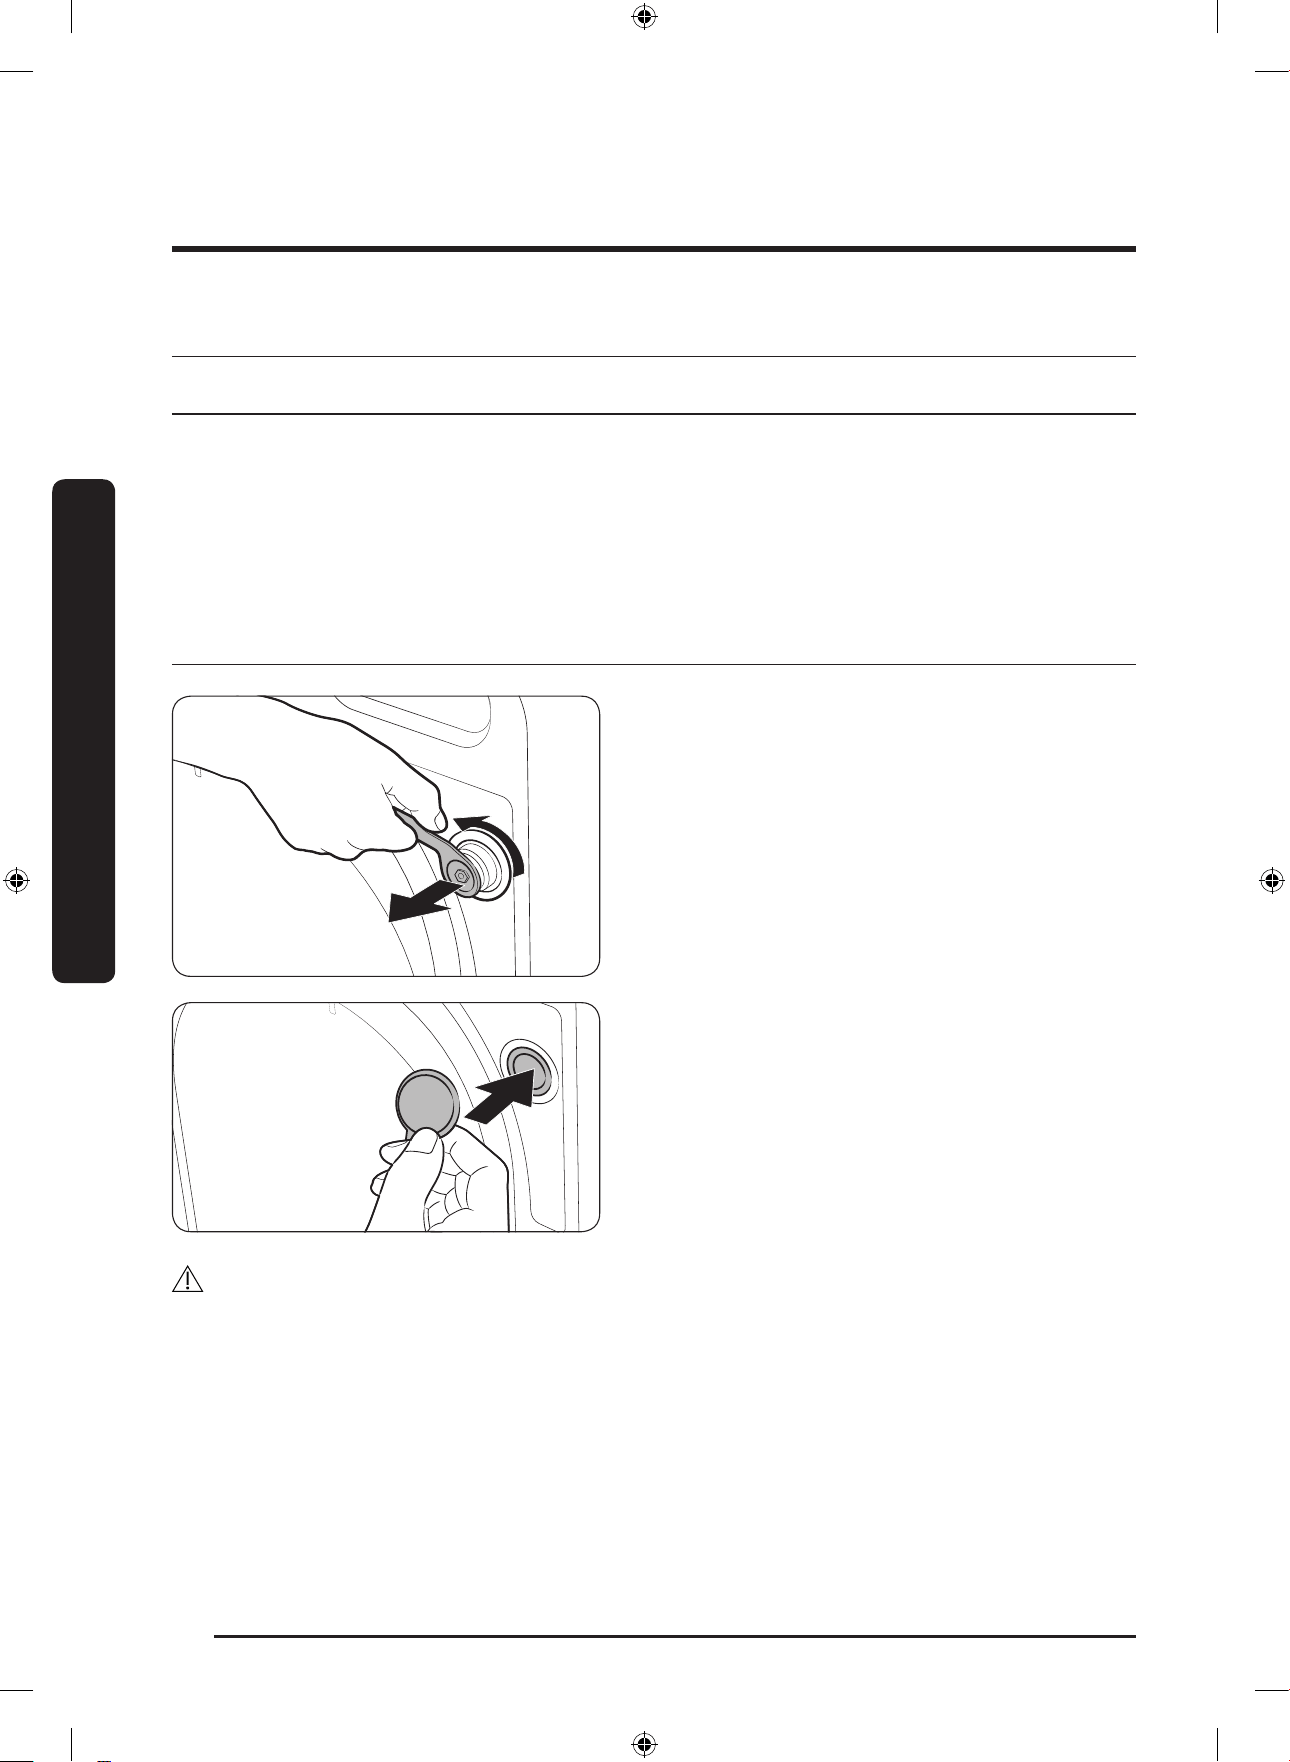
การต
ิ
ดตั้ง
ไทย
16
การต
ิ
ดตั้ง
การต
ิ
ดตั้งทีละขั้นตอน
ขั้นตอนที่ 1 เลือกที่ตั้ง
ข้อก�าหนดของต�าแหน่ง:
• มีพื้นผิวแข็ง ราบเรียบเสมอกัน โดยไม่มีพรมหรือวัสดุปูพื้นที่อาจปิดกั้นการระบายอากาศ
• พ้นจากแสงแดดโดยตรง
• มีพื้นที่ว่างส�าหรับการระบายอากาศและการเดินสายอย่างเพียงพอ
• อุณหภูมิแวดล้อมต้องสูงกว่าจุดเยือกแข็ง (0 ˚C) อยู่เสมอ
• อยู่ห่างจากแหล่งก�าเนิดความร้อนเสมอ
ขั้นตอนที่ 2 การถอดหมุดส�าหรับขนส
่
ง
แกะบรรจุภัณฑ์ของผลิตภัณฑ์ออกและน�าหมุดส�าหรับการขนส่งทั้งหมดออก
1. คลายหมุดส�าหรับการขนส่งทั้งหมดที่ด้านหลังของเครื่องโดยใช้ประแจ
ที่มีให้
2. น�าฝาครอบน็อตที่เป็นพลาสติกที่มีให้ใส่ลงในช่อง
เก็บหมุดไว้เพื่อใช้ในอนาคต
ค�าเตือน
วัสดุบรรจุภัณฑ์อาจเป็นอันตรายกับเด็ก โปรดทิ้งวัสดุบรรจุภัณฑ์ทั้งหมด (ถุงพลาสติก โฟม เป็นต้น) ให้พ้นมือเด็ก
Untitled-6 16 2017-12-15 11:43:26
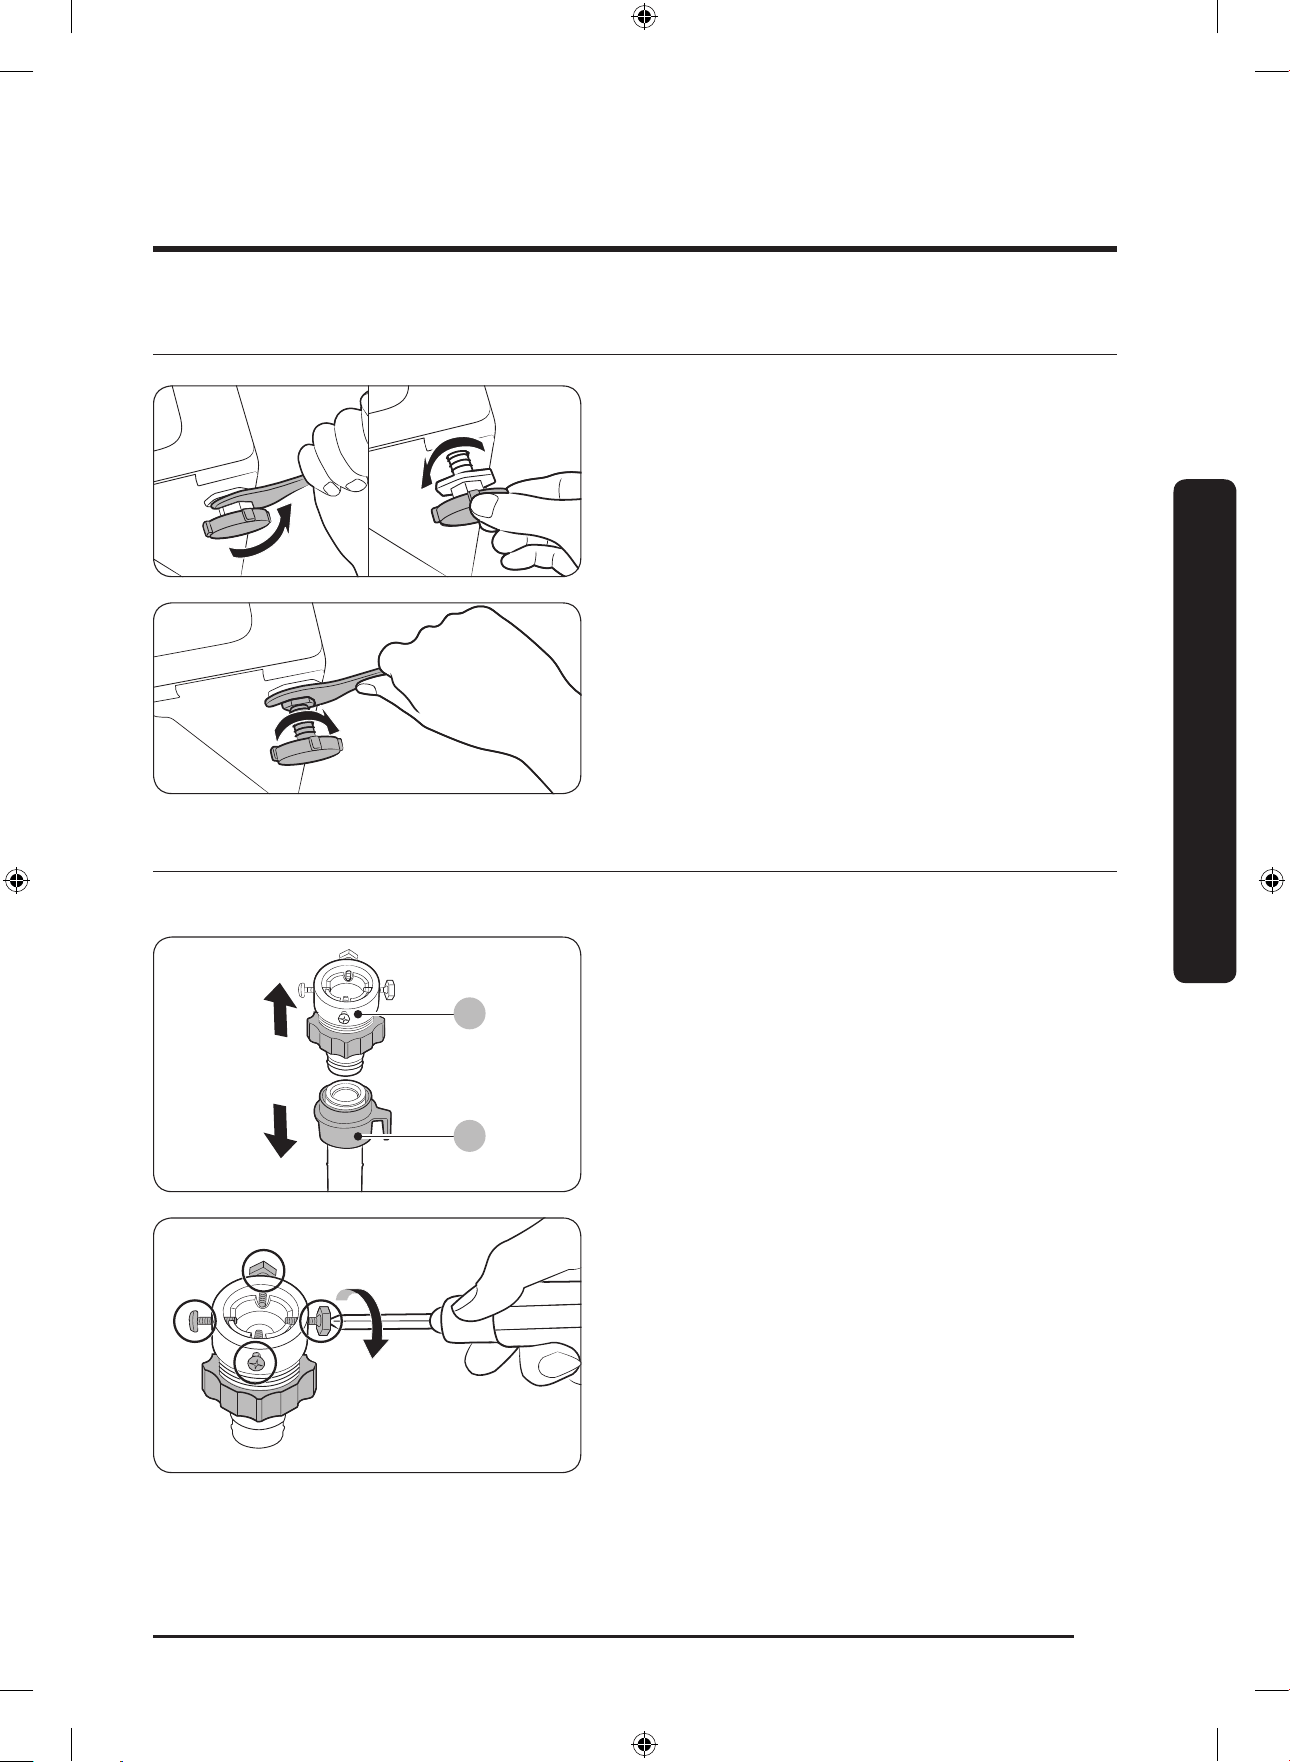
ไทย
17
การต
ิ
ดตั้ง
ขั้นตอนที่ 3 ปรับขาตั้งปรับระดับ
1. ค่อยๆ เลื่อนเครื่องซักผ้าเข้าสู่ต�าแหน่งที่ติดตั้ง การใช้แรงมากเกินไป
อาจท�าให้ขาตั้งปรับระดับเสียหาย
2. ปรับระดับเครื่องซักผ้าด้วยการปรับขาตั้งปรับระดับด้วยตนเอง
3. เมื่อการปรับระดับเสร็จสิ้น ให้ขันน็อตโดยใช้ประแจ
ขั้นตอนที่ 4 ต
่
อท
่
อจ
่
ายน�้า
ตัวแปลงท่อที่ให้มาอาจแตกต่างกันในแต่ละรุ่น ขั้นตอนนี้จะแนะน�าการต่อตัวแปลงแบบข้อต่อ ถ้าคุณได้รับตัวแปลงแบบเกลียว โปรดไปที่ข้อ 7
A
B
ต่อท่อจ่ายน�้าเข้ากับก๊อกน�้า
1. ถอด ตัวแปลง(A) จาก ท
่
อ(B)
2. ใช้ไขควงฟิลลิปส์เพื่อคลายสกรูสี่ตัวบนข้อต่อ
Untitled-6 17 2017-12-15 11:43:27

การต
ิ
ดตั้ง
ไทย
18
การต
ิ
ดตั้ง
C
3. จับข้อต่อไว้และหมุน ช
ิ้
นส
่
วน(C) ไปตามทิศทางของลูกศร
เพื่อคลายออก 5 มม. (*)
C
4. ต่อข้อต่อเข้ากับก๊อกน�้า และขันสกรูให้แน่นพร้อมทั้งยกข้อต่อขึ้น
5. หมุน ช
ิ้
นส
่
วน(C) ไปตามทิศทางของลูกศรเพื่อขันให้แน่น
D
6. ในขณะจับด้านล่างของ ช
ิ้
นส
่
วน(D) ไว้ ให้เชื่อมต่อท่อจ่ายน�้าเข้ากับ
ข้อต่อ จากนั้น ปลด ช
ิ้
นส
่
วน(D) ท่อจะต่อเข้ากับข้อต่อได้พอดี
พร้อมกับมีเสียงคลิก
7. ถ้าใช้ก๊อกน�้าแบบเกลียว ให้ใช้ตัวแปลงแบบเกลียวเพื่อต่อกับก๊อกน�้า
ดังที่แสดง
Untitled-6 18 2017-12-15 11:43:28
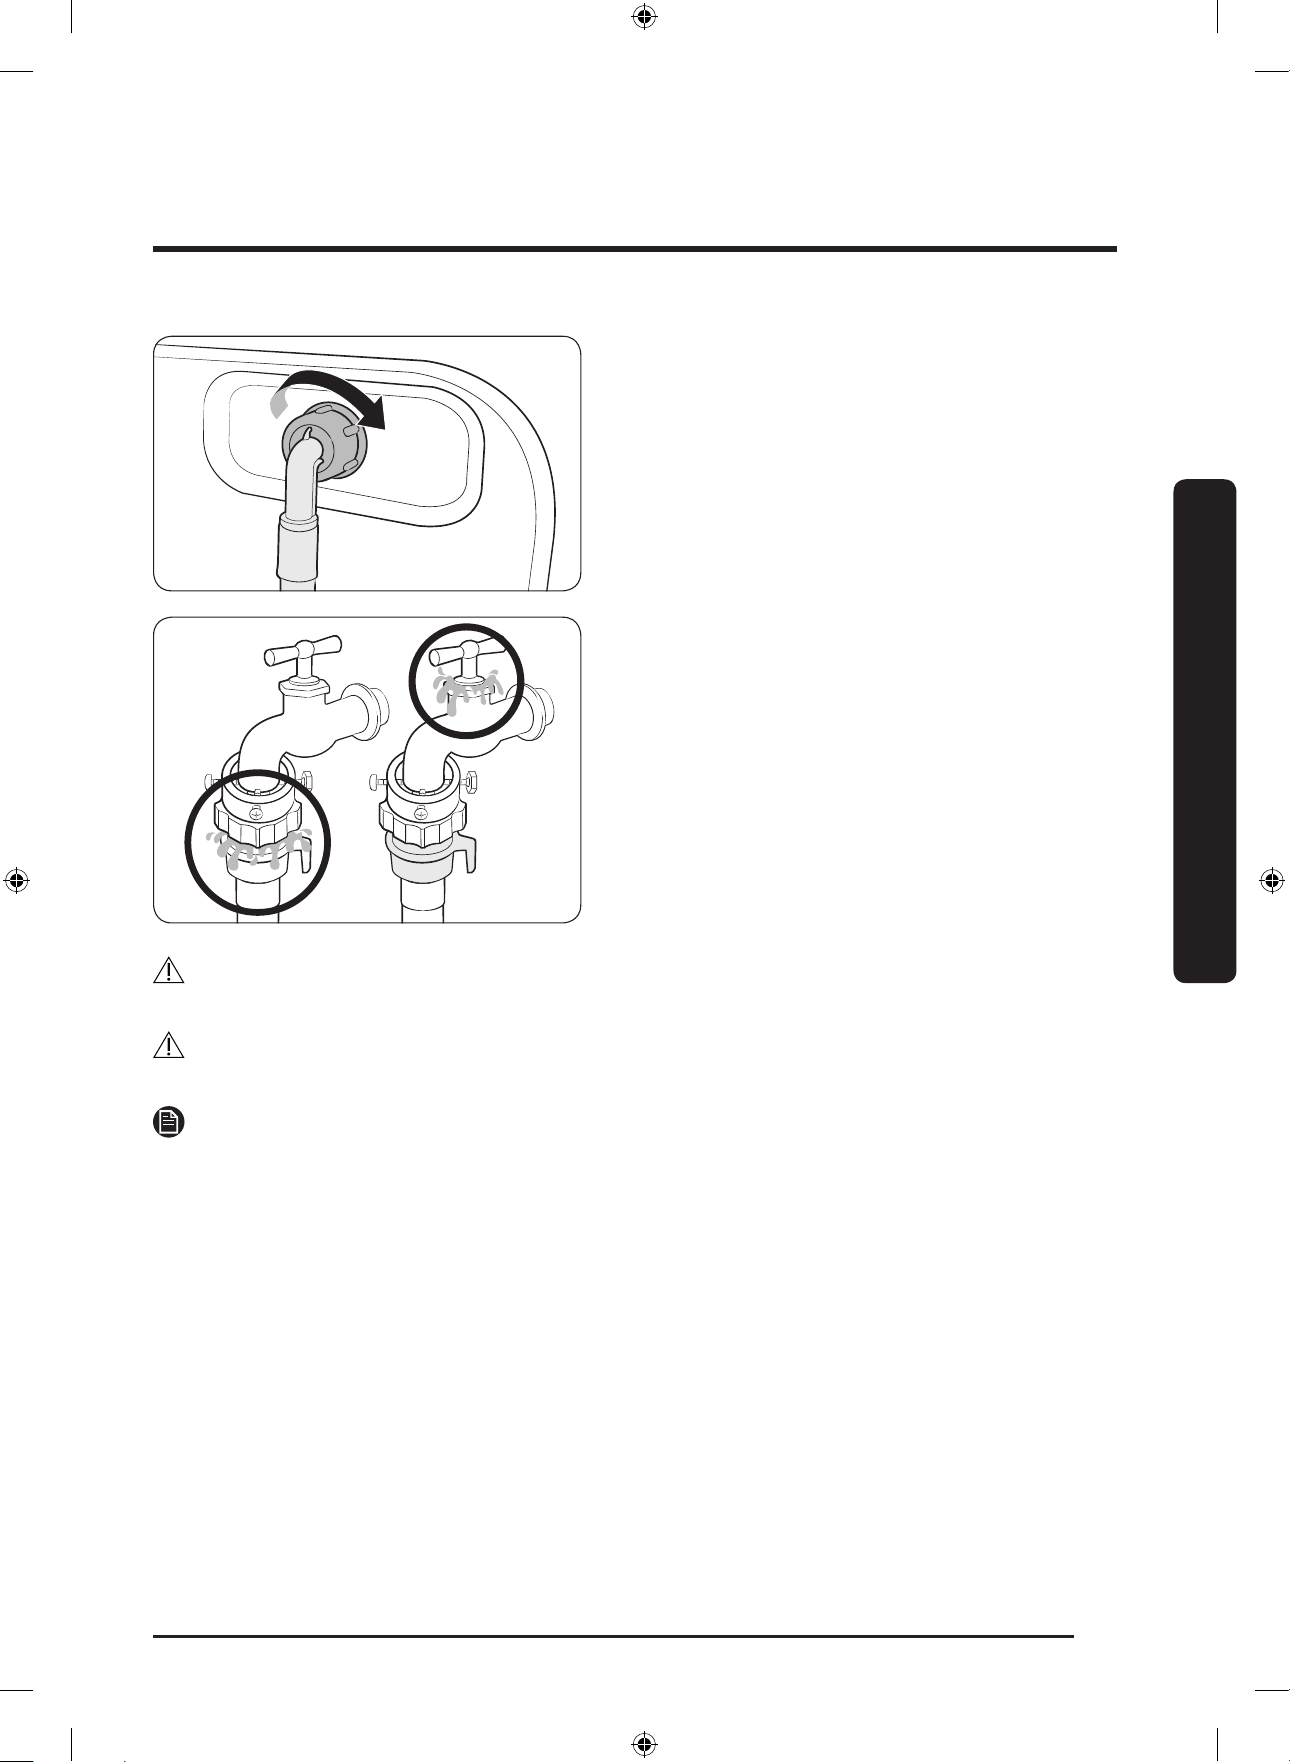
ไทย
19
การต
ิ
ดตั้ง
8. ต่อปลายอีกด้านของท่อน�้าเข้ากับวาล์วน�้าเข้าที่ด้านหลังของ
เครื่องซักผ้า หมุนท่อตามเข็มนาฬิกาเพื่อขันให้แน่น
9. เปิดก๊อกน�้าและตรวจสอบว่ามีรอยรั่วรอบบริเวณเชื่อมต่อหรือไม่ ถ้ามี
น�้ารั่ว ให้ท�าตามขั้นตอนข้างต้นนี้ซ�้า
ค�าเตือน
ถ้ามีน�้ารั่ว ให้หยุดการใช้งานเครื่องและถอดปลั๊กไฟออกจากแหล่งจ่ายไฟ จากนั้นโปรดติดต่อศูนย์บริการของ Samsung ในพื้นที่ มิฉะนั้นอาจท�าให้เกิดไฟช็อต
ข้อควรระวัง
โปรดอย่าดึงท่อจ่ายน�้าจนตึงโดยใช้แรง หากท่อจ่ายน�้าสั้นเกินไป โปรดเปลี่ยนเป็นท่อแรงดันสูงที่ยาวขึ้น
หมายเหตุ
• หลังจากต่อท่อน�้าเข้ากับข้อต่อแล้ว ให้ตรวจสอบว่ามีการเชื่อมต่ออย่างถูกต้องหรือไม่ โดยดึงท่อจ่ายน�้าลง
• โปรดใช้ก๊อกน�้าประเภทที่ใช้งานกันทั่วไป หากก๊อกน�้าเป็นแบบเหลี่ยมหรือใหญ่เกินไป ให้น�าวงแหวนออกก่อนที่จะต่อก๊อกน�้าเข้ากับข้อต่อ
Untitled-6 19 2017-12-15 11:43:29
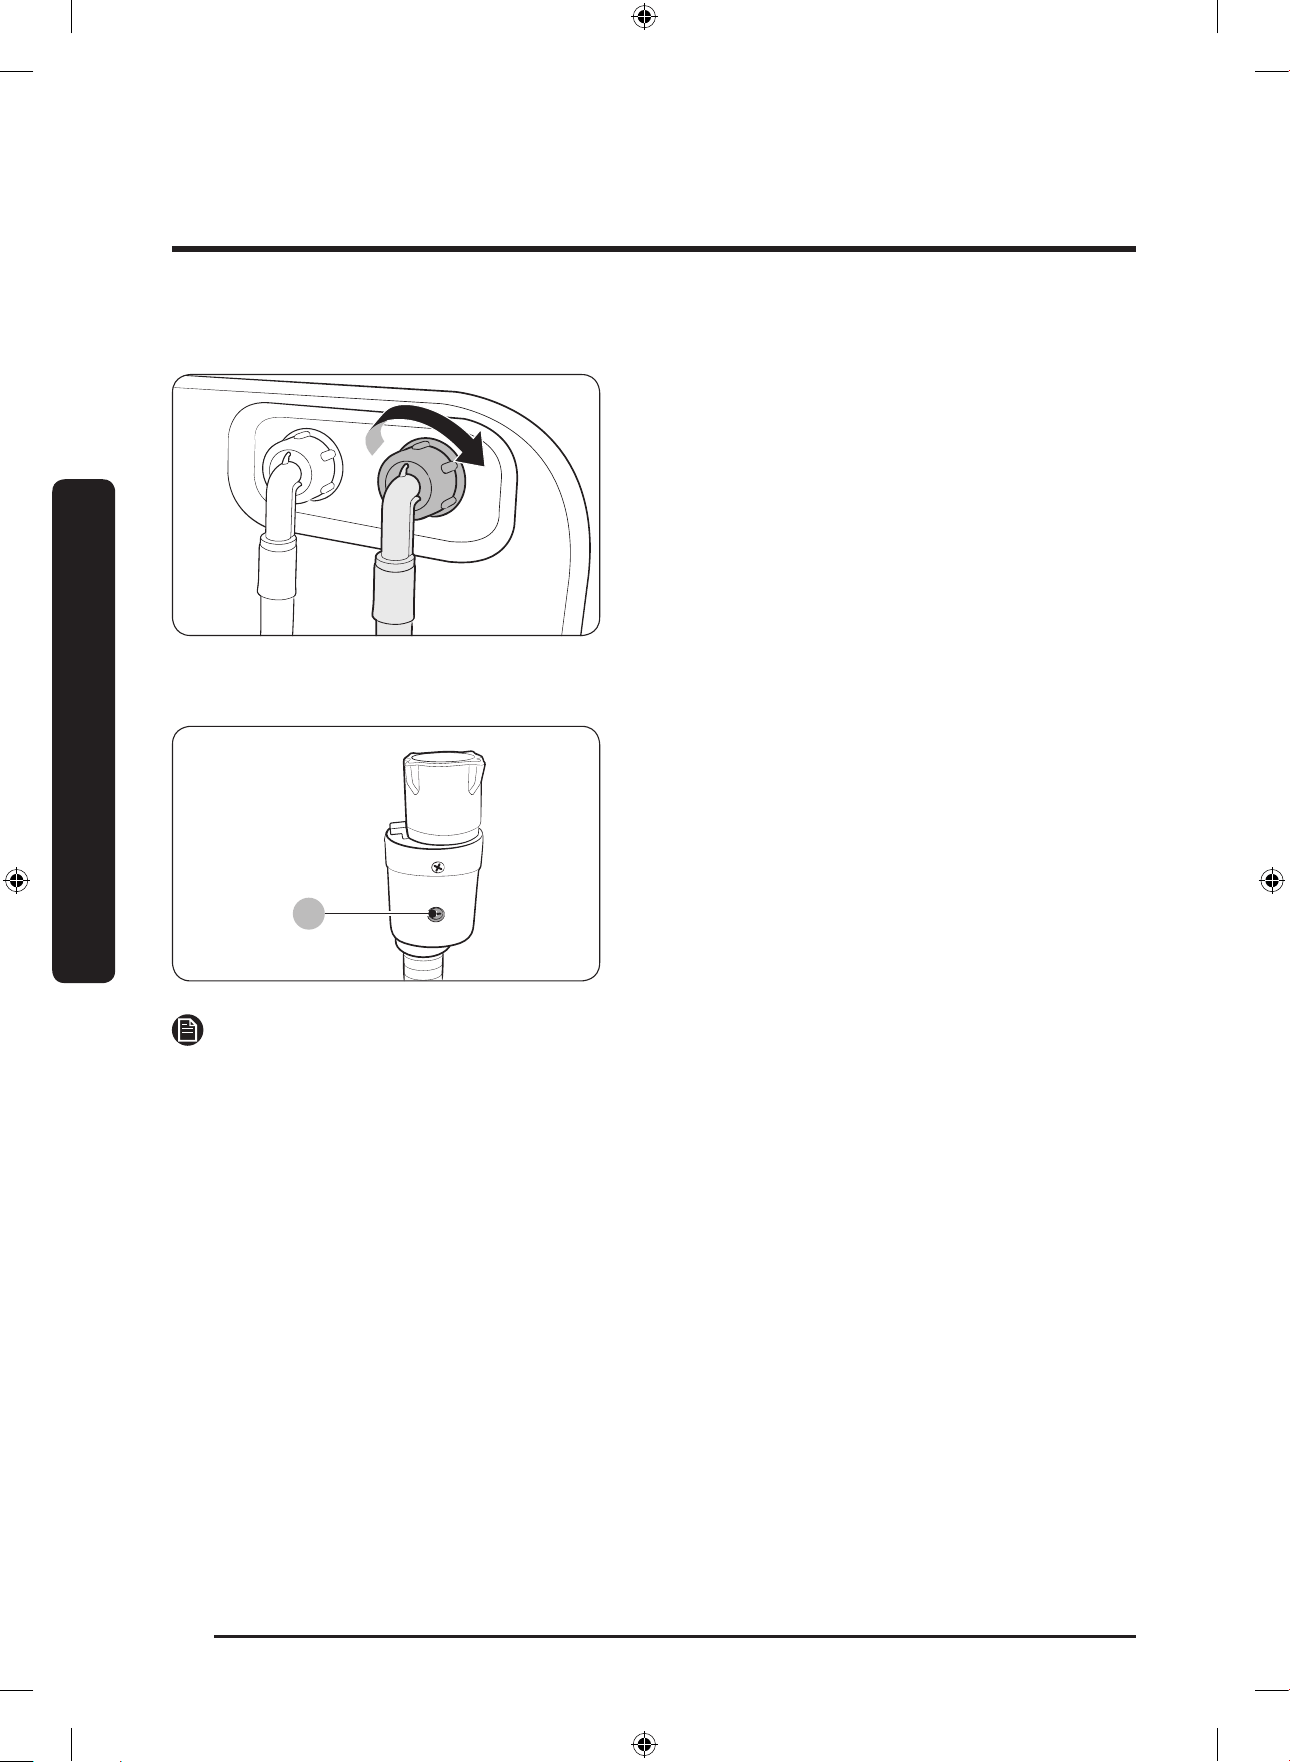
การต
ิ
ดตั้ง
ไทย
20
การต
ิ
ดตั้ง
ส�าหรับรุ
่
นที่มีช
่
องน�้าร้อนเข้าเพ
ิ่
มเต
ิ
ม:
1. ต่อปลายสีแดงของท่อน�้าร้อนกับช่องน�้าร้อนเข้าที่ด้านหลังของ
เครื่องซักผ้า
2. ต่อปลายอีกด้านของท่อน�้าร้อนเข้ากับก๊อกน�้าร้อน
ท
่
อเตือนน�้ารั่ว(เฉพาะรุ
่
น)
A
ท่อเตือนน�้ารั่วจะเตือนให้ผู้ใช้ทราบถึงความเสี่ยงที่จะเกิดน�้ารั่ว อุปกรณ์
จะรับรู้การไหลของน�้าและเปลี่ยนเป็นสีแดงที่ สัญลักษณ์(A) บริเวณ
กึ่งกลาง
ในกรณีที่เกิดการรั่ว
หมายเหตุ
ปลายท่อเตือนน�้ารั่วจะต้องติดตั้งก๊อกน�้า ไม่ใช่ต่อเข้ากับเครื่อง
Untitled-6 20 2017-12-15 11:43:29
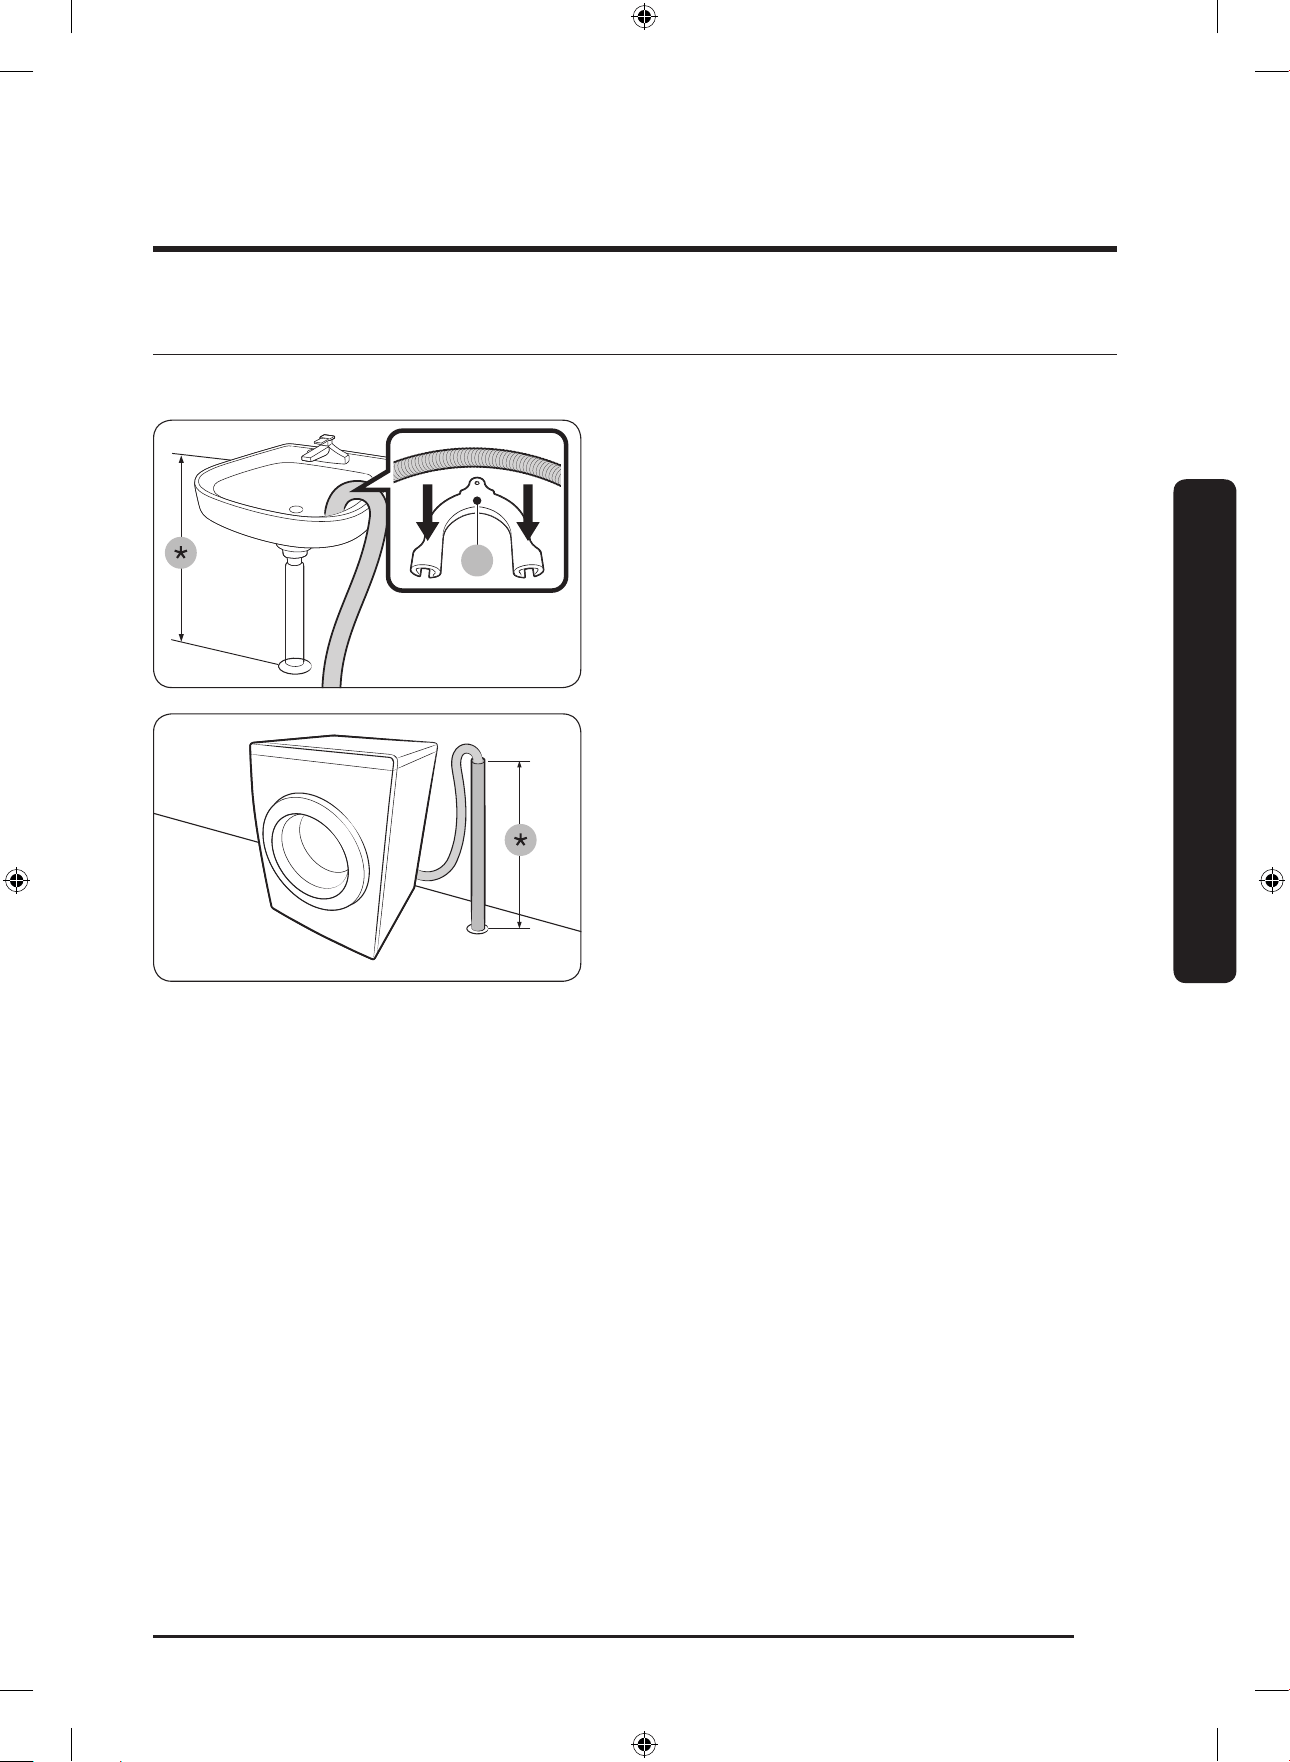
ไทย
21
การต
ิ
ดตั้ง
ขั้นตอนที่ 5 จัดวางท
่
อน�้าท
ิ้
ง
สามารถติดตั้งท่อระบายน�้าได้สามวิธี:
A
พาดขอบอ่างซักล้าง
ท่อทิ้งน�้าต้องวางในความสูงระหว่าง 60 ซม. ถึง 90 ซม. (*) จากพื้น หาก
ต้องการท่อทิ้งน�้าโค้ง ให้ใช้ ตัวน�าท
่
อพลาสต
ิ
ก(A) ที่ให้มา ยึดตัวน�ากับ
ผนังโดยใช้ตะขอเพื่อให้แน่ใจว่าจะสามารถระบายน�้าทิ้งได้เสมอ
ในท่อระบายน�้าของอ่างล้างมือ
ท่อระบายน�้าจะต้องอยู่เหนือท่อพักของอ่างล้างมือ เพื่อให้ปลายท่ออยู่เหนือ
พื้นอย่างน้อย 60 ซม.
ในท่อน�้าทิ้ง
ท่อระบายน�้าควรมีความสูงระหว่าง 60 ซม. ถึง 90 ซม. (*) ขอแนะน�าให้ใช้
ท่อแนวตั้งที่มีความสูง 65 ซม. โปรดตรวจสอบให้แน่ใจว่าได้ต่อท่อระบายน�้า
เข้ากับท่อตั้งในแนวเอียง
ข้อก�าหนดของท่อตั้งส�าหรับระบายน�้าทิ้ง:
• เส้นผ่าศูนย์กลางขั้นต�่า 5 ซม.
• สามารถระบายน�้าได้ขั้นต�่า 60 ลิตรต่อนาที
Untitled-6 21 2017-12-15 11:43:30

การต
ิ
ดตั้ง
ไทย
22
การต
ิ
ดตั้ง
ข้อควรระวัง
อย่าใส่ท่อระบายน�้าทิ้งในสถานที่น�้าขังหรือเป็นบ่อ น�้าอาจไหลกลับเข้าสู่
เครื่องซักผ้า
ขั้นตอนที่ 6 เป
ิ
ดเครื่อง
ต่อสายไฟเข้ากับเต้ารับไฟฟ
้
าที่ผนัง ซึ่งมีเต้ารับไฟฟ
้
า AC 220-240 V / 50 Hz ที่ผ่านการรับรองและมีการป
้
องกันด้วยฟิวส์หรือเบรกเกอร์วงจร จากนั้นให้กดปุ
่
ม
เป
ิ
ด/ป
ิ
ด เพื่อเปิดเครื่องซักผ้า
Untitled-6 22 2017-12-15 11:43:30
ไทย
23
ก
่
อนการเร
ิ่
มต้น
การตั้งค
่
าเร
ิ่
มต้น
เรียกใช้การเทียบค
่
า(แนะน�า)
การเทียบค่า จะช่วยให้เครื่องซักผ้าสามารถตรวจหาน�้าหนักที่ถูกต้อง โปรดตรวจสอบว่าถังซักว่างเปล่าก่อนเรียกใช้ การเทียบค่า
1. ปิดเครื่อง จากนั้นเปิดเครื่องซักผ้า
2. กดปุ
่
ม Temp.(อุณหภูม
ิ
) และ DelayEnd(ตั้งเวลาส
ิ้
นสุด) พร้อมกันค้างไว้ 3 วินาทีเพื่อเข้าสู่โหมด การเทียบค่า ข้อความ “Cb” จะปรากฏขึ้น
3. กด เร
ิ่
ม/พัก เพื่อเริ่มต้นรอบ การเทียบค่า
4. ถังซักจะหมุนเป็นเวลาประมาณ 3 นาที (ทิศทางการหมุนของถังซักอาจแตกต่างกันไปในแต่ละรุ่น)
5. เมื่อโหมดปรับตั้งเสร็จสมบูรณ์ ข้อความ “0” จะปรากฏในจอแสดงผล และเครื่องซักผ้าจะปิดตัวลงโดยอัตโนมัติ
6. ขณะนี้เครื่องซักผ้าพร้อมใช้งานแล้ว
ค�าแนะน�าของผ้า
ขั้นตอนที่ 1 แยกผ้า
แยกผ้าตามเกณฑ์ดังนี้:
• ฉลากดูแลผ้า: แยกผ้าเป็น ผ้าฝ
้
าย ผ้าเนื้อผสม ผ้าใยสังเคราะห์ ผ้าไหม ผ้าขนสัตว์ และเรยอน
• สี: แยกผ้าขาวออกจากผ้าสี
• ขนาด: การน�าผ้าที่มีขนาดแตกต่างมารวมเข้าไว้ด้วยกันในถังซักจะช่วยเพิ่มประสิทธิภาพในการซัก
• ความบอบบาง: ซักผ้าบางแยกต่างหากส�าหรับผ้าขนสัตว์ใหม่ล้วน ผ้าม่าน และผ้าไหม โปรดดูฉลากบนผ้า
หมายเหตุ
โปรดดูฉลากดูแลผ้าบนเสื้อผ้า และแยกเสื้อผ้าตามนั้นก่อนเริ่มต้นซัก
ก
่
อนการเร
ิ่
มต้น
Untitled-6 23 2017-12-15 11:43:31
ก
่
อนการเร
ิ่
มต้น
ไทย
24
ก
่
อนการเร
ิ่
มต้น
ขั้นตอนที่ 2 น�าส
ิ่
งของออกจากกระเป๋ า
น�าส
ิ่
งของออกจากทุกประเป๋ าของเสื้อผ้า
• วัตถุที่เป็นโลหะ เช่น เหรียญ เข็มหมุด และหัวเข็มขัดบนเสื้อผ้าอาจท�าให้ผ้าอื่นๆ และถังซักเสียหาย
กลับผ้าที่มีกระดุมและเสื้อผ้าที่มีลายปักเอาด้านในออกมาด้านนอก
• ถ้าไม่รูดซิปกางเกงหรือแจ็คเก็ตปิดไว้ขณะซัก ถังซักอาจเสียหายได้ โปรดรูปซิปปิดไว้
• เสื้อผ้าที่มีเชือกยาวอาจพันกับผ้าชิ้นอื่น โปรดผูกเชือกไว้ก่อนที่จะเริ่มต้นซักผ้า
ขั้นตอนที่ 3 ใช้ถุงใส
่
ผ้าส�าหรับซัก
• ต้องใส่ชุดชั้นในสตรี (ซักเครื่องได้) ลงในถุงใส่ผ้าส�าหรับซัก ส่วนที่เป็นโลหะของชุดชั้นในสตรีอาจท�าให้วัสดุแตกหักและท�าความเสียหายแก่เสื้อผ้าได้
• เสื้อผ้าชิ้นเล็กและมีน�้าหนักเบา เช่น ถุงเท้า ถุงมือ ถุงน่อง และผ้าเช็ดหน้า อาจติดอยู่บริเวณประตู โปรดใส่เสื้อผ้าเหล่านี้ไว้ในถุงใส่ผ้าส�าหรับซัก
• อย่าซักถุงใส่ผ้าเพียงอย่างเดียวโดยไม่มีผ้าอื่น เนื่องจากอาจท�าให้เกิดการสั่นสะเทือนที่ท�าให้เครื่องซักผ้าเคลื่อนที่และอาจท�าให้ได้รับบาดเจ็บ
ขั้นตอนที่ 4 แช
่
ผ้าก
่
อนซัก(ถ้าจ�าเป็น)
เลือกตัวเลือก ซักล่วงหน้า ส�าหรับโปรแกรมที่เลือก ถ้าผ้าสกปรกมาก เมื่อเลือกตัวเลือก ซักล่วงหน้า โปรดใส่ผงซักฟอกแบบผงในช่องใส่ส�าหรับการซักหลัก
ขั้นตอนที่ 5 พ
ิ
จารณาปร
ิ
มาณผ้าที่จะซัก
ห้ามใส่ผ้าเกินปริมาณที่ก�าหนด การใส่ผ้ามากเกินไปอาจท�าให้เครื่องซักผ้าไม่สามารถซักได้อย่างเหมาะสม โปรดดูที่หน้า 32 ส�าหรับข้อมูลเกี่ยวกับปริมาณผ้า
แต่ละชนิดที่จะซัก
หมายเหตุ
เมื่อซักชุดเครื่องนอนหรือผ้านวม เวลาในการซักอาจนานขึ้น และประสิทธิภาพในการป
ั่
นหมาดจะลดลง ส�าหรับชุดเครื่องนอนหรือผ้านวม ความเร็วของรอบ
ป
ั่
นหมาดสูงสุดที่แนะน�าคือ 800 รอบต่อนาที และน�้าหนักคือ 2.0 กิโลกรัม หรือน้อยกว่า
ข้อควรระวัง
ถ้าผ้าไม่สมดุลและรหัสข้อมูล “Ub” ปรากฏขึ้น ให้กระจายชิ้นผ้าให้เสมอกัน ผ้าที่ไม่สมดุลอาจลดประสิทธิภาพในการป
ั่
น
Untitled-6 24 2017-12-15 11:43:31
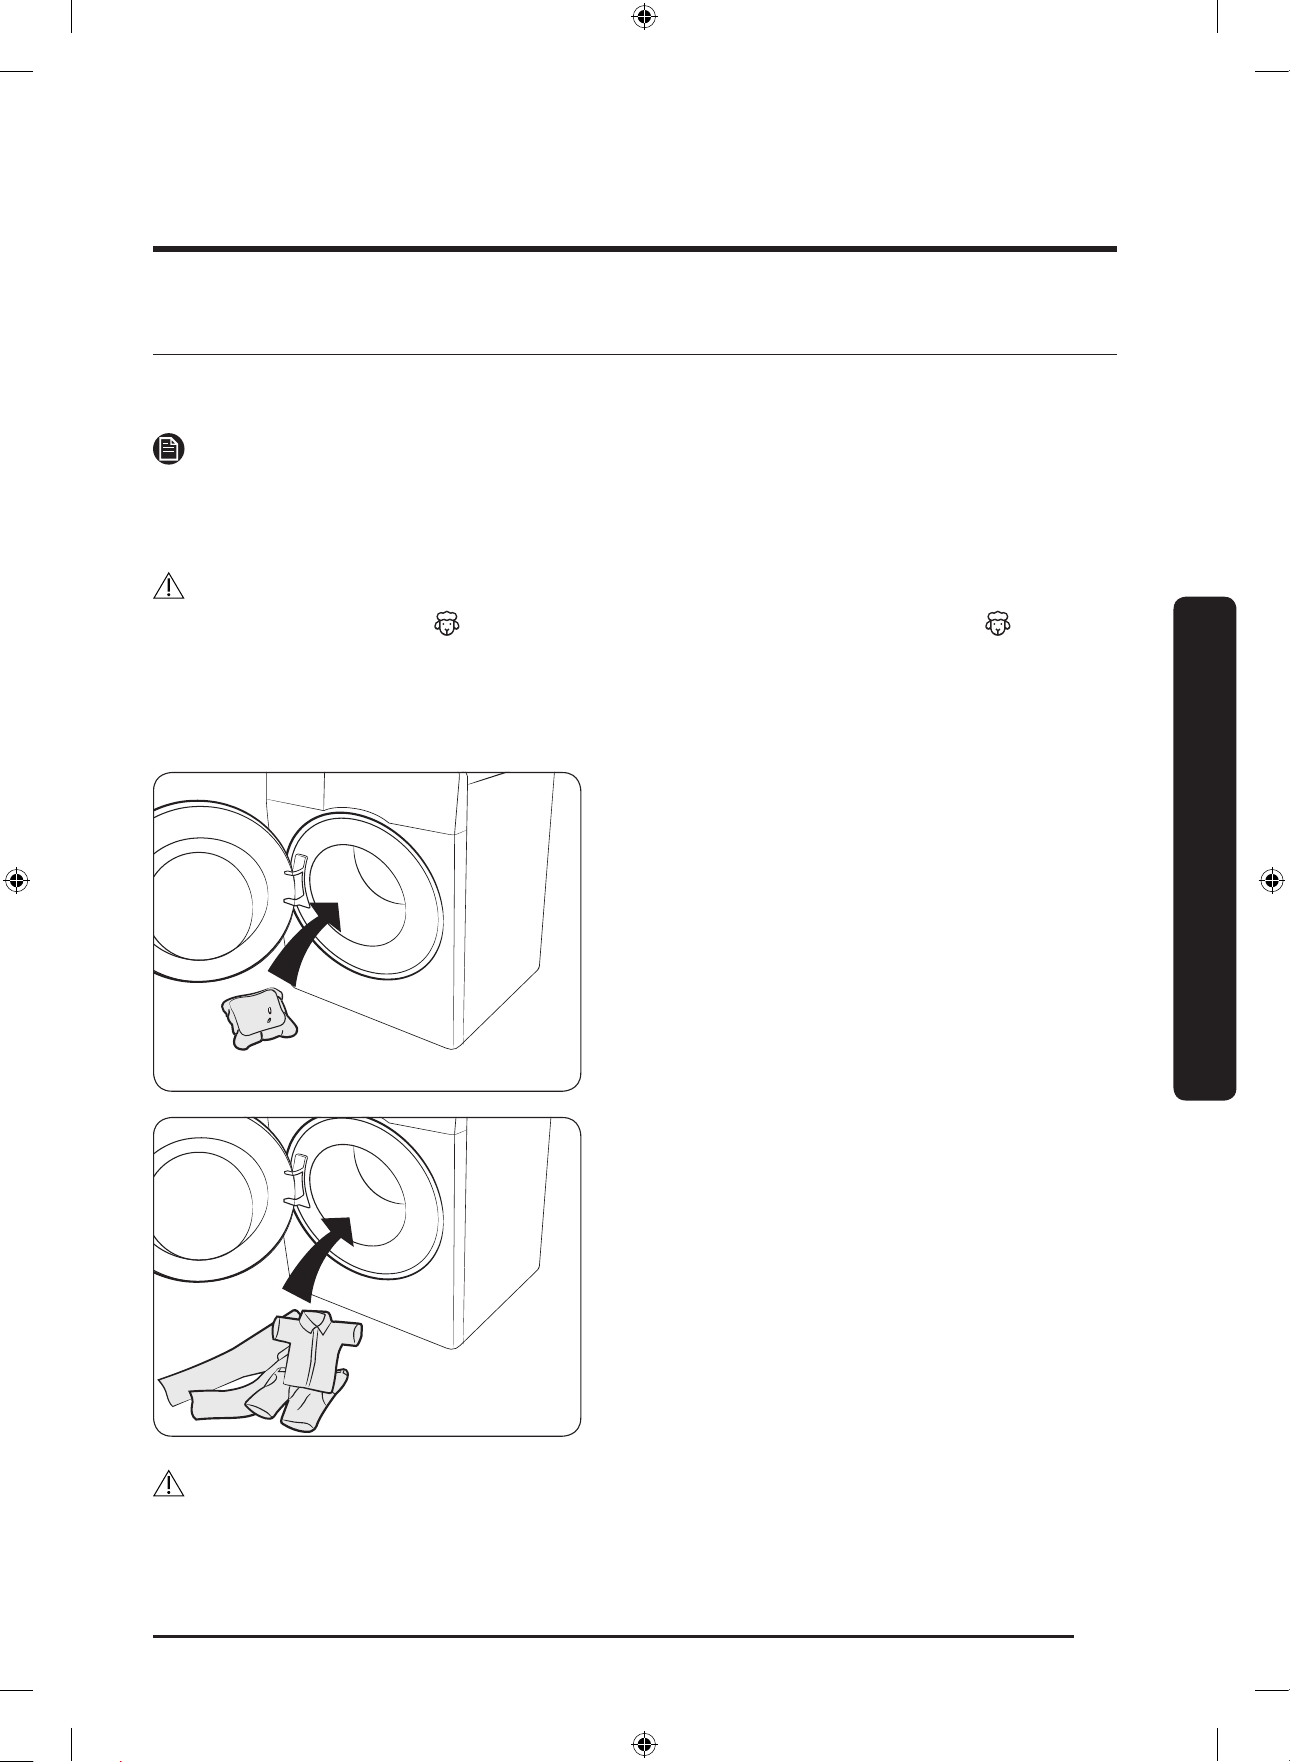
ไทย
25
ก
่
อนการเร
ิ่
มต้น
ขั้นตอนที่ 6 ใช้ประเภทผงซักฟอกที่เหมาะสม
ประเภทของผงซักฟอกขึ้นอยู่กับประเภทเนื้อผ้า (ผ้าฝ
้
าย ผ้าใยสังเคราะห์ ผ้าบาง ขนสัตว์) สี อุณหภูมิที่ซัก และระดับความสกปรก โปรดใช้ผงซักฟอกชนิด
ฟองน้อย ซึ่งได้รับการออกแบบส�าหรับเครื่องซักผ้าอัตโนมัติ
หมายเหตุ
• ปฏิบัติตามค�าแนะน�าของผู้ผลิตผงซักฟอก ตามน�้าหนักของผ้า ระดับความสกปรก และความกระด้างของน�้าในพื้นที่ของคุณ ถ้าคุณไม่แน่ใจเกี่ยวกับ
ความกระด้างของน�้า โปรดติดต่อผู้ให้บริการน�้าประปาในพื้นที่
• ห้ามใช้ผงซักฟอกที่ที่เกาะตัวหรือแข็ง ผงซักฟอกอาจค้างอยู่ในรอบการซัก ท�าให้ช่องระบายน�้าอุดตัน
ข้อควรระวัง
เมื่อซักผ้าขนสัตว์โดยใช้โปรแกรม ผ้าขนสัตว์ ให้ใช้น�้ายาซักผ้าที่มีสภาวะเป็นกลางเท่านั้น ถ้าใช้ผงซักฟอกกับโปรแกรม ผ้าขนสัตว์ ผงซักฟอก
อาจตกค้างอยู่ในผ้าและท�าให้ผ้าสีเปลี่ยน
แคปซูลซักฟอก
เพื่อให้ได้ผลลัพธ์ที่ดีที่สุดจากการใช้แคปซูลซักฟอก โปรดปฏิบัติตามค�าแนะน�าเหล่านี้
1. ใส่แคปซูลที่ด้านล่างของถังซักที่ว่างอยู่ โดยใส่ไว้ในส่วนด้านหลัง
2. ใส่ผ้าในถังซักโดยใส่ทับบนแคปซูล
ข้อควรระวัง
ส�าหรับโปรแกรมซักที่ใช้น�้า หรือโปรแกรมซักที่ท�างานเสร็จภายในหนึ่งชั่วโมง ขอแนะน�าให้ใช้น�้ายาซักผ้าแบบเหลว มิฉะนั้น แคปซูลอาจละลายไม่หมด
Untitled-6 25 2017-12-15 11:43:32
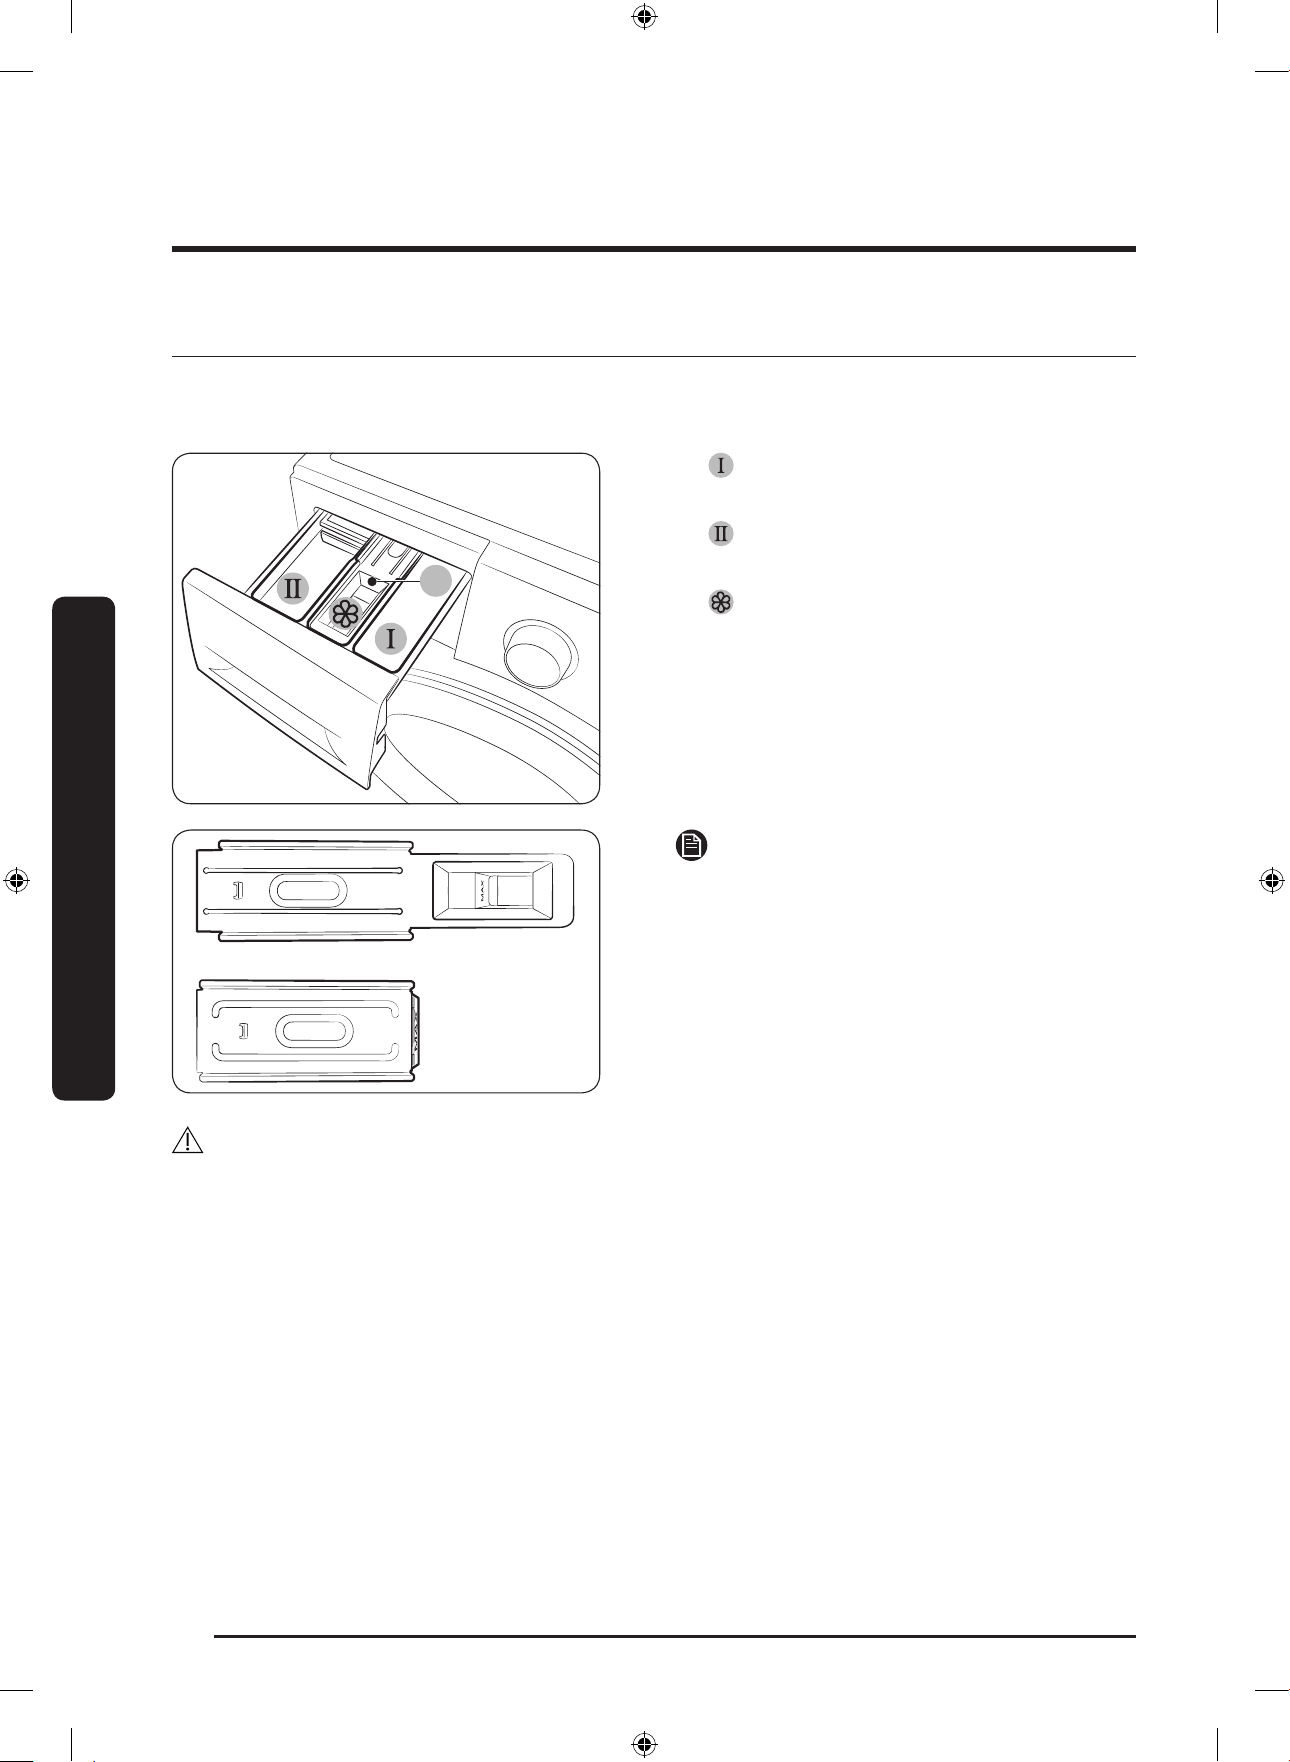
ก
่
อนการเร
ิ่
มต้น
ไทย
26
ก
่
อนการเร
ิ่
มต้น
ค�าแนะน�าส�าหรับช
่
องใส
่
น�้ายาซักผ้า
เครื่องซักผ้ามีช่องจ่ายน�้ายาแบบสามช่อง ดังนี้ ช่องด้านซ้ายส�าหรับการซักหลัก ช่องด้านขวาหน้าส�าหรับน�้ายาปรับผ้านุ่ม และช่องด้านขวาหลัง
ส�าหรับการซักขั้นต้น
A
1. ช
่
องใส
่
สารซักฟอกส�าหรับการซักล
่
วงหน้า: ใส่สารซักฟอก
ส�าหรับการซักล่วงหน้า
2. ช
่
องใส
่
สารซักฟอกหลัก: ใส่สารซักฟอกหลัก น�้ายาปรับผ้านุ่ม
น�้ายาส�าหรับแช่ผ้า น�้ายาฟอก และ/หรือน�้ายาขจัดคราบ
3. ช
่
องใส
่
น�้ายาปรับผ้านุ
่
ม: ใส่น�้ายาเสริมเช่นน�้ายาปรับผ้านุ่ม อย่า
เติมเกิน เส้นระดับสูงสุด(A)
หมายเหตุ
ลักษณะตามจริงของตัวกั้นน�้ายาปรับผ้านุ่มอาจแตกต่างกันไปในแต่ละรุ่น
ข้อควรระวัง
• ห้ามเปิดช่องใส่น�้ายาซักผ้าขณะที่เครื่องซักผ้าท�างาน
• ห้ามใช้น�้ายาซักผ้าชนิดต่อไปนี้ในช่องใส่:
- ชนิดเม็ดหรือแคปซูล
- ชนิดบอลหรือตาข่าย
• เพื่อช่วยป
้
องกันการอุดตันในช่อง ต้องมีการเจือจางสารเข้มข้นหรือประสิทธิภาพสูง (น�้ายาปรับผ้านุ่มหรือน�้ายาซักผ้า) ด้วยน�้าสะอาดก่อนน�าไปใช้งาน
• เมื่อเลือก ตั้งเวลาสิ้นสุด ไว้ โปรดอย่าใส่ผงซักฟอกหรือน�้ายาซักผ้าในถังซักโดยตรง มิฉะนั้นอาจท�าให้ผ้าสีตก ใช้ช่องใส่น�้ายาซักผ้าเมื่อเลือก
ตั้งเวลาสิ้นสุด ไว้
Untitled-6 26 2017-12-15 11:43:33
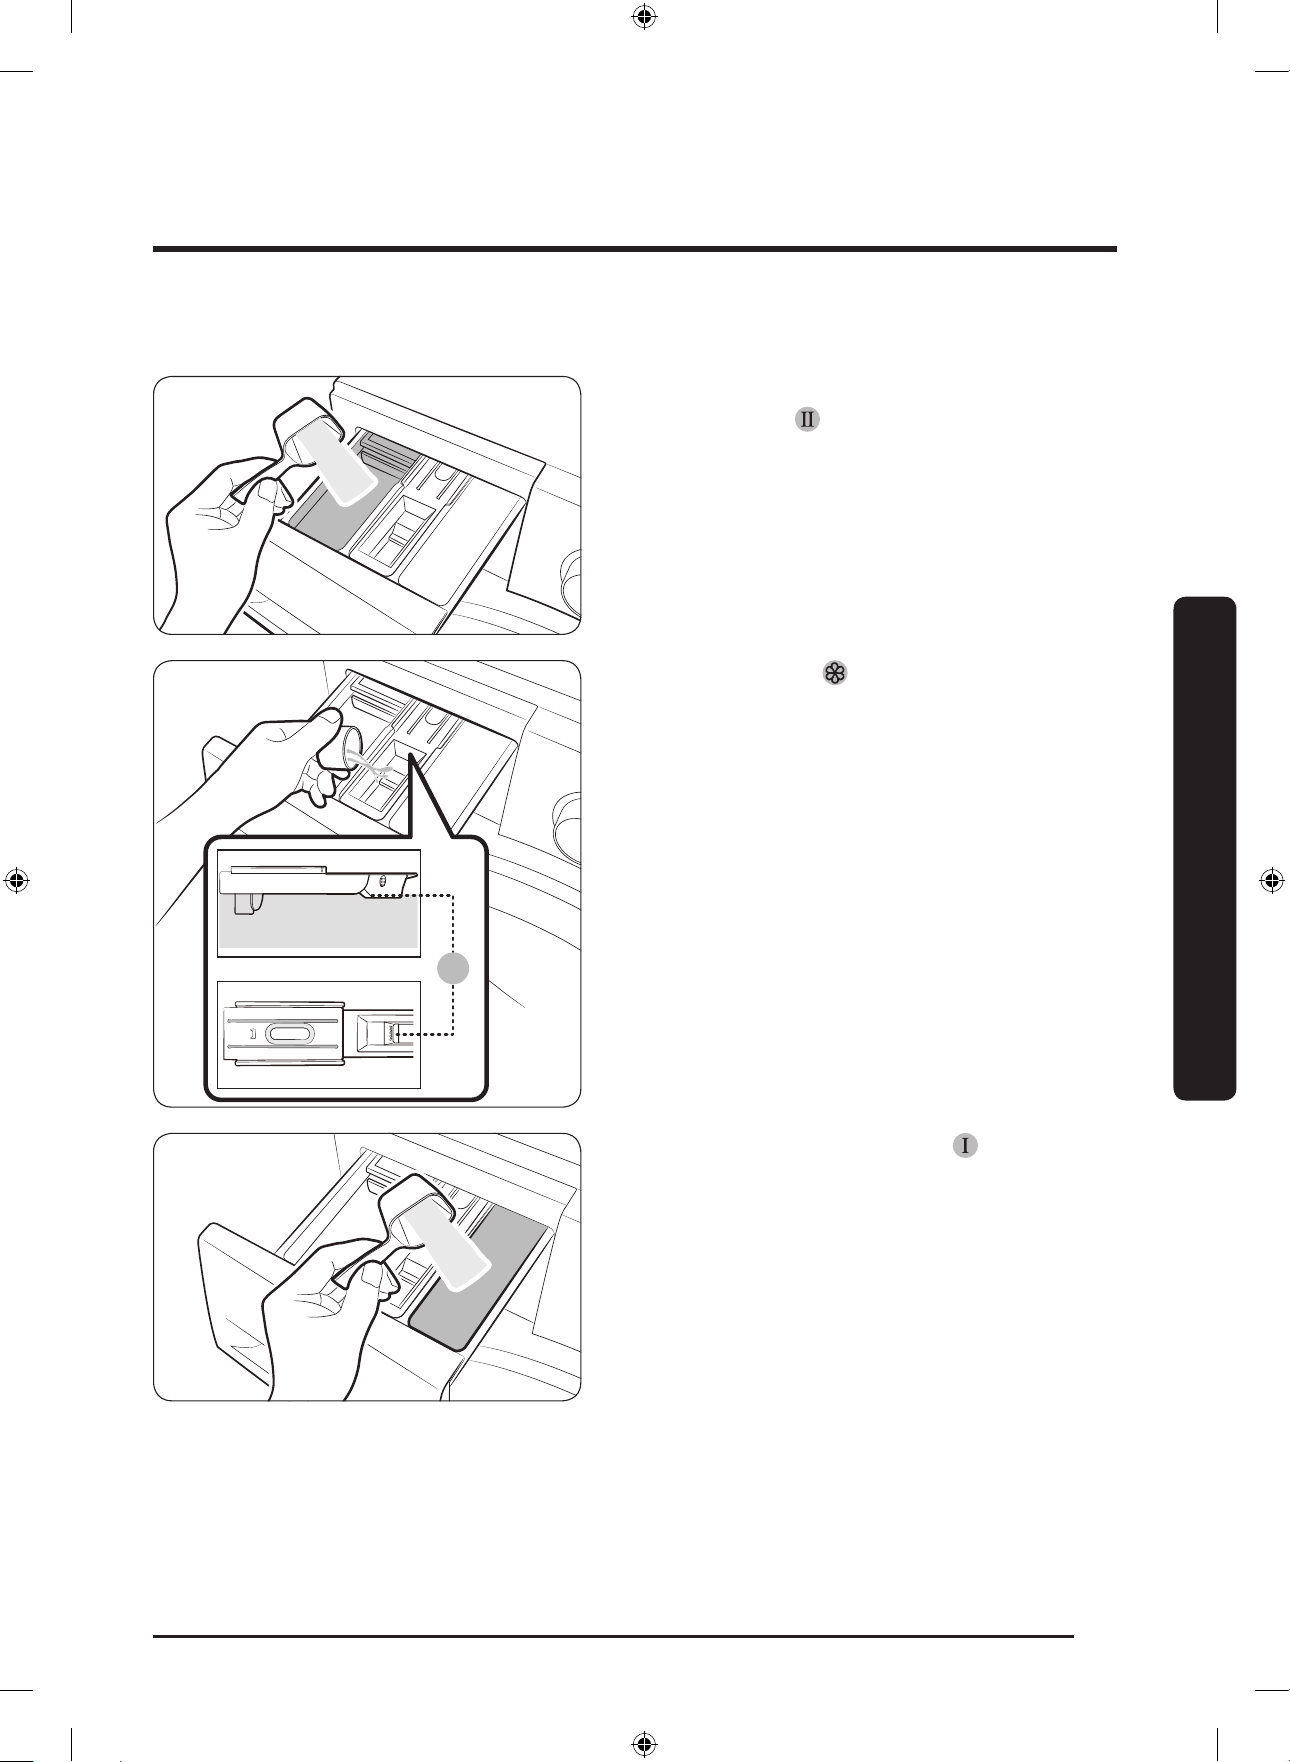
ไทย
27
ก
่
อนการเร
ิ่
มต้น
ในการใส
่
สารซักฟอกในช
่
องใส
่
สารซักฟอก
1. เลื่อนเพื่อเปิดช่องใส่น�้ายาซักผ้า
2. ใส่น�้ายาซักผ้าใน ช
่
องใส
่
สารซักฟอกส�าหรับการซักหลัก ตาม
ค�าแนะน�าของผู้ผลิต ในการใช้น�้ายาซักผ้าแบบเหลว โปรดดูที่หน้า 28
A
3. ใส่น�้ายาปรับผ้านุ่มใน ช
่
องใส
่
น�้ายาปรับผ้านุ
่
ม อย่าเติมเกิน เส้น
ระดับสูงสุด(A)
เครื่องจะจ่ายน�้ายาปรับผ้านุ่มเข้าสู่การซักในขั้นตอนการล้างน�้าสุดท้าย
4. ถ้าต้องการซักล่วงหน้า ให้ใส่น�้ายาซักผ้าใน ช
่
องใส
่
สารซักฟอก
ส�าหรับการซักล
่
วงหน้า ตามค�าแนะน�าของผู้ผลิต
5. ปิดช่องใส่สารซักฟอก
Untitled-6 27 2017-12-15 11:43:34
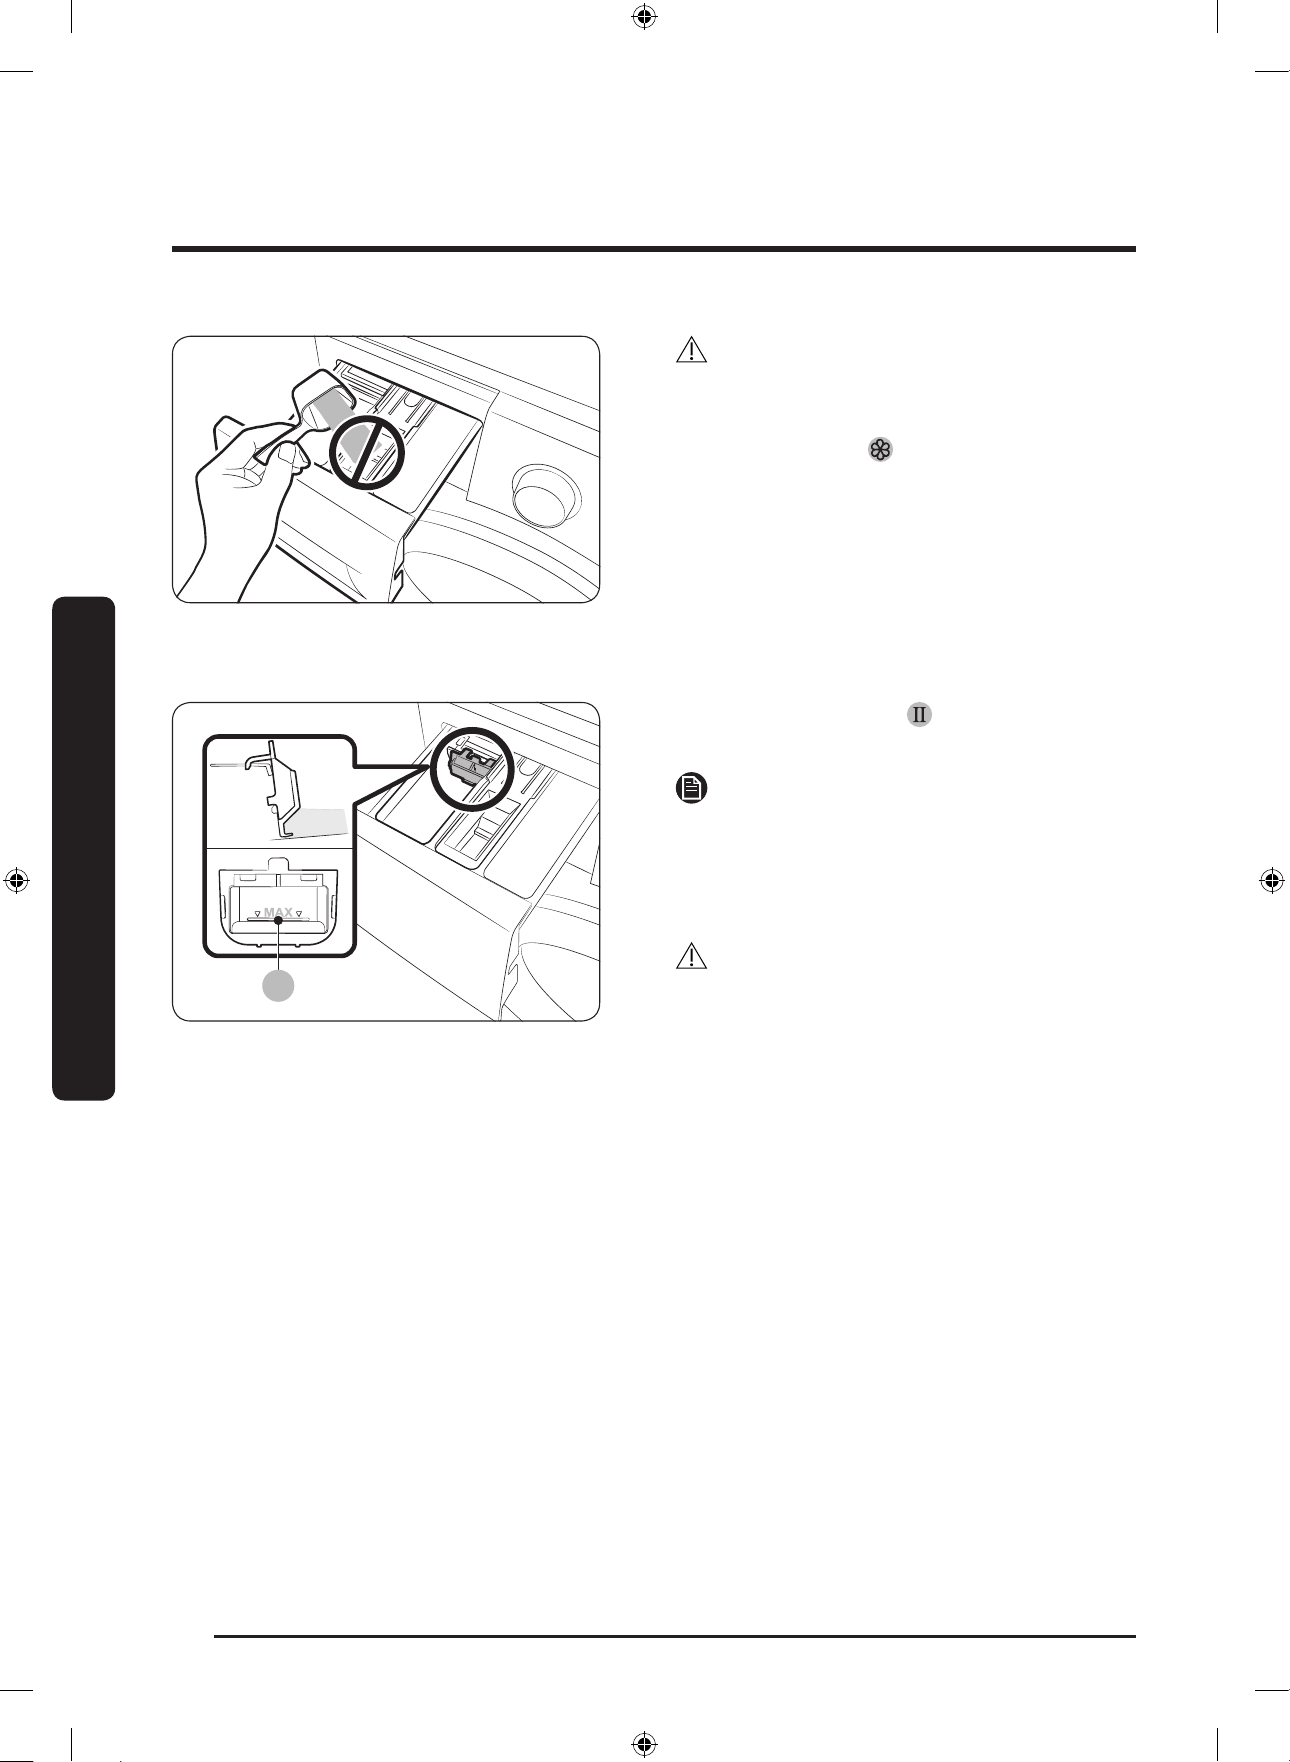
ก
่
อนการเร
ิ่
มต้น
ไทย
28
ก
่
อนการเร
ิ่
มต้น
ข้อควรระวัง
• อย่าใส่ผงซักฟอกชนิดผงในช่องใส่น�้ายาซักผ้า
• โปรดละลายน�้ายาปรับผ้านุ่มชนิดเข้มข้นด้วยน�้าก่อนที่จะใช้
• อย่าใส่สารซักฟอกหลักใน ช
่
องใส
่
น�้ายาปรับผ้านุ
่
ม
ในการใช้น�้ายาซักผ้าแบบเหลว(เฉพาะรุ
่
น)
A
ขั้นแรก ให้ใส่ที่ใส่น�้ายาซักผ้าที่มีให้ใน ช
่
องส�าหรับน�้ายาซักผ้าหลัก
จากนั้น ใส่น�้ายาซักผ้าในช่องใส่โดยไม่เกิน เส้นสูงสุด(A)
หมายเหตุ
• ใส่ที่ใส่น�้ายาซักผ้าหลังจากน�าช่องใส่ผงซักฟอกออกจากเครื่องแล้ว
เท่านั้น ด้วยการกด สลักคลาย(A)
• หลังจากการซัก สารซักฟอกชนิดเหลวอาจยังหลงเหลืออยู่ในช่องใส่
สารซักฟอก
ข้อควรระวัง
• ห้ามใช้ฟ
ั
งก์ชันซักล่วงหน้าเมื่อคุณใช้สารซักฟอกชนิดเหลว
• น�าที่ใส่น�้ายาซักผ้าออกก่อนที่จะใช้ผงซักฟอก
Untitled-6 28 2017-12-15 11:43:35
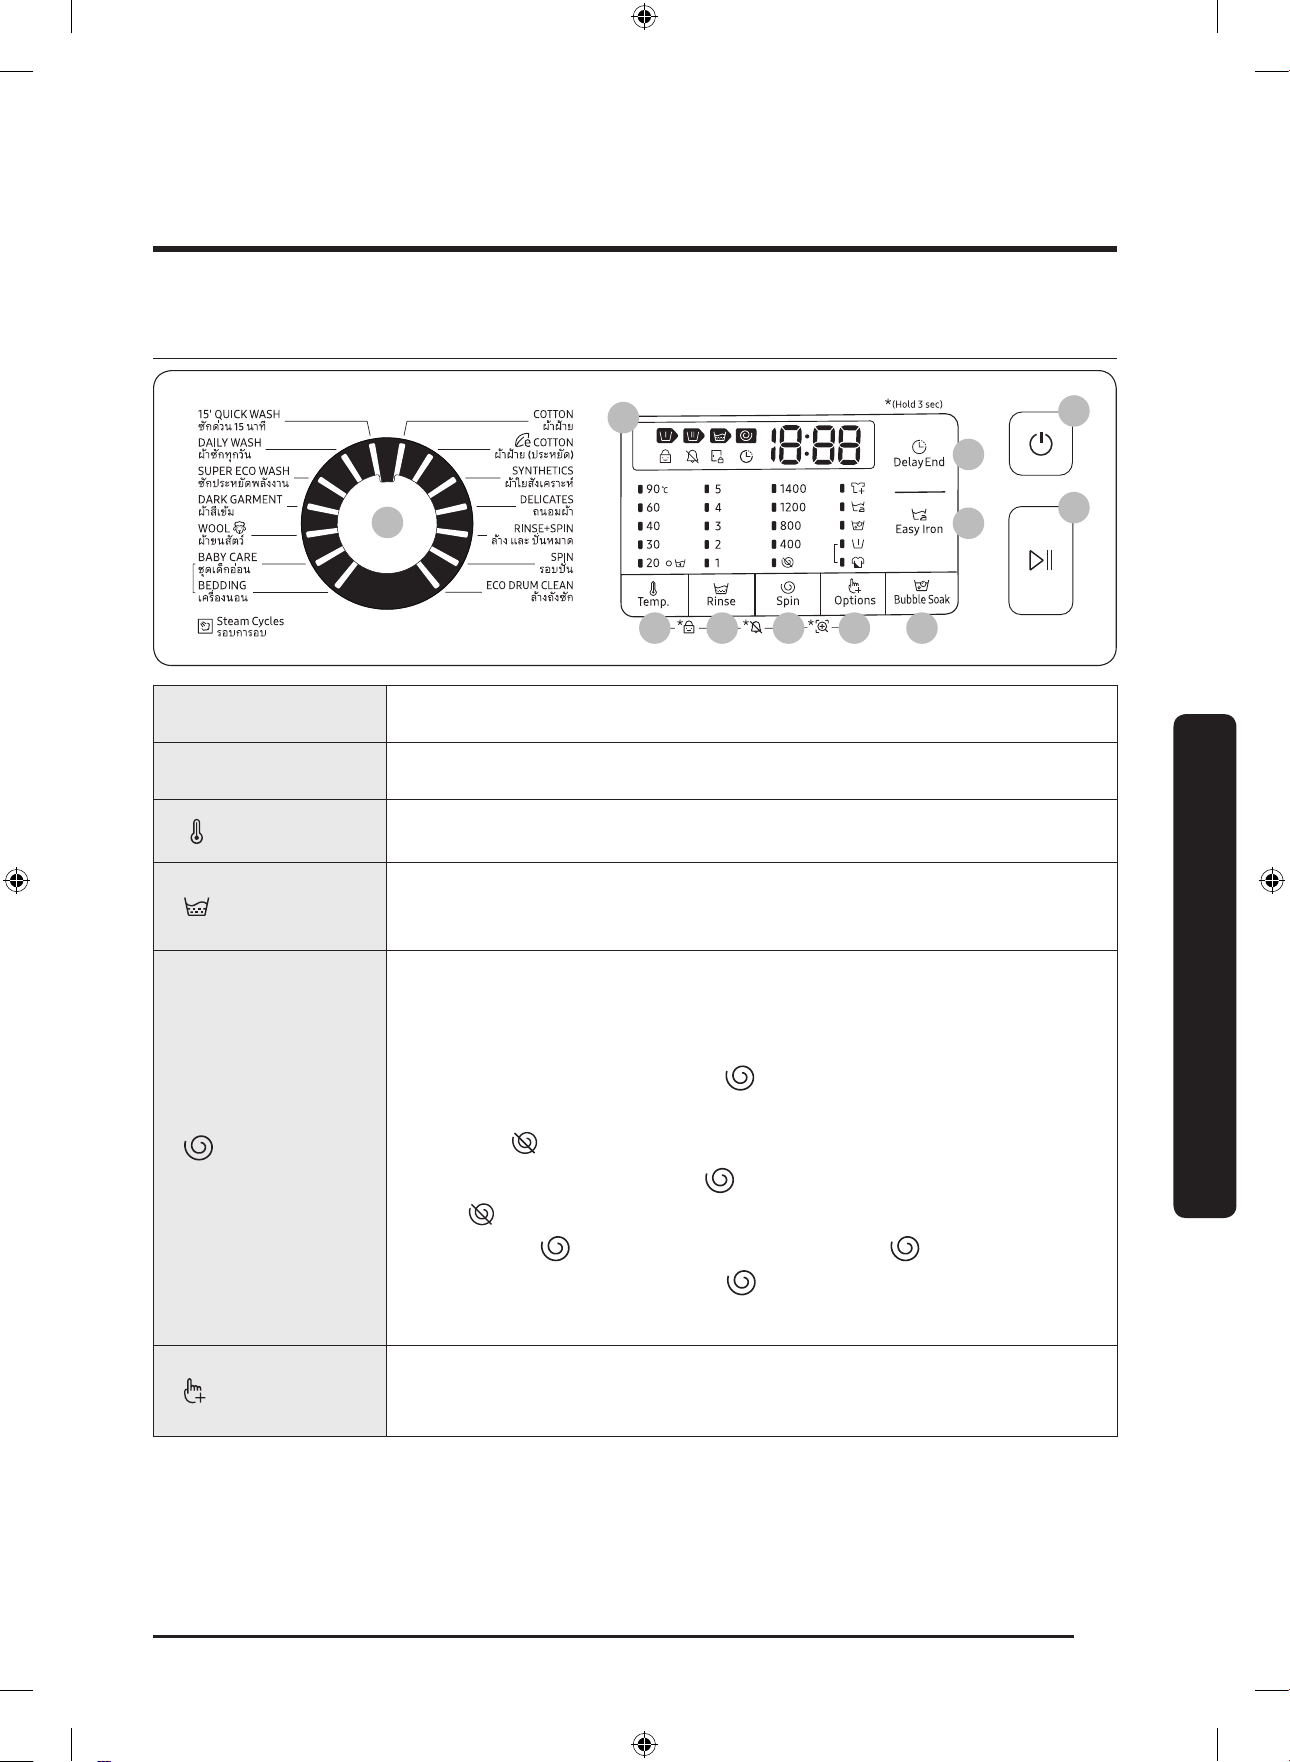
ไทย
29
การท�างาน
แผงควบคุม
01
02
03 04 05 06 07
08
09
11
10
01 ปุ่มเลือกโปรแกรม
หมุนปุ
่
มบิดเพื่อเลือกโปรแกรม
02 จอแสดงผล
จอแสดงผลจะแสดงข้อมูลโปรแกรมป
ั
จจุบันและเวลาที่เหลือโดยประมาณ หรือรหัสข้อมูลเมื่อมีป
ั
ญหาเกิดขึ้น
03 Temp.(อุณหภูม
ิ
)
กดเพื่อเปลี่ยนอุณหภูมิน�้าส�าหรับโปรแกรมป
ั
จจุบัน
04 Rinse(ล้างน�้า)
กดเพื่อเปลี่ยนจ�านวนครั้งในการล้างน�้าส�าหรับโปรแกรมป
ั
จจุบัน คุณสามารถตั้งค่ารอบการล้างน�้าได้สูงสุด 5 รอบ ทั้งนี้
ขึ้นอยู่กับโปรแกรมที่ใช้
05 Spin(ปั่นหมาด)
กดเพื่อเปลี่ยนความเร็วในการป
ั่
นส�าหรับโปรแกรมป
ั
จจุบัน รอบการหมุนต่อนาที (RPM) จะแตกต่างกันไปในแต่ละรุ่น
• หยุดการล้างน�้า: การล้างน�้ารอบสุดท้ายถูกระงับไว้เพื่อให้ผ้าแช่อยู่ในน�้า หากต้องการน�าผ้าออก ให้ใช้โปรแกรม
ระบายน�้าหรือรอบป
ั่
น
- ในการใช้ตัวเลือก หยุดการล้างน�้า ให้กดปุ
่
ม Spin(ปั่นหมาด) ซ�้าๆ จนกระทั่งสัญญาณของตัวเลือก
การป
ั่
นหมาดดับลงทั้งหมด
• ไม
่
ปั่นหมาด : ถังจะไม่ป
ั่
นหมาดหลังจากการระบายน�้ารอบสุดท้าย
- ในการใช้ตัวเลือก ไม่ป
ั่
นหมาด ให้กดปุ
่
ม Spin(ปั่นหมาด) ซ�้าๆ จนกระทั่งสัญญาณ ไม่ป
ั่
นหมาด
( ) ปรากฏขึ้น
• ปั่นหมาดเท
่
านั้น : ในการเรียกใช้โปรแกรม ป
ั่
นหมาดเท่านั้น ให้กดปุ
่
ม Spin(ปั่นหมาด) ค้างไว้ 3
วินาที ขณะที่เวลาของโปรแกรมปรากฏอยู่ ให้กด Spin(ปั่นหมาด) ซ�้าๆ จนได้ความเร็วในการป
ั่
นหมาดที่
ต้องการ จากนั้นกด เร
ิ่
ม/พัก เพื่อเริ่มต้นรอบการท�างาน เวลาในการป
ั่
นหมาดจะขึ้นอยู่กับโปรแกรมที่เลือก
06 Options(ตัวเลือก)
กดเพื่อเลือกตัวเลือกจาก ซักคราบฝ
ั
งลึก และ ซักล่วงหน้า กดอีกครั้งเพื่อยกเลิกการเลือก
• การใช้งานตัวเลือกนี้ขึ้นอยู่กับโปรแกรมที่ใช้
การท�างาน
Untitled-6 29 2017-12-15 11:43:37

การท�างาน
ไทย
30
การท�างาน
07 BubbleSoak(พลังฟอง
แช
่
ผ้า)
กดเพื่อเปิด/ปิดการท�างานของฟ
ั
งก์ชัน พลังฟองแช่ผ้า ฟ
ั
งก์ชันนี้จะช่วยขจัดคราบฝ
ั
งลึกได้หลากหลายแบบ
• พลังฟองแช่ผ้า จะช่วยขจัดคราบฝ
ั
งลึกได้หลากหลายแบบ
• เมื่อเลือก พลังฟองแช่ผ้า ผ้าจะแช่อยู่ในน�้าที่มีฟองเพื่อให้การซักที่สะอาดและมีประสิทธิภาพ
• พลังฟองแช่ผ้า จะใช้ได้ใน 5 โปรแกรม และจะเพิ่มเวลาอีก 30 นาที: ผ้าฝ้ าย,
ผ้าใยสังเคราะห์, ผ้าซักทุกวัน, ชุดเด็กอ
่
อน และ เครื่องนอน
08 DelayEnd(ตั้งเวลา
ส
ิ้
นสุด)
ตั้งเวลาสิ้นสุด ใช้ส�าหรับตั้งเวลาสิ้นสุดของโปรแกรมป
ั
จจุบัน เวลาเริ่มต้นของโปรแกรมจะถูกก�าหนดโดยตรรกะ
ของเครื่อง โดยพิจารณาจากการตั้งค่าของคุณ ตัวอย่างเช่น การตั้งค่านี้มีประโยชน์ส�าหรับการตั้งโปรแกรมเครื่อง
ให้ซักเสร็จในเวลาที่คุณมักจะกลับจากที่ท�างานตามปกติ
• กดเพื่อเลือกหน่วยชั่วโมงที่ตั้งไว้แล้ว
09 EasyIron(โปรแกรม
รีดง
่
าย)
กดเพื่อเตรียมเสื้อผ้าของคุณเพื่อให้รีดง่าย ด้วยการลดรอยยับระหว่างรอบการป
ั่
นหมาด
• โปรแกรมรีดง่ายจะใช้ได้เฉพาะโปรแกรมซักผ้าต่อไปนี้: ผ้าฝ้ าย, ผ้าฝ้ าย(ประหยัด), ผ้าใยสังเคราะห์,
ผ้าซักทุกวัน, ซักประหยัดพลังงาน, ผ้าสีเข้ม, ชุดเด็กอ
่
อน และ เครื่องนอน
10 เป
ิ
ด/ป
ิ
ด
กดเพื่อเปิด/ปิดเครื่องซักผ้า
11 เร
ิ่
ม/พัก
กดเพื่อเริ่มหรือหยุดการท�างาน
ส�าหรับข้อมูลเพิ่มเติมเกี่ยวกับตัวเลือกต่างๆ โปรดดูที่หัวข้อ “คุณสมบัต
ิ
พ
ิ
เศษ”
* (Hold 3 sec): กดค้างไว้เป็นเวลา 3 วินาที
Untitled-6 30 2017-12-15 11:43:37
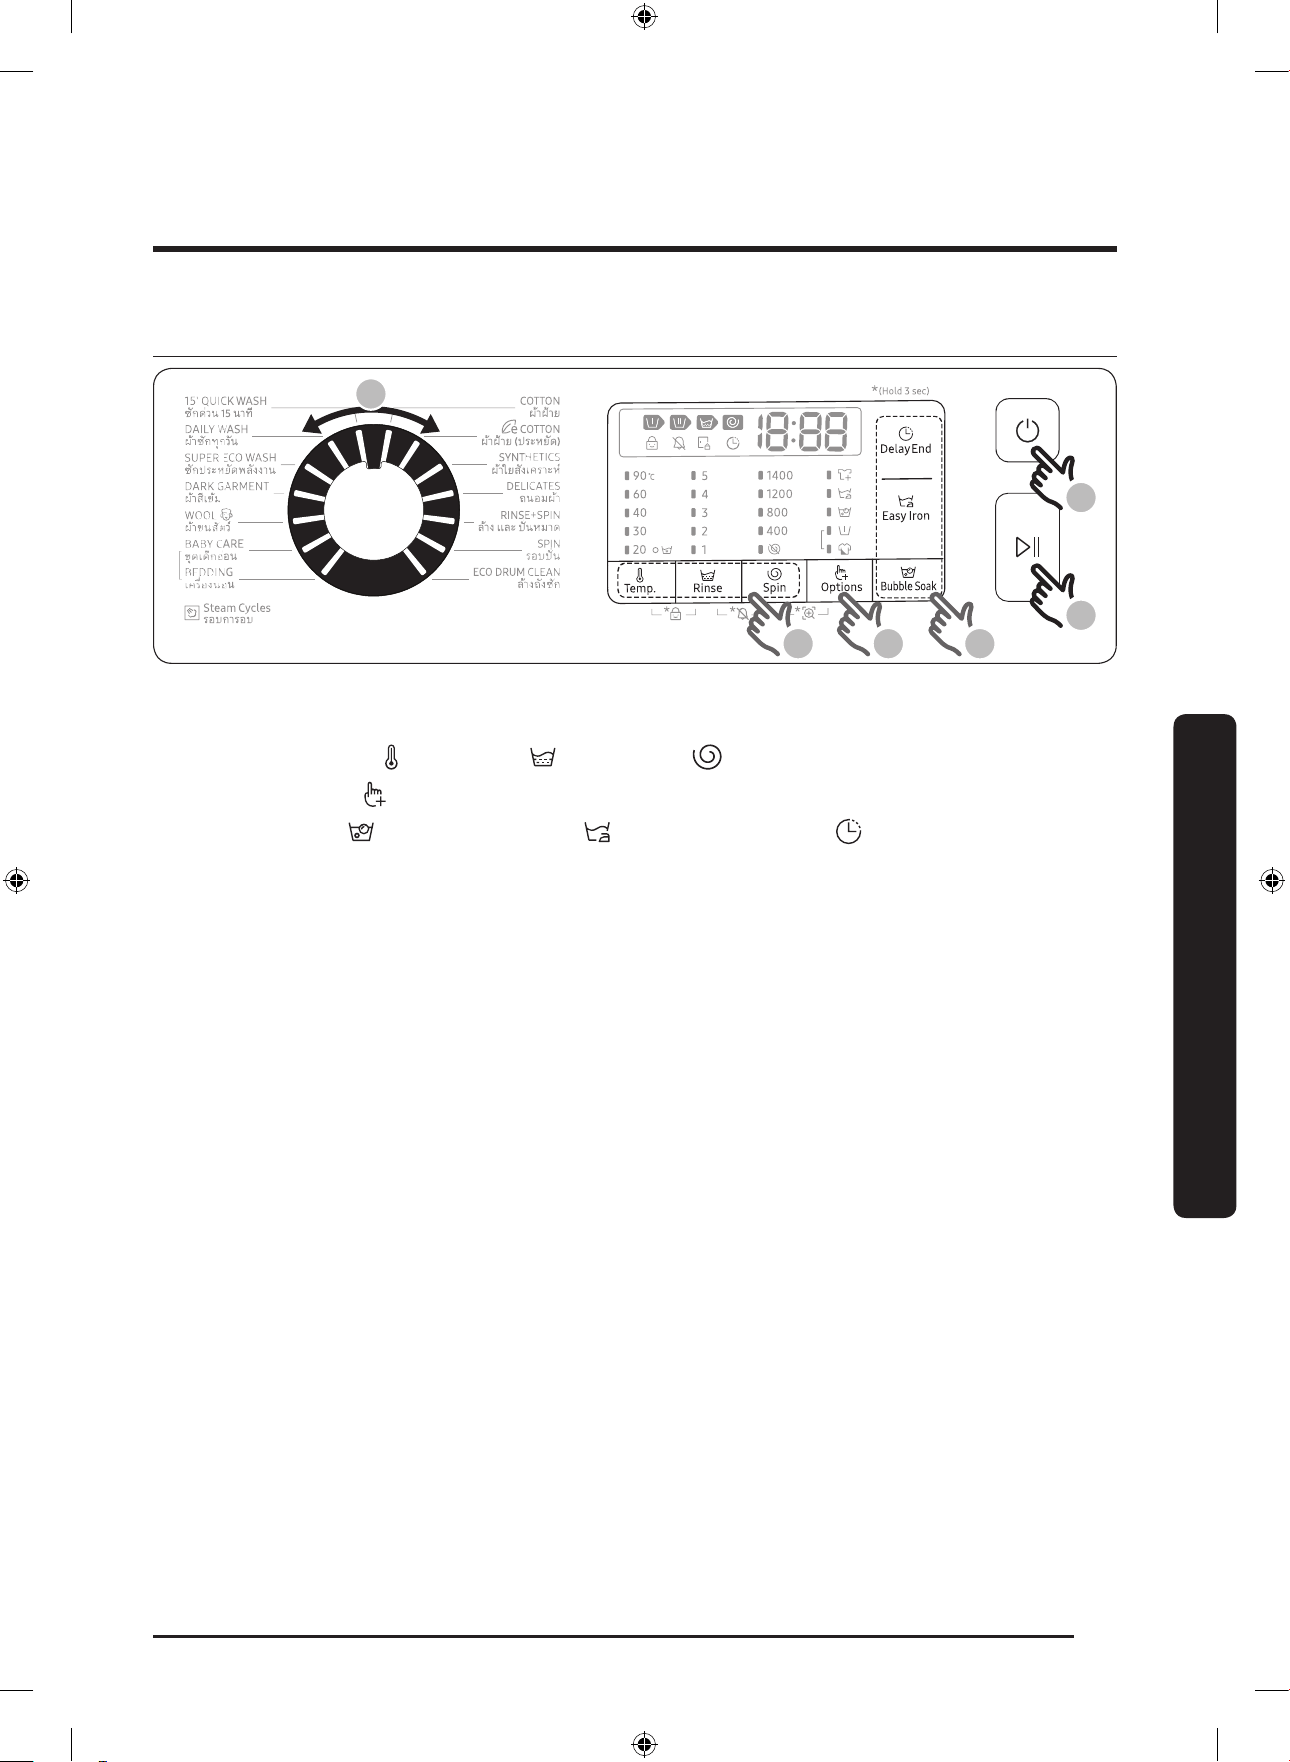
ไทย
31
การท�างาน
ขั้นตอนง
่
ายๆในการเร
ิ่
มต้น
1
4
6
2
53
1. กดปุ
่
ม เป
ิ
ด/ป
ิ
ด เพื่อเปิดเครื่องซักผ้า
2. หมุน ปุ่มเลือกโปรแกรม เพื่อเลือกโปรแกรม
3. เปลี่ยนการตั้งค่าของโปรแกรม ( Temp.(อุณหภูม
ิ
), Rinse(ล้างน�้า) และ Spin(ปั่นหมาด)) ตามต้องการ
4. ในการเพิ่มตัวเลือก ให้กดปุ
่
ม Options(ตัวเลือก) ใช้ปุ
่
มนี้อีกครั้งเพื่อเลือกรายการที่ต้องการ
5. เครื่องนี้มีปุ
่
ม 3 ปุ
่
มส�าหรับ BubbleSoak(พลังฟองแช
่
ผ้า), EasyIron(โปรแกรมรีดง
่
าย) และ DelayEnd(ตั้งเวลาส
ิ้
นสุด) เพื่อให้
เข้าถึงได้ง่าย ถ้าคุณต้องการใช้ตัวเลือกเหล่านี้ ให้กดปุ
่
มส�าหรับตัวเลือกที่ต้องการ
6. กด เร
ิ่
ม/พัก
ในการเปลี่ยนโปรแกรมระหว
่
างการท�างาน
1. กด เร
ิ่
ม/พัก เพื่อหยุดการท�างาน
2. เลือกโปรแกรมอื่น
3. กด เร
ิ่
ม/พัก เพื่อเริ่มต้นรอบการซักใหม่
Untitled-6 31 2017-12-15 11:43:38
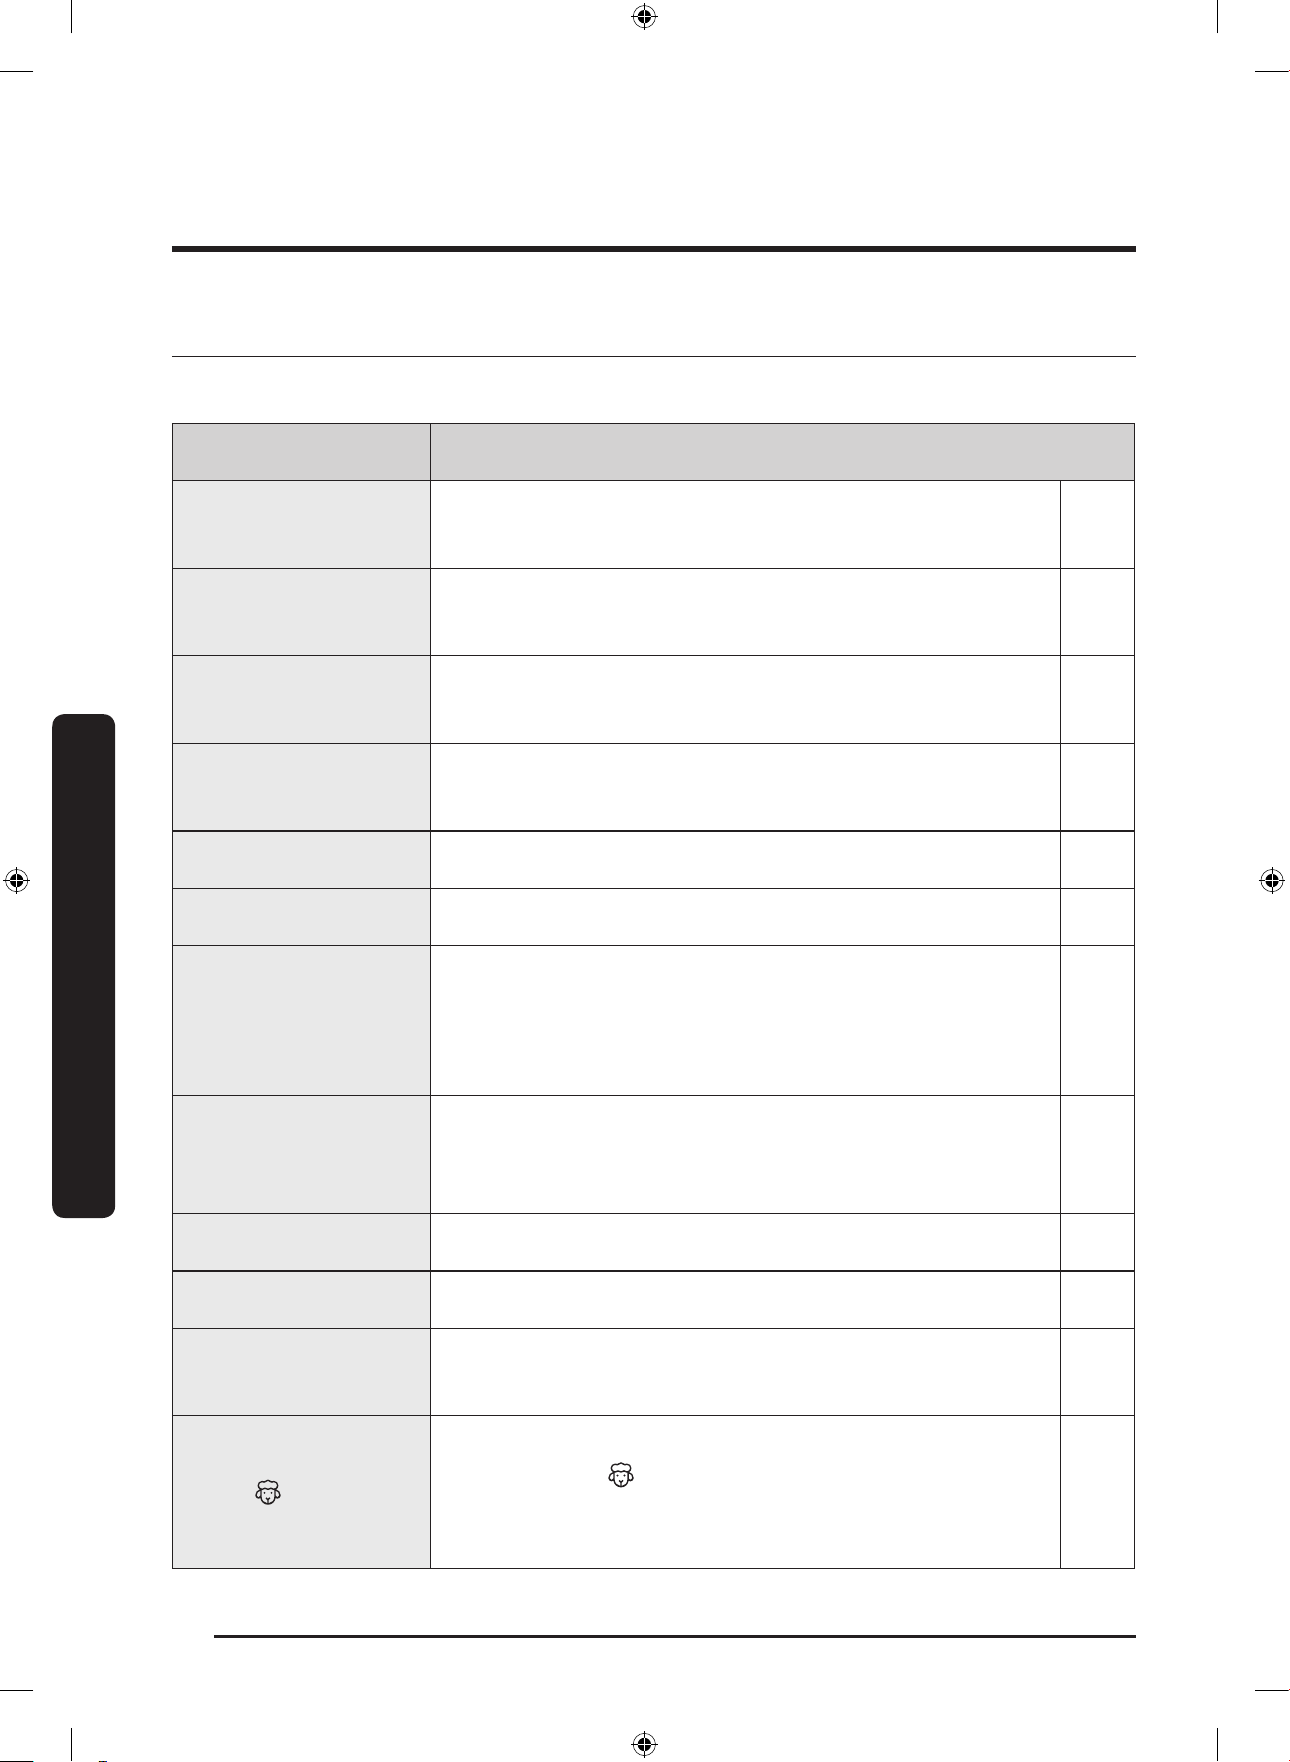
การท�างาน
ไทย
32
การท�างาน
ภาพรวมของโปรแกรม
โปรแกรมมาตรฐาน
โปรแกรม ค�าอธ
ิ
บาย&น�้าหนักสูงสุด(กก.)
ผ้าฝ้ าย
• ส�าหรับผ้าฝ
้
าย ผ้าปูที่นอน ผ้าปูโต๊ะ ชุดชั้นใน ผ้าขนหนู หรือเสื้อเชิ้ต เวลาในการซักและจ�านวน
รอบการล้างน�้าจะมีการปรับโดยอัตโนมัติตามน�้าหนัก
สูงสุด
ผ้าฝ้ าย(ประหยัด)
• ประสิทธิภาพที่ดีที่สุดพร้อมกับใช้พลังงานน้อยลงส�าหรับผ้าฝ
้
าย ผ้าปูที่นอน ผ้าปูโต๊ะ ชุดชั้นใน
ผ้าขนหนู หรือเสื้อเชิ้ต เพื่อประหยัดพลังงาน อุณหภูมิในการซักจริงอาจต�่ากว่าที่ระบุ
สูงสุด
ผ้าใยสังเคราะห์
• ส�าหรับเสื้อหรือเสื้อเชิ้ตที่ท�าจากโพลีเอสเตอร์ (ไดโอเลน, เทรวิรา) โพลีอาไมด์ (เพอร์ลอน
ไนลอน) หรือส่วนผสมอื่นๆ
4
ถนอมผ้า
• ส�าหรับผ้าเนื้อบาง ชุดชั้นในสตรี ชุดชั้นใน (ผ้าไหม) และผ้าอื่นๆ ที่ต้องซักด้วยมือเท่านั้น
• เพื่อประสิทธิภาพที่ดียิ่งขึ้น โปรดใช้น�้ายาซักผ้า
2
ล้างและปั่นหมาด
• ล้างน�้าเพิ่มเติมหลังจากเทน�้ายาปรับผ้านุ่มลงในผ้า -
รอบปั่น
• เป็นกระบวนการป
ั่
นหมาดเพิ่มเติมเพื่อขจัดความชื้นจากผ้าอย่างมีประสิทธิภาพ -
ล้างถังซัก
• ท�าความสะอาดถังซักด้วยการขจัดคราบสกปรกและแบคทีเรียออกจากถังซัก
• ด�าเนินการหนึ่งครั้งเมื่อซักครบ 40 ครั้งโดยไม่ต้องใส่ผงซักฟอกหรือสารฟอกขาว
• ตรวจสอบว่าถังซักว่างเปล่า
• โปรดอย่าใช้สารท�าความสะอาดเพื่อท�าความสะอาดถังซัก
-
ซักด
่
วน15นาที
• ส�าหรับผ้าที่สกปรกน้อยและต้องการซักอย่างรวดเร็ว
• ใช้สารซักฟอกน้อยกว่า 20 กรัม การใช้สารซักฟอกมากกว่า 20 กรัมอาจท�าให้มีสารซักฟอก
ตกค้าง
2
ผ้าซักทุกวัน
• ใช้ส�าหรับเสื้อผ้าที่ใช้ทุกวัน เช่น ชุดชั้นในและเสื้อเชิ้ต 4
ซักประหยัดพลังงาน
• โปรแกรม ซักฟองแบบประหยัด อุณหภูมิต�่าจะช่วยลดการใช้พลังงาน 4
ผ้าสีเข้ม
• การล้างน�้าเพิ่มเติมและการป
ั่
นหมาดที่ลดความเร็วลงช่วยให้เสื้อผ้าได้รับการซักอย่างนุ่มนวล
และล้างอย่างสะอาด
4
ผ้าขนสัตว์
• เหมาะส�าหรับผ้าขนสัตว์ที่ซักด้วยเครื่องได้ มีน�้าหนักผ้าน้อยกว่า 2.0 กก.
• โปรแกรม ผ้าขนสัตว์ มีการหมุนและการแช่ที่นุ่มนวลเพื่อป
้
องกันเส้นใย
ผ้าขนสัตว์เกิดการหดตัว/ผิดรูป
• ขอแนะน�าให้ใช้สารซักฟอกที่มีฤทธิ
์
เป็นกลาง
2
Untitled-6 32 2017-12-15 11:43:38
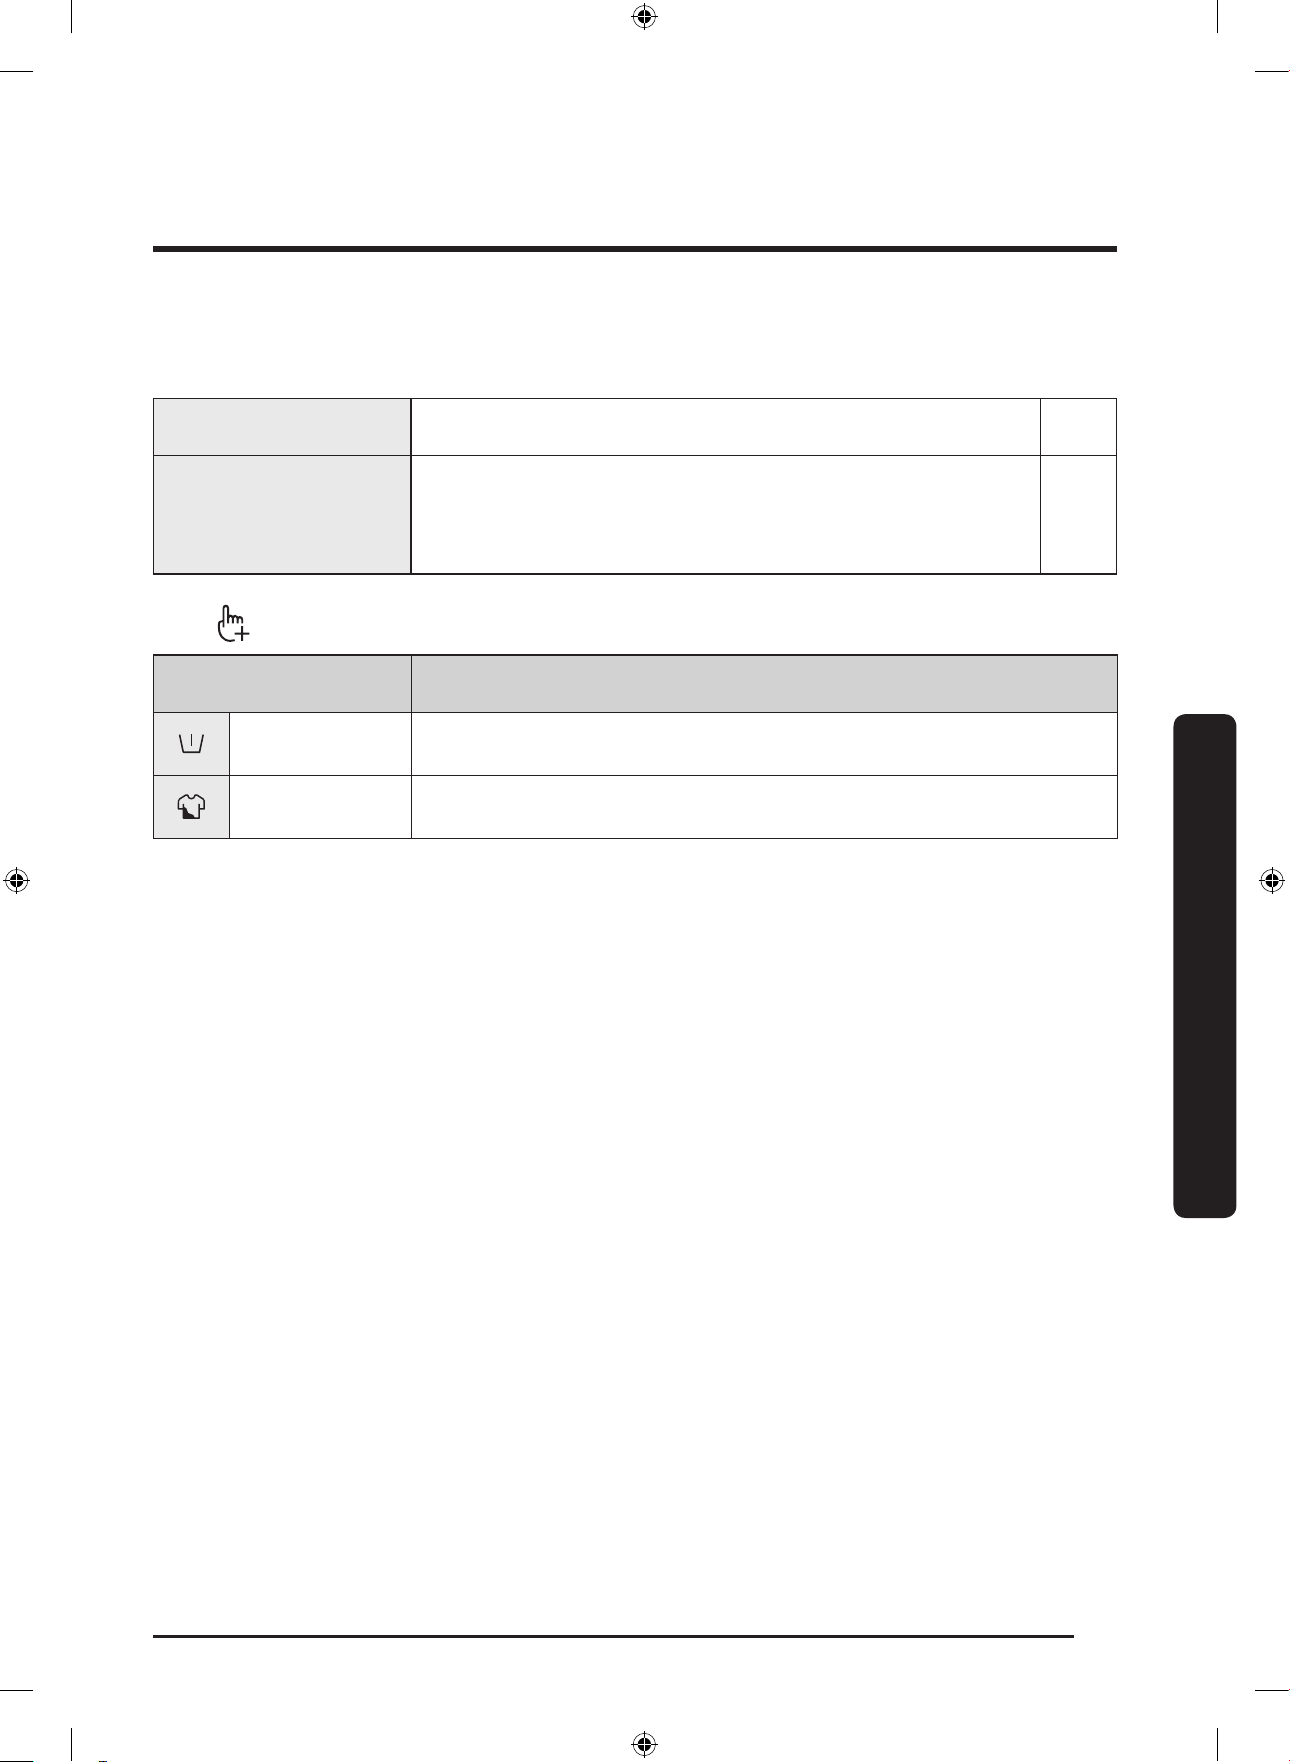
ไทย
33
การท�างาน
รอบการอบ
ไอน�้าอาจไม่ปรากฏให้เห็นหรือมีอยู่ในระหว่างโปรแกรม ซึ่งเป็นอาการปกติ
ชุดเด็กอ
่
อน
• ใช้การซักอุณหภูมิสูงและล้างน�้าเพิ่มเติมเพื่อช่วยขจัดสารซักฟอกตกค้างได้อย่างมีประสิทธิภาพ 4
เครื่องนอน
• ส�าหรับผ้าปูที่นอน ผ้าคลุมเตียง หรือปลอกผ้านวม ฯลฯ
• เพื่อให้ได้ผลลัพธ์ที่ดีที่สุด ให้ซักผ้าปูที่นอนเพียง 1 ประเภทเท่านั้นและน�้าหนักผ้าต้องไม่เกิน
2.0 กก.
2
ตัวเลือก
ตัวเลือก ค�าอธ
ิ
บาย
ซักล
่
วงหน้า
• เพิ่มรอบการซักขั้นต้นก่อนรอบการซักหลัก
ซักคราบฝังลึก
• ส�าหรับผ้าสกปรกมาก เวลาในการท�างานส�าหรับแต่ละรอบจะยาวนานกว่าปกติ
Untitled-6 33 2017-12-15 11:43:39
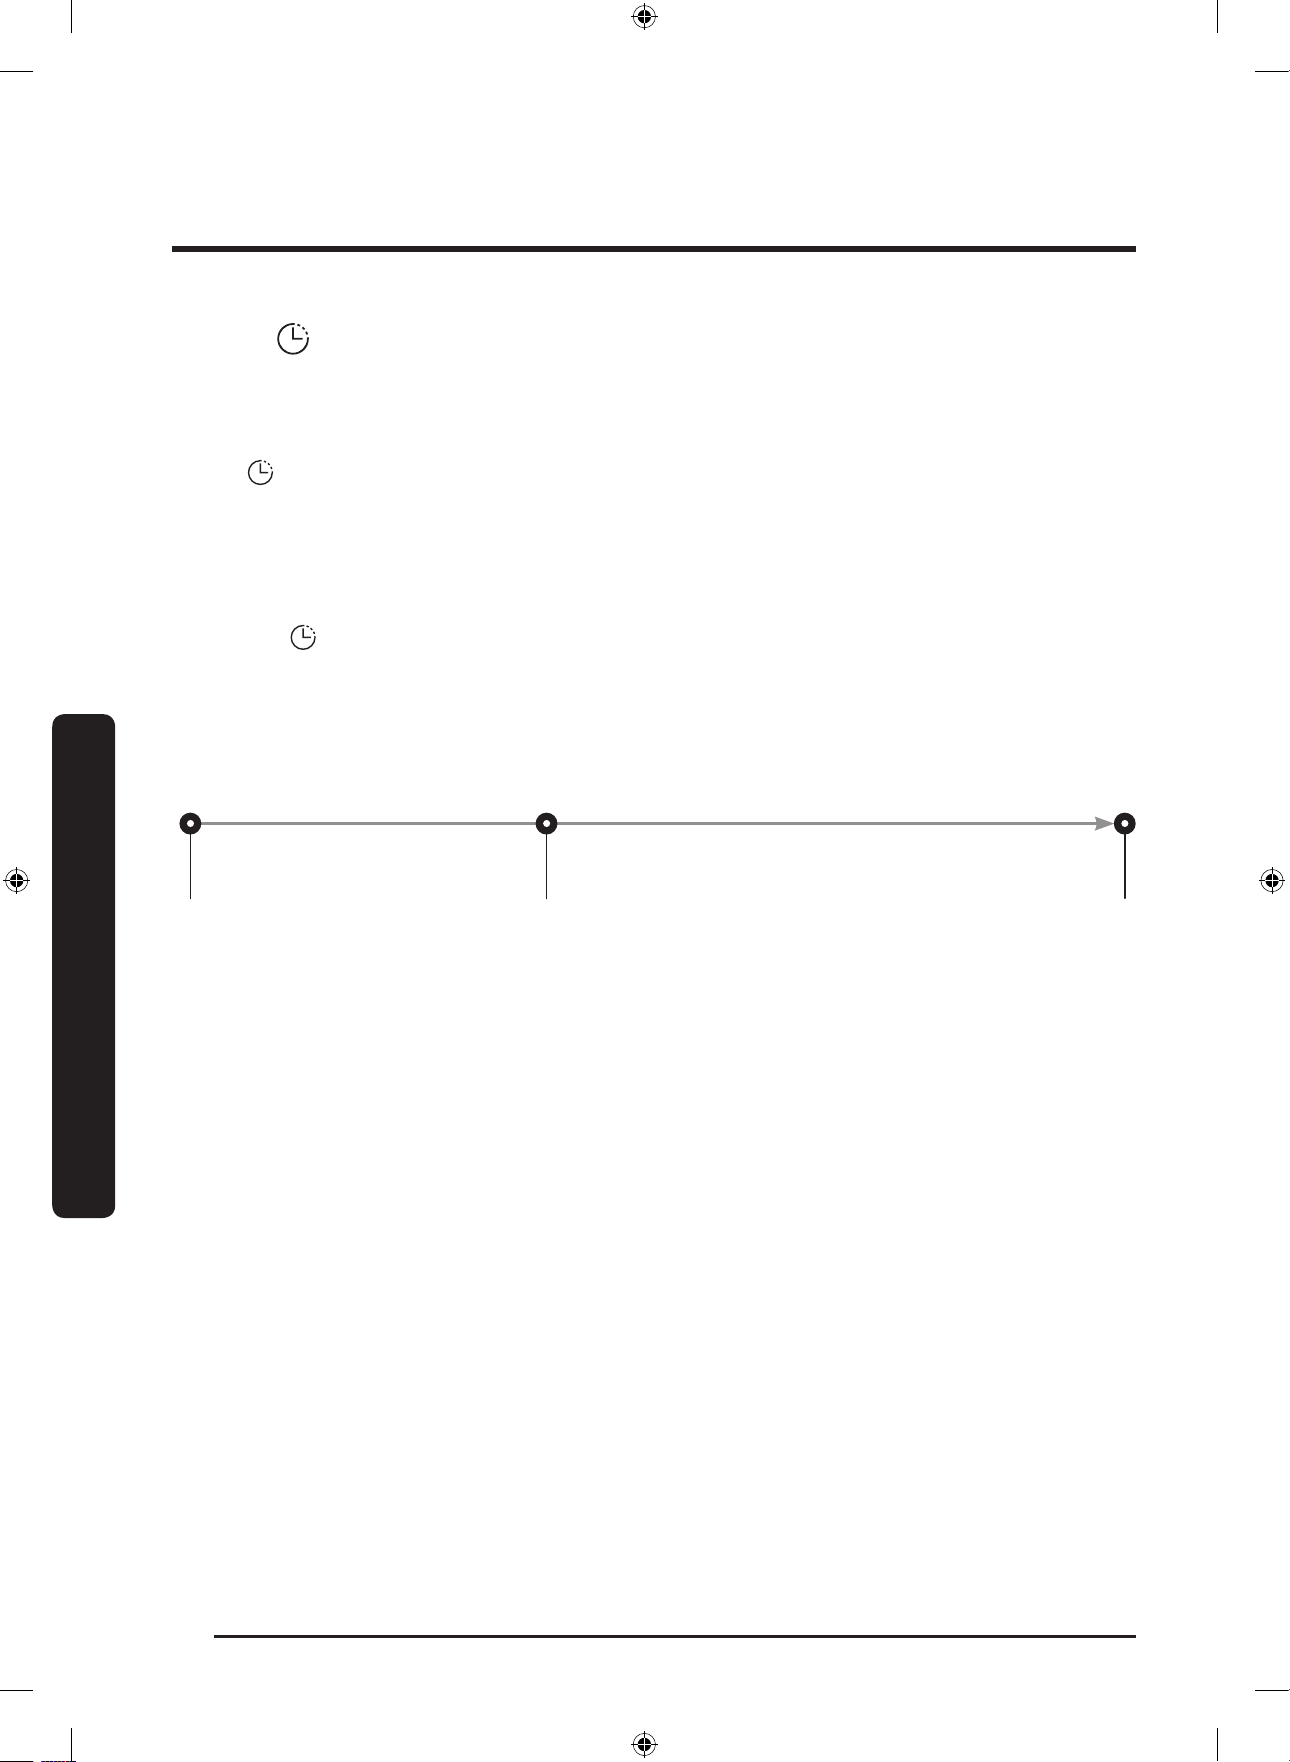
การท�างาน
ไทย
34
การท�างาน
ตั้งเวลาส
ิ้
นสุด
คุณสามารถก�าหนดให้เครื่องซักผ้าเสร็จในเวลาอื่นโดยอัตโนมัติ โดยเลือกได้ตั้งแต่ 1 ถึง 24 ชั่วโมง (เพิ่มได้ครั้งละ 1 ชั่วโมง) จ�านวนชั่วโมงที่แสดงนั้น
เป็นเวลาที่รอบการซักจะสิ้นสุดลง
1. เลือกโปรแกรม จากนั้นเปลี่ยนการตั้งค่าโปรแกรมตามต้องการ
2. กดปุ
่
ม DelayEnd(ตั้งเวลาส
ิ้
นสุด) ซ�้าๆ เพื่อตั้งเวลาสิ้นสุดตามต้องการ
3. กด เร
ิ่
ม/พัก
สัญญาณ ตั้งเวลาสิ้นสุด จะกะพริบและเครื่องจะหมุนถังซักเพื่อตรวจหาน�้าหนักผ้า ถ้ามีการเลือกโปรแกรม ผ้าฝ้ าย หรือ
ผ้าฝ้ าย(ประหยัด) ไว้ การตรวจหาน�้าหนักผ้าจะได้รับการตั้งค่าล่วงหน้าและเปิดใช้งานเฉพาะใน 2 โปรแกรมนี้เท่านั้น เมื่อท�างานเสร็จ เครื่อง
จะแสดงเวลาที่ตั้งค่าไว้ขณะที่ตัวตั้งเวลาจะเริ่มท�างาน
4. ในการยกเลิก DelayEnd(ตั้งเวลาส
ิ้
นสุด) ให้เริ่มต้นเครื่องซักผ้าใหม่ด้วยการกดปุ
่
ม เป
ิ
ด/ป
ิ
ด
กรณีการใช้งานจร
ิ
ง
คุณต้องการให้โปรแกรมซักที่ใช้เวลาสองชั่วโมงท�างานเสร็จในอีก 3 ชั่วโมงนับจากนี้ ด้วยเหตุนี้คุณจึงเพิ่มตัวเลือก ตั้งเวลาสิ้นสุด ของโปรแกรมป
ั
จจุบันให้มีการ
ตั้งค่า 3 ชั่วโมง และกด เร
ิ่
ม/พัก เวลา 14:00 น. จากนั้นจะเกิดอะไรขึ้น เครื่องซักผ้าเริ่มจะท�างานในเวลา 15:00 น. และสิ้นสุดในเวลา 17:00 น. ตามตัวอย่าง
ช่วงเวลาด้านล่างนี้
14:00
ตังค่า ตังเวลาสินสุด เป็น 3 ชัวโมง
15:00
เริมทํางาน
17:00
สินสุด
Untitled-6 34 2017-12-15 11:43:39

ไทย
35
การท�างาน
คุณสมบัต
ิ
พ
ิ
เศษ
AddWash
เมื่อสัญญาณ AddWash สว่าง คุณสามารถหยุดการท�างานของเครื่องและใส่ผ้าเพิ่มหรือน�้ายาปรับผ้านุ่มในถังซักได้ Add Door เปิดได้มากกว่า 130° เพื่อให้
เข้าถึงได้ง่าย
1. กด เร
ิ่
ม/พัก เพื่อหยุดการท�างาน
2. กดส่วนบนของ Add Door จนได้ยินเสียงคลิกปลดล็อค ดึงมือจับ
ของ Add Door เพื่อเปิด
3. เปิด Add Door และใส่ผ้าเพิ่มเติมหรือน�้ายาปรับผ้านุ่มในถัง
4. กดส่วนบนของ Add Door จนได้ยินเสียงคลิกปิด
5. กด เร
ิ่
ม/พัก เพื่อกลับสู่การท�างาน
ข้อควรระวัง
อย่าใช้แรงกับ Add Door มากเกินไป อาจท�าให้อุปกรณ์เสียหายได้
หมายเหตุ
น�้าในถังจะไม่รั่วออกมาถ้าปิด Add Door อย่างถูกต้อง อาจมีหยดน�้าเกาะรอบๆ ประตู แต่จะไม่รั่วจากภายในถังซัก
ข้อควรระวัง
• อย่าเปิด Add Door ถ้ามีฟองภายในถังซักเกินกว่าระดับของ Add Door
• อย่าพยายามเปิด Add Door ขณะที่เครื่องท�างานอยู่โดยไม่ได้กด เร
ิ่
ม/พัก ก่อน โปรดทราบว่า Add Door อาจเปิดโดยไม่ได้ตั้งใจ (โดยไม่ได้กด เร
ิ่
ม/พัก)
เมื่อการซักสิ้นสุดลง
• อย่าใส่ผ้าทาง Add Door มากเกินไป ประสิทธิภาพการท�างานอาจลดลง
• อย่าใช้ส่วนล่างของ Add Door เป็นมือจับ นิ้วมืออาจติดได้
• ระวังอย่าให้ผ้าติดอยู่ที่ Add Door
• อย่าให้สัตว์เลี้ยงอยู่ใกล้กับเครื่องซักผ้า โดยเฉพาะ Add Door
• เมื่อใช้น�้าร้อนในการซัก Add Door อาจดูเหมือนมีน�้ารั่วหลังจากเปิดและปิด Add Door อาการเช่นนี้เป็นกรณีปกติ เนื่องจากไอน�้าที่ออกมาจาก Add Door
ที่เปิดอยู่เย็นลงและกลายเป็นหยดน�้าที่พื้นผิว
• เมื่อปิด Add Door ประตูจะผนึกแน่นและไม่มีน�้ารั่วออกมา แต่คุณอาจพบว่ามีลักษณะคล้ายน�้ารั่วอยู่รอบๆ ประตู เป็นน�้าที่หลงเหลืออยู่รอบๆ Add Door
และอาจเกาะตัวเป็นหยด ซึ่งเป็นอาการปกติ
• ทั้งประตูหลักและ Add Door จะไม่สามารถเปิดได้เมื่อน�้ามีอุณหภูมิ 50 ˚C ขึ้นไป ถ้าระดับน�้าในถังซักสูงเกินระดับที่ก�าหนด ประตูหลักจะไม่สามารถเปิดได้
Untitled-6 35 2017-12-15 11:43:40

ไทย
37
การท�างาน
การตั้งค
่
า
ล็อคป้ องกันเด็ก
เพื่อป
้
องกันไม่ให้เกิดอุบัติเหตุกับเด็ก ล็อคป
้
องกันเด็ก จะล็อคปุ
่
มทั้งหมด
ยกเว้นปุ
่
ม เป
ิ
ด/ป
ิ
ด
• ในการตั้งค่าฟ
ั
งก์ชัน ล็อคป
้
องกันเด็ก ให้กดปุ
่
ม Temp.(อุณหภูม
ิ
)
และ Rinse(ล้างน�้า) พร้อมกันเป็นเวลา 3 วินาที
• ในการปลดล็อคฟ
ั
งก์ชัน ล็อคป
้
องกันเด็ก ให้กดปุ
่
ม Temp.
(อุณหภูม
ิ
) และ Rinse(ล้างน�้า) พร้อมกันเป็นเวลา 3 วินาที
หมายเหตุ
• ในสถานะ ล็อคป
้
องกันเด็ก ขั้นแรก คุณจะต้องยกเลิกฟ
ั
งก์ชัน ล็อค
ป
้
องกันเด็ก ถ้าต้องการเติมสารซักฟอกหรือเติมผ้า
• การตั้งค่าจะคงเดิมแม้ว่าจะเริ่มต้นการท�างานเครื่องใหม่ก็ตาม
เป
ิ
ด/ป
ิ
ดเสียง
คุณสามารถเปิดหรือปิดเสียงจากเครื่องซักผ้าได้ เมื่อตั้งค่าปิดฟ
ั
งก์ชันนี้ การ
เตือน AddWash, เสียงแจ้งโปรแกรมเสร็จสมบูรณ์ และเสียงเตือนเมื่อปิด
เครื่องจะไม่ดัง แต่เสียงอื่นๆ จะยังคงท�างาน
• ในการปิดเสียง ให้กดปุ
่
ม Rinse(ล้างน�้า) และ Spin(ปั่น
หมาด) ค้างไว้ 3 วินาที
• ในการเปิดเสียง ให้กดปุ
่
มค้างไว้ 3 วินาทีอีกครั้ง
• การตั้งค่าจะคงเดิมแม้ว่าจะเริ่มต้นการท�างานเครื่องใหม่ก็ตาม
Untitled-6 37 2017-12-15 11:43:41
ไทย
38
การบ�ารุงรักษา
โปรดรักษาให้เครื่องซักผ้าสะอาดอยู่เสมอเพื่อป
้
องกันประสิทธิภาพลดลงและเพื่อให้มีอายุการใช้งานที่ยาวนาน
ล้างถังซัก
โปรดใช้โปรแกรมนี้เป็นประจ�าเพื่อล้างถังซักและก�าจัดแบคทีเรียออก
1. กดปุ
่
ม เป
ิ
ด/ป
ิ
ด เพื่อเปิดเครื่องซักผ้า
2. หมุน ปุ่มเลือกโปรแกรม เพื่อเลือก ล้างถังซัก
3. กด เร
ิ่
ม/พัก
หมายเหตุ
• อุณหภูมิของน�้าส�าหรับ ล้างถังซัก มีการตั้งค่าไว้ที่ 70 °C ซึ่งจะไม่สามารถเปลี่ยนแปลงได้
• ขอแนะน�าให้เรียกใช้โปรแกรม ล้างถังซัก หนึ่งครั้งเมื่อผ่านการซักไปแล้ว 40 ครั้ง
ข้อควรระวัง
โปรดอย่าใช้สารท�าความสะอาดเพื่อท�าความสะอาดถังซัก สารเคมีตกค้างในถังซักจะท�าให้ประสิทธิภาพในการซักลดลง
การเตือนการล้างถังซัก
• การเตือนของโปรแกรม ล้างถังซัก จะปรากฏบนหน้าจอหลักหนึ่งครั้งเมื่อซักครบ 40 ครั้ง ขอแนะน�าให้ใช้โปรแกรม ล้างถังซัก เป็นประจ�า
• เมื่อคุณเห็นการเตือนนี้เป็นครั้งแรก คุณจะสามารถใช้เครื่องเพื่อซักต่อไปได้โดยไม่ต้องด�าเนินการใดๆ อีก 6 ครั้งติดต่อกัน ตั้งแต่การซักครั้งที่ 7 เป็นต้นไป
การแจ้งเตือนจะไม่ปรากฏอีก แต่จะปรากฏอีกเมื่อซักครบ 40 ครั้งในคราวถัดไป
การบ�ารุงรักษา
Untitled-6 38 2017-12-15 11:43:41
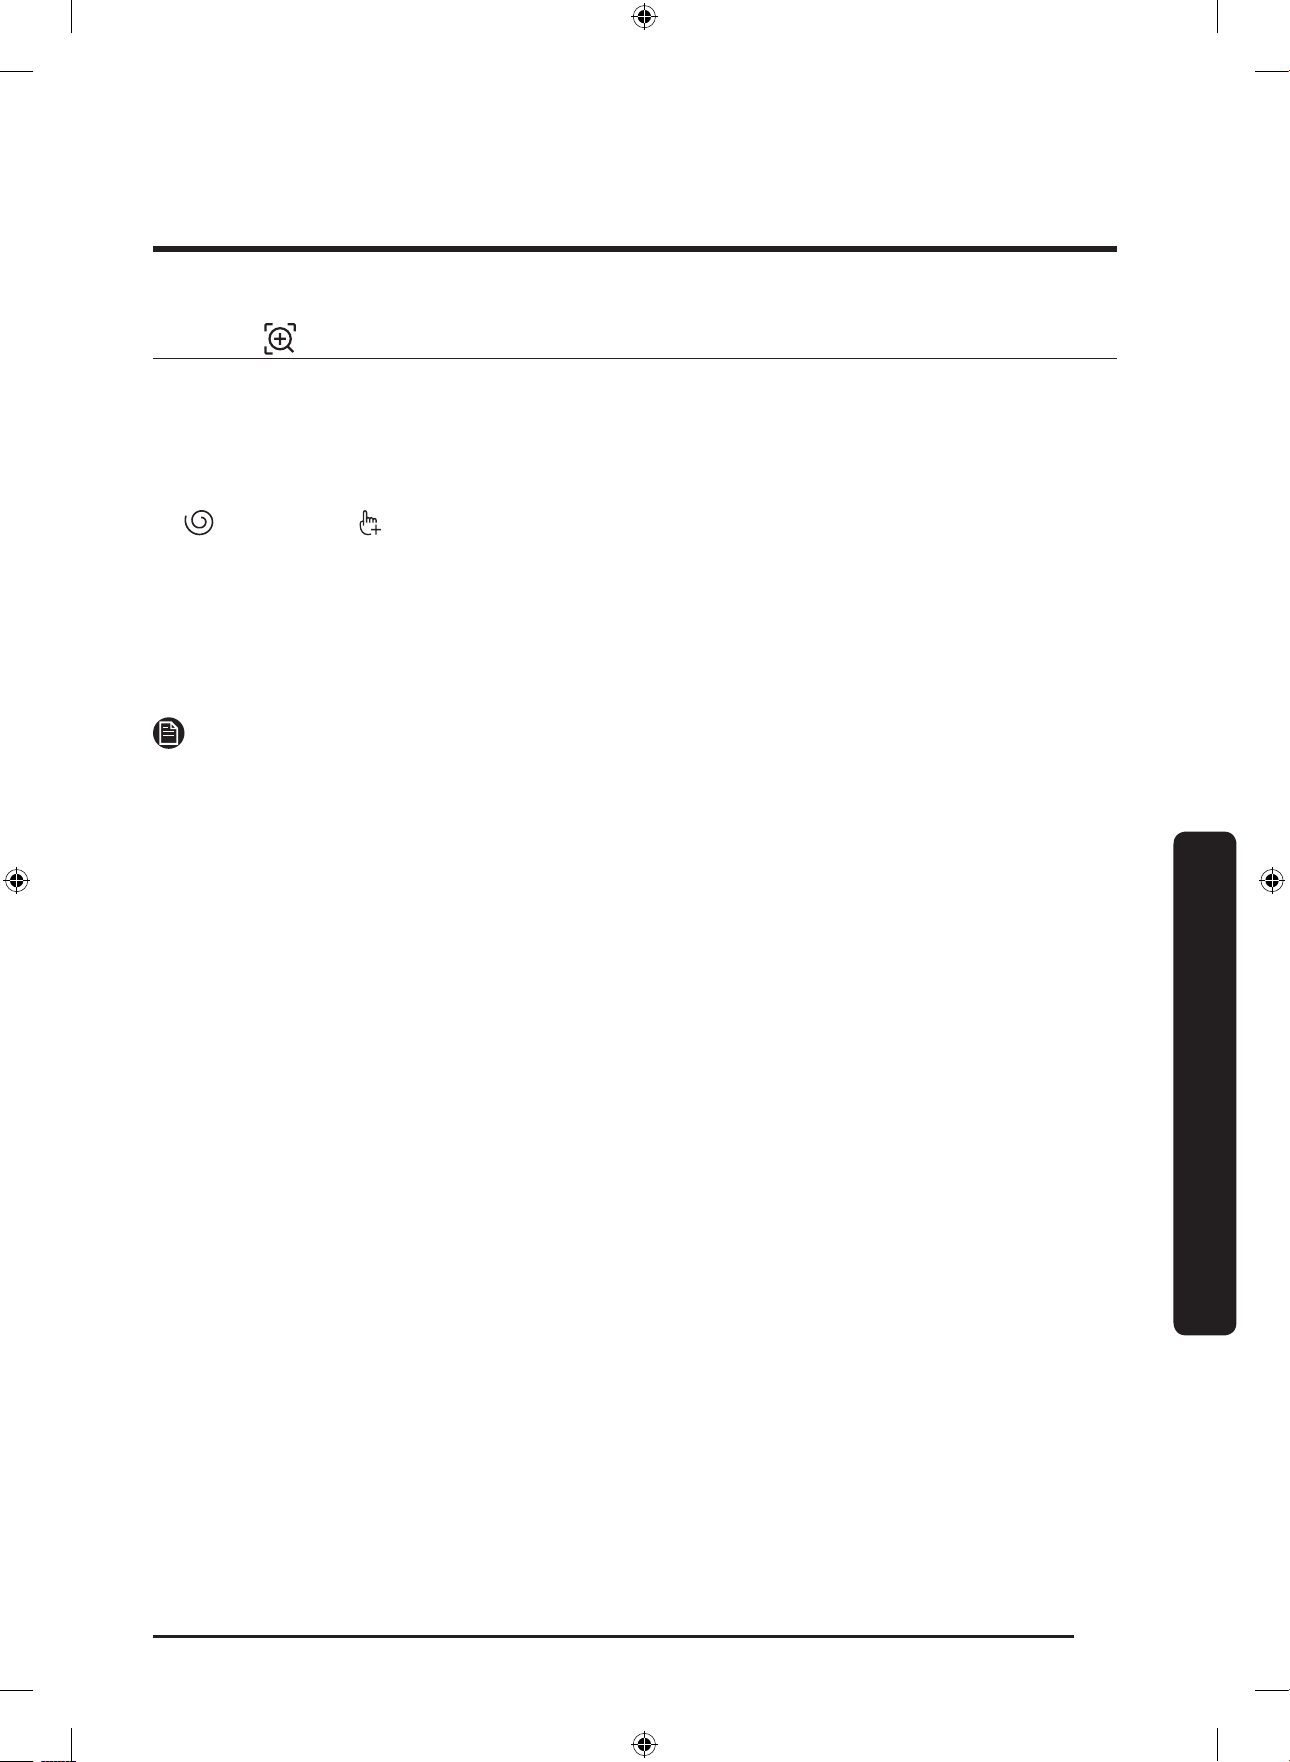
ไทย
39
การบ�ารุงรักษา
SmartCheck
หากต้องการเปิดใช้งานฟ
ั
งก์ชันนี้ ขั้นแรก คุณต้องดาวน์โหลด Samsung Smart Washer ที่ Play Store หรือ Apple Store และติดตั้งในอุปกรณ์เคลื่อนที่
ซึ่งมีกล้อง
ฟ
ั
งก์ชั่น Smart Check ได้รับการปรับให้มีประสิทธิภาพสูงสุดกับโทรศัพท์รุ่น Galaxy & iPhone (เฉพาะบางรุ่น)
1. เมื่อเครื่องซักผ้าตรวจพบป
ั
ญหาที่จะต้องตรวจสอบ จะมีรหัสข้อมูลปรากฏบนจอแสดงผล ในการเข้าสู่โหมด Smart Check ให้กดปุ
่
ม
Spin(ปั่นหมาด) และ Options(ตัวเลือก) พร้อมกันเป็นเวลา 3 วินาที
2. เครื่องซักผ้าจะเริ่มกระบวนการวินิจฉัยด้วยตนเอง และแสดงรหัสข้อผิดพลาดถ้าพบป
ั
ญหา
3. เรียกใช้แอปพลิเคชั่น Samsung Smart Washer ในอุปกรณ์เคลื่อนที่ และแตะ Smart Check
4. ถืออุปกรณ์เคลื่อนที่ใกล้กับแผงจอแสดงผลของเครื่องซักผ้า โดยให้กล้องของสมาร์ทโฟนหันเข้าหาเครื่องซักผ้า จากนั้น แอปพลิเคชั่นจะรับรู้รหัส
ข้อผิดพลาดโดยอัตโนมัติ
5. เมื่อรับรู้รหัสข้อผิดพลาดได้อย่างถูกต้อง แอปพลิเคชั่นจะแสดงข้อมูลโดยละเอียดส�าหรับข้อผิดพลาด พร้อมกับวิธีการด�าเนินการต่อไป
หมายเหตุ
• ชื่อฟ
ั
งก์ชัน Smart Check อาจแตกต่างกันไปในแต่ละภาษา
• ถ้าเครื่องซักผ้ามีไฟสะท้อนบนจอแสดงผล แอปพลิเคชั่นอาจไม่สามารถรับรู้รหัสข้อผิดพลาด
• ถ้าแอปพลิเคชั่นไม่รับรู้รหัสของ Smart Check ติดต่อกัน ให้ป
้
อนรหัสข้อผิดพลาดด้วยตนเองลงในหน้าจอของแอปพลิเคชั่น
Untitled-6 39 2017-12-15 11:43:41

การบ�ารุงรักษา
ไทย
40
การบ�ารุงรักษา
ทางระบายน�้าฉุกเฉ
ิ
น
ในกรณีที่เกิดไฟฟ
้
าดับ ให้ระบายน�้าภายในถังซักก่อนน�าผ้าออก
A
1. ปิดเครื่องและถอดปลั๊กเครื่องซักผ้าออกจากเต้ารับไฟฟ
้
าที่ผนัง
2. ค่อยๆ กดบริเวณด้านบนของ ที่ป
ิ
ดตัวกรอง(A) เพื่อเปิด
B
3. วางภาชนะเปล่าขนาดใหญ่ไว้รอบๆ ที่ปิด และดึงท่อระบายน�้าฉุกเฉิน
ไปที่ภาชนะขณะที่จับ ฝาป
ิ
ดท
่
อ(B) ไว้
C
4. เปิดฝาปิดท่อและปล่อยน�้าใน ท
่
อระบายน�้าฉุกเฉ
ิ
น(C) ไหลลงใน
ภาชนะ
5. เมื่อเสร็จแล้ว ให้ปิดฝาปิดท่อและใส่ท่อกลับเข้าที่ จากนั้นปิดฝาครอบ
ของตัวกรอง
หมายเหตุ
ใช้ภาชนะขนาดใหญ่เนื่องจากน�้าในถังซักอาจมีมากกว่าที่คาดไว้
Untitled-6 40 2017-12-15 11:43:42
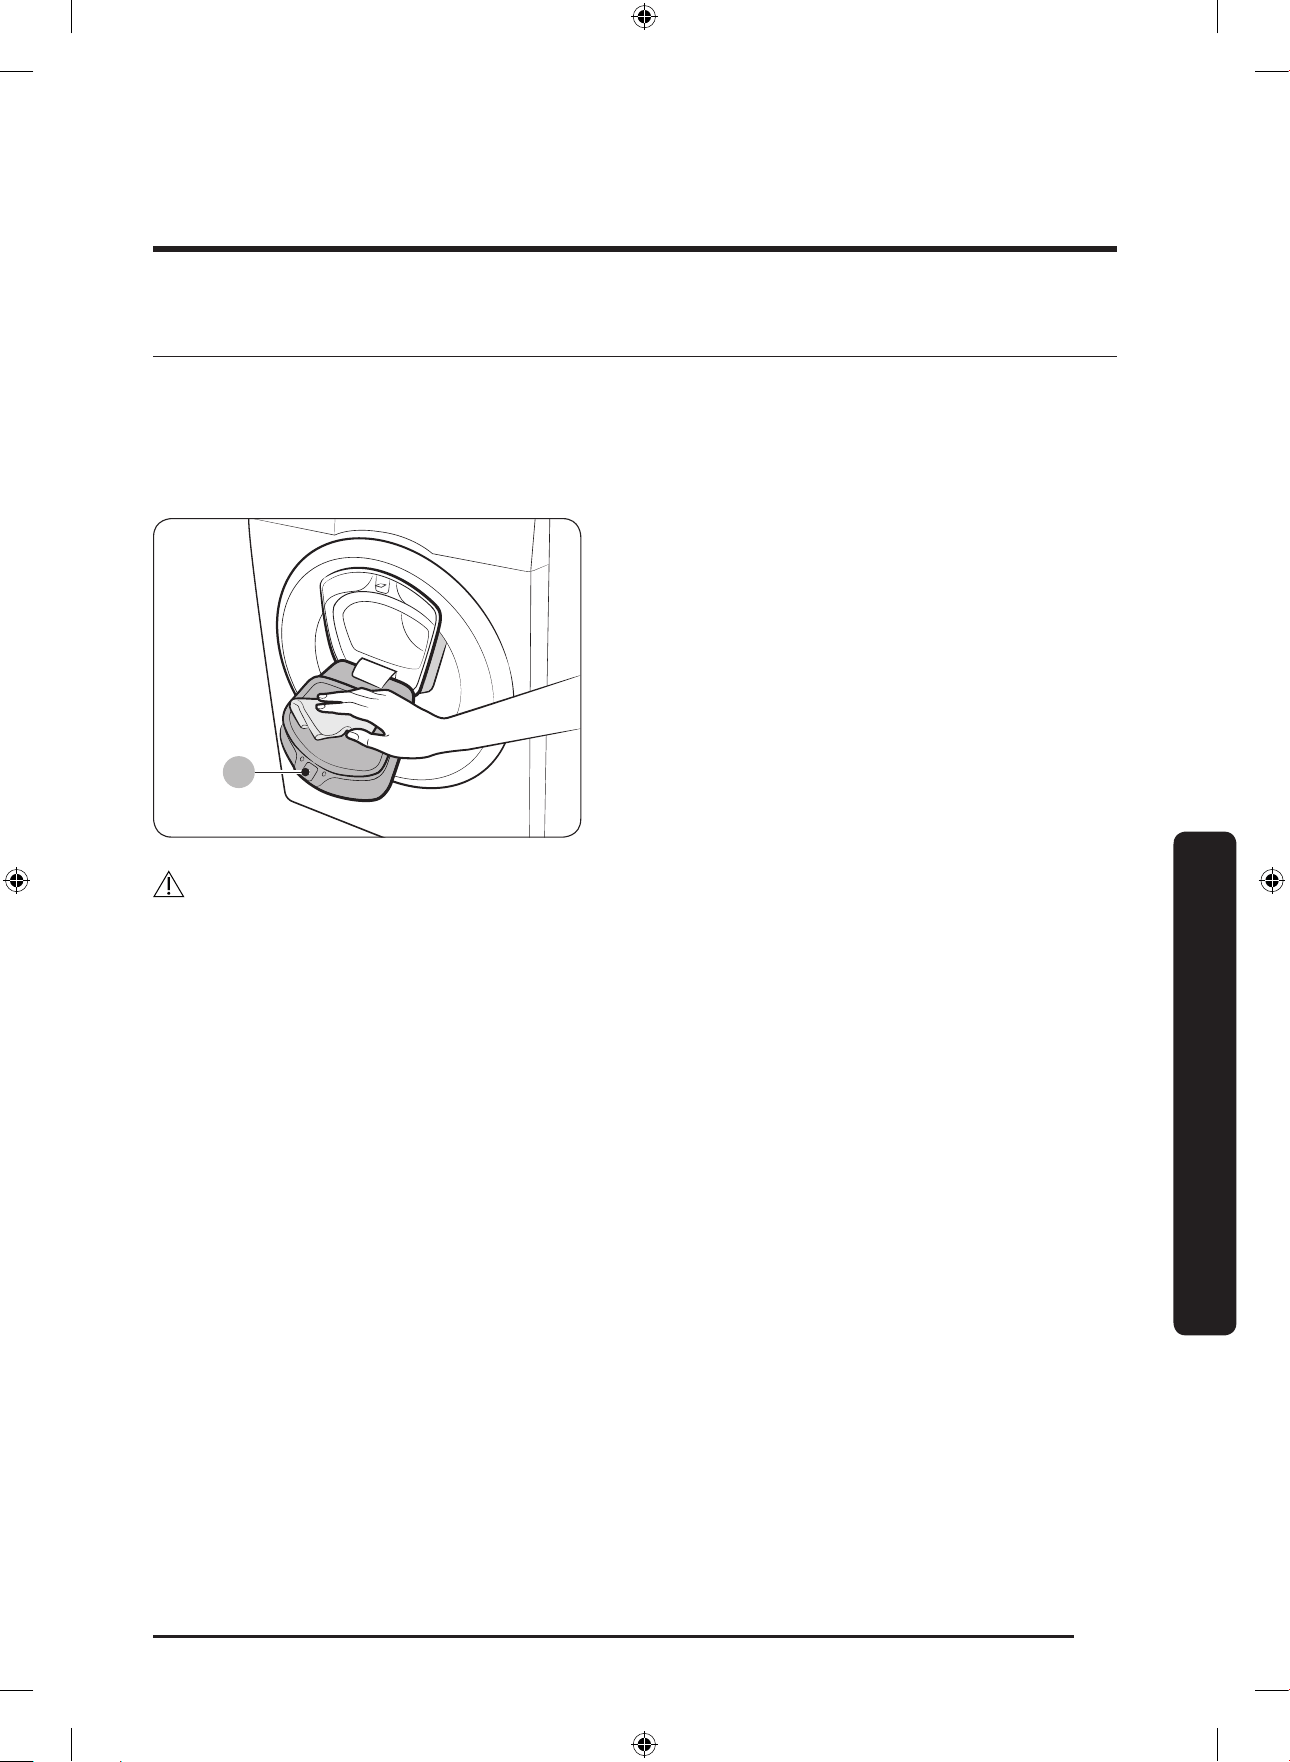
ไทย
41
การบ�ารุงรักษา
การท�าความสะอาด
พื้นผ
ิ
วของเครื่องซักผ้า
ใช้ผ้านุ่มเช็ดที่มีน�้ายาท�าความสะอาดที่ไม่มีสารขัดถู ห้ามฉีดน�้าลงบนเครื่องซักผ้า
AddDoor
A
1. เปิด Add Door
2. ใช้ผ้าเปียกเพื่อท�าความสะอาด Add Door
- ห้ามใช้สารท�าความสะอาด อาจท�าให้สีเปลี่ยน
- ใช้ความระมัดระวังเมื่อท�าความสะอาดซีลยางและ
กลไกการล็อค(A)
- ป
ั
ดฝุ
่
นออกจากพื้นที่บริเวณประตูเป็นประจ�า
3. เช็ดและปิด Add Door ให้ได้ยินเสียงคลิก
ข้อควรระวัง
• อย่าใช้แรงกับ Add Door มากเกินไป อาจท�าให้อุปกรณ์เสียหายได้
• อย่าเปิด Add Door ทิ้งไว้ขณะที่เครื่องท�างาน
• อย่าวางของหนักบน Add Door ไม่ว่าในกรณีใดๆ
• เพื่อป
้
องกันการบาดเจ็บ โปรดอย่าสัมผัส Add Door ขณะที่ถังซักหมุน
• อย่าเปิด Add Door ขณะที่เครื่องท�างาน อาจท�าให้เกิดการบาดเจ็บ
• อย่าปรับเปลี่ยนแผงควบคุมขณะที่ Add Door เปิดอยู่ อาจท�าให้เกิดการบาดเจ็บหรือท�าให้ระบบท�างานผิดพลาด
• อย่าใส่สิ่งของอื่นใดที่ไม่ใช่ผ้า
• อย่าใส่ผ้าชิ้นใหญ่ในถังซักผ่าน Add Door
• อย่าดึงซีลยางออกจาก Add Door เมื่อท�าความสะอาด อาจท�าให้เกิดความเสียหาย
Untitled-6 41 2017-12-15 11:43:42
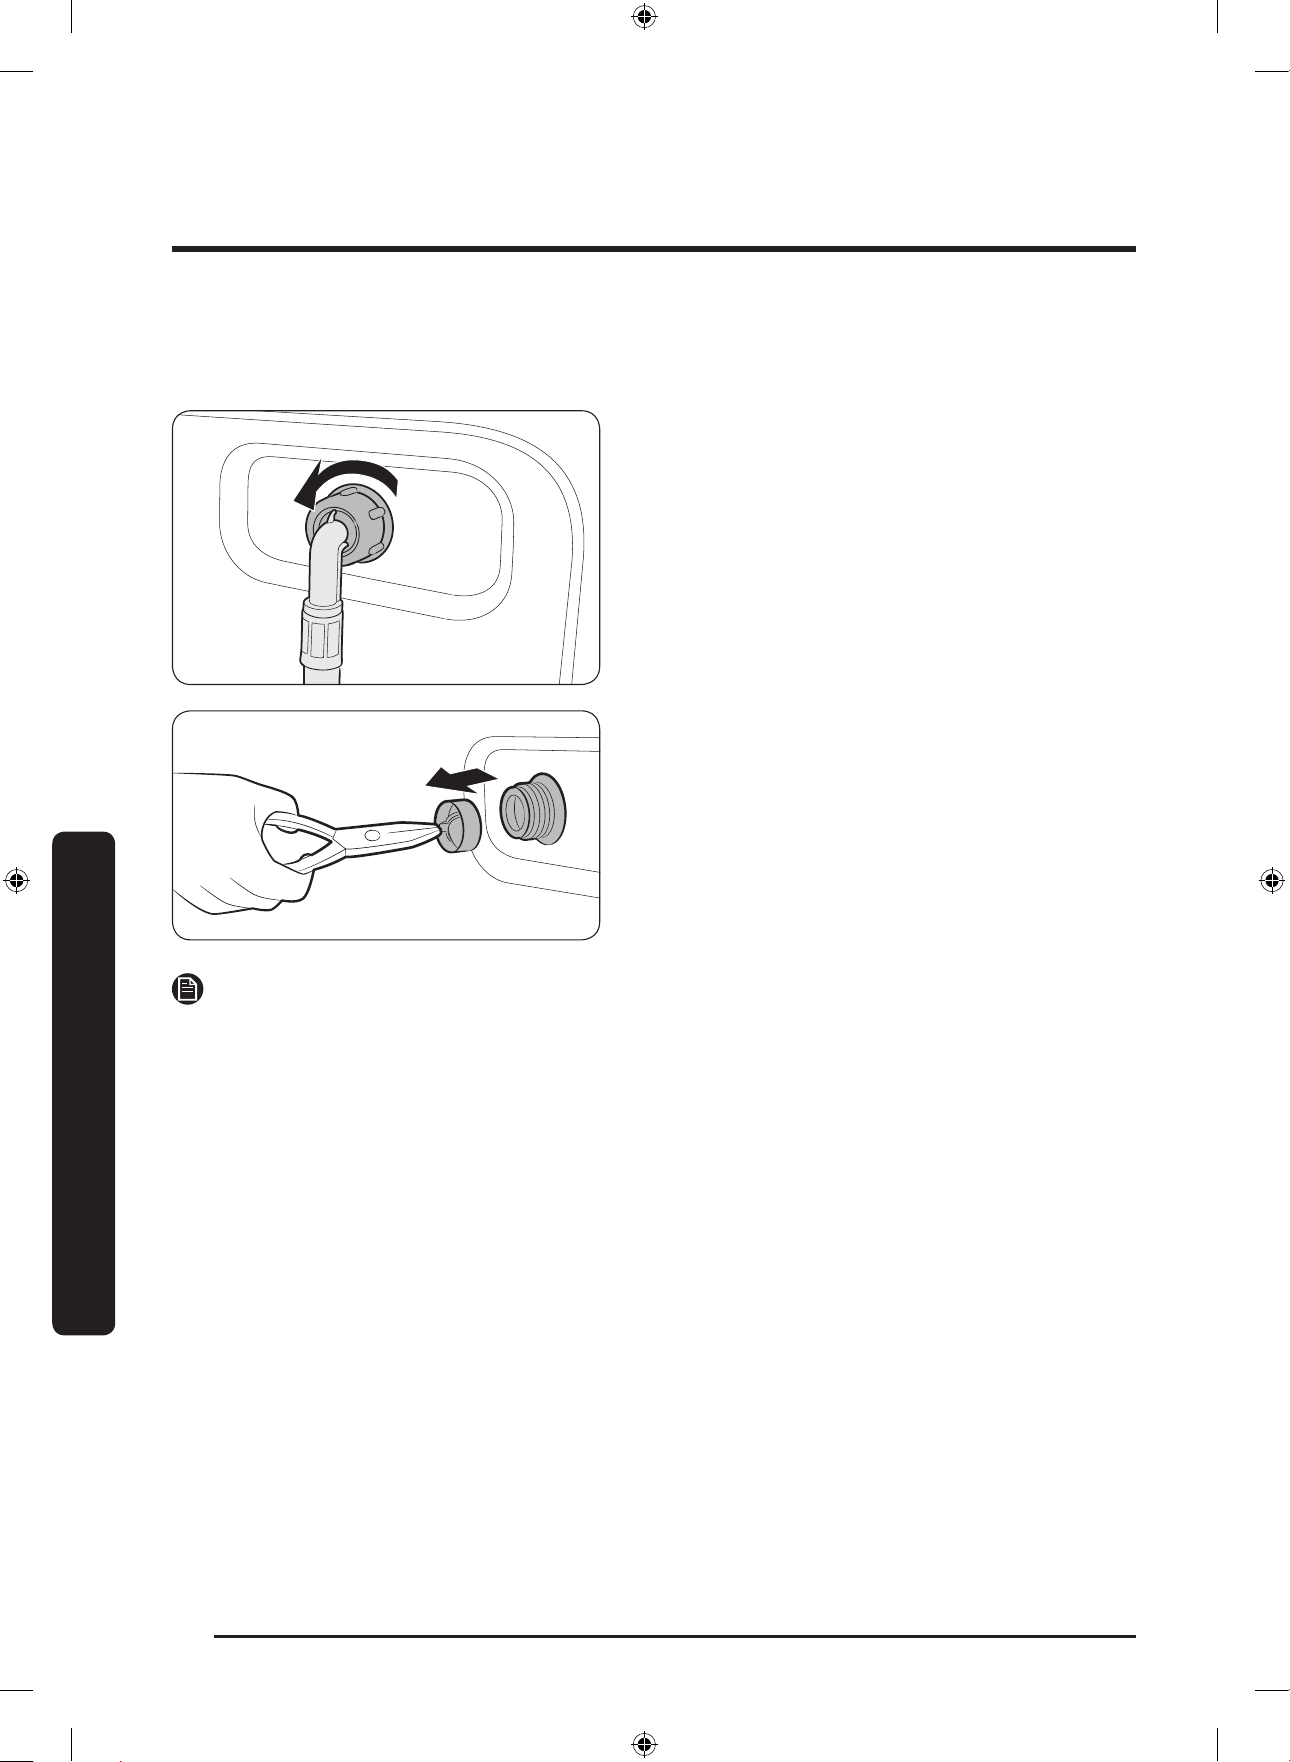
การบ�ารุงรักษา
ไทย
42
การบ�ารุงรักษา
ตะแกรงตัวกรอง
ท�าความสะอาดตะแกรงตัวกรองของท่อจ่ายน�้าหนึ่งหรือสองครั้งต่อปี
1. ปิดเครื่องซักผ้า และถอดปลั๊กสายไฟ
2. ปิดก๊อกน�้า
3. คลายและปลดท่อจ่ายน�้าจากด้านหลังของเครื่องซักผ้า หุ้มท่อด้วยผ้า
เพื่อป
้
องกันน�้าไหลออก
4. ใช้คีมเพื่อดึงตะแกรงตัวกรองออกจากช่องวาล์วน�้าเข้า
5. จุ่มตะแกรงตัวกรองลงในน�้าให้มิดเพื่อให้ข้อต่อที่เป็นเกลียวจมน�้าด้วย
6. ตากตะแกรงตัวกรองให้แห้งสนิทภายในร่ม
7. ใส่ตะแกรงตัวกรองในวาล์วน�้าเข้า และต่อท่อน�้าเข้ากับวาล์วน�้าเข้า
8. เปิดก๊อกน�้า
หมายเหตุ
ถ้าตะแกรงตัวกรองอุดตัน รหัสข้อผิดพลาด “4C” จะปรากฏบนหน้าจอ
Untitled-6 42 2017-12-15 11:43:43
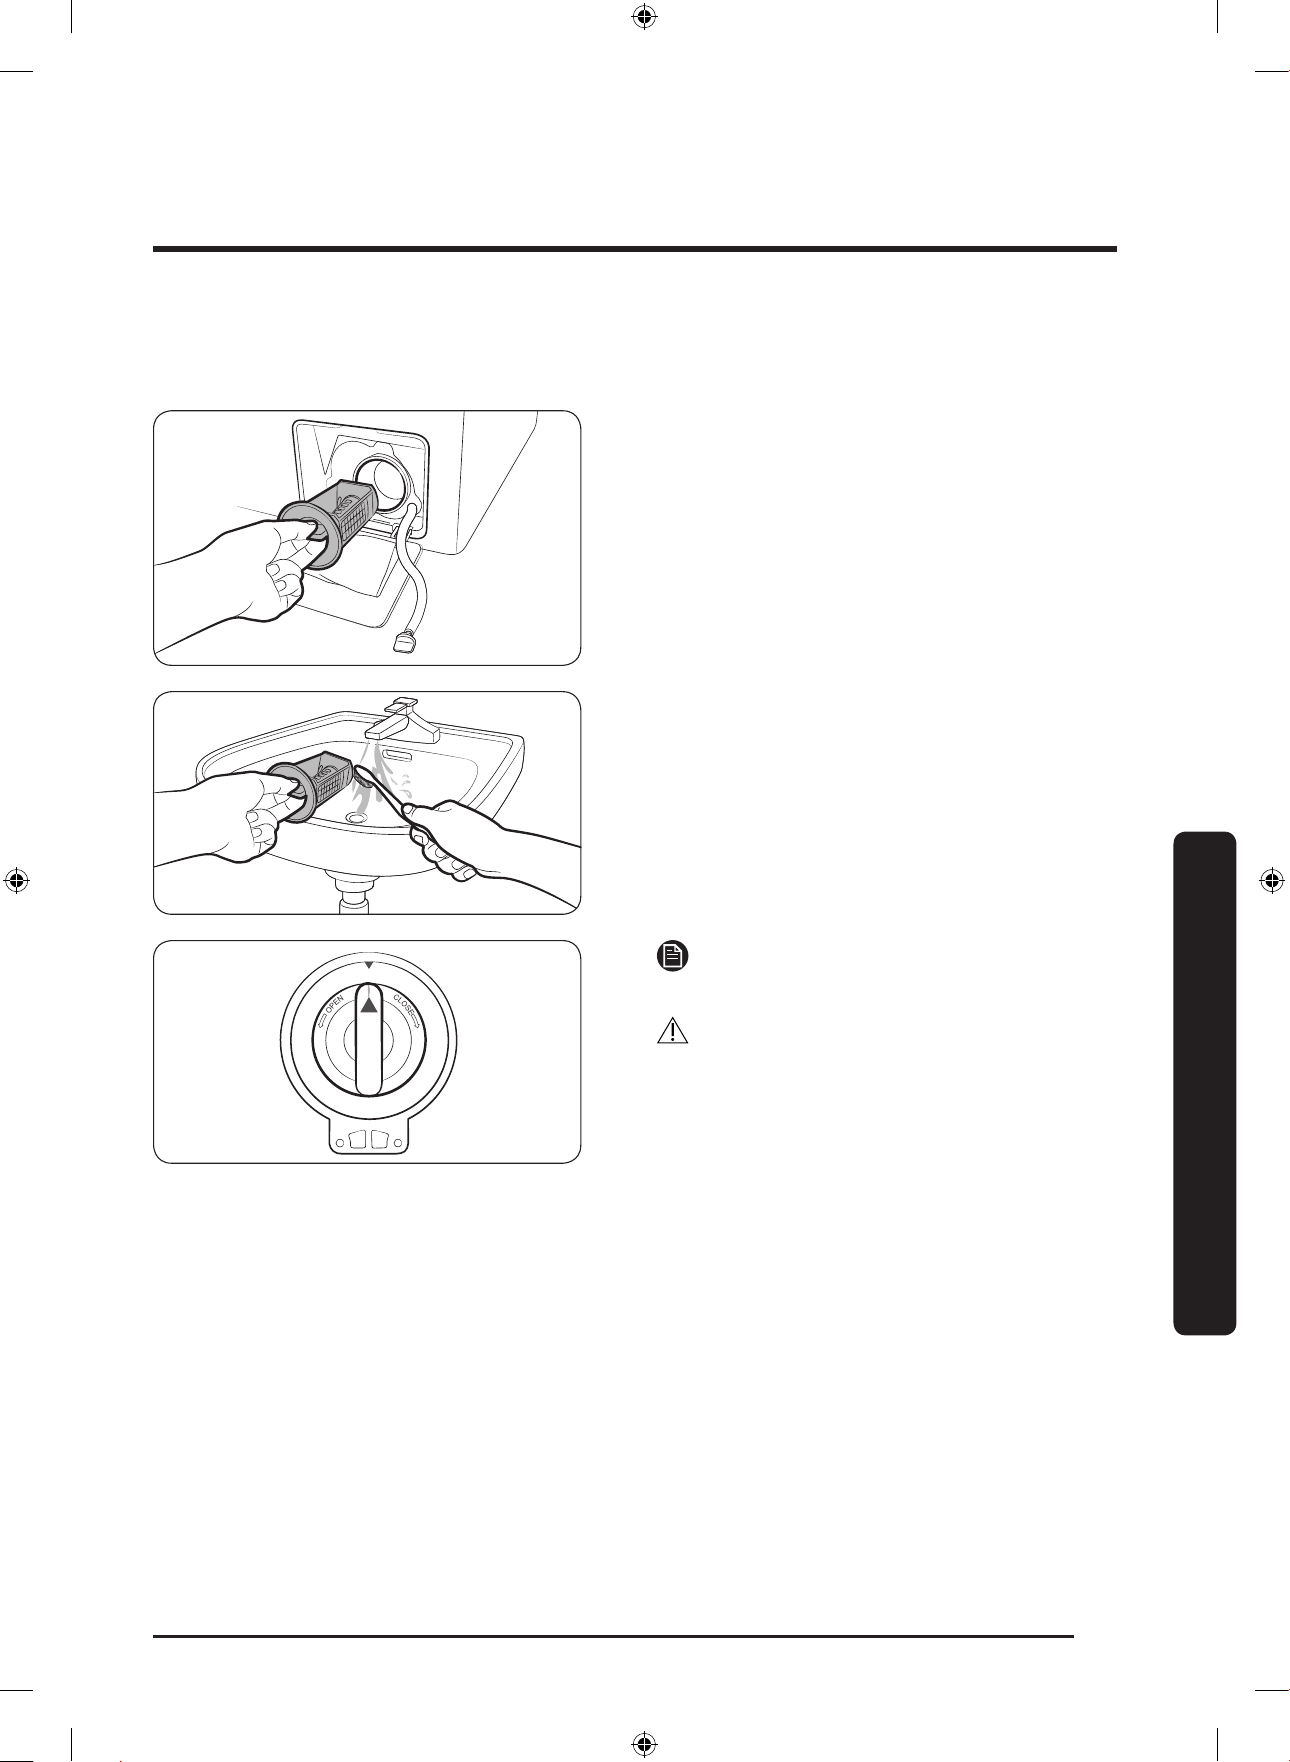
ไทย
43
การบ�ารุงรักษา
ตัวกรองปั๊ม
ขอแนะน�าให้ท�าความสะอาดตัวกรอง 5 หรือ 6 ครั้งต่อปีเพื่อป
้
องกันการอุดตัน ตัวกรองป
ั๊
มที่อุดตันอาจลดประสิทธิภาพของการซักฟอก
1. ปิดเครื่องซักผ้า และถอดปลั๊กสายไฟ
2. ระบายน�้าที่เหลือภายในถังซัก ดูที่หัวข้อ “ทางระบายน�้าฉุกเฉ
ิ
น”
3. ค่อยๆ กดบริเวณด้านบนของที่ป
ิ
ดตัวกรองเพื่อเปิด
4. หมุนปุ
่
มของตัวกรองป
ั๊
มไปทางซ้าย และระบายน�้าที่เหลืออยู่ออก
ให้หมด
5. ท�าความสะอาดตัวกรองป
ั๊
มโดยใช้แปรงขนนุ่ม ตรวจสอบว่าใบพัด
ของป
ั๊
มน�้าทิ้งภายในตัวกรองไม่อุดตัน
6. ใส่ตัวกรองป
ั๊
มกลับเข้าที่ และหมุนปุ
่
มของตัวกรองไปทางขวา
หมายเหตุ
ถ้าตัวกรองป
ั๊
มอุดตัน รหัสข้อผิดพลาด “5C” จะปรากฏบนหน้าจอ
ข้อควรระวัง
• โปรดปิดปุ
่
มบิดของตัวกรองอย่างเหมาะสมหลังจากท�าความสะอาด
ตัวกรอง มิฉะนั้นอาจท�าให้เกิดน�้ารั่ว
• โปรดใส่ตัวกรองอย่างเหมาะสมหลังจากท�าความสะอาดตัวกรอง
มิฉะนั้นตัวกรองอาจไม่ท�างานหรืออาจท�าให้เกิดน�้ารั่ว
Untitled-6 43 2017-12-15 11:43:44
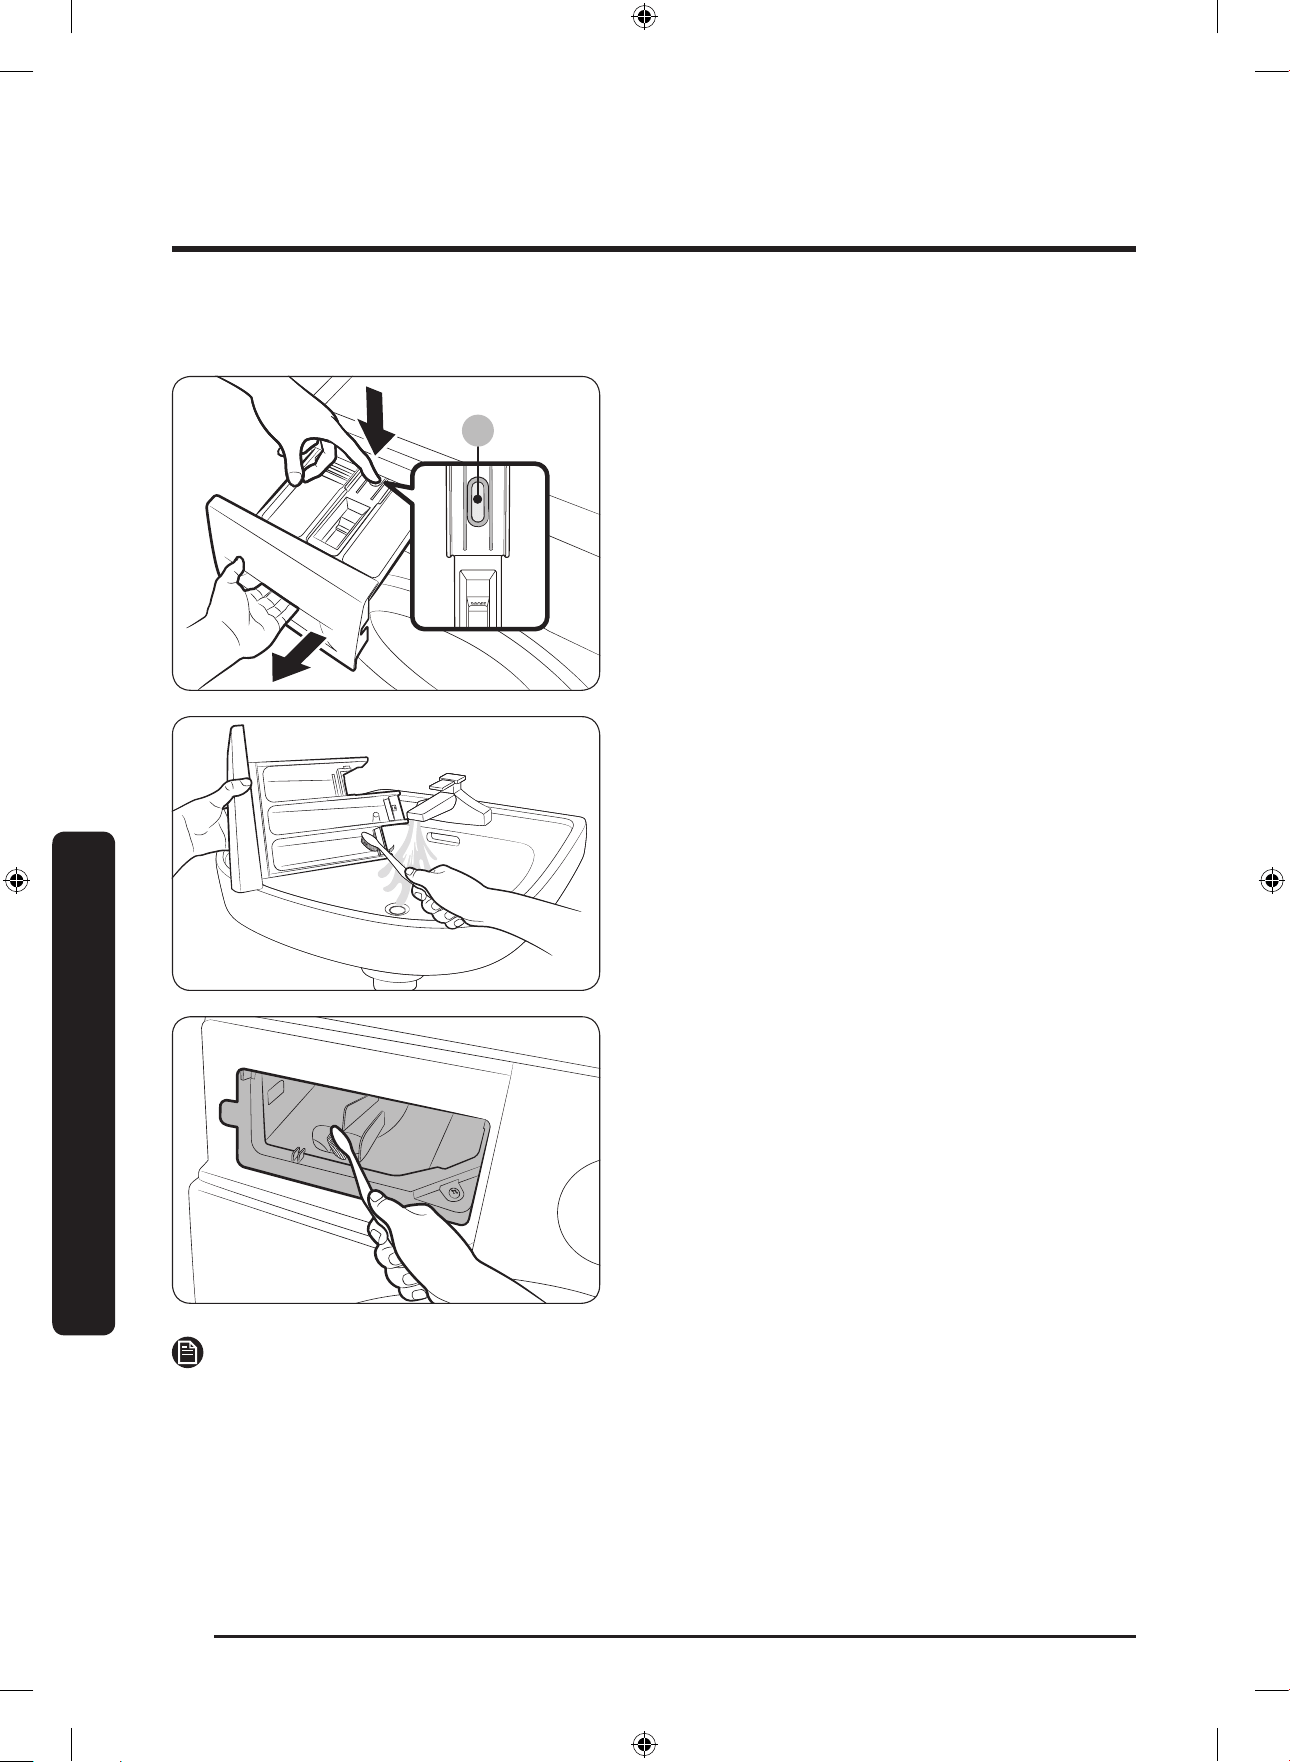
การบ�ารุงรักษา
ไทย
44
การบ�ารุงรักษา
ช
่
องใส
่
น�้ายาซักผ้า
A
1. กด สลักคลาย(A) ที่ด้านในของช่องค้างไว้ขณะที่เลื่อนเพื่อเปิดช่อง
2. น�าสลักคลายและที่ใส่น�้ายาซักผ้าออกจากช่อง
3. ท�าความสะอาดช่องโดยให้น�้าไหลผ่านและใช้แปรงขนนุ่ม
4. ท�าความสะอาดช่องของที่ใส่น�้ายาซักผ้าด้วยแปรงขนนุ่ม
5. ใส่สลักคลายและที่ใส่น�้ายาซักผ้ากลับเข้าที่ในช่อง
6. เลื่อนช่องเข้าด้านในเพื่อปิด
หมายเหตุ
ในการน�าผงซักฟอกที่ตกค้างอยู่ออก ให้ใช้โปรแกรม ล้างและปั่นหมาด ขณะที่ถังซักว่างเปล่า
Untitled-6 44 2017-12-15 11:43:45

ไทย
45
การบ�ารุงรักษา
การคืนสภาพจากการเป็นน�้าแข็ง
เครื่องซักผ้าอาจกลายเป็นน�้าแข็งเมื่ออุณหภูมิต�่ากว่า 0 °C
1. ปิดเครื่องซักผ้า และถอดปลั๊กสายไฟ
2. เทน�้าอุ่นบนก๊อกน�้าเพื่อคลายท่อจ่ายน�้าให้หลวม
3. ถอดท่อจ่ายน�้า และแช่ในน�้าอุ่น
4. เทน�้าอุ่นลงในถังซักและปล่อยทิ้งไว้เป็นเวลาประมาณ 10 นาที
5. ต่อท่อจ่ายน�้ากลับเข้ากับก๊อกน�้า
หมายเหตุ
ถ้าเครื่องซักผ้ายังคงไม่ท�างานตามปกติ ให้ด�าเนินการซ�้าตามขั้นตอนข้างต้นจนกว่าจะสามารถท�างานได้ตามปกติ
การดูแลเมื่อไม
่
ได้ใช้งานเป็นเวลานาน
โปรดหลีกเลี่ยงการไม่ใช้เครื่องซักผ้าเป็นเวลานาน ถ้าเกิดกรณีนี้ขึ้น ให้ระบายน�้าออกจากเครื่องซักผ้าและถอดปลั๊กสายไฟ
1. หมุน ปุ่มเลือกโปรแกรม ไปที่ ล้างและปั่นหมาด
2. ตรวจสอบว่าถังซักว่างเปล่า และกดปุ
่
ม เร
ิ่
ม/พัก
3. เมื่อโปรแกรมท�างานเสร็จ ให้ปิดก๊อกน�้าและถอดท่อจ่ายน�้า
4. ปิดเครื่องซักผ้า และถอดปลั๊กสายไฟ
5. เปิดประตูเพื่อให้มีอากาศไหลเวียนในถังซัก
Untitled-6 45 2017-12-15 11:43:45
ไทย
46
การแก้ไขปัญหา
จุดตรวจสอบ
ถ้าคุณพบว่าเกิดป
ั
ญหากับเครื่องซักผ้า โปรดตรวจสอบที่ตารางด้านล่างนี้ก่อนและลองด�าเนินการตามค�าแนะน�า
ปัญหา การด�าเน
ิ
นการ
เครื่องไม
่
เร
ิ่
มท�างาน
• ตรวจสอบว่าเสียบปลั๊กเรียบร้อย
• ตรวจสอบว่าประตูปิดเหมาะสมแล้ว
• ตรวจสอบว่าก๊อกน�้าเปิดอยู่
• โปรดกดหรือแตะ เร
ิ่
ม/พัก เพื่อเริ่มต้นเครื่องซักผ้า
• ตรวจสอบว่าไม่ได้เปิดใช้ ล็อคป
้
องกันเด็ก ไว้
• ก่อนที่เครื่องซักผ้าจะเริ่มเติมน�้า จะมีเสียงคลิกๆ ดังเพื่อตรวจสอบประตูและด�าเนินการระบายน�้าอย่างรวดเร็ว
• ตรวจสอบฟิวส์หรือเบรกเกอร์วงจร
การจ
่
ายน�้าไม
่
เพียงพอหรือไม
่
มี
การจ
่
ายน�้า
• เปิดก๊อกน�้าจนสุด
• ตรวจสอบว่าประตูปิดเหมาะสมแล้ว
• ตรวจสอบว่าท่อจ่ายน�้าไม่จับตัวเป็นน�้าแข็ง
• ตรวจสอบว่าท่อจ่ายน�้าไม่บิดงอหรืออุดตัน
• ตรวจสอบว่ามีแรงดันน�้าเพียงพอหรือไม่
หลังจากจบรอบการท�างานมี
ผงซักฟอกหลงเหลือในช
่
องใส
่
ผงซักฟอก
• ตรวจสอบว่าเครื่องซักผ้าต่อกับแหล่งจ่ายน�้าที่มีแรงดันเพียงพอ
• ตรวจสอบว่าได้เติมน�้ายาซักผ้าที่กึ่งกลางของช่องใส่น�้ายาซักผ้า
• ตรวจสอบว่าได้ใส่ที่กั้นน�้ายาปรับผ้านุ่มไว้อย่างถูกต้อง
• ถ้าใช้ผงซักฟอกแบบเม็ด โปรดตรวจสอบว่าตัวเลือกผงซักฟอกอยู่ในต�าแหน่งด้านบน
• ถอดที่กั้นน�้ายาปรับผ้านุ่มออกและท�าความสะอาดช่องใส่ผงซักฟอก
มีการสั่นสะเทือนหรือเสียงมาก
ผ
ิ
ดปกต
ิ
• ตรวจสอบว่าเครื่องซักผ้าตั้งอยู่บนพื้นที่เรียบเสมอกันและไม่ลื่น ถ้าพื้นที่ไม่เรียบเสมอกัน ให้ใช้ขาตั้งปรับระดับ
เพื่อปรับระดับความสูงของเครื่องซักผ้า
• ตรวจสอบว่าน�าหมุดส�าหรับการขนส่งออกแล้ว
• ตรวจสอบว่าเครื่องซักผ้าไม่ได้สัมผัสกับวัตถุอื่น
• ตรวจสอบว่าปริมาณผ้าอยู่ในถังอย่างสมดุล
• มอเตอร์อาจท�าให้เกิดเสียงระหว่างการท�างานปกติ
• ชุดเอี๊ยมหรือเสื้อผ้าที่มีเครื่องประดับโลหะอาจท�าให้เกิดเสียงขณะซักได้ ซึ่งเป็นอาการปกติ
• มีสิ่งของที่เป็นโลหะ เช่น เหรียญ ท�าให้เกิดเสียง หลังจากการซัก น�าสิ่งของเหล่านี้ออกจากถังซักหรือ
ที่ใส่ตัวกรอง
การแก้ไขปัญหา
Untitled-6 46 2017-12-15 11:43:45
ไทย
47
การแก้ไขปัญหา
ปัญหา การด�าเน
ิ
นการ
ไม
่
ระบายน�้าและ/หรือปั่นหมาด
• ตรวจสอบว่าท่อทิ้งน�้าเหยียดตรงตลอดเส้นทางไปยังระบบระบายน�้า ถ้าพบว่าการระบายน�้ามีป
ั
ญหา โปรด
ติดต่อศูนย์บริการ
• ตรวจสอบว่าตัวกรองเศษผ้าไม่อุดตัน
• ปิดประตู จากนั้นกดปุ
่
ม เร
ิ่
ม/พัก เพื่อความปลอดภัย เครื่องซักผ้าจะไม่หมุนหรือป
ั่
นหมาดถ้าประตูไม่ปิดสนิท
• ตรวจสอบว่าท่อระบายน�้าทิ้งไม่อุดตัน
• โปรดตรวจสอบให้แน่ใจว่าได้ต่อท่อระบายน�้าเข้ากับระบบระบายน�้าที่ไม่อุดตัน
• ถ้าเครื่องซักผ้ามีก�าลังไฟฟ
้
าไม่เพียงพอ เครื่องอาจไม่ระบายน�้าหรือป
ั่
นหมาดเป็นการชั่วคราว เมื่อ
เครื่องซักผ้ามีก�าลังไฟฟ
้
าเพียงพอ เครื่องจะท�างานตามปกติ
ประตูไม
่
ยอมเป
ิ
ด
• โปรดกดหรือแตะ เร
ิ่
ม/พัก เพื่อหยุดเครื่อง
• อาจใช้เวลาสักครู่ก่อนที่กลไกประตูจะปลดล็อค
• ประตูจะไม่สามารถเปิดได้จนกว่าจะครบ 3 นาทีหลังจากที่เครื่องหยุดการท�างานหรือมีการปิดเครื่อง
• โปรดตรวจสอบว่าได้ระบายน�้าออกจากถังซักทั้งหมดแล้ว
• ประตูอาจไม่เปิด ถ้ามีน�้าอยู่ในถัง ระบายน�้าในถังทิ้งและเปิดประตูด้วยตนเอง
• ตรวจสอบว่าไฟล็อคประตูดับอยู่ ไฟล็อคประตูจะดับลงหลังจากที่เครื่องซักผ้าระบายน�้าออกแล้ว
มีฟองล้น
• โปรดใช้ผงซักฟอกประเภทที่แนะน�าตามความเหมาะสม
• ใช้ผงซักฟอกประสิทธิภาพสูง (HE) เพื่อป
้
องกันการเกิดฟองล้น
• ลดปริมาณผงซักฟอกส�าหรับน�้าอ่อน ผ้าปริมาณน้อยหรือผ้าที่ไม่สกปรกมาก
• ไม่แนะน�าให้ใช้ผงซักฟอกที่ไม่ใช่แบบ HE
ไม
่
สามารถเทผงซักฟอกเพ
ิ่
มได้
• โปรดตรวจสอบว่าปริมาณผงซักฟอกและน�้ายาปรับผ้านุ่มที่เหลืออยู่ไม่เกินขีดจ�ากัด
หยุด
• ตรวจสอบว่าสายไฟต่อเข้ากับเต้ารับไฟฟ
้
าที่มีไฟฟ
้
า
• ตรวจสอบฟิวส์หรือเบรกเกอร์วงจร
• ปิดประตู และกดหรือแตะ เร
ิ่
ม/พัก เพื่อเริ่มการท�างานของเครื่อง เพื่อความปลอดภัย เครื่องซักผ้าจะไม่หมุน
หรือป
ั่
นหมาดถ้าประตูไม่ปิดสนิท
• ก่อนที่เครื่องซักผ้าจะเริ่มเติมน�้า จะมีเสียงคลิกๆ ดังเพื่อตรวจสอบประตูและด�าเนินการระบายน�้าอย่างรวดเร็ว
• อาจมีการหยุดหรือแช่ผ้าในโปรแกรม รอสักครู่และเครื่องอาจเริ่มท�างานเอง
• ตรวจสอบว่าตัวกรองของท่อจ่ายน�้าที่ก๊อกน�้าไม่อุดตัน ท�าความสะอาดตะแกรงตัวกรองเป็นประจ�า+
• ถ้าเครื่องซักผ้ามีก�าลังไฟฟ
้
าไม่เพียงพอ เครื่องอาจไม่ระบายน�้าหรือป
ั่
นหมาดเป็นการชั่วคราว เมื่อ
เครื่องซักผ้ามีก�าลังไฟฟ
้
าเพียงพอ เครื่องจะท�างานตามปกติ
Untitled-6 47 2017-12-15 11:43:45
การแก้ไขปัญหา
ไทย
48
การแก้ไขปัญหา
ปัญหา การด�าเน
ิ
นการ
เต
ิ
มน�้าในอุณหภูม
ิ
ที่ไม
่
ถูกต้อง
• เปิดก๊อกน�้าทั้งสองก๊อกจนสุด
• ตรวจสอบว่าการเลือกอุณหภูมิถูกต้อง
• ตรวจสอบว่าท่อต่อกับก๊อกที่ถูกต้อง ล้างท่อน�้า
• ตรวจสอบว่าเครื่องท�าน�้าร้อนมีการจ่ายน�้าร้อนที่อุณหภูมิ 120 °F (49 °C) เป็นอย่างต�่า และตรวจสอบ
เครื่องท�าน�้าร้อนและอัตราการรับน�้า
• ถอดสายและท�าความสะอาดตะแกรงตัวกรอง ตะแกรงตัวกรองอาจอุดตัน
• ขณะที่เครื่องซักผ้าเติมน�้า อุณหภูมิของน�้าอาจเปลี่ยนแปลงขณะที่คุณลักษณะการควบคุมอุณหภูมิอัตโนมัติ
ตรวจสอบอุณหภูมิของน�้าที่ไหลเข้า ซึ่งเป็นอาการปกติ
• ขณะที่เครื่องซักผ้าเติมน�้า คุณอาจพบว่ามีเพียงน�้าร้อนหรือน�้าเย็นไหลผ่านช่องจ่ายผงซักฟอก เมื่อเลือก
อุณหภูมิการซักแบบเย็นหรืออุ่น กรณีนี้เป็นการท�างานปกติของคุณลักษณะการควบคุมอุณหภูมิอัตโนมัติ
เนื่องจากเครื่องซักผ้าจะก�าหนดอุณหภูมิของน�้า
ผ้าเปียกเก
ิ
นไปเมื่อส
ิ้
นสุดโปรแกรม
• ใช้ความเร็วการป
ั่
นหมาดสูงหรือสูงมาก
• ใช้ผงซักฟอกประสิทธิภาพสูง (HE) เพื่อลดการเกิดฟองล้น
• ผ้ามีปริมาณน้อยเกินไป ผ้าน้อยเกินไป (ชิ้นหรือสองชิ้น) อาจท�าให้เสียสมดุลและอาจไม่มีการป
ั่
นหมาด
อย่างเหมาะสม
• ตรวจสอบว่าท่อระบายน�้าทิ้งไม่บิดงอหรืออุดตัน
น�้ารั่ว
• ตรวจสอบว่าประตูปิดเหมาะสมแล้ว
• ตรวจสอบว่าท่อมีการต่อแน่นหนา
• ตรวจสอบว่าปลายท่อระบายน�้ามีการต่อไว้อย่างถูกต้องและแน่นหนากับระบบระบายน�้า
• อย่าใส่ผ้ามากเกินไป
• ใช้ผงซักฟอกประสิทธิภาพสูง (HE) เพื่อป
้
องกันการเกิดฟองล้น
มีกล
ิ่
นอับ
• ตะกอนผงซักฟอกที่ค้างอยู่มากเกินไปจะท�าให้เกิดกลิ่นเหม็น
• ใช้โปรแกรมท�าความสะอาดเป็นประจ�า
• ท�าความสะอาดซีล (ยางขอบประตู)
• ทิ้งให้ภายในเครื่องซักผ้าแห้งหลังจากจบโปรแกรม
ไม
่
เห็นว
่
ามีฟอง(เฉพาะรุ
่
น
Bubbleshot)
• การใส่ผ้ามากเกินไปอาจท�าให้ไม่มีฟอง
• ผ้าที่สกปรกมากอาจท�าให้ไม่เกิดฟอง
ฉันจะเป
ิ
ดAddDoorเมื่อใดก็ได้
ใช
่
ไหม
• คุณสามารถเปิด Add Door เฉพาะเมื่อสัญญาณ ปรากฏขึ้น แต่ประตูนี้จะไม่เปิดในกรณีต่อไปนี้:
- เมื่อกระบวนการท�าความร้อนหรือการอบแห้งท�างานอยู่และอุณหภูมิภายในเครื่องสูง
- ถ้าคุณตั้งค่า ล็อคป
้
องกันเด็ก ไว้เพื่อความปลอดภัย
- เมื่อโปรแกรมซักหรืออบแห้งในถังซักท�างานและไม่มีการเพิ่มผ้า
ถ้าป
ั
ญหาเหล่านี้ยังคงอยู่ โปรดติดต่อศูนย์บริการของ Samsung ในพื้นที่
Untitled-6 48 2017-12-15 11:43:45
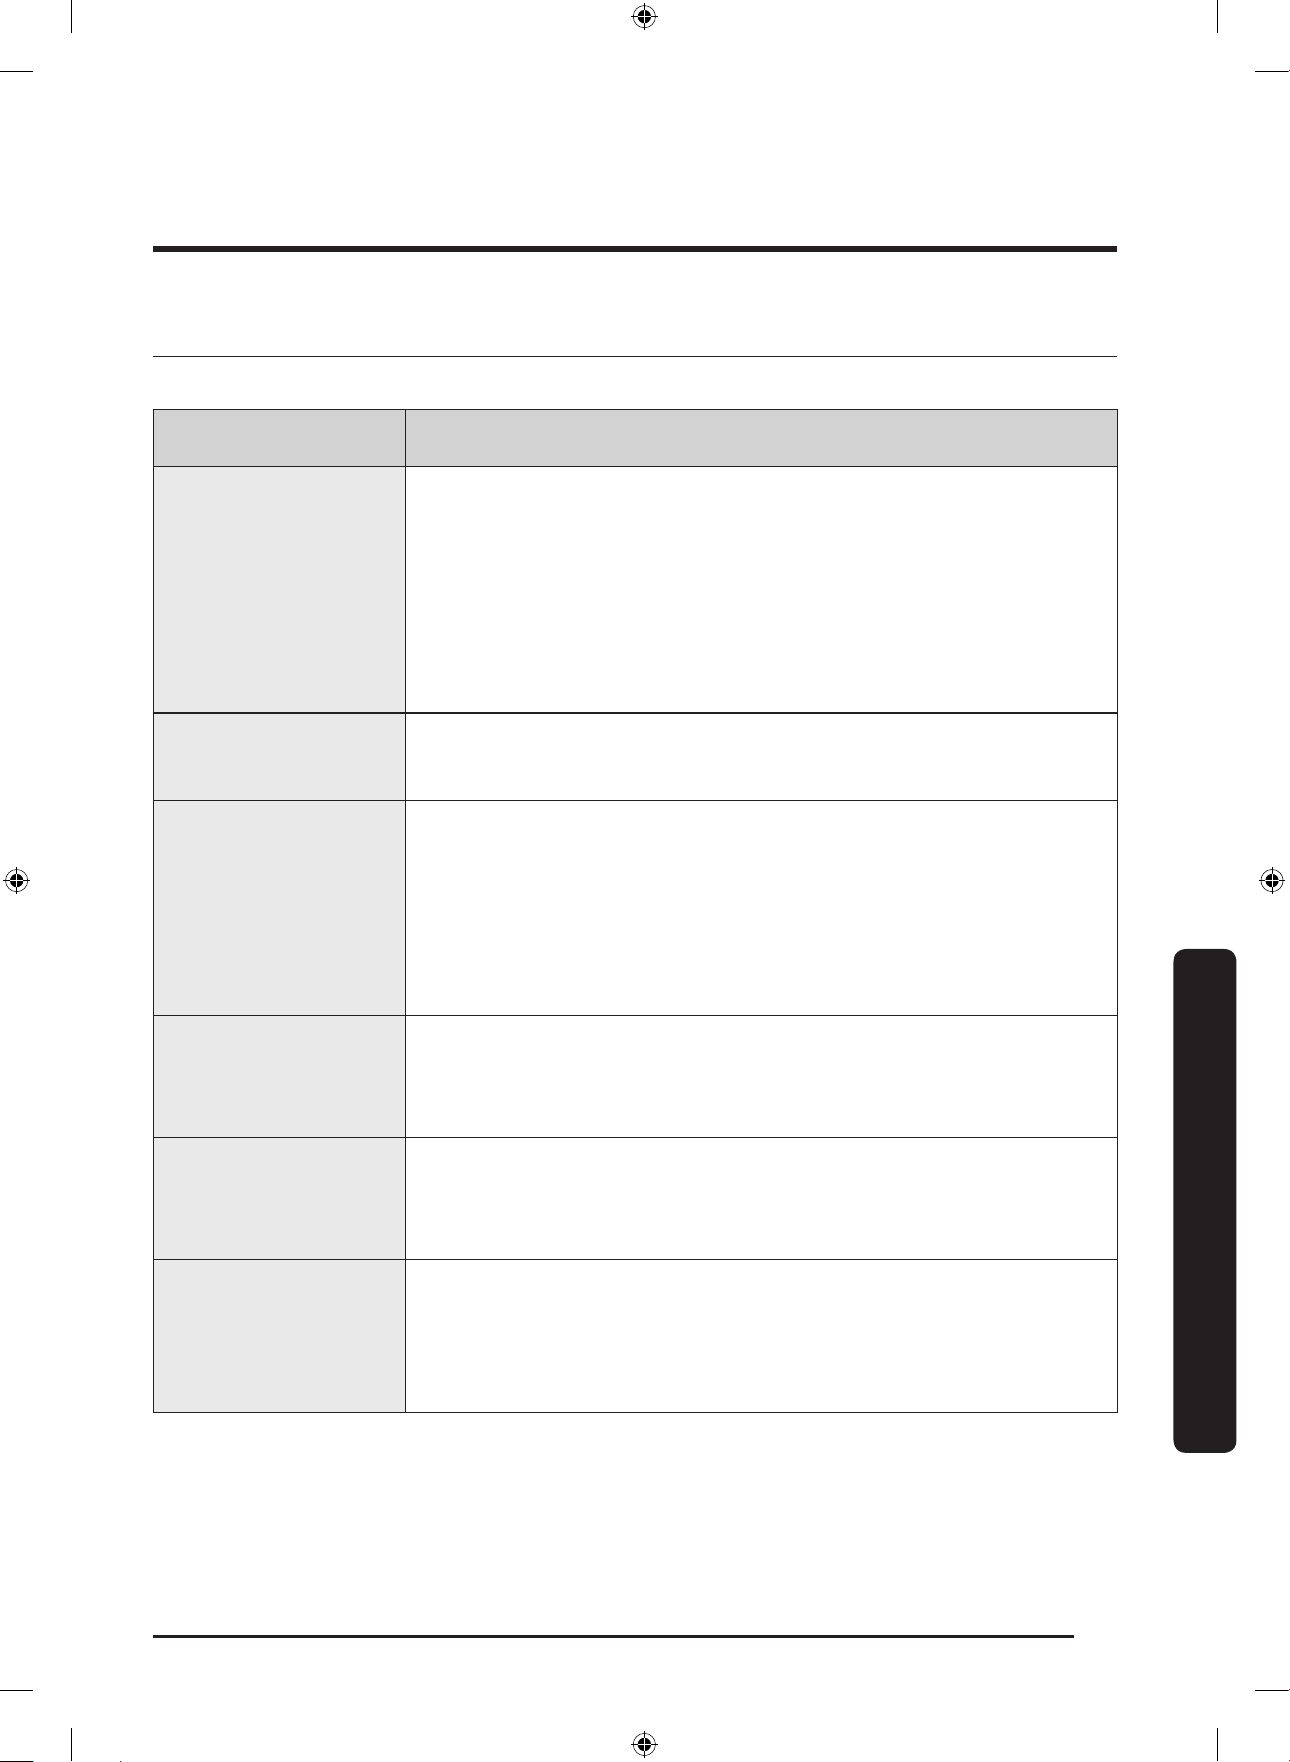
ไทย
49
การแก้ไขปัญหา
รหัสข้อมูล
ถ้าเครื่องซักผ้าไม่ท�างาน คุณสามารถดูรหัสข้อมูลบนหน้าจอได้ โปรดตรวจสอบตารางด้านล่างและลองด�าเนินการตามค�าแนะน�า
รหัส การด�าเน
ิ
นการ
4C
เครื่องไม่จ่ายน�้า
• ตรวจสอบว่าก๊อกน�้าเปิดอยู่
• ตรวจสอบว่าท่อน�้าไม่อุดตัน
• ตรวจสอบว่าก๊อกน�้าไม่เกาะตัวเป็นน�้าแข็ง
• ตรวจสอบว่าเครื่องซักผ้าต่อกับแหล่งจ่ายน�้าที่มีแรงดันเพียงพอ
• ตรวจสอบว่าก๊อกน�้าเย็นและก๊อกน�้าร้อนมีการต่ออย่างถูกต้อง
• ท�าความสะอาดตะแกรงตัวกรองเมื่อมีการอุดตัน
4C2
• ตรวจสอบว่าท่อจ่ายน�้าเย็นต่อกับก๊อกน�้าเย็นอย่างแน่นหนา ถ้าต่ออยู่กับก๊อกน�้าร้อน ผ้าอาจเสียหาย
ในบางโปรแกรมซัก
5C
เครื่องไม่ระบายน�้าทิ้ง
• ตรวจสอบว่าท่อระบายน�้าทิ้งไม่อุดตัน
• ตรวจสอบว่าท่อระบายน�้าทิ้งอยู่ในต�าแหน่งที่เหมาะสม ตามประเภทการเชื่อมต่อ
• ท�าความสะอาดตัวกรองเมื่อมีการอุดตัน
• ตรวจสอบว่าท่อทิ้งน�้าเหยียดตรงตลอดเส้นทางไปยังระบบระบายน�้า
• ถ้ายังคงมีรหัสข้อมูลปรากฏอยู่ โปรดติดต่อศูนย์บริการลูกค้า
dC
มีการใช้เครื่องซักผ้าขณะที่ประตูเปิดอยู่
• ตรวจสอบว่าประตูปิดเหมาะสมแล้ว
• ตรวจสอบว่าผ้าไม่ได้ติดอยู่ที่ประตู
OC
น�้าล้น
• เริ่มต้นใหม่หลังจากป
ั่
นหมาด
• ถ้ารหัสข้อมูลยังคงปรากฏบนหน้าจอ โปรดติดต่อศูนย์บริการของ Samsung ในพื้นที่
LC,LC1
ตรวจสอบท่อระบายน�้า
• โปรดตรวจสอบว่าปลายท่อน�้าทิ้งไม่ได้วางอยู่บนพื้น
• ตรวจสอบว่าท่อระบายน�้าทิ้งไม่อุดตัน
• ถ้ายังคงมีรหัสข้อมูลปรากฏอยู่ โปรดติดต่อศูนย์บริการลูกค้า
Untitled-6 49 2017-12-15 11:43:45
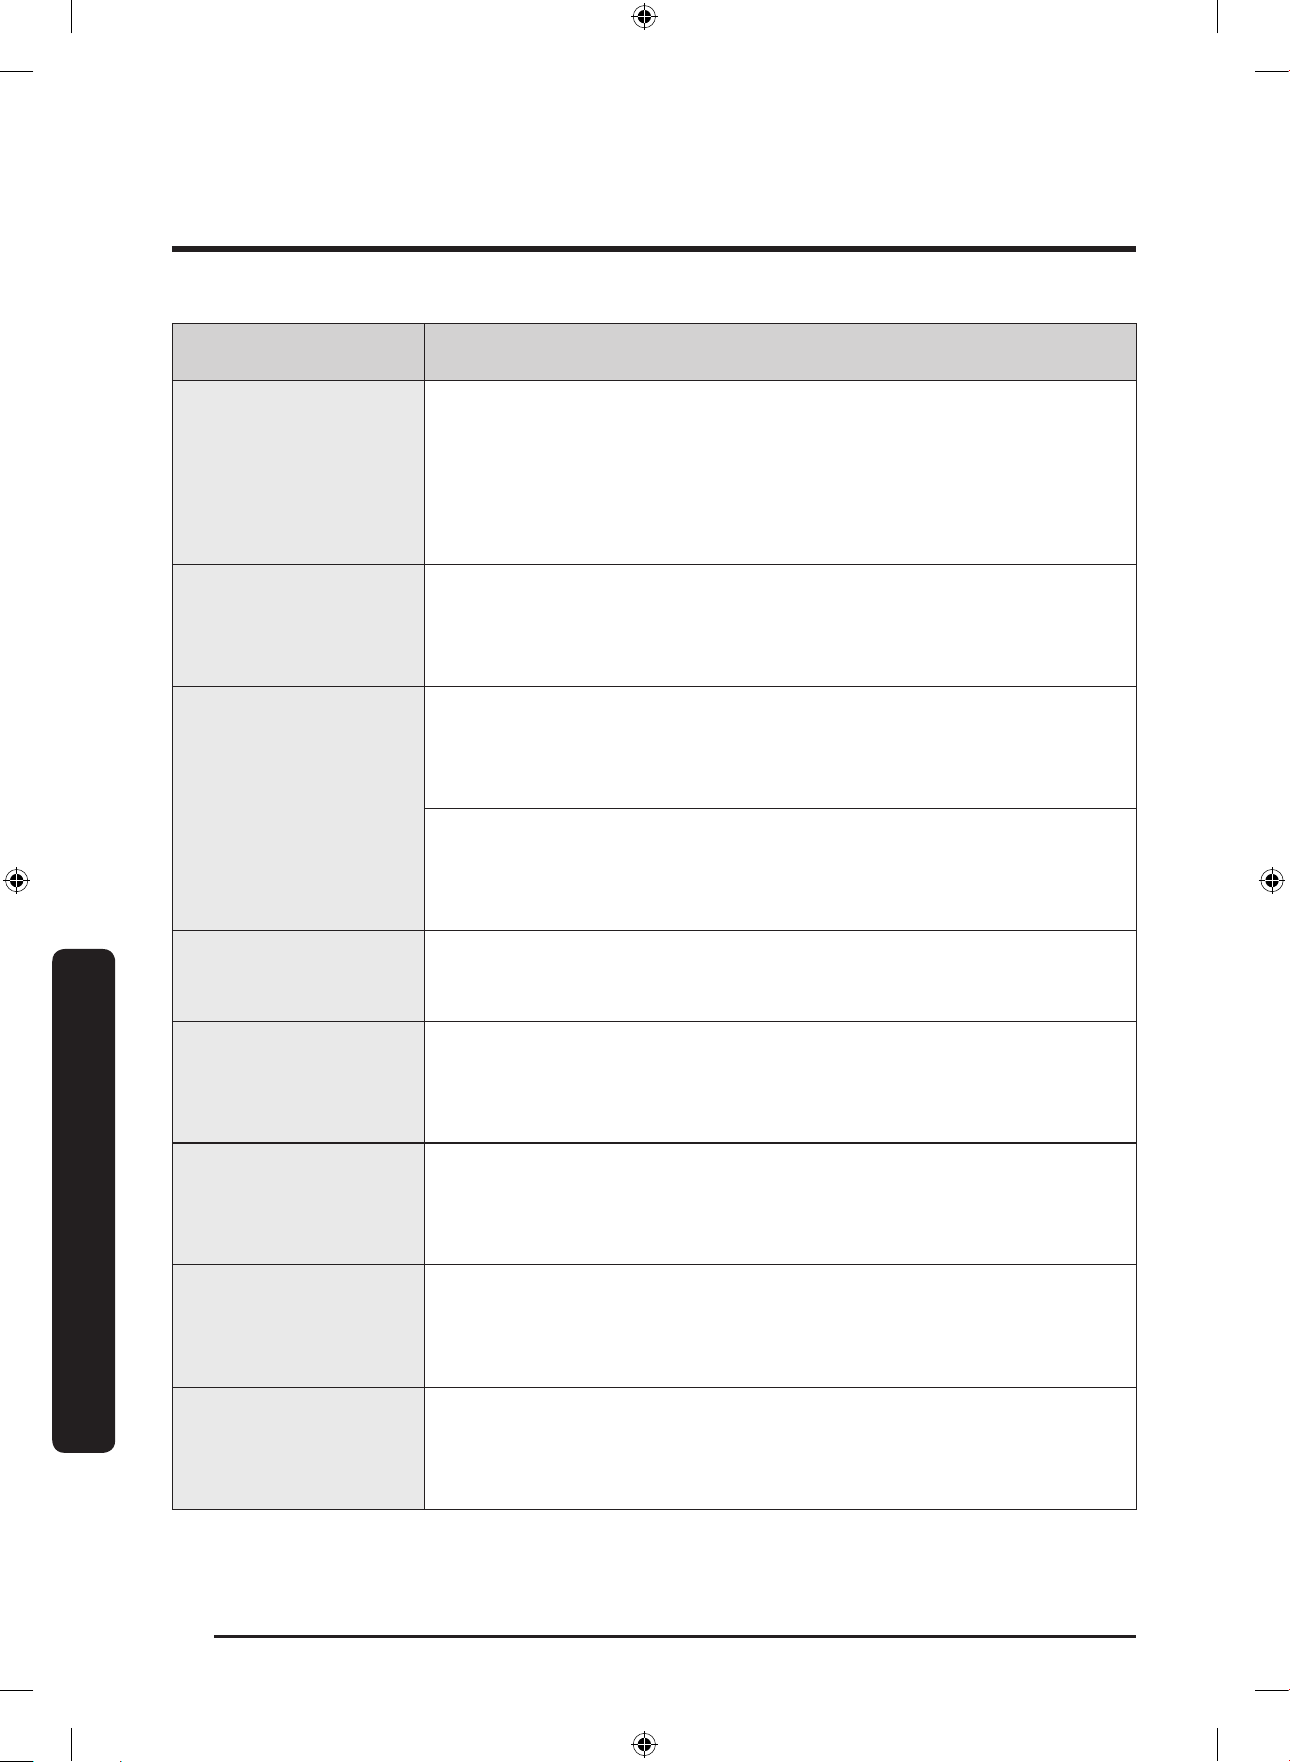
การแก้ไขปัญหา
ไทย
50
การแก้ไขปัญหา
รหัส การด�าเน
ิ
นการ
Ub
การป
ั่
นหมาดไม่ท�างาน
• ตรวจสอบว่าผ้ากระจายตัวสม�่าเสมอ
• ตรวจสอบว่าเครื่องตั้งอยู่บนพื้นที่ซึ่งราบเสมอกัน
• ให้คลายผ้าที่พันกันออก หากมีการซักผ้าเพียงชิ้นเดียว เช่น เสื้อคลุมอาบน�้าหรือกางเกงยีนส์ การป
ั่
น
ครั้งสุดท้ายอาจไม่ได้ผลดีเท่าที่ควร และข้อความตรวจสอบ "Ub" จะปรากฏในจอแสดงผล
3C
ตรวจสอบการท�างานของมอเตอร์
• ลองเริ่มต้นโปรแกรมใหม่
• ถ้ายังคงมีรหัสข้อมูลปรากฏอยู่ โปรดติดต่อศูนย์บริการลูกค้า
UC
ต้องตรวจสอบการควบคุมอิเล็กทรอนิกส์
• ตรวจสอบว่ามีการจ่ายไฟอย่างถูกต้อง
• ถ้ายังคงมีรหัสข้อมูลปรากฏอยู่ โปรดติดต่อศูนย์บริการลูกค้า
ตรวจพบแรงดันไฟฟ
้
าต�่า
• ตรวจสอบว่าสายไฟเชื่อมต่ออย่างเหมาะสม
• ถ้ายังคงมีรหัสข้อมูลปรากฏอยู่ โปรดติดต่อศูนย์บริการลูกค้า
HC
ตรวจสอบการให้ความร้อนอุณหภูมิสูง
• ถ้ายังคงมีรหัสข้อมูลปรากฏอยู่ โปรดติดต่อศูนย์บริการลูกค้า
1C
เซ็นเซอร์ระดับน�้าท�างานไม่ถูกต้อง
• ลองปิดเครื่องและเริ่มต้นโปรแกรมใหม่
• ถ้ายังคงมีรหัสข้อมูลปรากฏอยู่ โปรดติดต่อศูนย์บริการลูกค้า
AC
ตรวจสอบการสื่อสารของ PBA หลักและรอง
• ลองปิดเครื่องและเริ่มต้นโปรแกรมใหม่
• ถ้ายังคงมีรหัสข้อมูลปรากฏอยู่ โปรดติดต่อศูนย์บริการลูกค้า
DDC,ddC
ข้อความนี้จะปรากฏเมื่อคุณเปิด Add Door โดยไม่ได้กด เร
ิ่
ม/พัก ในกรณีนี้ ให้ด�าเนินการดังต่อไปนี้:
• กด Add Door ให้ปิดอย่างเหมาะสม จากนั้นกด เร
ิ่
ม/พัก และลองอีกครั้ง
• ในการเพิ่มผ้า ให้เปิด Add Door และใส่ผ้า ปิด Add Door ให้สนิท จากนั้นกด เร
ิ่
ม/พัก เพื่อกลับสู่การท�างาน
8C
เซนเซอร์ MEMS ไม่ท�างานอย่างถูกต้อง
• ลองปิดเครื่องและเริ่มต้นโปรแกรมใหม่
• ถ้ายังคงมีรหัสข้อมูลปรากฏอยู่ โปรดติดต่อศูนย์บริการลูกค้า Samsung
Untitled-6 50 2017-12-15 11:43:46
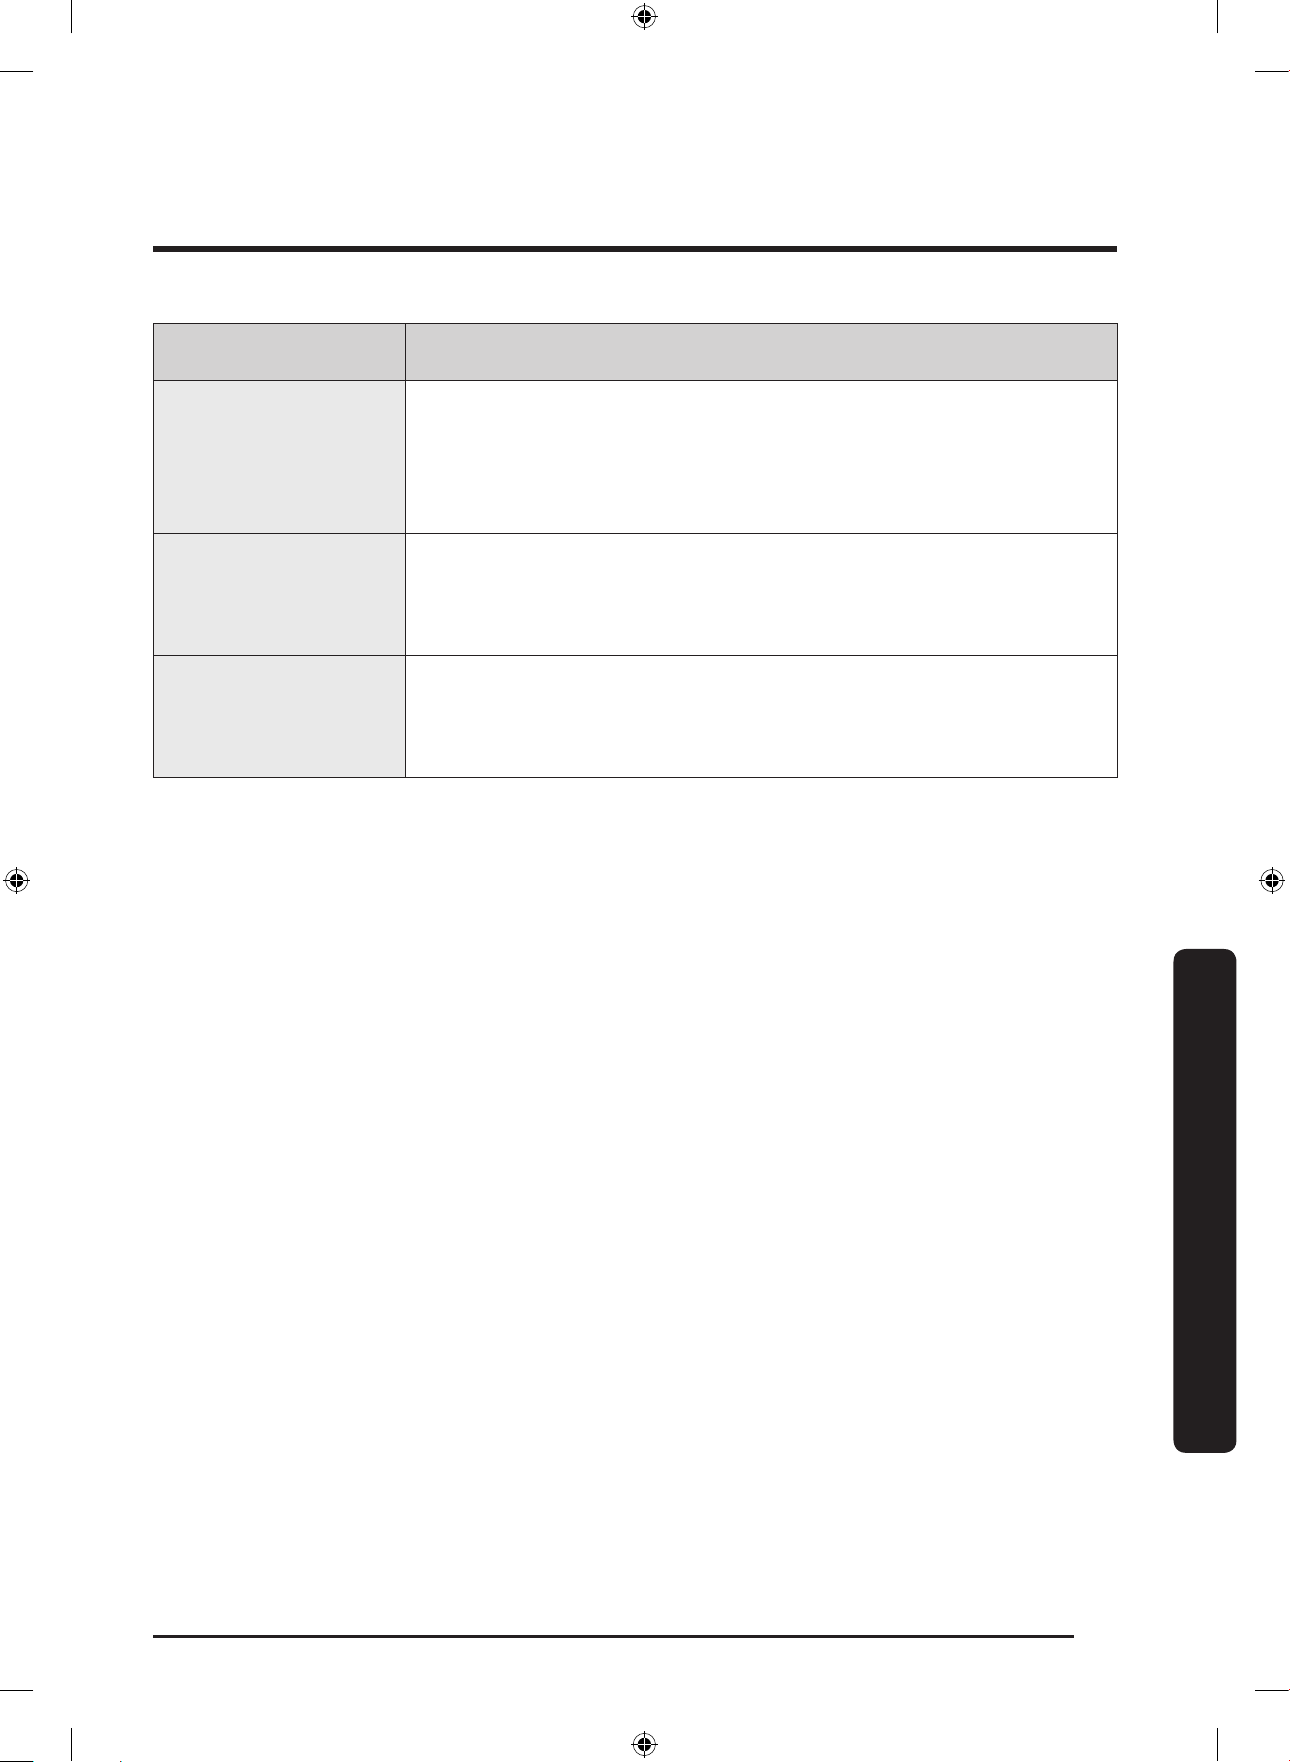
ไทย
51
การแก้ไขปัญหา
รหัส การด�าเน
ิ
นการ
AC6
ตรวจสอบการสื่อสารของ PBA อินเวอร์เตอร์หลักและรอง
• เครื่องอาจกลับสู่การท�างานปกติได้เอง ทั้งนี้ขึ้นอยู่กับสภาวะการท�างานในขณะนั้นๆ
• ลองปิดเครื่องและเริ่มต้นโปรแกรมใหม่
• ถ้ายังคงมีรหัสข้อมูลปรากฏอยู่ โปรดติดต่อศูนย์บริการลูกค้า Samsung
DC1
การล็อค/ปลดล็อคประตูหลักไม่ท�างานตามปกติ
• ลองปิดเครื่องและเริ่มต้นโปรแกรมใหม่
• ถ้ายังคงมีรหัสข้อมูลปรากฏอยู่ โปรดติดต่อศูนย์บริการลูกค้า Samsung
DC3
การล็อค/ปลดล็อค Add Door ไม่ท�างานตามปกติ
• ลองปิดเครื่องและเริ่มต้นโปรแกรมใหม่
• ถ้ายังคงมีรหัสข้อมูลปรากฏอยู่ โปรดติดต่อศูนย์บริการลูกค้า Samsung
ถ้ารหัสข้อมูลยังคงปรากฏบนหน้าจอ โปรดติดต่อศูนย์บริการของ Samsung ในพื้นที่
Untitled-6 51 2017-12-15 11:43:46
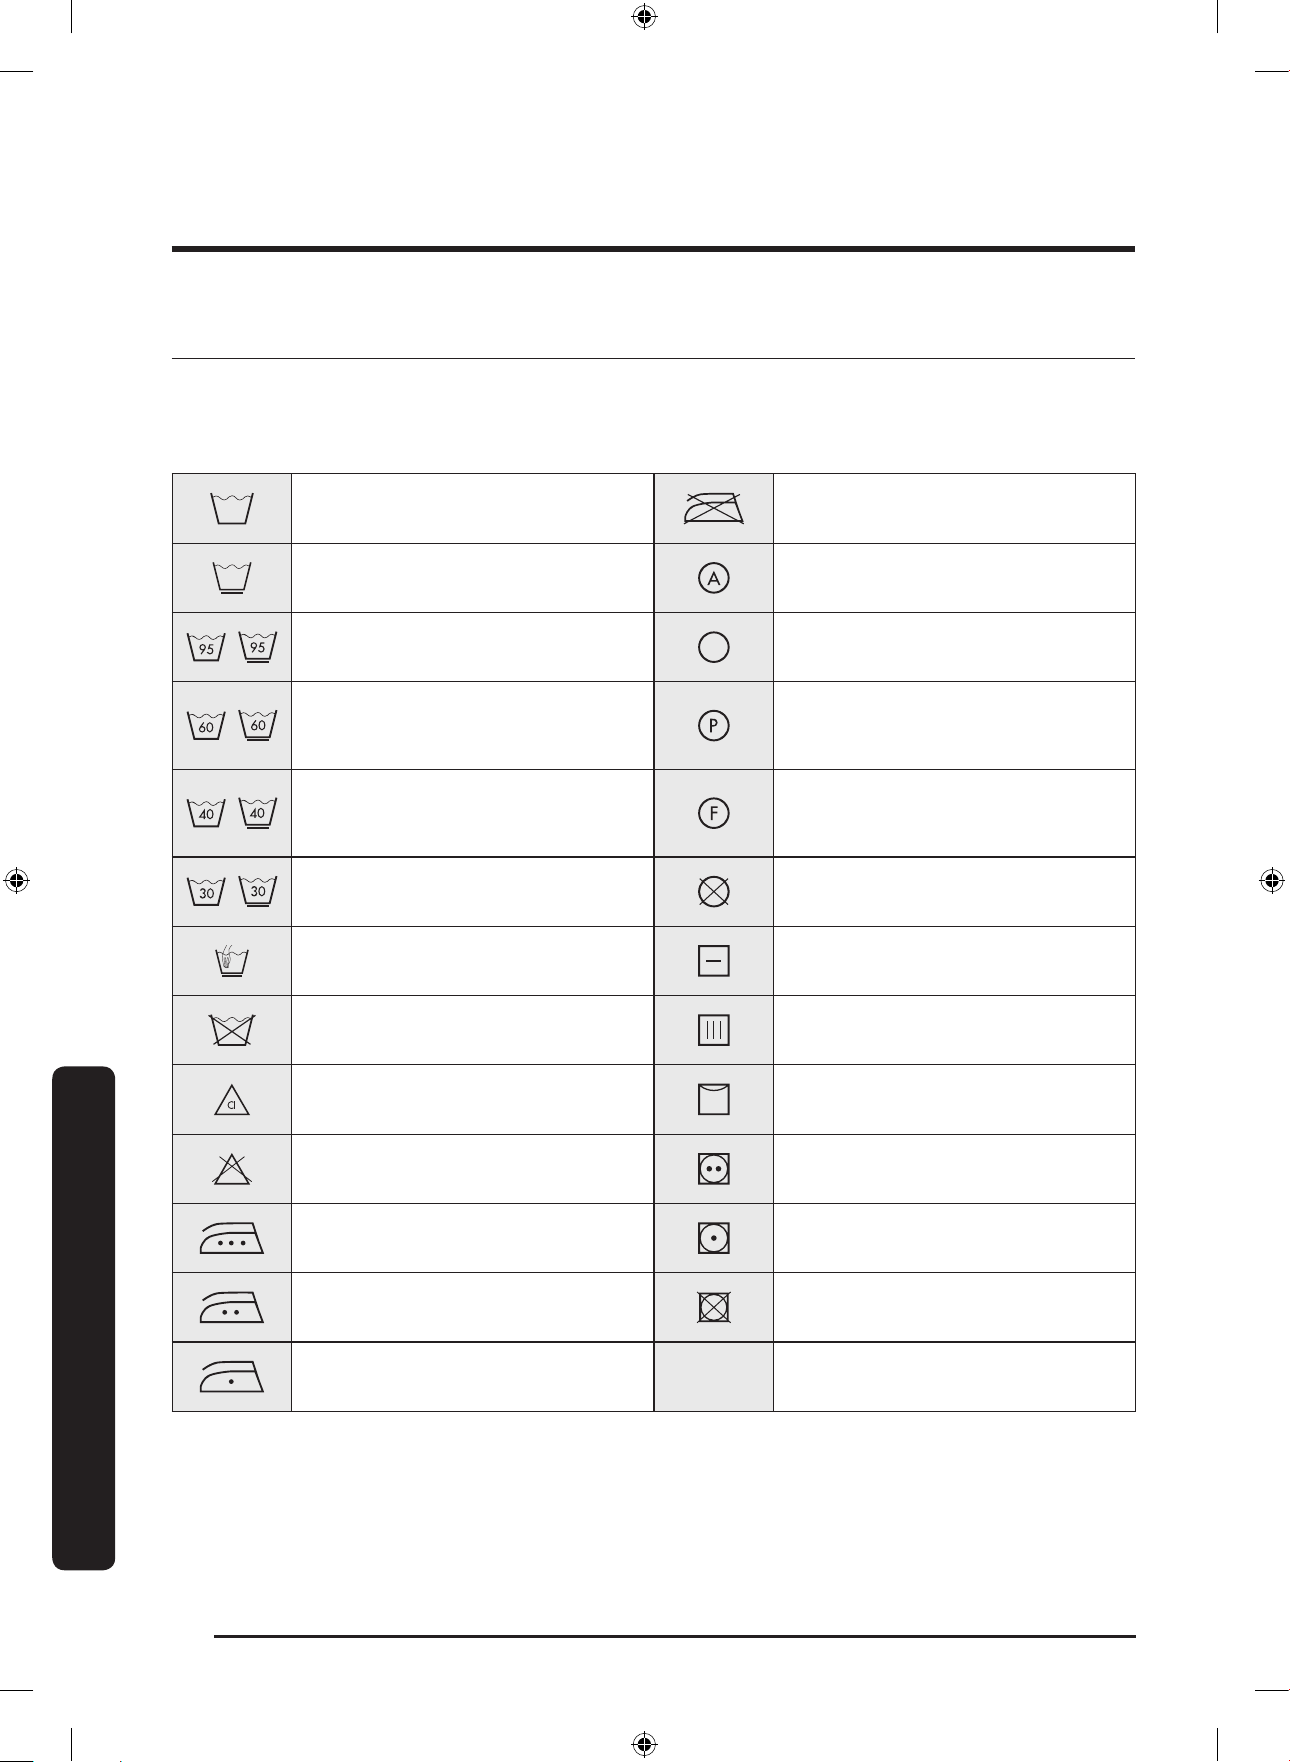
ไทย
52
ข้อมูลจ�าเพาะ
ผังการดูแลผ้า
สัญลักษณ์ต่อไปนี้เป็นค�าแนะน�าในการดูแลผ้า สัญลักษณ์การดูแลผ้าประกอบด้วยสัญลักษณ์สี่อย่างตามล�าดับ: การซัก การฟอกขาว การอบแห้ง และการรีด
(และการซักแห้งถ้าจ�าเป็น) การใช้สัญลักษณ์ช่วยให้มีความสม�่าเสมอระหว่างผู้ผลิตเสื้อผ้าแต่ละรายทั้งส�าหรับผ้าในประเทศและผ้าที่น�าเข้า โปรดปฏิบัติตาม
ฉลากการดูแลเพื่อยืดอายุการใช้งานของผ้าและลดป
ั
ญหาในการซักผ้า
ผ้าหนา ห้ามรีด
ผ้าบาง ซักแห้งด้วยสารท�าละลายใดก็ได้
ซักได้ที่ 95 องศาเซลเซียส ซักแห้ง
ซักได้ที่ 60 องศาเซลเซียส
ซักแห้งด้วยเปอร์คลอไรด์ น�้ามันไฟแช็ก แอลกอฮอล์
บริสุทธิ
์
หรือ R113 เท่านั้น
ซักได้ที่ 40 องศาเซลเซียส
ซักแห้งด้วยน�้ามันเครื่องบิน แอลกอฮอล์บริสุทธิ
์
หรือ
R113 เท่านั้น
ซักได้ที่ 30 องศาเซลเซียส ห้ามซักแห้ง
ซักมือเท่านั้น ห้ามแขวน
ซักแห้งเท่านั้น แขวนได้
ใช้สารฟอกในน�้าเย็น ตากด้วยไม้แขวนเสื้อ
ห้ามใช้สารฟอก ใช้เครื่องอบ ความร้อนปกติ
รีดด้วยความร้อนสูงสุด 200 องศาเซลเซียส ใช้เครื่องอบ ความร้อนต�่า
รีดด้วยความร้อนสูงสุด 150 องศาเซลเซียส ห้ามใช้เครื่องอบ
รีดด้วยความร้อนสูงสุด 100 องศาเซลเซียส
ข้อมูลจ�าเพาะ
Untitled-6 52 2017-12-15 11:43:52

ไทย
53
ข้อมูลจ�าเพาะ
การปกป้ องส
ิ่
งแวดล้อม
• อุปกรณ์นี้ได้รับการผลิตจากวัสดุรีไซเคิล หากคุณต้องการทิ้งอุปกรณ์นี้ โปรดปฏิบัติตามระเบียบการทิ้งขยะของพื้นที่ ตัดสายไฟ เพื่อป
้
องกันไม่ให้
มีการต่อสายไฟกับเครื่องใช้ไฟฟ
้
านี้อีก ถอดประตูออก เพื่อป
้
องกันไม่ให้สัตว์หรือเด็กติดอยู่ภายใน
• อย่าใช้ผงซักฟอกเกินปริมาณที่แนะน�าโดยผู้ผลิตผงซักฟอก
• ใช้สารขจัดคราบและสารฟอกขาวก่อนการซักเฉพาะเมื่อจ�าเป็นเท่านั้น
• ประหยัดน�้าและไฟฟ
้
าโดยซักเต็มถัง (ปริมาณผ้าขึ้นอยู่กับโปรแกรมที่ใช้)
Untitled-6 53 2017-12-15 11:43:52
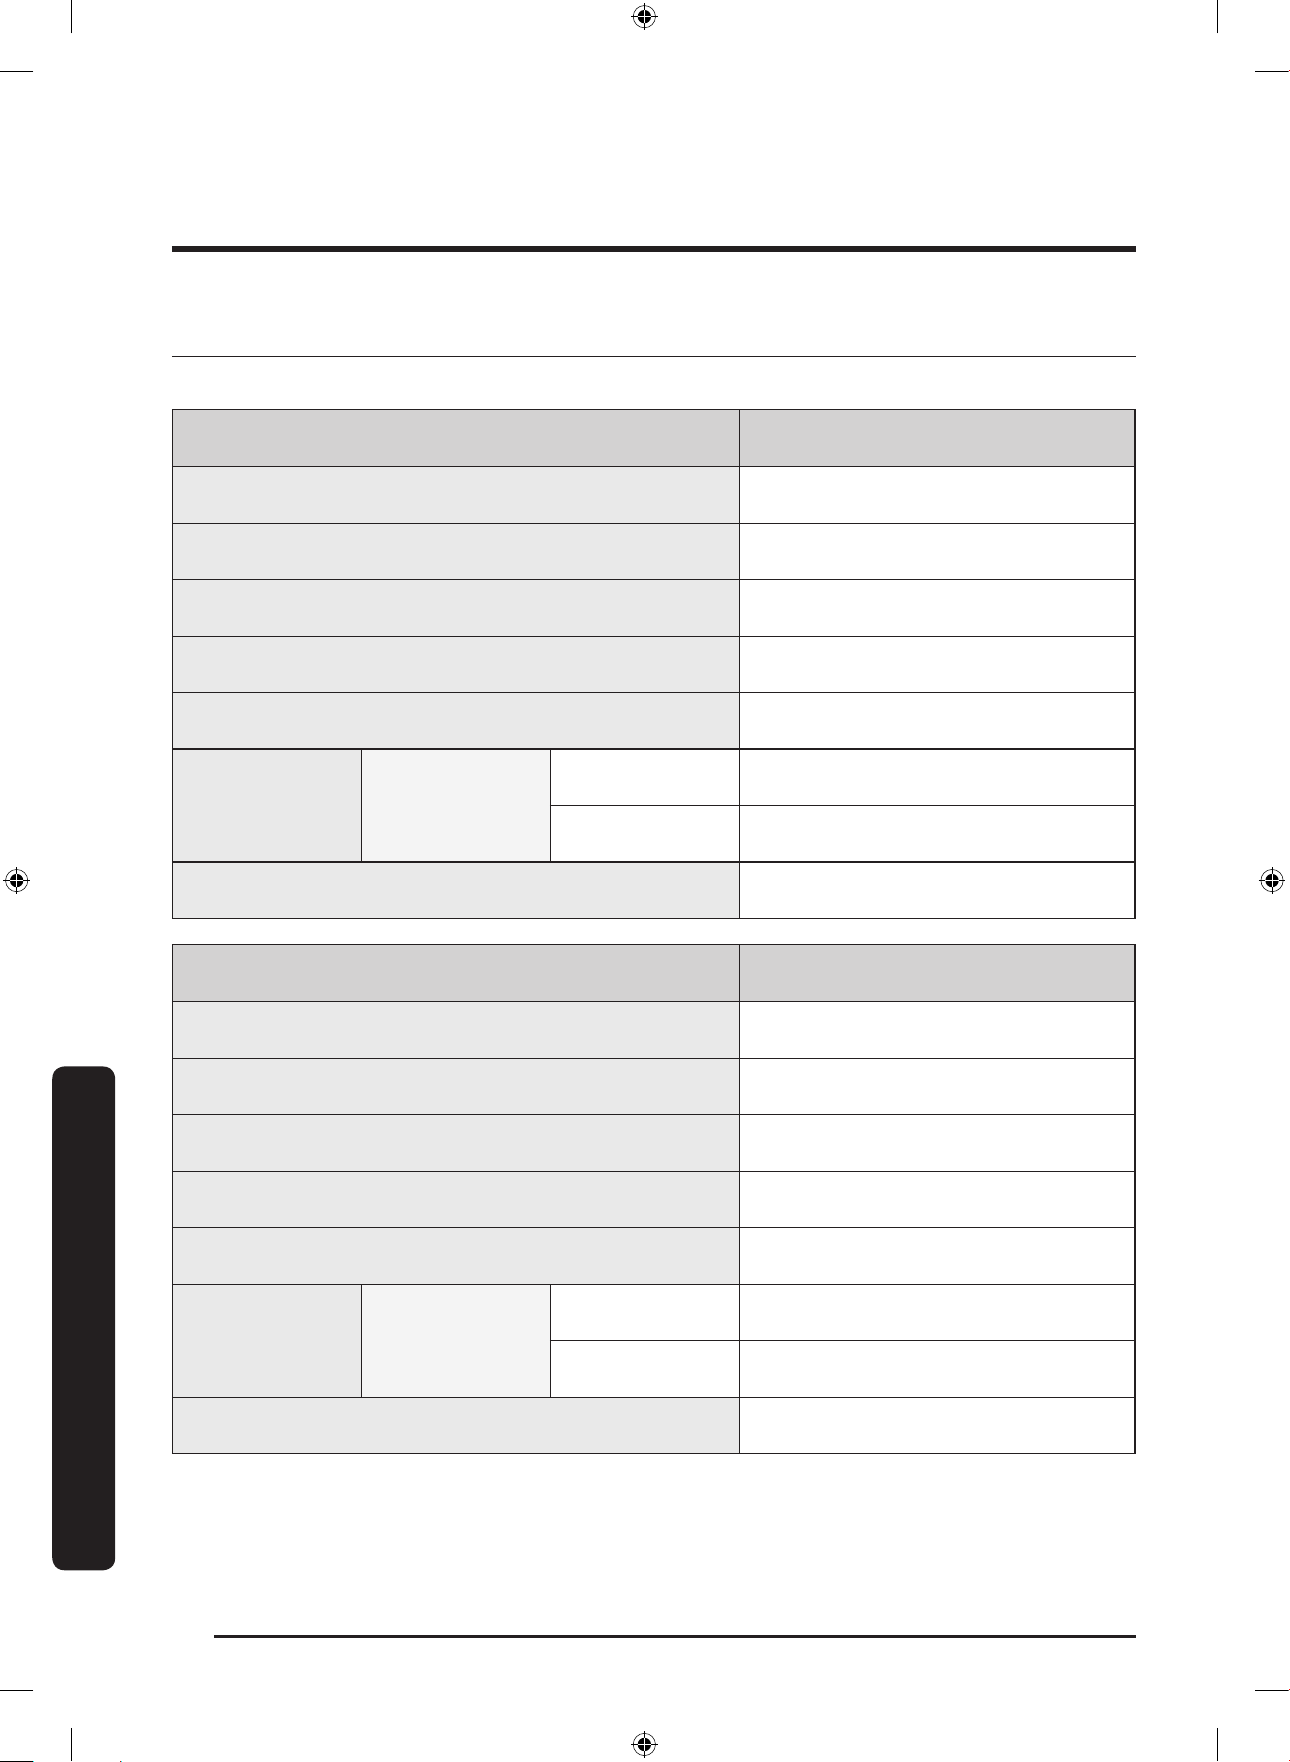
ข้อมูลจ�าเพาะ
ไทย
54
ข้อมูลจ�าเพาะ
ข้อมูลจ�าเพาะ
" * " เครื่องหมายดอกจันหมายถึงหมายเลขรุ่นที่แปรผัน (0-9) หรือ (A-Z)
ประเภท เครื่องซักผ้าฝาหน้า
ชื่อรุ่น WW9*K5*****
ขนาด กว้าง 600 x ลึก 550 x สูง 850 (มม.)
แรงดันน�้า 50-800 kPa
น�้าหนักสุทธิ 63.0 กก.
ความจุในการซักและการป
ั่
นหมาด 9.0 กก.
การใช้พลังงาน ขณะซักและให้ความร้อน
220 V 2000 W
240 V 2400 W
การหมุนป
ั่
นหมาด 1400 รอบต่อนาที
ประเภท เครื่องซักผ้าฝาหน้า
ชื่อรุ่น WW8*K5*****
ขนาด กว้าง 600 x ลึก 550 x สูง 850 (มม.)
แรงดันน�้า 50-800 kPa
น�้าหนักสุทธิ 63.0 กก.
ความจุในการซักและการป
ั่
นหมาด 8.0 กก.
การใช้พลังงาน ขณะซักและให้ความร้อน
220 V 2000 W
240 V 2400 W
การหมุนป
ั่
นหมาด 1400 รอบต่อนาที
Untitled-6 54 2017-12-15 11:43:52
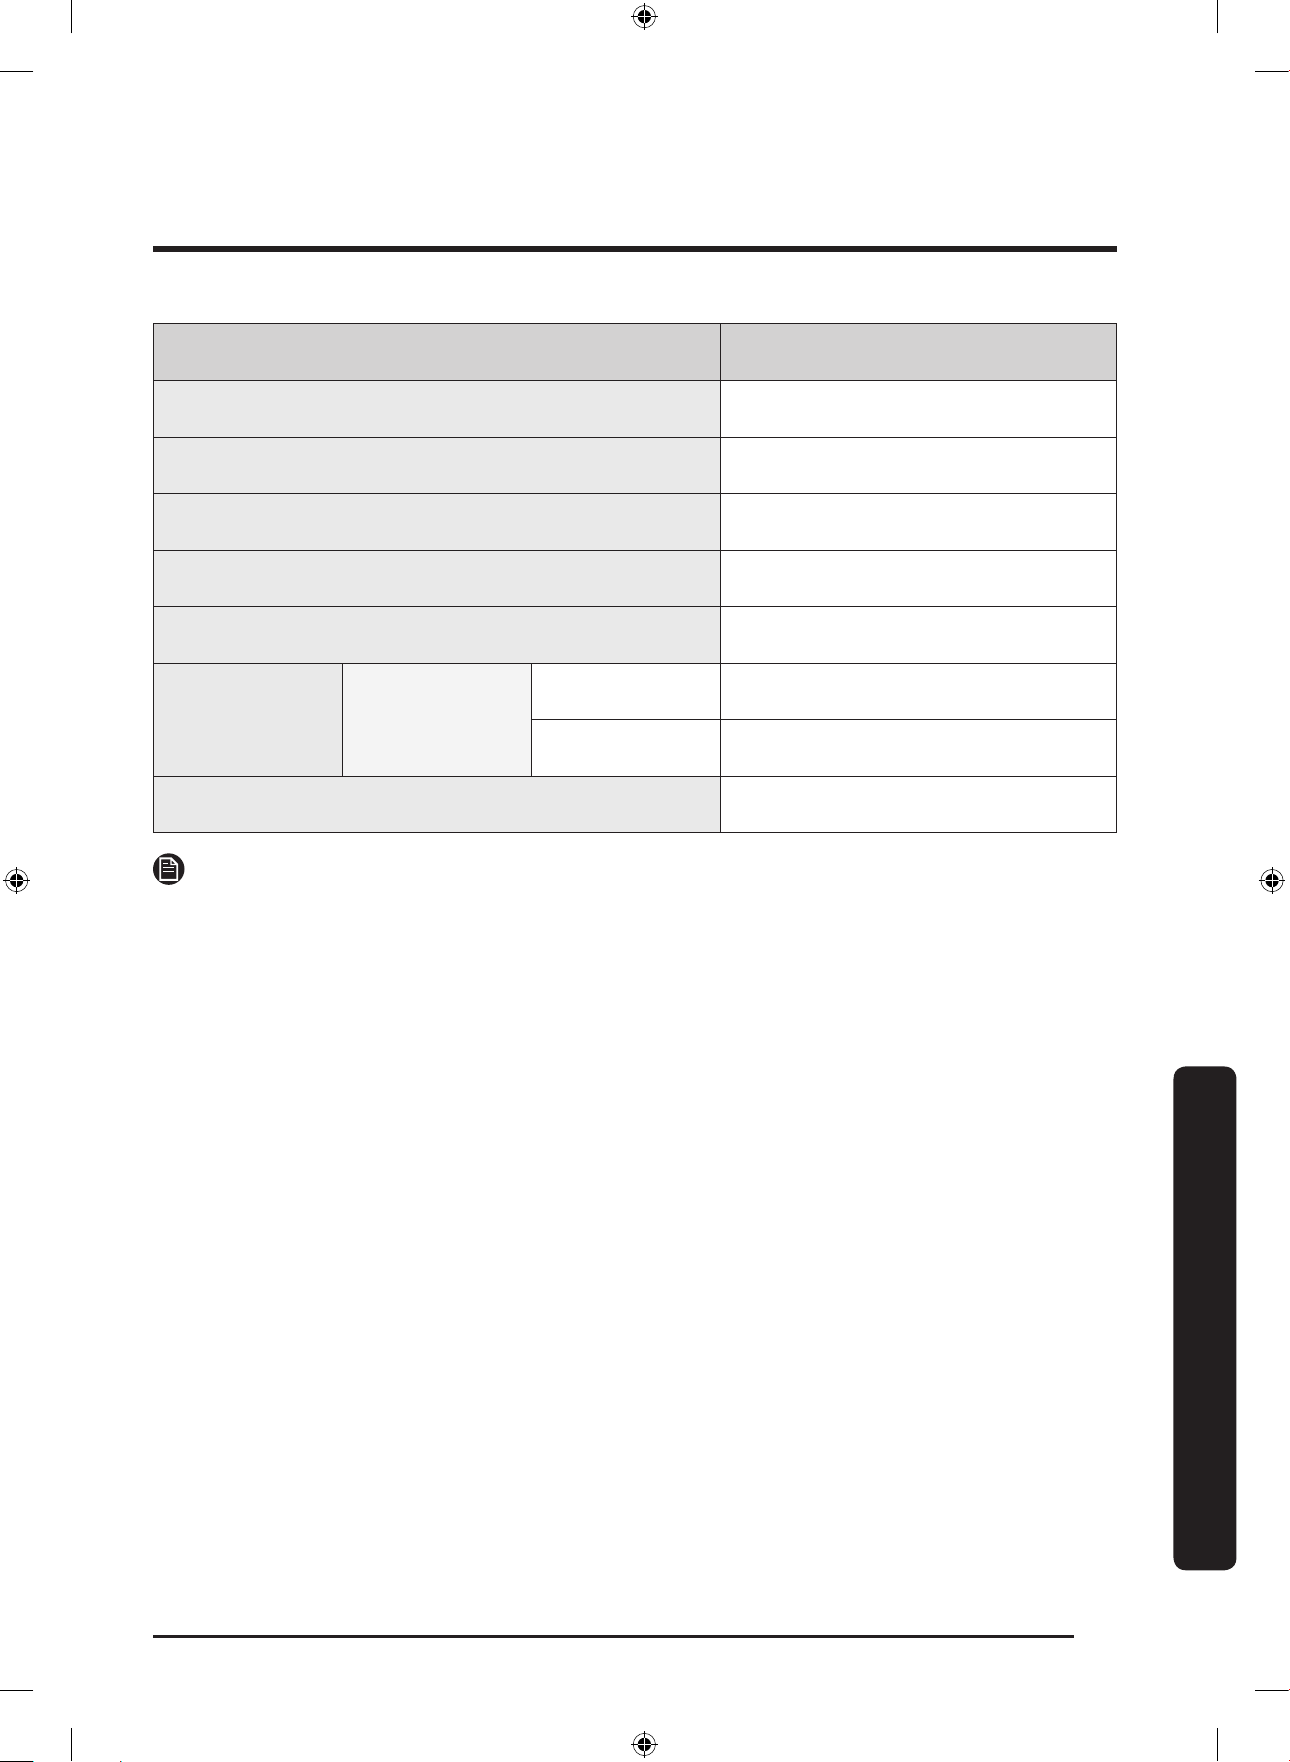
ไทย
55
ข้อมูลจ�าเพาะ
ประเภท เครื่องซักผ้าฝาหน้า
ชื่อรุ่น WW7*K5*****
ขนาด กว้าง 600 x ลึก 550 x สูง 850 (มม.)
แรงดันน�้า 50-800 kPa
น�้าหนักสุทธิ 63.0 กก.
ความจุในการซักและการป
ั่
นหมาด 7.0 กก.
การใช้พลังงาน ขณะซักและให้ความร้อน
220 V 2000 W
240 V 2400 W
การหมุนป
ั่
นหมาด 1400 รอบต่อนาที
หมายเหตุ
ลักษณะและข้อมูลจ�าเพาะอาจมีการเปลี่ยนแปลงเพื่อปรับปรุงคุณภาพโดยไม่ได้แจ้งให้ทราบ
Untitled-6 55 2017-12-15 11:43:52
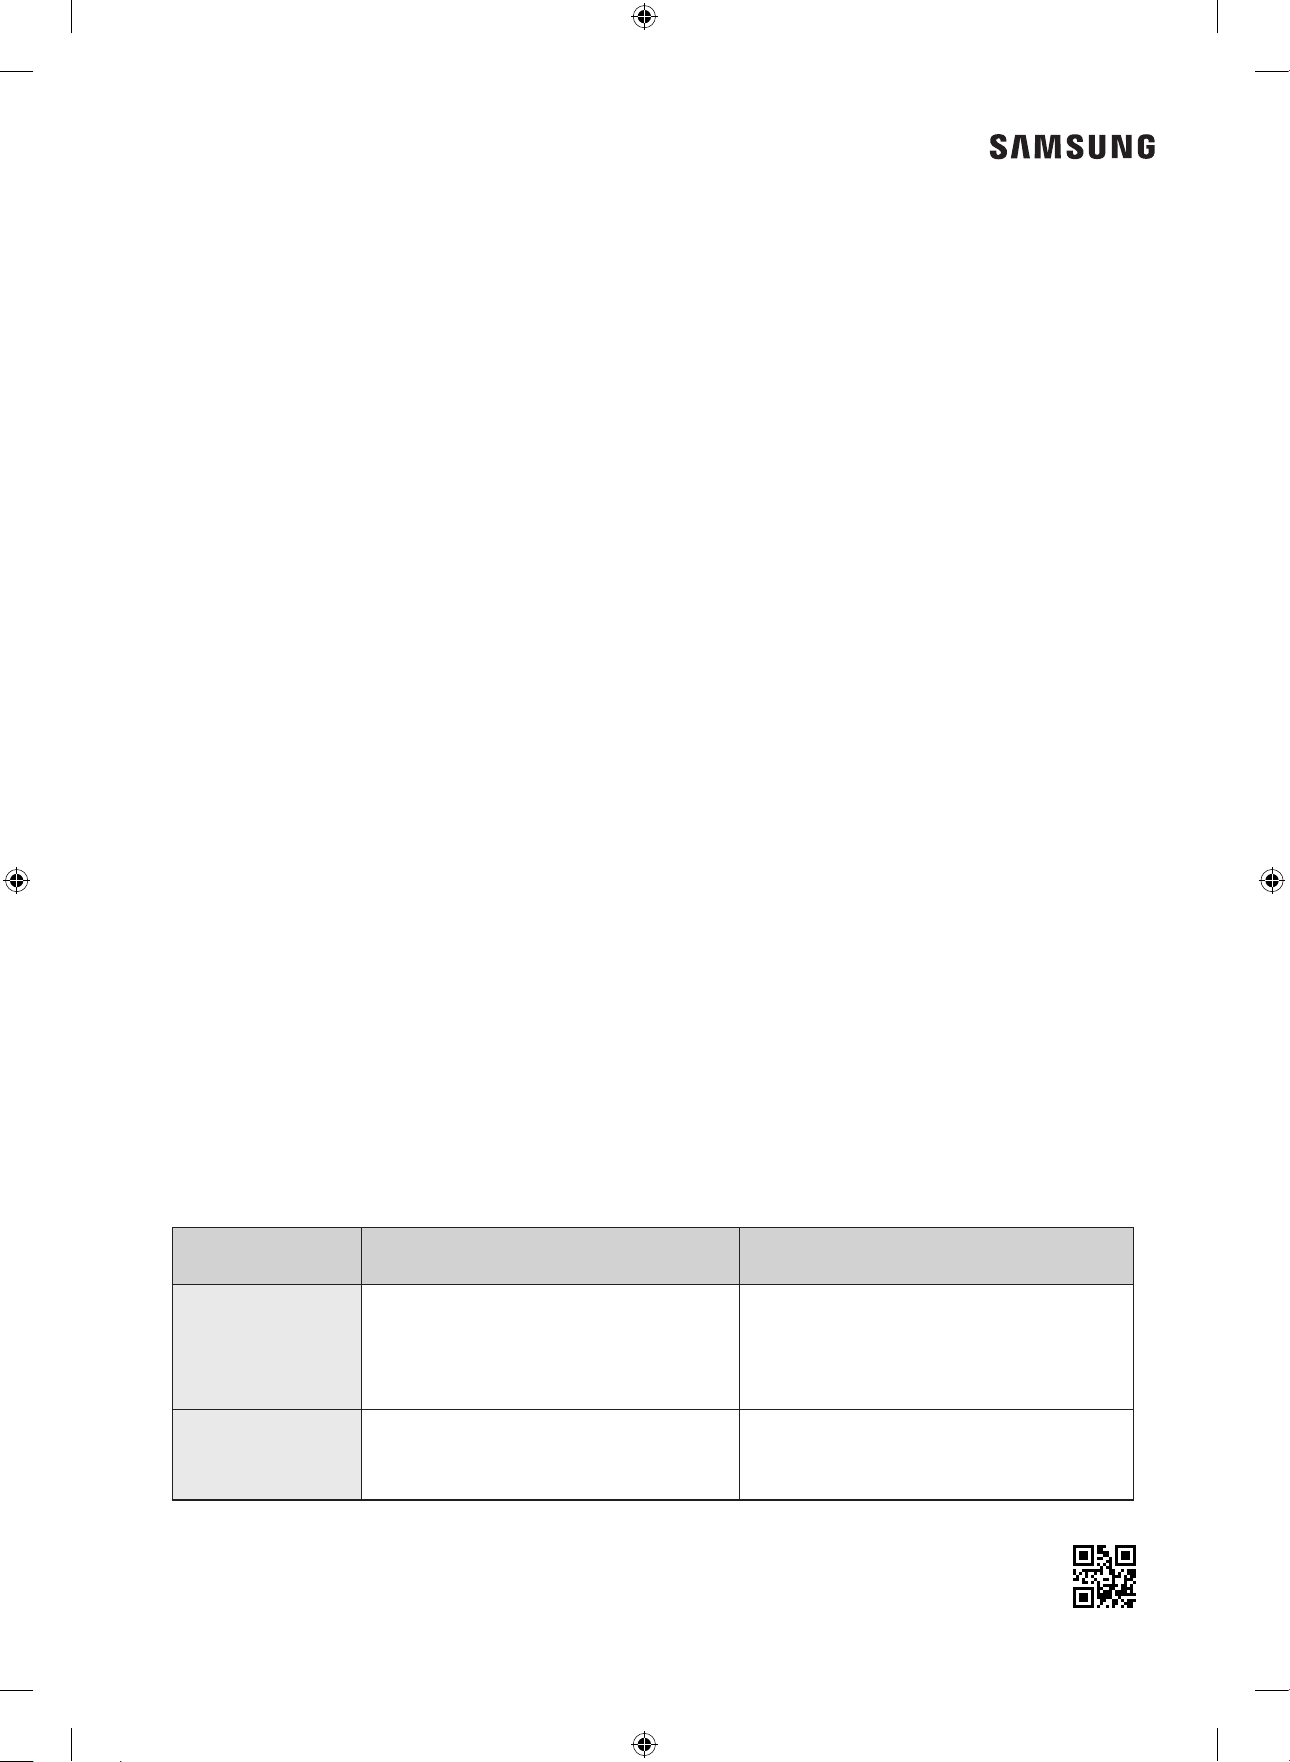
ถ้าคุณมีค�าถามหรือข้อค
ิ
ดเห็น
ประเทศ โทรศัพท์ หรือเยี่ยมชมเว็บไซต์ของเราที่
THAILAND
0-2689-3233 (only for HHP)
0-2689-3232 (OTH products)
1800-29-3232 (Toll free)
www.samsung.com/th/support
MYANMAR
+95-1-2399-888
VIP HHP +95-1-2399-990
www.samsung.com/th/support
DC68-03886A-00
Untitled-6 56 2017-12-15 11:43:53