7085 543-00
CNP 4416_4516
Operating instructions Page 2
NoFrost combined refrigerator-freezer
Installation instructions Page 12
2
Disposal notes
The appliance contains reusable materials and should
be disposed of properly - not simply with unsorted
household refuse.
Appliances which are no longer needed must be
disposed of in a professional and appropriate way, in
accordance with the current local regulations and laws.
When disposing of the appliance, ensure that the refrigerant circuit
is not damaged to prevent uncontrolled escape of the refrigerant
it contains (data on type plate) and oil.
• Disabletheappliance.
• Pulloutthemainsplug.
• Cutthroughtheconnectioncable.
WARNING
Danger of suocation due to packing material
and plastic lm!
Do not allow children to play with packaging
material.
Take the packaging material to an ocial collec-
tion point.
Content
DescriptionofApplianceandEquipment ................................. 2
Disposalnotes ..........................................................................2
Safety instructions and warnings .............................................3
Range of appliance use ............................................................3
Climate rating ...........................................................................4
Setting up .................................................................................4
Electricalconnection ................................................................ 4
Saving energy ..........................................................................4
Operating and control elements ...............................................5
Switchingtheapplianceonando ..........................................6
Setting the temperature ............................................................6
Temperature display .................................................................6
Ventilation .................................................................................6
SuperCool ................................................................................6
Audible alarm signal .................................................................7
Power failure/frostcontrol display .............................................7
Setup mode ..............................................................................7
Arranging food ..........................................................................9
Equipment ................................................................................9
Interior light .............................................................................10
Freezing..................................................................................10
Freezing with SuperFrost .......................................................10
Freezing and storage ..............................................................10
Defrosting ............................................................................... 11
Cleaning ................................................................................. 11
Malfunctions ........................................................................... 11
Shutting your appliance down ................................................ 11
Appliance dimensions ............................................................12
CabinetOpeningDimensions ................................................13
Unit Venting ............................................................................ 14
Leveling the Appliance ........................................................... 14
Mounting the anti tipping device.............................................15
Changing over door hinges ....................................................16
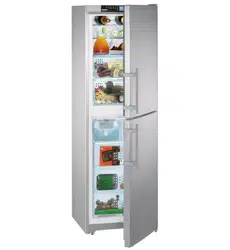
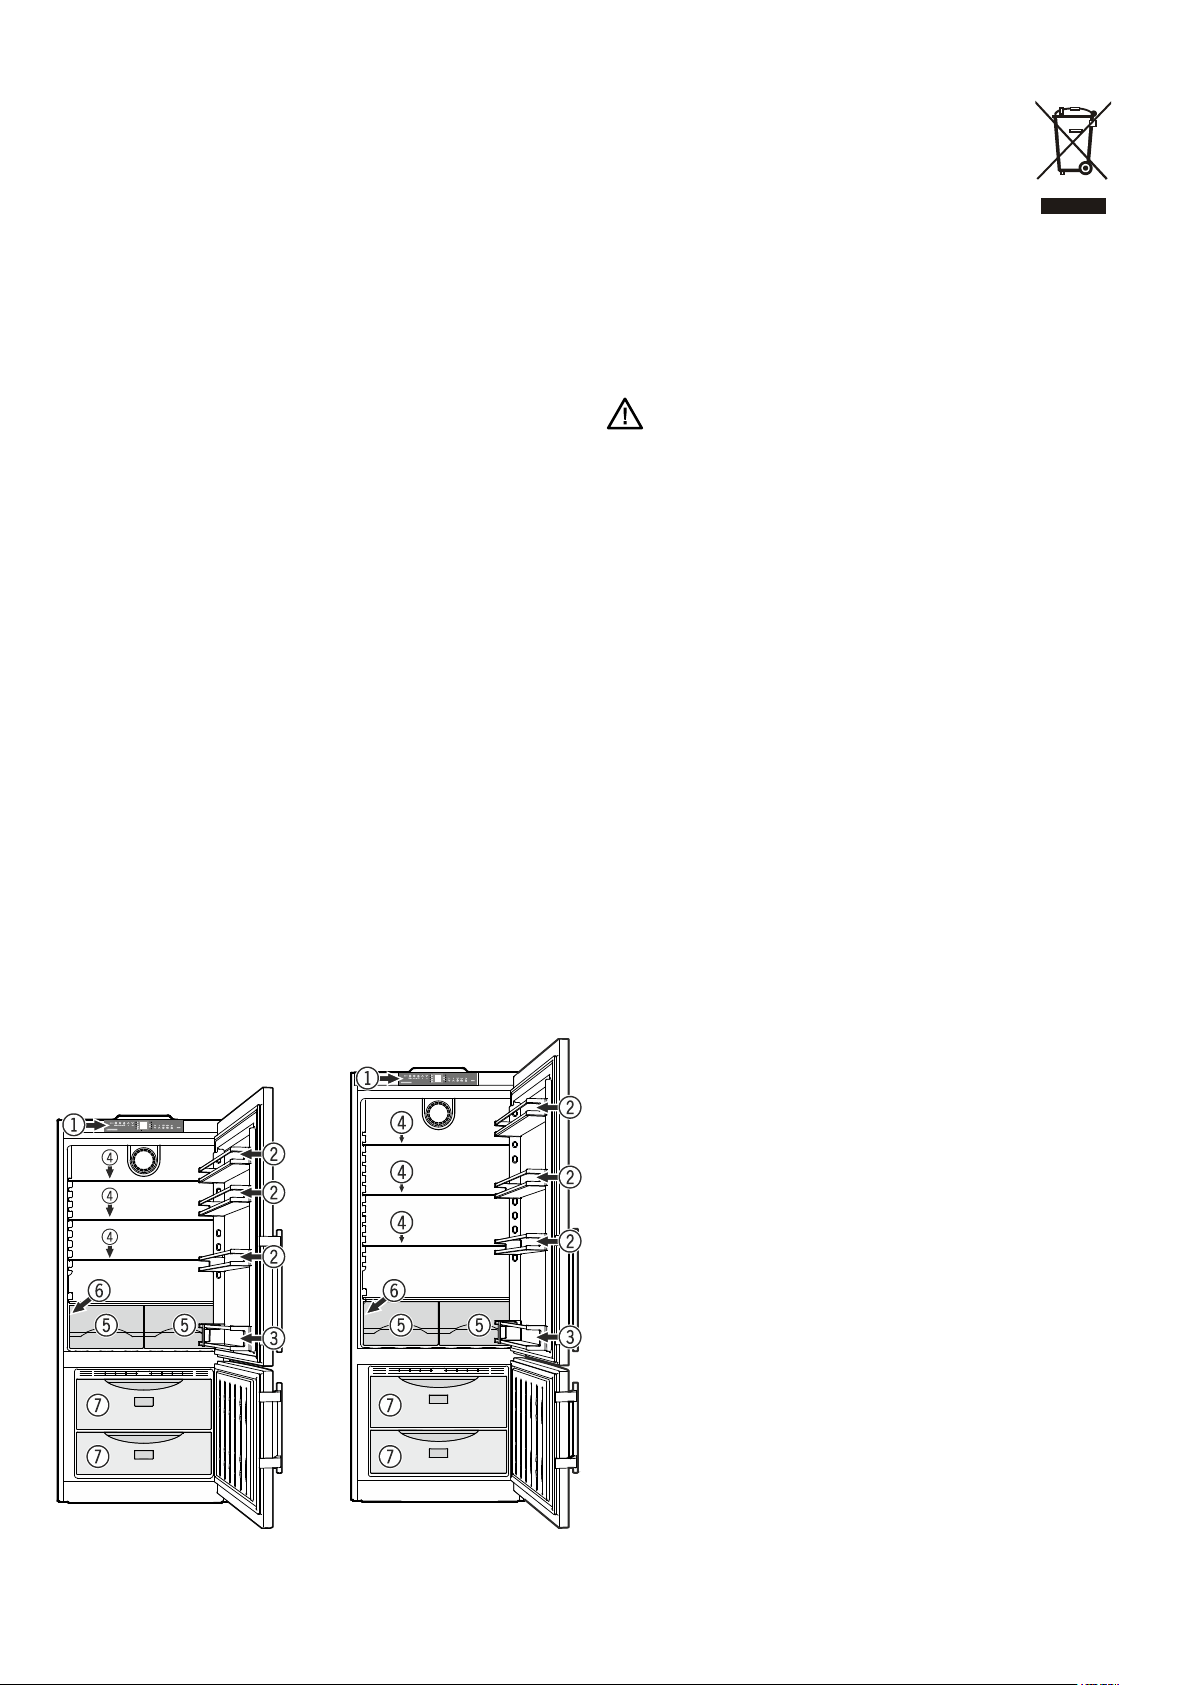
(1) Operating and control elements
(2) Adjustable door racks
(3) Bottle rack
(4) Adjustable shelves
(5) Vegetable drawers
(6) Type plate (behind the vegetable drawer on the left
hand side)
(7) Freezer drawers
Description of Appliance and Equipment
CNPef 4416
CNPef 4516

3
Safety instructions and warnings
•Topreventinjuryordamagetotheunit,theap-
pliance should be unpacked and set up by two
people.
•Intheeventthattheapplianceisdamagedon
delivery, contact the supplier immediately before
connecting to the mains.
•Toguaranteesafeoperation,ensurethattheap-
pliance is set up and connected as described in
these operating instructions.
•Disconnecttheappliancefromthemainsifany
fault occurs. Pull out the plug, switch off or remove
the fuse.
•Whendisconnectingtheappliance,pullonthe
plug, not on the cable.
•Anyrepairsandworkontheapplianceshould
only be carried out by the customer service
department, as unauthor ised work could prove
highly dangerous for the user. The same applies
to changing the mains power cable.
•Donotallownakedflamesorignitionsources
to enter the appliance. When transporting and
cleaning the appliance ensure that the refrigerant
circuit is not damaged. In the event of damage,
make sure that there are no ignition sources
nearby and keep the room well ventilated.
•Donotstandontheplinth,drawersordoorsor
use them to support anything else.
•Thisappliancecanbeusedbychildrenof8years
old and over, and also by persons with restricted
physical, sensory or mental capacity or lack of
experience and knowledge, if they are supervised
or have been instructed on safe use of the appli-
ance and understand the resulting risks. Children
must not be allowed to play with the appliance.
Cleaning and user maintenance must not be
carried out by children without supervision.
•Avoidprolongedskincontactwithcoldsurfacesor
chilled/frozen food. This could cause pain, numb-
ness and frostbite. In the case of prolonged skin
contact, protective measures should be taken,
e.g. gloves should be worn.
•Donoteaticecream,particularyicelolliesorice
cubes, immediately after taking them from the
freezer compartment as there is a risk of "burn-
ing" because of the very cold temperatures.
•Donotconsumefoodwhichhasbeenstoredfor
too long, as it could cause food poisoning.
•Do not storeexplosives or sprays using com-
bustible propellants such as butane, propane,
pentaneetc.intheappliance.Electricalcompo-
nents might cause leaking gas to ignite. You may
identify such sprays by the printed contents or a
flame symbol.
•Donotuseelectricalappliancesinsidetheap-
pliance.
•Theapplianceisdesignedforuseinenclosed
areas.Donotoperatetheapplianceoutdoorsor
in areas where it is exposed to splash water or
damp conditions.
•TheLEDlightstripsilluminatetheinteriorofthe
appliance. They are not suitable for lighting a
room.
Range of appliance use
The appliance is suitable solely for cooling food in
a domestic environment or similar. This includes,
for example, use
- in staff kitchenettes, bed and breakfast establish-
ments,
- by guests in cottages, hotels, motels and other
forms of accommodation.
The appliance is not intended for com-
mercial use such as in catering and
similar services in the wholesale trade.
Use the appliance solely as is customary within a domestic en-
vironment. All other types of use are inadmissible.
The appliance is not suitable for storing and cooling medicines,
blood plasma, laboratory preparations or similar substances and
productscoveredbythe2007/47/ECMedicalDevicesDirective.
Any misuse of the appliance may result in damage to or spoilage
of stored goods.
Furthermore, the appliance is not suitable for operation in poten-
tially explosive atmospheres.
4
Saving energy
- Alwaysensuregoodventilation.Donotcoverventilationopen-
ings or grille.
- Always keep fan louvres clear.
- Donotplaceapplianceinareasofdirectsunlightornexttoa
stove, heater or similar object.
- The energy consumption depends on the installation conditions,
e.g. the ambient temperature.
- Keep the time the appliance is open to a minimum.
- Store food logically.
- Ensurethatallfoodiswellpackedandcoveredforstorage.This
will prevent frost from forming.
- First cool warm food to room temperature before storing it.
- Defrostfrozenfoodintherefrigerator.
- If there is a thick layer of frost in the appliance: defrost the appli-
ance.
- Emptyandswitchoffrefrigeratingunitforlongervacationperiods.
- Use the vacation function for longer vacation periods.
Accumulated dust increases the energy consumption:
- Once a year, dust the refrigerating unit together with the metal
grille of the heat exchanger at the back of the appliance.
Setting up
• Avoidpositioningtheapplianceindirectsunlightornearcookers,
radiators and similar sources of heat.
• Theflooronwhichtheappliancestandsshouldbehorizontal
and level. To compensate for any unevenness, adjust the height
of the feet with the open-ended spanner supplied.
• Theventilationgrillesshouldnotbeobstructed.Alwaysensure
that there is good ventilation and that the outward flowing air is
able to escape.
• Do not place heat-emitting appliances, e.g. microwave oven,
toaster, etc., on top of the appliance.
• StandardEN378 specifies thatthe room inwhich you install
your appliance must have a volume of 1 m
3
per8gofR600a
refrigerant used in the appliance, so as to avoid the formation of
inflammable gas/air mixtures in the room where the appliance is
locatedintheeventofaleakintherefrigerantcircuit.Thequantity
of refrigerant used in your appliance is indicated on the type plate
on the inside of the appliance.
Electrical connection
Only operate the appliance with alternating current (AC).
Thepermissiblevoltageandfrequencyareindicatedonthetype
plate. The position of the type plate is shown in the section entitled
Description of the appliance.
The socket must be properly earthed and protected by a fuse.
The tripping current of the fuse must be between 10 A and 16 A.
The socket must not be situated behind the appli-
ance and must be easily accessible.
Donotconnecttheapplianceusinganexten-
sion cable or extension socket.
Donotusestand-aloneinverters(conversion
of direct current to alternating current/three-
phase current) or energy-saving plugs.
Risk of damage to the electronic control system!
Climate rating
The climate rating indicates the room
temperature at which the appliance may
be operated in order to achieve full refrig-
eration performance.
The climate rating is indicated on the
type plate.
The position of the type plate is shown in the section entitled
Description of the appliance.
Climate rating Room temperature
SN +10°C to +32°C
N +16°C to +32°C
ST +16°Cto+38°C
T +16°C to +43°C
SN-ST +10°Cto+38°C
SN-T +10°C to +43°C
Do not operate the appliance outside the
specied room temperature range.
5
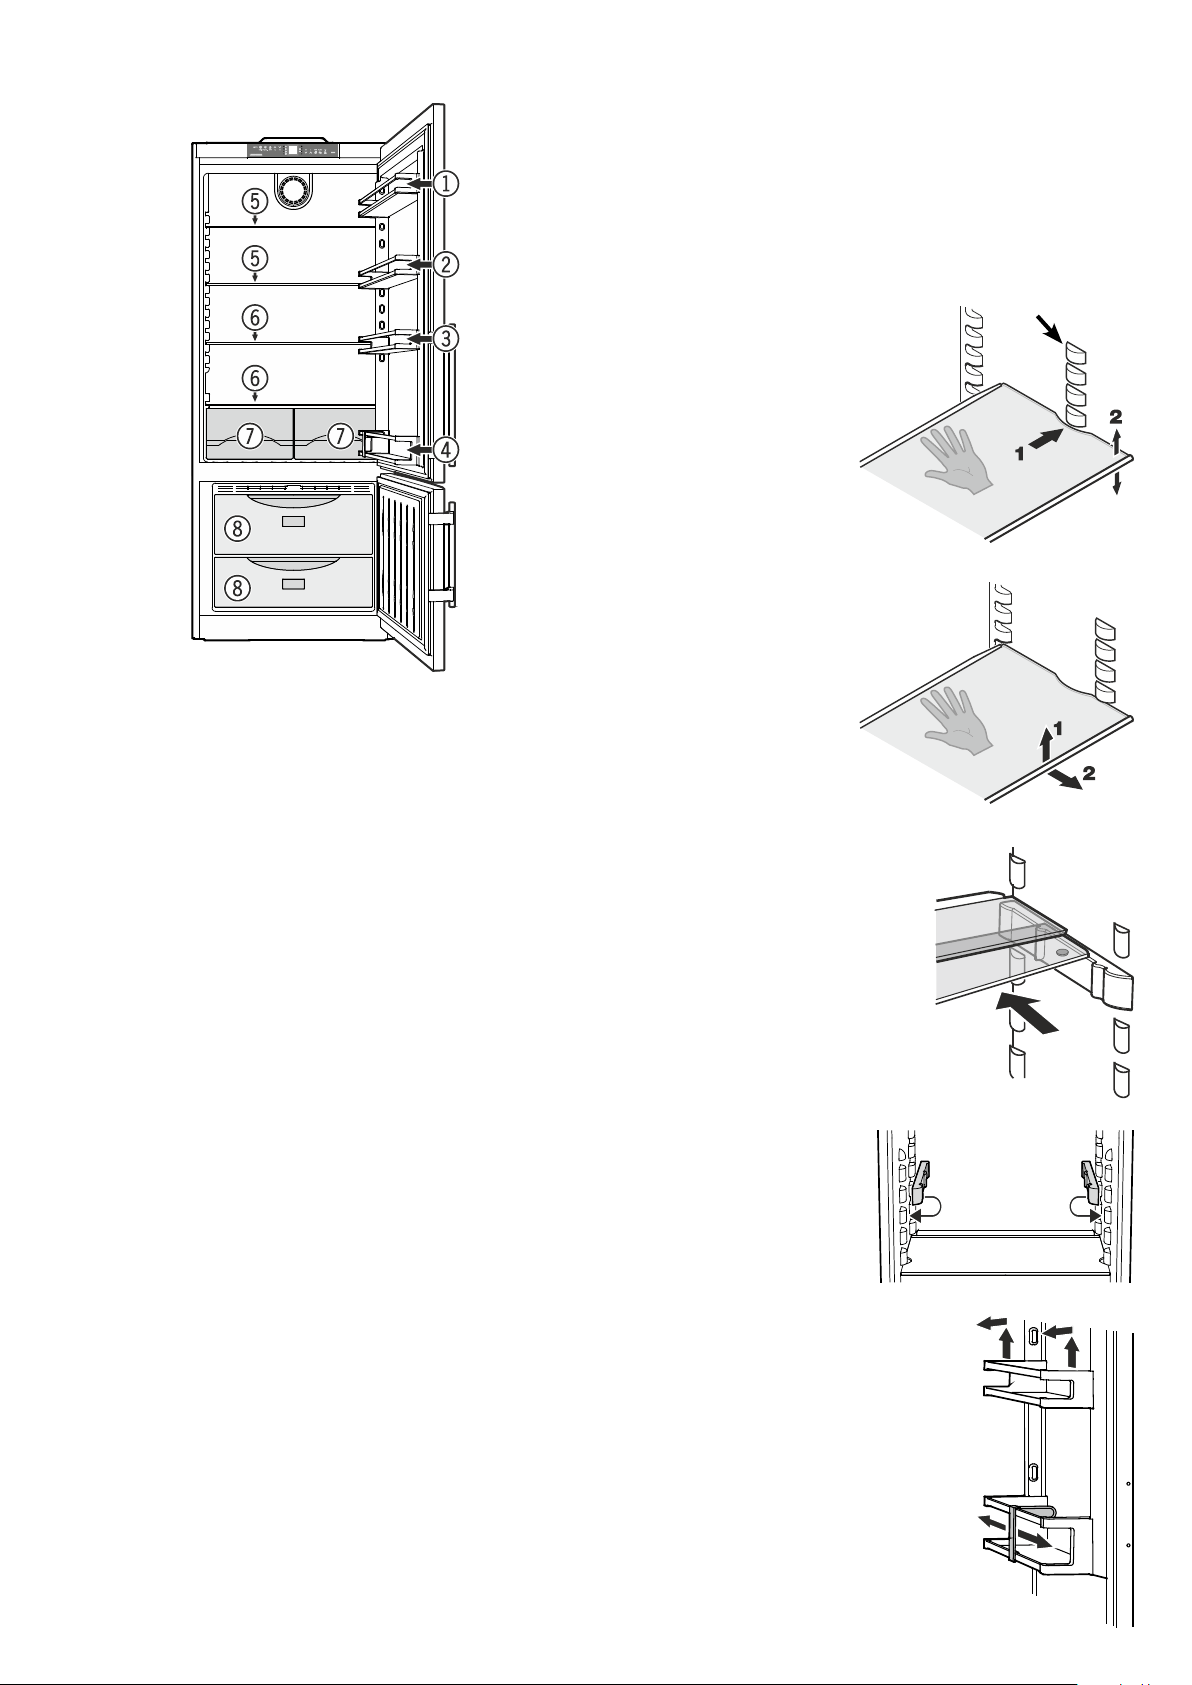
Freezer operating icons
Temperature Up control (to increase
the freezer temperature)
TemperatureDowncontrol(to
reduce the freezer temperature)
Freezer On/Off
SuperFrost
Alarm mute (refrigerator and freez-
er)
Operating and control elements
The electronic control panel has the Touch capacitance technol-
ogy.Anyfunctioncanbeactivatedbyangertiponthesymbol
of the operating icons.
Refrigerator operating icons
Ventilation (circulation) On/Off
SuperCool
Refrigerator On/Off
Temperature Up control (to increase the
refrigerator temperature)
TemperatureDowncontrol(toreducethe
refrigerator temperature)
Refrigerator
operating icons
Appliance
control icons
Freezer
operating icons
Temperature and control display
DisplaymodedegreesCelsius
DisplaymodedegreesFahrenheit
Refrigerator temperature display
Freezer temperature display
Sabbath mode is activated
Menu mode is activated
(for setting additional functions)
Appliance control icons
PowerfailureLED
SuperCoolLED
ChildlockLED
AlarmLED
SuperFrostLED
VentilationONLED
The exact contact point is between the
symbol and its label.
6
Setting the temperature
The appliance is pre-set for normal operation. We recommend
temperaturesof3°Cintherefrigeratorand-18°Cinthefreezer.
To reduce the temperature
Touch the Down icon on the left to reduce the refrigerator tem-
perature and the Down icon on the right to reduce the freezer
temperature.
To increase the temperature:
Touch the Up icon on the left to increase the refrigerator tem-
perature and on the right to increase the freezer temperature.
• While you are entering the temperature, the set temperature will
flash on the display.
• When you touch the temperature setting icons for the first time,
the most recent setting is displayed.
• You can change the settings in increments of 1°C by briefly
touching the icons again. If the icons are held, the temperature
setting will change faster.
• Approximately five seconds after the icon has been released,
the display will automatically show the actual freezing or cooling
temperature.
You can change the temperatures:
In the refrigerator between 2°C and 7°C and in the freezer between
-27°C and -14°C.
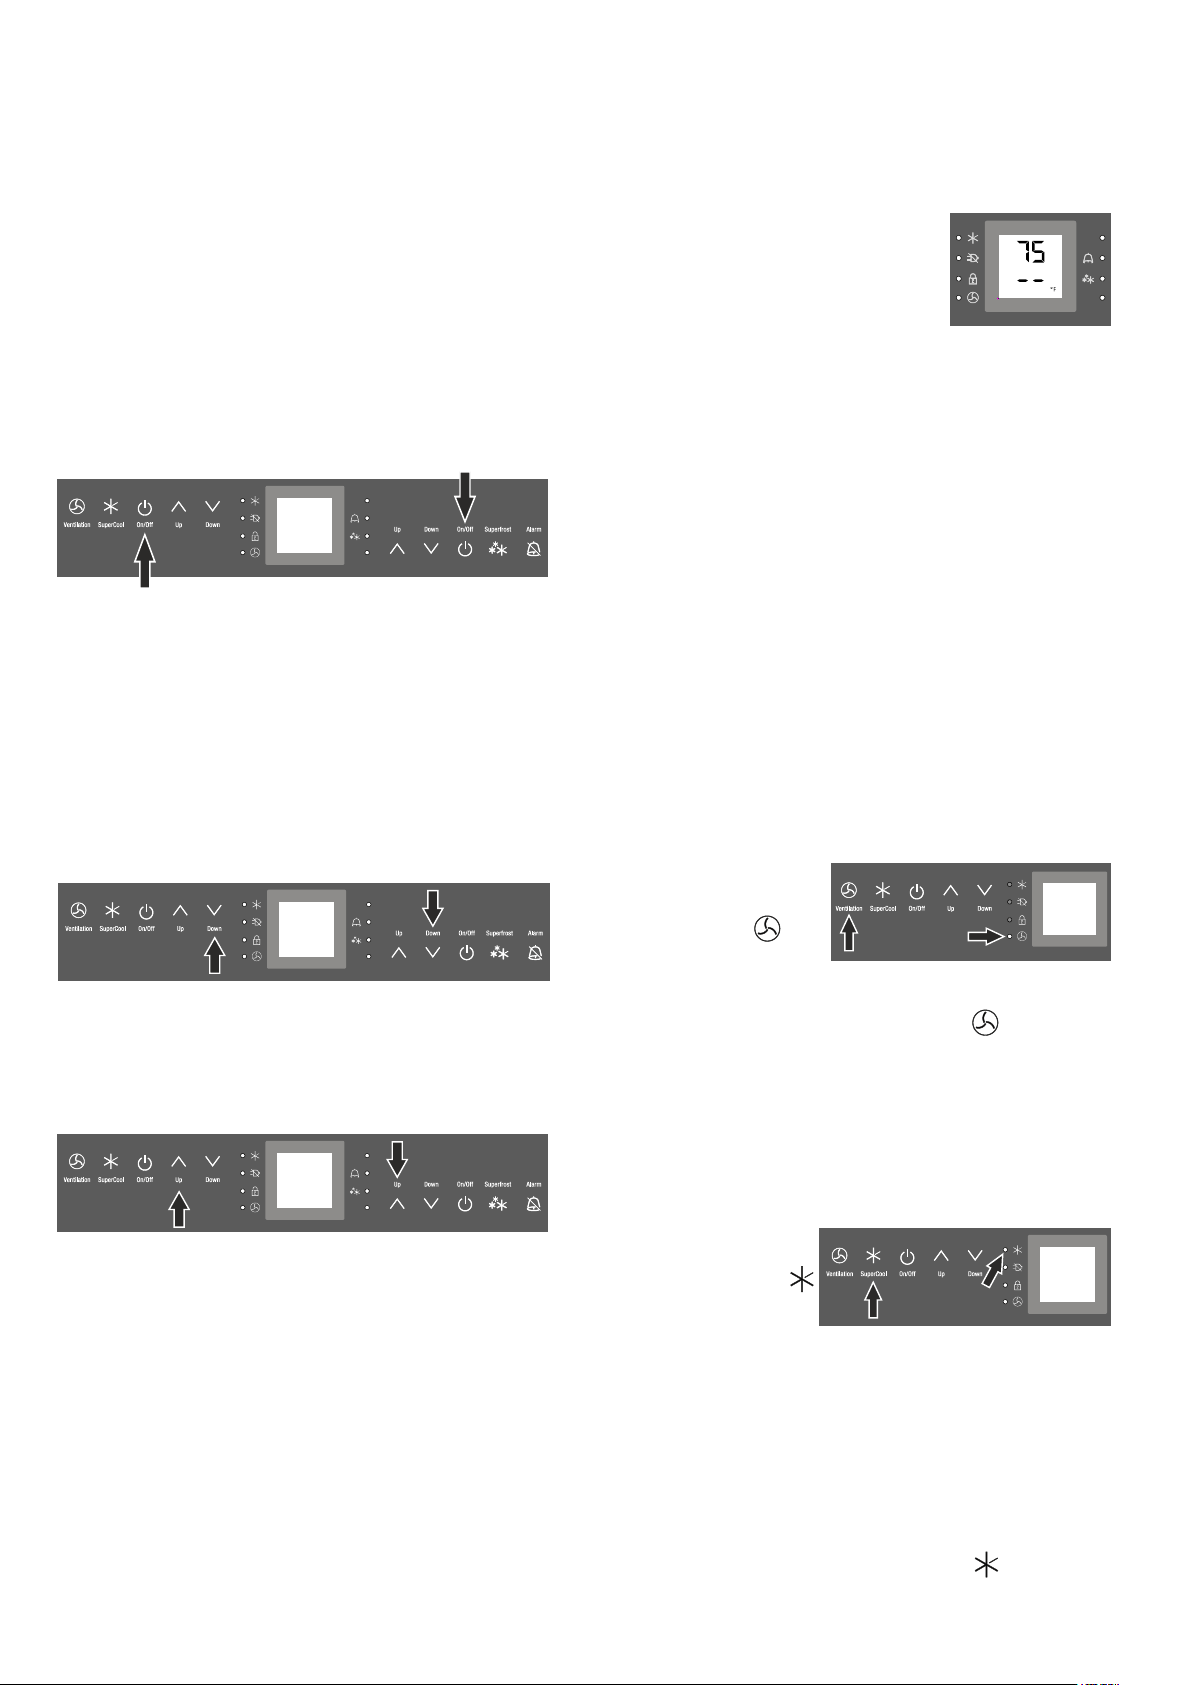
Ventilation
The Ventilation switch is used for re-circulated cool air.
You can use the switch as required to:
• chilllargequantitiesoffreshfoodfast.
• keepthetemperatureevenlydistributedthroughouttheentire
refrigerator compartment. The air will circulate more intensively,
keeping all the different areas in the compartment at the same
temperature and ensuring all the food inside is chilled at the
same temperature.
We recommended you use the ventilation fan if:
• roomtemperaturesaretoohigh(approximately35°Corhigher).
• theairhumidityishigh,duringhighheatandhumidity.
Turning on
Touch the Ventilation icon
brieysotheLED
turns
on.
Turning o
TouchtheVentilationiconagainuntiltheLED turnso.
SuperCool
Itisrecommendedparticularlyifyouwishtocoollargequantities
of food, drinks, freshly baked goods or meals rapidly.
Turning on
Touch the SuperCool icon
briefly so the LED
turns on. The refrigerator
temperature will drop to
its lowest value.
Note
The SuperCool function uses slightly more energy. After ap-
proximately six hours, however, the refrigerator switches back
automaticallytonormalenergy-savingoperation.Ifrequired,the
SuperCoolfunctioncanbeturnedosooner.
Turning o
TouchtheSuperCooliconagainuntiltheLED turnso.
Switching the appliance on and o
Cleantheappliancebeforeturningitonforthersttime.See
Cleaning.
Do not place frozen food in the freezer until the temperature
showsatleast-18°C.
Switching the appliance on
TouchtheRefrigeratorOn/OiconortheFreezerOn/Oicon
so the temperature displays light up.
Switching the refrigerator compartment o
TouchtheRefrigeratorOn/Oiconforapproximately3seconds.
Note
Ifthefreezercompartmentisswitchedo,theentireappliance
willbeswitchedo.
Temperature display
In normal operation, the following settings will be
displayed:
• theaveragerefrigeratortemperature
• thewarmestfrozenfoodtemperature.
Whenstartingupforthersttimeorwhen
the appliance is warm, dashes will appear
in the freezer temperature display, until
the temperature in the freezer compart-
ment is 0°C.
The display will ash:
• ifyouchangethetemperatureor
• ifthetemperaturerisesbyseveraldegrees,indicatingcoldloss,
e.g. if you place fresh, “warm” food in the freezer or if you remove
or repack frozen food, the temperature may rise for a short time
due to warm air flowing into the freezer.
Refrigerator
Freezer
7
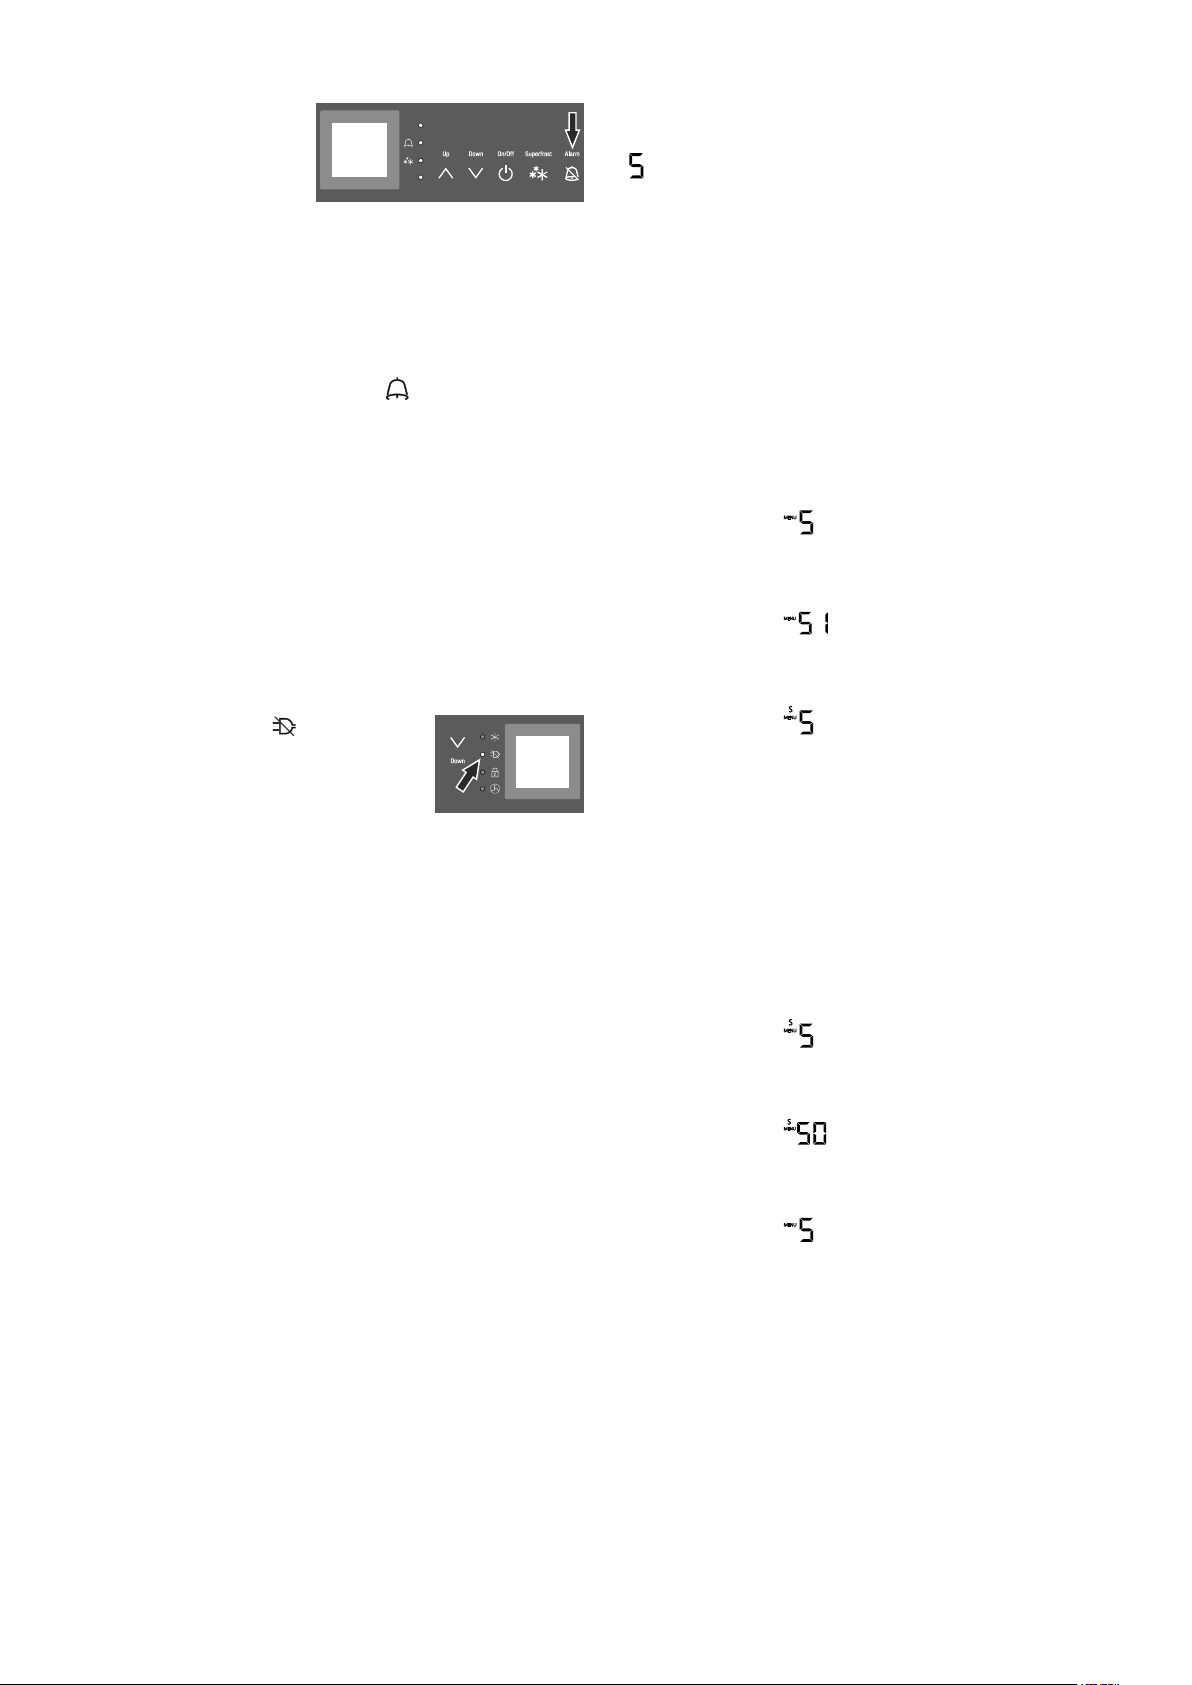
Audible alarm signal
The audible alarm signal is
switched obytouching the
alarm icon.
Audible door alarm
This sounds when the door has been left open for longer than
about60seconds.Thesoundswitch-ofunctionisactiveaslong
as the door is left open. The alarm automatically switches back
to standby when the door is shut.
Audible/visual temperature alarm
It always sounds if the freezer temperature is not low enough. The
temperaturedisplayandthealarmLED
a s hatth e s am eti m e.
This can be caused by:
- warm, fresh food being placed in the freezer,
- too much warm air from the outside entering when re-arranging
or removing frozen food,
- a fault in the appliance.
Thetemperaturedisplaywillcontinuetoashuntilthecauseof
thealarmhasbeenrectied.Itwillthenstopashingandlightup
continually. The audible warning signal is now automatically reset.
Power failure/frostcontrol display
IfthepowerfailureLED is lit, this means
the freezer temperature has risen too high
during the last few hours or days due to a
power failure. The freezer temperature display
ashesatthesametime.
• IfyoutouchtheAlarm icon now, the highest temperature regis-
tered during the power failure will be displayed.
• Checkthequalityofthefoodincaseithasbecometoowarmor
even defrosted.
• Thehighesttemperaturewillappearforapproximatelyoneminute.
After that, the actual temperature in the freezer will reappear.
The display can be turned off by touching the Alarm icon again.
= Sabbath mode
ThisfeatureconsidersthereligiousrequirementsontheSabbath
or holidays. When the Sabbath mode is active, some functions
oftheelectroniccontrolsareswitchedo.
• Thelightingremainsoff.
• Thecoolingfanremainsinitsactualstate:Ifitison,itremains
on, if it is off, it remains off.
• Thereisnodooralarm.
• Thereisnotemperaturealarm.
Activating the Sabbath mode
• ActivatethesetupmodebytouchingtheSuperFrost icon for
5 seconds.
- the display shows
• TouchtheSuperFrost icon
- the display shows
• TouchtheSuperFrost icon again
- the display shows
- the Sabbath mode is activated.
• ExitsetupmodebytouchingthefreezercompartmentOn/Off
icon.
Sabbathmodeswitchesoautomaticallyafter120hoursifitis
notmanuallyswitchedobeforehand.
Deactivating the Sabbath mode
• ActivatethesetupmodebytouchingtheSuperFrost icon for
5 seconds.
- the display shows
• TouchtheSuperFrost icon
- the display shows
• TouchtheSuperFrost icon again
- the display shows
the Sabbath mode is deactivated.
• ExitsetupmodebytouchingthefreezercompartmentOn/Off
icon.
Setup mode
In the setup mode, you can activate the following functions:
8
= Display brightness
Adjusting the display brightness
• ActivatethesetupmodebytouchingtheSuperFrost icon for
5 seconds.
• Touchthefreezer compartment Down icon until
appears in
the freezer temperature display.
• TouchtheSuperFrost icon
- the display shows
• Touchfreezer compartment Up/Down icons to select
0 = minimum to
5 = maximum brightness
• TouchtheSuperFrost icon at the desired value.
• ExitsetupmodebytouchingthefreezercompartmentOn/Off
icon.
• Close the appliance door. The adjusted brightness will be ac-
tivated after one minute.
= Temperature display mode
You can choose the unit of temperature for the display in degrees
Celsius or degrees Fahrenheit.
The factory setting is degrees Celsius.
• ActivatethesetupmodebytouchingtheSuperFrost icon for
5 seconds.
• Touchthefreezer compartment Down icon until
appears in
the freezer temperature display.
• TouchtheSuperFrost icon
- the display shows
• TouchtheSuperFrost icon again
- the temperature reading is now displayed in degree Fahrenheit.
• ExitsetupmodebytouchingthefreezercompartmentOn/Off
icon.
• To change the temperature display back to degrees Celsius,
follow the steps above.
= Child lock
The child lock is designed to protect the appliance from being
switched oandthetemperaturesettingfrombeing changed
accidentally.
Activating the child lock
• ActivatethesetupmodebytouchingtheSuperFrost icon for
5 seconds.
• Touchthefreezer compartment Down icon until
appears in
the freezer temperature display.
• TouchtheSuperFrost icon
- the display shows
• TouchtheSuperFrost icon again
-theLED
is lit and the child lock is activated.
• ExitsetupmodebytouchingthefreezercompartmentOn/Off
icon.
Deactivating the child lock
• ActivatethesetupmodebytouchingtheSuperFrost icon for
5 seconds.
• Touchthefreezer compartment Down icon until
appears in
the freezer temperature display.
• TouchtheSuperFrost icon
- the display shows
• TouchtheSuperFrost icon again
-theLED
goes out. The child lock is deactivated.
• ExitsetupmodebytouchingthefreezercompartmentOn/Off
icon.
9
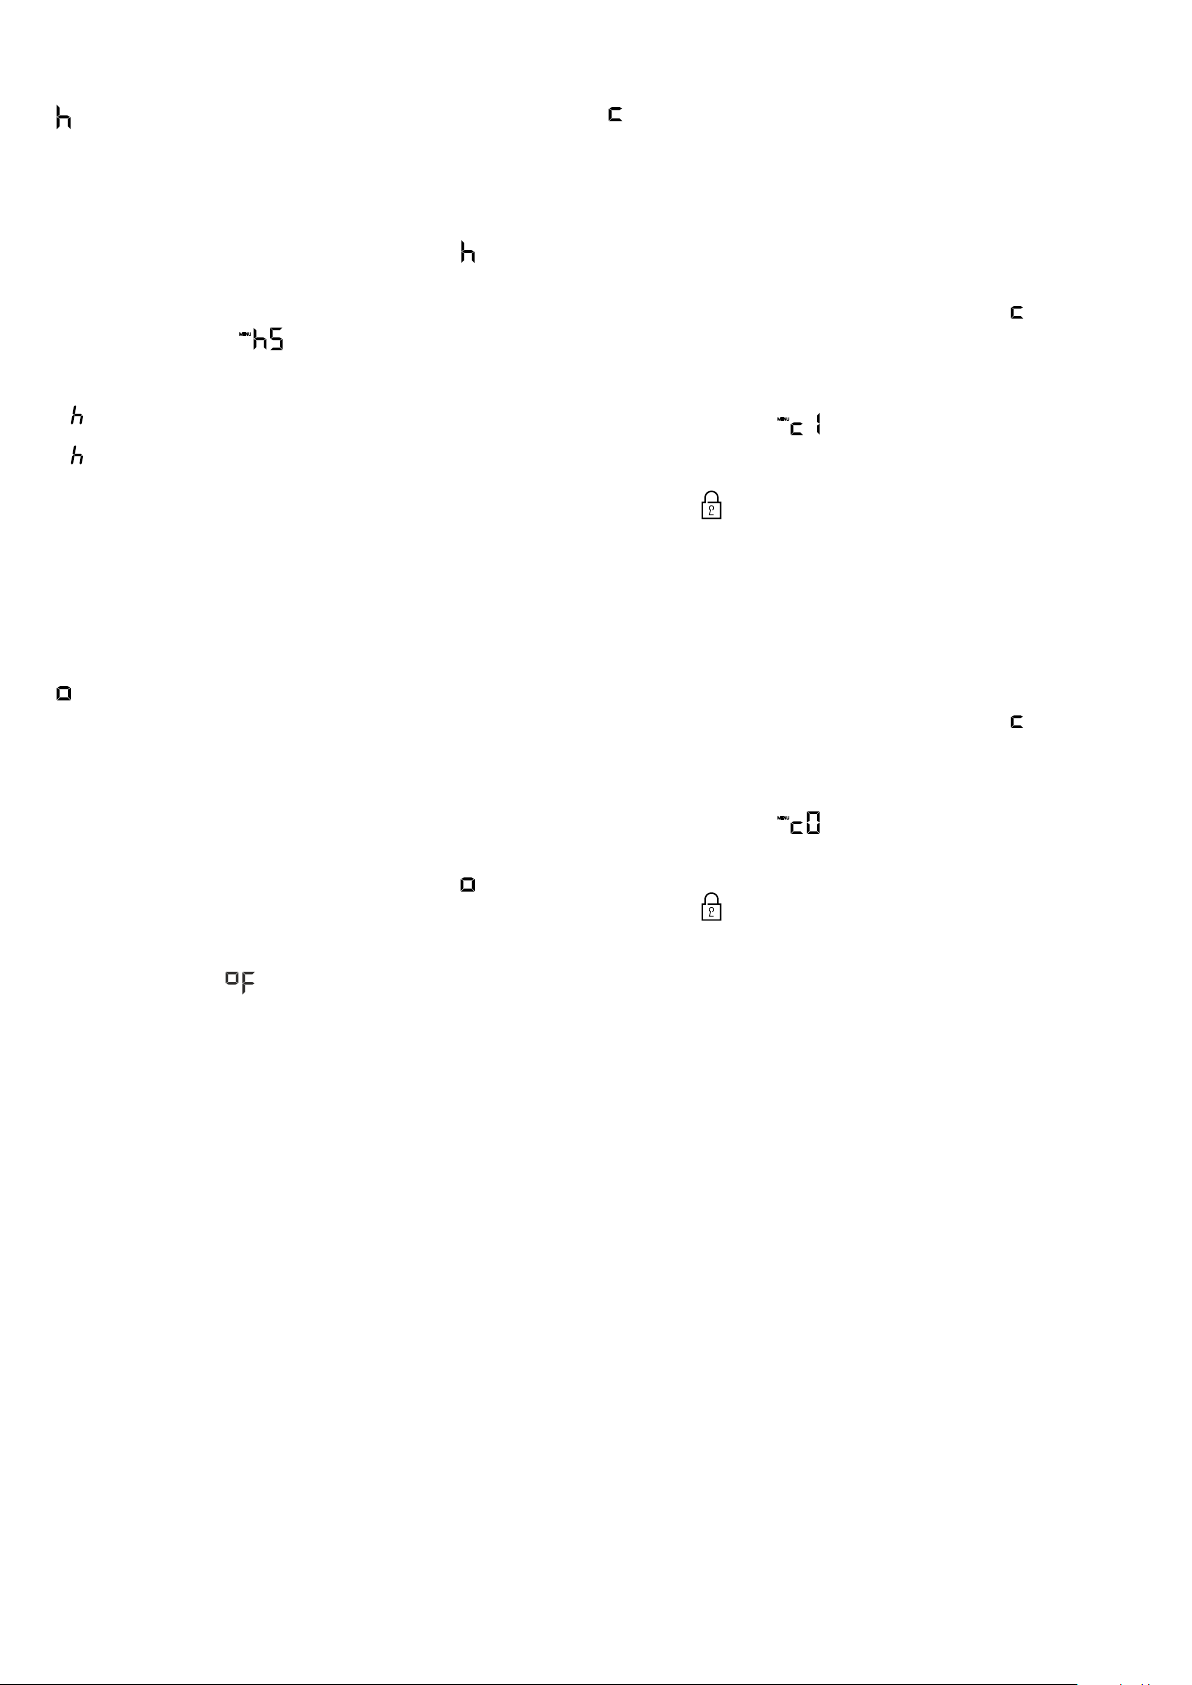
Arranging food
(1) Butter, cheese
(2)Eggs
(3) Cans, drinks
(4) Bottles
(5) Baked goods, pre-cooked meals
(6) Meat and sausage products, dairy products
(7) Fruit, vegetables, salad
(8)Frozenfood
IMPORTANT
• Liquids and food which give off or absorb odors and flavors
should always be stored covered or in closed containers.
• High-percentagealcoholsshouldbetightlysealedandstored
upright.
• Fruit,vegetablesandsaladcanbestoredunpackedintheveg-
etable drawers.
Repositioning the sectioned
shelf
Place the shelf rails provided
on the supports on the left and
right at the desired height
Sectioned shelf
If you need to make space for tall
containers, simply slide the front half
of the sectioned glass shelf carefully
underneath the back half.
Repositioning the door racks
Slide the door rack up, pull out toward you
and replace in reverse order.
Bottle holder
You can protect the bottles from falling over
when the door is opened and closed.
Move the bottle holder to the desired posi-
tion. Always hold at the front for moving.
Repositioning the shelves
Holdtheshelfunderneathwithyourhandtoavoidfromtipping
down backwards when removing.
Lift the shelf at the front.
1. Remove the shelf forward
until the circular cutout of
the shelf is in line with the
front supports.
2. Lift the shelf up or down
and replace in the desired
position.
Removing the shelves
Open the door as far as
possible.
1. Lift the shelf at the front.
2. Remove the shelf for-
ward.
Front
supports
Equipment
You can rearrange the height of the shelves and door racks as
required.
10
Freezing and storage
• Packfrozenfoodinstandardfreezerbagsorreusableplastic,
metal or aluminum containers.
• Donotallowfreshfoodwhichistobefrozentocomeintocontact
with food already frozen. Always keep packages dry in order
to avoid them sticking together.
• Alwayswritethedateandcontentsonthepackageanddonot
exceed the stated storage time for the food. This prevents
spoiling.
• Packfoodwhichyouarefreezingyourselfinquantitiesrightfor
yourhousehold.Toensurethefoodfreezesrightthroughquickly,
thefollowingquantitiesshouldnotbeexceededperpackage:
- fruit, vegetables: up to 1 kg;
- meat: up to 2.5 kg.
• Donotfreezebottlesandcanswhichcontaincarbonateddrinks
astheymightburst.Drinkscanbecooleddownquickly,but
take the bottles out of the freezer compartment after an hour
at the most.
• Onlytakeoutasmuchfoodasneededforthawing.Cookfood
whichhasbeenthawedasquicklyaspossible.Frozenfood
can be thawed in the following ways:
- in a microwave oven
- in the refrigerator: the safer way to thaw food because there is
less chance of bacteria growth. Use this method for high density
food such as roasts or poultry.
Freezing
Fresh food should be frozen completely and as rapidly as possible.
This is provided by the SuperFrost feature and ensures that the
nutritionalvalue,appearanceandavorofthefoodremainsintact.
Freezing with SuperFrost
• TouchtheSuperFrosticonbrieflysotheLED turns on.
• Wait24hours.
• Thenplacethefreshfoodinsidethefreezer.
• TheSuperFrostfunctionturnsoffautomatically.Dependingon
thequantityoffoodplacedinthefreezer,thiswillnormallybe
between 30 and maximum 65 hours.
Thefreezingprocessisnowcomplete;theSuperFrostLED
willturno,andthefreezerwillchangebacktonormalenergy-
saving operation.
You should not turn on the SuperFrost function:
• whenplacingfrozenfoodinthefreezer;
• whenfreezinguptoapproximately2kgfreshfooddaily.
Interior light
There is an interior light on the
right and left of the refrigerator
compartment.
The light comes on when the
refrigerator door is opened.
The light switches o when
the door has been left open for
more than 15 minutes.
At the same time, the audible
warning signal sounds.
The light intensity of the
LED light corresponds to
laser class 1/1M.
IMPORTANT
The light cover may only be removed by customer
service sta.
CAUTION!
Risk of eye damage.
If the cover is removed, do not look directly at
the light through optical lenses from a close
distance.
This can damage your eyes.
11
Defrosting
Refrigerator compartment
The refrigerator compartment defrosts automatically. The water that
forms on the rear wall drains into a reservoir at the back of the ap-
pliance and evaporates automatically through the compressor heat.
Freezer compartment
The NoFrost system automatically defrosts the appliance.
Any moisture arising collects on the evaporator and freezes, and
is periodically defrosted and evaporated.
Cleaning
Before cleaning always switch o the appli-
ance. Pull out the mains plug or switch o or
unscrew the fuse.
• Firstcleanthesidepanelswithlukewarmwaterandalittlede-
tergent.
•
Only clean the door surfaces with a clean and soft cloth. If
necessary, moisten the cloth (water + detergent). Alternatively,
use a micro-fibre cloth.
- Donotuseabrasivespongesorscourers,donotuseconcentrated
cleaning agents and never use cleaning agents containing sand,
chloride or acid or chemical solvents, as these would damage
the surfaces and could cause corrosion.
• Cleantheinsideandequipmentwithlukewarmwaterandalittle
detergent.
Do not use steam cleaners because of the
risk of injury and damage.
• Ensure that no cleaning water penetrates into the electrical
components or ventilation grille.
• Dryallpartswellwithacloth.
• Donotdamageorremovethetypeplateontheinsideofthe
appliance. It is very important for servicing purposes.
Malfunctions
You may be able to rectify the following faults by checking
the possible causes yourself:
Appliance does not function:
– Is the appliance switched on?
– Is the plug correctly fitted in the mains socket?
– Is the fuse intact?
Loud running noise:
– Is the appliance set up firmly on the floor?
–Doestheappliancecausenearbyitemsoffurnitureorobjectsto
vibrate? Please note that noises caused by the refrigerant circuit
cannot be avoided.
The temperature is not cold enough:
– Is the temperature setting correct (see "Setting the temperature")?
–Haveexcessiveamountsoffreshfoodbeenplacedintheappli-
ance?
–Does the separately installed thermometer show the correct
reading?
– Is the ventilation system working properly?
– Is the appliance set up too close to a heat source?
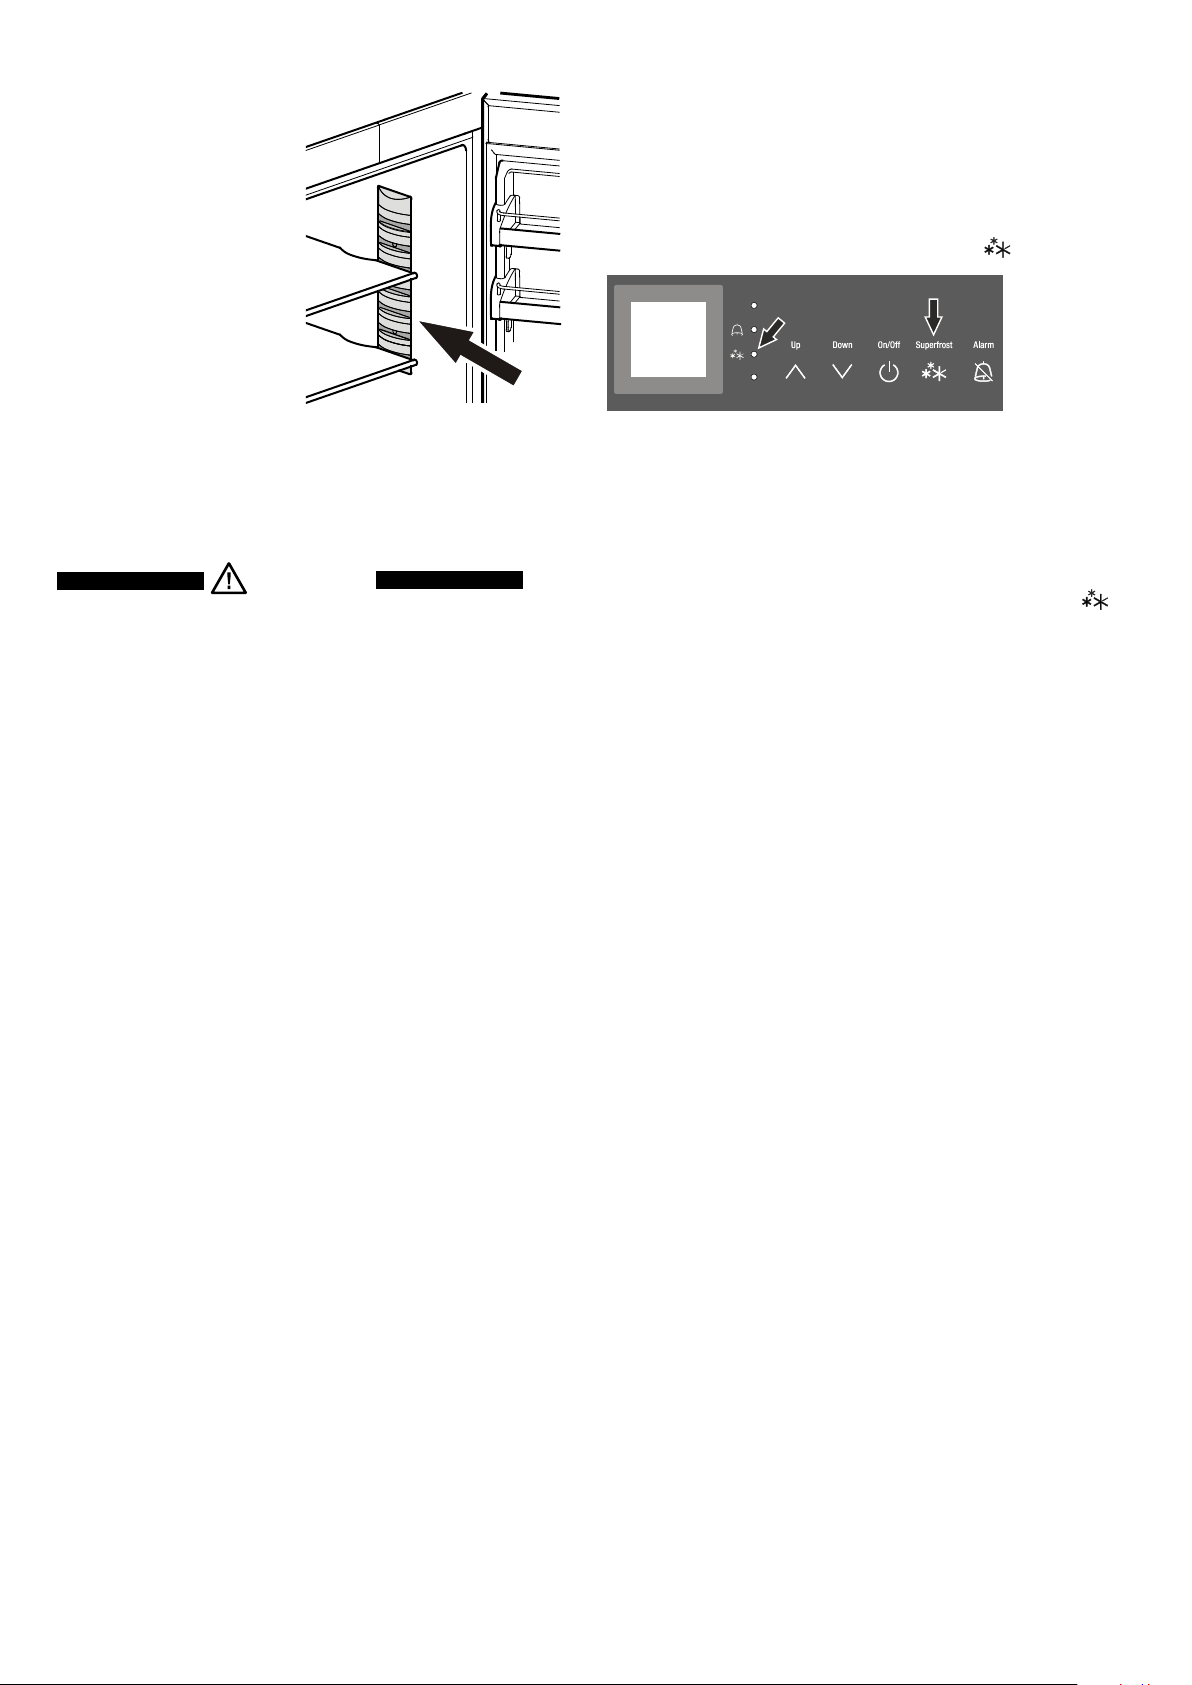
If none of the above causes
apply and you cannot rectify
the fault yourself, contact the
nearest customer service de-
partment stating the type des-
ignation
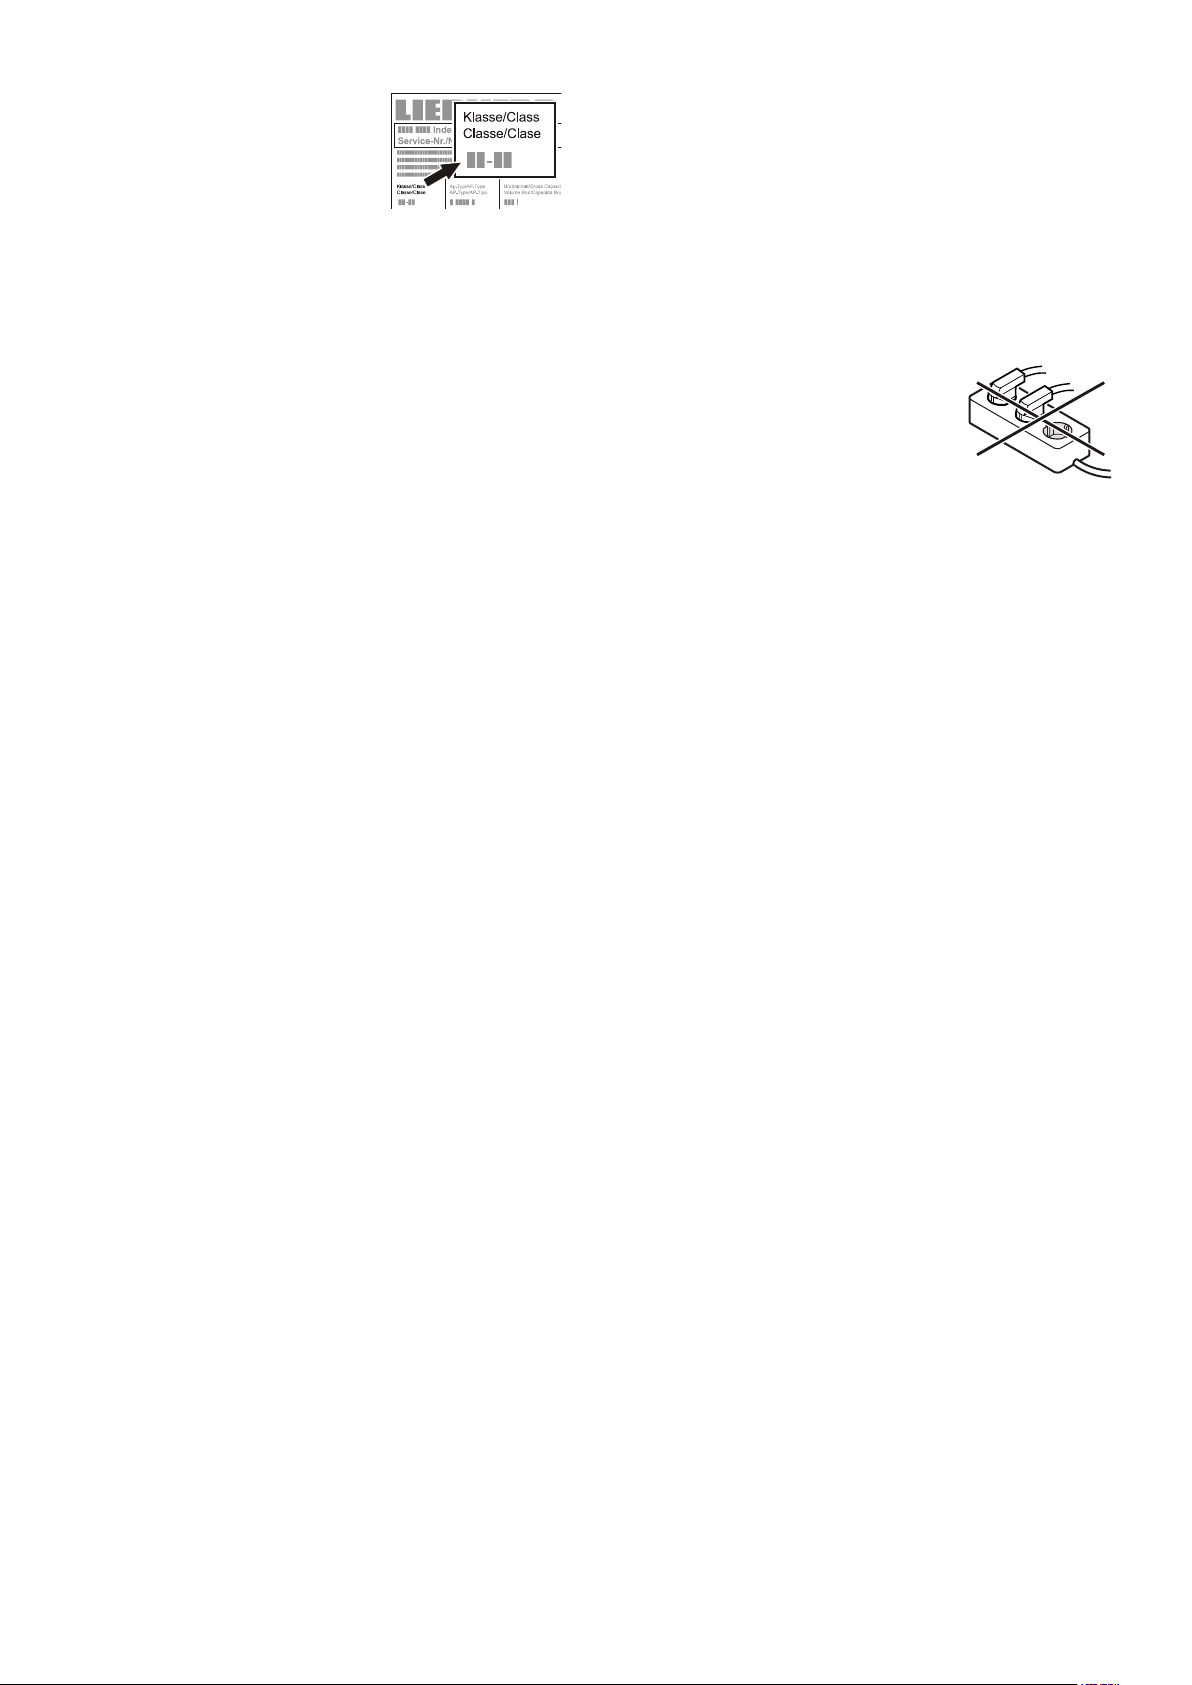
1, service number 2
and appliance number
3 as
indicated on the type plate.
The position of the type plate is shown in the section entitled
Description of the appliance.
Shutting your appliance down
If your appliance is to be shut down for any length of time, switch
itoanddisconnecttheplugorswitchoorunscrewthefuse.
Clean the appliance and leave the door open in order to prevent
unpleasant smells.
The appliance complies with the relevant safety regulations and
ECDirectives2014/30/EUand2014/35/EU.

12
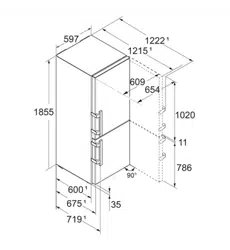
Model
A B C
CNPef 4416
1040 mm 1684mm 1666 mm
CNPef 4516 1216 mm 1859mm 1841mm
Appliance dimensions
13
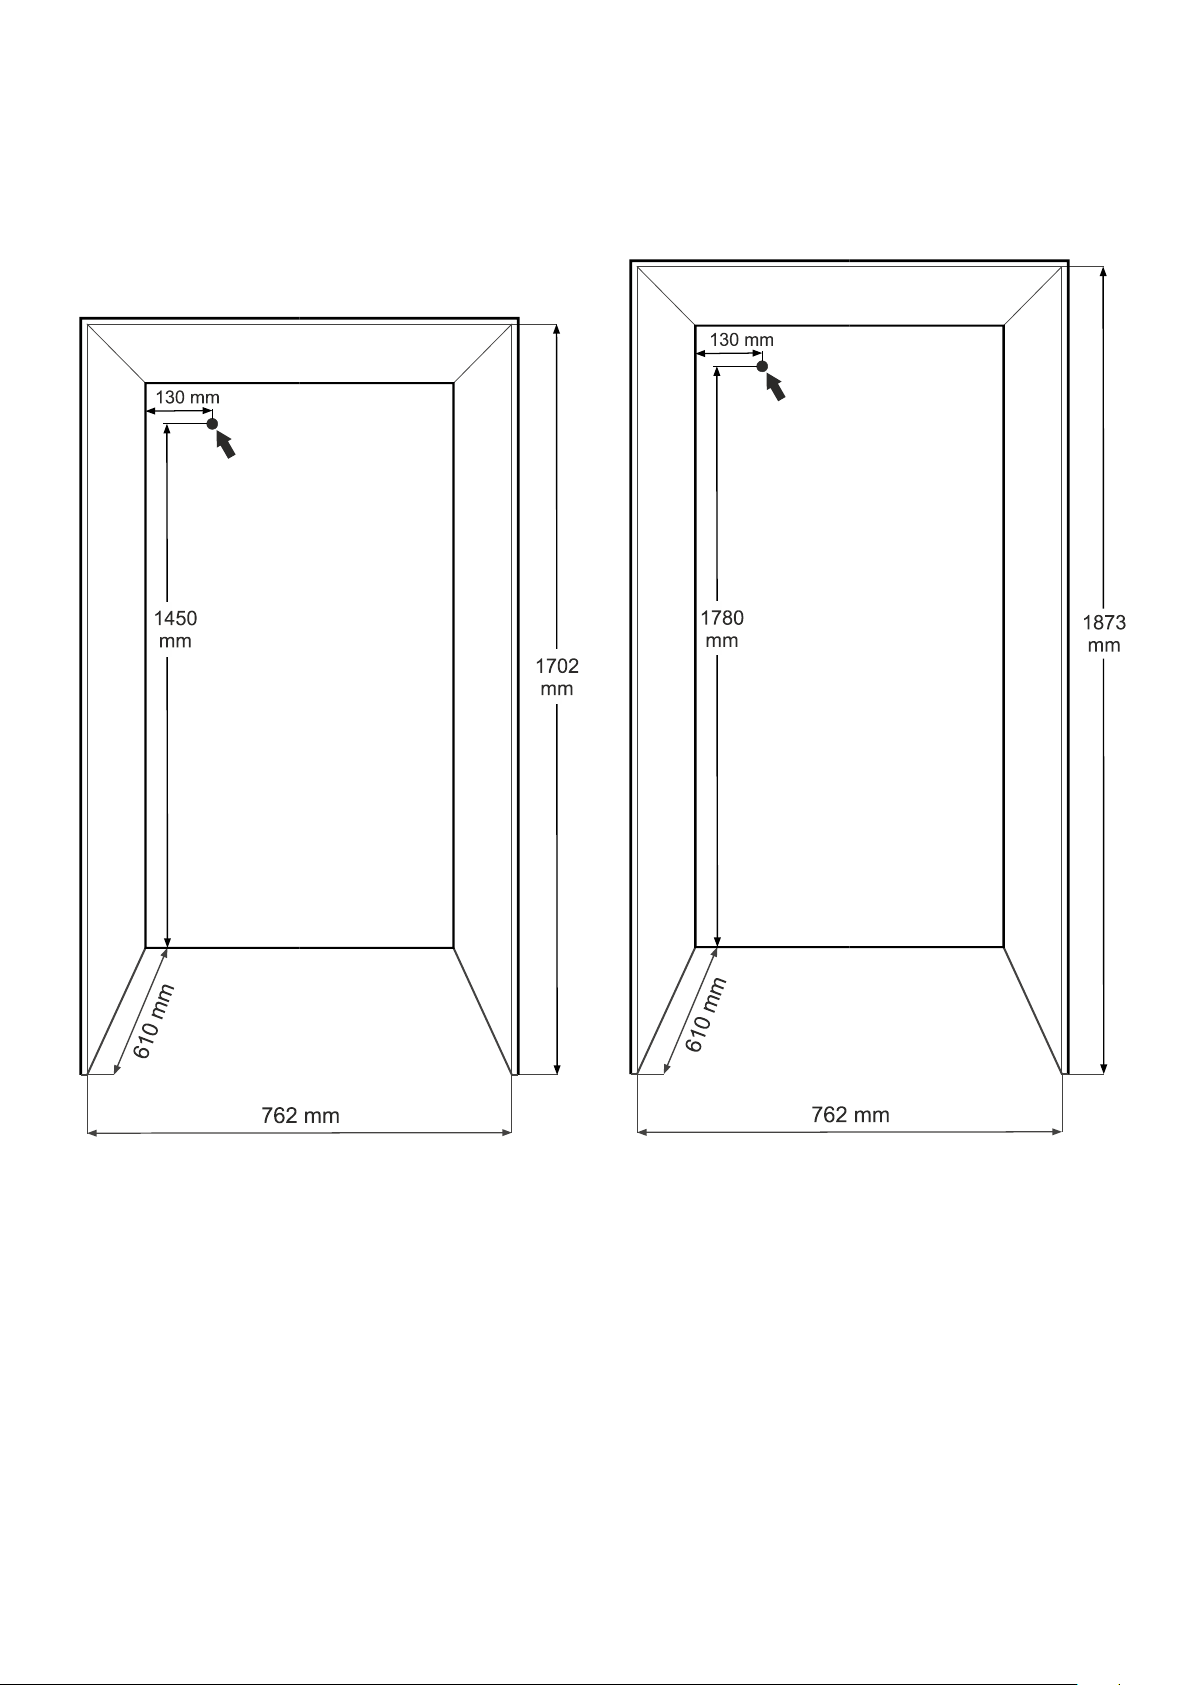
The appliance can be used freestanding or semi built-in.
If semi built-in, please consider the cabinet opening dimensions.
Cabinet Opening Dimensions
CNPef 4416
CNPef 4516
This is where the power
cord extends from the back
of the appliance.
Free length of the power
cord = 2500 mm.
NOTE
If the gap between the rear of the appliance and the wall is less than 50 mm, the power consumption level may increase.
IMPORTANT
The power plug must be easily accessible so that the appliance can be disconnected from the mains
quickly in an emergency. It must not be behind the back of the appliance.
This is where the power
cord extends from the back
of the appliance.
Free length of the power
cord = 2500 mm.
14
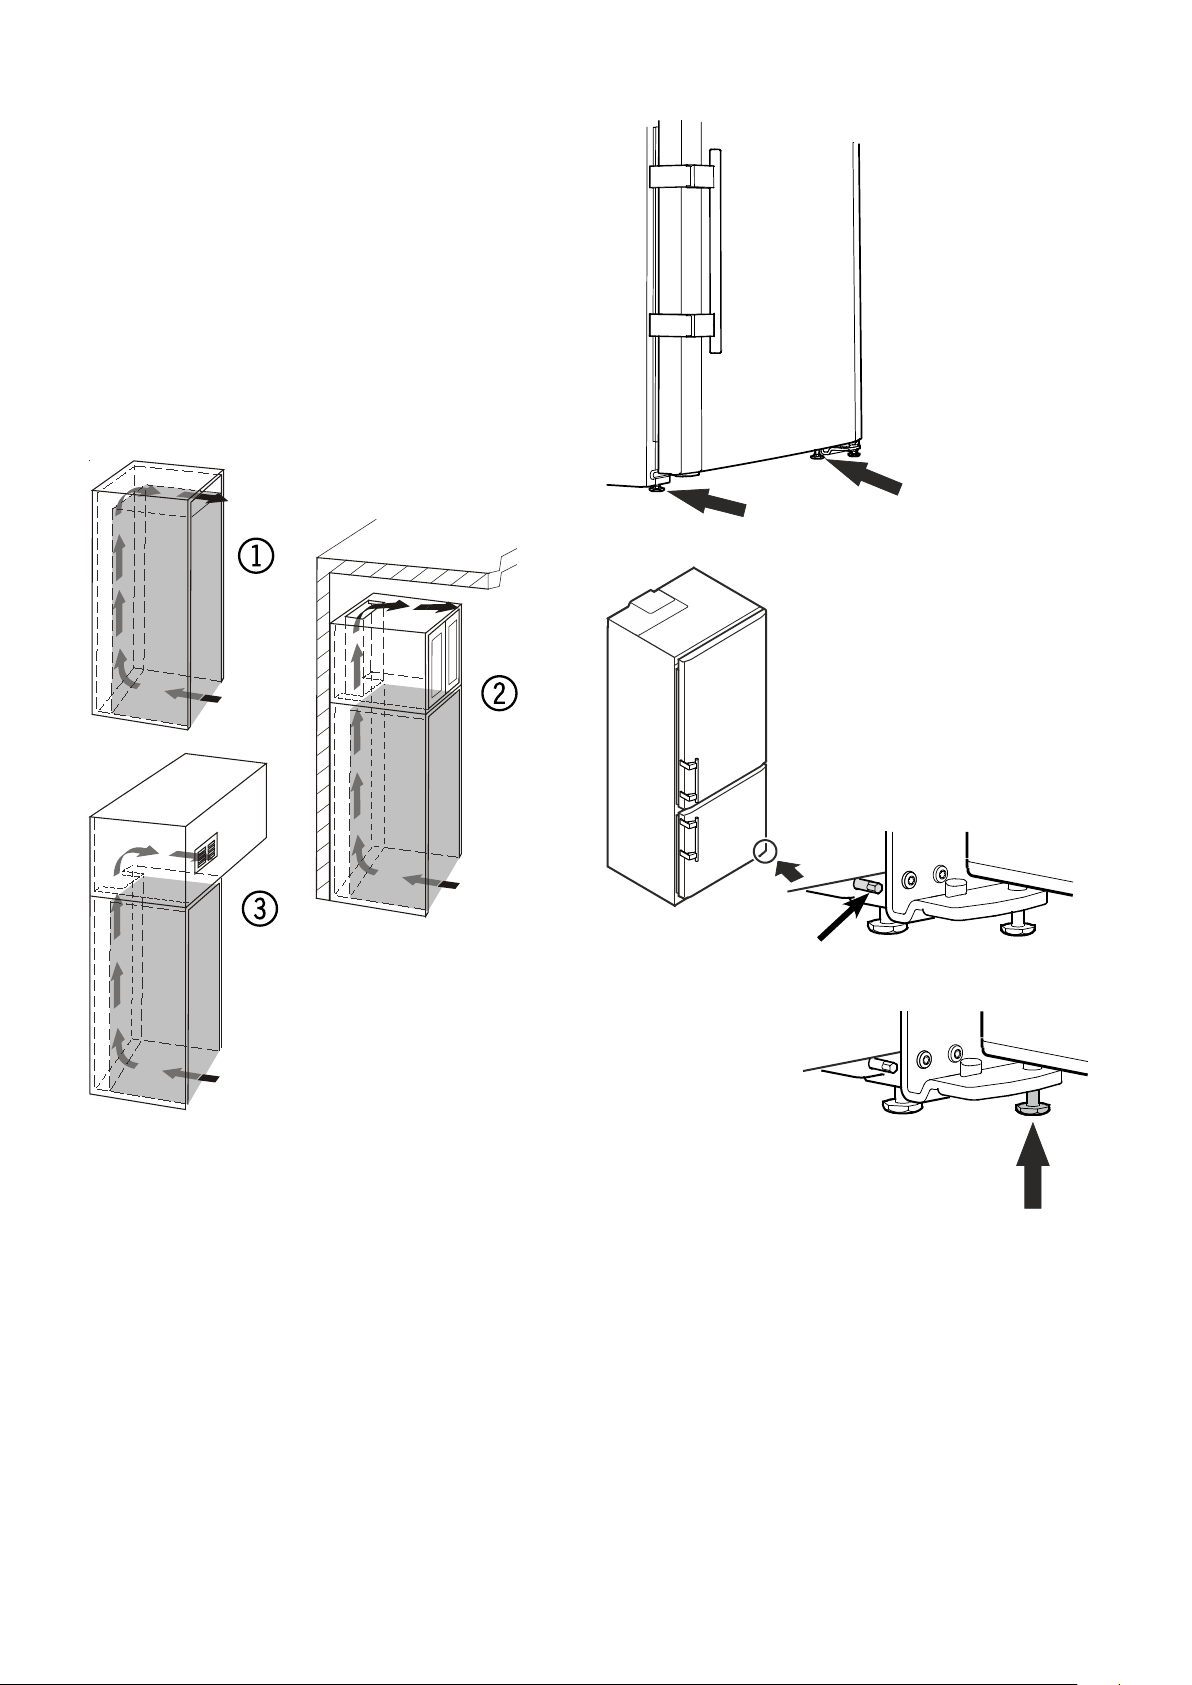
Unit Venting
Donotrestricttheairow.
The ventilation opening can either be directly over the appliance
1
, above the cabinet and below the ceiling
2
or through a vent
installedinasot
3
.
IMPORTANT
The clear ventilation cross-section must be at least
200 cm² from the lower ventilation opening right to
the upper one.
The section below the freezer door and the oor
must not be covered.
5 mm socket
22 mm
wrench
IMPORTANT
After nal installation, this screw must be turned
down until it has proper oor contact to support the
hinge bracket.
The height can be adjusted in
front by twisting the leveling
feet.
Twist the adjusting bolt to set up the
back of the appliance. Align the appli-
ance with sides of kitchen cabinets by
adjusting leveling feet and the supports.
Leveling the Appliance
15
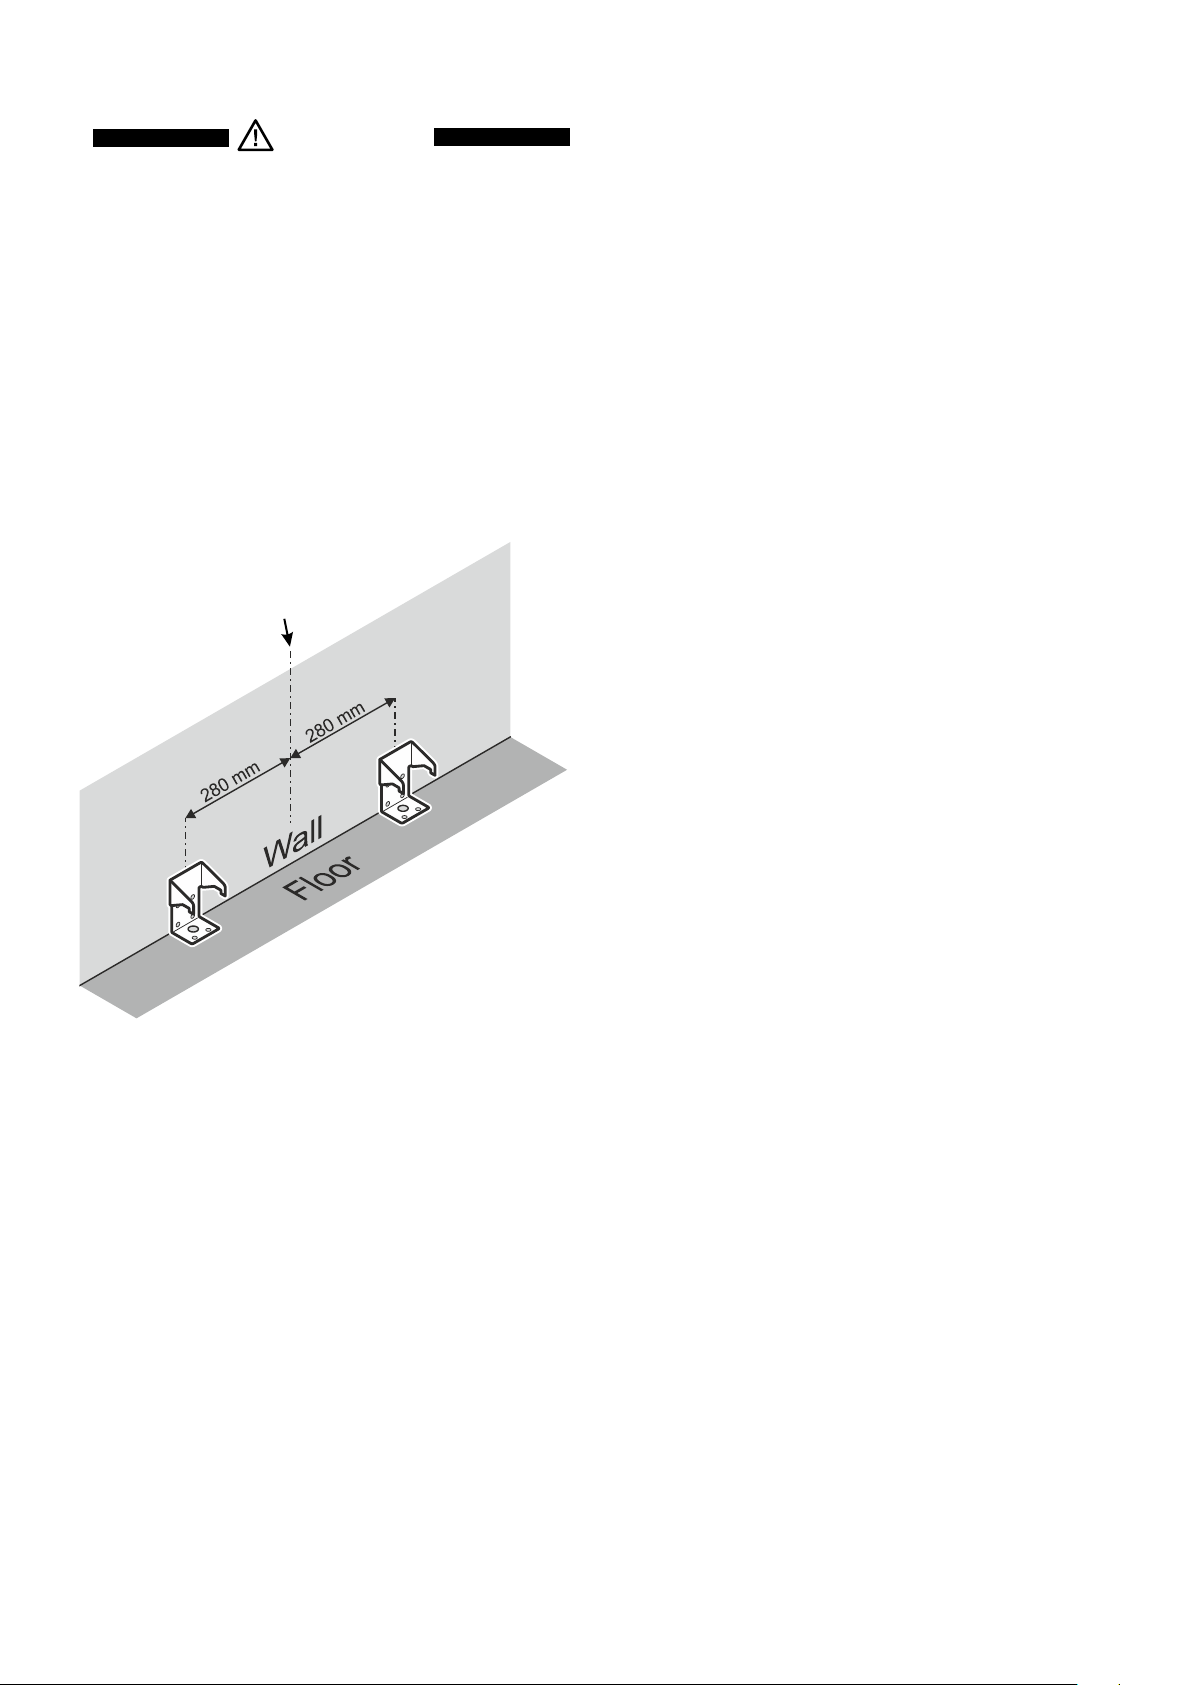
Mounting the anti tipping device
WARNING!
Tip over hazard!
The anti tipping brackets must be mounted
to prevent the appliance from tipping when
the fully stocked door is opened.
IMPORTANT
Be sure that there is no plumbing or electrical wiring
located in this area which screws or drills could
damage.
1. Mark the center of the appliance on the back wall.
2. Mount the anti tipping brackets within the given area.
Center line of appliance.
IMPORTANT
The screws for fastening the anti-tip device are not
supplied with the appliance. Appropriate screws
must be used for the material (wood, concrete, etc.)
in which the safety device is mounted.
16
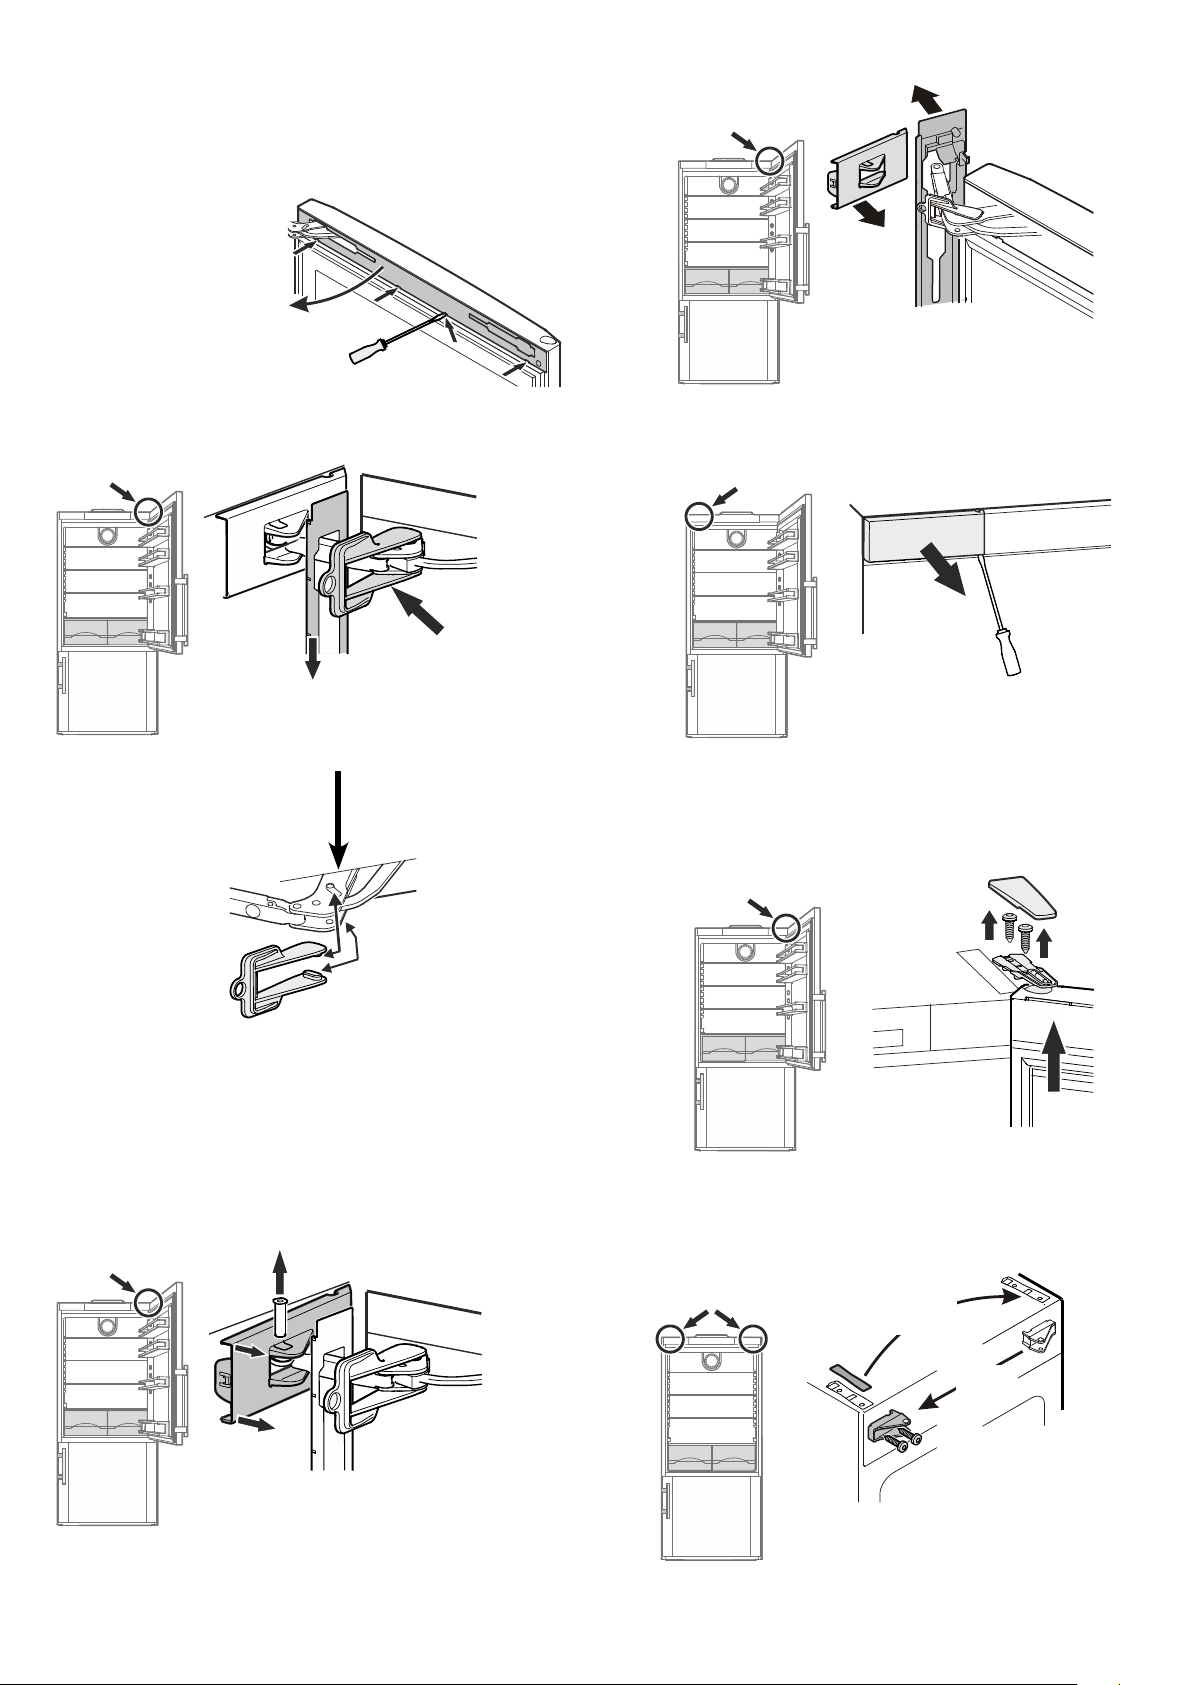
Changing over door hinges
Doorhingesshouldonlybechangedbyatrainedexpert.
Changingoverthedoorhingesrequirestwopeople.
1.
1. Open top door, prise off
door cover and pivot to
the left.
2. Let door cover hang down.
3. Slide red safety bracket over the
hinge.
2.
3.
IMPORTANT
The two knobs on the safety bracket must be fully
inserted into the marked openings on the hinge.
4.
5.
6.
7.
6. Open top door wide and
remove covers.
7. Remove cover.
4. Pull the left-hand side of the cover
approx. 1/4" (6 mm) towards you.
5. Remove pin.
8.
8. Remove cover from upper door
mounting and unscrew door.
9. Transfer fastener for soft stop mecha-
nism to the opposite side.
10. Transfer cover plate to the opposite
side.
9.
10.
IMPORTANT
The door must now be held secure by another
person.
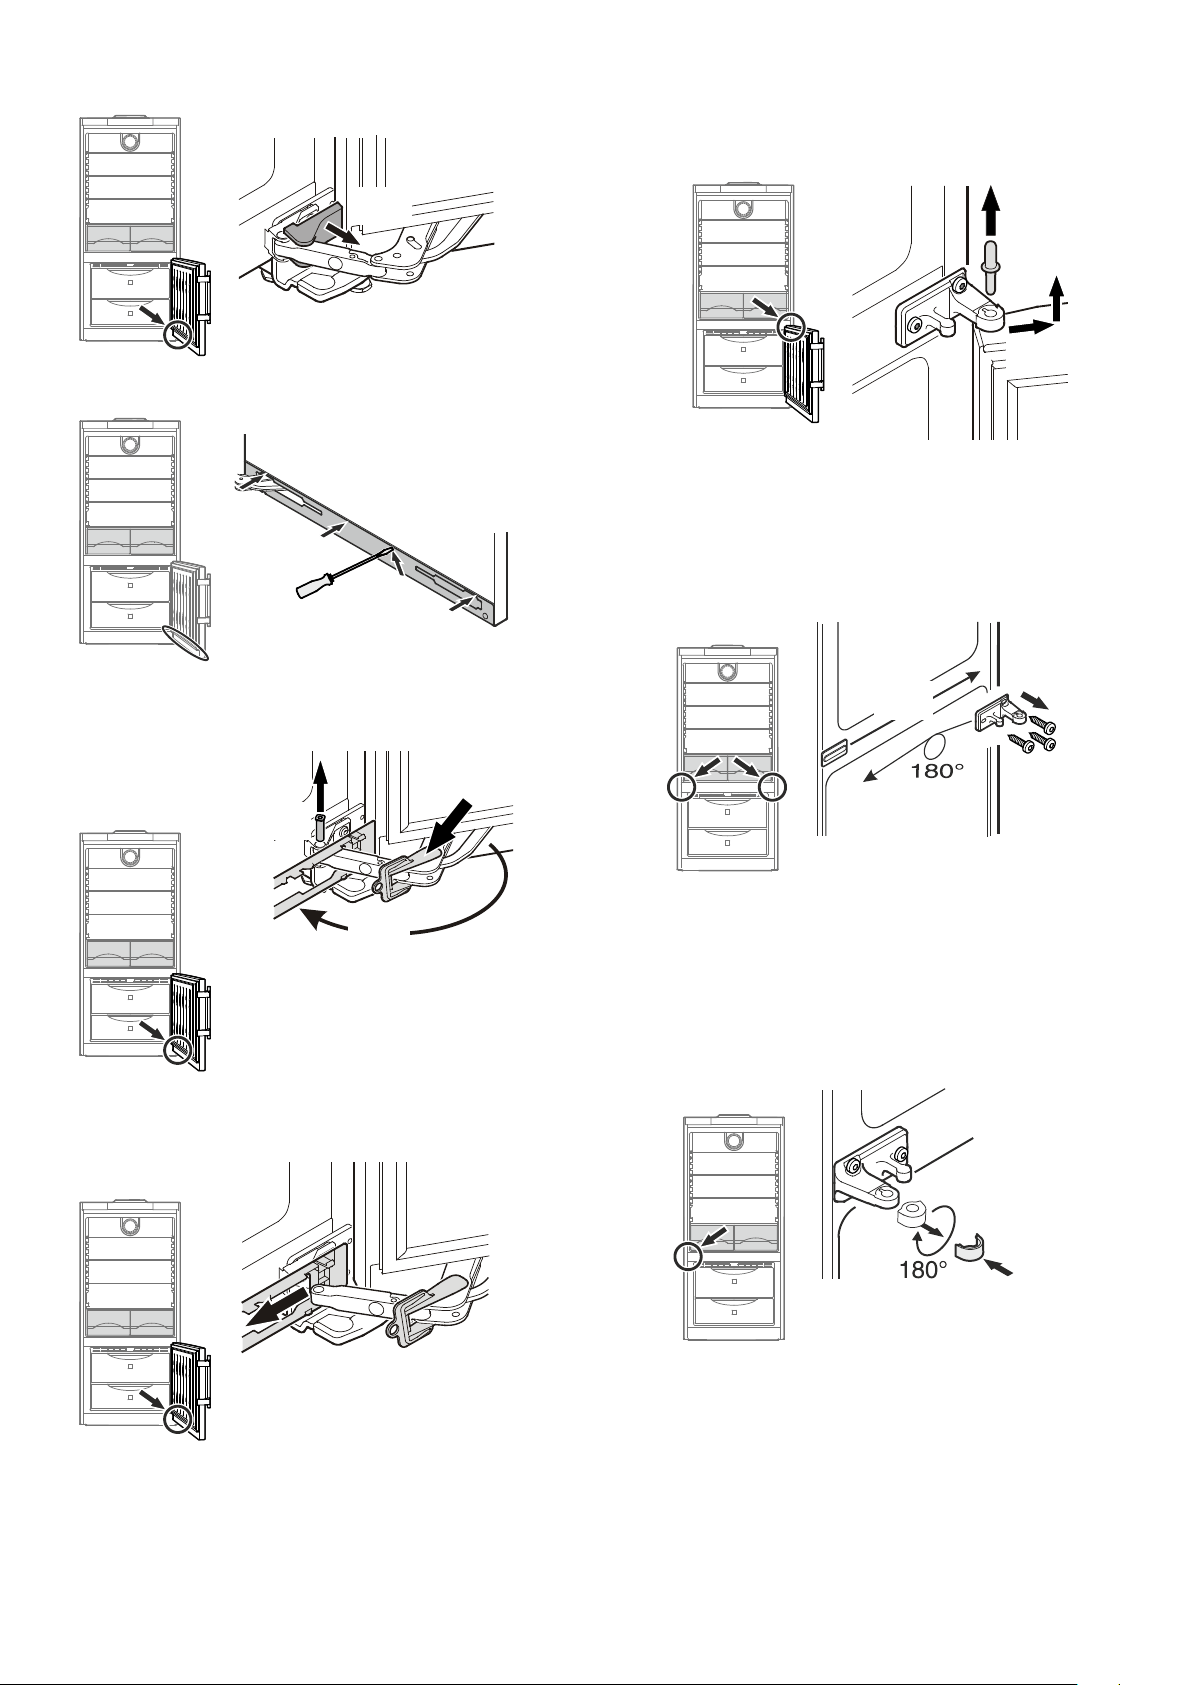
17
11.
11. Remove cover.
12.
12. Open bottom door, prise off door cover.
13.
14.
15.
13. Pivot door cover to the left.
14. Slide red safety bracket over the
hinge.
15. Remove pin.
16.
16. Open bottom door wide and re-
move cover.
22. Remove hinge bushing, turn through
180°andre-fit.
22.
17. Pull out middle hinge pin.
18. Remove bottom door.
19. Unscrew hinge bracket.
20. Transfer cover plate to the opposite
side.
21. Turn hinge bracket through180°and
screw into place.
17.
18.
19.
20.
21.
IMPORTANT
The door must now be held secure by another
person.
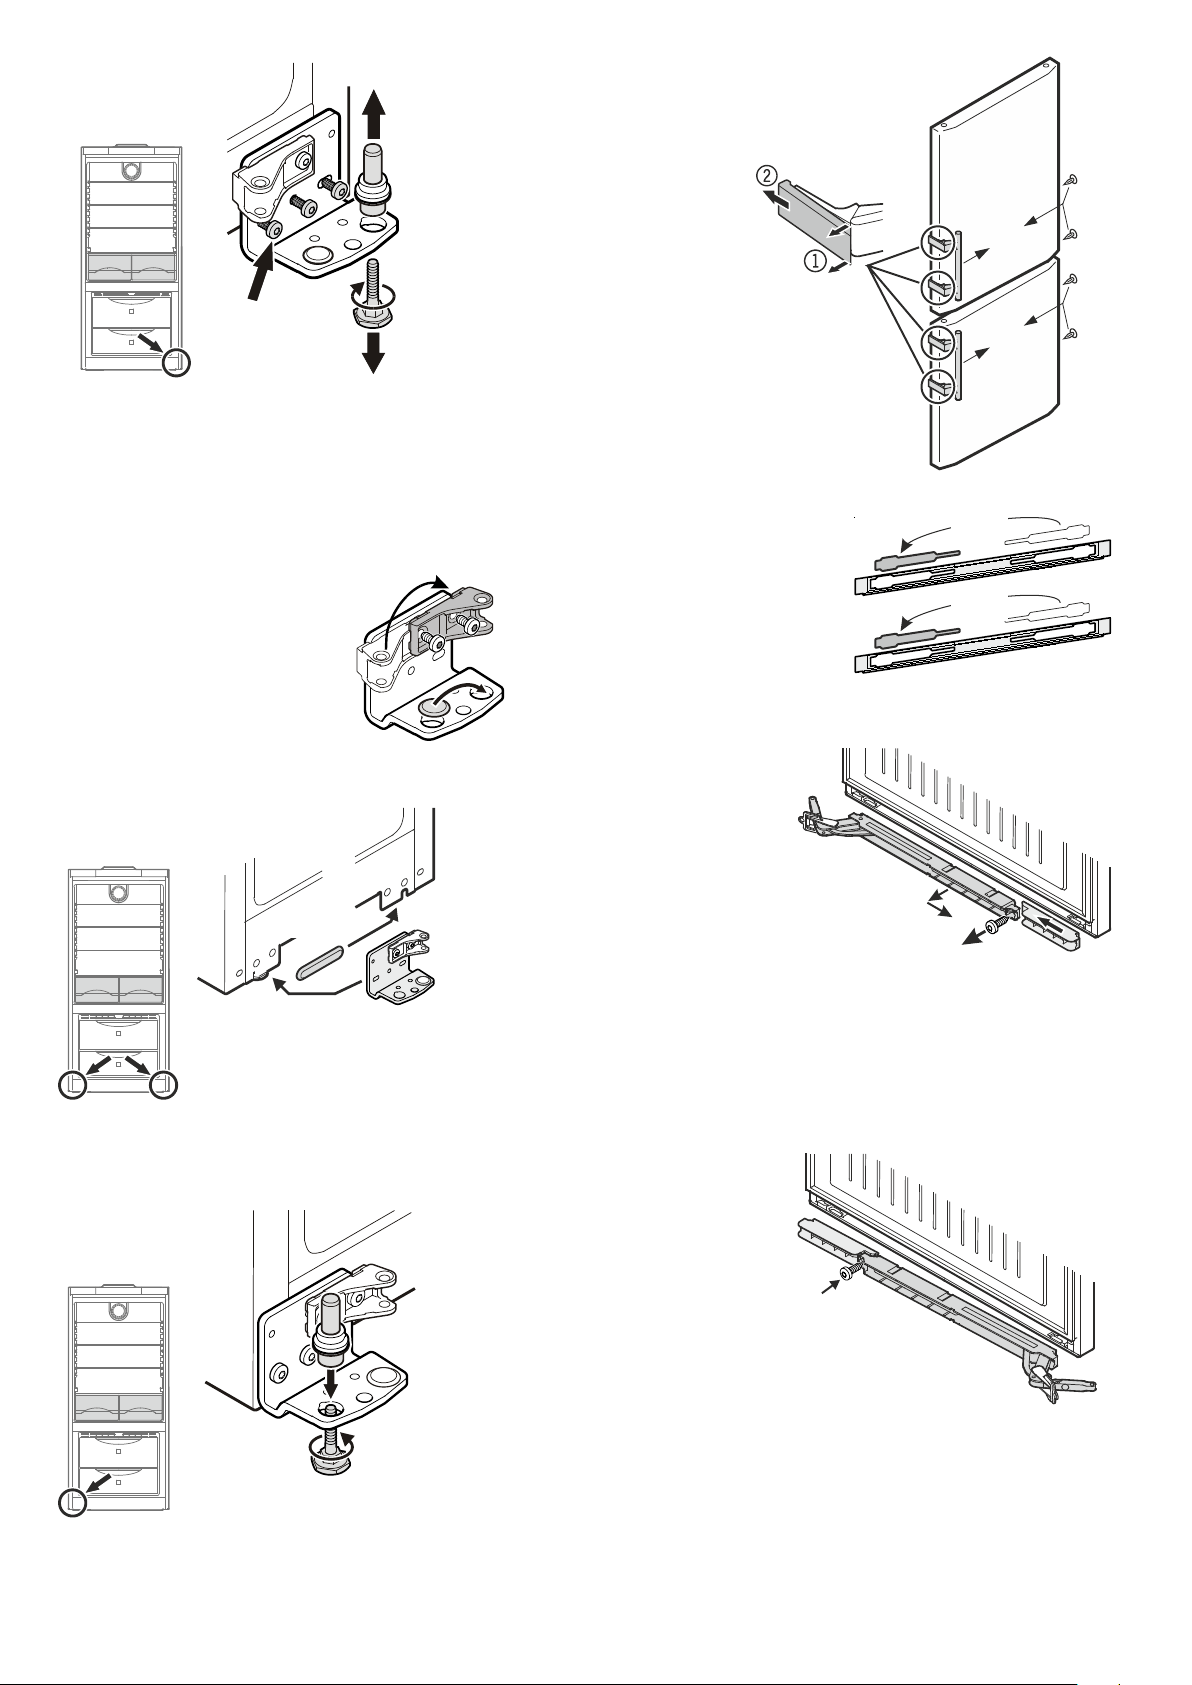
18
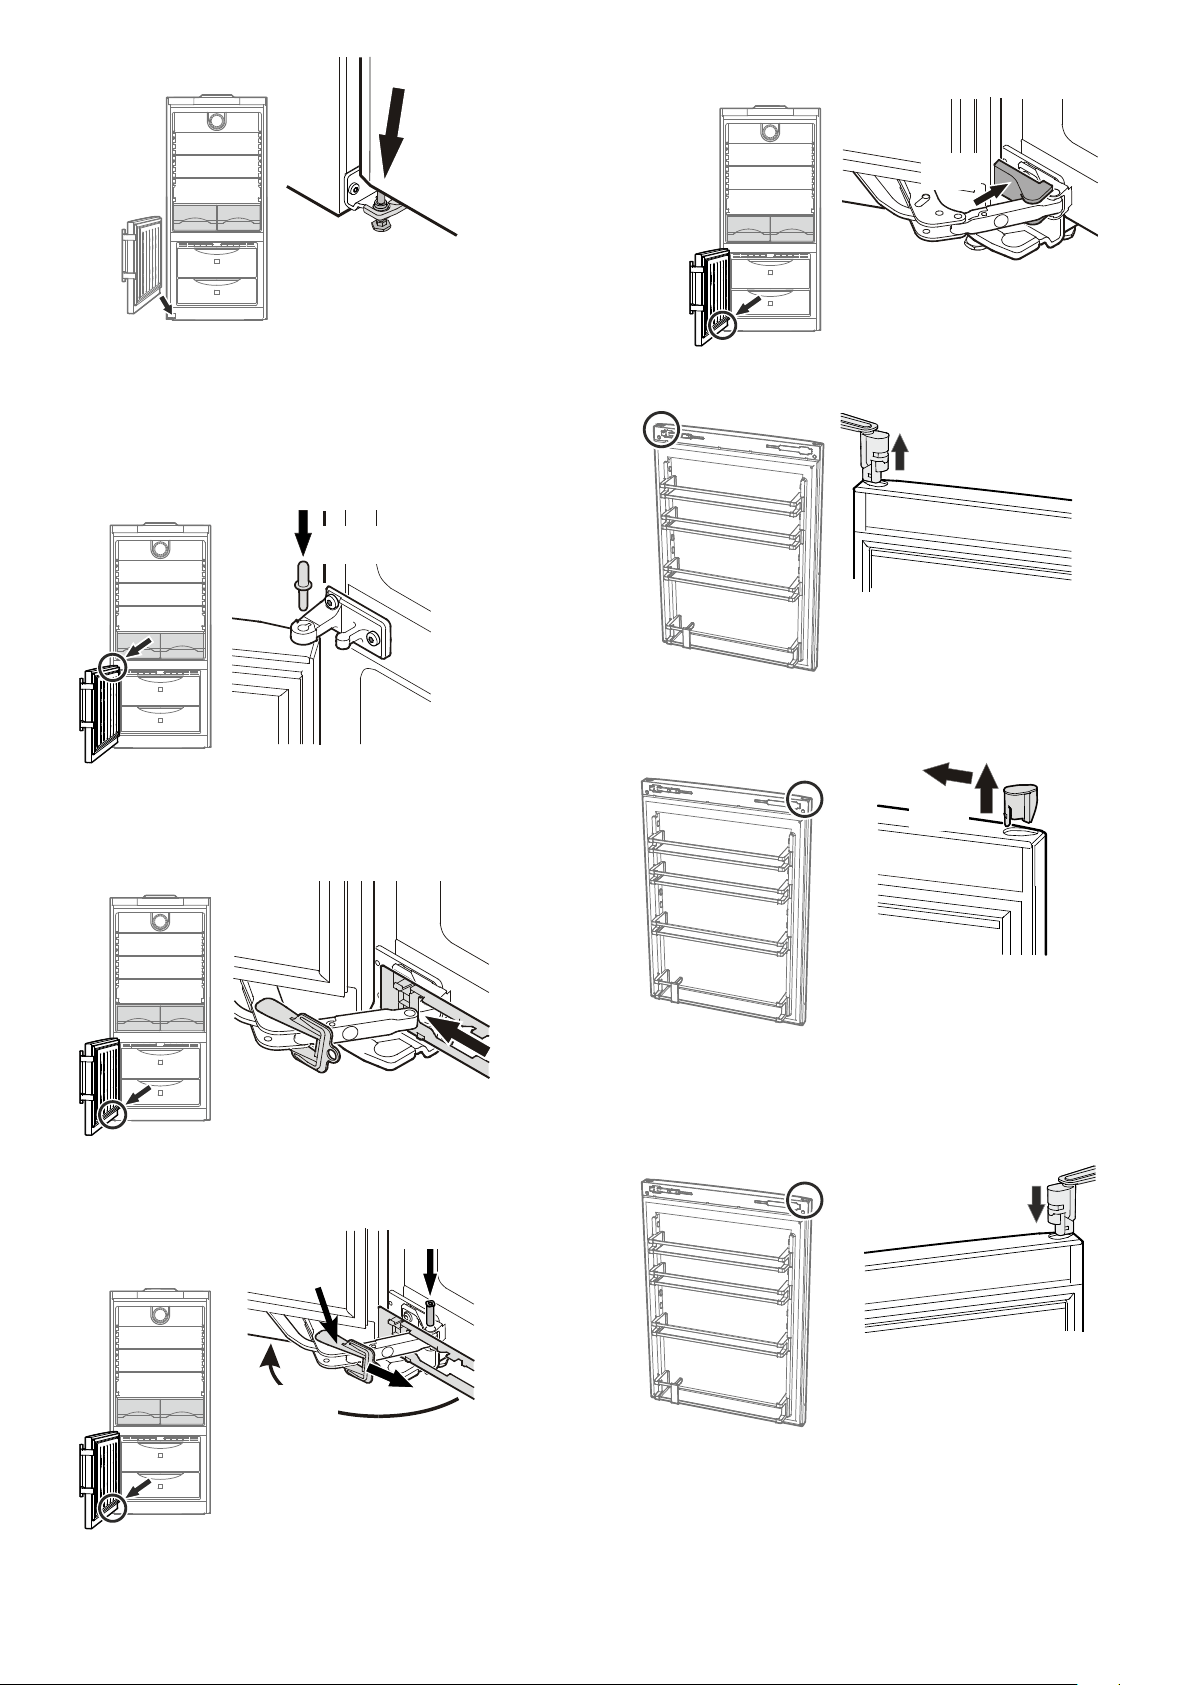
23. Tilt appliance slightly backwards and un-
screw the adjustable foot.
24. Remove the hinge pin
25. Unscrew hinge bracket.
26. Transfer fastener for soft stop
mechanism on hinge bracket
to the opposite side.
27. Transfer cover to the opposite
side.
23.
24.
25.
26.
27.
28. Transfer cover plate to the opposite side.
29. Screw hinge bracket into place.
29.
28.
31.
32.
32.
31. Release pressure plates at the
front
1
and pull them back-
wards to remove
2
.
32. Transfer door handle and plugs
to the opposite side.
30. Tilt appliance slightly backwards, insert
pin and attach using the adjustable foot.
33. Transfer panels of both
door covers to the oppo-
site side.
30.
33.
33.
Both doors
34. Remove screw.
35. Pivot soft stop mechanism outwards on
the right, pull to the right and remove.
36. Slide spacer to the left and remove.
34.
35.
36.
Both doors
37. Turn spacer through 180° and re-fit on the
opposite side.
38. Turnsoftstopmechanismthrough180°and
re-fit on the opposite side. Then secure both
parts with screws.
37.
38.
19
39. Suspend bottom door on
hinge pin.
39.
IMPORTANT
The door must now be held secure by another
person.
42. Move soft stop mechanism hinge
to the fastener and insert pin.
43. Remove red safety bracket.
44. Pivot door cover to the left and click
into place on the door.
42.
43.
44.
40. Insert middle hinge pin.
41. Slide door cover over soft stop
mechanism hinge.
40.
41.
48. Insert hinge.
48.
46. Using a screwdriver, push out the
hinge from underneath and remove
it from the door .
47. Using a screwdriver, push out the
plug from underneath and transfer
it to the opposite side.
45. Click cover into place.
45.
46.
47.
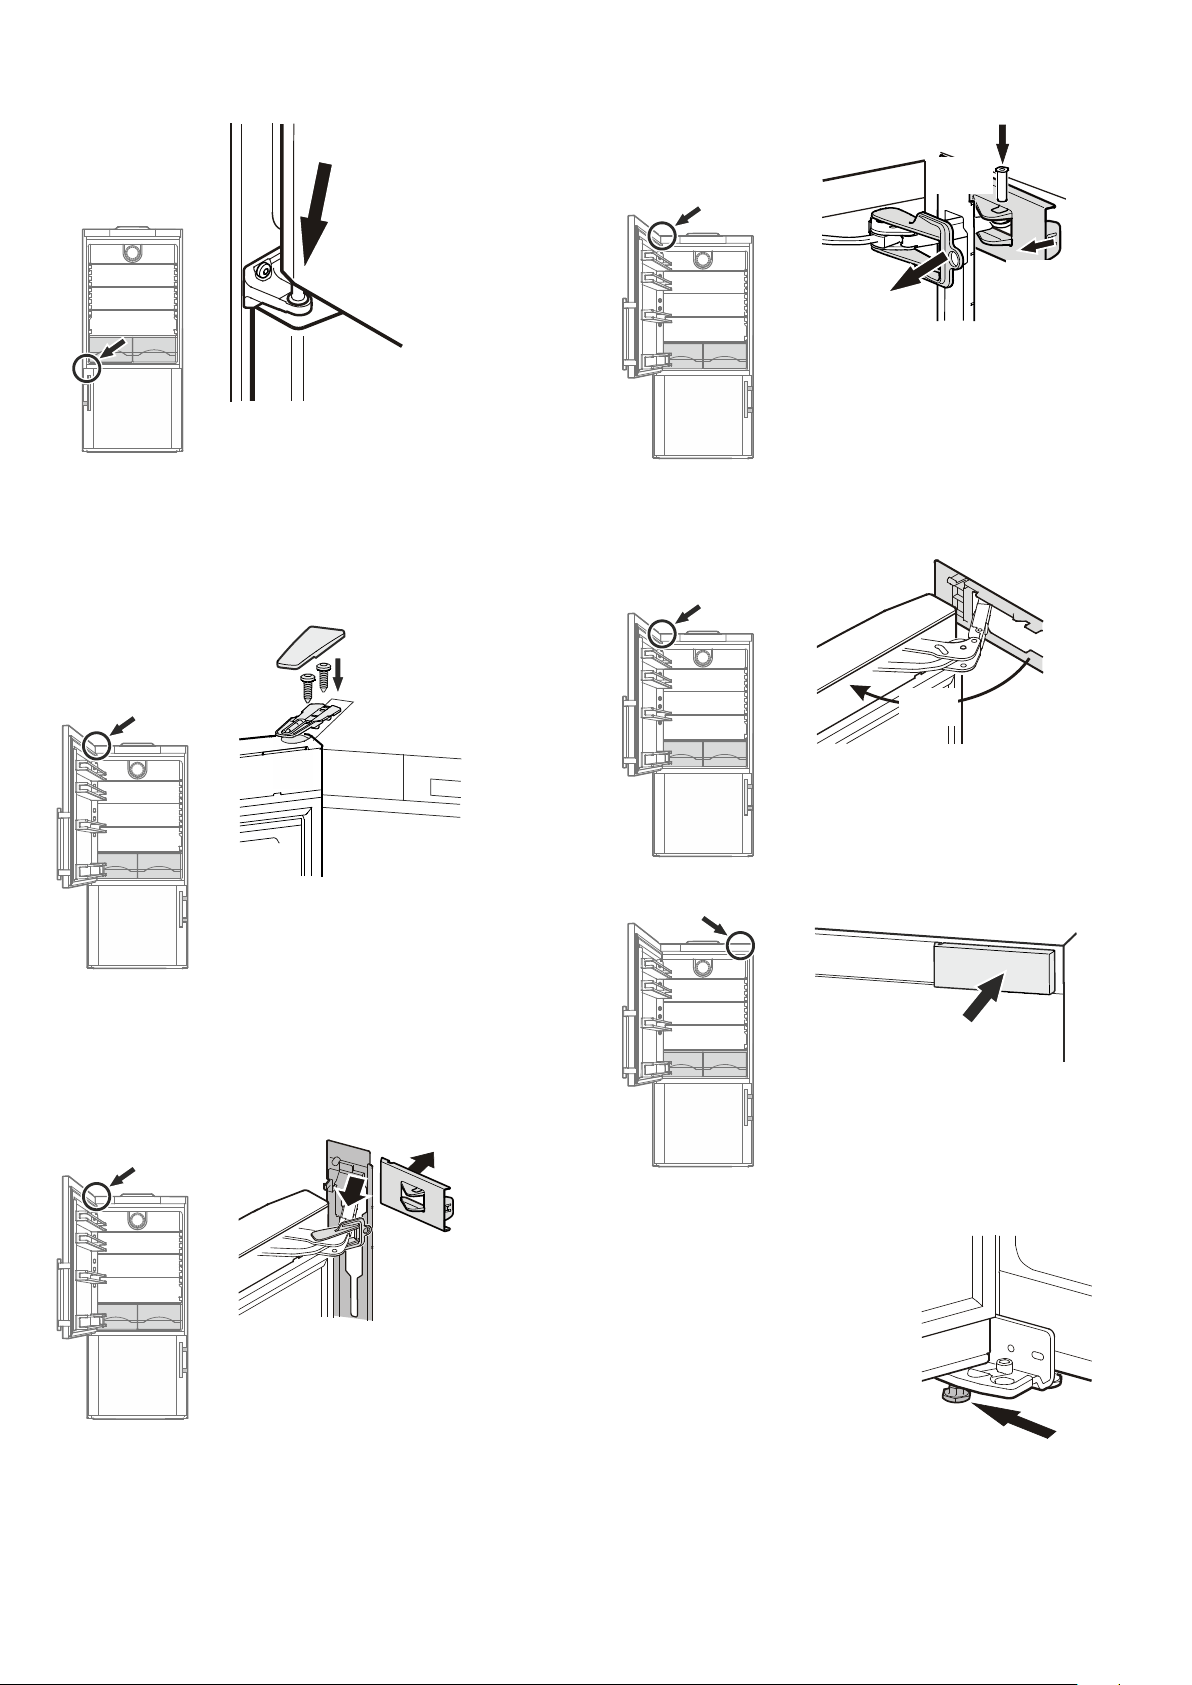
20
49. Suspend top door on hinge pin. For this,
the door must be open at least 90°.
49.
50. Secure door with screws and
click cover into place.
51. Click cover into place.
52. Slide door cover over soft stop
mechanism hinge.
50.
51.
52.
53. Pull the right-hand side of the cover
approx. 1/4" (6 mm) towards you.
54. Move soft stop mechanism hinge to the
fastener and insert pin.
55. Remove red safety bracket.
56. Pivot door cover to the left and click
into place on the door.
57. Click cover into place.
58. Place the appliance in its final
position at the place of installation.
Extend the adjustable foot at
the bottom hinge bracket until it
rests on the floor and then make
a further 90° turn.
54.
53.
55.
56.
58.
57.
IMPORTANT
The door must now be held secure by another
person.

21


Liebherr Hausgeräte Lienz GmbH
Dr.-Hans-Liebherr-Strasse1
A-9900 Lienz
Österreich
www.liebherr.com