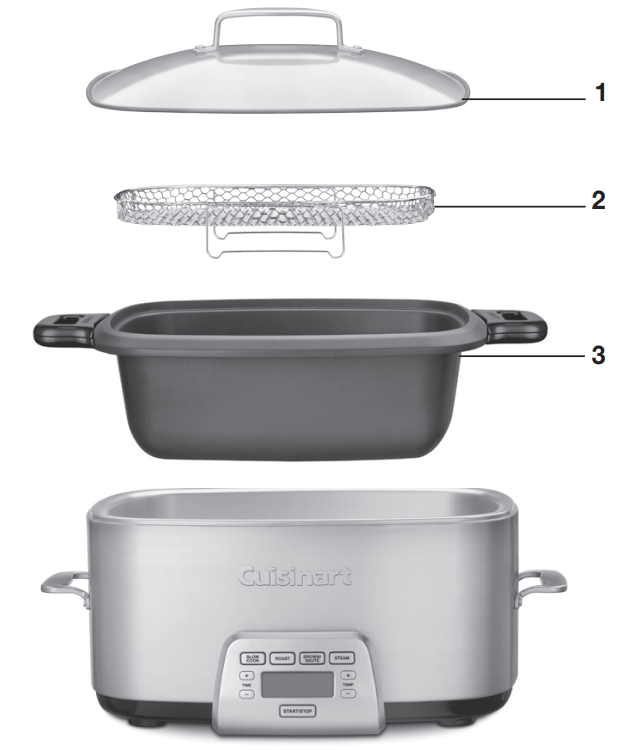
Check the progress of a dish without releasing heat.
2. Reversible Steaming/Roasting Rack
Elevates ingredients to steam or lifts ingredients off pan bottom to roast.
3. Cast Aluminum Nonstick Cooking Pot
Spreads heat evenly to perfectly brown, sear and sauté ingredients right in unit.
Extra-large 7-qt capacity.
4. Retractable Cord (not shown)
For convenient, easy storage.
5. BPA Free (not shown)
All parts that come into contact with food are BPA free.
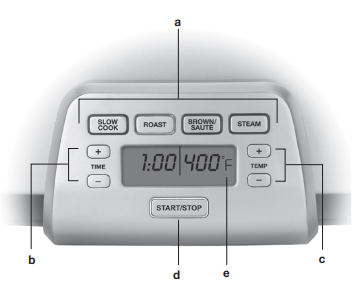
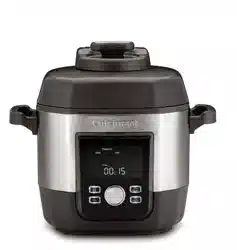
GETTING TO KNOW YOUR CONTROL PANEL
a. Cooking Function Buttons
Use to select SLOW COOK, ROAST,
BROWN/SAUTÉ or STEAM.
b. Time Directionals
Use to set cooking time. Press and hold to scroll quickly; press and release to advance more slowly.
c. Temperature Directionals
Use to set cooking temperatures.
Press and hold to scroll quickly; press and release to advance more slowly. d. Start/Stop Button
Starts and stops cooking function.
e. Blue Backlit LCD Display
Side-by-side display shows cooking time and temperature.
OPERATION
Cooking is simple with the Cook Central™ 4 in-1 Multicooker. Use the slow cooker as you would a normal slow cooker, the roaster as you would a normal oven and brown/sauté as you would a skillet.
Select your cooking function.
Set your desired cooking time and temperature.
Press START/STOP to begin cooking.
To turn off the heater at any time during cooking, press START/STOP.
NOTE: Always use pot holders during and after cooking, and always lift the lid away from you – the unit is hot.
CHANGING SETTINGS DURING COOKING
Switching functions during cooking is easy. Press the new cooking function button and the unit will adjust to the default settings for your selection. Set your desired time and temperature as needed.
You can adjust cooking time or temperature at any point with the Time/
Temperature Directionals.
There is no need to press START/STOP to select new settings.
COOKING WITHOUT A TIMER
If you do not wish to program a time, the unit will cook at the selected temperature until you manually turn the heater off. The heater will turn off after the maximum allowable cooking time for the selected function has been reached.
NOTE: Do not leave the unit on 500°F for over 1 hour – prolonged heat at this high temperature can harm the nonstick coating or overheat the unit.
SLEEP MODE
The multicooker is equipped with a powersaving Sleep mode that will turn off the lights if there is no use. The unit will also enter this mode if you manually stop cooking. Press any button to “wake up” the unit and operate as normal.
PROGRAMMING
BROWN, SAUTÉ, SEAR
Press BROWN/SAUTÉ. A preset temperature of 350°F will flash, as this is the most commonly used Brown/ Sauté temperature.
Press Temperature Directionals to select a different temperature (from 250°F to 500°F).
Press the START/STOP button to begin preheating. Selected temperature will flash during heatup.
When selected temperature is reached, two beeps will sound. Add ingredients to cooking pot—for best results, do not crowd pot.
Once cooking is complete, press START/STOP to stop cooking, or if you’ve browned ingredients as a first step in your recipe, switch to the next function in your recipe. There is no need to press START/STOP again, as the unit is already cooking.
NOTE: Though browning is usually a hands-on task, you can set a cooking time if you wish with the Time Directionals.
If time is selected, countdown will start when selected temperature is reached.
Unit will automatically shut off when countdown is complete.
SLOW COOK
Fill cooking pot with ingredients and cover with lid.
Press SLOW COOK. A preset temperature setting of Low will flash, as this is the most commonly used Slow Cook setting.
Press Temperature Directionals to select High, Low, Simmer or Warm, displayed along the bottom of the LCD.
Set desired cooking time (up to 24 hours) with Time Directionals.
Press the START/STOP button to begin cooking. Selected time and temperature setting (High, Low, Simmer or Warm) will be displayed.
NOTE: If you brown ingredients before switching to slow cooking, the unit is already on, so Step 5 is not necessary.
When slow cooking on High, Low or Simmer, the unit will beep five times at the end of the cooking time and will automatically switch to the Keep Warm setting for 8 hours.
When Keep Warm time elapses, one beep will sound and heater will turn off.
To turn the heater off manually at any time, press the START/STOP button.
NOTE: The U.S. Department of Agriculture (USDA) recommends that when cooking in a slow cooker, food should reach 140°F within 3 hours.
ROAST
Put cooking rack in pot in Roast position, as shown below. Place ingredients on rack and cover pot with lid for faster heatup.
2. Press ROAST. A preset temperature of 350°F will flash, as this the most commonly used Roast temperature.
3. Use Temperature Directionals to select a different temperature (from 250°F to 450°F).
4. Set desired cooking time (up to 6 hours) with Time Directionals.
5. Press the START/STOP button to begin preheating. Selected time and temperature will flash as unit heats up.
NOTE: If you brown ingredients before switching to roasting, the unit is already on, so Step 5 above is not necessary.
6. When selected roasting temperature is reached, the unit will beep two times and the timer will begin counting down cooking time.
7. When cooking time has elapsed, the unit will beep five times and the heater will automatically turn off.
8. Carefully remove food from pot with spoon, fork or tongs. Do not use rack as handles; they will be hot.
9. To turn the heater off manually at any time, press the START/STOP button.
STEAM
Place about 1 quart (4 cups) of water or other liquid in cooking pot and place cooking rack in steam position, as shown below; cover with lid. For best results, do not add ingredients to pot until steaming temperature is reached preheating is complete).
2. Press STEAM. Steaming temperature cannot be changed.
3. Set desired cooking time (up to 1½ hours) by pressing Time Directionals.
4. Press the START/STOP button to start preheating. Selected time and temperature will flash as unit heats up.
5. When steaming temperature is reached, the unit will beep two times and the timer will begin counting down cooking time.
With pot holders, carefully lift lid away from you and place food on rack, starting in the middle and working your way out.
Be sure to cover pot with lid again.
6. When cooking time is completed, the unit will beep five times and the heater will turn off automatically.
7. Carefully remove food from pot with spoon, fork or tongs.
8. To turn the heater off manually at any time, press the START/STOP button.
NOTE: The unit is equipped with a boil-dry protection. If all water has boiled out, the unit will shut off to avoid damaging the heater.
CLEANING & CARE
All removable parts are dishwasher safe.
Unplug unit and allow it to cool completely before cleaning.
Never immerse unit in water or other liquids.
To clean the housing and control panel, simply wipe with a clean damp cloth.
Wash cooking pot, lid and rack with warm soapy water and rinse thoroughly. Or, clean in the dishwasher.
Dry all parts after every use.
Maintenance: Any servicing should be performed by an authorized service representative.
NOTE: If food residue sticks to cooking pot surface, fill pot with warm soapy water and allow to soak before cleaning. If scouring is necessary, use a nonabrasive cleanser or liquid detergent with a nylon pad or brush.
TIPS & HINTS
Heatup times may vary in different cooking modes, based on a number of factors. The selected temperature, the current temperature of the cooking pot, the contents of the pot, and other factors can all affect heatup time.
For example, you may reach the set temperature in the Brown/Sauté mode, but require additional heatup time if you switch to the Roast mode, even though your temperature selection is the same.
For an idea of how long it takes to reach a temperature in different modes, see below:
Brown/Saute (350ºF, empty pot) - 5 min
Roast (400ºF, with 4-lb roast) - 9½ min
Steam (1 quart of water) - 8½ min
Always use nonstick utensils in your cooking pot. Metal utensils may damage the nonstick coating.
BROWN/SAUTÉ TIPS
Use Brown/Sauté as you would a skillet or sauté pan on the stove – from quickly sautéed skillet dishes to the first step in many braised or slow-cooked dishes.
Brown/Sauté also works well to brown foods on all sides before roasting.
For even browning, it is important not to crowd the pan. Foods should be cooked in an even layer on the bottom of the pan, so it is good to cook foods in batches when necessary.
Many recipes call for browning and sautéing foods before slow cooking or roasting. Some items produce more grease and fat than is desirable in the finished dish. To remove the excess grease, using pot holders, very carefully remove the cooking pot from the base and pour out the grease from the corner of the cooking pot. Return the cooking pot to the base and finish cooking the dish as desired.
When browning meats, any brown bits that are left in the bottom of the pan can be used to flavor the dish. Simply add a small amount of liquid (like wine or broth) to the pan and scrape up the browned bits with a wooden spoon – leave in pot.
Incorporate into the dish or sauce.
Foods can be reheated with the Brown/Sauté function. Put precooked foods into the cooking pot. Set on Brown/Sauté at 350°F. Stir ingredients while heating so that all ingredients are warmed through.
Once food is simmering, switch to Warm on the Slow Cook function for serving.
ROASTING TIPS
For roasting, foods should first be placed on the roasting rack and then into the multicooker pot. The pot should then be covered during preheating and cooking.
There are some recipes that do not require the use of the rack – some dishes benefit from direct heat.
Be careful removing foods after roasting, as the sides of the pot can still be very hot. Allow foods like roasted meats to rest for about 10 minutes for juices to distribute evenly. Remove foods from rack and arrange on a cutting board or platter for serving.
Foods like meats and poultry benefit by browning first on all sides to caramelize the exterior and lock in flavors.
For easy food release, spray roasting rack with nonstick cooking spray before roasting.
Baked goods like cakes and breads can also be prepared using the Roast function. An 8-inch round or square pan or a loaf pan fits well on top of the roasting rack. For baking, the roasting temperature should be set the same as you would your oven.
SLOW COOKING TIPS
Slow cooking is perfect for foods that require long, slow simmering, such as soups, stocks, stews, and dried beans.
Slow cooking is ideal for tougher and less expensive cuts of meat like shoulder and pot roast.
We encourage browning foods before slow cooking as it adds much depth and flavor to the finished dish. However, if time is short this step can be skipped and all ingredients can be added to your cooking pot to slow cook.
When converting a traditional slow cook recipe for the multicooker that incorporates the Brown/Sauté or Roast function first the liquid amount will need to be increased. This is because the cooking pot will start at a higher temperature than it would in a traditional slow cooker. Every recipe is different and we’ve created our recommended recipes accordingly, but our approximate guideline is to double the liquid for a long braise and increase it by about 50% for a soup or stew. Also, set the slow cook timer to the lower end of the recommended time range.
Ground meats should always be browned before slow cooking.
Slow cook up to 24 hours, with an 8 hour Keep Warm. Certain foods benefit from a long, slow cook time on either
Low or Simmer, but may be finished and served much sooner. Some included recipes have a range of cooking times – adjust the recommended time to suit yours.
For best cooking results, fill multicooker at least one-quarter full but not more than three-quarters full.
To ensure that root vegetables such as carrots and potatoes are cooked through, they should be cut no larger than 1-inch pieces. This is most important for slow-cooked dishes under 6 hours.
"Crisp-tender” vegetables should be added during the last 30 minutes of cooking time to prevent overcooking.
Fresh herbs should be stirred into dishes immediately before serving.
In general, cooking for 1 hour on High is the equivalent of cooking for 2 hours on Low.
The Keep Warm function keeps foods at perfect serving temperature after they are finished cooking on the Slow Cook function.
We do not recommend removing the lid when slow cooking as heat will escape, requiring extra cooking time.
Each time the lid is removed, about 15 to 20 minutes of cooking time should be added.
A fat mop can be used to remove separated fat from slow-cooked food by brushing it over the top. Alternatively, the food may be refrigerated and the congealed fat can then be lifted off and discarded before reheating and serving.
Many slow-cooked foods such as stews benefit from cooling and refrigerating, then reheating – as the saying goes, stew or chili is always better the second day.
A great way to reheat slow-cooked foods is to bring them to a simmer on the Brown/Sauté function at 350°F. Stir to ensure all ingredients are warmed through and then switch to Warm on the
Slow Cook function for serving.
If using frozen foods, thaw completely before slow cooking.
Recipes can be assembled the night before cooking. Brown ingredients if necessary and then combine with remaining ingredients in cooking pot.
Cover and refrigerate. When ready to cook, place the cooking pot in the cold multicooker and add 30 minutes to your projected cooking time.
To decrease the amount of fat in recipes, remove as much of the visible fat as possible from meats and poultry.
Remove skin from poultry and drain any fat from browned meats.
Dried beans should be soaked overnight, then brought to a boil, drained and rinsed before cooking. Do not add salt or any acid to beans when cooking, as it will prevent them from softening completely. Dried beans can be cooked ahead, drained and frozen. Thaw to add to your favorite recipes.
Adapt your own recipes to slow cook:
For recipes that do not require Brown/ Sauté or Roast function before slow cooking, reduce the cooking liquid by at least 50% (soups are the exception).
Liquids do not evaporate as they do in traditional cooking, and most often you will end up with much more liquid than you began with.
When converting a traditional slow cook recipe that incorporates the Brown/Sauté or Roast function first, the liquid amount will need to be increased. Every recipe is different. Our approximate guideline is to double the liquid for a long braise and increase it by about 50% for a soup or stew. Also, set the slow cook time to the lower end of the recommended time range.
Certain cuts of meat are more appropriate for slow cooking. Lean cuts such as boneless, skinless chicken breast or pork tenderloin may seem dry if slow cooked.
See our suggestions on page 9 for more information.
Dairy products (milk, sour cream, some cheeses) will break down and curdle during slow cooking. Substitute canned evaporated milk, nonfat dry milk, or add dairy products during the last 30 minutes of cooking.
When making soups, add solid ingredients to multicooker and then liquid to cover. If a thinner soup is desired, add more liquid to taste when finished.
If your recipe calls for precooked pasta, UNDERCOOK it and add to the pot in the last 30 minutes of slow cooking. The same goes for rice. Add precooked rice in the last 30 minutes of cooking.
STEAMING TIPS:
Steaming is one of the healthiest methods of cooking, as the smallest amount of nutrients are lost in the cooking process.
To steam, fill the multicooker pot with quart of water unless otherwise indicated.
When adding heavier foods like corn on the cob to the steaming rack, place them on the middle of the rack and work your way to the edges.
There are some instances when it is best to add ingredients to the rack before preheating, such as delicate food like dumplings or tamales.
Always use caution when removing lid. It is best to remove the lid away from you.
COOKING GUIDELINES
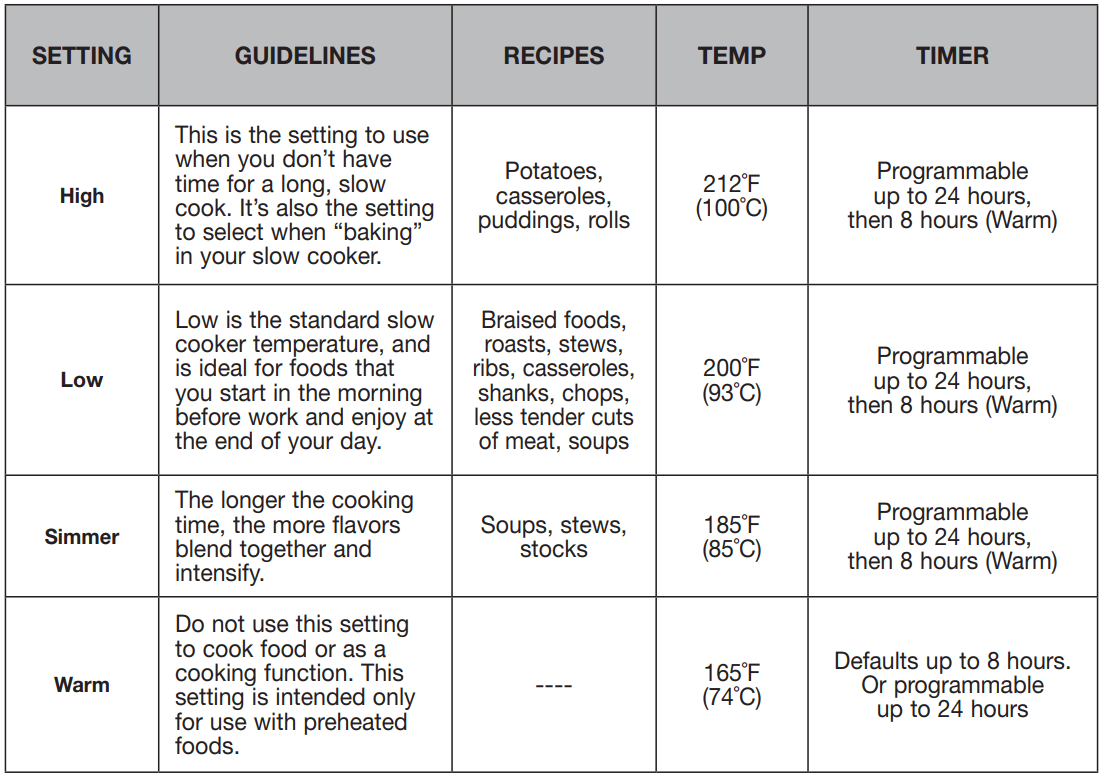
Slow Cooking Modes
Three cooking modes, Simmer, Low and High, give you the opportunity to prepare a wider variety of dishes. You will usually want to use the Simmer or Low setting for recipes that cook longer. If you’re starting a dish later in the day, select the High setting to ensure that your food is cooked, warm, and ready when you’d like to eat.
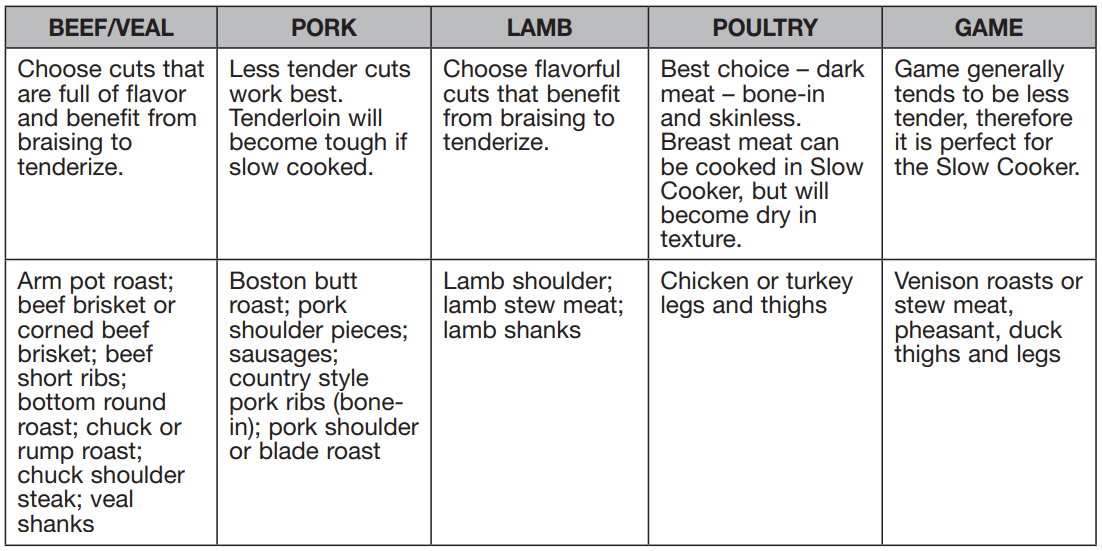
Suggested Cuts of Meat for Slow Cooking
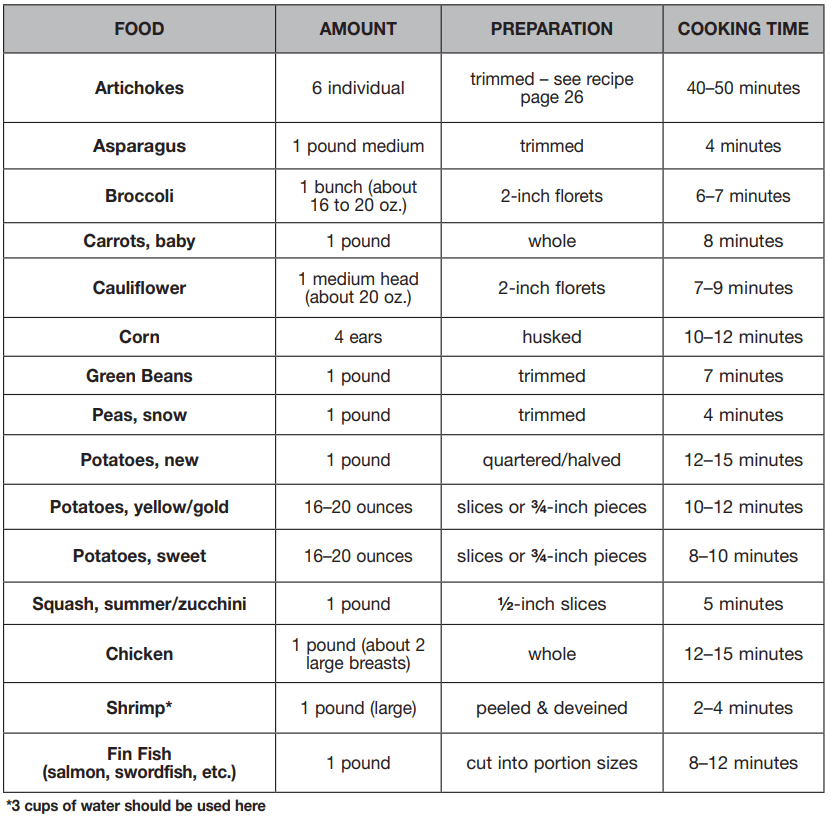
Steaming Chart
TROUBLESHOOTING
- - - - - - - (Error Codes flashing) indicates that the pot has been removed from the unit or is not seated properly. The heater will turn off temporarily if the pot is removed to avoid damage. Once the pot is returned, the unit should resume cooking.
Note: If the pot is out of place for over minutes, you will need to restart the program.
Err indicates the unit has overheated. Wait for the unit to cool down and try again. If the problem persists contact Customer Service at 1-800-726-0190.
Troubleshooting Chart
Subject
Question
Answer/Solution
Why won't my unit turn on?
Check to make sure your unit is plugged into a functional outlet.
Contact Customer Service at 1-800-726-0190.
If no cooking function has been started, the cooker will enter sleep mode after 5 minutes of no use. All lights will turn off. Press any button to “wake up” the unit and operate as normal.
It is possible the unit overheated. Wait for the unit to cool down and try again. If it does not turn back on, contact Customer Service at 1-800-726-0190.
If all of your water has boiled out during steaming, the unit will shut off as a safety precaution. To continue steaming, add water to the pot and restart the program.
Power
Why is my unit turning itself off?
If the pot is out of place for more than 15 minutes, when the pot is replaced, the unit will not resume cooking. You will need to restart the program.
If changing functions when the unit is already cooking, you do not need to hit the START/STOP button again to select. Doing so will turn the unit off. Simply press your new function and select your desired settings; the unit will switch automatically.
The heater will turn off automatically after the cooking time and/ or Keep Warm time have elapsed. This is normal.
If you do not set a cooking time, the unit will cook for the maximum allowable cooking time before shutting off automatically. This is normal.
Can I set a timer for the Brown/ Saute function?
Yes. Setting a timer for brown/saute is an optional step. Simply set your timer using the Time Directionals as you would any other function.
Programming
Can I change my cooking function, time or temperature when the unit is already cooking?
Yes. Simply use the cooking function, Time and Temperature Directionals, to change your programming. Note: The unit is already on, so you do not need to hit the START/STOP button again to select. Doing so will turn the unit off. Simply press your new function or desired settings; the unit will switch automatically and adjust accordingly.
When should I brown my meat before slow cooking/roasting?
Browning meat before slow cooking and roasting is an optional step. It is beneficial, as it adds flavor and color, but the step can be omitted if time is short. Exception: ground meats.
Cooking
Which position should the rack be in for steaming/roasting?
The rack is intended for steaming in the “up” position. The rack is intended for roasting in the “down” position (see page 5).
Can I use the cooking pot on the stove/in the oven?
The cooking pot was designed specifically for use in this multicooker. We do not suggest using it on the stove or in the oven.
Why is there not enough liquid in my slow cooked dish?
Recipe ingredient amounts may vary if using multiple functions. See page 8 for details.
Can I put my unit in the dishwasher?
All removable parts are top-rack dishwasher safe.
Do not immerse or put the base of the unit in the dishwasher. Clean the base and control panel with a clean damp cloth.
Cleaning
The pot is nonstick - why is food sticking?
While the pot does have a nonstick coating, it is possible for food residue to burn onto the pot, making it difficult to remove.
Food residue is sticking to the cooking pot surface. How do I clean it without damaging it?
If food has burned on, fill pot with warm soapy water and allow to soak before cleaning. If scouring is necessary, use a nonabrasive cleanser or liquid detergent with a nylon pad or brush.