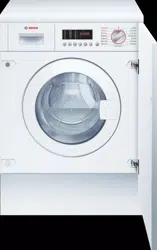
User Manual Dryer
Positioning and connecting
Standard accessories
Note: Check the appliance for transport damage. Never use a damaged appliance. If you have any complaints, contact the dealer from whom you purchased the appliance or our Customer Service.
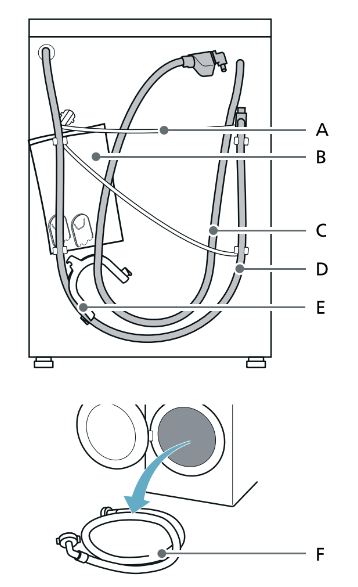
A Mains lead
B Bag*:
- Installation and operating instructions
- Customer Service location directory*
- Warranty*
- Supplementary sheet for the installation and operating instructions*
- Cover caps for openings after the transport braces have been removed
C Water inlet hose on aquaStop models
D Water outlet hose
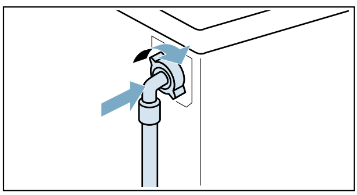
E* Elbow to secure the water outlet hose
F Cold water inlet hose on Standard/Aqua-Secure models
* Depending on the model
Included with the appliance
Number Description
5 Covers for openings left after removing the transport bolts.
1 Spanner
1 24-40 mm dia. hose clamp for connection to a siphon
1 Door template
2 Door hinges with screws
Useful tool
- Wrench for loosening the transport bolts and aligning the appliance feet
- Wrench with:
- WAF13 for loosening the transport braces and
- WAF17 for aligning the appliance feet
Safety instructions
Warning
Risk of injury!
- The appliance is very heavy.
Be careful when lifting/transporting the appliance.
- When the appliance is lifted by its protruding parts (e.g. the appliance door), the components may break off and cause injuries. Do not lift the appliance by protruding parts.
- If the hose and mains cables are not routed properly, there is a risk of tripping and injury.
Lay hoses and cables in such a way that there is no risk of tripping.
Caution!
Damage to the appliance
Frozen hoses may rip/burst.
Do not install the appliance in areas exposed to frost or outdoors.
Caution!
Water damage
The connection points for the water supply hose and water drain hose are under high water pressure. To prevent leaks and water damage, you must follow the instructions in this section.
Notes
- In addition to the safety information listed here, the local water and electricity suppliers may have special requirements.
- If in doubt, have the appliance connected by a specialist.
Removing the transport locks
Caution!
Damage to the appliance
- The appliance is secured for transportation using transport locks.
If the transport locks are not removed, the appliance may become damaged when it is
operated.
- To prevent transport damage from occurring if the appliance is moved at a later date, you must refit the transport locks before transporting the appliance.
Note: Keep the screws and sleeves in a safe place.
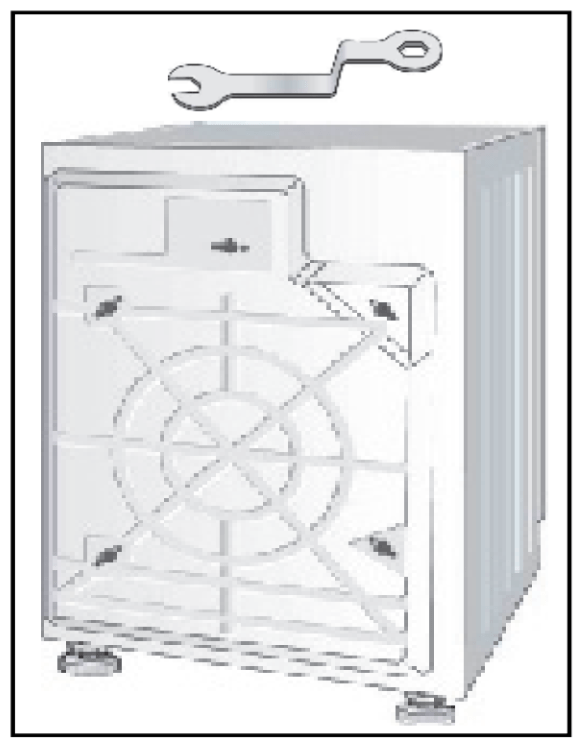
1. Unscrew all screws using the spanner supplied.
- Remove all transport safety bolts completely
- take the mains cable out of the retainers
2. Insert the protective covers.
Notes
- Before using the appliance for the first time, make sure that all transport safety bolts have been removed and kept safe for any subsequent transport.
- If you need to transport the appliance at a later date, always refit the transport safety bolts to prevent damage to the washer and dryer.
Installation surface
Note: The appliance must be stably aligned so that it does not move around.
- The installation surface must be firm and level.
- Soft floors/floor coverings are not suitable.
Installation on a base or a wooden joist floor
Caution!
Damage to the appliance
The appliance may damage the appliance and kitchen furniture when spinning.
Note: On wooden joist floors, install the appliance:
- The feet of the appliance must be secured,
- On a water-resistant wooden board (min. 30 mm thick) which is screwed tightly to the floor.
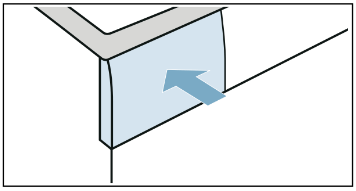
Positioning and leveling
Caution!
Appliance stability is essential to ensure that the washer-dryer does not “creep” during spin cycles.
The installation area must be firm, clean, and level.
Parquet floors and soft floor coverings, e.g. carpets or foam-backed floor coverings, are unsuitable.
Installing the appliance in a kitchenette
Warning
Risk of death!
There is a risk of electric shock if you touch live components.
Do not remove the appliance covering plate.
Notes
- A recess width of 60 cm is required.
- Only install the appliance underneath a continuous worktop that is securely connected to adjacent cabinets
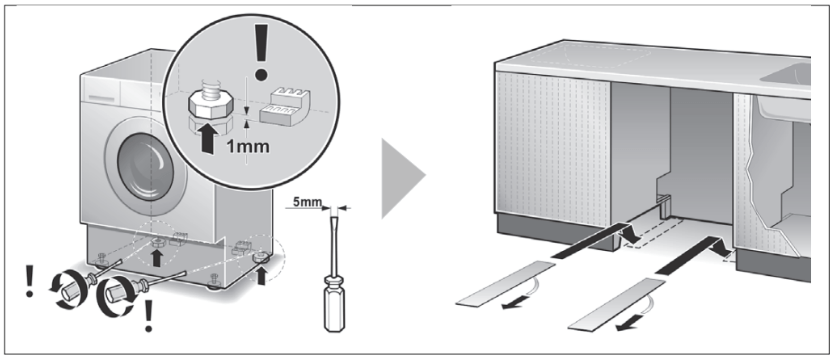
Slide sheets make it easier to slide the washing machine into the installation recess.
Notes
- Can be ordered from the after-sales service, spare part no. 66 1827.
- Moisten the slide sheets with a mixture of water and washing-up liquid before sliding the washer-dryer into place. Do not use grease and/or oil.
Leveling
Caution!
Intense noise, vibrations, and wandering may be the result of incorrect leveling.
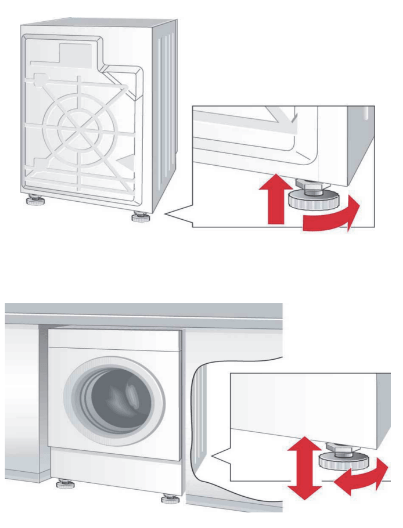
Notes
- All four appliance feet must stand firmly on the ground.
- The washer-dryer must not wobble.
- Check the levelness of the washer-dryer with a spirit level and correct it if necessary.
- The washer-dryer must not rest against the sides of the installation recess.
- The lock nuts of the front appliance feet must be screwed tightly against the housing.
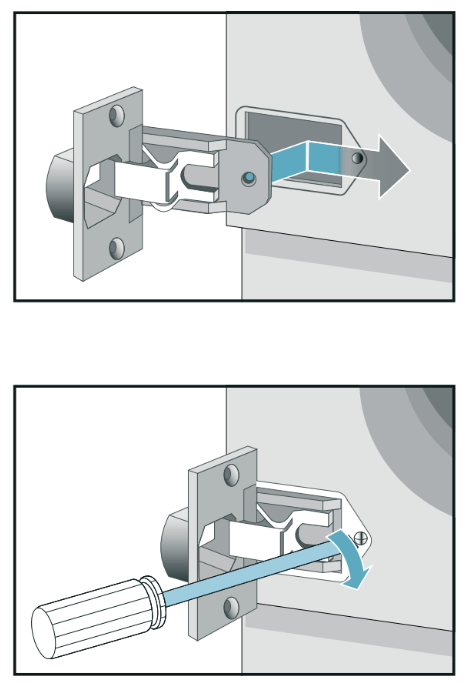
Fitting the door hinges
Caution!
Once the washer-dryer has been installed in a kitchen unit, it can be concealed with a door. Hinges supplied to the washer-dryer must be fitted.
Hose and cable lengths
Connection on the left side or connection on the right side
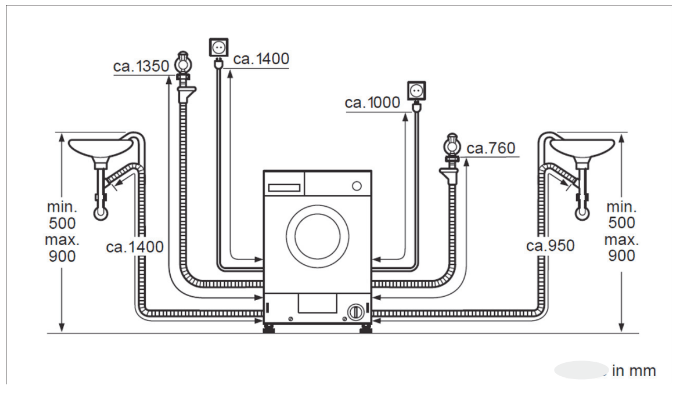
Note:
If the supply hose is too short for your connection, you can order an extension from the after-sales service.
Water inlet
Warning
Risk of death!
There is a risk of electric shock if you touch live components.
Do not immerse the Aqua-Stop safety valve* in water (it contains an electric valve).
* Depending on the model
Observe the following when connecting the appliance:
Notes
- Only operate the appliance using cold mains water.
- Do not connect the appliance to the mixer tap of an unpressurized hot-water boiler.
- Do not use a used supply hose. Only use the supply hose supplied or one that was purchased from an authorized specialist retailer.
- Do not bend, squash, modify or cut through the water supply hose (otherwise its strength is no longer guaranteed).
- Only tighten the screw connections by hand. If the screw connections are tightened too much with a tool (pliers), the thread may be damaged.
Optimum water pressure in the supply network
At least 50 kPa (0,5 bar)
Maximum 900 kPa (9 bar)
When the tap is open, the water flow is at least 8 l/min.
If the water pressure is higher than this, a pressure-reducing valve must be installed.
Caution!
Water damage
When water is being pumped away, the outlet hose is under water pressure and may slip out of the wash basin or connection point. Secure the drain hose so that it cannot slip out.
Connection
1. Connect the water supply hose to the water tap (3⁄4" = 26.4 mm) and to the appliance (*depending on the model):
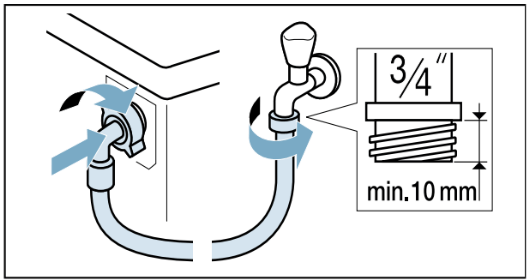
Tip: Connect also an external water filter (depending on the model) between the water supply hose and tap.
The filter filters dirt particles out of the water.
The water filter must be cleaned regularly to remove contaminants. This will prevent blockages. See also ~ separate installation and cleaning instructions for the water filter.
2. Open the water tap carefully, checking the leak tightness of the connection points. The screw connection is under mains water pressure.
Water outlet
Warning
Risk of scalding!
When you are washing at high temperatures, there is a risk of scalding if you come into contact with hot water (e.g. when draining hot water into a washbasin).
Do not reach into the hot water.
Caution!
Damage to the appliance/fabrics
If the end of the drain hose is immersed in the drained water, water may be sucked back into the appliance and may damage the appliance/fabrics.
Make sure that:
- The end of the drain hose is not immersed in the drained water.
- The water drains away quickly enough.
Note: Do not kink the water drain hose or put a strain on it lengthways.
Connection
The connection point must be secured using a hose clamp with a diameter of 24 - 40 mm (inside the accessory).
Electrical connection
Warning
Risk of death!
There is a risk of electric shock if you touch live components.
- Never touch or hold the mains plug with wet hands.
- Only pull out the mains cable by the plug and never by the cable, as this could damage it.
Observe the following information and ensure that:
Notes
- The mains voltage and voltage indicated on the appliance (rating plate) are the same.
The connected load and fuse required are specified on the rating plate.
- The appliance is only connected to an alternating current via a properly installed earthed socket.
- The mains plug fits the socket.
- The earthing system is properly installed.
- The main cable is only replaced by a qualified electrician (if this is necessary). Replacement mains cables are available from the after-sales service.
- No multiple plugs/couplings or extension cables are used.
- If an earth-leakage circuit breaker is used, only a type that displays this symbol is used:
 .
.
Only this symbol guarantees compliance with the currently applicable regulations.
- The main plug can be accessed at all times.
- The mains cable is not bent, squashed, modified, cut through, or in contact with heat sources.
Before washing for the first time
The appliance was inspected thoroughly before leaving the factory. To remove any residual test water, run the Cotton 60°C program the first time without laundry.
Note:
- The appliance must have been installed and connected properly. ~ "Positioning and connecting"
- Never switch on a damaged appliance.
- Insert mains plug.
- Turn the water tap on.
- Close the door. Do not load any laundry.
- Select the Cotton 60°C program.
- Open the detergent drawer.
- Add standard detergent to dispenser II according to the manufacturer’s instructions for light soiling. Note: To prevent over-sudsing, use only half the recommended amount of detergent. Do not use any woolen or mild detergents.
- Close the detergent drawer.
- Select
 .
.
- When the program ends, turn the dial to the Off position and open the door.
Your appliance is now ready for use.
Transportation
e.g. when moving home
Preparatory work:
- Turn off the water tap.
- Reduce the water pressure in the supply hose.
- Drain any residual water.
- Disconnect the appliance from the mains.
- Remove the hoses.
- Empty the dispensers. ~ "Detergent drawer and housing"
Installing the transport locks:
- Remove the covers and keep them in a safe place. Note: Use a screwdriver if necessary.
- Insert all four sleeves.
a) Clip the main cable securely in the holders.
b) Insert and tighten the screws.
c) Clip the hoses securely in the holders.
Before switching on the appliance again:
Note: The transport bolts must be removed.
Getting to know the appliance
Appliance
- Detergent drawer
- Operating/display panel
- Loading door
- Service flap
Control panel
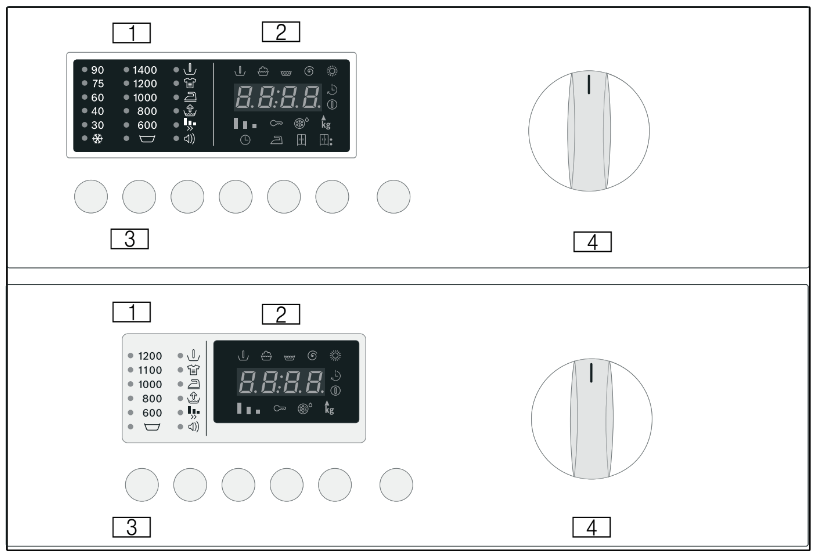
1. Indicator lamp*
Indicates the settings that have been selected for:
- Temperature
 90°C
90°C
- Spin speed 1400 rpm.
- Options/signal
2. Display Panel*
Shows the settings that have been selected (e.g. spin speed, drying time), the progress of the current program, and the program status.

3. Buttons*
- Temperature °C: individual adjustment of the washing temperature.
- Spin speed: individual adjustment of the spin speed.
- Options button: sets washing options.
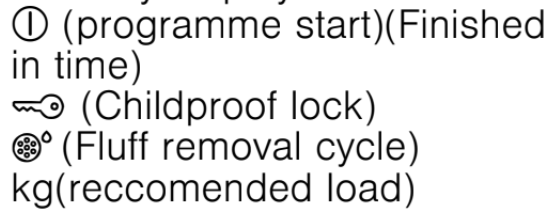
- Set: activation/deactivation of the selected washing options.
- Finished In delays the Program start.
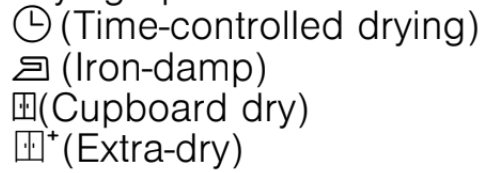
- Drying
 : sets the drying options
Start/Pause starts and stops the washing program.
4. Program selector*
Switching the washer-dryer on and off and selecting the program, can be turned in both
directions. Do not adjust the program selector while washing/drying is in progress.
* Depending on the model.
Operating the appliance
Preparing the appliance
The appliance was tested before delivery. To remove residual water from the test procedure, the first wash cycle should be run without laundry using the Cotton 60°C program.
Notes
- Never switch on a damaged appliance!
- Inform customer service!
1. Insert mains plug.
Warning
Risk of death from electric shock!
Risk of death if live parts are touched.
- Never pull out the mains plug by tugging the power cord.
- Insert/pull out the mains plug with dry hands only.
2. Turn the water tap on.
3. Open the appliance door.
Select the program/switch on the appliance
Note: If you have activated the childproof lock, you must first deactivate it before you can set a program.
Use the program selector to select the required program. The program selector can be rotated in either direction.
The appliance is switched on.
The program default settings for the selected program alternately appear in the display panel:
- The maximum load and
- the duration of the program and
- ...
Placing laundry into the drum
Insert the laundry.
Close the door.
Notes
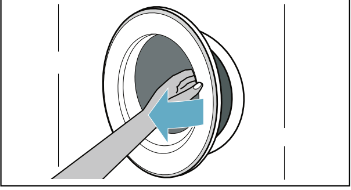
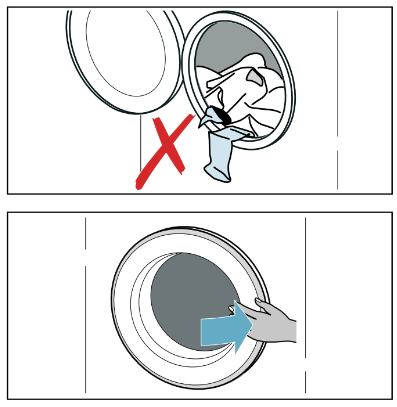
- Unfold and load presorted items of laundry. Mix large and small items. Washing items of different sizes distribute themselves better during the spin cycle. Individual items of washing may cause an unbalanced load.
- Observe the maximum specified load. Overfilling adversely affects the washing/drying result and promotes creasing. Make sure that no items of laundry are trapped between the door and the rubber seal, and close the door.
Dosing and adding detergent and care products
Caution!
Damage to the appliance
Detergents and agents for the pretreatment of laundry (e.g. stain remover, prewash sprays, etc.) may damage the surfaces of the appliance. Keep these agents away from the surfaces of the appliance. Using a damp cloth, immediately remove any fine spray residue and other residues/ droplets.
Dosing
Does the detergents and care products according to the:
- water hardness (ask your water supply company),
- the manufacturer’s specifications on the packaging,
- the amount of laundry,
- soiling.
Filling the dispensers
1. Pull out the detergent drawer.
Warning
Eye/skin irritation!
If the detergent drawer is opened while the appliance is running, the detergent/care product may run out.
Carefully open the drawer.
If detergent/care product comes into contact with eyes or skin, rinse thoroughly.
If accidentally swallowed, seek medical advice.
2. Pour in detergent and/or cleaning product.

Notes
- Always follow the manufacturer's instructions when dosing all detergents, cleaning aids, care products, and cleaning agents.
- Dilute viscous fabric softener and fabric conditioner with water. This will prevent blockages.
- Be careful when opening the detergent drawer while the appliance is running.
Measuring aid A* for liquid detergent
*depending on the model
Position the measuring aid A for measuring the correct amount of liquid detergent:
- Pull out the detergent drawer. Press down the insert and fully remove the drawer.
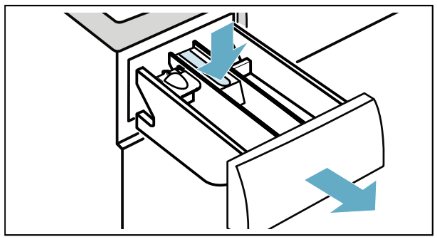
- Slide the measuring aid forwards, fold it down, and click it into place.
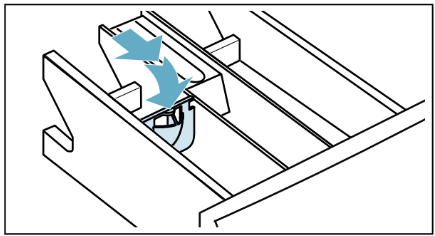
- Reinsert the drawer.
Note: Do not use the measuring aid for gel detergents and washing powder, for programs with pretreat, or when "Finish in" time is selected.
Childproof lock
You can lock the appliance to prevent the functions you have set from being changed inadvertently. To do this, activate the childproof lock.
To activate or deactivate the childproof lock:
After the program starts, press and hold the Option button and Set button.
 (Childproof lock) lights up: The childproof lock is activated.
Note: When the program ends, the door is unlocked. (Childproof lock) remain on to remind you to deactivate the childproof lock.
Removing laundry/switching off the machine
- Set the program selector to Off Off.
- Open the door and remove the laundry.
- Turn off the water tap.
Note: Not required for Aqua-Stop models.
Notes
- Do not leave any items of laundry in the drum. They may shrink in the next wash or discolor another item.
- Remove any foreign objects from the drum and the rubber seal – the risk of rusting.
- Wipe the rubber seal dry.
- Leave the door and detergent drawer open so that any residual water can evaporate.
- Always wait until the program ends, as the appliance could still be locked. Then switch the appliance on and wait for it to unlock.
Cleaning and maintenance
Warning
Risk of death!
There is a risk of electric shock if touching life components.
Turn the program selector to Off Off.
Pull out the mains plug.
Caution!
Fire and explosion hazards!
Toxic vapors can be produced by cleaning agents that contain solvents, e.g. cleaning solvents.
Do not use cleaning agents that contain solvents.
Caution!
The appliance may be damaged!
Cleaning agents that contain solvents, e.g. cleaning solvents, can damage surfaces and components in the appliance.
Do not use cleaning agents that contain solvents.
Appliance housing/control panel
- Remove the detergent residue immediately.
- Wipe the housing and the control panel with a soft, damp cloth.
- Do not use abrasive cloths, sponges, or detergents (stainless steel cleaner).
- Do not clean the appliance with a water jet.
Drum
Use chlorine-free cleaning agents, do not use steel wool.
If there are odors in the appliance, or to clean the drum, run the Fluff Clean program without laundry.
Descaling
Descaling should not be necessary if the detergent is measured out correctly. However, if it is required, follow the manufacturer's instructions for the descaling agent. Suitable descalers can be obtained via our website or from customer services.
Detergent drawer and housing
If the appliance contains detergent or fabric softener residues:
- Pull out the detergent drawer. Press down the insert and fully remove the drawer.

- To remove the insert: Push the insert upwards from below with your finger.
- Clean the detergent dispenser tray and insert with water and a brush, and dry it. Clean the inside of the housing as well.
- Fit the insert and lock it in place (push the cylinder onto the guide pin).
- Push in the detergent drawer.
Note: Leave the detergent drawer open so that any residual water can evaporate.
A drain pump is blocked
Note: Turn the water tap off to prevent more water from flowing in and to ensure that it is drained via the pump.
Warning
Risk of scalding!
When you wash at high temperatures, the water gets very hot. If you come into contact with the hot water, you may be scalded.
Allow the water to cool down first.
- Switch off the appliance. Pull out the mains plug.
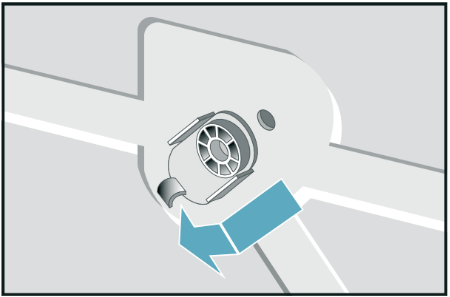
- Open the service flap. Use a screwdriver to release the lock pins
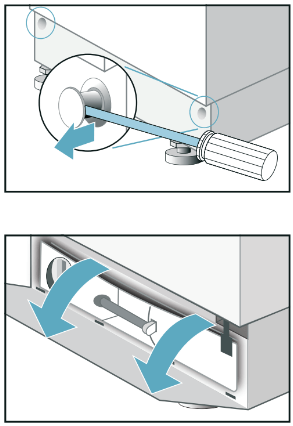
- Take the drain hose out of the retainer.
Remove the sealing cap and pour the water out into a suitable container. The container for the drained water may have to be emptied several times.
Replace the sealing cap and place the drain hose back in the retainer. 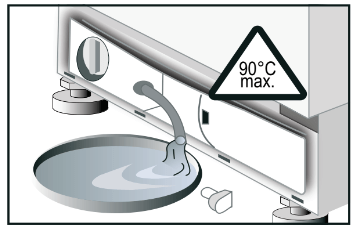
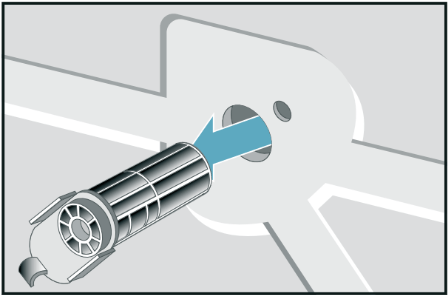
- Carefully unscrew the pump cover; residual water may leak out.
Clean the pump housing and remove any foreign objects. The impeller in the drain pump must be able to rotate. 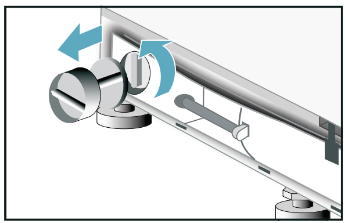
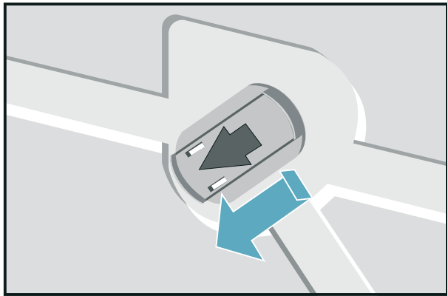
- Replace the pump cover and screw it firmly in place. Place the kick panel in the 4 clip-in slots and secure it to the housing using the lock pins.
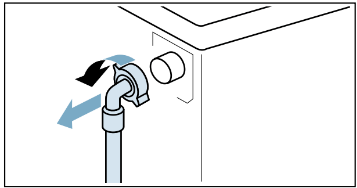
The drain hose at the siphon is blocked
-
Set the program selector to Off. Pull out the mains plug.
-
Loosen the hose clamp. Carefully remove the drain hose; residual water may leak out.
-
Clean the drain hose and siphon connecting piece. 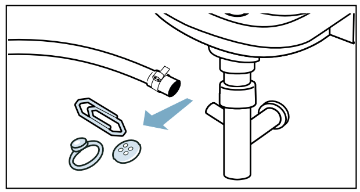
-
Re-attach the drain hose and secure the connection point using the hose clamp.
Filter in the water supply is blocked
Release water pressure in the supply hose:
- Turn off the water tap.
- Select the
 button and start the program. Allow running for approx. 40 seconds.
- Set the program selector toOff
- Pull out the mains plug.
Clean the filters:
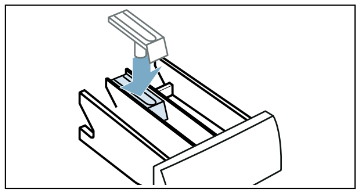
- Disconnect the hose from the rear of the appliance.
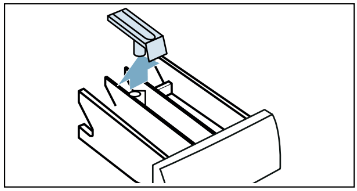
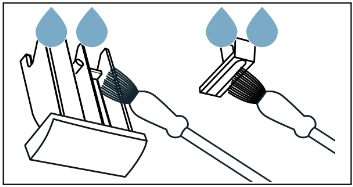
- Use pliers to remove the filter.
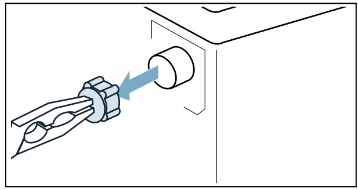
- Clean the filter with a small brush.
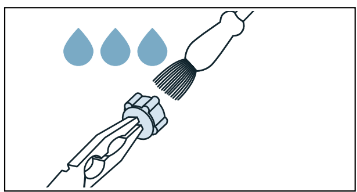
- Connect the hose and check for leaks.
Faults and what to do about them
Emergency release
E.g. power outage or in the event of a loss of power
The program continues when the power supply is restored.
However, if the laundry has to be removed, the appliance door can be opened as follows:
Warning
Risk of scalding!
When you are washing at high temperatures, there is a risk of scalding if you come into contact with hot water and laundry.
If possible, leave it to cool down first.
Caution!
Risk when reaching into/gripping the rotating drum!
You may injure your hands if you reach into the drum while it is turning.
Do not reach into the drum when it is turning.
Caution!
Water damage!
Any escaping water may cause water damage.
Do not open the door if water can be seen through the glass.
- Switch off the appliance. Pull out the mains plug.
- Drain the water
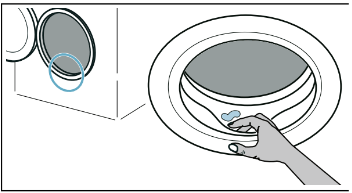
- Pull the emergency release downwards with a tool and open the door at the same time.
Information on the display panel
 : The door is not properly closed. Close the door.
 : The water control system has been activated. Disconnect the appliance from the mains, turn off the tap, and advise the after-sales service.
 : Water is not entering the appliance. See the fault Water is not flowing in
 : The water is not Drained. See the fault Water is not Drained
 : Not a fault! The unbalanced load detection system has detected an unbalanced load caused by laundry items. The fluff removal cycle cannot start. Remove the laundry.
 : Maximum or minimum drying load not taken into account. HI/End, or LO/End flash alternately in the display. See information for the Drying result, not satisfactory fault...
Other fault codes are only for use by the after-sales service. Make a note of the fault code to inform the after-sales service.
Faults and what to do about them
The program does not start
- The Start/Pause button has not been pressed.
- Press the Start/Pause button.
- A delayed start time has been selected.
- Washer and dryer start on completion of the delay period. Change the “finished in time” if necessary.
- Power cut. The delayed start time that was selected has been cleared.
- The door is not properly closed.
- The plug was not inserted properly into the socket.
The maximum spin speed cannot be set.
- The maximum spin speed depends on the program selected.
- Change program as required.
The water is not Drained.
- The drain hose is twisted.
- Fit the Drain hose correctly.
- The detergent pump is blocked.
Detergent residues in the detergent drawer.
- Damp or lumpy detergent.
- Clean and dry the detergent drawer.
- Use the measuring aid for liquid detergent.
Water is not flowing in.
- The mains plug is not correctly plugged in.
- Plug in the mains plugs correctly.
- The door is not properly closed.
- The tap is not turned on.
- The filter in the water supply hose is blocked.
- Clean the filter in the water supply hose.
- The water supply hose is pinched or kinked.
- Check the water inlet hose.
Intense vibrations during spinning.
- The washer-dryer is not correctly leveled.
- The transport safety bolts have not been removed.
- Remove the transport safety bolts.
Washer-dryer fills with water and continuously drains it away.
- The drain hose fitted too low.
- Fit the Drain hose correctly.
No water can be seen in the drum.
- Not a fault.
- During certain programs, the water level is below the visible range.
Water leaks from the bottom of the appliance.
- The supply hose screw connection is leaking.
- Tighten the screw connection.
- The drain hose is leaking.
- Has the Drain hose been replaced by the aftersales service?
Foam escapes from the detergent drawer.
- Too much detergent has been used.
- Only use detergent which is correct for textiles, and suitable for use in automatic washing machines. Make sure that you use the correct dosage.
Several attempts to start spinning.
- Not a fault. The unbalanced load detection system attempts to redistribute an unbalanced load by starting to spin several times.
- Always wash large and small items together.
Washing results are not satisfactory.
- Uncleaned areas worse than expected.
 (Prewash) Pretreat stains if necessary.
- Too little or incorrect detergent was used.
- Use the correct dosage of a suitable detergent, in accordance with the manufacturer's instructions.
- Maximum load exceeded.
- Select the load appropriate for the program.
Detergent residues on the washing.
- Some phosphate-free detergents contain water-insoluble residues which appear on washing as light specks.
- Rinse the laundry again or change to using liquid detergent. Brush the laundry after it has dried.
Grey residues on the washing.
- Soiling is caused by ointments, grease, or oil.
- Wash the laundry using the maximum detergent dosage and the maximum permissible temperature – see the care label.
The program terminated unexpectedly.
- Press the Start/Pause button elected accidentally.
The drying result is not satisfactory.
- The laundry clings to the sides of the drum after being spun
- Loosen up the laundry by hand; start the drying program.
- Closed tap
- Selected drying time too short
- Select the drying time according to the Load.
- Maximum or minimum load not taken into account
- Once the program has ended: adjust the load quantity, and select a suitable drying program and restart.
Spinning during drying.
- No fault
- "Thermo spin", which is for energy-effi-cient drying, starts after a drying time of approx. 10 minutes.
The fabric softener is not completely flushed in or too much water remains in the compartment.
- The fabric softener compartment insert is not correctly attached or is blocked.
- If necessary, clean the fabric softener compartment insert and fit it correctly in the compartment.
The laundry is not dried.
- The tap is turned off.
- The load is too large.
- The drying time is too short.
- Select a suitable drying time.
No display on the display panel.
- Power cut
- The program continues when power is restored. If you wish to remove the laundry during a power cut, you must first Drain out the water. Check whether:– the plug is plugged into the socket correctly.– the circuit breaker (fuse) has tripped; if it has, call the after- sales-service
The door cannot be opened.
- Rinse hold has been selected
- Select the program
 Empty+Spin and press the Start/Pause button.
- The program is running or the door is locked for safety reasons
- Wait until End appears on the display panel.
- Power cut.
- Unlock the door mechanically
Emergency release
- To release the door mechanically in the event of a power cut:
- turn the program selector Off and unplug the mains plug from the socket
- open the base panel and Drain out the water
- pull the emergency release downwards and open the door at the same time.
Before opening the door, make sure that there is no water or hot detergent solution
in the washer and dryer.
Under no circumstances open the door with the emergency release while the drum
is still turning.
If you cannot correct a fault yourself (switching on/off) or a repair is required:– Turn the program selector to Off and unplug the mains plug from the socket.– Turn off the tap and call the after-sales service.