
BDW146X
14 place settings
half-load function
Witheachwashcycle.
Compartment
For programmes with pre-wash onl y.
(Follow the )User Man ual
Electric indicator on control panel (if provided).
Check the rinse aid level
Load the baskets
Select a programme
Turn on the water ta p and press the . T he mac h ine will start working
after about 10 seconds.
Start/Pause Button
Running the dishwasher
Switch off the appliance
Turn off the water tap,
unload the baskets
Fill the detergent dispenser
Warning: wait a few minutes (about 15 minutes) before unloading the dishwasher to avoid handling
the dishes and utensils while they are still hot and more susceptible to break.
They will alsodry better.Unload the appliance, startingfro m the lower basket.
Changing theprogramme
Add forgotten dishes in the
dishwasher.
Scrape off any large amount of leftover food. S often remnants of burnt foodin pans,
then l oad the baskets. Ref er to the dishwasher loadinginst ruct ions.
Close the door,press the Programme Button until the selected programme lights up.
( See the section entitled Operation instruction )“”
When the working cycle has finished, the buzzer of the
dishwasher will sound 8 times, then stop.
Turn off the appliance using the On/Off Button.
If the appliance is switched
off during a wash cycle.
Op en t he door car ef ull y.
Hots team may escape
whenthedoorisopened.
If the appliance is switched off during a wash cycle, when switched
on again, please re-select the washing cycle and operate the dishwasher
according to the original Power-on state.
Switch on the appliance Press the On/Off button to switch on the appliance, Op en the door.
For detailedoperating methodread the corresponding content onthe instruction manual.
1. A running cycle can o nly be modified ifit has been running for a short time. Otherwise the detergent
m ay have already been released and the water a lready drained. If this is the case, the detergent
dispenser must be refilled.
2.
Press the Start/Pause button, press the program button for more than three seconds, the
machine will be in standby state, then you can change the program to the desi red cycle setting
1.Press the Start/Pause Button to st op the washing.
2.Open the door a little .
3.After the spray arm s stop working, you can open the door
c ompletely.
4.Add forgotten dishes.
5.Close the door.
6.Press the Sta rt/Pause Butt on, the dishwasher will run
after 10 seconds.
The secti on o nt ro uble shooti ngTips w ill help you tosolve some co mmo npr oblems by you rself.
Dear Cu s tom e r,
Please carefully readthis manual beforeusingthedishwasher,itwil lhelpyou to useandmaintainthe
dishwasherp roperly.
Passit onto anysubsequent ownerof theappliance .
Thi s ma n ual con t ain s sec t ions on safety In st ruc ti on s,O p era t ing I nstructions, Installation I nstr uct io ns an d
Tr ou bl es hooting Tips , et c .
The man ufacture r, f ollowi ng apolicy ofcon stant de velopment a nd updating of the produc t,may m ak e
modificati ons with outgiving prior notice.
Keepit as a referenceforlaterdays.
Ifyou can not solv ethe pro blems b yyou rself ,ple ase ask for th ehe lpof pro fessional technici an s.
Th is a ppl iance isin tended t ob e used in hous eho ld an dsi mila r app licat ions suc h as:
-s taff kitch en ar eas in s hop s,offices and othe rw orkin gen viron me nts;
-farm hous es;
-b yclients in hotel s,mot els and othe rresiden tia l type env ironment s;
-bedandbreakfast type environments.

Dishwas her Features............... ......... ............ .... ............. ............ ......... ..................... ....2
AttentionbeforeorafterloadingtheDishwasher
Baskets....................................................................................................... ..............6
FilteringSyst em.......... ...................................... .......... ....................................... .......11
Caring for the Dishwasher..... ................ ....... ..... ......... .......... ......... ........................ ....1 2.
A FilltheRinseAid Disp enser............. .. ......... .....................................................3、 ..... ...
B Function ofDete rgent ....... .......... ................... ......... ........................................4、 . ... . ...
..... ...... ......... ...... ...... ......... ...... ...... ... ... ...... .....7
The M eth od of L oading No rmal Di shw are
WashCycleTable........ ..... ................... ............................. .......... ............................. ....9
Turning on theAppliance........................................ .....................................................9
Cha nge theP rogramme.............. ............................................................................10....
At the Endof theWash Cycle .. .................. ......... ....................................................... ...10
Positioning theAppliance................... ....................................................... ........... ...13..
Water Co nnecti on.. ...... ...... ...... ..... ....... .. .. ...... ...... ...... ...... ...... ...... ...... ...... ...... ...... ....1 4.
AboutPowerConnection........................ ..................................................................13.
Start of dishw asher..... ............ ............... .... .............................................. ..... ...........15..
Be forecalling forservice..... ........ ....... ....... ............................................. .................. ..16.
Errorcodes.................................... .......... ...............................................................17.
Technicalinfo rmation....... ....................... . .................... .............. ...... ....... ...... ..........18..
Control Panel....... ............... ....... ............... ............................... .................. ............... ...2
CONTENTS

This appliance must be grounded. In the event of a
malfunction or breakdown, grounding will reduce
the risk of an electric shock by providing a path of
least resistance of electric current. This appliance
is equipped with a cord having an equipment-
grounding conductor and a grounding plug.
The plug must be plugged into an appropriate outlet
that is installed and gro unded in accordance with
all local codes and ordinances.
Keep children away fro m detergent and ri nse aid, keep
child away from the open door of the dis hwasher,
there could still be some detergent left inside.
ren
Donotabuse,siton,orstandonthedoorordish
rack of the dishwasher.
Do n ot touch the heating element during or
immediatel y after use.
(This instruction i s only app li cable to machines
with a visual heating element.)
Do not wash plastic items unless they are marked
dishwasher safe or the equivalent. For plastic items
n
ot so marked, check the manufacturer's
recommendations.
Use o nly det ergent and rin se additives
desi gn ed for an au tom atic dis hwa sher.
Never us esoap, laun dry dete rg en t, or h an d
washi ng deter gent in you r dis hwa sher.Keep
t h ese pr odu cts o ut of the r eac h of c hil dren.
Dur ing i nstall at io n,the po wer supply m ust not
be ex ce ssive ly or dangero usly be nt or fl att en ed.
Do not tamper with controls.
Do not place any heavy objects the
door when it is open. The appliance could tip
forward.
on or stand on
When l oading ite ms to be w ashed :
1) L ocate sharp it ems sothat they are not likel y
to damage t he door seal;
2 War ning: Kni ves and ot herute nsils with
shar p points m ustbe loade di nt he bas ket
with their points do wn or p laced in a
horizontal position.
)
W he n using y our di sh washer, yoush oul d
p reven t pl a stic item s f r o m c oming in to c ont a c t
w iththehe ati nge lement.( This i nst ruction is only
appli cable to machi ne s wi tha visual heat in g
el ement. )
Ifthesupplycordisdamaged, itmust bereplaced
bythemanufactureroritsserviceagentora
simi la rly q ualified pers on i n or der to av oid a
ha zard.
Pleasedispose ofpackingmaterials properly.
Use the dishwasher only for its intended function.
Remove the door to the washing compartment when
removing an old dishwasher from service or discarding it.
Dishwash erdeterge ntsare stro ngly alkal in e,th ey
can be extrem ely da ng erou sif swall owed.Avoid
conta ctwith skin and e yes and kee pchildren away
fro m the dish washer when the door is open.
C heck th at the de terg ent c omparm ent i se mpt y
aft er compl etion of th e wash c ycle .
Th ea ppliance is to be conn ec ted to the wa ter
mainsusingnewhose sets and thatold hose-sets
s houldno tbe reused.
T hemaxim um numb er of place set ti ngs to b e
washedis14.
T hemaxim um perm i ss ibl e inlet water p res s ure is
1Mpa.
T hemi nimum p erm is si ble i nle t w ate r p ressu r e is
0.04Mpa.
Children should be supervised to ensure that they do
not play with the appliance.
This appliance is not intended for use by persons
(including children with reduced physical, sensory or
mental capabilities, or lack of experience and
knowledge ,unless they have been given supervision
or instruction concerning use of the appliance by a
person responsible for their safety.
)
When u sin g your dishw asher, fo ll ow t he pr ecaut i ons li s t ed bel ow:
The d oorshoul dnot be left o pe n,
since this coul d increas ethe ris kof trippi ng .
Im proper connection of the equipment-grounding
conductor can result in the risk of an electric shock.
Check with a qualified electrician or service
representative if you are in doubt whether the
appliance is properly grounded. Do not modify the
plug provided with the appliance; If it does not fit
the outlet. Have a proper outlet installed by a
qualified electrician.
Do not operate your dishwasher unless all
enclosure panels are properly in place. Open
the door very carefully if the dishwasher is
operating, there is a risk of water squirting out.
The dishwasher must always be connected to
the water system using new hose sets.
If t he ap plia nce is in stalle d on a carpet f loor,
tak e care that the openings in i ts base are not obstruct e d.
beforeusingit forthe first tim e.
To getthe best performance fromyourdishwas her,read all operating instructions
10
11
Ba ck View
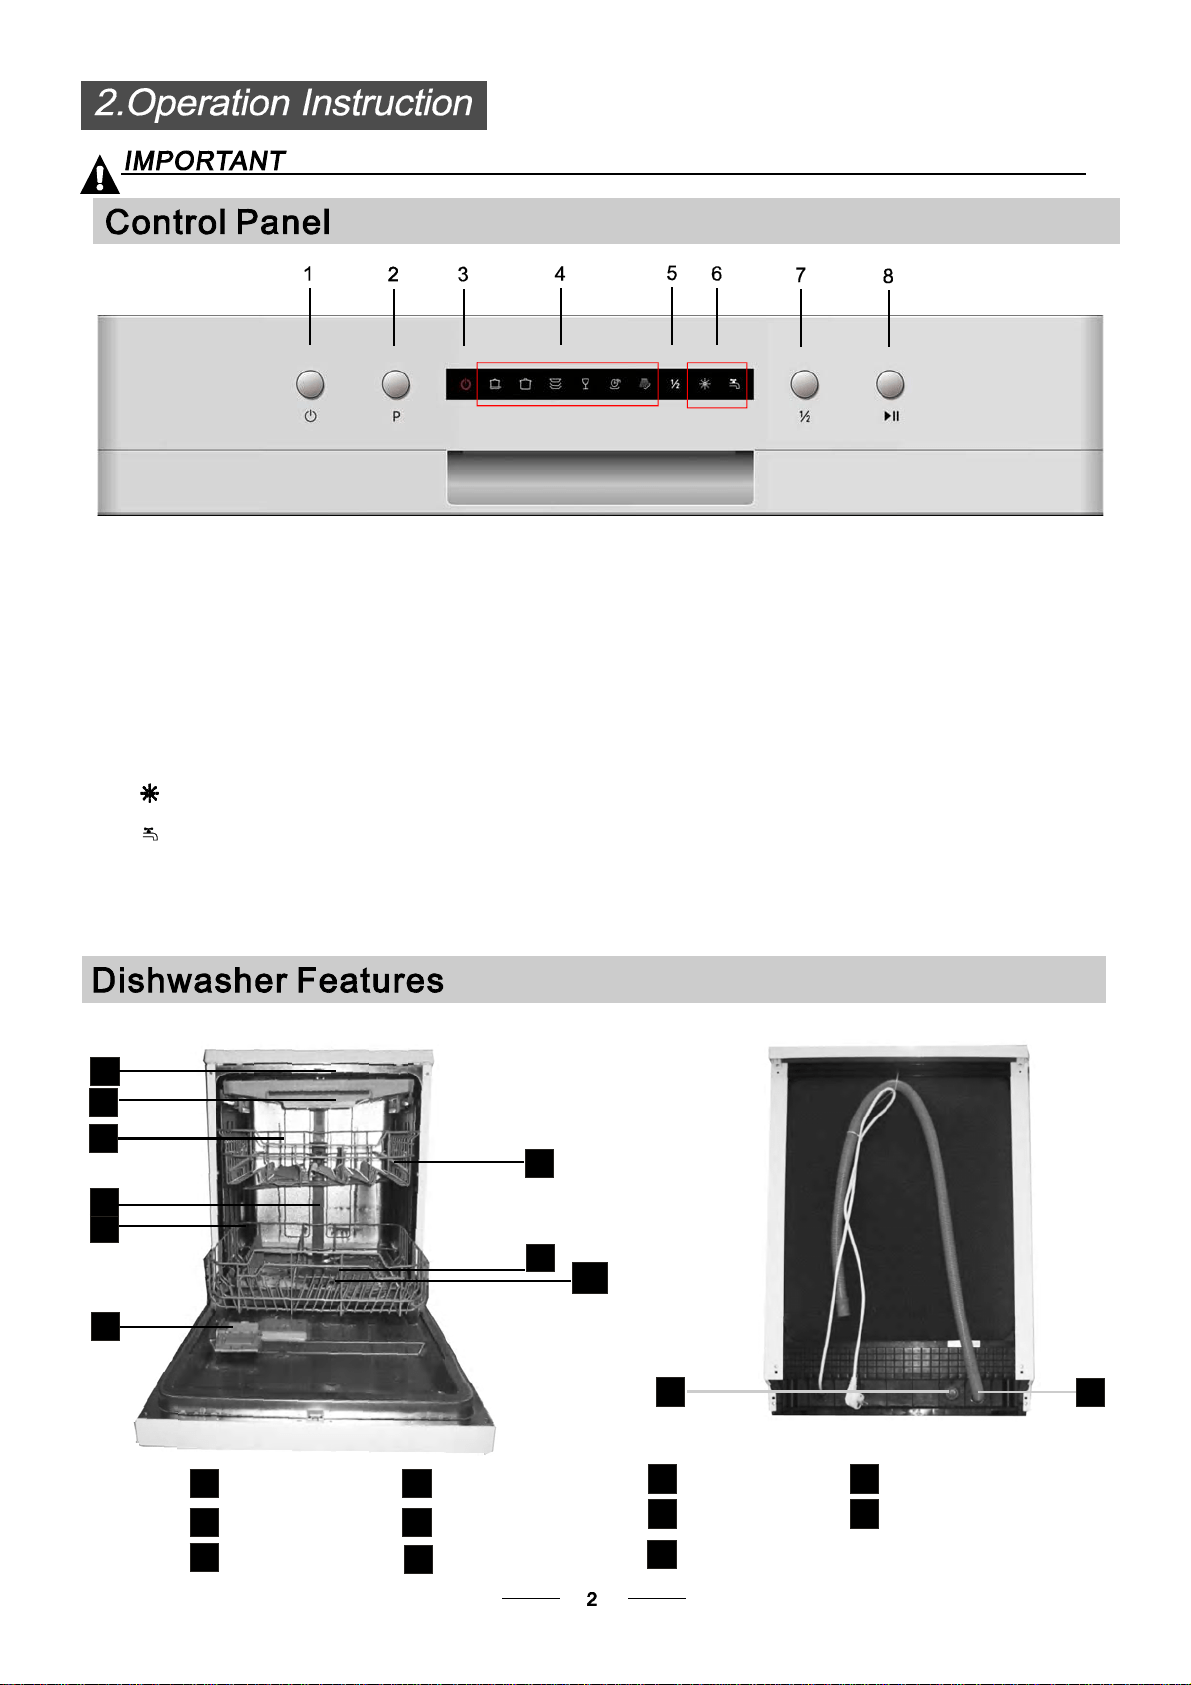
1
2
3
4
5
6
7
8
9
Fron t vi ew
Lower basket
Dispenser
Cupshelf
Sp ray a rm s
Filt er a s sembly
Inletpipeconnector
Drain pipe
Upper basket
Cutlery rack
Top s pray arm
1
I nner pip e
5
6
7
8
9
11
10
3
2
4
8. S ta rt /Pa use bu tton: Tostart the sel ected
wash ing pro gram or pau set he washin gprogram
when th em achin e is wor king.
1. On/Off Button: t oswitchOn/Offthea ppliance.
7. Half load fun cti on But ton :To select H alflo ad
function. (With this Half load functionyoucan
onl yuse it when you ha veo nly a bo ut or less t han
6 place setting ,andyouwillsee less
wa terand ener gyc onsumpt ion. can
onl ybe use dwi thInt ens ive, Heavy, Nor mal, Glas s
and 1 Hour .)
di s hwa r e
This fu nc tion
3. P ower ind icat or :To sho w whe nthe pow er i so n .
2.Program Button:ToPressthebuttontoselect
appr opriate Pr ogram.
4. Prog ram i ndi c ato r s: To sh ow w h ic h pro g ra m
you havechoose.
5. Hal fload i ndicators :To sh ow Half l oad fu nct ion
starting up or not.
Ri nse aid war nin glig ht s :To show
whenthe dispenser needsto be refilled
Wa ter faucet li ght : to show w hen the w ater
fauc et i s not tur n ed on.
6.
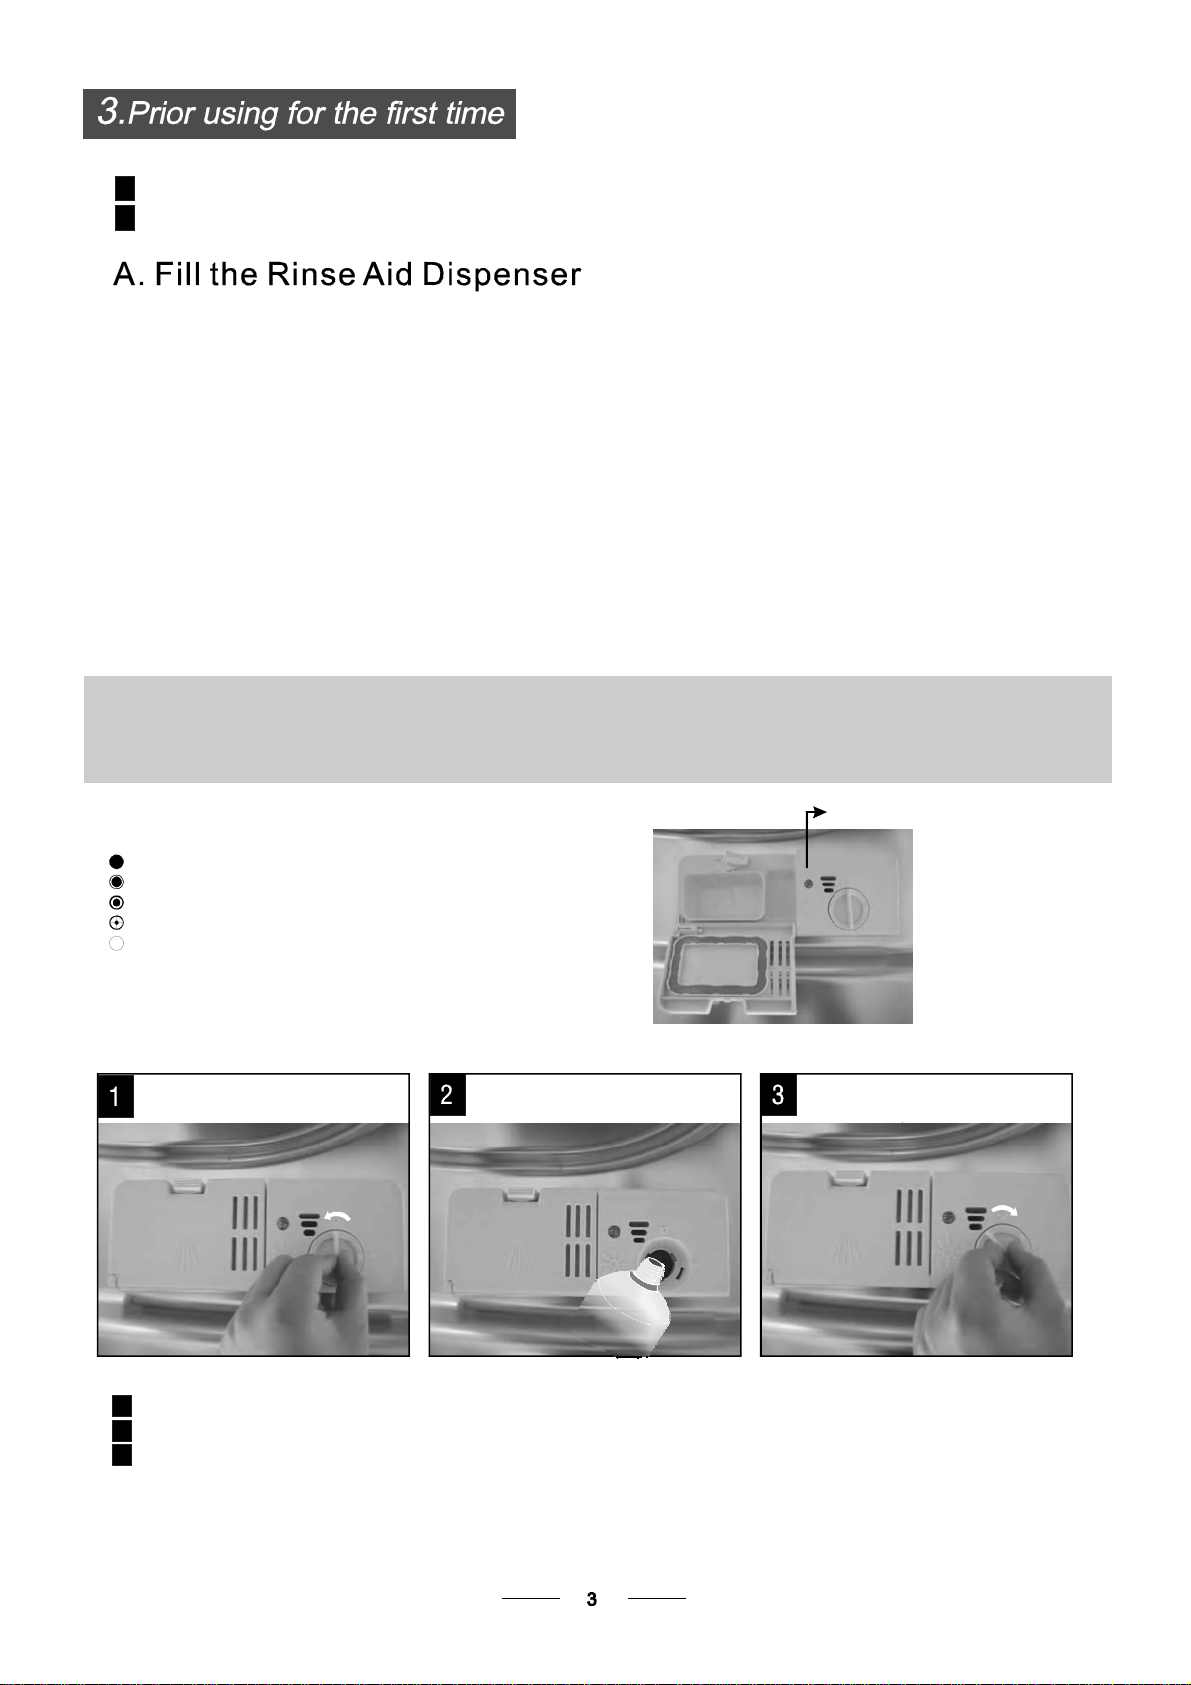
Bef or e usi ngy our di sh was herfor th e fir st ti me:
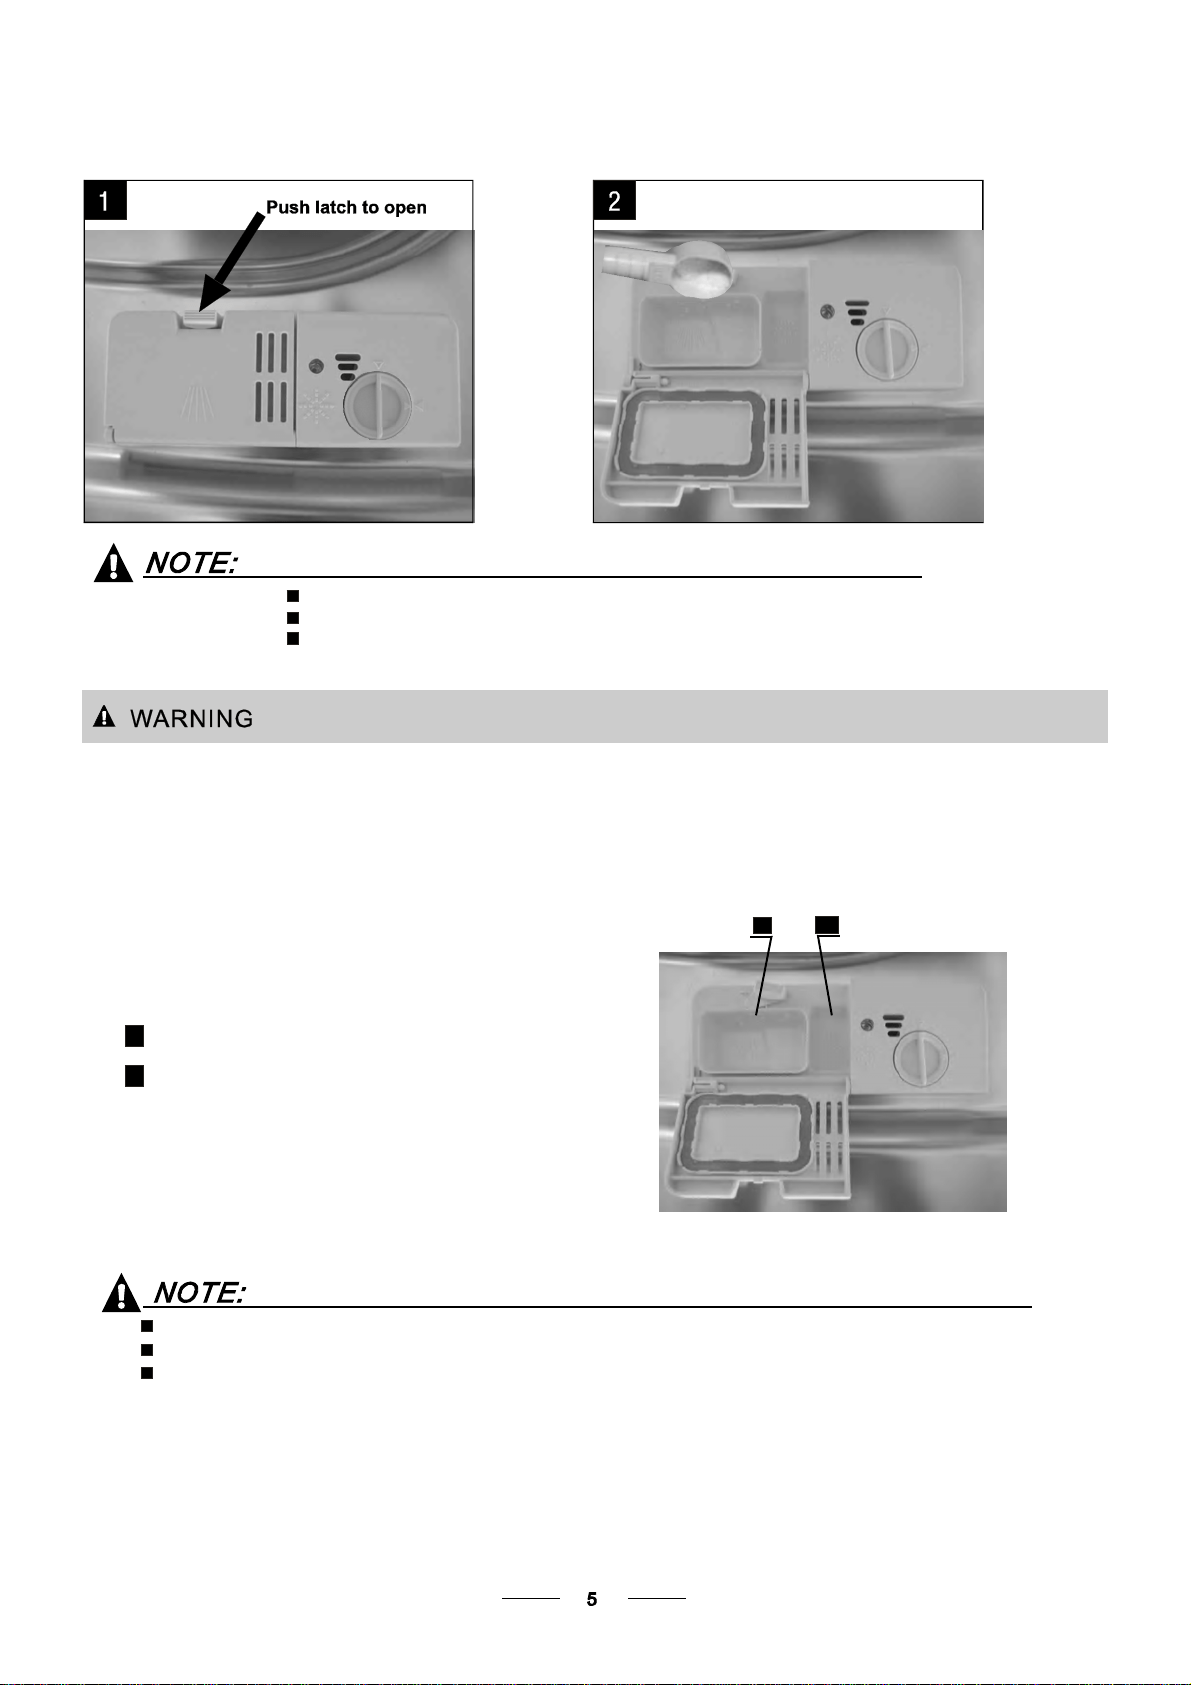
A. Filltherinse aiddispenser
B. F unct ion Of Dete rgent
Therinse aid isreleased duringthe finalrinseto preventwaterfrom forming dropletsonyourdishes, wh ich can
leave spots and streaks. Italsoimprovesdryingby allowing waterto rolloff thedishes. Yourdishwasheris
designedtouseliquidrinseaids.Therinseaid dispenserislocatedinsidethedoor nextto thedetergentdispenser.
Tofil lt he dispens er,open the c apa nd pou r the rin se a idinto the di spen ser unti lth e le velindi catorturns compl etely
black.Thevolume ofthe rinseaidcontainerisabout110ml.
RinseAid Di spen ser
Function of RinseAid
Rin se aid is aut omati cal ly a dde d du ring the l ast r inse, e nsuri ngth oroug hr in sing, and s po tand st reak fre e dry ing.
Attention.
Onlyusebranded rinse aid for dishwasher.Never fill the rinseaiddispenserwithanyother substances
(e. g. Di shwas her c leaning a gent ,l iquid de tergen t). Thi swou lddama ge t he appli ance.
As the rin se aid diminis hes, the size of the bl ac k dot
on the rinse ai dl ev el indi cator change s, as i llust rated be low.
Fu ll
3/4full
1/2full
1/4full-Shouldrefilltoeliminatespotting
Empty
If t here i sn orinse -aid war ning l ig ht in th ec ontrol p ane l, y ou can j udge the amo un t o frinse-aid by t he col orof t he
opti cal le ve l indi cator "C " loc ated nex ttothe ca p. Wh en the rin se-aid c ontaine r is ful l, the whol ei ndica to r w ill be
dark .As t he rin se-aid di minish es,the si ze of th edark d ot decr eases. You sh ould neve rlet t herinse aid get b elow
1/4full.
When to Refill the RinseAid Dispenser
RINSEAIDDISPENSER
To o pe n the dispe ns er, tur nthe cap to the "ope n"(left )arrow and lift it out.
Po ur th e ri nse aid in to t he di sp en se r, bein g car eful no tto o verf ill.
Replacethe capby inserting italignedwith "open"arrowand turning ittothe closed(right) arrow.
Be ca reful not to over fillt he di sp ense r,bec ause this c ould cau se over suds ing. Wipe away any sp il ls
witha damp cloth. Don'tforgettoreplacethec ap beforeyou close the dishwasherdo or.
Attention.
Clean up any ri nse ai d spilt during filling w ith an absorbe ntclo th t oav oidexce ssfoamin g
during the ne xtw ash.
1
2
3
C(Rinse-Aidindicator)
Adjusting RinseAid Dispenser
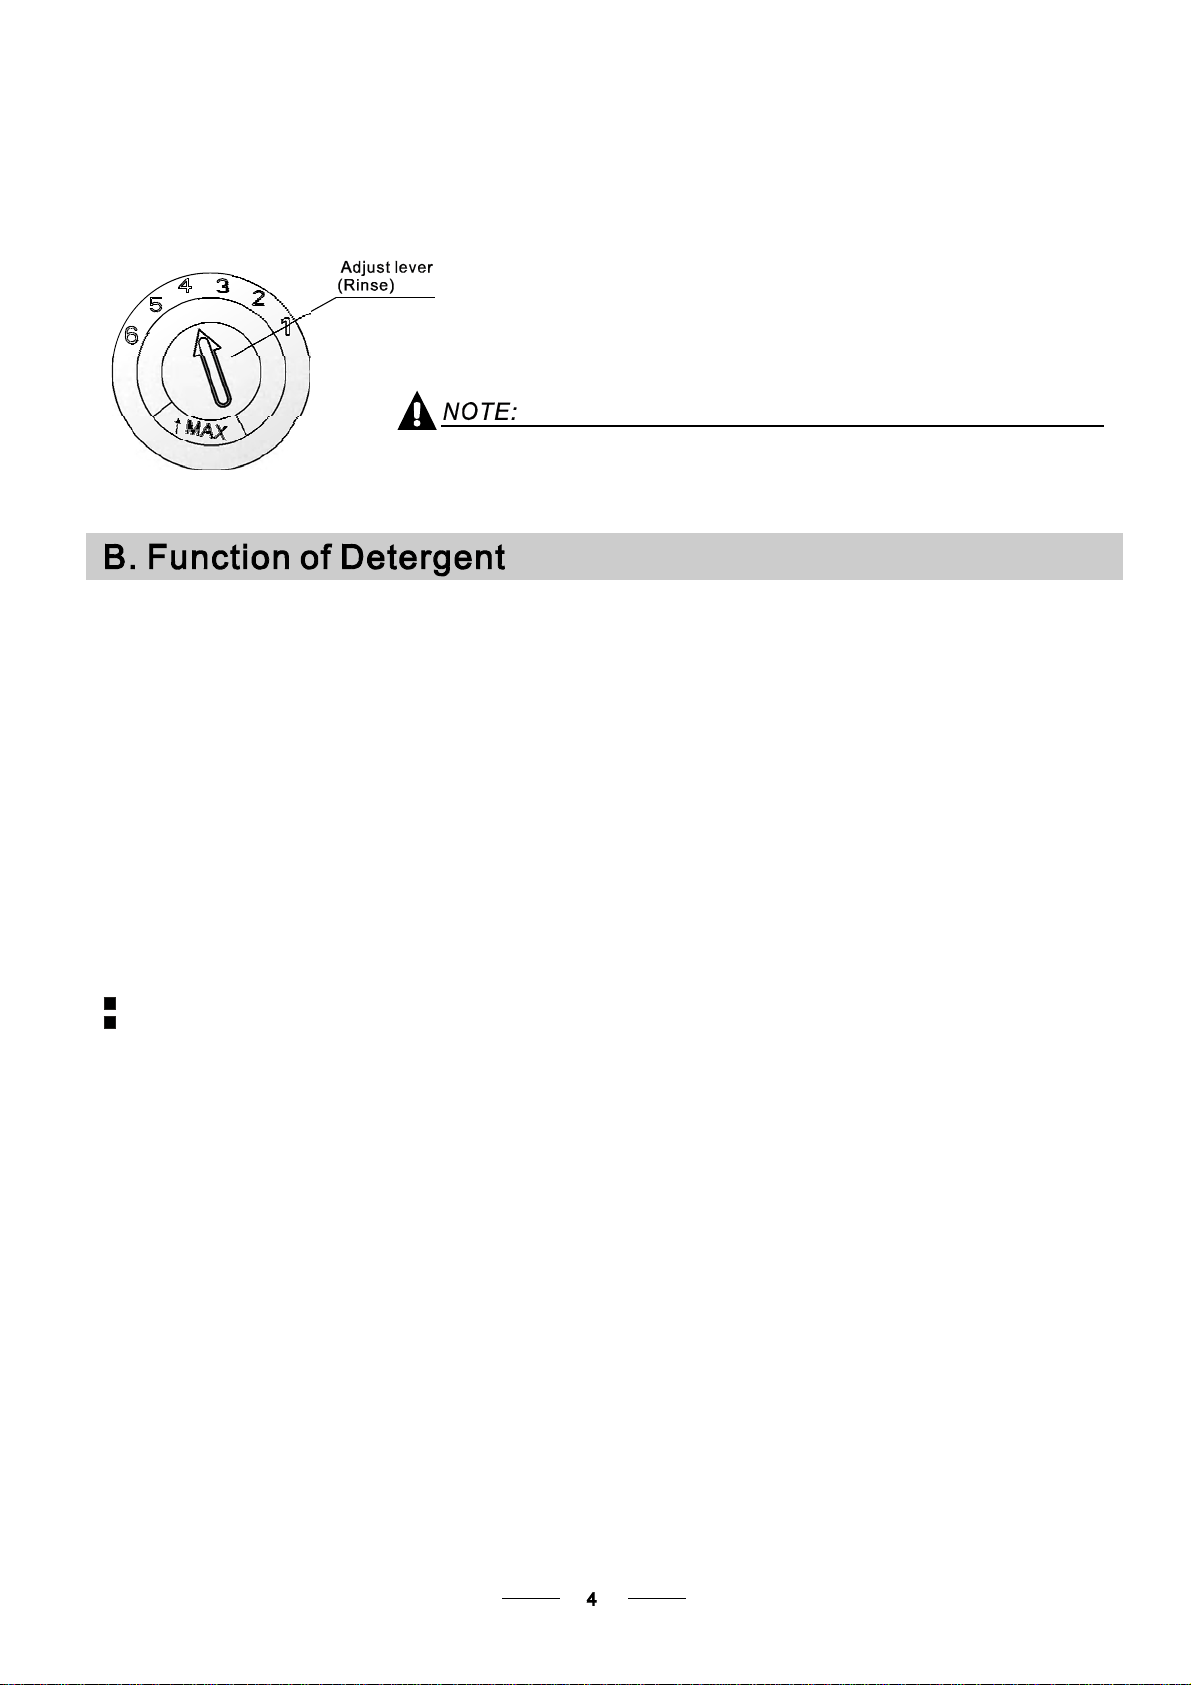
The r inse a id di spen serh as s ix or four set tings.Alw ays st art wi th th e dispens er
set o n"4" .I f s po ts an dpoor dr yingar ea pro ble m,i ncrea sethe am ount of rinse
aiddispensed by removing thedispenserlidandrotatingthedialto"5".Ifthe
d is he s are s till not drying pr op erly or are showi ngs pots, ad just the d ial t ot he ne xt
h igher le ver u ntil your dishes are spot -free. T he recom mended se tting is "4".
(Factory value is"4" .)
Incr ease the dose if ther eare d rops of wate ro r lime sp ots on t he dishes a fter washing .
Reduce i tif th ere are sticky whitis hstai ns on your di sh es or ablu ish f ilm on gl assware o r
knifeblades.
Dete rge nts w ith its c hemical i ngredients ar ene cessary t o remove dirt, cru shdirt an dtranspo rt it ou tof the di sh washer.
Most of th ecommerci al qu al ity de tergent sar e sui ta blef ort hisp ur pose.
Detergents
Ther ea re3 sorts of det ergents
1.W ith phosphat e and wit hc hlorine
2.W ith phos phate and wit hout c hlori ne
3.W ithou tp hosphate and w ithou t chlorine
Based on their chemicalcomposition, detergentscanbe splitintwo basic types:
Theuseof normal washingprogramsin combinationwith concentrated detergents
reducespollutionandis goodforyourdishes;these washprogramsare specificallymatched
to the dirt- diss olvin gpr operties of the e nzymes of t heconcent rat ed d eter gent. For th isrea son
norm al was hpro gramsi nwh ich conc entrated de terge nts are used can ac hievethe sam e
res ul ts that c anoth erwi se o nl ybe ac hiev ed using i ntensive progr ams .
“”
“”
“”
De te rgent t abl ets o fdi fferen tbr andsdissolve at diffe rent spe eds. For this reason some
det er gent t able tscannot d is so lve an dde velop th eirfull c leaning pow erdu ring sho rt
pro gra ms .Therefo replease use lon gprogra ms wh enusing d etergent tabl ets, to
ensurethe completeremovalof detergentresiduals.
Thed ispensermus tbe refilled before the start of eachwash cyclefollowingtheinstructions
pro vi ded in the wash cy cle t able . Yo ur d ishwasheruses less detergent an drin se a id t han
Co nv ention aldishwash er.Generally,on lyon eta bles poonof detergent is need ed for
a normalwash load.Moreh eavilysoileditemsneedmoredetergent.Alwaysaddthe
det er gent j ustbefor est ar tin gth edis hwashe r, ot herw ise it coul dg et d am p and w ill not
dis solv epr oper ly.
Concentrated Detergent
DetergentTablets
DetergentDispenser
conv enti onal, alk al ine de tergent s with cau stic compon ents
l ow a lkal ineconc ent rated det ergents with natu ral enzymes
N ormally new pulv eris edd etergent is wi thout p hosphat e.Th usthew ater sof tene r fun ction of
phosp hate is not given .In this case we recommend tof ill sa ltin the s alt c onta ine r even w hen
thehardness ofwater isonly6 dH.Ifdetergentswithoutphosphate are used inthecase ofhardwater
of ten whit esp ots appe aro ndi shes and glas ses . In this case please add more detergent to ac hieve
bet ter resu lts. Det ergents with out chlor ine do onl ybl eac ha li ttl e. Str ong a nd coloured sp ots w ill not
be rem ov edcompl etel y. In this c as e ple ase choo se a pr ogra mw itha higher te mp erat ure.
°
AmountofDetergentto Use
ProperUseofDetergent
Use ofd eterg entspecifical ly made fo r use in dishw ashers . Keep yo urd eterg en t fresh anddry.
Don't put pow deredd eter gentinto the dispe ns eruntil you'r e re ady to wa sh dishes.
Dishwasher detergentis corrosive.Takecare tokeepitoutofreach ofchildren.
Alw ays add the d ete rgentjus tb efore start ing eac hwa shcycle .
Only use br anded de terg en t aid f or d ishw ash er.
If t he l i d i s c losed: pr es s r e leas e button. The l i d will s pring op en.
Fill the detergen tdi spen ser with dete rgent.
The markingindicatesthedosinglevels , as
illustratedontheright:
The p lacefor mai n wash cy cle deterge nt.
The p la cefor pre -wa sh cycle de terg ent.
Ple ase observe the man ufa cture rsd osingan dst orag e
Recomme nda t ion s as s tated on t he det ergen t packa gin g .
Close t he li d an dpre ss u ntil it l ocks in pla ce.
If thedishesareheavily soiled,placean additional
deterge nt dose in the pr e-wash d ete rgen t ch amber. T his deterge ntw ill tak ee ffect duri ng the p re- w ash phas e.
A
B
Fill in Detergent
Infor ma tion abou ttheamount of d eter gent for thesing lepr ogra mme is loca teda t the wa sh ing cy cle table .
Plea sebeaw are, tha taccord ing t ot he lev el soili ng and the spe ci fic har dn esso f wa ter d iffer ences a repossible.
Plea seo bserve t hemanu fa cturer 'sre commen dat ions on the dete rgent pac kagi ng.
A
B

Cutlery withwooden,horn china or
mother -of-pearl handle s
Plast icitems that ar en ot h eat r esi st ant
Older cutl erywith glued parts t hat a renot
temperatureresistant
Bonded c utlery i te m sor dish es
Pewter or coop er ite ms
Crystal gl ass
Steel items s ubject t orusting
Wooden pl atte rs
Items madefromsynthetic fibres
So me t ypes of g lasses c anb ecome
dull aft e r a large nu mbe r of was h e s
Silv er an dal uminu m part s ha ve a
tendencyto discolourduring washing
Glazed patternsmay fade ifmachine
washed frequent ly
Are not suitable
Are of limited suitability
Dishesanditemsofcutlerymustnotlie insideoneanother, orcover each other.
To av oidd a mage to gl asse s,th eym ust not touc h.
Lo ad large ite msw hic h ar e most di fficul ttoclea nin tothe l owe rbask et.
The u pper bas ket i sde signed to ho ldmor ed eli cate and li gh ter d ishwa re such as gl as ses ,cof fee
andteacups
Lo ng bladed k nives stored i nan upr igh tpositio nare a p otent ial haza rd .
Lo ng and/or sharp items o f cut lery such as carvi ng kniv esmust be positi oned
h orizon ta llyin the upper b asket.
P lease do n ot ove rload yo urdishwashe r. T his is import an tforgoo dresults a ndfor
r easonab leco nsumption o fener gy.
Load h oll owite mssuc has cup s,gl asses, p ans etc. With t he openi ng faci ngdownwards s othat
w a t er c ann o t c o lle c t i n t he c onta ine r or a de epbase.
Consider buyingutensilswhichare identifiedas dishwasher-proof.
Usea mild detergentthatisdescribedas'kindtodishes'.Ifnecessary,seekfurther
informationfromthedetergentmanufacturers.
Forparticular items, select aprogramwithaslow atemperatureaspossible.
Toprev ent da mage, d onot tak e gla ssa ndcutl ery out of the d ishw ashe r i mmed iatel y
aft er t he p rogr amm eh a sende d.
(For b estperform anceof the di shw asher, fol lowthe sel oading gu ide lines.
Featu res and appeara nce of baske tsand cutl eryba sket smay vary from your m odel.)
Scrape off any larg eamo untso fle ft over food. S often r emnants ofbur ntfood i npa ns.
It i snot necess ary to ri nse t he d ishes u nder runni ng water.
Pl ace ob jects in the dishwa sherin the followi ng way:
1.I tem ssu ch a scups,glasses, pots /pa ns,etc. a re fa ced dow nwa rds.
2.Cu rved i tems, or ones wit hrecess es, should b eloaded a slant so th atwater can run off.
3.Al lutensils are st ackedsecur elyand can not ti po ver.
4.Al lutensils are pl aced in t heway t hat the spray arms can rotat ef reely during wa shing.
Ve rysm al litems s hould n otbe washe di n the dish washer as they could eas il yfall out of the basket.
To pre ven twater dr ippi ngfr om t he uppe rbasket i nto t he lower baske t, we rec ommend tha tyou
empty the lower ba sk et fir stand the nthe upp erbask et.

77
The upper basket is designed to hold more delicate
and lighter dishware such as glasses, coffee and
tea cups and saucers, as well as plates, small bowls
and shallow pans (as long as they are not too dirty).
Position the dishes and cookware so that they will
not get moved by the spray of water.
Loading the Upper BasketLoading the Upper Basket
We suggest that you place large items and the most
difficult to clean items into the lower basket: such as
pots, pans, lids, serving dishes and bowls, as shown
in the figure below. It is preferable to place serving
dishes and lids on the side of the racks in order to
avoid blocking the rotation of the top spray arm.
Loading the Lower BasketLoading the Lower Basket
Pots, serving bowls, etc, must always be placed top down.
Deep pots should be slanted to allow water to flow out.
Please be reminded that:
The Bottom Basket features folding spikes so that larger or more pots and pans can be loaded.
The Method Loading Normal DishwareThe Method Loading Normal Dishware
IN
Folding Spikes of Lower Basket
Folding back the cup shelives
Cutlery should be placed in the cutlery rack separately
from each other in the appropriate positions, and do
make sure the utensils do not nest together, this may
cause bad performance.
Cutlery BasketCutlery Basket
For a top quality cleaning, place the silverware in the basket
making sure that:
For a top quality cleaning, place the silverware in the basket
making sure that:
They do not stick together.They do not stick together.
Silverware is placed with the male face up.Silverware is placed with the male face up.
Long utensils in the middle. Long utensils in the middle.
IN
For better stacking of pots and pans,
the spikes can be folded down as
show in the picture right.
For better stacking of pots and pans,
the spikes can be folded down as
show in the picture right.
Adjusting the Upper Basket
The height of the upper basket can be adjusted in order to
create more space for large utensils both for the upper
/lower basket. The height of the upper basket can be
adjusted by lift up the basket for the upper position, and up
press the handle to lower the upper basket, see the picture
below:
Lift the basket
for upper postion
Lift the basket
for upper postion
Up press the handle
to lower the basket
Up press the handle
to lower the basket
Adjust handleAdjust handle
Posi tion one: lift the lef t baske t up, both le ft and ri ght
basket s are slanti ng.
Posi tion two: adjust the l eft basket t o low erposition , left
basket is f lat and r ight bask et is s la nting.
Posi tion three : lift the r ight ba sket up , both l eft and ri ght
basket s are fl at.
Posi tion Four: Mov ethe r ight bask et from r ight t o left, two
basket are o verlapp ing.
Posi tion Five : R emove th e right b asket f rom the tr ay,
only has the lef t basket.
Mode 1
Mode 2
Mode3
Mode 4
Mode5
Cutlery tray canbe5 different positions
Pre-wash(45 )
Was h ( 5 5 )
Rin se
Rinse(60 )
Dry ing
℃
℃
℃
Means:need tofill rinse into the Rinse-AidDispenser.
()
Forheavilysoiledloads,
suchas pots,plates,glasses
andl ightly soile d pan s.
* : T hi s pro g ram is th e tes t cy cl e. The info rma ti on for compa r a bili ty test
in ac c ordanc e wit h , as f ol low s:
AS/NZS 2007.1
AS/ NZS200 7. 1
Capacity: 14setting
Posi t io n Upp er bas ke t: up per w heel s onrai ls
Rinse aid setting: 6
O pen the door s lig ht l y 50 mm to a ss i s t i n drying of t he di shes af te r e very w ash
Means:need tofill rinse into the Rinse-AidDispenser.
()
Int ensi ve
Normal
165
160
135
1.1 5
0.87
1. 4 0
18.0
14.5
13.6
1H our
60 10.0
0.90
Sta ndarddaily cyc lefor
normal lysoi led l oads, such
aspots plates glasses .、、
Fo r h ea v i e st s oi le d cr oc kery,
and soiled pots pa ns
dishes etc wi th dried
onsoiling.
、、
For ligh t ly s o ile d loa ds t h at
do n ot n eed exc e ll en t d ry in g
effi cie ncy.
Gl a ss
Pre-wa sh
was h(4 0 )
Rin se
Rinse(60 )
Dry ing
℃
℃
115
0.80
14.5
Forlightly soiledcrockery
andglass.
Torinsedis hes that y ou plan
to wash later that day.
Pre-wa sh
8 0.01 3.8
Startinga cyclewash
1 Dr aw out the l owe rand up per b ask et ,load t hed ishes and push the m back.
I ti s to l oad the l ow erbasket first ,the nthe uppe rone ( see the sec tion entitl ed
Lo ading th e Di shwashe r ).
2 Pour in th ed eterg ent (se ethe section ent itled D etergent a ndRinseAid ).
3 I ns ert the pl ug into t he socket. The power s uppl yis 2 20-240 VAC / 50 HZ, th esp ecificatio n
of the so cket is10A 250VAC. Make su re that the wa ter supp ly is turned on to full pres sur e.
4 Clo se the door,press the ON/OFF Butt on, a nd the d isplay will tur n on.
5 Pr ess the pr ogram Bu tton , t he wa sh p rogram wi llbe ch anged a sf ollows di rectio n:
“”
“”
Intensive->Heavy-> No rmal->Glass->1 Hour->Soak;
I f a p ro gramisse lect ed, the resp onse light will li ght.Th en press the Star t/ Pause but ton, th e
dish wash erb egin sto start.
r eco mmended
Pre-wash(50 )
Was h ( 6 5 )
Rin se
Rin se
Rinse(65 )
Dry ing
℃
℃
℃
Pre-wa sh
Was h ( 5 0 )
Rin se
Rinse(50 )
Dry ing
℃
℃
Pre-w ash(50 )
Was h ( 60 )
Rinse(55 )
Drying
℃
℃
℃
5/2 7.5g
20g
(OrAll )in 1
5/27.5g
5
(Or All )
/27.5g
in1
5
(OrAll )
/27.5g
in1
Heavy
(*AS/NZ S 2007.1)
Washthearms insoapy an dwarmw aterand use a s oftbrush to
clean thejet s. R ep lace them af terr insin gthem th orough ly.
When following this procedure from step1 to step 3, the filter system will be removed;
when following it from Step 3 to Step 1, the filter system will be installed.
Itisdangerousto openthe doorwhen washing,becausethehot water may scald you.
W h en t h e working cy cle h as fini shed, the b u zzer o f t he di s hwa she r wi l l so und for 8 seco n d s , t h en s t op . Tu r n o ff
the app li a n c e u s ing t he Power swi tc h bu tto n , shu t off th e w ate r su p p l y and open t h e do or o f the di sh w a s her.
Wait for a few mi nutes b efore unlo ading th edi shwashe rt oa voi dha ndlin gth edi shes and ut ensils wh ileth ey
are still h ot a ndm ore suscept ibl e to br eak age. The yw ill als od rybetter.
SwitchOfftheDishwasher
The p rogr amlight is on but i snot blin king, only in th is case the programm eh asended .
Po wer1.Sw itch off the dishwa sher by p ressin gthe button.
2.Turnoffthewatertap.
Openthedoorcarefully.
Hot di shes are sensi tive to kn ocks.The dishes should therefor eb eallow edt o cool d ow n arou nd15 minutes
before removingfromthe appliance.
Open t hed ishwas herdoor, leave it ajar and wai ta few m inutes be fore r emoving the dishe s. In thi sw ay they
will be cooler and the drying will b eimproved.
Unloadingthedishwasher
Itis normal t hatthe dish washe r is wet inside.
Empty the low erbasket f irst a nd then the upper o ne.This w ill avoid water dripping f ro mthe uppe rBasket on to
the dishes in the low er one.
If you ope nth edoor , the m ach ine will paus e. The p rog ramlight wi ll
stop b l i n ki ng an d t he buzze r w ill b e ever y m in ute unle ss y o u clo se the doo r . A fte r
y ou cl ose the door,the ma chin ewi llkeep o nw orking aft er 1 0se conds.
duringawash cycle
beeping
Acycl ethat is under waycan on ly be m odified if i t has on ly been r unning for a s hor ttime. Ot herwis e, the
de tergent m ay have a lready be en relea sed,a nd the applian ce m ay have alre ady dr ain edthe wash water.
If t his is t he case ,the dete rgent d isp enser mu st be refil led(see t he sec tio nentitled "Loading t he
Det ergent " ).
Pr ess the S tart/Pau sebutton , the m achin ewill be in st andby s tate, press the p rogram b utton f ormore than
3 then you can ch an ge the progra mtothe desi red cycl esetti ng(see the secti on entitl ed " Start ing
a w ash cycle ) ."
1
2
sec onds
Aforgotten dish can be added any time before the detergent cup opens.
Add forgotte n dishes.
Close the door
After the spray arms stop working, you can open the door
comp letely.
2
3
Open the door a little to stop the washing.
1
4
5
6
Press the Start/Pause button
Press the button, the dishwasher will run
after 10 seconds.
Start/Pause
When you presstheStart/Pausebutton topause during washing,the runningindicator will
s top b linking a nd the d ishwasher will eve ry m inu teun less you pre ss t he
button to s tart.Start/Pause
be beeping
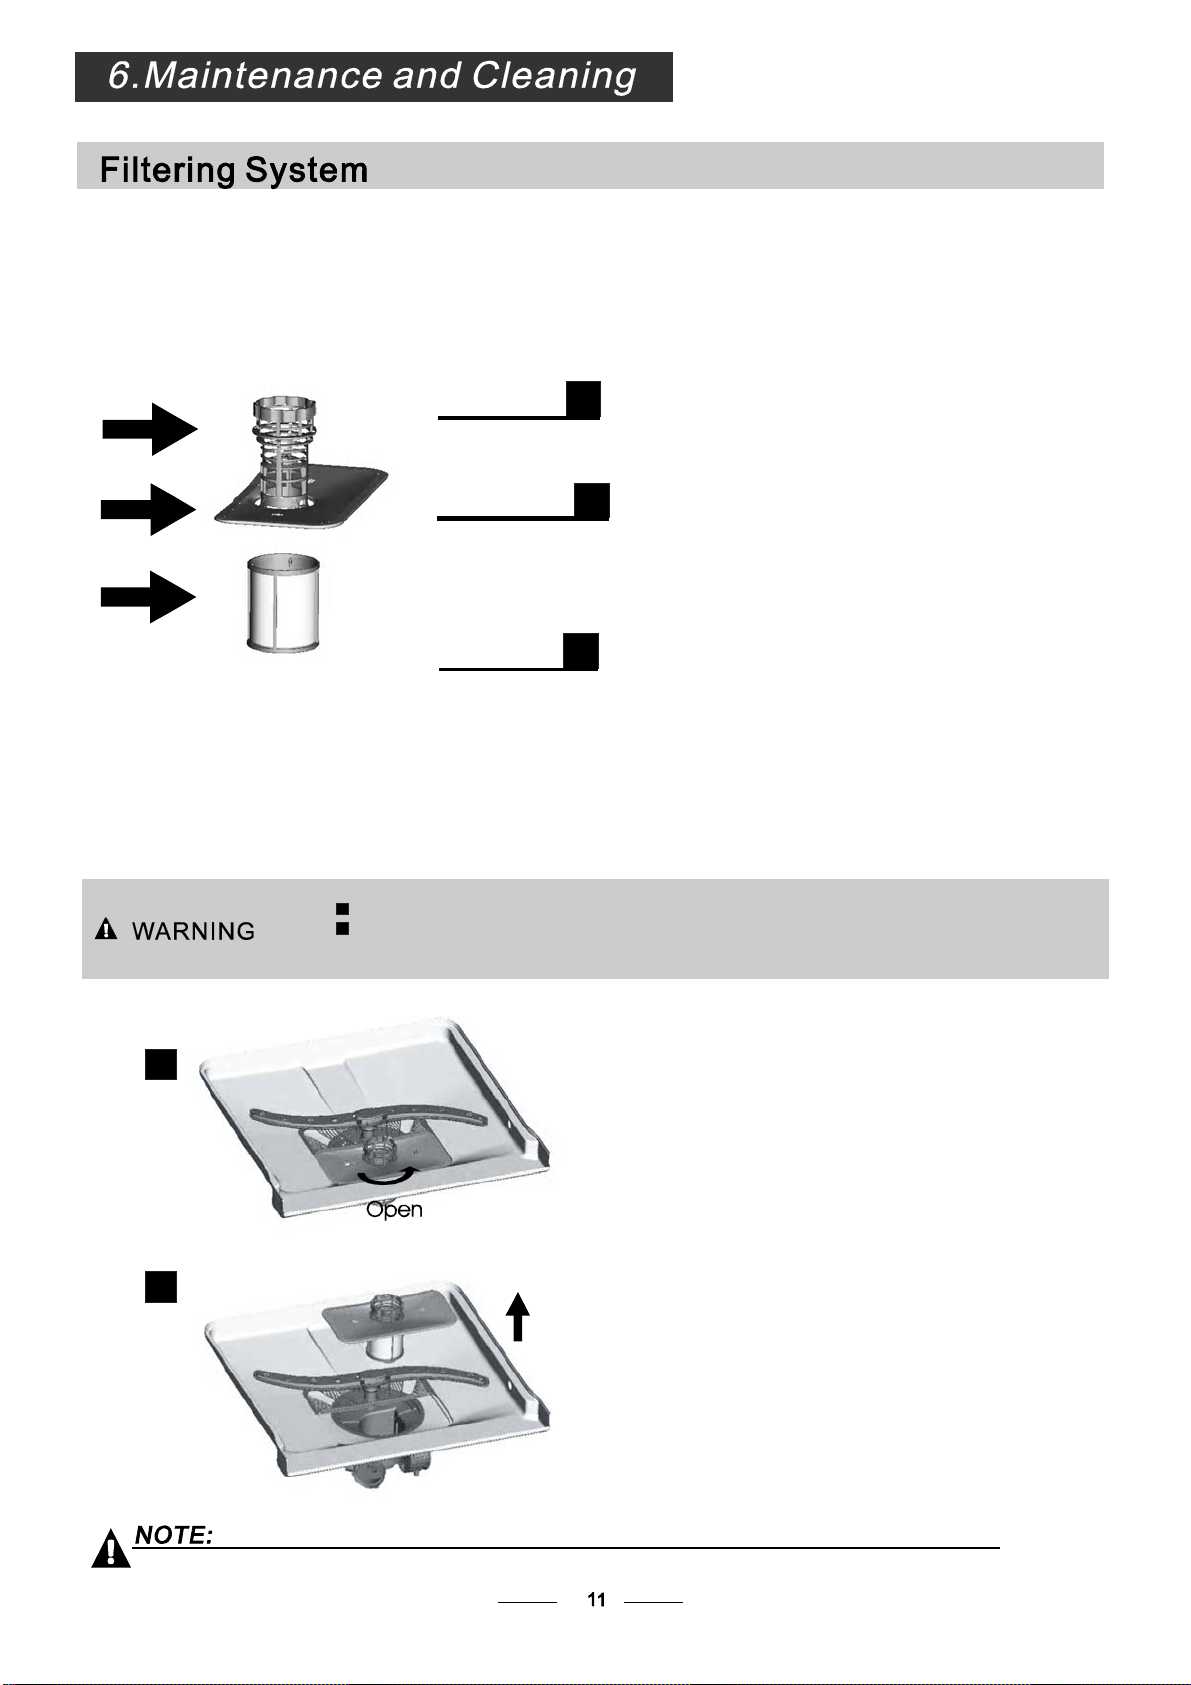
The filter prev ent sl ar ger remn ant sof food or ot her objects from get ting i nsi de th ep ump.
Theresidues mayblockthefilter, in thiscasethey mustbe removed.
The fi lter syst em c on sists of a coar sefilter,a flat ( Mainfilter)
A n da mi c r o filter( F i ne fi lte r ) .
Food and soil particles trappedinthisfilterarepulverizedby a
specia l jet ont he l owe r spr aya rman dw ash edd own t od rain .
Larg er i tems, s uc h as pi e c eso f bo ne s or gl ass, t ha t cou ldb l o ck
the drain Toremove
the items
andeasily become trappedinthecoursefilter
caughtbythe filter,gently squeeze the taponthetopofthis
filterandliftout.
Thisfilter holds soilandfoodresiduesinthe sumpareaand
pr eve nts i t fro m be ing on th e di shes dur ing w ash cyc le.redeposited
Main filter
1
Coarse filter
2
Fine filter
3
2
3
1
Filterassembly
Thefilter efficiently
For b est p er formance and res ults, the filte rmustbe cleane dre gularly. t hisr easo n, it i sa goo dide at o
r em ove th ela rger fo odpar ticl estr app ed in the f ilte raftere ach was hcyc leby rin sing t he s em icirc ula r f il te rand
c up unde rr unnin gwa ter. To re mo veth ef il terde vic e,pull t hec up ha ndl e in t heupwar dd irect ion.
re mo vesf ood par ticle s from th ewashw at er, all owing it to be rec ycle dd uring t he cycl e.
For
T he dishwas her mus t ne ver beu sed w i t hout t he filter s.
Imp ro per replace men tof the f ilter may re duce the perform an ce lev elof the applian ce
and damage dishesand utensils.
St ep 1 Turn the filter i n ant i-cl ockwise d irection,:
Step 2 li ft t h e f il ter up:
When following this procedure from step 1 to step 2, the filter system will be removed;
when following it from Step 2 to Step 1, the f ilter system will be installed.
1
2
The cont ro l p ane l can be clea ned by u si nga lig htly dampen edc loth.
Afte rcleaning, m ake sure to dry it tho roug hly.
For the ext e ri or, us e a good applia nc e poli s h wax.
Neveruse s harp object s,scouring pa ds o rh ar sh clean er s on a ny p art o ft hedis hw asher.
ProtectAgain st Freezing
1.Cutoff theelectricalpower to thedishwasher.
2.Tur nof fthe water suppl yan ddisco nnect the w ater inl etpipe from the w ater val ve.
3.Drain th ew ater from the inlet pipe an dwater va lve. (Use a pan to gathe r th e w ater)
4.Reconnect t he water inl et pipe t othe wa ter val ve.
5.Remove the filter at the bott omo f the tub and use a spong et o soak up wate rin t he sump.
pl ease take frost pr ot ection m easures o nt hedishw asher in winter.Every fter washing c ycles,
pl ease oper ateas follow s
time a
:
Cleaning the Filter
CleaningThe Door
To clean the coarse filter and the fine filter, use a cleaning brush. Reassemble the filter parts as shown in the figures
on the previous page and reinsert the entire assembly in the dishwash er, positioning it in its seat and pressing downwards.
Whencleaning thefilters, don't knock on them. Otherwise, the filterscould b e
contorted andtheperformance ofthe dishwashercouldbedecreased.
To clean thee dge around t hedoor, you sho ulduse o nly a soft warm, d am p cl oth.
To avoid pene trati ono f wa terinto the door l ock and el ectrical com po nents ,d o no t
usea spr ay cleaner of any kind.
Never u se a spr ay cl ean er t ocle an t he door panel as i tmay dam age the door loc k
and electricalcomponents.
Abr asive ag entsor some pa pe r towels shou ldnot be u sed becau seof t her iskof
sc r a t c hi ng o r leavin g s p ots on the stainless stee l s ur fa ce.
Cleaning the SprayArms
I fyour dis hwasher cannot work beca use of the ice,
pl ease con tac t prof essional service pe rso ns.
It i s ne ces sary t o clean t h e s p r ay ar ms regula r l y for h ar d
waterchemicalswillclogthesprayarmjetsandbearings.
- Inspec t the filte rsfo rblockin ga ftere ver y time th edis hwa sher has be enused .
- By uns crewing the coar sefi lter, y oucan rem ove the filter system .Re mov ean yfoo dremna nts and
cleanthefilters underrunningwater.
Remarks:
Theentirefilterassembly shouldbe cleanedonce a week.
Toremoveth elowerspray arm,pulloutthe spray armupwa rd.
To r e move th e u pper s p rayarm, hold t he nut, r ot ate th e a rm
clockwisetoremoveit.
Washthearms in soap yan dw arm water and u sea soft brush t o
clean the jets. Replace them af ter rinsin gt hem thor oughly.
Itisrecommendthatyourun awashcycle withthe
dish washer e mpt yan dthe nr emove th epl ugfrom the
socket, t urn o ff t he wa te r supp ly and le av e the door of
t he appli a n c e sl ig ht ly ope n. T h i s wil l hel p t h e door
sealsto lastlongerandpreventodoursfromforming
withi ntheappliance.
If th e appliance must be move d, tr yt o keep i tin the
verticalposition. Ifabsolutelynecessary, itcanbe
positi oned on its back.
Oneofthefactorsthatcauseodourstoforminthe
dishwasher is foo dth atremain str app edi n the seal s.
Periodic clea ning with a d amp sponge will p reve ntthis
f r o m occurrin g.
Ensurethevoltageand frequencyof thepowerbeing usedcorresponds to
t hose on the rating plate. Only in sert the p lug into an elec trica lsocke twh ich is ea rthed
pr op erly. I fth eelectri cal sock et t owhich theappl ianc em ustbe c onn ected is not
appr opriate fortheplug, replacethe socket, ratherthan using aa daptor orthelikes as
they couldcauseoverheating andburns.
Plea selook at th era ting lab el t o know the rat ing v oltage a nd c onn ect t he dishwash er to the app ropr iate pow er suppl y.
Use the r equi red fuse 1 0 amp ,tim ed elay f use orc ircui tbreake rr ecommended and provide separate circuit servi ng
only this appl ia nce.
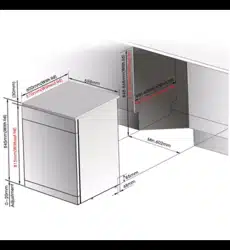
Posi tion the ap pliance i n the d esired lo cati on.T he back sho uld r est ag ainst the w all b ehi nd it, and the side s,
along the adj acen t ca bi netsor wa lls.T he d is hwash er i s equippe dwith water supply a nd d rain hos es th at can
be pos itioned either tothe righ tor the l efts ide sto fac ilitate p rop er in stal latio n.
O nce th e appl ianc ei s pos itioned f or levell ing, the height of the dishw ashe r
m ay be a lteredvi aad justment of the scre wing level o ft he fee t. In any case,
th eappl ia nce sho uld notbe incl in ed more than 2 .
For personal saf ety:
DO NOT USE AN EXTENSION CORD OR AN ADAPTER PLUG WITH THIS APPLIANCE.
DO NOT, UNDERANY CIRCUMSTANCES, CUTOR REMOVETHE EARTHING
CONNECTION FROM THE POWER CORD.
Befo re cl eaning or p erforming mainten ance, alw ays
remove th ep lugfrom the socket.
Tocleantheexteriorandrubberpartsofthe dishwasher,
donotusesolventsor abrasivecle aningproducts.
O nly u se a cloth with w arm so apy wate r.
Torem ov esp otso rst ains from the sur f ac e of t he
in teri or, u se a clot hda mp ened wit hwa ter a nd alitt le
v inega r, o ra c lea ning pro duct mad es peci fically f or
dishwashers.
Remove the Plug
No S olv ents orAbras ive Cl eanin g
Mov ing theApplianc e
Seals
Aft er ever ywa sh, turn off t hewater supp ly to the
applia nce and leave th e door s light lyop en soth at
m oisturean dodours a ren ottra pped i nside.
After EveryWash
When not inUse foraLong Time
This appliance must be earthed. In the event of a malfunction or breakdown, earthing will reduce the risk of
electric shock by providing a path of least resistance for the electric current. This appliance is equipped with a
cord having an equipment-eart hing conductor and an earthing plug. The plug must be plugged into an
appropriate outlet that is installed and earthed in accordance with all local standards and requirements.
for personal safety:
DO NOT USE AN EXTENSION CORD OR AN ADAPTER PLUG WITH THIS APPLIANCE.
DO NOT, UNDER ANY CI RCUMSTANCES, CUT OR REMOVE THE
FROM THE POWER CORD.
EAR THING
CONNECTION
Improper connection of the equipment earthing conductor can result in the risk of an
electric shock.
Check with a qualified electrician or service representative if you are in doubt whether the
appliance is properly earthed.
Do not modify the plug provided with the appliance. If the plug does not fit properly to the
outlet, please have a qualified electrician to install a proper outlet.
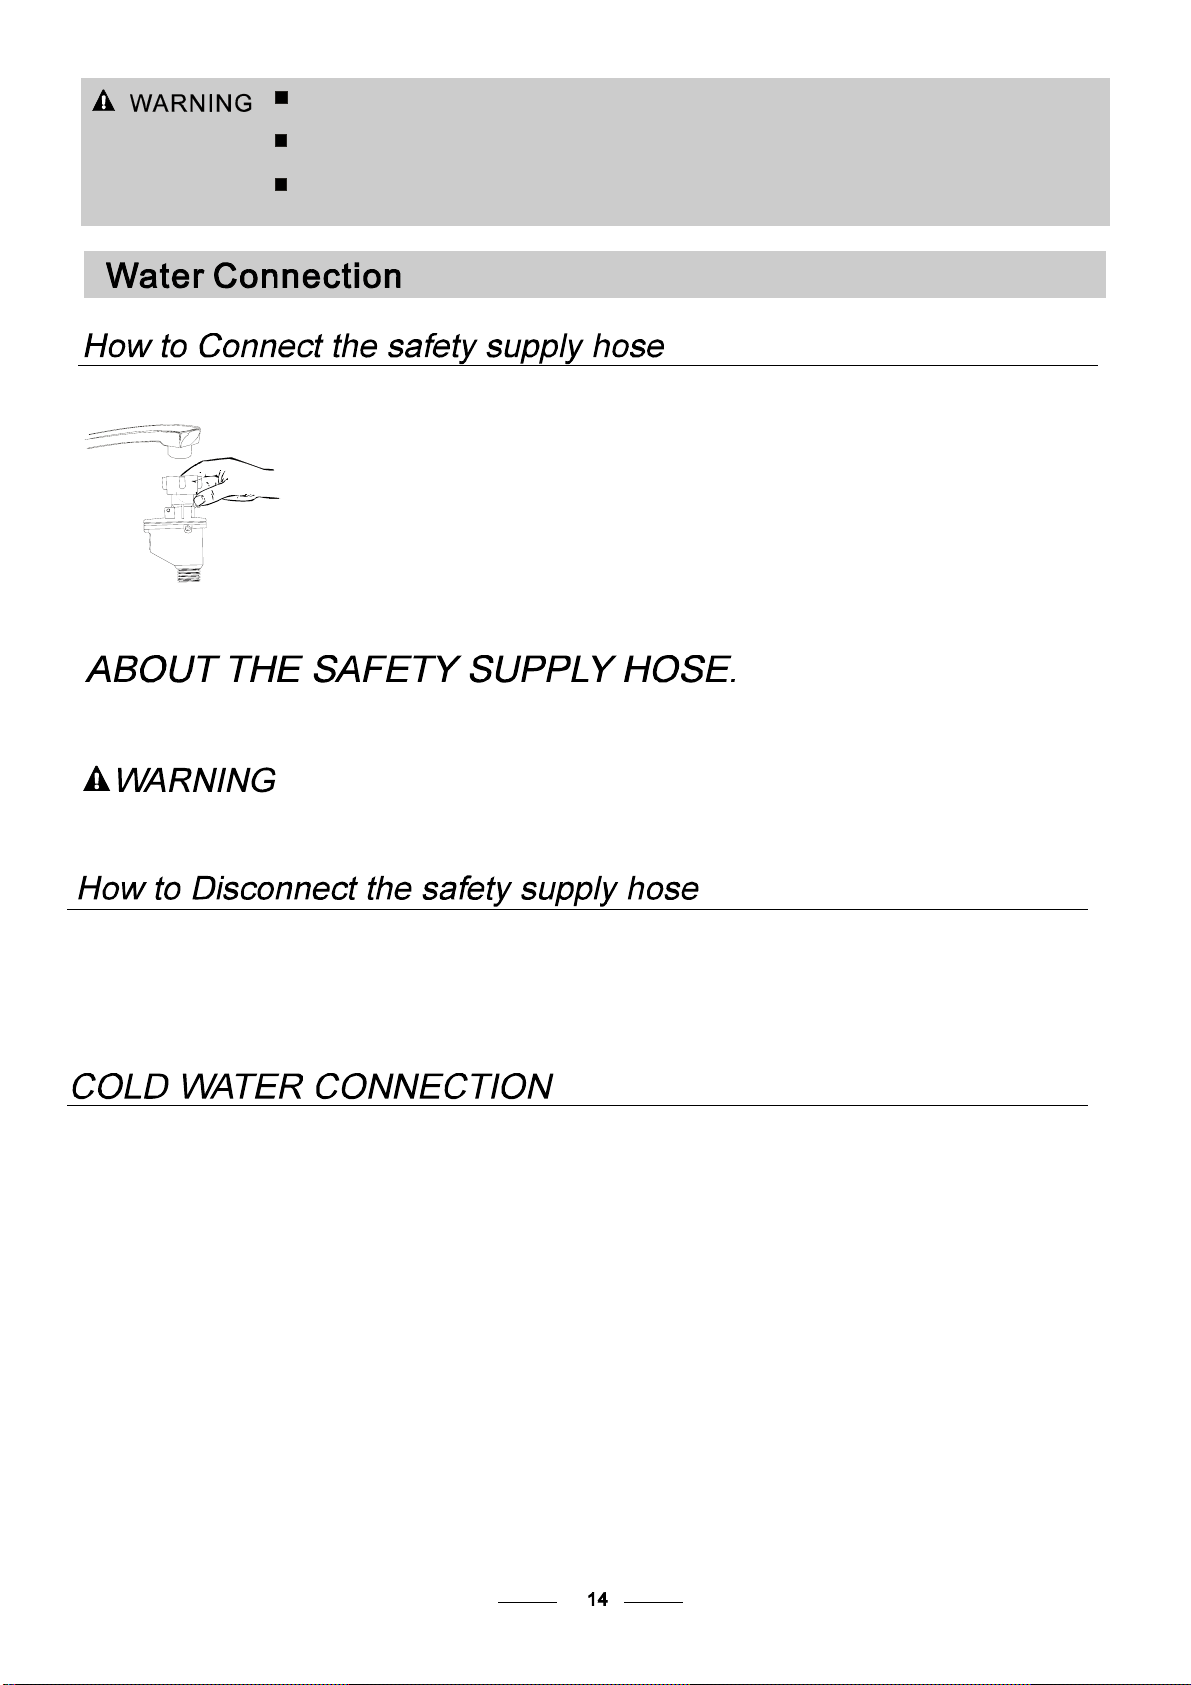
Ahosethatattachesto asinkspray canburstif itis insta lled on thesame waterlineasthe dishwasher.If your sink
hasone,it is recommendedthatthe ho sebedisconnectedandthehole plugged.
Pull The safety supply hoses completely out from the storage compartment located at rear of
dishwasher.
T urn water fully on before starting th e dishwasher.
1
Tighten the screws of the safety supply hose to the faucet with thread 3/4inch.
Thesafety supply hose consistsofthe doublewalls.Thehose'ssystemguaranteesitsinterventionbyblocking the
f lowo fwa ter inc aseof the sup ply hose bre akingan dwh en the a irsp ace b et ween the sup ply hose i tse lfa nd th eou ter
corrugatedhoseis full ofwater.
T urn off the water .
Release the water pre ssure by depressing the pressure release button. This relieves water pressure and prote cts you, and the
room, fr om severe splashing.
Unscrew the safety supply hose from the faucet.
3
2
1
2
3
Theapp liance m ust be conne cte dt o the wat erma ins using n ewhose- sets.
The o ld hose -se ts sho uld no t be re used.
Waterpressuremust bebetween 0,04 MPa and1 MPa.Ifthepressure isbelow the
minimumconsultourService Departmentforadvice.
C onnect the cold w ater sup ply hose to a threaded 3/4 (inch ) co nn ector and mak esure th at it is f astened tig htly in p lace.
Ifthewaterpipesare new orhavenot been usedfor anextendedperiodoftime,let the water runto make surethatthe
w ate r is c lear and free of im puri ties. If th isprecau ti on is n ottaken, there is a risk tha tthe wat er in let c ang et bl ocked
and d ama ge the ap pliance.
Thefollowingthingsshouldbe checked before starting the dishwasher.
The content of this manualis veryhelpfulto theusers.
After installation, please make sure to keep this manual.
1
Thedishwasher is levelandfixedproperly
2
T he i nlet val ve i s o pen
3
T here is no lea kag e at t he c onn ecti ons of t he conduc ts
4
Thewiresaretightlyconnected
5
The poweris switched on
6
The inl et an d dr ain ho ses a re knott ed
7
Allpackingmaterials andprintings shouldbe taken outfromthedishwasher
Extension Hose
Ifyouneeda drainhoseextension,make sure tousea similar drain hose.
It mu stb e no lon ger th an 4 metres ;ot herw ise the c leani ng effe ctof t he di sh washer could be reduc ed .
Wa t e r O u t l et
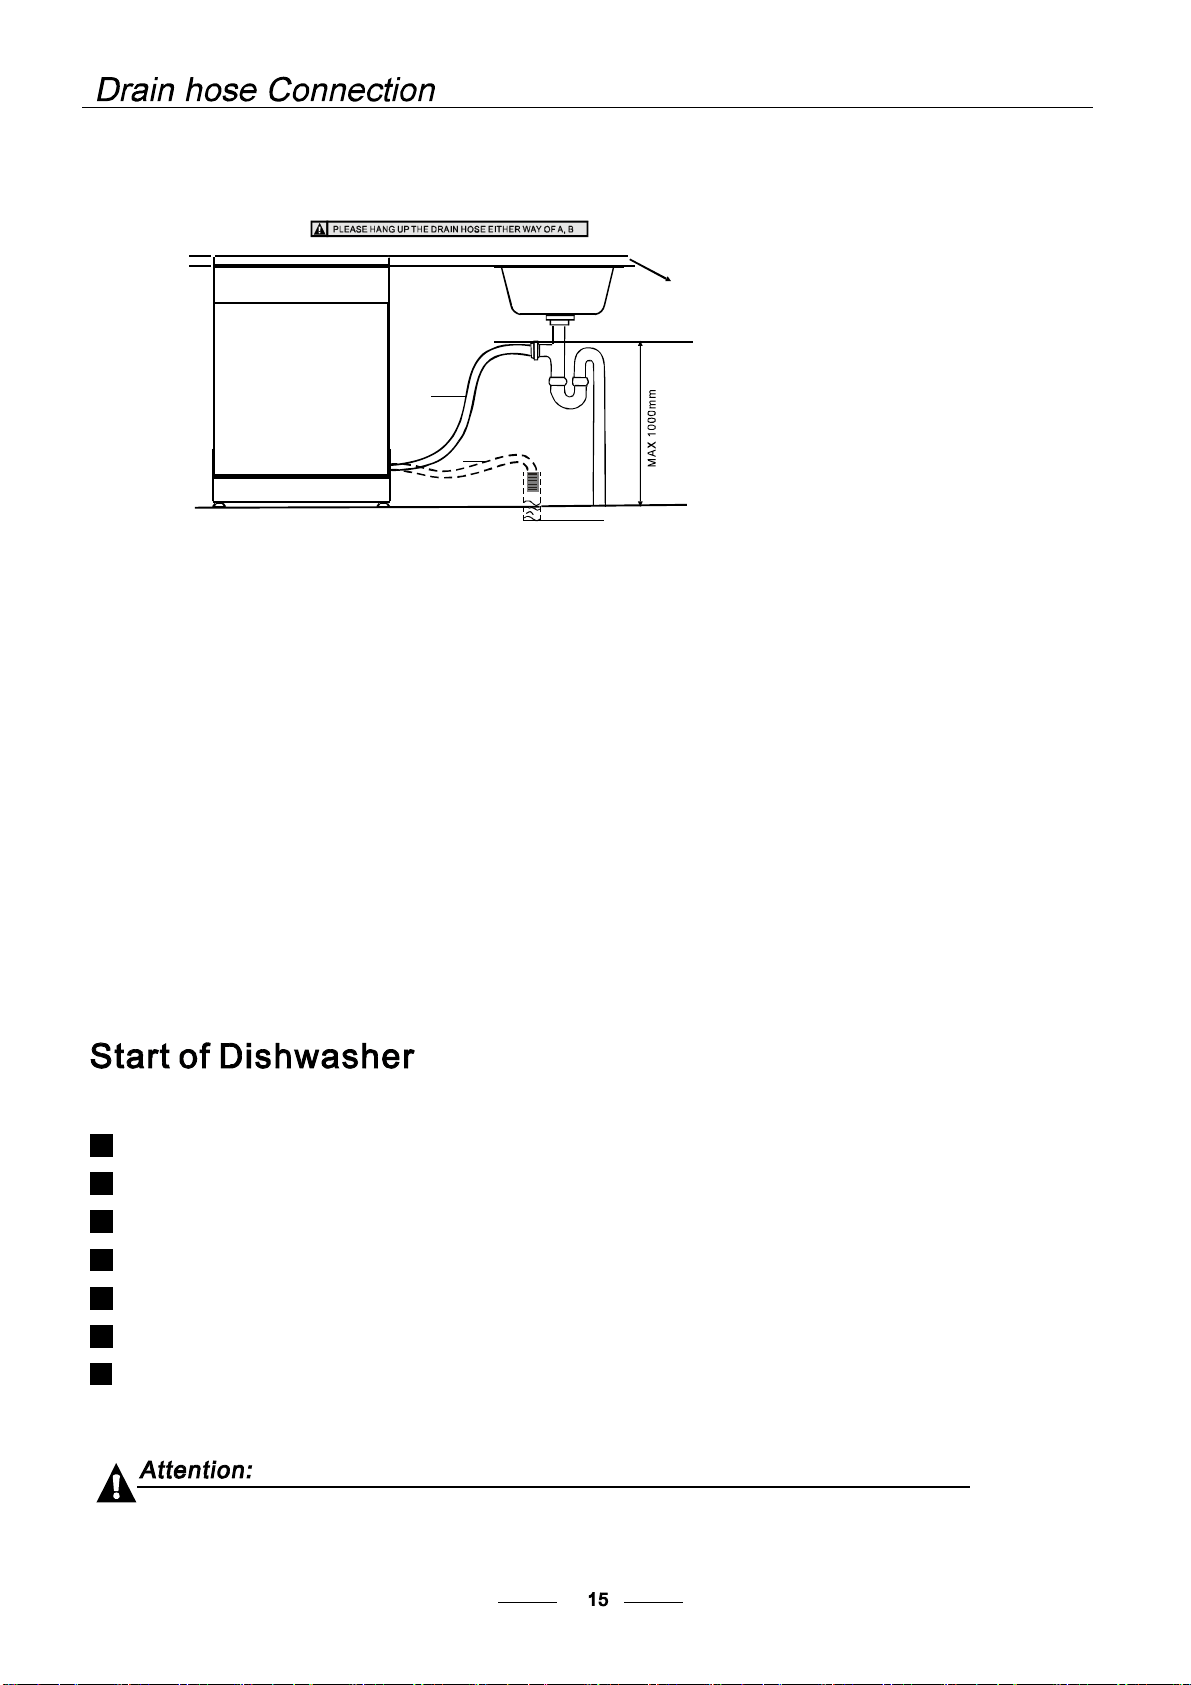
Connect the wat erdrain hose. The dr ain h ose mu st be corr ect ly fit tedt o avoi dwater lea ks.
Ensur ethat thew ate rdra inhose is no t kin ked ors q uas hed.
If th esin k is 1000 mm hig her from the f loor, th e exc ess water in hose sc annot be d ra ined d ir ectly
into the sink.Itwillbe necessary todrainexcesswaterfromhoses into abowlorsuitable
conta ine r that is held out side and lower th ant hesi nk.
How toDrain ExcessWater FromHoses
Syphon Connection
Insert t he drai nh ose into a dra inpipe with a minimum di ameter o f40mm ,or leti trun into the sink, ma king sure to
avoid bendin gor cr imping it.T he to pof the hose mus t be les sthan 1000m m.
Insert th edrain h ose into ad rain pipe with a m ini mum diam ete ro f40mm, or l et i trun into the sink, m aking su reto
avo idbendin go rcrimpin git. The to pof th eho semus t be less t han 100 0m m.
A
Counter
Front
Drain pipe
NOT E
The top of thehose
must be less t han
1000mm.
φ 40mm
B

Fuse blown, or the home
circuit breaker has been
triggered.
Replace fuse or reset circuit breaker. Remove any other
appliances sharing the same circuit with the dishwasher
Spil led rinse- aid
Always wipe up rinse-aid spills immediately.
Hard water minerals
The affec ted items are
notcorrosion resistant.
Aspayarmis
knockin g against
an item in a basket
r
Item s of croc kery
are loose in the
wash cabinet
This may be caused
by on-site installation
or the cross-section of
the piping.
To clean the interior, use a damp sponge with
dishwasher detergent and wear rubber gloves.
Never use any other cleaner than dishwasher
detergent for the risk of foaming or suds.
Interrupt the programme, and rearrange the items
which are obstructing the sp ay arm.r
Interrupt the programme,
and rearrange the items of crockery.
Thisha s no influence onthe dishwasher function.
if in doubt, contact a suitably qualified plumber.
Detergent with
colourant was used
Make sure that the detergent is the one without
colourant.
Improper det ergent
Make sure the dishwasher is tu rned on and t he door i s
closed securely.
Check that the water supply is connected properly and
the water is turned on.
Makesure t o closethe door properly and latch it.
Make sure the power cord is properly plugged into the
wall socket.
Power supply is not
turned on
Error code:E1;
Water pressure is low
Door of dishwasher
not properly closed.
Kink in drain hose
Filt er clogged
Kitchen sink clogged
Check drain hose.
Check the filter
(se e se ction titled )" Cleaning The Filter "
Check the kitchen sink to make sure it is draining well.
If the problem is thekitchen sink not draining ,you may
need a plumber rather than a serviceman for dishwashers.
Use only the special dishwasher detergent to avoid suds.
If this occurs, open the dishwasher and let suds evaporate.
Add 1 gallon of cold water to the tub. Close and latch the
dishwa sher, then select any cycle. Dishwasher will drain
out the water at the first step.
Repeat if necessary.
Open the door after the draining
has stopped and check if the suds have disappeared.
The items should be corrosion resistant.
The dishes were not
loaded correctly.
See notes in " Loading the Dishwasher Baskets ".
Select a more intensive programme.
See" Wash Cycle Table ."
Use more detergent, or change your detergent.
Rearrange the items so that the sp ay can rotate freely.r
Clean and/or fit the filter combination correctly.
Clean the sp ay arm jets. See "Cleaning the Spray
Arms".
r
Use less detergent if you have soft water and select
a s horter cycle to wash the glassware and to get
them clean.
Use a mild abrasive cleaner to eliminate those marks.
Re-loading the dishes properly.
Load the dishwasher as suggested in the directions.
Increase the amount of rinse-aid/refill the rinse-aid
dispenser.
Do not empty your dishwasher immediately after
washing. Open the door slightly so that the steam can
escape. Begin unloading the dishwasher only once
the dishes are barely warm to the touch. Empty the low
basket first. This prevents water form dropping off
dishes in the upper basket.
In short program the washing temperature is lower.
This also lowers cleaning performance. Choose
a program with a long washing time.
Water drainage is more difficult with these items.
Cutlery or dishes of this type are not suitable for
washing in the dishwasher.
The programme was
notpowerful enough.
Not eno ugh detergent
was dispensed.
Items are blocking
the path of sp ay arms.r
The filter combination
inthebaseofwash
cabinet is not clean or
is n ot correctly fitt ed.
This may cause
the sp ay arm jets
to get blocked.
r
Combination of soft
water and too much
detergent.
Aluminum utensils
have rubbed against
dishes.
Dishes block
detergent cups.
Improper loading
Too little rinse-aid
Dishes are removed
too soon
Wrong program
has been selected
Use of cutlery with
a low-quality coa ting
Overflow .
Whe n some malfunctions come on, the appliance will displ ay error codes to warn you:
Longer inlet time.
F aucets is not op ened, or water intake is
restricted,or water pressure is too low.
Some eleme nt of dishwasher leaks .
TheSoak lightflicker fleetly
T he Gl as s l igh tf licke r fle et ly
If overflow occurs, turn off the main water sup ply before calling service.
If there is water in the base pan because of an overfill or small leak,
the wate r should be removed before restarting the dishw asher .
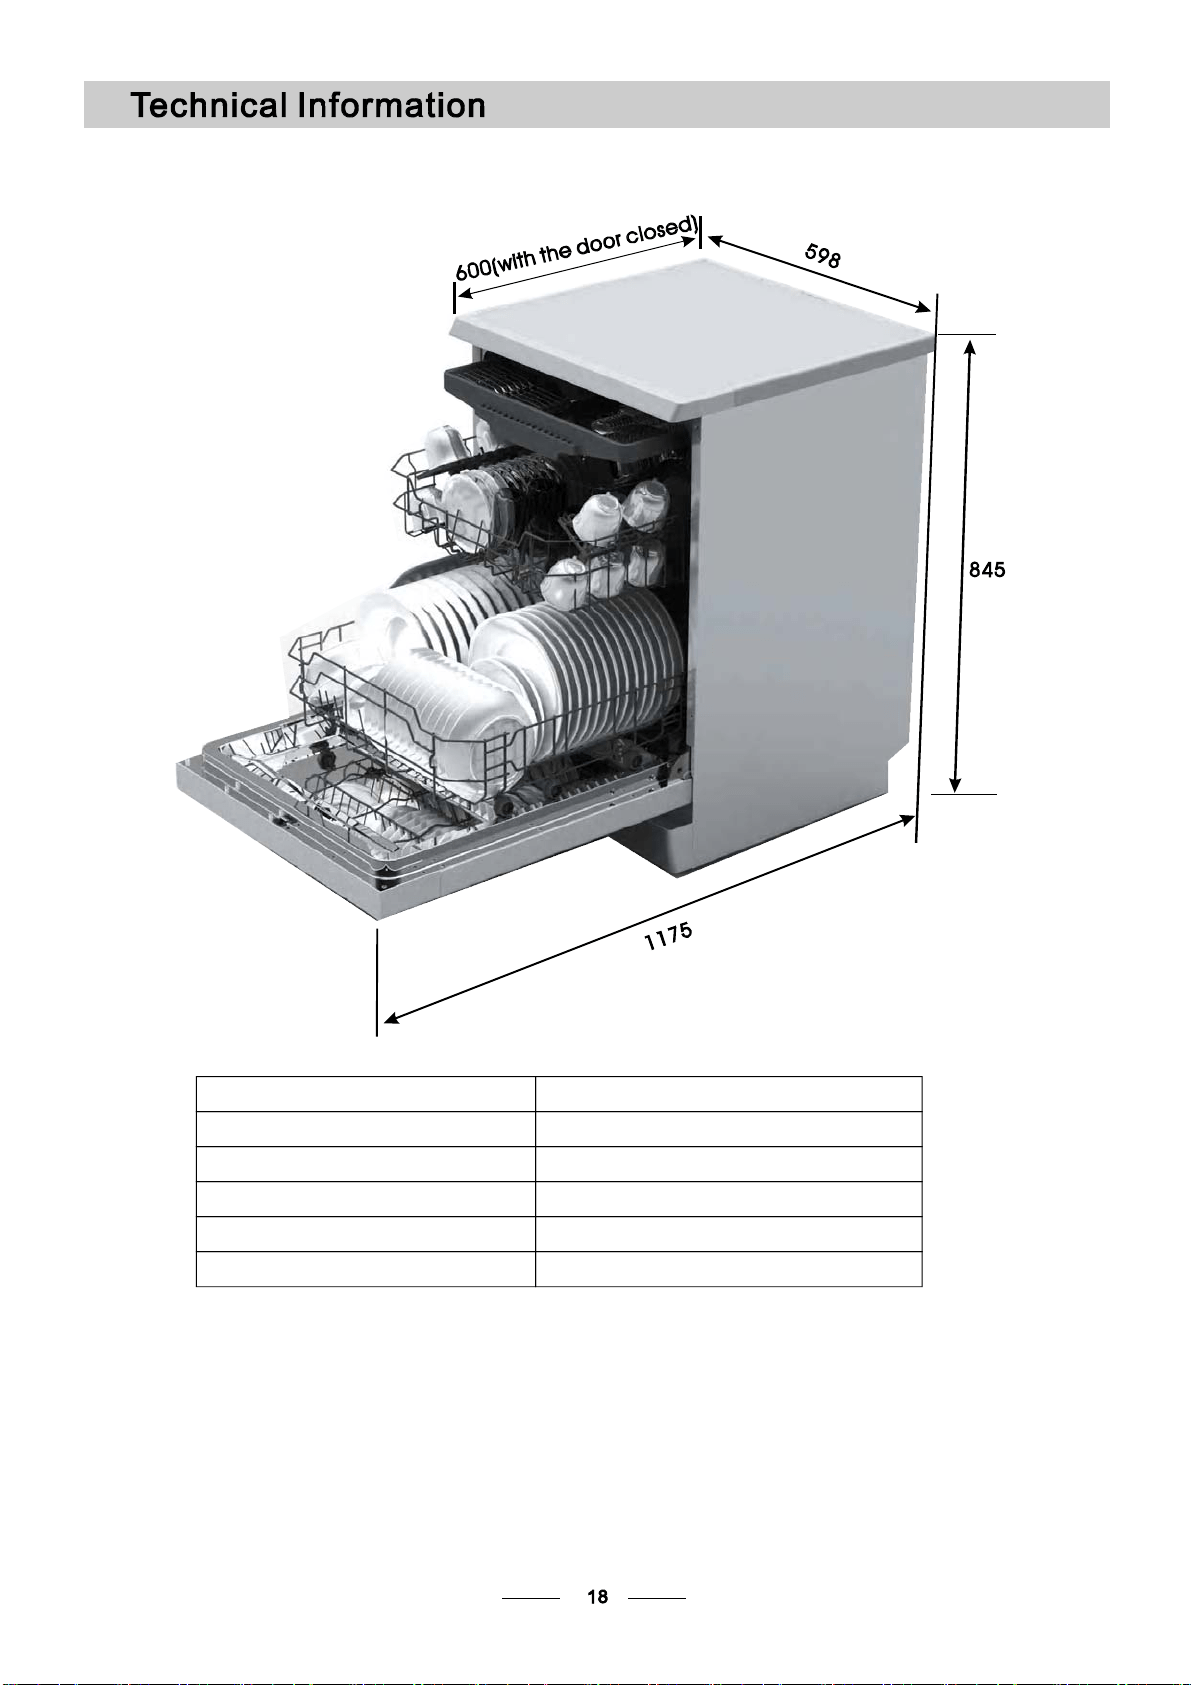
Height: 845mm
Width : 598mm
Depth : 600mm
(with the door closed)
Water pressure: 0.04-1.0MPa
Power supply: see rating label
Capacity: 14placesettings
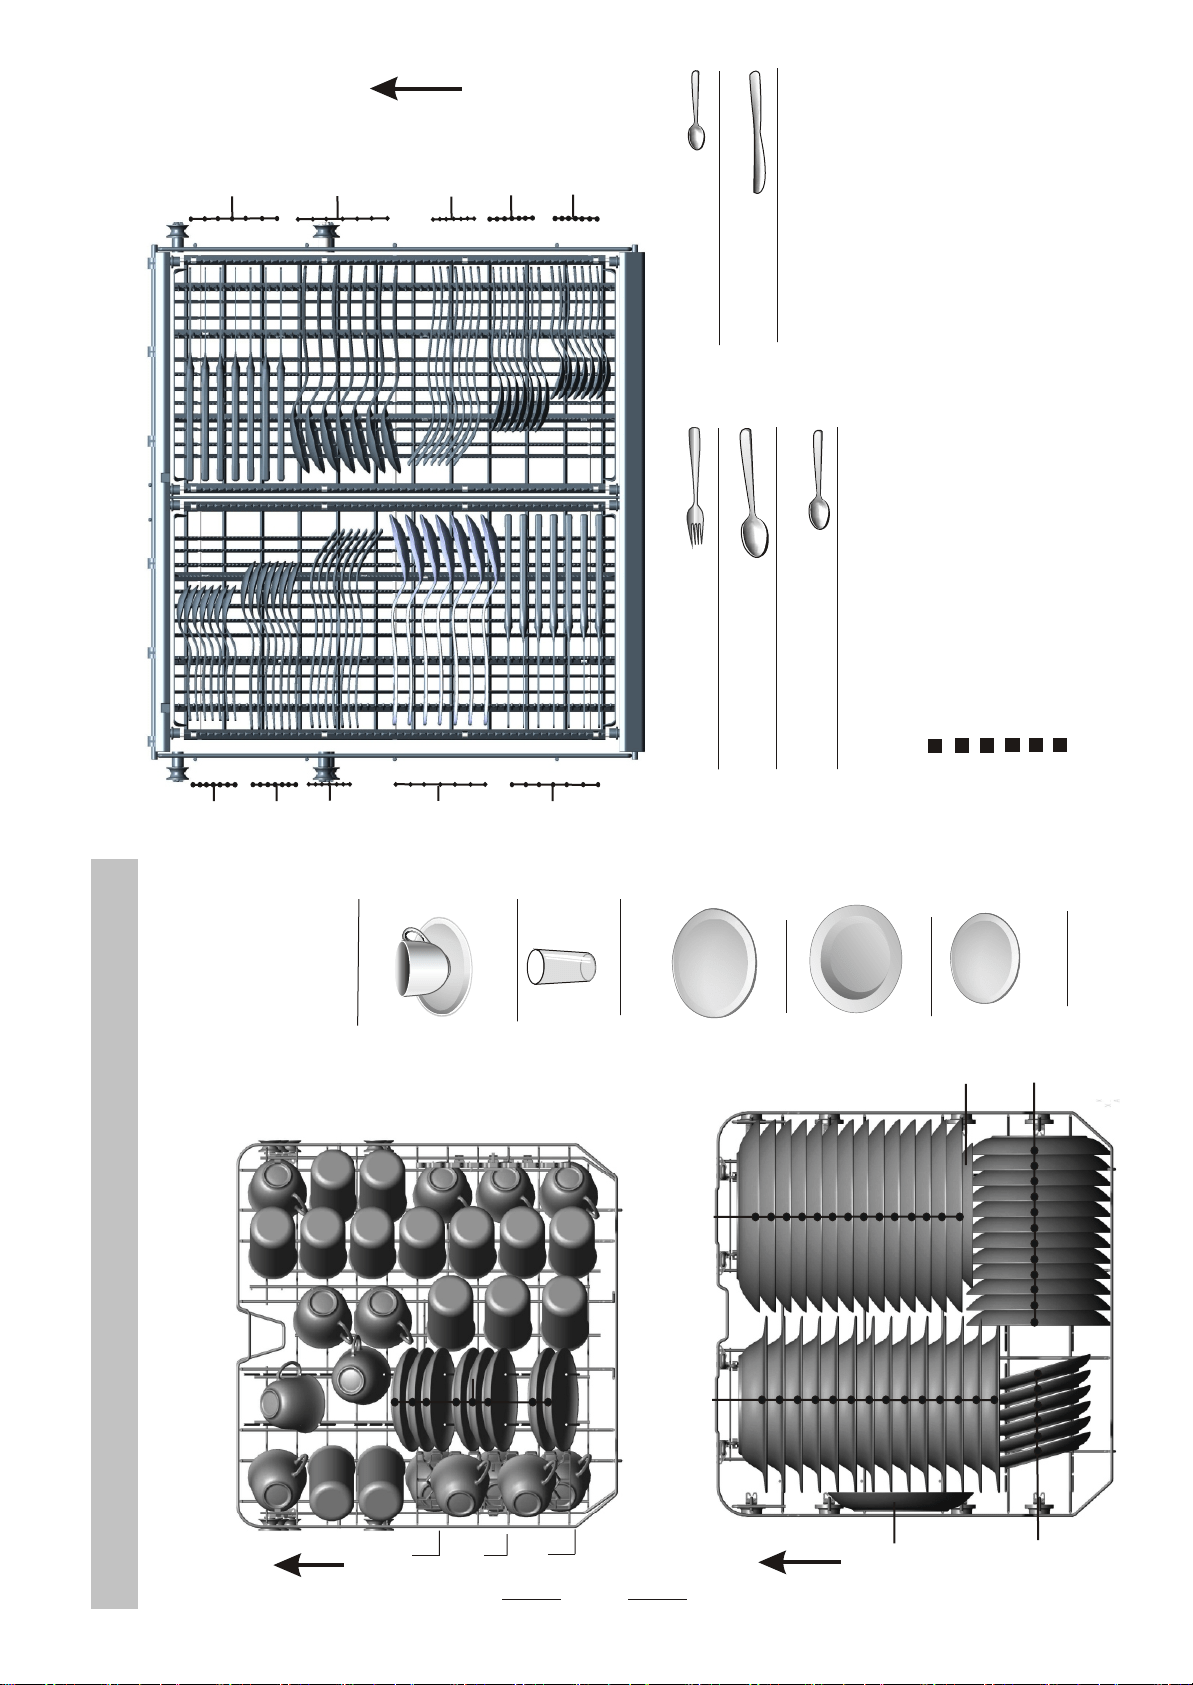
1.Upper basket:1.Upper basket:
Loading the baskets according to (*AS/NZS 2007.1) : Loading the baskets according to :
c
Glasses
Saucers
b
Cups
a
2.Lower basket:2.Lower basket:
d
Dinner plates
e
Soup plates
Dessert dishes
f
3.
Cutte
rly baske
t:3.
Cutte
rly baske
t:
Forks
1
Soup spoons
2
3
Dessert spoons
Teaspoons
4
Knives
5
Voltage:230V/50Hz Voltage:230V/50Hz
Information
for comparability tests in
accordance with (*AS/NZS 2007.
1)
Capacity: 14
place settings Capacity: 14
place settings
Position of t
he upper basket: lower Position of t
he upper basket: lower
Programme: Normal Programme: Normal
Rinse aid setting: 6 Rinse aid setting: 6
Detergent(Pre/main): 5 g/27.5 g Detergent(Pre/main): 5 g/27.5 g
a
a
c
c
c
c
c
c
c
c
a
a
a
a
a
a
a
a
a
a
a
IN
c
c
c
c
a
c
b
c
IN
f
f
b
e
f
d
IN
4
5
2
1
3
4
3
1
2
5
1919