BDW45X
10 place settings
Half-load function
Compartment A:
Witheachwashcycle.
Compartment B:
For programm es with pre-wash only.
(Follow the !)Us er Man ual
Mechanical indicator C.
Electric indicator on control panel(if provided).
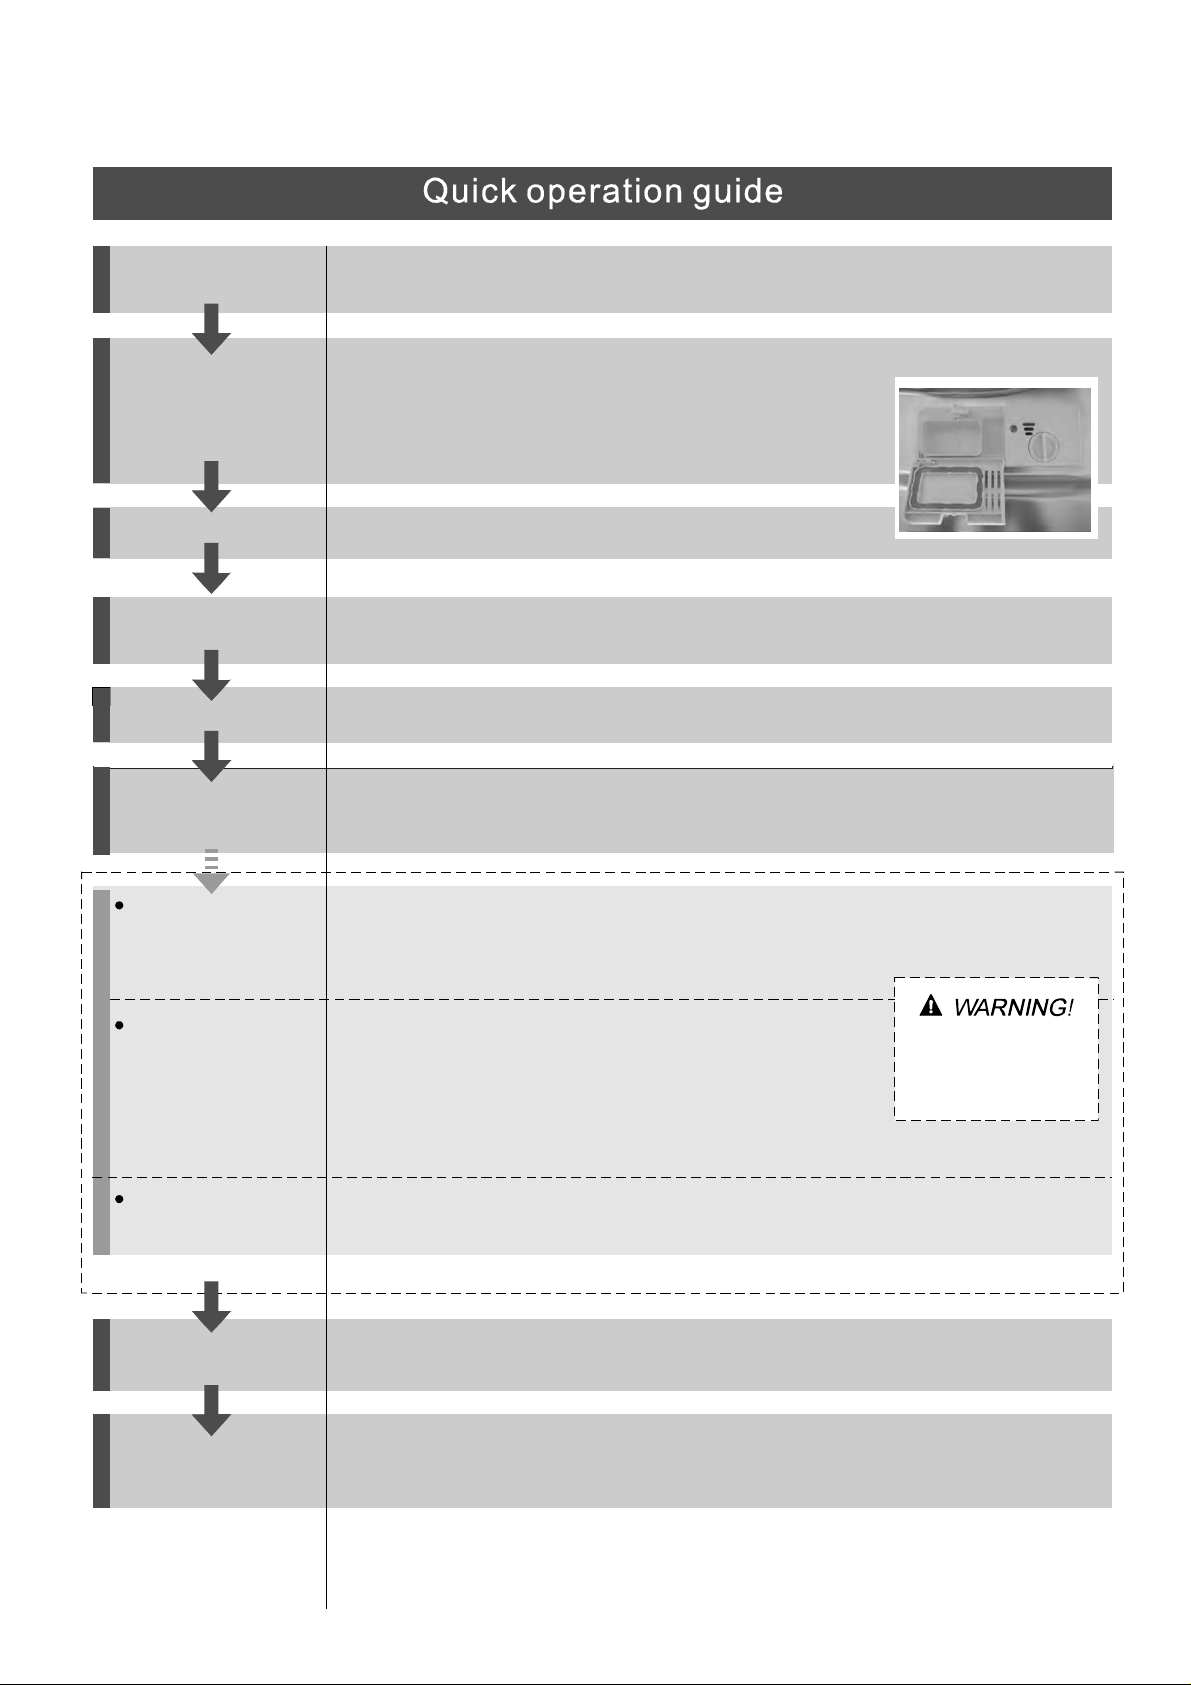
Check the rinse aid level
Load the baskets
Select a programme
Turn on the water tap and press the . T he machine will start working
after about 10 seconds.
Start/Pause Button
Running the dishwasher
Switch off the appliance
Turn off the water tap,
unload the baskets
Fill the detergent dispenser
Warning: Wait a few minute s (about 15 minutes) before unload ing the dishwasher to avoid handling
the dishes and utensils while they are still hot and more susceptible to breakage.
They w ill also dry better. Unload th e appliance, starting from the lower bask et.
Changing theprogramme
Add forgotten dishes in the
dishwasher.
Scrape off anylarge amount of leftover food. Soften remnants of burnt foo d in pans,
then l oad the baskets. Refer to the dishwasher loadin g instructions.
Close the door,press the Programme Button until the selected programme lights up.
( See the section entitled Oper ation instruction )“”
When the working cy cle has finished, the buzzer of the
dishwasher will sound 8 times, then stop.
Turn off the appliance using the On /Off Button.
If the appliance is switched
off during a wash cycle.
Op en t he door caref ul l y.
Hotst eammay escape
when thedoorisopened!
If the appliance is switched off during a wash cycle, when switched
on again, please re-select the washing cycle and operate the dishwasher
according to the origi n al Power-on state.
Switch on the applia nce Press the On/Off button to switch on the appliance, Open the door.
For detailedoperating method read theco rresponding content onthe instruction manual.
1. A running cycle can o nly be modified if it has been running for a short time. O therwise the detergent
m ay have already been released and the water already drained. If this is the case, the de tergent
dispenser must be refilled.
2. Pres s the Start/Pause button, press the program button for more than three seconds,the
m achine will be in standby state, then you can change the program to the desired cycle setting
1.Press the Start/Pause Button to stop the washin g.
2.Open the door a little .
3.After the spray arm s stop working, you can open the door
c ompletely.
4.Add forgotten dishes.
5.Close the door.
6.Press the Sta rt/Pause Button, the dishw a s her will run
after 10 seconds.
A
B
C
Th e sect ion on tro ubleshooting Tips w ill help you tos olve som eco mm on pr obl emsb yyou rse lf.
Dear Cu s to m er,
Please carefully readthis manual beforeusing thedishwasher,itwil lhelpyouto useandmaintain the
dishwasherproperly.
Passit ontoany subsequentownerof theappliance.
Thi s ma n ual con t ain s sec t ions on safety Instr uc tio n s,Opera t ing I ns tructi o ns, Inst al lat i on I nstr u cti o ns a nd
Tr ou bl es hoo ti ng Tip s , et c.
The man ufacture r, f ollowing a pol icy ofc onst antde velopment a nd upda ting of t he produc t,may mak e
modificati ons wi thout giving prior no tice.
Ke ep it as a r e fer ence in th e lat er days.
Ifyo ucan not solv ethe pr oblems b yyo urself ,pl ease ask fort he help of pro fessional tech nici ans.
Th is appli ance is in tended t ob e used in hous eho ld and si milar app lications suc h as:
-s taff kitch en ar eas in s hop s, off ices and othe rwo rkin gen viron me nts;
-farm hous es;
-b ycli ents inh otel s, mo tels and othe r r esiden tia l typ e env ironment s;
-bedand breakfast type environments.
Dishwasher Features... ..................... ............ .... .... ................. ..................... .................2
AttentionbeforeorafterloadingtheDishwasher
Baskets...... ........................................................................... ...................... .......... ....6
FilteringSystem.......... ..... ......... ............... ......... ............... .................................. .......10
Caring for the Dishw asher..... .............. .. ..................... ........................ ............... ........11.
A Fillth eRinseAid Dispenser............. .. ..............................................................3、 .... . ...
B Function ofDetergent ....... .............. ..... .......... ................................................ .4、 . ... . ...
..... ...... ......... ...... ...... ......... ...... ...... ... ... ...... .....7
The M et hod of L oading Nor malD ishw are
WashCycleTable..................................... ............... ................................. .......... ..... ....8
Turningon theAppliance........................................ .....................................................8
Cha nge theP rogramme.............. .............................................................................9....
At the Endof theWas hC ycle............................. ................................ .................. .........9
Positioning theAppliance. .................. .....................................................................12..
Water Co nnecti on.. ...... ...... ...... ..... ....... .. ... ...... ...... ...... ...... ...... ...... ...... ...... ...... ...... ...1 3.
AboutPowerConnection........................ ....................................... ...........................12.
Start of dishw asher............. ................... ............. ......................... ................. ...........1 4..
Be forecalling forservice............. .............. ............... ....... ........... ................................15.
Error codes.................................... .......... ...............................................................16.
Technical information.............................. ........ ........................................ ................17..
Control Panel...................... ............... ....... ............ .............................. ....... ............ ... ...2
CONTENTS
This appliance must be grounded. In the even t of a
malfunction or breakdown, gr ounding will reduce
the risk of anelectric shock by providing a path of
least resist ance of electric current. This appliance
is equipped with a cord having an equipment-
grounding conductor and a grounding plug.
The plug must be plugged into an appropriate outlet
that is installed and grounded in accordance with
all local codes and ordinances.
Keep children away from detergent and rinse aid, keep
child away from the open door of the dishwash er,
there c ould still be some detergent left inside.
ren
Donotabuse,siton,orstandonthedoorordish
rack of the dishwas her.
Do n ot touch the heating element during or
immediatel y after use.
(This instruction is only app li cable to machines
with a visual heating element.)
Do not wash plastic items unless they are marked
dishwasher safe or the equivalent. For plastic items
n
ot so marked, check t he manufacturer's
recommendations .
Use o nly det erge nt and ri nse addi tives
desi gn ed for an aut om atic dis hwa sher.
Never us eso ap, l aun dry de te rgent ,or h an d
washi ng deter gent in you r dis hwa sher.Ke ep
t h ese pr od u cts out of t h e reach of c hil dr en.
Dur in gi nstall at ion, th epo wer suppl ymust not
be ex ces siv ely or dan ge ro usly ben tor flatt en ed.
Do not tamper with controls.
Do not place any heavy objects the
door wh en it is open. The appliance could tip
forward.
on or stand on
When l oading ite ms to be washed :
1) L ocate sharp items sot hat they are not li kely
to damage t he door seal;
2 Warni ng:K nives and other u tensils with
shar p points m ustbe loade din t he ba sket
with their points do wnor p laced in a
horizontalposition.
)
W he n using y our di sh washer, yous hould
p revent pla sti c item s f ro m c omi n g i n to c onta c t
w itht heh eati ng e lement.(T his inst ructi on i s onl y
appli cable to machi ne s wit ha visual he ating
el ement. )
Ifthes upplycordisdamaged, itmustbereplaced
bythemanufactureroritsserviceagentora
simi la rly q ualifi ed pers on i n or de r to a void a
ha zard .
Pleasedispose ofpackingmaterials properly.
Use the dishwasher only for its intended function.
Remove the door to the washing compartment when
removing an old dishwasher from service or discarding it.
Dishwash erde ter gent sare strongl yalkal ine, they
can be extrem ely da ng erous if swall owed.Avoi d
conta ctwit hskin a nde yes and kee pch ildren away
fro m the dish was her when the door is ope n.
C heck th at the det erg ent com parm ent is e mpt y
aft er complet iono f th e wa shc ycl e.
Th ea ppl iance i sto be con nect edto the wa ter
mainsusingnewhose sets and thatold hose-sets
s houldno t be reused.
T he max imum num b er of p l ace settings to be
washedis10.
T he max imum per miss ible inlet water pr ess ur e is
1Mpa.
T he mini mum permis si ble inlet w at e r pr essure i s
0.04Mpa.
Children should be supervised to ensure that they do
not play with the appliance.
This appliance is not intended for use by persons
(including children with reduced physical, sensory or
mental capabilities, or lack of experience and
knowledge unless they have been given supervision
or instruction concerning use of the appliance by a
person responsible for their safety.
)
,
When usin g your dishw as he r, foll ow the precaut i ons lis t ed below:
The d oor sh ou ld n ot be left o pe n,
since this coul d increa sethe risk of trip ping .
Improper connection of the equipment-grounding
conductor can result in the risk of an electric shock.
Check with a qualified electrician or service
representative if you are in doubt whether the
appliance is properly grounded. Do not modify the
plug provided with the appliance. If it does not fit
the outlet, have a proper outlet installed by a
qualified electrician.
Do not operate your dishwasher unless all
enclosure panels are properly in place. Open
the door very carefully if the dishwasher is
operating, there is a risk of water squirting out.
The dishwasher must always be connected to
the water system using new hose sets.
If t hea pplia nce isin stal ledo na carp etfl oor,
tak ec are that t h e o penings in it s bas e a r e no t ob st ru cted .
beforeusingit forthe firsttime.
To getthe best perform ance fromyourdishwasher,read all operatinginstructions
10
11
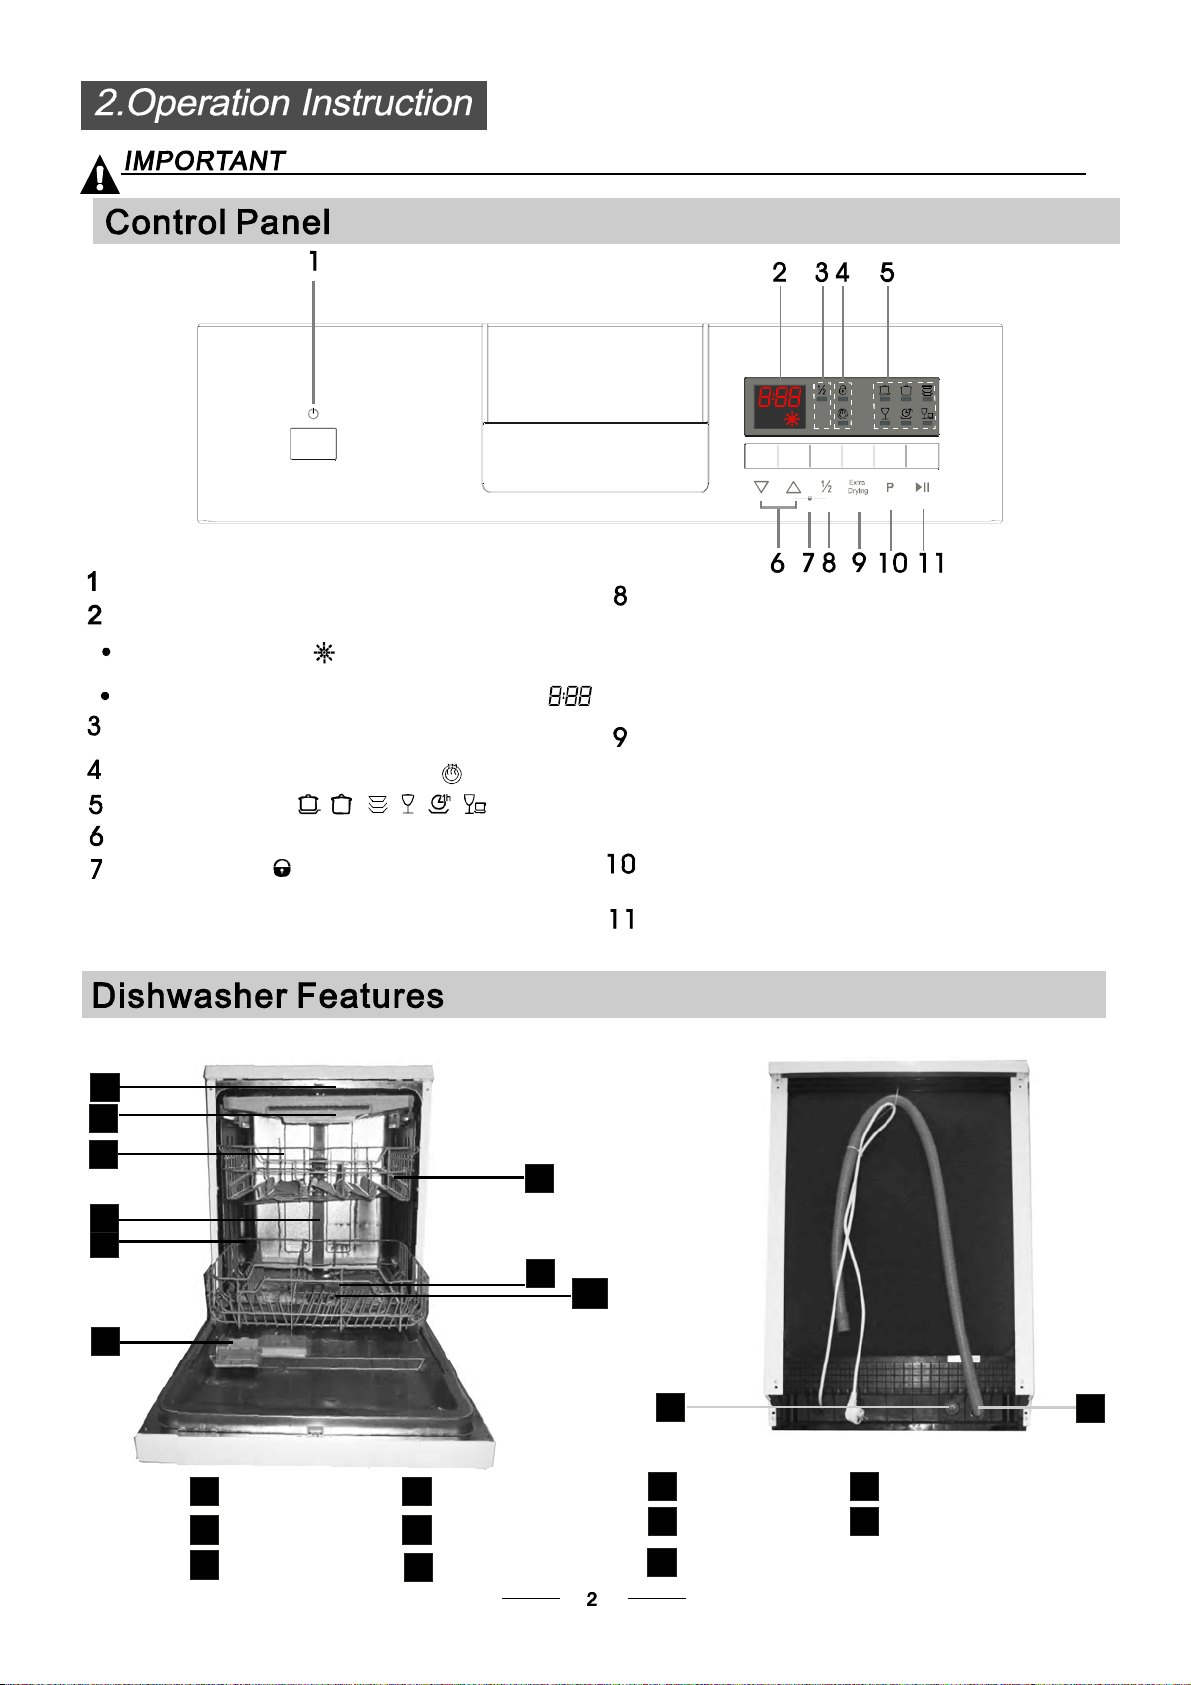
Ba ck View
1
2
3
4
5
6
7
8
9
Fron t vi ew
Lower basket
Dispenser
Cupshelf
Sp ray arms
Filter a s sem bly
Inletpipeconnector
Drain pipe
Upperbasket
Cutleryrack
Top s pray arm
1
I nner pip e
5
6
7
8
9
11
10
3
2
4
On/OffButton:To turnon/off thepower supply.
D ispl ay scr een: Tos how th e r em aining tim e
and the state(runningstate,delaytime etc);
Pr ogra min dicators:
RinseAidindicator:
Indicates whe nthedispen sern eeds to berefille d.
D elay tim e, Rema intime,o rerror codes indicator:
ExtraDryingfunctionselectButton :ToselectExtra
Drying functio n.(This funct ionc ano nlybe use dwith
Prog rams Intensi ve, H eavy, No rm al, Glas san d1H our.
Anincreasedtemperatureduring thefinalrinseto
increase the drying w ell. Ther eis a sli ghti ncrease i n
the ener gy consum ption ).
D ela y Button : To Pres s the button to dela y.
Program Button:To Pressthebutton toselect
appropriate Program.
Sta rt /Pause Bu tton: To star tth ese lected
was hing pr ogr a m orp aus e the w ashing p rogram
whenthe machineis working.
ChildlockandExtra Dryingindicator
Half loadi ndictat or: To show when Half load fun cti on
isselected.
Half load functionButton:To selectHalfload
function . (This fu nction c ano nly beu sed with
prog ram sof Inte nsiv e,H eavy, Normal ,Glass and
1Ho urw hen you have on lya bou t orl ess th an half
load di shes, i tcan sa vew at er an den ergy consump tio n.
All s prayers will be ru nning a ndal lba ske ts c ould b e
loaded.)
Child l ock f unc ti on : Press Dela yB ut ton a nd
Button simultaneously more than3secondtolock
theprogram,usethesamemethodtocancelthe
child l ockfu nc tion.
½
Bef or e using y our di sh was herfo r the fi rst ti me:
A. Fill therinse aiddispenser
B. F ill in deterge nt
Therinse aid isreleasedduringthe finalrinseto preventwater from formingdropletson your dishes,wh ich can
leave spots and streaks.It also improvesdryingby allowing water to rolloff thedishes. Yourdishwasheris
designedtouseliquidrinseaids.Therinseaid dispenserislocatedinsidethedoor nextto thedetergent dispenser.
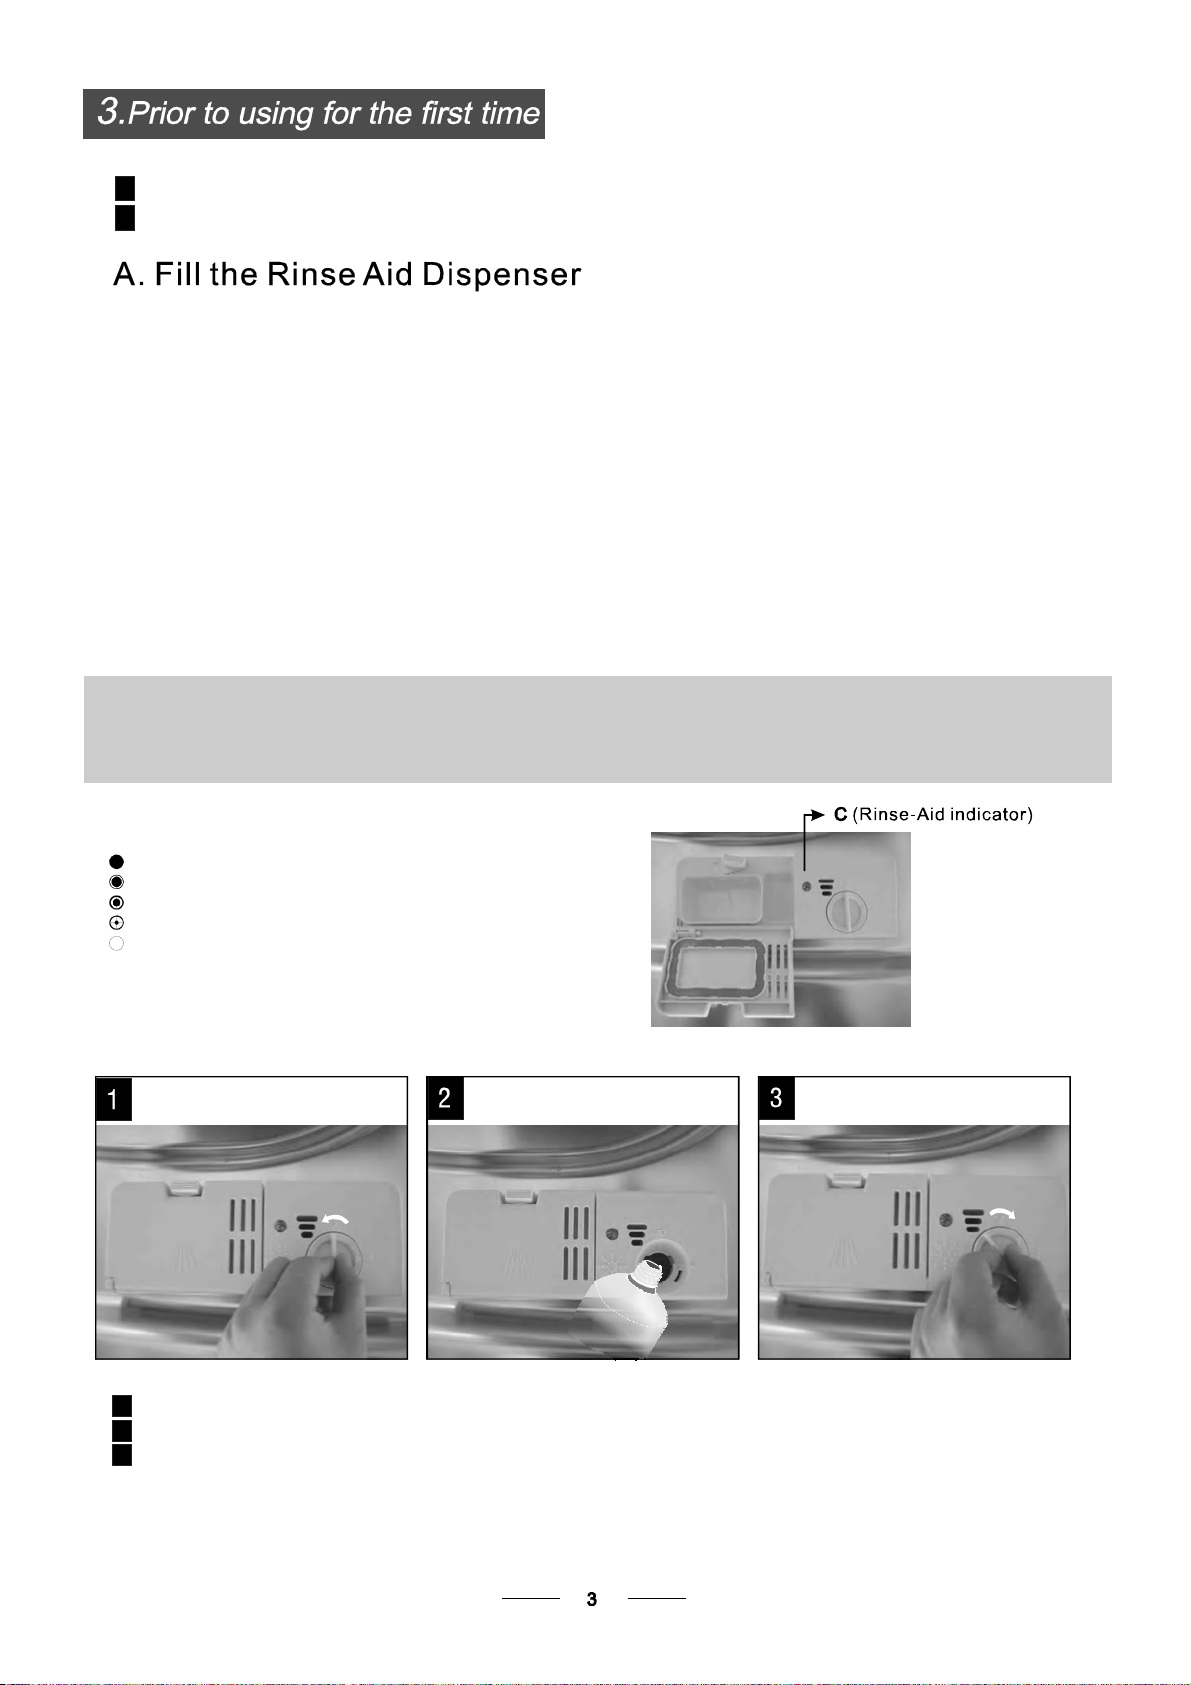
To f il lt he dispense r, open the c apa nd pou r the rin se ai di nto the di spen ser until th e level indi cator t urns comp letely
black.Thevolume ofthe rinseaidcontainerisabout 110ml.
RinseAi d Dispenser
Function of RinseAid
Rin se aid is aut omati cal l ya dde ddu ring the l ast rin se,e nsuri ng t hor ough r ins ing, an ds po tan d str eakf ree dry ing.
Attention!
Onlyusebrandedrinse aidfor dishwasher.Never fillthe rins eaiddispenserwithany othersubstances
(e. g. Di shwas her c leaning a gent ,li quid dete rgen t). Thi sw oul dd amage the appli ance.
As the rin se ai d dim inis hes, the size of t he bl ac k dot
on the rinse ai dlevel indi cator c hange s, as il lust rated be low.
Fu ll
3/4full
1/2full
1/4full-Shouldrefilltoeliminatespotting
Empty
If t here i sn ori nse-aid warnin g lig htin th ec ontrolp ane l,y ou can judg ethe amo un t o frin se-aid by t he color of t he
opti cal le ve l indi cator "C" locate d nex tt othe cap. When the rinse-a idc ontaine r is ful l, th e whol ei nd icato rw illb e
dark .As t he rin se-aid dimin ish es,t he size of th ed ark dot decr eases. You sh ould neve rl ett he ri nse aid get b elow
1/4full.
When to Refill the RinseAid Disp ense r
RINSEAID DISPENSER
To o pe n the dispe ns er, turn the cap to the "ope n"(l eft) arr ow a nd lift it out.
Po ur th e r inse ai d in to t he di sp ense r, bei ng ca re fu l no tto o ver fil l.
Replacethe capby insertingitalign ed with "open"arrow and turning it tothe closed (right) arrow.
Be ca reful no tto o verfillt he dispense r,b ecause this c ould cau se over suds ing. Wi peaw ay an ysp il ls
witha dampcloth. Don't forgetto replace thecap beforeyou close thedishwasherdoor.
Attention!
Clean up a ny ri nse aid spilt during filling w ith an absorbe nt cloth toa void e xcess fo aming
during the ne xtw ash .
1
2
3
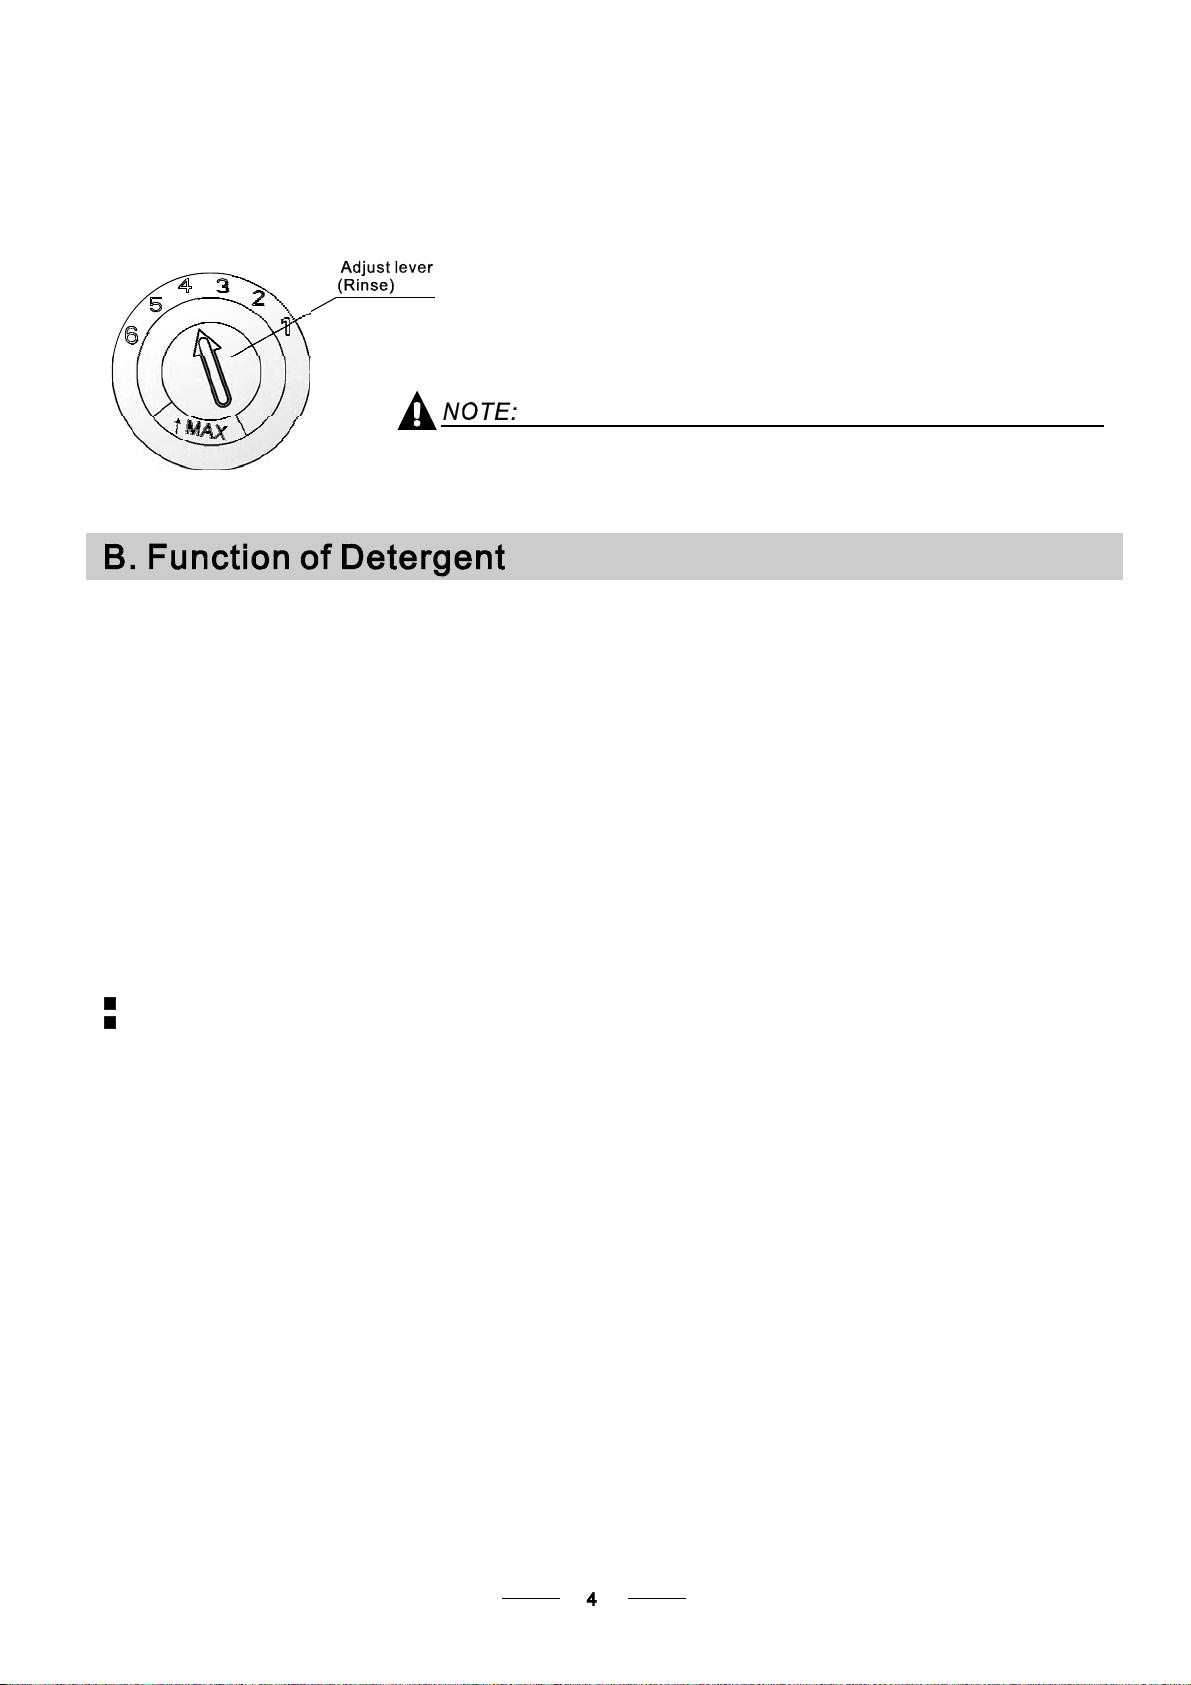
Adjusting RinseAid Dispenser
The r inse aid di spen se rh ass ix or f ours ettin gs .A lways s tart with th e dispens er
set o n" 4". If s po ts an dpoor dryi nga rea pro ble m,incr ease th eam ount of r inse
aiddispensed by removing thedispenserlidandrotatingthedialto"5".Ifthe
d ishes are s till not drying pr op erly o r are showing s pots, ad just the d ial to t he ne xt
h ighe r le veru ntil you rd is hes ar esp ot-fr ee .T he recomm ended setting is "4 ".
(Factory value is "4".)
Incr ease the dose if ther eare d rops of wate ro r lim esp otson the dish es af ter wa shing.
Reduce i ti f th ere ar e sticky whit ish stai ns on your di sh eso r a blu ish f ilm on g lasswar eo r
knifeblades.
Dete rge nt sw ith its c hemic ali ngredients a re ne cess ary t or emove dirt ,c rush d irt and t ransport it ou tof the dishw as he r.
Most of th eco mme rci al qu ali ty deter gentsa re suita blefo rt hisp urpose.
Detergents
Ther eare 3 sor ts of d etergents
1.Wit h phos pha te and withc hlori ne
2.With phos phate and witho utc hlorine
3.Wit hou tpho sphate and without chl orine
Based on their chemicalcomposition,detergentscanbe splitin twobasic types:
Theuseof normal washingprograms in combinationwith concentrateddetergents
reducespollutionand is goodforyourdishes ;thesewashprogramsarespecificallymatched
to the dirt -diss olvin gpr ope rties of t heenzym es of th eco ncent rated dete rgent .For this rea son
norm al wa shp rogra ms i nwh ich conc entr ated de ter gents are used ca nac hieve t he same
res ul ts that c ano therwi se o nl ybe ac hieved using i ntensive progr am s.
“”
“”
“”
De te rg ent t able ts o fdifferen tbrands di ssolve at di ffe rent spe eds. For this reason som e
det er gent t able tsca nnotd issolve an dde velop th eir f ul l c lean ing power du ring sho rt
pro gra ms. Therefo repl ease use lon gprogr ams when u sing d ete rgent t ablets, to
ensure the completeremovalof detergentresiduals.
Thedispenser mustbe refilledbeforethestartof eachwash cycle followingth einstructions
pro vi ded i n the wash cy cle t abl e .Your dishwash er u ses l ess dete rge nt an drin se a id th an
Co nven tional dishwash er. Gene ral ly, onl yon eta ble spoon of det ergent is need ed f or
a normalwash load.Moreheavilysoileditemsneed moredetergent.Alwaysaddthe
det er gent j ustb efore st arting t hed is hwas her, other wise it could g etd am p and w ill not
dis solv epr oper ly.
ConcentratedDetergent
DetergentTablets
DetergentDispenser
conv enti onal ,alk al ine de tergent s with cau stic com ponen ts
l ow alkal inec oncentr at ed det erge nts wi th natu ral enzymes
N ormally new pulv eris edd eter gen t is wi thoutp hosph at e.T hus t hew ater soft ene r fun ction of
phosp hate is not g iven . In this case we recommend tofi ll sa ltin t hes alt c onta ine reven w hen
thehardnessofwater isonly6 dH. Ifdetergentswithout phosphate are used inthecase ofhardwater
of ten whit esp ots appe aro ndi shes and glas ses . In this case pl ease add more deterg entto reach
bet ter resu lts . Det erge nts with out chlo rine doo nlybl ea cha li ttl e. Str ong a nd colo ure d sp ots w il ln ot
be rem ov edc omp letel y. In this c ase ple ase choo se a progra mwi tha higher t emp erature.
°
AmountofDetergenttoUse
ProperUseofDetergent
Use o nly det ergent spe cif ic all ym adef ort he us ein d ishwasher s.Ke ep your d et ergent fr esh and dry.
Don't put pow deredd eter genti nto the di spenser u ntily ou're ready to wash dishes.
Dishwasher detergent iscorrosive!Takecare tokeepitoutofreachofc hildren.
Alw ays add the d ete rgentj ustb efore star ting eac hwa sh c ycl e.
Only us ebr anded de tergent and rins eaid for dish washer.
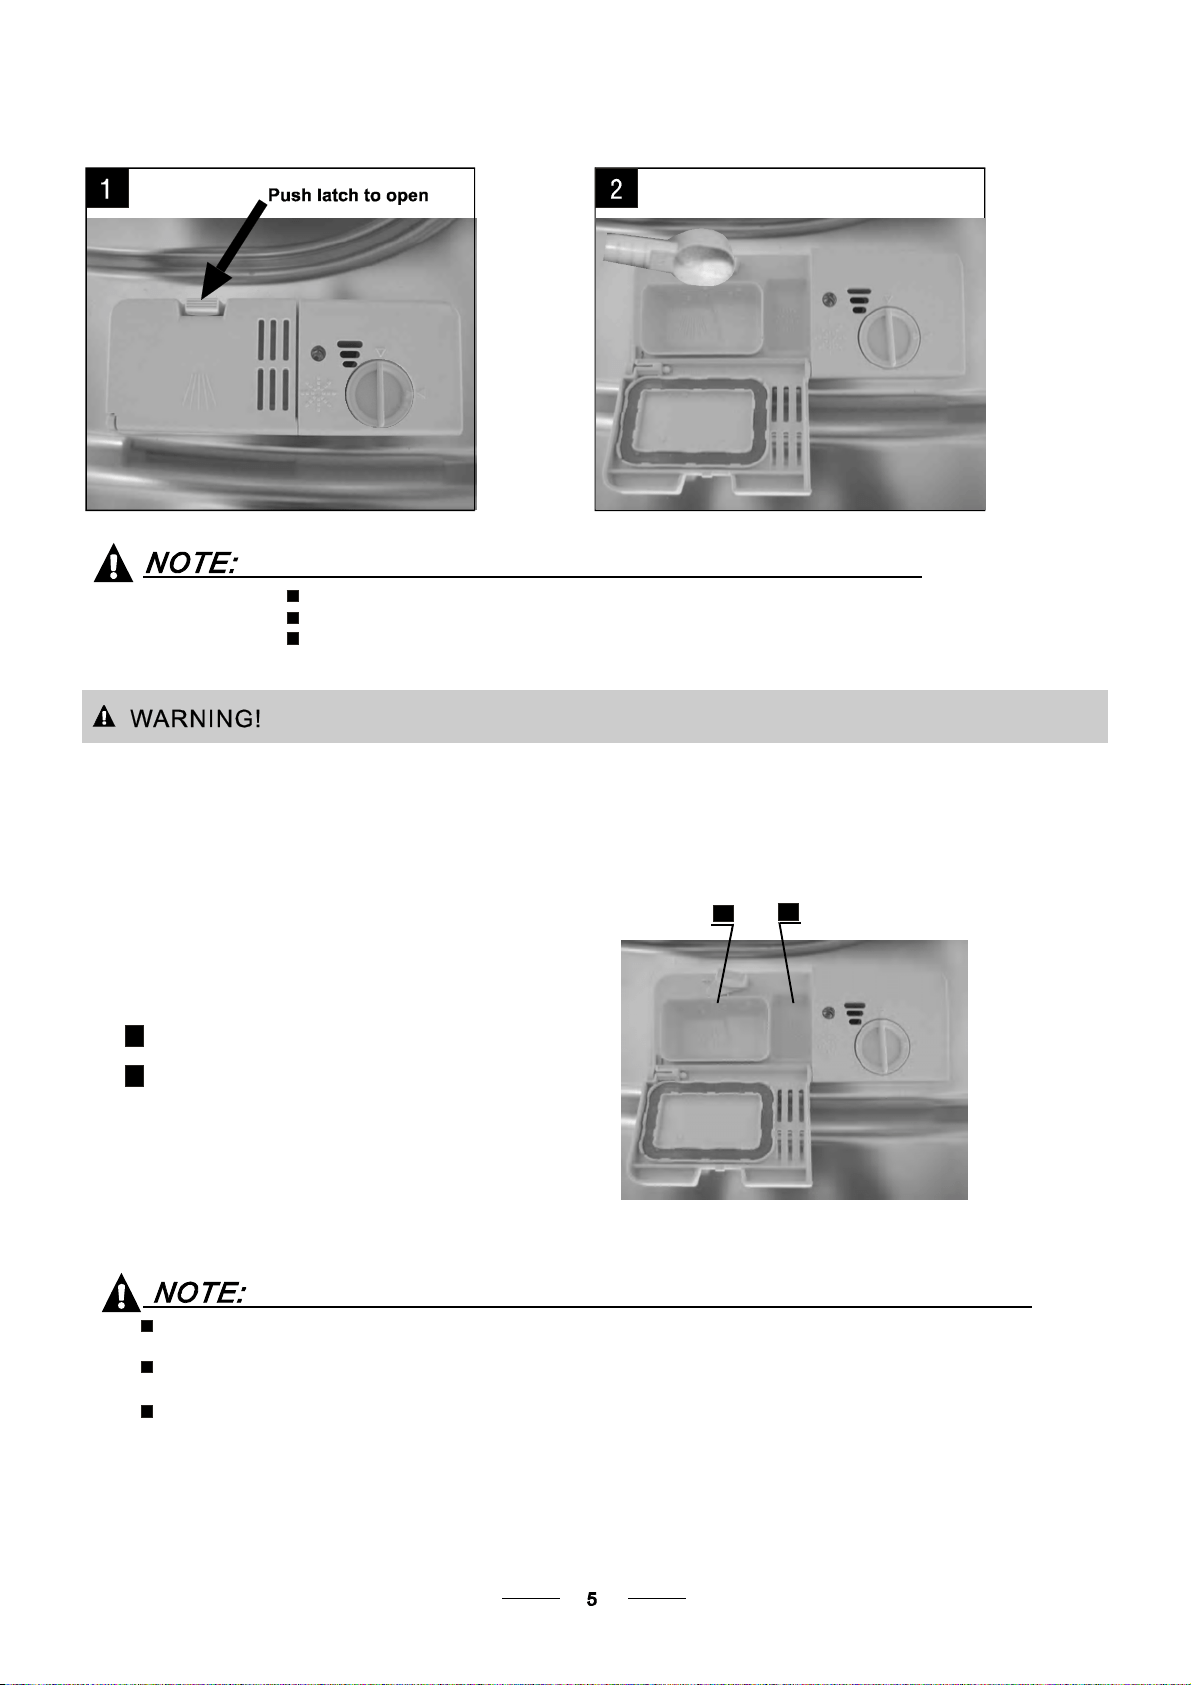
If t he li d i s closed: pr ess re lease bu tton. The lid wi ll s prin g op en.
Fill the detergen tdi spen ser with dete rgent.
Themarking ind icatesthedosinglevels, as
illustratedontheright:
The p lacef orm ain wa shcy cledet ergent.
The p la cefor p re -wa shcycle deterg ent.
Ple ase observe the man ufa cture rs d osing an dst orag e
Rec omme ndation s as s tated on the detergent p ac k a gin g .
Close t he li d an d pre ss u ntil i tl ocks in pl a ce.
If thedishesare heavily soiled, placean additional
deterge nt dose in the pr e-wash d et ergen t ch amber.T his dete rge nt wi llta kee ffect duri ngth ep re- wash phas e.
A
B
Fill in Detergent
Th e infor mation abo ut the am oun tof deter gen t for the single pr ogramm e please refer to the Wa sh
CycleTa ble on th epa ge 8.
Pl ea se b eaw are,t ha taccord ing t othe le vel soiling and the spe cific har dn esso f w aterd ifferences
are possibl e.
Pl ea se o bserve t heman ufa ct ur er'sre com men dat ions on the de terg ent pac kagi ng.
A
B
Cutlerywithwooden,horn chinaor
mother -of-pearl handle s
Plast ici te ms t hat ar en oth eat resis tant
Older cutl eryw ith glued par tst hata ren ot
temperatureresistant
Bonded c utler yite msor dish es
Pewter or coo per ite ms
Crystal gl ass
Steel items s ubject to rusti ng
Wooden p latte rs
Items made fromsyntheticfibres
So me ty pes of g lasses c anb ecome
dull af ter a large n u m b e r of w ash e s
Sil veran da luminiu mpar ts h ave a
tendencyto discolourduringwashing
Glazedpatterns mayfadeifmachine
washed frequent ly
Are not suitable
Are of limited suitability
Dishesand itemsof cutlery mustnot lie ins ideoneanother, orcovereach other.
To av oidd amage to gl asses, th eym ust not touc h.
Lo ad large items w hic h are most di ffi cul t to clea nint othe lower basket.
The u pper bas ket i sde signed to ho ldm ored eli cate and lighter d ishware suc has glasses , coffee
andteacups
Lo ng blad edk nives sto red in a n uprigh tpo sition are a pot en tial haza rd!
Lo ng and/or s harp itemso f cut lery such as carvi ng kniv esmust be p ositi one d
h orizon ta llyi n the upp erb asket.
P lease do n ot ove rl oa d yo ur di shwasher. T his is i mport an tf orgoo dr esults a ndfo r
r easonab leconsu mption o fen ergy.
Load h oll owit ems suc has cups ,glasses, pans etc. With the opening facing downwa rd sso that
w a t er c anno t c o l l ec t in t he c ont a i n e r or a deep ba se.
Consider buyingutensils whichare identifiedasdishwasher-proof.
Usea milddetergentthatisdescribedas'kindtodishes'. Ifnecessary,seekfurther
information fromthedetergentmanufacturers.
Forparticular items,select aprogramwithaslow atemperatureaspossible.
Topr ev en t da mage , do not t ake glass a ndcutl ery out of the dis hwas her imm ediat el y
aft er t he p rogr amm eh as e nde d.
(For b estper formance of the di shw asher, fol lowthe sel oading gu ide lines.
Featu res and appeara nce of baske ts and cut ler yba sket sm ay v ary fr om your mod el.)
Scrape off any larg eamo untso f left over foo d. S often remnan ts o fbur ntf oodi npa ns.
It i sno tnecess ary tori nse t hed ishes u nder runni ng wat er.
Pl ace ob jects i nthe dishwa sheri n the f ollowing way:
1.Item ssu ch a scups, g la sses, po ts /pans, e tc.a re f aced dow nwa rds.
2.Cu rv edi tems, or ones wi threces ses, shoul dbe l oaded asla nts oth at w ater can run off.
3.All u tens ils are st acked s ecurely and can not ti pov er.
4.Al lu tens ils a re pl aced in t heway t hat the s pray arm scan rotate f reely during wa shing.
Ve rysm all it ems sho ul dn otb ewashe di nthe dish washer as they c ould eas il yfal l out o f the basket.
To pre ven t wat er drip ping fr omthe uppe rba sketi ntot he lo wer ba sk et, w e rec omme nd that you
empty the lower ba sk et fir stan dthe nt he upper bask et.
Th eu ppe r bas ket is design edt oho ldm ore delic ate
and li ghte rd ishware s uch as g lasses, coffee and
teacupsandsaucers,aswellasplates,small bowls
andshallowpans(as long astheyarenot toodirty).
Positi onthedishe san dco okware s othatthey will
notgetmoved bythespray of wate r.
We su gges t tha t yo u pl a ce large item s a nd t he m ost
difficulttocleanitemsaretobeplacedinto thelower
basket : su cha spo ts,p ans , lids, se rvin g d ishes and
bow ls , as sh own in th e fi gur e be low. I t is prefer abl e to
pla ce s er vi n g di she s a nd l i ds on the s i de of t h e ra cks
in orde rto avoid bl ocki ngth ero tat ion of t he t op spra y
arm .
Pots,servingbowls,etc,mustalwaysbeplacedtopdown.
Deep pots sho uld be sla nte d to a llow water to f low out.
Ple ase ber eminded that :
T heB ottomB ask et f eatur es foldin g sp ikes so that larg e ror mo re po ts a nd p ans can be l oade d.
Foldin g Spikes of Lower Bask et
F or b e tter sta ckin g o f p ots and pan s ,
th e spikes can be f ol de d d own as
sh ow inth e pic ture righ t.
Folding back the cup shelives
Fo r bett er s tacking ofpo tsa ndp ans,
th e sp ikes can be folde d dow n as
show in th e pictu re ri gh t.
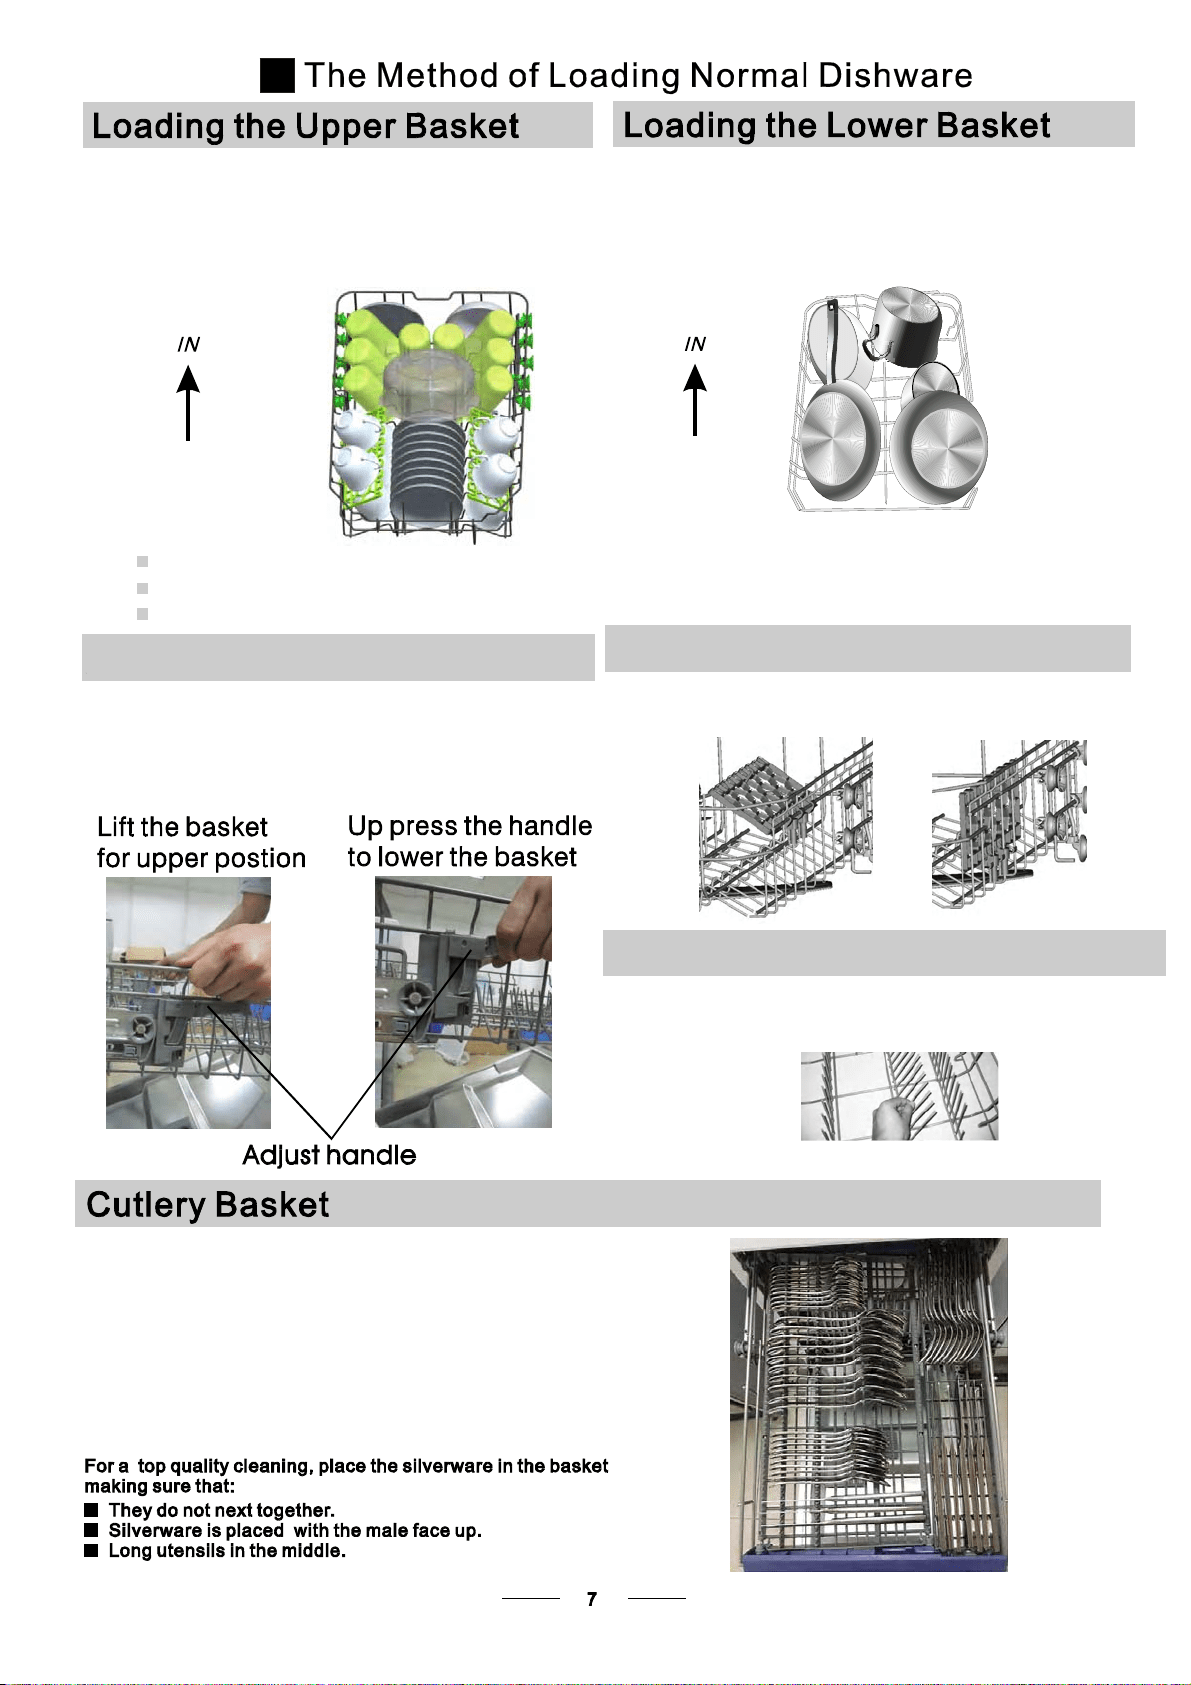
Cutleryshouldbe placed inthecutlery rackseparately
f rom eachot her i nth eap propr iate pos itions, a ndd o
m ake sur eth eut ensil sdo not nest tog ethe r,t hism ay
causebadperformance.
Adjusting the Upper Basket
The h eig htof the upper ba sket can be adjusted ino rder to
createmorespacefor largeutensilsbothfortheupper
/ low erb asket. Th ehei ght of t he u pper bas ket c an b e
adjus ted byl iftu pt he bas ket for th eu ppe r posi tion , and up
press the handle tolower theupperbasket,seethe picture
below:

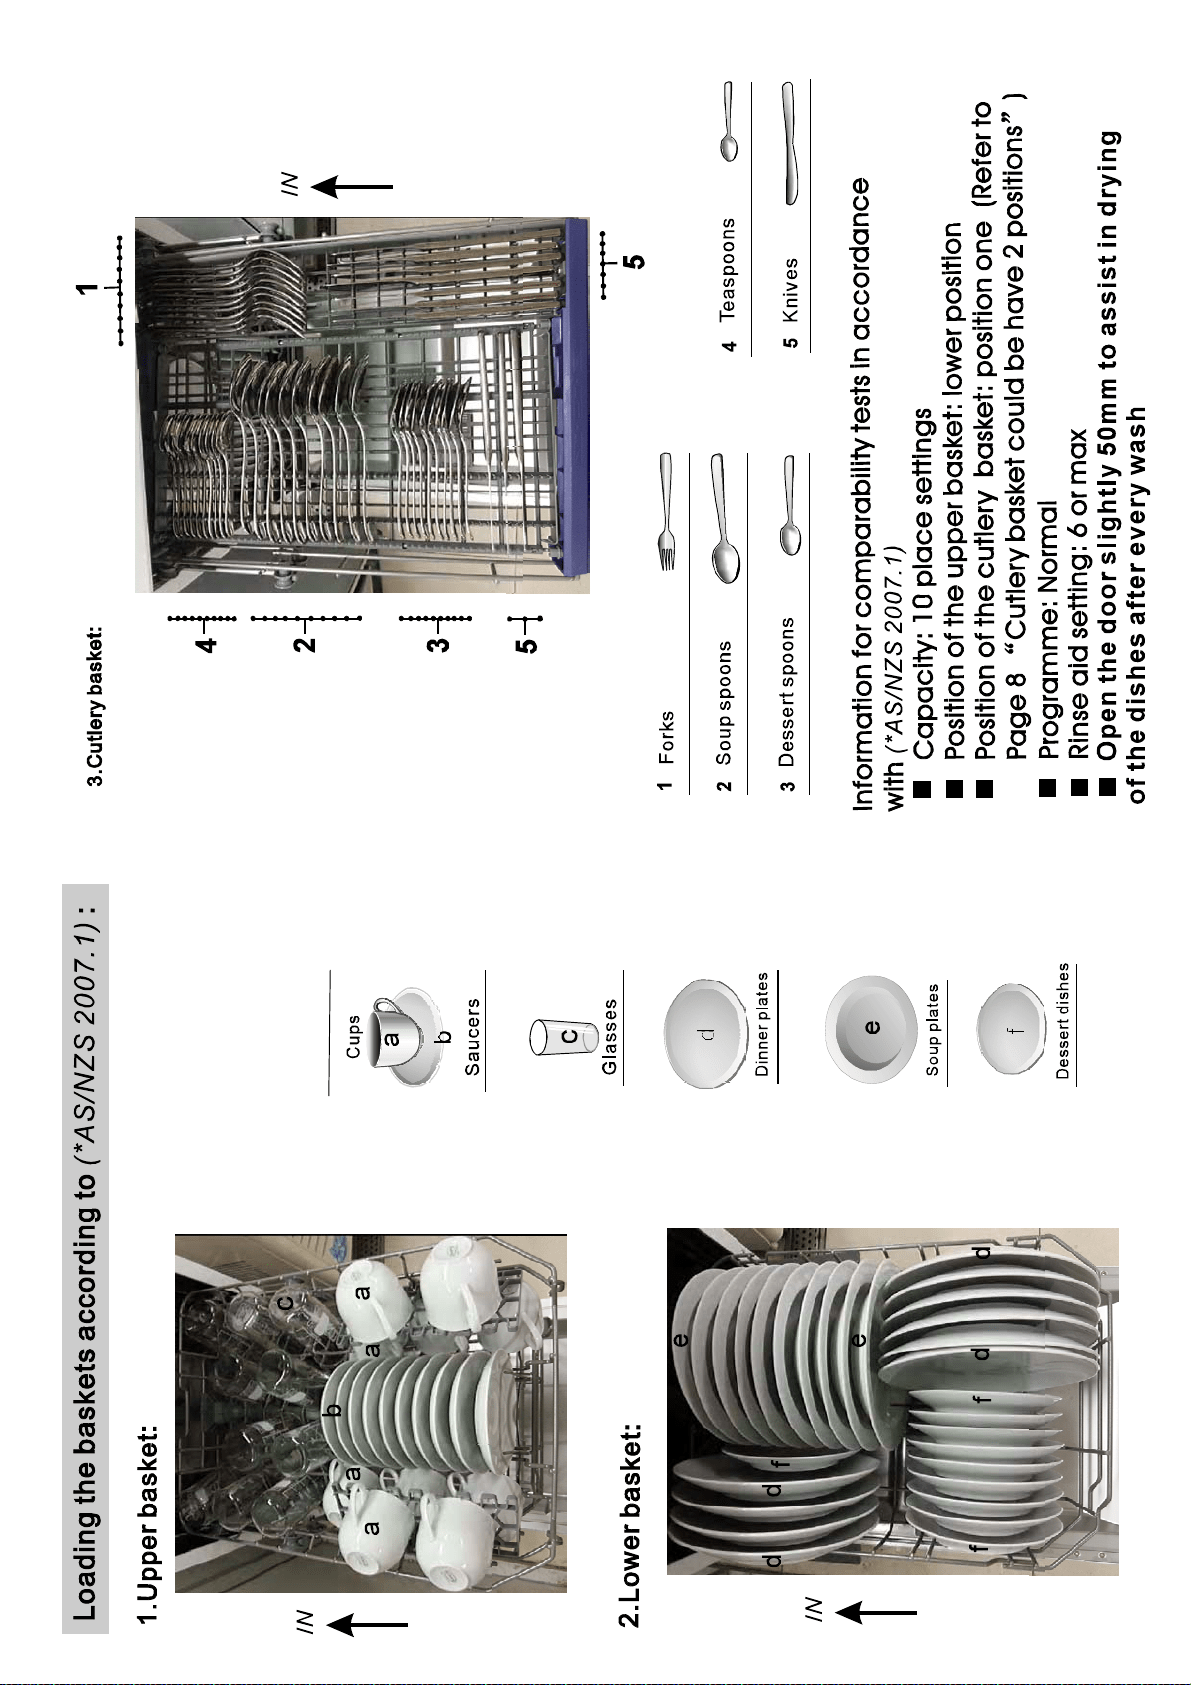
* : This programis thetestcycle.Theinformationfor comparabilitytest
in ac cord anc ewi t h , a s fol lows :
AS/NZS 2007.1
AS/NZS 2007.1
Capacity: 10setting
Posit i on U p p e r baske t: up per w hee l s on r ai ls
Rinse aid setting: 6
O pen t he door sl i ght l y 50 mm to assi s t i n dr yi n g of t he di she s a f t e r eve ry w ash
Means: need to fill rinse into the Rinse-AidDispenser.
()
5/22 .5 g
Pr e-wash(50 )
wa sh (6 5 )
Rinse
Rinse
Rins e( 60 )
Dr yi n g
℃
℃
℃
Pr e-wash(45 )
Wash (55 )
Rinse
Rins e(65 )
Dr yi n g
℃
℃
℃
Was h ( 5 0 )
Rin se
Dry ing
Pre-wa sh
Rinse (50 )
℃
℃
Wash (40 )
Rinse
Rins e(45 )
℃
℃
155
130
130
40
1.0 5
0.61
1.2
0.4 5
16
13
12.2
10
(50 )
Wash(60 )
Rins e( 60 )
Dryi ng
Pre- was h
℃
℃
℃
60
9
0.8
20 g
Intensive
For heaviest soiled croc kery,
and normally soiled pots
pans dishes etc wi th dried
onsoiling.
、
、
Fo r lightly soi l ed l o a ds t hat
don ot need exce llent d ry ing
effic ienc y.
Ashor ter wash fo rli ghtly
soiledloads thatdo not
need dr ying.
For light lyso il ed load s,
such as glas se s,
cr y st a l a n d fi n e c h ina .
Pre-wash
wash(40 )
Rinse
Rins e(6 0 )
Drying
℃
℃
110
0.7 13
Rapid
1Hou r
Glas s
Fo rh ea vilyso ile d loads,
such as pot s, p lat es , gla sse s
andlightly soiledpans.
Normal
Standard dailycycle for
normallysoil ed loads,s uch
as pots pl ates gl as ses.、、
Hea vy
(*AS/NZS 2007.1)
Cutlery basket coul d b eh av e 2 positions:
Posi tio n on e : li ft the l e f t ba sket up,
t he le f t b asket is sideling.
Position tw o: ad ju st the left basket to low er
posi tio n, a nd the left basket i s flat.
(OrAll )in1
5/22 .5 g
(OrAll )in1
5/22 .5 g
(OrAll )in1
5/22 .5 g
(OrAll )in1
5/22 .5 g
(OrAll )in1

Washth earms ins oapy an dwarm w ater an duse a s oftb rush to
clean thej ets. R ep lace them aft err insing the mth orough ly.
When following this procedure from step1 to step 3, the filter system will be removed;
when following it from Step 3 to Step 1, the filter system will be installed.
Itis dangerous to openthe doorwhenwashing,becausethe hot watermay scald you.
W h en t h e worki n g c y cl e has fini s hed, the bu z zer o f t he d ishwa sh e r wi l l so u ndf or 8 s eco n d s , th en stop . Tu rn o ff
the appli a n c e us ing t he Power s witc h bu t t on, shut of f the w at e r sup p ly and o pe n t h e do or of the d ishwasher.
Wait for a few mi nutesb efore unlo adin gth edis hw ashe rto a voidha ndlin gth edishes and ute nsils wh ile th ey
are still hota ndm ore suscept ible tobr eak age. The yw ill als odr ybe tter.
SwitchOfftheDishwasher
The p rogr aml ight is on but is n otbl inking, onl y in th is case the programm eh as e nded .
Po wer1.Sw itch off t he di shwasher by p ressing t he button.
2.Turnoff thewatertap.
Openthedoorcarefully.
Hot di shes are sensitive to knocks. The dis hes should t herefore be a llowed to cool d ow n arou nd15 minutes
beforeremoving fromtheappliance.
Open t hed ishwasher do or, le ave it ajar and wait a few m inu tes be fore removi ng thedi shes. In this w ay they
will be cooler and the dryi ngwi ll b eim proved .
Unloadingthedishwasher
Iti s norm alt hat t he di sh washe ris wet insid e.
Empty the low erba sket first a nd then t he upper o ne.T hisw ill avoi dwat er dripping from t he uppe r Basket onto
the dishes in the l ower one.
If you openth edo or , th emachi ne will p ause. T he p rogr aml ight will
stop bl i n ki ng an d the buz ze r will b e eve ry m i n ut e unless y o u close the door . A f t er
youclose thedoor,themachine will keeponworking after10seconds.
duringawash cycle
beeping
Premis e:
Acycle that is under wayca non ly be mod ifi ed if i tha son ly been r unn ing for a s hor tt ime.O therw is e, the
de tergent m ay hav ealr eady be en releas ed,a nd the applian cem ay have alrea dy dr ain ed the w ash wa ter.
If t hi sis the case , the deter gentd ispenser mu st be refil led( see the sec tion ent itled " Load ing t he Deterge nt " ) .
Pr ess the S tart/Pau seb utton, the m ac hine w ill pau se, press th epro gram button for mor et han3 then
yo uc anc hange t he program to the desired c ycle s et ting (se et he sectio ne nti tled " Starting a wa shcy cle. . .") .
1
2 secon ds,
Aforgotten dish can be added any time before the detergent cup opens.
Add forgotten dishes.
Close the door
After the spray arms stop working,you can ope n the door
completely .
2
3
Open the door a little to stop the washing.
1
4
5
6
Press the Start/Pause button
Press the button, the dishwasher will run
after 10 seconds.
Start/Pause
When you pr ess th eSta rt/Paus ebu tton t op ausedu ring washi ng ,t he running indicator wil lst opbl inki ng and
the di shw ashe r will every minute unl ess you press the button tos tart.Sta r t / Pausebe b eeping
St ar ting a cycl ewash
1 Draw out the lowe rand upper b asket, l oad the d ishesa nd push the m back.
It i s to load the lower b as ket fi rst, then the upper one (see the sec tion entitl ed
Loadi ngth e Dishw asher ).
2 Pour in th ed etergent (se et he secti one ntitled Detergen t and Ri nseAi d ).
3 Inse rt the plug into t he socket .The power su pply is 2 20-240 VAC /50 HZ, th esp ecification
of the socket i s 1 0A 25 0VAC . M akesur e that t he water supply is tu rn ed on to full p ressure.
4 Clo se the do or, press the O N/O FFBu tton,a nd th ed isplay wi llt urn on.
5 Press the prog ra m Button tose lect your d esiredpr ogram.
“”
“”
If a p rogram i sselected , the resp onse ligh twi ll li ght.Th en press the Start /Pause but ton, th e
dish washer be gins t o start.
re c o mm en d ed
The filter prev ent sl ar ger remnant sof food or o ther obj ect s from gett ing i nsi de th epu mp.
Theresidues mayblockthefilter, inthiscasethey mustbe removed.
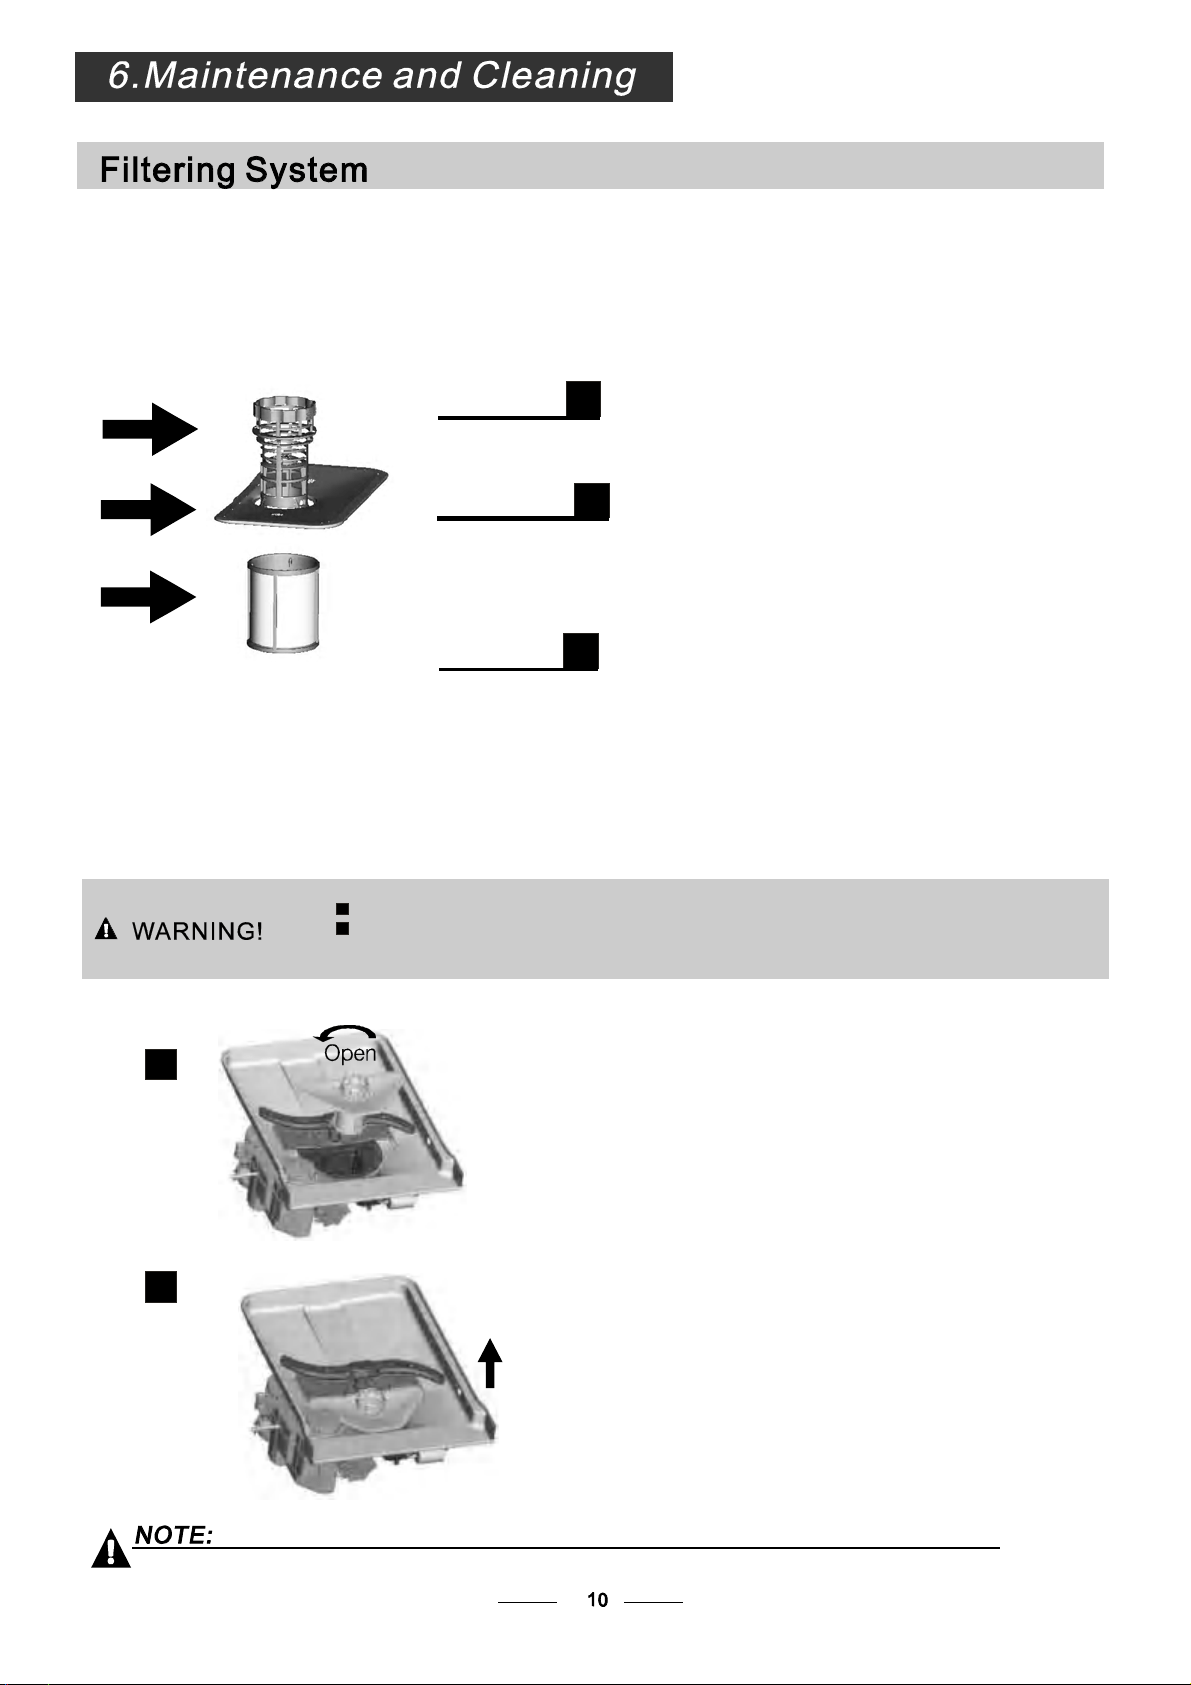
The fi lter syst em c on sists of a coarse fi lte r, a f la t (Main f ilter)
anda microfilter(Fine filte r).
Food and soil particles trapped inthis filter arepulverizedby a
specia l jet ont hel owe r spr aya rman dw ash edd own tod rain.
Larg er i tems, s uc h as pi e c esof bo ne s or glas s, tha t cou ld block
the drain Tore move
the items
andeasilybecome trappedinthecoursefilter
caughtbythe filter,gently squeezethe tap on thetopof this
filterandliftout.
Thisfilter holds soil and foodresiduesinthe sumpareaand
pr eve nts i t fro m be ing on th e di shes dur ing w ash cyc le.redeposited
Main filter
1
Coarse filter
2
Fine filter
3
2
3
1
Filterassembly
Thefilter efficiently
For best perfo rm ance and res ults, t he filte rmust b e cleane dre gularly. t hisr eason, it i sa goo dide ato
r em ove th ela rge r fo od pa rti clest rapp edin the f ilte raft ere ach was h cyc leb yrin sing the s emicirc ula r f ilte ran d
c up unde rru nningw ater. To re moveth efil terd evice ,pull t hec up ha ndle in t heu pwardd irection.
re mo vesf ood par ticle sfrom th ewa shw at er,all owing it to be recycle dd ur ing the cycl e.
For
T he di sh was her mus t n e ver be used wit hout t he filter s.
Imp ro per r ep lace men tof the f ilter may red uce the performanc elev elo fthe applian ce
and damage dishesand utensils.
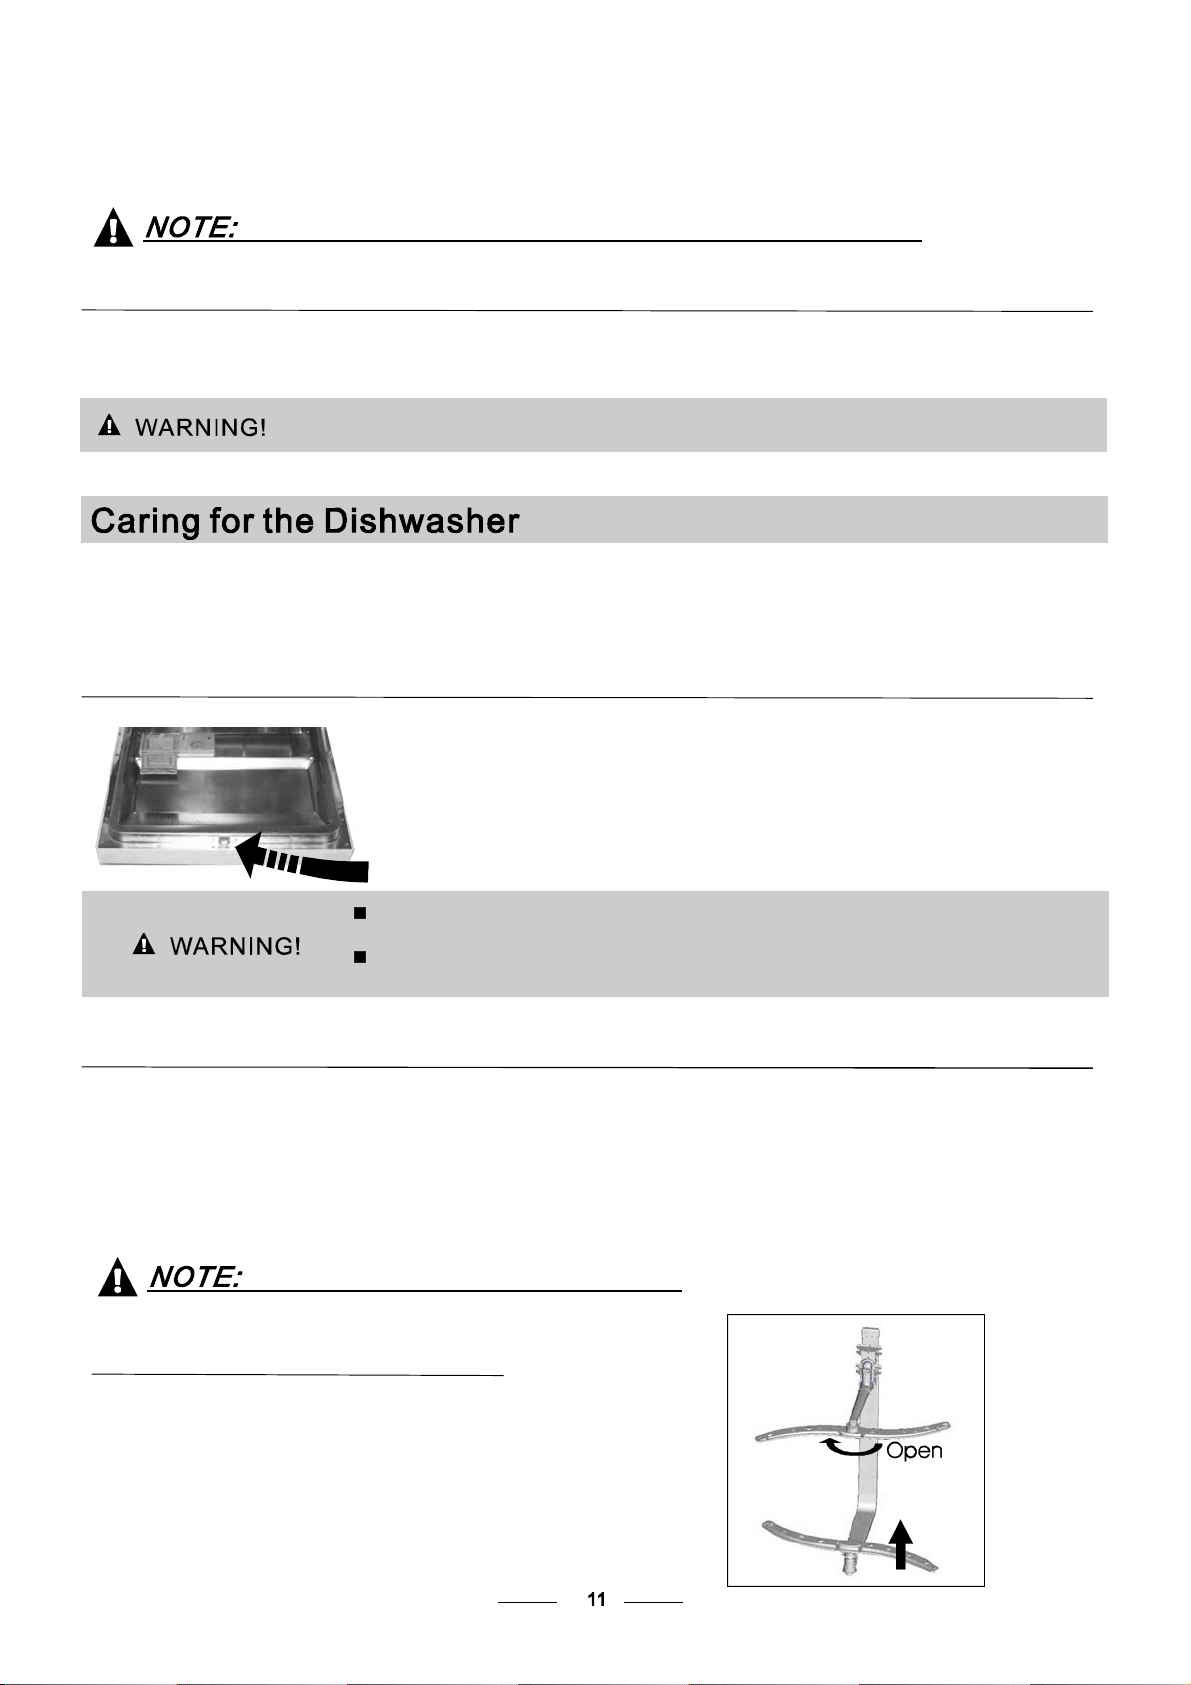
Ste p 1 Turn the filter i n anti-cl ockwis edir ect ion.:
Step 2 l ift the filte rup .:
When following this procedure from step 1 to step 2, the filte r system will be removed;
when following it from Step 2 to Step 1, the filter system will be installed.
1
2
The cont ro l pane lcan be clea ned by u si nga lightly dampen edc loth.
Af ter cle anin g,m ake sure to dry it tho roug hly.
For the e xterior, us e a good app lia nce po lish wax .
Neveru ses harp obj ects, scouring pads o rhar sh c lean ers ona ny p art of the dis hw asher.
ProtectAgainst Freezing
1.Cut off the electricalpowertothe dishwasher.
2.Turn of fth ewat ersu ppl y an ddisco nnect the w ater i nlet pi pe from the w ate r valve.
3.Drain th ewat er fr omt he inlet pipe an d w ater va lve. (Use a p an togat her th ewat er)
4.Reconnect the water inlet pipe t othe wate rval ve.
5.Remove the filter at the bottomo f the t ub and use a sponge to soak up wate rin the sum p.
pl ease take frost prot ectio n meas ures o nt he di shwasher inwi nter. Ev ery fter washing c ycles,
pl ease oper ateas follow s
time a
:
Cleaning the Filter
CleaningThe Door
To c l ean th e c o a rs e f ilt er a nd t he fine fi l t e r, us e a clean i n g bru sh . Reas se mble th e filt er part s as sho wn in t h e fi gur es
on t he p re vi ous p ag e an d r eins ert t he e ntir e assem b ly in t he d ishwash er,p os itionin g it in its seat and pres sing down ward s.
Whencleaning the filters, don't knock on them.Otherwise, thefilters could be
contortedandtheperformanceofthe dishwashercouldbedecreased.
To cle anth ee dge around the door,you shoul du seo nly a so ft warm, d am p cl oth.
To avoid pene tr at iono f wa te rin tot hed oorlock and el ectrical component s,do not
usea spr ay cleaner of any kind.
Never u se a spr ay c lean ert ocle an t he d oor pan el as i tm ay dam age the door loc k
and electricalcomponents.
Abr asive ag entso r som e paper towels shou ldnot be u sed b ecau seo ft heris kof
sc r a t c hi ng or leav ing spot s on t he st ainless steel sur f a ce.
Cleaning the SprayArms
I fyour dis hwa sher cannot wor k beca useof the ice,
pl ease con tac t prof essional service pe rso ns.
It is ne cessary to clean t h e s p r ay a rms regular l y for har d
waterchemicalswillclogthe sprayarmjetsandbearings.
- Inspec t the filt ers fo rblo ckinga ftere ver ytime t he di shwa she rha sbe enu sed.
- By uns crewing the c oar se fi lter, you can rem ove the filter system. Re mov ea nyf oo dr emna nts and
clean thefilters underrunningwater.
Remarks:
Theentirefilterassembly shouldbe cleaned oncea week.
Toremovethelower spray arm,pulloutthespray armupward.
To r e mov e th e u pper s pr a yarm , h o ld t he n ut, r ot ate the a rm
clockwisetoremoveit.
Washthe ar ms in soapy an dwar mw ater an du sea soft brus ht o
clean the jets .R eplac e th emaft erri nsingt hem th orough ly.
Itisrecommend thatyouruna washcycle withthe
dish washer e mpt yan dthe nre move t hepl ugfr omthe
socket, t urn o ff t he wa te r supp ly and le ave the door of
t he app lia nce sl ig htl y open. T h i s wil l h elp th e doo r
sealsto lastlonger andprevent odoursfromforming
withi nthe appliance.
If th e applian cem ustbe move d, tr yto keep it in the
verticalposition.If absolutely necessary,itcanbe
positi oned on its back .
Oneofthefactorsthatcauseodourstoforminthe
dishwasher is foo dth atre main str app edi n the s eals.
Periodic clea ning with a d amp sponge wi llp rev entt his
f r o m occurr i ng.
Ensurethevoltageandfrequencyofthepowerbeing usedcorresponds to
t hose on the ratin gplate . On lyin sert the p lug i nto an elec trica lso cke t whi ch is ea rthed
pr op erly. If th eel ectrical sock et t owhi ch thea pplianc emu st b ec onn ecte dis not
appropriatefortheplug, replacethe socket, ratherthanusing an adaptor orthe likes as
they couldcause overheating andburns.
Plea selook at th era ting labe l to know t her at ing v oltage a nd c on nect t he d ishwasher to the app ro priate powers uppl y.
Use the r equi red fuse 1 0amp ,tim ed ela yf use orc ircui tbre ak er rec om mended and provide sepa rate circ uits erving
only this appl ianc e.
Posi tion the ap pli anc ei n the d esired l ocation.T he back should r est again st the w all b ehi nd it, and the side s,
along the adj acen tca bine tso rwa lls.T he d is hwasher is equippe dwi th wat er supply a nd drai nhos esth atcan
be pos itioned either to the righ tor the l eft s ides t o facil it at ep ro per i nstallati on.
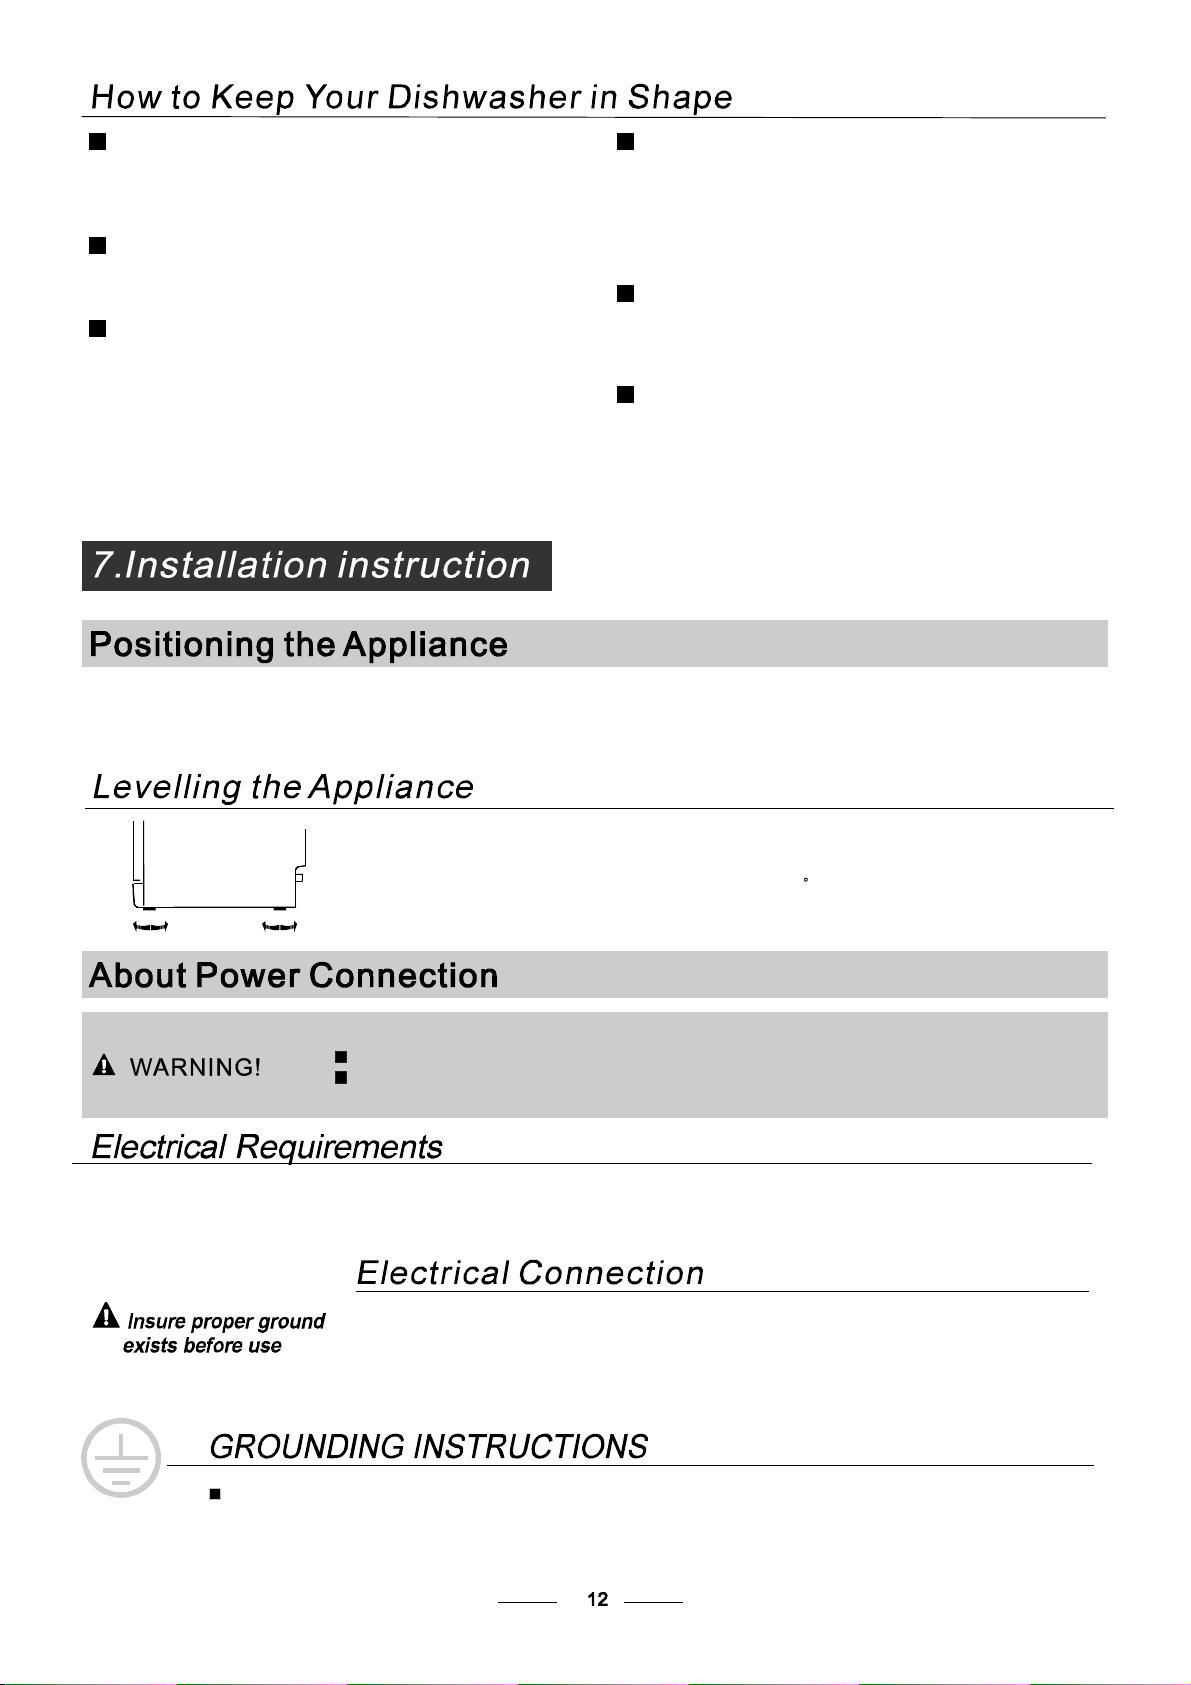
O nce th e applian ceis pos itioned f or leve ll ing, t he hei ghtof the di shwashe r
m ay be alter edvi aad just ment of the scre wing level oft he fee t. In any case,
th eapplia nce sho uld not be incl ined more t han2 .
For personal saf ety:
DO NOT USE AN EXTENSION CORD OR AN ADAPTER PLUG WITH THIS APPLIANCE.
DO NOT, UNDERANY CIRCUMSTANCES, CUTOR REMOVE THE EARTHING
CONNECTION FROM THE POWER CORD.
Befo re cl eaning or p erformi ng mainten ance, always
remove th ep lug from t hesocket.
Tocleanthe exteriorandrubberparts ofthedishwasher,
donot use solventsor abrasivecleaningproducts.
O nly u se a cloth w ith w arm so apy wate r.
Tor em ove sp ots or st ain s f rom the sur face of t h e
in teri or, u se a cloth da mpe ne d wit hwa t er a nd al itt le
v ineg ar, o ra c lea ning pro duct mad esp eci fically f or
dishwashers.
Remove the Plug
No Solvent s orAb rasiv e Cl eanin g
Mov ing theAp plia nce
Seals
Aft er every wa sh, t urn offt hew ater sup plyt o the
applia nce and leave th e doo rslight lyop en soth at
m oisturea nd odou rsa reno ttra pped in side.
After EveryWash
When not inUse foraLong Time
This appliance must be earthed. In the event of a malfunction or breakdown, earthing will reduce the risk of
electric shock by providing a path of least resistance for the electric current. This appliance is equipped with a
cord having an equipment-earthing conductor and an earthing plug. The plug must be plugged into an
appropriate outlet that is installed and earthed in accordance with all local standards and requirements.
for pers onal safety:
DO NOT USE AN EXTENSION CORD OR AN ADAPTER PLUG WITH THIS APPLIANCE.
DO NOT, UNDER A NY CIRCUMSTANCES, CUT OR REMOVE THE
FROM THE POWER CORD.
EAR THING
CONNECTION
Improper connection of the equipment earthing conductor can result in the risk of an
electric shock.
Check with a qualified electrician or service representative if you are in doubt whether the
appliance is properly earthed.
Do not modify the plug provided with the appliance. If the plug does not fit properly to the
outlet, please have a qualified electrician to install a proper outlet.
Connec t the cold wate rsuppl y hose to at hread ed3 /4(inch) conn ecto ran dmak es ure
tha titis fastened tig htly in place.
Ifth ewa ter p ipe s are new or have not been use dfo r an e xt ended per iod o f time ,let the
waterrunto makesureth atthewater is clear.This precautionis needed toavoidthe
risk of t hew ater in let to b eblo cke d an ddam ag e the app lian ce.
Please closet he hydrant after using.
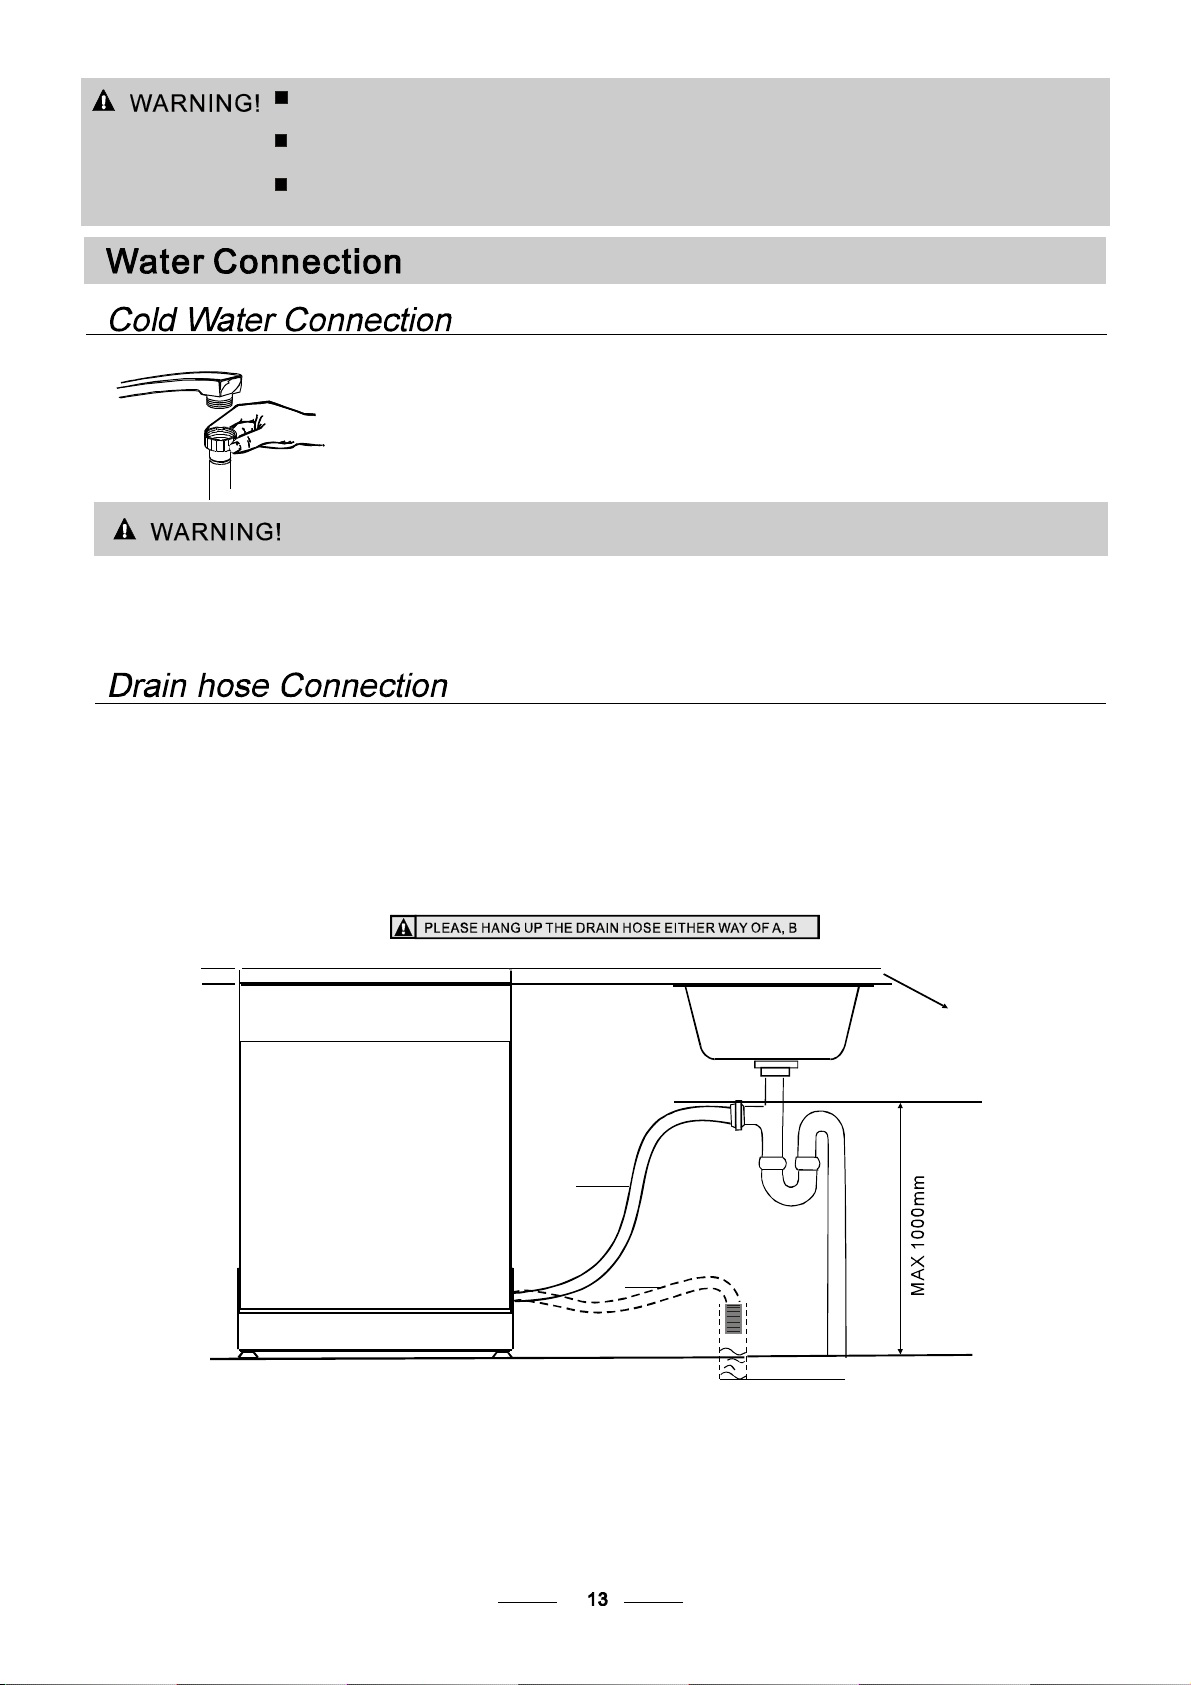
Ins er tt he drain hos eint oad rain pi pe wi th a minimum di ameter of 40mm, orl et i t r un into th esi nk,mak ing s ur et o
av oid b en dingo r cr impi ng it .Th eto pof the h ose mus tbe less than 10 00m m.
A
Counter
Front
Drain pipe
NOTE
The top of the hose
must be less than
1000mm.
φ 40mm
B
Thefollowingthingsshould bechecked before starting the dishwasher.
The contentof this manual is veryhelpfulto the users.
After installation, please make sure to keep this manual.
1
Thedishwasherislevel and fixed properly
2
T he i nlet va lv ei s o pen
3
There isa leakageat theconnectionsof theconducts
4
Thewiresaretightlyconnected
5
The poweris switched on
6
The inlet an d dr ain hoses a re kno tte d
7
Allpackingmaterials andprintingsshouldbe taken out fromthe dishwasher
ExtensionHose
Ifyou needa drainhoseextension, makesure tousea similar drain hose.
It mu stbe no longer th an 4 met res; ot herw ise t hec leani ng effe ctof the dishw as her coul d be redu ced .
Wa t e r O u t l et
Connect t he wa te rdrain hose. The dr ain h os e mu stbe correct lyfit tedt o avoi dwate r leaks.
Ensur ethat th ew ate r dra inh ose is no t kinked ors quashed .
If th esin k is 1000mm higher from the floor, the exc ess wat er in hose sca nnot be d ra ined d ire ctly
into the sink.Itwillbe necessary todrainexcesswater fromhoses into abowlo rsuitable
conta ine r tha t is held outsi de and lower th ant hesi nk.
How to Drain ExcessWater From Hoses
Syphon Conn ection
Insert the drai nh ose into adra inpi pe with a minim umdiam eter o f 40mm ,or l eti tr un into the sink, mak ing sur et o
avoid bendin gor crimping it.T he topo f the hose mus t be les sthan 1000m m.
Fuse blown, or the home
circuit breaker has been
triggered.
Replace fuse or reset circuit breaker. Remove any other
appliances sharing the same circuit with the dishwasher
Spil led rinse-aid
Always wipe up rinse-aid spills immediately.
Hard water minerals
The affected item s are
notcorrosion resistant.
Aspayarmis
knocking against
an item in a basket
r
Items o f crockery
are loose in the
wash cabinet
This may becaused
by on-site installation
or the cross-section of
the piping.
To clean the interior, use a damp sponge with
dishwasher detergent and wear rubber gloves.
Never use any other cleaner than dishwasher
detergent for the risk of foaming or suds.
Interrupt the programme, and rearrange the items
which are obstructing the sp ay arm.r
Interrupt the programme,
and rearrange the items of crockery.
This has no influence on the dishwasher funct ion.
if in doubt, contact a suitabl y qualified plumber.
Detergent with
colourant was used
Make sure that the detergent is the one without
colourant.
Improper detergent
Make sure the dishwasher is turned on and the door is
closed securely .
Check that the water supply is connected properly and
the water is turned on.
Make sure to close the door properly and latch it.
Make sure the powe r cord is properly plugged into the
wall socket.
Power suppl y is not
turned on
Error code:E1;
Water pressure is low
Door of dishwasher
not properly closed.
Kink in drain hose
Filt er clogged
Kitchen sink clogged
Check drain hose.
Check the filter
(see section titled )" Cleaning The Filter "
Check the kitchen sink to make sure it is draining well.
If the problem is the kitchen sink not dr aining, y ou m ay
need a plumber rather than a serviceman for dishwashers.
Use only the special dishwasher detergent to avoid suds.
If this occurs, open the dishwasher an d let suds evaporate.
Add 1 gallon of col d water to the tub. Close and latch the
dishwasher, then select any cycle. Dishwasher will drain
outthe waterat the first step.
Repeat if necessary.
Open the door after th e draining
has stopped and check if the suds have disappeared.
The items should be corrosion resist ant.
The dishes were not
loaded correctly .
See notes in " Loading the Dishwasher Baskets ".
Select a more intensive programme.
See" Wash Cycle Table ."
Use more detergent, or change your detergent.
Rearrange the items so that the sp ay can rotat e freely.r
Clean and/or fit the filter combination correctly.
Clean the sp ay arm jets. See "Cleani ng the Spray
Arms".
r
Use less detergent if you have soft wate r and select
a shorter cycle to wash the glassware and to get
them clean.
Use a mild abrasive cleaner to eliminate those marks.
Re-loading the dishes properly.
Load the dishwasher as suggested in the directions.
Increase the amount of rinse-aid/refill the rinse-aid
dispenser.
Do not empty your dishwasher im mediately after
washing. Open the door slightly so that the steam can
escape . Begin unloading the dishwasher only once
the dishes are barely warm to the touch. Empty the lo w
basket first. This prevents water form dropping off
dishes in the upper basket.
In short program the washing temperature is lower.
This also lowers cleaning performance. Choose
a program with a long washing time.
Water drainage is more difficult with these items.
Cutlery or dishes of this type are not suitable for
washing in the dishwasher.
The programme was
notpowerful enough.
Not eno ugh deter gent
was dispensed.
Items are blocking
the path of sp ay arms.r
The filter combination
inthebaseofwash
cabinet is not clean or
is not correctly fitted.
This may cause
the sp a y arm jets
to get blocked.
r
Combinat ion of soft
water and too much
detergent.
Aluminum utensils
have rubbed against
dishes.
Dishes block
detergent cups.
Improper loading
To o little rinse -aid
Dishes are removed
too soon
Wrong program
has been selected
Use of cutlery with
a low-quality coating
Overflow.
Whe n s o me malfunctions come on, the appliance w ill displ ay error code s to warn you:
Longer inlet time.
Taps are not opened, or water intake is
restricted, or water pressure is too low.
Some element of dishwasher leaks .
E1
E4
If overflow occurs, turn off the main water supply before calling a service.
If there is water in the b ase pan be cause of an overfill or small leak,
the water should be removed before restarting the dishwasher.
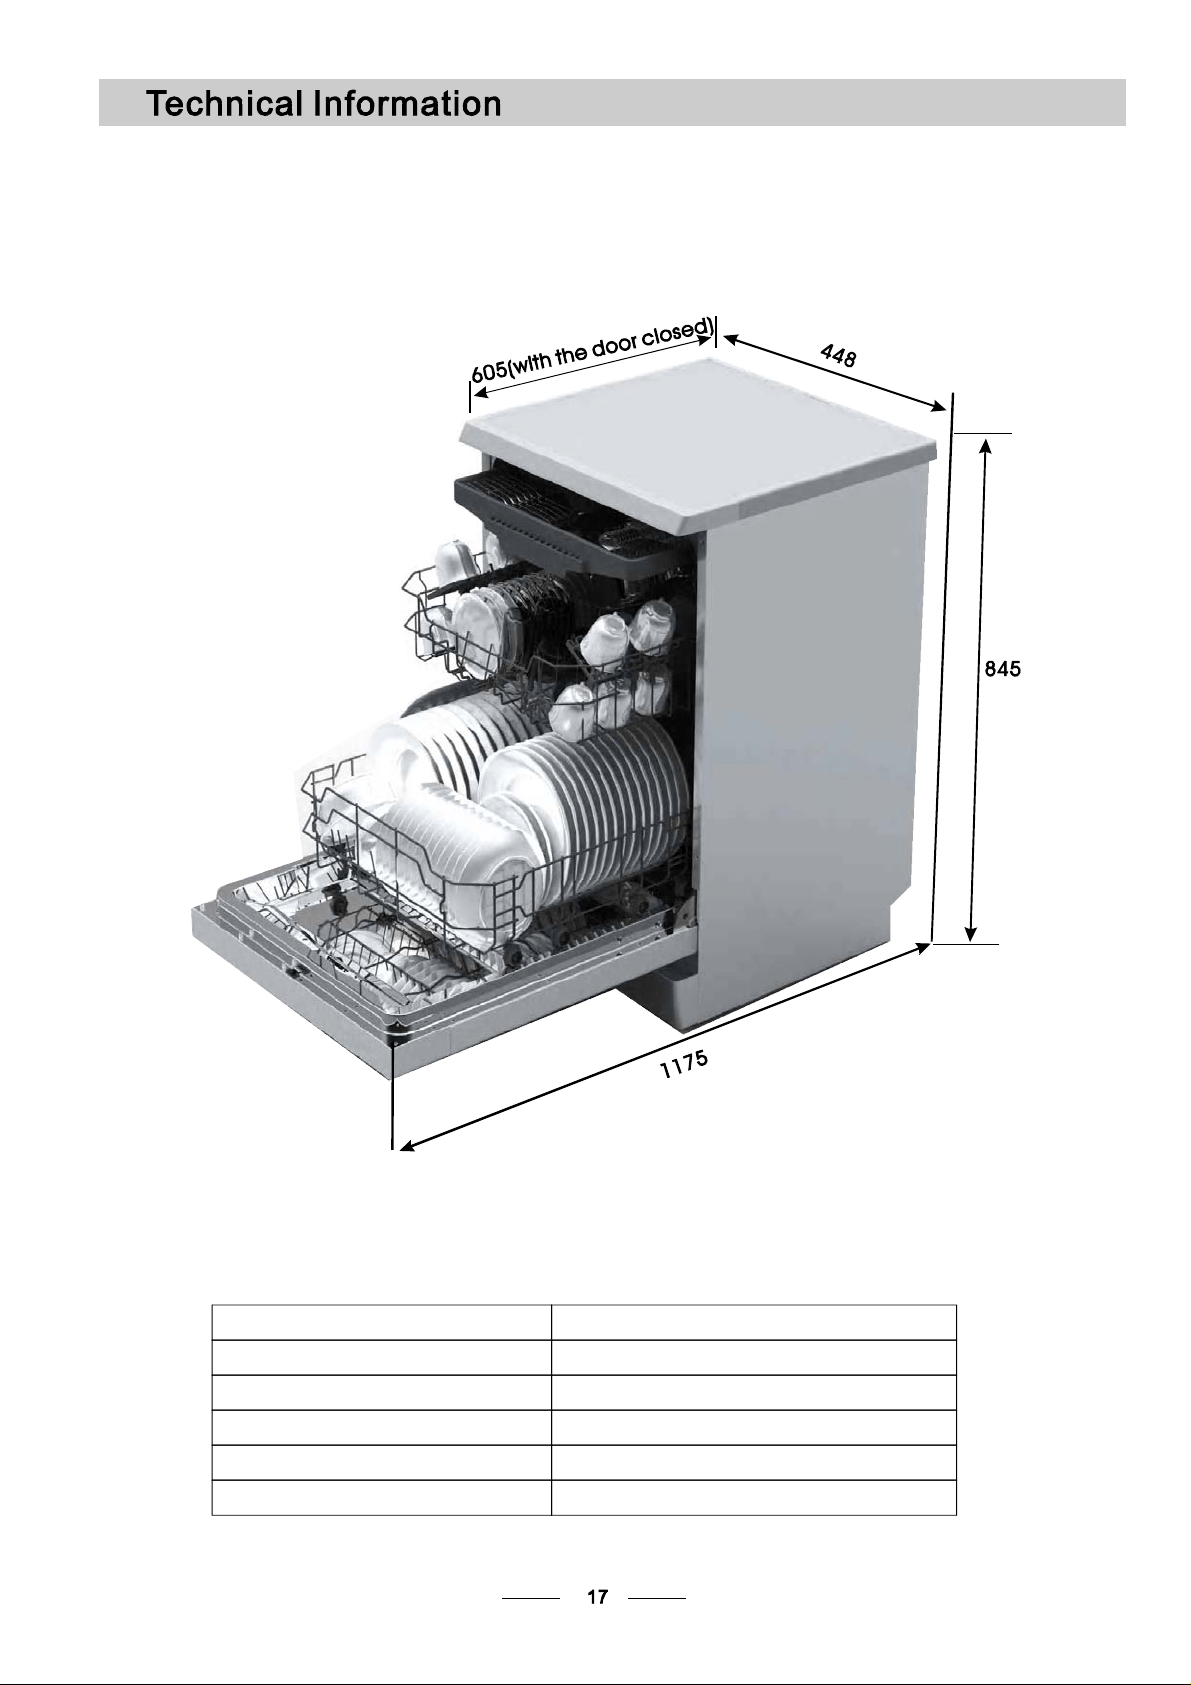
Height: 845mm
Width : 448mm
Depth: 605mm
(with the door closed)
Wat e r pr ess ure : 0. 04- 1.0M Pa
Po w er su pp ly: se e r at i ng la b el
Capacity: 10place settings