de
en
it
el
de Gebrauchs- und
Montageanleitung
en Operating and Fitting
Instructions
it Istruzioni per l’uso
e l’installazione
el Οδηγίες χρήσεως και
συναρµολγησης
L1542N0

2
de Seite 03–11
en
page 12 – 20
it
pagina 21 – 29
el
Σελίδα 30 – 38
Noch Fragen? Sie erreichen uns:
Postfach 83 0101 Quellenstraße 2 Per Telefon:
D-81701 München A-1100 Wien
Fax: +49 (0) 89 / 45 90-35 32 Fax: +43 (0) 1/ 6 05 75-5 12 60
Internet: www.neff.de Internet: www.neff.at
€ 0,12/min. DTAG
Für Österreich:
Tel: 08 10 / 70 04 00
zum Regionaltarif

3
Inhaltsverzeichnis
Worauf Sie achten müssen . . . . . . 4
Verpackung und Altgeräte . . . . . . . . 4
Vor dem Einbau . . . . . . . . . . . . . . . . 4
Sicherheitshinweise . . . . . . . . . . . . . 5
Ursachen für Schäden . . . . . . . . . . . 5
Das Bedienfeld . . . . . . . . . . . . . . . . 6
Versenkbare Schalter . . . . . . . . . . . . 6
Kochen . . . . . . . . . . . . . . . . . . . . . . 7
Bedienen der Kochstellen . . . . . . . . 7
Reinigen und Pflegen . . . . . . . . . . 8
Wichtige Hinweise . . . . . . . . . . . . . . 8
Störungen und Reparaturen . . . . . 8
Inhaltsverzeichnis
Montageanleitung
Für den Installateur
und Küchenfachmann
Wichtige Hinweise . . . . . . . . . . . . . 9
Anschließen der Einbaumulde . . . 10
Einbauen des Schaltkastens . . . . 11
4
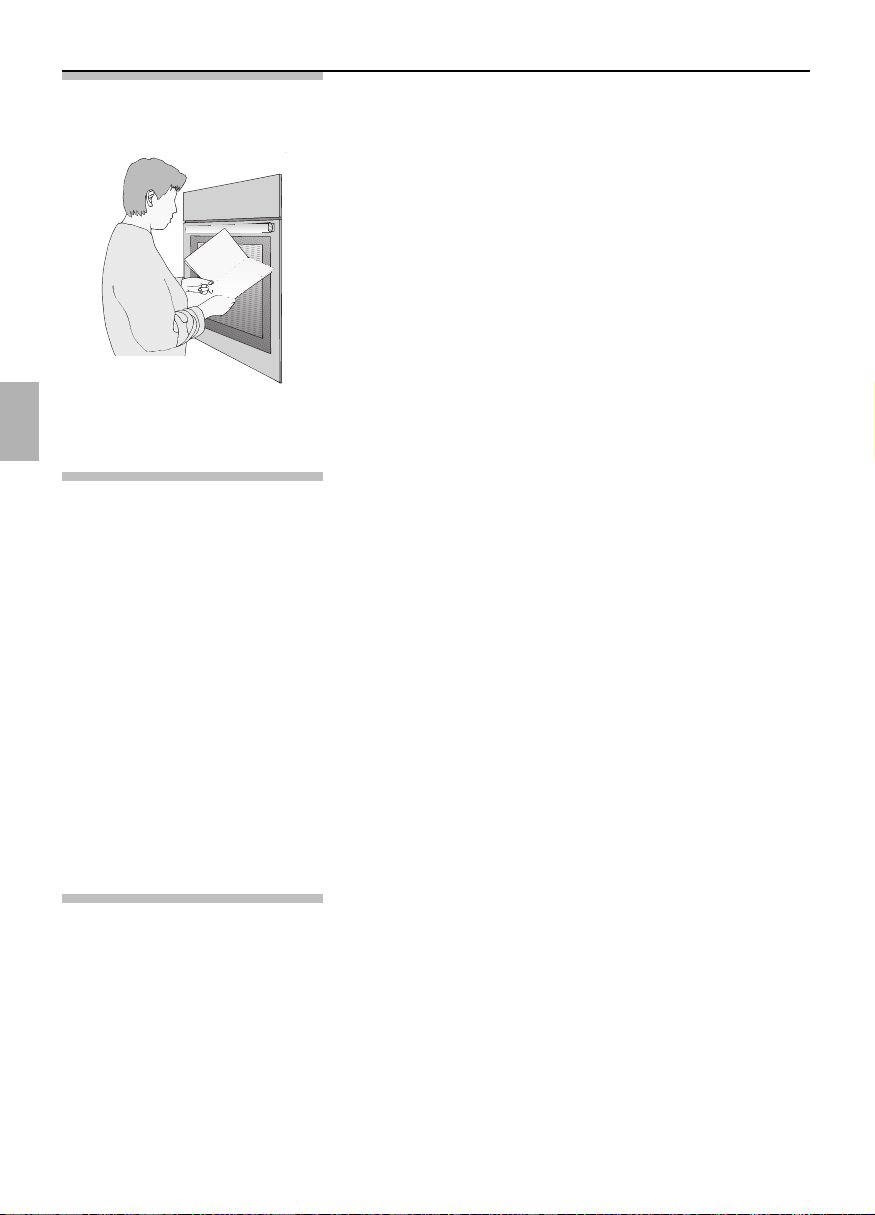
Worauf Sie achten müssen
Lesen Sie bitte sorgfältig diese Gebrauchsanleitung.
Nur dann können Sie Ihren Schaltkasten sicher und
richtig bedienen.
Diese Gebrauchsanleitung gilt für mehrere Geräte-
Ausführungen. Es ist möglich, dass einzelne
Ausstattungsmerkmale beschrieben sind, die nicht
auf Ihr Gerät zutreffen.
Heben Sie die Gebrauchs- und die Montagean-
leitung gut auf. Wenn Sie das Gerät weitergeben,
legen Sie die Anleitung bei.
Verpackung und Ihr neues Gerät wurde auf dem Weg zu Ihnen durch
Altgerät
die Verpackung geschützt. Alle eingesetzten
Materialien sind umweltverträglich und wieder
verwertbar. Bitte helfen Sie mit und entsorgen Sie die
Verpackung umweltgerecht.
Altgeräte sind kein wertloser Abfall. Durch umwelt-
gerechte Entsorgung können wertvolle Rohstoffe
wiedergewonnen werden.
Bevor Sie das Altgerät entsorgen, machen Sie es
unbrauchbar oder kennzeichnen Sie es mit einem
Aufkleber „Achtung Schrott!”
Über aktuelle Entsorgungswege informieren Sie sich
bitte bei Ihrem Fachhändler oder bei Ihrer Gemeinde-
verwaltung.
Vor dem Einbau
Transportschäden Prüfen Sie das Gerät nach dem Auspacken. Bei
einem Transportschaden dürfen Sie das Gerät nicht
anschließen.
Elektrischer Anschluss Nur ein konzessionierter Fachmann darf das Gerät
anschließen. Bei Schäden durch falschen Anschluss
haben Sie keinen Anspruch auf Garantie.

5
Sicherheitshinweise Dieses Gerät ist nur für den privaten Haushalt
bestimmt.
Benutzen Sie den Schaltkasten ausschließlich zum
Zubereiten von Speisen.
Die Oberflächen von Heiz- und Kochgeräten werden
bei Betrieb heiß. Halten Sie Kinder grundsätzlich fern.
Verbrennungsgefahr! Halten Sie Kinder grundsätzlich
fern.
Nie brennbare Gegenstände auf das Kochfeld legen.
Brandgefahr!
Nie Anschlusskabel von Elektrogeräten auf die
heißen Kochstellen legen.
Die Kabelisolierung kann schmelzen.
Kurzschluss-Gefahr!
Reparaturen Unsachgemäße Reparaturen sind gefährlich.
Stromschlag-Gefahr!
Nur ein von uns geschulter Kundendienst-Techniker
darf Reparaturen durchführen.
Wenn das Gerät defekt ist, die Sicherung im
Sicherungskasten ausschalten.
Rufen Sie den Kundendienst.
Ursachen für
Schäden
Pflege und Reinigung Verwenden Sie keine Hochdruckreiniger oder
Dampfstrahler.
Kochstellen Beobachten Sie Schnellkochtöpfe beim Erhitzen.
Ist der richtige Kochdruck erreicht, rechtzeitig
zurückschalten.
Bitte beachten Sie die dem Kochfeld beiliegende
Gebrauchsanleitung.
6
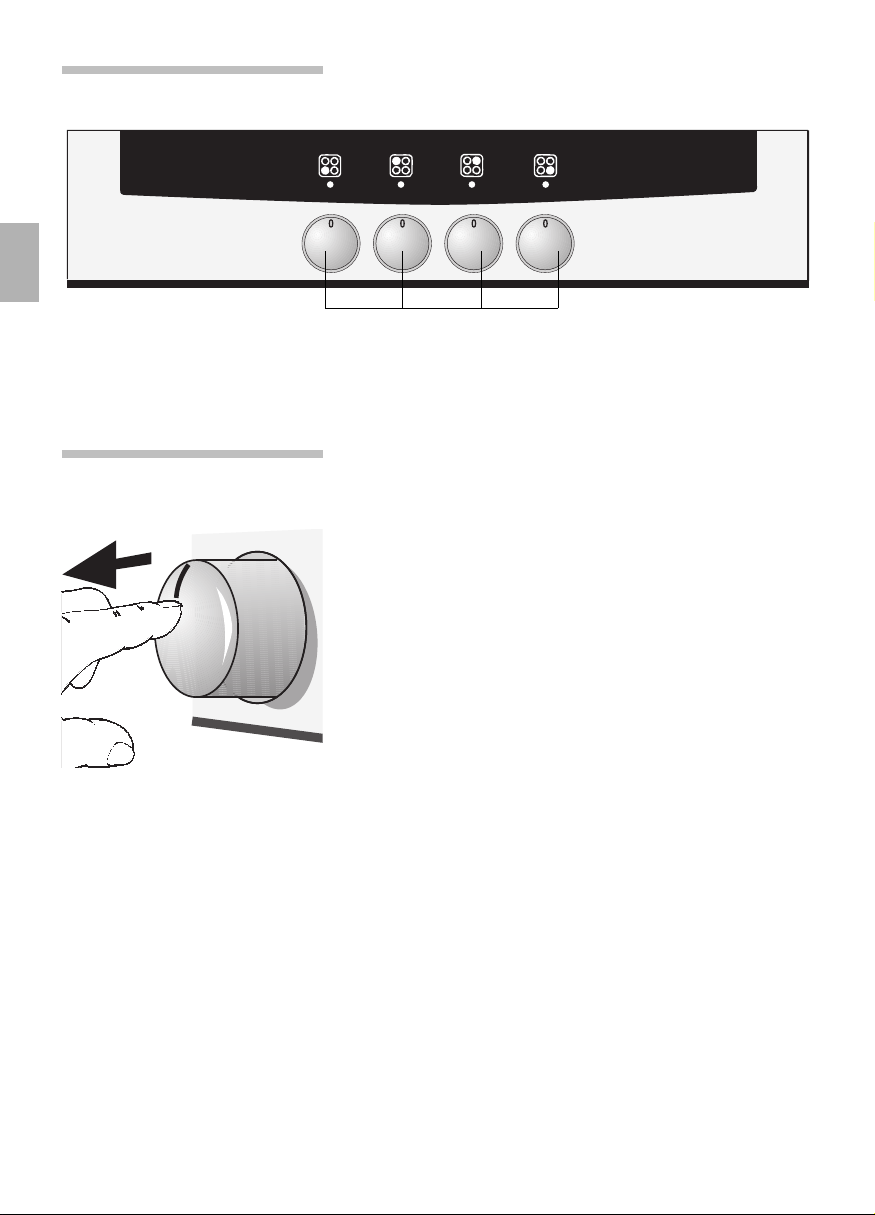
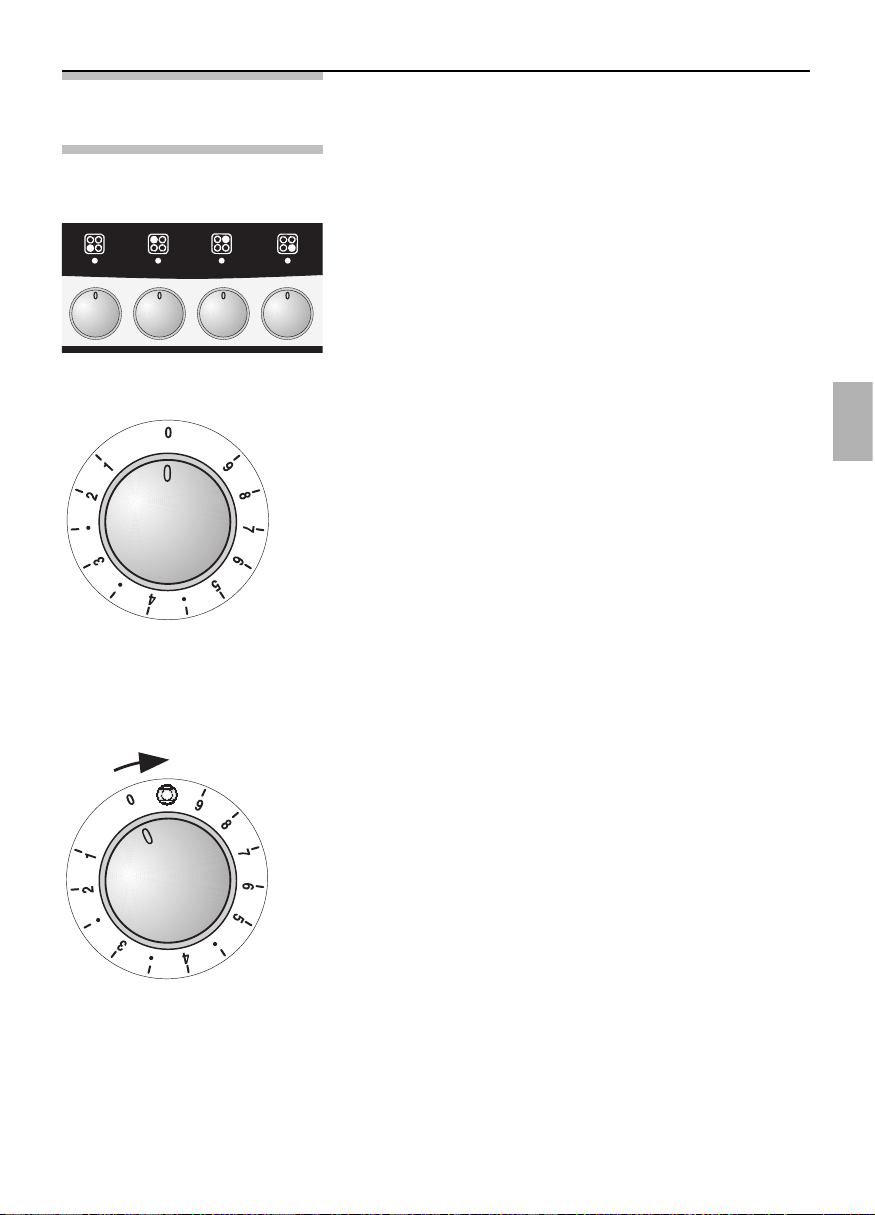
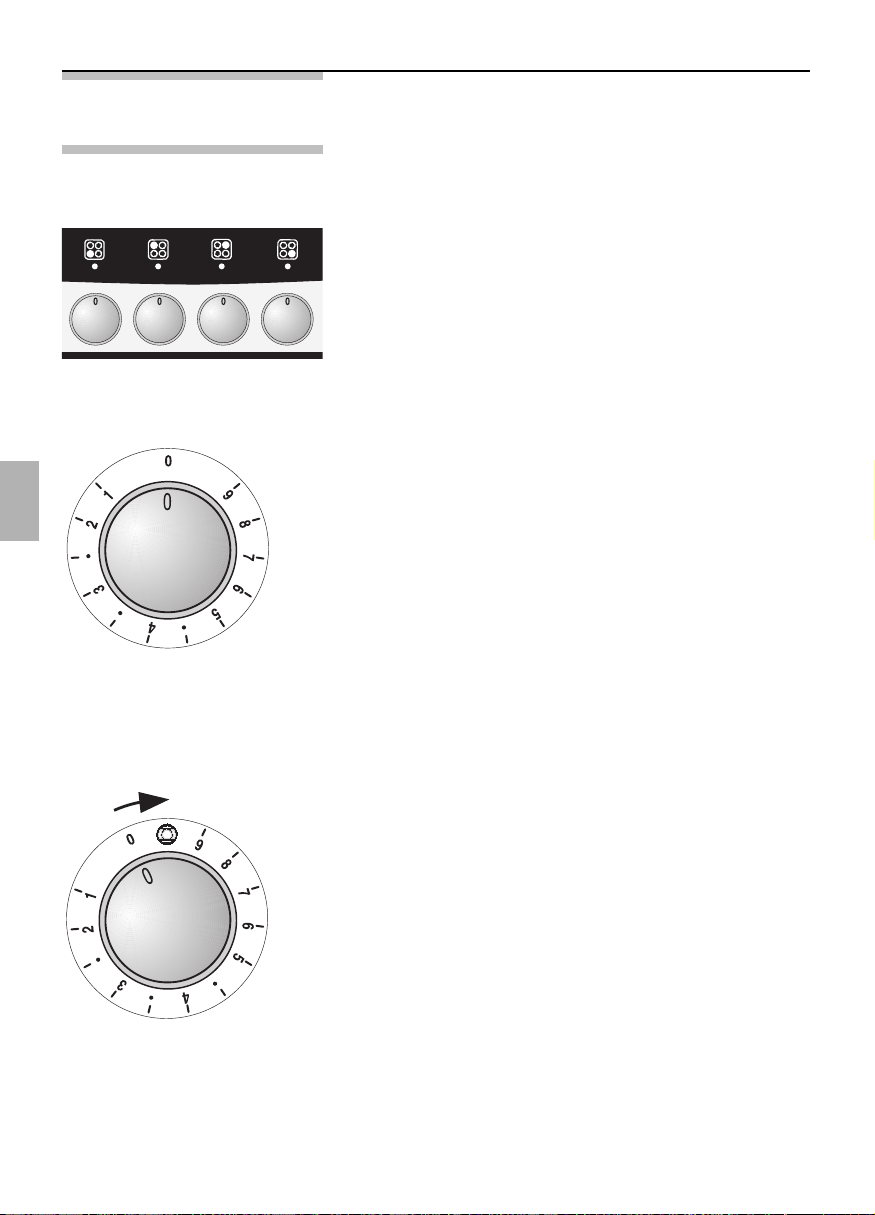
Versenkbare Zum Aus- und Einrasten drücken Sie auf den
Schalter
Schalter.
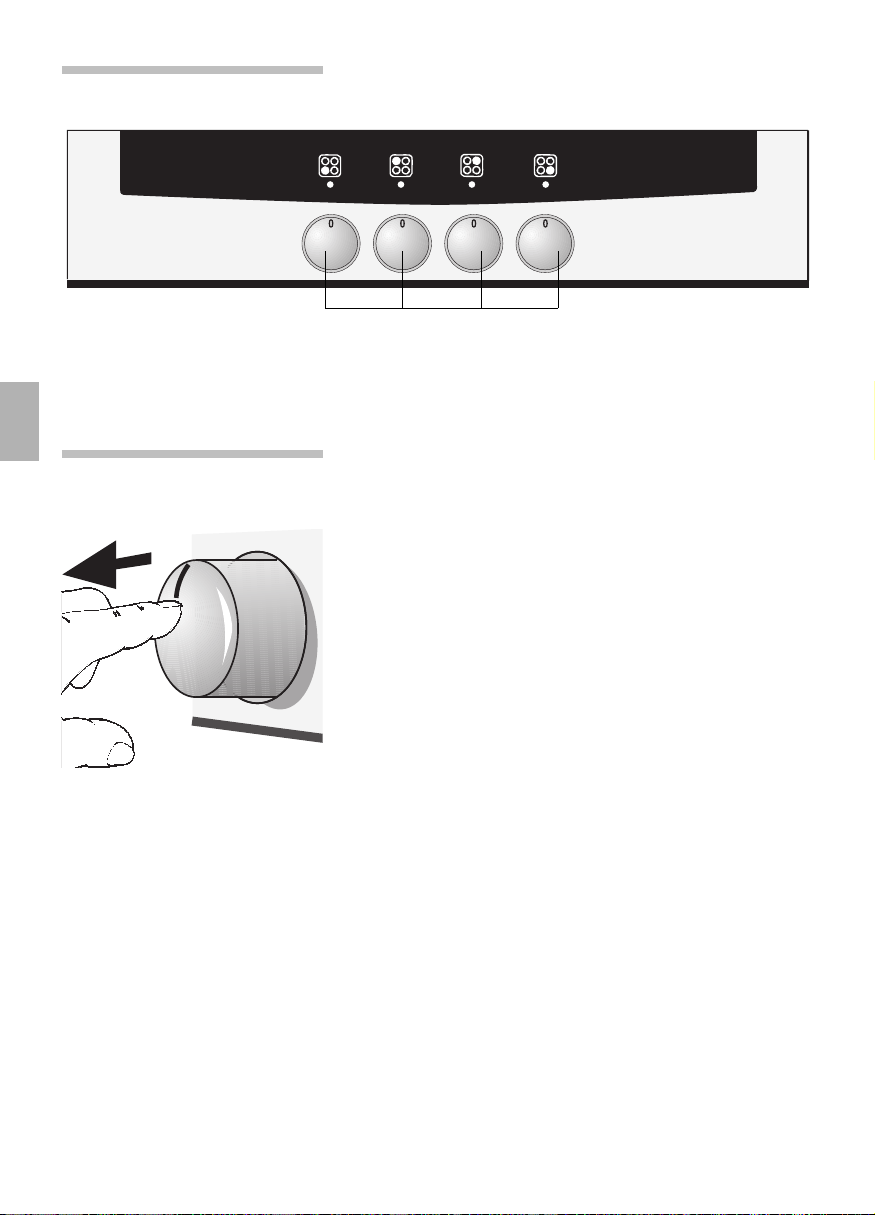
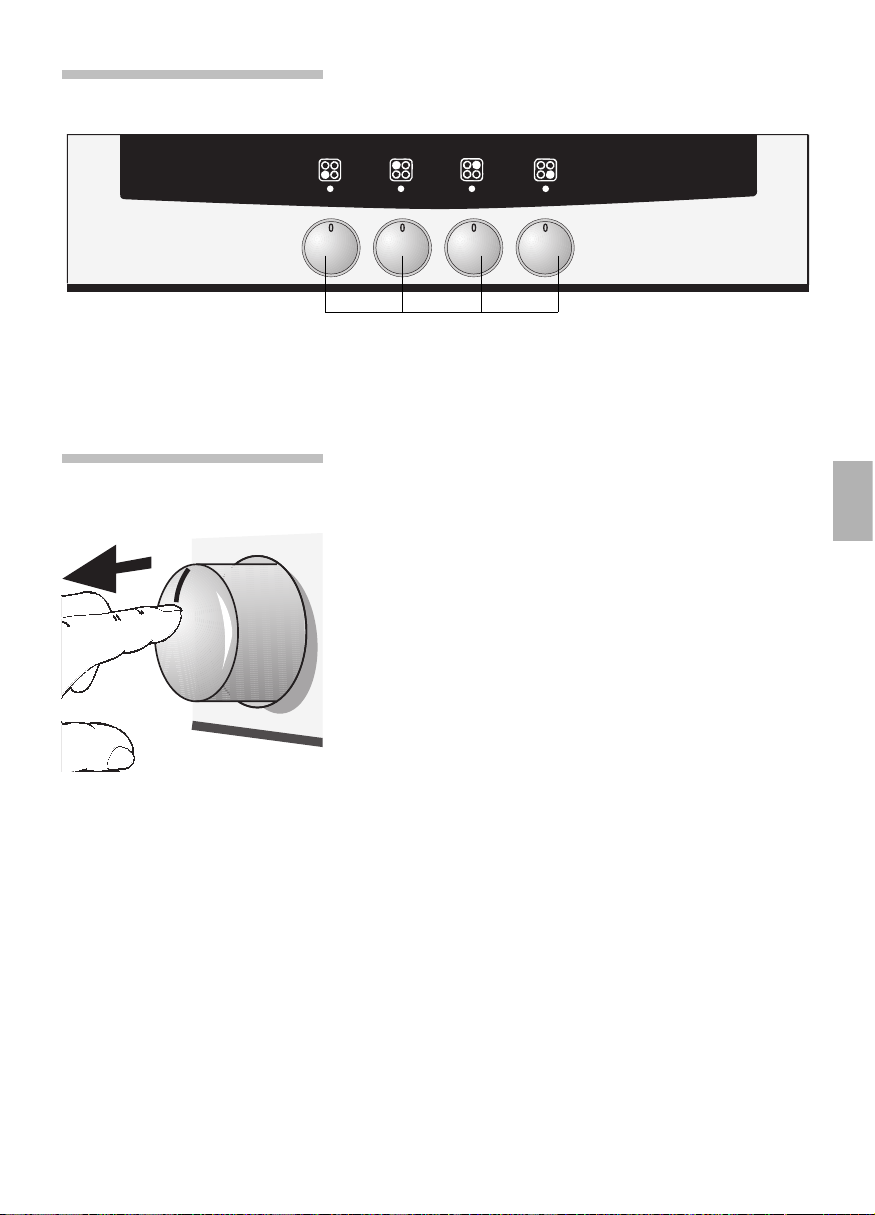
Das Bedienfeld
Schalter für Kochstellen
7
Kochen
Bedienen der Die Kennzeichnung n auf der Bedienblende zeigt
Kochstellen
Ihnen, welcher Schalter zu welcher Kochstelle
gehört.
Die Einstellung der Kochstellen ist stufenlos möglich.
Dem Kochfeld liegt eine gesonderte Gebrauchs-
anleitung bei. Bitte lesen Sie vor dem ersten
Benutzen alle dort angegebenen Informationen
aufmerksam durch.
Normal-Kochstelle
1. Drehen Sie den Kochstellenschalter zum
Ankochen auf Stellung 9.
2. Drehen Sie den Kochstellenschalter nach dem
Ankochen auf Fortkochstellung zurück.
Im Bereich 2 – 5 sind die Zwischeneinstellungen
durch einen Punkt gekennzeichnet.
Zweikreiskochzonen
1. Die Zweikreiskochzone schalten Sie durch
bei Glaskeramik-Kochfeldern Drehen des zugehörigen Schalters auf das
Symbol
o
ein.
2. Weitere Einstellungen erfolgen wie bei den
Normal-Kochstellen.
Zum Ausschalten der Zweikreis-Kochzone drehen
Sie den Schalter auf 0.

Störungen und Reparaturen
Bei Störungen oder Reparaturen, die Sie nicht
selbst beheben können, ist der Kundendienst für
Sie da.
Anschriften siehe Kundendienststellenverzeichnis.
Achtung: Es kostet Ihr Geld, wenn Sie wegen eines
Bedienfehlers den Kundendienst rufen.
E-Nummer und Sie finden diese Angaben auf dem Typenschild, oder
FD-Nummer auf der Rückseite dieser Gebrauchsanleitung.
Das Typenschild befindet sich auf der oberen
Abdeckung des Gerätes.
Bei Kundendienstfällen bitte angeben:
E-Nr. FD
8
Reinigen und Pflegen
Wichtige Hinweise Verwenden Sie zum Reinigen keine Scheuermittel,
keine scharfen Mittel und keine kratzenden
Gegenstände.
Kratzen Sie eingebrannte Speisenrückstände nicht
ab, sondern weichen Sie diese mit einem feuchten
Tuch und Spülmittel auf.
Verwenden Sie Spezialreiniger (z. B. Sprays) nicht
für Aluminium- und Kunststoffteile.
Edelstahlfront Bei Verwendung von handelsüblichen Edelstahl-
reinigern kann die Bedruckung angegriffen werden.
Verwenden Sie keine kratzenden Schwämme.
Tragen Sie handelsübliche Spülmittel auf einen
weichen, feuchten Lappen oder Fensterleder auf.
Email und Glas Verwenden Sie zum Reinigen heiße Spüllauge.
Kochfeld Dem Kochfeld liegt eine gesonderte Gebrauchs-
anleitung bei.
Beachten Sie alle dort angegebenen Reinigungs-
hinweise.
9
Montageanleitung
Für den Installateur und
Küchenfachmann!
Wichtige Hinweise
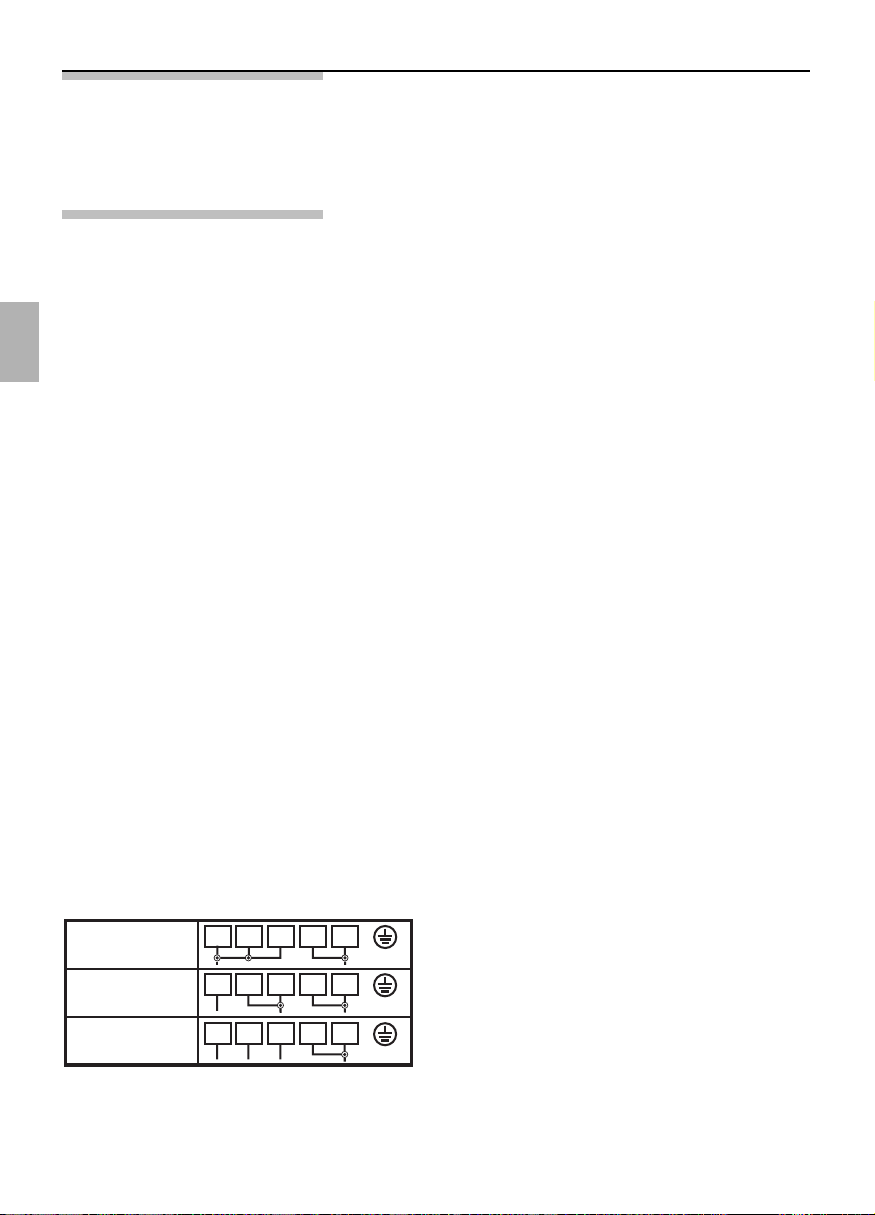
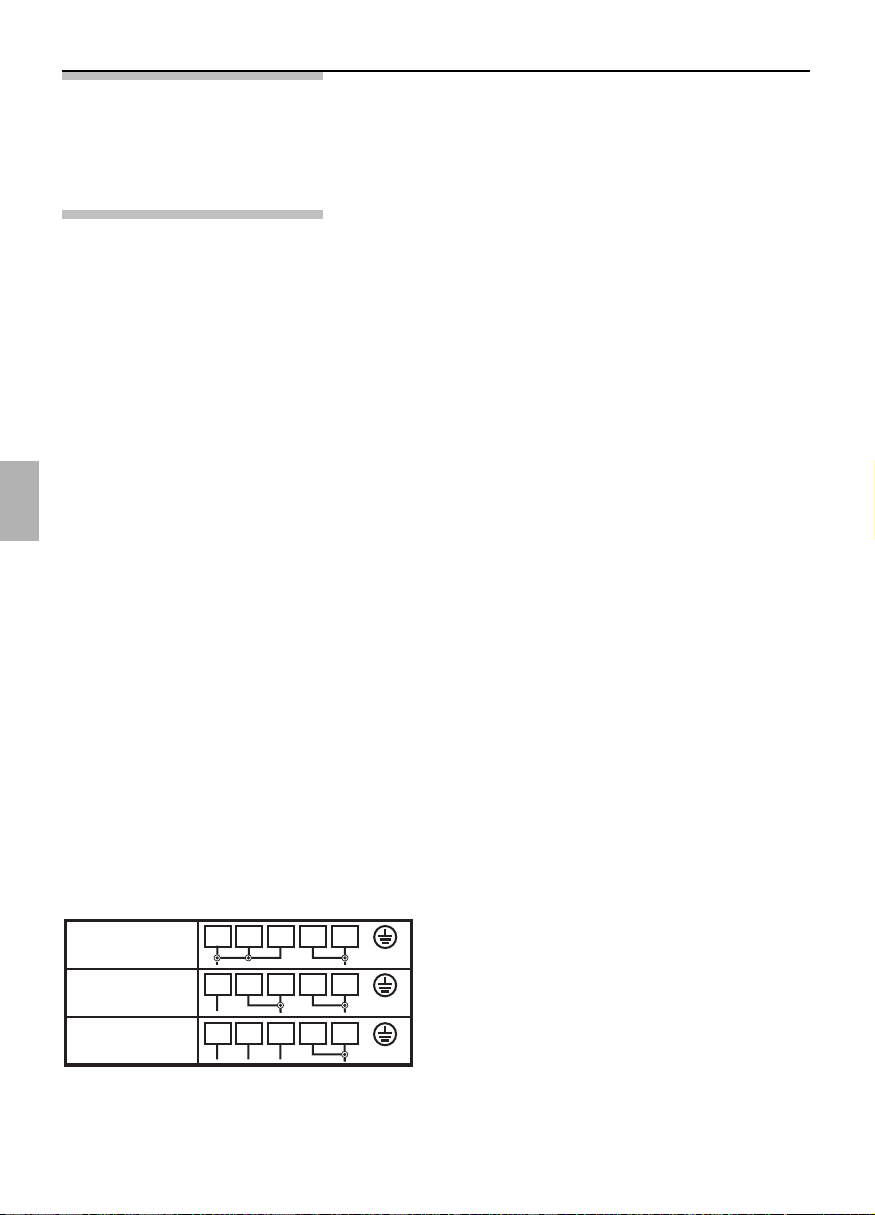
~
380-400V2N
~
220-230V
~
380-400V3N
L1
N
L2
L3
N
N
L3
123 4
5
5
5
4
4
3
32
21
1
L1
L1
Verpackungsmaterial ordnungsgemäß
entsorgen.
Achtung: Anschluss und Inbetrieb-
nahme dürfen nur von einem
autorisierten Fachmann vorgenommen
werden.
Für den Anschluss ist ein
Netzanschlusskabel H05VV-F zu
verwenden.
Nennaufnahme: max. 8 kW.
Nennspannung: 220 – 230 V ~.
Typen-Nr. des Gerätes:
siehe Typenschild.
Die elektrische Sicherheit des Gerätes
ist nur gewährleistet, wenn das
Schutzleitersystem der Hausinstallation
vorschriftsmäßig installiert ist.
Installationsseitig ist eine Trennvorrich-
tung vorzusehen. Als Trennvorrichtung
gelten Schalter mit einer Kontaktöffnung
von mehr als 3 mm. Dazu gehören LS-
Schalter, Sicherungen und Schütze.
Bei Reparaturen das Gerät generell
stromlos machen.
Das ordnungsgemäß eingebaute Gerät
muss nach allen Seiten so abgedeckt
sein, dass eine Berührung auch von
betriebsisolierten Teilen nicht möglich ist.
Die Abdeckung darf nur mit Hilfe von
Werkzeugen abnehmbar sein.
Das Anschlussbild befindet sich auf
der Rückwand des Gerätes.
10
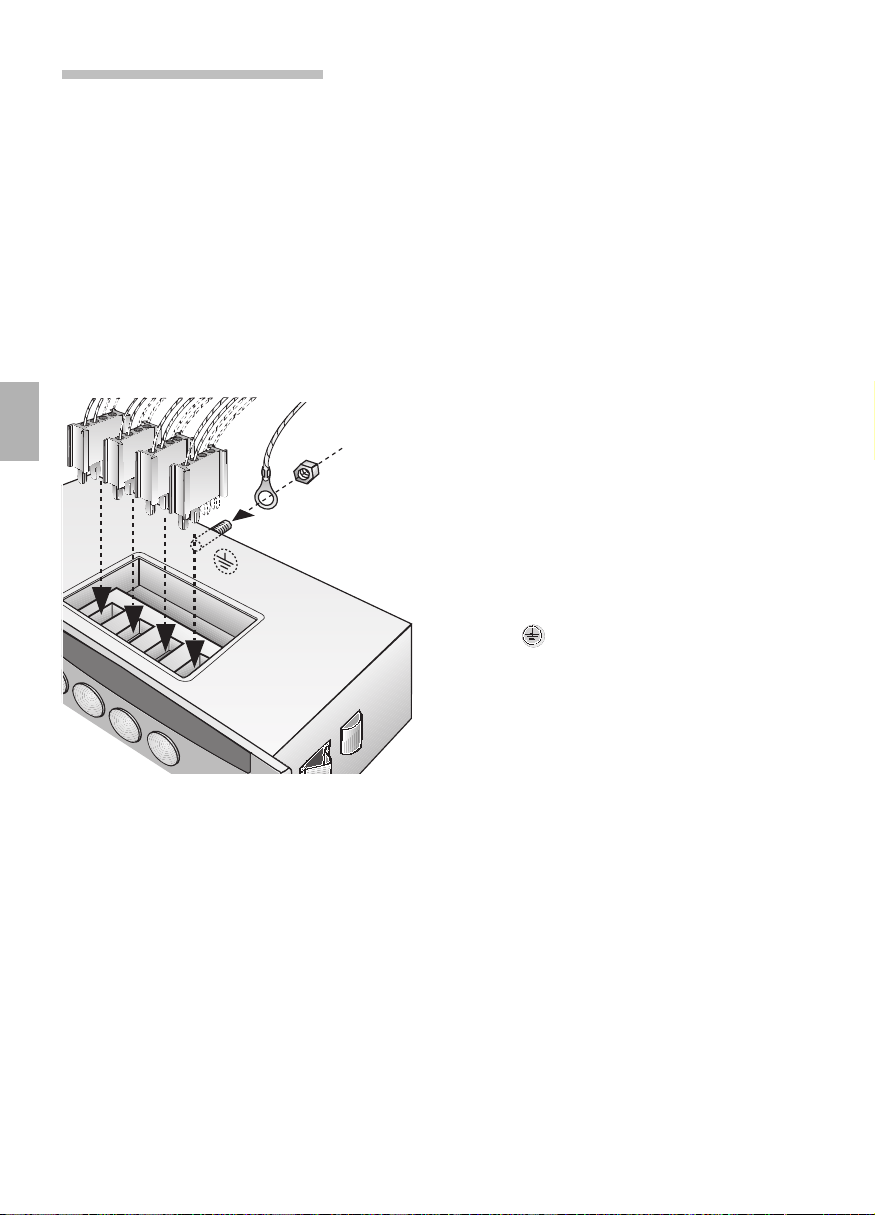
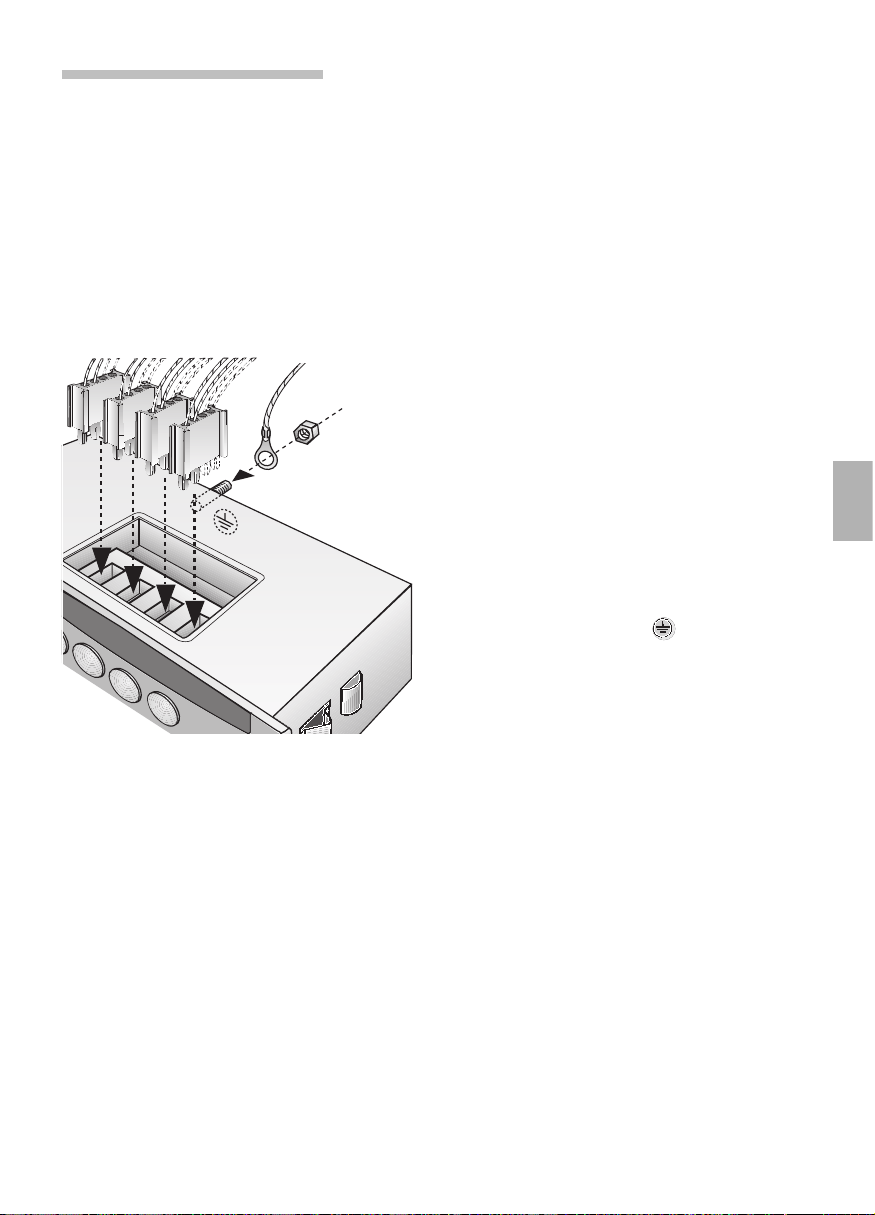
Anschließen
der Einbaumulde
Anschließbare Einbaumulden
Kochfeld und Gerät müssen vom
gleichen Hersteller und mit einem
gleichfarbigen Punkt auf dem Hinweis-
aufkleber für Kombination gekenn-
zeichnet sein, sonst Funktionsstörung.
Sie müssen die gleiche Nennspannung
haben (siehe Typenschild).
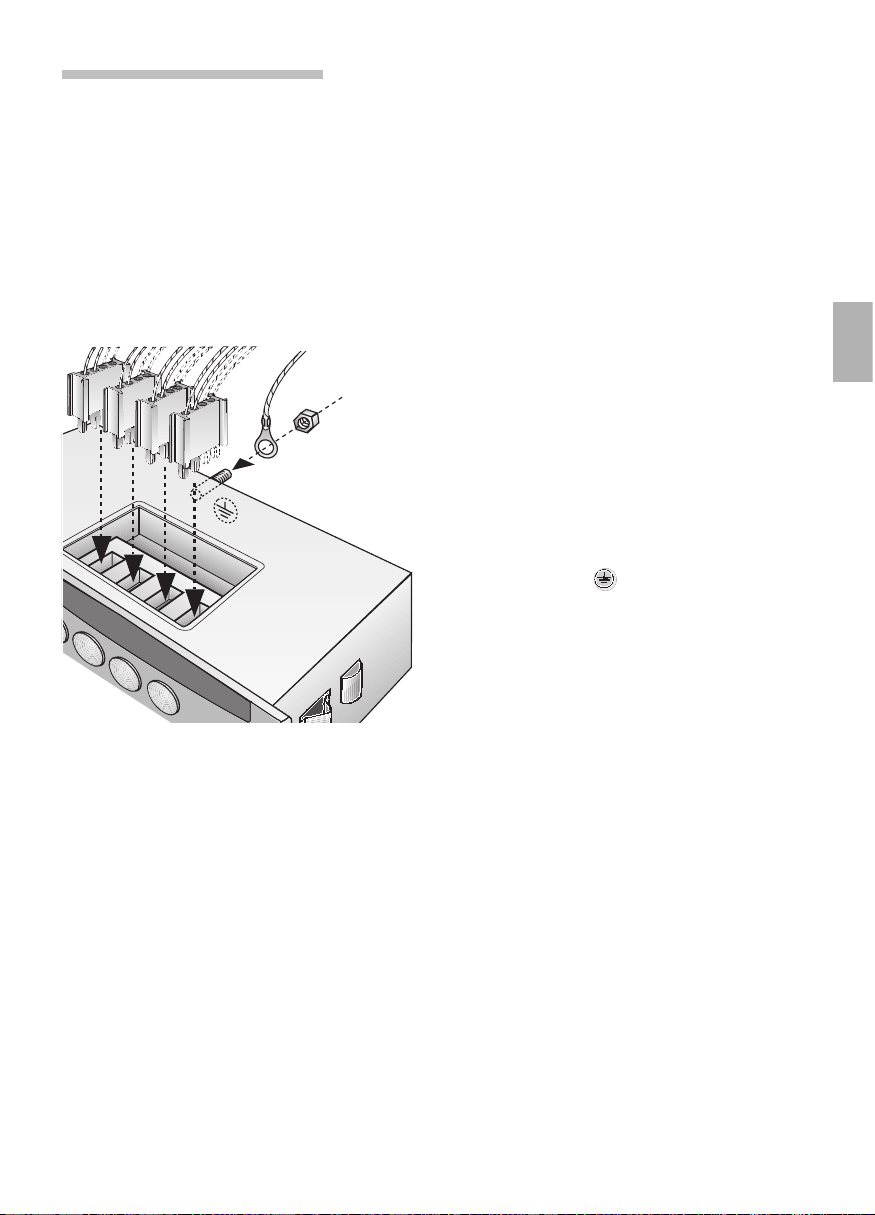
Anschließen Der Schaltkasten muss vor dem
Anschließen der Einbaumulde eingebaut
sein
Achtung: Beim Anschließen der
Einbaumulde an den Schaltkasten
unbedingt das Anschluss Schema am
Gerät und die Montageanleitung für die
Einbaumulde beachten.
Die grün-gelbe Erdungsleitung der
Einbaumulde muss mit der durch
gekennzeichneten Erdungsschraube
des Schaltkastens verbunden werden.
Bei nicht fachgerecht angeschlossener
Erdungsleitung besteht die Gefahr eines
elektrischen Schlages.
Wichtig: Die farbig gekennzeichneten
Stecker der Einbaumulde müssen in
die gleichfarbig gekennzeichneten
Buchsen am Schaltkasten gesteckt
werden.
Möbelprogramme Für den Schaltkasten sind Herdumbau-
schränke aller Küchenprogramme
verwendbar. Bei den Herdumbau-
schränken müssen Furniere oder
Kunststoffbeläge mit hitzebeständigem
Kleber (90° C) verarbeitet sein. Sind
Kunststoffbeläge oder Kleber nicht
genügend temperaturbeständig, so
kann sich der Belag verformen oder
lösen.
Gemäß Prüfbestimmung für Erwärmung
entspricht das Gerät dem Typ Y.
11
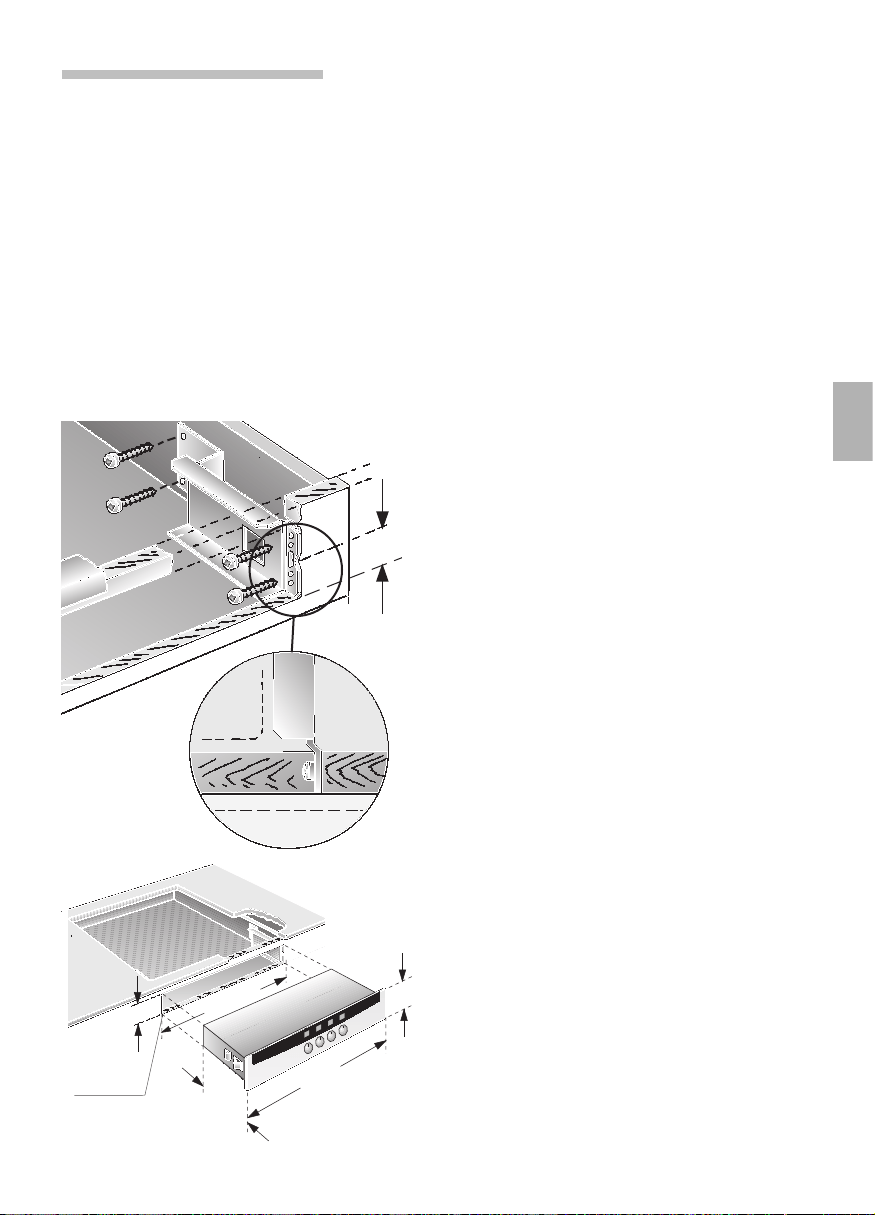
Einbauen des Schaltkastens
Achtung Das Gerät darf nur an einer Seite neben
einem Hochschrank oder einer hohen
Wand eingebaut werden. die Höhe an
der gegenüberliegenden Seite darf die
der Arbeitsfläche, in der die Kochmulde
eingebaut ist, nicht überschreiten.
Der seitliche Abstand der Kochmulde
zu einem Hochschrank und der zur
Rückwand muss der Montageanleitung
für die Einbau-Kochmulde entsprechen,
dort angegebene Schutzklasse für
Erwärmung beachten.
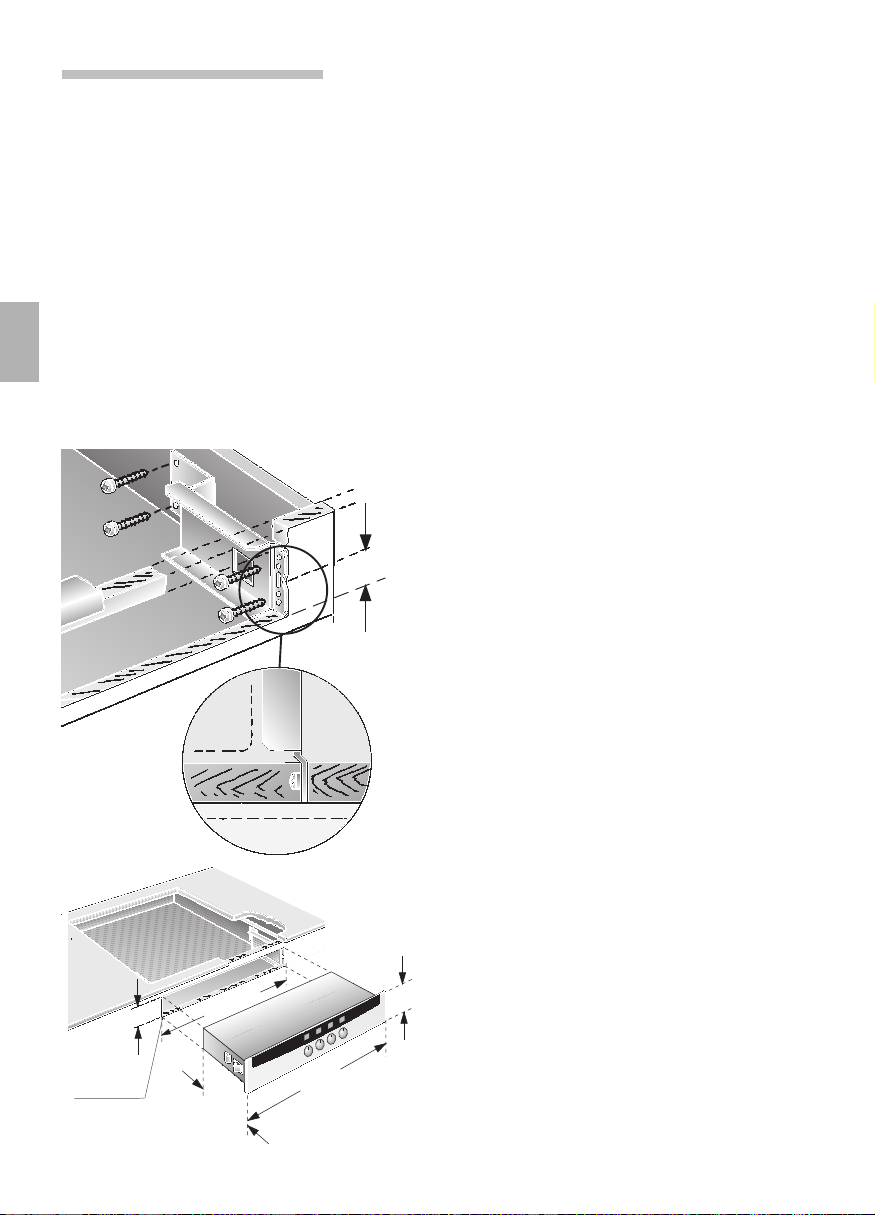
Einbauen Arbeitsplattenausschnitt für Einbau-
Kochmulde muss vorhanden sein (siehe
Montageanweisung Einbau-Kochmulde).
Schaltkasten muss vor der Kochmulde
eingebaut werden.
1. Ausschnitt in Holzfront (88
+2
mm x
525
+2
mm) anbringen.
(Ausschnitt-Maße der Arbeitsplatte
siehe Montageanleitung –
Einbaumulde).
2. Vorbereitung zum Einbau:
Ausschnittmarke markieren.
Träger mit Kerbe anlegen und
bündig mit Blendenvorderkante
anschrauben.
3. Gerät einsetzen:
Gerät vorsichtig einschieben, dass
keine Leitungen eingeklemmt
werden.
4. Funktionskontrolle.
Wichtig beim Ausbau:
Gerät spannungslos machen.
Schutzleiter von der Erdungsschraube
lösen.
Kochfeld oder Zwischenboden
abnehmen und Schaltkasten von hinten
herausdrücken.
43
88
+2
525
+2
5
6
7
260
100
max. R 8

12
Table of contents
Important Information . . . . . . . . . . 13
Packaging and old appliances . . . . . 13
Before installation . . . . . . . . . . . . . . 13
Safety information . . . . . . . . . . . . . . 14
Reasons for damage . . . . . . . . . . . . 14
The control panel . . . . . . . . . . . . . . . 15
Press-down switches . . . . . . . . . . . 15
Cooking . . . . . . . . . . . . . . . . . . . . . 16
Operating the hotplates . . . . . . . . . . 16
Cleaning and Care . . . . . . . . . . . . . 17
Important cleaning basics . . . . . . . . 17
Service and Repair information . . 17
Inhaltsverzeichnis
Assembly instructions
For the fitter
and kitchen specialist
Important . . . . . . . . . . . . . . . . . . . . 18
Connecting the hob . . . . . . . . . . . . 19
Installing the switchbox . . . . . . . . 20

13
Important information
Before using your new appliance, please read these
Instructions for Use carefully. They contain important
information concerning your Personal safety as well
as on use and care of the appliance.
The Instructions for Use apply to several versions of
this appliance. Accordingly, you may find
descriptions of individual features that do not apply
to your specific appliance.
Please keep the operating and installation
instructions in a safe place; this important
documentation may also be of use to a possible
subsequent owner.
Packaging and Your new appliance was protected by suitable
old appliances
packaging while it was on its way to you. All materials
used for this purpose are environmentally friendly and
can be recycled. Please make a contribution to
protecting the environment by disposing of the
packaging appropriately.
Old appliances are not worthless rubbish.
Environmentally-conscious recycling can reclaim
valuable raw materials.
Before disposing of your old appliance, please make
sure that it is unusable, or label it with a sticker
stating „Caution, scrap”.
Up-to-date information on how to dispose of your
old appliance and the packaging from the new one
can be obtained from your retailer or local authority.
Before installation
Transport damage Check the appliance after unpacking it. Do not
connect the appliance if it has been damaged in
transport.
Electrical connection The cooker may only be connected by an approved
specialist. Losses resulting from damage caused by
incorrect connection will invalidate warranty claimes.

14
Safety information This appliance is intended for domestic use only.
Only use the cooker for food preparation.
The surfaces of heating and cooking appliances
become hot during operation. There is a risk of
burning. Children must be kept at a safe distance
from the appliance.
Never place flammable objects onto the hot plates.
Fire hazard!
Never place cables of electronic devices onto the hot
plates.
The insulation on the leads could melt.
There is a risk of short-circuiting.
Repairs Incorrectly done repairs are dangerous. There is a
risk of electrocution.
Repairs may only be carried out by after-sales
service technicians who have been fully trained by
BSH.
If there is a fault, switch off the fuse at the fuse
box.
Call the after-sales service.
Reasons for
damage
Care and cleaning Do not use high-pressure cleaners or steam jets.
Hotplates Keep an eye on pressure cookers during the heat-up
phase. As soon as the proper cooking pressure is
reached, reduce the heat setting.
Please observe the separate operating instructions
that came with your hob.

15
Press-down To engage and disengage, depress the switch,
switches making sure that it is in OFF position.
The control panel
Hotplate control switches
16
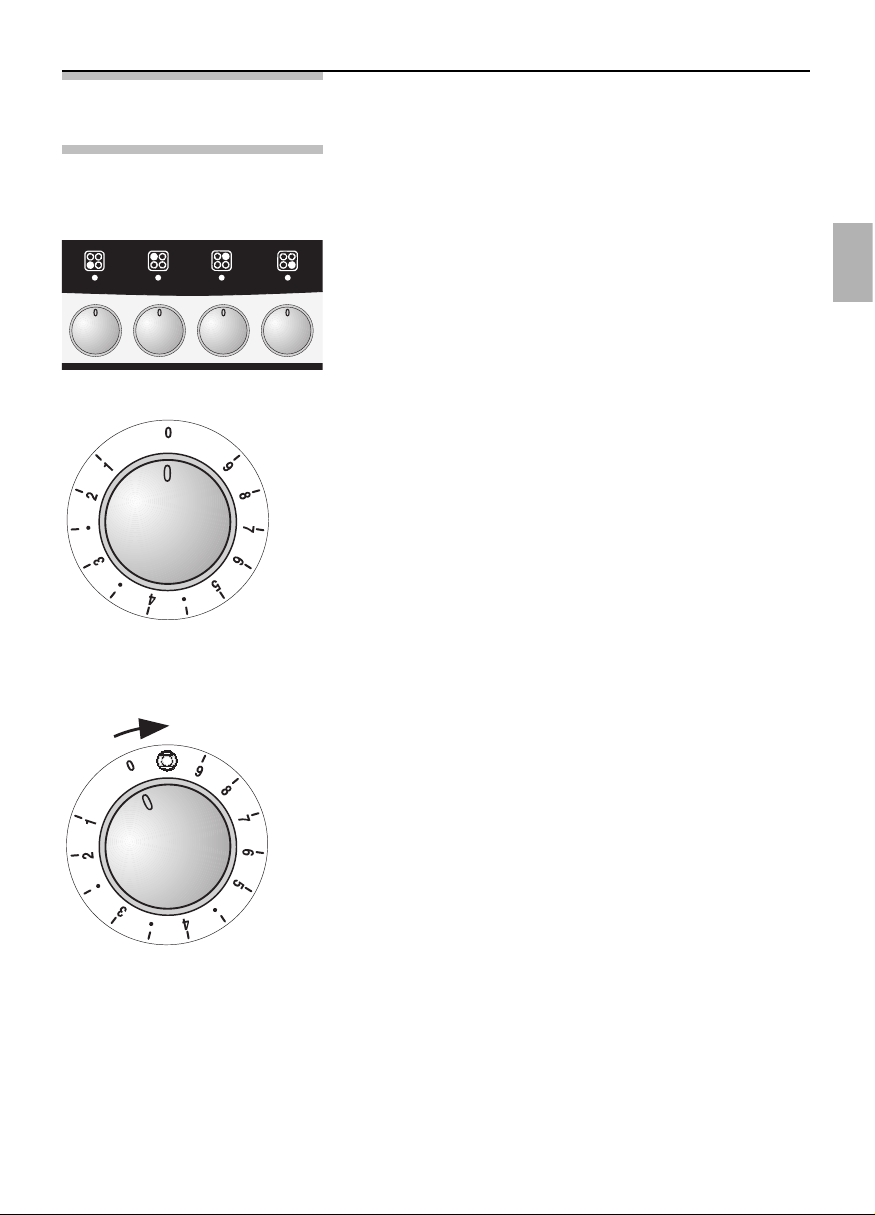
Cooking
Operating the The n symbol on the switch panel represents the
hotplates
different hotplates and their respective switches.
The hotplate heat settings are infinitely variable.
Separate operating instructions apply to the
hotplate. Before the initial use of the hotplates,
please familiarise yourself with the information
contained therein.
Standard hotplate
1. Turn the hotplate control switch to setting 9.
2. After the initial high-heat cooking phase, turn the
control switch to a suitable setting for continuous
cooking.
Intermediate settings between the heat settings
2 to 5 are marked by a dot.
Dual-zone hotplate
1. The dual-zone cooking zone is activated by
in glass-ceramic hobs turning the associated hotplate control switch to
the
o
symbol.
2. The remaining settings are the same as those
for the standard hotplates.
To switch of the dual-zone hotplate, turn the control
switch to 0.
17
Cleaning and Care
Important cleaning For cleaning, do not use abrasives, no corrosive
basics
cleaners, and no sharp objects.
Do not scratch off burnt-in food residues, but soak
them off with a moist cloth and dishwashing
detergent.
Special cleaners, such as oven cleaning spray, must
not be used on aluminium or plastic parts.
Stainless steel front When using commercially available stainless steel
cleaning agents, the lettering may become damaged.
Do not use scouring sponges.
Use commercially available detergents applied to a
soft, moistened cloth or a chamois.
Enamel and glass Use hot detergent suds for cleaning.
Hob surface The hob is covered by a special set of operating
instructions.
Please observe all cleaning directions contained in
the instructions.
Service and Repair Information
In the event of problems or repairs that you cannot
solve or perform yourself, our customer service will
be happy to help. Check the customer service
directory for a customer service facility in your area.
Caution: Calling the customer service because of an
operator error can be very costly!
E No and FD No You can find this information on the appliance‘s
nameplate, or on the back of this instruction booklet.
The nameplate are fitted to the top cover of the
appliance.
In the event of a customer service request, please
have the following information handy:
E-Number FD
18
Assembly Instructions
For the fitter and
kitchen specialist
Important
~
380-400V2N
~
220-230V
~
380-400V3N
L1
N
L2
L3
N
N
L3
123 4
5
5
5
4
4
3
32
21
1
L1
L1
Properly dispose of packaging
materials.
WARNING: Connection and first start
of the appliance may only be performed
by an authorised specialist.
Connection must be made using an
H05VV-F mains connection cable.
Rated consumption: Max. 8 kW.
Rated voltage: 220 – 230 V~.
Appliance type no.: see rating plate.
Electrical safety of the appliance can
be ensured only if the equipment earth
in the building installation has been
installed according to regulations.
On the installation side a separating
device shall be provided.
Any switch with a contact gap ex-
ceeding 3 mm may be considered
a separating device.
Other examples are LS switches, fuses
and contactors.
In the case of repairs interrupt all
power connections to the unit.
The properly installed appliance must
be covered on all sides in such a
fashion that not even components with
rough insulation are exposed to the
touch. The cover must be removable
with tools only.
The connection diagram is located on
the rear panel of the appliance.
19
Connecting
the hob
Connectable built-in hobs
Cooking surface and appliance must be
from the same manufacturer and
marked with a point on the instructions
sticker. Otherwise functional failures will
result. They must have the same rated
voltage (see nameplate).
Connecting The switchbox must be installed before
connecting up the built-in hob.
Important: When connecting up the
built-in hob to the switchbox, it is
essential to follow the connecting
diagram on the appliance and the
installation instructions for the built-in
hob.
The green-yellow earth line of the
built-in hob must be connected to the
earthing screw of the built-in cooker.
If the earth line is not properly
connected, there is the danger of
electric shock.
Important: The built-in hob
connectors must be plugged into the
switchbox sockets with the same
coloured markings.
Furniture programmes Built-in cooker units from any kitchen
range can be used for the switchbox.
The veneers or plastic coating of the
units in question must have been
processed using heat-resistant
adhesive (90° C). If plastic coating or
adhesive is insufficiently temperature-
resistant, the coating may deform or
loosen.
In line with the test regulations on
heating, the appliance corresponds to
Type Y.
20
Installating the switchbox
WARNING The appliance may be installed with a
high cabinet or a high wall only on one
side of it. On the respective opposite
side, the height of an adjacent piece of
furnishing may not exceed the height of
the working surface in which the hob is
installed. The distance between the
high wall on the side of the hob and the
rear wall must comply with the
assembly instructions for the built-in
hob. Observe the protection class for
heat exposure as stated in the
assembly instructions
Installation The worktop must already have a
cutout for the built-in hob (see built-in
hob installation instructions).
The switchbox must be installed before
the hob.
1. Cut an opening in the wooden front
(max. 88
+2
mm x 525
+2
mm). (For
cutout dimensions of worktop, see
installation instructions for hob).
2. Prior to installation:
Mark the centre of the cutout.
Align the support with the notch and
screw on flush with the front edge of
the facia.
3. Insert appliance:
Push the appliance in carefully so
that no cables can become caught.
4. Check functioning.
Important when disassembling:
Deenergize the appliance. Undo the
earthed conductor from the earthing
screw.
Remove hob or intermediate base and
push out the switchbox from the back.
43
88
+2
525
+2
5
6
7
260
100
max. R 8

21
Indice
Aspetti a cui prestare attenzione . 22
Imballaggio e apparecchio dismesso 22
Prima del montaggio . . . . . . . . . . . . 22
Norme di sicurezza . . . . . . . . . . . . . 23
Cause di danni . . . . . . . . . . . . . . . . 23
Pannello comandi . . . . . . . . . . . . . . 24
Comando a scomparsa . . . . . . . . . . 24
Cucinare . . . . . . . . . . . . . . . . . . . . . 25
Uso delle zone di cottura . . . . . . . . . 25
Pulizia e manutenzione . . . . . . . . . 26
Avvertenze importanti . . . . . . . . . . . 26
Guasti e riparazioni . . . . . . . . . . . . 26
Inhaltsverzeichnis
Istruzioni di montaggio
Per l’installatore e
il tecnico di cucine
Avvertenze importanti . . . . . . . . . . 27
Collegamento del piano
di cottura da incasso . . . . . . . . . . 28
Installazione . . . . . . . . . . . . . . . . . . 29
22
Aspetti a cui prestare attenzione
Prima di usare il nuovo apparecchio, leggete
attentamente le istruzioni per l'uso. Esse contengono
informazioni importanti per la Vostra sicurezza,
e anche per l'uso e la manutenzione
dell'apparecchio.
Questo libretto di istruzioni per l'uso è previsto per
più versioni dell'apparecchio. É possibile che siano
descritti singoli particolari della dotazione, che non
riguardano il Vostro apparecchio.
Conservate bene il libretto delle istruzioni per l'uso e
il montaggio, per un eventuale successivo
proprietario.
Imballaggio e L’imballaggio ha protetto il nuovo apparecchio
apparecchio
durante la fase di trasporto. Tutti i materiali utilizzati
sono compatibili con l’ambiente e riciclabili. Si
dismesso
raccomanda di smaltire l’imballaggio conformemente
alle normative vigenti in materia di tutela ambientale.
Gli apparecchi dismessi non sono rifiuti senza valore.
Attraverso uno smaltimento correto, in linea con le
normative per la tutela ambientale, si possono
recuperare materie prime pregiate.
Prima di smaltire l’apparecchio dismesso, renderlo
inservibile oppure contrassegnarlo con un’etichetta
adesiva „Attenzione: rottami”.
Informarsi sulle attuali possibilità di smaltimento
presso il proprio rivenditore specializzato oppure
presso il proprio comune.
Prima del montaggio
Danni imputabili al trasporto Controllare l’apparecchio dopo averlo disimballato.
Non allacciare l’apparecchio se si riscontrano danni
di trasporto.
Collegamento elettrico L’allacciamento della cucina deve essere effettuato
esclusivamente da personale autorizzato. Il diritto alla
garanzia si estingue in caso di danno causato da un
allacciamento errato.

23
Norme di sicurezza Questo apparecchio è stato concepito
esclusivamente per uso domestico.
Si raccomanda di utilizzare il forno esclusivamente
per la preparazione delle pietanze.
Le superfici degli apparecchi da riscaldamento e da
cucina durante il funzionamento diventano roventi.
Pericolo di scottature! Tenere lontano i bambini.
Non deporre mai oggetti infiammabili sul piano di
cottura. Pericolo d’incendio!
Non deporre mai i cavi d’alimentazione di apparecchi
elettrici sulle zone di cottura calde.
L’isolamento del cavo può fondersi.
Pericolo di cortocircuito!
Riparazioni Gli interventi di riparazioni effettuati in modo non
conforme rappresentano una fonte di pericolo.
Rischio di scosse elettriche!
Le riparazioni devono essere effettuate
esclusivamente da personale tecnico da noi
adeguatamente istruito.
Se l’apparecchio è difettoso, disattivare l’interruttore
di sicurezza nella scatola dei fusibili.
Rivolgersi al servizio di assistenza tecnica.
Cause di danni
Cura e manutenzione Non utilizzare detergenti ad alta pressione o
dispositivi a getto di vapore.
Zone di cottura Sorvegliate le pentole a pressione durante il
riscaldamento. Raggiunta la pressione di cottura
corretta, ridurre in tempo il riscaldamento.
Siete pregati di osservare le istruzioni per l'uso
accluse al piano di cottura.
24
Comando a Premete sul selettore per farlo uscire o rientrare.
scomparsa
Pannello comandi
Interruttori per le zone di cottura
25
Cucinare
Uso delle zone Il simbolo n sul pannello di comando indica
di cottura
l'appartenenza del selettore alla zona di cottura.
É possibile la regolazione continua delle zone di
cottura.
Al piano di cottura é accluso un apposito libretto
di istruzioni per l'uso. Prima del primo impiego,
siete pregati di leggere attentamente tutte le
informazioni in esso riportate.
Zona di cottura normale
1. Per la prima cottura rapida, girate il selettore sulla
posizione 9.
2. Dopo la prima cottura rapida, girate il selettore
indietro sulla posizione di prosecuzione cottura.
Nei gradi da 2 a 5 le posizioni intermedie sono
indicate con un punto.
Zone di cottura a circuito
1. Potete accendere le zone di cottura a circuito
doppio nei piani di cottura doppio girando il selettore relativo sul simbolo
o
.
in vetroceramica
2. Le altre regolazioni si effettuano come per le zone
di cottura normali.
Per spegnere la zona di cottura a circuito doppio,
girate il selettore sullo 0.

26
Pulizia e manutenzione
Avvertenze Per la pulizia non adoperate mai sostanze abrasive,
importanti
prodotti corrosivi e oggetti che graffiano.
Non raschiate residui di cibo bruciati, ma
ammorbiditeli con un panno umido e detergente.
Per le parti in alluminio e in plastica non usate
detergenti speciali (p. es. spray e simili).
Frontale in acciaio inox I detergenti commerciali per pulire l'acciaio inox
possono aggredire la decorazione stampata.
Non usate pagliette che graffiano.
Versate un detersivo liquido per piatti
commerciale su un panno morbido, umido o su una
pelle per vetri.
Smalto e vetro Per la pulizia usate una soluzione di lavaggio ben
calda.
Piano di cottura Al piano di cottura è accluso un apposito libretto di
istruzioni per l'uso.
Osservate tutte le istruzioni per la pulizia in esso
indicate.
Guasti e riparazioni
In caso di guasti o di riparazioni, che non siete in
grado di effettuare Voi stessi, il servizio assistenza
clienti è a Vostra disposizione. Trovate gli indirizzi
nell'elenco dei centri di assistenza.
Attenzione: non spendete inutilmente il vostro
denaro, chiamando il servizio assistenza per un
Vostro errore nell'uso.
Sigla del prodotto e Trovate questi dati sulla targa delle caratteristiche,
numero di fabbricazione oppure alla fine di queste istruzioni per l’uso.
La targa delle caratteristiche si trova sul coperchio
superiore dell’apparecchio.
In caso di ricorso al servizio assistenza siete pregati
di indicare:
E-Nr. FD

27
Istruzioni di montaggio
Per l’installatore e il tecnico
di cucine
Avvertenze importanti
~
380-400V2N
~
220-230V
~
380-400V3N
L1
N
L2
L3
N
N
L3
123 4
5
5
5
4
4
3
32
21
1
L1
L1
Smaltire in modo regolamentare il
materiale d'imballaggio.
Attenzione: l'allacciamento e la messa
in funzione devono essere eseguiti solo
da un tecnico autorizzato.
Impiegare per l'allacciamento un cavo
di collegamento alla rete H05VV-F
Assorbimento nominale: max. 8 kW.
Tensione nominale: 220 – 230 V ~.
N° del tipo di apparecchio:
vedi targhetta d'identificazione.
La sicurezza elettrica dell'apparecchio
è assicurata solo se il cavo di terra
nell'impianto domestico è installato in
modo conforme alle disposizioni.
Nell'impianto deve essere previsto un
dispositivo di separazione.
Hanno valore di dispositivo di separa-
zione gli interruttori con un'apertura di
contatto superiore a 3 mm.
Rientrano tra questi gli interruttori auto-
matici, i fusibili e i relè.
In caso di riparazioni dell'apparecchio
togliere sempre la corrente.
L'apparecchio installato regolarmente
deve essere coperto su tutti i lati, in
modo che sia impossibile un contatto
con parti funzionali anche se isolate. La
copertura deve essere smontabile solo
con il ricorso ad utensili.
Lo schema di allacciamento si trova
sulla parete posteriore dell'apparecchio.
28
Collegamento del piano
di cottura da incasso
Cucine da incasso collegabili
Il piano di cottura e la cucina devono
appartenere alla stessa fabbrica di
produzione ed essere contrassegnate
con un punto dello stesso colore,
secondo l’adesivo di avvertenza per le
combinazione, altrimenti si verificano
disturbi di funzionamento. Essi devono
e avere la stessa tensione nominale
(vedasi la targhetta del modello).
Collegamento La cassetta di comando deve essere
installata prima di collegare il piano di
cottura da incasso.
Attenzione: collegando il piano di
cottura da incasso alla cassetta di
comando, rispettare assolutamente lo
schema dei collegamenti sull'apparec-
chio e le istruzioni di montaggio per il
piano di cottura da incasso.
Il cavo di terra giallo-verde del piano
di cottura da incasso deve essere
collegato alla vite di terra contrassegna-
ta con del forno da incasso.
Se il cavo di terra non è collegato
correttamente, sussiste il pericolo di scossa
elettrica.
Importante: i connettori del piano di
cottura da incasso, contrassegnati a
colori, devono essere innestati nelle
prese della cassetta di comando
contrassegnate con lo stesso colore.
Programmi di mobili Per la cassetta di comando sono
utilizzabili tutti i mobili di montaggio di
tutti i programmi di cucine. I mobili di
montaggio devono essere lavorati con
fogli per impiallacciatura o rivestimenti in
materiale sintetico con adesivi resistenti
al calore (90° C). Se i rivestimenti in
materiale sintetico o gli adesivi non sono
sufficientemente termoresistenti, il
rivestimento può deformarsi o scollarsi.
Secondo le norme di controllo per il
riscaldamento, l'apparecchio è
conforme al tipo Y.
29
Installazione
Attenzione L'apparecchio può essere montato con
un solo fianco accanto ad un mobile
alto o ad una parete alta. L'altezza del
lato opposto non deve superare il piano
di lavoro nel quale è montata la cucina.
La distanza laterale della cucina rispetto
ad un mobile alto e rispetto alla parete
posteriore deve essere conforme alle
istruzioni di montaggio per la cucina da
incasso e rispettare la classe di
sicurezza per il riscaldamento indicata
nelle istruzioni.
Montaggio L'intaglio per il piano di cottura da
incasso nel piano di lavoro deve essere
già disponibile (vedi istruzioni di
montaggio del piano di cottura da
incasso).
La cassetta di comando deve essere
montata prima del piano di cottura.
1. Praticare l'intaglio nel frontale di
legno (max. 88
+2
mm x 525
+2
mm).
(Misure dell'intaglio nel piano di
lavoro, vedi istruzioni di montaggio –
piano di cottura da incasso).
2. Preparazione al montaggio:
Tracciare il centro dell’intaglio.
Poggiare il supporto con la tacca e
avvitarlo a raso con lo spigolo
anteriore del pannello.
3. Sistemare l’apparecchio:
Introdurre con cautela l’apparecchio
evitando di schiacciare cavi.
4. Controllo di funzionamento.
Importante nello smontaggio:
Togliere tensione all’apparecchio.
Svitare il cavo di terra dal contatto di
terra.
Estrarre il piano di cottura o il piano
intermedio e spingere in fuori da dietro
la cassetta di comando.
43
88
+2
525
+2
5
6
7
260
100
max. R 8

30
Περιεχµενα
Τι πρέπει να προσέχετε . . . . . . . . . . 31
Συσκευασία και παλιά συσκευή . . . . 31
Πριν τον εντοιχισµ . . . . . . . . . . . . . 31
Υποδείξεισ ασφαλείασ . . . . . . . . . . . 32
Αιτίεσ για τισ ζηµιέσ . . . . . . . . . . . . . 32
Το πεδίο χειρισµού . . . . . . . . . . . . . . 33
Χωνευτοί διακπτεσ . . . . . . . . . . . . . 33
Μαγείρεµα . . . . . . . . . . . . . . . . . . . . . 34
Χειρισµσ των µατιών . . . . . . . . . . . 34
Καθαρισµς και περιποίηση . . . . . . 35
Σηµαντικέσ υποδείξεισ . . . . . . . . . . . 35
Επισκευές Βλάβης . . . . . . . . . . . . . . 35
Inhaltsverzeichnis
Οδηγίες τοποθέτησης
Για τον τεχνικ τοποθέτησης και για
τον ειδικ τεχνικ κουζίνας
Σηµαντικές υποδείξεις
. . . . . . . . . . 36
Σύνδεση του εντοιχιζµενου
πλαισίου
. . . . . . . . . . . . . . . . . . . . . 37
Τοποθέτηση
. . . . . . . . . . . . . . . . . . 38
31
Τι πρέπει να προσέχετε
Προτού χρησιµοποιήσετε την καινούργια συσκευή,
διαβάστε µε προσοχή τισ οδηγίεσ χρήσησ.
Περιέχουν σηµαντικέσ πληροφορίεσ για την
ασφάλειά σασ καθώσ και για τη χρήση και τη
συντήρηση τησ συσκευήσ.
Tο παρν εγχειρίδιο οδηγιών χρήσησ ισχύει για
διάφορα µοντέλα τησ συσκευήσ. Eνδέχεται
ορισµένα µεµονωµένα χαρακτηριστικά του
εξοπλισµού που περιγράφονται να µην αφορούν τη
δική σασ συσκευή.
Φυλάξτε καλά το εγχειρίδιο οδηγιών χρήσησ και
εγκατάστασησ ενδεχοµένωσ για κάποιον επµενο
χρήστη.
Συσκευασία και Η συσκευασία προστατεύει την καινούργια σασ
παλιά συσκευή
συσκευή κατά τη µεταφορά µέχρι το σπίτι σασ.
λα τα χρησιµοποιούµενα υλικά συσκευασίασ είναι
φιλικά προσ το περιβάλλον και µπορούν να
ξαναχρησιµοποιηθούν. Παρακαλείσθε να
συντελέσετε κι εσείσ στην προστασία του
περιβάλλοντοσ και αποσύρετε τη συσκευασία µε
τρπο φιλικ προσ το περιβάλλον.
Οι παλιέσ συσκευέσ δεν αποτελούν άχρηστα
απορρίµµατα. Με την απσυρσή τουσ, σύµφωνα µε
τουσ κανονισµούσ για την προστασία του
περιβάλλοντοσ, µπορούν να επανακτηθούν
πολύτιµεσ πρώτεσ ύλεσ.
Προτού αποσύρετε την παλιά σασ συσκευή πρέπει
να την αχρηστέψετε ή να κολλήσετε µια ετικέτα µε
την ένδειξη "Προσοχή, άχρηστη!"
Γι α τουσ ισχύοντεσ τρπουσ απσυρσησ
παρακαλείσθε να ζητήσετε πληροφορίεσ απ το
ειδικ κατάστηµα, απ το οποίο αγοράσατε τη
συσκευή ή απ τη ∆ηµοτική ή Κοινοτική Αρχή τησ
περιοχήσ σασ.
Πριν τον εντοιχισµ
Ζηµιές µεταφοράς Μετά την αφαίρεση απ τη συσκευασία, ελέγξτε τη
συσκευή. Σε περίπτωση ζηµιάσ κατά τη µεταφορά
δεν επιτρέπεται να συνδέσετε τη συσκευή.
Ηλεκτρική σύνδεση Μνο ένασ αδειούχοσ ηλεκτρολγοσ επιτρέπεται
να συνδέσει την ηλεκτρική κουζίνα. Σε περίπτωση
ζηµιών που οφείλονται σε λάθοσ σύνδεση, δεν
έχετε κανένα δικαίωµα εγγύησησ.

32
Υποδείξεις Αυτή η συσκευή προορίζεται µνο για οικιακή
ασφαλείας
χρήση.
Χρησιµοποιείτε την ηλεκτρική κουζίνα
αποκλειστικά για το µαγείρεµα φαγητών.
Oι επιφάνειεσ συσκευών θέρµανσησ και µαγειρικήσ
ζεσταίνονται ταν λειτουργούν. Γι αυτ κρατάτε
τα παιδιά οπωσδήποτε µακριά απ αυτέσ.
Κίνδυνοσ εγκαυµάτων!
Κρατάτε τα παιδιά πάντοτε µακριά.
Μη µαγκώνετε ποτέ τα καλώδια σύνδεσησ των
ηλεκτρικών συσκευών στη ζεστή πρτα του
φούρνου. Η µνωση των καλωδίων µπορεί να
λιώσει. Κίνδυνοσ βραχυκυκλώµατοσ!
Μην τοποθετείτε ποτέ εύκαυστα αντικείµενα
επάνω στην εστία. Κίνδυνοσ πυρκαϊάσ!
Μη βάζετε ποτέ τα τροφοδοτικά καλώδια
ηλεκτρικών συσκευών επάνω στα καυτά µάτια.
Επισκευές Οι ακατάλληλεσ επισκευέσ είναι επικίνδυνεσ.
Κίνδυνοσ ηλεκτροπληξίασ!
Οι επισκευέσ επιτρέπεται να γίνονται µνο απ
έναν τεχνικ του τµήµατοσ εξυπηρέτησησ
πελατών, εκπαιδευµένο απ εµάσ.
Εάν η συσκευή έχει κάποια βλάβη, κατεβάστε τισ
ασφάλειεσ για την ηλεκτρική κουζίνα στον πίνακα
µε τισ ασφάλειεσ.
Καλέστε την υπηρεσία τεχνικήσ εξυπηρέτησησ
πελατών.
Αιτίες για τις ζηµιές
Φροντίδα και καθαρισµς Μη χρησιµοποιείτε συσκευέσ καθαρισµού υψηλήσ
πίεσησ ή συσκευέσ εκτξευσησ ατµού.
Εστίες (µάτια) Nα έχετε υπ επιτήρηση τισ χύτρεσ ταχύτητασ,
ταν τισ ζεσταίνετε. Nα χαµηλώνετε έγκαιρα την
εστία, ταν έχει επιτευχθεί η σωστή για το
µαγείρεµα πίεση.
Παρακαλείσθε να προσέξετε τισ επισυναπτµενεσ
οδηγίεσ χρήσησ για το πεδίο των µατιών τησ
κουζίνασ.
33
Χωνευτοί διακπτες Γι α να µπουν µέσα ή να βγουν έξω, πατάτε στον
διακπτη. Ο διακπτησ µωσ πρέπει να βρίσκεται
στη θέση εκτσ λειτουργίασ.
Το πεδίο χειρισµού
∆ιακπτεσ µατιών
34
Μαγείρεµα
Χειρισµς των H ένδειξη n στο ταµπλ χειρισµού σασ δείχνει,
µατιών της κουζίνας
ποιοσ διακπτησ αντιστοιχεί σε κάθε µάτι τησ
κουζίνασ.
H ρύθµιση τησ θερµοκρασίασ των µατιών δεν είναι
βαθµιδωτή.
Για το πεδίο των µατιών της κουζίνας υπάρχει ένα
ξεχωριστ εγχειρίδιο χρήσης. Παρακαλείσθε να
διαβάσετε προσεκτικά λες τις πληροφορίες που
περιέχονται σ αυτ πριν απ την πρώτη χρήση.
Κανονική εστία
1. Γυρίστε το διακπτη στη θέση 9 µέχρι να πάρει
βράση το φαγητ.
2. Mετά απ αυτ γυρίστε το διακπτη στη θέση
για το µαγείρεµα.
Στισ θέσεισ 2-5 διακρίνονται τα ενδιάµεσα
σηµεία µε τελείεσ
(παράδειγµα: 2• σηµαίνει µεταξύ 2 και 3).
Ζώνες µαγειρικής
1. Aνάβετε τη ζώνη µαγειρικήσ δύο κυκλωµάτων
2 κυκλωµάτων γυρίζοντασ τον αντίστοιχο διακπτη στο
για υαλοκεραµικέσ εστίεσ σύµβολο
o
.
2. Oλεσ οι άλλεσ ρυθµίσεισ γίνονται πωσ και στισ
κανονικέσ εστίεσ.
Γι α να σβήσετε τη ζώνη µαγειρικήσ δύο
κυκλωµάτων γυρίστε το διακπτη στο 0.

Καθαρισµς και περιποίηση
Σηµαντικές Mη χρησιµοποιείτε για καθαρισµ απορρυπαντικά
υποδείξεις
σε σκνη, ισχυρά καθαριστικά και αιχµηρά
αντικείµενα που χαράζουν.
Nα µην ξύνετε καµµένα κατάλοιπα φαγητών, αλλά
να τα µαλακώνετε µε ένα υγρ πανί και
απορρυπαντικ πιάτων.
Nα µη χρησιµοποιείτε ειδικά καθαριστικά (π.χ.
σπρέυ) για µέρη απ αλουµίνιο και πλαστικ.
Πρσοψη απ ανοξείδωτο Mε τη χρήση των καθαριστικών ανοξείδωτου
χάλυβα χάλυβα του εµπορίου µπορεί σβηστούν τα
γράµµατα.
Mη χρησιµοποιείτε σφουγγάρια που χαράζουν.
Xρησιµοποιείτε ένα κοιν απορρυπαντικ του
εµπορίου πάνω σε ένα υγρ µαλακ πανί ή δέρµα
καθαρισµού παραθύρων.
Εµαγιέ και Γυαλί Xρησιµοποιείτε για καθαρισµ ζεστ διάλυµα
απορρυπαντικού.
Πεδίο εστιών Για το πεδίο των εστιών επισυνάπτεται ένα
ξεχωριστ εγχειρίδιο οδηγιών.
∆ώστε προσοχή σε λεσ οδηγίεσ καθαρισµού που
περιέχονται σ αυτ.
Επισκευές και Βλάβης
Σε περίπτωση βλαβών ή επισκευών, που δεν είστε
σε θέση να τισ αντιµετωπίσετε µνοι σασ, υπάρχει
για σασ το τµήµα εξυπηρέτησησ πελατών. Tισ
διευθύνσεισ θα τισ βρείτε στον κατάλογο των
γραφείων εξυπηρέτησησ πελατών.
Προσοχή: Σε περίπτωση που καλέσετε το τµήµα
εξυπηρέτησησ πελατών, λγω δικού σασ
λανθασµένου χειρισµού, θα χρεωθείτε κάποιο
ποσ.
Αριθµς Ε και Τα στοιχεία αυτά θα τα βρείτε στην πλακέτα τησ
συσκευήσ ή στο πίσω εξώφυλλο του παρντοσ
εγχειριδίου. Την πλακέτα θα βρείτε πίσω απ το
πάνω κάλυµµα τησ συσκευήσ.
Oταν καλείτε το τµήµα εξυπηρέτησησ πελατών,
παρακαλούµε να δίνετε τουσ αναγραφµενουσ στη
συσκευή σασ αριθµούσ:
EFD
35
36
Οδηγίες τοποθέτησης
Για τον τεχνικ τοποθέτησης
και για τον ειδικ τεχνικ κουζίνας!
Σηµαντικές υποδείξεις
~
380-400V2N
~
220-230V
~
380-400V3N
L1
N
L2
L3
N
N
L3
123 4
5
5
5
4
4
3
32
21
1
L1
L1
Απσυρση του υλικού συσκευασίας
σύµφωνα µε τισ προδιαγραφέσ.
Μη χρησιµοποιείτε τη λαβή της πρτας
του φούρνου για µεταφορά και
τοποθέτηση τησ συσκευήσ.
Προσοχή: Η σύνδεση και η θέση σε
λειτουργία για πρώτη φορά επιτρέπεται
να γίνουν µνον απ εξουσιοδοτηµένο
ειδικ.
Για τη σύνδεση στο ηλεκτρικ δίκτυο
χρησιµοποιείτε καλώδιο τύπου
Η05VV-F.
Ονοµαστική αναρροφούµενη ισχύς:
το πολύ 8 kW
Ονοµαστική τάση: 220 – 230 V ~.
Αριθµ. τύπου της συσκευής:
βλέπε πινακίδα τύπου.
Εγγύηση για ασφάλεια κατά των
ηλεκτρικών ατυχηµάτων υπάρχει
µνον, ταν το σύστηµα ασφαλείασ
αγωγών του οικήµατοσ είναι τοπο-
θετηµένο σύµφωνα µε τισ προδια-
γραφέσ.
Απ την πλευρά τησ τοποθέτησησ να
υπάρχει πρβλεψη για µια διαχωριστική
εγκατάσταση.
∆ιαχωριστικέσ εγκαταστάσεισ
θεωρούνται διακπτεσ µε άνοιγµα
επαφήσ µεγαλύτερο των 3 mm.
Τέτοιοι είναι διακπτεσ LS, ασφάλειεσ
και σύνδεσµοι ασφαλείασ.
Σε περίπτωση εκτέλεσης επισκευών
γενικά δεν επιτρέπεται να επικρατεί
στη συσκευή ηλεκτρική τάση.
Μια συσκευή που έχει τοποθετηθεί
σύµφωνα µε τουσ κανονισµούσ, πρέπει
να είναι καλυµµένη απ' λεσ τισ
πλευρέσ κατά τέτοιον τρπο, ώστε να
µην είναι δυνατή η επαφή ακµη και
µονωµένων τµηµάτων. Το κάλυµµα
επιτρέπεται να µπορεί να αφαιρεθεί
µνο µε τη βοήθεια εργαλείων.
Το σχέδιο σύνδεσης βρίσκεται στην
πίσω πλευρά τησ συσκευήσ.
Σύνδεση του εντοιχιζµενου
πλαισίου
Εντοιχιζµενα πλαίσια
Εστία και συσκευή πρέπει να είναι του
ίδιου κατασκευαστή και να φέρουν
κουκίδα µε το ίδιο χρώµα στην ετικέτα
ένδειξησ συνδυασµού µεταξύ τουσ.
Πρέπει δε να έχουν την ίδια
ονοµαστική τάση (βλέπε πινακίδα
κωδικών στοιχείων).
Πλαίσια
Το ηλεκτρολογικ κουτί θα πρέπει να
έχει τοποθετηθεί πριν απ την
τοποθέτηση του εντοιχιζµενου
πλαισίου.
Προσοχή: Κατά τη σύνδεση του
εντοιχιζµενου πλαισίοθ στο
ηλεκτρολογικ κοπτί να τηρηθεί σε
κάθε περίπτωση το σχέδιο σύνδεσησ
τησ συσκευήσ και η οδηγία
τοποθέτησησ για το εντοιχιζµενο
πλαίσιο.
Ο πρασινοκίτρινοσ αγωγσ γείωσησ
πρέπει να συνδεθεί µε τη βίδα
γείωσησ τησ εντοιχιζµενησ
ηλεκτρικήσ κουζίνασ που
χαρακτηρίζεται µε το .
Σε περίπτωση που ο αγωγσ γείωσησ
δεν έχει συνδεθεί κατ' αρµζοντα
τρπο, υπάρχει κίνδυνοσ
ηλεκτροπληξίασ.
Σηµαντικ: Τα φις του εντοιχιζµενου
πλαισίου που χαρακτηρίζονται µε
χρώµα, πρέπει να περασθούν στα
βύσµατα ίδιου χρώµατος του
ηλεκτρολογικού κουτιού.
Πργραµµα επίπλων Για το ηλεκτρολογικ κουτί
διατίθενται ντουλάπια κουζίνασ που
µπορούν να χρησιµοποιηθούν σε λα
τα προγράµµατα κουζινών. Οι
καπλαµάδεσ και οι πλαστικέσ
επιστρώσεισ στα ντουλάπια κουζίνασ
πρέπει να έχουν υποστεί επεξεργασία
µε κλλα αντοχήσ στη θερµτητα
(90° C). Αν οι πλαστικέσ επιστρώσεισ ή
η κλλα δεν έχουν επαρκή αντοχή στη
θερµτητα, ττε η επίστρωση µπορεί
να παραµορφωθεί ή να ξεκολλήσει.
Σύµφωνα µε τουσ κανονισµούσ
ελέγχου για θέρµανση, αντιστοιχεί η
συσκευή στο τύπο Υ.
37
38
Τοποθέτηση
Προσοχή Η συσκευή επιτρέπεται να τοποθετηθεί
µνον απ µε τη µια πλευρά τησ δίπλα
σε ψηλ ντουλάπι ή ψηλ τοίχο. Το ύψοσ
στην αντίθετη πλευρά δεν επιτρέπεται να
υπερβαίνει το ύψοσ του πάγκου εργασίασ,
στον οποίο είναι τοποθετηµένο το
εντοιχισµένο πλαίσιο. Η πλευρική
απσταση του εντοιχιζµενου πλαισίου
προσ ένα ψηλ ντουλάπι και προσ τον πίσω
τοίχο πρέπει να αντιστοιχεί σ' αυτή που
καθορίζεται απ την κατηγορία µνωσησ
για θέρµανση στην οδηγία τοποθέτησησ
του εντοιχιζµενου πλαισίου µαγειρικήσ.
Τοποθέτηση Η κοπή στον πάγκο για το εντοιχιζµενο
πλαίσιο πρέπει να υπάρχει (βλέπε οδηγίεσ
τοποθέτησησ εντοιχιζµενου πλαίσιου
µαγειρικήσ).
Το ηλεκτρολογικ κουτί να ενσωµατωθεί
πριν απ το εντοιχιζµενο πλαίσιο.
1. Κοπή στη µετωπική πρσοψη (το
πολύ 88
+2
mm x 525
+2
mm).
(διαστάσεισ κοπήσ στον πάγκο
εργασίασ βλέπε οδηγίεσ τοποθέτησησ
εντοιχιζµενου πλαίσιου µαγειρικήσ).
2. Προετοιµασία για την τοποθέτηση:
Σηµειώνετε τη µέση του ανοίγµατοσ.
Τοποθετείτε τη βάση µε εγκοπή και τη
βιδώνετε πρσωπο µε την εµπρσθια
άκρη τησ πρσοψησ του επίπλου.
3. Τοποθέτηση της συσκευής:
Βάζετε τη συσκευή µέσα µε προσοχή,
ώστε να µη µπλέκονται αγωγοί.
4. Έλεγχοσ λειτουργίασ.
Προσοχή κατά την αφαίρεση:
Αποµονώστε τη συσκευή εντελώσ απ το
ρεύµα. Στο τέλοσ λύνετε τον αγωγ
γείωσησ απ τη βίδα ζείωσνσ.
Αφαιρείτε την εστία ή τον ενδιάµεσο
πυθµένα και πιέζοντασ βγάζετε έξω το
πλεκτρολογικ κουτί απ πίσω.
43
88
+2
525
+2
5
6
7
260
100
max. R 8

39
Notizen

5750 207 985
Printed in Germany 0504 Es.


