Black plate (1,1)
北米Model "B4444BE-A" EDITED: 2016/ 4/ 28
Foreword
This supplement contains explanations and instructions for
correctly operating the following systems.
. Audio and Visual System
. Handsfree System
. APPS
If your vehicle contains one of the systems above, be sure to check
the contents of this supplement carefully.
If you transfer the ownership of the vehicle to another person, make
sure that this supplement is provided with the Owner’s Manual
inside the vehicle.
The information, specifications and illustrations in this supplement
are valid at the time of publication. Fuji Heavy Industries reserves
the right to change the specifications and design without prior
notice, with no obligation to perform the same or equivalent
changes to vehicles sold in the past.
This Owner’s Manual supplement applies to all models, and
describes all devices, including manufacturer-installed options.
This means that information may be included about devices that are
not installed in your vehicle.
Subaru STARLINK is the “in-car connectivity system” available on
select Subaru vehicles.
FUJI HEAVY INDUSTRIES LTD., TOKYO, JAPAN
is a registered trademark of FUJI HEAVY INDUSTRIES LTD.
*
C
Copyright 2016 FUJI HEAVY INDUSTRIES LTD.

Black plate (1,1)
北米Model "B4444BE-A" EDITED: 2016/ 4/ 28
Antenna system ........................................................ 2
FM reception ............................................................ 2
Installation of accessories........................................ 2
Audio set ................................................................... 2
Audio set ................................................................. 4
Tips for operating the audio/visual system ................ 5
Basic information before use.................................. 13
Basic operation...................................................... 16
Unit settings .......................................................... 17
SUBARU STARLINK (if equipped) ........................... 24
AM/FM radio........................................................... 26
SiriusXM Satellite Radio (if equipped) ..................... 35
aha
TM
by HARMAN ................................................. 42
Pandora
®
(if equipped) ........................................... 48
CD ......................................................................... 51
USB memory.......................................................... 53
iPod....................................................................... 54
Bluetooth audio...................................................... 56
AUX ....................................................................... 59
Remote controller on steering wheel..................... 61
Bluetooth
®
settings ................................................. 64
Regulatory information ........................................... 64
Registering/connecting Bluetooth
®
device ............... 64
Setting Bluetooth details ......................................... 67
Hands-free phone system ...................................... 69
Control screen........................................................ 70
Registering/connecting a Bluetooth phone .............. 71
Using the phone ..................................................... 71
How to change the hands-free phone system .......... 72
Making a call .......................................................... 72
Receiving a call ...................................................... 76
Talking on the phone .............................................. 76
Phone settings ....................................................... 77
Voice command system ......................................... 80
Using the voice command system........................... 80
Voice command system operation........................... 81
Command list ......................................................... 83
What to do if............................................................ 87
Troubleshooting...................................................... 87
Appendix ................................................................. 91
Certification............................................................ 91
Certification for the Hands-free system.................... 91
Certification for Mexico models ............................... 92
Table of contents
Black plate (4,1)
北米Model "B4444BE-A" EDITED: 2016/ 4/ 28
Antenna system
& FM reception
Although FM is normally static free,
reception can be affected by the surround-
ing area, atmospheric conditions, station
strength and transmitter distance. Build-
ings or other obstructions may cause
momentary static, flutter or station inter-
ference. If re ception co ntinues to be
unsatisfactory, switch to a stronger station.
Installation of accessories
Always consult your SUBARU dealer
before installing a citizen band radio or
other transmitting device in your vehicle.
Such devices may cause the electronic
control system to malfunction if they are
incorrectly installed or if they are not
suited for the vehicle.
Audio set
Your vehicle may be equipped with one of
the following audio sets. Refer to the
pages indicated in this section for operat-
ing details.
CAUTION
. Always consult your SUBARU
dealer before installing a citizen
band radio or other transmitting
device in your vehicle. Such
devices may cause the electronic
control system to malfunction if
they are incorrectly installed or if
they are not suited for the vehi-
cle.
. To prevent the battery from being
discharged, do not leave the
audio/visual system on when
the engine is not running.
NOTE
. If a cell phone is placed near the
audio set, it may cause the audio set to
emit noise when the phone receives
calls. This noise does not indicate an
audio set malfunction. Note that a cell
phone should not be placed near the
audio set.
2

Black plate (5,1)
北米Model "B4444BE-A" EDITED: 2016/ 4/ 28
. Some functions may not be avail-
able depending on the market and
specifications of your vehicle.
. The images shown in this Owner’s
Manual are sample images. The actual
images may vary depending on the
market and specifications of your ve-
hicle.
– CONTINUED –
3
0
Black plate (6,1)
北米Model "B4444BE-A" EDITED: 2016/ 4/ 28
& Audio set
The audio set will operate only when the
ignition switch is in the “ACC” or “ON”
position.
NOTE
HD Radio Technology should be in-
cluded as feature.
4
Black plate (7,1)
北米Model "B4444BE-A" EDITED: 2016/ 4/ 28
& Tips for operating the audio/
visual system
CAUTION
To avoid damage to the audio/visual
system:
. Be careful not to spill beverages
over the audio/visual system.
. Do not put anything other than an
appropriate disc into the disc
slot.
NOTE
The use of a cell phone inside or near
the vehicle may cause a noise from the
speakers of the audio/visual system
which you are listening to. However,
this does not indicate a malfunction.
! Radio
Usually, a problem with radio reception
does not mean there is a problem with the
radio — it is just the normal result of
conditions outside the vehicle.
For example, nearby buildings and terrain
can interfere with FM reception. Power
lines or phone wires can interfere with AM
signals. And of course, radio signals have
a limited range. The farther the vehicle is
from a station, the weaker its signal will
be. In addition, reception conditions
change constantly as the vehicle moves.
Here, some common reception problems
that probably do not indicate a problem
with the radio are described.
! FM
Fading and drifting stations: Generally, the
effective range of FM is about 25 miles (40
km). Once outside this range, you may
notice fading and drifting, which increase
with the distance from the radio transmit-
ter. They are often accompanied by
distortion.
Multi-path: FM signals are reflective,
making it possible for 2 signals to reach
the vehicle’s antenna at the same time. If
this happens, the signals will cancel each
other out, causing a momentary flutter or
loss of reception.
Static and fluttering: These occur when
signals are blocked by buildings, trees or
other large objects. Increasing the bass
level may reduce static and fluttering.
Station swapping: If the FM signal being
listened to is interrupted or weakened, and
there is another strong station nearby on
the FM band, the radio may tune in the
second station until the original signal can
be picked up again.
! AM
Fading: AM broadcasts are reflected by
the upper atmosphere — especially at
night. These reflected signals can inter-
fere with those received directly from the
radio station, causing the radio station to
sound alternately strong and weak.
Station int erference: When a reflected
signal and a signal received directly from
a radio station are very nearly the same
frequency, they can interfere with each
other, making it difficult to hear the broad-
cast.
Static: AM is easily affected by external
sources of electrical noise, such as high
tension power lines, lightening or electrical
motors. This results in static.
! SiriusXM (if equipped)
. Cargo loaded on the roof luggage
carrier, especially metal objects, may
adversely affect the reception of SiriusXM
Satellite Radio.
. Alternation or modifications carried out
without appropriate authorization may in-
validate the user’s right to operate the
equipment.
– CONTINUED –
5
0
Black plate (8,1)
北米Model "B4444BE-A" EDITED: 2016/ 4/ 28
! CD player and disc
. This CD player is intended for use with
4.7 in. (12 cm) discs only.
. Extremely high temperatures can keep
the CD player from working. On hot days,
use the air conditioning system to cool the
inside of the vehicle before using the
player.
. Bumpy roads or other vibrations may
make the CD player skip.
. If moisture gets into the CD player, the
discs may not be able to be played.
Remove the discs from the player and
wait until it dries.
WARNING
CD players use an invisible laser
beam which could cause hazardous
radiation exposure if directed out-
side the unit. Be sure to operate the
player correctly.
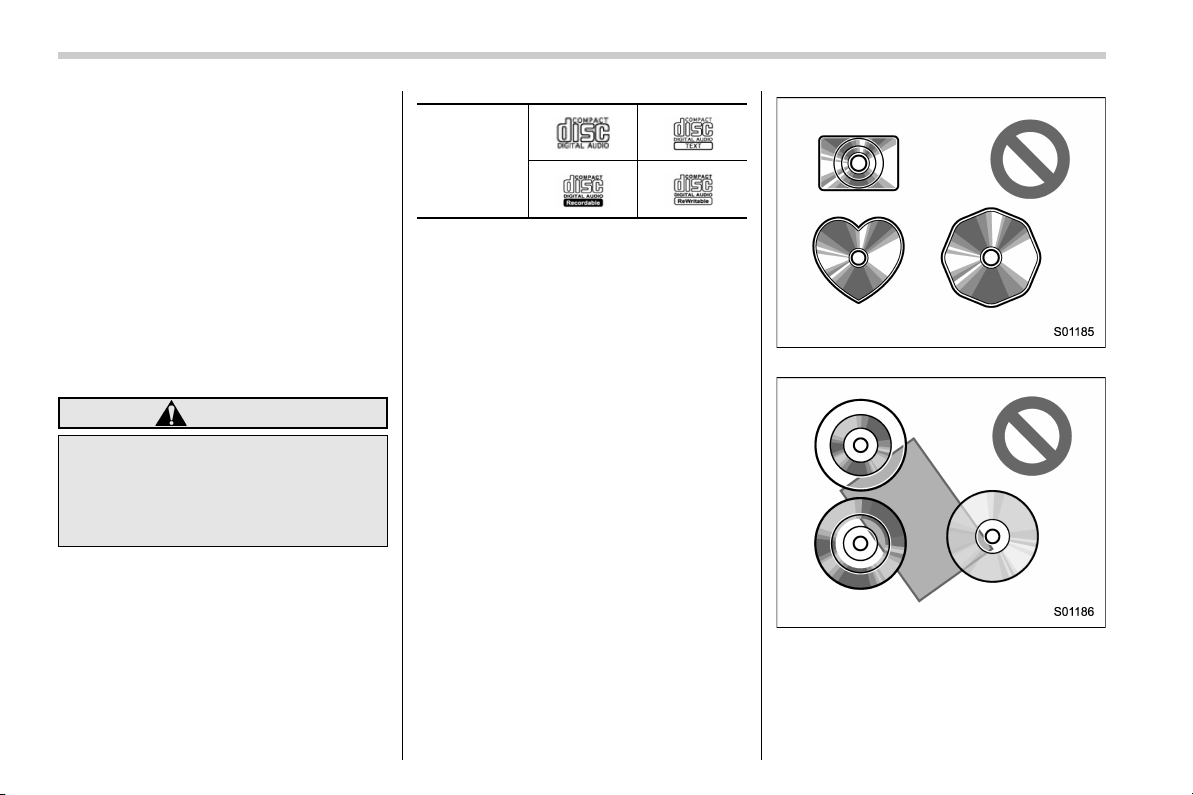
Audio CDs
. Use only discs marked as shown
above. The following products may not
be playable on your player:
– SACD
– dts CD
– Copy-protected CD
– Video CD
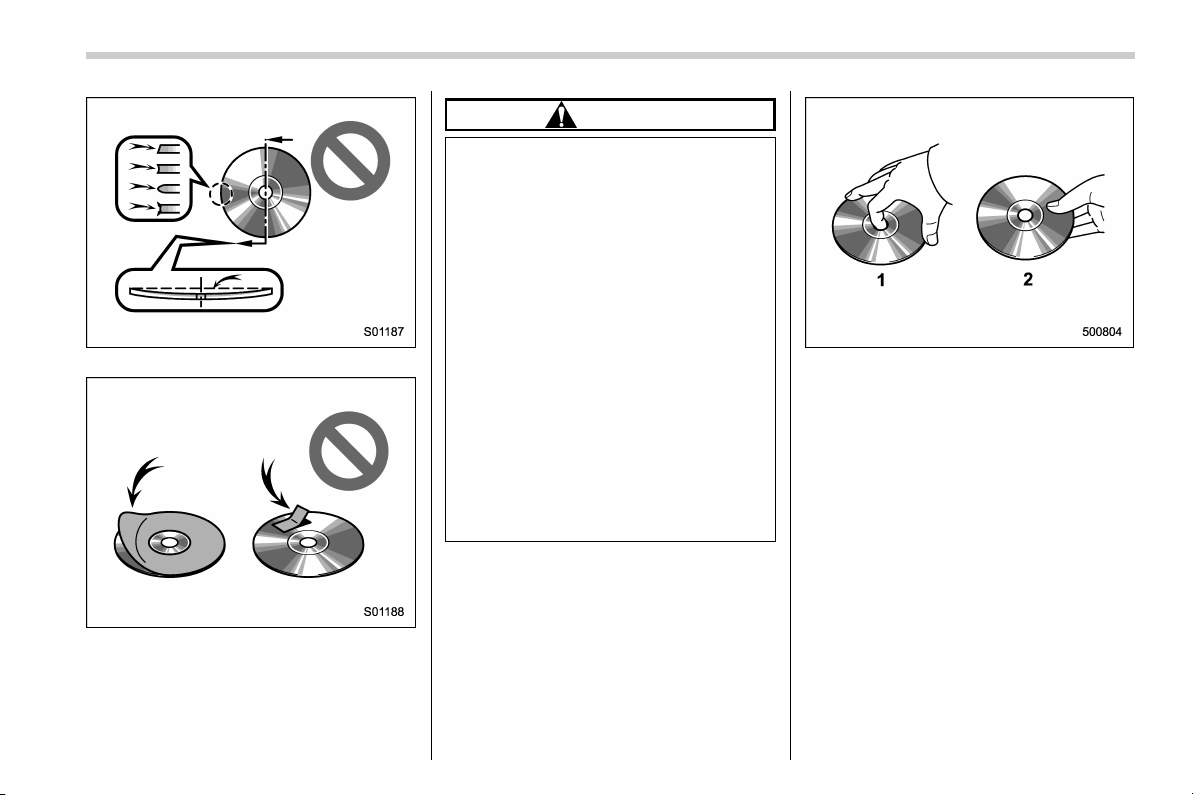
Special shaped discs
Transparent/translucent discs
6
Black plate (9,1)
北米Model "B4444BE-A" EDITED: 2016/ 4/ 28
Low quality discs
Labeled discs
CAUTION
. Do not use special shaped, trans-
parent/translucent, low quality or
labeled discs s uch as those
shown in the illustrations. The
use of such discs may damage
the player, or it may be impossi-
ble to eject the disc.
. This system is not designed for
use of Dual Discs. Do not use
Dual Discs because they may
cause damage to the player.
. Do not use discs with a protec-
tion ring. The use of such discs
may damage the player, or it may
be impossible to eject the disc.
. Do not use printable discs. The
use of such discs may damage
the player, or it may be impossi-
ble to eject the disc.
1) Correct
2) Wrong
. Handle discs carefully, especially when
inserting them. Hold them on the edge and
do not bend them. Avoid getting finger-
prints on them, particularly on the shiny
side.
. Dirt, scratches, warping, pin holes or
other disc damage could cause the player
to skip or to repeat a section of a track. (To
see a pin hole, hold the disc up to the
light.)
. Remove discs from the players when
not in use. Store them in their plastic
cases away from moisture, heat and direct
sunlight.
– CONTINUED –
7
0
Black plate (10,1)
北米Model "B4444BE-A" EDITED: 2016/ 4/ 28
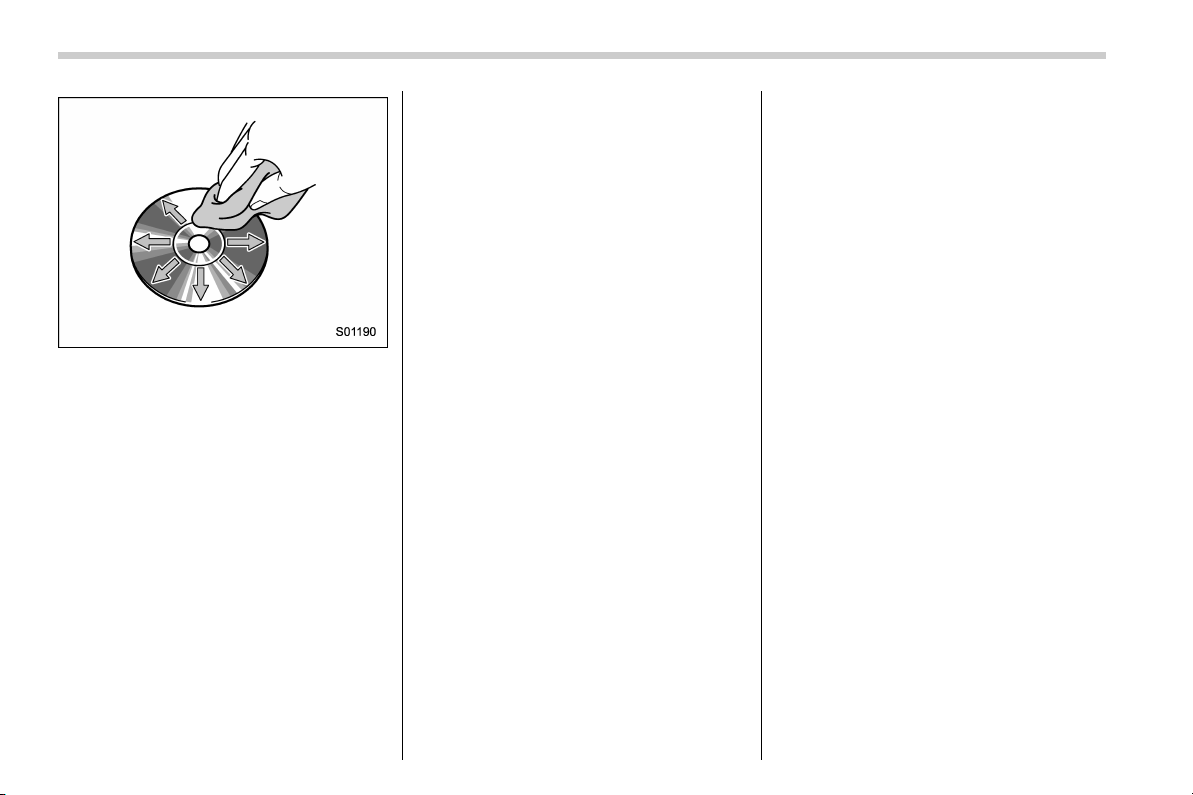
To clean a disc: Wipe it with a soft, lint-
free cloth that has been dampened with
water. Wipe in a straight line from the
center to the edge of the disc (not in
circles). Dry it with another soft, lint-free
cloth. Do not use a conventional record
cleaner or anti-static device.
! CD-R/RW discs
. CD-R/CD-RW discs that have not been
subject to the “finalizing process” (a
process that allows discs to be played
on a conventional CD player) cannot be
played.
. It may not be possible to play CD-R/
CD-RW discs recorded on a music CD
recorder or a personal computer because
of disc characteristics, scratches or dirt on
the disc, or dirt, condensation, etc. on the
lens of the unit.
. It may not be possible to play discs
recorded on a personal computer depend-
ing on the application settings and the
environment. Record with the correct
format. (For details, contact the appropri-
ate application manufacturers of the ap-
plications.)
. CD-R/CD-RW discs may be damaged
by direct exposure to sunlight, high tem-
peratures or other storage conditions. The
unit may be unable to play some damaged
discs.
. If you insert a CD-RW disc into the
player, playback will begin more slowly
than with a conventional CD or CD-R disc.
. Recordings on CD-R/CD-RW cannot
be played using t he DDCD (Double
Density CD) system.
! USB memory device
. US B communic ation formats: USB
1.1/2.0 HS (480 Mbps) and FS (12 Mbps)
. File formats: FAT 16/32
. Correspondence class: Mass storage
class
! iPod
The following iPod, iPod n ano, iPod
classic, iPod touch and iPhone devices
can be used with this system.
Made for
. iPod touch (5th generation)*
. iPod touch (4th generation)
. iPod touch (3rd generation)
. iPod touch (2nd generation)
. iPod touch (1st generation)
. iPod classic
. iPod nano (7th generation)*
. iPod nano (6th generation)*
. iPod nano (5th generation)
. iPod nano (4th generation)
. iPod nano (3rd generation)
. iPod nano (2nd generation)*
. iPod nano (1st generation)*
. iPhone 5s*
. iPhone 5c*
. iPhone 5*
. iPhone 4s
. iPhone 4
. iPhone 3GS
. iPhone 3G
. iPhone
*: iPod video not supported
Depending on differences between mod-
els or software versions etc., some mod-
els might be incompatible with this sys-
tem.
8
Black plate (11,1)
北米Model "B4444BE-A" EDITED: 2016/ 4/ 28
! File information
Compatible compressed files (Audio)
Item USB DISC
Compatible
file format
MP3/WMA/AAC
Folders in the
device
Maximum
512
Maximum
255
Files in the
device
Maximum
8000
Maximum
512
Files per
folder
Maximum
255
—
Corresponding sampling f requency
(Audio)
File type Frequency (kHz)
MP3 files:
MPEG 1 LAYER 3
32/44.1/48
MP3 files:
MPEG 2 LSF LAYER 3
16/22.05/24
WMA files:
Ver. 7, 8, 9 (9.1/9.2)
32/48/64/80/96/128/
160/192
AAC files:
MPEG4/AAC-LC
48/44.1/32/24/22.05/
16/12/11.025/8
Corresponding bit rates (Audio)
File type Bit rate (kbps)
MP3 files:
MPEG 1 LAYER 3
32 - 320
MP3 files:
MPEG 2 LSF LAYER 3
8 - 160
WMA files: Ver. 7, 8 CBR 48 - 192
WMA files:
Ver. 9 (9.1/9.2)
CBR 32 - 192
AAC files:
MPEG4/AAC-LC
16 - 320
(Variable Bit Rate (VBR) compatible)
. MP3 (MPEG Audio Layer 3), WMA
(Windows Media Audio) and AAC (Ad-
vanced Audio Coding) are audio compres-
sion standards.
. This system can play MP3/WMA/AAC
files on CD-R, CD-RW discs, USB mem-
ory, and Bluetooth device.
. This system can play disc recordings
compatible with ISO 9660 level 1 and level
2 and with the Romeo and Joliet file
system.
. When naming an MP3/WMA/AAC file,
add an appropriate file extension (.mp3/
.wma/.m4a).
. This system plays back files with .mp3/
.wma/.m4a file extensions as MP3/WMA/
AAC files respectively. To prevent noise
and playback errors, use the appropriate
file extension.
. This system can play only the first
session when using multi-session compa-
tible CDs.
. MP3 files are compatible with the ID3
Tag Ver. 1.0, Ver. 1.1, Ver. 2.2 and Ver. 2.3
formats. This system cannot display disc
title, track title and artist name in other
formats.
. WMA/AAC files can contain a WMA/
AAC tag that is used in the same way as
an ID3 tag. WMA/AAC tags carry informa-
tion such as track title and artist name.
. The emphasis function is available only
when playing MP3/WMA files recorded at
32, 44.1 and 48 kHz.
. This system can play back AAC files
encoded by iTunes.
. The sound quality of MP3/WMA files
generally improves with higher bit rates. In
order to achieve a reasonable level of
sound quality, discs recorded with a bit
rate of at least 128 kbps are rec om-
mended.
. The MP3/WMA player does not play
back MP3/WMA files from discs recorded
using packet write data transfer (UDF
format). Discs should be recorded using
“pre-mastering” software rather than pack-
etwrite software.
– CONTINUED –
9
0
Black plate (12,1)
北米Model "B4444BE-A" EDITED: 2016/ 4/ 28
. M3u playlists are not compatible with
the audio device.
. MP3i (MP3 interactive) and MP3PRO
formats are not compatible with the audio
device.
. The player is compatible with VBR
(Variable Bit Rate).
. When playing back files recorded as
VBR (Variable Bit Rate) files, the play time
will not be correctly displayed if the fast
forward or reverse operations are used.
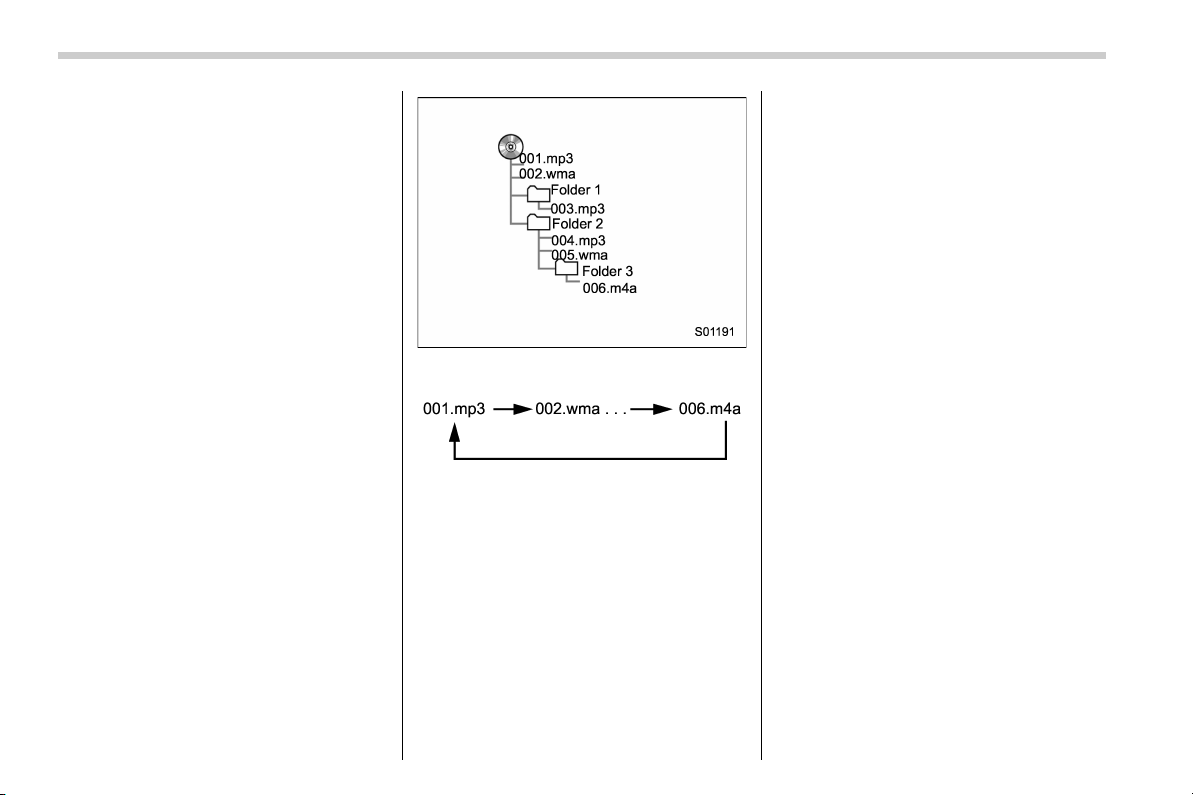
. It is not possible to check folders that
do not include MP3/WMA/AAC files.
. MP3/WMA/AAC files in folders up to 8
levels deep can be played. However, the
start of playback may be delayed when
using discs containing numerous levels of
folders. For this reason, we recommend
creating discs with no more than 2 levels
of folders.
. The play order of the compact disc with
the structure shown above is as follows:
. The order changes depending on the
personal computer and MP3/WMA/AAC
encoding software you use.
! Terms
! Packet write
. This is a general term that describes
the process of writing data on-demand to
CD-R, etc., in the same way that data is
written to floppy or hard discs.
! ID3 tag
. This is a method of embedding track-
related information in an MP3 file. This
embedded information can include the
track number, track title, the artist’s name,
the album title, the music genre, the year
of production, comments, cover art and
other data. The contents can be freely
edited using software with ID3 tag editing
functions. Although the tags are restricted
to a number of characters, the information
can be viewed when the track is played
back.
! WMA tag
. WMA files can contain a WMA tag that
is used in the same way as an ID3 tag.
WMA tags carry information such as track
title and artist name.
! ISO 9660 format
. This is the international standard for
the formatting of CD-ROM folders and
files. For the ISO 9660 format, there are 2
levels of regulations.
. Level 1: The file name is in 8.3 format
(8 character file names, with a 3 character
file extension. File names must be com-
posed of one-byte cap ital letters a nd
numbers. The “_” symbol may also be
included.)
10

Black plate (13,1)
北米Model "B4444BE-A" EDITED: 2016/ 4/ 28
. Level 2: The file name can have up to
31 characters (including the separation
mark “.” and file extension). Each folder
must contain fewer than 8 hierarchies.
! MP3
. MP3 is an audio compression standard
determined by a working group (MPEG) of
the ISO (International Standard Organiza-
tion). MP3 compresses audio data to
about 1/10 the size of that on conventional
discs.
! WMA
. WMA (Windows Media Audio) is an
audio compression format developed by
Microsoft
®
. It compresses files into a size
smaller than that of MP3 fil es. The
decoding formats for WMA files are Ver.
7, 8 and 9.
. This product is protected by certain
intellectual property rights of Microsoft
Corporation and third parties. Use or
distribution of such technology outside of
this product is prohibited without a license
from Microsoft or an authorized Microsoft
subsidiary and third parties.
! AAC
. AAC is short for Advanced Audio
Coding and refers to an audio compres-
sion technology standard used with
MPEG2 and MPEG4.
– CONTINUED –
11
0
Black plate (14,1)
北米Model "B4444BE-A" EDITED: 2016/ 4/ 28
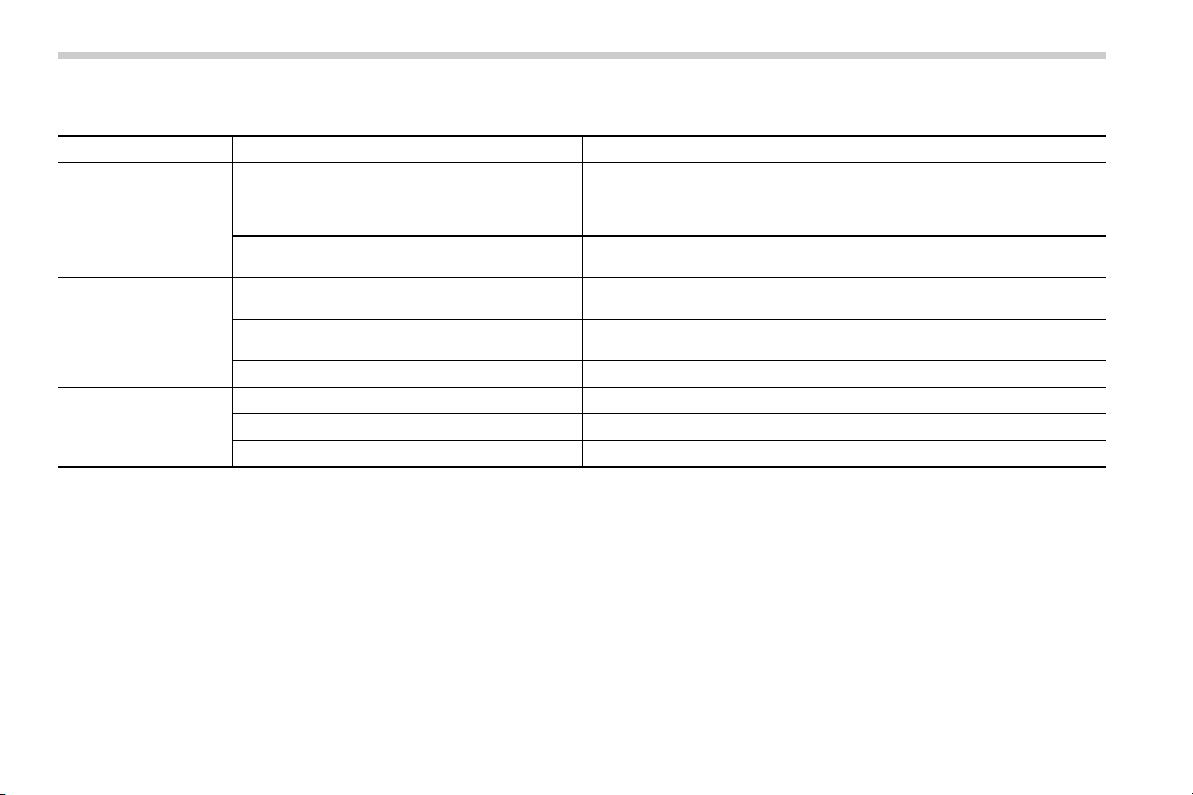
! Error messages
Mode Message Explanation
CD
“Disc read error.”
. This indicates that no MP3/WMA/AAC files are included in the disc.
. This indicates that the disc is dirty, damaged, or it was inserted upside
down. Clean the disc or insert it correctly. It indicates a disc which is
not playable is inserted.
“Please eject disc.”
There is a trouble inside the system.
Eject the disc.
USB
“Media not connected. Press AUDIO/TUNE knob
to exit.”
This indicates a problem in the USB memory or its connection. Refer to
“Connecting and disconnecting a USB memory/portable device” F15.
“No audio file.”
This indicates that no MP3/WMA/AAC files are included in the USB
memory.
“Unplayable file” This indicates that the accessed file cannot play back.
iPod
“Media not connected” This indicates that a USB device/iPod is not connected to the system.
“No audio file” This indicates that there is no audio file in the connected iPod.
“Unplayable file”
This indicates that the accessed file cannot play back.
NOTE
If the malfunction is not rectified: Take your vehicle to your SUBARU dealer.
12
Black plate (15,1)
北米Model "B4444BE-A" EDITED: 2016/ 4/ 28
& Basic information before use
WARNING
When the vehicle is stopped with the
engine running, always apply the
parking brake for safety. Failure to
do so may result in loss of control of
your vehicle and cause an accident
or serious injury.
CAUTION
. To prevent damaging the screen,
touch the screen keys with your
finger lightly.
. Wipe off fingerprints using a
glass cleaning cloth. Do not use
chemical cleaners to clean the
screen, as they may damage the
touch screen.
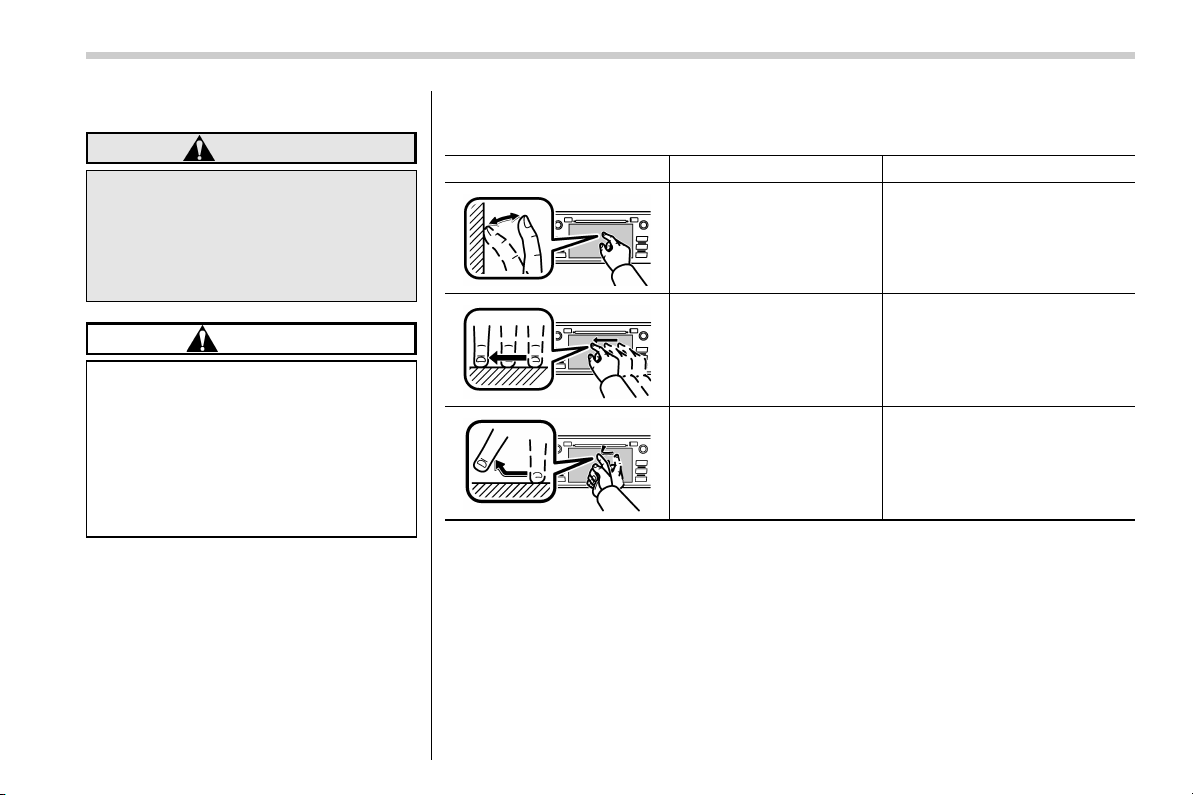
! Touch screen gestures
Operations are performed by touching the touch screen directly with your finger.
Operation method Outline Main use
Touch
Quickly touch and release
once.
Changing and selecting various
settings
Drag*
Touch the screen with your
finger, and move the screen
to the desired position.
Scrolling the lists
Flick*
Quickly move the screen by
flicking with your finger.
Scrolling the main screen page
*: The above operations may not be performed on all screens.
NOTE
There may be a delayed response to flick operation that are performed at high
altitudes.
– CONTINUED –
13
0
Black plate (16,1)
北米Model "B4444BE-A" EDITED: 2016/ 4/ 28
! Touch screen operation
This system is operated mainly by the
keys on the screen.
When a screen key is touched, a beep
sounds. You can set the beep sound.
Refer to “Unit settings” F17.
NOTE
. If the system does not respond to
touching a screen key, move your
finger away from the screen and touch
it again.
. Grayed-out screen keys cannot be
operated.
. The displayed image may become
darkerandmovingimagesmaybe
slightly distorted when the screen is
cold.
. In extremely cold conditions, the
screen may not be displayed correctly.
Also, the screen keys may be less
responsive than usual when pressed.
. When you look at the screen
through polarized material such as
polarized sunglasses, the screen may
be dark and difficult to see. If so, look at
the screen from different angles, adjust
the screen settings or take off your
sunglasses. Refer to “Unit settings”
F17.
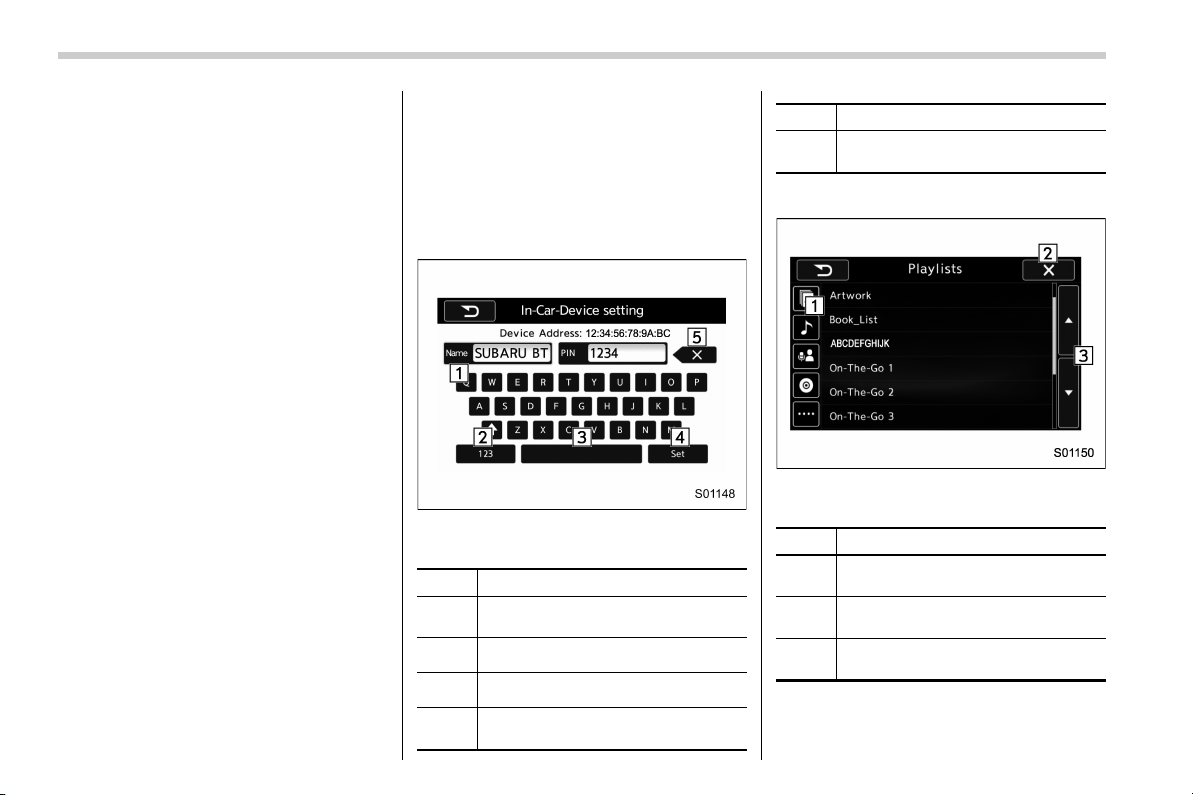
! Entering letters and numbers/list
screen operation
! Entering letters and numbers
When entering the Bluetooth device name
or PIN-code, or the phone number, letters
and numbers can be entered via the
screen.
Enter letters (example: In-Car-Device
setting)
No. Function
&
1
Enter the desired characters (alpha-
bet key mode).
&
2
Switch to the screen for characters.
&
3
Enter a space.
&
4
Confirm the characters/numbers en-
tered into the window.
No. Function
&
5
Delete a character/number entered
into the window.
! List screen
Multimedia playlists (example: iPod play-
list)
No. Function
&
1
Select a category that wants to play
back.
&
2
Return to the playback display of
each mode.
&
3
Select to skip to the next or previous
page.
14
Black plate (17,1)
北米Model "B4444BE-A" EDITED: 2016/ 4/ 28
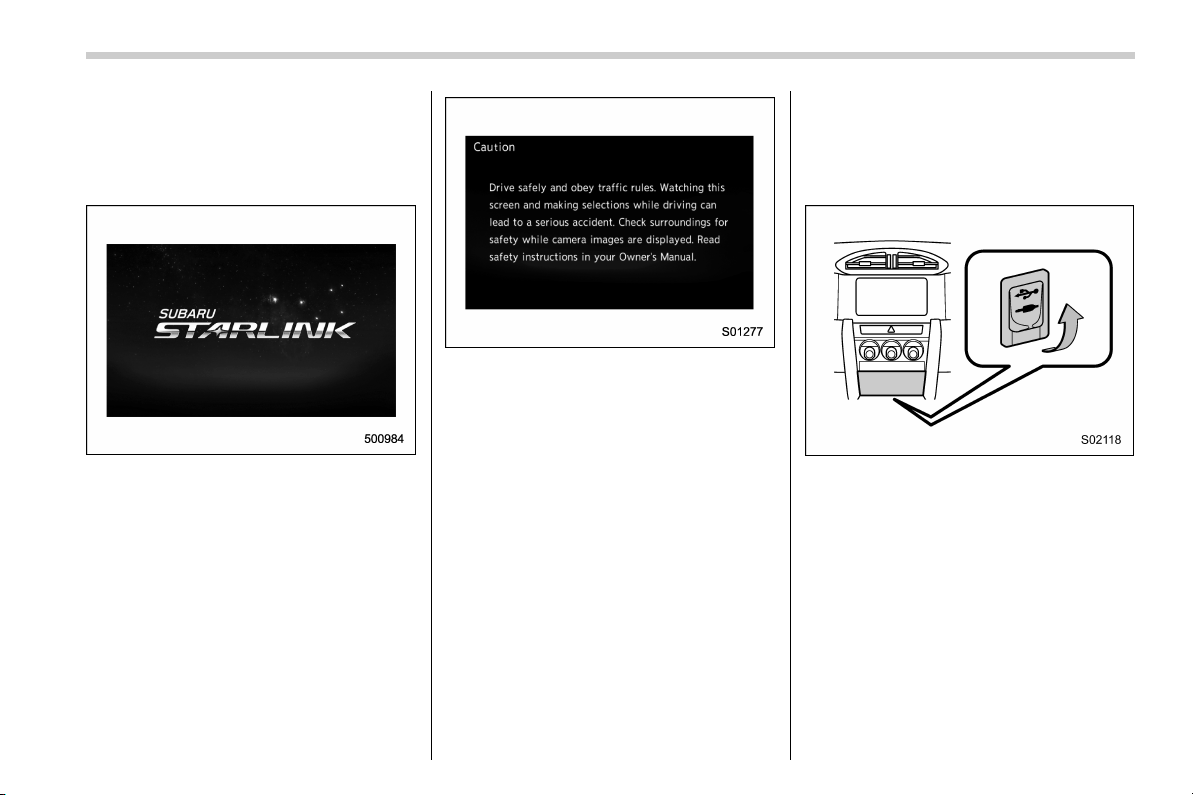
! Initial screen
When the ignition switch is in the “ACC” or
“ON” position, the initial screen will be
displayed and the system will begin
operating.
. When using the SUBARU STARLINK
function (if equipped), the display screen
may be different from the screen above.
. After a few seconds, the caution screen
will be displayed.
. After about 5 seconds, the caution
screen automatically switches to the next
screen.
! Connecting and disconnecting a
USB memory/portable device
The USB port and the AUX jack are
located as shown in the following illustra-
tion.
NOTE
. This unit does not support commer-
cially available USB hubs.
. Turn on the power of the device
when it is not turned on.
. This device has a USB port for USB
memory/portable device.
. For compatible U SB memory de-
vices, refer to “USB memory device”
F8.
. For compatible iPod models, refer to
“iPod” F8.
. Even if a USB hub is used to
connect more than two USB devices,
– CONTINUED –
15
0
Black plate (18,1)
北米Model "B4444BE-A" EDITED: 2016/ 4/ 28
only the first two connected devices
will be recognized.
& Basic operation
This section describes some of the basic
features of the audio/visual system. Some
information may not pertain to your sys-
tem.
Your audio/visual system works when the
ignition switch is turned to the “ACC” or
“ON” position.
CAUTION
To prevent the battery from being
discharged, do not leave the audio/
visual system on longer than neces-
sary when the engine is not running.
NOTE
Some functions can also be operated
by using the voice command system.
For details, refer to “Voice command
system” F80.
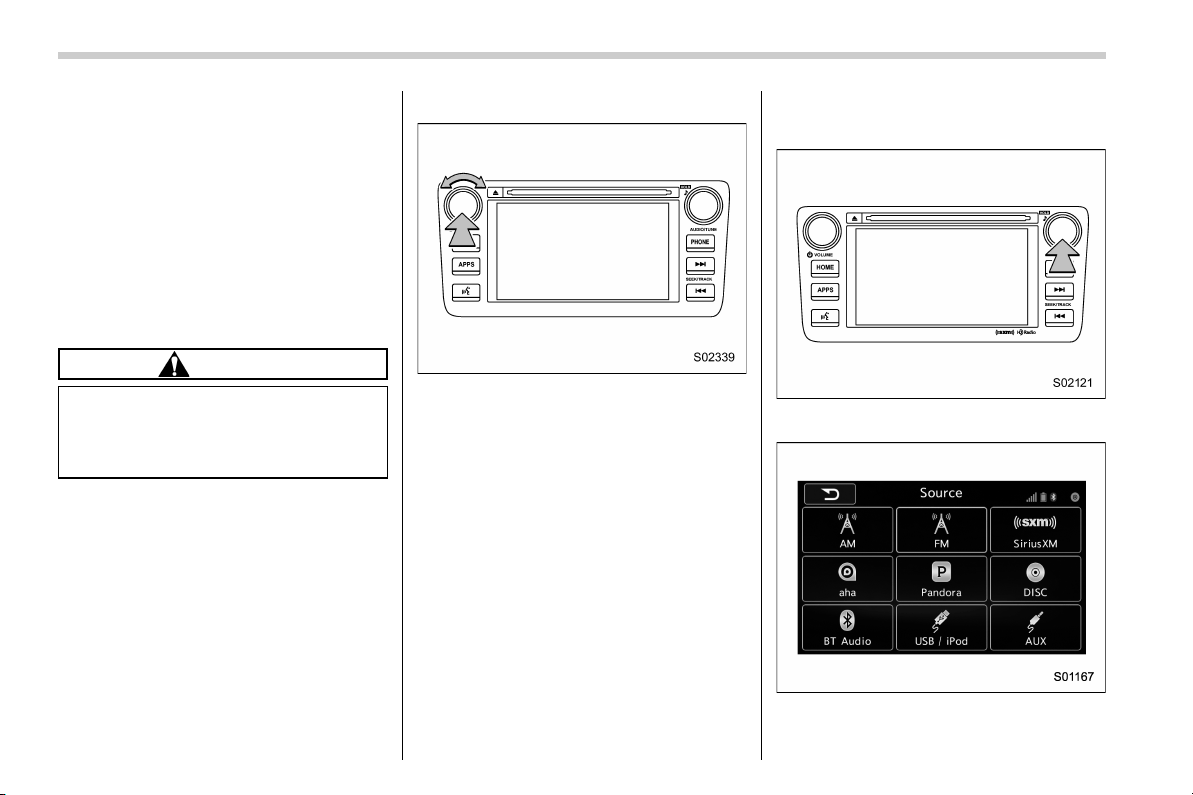
! Turning the system on and off
Press the power/VOLUME knob to turn
the audio/visual system on and off. When
the system turns on, the mode that was in
use the last time the system was turned off
will be displayed. Press and hold the knob
to turn the display off.
Turn this knob to adjust the volume.
! Selecting an audio source
1. Press the AUDIO/TUNE knob.
2. Select the desired source.
Example: Source select screen
16

Black plate (19,1)
北米Model "B4444BE-A" EDITED: 2016/ 4/ 28
NOTE
. If the audio control screen appears,
select the “Source” key on the audio
screen or press the AUDIO/TUNE knob
again.
. When you push the AUDIO/TUNE
knob while any screen other than the
audio control screen is displayed, the
display will return to the audio control
screen.
. When the AUDIO/TUNE knob is
pushed and held, the graphic equalizer
screen will be displayed. Refer to
““Graphic Equalizer”” F21.
! Selecting a function menu
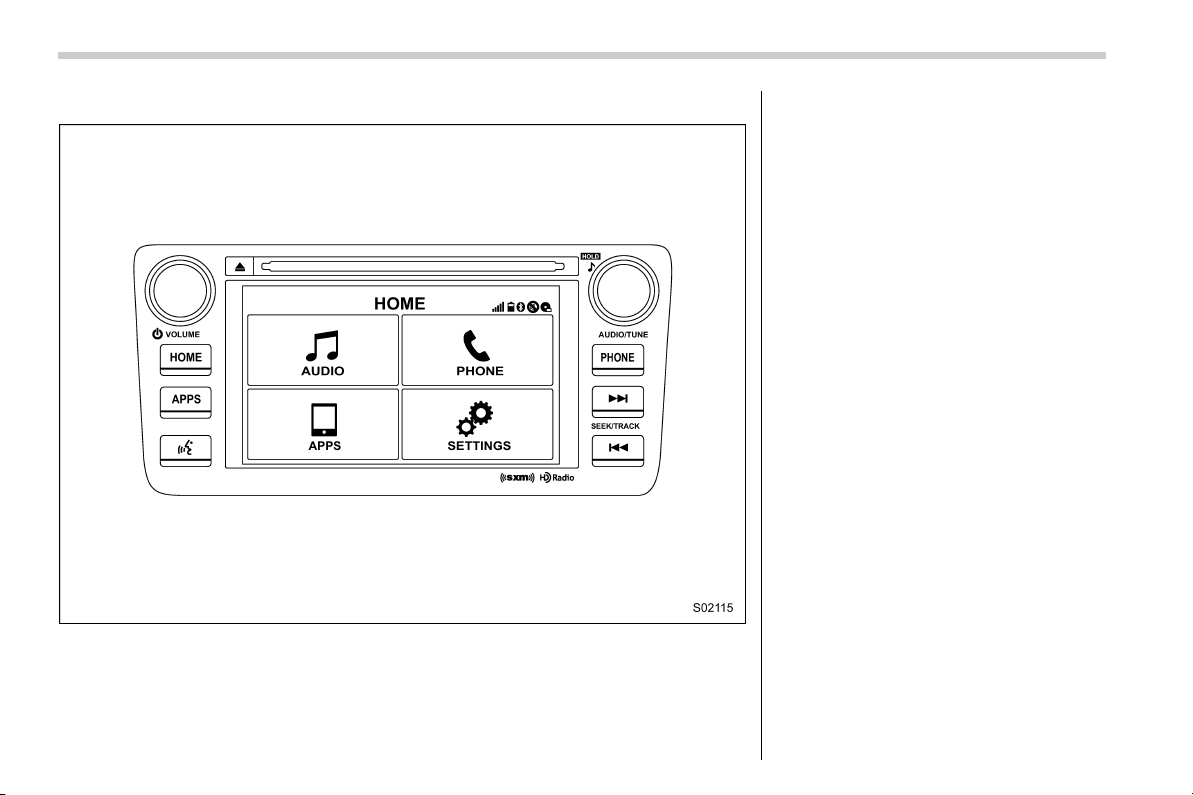
Press the HOME button to display home
screen.
Item Function
AUDIO
Select to display the main
screen of the audio source that
was selected previously.
PHONE
Select to display the hands-free
function using your cell phone.
Refer to “Hands-free phone
system” F69.
APPS
Select to display the functions
linked with a smartphone. Refer
to “SUBARU STARLINK” F24.
SETTINGS
Select to display the functions
for performing various settings.
Refer to “Unit settings” F17.
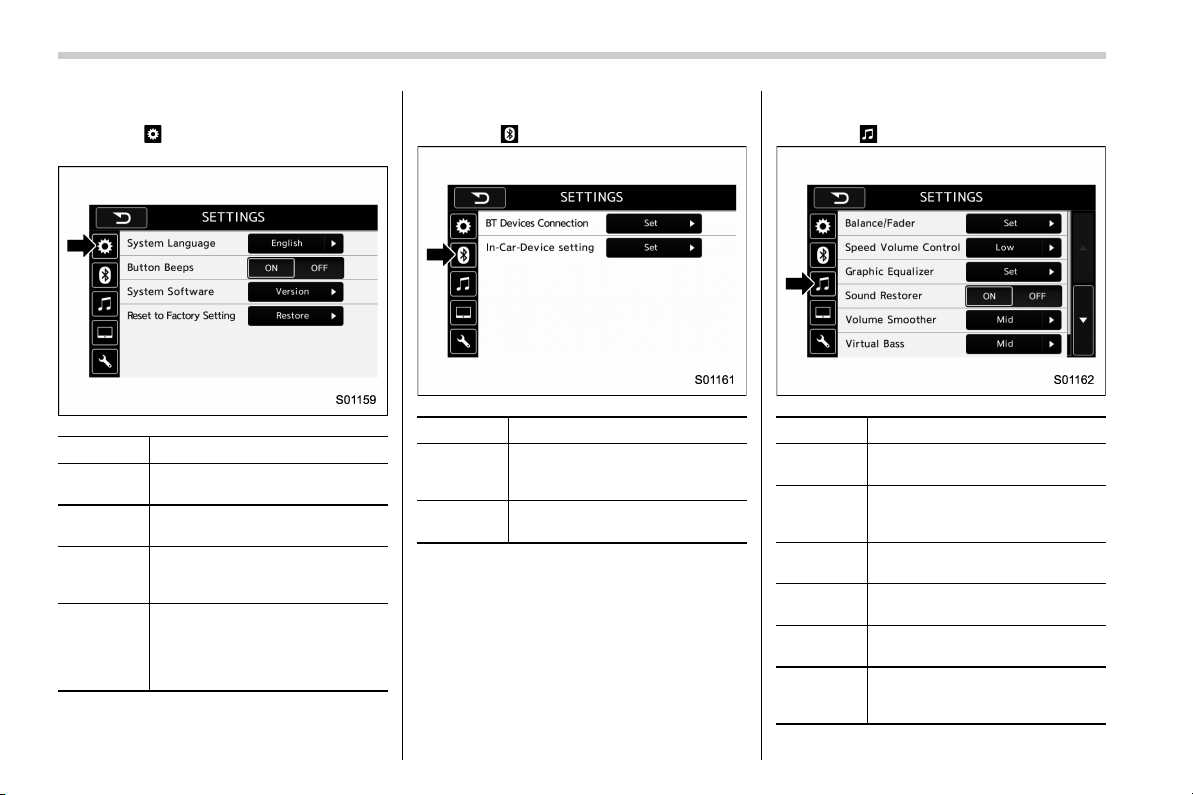
& Unit settings
Sound quality adjustment, screen adjust-
ment, and information of the audio unit are
displayed.
1. Press the HOME button on the audio
panel.
2. Touch the “SETTINGS” key.
3. Select the items to be set.
Available setting:
. General settings: Select the
tab to
check the system software update infor-
mation. Refer to “General settings” F18.
. Bluetooth settings: Select the
tab to
set the Bluetooth settings. Refer to “Blue-
tooth settings” F18.
. Sound settings: Select the
tab to set
the sound quality settings. Refer to
“Sound settings” F18.
. Display settings: Select the
tab to
set the screen settings. Refer to “Display
settings” F23.
. SUBARU STARLINK settings (if
equipped): Select to the
tab set the
SUBARU STARLINK settings. Refer to
“SUBARU STARLINK settings” F24.
– CONTINUED –
17
0
Black plate (20,1)
北米Model "B4444BE-A" EDITED: 2016/ 4/ 28
! General settings
Touch the
tab for the audio unit basic
settings.
Item Function
System
Language
Select to change the language.
Button
Beeps
Select to set the sound beeps
on/off.
System
Software
Select to update software ver-
sions. This menu is not used in
usual operation.
Reset to
Factory
Setting
Select to reset the device to
factory settings. This menu is not
used in usual operation.
After resetting to factory settings,
turn ignition off and on again.
! Bluetooth settings
Touch the
tab to set Bluetooth.
Item Function
BT De-
vices Con-
nection
Select to pair/connect the Blue-
tooth devices.
In-Car-De-
vice setting
Select to enter the Bluetooth
device name or PIN-code.
For details, refer to “Bluetooth
®
settings”
F64.
! Sound settings
Touch the
tab to set the sound quality.
Item Function
Balance/
Fader
Select to adjust speaker volume
balance (right/left and front/rear).
Speed Vo-
lume Con-
trol
Select to adjust speaker volume
coupled to vehicle speed.
Graphic
Equalizer
Select to adjust sound quality in
each frequency band.
Sound Re-
storer
Select to add high-pitched tone
to the compressed audio file.
Volume
Smoother
Select to adjust volume differ-
ence between audio sources.
Virtual
Bass
Select to add harmonic tone so
that low-pitched tone is
strengthened.
18
Black plate (21,1)
北米Model "B4444BE-A" EDITED: 2016/ 4/ 28
Item Function
Vocal Im-
age Con-
trol
Select to pick-up vocal sound
signal from the sound data, and
adjust it to right/left or front/rear.
Refer to the following table for the adjustment range of each audio setting item and
default value.
Item Step Default
Balance/
Fader
Volume
Balance
Control
Balance L9-R9 0 (Center)
Fader F9-R9 0 (Center)
Vocal
Image
Control
Balance L9-R9 R3
Fader F9-R9 0 (Center)
Speed Volume Control OFF, Low, High Low
Graphic Equalizer −6-+6 0 (Flat)
Sound Restorer ON, OFF ON
Volume Smoother OFF, Low, Mid, High Mid
Virtual Bass OFF, Low, Mid, High
Mid
– CONTINUED –
19
0
Black plate (22,1)
北米Model "B4444BE-A" EDITED: 2016/ 4/ 28
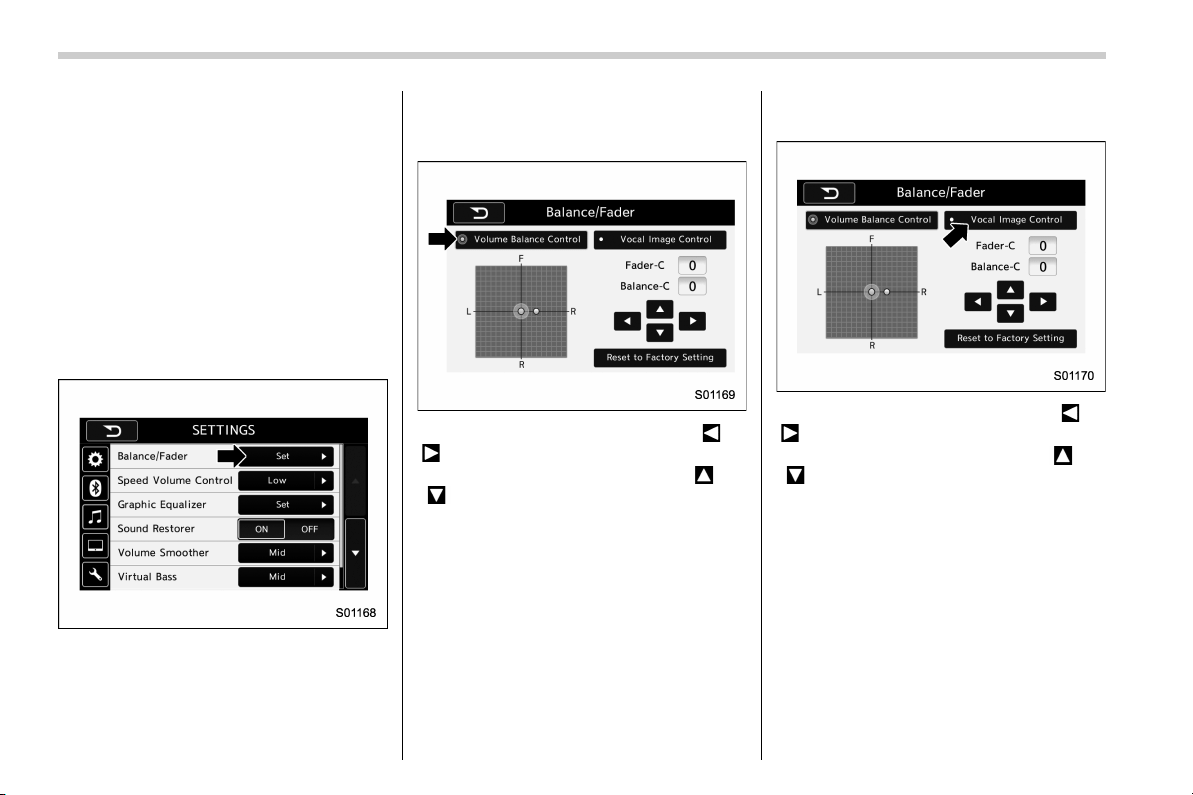
! “Balance/Fader”
A good balance of the left and right stereo
channels and of the front and rear sound
levels is important for good quality audio
program listening.
Keep in mind that when listening to a
stereo recording or broadcast, changing
the right/left balance will increase the
volume of 1 group of sounds while
decreasing the volume of another.
Touch the “Set” key of the “Balance/Fader”
key. The “Balance/Fader” screen will
appear.
. Volume Balance setting
1. Select the “Volume Balance Control”
key.
2. Adjust the balance by pressing “ ” or
“
” key.
3. Adjust the fader by pressing “
” or
“
” key.
. Vocal image setting
1. Select the “Vocal Image Control” key.
2. Adjust the balance by pressing “ ” or
“
” key.
3. Adjust the fader by pressing “
” or
“
” key.
20
Black plate (23,1)
北米Model "B4444BE-A" EDITED: 2016/ 4/ 28
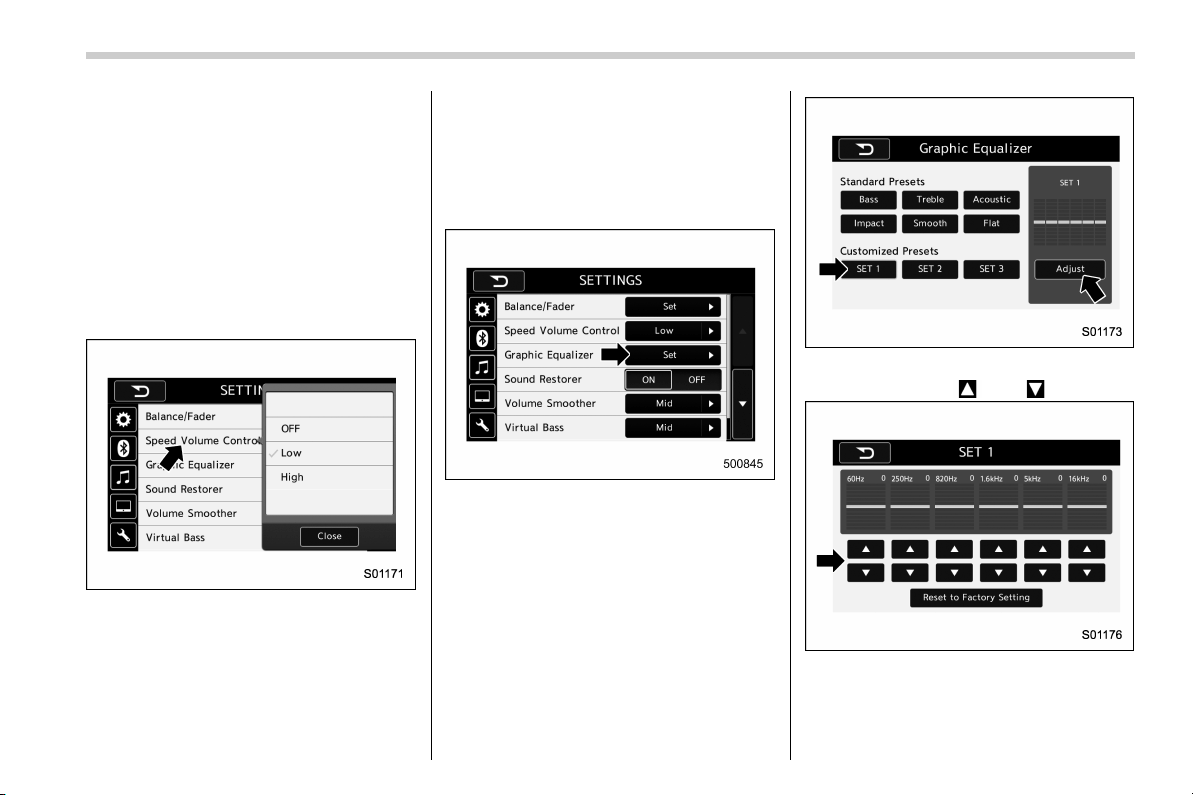
! “Speed Volume Control”
The system adjusts to the optimum
volume and tone quality according to
vehicle speed t o compensate fo r in-
creased vehicle noise.
1. Touch the right side key of the “Speed
Volume Control” key.
2. Select the desired item. The “High”
key comes to have a bigger effect. When
the “OFF” key is selected, speed volume
control function is cancelled.
! “Graphic Equalizer”
You can adjust the sound quality by
increasing/decreasing the gain for each
frequency range.
1. Touch the “Set” key of the “Graphic
Equalizer” key.
2. In this mode, 6 preset equalizer
patterns (the “Bass”, “Treble”, “Acoustic”,
“Impact”, “Smooth” and “Flat” key) and 3
customized patterns (the “SET 1” - “SET
3” key) are available.
3. When customizing the equalizer pat-
tern, touch among “SET 1”, “SET 2” or
“SET 3” and then touch the “Adjust” key.
4. Adjust the level of each frequency
band by touching “
” or “ ” key.
– CONTINUED –
21
0
Black plate (24,1)
北米Model "B4444BE-A" EDITED: 2016/ 4/ 28
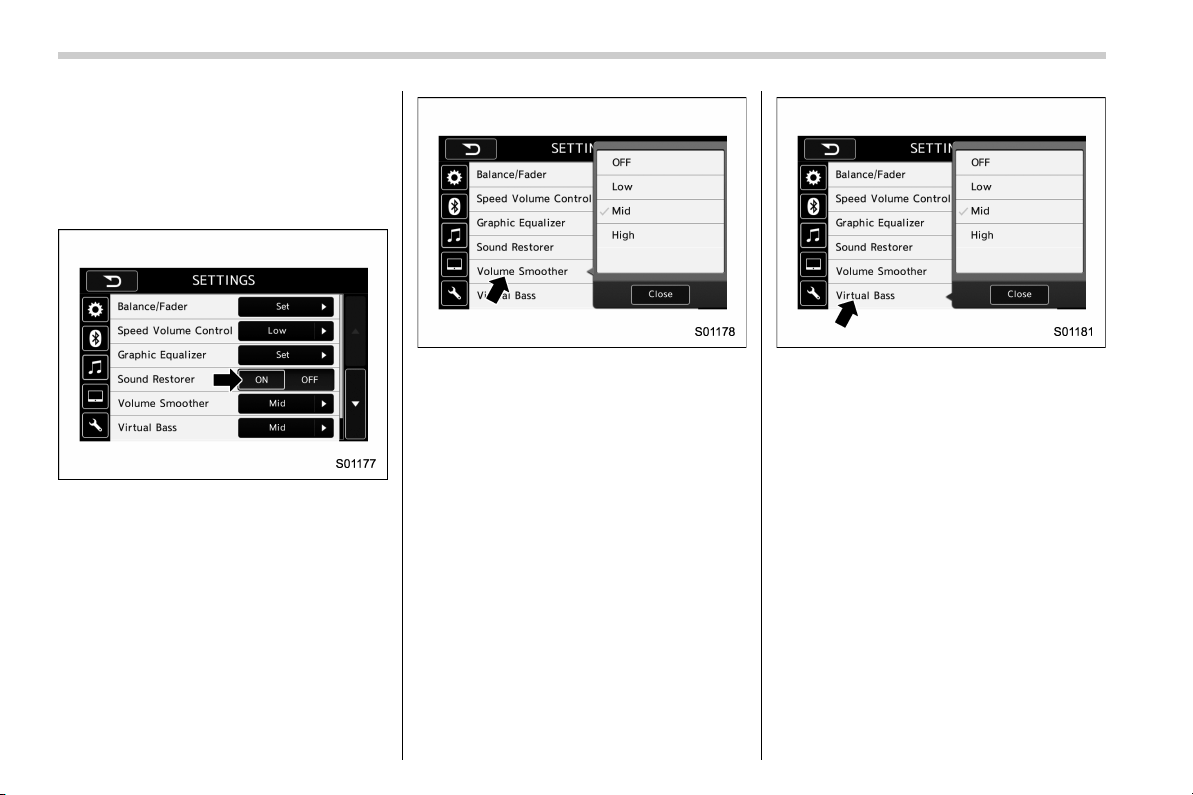
! “Sound Restorer”
You can play compressed audio data with
a sound quality that is close to the original
sound.
Select the “ON” or “OFF” key by the right
side key of the “Sound Restorer” key.
! “Volume Smoother”
This function reduces the difference in
volume among the sound sources to be
played.
1. Touch the right side key of the “Volume
Smoother” key.
2. Select the “OFF”, “Low”, “Mid” or
“High” key. The “High” key comes to have
a bigger effect. When the “OFF” key is
selected, the volume smoother function is
cancelled.
! “Virtual Bass”
This function enables you to adjust the
bass tone.
1. Touch the right side key of the “Virtual
Bass” key.
2. Select the “OFF”, “Low”, “Mid” or
“High” key. The “High” key comes to have
a bigger effect. When the “ OFF” key is
selected, the virtual bass function is
cancelled.
! “Vocal Image Control”
Refer to ““Balance/Fader”” F20.
22
Black plate (25,1)
北米Model "B4444BE-A" EDITED: 2016/ 4/ 28
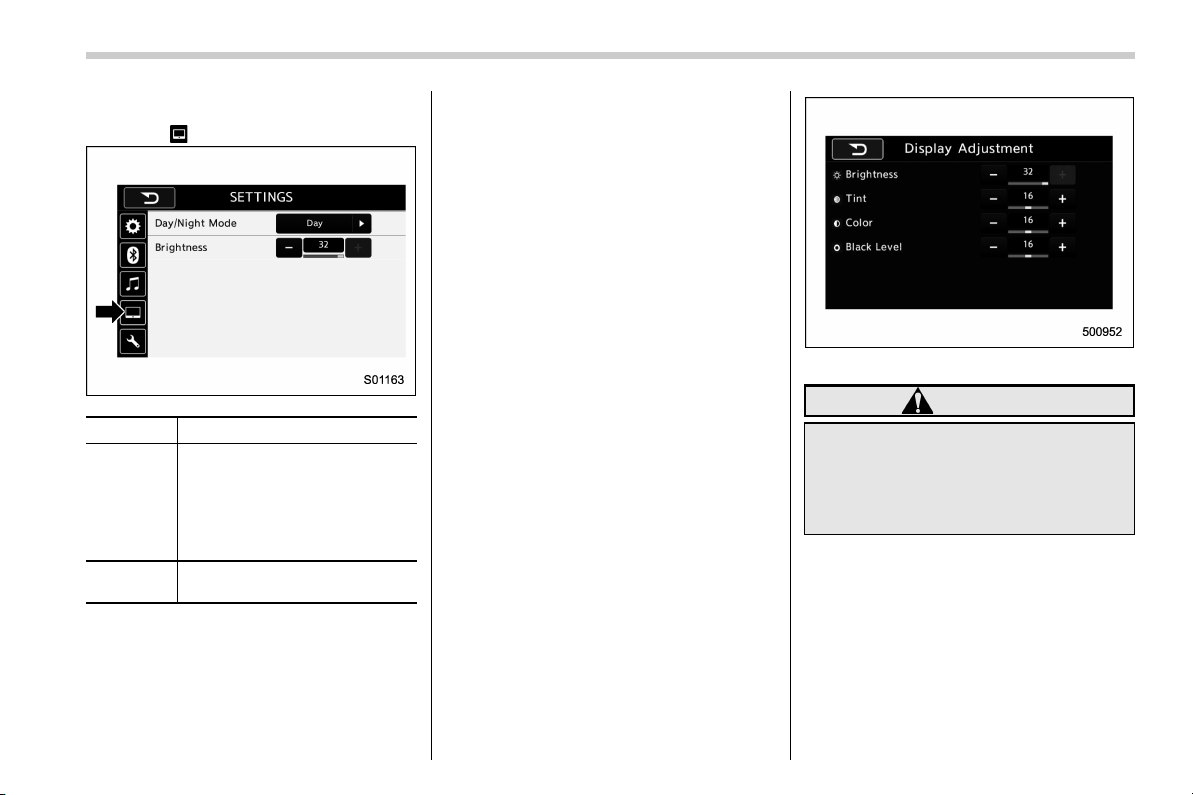
! Display settings
Touch the
tab to set display.
Item Function
Day/Night
Mode
The “Auto”, “Day” or “Night” key
can be selected on the pop-up
screen.
When the “Auto” key is selected,
the screen changes to day or
night mode depending on the
position of the headlight switch.
Brightness
Touch “+” or “−” to adjust the
brightness.
NOTE
. When the screen is viewed through
polarized sunglasses, a rainbow pat-
tern may appear on the screen due to
optical characteristics of the screen. If
this is disruptive, please operate the
screen without polarized sunglasses.
. If the screen is set to “Day” mode
with the headlight switch turned on,
this condition is memorized even with
the engine turned off.
! How to adjust the rear view
image
In the camera display, the brightness, tint,
color and black level of the screen can be
adjusted.
1. Depress the brake pedal fully and stop
the vehicle.
2. While the vehicle is stopped, set the
shift lever (MT models) or select lever
(CVT models) in the “R” position, and then
touch the display.
3. Touch the “Display Adjustment” key.
4. Touch the items to adjust the rear
camera screen.
Camera display
WARNING
When adjusting camera display
screen, make sure to depress the
brake pedal fully to avoid the vehicle
from moving. Failure to do so may
lead to a serious accident.
NOTE
The camera display can be accessed
when the rear camera monitor is dis-
played.
– CONTINUED –
23
0
Black plate (26,1)
北米Model "B4444BE-A" EDITED: 2016/ 4/ 28
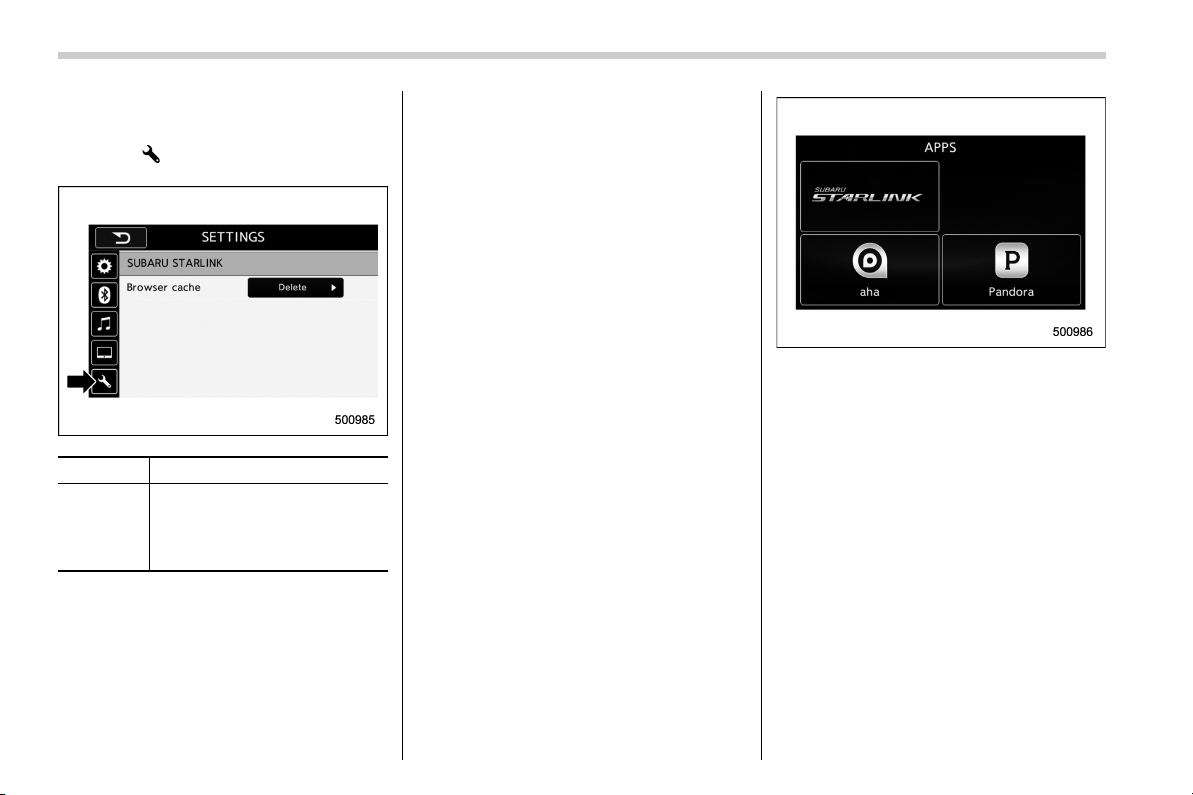
! SUBARU STARLINK settings (if
equipped)
Touch the
tab to change the SUBARU
STARLINK settings.
Item Function
Browser
cache
Select to initialize cache files
that the browser stores. If the
confirmation screen appears
and the “OK” key is selected, the
cache files will be deleted.
& SUBARU STARLINK (if
equipped)
The SUBARU STARLINK function allows
the system to link with a smartphone using
Bluetooth.
! How to use SUBARU STARLINK
1. Connect to the audio system. Use a
USB port for an iPhone or iPod touch and
Bluetooth for Android devices.
. For details about connecting an
iPhone/iPod touch: Refer to “Connect-
ing and disconnecting a USB memory/
portable device” F15.
. For details about registering or con-
necting an Android device: Refer to
“Registering/connecting Bluetooth
®
device” F64.
2. Press the HOME button, and then
touch the “APPS” key, or press the APPS
button on the audio panel. The APPS
screen is displayed.
3. Touch the “SUBARU STARLINK” key
on the APPS screen. The disclaimer
screen or the error screen is displayed.
4. Touch the “Check” key on the disclai-
mer screen and then the APPS main
screen will appear. If you touch th e
“Cancel” key, the disclaimer screen dis-
appears and the previous screen will be
displayed again.
NOTE
. The SUBARU STARLINK connection
error screen will be displayed due to
one of the following possible reasons.
– Your smartphone and the system
has not been connected via USB
(for iPhone) or Bluetooth (for An-
droid).
– SUBARU STARLINK APPS has
24
Black plate (27,1)
北米Model "B4444BE-A" EDITED: 2016/ 4/ 28
not been activated.
. You can als o switch to aha or
Pandora (if equipped) from the APPS
screen.
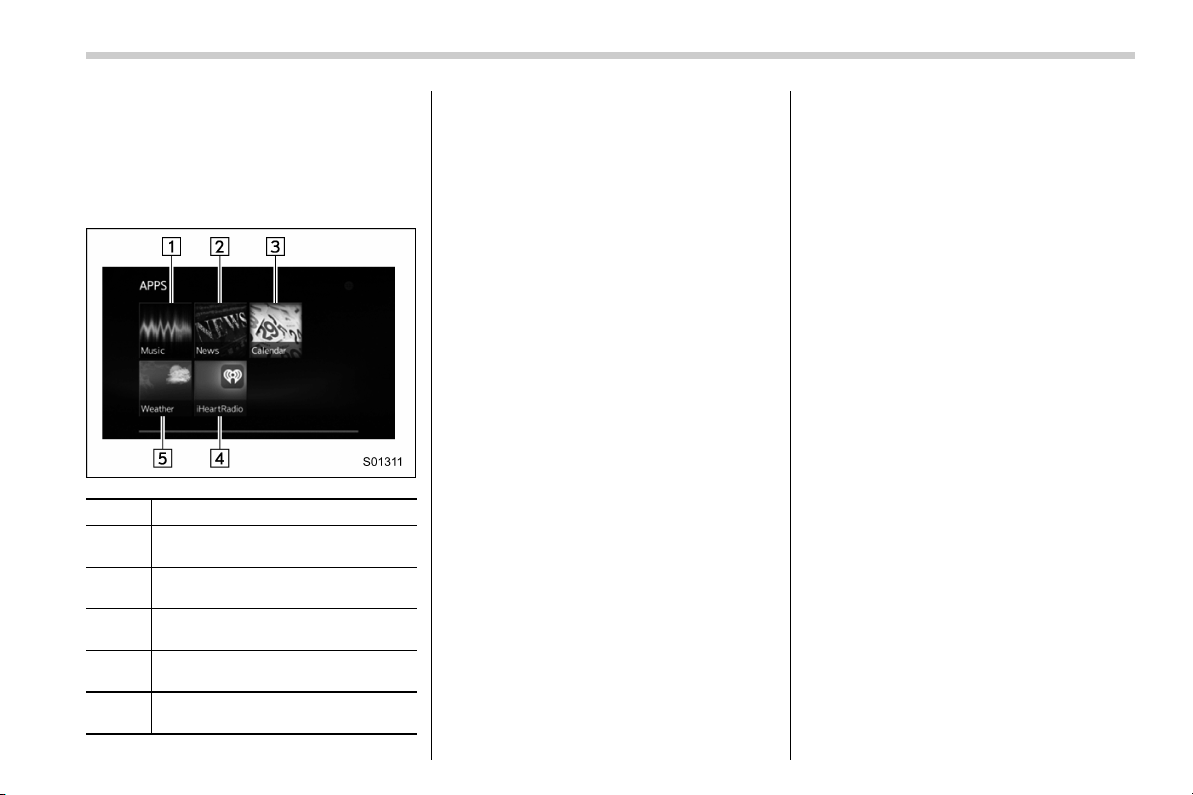
! APPS main screen
No. Function
&
1
Select to go to the Music APPS
screen.
&
2
Select to go to the News APPS
screen.
&
3
Select to go to the Calender APPS
screen.
&
4
Select to go to the iHeartRadio
APPS screen.
&
5
Select to go to the Weather APPS
screen.
NOTE
. The error screen will be displayed
while using SUBARU STARLINK due to
one of the following possible reasons.
– When your smartphone has no
service or the Bluetooth communi-
cation is not possible.
– When your smartphone is turned
off.
– When the SUBARU STARLIN K
APPS is quit.
– When connection to the SUBARU
STARLINK server is not possible.
– When a problem occurs other
than a server error.
. When using the SUBARU STARLINK
function, a disclaimer screen will be
displayed. Be sure to fully read the
contents before using the function.
. Supported devices
– iPhone: iPhone 4/iPhone 4s/
iPhone 5 (iOS Ver. 5.1 or later)/
iPhone 5c/iPhone 5s
– Android: (OS Ver. 4.0 or later)
– CONTINUED –
25
0
Black plate (28,1)
北米Model "B4444BE-A" EDITED: 2016/ 4/ 28
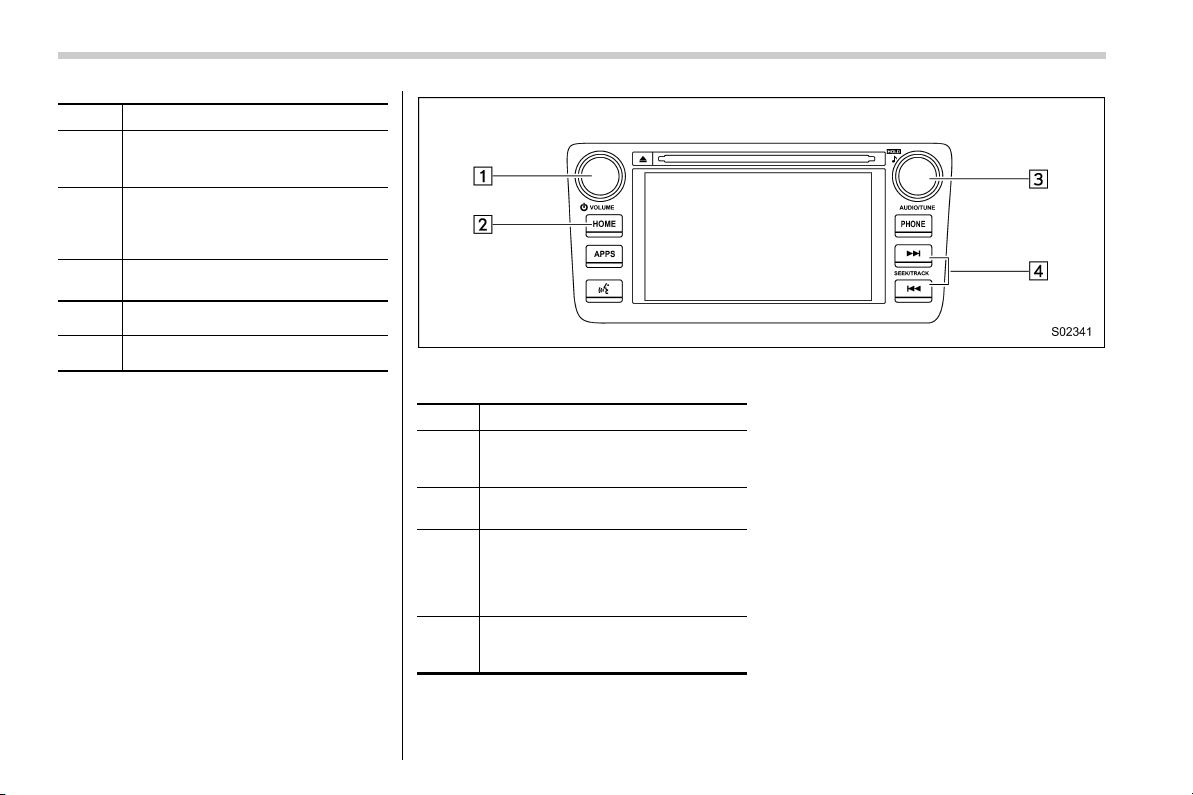
& AM/FM radio
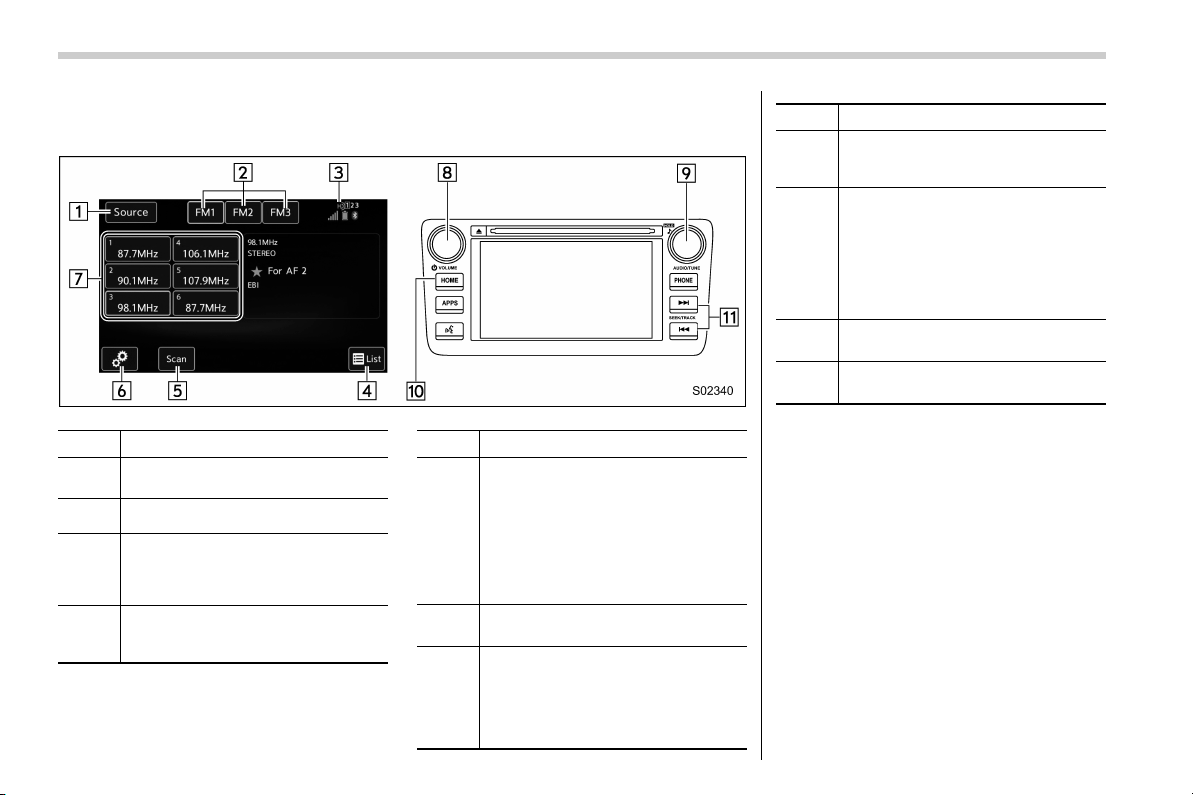
! Control screen and audio panel
No. Function
&
1
Select to display the audio source
selection screen.
&
2
Select to change the band.
&
3
The HD Radio indicator on the top
right of the screen changes accord-
ing to the reception condition of HD
Radio (if equipped).
&
4
Select to display a station list (if
equipped). Refer to “Selecting a
station from the list” F27.
No. Function
&
5
Select to scan radio channels.
This function enables searching for
receivable stations automatically,
and tunes in to a frequency for 5
seconds if a station is found. When
the 5-second period has elapsed, the
system searches for the next recei-
vable station again, and tunes in to
the frequency for 5 seconds.
&
6
Select to open the “Option” screen.
Refer to “Radio settings” F28.
&
7
When you touch a key, the system
tunes to the stored frequency.
When you touch and hold a key, the
system stores the frequency to the
selected preset channel. Refer to
“Presetting a station” F27.
No. Function
&
8
Turn to adjust volume.
Press to turn the audio system on/
off.
&
9
Turn to step up/down frequencies.
Turn to move up/down the list. Also,
the knob can be used to enter
selections on the list screens by
pressing.
Press to select an audio mode. For
details, refer to “Selecting an audio
source” F16.
&
10
Press to display the sound setting
screen. Refer to “Unit settings” F17.
&
11
Press to seek for a station/channel.
Press and hold for continuous seek.
NOTE
. Although FM is normally static free,
reception can be affected by the sur-
rounding area, atmospheric conditions,
station strength and transmitter dis-
tance. Buildings or other obstructions
may cause momentary static, flutter or
station interference. If reception con-
tinues to be unsatisfactory, switch to a
stronger station.
. The radio automatically changes to
stereo reception when a stereo broad-
cast is received.
26
Black plate (29,1)
北米Model "B4444BE-A" EDITED: 2016/ 4/ 28
. The radio automatically blends to an
HD Radio signal (if equipped) in AM or
FM where available.
! How to change the source
Select the “AM” or “FM” key on the source
select screen. Refer to “Selecting an audio
source” F16.
! Presetting a station
In total 18 stations can be set for the FM
band (6 each for FM1, FM2 and FM3) and
12 stations can be set for the AM band (6
each for AM1 and AM2).
1. Tune in the desired station.
2. If you touch and hold a key, the system
stores the frequency to the selected
preset channel.
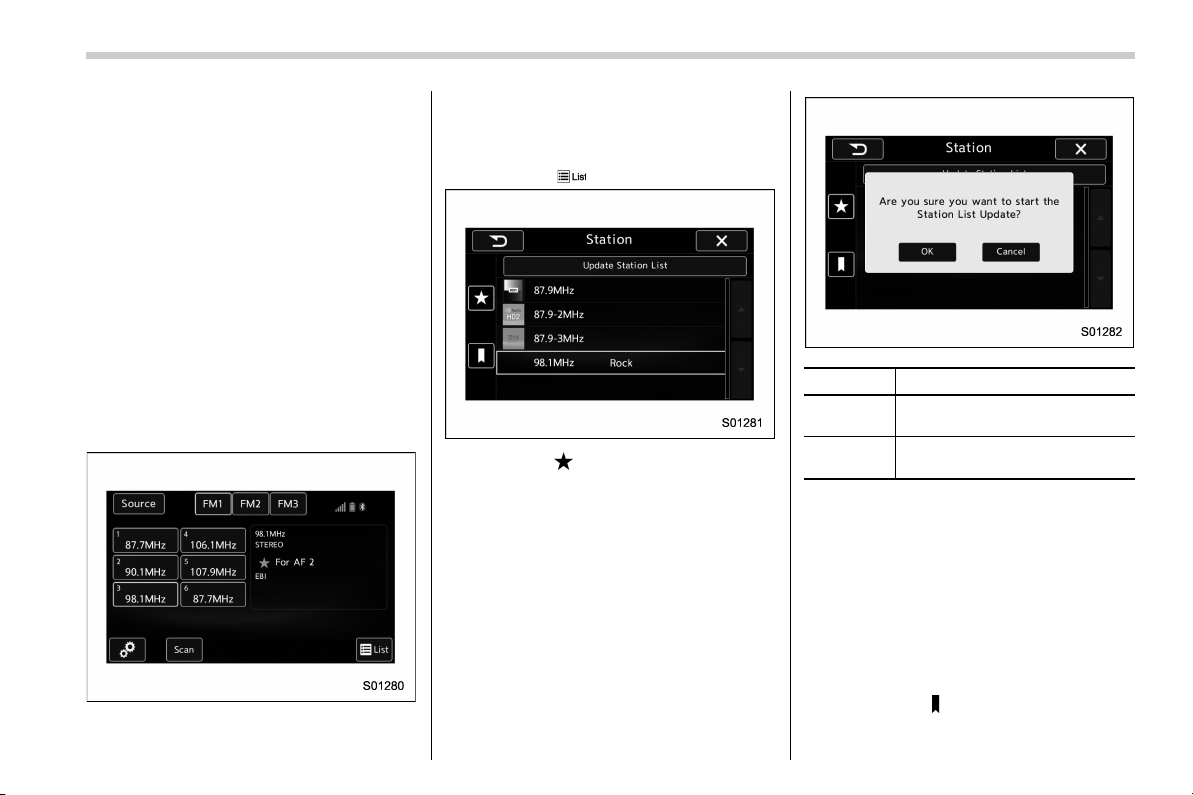
! Selecting a station from the list (if
equipped)
A station list can be displayed.
1. Touch the
tab.
2. Touch the tab and the station list will
appear.
3. Select the desired station.
! Update the station list
Touch the “Update Station List” key on the
station list screen and the following screen
will be displayed.
Item Function
OK
Select to execute the manual
update.
Cancel
Select to cancel the manual
update.
NOTE
. The audio system sound is muted
during refresh operation.
. In some situations, it may take some
time to update the station list.
! Bookmark the list
You can store and call up the received
data (images, song titles, artist names,
etc.). The stored data is displayed as a list.
1. Touch the
tab on the station list
screen and the following screen will be
– CONTINUED –
27
0
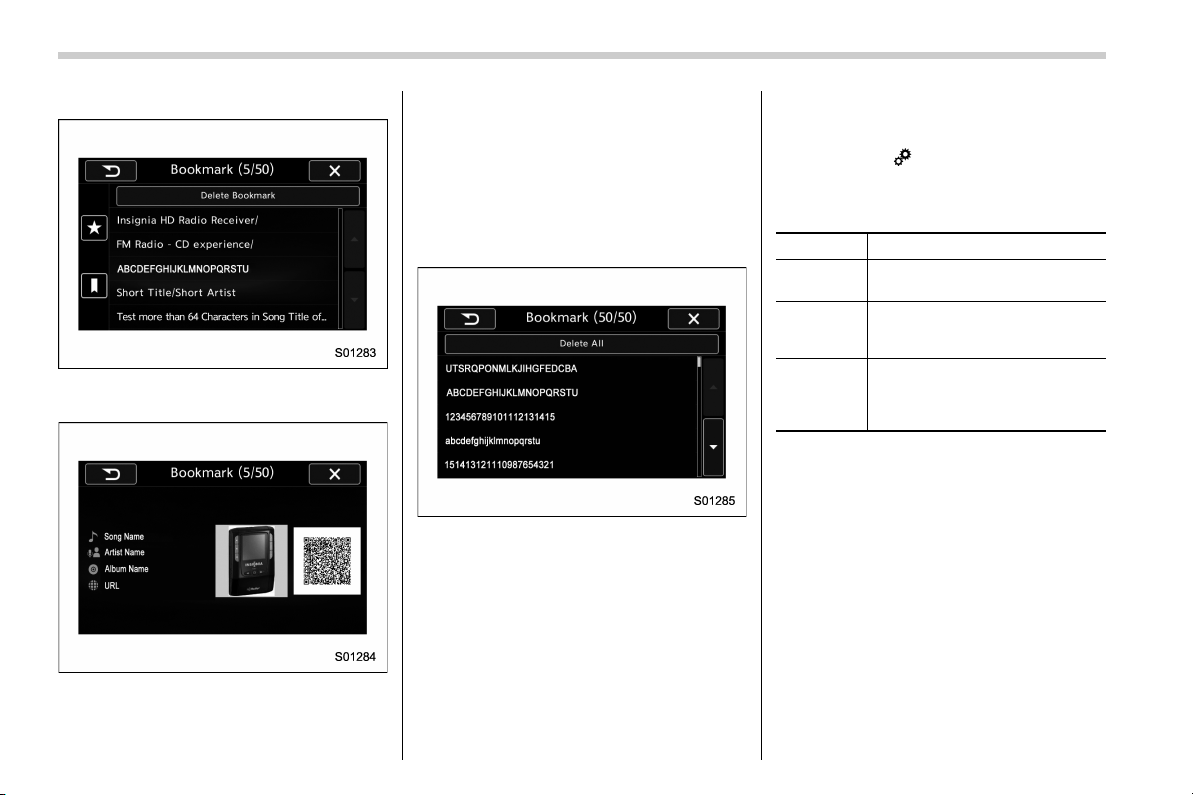
Black plate (30,1)
北米Model "B4444BE-A" EDITED: 2016/ 4/ 28
displayed.
2. Select an item from the bookmark list,
the following image will be displayed.
3. When you call up bookmark informa-
tion, a QR cod e conver ted fro m the
bookmark information will be displayed
on the screen. You can access a URL by
reading the QR code using a smartphone,
etc.
! Delete bookmark from the list
1. Touch the “Delete Bookmark” key on
the station list screen and the following
screen will be displayed.
2. If you select an item from the book-
mark list, the item will be deleted from the
bookmark list.
3. Touch the “Del ete All” key. If the
confirmation screen appears and the
“OK” key is selected, all bookmark items
in the list will be deleted.
! Radio settings
You can perform various radio settings.
1. Touch the
tab.
2. Select the desired item from the
following table.
Item Function
HD (if
equipped)
Select to turn HD radio on/off.
PTY Select
(if
equipped)
Select to set the PTY group.
Auto Store
Select to detect 6 radio stations
with strong frequencies automa-
tically and to store them in the
order of frequency.
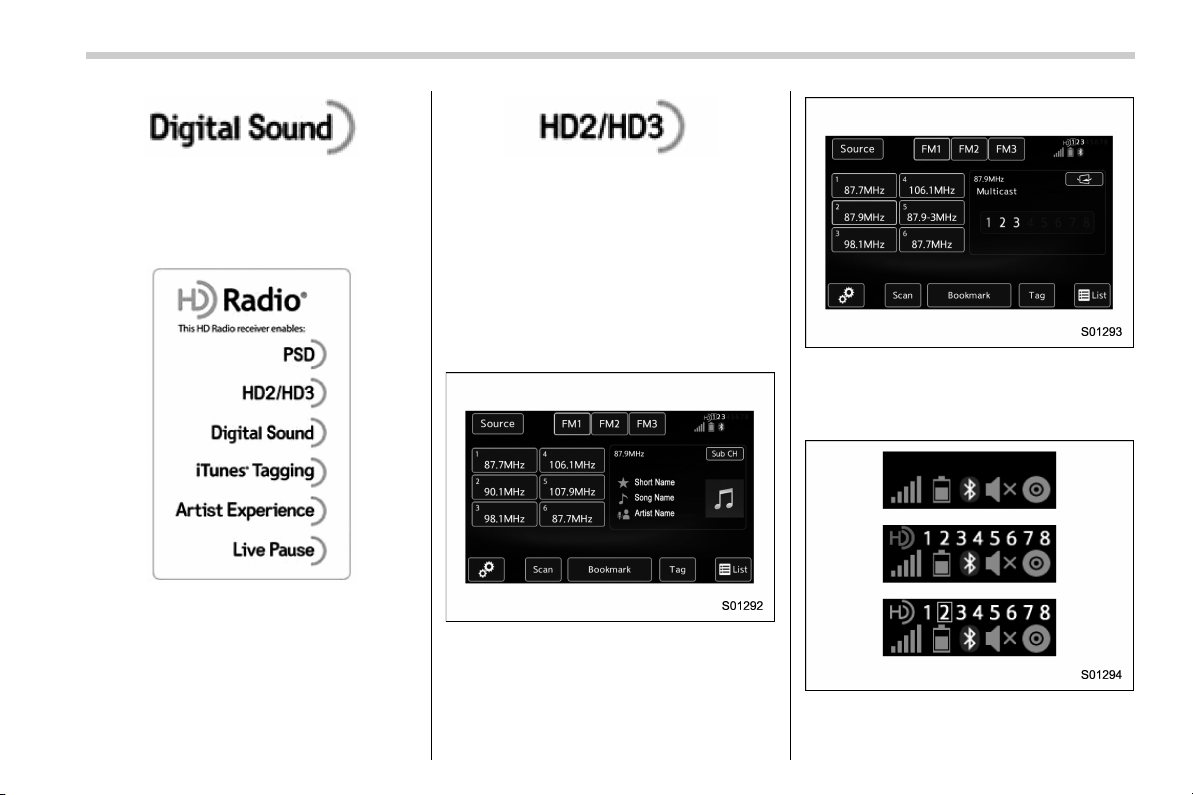
! About HD Radio
TM
technology (if
equipped)
HD Radio
TM
Technology is the digital
evolution of analog AM/FM radio. Your
radio product has a special receiver which
allows it to receive digital broadcasts
(where available) in addition to the analog
broadcasts it already receives. Digital
broadcasts have better sound quality than
analog broadcasts as digital broadcasts
provide free, crystal clear audio with no
static or distortion. For more information,
and a guide to available radio stations and
programming, refer to www.hdradio.com.
28
Black plate (31,1)
北米Model "B4444BE-A" EDITED: 2016/ 4/ 28
AM and FM broadcast sound quality is
now crystal clear, with AM sound quality
that virtually matches FM quality of the
past, and FM broadcasts that have near
CD-level sound quality.
HD Radio Technology manufactured un-
der license from iBiquity Digital Corpora-
tion. Foreign Patents. HD Radio
TM
and the
HD, HD Radio, and “Arc” logo s are
proprietary trademarks of iBiquity Digital
Corp.
FM stations can provide additional digital-
only audio pro gramming on HD2/HD3
Channels.
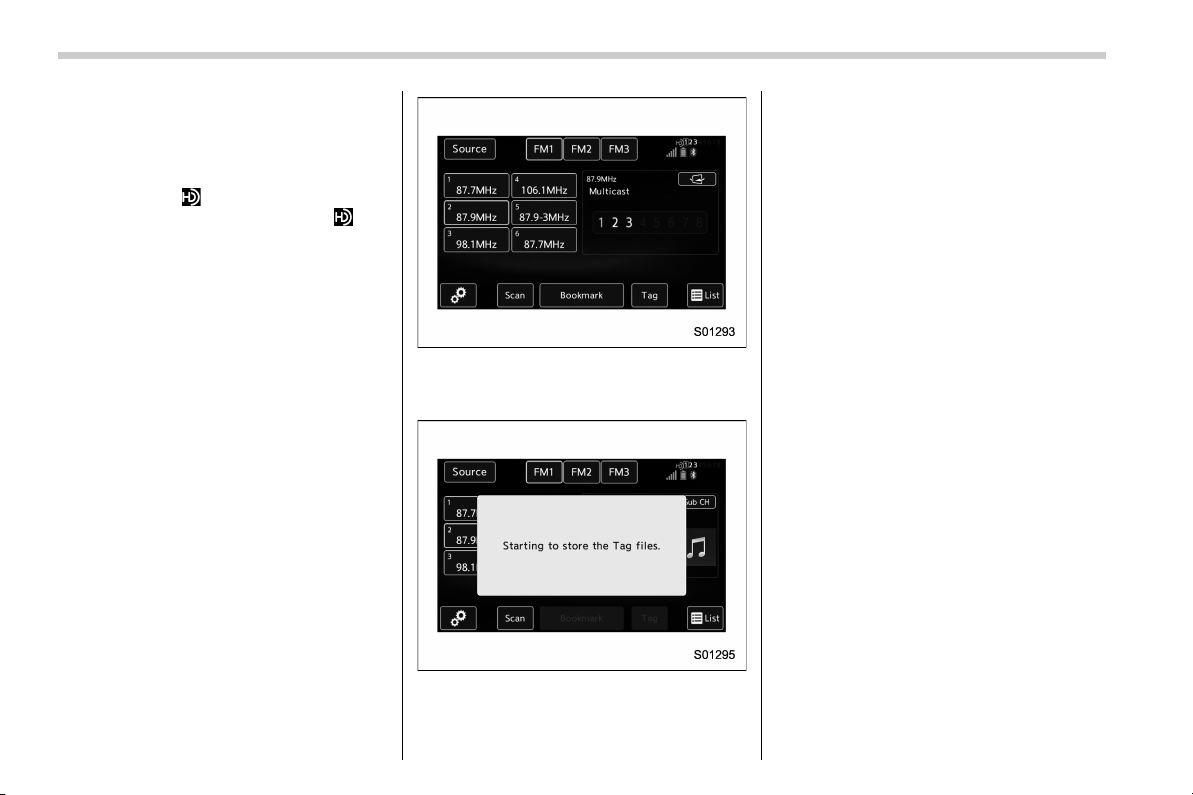
! Available HD Radio
TM
technology (if
equipped)
! Multicast
On the FM radio frequency most digital
stations have “multiple” or supplemental
programs on one FM station.
1. Touch the “Sub CH” key on the control
screen and the following screen will be
displayed.
2. The indication that shows whether the
current broadcast is digital or analog is
displayed on the top right of the control
screen.
3. Select the desired channel.
Turning the AUDIO/TUNE knob can also
– CONTINUED –
29
0
Black plate (32,1)
北米Model "B4444BE-A" EDITED: 2016/ 4/ 28
select the desired multicast channel.
NOTE
. HD Radio
TM
stations can be preset.
. An orange
will be displayed on
the screen when in digital. The
will
first appear in a gray color indicating
the station is indeed (an analog and) a
digital station. Once the digital signal is
acquired, the logo will change to a
bright orange color.
. The song title and artist name will
appear on the screen when available by
the radio station. The radio station can
send album pictures when available.
. As a user works through the analog
radio stations, (where applicable) the
radio receiver will automatically tune
from an analog signal to a digital signal
within 5 seconds.
! Preserving a music information
Tag information in the music broadcasting
is preserved in the system and transmits
to an iPod.
1. Touch the “Tag ” key in the control
screen while receiving HD Radio, the tag
setting screen will be displayed.
2. Connect an iPod. Refer to “Connecting
and disconnecting a USB memory/porta-
ble device” F15.
. Turn on the power of the iPod if it is
not turned on.
. Once an iPod is connected, the
music tag moves from the radio into
the iPod.
. When the iPod is connected to
iTunes, the tagged information of the
songs which were tagged while listen-
ing to the radio can be viewed. Then a
user may decide to purchase the song
or CD/Album which had been listened
to on their radio.
30
Black plate (33,1)
北米Model "B4444BE-A" EDITED: 2016/ 4/ 28
In addition, the following messages appear.
Display Message Contents
“Tag storage full”
If there is not enough memory in the digital
audio
“Already Stored”
If the same information is stored in the digital
audio
“Storing Failed” If the store process in the digital audio failed
“iPod full Tags cannot be stored” If there is not enough memory in the iPod
“Starting to transfer the Tag files.”
If the system starts to transmit music informa-
tion to an iPod
“Transferring Failed”
If the transmitting process of music information
to an iPod failed
“X Tag(s) Sent” (X = number of transmitted
information) will be displayed.
If the transmitting process of music information
to an iPod is successful
NOTE
. The tag information can not be
preserved while scanning or caching
the radio station.
. If tagging the music information
fails, “Saving the HD Radio tag was
unsuccessful. (Saving the HD Radio
tag was unsuccessful.) ” will be dis-
played on the screen. If this occurs, tag
the information again.
. Program Service Data: Presents song
name, artist, station IDs, and other rele-
vant data streams.
. iTunes Tagging provides you the op-
portunity to discover a wide range of
content an d the mea ns to “tag” that
content for later review and purchase from
the iTunes Store. Also refer to the Apple
Automotive specifications for implement-
ing iTunes Tagging.
– CONTINUED –
31
0

Black plate (34,1)
北米Model "B4444BE-A" EDITED: 2016/ 4/ 28
. Visual information related to content
being played on your HD Radio receiver,
such as Album Art, historical photographs,
still art from live broadcasts, among other
related content.
32

Black plate (35,1)
北米Model "B4444BE-A" EDITED: 2016/ 4/ 28
! Troubleshooting guide
Experience Cause Action
Mismatch of time alignment - a user may hear
a short period of programming replayed or an
echo, stutter or skip.
The radio stations analog and digital volume is
not properly aligned or the station is in ballgame
mode.
None, radio broadcast issue. A user can contact
the radio station.
Sound fades, blending in and out.
Radio is shifting between analog and digital
audio.
Reception issue. May clear-up as the vehicle
continues to be driven. Turning the indicator of the
HD Radio
TM
off will change the radio mode to
analog audio.
Audio mute condition when an HD2/HD3
multicast channel had been playing.
The radio does not have access to digital
signals at the moment.
This is normal behavior, wait until the digital signal
returns. If out of the coverage area, seek a new
station.
Audio mute delay when selecting an HD2/
HD3 multicast channel preset.
The digital multicast content is not available until
HD Radio
TM
broadcast can be decoded and
make the audio available. This takes up to 7
seconds.
This is normal behavior, wait for the audio to
become available.
Text information does not match the present
song audio.
Data service issue by the radio broadcaster.
Broadcaster should be notified. Complete the form;
www.ibiquity.com/automotive/report_radio
_station_experiences.
No text information shown for the present
selected frequency.
Data service issue by the radio broadcaster.
Broadcaster should be notified. Complete the form;
www.ibiquity.com/automotive/report_radio
_station_experiences.
The “Acquiring” caution message appears
when the system attempts to acquire digital
transmission.
When acquiring digital data while receiving a
digital broadcast and SPS station.
. When the reception in digital of the SPS station
is confirmed.
. When the system determined that the SPS
station could not be received.
. When the SPS broadcast is ended (stopped) by
the radio station while receiving SPS.
– CONTINUED –
33
0

Black plate (36,1)
北米Model "B4444BE-A" EDITED: 2016/ 4/ 28
Experience Cause Action
The “HD Channel is unavailable” caution
message appears when digital reception is not
possible.
. When the system determined that the SPS
station could not be received while receiving
a digital broadcast and SPS station.
. When the SPS broadcast is ended
(stopped) by the radio station while receiv-
ing SPS.
. When the status is changed to acquiring digital
data because the reception condition of SPS
station has improved.
. When the received station is changed.
34
Black plate (37,1)
北米Model "B4444BE-A" EDITED: 2016/ 4/ 28
& SiriusXM Satellite Radio (if
equipped)
! SiriusXM Data Service
Data service information, which is com-
prised of traffic information and weather
information, can be received via the
SiriusXM Radio.
To receive the data service information in
the vehicle, a subscription to the SiriusXM
Satellite Radio service is necessary.
Content set to use the SiriusXM data
service is reset when personal information
is initialized.
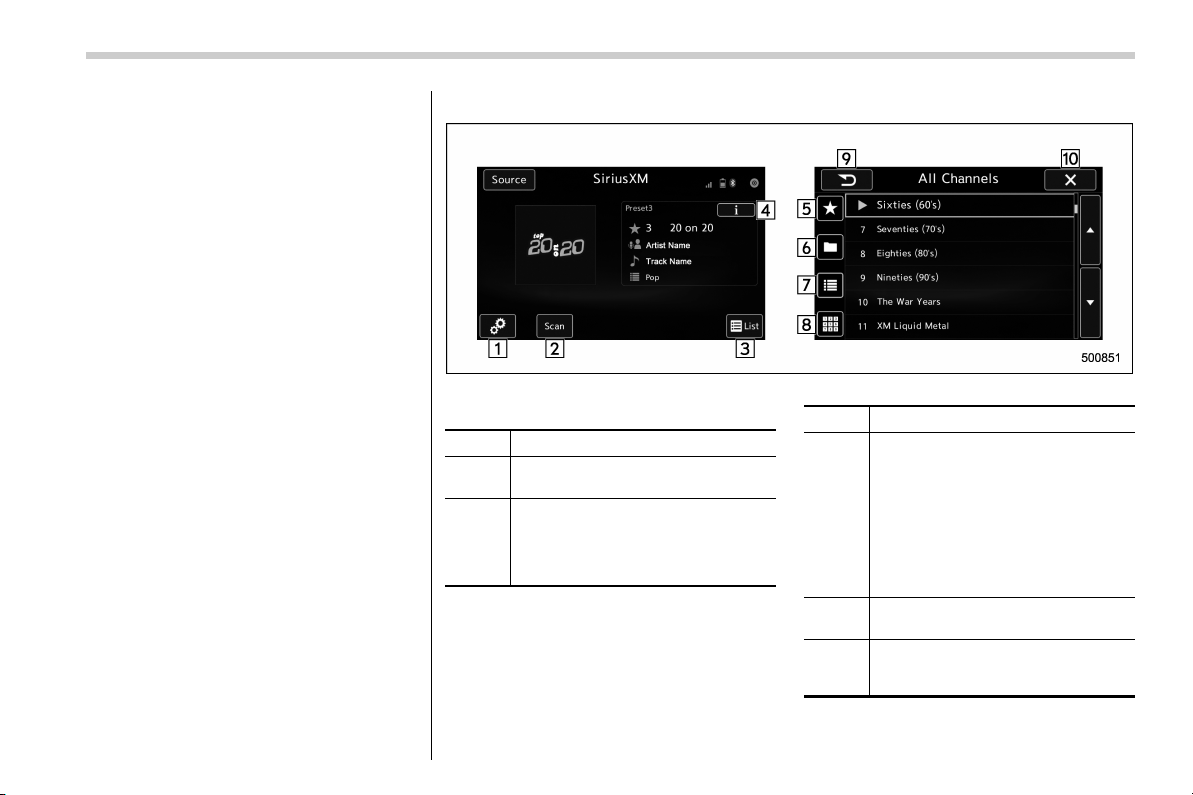
! Control screen and audio panel
Control screen
No. Function
&
1
Perform the SXM setting. See be-
low. Refer to “ SXM setting” F41.
&
2
Search for a channel which the
direction of higher frequency from
current frequency. Reproduce the
channel that can receive by 5
seconds.
No. Function
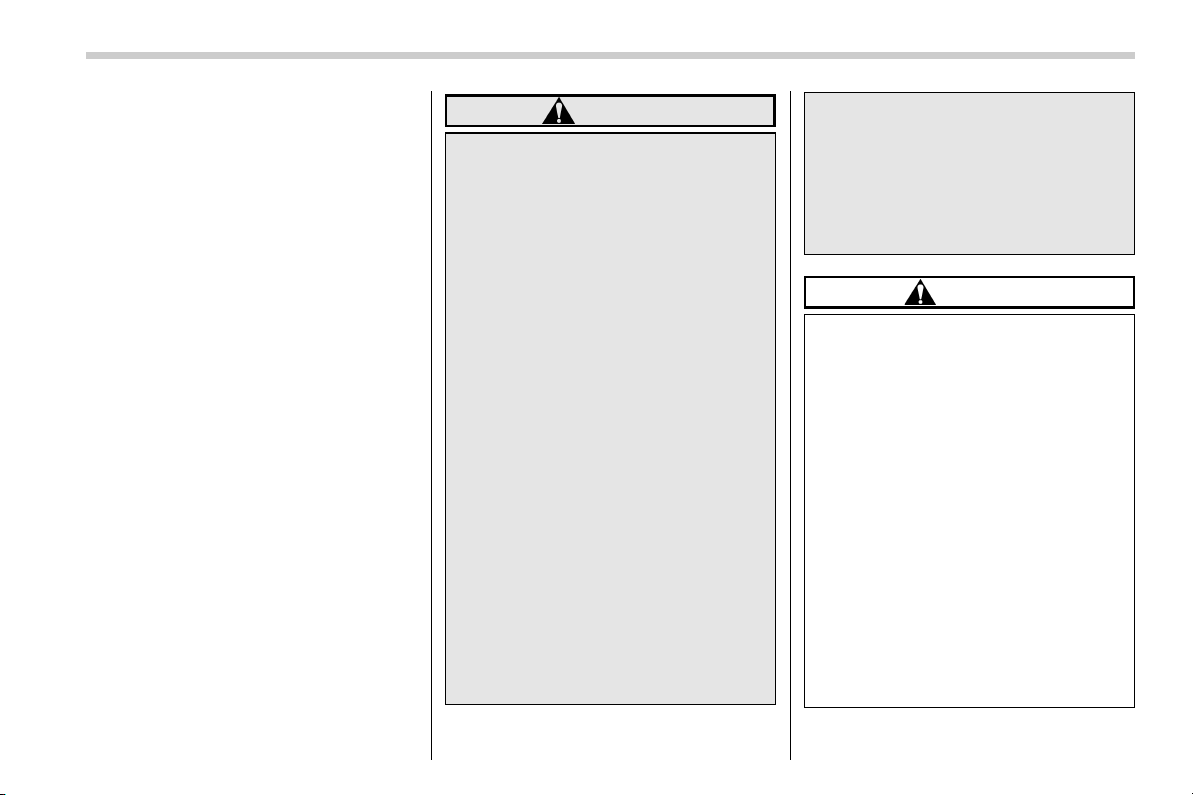
&
3
A list is displayed. There are three
types of lists (“Presets”, “Categories”
or “All Channels”) available.
. “Presets”: Preset channels are
displayed in a list.
. “Categories”: The channels of
the selected category are dis-
played in a list.
. “All Channels”: All selectable
channels are displayed in a list.
&
4
Display the contents information of a
channel receiving.
&
5
Presets list (30 channels max.) is
displayed. Refer to “Presetting a
channel” F39.
– CONTINUED –
35
0
Black plate (38,1)
北米Model "B4444BE-A" EDITED: 2016/ 4/ 28
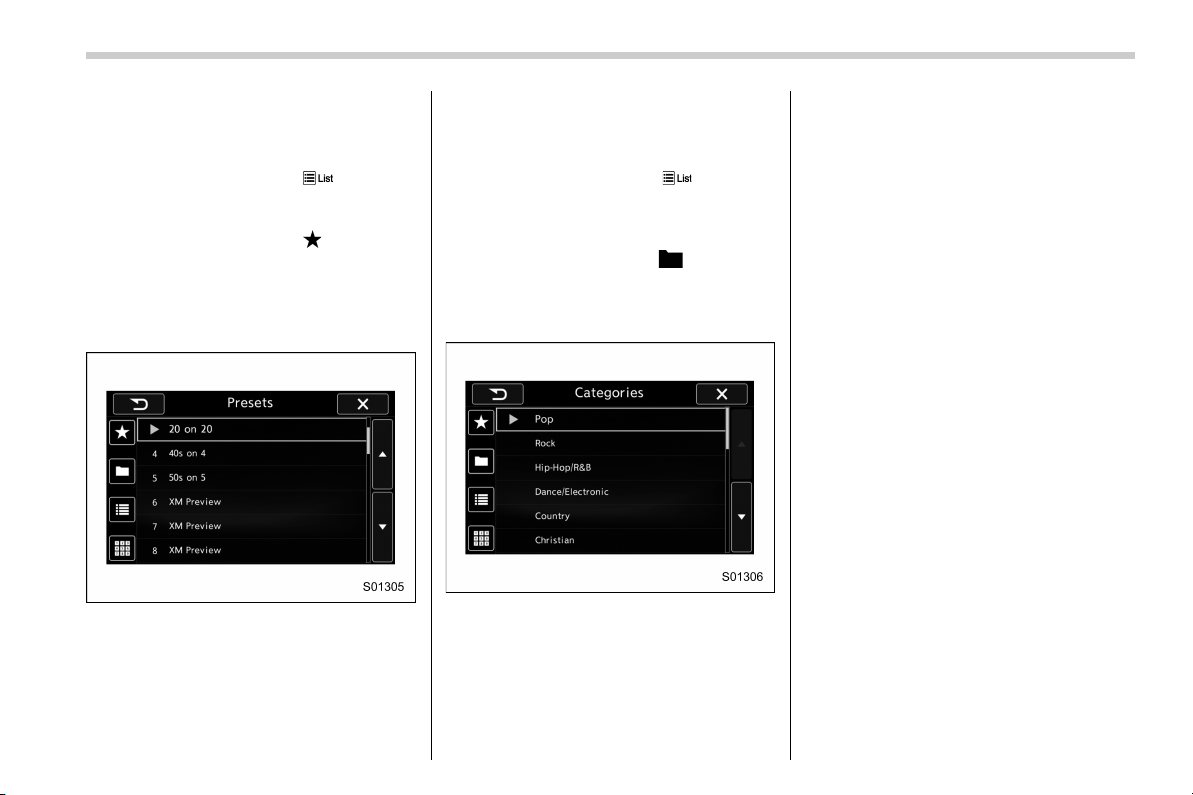
No. Function
&
6
Categories list is displayed. Refer to
“Selecting a channel from the list”
F39.
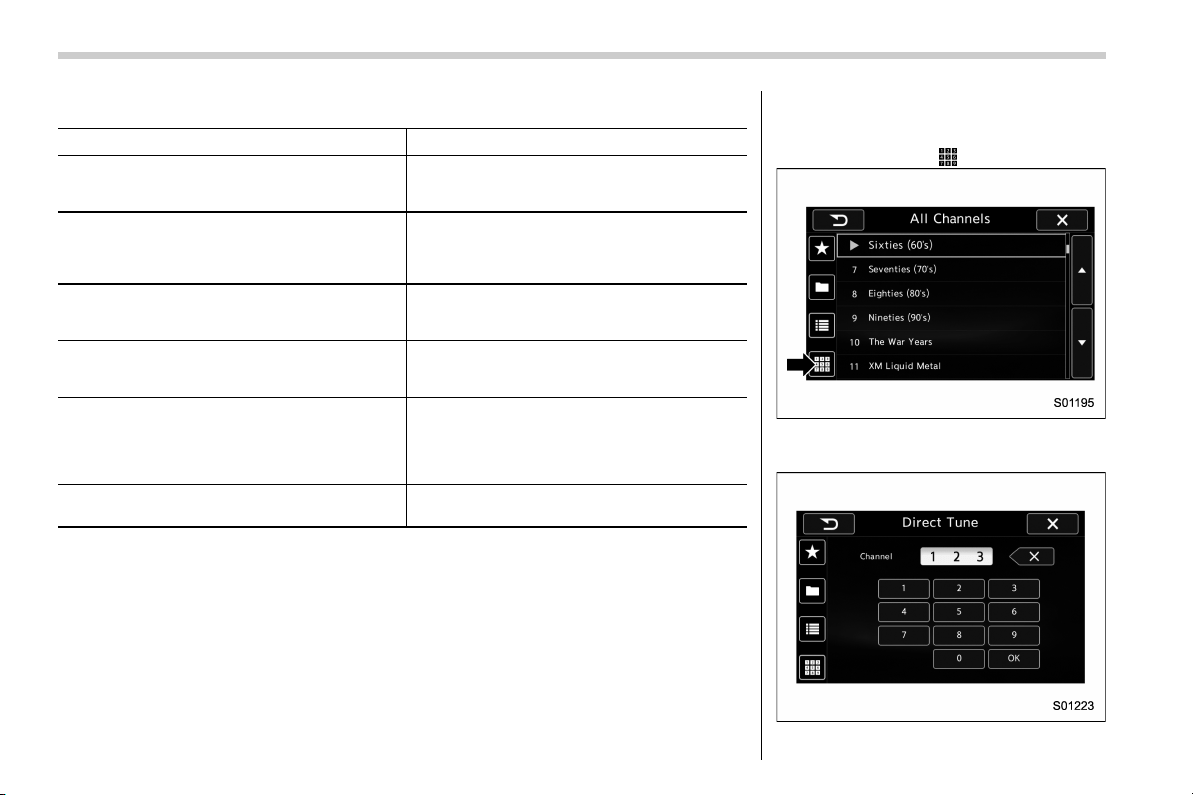
&
7
All channels list is displayed.
The available received channels are
displayed, and you can select a
channel.
&
8
Change to the Direct Tune display.
Refer to “Direct Tune” F40.
&
9
Return to the previous display.
&
10
Return to the playback display.
Audio panel
No. Function
&
1
Turn to adjust volume.
Press to turn the audio system on/
off.
&
2
Press to display the sound setting
screen. Refer to “Unit settings” F17.
&
3
Turn right to step up channels and
turn left to step down channels.
Press to select an audio source.
Refer to “Selecting an audio source”
F16.
&
4
Press to step up/down channels.
Press and hold to step up/down
channels fast.
36
Black plate (39,1)
北米Model "B4444BE-A" EDITED: 2016/ 4/ 28
! How to subscribe to SiriusXM Sa-
tellite Radio
To listen to a satellite radio broadcast in
the vehicle, a subscription to the SiriusXM
Satellite Radio service is necessary.
A SiriusXM Satellite Radi o is a tuner
designed exclusively to receive broad-
casts provided under a separate subscrip-
tion.
! How to subscribe
It is necessary to enter into a separate
service agreement with SiriusXM Satellite
Radio in order to receive satellite broad-
cast programming in the vehicle. Addi-
tional activation and service subscription
fees apply that are not included in the
purchase price of the vehicle and digital
satellite tuner.
For complete information on subscription
rates and terms, or to subscribe to
SiriusXM Satellite Radio:
. U.S. customers:
Refer to www.siriusxm.com or call
1-866-635-2349
. Canadian customers:
Refer to www.siriusxm.ca or call
1-877-209-0079
WARNING
. SiriusXM Satellite Radio Services
— Legal Disclaimers and Warn-
ings
– Fees and Taxes — Subscrip-
tion fee, taxes, one time acti-
vation fee, and other fees may
apply. Subscription fee is con-
sumer only. All fees and pro-
gramming subject to change.
Subscriptions subject to Cus-
tomer Agreement available at
www.siriusxm.com (U.S.) or
www.siriusxm.ca (Canada).
SiriusXM U.S. satellite and
data services are available
only in the contiguous USA
and DC. SiriusXM satellite
service is also available in
Canada: see
www.siriusxm.ca.
Explicit Language Notice —
Channels with frequent expli-
cit language are indicated
with an “XL” preceding the
channel name. Channel block-
ing is available for SiriusXM
Satellite Radio receiver s by
notifying SiriusXM at:
. U.S. customers:
Visit www.siriusxm.com or call
1-866-635-2349
. Canadian customers:
Visit www.siriusxm.ca or call
1-877-209-0079
CAUTION
. It is prohibited to copy, decom-
pile, disassemble, reverse engi-
neer, hack, manipulate or other-
wise make available any technol-
ogy or software incorporated in
receivers compatible with the
SiriusXM Satellite Radio System
or that support the XM website,
the Online Service or any of its
content. Furthermore, the
AMBE
®
voice compression soft-
ware included in this product is
protected by intellectual property
rights including paten t rights,
copyrights, and trade secrets of
Digital Voice Systems, Inc.
. Note: this applies to SiriusXM
Satellite Radio receive rs only
and not XM Ready devices.
– CONTINUED –
37
0

Black plate (40,1)
北米Model "B4444BE-A" EDITED: 2016/ 4/ 28
NOTE
. SiriusXM Satellite Services — De-
scriptions
– Only SiriusXM Satellite Radio
®
brings you more of what you love,
all in one place. Get over 175
channels, including commercial-
free music, plus the best sports,
news, talk, comedy and entertain-
ment. Welcome to the world of
satellite radio. More information
about SiriusXM Satellite Radio is
available online at
www.siriusxm.com (U.S.) and
www.siriusxm.ca (Canada).
. SiriusXM Satellite Services — Sub-
scription Instructions
– For SiriusXM Services requiring
a subscription (such as SiriusXM
Satellite Radio, and some Infotain-
ment & data services), the following
paragraph shall be included.
Required SiriusXM Satellite Radio
and some Infotainment & data ser-
vices monthly subscriptions sold
separately after trial period. Sub-
scription fee is consumer only. All
fees and programming subject to
change. Subscriptions are subject
to the Customer Agreement avail-
able at www.siriusxm.com (U.S.) or
www.siriusxm.ca (Canada). Sirius,
XM and all related marks and logos
are trademarks of Sirius XM Radio
Inc. All other marks, channel names
and logos are the property of their
respective owners.
For more information, program
schedules, and to subscribe or
extend subscription after compli-
mentary trial period; more informa-
tion is available at:
. U.S. customers:
Visit www.siriusxm.com or call
1-866-635-2349
. Canadian customers:
Visit www.siriusxm.ca or call
1-877-209-0079
. SiriusXM Satellite Radio is solely
responsible for the quality, availability
and content of the satellite radio ser-
vices provided, which are subject to
the terms and conditions of the
SiriusXM Satellite Radio customer ser-
vice agreement.
. Customers should have their radio
ID ready; the radio ID can be found by
tuning to “Ch 000” on the radio. For
details, see “DISPLAYING THE RADIO
ID” below.
. All fees and programming are the
responsibility of SiriusXM Satellite
Radio and are subject to change.
! How to change the source
Select the “Sirius XM” key on the source
select screen. Refer to “Selecting an audio
source” F16.
38
Black plate (41,1)
北米Model "B4444BE-A" EDITED: 2016/ 4/ 28
! Presetting a channel
1. The presets list is displayed via either
of the following procedures.
. When you touch the
tab in the
SiriusXM main screen (if the list that
was displayed the last time is Presets).
. When you select the
tab in each
list screen.
2. The current channel is stored if you
touch and hold the preset list key. You can
store up to 30 channels (A beep sounds
when a channel stored).
The playing icon is displayed for the
currently selected channel.
! Selecting a channel from the list
1. The categories list is displayed via
either of the following procedures.
. When you touch the
tab in the
SiriusXM main screen (if the list that
was displayed the last time is Cate-
gories).
. When you select the
tab in each
list screen.
2. Each channel list is displayed when
you select each category item.
– CONTINUED –
39
0
Black plate (42,1)
北米Model "B4444BE-A" EDITED: 2016/ 4/ 28
In addition, the following messages appear.
Display Message Contents
“Subscription Update”
“Press OK to Continue”
An update to your SiriusXM subscription has
been received by the SiriusXM tuner. Touch
any key to continue.
“Channel XXX Not Available”
(“XXX” refers to the selected channel number.)
This channel is not a valid SiriusXM channel.
The channel number has been entered incor-
rectly, or the channel was removed from the
SiriusXM channel lineup.
“Channel XXX Not Subscribed Call.”
“Call SiriusXM to Subscribed.”
(“XXX” refers to the selected channel number.)
This channel is not included in your SiriusXM
subscription plan.
“Ch Locked”
“Lock Code?”
The selected channel has been locked by the
parental controls.
A prompt to enter the unlock code will appear.
“Check Antenna”
Ensure the SiriusXM antenna cable is con-
nected to the SiriusXM tuner correctly.
Check the SiriusXM antenna wire for breaks or
sharp bends.
Replace the antenna if necessary.
“No Signal”
The vehicle must be outside, and the antenna
must have a clear view of the southern sky.
NOTE
Contact SiriusXM
. Listener Care Center (U.S. customers):
1-866-635-2349
. Listener Care Centre (Canadian customers):
1-877-209-0079
! Direct Tune
1. A channel input screen is displayed
when you touch the
tab.
2. Input any number and touch the “OK”
key, receive the channel which input.
40
Black plate (43,1)
北米Model "B4444BE-A" EDITED: 2016/ 4/ 28
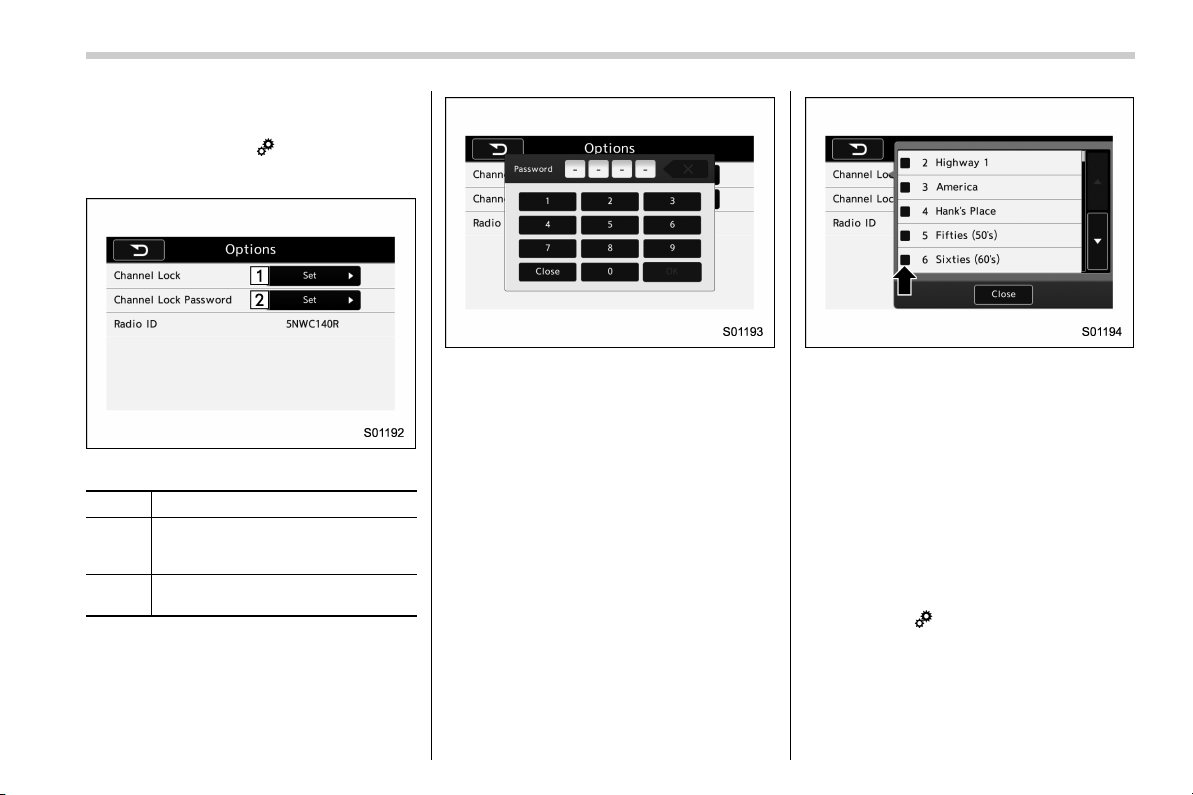
! SXM setting
1. An option menu screen is displayed
when you touch the
tab on the lower
left side of the screen. The “Options”
screen will appear.
Option menu screen
No. Function
&
1
Set the lock function of each chan-
nel. Input the password is necessary
for operation.
&
2
Set the password of the lock func-
tion.
2. A password input screen is displayed
when you touch the “Set” key of the
Channel Lock function.
Password input screen
3. When the input password is approved,
change to the lock channel selection
screen.
Lock channel selection screen
4. In the channel list, touch the channel
that should be locked.
! Displaying the Radio ID
Each SiriusXM tuner is identified with a
unique radio ID. The “Radio ID” is required
when activating an SiriusXM Satellite
Services or when reporting a problem.
. If “Ch 000” is selected using the
AUDIO/TUNE knob, the ID code will be
displayed.
. Touch the
key. The Radio ID will be
displayed on the “Options” screen.
– CONTINUED –
41
0

Black plate (44,1)
北米Model "B4444BE-A" EDITED: 2016/ 4/ 28
& aha
TM
by HARMAN
aha i s a cloud-based application t hat
connects to the system and gives you
access to your favorite web content safely
and easily. There are over 30,000 stations
spanning internet radio, personalized mu-
sic, audiobooks, Facebook, Twitter, res-
taurant and hotel searches, weather and
more. For more about aha, go to the aha
site (http://www.aharadio.com).
When connecting iPhone and iPod touch
or Android devices with the aha applica-
tion installed, you can control, view, and
hear aha content through the system.
In order to connect to this system, use a
USB port for an iPhone or iPod touch and
Bluetooth for Android devices.
In this chapter, iPhone and iPod touch or
Android devices will be referred to as a
smartphone.
WARNING
Do not connect or operate the
smartphone while driving. Doing so
may result in loss of control of your
vehicle and cause an accident or
serious injury.
CAUTION
. Do not leave your smartphone in
the car. In particular, high tem-
peratures inside the vehicle may
damage the smartphone.
. Do not push down on or apply
unnecessary pressure to the
smartphone while it is connected
as this may damage the smart-
phone or its terminal.
. Do not insert foreign objects into
the port as this may damage the
smartphone or its terminal.
42

Black plate (45,1)
北米Model "B4444BE-A" EDITED: 2016/ 4/ 28
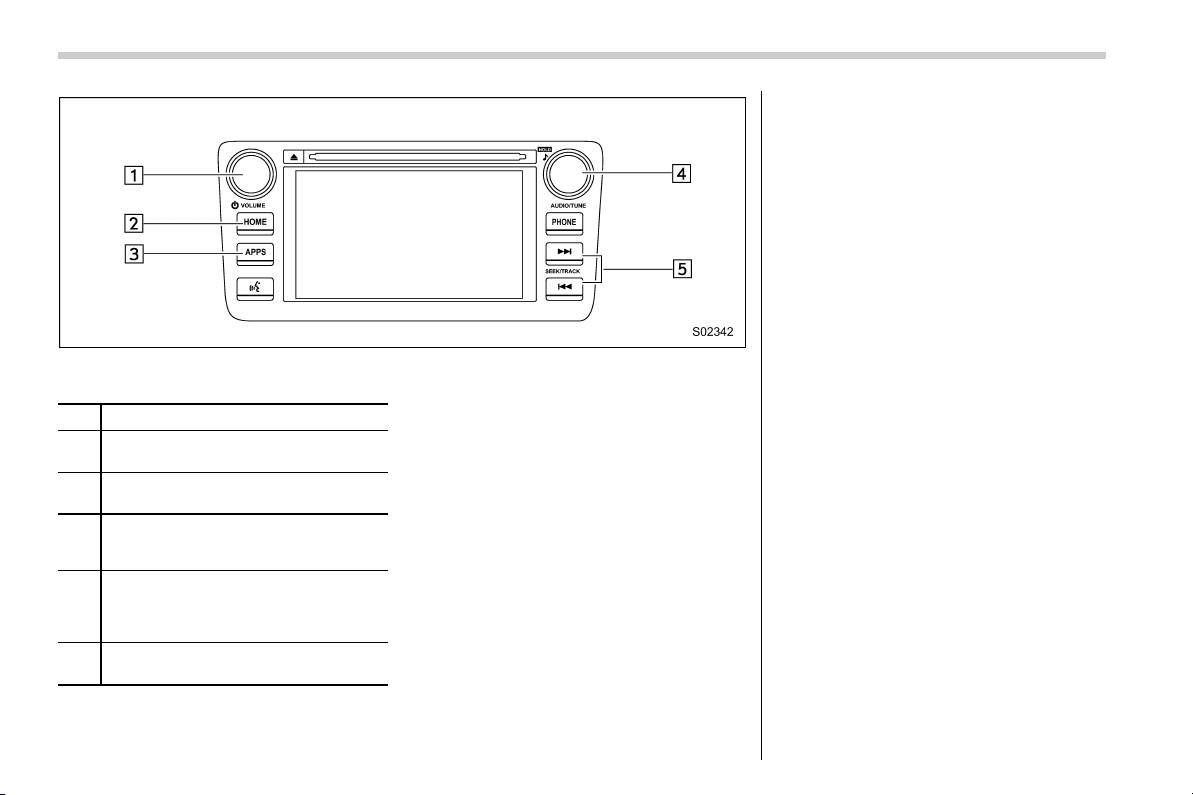
! Control screen and panel
Control screen (main screen and station screen)
No. Function
&
1
Select to display the audio source
selection screen.
&
2
Select to open the station list. Refer to
“Using aha application” F47.
&
3
Select to fast forward the current con-
tent item by 30 seconds.
&
4
Select to display the contents list of the
selected station.
&
5
Select to make a phone call to the
current content item.
A phone number is distributed depend-
ing on content items.
This feature is available only in these
cases.
No. Function
&
6
The track pauses when pressed during
playback and plays back when touched
during pause.
&
7
Select to set thumbs up.
&
8
Select to set thumbs down.
&
9
Select to start the playback from the
beginning of the content in the target
station.
&
10
Select to rewind the current content
item by 15 seconds.
&
11
Select to display the preset list.
&
12
Return to the control screen.
No. Function
&
13
Select to display the nearby list.
– CONTINUED –
43
0
Black plate (46,1)
北米Model "B4444BE-A" EDITED: 2016/ 4/ 28
Audio panel
No. Function
&
1
Turn to adjust volume.
Press to turn the audio system on/off.
&
2
Press to display the sound setting
screen. Refer to “Unit settings” F17.
&
3
Press to display the station operation
screen.
Press to select an audio mode.
&
4
Turn to display the next/previous con-
tent item.
Press to select an audio source. Refer
to “Selecting an audio source” F16.
&
5
Press to display the next/previous con-
tent item.
NOTE
. For safety reasons, certain func-
tions are not available while your
vehicle is in motion.
. In order to maximize signal recep-
tion, performance and precision of the
smartphone, please ensure the smart-
phone is placed as close to the system
as possible, while ensuring it is stowed
and secure while driving.
. When the ignition switch is in the
“ACC” or “ON” position, the battery of
the connect ed iPhone/iPod touch is
charged.
. iPhone/iPod touch may not be re-
cognized when the ignition switch is in
the “ACC” or “ON” position. In this
case, remove the iPhone/iPod touch
and reconnect it.
. The accuracy of the displayed in-
formation or the signal reception per-
formance depends on the smartphone
or the connected device, and it’s wire-
less connection.
. Since the aha application uses sig-
nals from GPS satellites and wireless
communication lines, it may not work
properly in the following locations.
– In a tunnel
– In underground parking lots
44

Black plate (47,1)
北米Model "B4444BE-A" EDITED: 2016/ 4/ 28
– Outside wireless communication
range, such as some countryside
areas
– Where the wireless communica-
tion network is congested, or where
communications are restricted
. Depending on the circumstances
and environment, the signal may be
weak or not be received. In such cases,
an error may occur.
. Top 35 entries in the preset station
list on the smartphone are displayed.
When there are more than 35 entries in
the preset station list, change the order
of the entries in the list on the smart-
phone. You can change the priority of
your preset stations within the aha
application (after disco nnected from
this system) to modify the station list
shown on the screen. Please see your
smartphone aha application “Edit Pre-
sets (in Main menu)” to modify this list.
. For operating the smartphone, see
the instruction manual that comes with
it.
. If there are multiple music files
stored on your iPhone or iPod touch,
it may take some time until playback
starts.
. Playback may be intermittent when
you switch to streaming Bluetooth
audio from aha on your smartphone
device.
. When connecting the device via
Bluetooth, the communication speed
may become slower than via USB.
! Before using aha application
In order to use the aha application on this
system, the application must be installed
on the smartphone.
! Settings required to use aha
application
. Search and download the aha applica-
tion from your smartphone app store.
– iPhone and iPod touch: Apple App
Store via iTunes
– Android device: Google Play Store
. Create an account and login to the aha
application on the smartphone.
NOTE
Please use the latest version of the aha
application.
! About app-based connected con-
tent
Requirements for using t he connected
content services of the aha application
on this system.
. Latest version of the system is compa-
tible with connected content application(s)
for the smartphone, available from aha,
downloaded to your smartphone.
. A current account w ith a wireless
content service provider.
. A smartphone data plan: If the data
plan for your smartphone does not provide
for unlimited data usage, additional
charges from your carrier may apply for
accessing app-based connected content
via 3G, 4G, Wi-Fi or 4G LTE wireless
networks.
. Connection to the internet via 3G, 4G,
Wi-Fi or 4G LTE networks.
NOTE
. Changes to product specifications
may result in differences between the
content of the manual and features of
the product.
. Be careful not to exceed the data
usage li mits for your smartphone.
Doing so will result in additional data
usage charges from your phone car-
rier.
. Access to app-based connected
content will depend on the availability
of wireless cell and/or Wi-Fi network
coverage for the purpose of allowing
your smartphone to con nect to the
internet.
. Service availability may be geogra-
phically limited by region. Consult the
wireless connected content service
– CONTINUED –
45
0
Black plate (48,1)
北米Model "B4444BE-A" EDITED: 2016/ 4/ 28
provider for additional information.
. Abil ity of this product to access
connected content is subject to change
without notice and could be affected by
any of the followi ng: compatibility
issues with future firmware versions
of the smartphone; compatibility is-
sues with future versions of the con-
nected content application(s) for the
smartphone; changes to or disconti-
nuation of the connected content ap-
plication(s) or service by its provider.
. Commun ication and phone call
charges for smartphones should be
paid by the wireless subscriber.
. If you lose the data in a smartphone
or other device while using it with the
system, no compensation will be given
for the lost data.
. Fuji Heavy Industries makes no
guarantee regarding the content pro-
vided by aha.
. aha may not work due to factors on
smartphones, smartphone applications
or stations. Fuji Heavy Industries is not
responsible for it.
! About the supported devices
This system supports the following de-
vices.
. For iPhone/iPod touch users
Type Generation
Firmware
version or
OS
iPhone
iPhone 3G iOS 4.2.x
iPhone 3GS iOS 6.1.x
iPhone 4 iOS 7.0.x
iPhone 4s iOS 7.0.x
iPhone 5 iOS 7.0.x
iPhone 5c iOS 7.0.x
iPhone 5s iOS 7.0.x
iPod touch
iPod touch iOS 3.1.x
iPod touch 2 iOS 4.2.x
iPod touch 3 iOS 5.1.x
iPod touch 4 iOS 6.1.x
iPod touch 5
iOS 7.0.x
NOTE
Note that the warranty does not apply if
an unsupported iPhone/iPod touch is
connected.
. For Android device users
Android OS Specification Profile
Android
Ver. 2.2 or
Ver. 2.3
Bluetooth
Specification
Ver. 1.1 or
higher
(Ver. 2.0 +
EDR or higher
is recom-
mended)
. aha Con-
nect Bin-
ary API
over SPP
. Digital
audio by
A2DP
NOTE
The available functions may vary de-
pending on the type of Android device.
! Connecting a smartphone
If you connec t a smartphon e to this
system after starting a supported aha
application on the smartphone, you can
display and operate the aha application
displayed on the smartphone on t he
system screen.
1. Run the aha application on your
smartphone.
2. Connect the iPhone/iPod touch to the
USB port or connect the Android device
by utilizing the Bluetooth connection (SPP
and A2DP profile).
. For details about connecting an
iPhone/iPod touch: Refer to “Connect-
ing and disconnecting a USB memory/
portable device” F15.
. For details about registering or con-
46
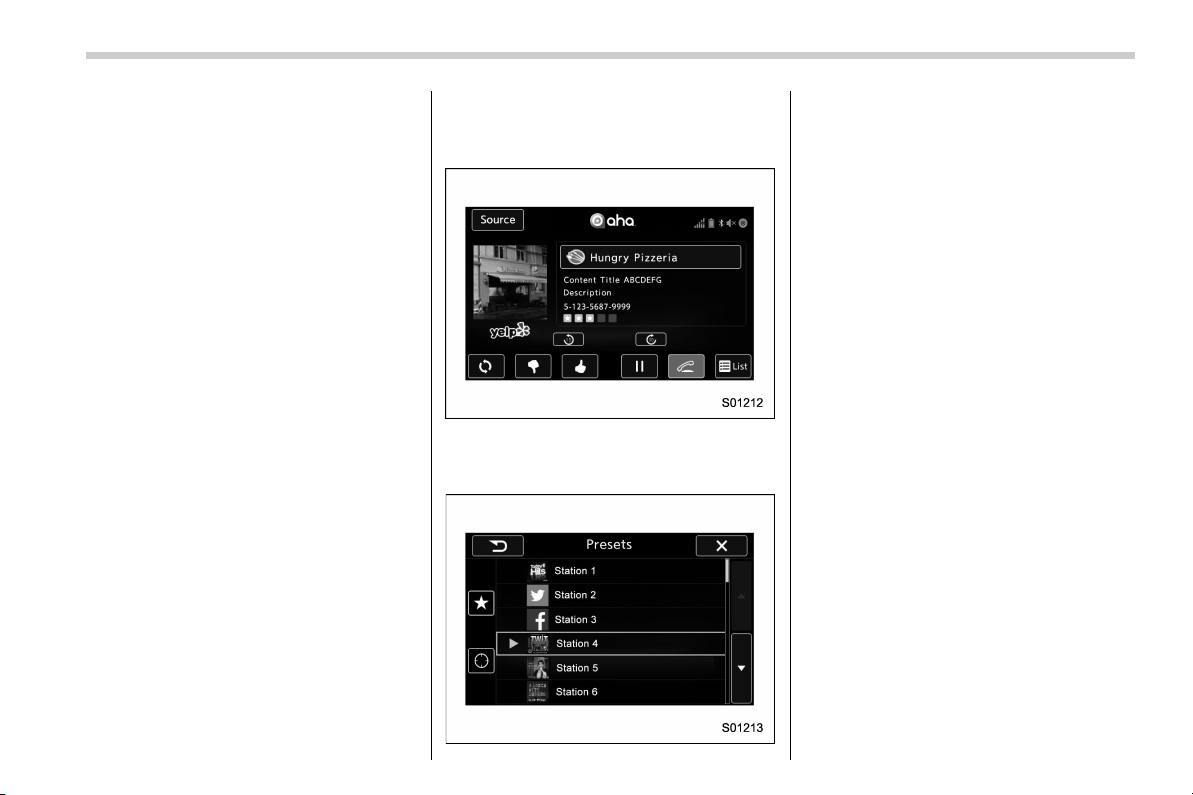
Black plate (49,1)
北米Model "B4444BE-A" EDITED: 2016/ 4/ 28
necting an Android device: Refer to
“Registering/connecting Bluetooth
®
device” F64.
NOTE
When iPhone/iPod touch and Android
device s ar e connected at the same
time, iPhone/iPod touch is prioritized.
! How to change the source
. Select the “aha” key on the source
select screen. Refer to “Basic operation”
F16.
. Select the “aha” key on the APPS
screen. Refer to “SUBARU STARLINK”
F24.
NOTE
When starti ng-up “aha”,thereare
some smartphone models for which
“aha” application does not start up
automatically.
! Using aha application
1. When the top screen is displayed,
touch the station key.
Example of the main screen
2. Select the desired station from the list.
The selected station is displayed.
NOTE
. The following operations are not
available on this system. Perform these
operations on the smartphone.
– Add/Reorder/Delete stations
– Login to Facebook/Twitter
. For the aha function, the following
touch screen gestures are not avail-
able.
– Multi-touch operation
– Double-tap
. For details on the services or the
operations, check the aha site
(http://www.aharadio.com) on the inter-
net.
. The button display will vary depend-
ing on each station or content item.
– CONTINUED –
47
0
Black plate (50,1)
北米Model "B4444BE-A" EDITED: 2016/ 4/ 28
& Pandora
®
(if equipped)
Pandora is an application for a smart-
phone. This can automatically select and
play recommended tracks.
By rating the track currently playing, tracks
that better match your preference will be
recommended.
In order to connect to this system, use a
USB port for an iPhone or iPod touch and
Bluetooth for Android devices.
Depending on differences between mod-
els or software version etc., some models
might be incompatible with this system.
This function is not available if the
Pandora application has not been in-
stalled on the smartphone.
WARNING
Do not operate the player’s controls
or connect the smartphone while
driving. Doing so may result in loss
of control of your vehicle and cause
an accident or serious injury.
CAUTION
. Do not leave your smartphone in
the car. In particular, high tem-
peratures inside the vehicle may
damage the smartphone.
. Do not push down on or apply
unnecessary pressure to the
smartphone while it is connected
as this may damage the smart-
phone or its terminal.
. Do not insert foreign objects into
the port as this may damage the
smartphone or its terminal.
NOTE
Follow the specific operation proce-
dures for the smartphone application.
48

Black plate (51,1)
北米Model "B4444BE-A" EDITED: 2016/ 4/ 28
! Control screen and audio panel
No. Function
&
1
Select to display the audio source
selection screen.
&
2
Select to open the station list. Refer to
“Station list” F50.
&
3
Select to skip the current track.
&
4
The track pauses when touched during
playback and plays when touched
during pause.
&
5
Select to set thumbs up.
This gives a high rating to the current
song.
All other similar songs will be played
back more frequently.
No. Function
&
6
Select to set thumbs down.
This gives a low rating to the current
song.
All other similar songs will be played
back less frequently.
When you select thumbs down, the
current track is skipped.
&
7
During playback of a station, you can
use this key to bookmark a song or
artist. Refer to “Registering Bookmarks”
F50.
&
8
Turn to adjust volume.
Press to turn the audio system on/off.
&
9
Turn clockwise to skip to the next track.
Press to select an audio source. Refer
to “Selecting an audio source” F16.
&
10
Press to display the sound setting
screen. Refer to “Unit settings” F17.
No. Function
&
11
Press to skip to the next track/cover art.
! Connecting a smartphone
Connect the iPhone/iPod touch to the
USB port or connect the Android device
by using Bluetooth connection (SPP and
A2DP profile).
. For details about connecting an
iPhone/iPod touch: Refer to “Connecting
and disconnecting a USB memory/porta-
ble device” F15.
. For details about registering or con-
necting an Android device: Refer to
“Registering/connecting Bluetooth
®
de-
vice” F64.
! How to change the source
The Pandora operation screen can be
reached by the following methods:
. Connecting a Pandora device. Refer to
“Connecting a Bluetooth device” F67 or
“Connect ing and disconnecting a USB
memory/portable device” F15.
. Select the “Pandora” key on the source
select screen. Refer to “Selecting an audio
source” F16.
. Select the “Pandora” key on the APPS
screen. Refer to “SUBARU STARLINK”
F24.
– CONTINUED –
49
0
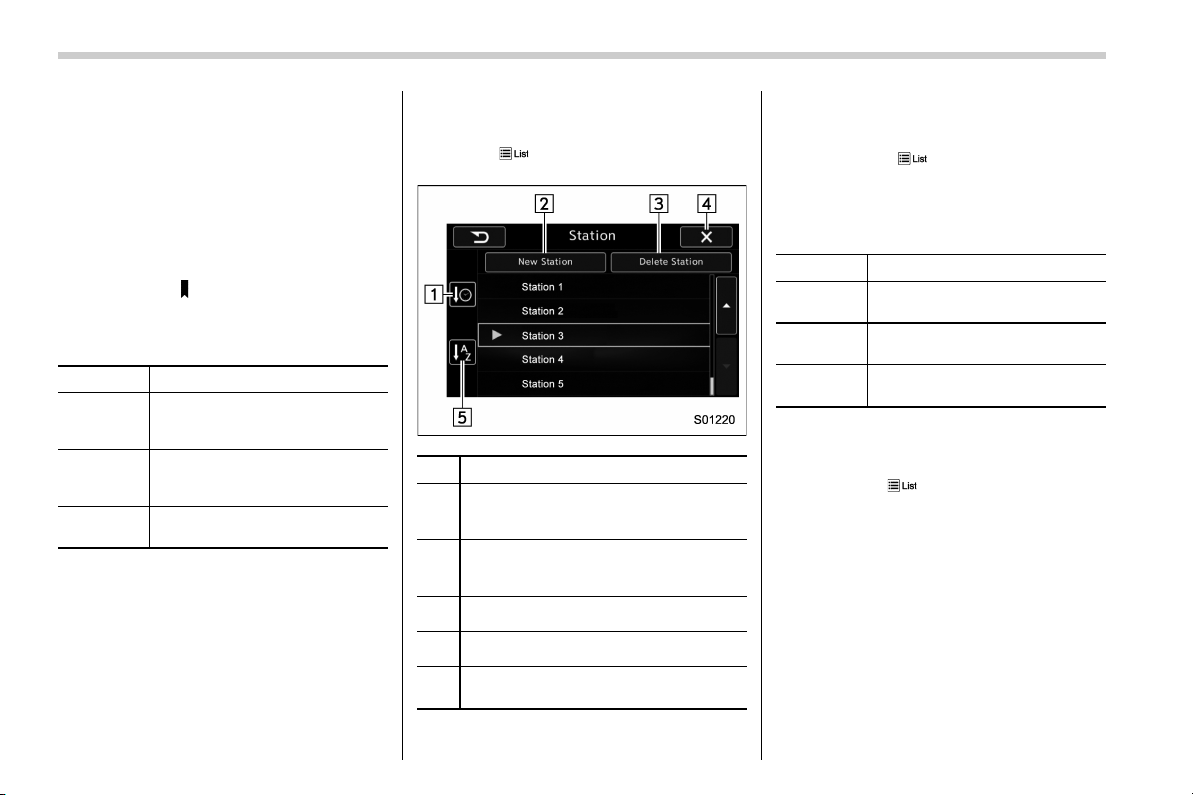
Black plate (52,1)
北米Model "B4444BE-A" EDITED: 2016/ 4/ 28
NOTE
When starting-up Pandora, there are
some smartphone models for which
Pandora application does not start up
automatically.
! Registering Bookmarks
You can register the music and artist now
being played in Bookmark.
1. Touch the
tab.
2. Select the desired key. The following
items are appeared on the screen.
Item Function
Track
When selected after the Book-
mark key is pressed, the current
track is bookmarked.
Artist
When selected after the Book-
mark key is pressed, the current
artist is bookmarked.
Cancel
Select to cancel the bookmark
operation.
! Station list
You can select, add or delete a station.
When the
tab is touched on the main
screen, a station list will be displayed.
No. Function
&
1
Select to sort the list in the chronologi-
cal order of when the Station List was
created.
&
2
Select to create a station.
The station can be created using track
names or artist names.
&
3
Select to delete a station.
&
4
Return to the control screen.
&
5
Select to sort the list based on the
alphabetical order of the station names.
! Store the station
You can register a station.
1. Touch the
tab on the Pandora
main screen.
2. Touch the “New Station” key, and then
select the desired key.
Item Function
From Track
Select to create a station using a
track name.
From Artist
Select to create a station using
an artist name.
Cancel
Select to cancel the operation to
add a station.
! Delete the station
You can delete a station.
1. Touch the
tab on the Pandora top
screen.
2. Touch the “Delete Station” key, and
then the station list is appeared.
3. Select the item to delete the station. If
the confirmation screen appears and the
“OK” key is selected, the selected station
will be deleted from station list.
50
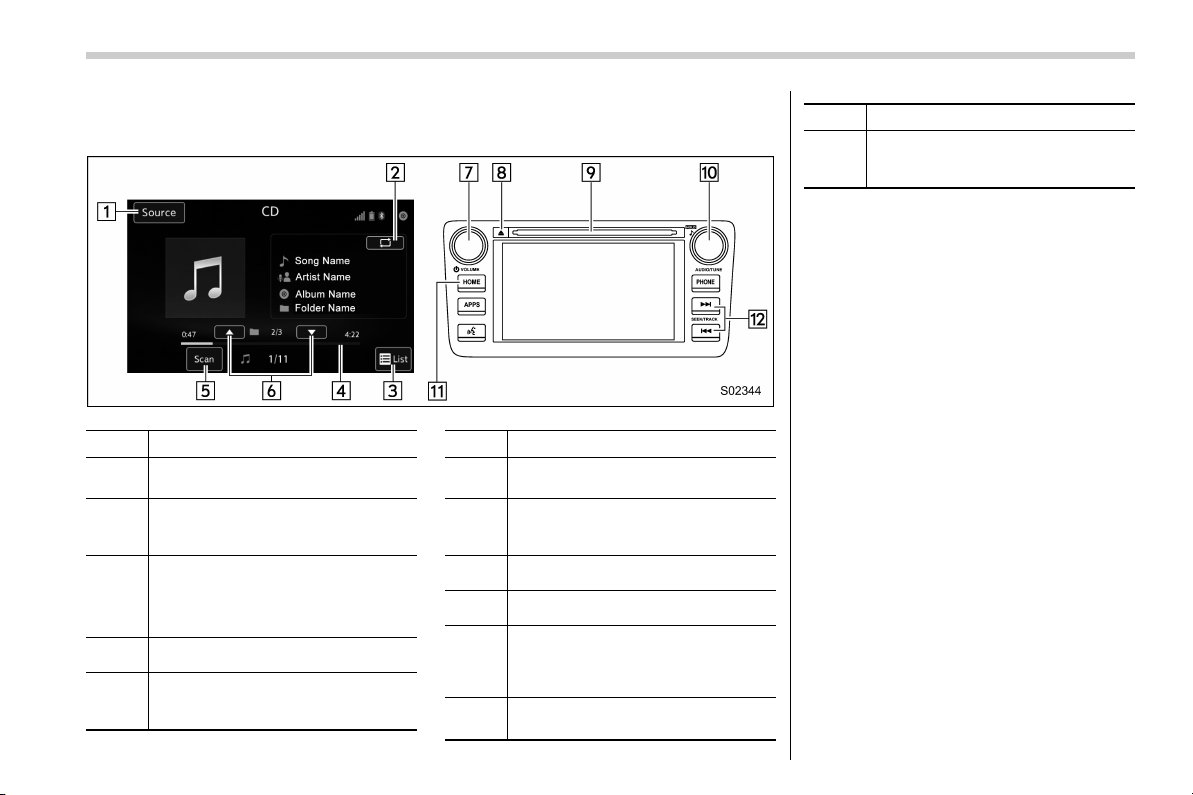
Black plate (53,1)
北米Model "B4444BE-A" EDITED: 2016/ 4/ 28
& CD
! Control screen and audio panel
No. Function
&
1
Select to display the audio source
selection screen.
&
2
Select to display the play mode
currently selected. Refer to “Select
play mode” F52.
&
3
Audio CD:
Select to display a track list.
MP3/WMA/AAC disc:
Select to display a folder list.
&
4
Shows progress.
&
5
The tracks in the disc are played
back for 10 seconds each from the
beginning of the track.
No. Function
&
6
MP3/WMA/AAC disc:
Select to choose a folder.
&
7
Turn to adjust volume.
Press to turn the audio system on/
off.
&
8
Press to eject a disc.
&
9
Disc slot
&
10
Turn to select a track/file.
Press to select an audio source.
Refer to “Selecting an audio source”
F16.
&
11
Press to display the sound setting
screen. Refer to “Unit settings” F17.
No. Function
&
12
Press to select a track/file.
Press and hold to fast forward/re-
wind.
NOTE
. Depending on the compression data
format of the inserted CD, some keys
may not be displayed on the screen.
. If a disc contains CD-DA files and
MP3/WMA/AAC files, only the CD-DA
files can be played back.
. If a CD-TEXT disc is inserted, the
title of the disc and track will be
displayed. Up to 32 characters can be
displayed.
. If the disc contains no CD-TEXT,
only the track number would be dis-
played on the screen.
. If you press the mute button on the
steering wheel during playback, the
track pauses. If you press the mute
button once again, the playback re-
sumes.
– CONTINUED –
51
0
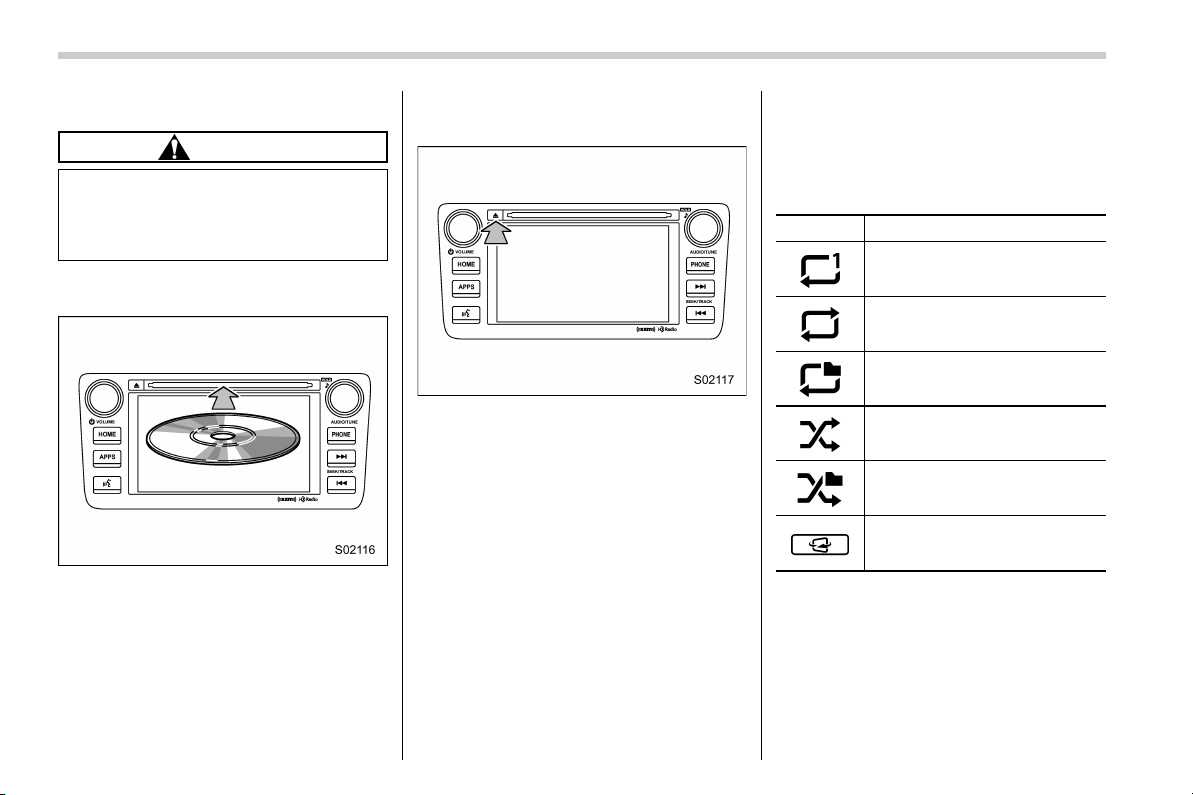
Black plate (54,1)
北米Model "B4444BE-A" EDITED: 2016/ 4/ 28
! Loading a disc
CAUTION
Never try to disassemble the audio
kit or lubricate any part of the CD
player. Do not insert anything other
than a disc into the slot.
Insert a disc into the disc slot. After
insertion, the disc is automatically loaded.
NOTE
When inserting a disc, gently insert it
with the label facing up.
! Unloading a disc
Press the eject button to remove the disc.
! How to change the source
The CD operation screen can be reached
by the following methods:
. Insert a disc. Refer to “Loading a disc”
F52.
. Select the “DISC” key on the source
select screen. Refer to “Selecting an audio
source” F16.
! Select play mode
The play mode settings display will appear
when play mode key is touched. Select
the preferred play mode from the following
items.
Icon Function
Touch to start 1 track repeat.
Touch to start repeat all.
Touch to start folder repeat.
Touch to start shuffle all.
Touch to start shuffle folder.
Return to the control screen.
NOTE
Depending on the compression data
formant of the inserted CD, the dis-
played play mode may differ from the
illustration shown here.
52
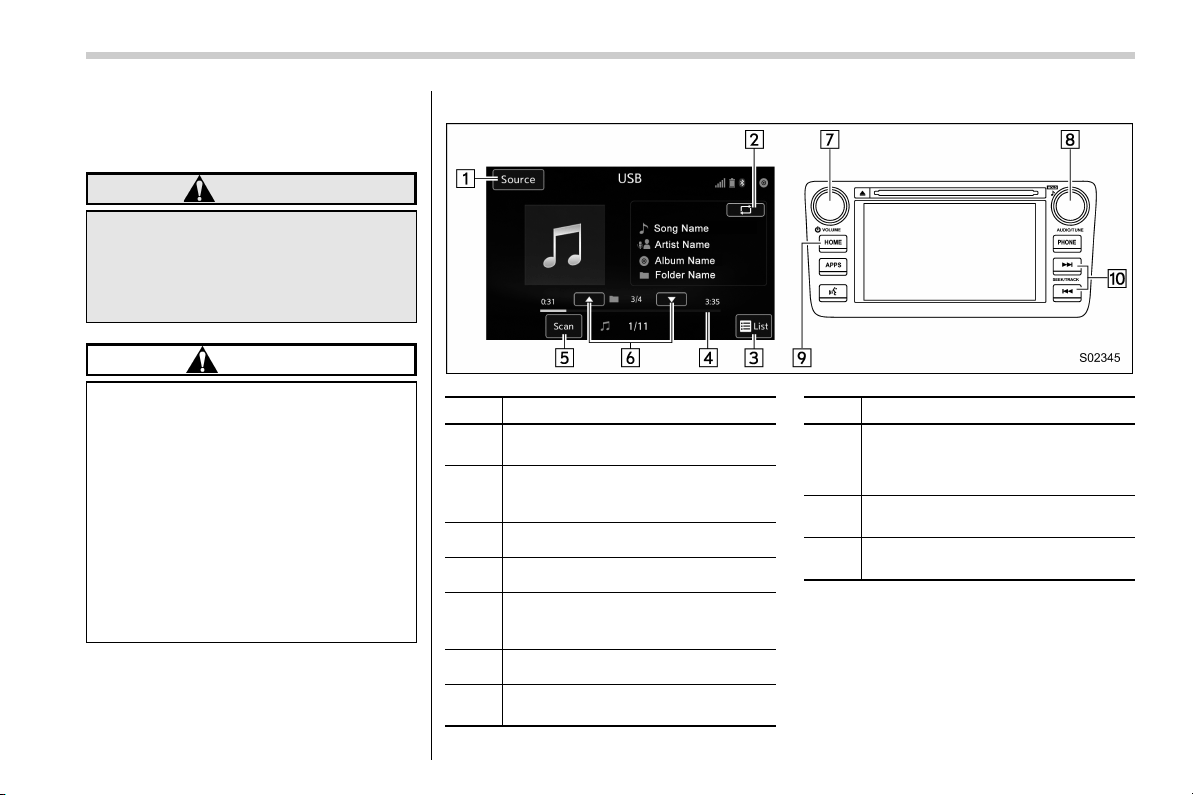
Black plate (55,1)
北米Model "B4444BE-A" EDITED: 2016/ 4/ 28
& USB memory
Audio files on the USB memory can be
played.
WARNING
Do not operate the player’s controls
or connect the USB memory while
driving. Doing so may result in
losing control of your vehicle and
cause an accident or serious injury.
CAUTION
. Do not leave your USB memory
in the car. In particula r, high
temperatures inside the vehicle
may damage the USB memory.
. Do not push down on or apply
unnecessary p ressure to the
USB memory while it is con-
nected as this may damage the
USB memory or its terminal.
. Do not insert foreign objects into
the port as this may damage the
USB memory or its terminal.
! Control screen and audio panel
No. Function
&
1
Select to display the audio source
selection screen.
&
2
Select to display the play mode
currently selected. Refer to “Select
play mode” F54.
&
3
Select to display folder list.
&
4
Shows progress.
&
5
The tracks in the folder are played
back 10 seconds each from the
beginning of the track.
&
6
Select to choose a folder.
&
7
Turn to adjust volume.
Press to turn the audio system on/off.
No. Function
&
8
Turn to select a file/track.
Press to select an audio source.
Refer to “Selecting an audio source”
F16.
&
9
Press to display the sound setting
screen. Refer to “Unit settings” F17.
&
10
Press to select a file/track.
Press and hold to fast forward/rewind.
– CONTINUED –
53
0

Black plate (56,1)
北米Model "B4444BE-A" EDITED: 2016/ 4/ 28
NOTE
If you press the mute button on the
steering wheel during playback, the
track pauses. If you press the mute
button once again, the playback re-
sumes.
! Connecting a USB device
You can connect a USB device to the
vehicle USB port. Refer to “Connecting
and disconnecting a USB memory/porta-
ble device” F15.
! How to change the source
The USB Audio playback screen can be
reached by the following methods:
. Connect a USB memory. Refer to
“Connect ing and disco nnecting a USB
memory/portable device” F15.
. Select the “USB/iPod” key on the
source select screen. Refer to “Selecting
an audio source” F16.
! Select play mode
The play mode settings display will appear
when play mode key is touched. Select
the preferred play mode from the following
items.
Icon Function
Touch to start 1 track repeat.
Touch to start repeat all.
Touch to start folder repeat.
Touch to start shuffle all.
Touch to start shuffle folder.
Return to the control screen.
& iPod
Audio files on the iPod can be played.
WARNING
Do not operate the player’s controls
or connect the iPod while driving.
Doing so may result in loss of
control of your vehicle and cause
an accident or serious injury.
CAUTION
. Do not leave your portable player
in the car. In pa rticular, high
temperatures inside the vehicle
may damage the portable player.
. Do not push down on or apply
unnecessary pressure to the por-
table player while it is connected
as this may damage the portable
player or its terminal.
. Do not insert foreign objects into
the port as this may damage the
portable player or its terminal.
54
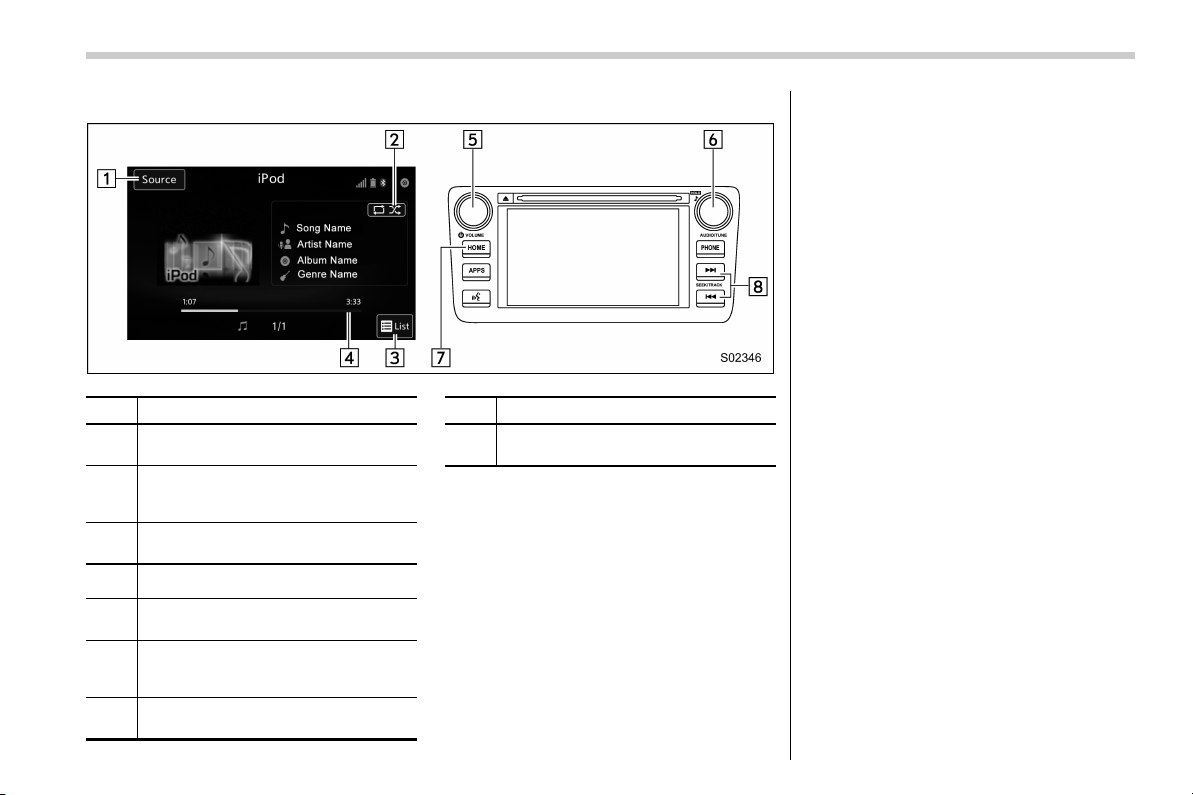
Black plate (57,1)
北米Model "B4444BE-A" EDITED: 2016/ 4/ 28
! Control screen and audio panel
No. Function
&
1
Select to display the audio source
selection screen.
&
2
Select to display the play mode
currently selected. Refer to “Select
play mode” F56.
&
3
Select to display iPod List. Refer to
“iPod settings” F56.
&
4
Shows progress.
&
5
Turn to adjust volume.
Press to turn the audio system on/off.
&
6
Turn to select a track/file.
Press to select an audio source. Refer
to “Selecting an audio source” F16.
&
7
Press to display the sound setting
screen. Refer to “Unit settings” F17.
No. Function
&
8
Press to select a track/file.
Press and hold to fast forward/rewind.
NOTE
. When an iPod is connected using a
genuine USB cable, the iPod starts
charging its battery.
. When an iPod is connected and the
audio source is changed to iPod mode,
the iPod will resume playing from the
same point it was last used.
. Depending on the iPod that is con-
nected to the system, certain functions
may not be available.
. Files/tracks selected by operating a
connected iPod may not be recognized
or displayed properly.
. If you press the mute button on the
steering wheel during playback, the
track pauses. If you press the mute
button once again, the playback re-
sumes.
! Connecting the iPod
You can connect an iPod to the vehicle
USB port using the USB cable. Refer to
“Connect ing and disconnecting a USB
memory/portable device” F15.
– CONTINUED –
55
0

Black plate (58,1)
北米Model "B4444BE-A" EDITED: 2016/ 4/ 28
! How to change the source
TheiPodoperationscreencanbe
reached by the following methods:
. Connect an iPod. Refer to “Connecting
and disconnecting a USB memory/porta-
ble device” F15.
. Select the “USB/iPod” key on the
source select screen. Refer to “Selecting
an audio source” F16.
! Select play mode
The play mode settings display will appear
when play mode key is touched. Select
the preferred play mode from the following
items.
Icon Function
Touch to start 1 track repeat.
Touch to start repeat all.
Touch to start shuffle all.
Touch to turn off shuffle.
Touch to start shuffle album.
Return to the control screen.
! iPod settings
You can choose the following items from
the list screen after touching the
tab
on the screen.
Icon Function
Select to display the play list.
Select to display tracks list.
Select to display artists list.
Select to display albums list.
Select to open other list (“Gen-
res”, “Composers”, “Audiobooks”
and “Podcast”).
Select to open “Genres” list.
Select to open “Composers” list.
Select to open “Audiobooks” list.
Select to open “Podcasts” list.
& Bluetooth audio
The Bluetooth audio system enables
users to enjoy listening to music that is
played on a portable player on the vehicle
speakers via wireless communication.
This audio system supports Bluetooth, a
wireless data system capable of playing
portable audio music without cables. If
your device does not support Bluetooth,
the Bluetooth audio system will not func-
tion.
WARNING
. Do not operate the player’s con-
trols or connect to the Bluetooth
audio system while driving.
Doing so may result in loss of
control of your vehicle and cause
an accident or serious injury.
. Your audio unit is f itted wit h
Bluetooth antennas. People with
implantable cardiac pacemakers,
cardiac resynchronization ther-
apy-pacemakers or implantable
cardioverter defibrillators should
maintain a reasonable distance
between themselves and the
Bluetooth antennas. The radio
waves may affect the operation
of such devices.
56
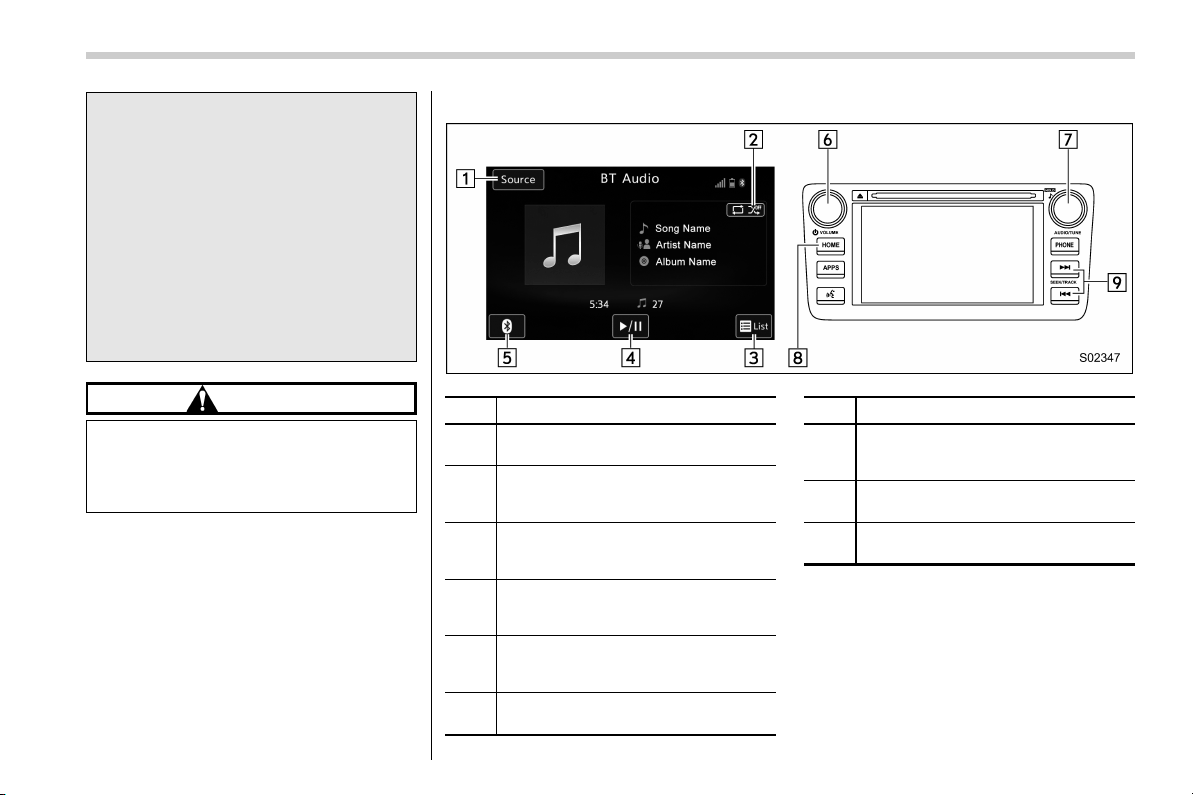
Black plate (59,1)
北米Model "B4444BE-A" EDITED: 2016/ 4/ 28
. Before using Bluetooth devices,
users of any electrical medical
device other than i mplantable
cardiac pacemakers, cardiac re-
synchronizatio n therapy -pace-
makers or implantable cardiover-
ter defibrillators should consult
the manufacturer of the device
for information about its opera-
tion under the influence of radio
waves. Radio waves could have
unexpected effects on the opera-
tion of such medical devices.
CAUTION
Do not leave your portable player in
the vehicle. In particular, high tem-
peratures inside the vehicle may
damage the portable player.
! Control screen and audio panel
No. Function
&
1
Select to display the audio source
selection screen.
&
2
Select to display the play mode
currently selected. Refer to “Select
play mode” F59.
&
3
Select to display as a list (for the
models with AVRCP Ver. 1.4 or high-
er).
&
4
The track pauses when touched dur-
ing playback and plays when touched
during pause.
&
5
Select to open Bluetooth Settings.
Refer to “Setting Bluetooth details”
F67.
&
6
Turn to adjust volume.
Press to turn the audio system on/off.
No. Function
&
7
Turn to select a track.
Press to select an audio source. Refer
to “Selecting an audio source” F16.
&
8
Select to display the sound setting
screen. Refer to “Unit settings” F17.
&
9
Press to select a track.
Press and hold to fast forward/rewind.
– CONTINUED –
57
0

Black plate (60,1)
北米Model "B4444BE-A" EDITED: 2016/ 4/ 28
NOTE
. Depending on the Bluetooth device
that is connected to the system, the
music may start playing when selecting
the
key while it is paused. Con-
versely, the music may pause when
selecting the
key while it is playing.
. In the following conditions, the sys-
tem may not function:
– The Bluetooth device is turned
off.
– The Bluetooth device is not con-
nected.
– The Bluetooth device has a low
battery.
. It may take time to connect the
phone when Bluetooth audio is being
played.
. For operating the portable player,
see the instruction manual that comes
with it.
. If the Bluetooth device is discon-
nected due to poor reception from the
Bluetooth network when the ignition
switch is in the “ACC” or “ON” posi-
tion, the system will automatically
reconnect to the portable player.
. If the Bluetooth device is discon-
nected on purpose, such as it was
turned off, this does not happen.
Reconnect the portable player manu-
ally.
. Bluetooth device information is re-
gistered when the Bluetooth device is
connected to the Bluetooth audio sys-
tem. When selling or disposing of the
vehicle, remove the Bluetooth audio
information from the system. Refer to
“Bluetooth
®
settings” F64.
! Connecting a Bluetooth device
To use the Bluetooth audio system, it is
necessary to register a Bluetooth device
with the system.
. Registering an additional device
1. Select the “Add” key on the Bluetooth
devices connection screen.
2. For more information: Refer to “Regis-
tering/connecting Bluetooth
®
device”
F64.
. Selecting a registered device
1. Select the “Select” key on the Blue-
tooth devices connection screen.
2. For more information: Refer to “BT
Devices Connection screen” F67.
! How to change the source
Select the “BT Audio” key on the source
select screen. Refer to “Selecting an audio
source” F16.
NOTE
Depending on the type of portable
player connected, some functions
may not be available and/or the screen
may look differently than shown in this
manual.
58
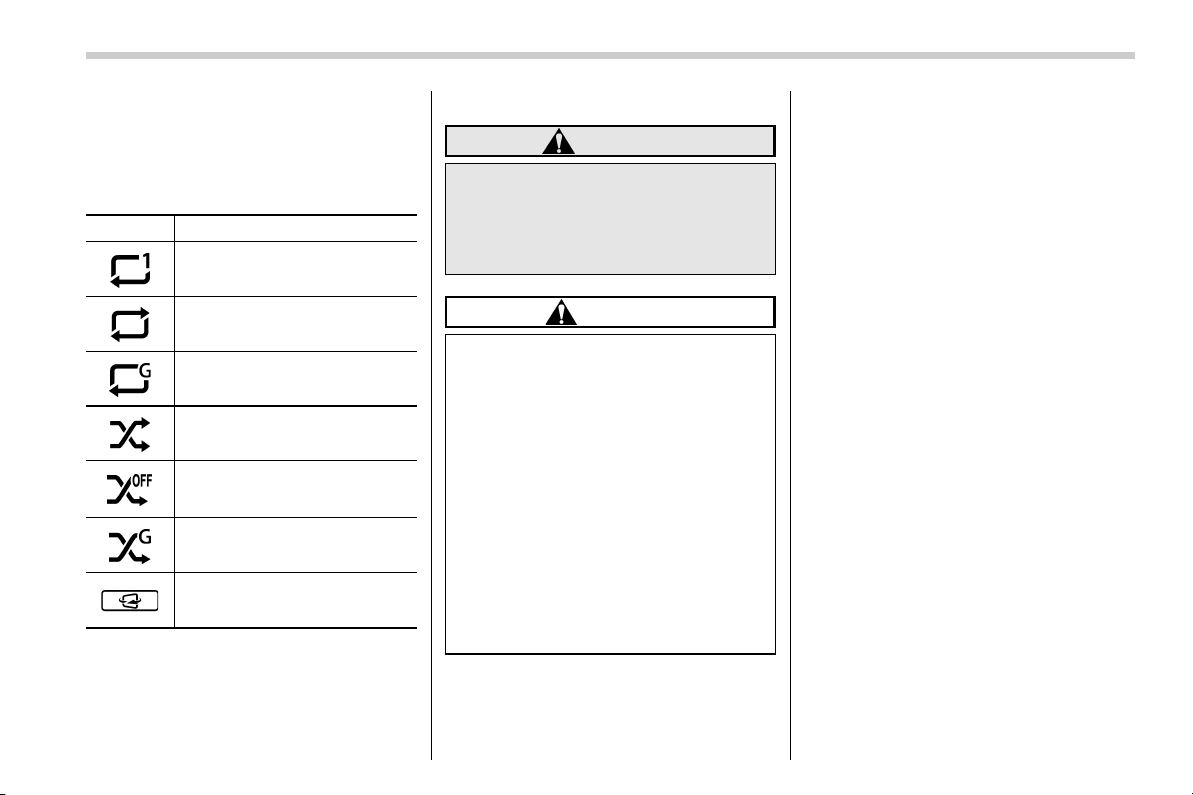
Black plate (61,1)
北米Model "B4444BE-A" EDITED: 2016/ 4/ 28
! Select play mode
The play mode settings display will appear
when play mode key is touched. Select
the preferred play mode from the following
items.
Icon Function
Touch to start 1 track repeat.
Touch to start repeat all.
Touch to repeat the tracks in the
group.
Touch to start shuffle all.
Touch to play tracks in the order
in which they are registered in
the audio device.
Touch to start shuffle group.
Return to the control screen.
NOTE
If the connected device does not sup-
port the group repeat mode, the group
functions are not available.
& AUX
WARNING
Do not operate the player’s controls
or connect the portable audio device
while driving. Doing so may result in
loss of control of your vehicle and
cause an accident or serious injury.
CAUTION
. Do not leave portable audio de-
vice in the vehicle. The tempera-
ture inside the vehicle may be-
come high, resulting in damage
to the player.
. Do not push down on or apply
unnecessary pressure to the por-
table audio device while it is
connected as this may damage
the portable audio device or its
terminal.
. Do not insert foreign objects into
the port as this may damage the
portable audio device or its term-
inal.
– CONTINUED –
59
0

Black plate (62,1)
北米Model "B4444BE-A" EDITED: 2016/ 4/ 28
! Control screen and audio panel
No. Function
&
1
Select to display the audio source
selection screen.
&
2
Select to adjust the audio gain level.
Refer to “Audio level settings” F60.
&
3
Turn to adjust volume.
Press to turn the audio system on/off.
&
4
Press to select an audio source.
Refer to “Selecting an audio source”
F16.
&
5
Press to display the sound setting
screen. Refer to “Unit settings” F17.
! Connecting a portable audio device
You can connect a portable audio device
to the vehicle AUX jack. Refer to “Con-
necting and disconnecting a USB mem-
ory/portable device” F15.
! How to change the source
The AUX operation s creen can be
reached by the following methods:
. Connect a portable audio device. Refer
to “Connecting and disconnecting a USB
memory/portable device” F15.
. Select the “AUX” key on the source
select screen. Refer to “Selecting an audio
source” F16.
! Audio level settings
You can set the audio gain level.
1. Select the
tab on the screen, and
then touch the right side key of the “Audio
Level” key.
2. Select the audio level from the follow-
ing items.
. Low
. Mid
. High
60
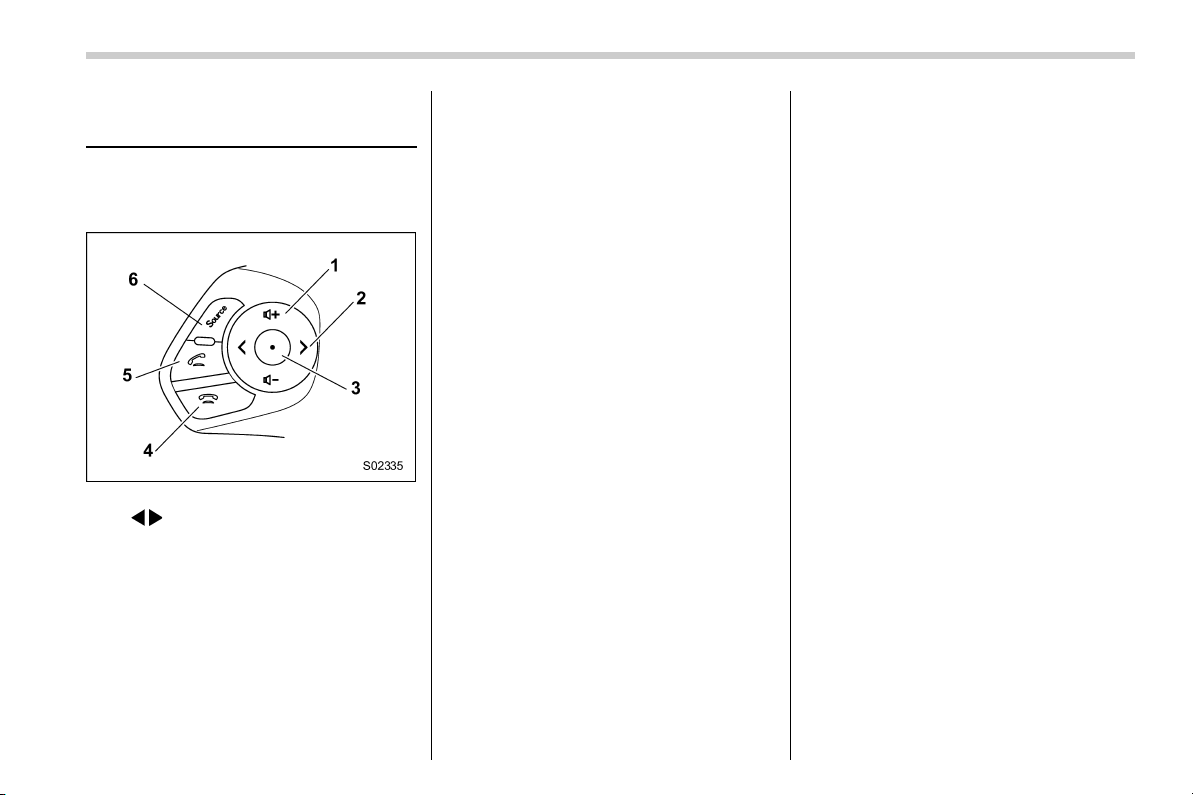
Black plate (63,1)
北米Model "B4444BE-A" EDITED: 2016/ 4/ 28
Remote controller on steer-
ing wheel
Some parts of the audio/visual system can
be operated by using the remote controller
on the steering wheel.
1) + − button
2)
/ button
3) Mute/Enter button
4) On hook button
5) Off hook button
6) Source button
– CONTINUED –
61
0
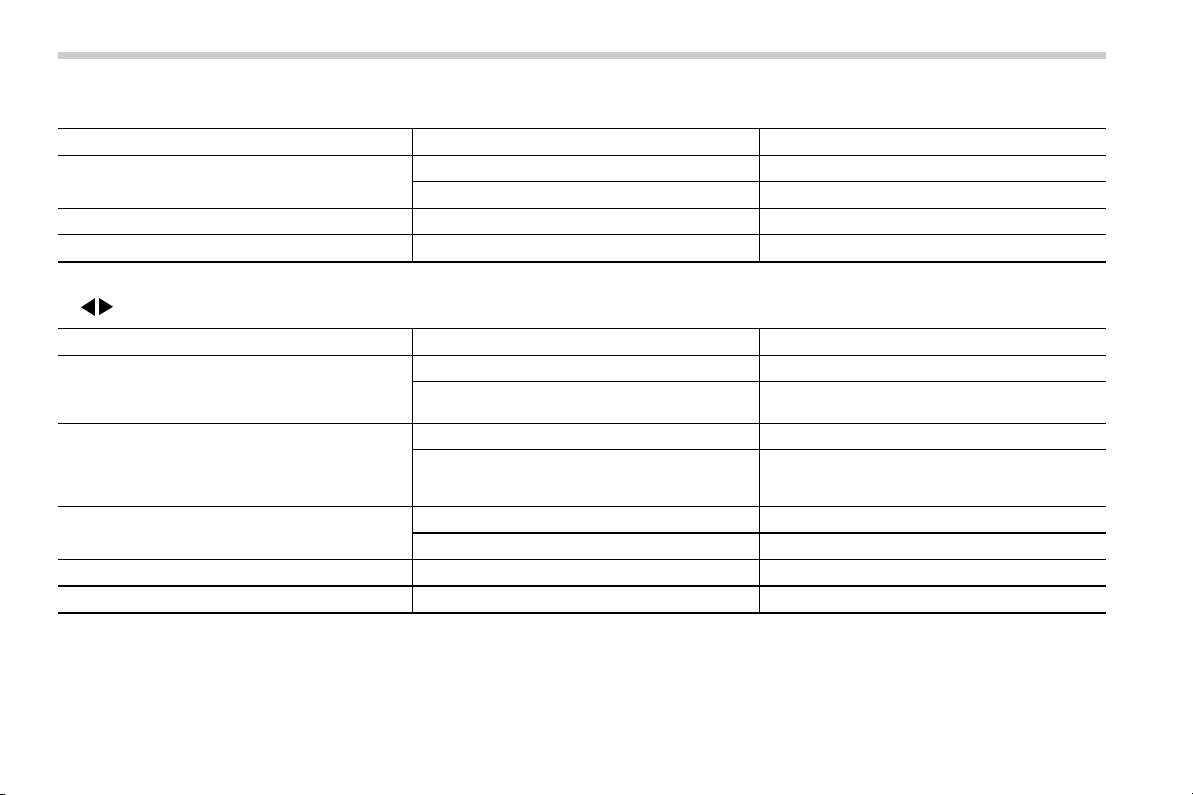
Black plate (64,1)
北米Model "B4444BE-A" EDITED: 2016/ 4/ 28
. +/− button
Mode Operation Function
Except list screen
Press Volume up/down
Press and hold Volume up/down continuously
List screen Press Move cursor up/down
Pandora main screen (if equipped) Press and hold
“+” button is thumb up/“−” button is thumb down
. / button
Mode Operation Function
AM/FM Radio, SiriusXM (if equipped)
Press Preset channel up/down
Press and hold
Seek up/down continuously while the button is
being pressed
aha
Press Content up/down
Press and hold
Reverse the current content item for 15 sec-
onds/Fast forward the current content item for
30 seconds
Audio CD, MP3/WMA/AAC disc, USB, iPod, BT
audio
Press Select a track/file
Press and hold Fast forward/rewind
Pandora (if equipped) Press and hold Thumbs up
List screen Press
Move cursor left/right
62

Black plate (65,1)
北米Model "B4444BE-A" EDITED: 2016/ 4/ 28
. Mute/Enter button
Mode Operation Function
List screen Press Select cursor entry
CD, USB, iPod, BT audio, Pandora (if equipped), aha Press Pause or play back
AM/FM radio, AUX, SiriusXM (if equipped) Press
Mute or cancel mute
. On hook/Off hook button
Mode Operation Function
All Press
Use or cancel the hands-free system
. Source button
Mode Operation Function
All Press
Change audio modes
NOTE
In the aha, Pandora (if equipped) and SUBARU STARLINK (if equipped) mode, some operation may be done on the screen
depend on the selected APPS.
63
0
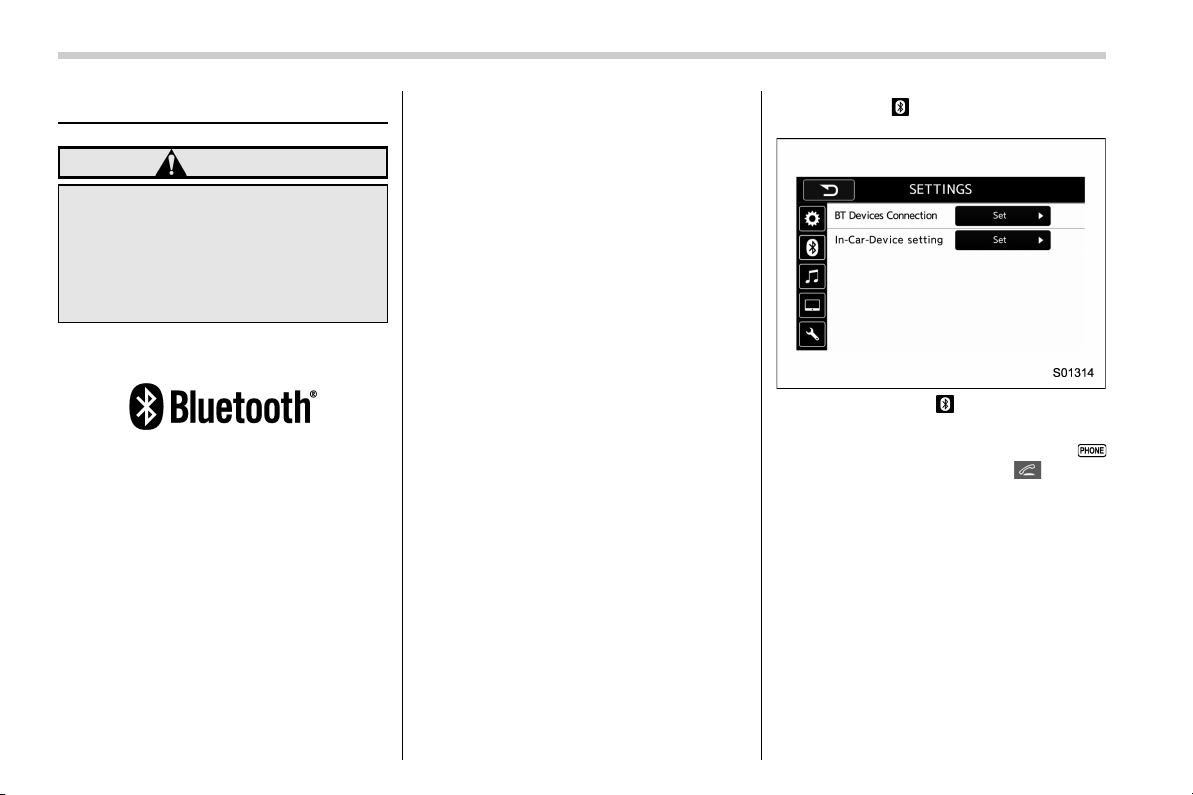
Black plate (66,1)
北米Model "B4444BE-A" EDITED: 2016/ 4/ 28
Bluetooth
®
settings
WARNING
Be sure to park the vehicle in a safe
location before connecting or oper-
ating a Bluetooth phone or audio
device. Failure to do so may result
in loss of control of your vehicle and
cause an accident or serious injury.
& Regulatory information
The Bluetooth
®
word mark and logos are
registered trademarks owned by Bluetooth
SIG, Inc.
& Registering/
connecting Bluetooth
®
device
You can regis ter up to five de vices,
regardless of whether they are Bluetooth
phones or audio devices.
NOTE
. Once the phone h as be en regis-
tered, it is possible to use the hands-
free system or Bluetooth audio.
. Devices cannot be registered during
driving.
! Registering a Bluetooth phone for
the first time
To use the hands-free system, it is
necessary to register a Bluetooth phone
with the system.
For details about registering a Bluetooth
device: Refer to “Registering a Bluetooth
Audio device for the first time” F65.
1. Turn the Bluetooth connection setting
of your cell phone on.
. This function is not available when
Bluetooth connection setting of your
cell phone is set to off.
2. Press the HOME button and select the
“SETTINGS” key.
3. Touch the
tab and then the “SET-
TINGS” screen will appear.
Settings (When the tab is selected)
. Operations up to this point can also
be performed by pressing t he
button (audio unit) or button
(steering wheel).
4. To register a device, touch the “Set”
key on “BT Devices Connection”.
64
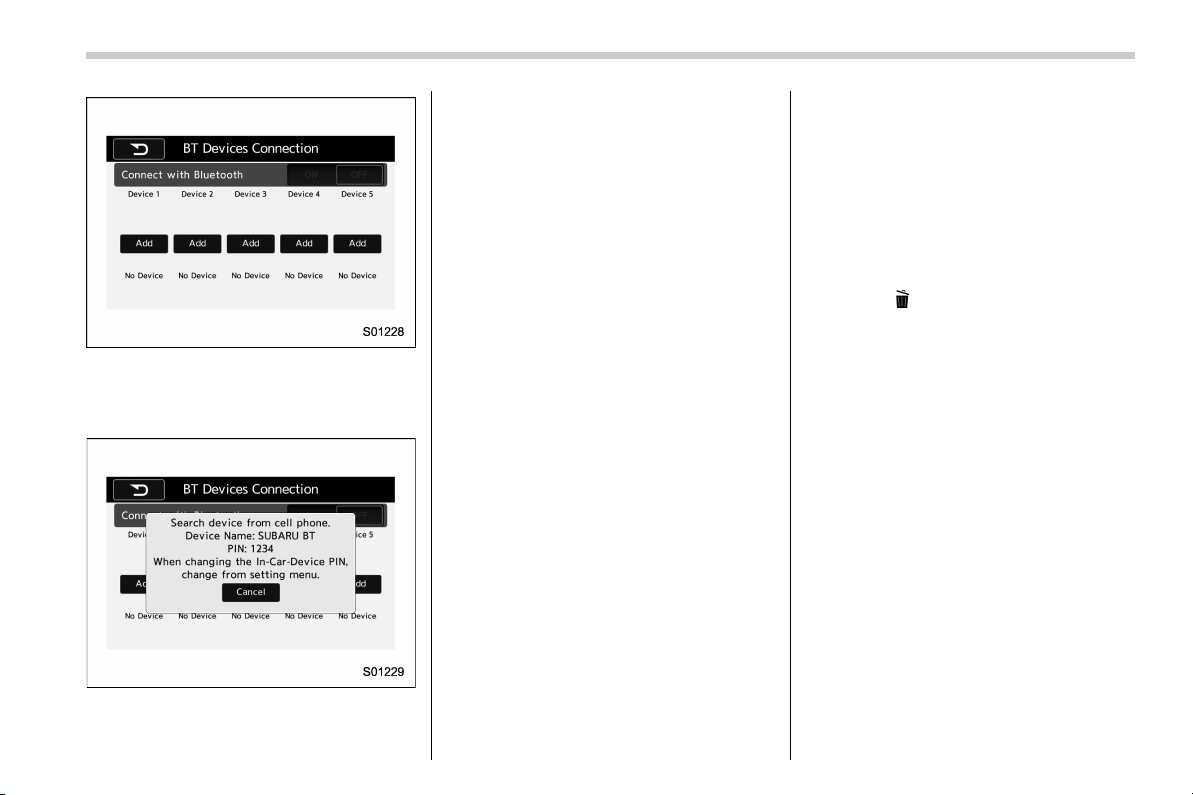
Black plate (67,1)
北米Model "B4444BE-A" EDITED: 2016/ 4/ 28
“BT Devices Connection” screen (At the
initial startup and when no device is
registered).
5. Touch the “Add” key.
When the “Add” key is selected (Waiting
for the connection request from a device).
. For details about operating the Blue-
tooth device, see the manual that
comes with it.
. To cancel the registration, touch the
“Cancel” key.
6. Register the Bluetooth device using
your Bluetooth device.
. A PIN-code is not required for SSP
(Secure Simple Pairing) compatible
Bluetooth devices. Depending on the
type of Bluetooth device being con-
nected, a message confirming regis-
tration may be displayed on the Blue-
tooth device’s screen. Respond and
operate the Bluetooth device accord-
ing to the confirmation message.
7. Check that the screen is displayed
when registration is complete.
. The system waits for connection
requests coming from the registered
device.
. At this stage, the Bluetooth func-
tions are not yet available.
! Registering a Bluetooth Audio de-
vice for the first time
To use the Bluetooth Audio, it is necessary
to register an audio device with the
system.
The device registration procedure is the
same for both the hands-free system and
Bluetooth audio.
1. Display the “ BT Devices Connection”
screen. Refer to “Registering a Bluetooth
phone for the first time” F64.
2. Select the “Add” key.
The “Add” key is not displayed when five
devices are already registered.
To add another device, you need to delete
one of the registered devices.
Press the
key for the device to be
deleted, and then select the “OK” key.
3. Register the Bluetooth device using
your Bluetooth device.
. A PIN-code is not required for SSP
(Secure Simple Pairing) compatible
Bluetooth devices. Depending on the
type of Bluetooth device being con-
nected, a message confirming regis-
tration may be displayed on the Blue-
tooth device’s screen. Respond and
operate the Bluetooth device accord-
ing to the confirmation message.
4. Check that the screen is displayed
when registration is complete.
. The system waits for connection
requests coming from the registered
device.
. At this stage, the Bluetooth func-
tions are not yet available.
– CONTINUED –
65
0
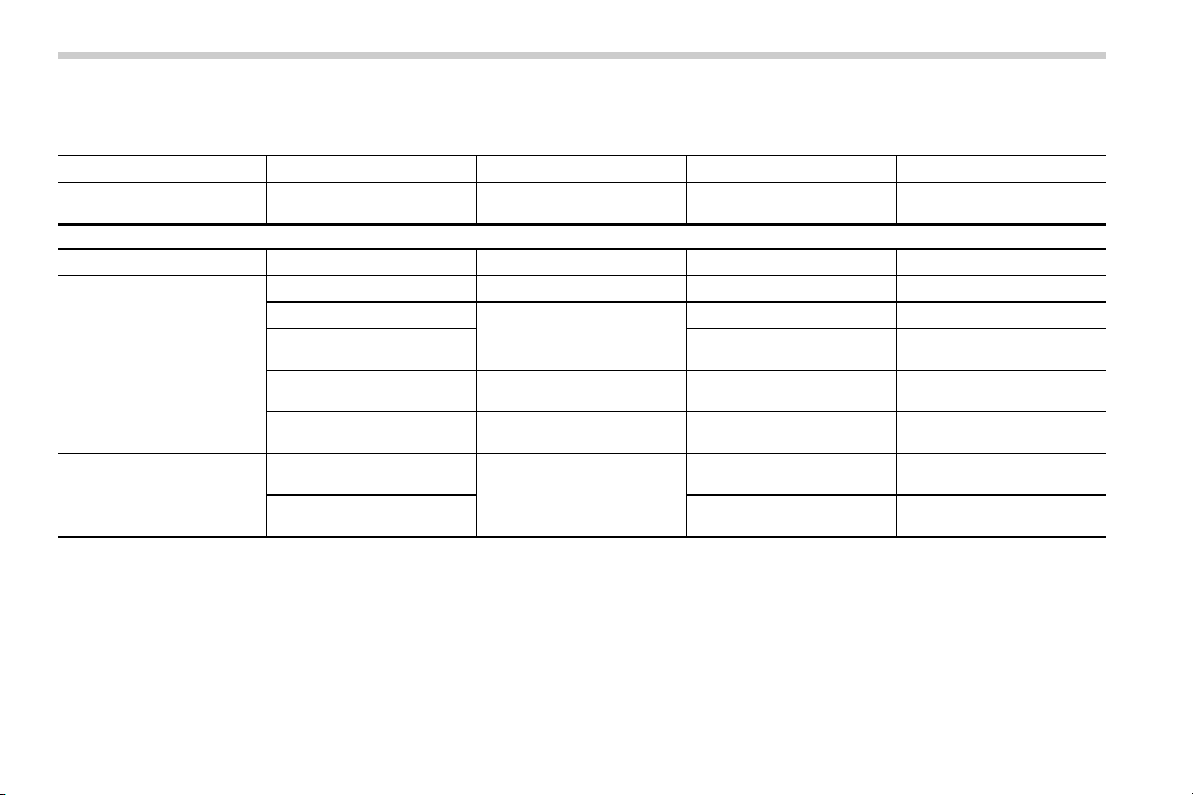
Black plate (68,1)
北米Model "B4444BE-A" EDITED: 2016/ 4/ 28
! Profiles
This system supports the following services.
Bluetooth Device Spec. Function Requirements Recommendations
Bluetooth Phone/Bluetooth
Audio Device
Bluetooth Specification
Registering a Bluetooth de-
vice
Ver. 1.1
Ver. 2.1 + EDR
Bluetooth Device Profile Function Requirements Recommendations
Bluetooth Phone
HFP (Hands-Free Profile) Hands-free system Ver. 1.0 Ver. 1.5
OPP (Object Push Profile)
Transferring the contacts
Ver. 1.1 Ver. 1.1
PBAP (Phone Book Access
profile)
Ver. 1.0 Ver. 1.0
MAP (Message Access
Profile)
Bluetooth phone message — Ver. 1.0
SPP (Serial Port Profile)
Connecting a Bluetooth
phone
— Ver. 1.1
Bluetooth Audio Device
A2DP (Advanced Audio
Distribution Profile)
Bluetooth audio system
Ver. 1.0 Ver. 1.2
AVRCP (Audio/Video Re-
mote Control Profile)
Ver. 1.0
Ver. 1.4
NOTE
. If your cell phone does not support HFP, registering the Bluetooth phone or using OPP, PBAP, MAP or SPP profiles
individually will not be possible.
. If the connected Bluetooth device version is older than recommended or incompatible, the Bluetooth device function may
not work properly.
. For USA customers, please visit www.subaru.com for details. Outside of the USA customers, contact your local dealer to
arrange a demonstration in order to confirm whether or not the device can be paired with the vehicle.
66
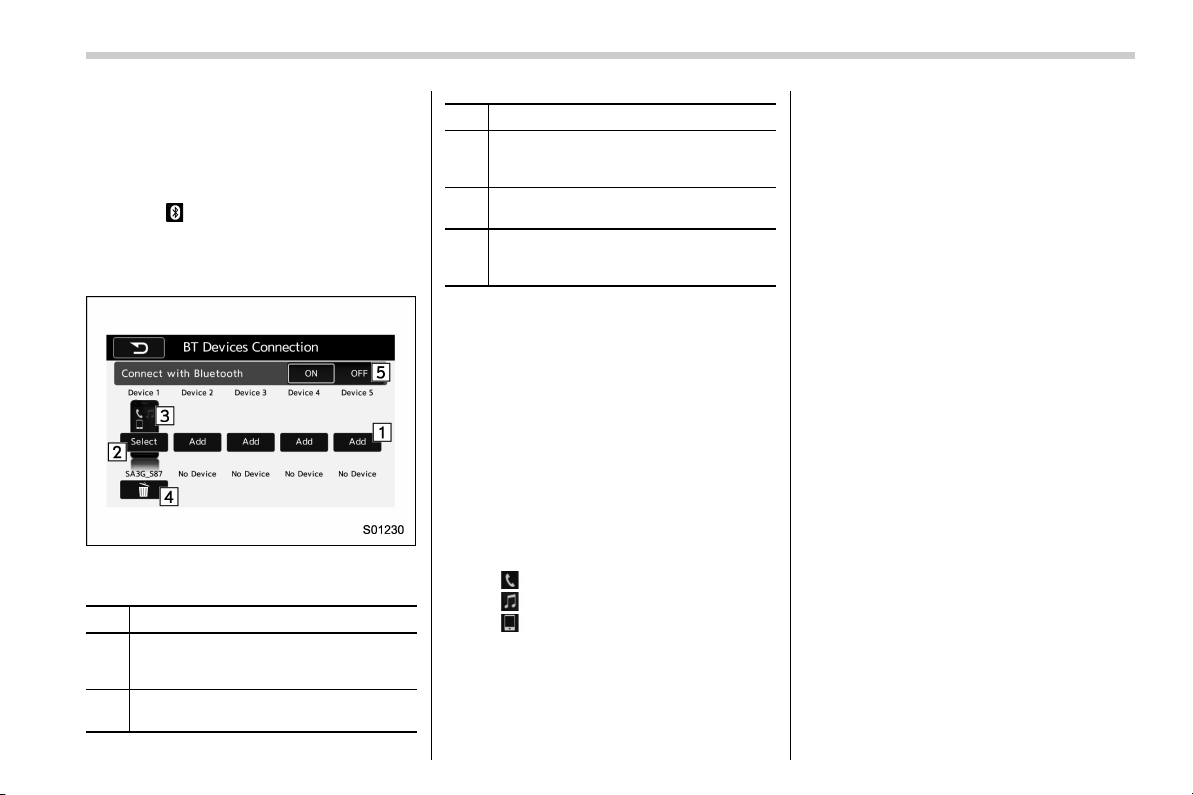
Black plate (69,1)
北米Model "B4444BE-A" EDITED: 2016/ 4/ 28
& Setting Bluetooth details
! BT Devices Connection screen
1. Press the HOME button.
2. Touch the “SETTINGS” key and then
touch the
tab.
3. Touch the “BT Devices Connection”
key and then select the desired device to
register.
“BT Devices Connection” screen (One
device is registered.)
No. Function
&
1
Register the device. Refer to “Regis-
tering/connecting Bluetooth
®
device”
F64.
&
2
Make the connection to the registered
device.
No. Function
&
3
This shows the status of the device
connection profile. (The icon illuminates
while connected.)
&
4
Delete the registered device. Refer to
“Deleting a Bluetooth device” F68.
&
5
Switch to connect/disconnect Bluetooth
communication. Refer to “Bluetooth
ON/OFF” F67.
! Connecting a Bluetooth device
Up to 5 Bluetooth devices (phones and
audio devices) can be registered.
If more than 1 Bluetooth device has been
registered, select which device to connect
to.
1. Display the “BT Devices Connection”
screen. Refer to “BT Devices Connection
screen” F67.
2. Select the device to be connected.
. Supported profile icons will be dis-
played.
–
: Phone
–
: Audio device
–
: Smartphone Application
. Supported profile icons for currently
connected devices will illuminate.
. The audio icon i lluminates only
when in the Bluetooth audio mode.
. All icons are dimmed when Blue-
tooth is set to off or when the connec-
tion cannot be made with the device.
NOTE
. It may take time if the device con-
nection is carried out during Bluetooth
audio playback.
. Depending on the type of Bluetooth
device being connected, it may be
necessary to perform additional steps
on the device.
. It is not possible to establish a
Bluetooth connection with iOS devices
currently connected with a USB cable.
. Supported profile icons of the un-
selected devices are not displayed if
several Bluetooth devices have been
registered.
! Bluetooth ON/OFF
1. Display the “ BT Devices Connection”
screen. Refer to “BT Devices Connection
screen” F67.
2. Select the “ON” or “OFF” key by the
right side of the “Connect with Bluetooth”
key. The “ON” key establishes a connec-
tion, and the “OFF” key disconnects the
connection.
– CONTINUED –
67
0
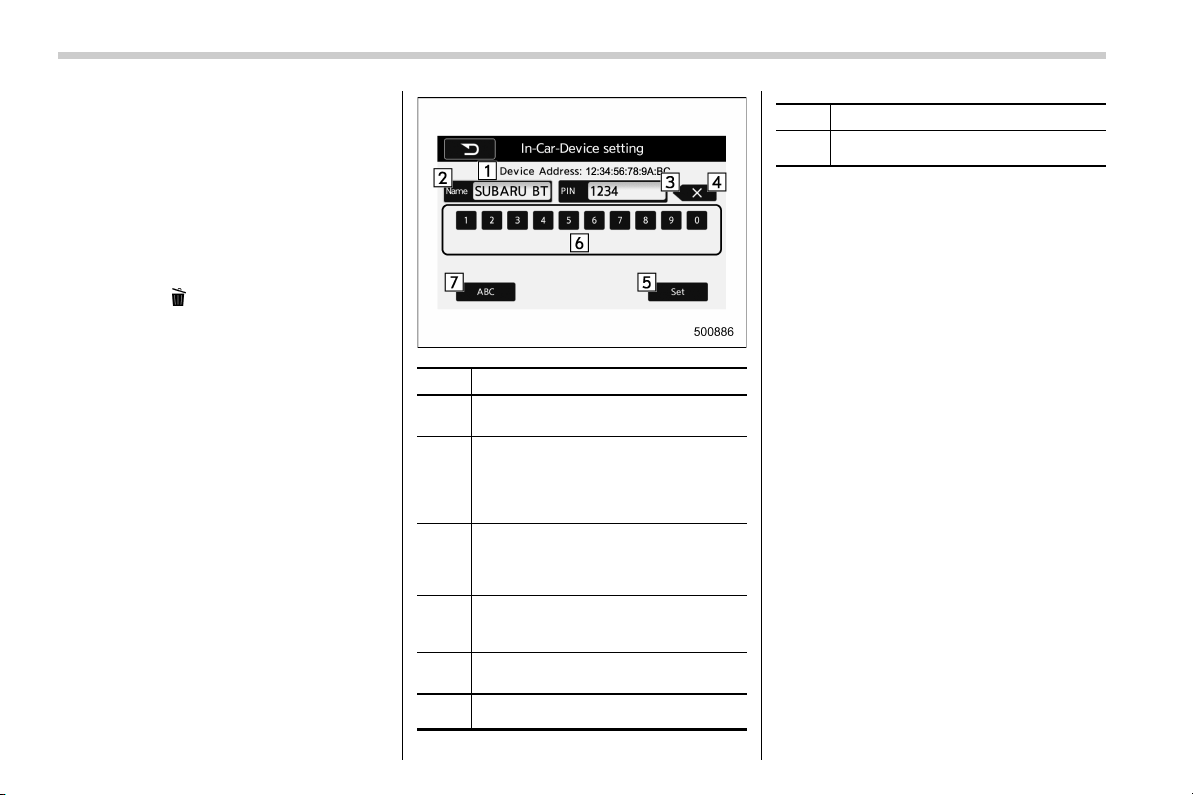
Black plate (70,1)
北米Model "B4444BE-A" EDITED: 2016/ 4/ 28
NOTE
The setting is fixed as the “OFF” key
when no device is registered.
! Deleting a Bluetooth device
1. Display the “BT Devices Connection”
screen. Refer to “BT Devices Connection
screen” F67.
2. Select the desired device.
3. Touch the
key for the device to be
deleted, and then select the “OK” key.
NOTE
When deleting a Bluetooth phone, the
contact data will be deleted at the same
time.
! “In-Car-Device setting” screen
The Bluetooth settings can be confirmed
and changed.
1. Display the “SETTINGS ” screen. Refer
to “Registering a Bluetooth phone for the
first time” F64.
2. On the “SETTINGS” screen for “In-
Car-Device setting”, select the “Set” key.
No. Function
&
1
Display the Bluetooth device address
of the in-vehicle equipment.
&
2
Display the Bluetooth device name of
the in-vehicle equipment. The default
name is “SUBARU BT”, which can be
changed by selecting it and entering
alphanumeric characters.
&
3
Display the PIN code of the in-vehicle
equipment. The default code is
“1234”, which can be changed by
selecting it and entering numbers.
&
4
Delete one character from the cur-
rently selected item (BT device name
or the PIN code).
&
5
Save the current BT device name and
PIN code.
&
6
Numeric input keys.
No. Function
&
7
Switch the screen to input characters.
! Editing the Bluetooth device
name
The device name can be set or changed.
1. Touch the “Name” key.
2. Enter a name and then select the “Set”
key.
! Editing the PIN-Code
The PIN-code can be set or changed.
1. Select the “PIN” Key.
2. Enter a PIN-code and then select the
“Set” key.
NOTE
If the “PIN” key is already selected, the
“ABC” key is cross-hatched and dis-
abled.
68
Black plate (71,1)
北米Model "B4444BE-A" EDITED: 2016/ 4/ 28
Hands-free phone system
The hands-free system enables calls to be
made and received without having to take
your hands off the steering wheel.
This system supports Bluetooth. Bluetooth
is a wireless data system that enables cell
phones to be used without being con-
nected by a cable or placed in a cradle.
The operating procedure of the phone is
explained here.
WARNING
. While driving, do not use a cell
phone or connect the Bluetooth
phone. Doing so may result in
loss of control of your vehicle
and cause an accident or serious
injury.
. Your audio unit is fitted with
Bluetooth antennas. People with
implantable cardiac pacemakers,
cardiac resy nchroniza tion ther-
apy-pacemakers or implantable
cardioverter defibrillators should
maintain a reasonable distance
between themselves and the
Bluetooth antennas. The radio
waves may affect the operation
of such devices.
. Before using Bluetooth devices,
users of any electrical medical
device other than implantable
cardiac pacemakers, cardiac re-
synchronization therapy-pace-
makers or implantable cardiover-
ter defibrillators should consult
the manufacturer of the device
for information about its opera-
tion under the influence of radio
waves. Radio waves could have
unexpected effects on the opera-
tion of such medical devices.
CAUTION
Do not leave your cell phone in the
vehicle. The temperature inside may
rise to a level that could damage the
phone.
NOTE
. If your cell phone does not support
Bluetooth, this system cannot function.
. In the following conditions, the sys-
tem may not function:
– The cell phone is turned off.
– The current position is outside
the communication area.
– The cell phone is not connected.
– The cell phone has a low battery.
. When using the hands free function
and other Bluetooth functions at the
same time, the following problems may
occur:
– The Bluetooth connection may
be cut.
– Noise may be heard when play-
ing back voice with the Bluetooth
function.
. The other party’s voice will be heard
from the front speakers. The audio/
visual system will be muted during
phone calls or when hands-free voice
commands are used.
. Talk alternately with the other party
on the phone. If both parties speak at
the same time, the other party may not
hear what has been said. (This is not a
malfunction.)
. Keep call volume down. Otherwise,
the other party’s voice may be audible
outside the vehicle and voice echo may
increase. When talking on the phone,
speak clearly towards the microphone.
. The other party may not hear you
clearly when:
– Drivingonanunpavedroad.
(Making excessive traffic noise.)
– Driving at high speeds.
– The moonroof or windows are
open.
– The air conditioning vents are
– CONTINUED –
69
0
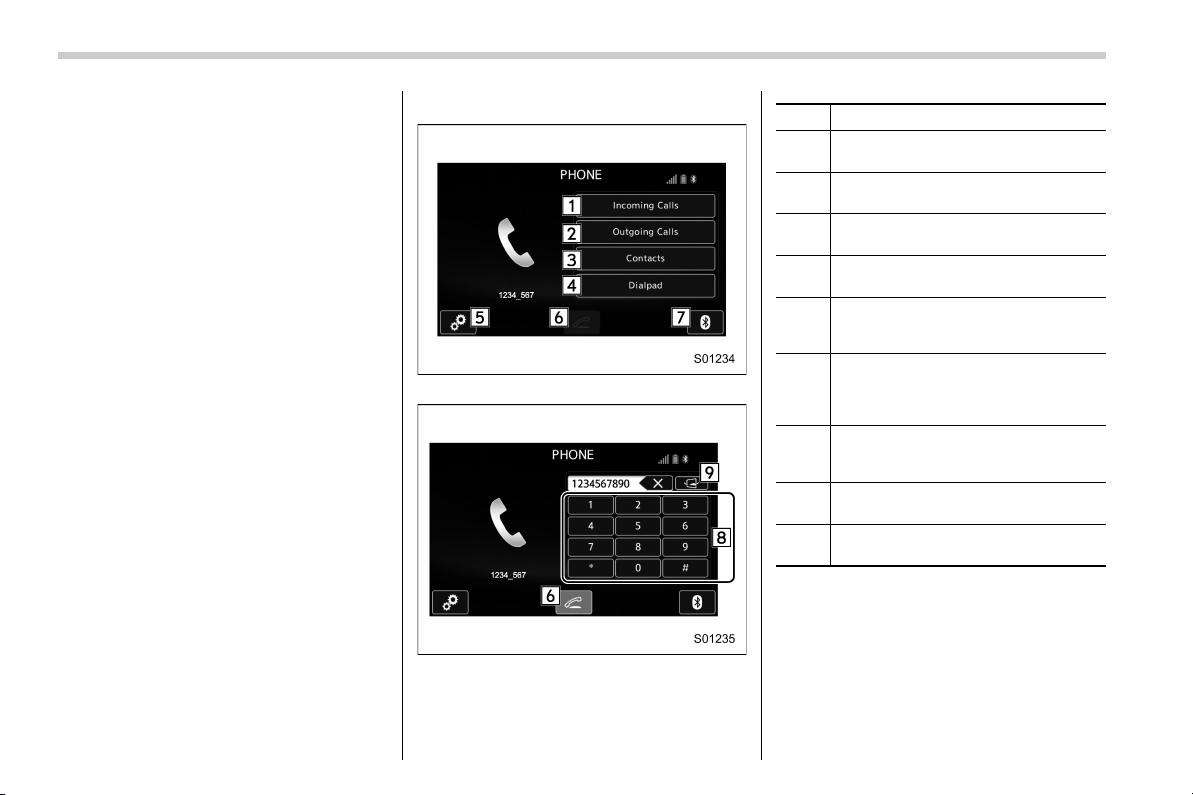
Black plate (72,1)
北米Model "B4444BE-A" EDITED: 2016/ 4/ 28
pointed towards the microphone.
– The sound of the air conditioning
fan is loud.
– Thereisanegativeeffecton
sound quality due to the phone
and/or network being used.
. When another phone is connected,
the following registered data cannot be
read:
– Contact data
– Call history data
– All phone settings
. When selling or disposing of the
vehicle, initialize the data. Refer to
“Unit settings” F17.
. Once initialized, the data and set-
tings will be erased. Take extra caution
when initializing the data.
. The voice command system sup-
ports phone commands, so dialing a
phone number using your voice is
possible. Refer to “Voice command
system” F80.
. The images shown in this Owner’s
Manual are sample images. The actual
images may vary depending on the
market and specifications of your ve-
hicle.
& Control screen
PHONE (Menu) screen
PHONE (Dialpad) screen
No. Function
&
1
Open the “Incoming Calls” screen.
Refer to “By incoming calls” F72.
&
2
Open the “Outgoing Calls” screen.
Refer to “By outgoing calls” F73.
&
3
Open the “Contacts” screen. Refer to
“By contacts list” F74.
&
4
Open the dialpad screen. Refer to “By
Dialpad” F75.
&
5
Open the phone volume settings
screen. Refer to “Phone volume set-
tings” F78.
&
6
Use to make a phone call. You cannot
press this key until you open the
dialpad screen and enter a phone
number.
&
7
Open the “BT Devices Connection”
screen. Refer to “Setting Bluetooth
details” F67.
&
8
Enter the phone number that you
want to call.
&
9
Switch the screen to the phone
(menu) screen.
NOTE
When the cell phone is not registered
and the Bluetooth setting is off, a
message is displayed instead of menu
items.
70
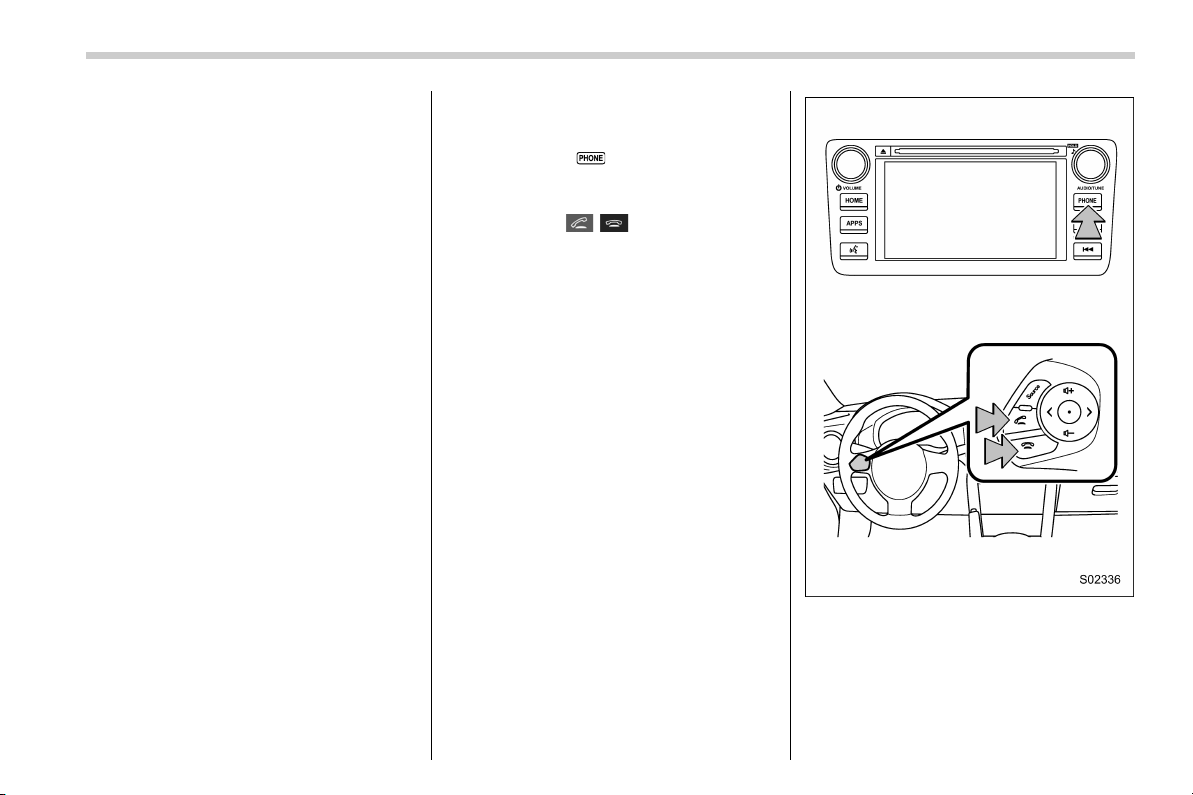
Black plate (73,1)
北米Model "B4444BE-A" EDITED: 2016/ 4/ 28
& Registering/connecting a
Bluetooth phone
To use the hands-free system for cell
phones, it is necessary to register a cell
phone with the system. Refer to “Register-
ing/connecting Bluetooth
®
device” F64.
! Bluetooth phone condition display
The condition of the B luetooth pho ne
appears on the upper right side of the
screen.
& Using the phone
. Audio unit
By pressing the
button, a call can be
received or ended.
. Steering wheel
By p ressing
/ , a call can be
received or ended without taking your
hands off the steering wheel.
– CONTINUED –
71
0
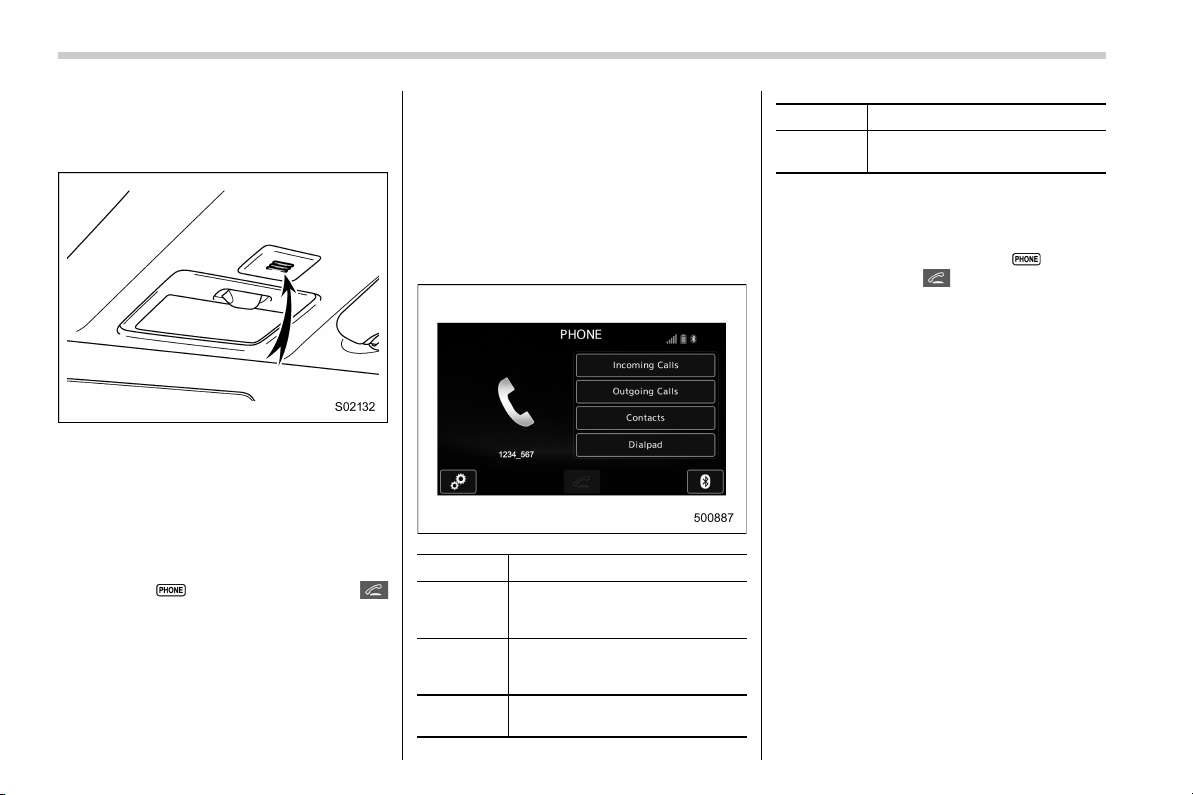
Black plate (74,1)
北米Model "B4444BE-A" EDITED: 2016/ 4/ 28
. Microphone
The microphone is used when talking on
the phone.
& How to change the hands-
free phone system
The phone (menu) screen can be used to
make a phone call. To display the hands-
free operation screen, press the HOME
button and then select the “PHONE” key,
or press the
button (audio unit) or
button (steering wheel).
& Making a call
There are several methods by which a call
can be made, as described below.
1. Press the HOME button on the audio
panel.
2. Touch the “PHONE” key.
3. Select the desired key to make a call
from the list.
Item Function
Incoming
Calls
Display the history of incoming
calls. Refer to “By incoming
calls” F72.
Outgoing
Calls
Display the history of outgoing
calls. Refer to “By outgoing calls”
F73.
Contacts
Display the phonebook. Refer to
“By contacts list” F74.
Item Function
Dialpad
Dial a phone number. Refer to
“By Dialpad” F75.
NOTE
You can also make a call by using the
following functions.
. Make a call using the
button
(audio unit) or
button (steering
wheel). Refer to “By off hook button”
F75.
. Make a call using voice operation.
Refer to “ Voice command system”
F80.
! By incoming calls
On the phone (menu) screen, select the
“Incoming Calls” key to open the “Incom-
ing Calls” screen.
You can make a call by selecting an item
in the incoming call history list.
If there is no incoming call history, a
message appears to indicate that there
is no incoming call history data.
72

Black plate (75,1)
北米Model "B4444BE-A" EDITED: 2016/ 4/ 28
Incoming Calls screen
No. Function
&
1
Open the “Outgoing Calls” screen.
&
2
Open the “Contacts” screen.
&
3
Delete all incoming call history data.
The “Delete All” key is disabled when
there is no incoming call history.
When you select an item in the history list
on the “Incoming Calls” screen, the out-
going call screen opens.
NOTE
. Up to 10 items in the incoming call
history are listed. Scroll the screen to
see items that are not on the screen.
. When making a call to the same
number continuously, only the most
recent call is listed in call history.
. When a phone number registered in
the contact list is received, the name is
displayed.
. Number-withheld calls are also
memorized in the system.
. International phone calls may not be
made depending on the type of cell
phone you have.
. The list should group together con-
secutive entries with the same phone
number and same call type.
! By outgoing calls
On the phone (menu) screen, select the
“Outgoing Calls” key to open the “Out-
going Calls” screen. You can make a call
by selecting an item in the outgoing call
history list.
If there is no outgoing call history, a
message appears to indicate that there
is no outgoing call history data.
Outgoing Calls screen
No. Function
&
1
Open the “Incoming Calls” screen.
&
2
Open the “Contacts” screen.
&
3
Delete all outgoing call history data.
The “Delete All” key is disabled when
there is no outgoing call history.
When you select an item in the history list
on the “Outgoing Calls” screen, the out-
going call screen opens.
– CONTINUED –
73
0
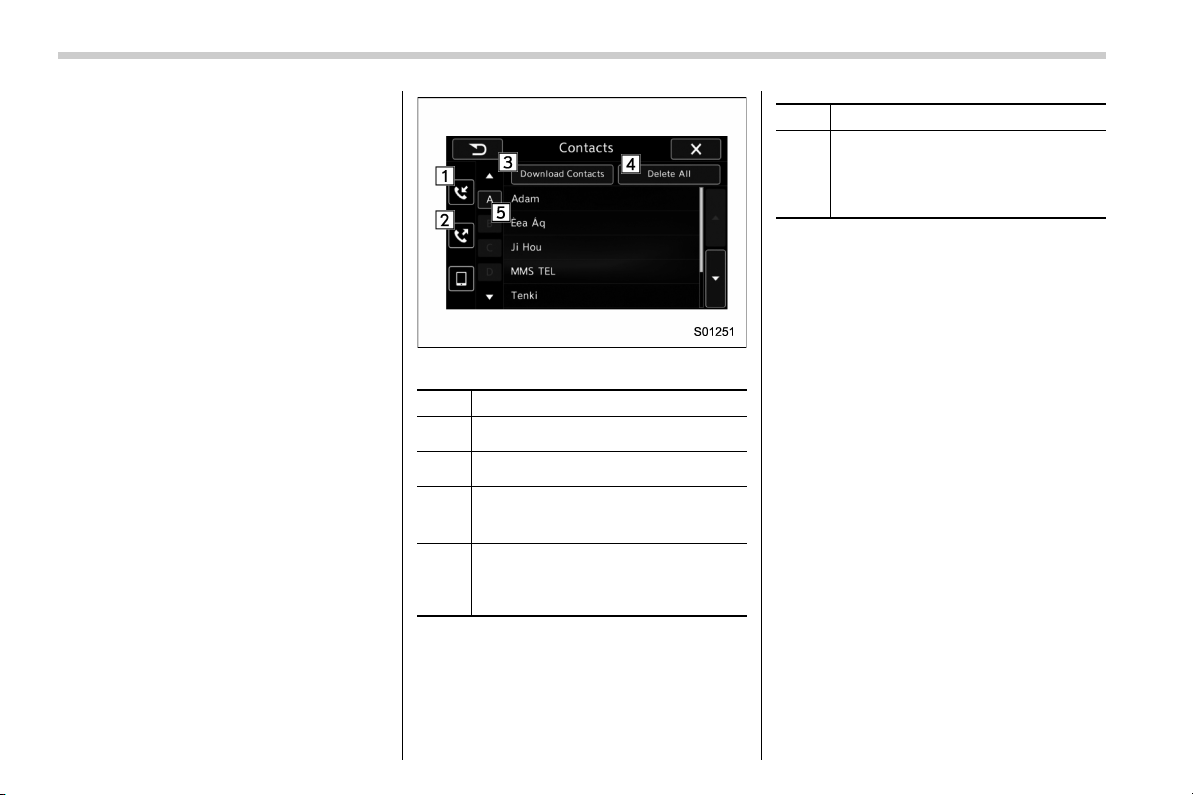
Black plate (76,1)
北米Model "B4444BE-A" EDITED: 2016/ 4/ 28
NOTE
. Up to 10 items in the outgoing call
history are listed. Scroll the screen to
see items that are not on the screen.
. When making a call to the same
number continuously, only the most
recent call is listed in call history.
. When a phone number registered in
the contact list is received, the name is
displayed.
. Number-withheld calls are al so
memorized in the system.
. International phone calls may not be
made depending on the type of cell
phone you have.
. The list should group together con-
secutive entries with the same phone
number and same call type.
! By contacts list
On the phone (menu) screen, select the
“Contacts” key to open the phone number
list screen.
You can make a call by selecting an item
in the list (up to five phone numbers are
listed).
If there is no contact data, a message is
displayed to indicate that there is no
contact data.
Contacts screen
No. Function
&
1
Open the “Incoming Calls” screen.
&
2
Open the “Outgoing Calls” screen.
&
3
Open a pop-up screen for starting the
download of contact data. Refer to
“Update contacts from phone” F78.
&
4
Delete all contact data. The “Delete
All” key is disabled when there is no
contact data. Refer to “Deleting the
contact data” F79.
No. Function
&
5
Open a list of contacts that starts with
the selected character. This key is
cross-hatched and cannot be se-
lected if there is no contact data that
starts with the selected character.
Select the up/down arrow key to scroll the
list of contacts.
When you select a phone number on the
screen, the outgoing call screen opens.
NOTE
Up to 1000 items in the contact data are
listed. Scroll the screen to see items
that are not on the screen.
! When the contact is empty
For PBAP incompatible but OPP com-
patible Bluetooth phones
On the “Contacts” screen, select the
“Download Contacts” key. A screen where
you can select how to download contacts
opens.
You can select to download all items or
download one item. For details, refer to
“Update contacts from phone” F78.
74
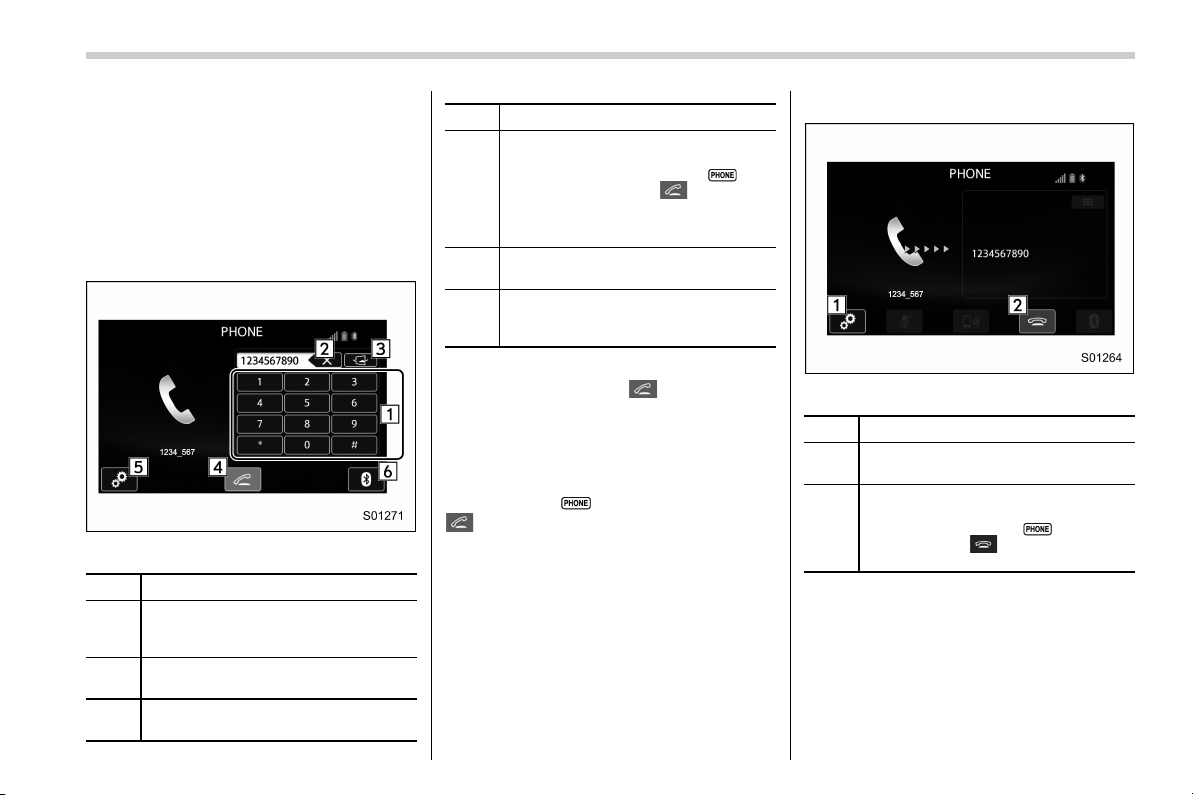
Black plate (77,1)
北米Model "B4444BE-A" EDITED: 2016/ 4/ 28
! Delete contacts
When the “Delete All” key is selected, all
contact data downloaded into the in-
vehicle equipment will be deleted.
Refer to “Deleting the contact data” F79.
! By Dialpad
Input the phone number manually using
the keypad displayed on the screen.
Phone (Dialpad) screen
No. Function
&
1
Allow you to enter numbers from 0 to
9 and *, #, and +. To enter “+”, press
and hold the “0” key.
&
2
Delete one character from the entered
characters.
&
3
Switch the screen to the phone
(menu) screen.
No. Function
&
4
Open the “Outgoing Calls” screen and
dials the entered phone number. This
is the same as pressing the
button (audio unit) or button
(steering wheel). This key is cross-
hatched and cannot be selected until
the phone number is entered.
&
5
Open the “Options” screen. Refer to
“Phone volume settings” F78.
&
6
Open the “BT Devices Connection”
screen. Refer to “Setting Bluetooth
details” F67.
When you enter a phone number on the
screen and select the
key, the “Out-
going Call” screen opens.
! By off hook button
Calls can be made using the latest call
history item.
1. Press the
button (audio unit) or
button (steering wheel) to display the
phone (menu) screen.
2. Check that the call screen is dis-
played.
! Outgoing screen
Outgoing call screen
No. Function
&
1
Open the “Options” screen. Refer to
“Phone volume settings” F78.
&
2
Abort the call. The screen returns to
the phone (menu) screen. This is the
same as pressing the
button
(audio unit) or
button (steering
wheel).
NOTE
. Depending on the type of Bluetooth
phone being connected, it may be
necessary to perform additional steps
on the phone.
. When you are on the outgoing call
screen, the screen changes to the call
screen when the other party answers
– CONTINUED –
75
0
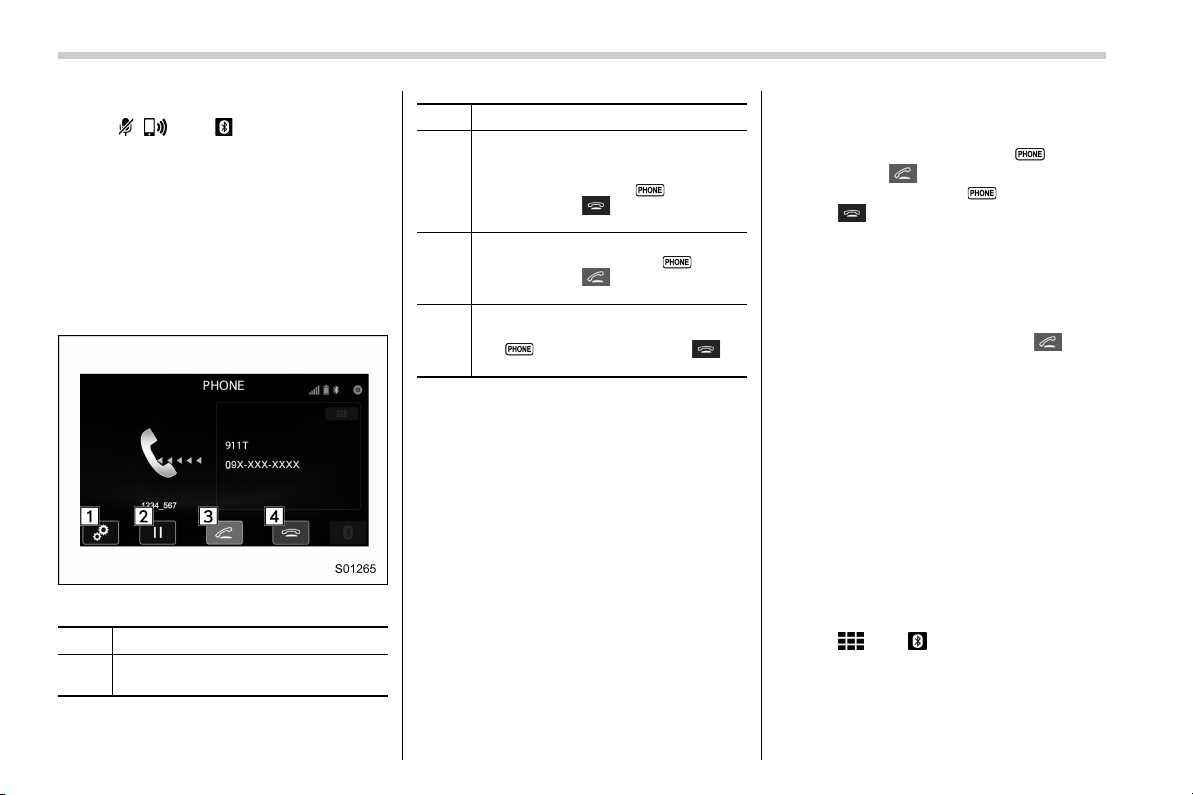
Black plate (78,1)
北米Model "B4444BE-A" EDITED: 2016/ 4/ 28
the call.
. The
, , and keys are disabled
on the outgoing call screen.
& Receiving a call
! Incoming calls
When a call is received, the incoming call
screen is displayed with a sound.
When you receive a phone call while the
cell phone is connected, the screen
changes to the incoming call screen.
Incoming call screen
No. Function
&
1
Open the “Options” screen. Refer to
“Phone volume settings” F78.
No. Function
&
2
Put the incoming call on hold. This
function may not work on some cell
phone models. This function is the
same as pressing the
button
(audio unit) or
button (steering
wheel) for a short period of time.
&
3
Open the call screen. This function is
the same as pressing the
button
(audio unit) or
button (steering
wheel).
&
4
Reject the incoming call. This function
is the same as pressing and holding
the button (audio unit) or
button (steering wheel).
NOTE
. During international phone calls, the
other party’s name or number may not
be displayed correctly depending on
the type of cell phone you have.
. The ringtone that has been set in the
phone setting screen sounds when
there is an incoming call. Depending
on the type of Bluetooth phone, both
the system and Bluetooth phone may
sound simultaneously when there is an
incoming call. Refer to “Phone volume
settings” F78.
! By off/on hook button
When you receive a call, you can also
answer it by pressing the
button
(audio unit) or
button (steering wheel).
To end a call, press the
button (audio
unit) or
button (steering wheel).
& Talking on the phone
The call screen opens when you perform
the following operations.
. When you accept a call on the incom-
ing call screen (by selecting the
key),
the call screen opens.
. When you are on the outgoing call
screen, the screen changes to the call
screen when the other party answers the
call.
While talking on the phone, this screen is
displayed. The operations outlined below
can be performed on this screen.
. When the incoming call screen is
displayed and you accept the call, the
screen changes to the call screen. The
screen stays on the incoming call screen if
you reject the call.
. The
and keys are disabled on
the incoming call screen.
76
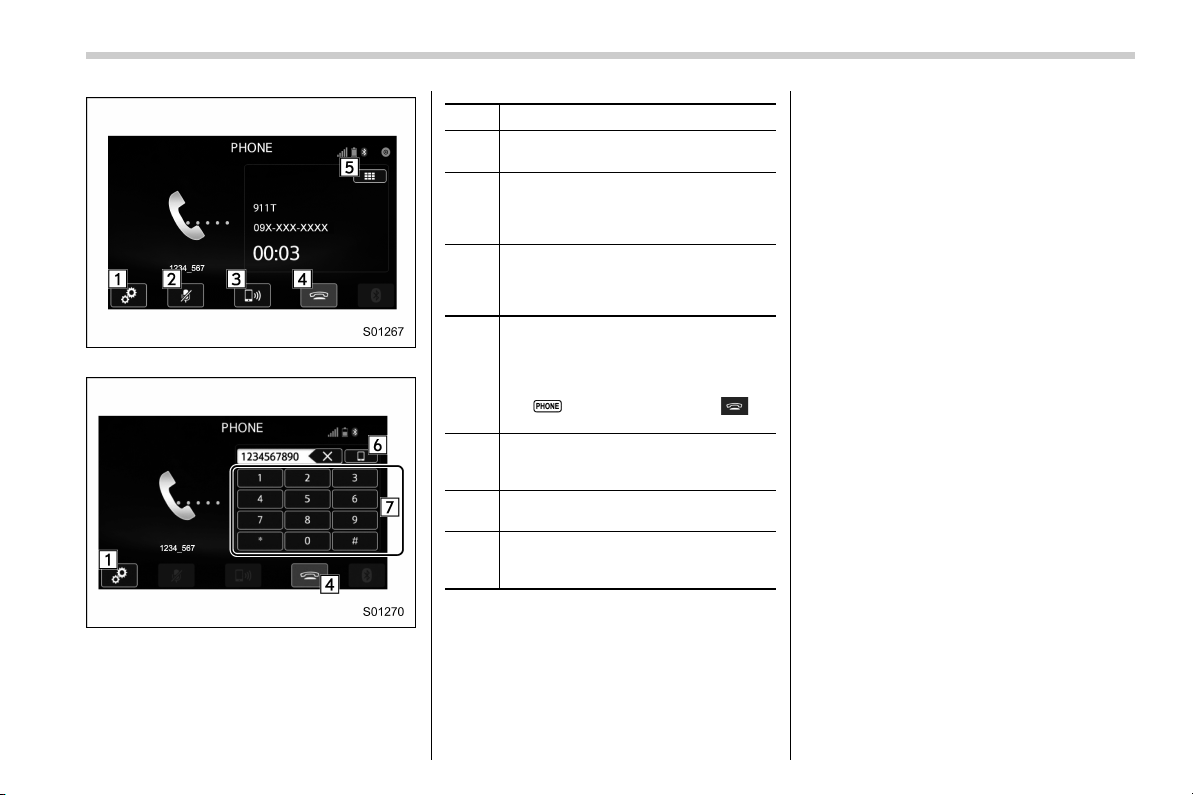
Black plate (79,1)
北米Model "B4444BE-A" EDITED: 2016/ 4/ 28
Call screen
Call (Dialpad) screen (DTMF)
No. Function
&
1
Open the “Options” screen. Refer to
“Phone volume settings” F78.
&
2
Mute your voice to the other party.
Touch this key again to deactivate the
Mute mode. This key is disabled in the
private mode.
&
3
Change the mode to private mode.
The other party’s voice emits from the
cell phone. Touch this key again to
deactivate the private mode.
&
4
End the call. This will return you to the
phone (menu) screen when ending
outgoing calls and the previous
screen when ending incoming calls.
This function is the same as pressing
the
button (audio unit) or
button (steering wheel).
&
5
Open the call (dialpad) screen. For
details about how to use the function,
refer to “By Dialpad” F75.
&
6
Switch the screen to the phone
(menu) screen.
&
7
Allow you to make DTMF (Dual Tone
Multi Frequency) calls. The numbers
you enter are sent as tone signals.
NOTE
. When cell phone call is changed to
hands-free call, the hands-free screen
is displayed and its functions can be
operated on the screen.
. Changing between cell phone call
and hands-free call can be performed
by operating the cell phone directly.
. Transferring methods and opera-
tions will be different depending on
the type of cell phone you have.
. For the operation of the cell phone,
see the manual that comes with it.
. The sound quality of the voice heard
from the other party’s speaker may be
negatively impacted.
& Phone settings
You can transfer the phonebook informa-
tion and adjust the volume of your phone
using the Bluetooth phone system.
NOTE
. The ringer volume for outgoing and
incoming calls, as well as the volume
while on hold or during a call are
controlled independently from the vo-
lume of the audio source. The volume
setting in the phone setting is applied.
. When making a call, receiving a call
or while talking on the phone, you can
adjust the volume by using the power/
Volume knob on the audio panel or the
volume control button on the steering
wheel.
– CONTINUED –
77
0

Black plate (80,1)
北米Model "B4444BE-A" EDITED: 2016/ 4/ 28
! Phone volume settings
The call and ringtone volume can be
adjusted. A ringtone can be selected.
1. Display the “PHONE” screen. Refer to
“How to change the hands-free phone
system” F72.
2. Touch the
key.
3. Select the desired item to be set.
. On the “PHONE” screen, the screen
changes to the “Options” screen when you
select the
key.
Options (volume settings) screen
No. Function
&
1
Adjust the ringtone volume. The “−”
key lowers the volume, and the “+”
key increases the volume. (Default
volume: 4 out of a total of 16 volume
levels)
&
2
Adjust the receive volume. The “−”
key lowers the volume, and the “+”
key increases the volume. (Default
volume: 4 out of a total of 16 volume
levels)
&
3
Adjust the transmit volume. The “−”
key lowers the volume, and the “+”
key increases the volume. (Default
volume: 3 out of a total of 5 volume
levels)
NOTE
. Depending on the type of phone,
certain functions may not be available.
. Contact data is managed indepen-
dently for every registered phone.
When one phone is connected, another
phone’s registered data cannot be
read.
! Update contacts from phone
Operation methods differ between PBAP
(Phone Book Access Profile) compatible
and PBAP incompatible but OPP (Object
Push Profile) compatible Bluetooth
phones.
1. Display the “PHONE” screen. Refer to
“How to change the hands-free phone
system” F72.
2. Touch the “Contacts” key, and then
select the “Download Contacts” key.
Contacts screen (Download selection)
No. Function
&
1
Open the download confirmation
screen. Confirm whether or not to
download. If the downloaded contact
(s) already
exist(s), confirm whether or not to
overwrite the existing data.
&
2
Download one set of contact data. To
download the data, you need to
operate from the connected device.
&
3
Cancel the download. The screen
returns to the “Contacts” screen.
78

Black plate (81,1)
北米Model "B4444BE-A" EDITED: 2016/ 4/ 28
NOTE
. If your cell phone is neither PBAP
nor OPP compatible, the contacts can-
not be transferred.
. When you are transferring the con-
tacts data, you may have to operate the
cell phone, depending on the type of
cell phone.
. Depending on the type of cell phone,
some functions may not be supported.
! For PBAP compatible Bluetooth
phones
1. Select the “Download Contacts” or
“Download 1 Entry” key. Contacts are
transferred automatically.
2. Check that a confirmation screen is
displayed when the operation is complete.
. This operation may be unnecessary
depending on the type of cell phone.
. If another Bluetooth device is con-
nected when transferring contact data,
depending on the phone, the con-
nected Bluetooth device may need to
be disconnected.
! For PBAP incompatible but OPP
compatible Bluetooth phones
1. Select the “Download 1 Entry” key.
2. Transfer the contact data to the sys-
tem using a Bluetooth phone.
. This operation may be unnecessary
depending on the type of cell phone.
. To cancel this function, select the
“Cancel” key.
3. Check that a confirmation screen is
displayed when the operation is complete.
NOTE
To download all items, you may need to
change the settings in your cell phone
beforehand.
! Deleting the contact data
You can delete the phonebook data stored
in the audio set.
1. Display the “PHONE” screen. Refer to
“How to change the hands-free phone
system” F72.
2. Touch the “Contacts” key, and then
select the “Delete All” key.
3. Select the “OK” key when the con-
firmation screen appears.
NOTE
. Manual transfer operation cannot be
performed while driving.
. If your cell phone is neither PBAP
nor OPP compatible, the contacts can-
not be transferred.
. Depending on the type of Bluetooth
phone:
– It may be necessary to perform
additional steps on the phone when
transferring contact data.
79
0
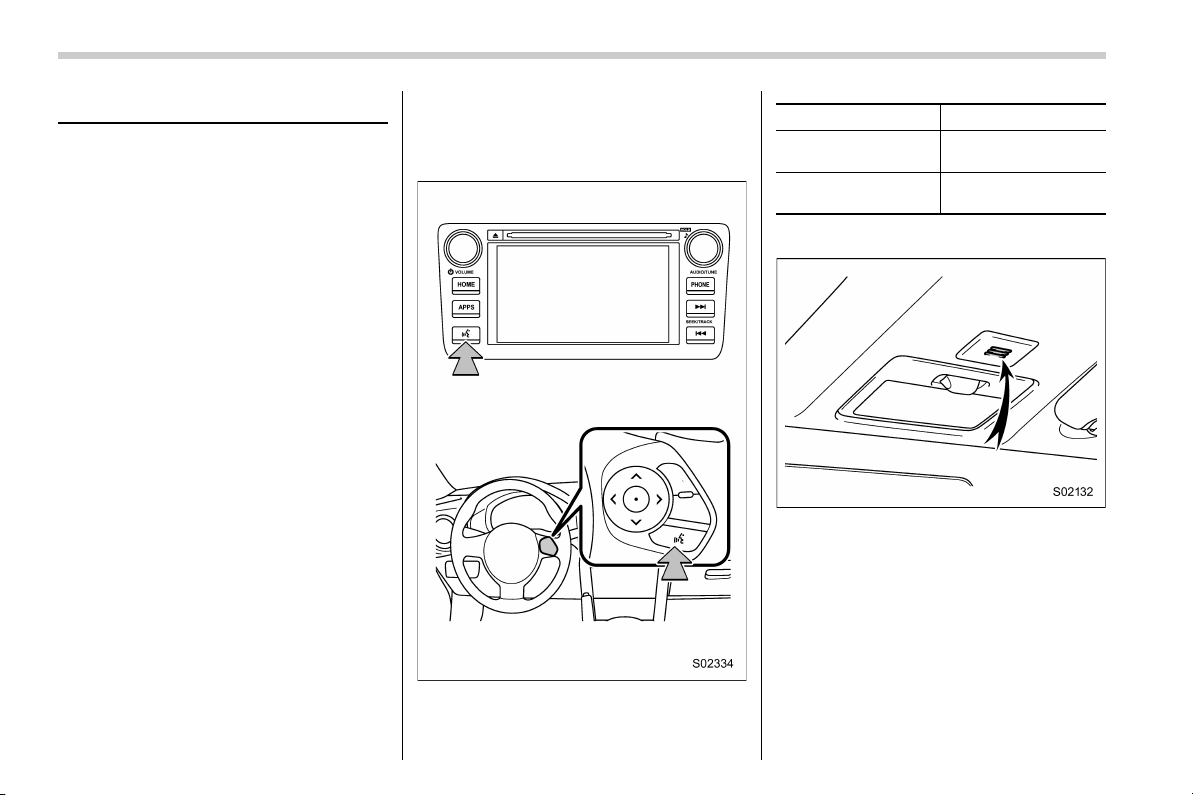
Black plate (82,1)
北米Model "B4444BE-A" EDITED: 2016/ 4/ 28
Voice command system
The voice command system enables the
audio, hands-free phone system, etc. to
be operated using voice commands.
Refer to the “Command list” F83 for
samples of voice commands.
Voice commands can be used even when
you set the system to another language.
For details about setting language, refer to
“General settings” F18.
& Using the voice command
system
! Talk button
Action Function
Press
Start the voice com-
mand system.
Press and hold
Cancel voice recogni-
tion.
! Microphone
It is unnecessary to speak directly into the
microphone when giving a command.
NOTE
. Wait for the confirmation beep be-
fore speaking a command.
. Voice commands may not be recog-
nized if:
– Spoken too quickly.
– Spoken at a low or high volume.
– The moonroof or windows are
80
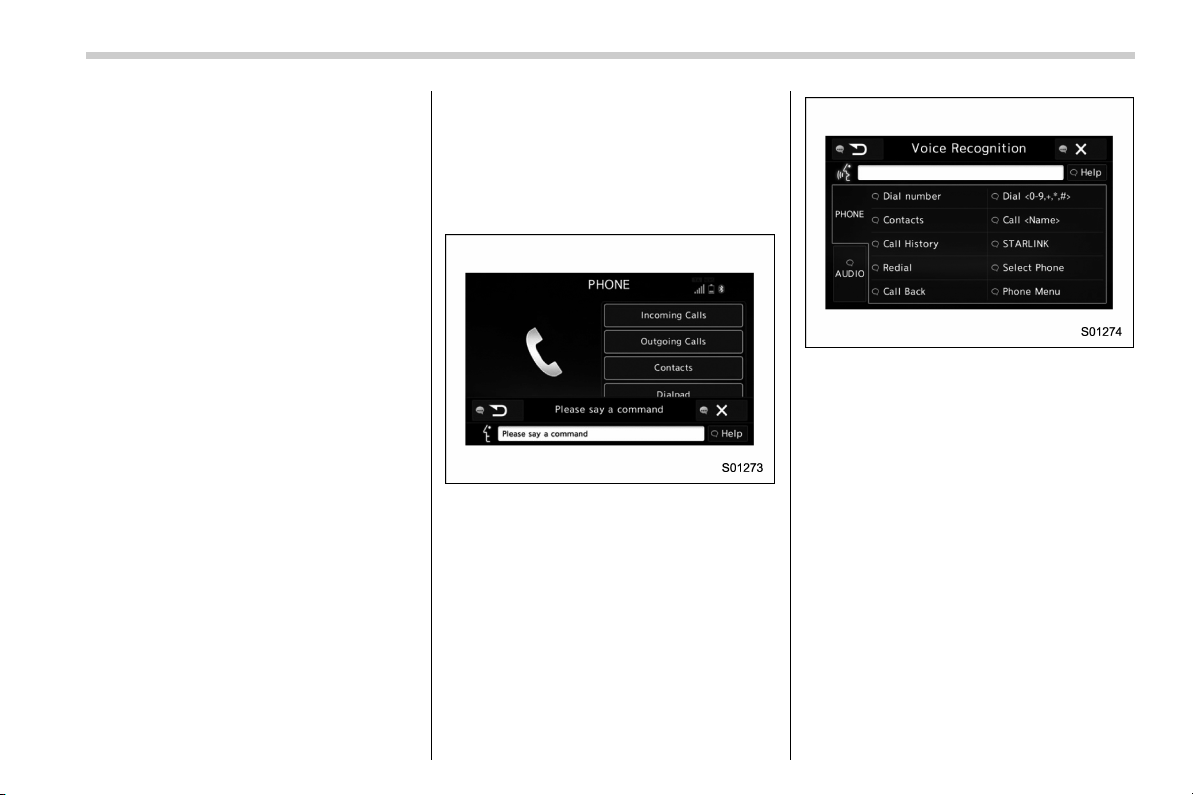
Black plate (83,1)
北米Model "B4444BE-A" EDITED: 2016/ 4/ 28
open.
– Passengers are talking while
voice commands are spoken.
– The air conditioning speed is set
high.
– The air conditioning vents are
turned towards the microphone.
. In the following conditions, the sys-
tem may not recognize the command
properly and using voice commands
may not be possible:
– The command is incorrect or
unclear. Note that certain words,
accents or speech patterns may be
difficult for the system to recognize.
– There is excessive background
noise, such as wind noise.
& Voice command system op-
eration
1. Press the talk button.
After the voice command top screen has
been displayed , speech gu idan ce will
commence.
NOTE
When the voice command mode is
audio mode, voice guidance for the
voice command system can be skipped
by pressing the talk button.
2. Say the command.
Example (Say “PHONE”)
NOTE
. Commands related with each func-
tion are displayed on the screen of the
each function tab. Some commonly
used commands are displayed on the
screen of the main tab. Even if any tab
is selected, all commands can be
operated.
. Saying
“Help”
prompts guidance to
offer examples of commands and op-
eration methods.
. To cancel voice recognition, select
“6”, or press and hold the talk button.
. If the system does not respond or
the confirmation screen does not dis-
appear, press the talk button and try
again.
– CONTINUED –
81
0
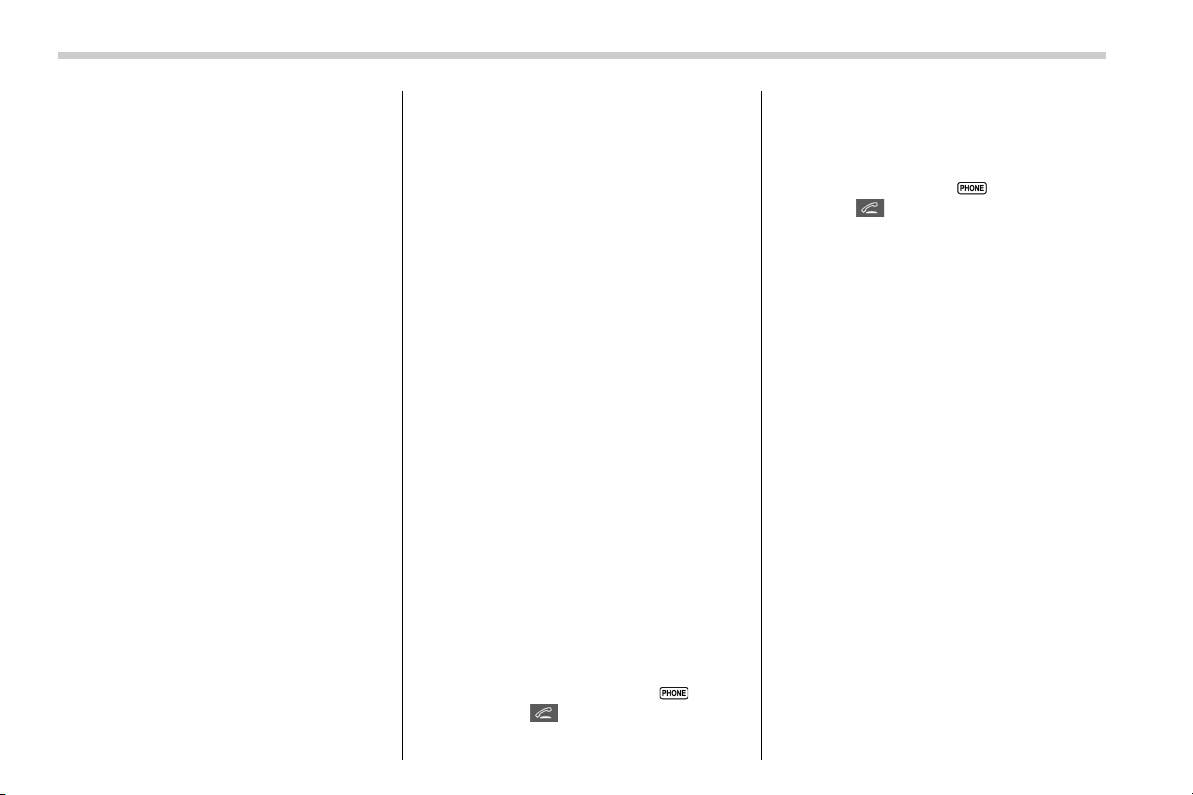
Black plate (84,1)
北米Model "B4444BE-A" EDITED: 2016/ 4/ 28
. The notations used in the com-
mands are as follows.
– < >: Numbers, titles or names to
be spoken
! Voice command example: Call
name
1. Press the talk button.
2. Say
“Call <contacts>”
.
. A confirmation screen will be dis-
played showing the recognition re-
sults. If multiple matching items are
found, a selection scr een will be
displayed. Say
“<number>”
or select
the number.
NOTE
. In the same manner as it is dis-
played on the scre en, “Call <con-
tacts>”, after saying
“Call a contact”
say the name of a contact. For exam-
ple:
“Call a contact”
,
“John Smith”
or
“Call a contact ”
,
“Mary Davis”
. Short or abbreviated names in the
contacts list may not be recognized.
Change names in the contacts list to
full names.
. Sometimes a voice recognition re-
sult confirmation screen will be dis-
played. After confirming the result, say
“Yes”
or
“No”
.
. When the system recognizes multi-
ple names from the contacts list, a
name candidate list will be displayed
on the screen. If the desired name is
not displayed on the top of the screen,
say or select the number of the name
from the candidate list (number 1,
number 2, etc.) to select a name from
the candidate list.
. When a contact has multiple phone
numbers registered in the contacts list,
a candidate list will be displayed. If the
desired phone number is not displayed
on the top of the screen, say or select
the number of t he desired phone
number from the candidate list (num-
ber 1, number 2, etc.) to select a phone
number from the candidate list.
! Voice command example: Dial
number
1. Press the talk button.
2. Say
“Dial number”
.
3. Say
“Dial <number>”
.
For example, if the phone number is
2345678:
Say
“two t hree four five six seven
eight”
Do not say
“twenty three forty five sixty
seven eight”
4. Say
“Dial”
or press the button
(audio unit) or
button (steering wheel).
NOTE
. When the system recognizes multi-
ple phone numbers, a phone number
candidate list will be displayed on the
screen. Pressing the
button (audio
unit) or
button (steering wheel)
makes a call to the top entry on the
list. If the desired phone number is not
displayed on the top of the screen, say
the number of the desired phone
number from the candidate list to
select a phone number from the candi-
date list.
. Calling to the following phone num-
bers
– 3 digit numbers (911, 411, 611)
– 7 dig it numbers (Local phone
numbers)
– 10 digit numbers (Area code +
Local phone number)
– 11 digit phone numbers (1 + Area
code + Local phone number)
. As the system c annot recognize
additional numbers, say the complete
number without stopping.
82
Black plate (85,1)
北米Model "B4444BE-A" EDITED: 2016/ 4/ 28
! Casual speech recognization
Due to natural language speech recogni-
tion technology, this system enables re-
cognition of a command when spoken
natur ally. However, the system cannot
recognize every variation of each com-
mand. In some situations, it is possible to
omit the command for the procedure and
directly state the desired operation. Not all
voice commands are displayed in the
function menu.
NOTE
If the command cannot be recognized
completely, the command input screen
will be displayed. (Search results will
be shown based on the part of the
command that was recognized.)
! Expression examples for each
function
Command Expression examples
“Dial <phone num-
ber>”
Phone <phone num-
ber>.
& Command list
Recognizable voice commands and their
actions are shown below.
NOTE
. Some voice commands may not be
available d epending on the market,
vehicle specifications or the device
connection status.
. Frequently used commands are
listed in the following tables.
. For devices that are not installed in
the vehicle, the related commands will
not be displayed on the screen. Also,
according to conditions, other com-
mands may not be displayed on the
screen.
. The functions available may vary
according to the system installed.
. Voice recognition language can be
changed. Refer to “Unit settings” F17.
. The not ations use d in the com-
mands are as follows.
– <
>: Numbers, titles or
names to be spoken
– (
): There is no need to
speak the command, the voice
command system will recognize
the content.
! Basic command
Voice command Function
Back
Go back one hierar-
chy or cancel the
voice recognition
(voice command top
screen)
Help
Ask for help with the
current task
Cancel, Close
Cancel the current
task
Yes
No
Display OFF Turns the display off
Audio ON
Turns the audio sys-
tem on
Audio OFF
Turns the audio sys-
tem off
STARLINK
Switch to APPS mode
– CONTINUED –
83
0
Black plate (86,1)
北米Model "B4444BE-A" EDITED: 2016/ 4/ 28
! Commands for changing the audio
mode
Voice command Function
Change to AM Switch to AM mode
Change to AM1
Switch to AM mode
band 1
Change to AM2
Switch to AM mode
band 2
Change to FM Switch to FM mode
Change to FM1
Switch to FM mode
band 1
Change to FM2
Switch to FM mode
band 2
Change to FM3
Switch to FM mode
band 3
Change to SiriusXM Switch to XM mode
Change to BT Audio
Switch to Bluetooth
Audio mode
Change to CD Switch to CD mode
Change to USB Switch to USB mode
Change to iPod Switch to iPod mode
Change to aha
Switch to aha radio
mode
Change to Pandora
Switch to Pandora
mode
Change to AUX
Switch to AUX mode
! Commands for hands-free phone
Voice command Function
Dial Number ? <0-9,
+, *, #> ? Change
number, Dial
Places a call to the
said phone number
Dial <0-9, +, *, #> ?
Change number, Dial
Contacts, Phonebook
? <Name> ? <1-5>
? Dial
Make a call by using
the phonebook
Call <Name> ?
<1-5> ? Dial
Call History ? In-
coming call, Outgoing
call ? Next (page),
Previous (page) ?
<1-5> ? Dial
Make a call by using
the call history
Incoming Calls
Display the call his-
tory screen
Outgoing Calls
Display the call his-
tory screen
Redial
Places a call to the
phone number of the
latest outgoing call
Callback
Places a call to the
phone number of the
latest incoming call
Select Phone ?
<1-5>
Display the phone
select screen
Phone Menu
Display the hands
free top screen
! Commands for Pandora
Voice command Function
Like Mark “Like” flag
Dislike Mark “Dislike” flag
Skip, Next
Skip to the next song
! Commands for aha
Voice command Function
Thumbs Up, Heart,
Like
Mark “Like” flag
Thumbs Down, Ban,
Dislike
Mark “Dislike” flag
Refresh, update
Refresh the selected
station to get the lat-
est information
Content Up
Playback next Con-
tent
Content Down
Playback previous
Content
84
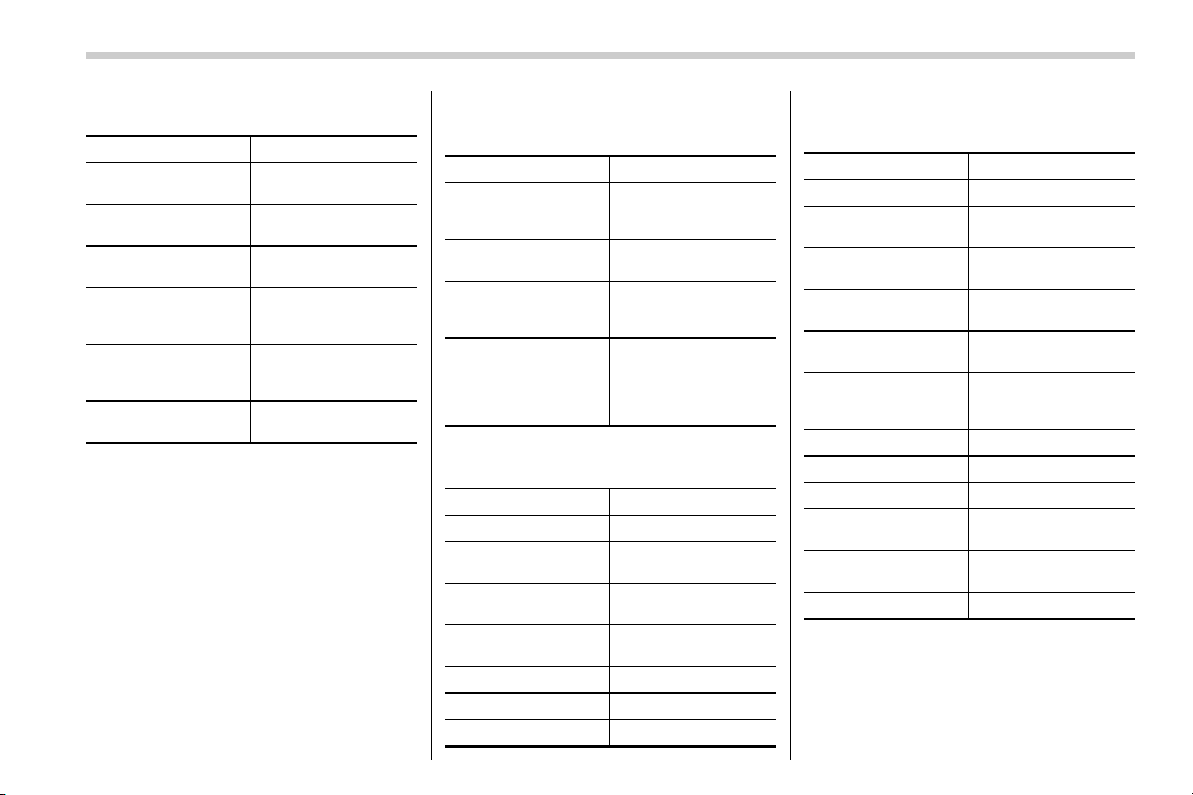
Black plate (87,1)
北米Model "B4444BE-A" EDITED: 2016/ 4/ 28
! Commands for AM/FM control
Voice command Function
Seek Up
Tunes in the higher
frequency direction
Seek Down
Tunes in the lower
frequency direction
Scan
Switch to the scan
mode
Tune to <Frequency>
Designate the fre-
quency to switch to a
specific radio station
Preset <preset num-
ber>
Designate the preset
channel to switch to
specific radio station
Tag
iTunes Tagging for
HD Radio
! Commands for SiriusXM radio con-
trol
Voice command Function
Preset <preset num-
ber>
Designate the preset
channel to switch to
specific radio station
Scan
Switch to the scan
mode
Channel <Channel
number>
Designate the chan-
nel to switch to spe-
cific radio station
Category ? Next
(page), Previous
(page), <1-5> ? Next
(page), Previous
(page), <1-5>
Displays the category
list screen
! Commands for CD control
Voice command Function
Track Up Select the next track
Track Down
Select the current
track
Scan
Switch to the scan
mode
Repeat ? 1 Track
Repeat, Repeat All
Select a repeat mode
1 Track Repeat Repeat single track
Repeat All Repeat all tracks
Shuffle
Plays randomly
! Commands for MP3/WMA/AAC,
USB control
Voice command Function
Track Up Select the next track
Track Down
Select the current
track
Folder Up
Plays from the start of
the next folder
Folder Down
Plays from the start of
the previous folder
Scan
Switch to the scan
mode
Repeat ? 1 Track
Repeat, Repeat
Folder, Repeat All
Select a repeat mode
1 Track Repeat Repeat single track
Repeat Folder Repeat of the folder
Repeat All Repeat all tracks
Shuffle ? Shuffle
Folder, Shuffle All
Select a random play
mode
Shuffle Folder
Plays randomly of the
folder
Shuffle All
Plays randomly
– CONTINUED –
85
0
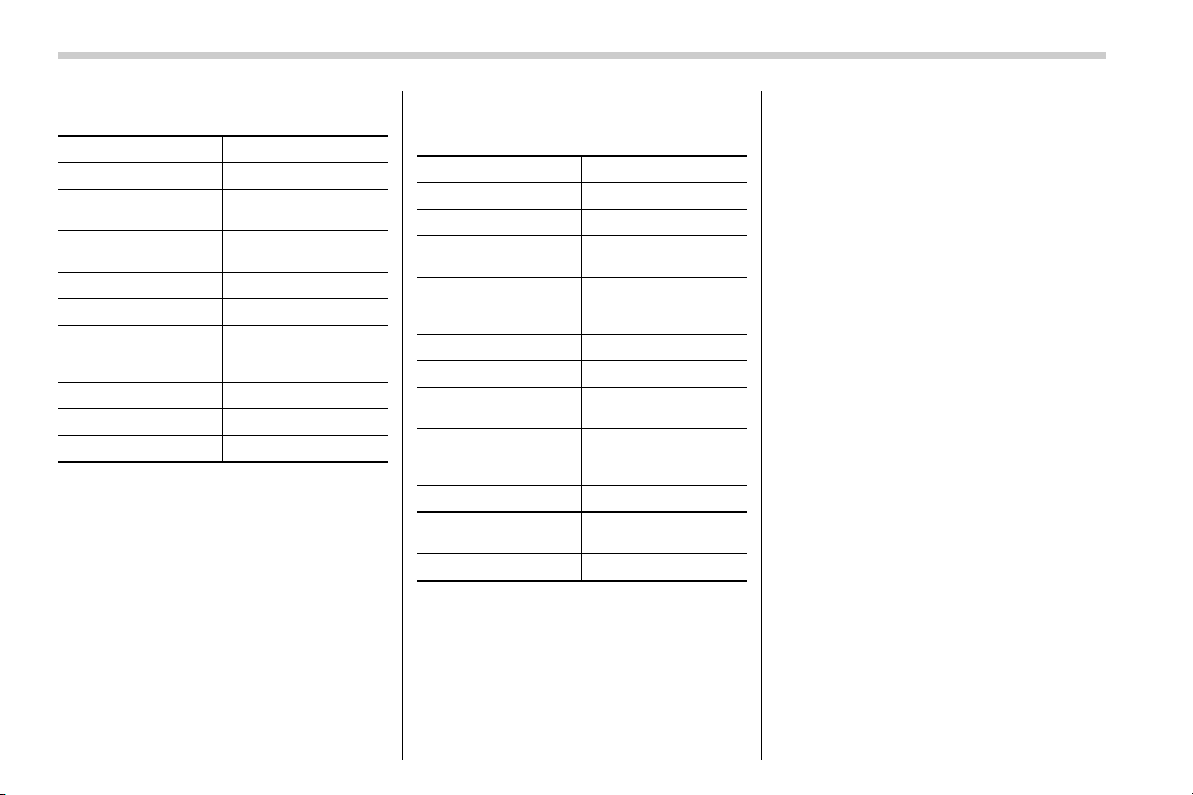
Black plate (88,1)
北米Model "B4444BE-A" EDITED: 2016/ 4/ 28
! Commands for iPod Control
Voice command Function
Track Up Select the next track
Track Down
Select the current
track
Repeat ? Repeat
One, Repeat All
Select a repeat mode
Repeat One Repeat single track
Repeat All Repeat all tracks
Shuffle ? Shuffle
Track, Shuffle Album,
Shuffle OFF
Select a random play
mode
Shuffle Track Shuffle all tracks
Shuffle Album Shuffle all tracks
Shuffle OFF
Turn off shuffle
! Commands for Bluetooth audio
control
Voice command Function
Pause Pause play
Track Up Select the next track
Track Down
Select the current
track
Repeat ? 1 track
Repeat, Repeat All,
Group Repeat
Select a repeat mode
1 Track Repeat Repeat single track
Repeat All Repeat all tracks
Group Repeat
Repeat tracks on
group
Shuffle ? Shuffle All,
Group Shuffle, Shuf-
fle OFF
Select a random play
mode
Shuffle All Shuffle all tracks
Group Shuffle
Shuffle tracks on
group
Shuffle OFF
Turn off shuffle
86

Black plate (89,1)
北米Model "B4444BE-A" EDITED: 2016/ 4/ 28
What to do if...
& Troubleshooting
If there is a problem with the hands-free system or a Bluetooth device, first check the table below.
When using the hands-free system with a Bluetooth device
Symptom Likely cause Solution
Page
Cell
phone
This
system
The hands-free system or Bluetooth
device does not work.
The connected device may not be a
compatible Bluetooth cell phone.
For USA customers, please visit
www.subaru.com for details. Outside of the
USA customers, contact your local dealer to
arrange a demonstration in order to confirm
whether or not the device can be paired with
the vehicle.
* —
The Bluetooth version of the connected
cell phone may be older than the
specified version.
Use a cell phone with Bluetooth version 1.1 or
higher (recommended: Ver. 2.1 + EDR or
higher).
*
66
*: For details, refer to the owner’s manual that came with the cell phone.
– CONTINUED –
87
0
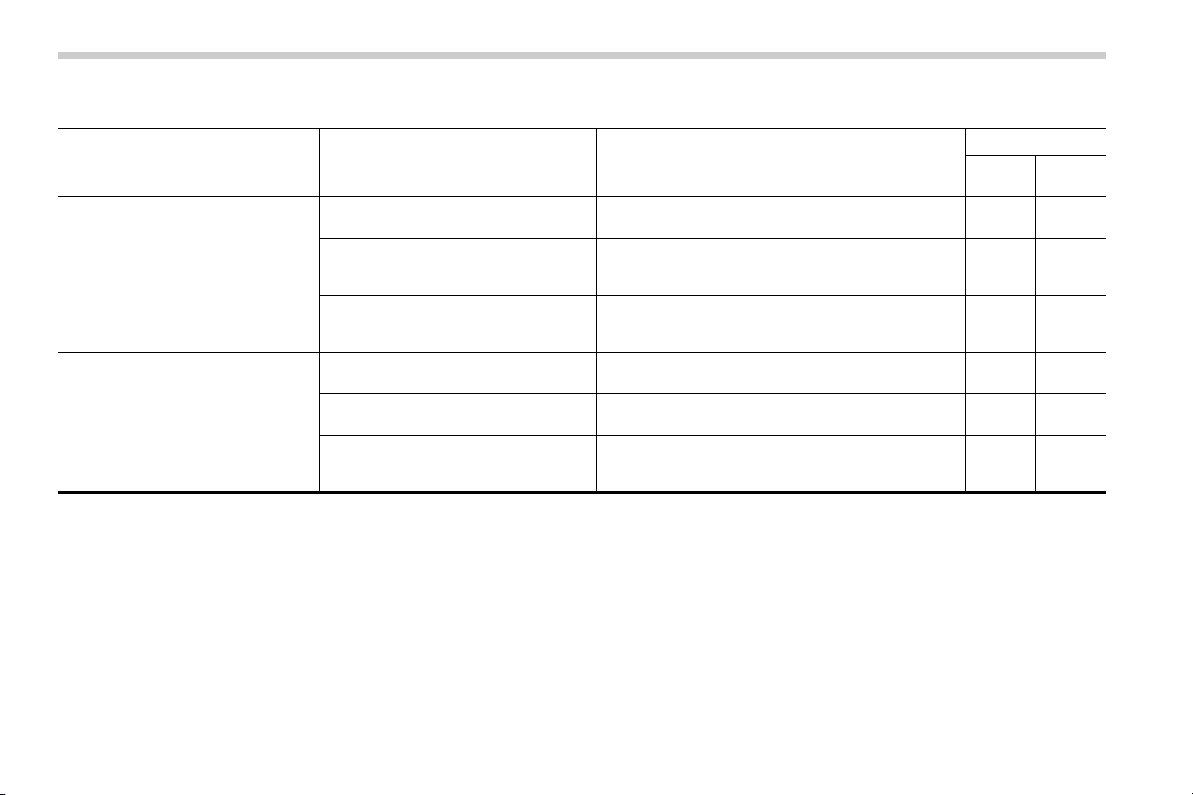
Black plate (90,1)
北米Model "B4444BE-A" EDITED: 2016/ 4/ 28
When registering/connecting a cell phone
Symptom Likely cause Solution
Page
Cell
phone
This
system
A cell phone cannot be registered.
An incorrect passcode was entered
on the cell phone.
Enter the correct passcode on the cell phone. * —
The registration operation has not
been completed on the cell phone
side.
Complete the registration operation on the cell
phone (approve registration on the phone).
* —
Old registration information remains
on either this system or the cell
phone.
Delete the existing registration information from
both this system and the cell phone, then register
the cell phone you wish to connect to this system.
*67
A Bluetooth connection cannot be
made.
Another Bluetooth device is already
connected.
Manually connect the cell phone you wish to use to
this system.
— 67
Bluetooth function is not enabled on
the cell phone.
Enable the Bluetooth function on the cell phone. * —
Automatic Bluetooth connection on
this system is set to off.
Set automatic Bluetooth connection on this system
to on when the ignition switch is turned to the “ACC”
or “ON” position.
—
67
*: For details, refer to the owner’s manual that came with the cell phone.
88

Black plate (91,1)
北米Model "B4444BE-A" EDITED: 2016/ 4/ 28
When using the phonebook
Symptom Likely cause Solution
Page
Cell
phone
This
system
Phonebook data cannot be trans-
ferred manually.
The profile version of the connected cell
phone may not be compatible with
transferring phonebook data.
For USA customers, please visit
www.subaru.com for details. Outside of the
USA customers, contact your local dealer to
arrange a demonstration in order to confirm
whether or not the device can be paired with
the vehicle.
* —
Transfer operation on the cell phone has
not completed.
Complete transfer operation on the cell phone
(approve transfer operation on the phone).
* —
Phonebook data cannot be edited.
Editing function is not available on this
system.
——
77
*: For details, refer to the owner’s manual that came with the cell phone.
– CONTINUED –
89
0
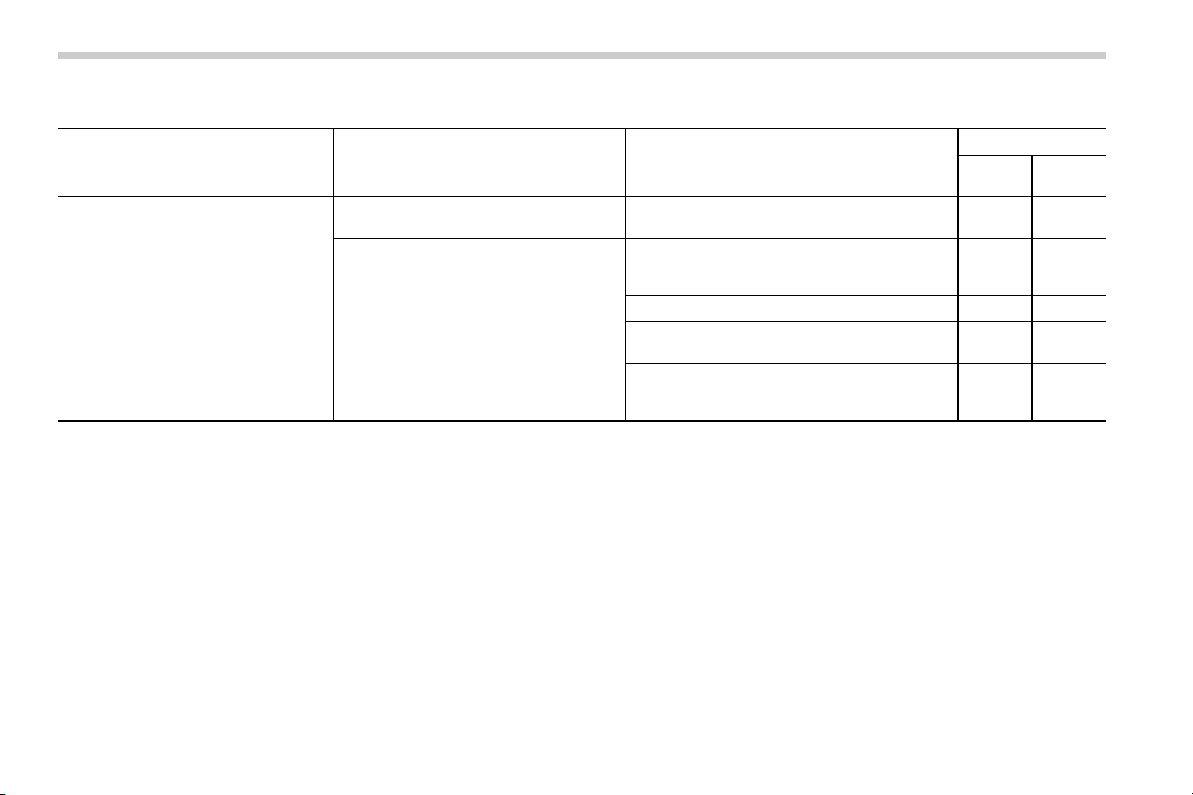
Black plate (92,1)
北米Model "B4444BE-A" EDITED: 2016/ 4/ 28
In other situations
Symptom Likely cause Solution
Page
Cell
phone
This
system
Even though all conceivable mea-
sures have been taken, the symptom
status does not change.
The cell phone is not close enough to
this system.
Bring the cell phone closer to this system. ——
The cell phone is the most likely cause
of the symptom.
Turn the cell phone off, remove and reinstall
the battery pack, and then restart the cell
phone.
* —
Enable the cell phone’s Bluetooth connection. * —
Stop the cell phone’s security software and
close all applications.
* —
Before using an application installed on the
cell phone, carefully check its source and how
its operation might affect this system.
*
—
*: For details, refer to the owner’s manual that came with the cell phone.
90
Black plate (93,1)
北米Model "B4444BE-A" EDITED: 2016/ 4/ 28
Appendix
& Certification
. Bluetooth
The Bluetooth word mark and logo are
registered trademarks of Bluetooth SIG,
Inc. and any use of such marks by Clarion
Co., Ltd. is under license.
. SiriusXM Satellite Radio (if
equipped)
SiriusXM
TM
and all related marks and
logos are trademarks of SiriusXM Radio
Inc. All rights reserved.
. Pandora (if equipped)
Pandora, the Pandora logo, and other
Pandora marks are trademarks or regis-
tered trademarks of Pandora Media, Inc.,
or its subsidiaries worldwide.
If you have any issues with the Pandora
application on your mobile phone, please
direct them to
. iPod
“Made for iPod” and “Made for iPhone”
mean that an electronic accessory has
been designed to connect specifically to
iPod or iPhone respectively, and has been
certified by the developer to meet Apple
performance standards. Apple is not
responsible for the operation of this device
or its compliance with safety and regula-
tory standards. Please note that the use of
this accessory with iPod or iPhone may
affect wireless performance.
iPhone, iPod, iPod classic, iPod nano,
iPod touch, and iTunes are trademarks of
Apple Inc., registered in the U.S. and other
countries.
. How to get the source code using
the open source
This system implements software using
the open source. For customers who
would like to get the source code of the
software, it is available by downloading it
from the web site of Clarion Co., Ltd.
For details, refer to the following web site.
http://www.clarion.com/us/en/support/in-
dex.html
& Certification for the Hands-
free system
This device complies with Part 15 of FCC
Rules and Industry Canada licence-ex-
empt RSS standard(s). Operation is sub-
ject to the following two conditions: (1)
This device may not cause harmful inter-
ference, and (2) this device must accept
any interference received, including inter-
ference that may cause undesired opera-
tion.
Le présent appareil est conforme à la
partie 15 des règles de la FCC et CNR
d’Industrie Canada applicables aux appa-
reils radio exempts de licence. L’exploita-
tion est autorisée aux deux conditions
suivantes : (1) l’appareil ne doit pa s
produire de brouillage, et (2) l’utilisateur
de l’appareil doit accepter tout brouillage
radioélectrique subi, même si le brouillage
est susceptible d’en compromett re le
fonctionnement.
This equipment complies with FCC/IC
radiation exposure limits set forth for an
uncontrolled environment and meets the
FCC radio frequency ( RF) Exposure
Guidelines in Supplement C to OET65
and RSS-102 of the IC radio frequency
– CONTINUED –
91
0
Black plate (94,1)
北米Model "B4444BE-A" EDITED: 2016/ 4/ 28
(RF) Exposure rules. This equipment has
very low levels of RF energy that it
deemed to comply witho ut maxi mum
permissive exposure evaluation (MPE).
Cet équipement est conforme aux limites
d’exposition aux rayonnements énoncées
pour un environnement non contrôlé et
respecte les lignes directrices d’exposition
aux fréquences radioélectriqu es de la
FCC dans le Supplément C à OET65 et
d’exposition aux fréquences radioélectri-
ques (RF) CNR-102 de l’IC. Cet équipe-
ment émet une énergie RF très faible qui
est considérée conforme sans évaluation
de l’exposition maximale autorisée.
FCC CAUTION
Changes or modifications not expressly
approve d by the party responsible for
compliance could void the user’s authority
to operate the equipment.
This transmitter must not be co-located or
operated in conjunction with any other
antenna or transmitter.
& Certification for Mexico mod-
els
IFETEL RCPCLPF14-0253-A5
Clarion PF-3764
92