User Manual
Installing and connecting the appliance
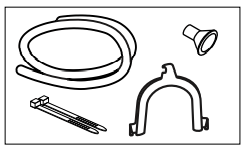
Scope of supply
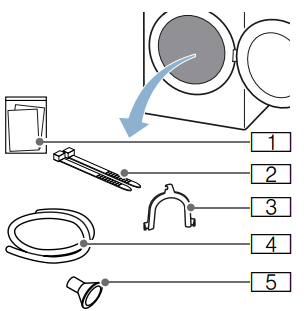
- Accompanying documents (e.g. installation and operating instructions)
- Fastening parts
- U-piece for fixing the drain hose in place
- Drain hose
- Connection adapter
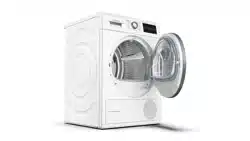
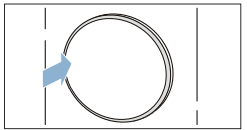
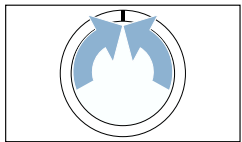
1. Remove any packaging and protective covers completely from the appliance.
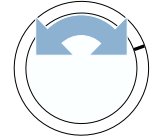
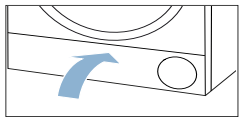
2. Open the door.
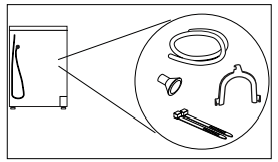
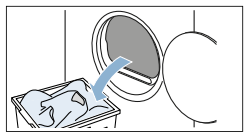
3. Remove all the accessories from the drum.
You can now install and connect the appliance
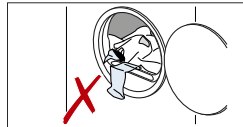
Caution!
Risk of material damage and damage to the appliance
Objects remaining in the drum that are not designed for operation with the appliance may result in material damage and damage to the appliance.
Remove these objects, along with all accessories, from the drum.
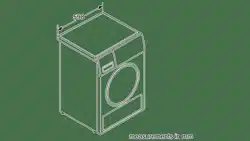
Installing the appliance
Install the appliance as follows:
- Place the appliance on a clean, even, solid surface.
- Check that the appliance is level using a spirit level.

- If necessary, turn the appliance feet to make sure it is level.
You can now connect the appliance.
Notes
- All appliance feet must stand firmly on the ground.
- If appliances are not aligned correctly, this may result in noises, vibrations, uneven drum operation and/or to residual water leaking out of the appliance
Connecting the appliance
Connect the appliance as follows:
1. Connecting the drain hose.
2. Plug the appliance's mains plug into the designated socket.
3. Check that the mains plug is in securely.
Your appliance is now ready to use.
Quick reference guide
Note: The appliance must be correctly installed and connected.
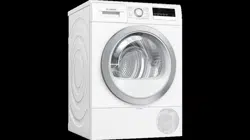
Familiarising yourself with your appliance
Appliance overview
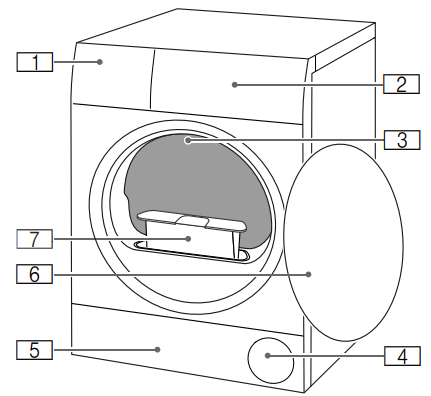
- Condensation container
- Control panel
- Drum interior lighting (depending on the model)
- Air inlet
- Maintenance flap on the base unit
- Door
- Fluff filter
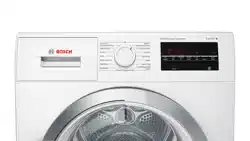
Fascia
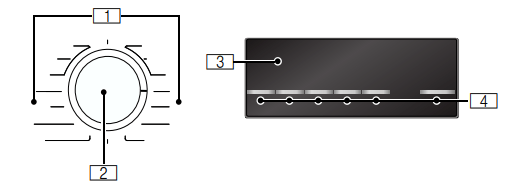
1. Programmes
2. Programme selector
- Switch the appliance on/off
- Set the programme/dryness level
3. Display
Displays settings and information
4 Buttons
for programme settings and additional functions/appliance settings
Display
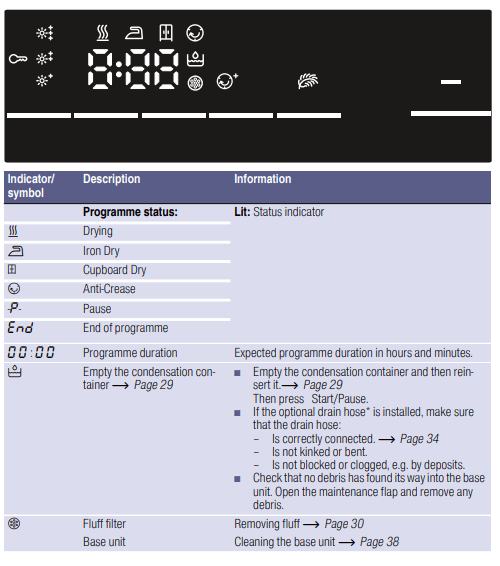
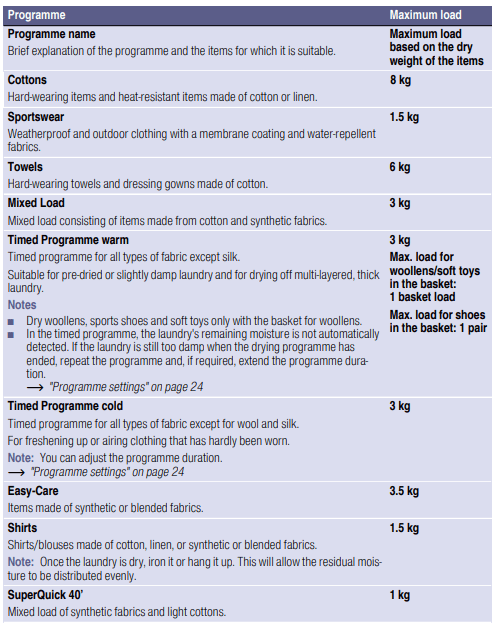
Overview of programmes
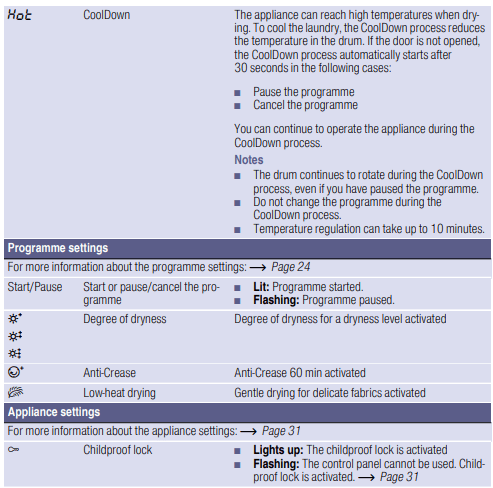
Programme settings
Note: Not all settings can be activated in every programme. The activated settings are displayed on the programme selector (dryness level) or highlighted brightly in the display. You can change or deactivate the activated settings by turning the programme selector or pressing the relevant buttons repeatedly
Drying result :
The dryness level defines how damp or dry the laundry is after the programme ends.
Use the programme selector to select the dryness level that you require for the laundry you need to dry.
Cupboard Dry Plus
Multi-layered, thick laundry that does not dry readily.
Cupboard Dry
Normal, single-layered laundry.
Iron dry
Normal, single-layered laundry that still needs to be damp after drying and is suit�able for ironing or hanging up.
Drying Level
If you think the laundry is still too damp when the drying programme has ended, you can adjust the degree of dryness to achieve a particular dryness level. To increase the dryness level, set the degree of dryness to between  and
and  . This extends the programme duration but the temperature remains the same.
Once you have adjusted the degree of dryness for a dryness level, this setting is retained even after the appliance is switched off.
Programme Duration
The drying time for timed programmes can be extended to up to three hours in 10-minute increments.
Finished in
Before starting the programme, you can delay the time at which the programme ends by up to 24 hours.
The set time in hours, e.g. 8 h, is shown in the display and counts down until the programme starts. Once the programme has started, the programme duration is displayed.
Note: The programme duration is included in the "Ready in" time.
Crease Guard
The drum moves the laundry at regular intervals after drying to prevent creasing.
You can extend the automatic Anti-Crease function by 60 minutes (  ).
).
Low Heat
Reduced temperature for delicate fabrics, e.g. polyacrylic or elastane, may increase the drying time.
Laundry
Preparing laundry
Prepare the laundry as follows:
- Tie cloth belts, apron strings, etc. together or use a laundry bag.
- Close zips, hooks, eyelets and buttons. Button up large items of laundry, such as covers.
- Always dry very small items of laundry, e.g. babies' socks, together with large items such as towels.
- Use timed programmes for single items.
- Knitted items, such as T-shirts and jerseys, often shrink slightly the first time they are tumble-dried. Use a gentle programme.
- Do not overdry easy-care laundry. This leads to increased creasing of your laundry.
- Some detergents and care products, e.g. starch or softeners, contain particles that may accumulate on the moisture sensor. This may impair the sensor's performance and, in turn, the drying result.
Notes
- When washing laundry to be tumble-dried, use the correct amount of detergent and care products as specified in the manufacturer's instructions.
- Clean the moisture sensor regularly
Sorting laundry
Note: Load the laundry item by item into the appliance. For more effective drying, do not stuff an entire bundle of laundry into the dryer at once.
Caution!
Risk of material damage to the dryer or laundry
Laundry that is unsuitable for tumble drying may damage the appliance and the laundry when it is dried. Before you dry it, sort the laundry according to the information given on the care label:
 Suitable for tumble drying
 Dry at normal temperature
 Dry at low temperature
 Do not tumble-dry
When sorting the laundry to be dried, take the following points into account:
- To achieve an even drying result, only dry laundry of the same type of fabric and texture together. If you dry thin, thick and multilayered fabrics together, they will dry to differing degrees.
- Use the fabric descriptions given for the individual drying programmes to help you choose the most appropriate programme. -> "Overview of programmes"
Note: You can select a timed programme to add extra drying time for laundry that is still damp.
Caution!
Risk of material damage to the appliance and laundry
Do not tumble-dry the following items or fabrics in the appliance:
- Laundry contaminated with solvents, wax or grease.
- Unwashed items.
- Items made from non-breathable fabrics (e.g. rubber-coated).
- Items made from delicate fabrics, such as silk and curtains made of synthetic material.
Operating the appliance
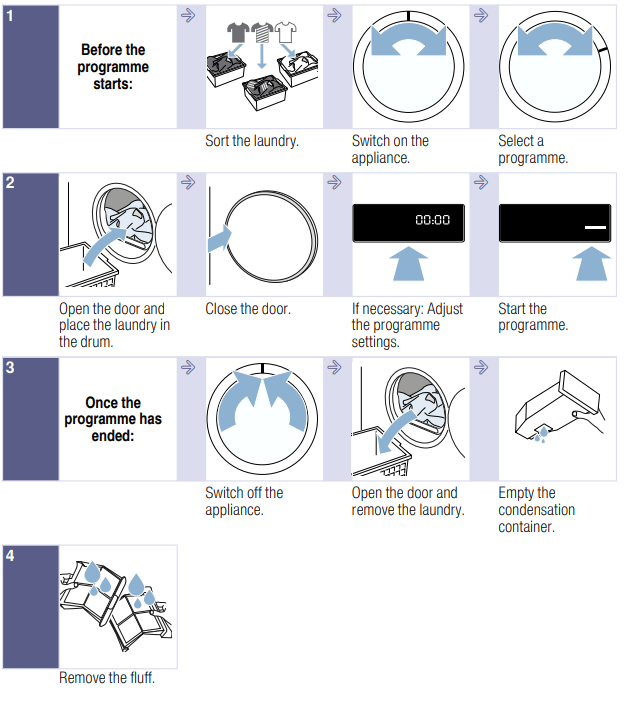
Loading laundry and switching on the appliance
Note: The appliance must be correctly installed and connected.
1. Prepare and sort the laundry.
2. Turn the programme selector to switch on the appliance.
3. Open the door.
Check that the drum has been completely emptied. Empty it if necessary
4. Load the laundry unfolded into the drum.
5. Close the appliance door.
Caution!
Risk of material damage to the appliance or laundry.
Make sure that laundry is not trapped in the door.
Note: The appliance's drum is lit up after the door is opened and closed and once the programme has started. The drum's interior light goes out on its own.
Setting a programme
Note: If you have activated the childproof lock, you must deactivate it before you can set a programme.
- Set the programme you require.
- Adjust the programme settings, if required. -> "Programme settings"
Starting the programme
Press Start/Pause.
Note: If you want to prevent the programme from being adjusted inadvertently, activate the childproof lock.
Programme progress
The programme status will be indicated on the display.
Note: When a programme is selected, the expected drying time for the maximum permitted load is displayed. The moisture sensor measures the residual moisture in the laundry as it is being dried. The programme duration and the remaining time indicated on the display are automatically adjusted as the programme progresses, depending on how damp the laundry is (exception: Timed programmes).
Changing the programme or adding more laundry
You can remove or add laundry and change or adjust the programme at any time during drying.
- Open the door or press Start/ Pause to pause the programme. Note: The drum will continue to rotate when the CoolDown process is in progress, even if you have paused the programme. You can stop the CoolDown process at any time by opening the door.
- Add or remove laundry.
- If required, select a different programme or a different programme setting. -> "Overview of programmes" -> "Programme settings" Note: Do not change the programme during the CoolDown process.
- Close the appliance door.
- Press Start/Pause.
Note: The programme duration is updated on the display, depending on the load and on the residual moisture in the laundry. The values displayed may change when the programme or load is changed.
Cancelling the programme
The programme can be cancelled at any time by opening the door or pressing Start/Pause.
Caution!
Risk of fire. Laundry may catch fire.
If you cancel the programme, remove all items of laundry from the dryer and spread them out to allow the heat to dissipate.
End of programme
The following message appears in the display: 
Removing laundry and switching off the appliance
- Remove the laundry.
- Turn the programme selector to switch off the appliance.
Emptying the condensation container
Note: After each drying cycle, empty the condensate container; otherwise the next drying programme may be cancelled as a result of the condensate container being full.
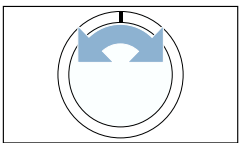
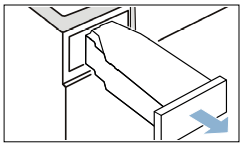
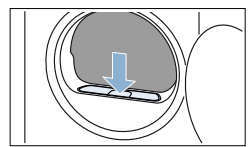
1. Pull out the condensation container horizontally.
2. Pour out the condensation water.
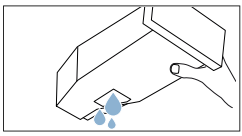
Caution!
Risk of harm to health and material damage
Condensation water is not suitable for drinking and may be contaminated with fluff.
Contaminated condensation water may be harmful to your health and cause material damage. Do not drink the condensation water or reuse it.
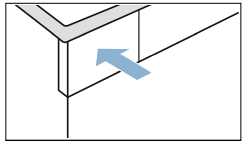
3. Push the condensation container back into the appliance until you feel it lock into place.
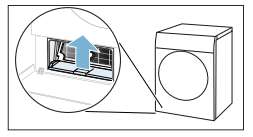
Removing the fluff
Note: During drying, fluff and hair from the laundry is trapped by the fluff filter. If the fluff filter is clogged or dirty, this reduces the flow of air, preventing the appliance from achieving optimal drying results. Dirty fluff filters increase the power consumption and increase the required drying time.
Clean the fluff filter after each drying cycle:
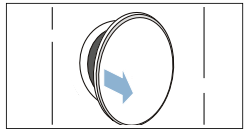
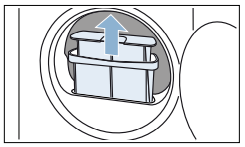
1. Open the door and remove all fluff from it.
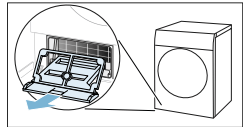
2. Pull out the two-part fluff filter.
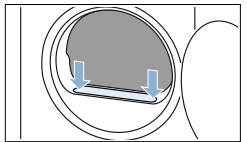
3. Remove the fluff from the fluff filter recess. Ensure that no fluff falls into the open shaft.
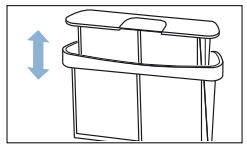
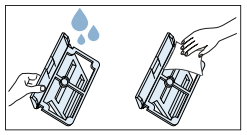
4. Pull the two-part fluff filter apart.
5. Open the two parts of the filter.
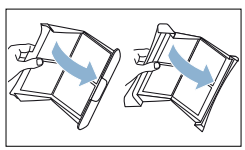
6. Remove all fluff from both parts of the filter.
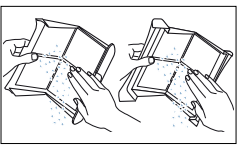
7. Rinse off fluff under warm, running water.
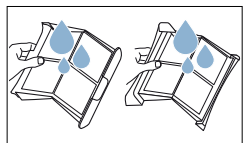
8. Dry the two parts of the fluff filter, snap them shut and reinsert the filter.
Caution!
Material damage/damage to the appliance
If you operate the appliance without a fluff catcher (e.g. fluff filter, fluff depot, depending on appliance specifications), or if the fluff catcher is incomplete or defective, this may result in damage to the appliance.
Do not operate the appliance without a fluff catcher, or with a fluff catcher that is incomplete or defective.
Apliance seettings
You can activate/deactivate or change the appliance settings directly.
Childproof lock
You can activate or deactivate the appliance's childproof lock. You can activate the childproof lock to prevent the control panel from accidentally being operated.
Activate/deactivate the appliance setting as follows:
Press and hold Programme Duration and Finished in at the same time for approx. three seconds.
 is shown/hidden in the display.
The childproof lock is activated/ deactivated.
Notes
- You can activate the childproof lock at any time after you switch on the appliance.
- The childproof lock remains active even after the appliance has been switched off. In order to operate the control panel when you turn on the appliance, you need to deactivate the childproof lock
Altering the appliance settings
You can call up and change the following appliance settings:
- Volume of the audible notification signals (e.g. at the end of a programme)
- Volume of the audible operating signals
- Spin speed used for spinning the laundry before drying
Call up and change the appliance settings as follows:
1. Set the programme to position 1.
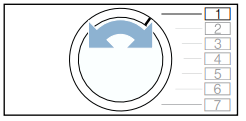
2. Press and hold Start/Pause. At the same time:
3. Set the programme to position 2.
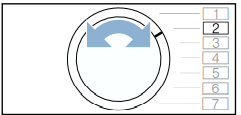
4. Release Start/Pause.
You can now alter the appliance settings.
Adjusting the volume of the audible notification signals
You can adjust the volume of the notification signal emitted at the end of the programme.
Adjust the appliance setting as follows:
1. Set the programme to position 3.
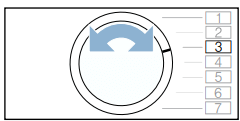
The current setting will appear on the display.
2. Press Programme Duration or Finished in until the required setting appears on the display.
Settings:
0 Off
1 Low
2 Medium
3 High
4 Very high
3. Alter any additional appliance settings you require or save and exit the appliance settings.
Adjusting the volume of the audible operating signals
You can adjust the volume of the buttons for operating the appliance.
Adjust the appliance setting as follows:
1. Set the programme to position 4.
The current setting will appear on the display.
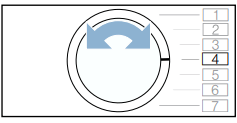
2. Press Programme Duration or Finished in until the required setting appears on the display.
3. Alter any additional appliance settings you require or save and exit the appliance settings.
Changing the spin speed
If you have spun the laundry before drying it, you can set this spin speed on the appliance. The drying time is increased or decreased in accordance with the set spin speed.
Note: The set spin speed does not change the drying time for the time programme.
Adjust the appliance setting as follows:
1. Set the programme to position 2.
The current setting will appear on the display.
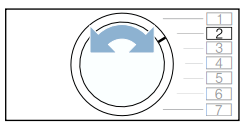
2. Press Programme Duration or Finished in until the required setting appears on the display.
Settings: 600 Low ->1800 High
3. Alter any additional appliance settings you require or save and exit the appliance settings.
Saving and exiting the appliance settings
Save and exit the appliance settings as follows:
1. Turn the programme selector to switch off the appliance.
. Wait 5 seconds.
Note: The selected settings are retained even after the appliance has been switched off.
Draining the condensation water
Condensation will form in the appliance as it dries the laundry.
You must ensure that the drain hose is connected when you operate the appliance.
If there is no drain hose connected to the appliance, the condensation water from the appliance will run into the condensation container. In this case, you will need to empty the condensation container each time the dryer finishes drying the laundry, and also if it becomes full before drying is complete.
Connect the drain hose as follows:
1. Remove any accessories from the drum.
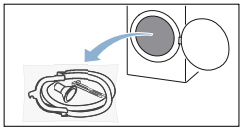
2. Remove all items from the bag.
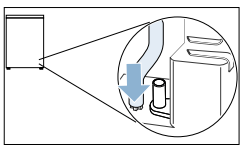
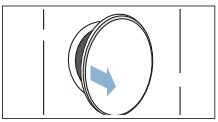
3. Detach the condensation hose from the connector.
Note: The appliance comes delivered with the condensation hose already fitted to the connector.
4. Place the condensation hose in the "parked" position.
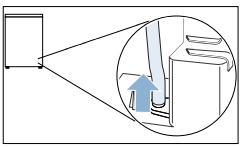
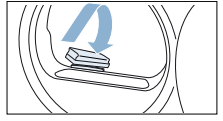
5. Take the drain hose from the accessories and push it fully onto the free connector.
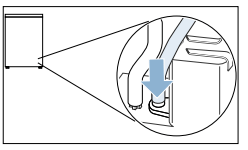
6. Push the drain hose into the appliance's hose guide.
Note: Take care not to kink the drain hose when doing this.
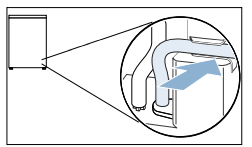
7. Secure the other side of the drain hose using the remaining accessories, depending on the connection situation.
Washbasin:
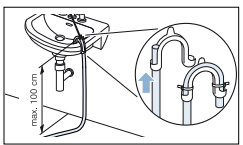
Siphon:
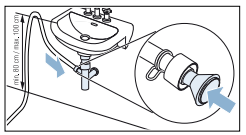
The connection point must be secured using a hose clamp (12-22 mm clamping range, available from specialist retailers).
When connecting to a siphon, make sure that the drain hose is routed at a height of at least 80 cm, but no more than 100 cm
Floor drain:
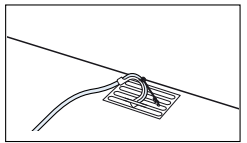
The condensation water is now discharged via the drain hose into the waste-water system or into a washbasin.
Note: If you want to drain the condensation water back into the condensation container, reverse these steps.
Caution!
Risk of material damage/damage to the appliance
If you are draining condensation water into the condensation container, liquid may leak out of the socket and cause material damage. Before operating the appliance, make sure that the condensation hose is secured to the socket.
Cleaning and maintenance
Cleaning the appliance
Warning
Risk of death!
The appliance is powered by electricity.
There is a risk of electric shock if you come into contact with live components.
Therefore please note:
- Switch off the appliance. Disconnect the appliance from the power supply (pull out the plug).
- Never take hold of the mains plug with wet hands.
- When removing the mains plug from the socket, always take hold of the plug itself and never the mains cable, otherwise this may damage the mains cable.
- Do not make any technical modifications to the appliance or its features.
- Repairs and any other work on the appliance must only be conducted by our customer service or by an electrician. The same applies for replacing the mains cable (when necessary).
- Spare mains cables can be ordered from our customer service.
Cleaning the moisture sensor
Note: The moisture sensor measures the amount of moisture in the laundry.
After long periods of usage, the moisture sensor may become covered by a fine layer of limescale or detergent and care product residue. These deposits must be removed regularly, otherwise the drying results may not be optimal.
- Open the door.
- Clean the moisture sensor with a rough sponge.
Cleaning the base unit
Fluff and hair from the laundry collect in the base unit during drying. Clean the appliance's base unit if the following message appears in the display: 
You can also clean the appliance's base unit even if this message does not appear in the display, e.g. if there is visible soiling.
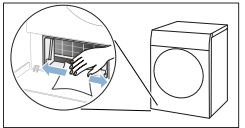
Clean the base unit as follows:
1. Clean the fluff filter
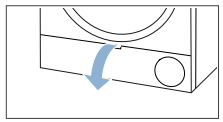
2. Open the maintenance flap by the handle.
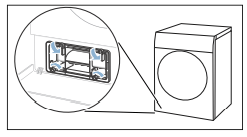
3. Unlock the levers on the heat exchanger cover.
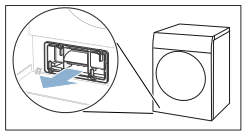
4. Pull the heat exchanger cover out by its grip.
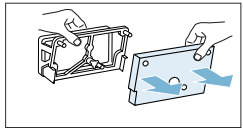
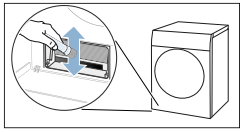
5. Carefully remove the filter mat from the heat exchanger cover.
Note: Take care not to damage the filter mat when doing this.
6. Use a soft brush to clean the heat exchanger cover.
Note: Make sure that no dirt or debris is left on the seal.
7. Rinse the filter mat under running water and squeeze out the water with your hand.

Notes
- If there are heavy deposits, you can clean the filter mat carefully with a vacuum cleaner.
- Only clean with clear water; do not use cleaning products.
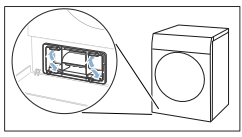
8. Position the filter mat fully on the retainers in the heat exchanger cover.
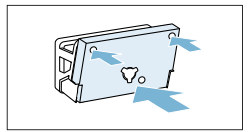
Notes
- Ensure that the filter mat is clean and dry, and positioned on the retainers as shown.
- The filter mat must not be put back if misshapen, damaged or reversed.
- You can order a new filter mat from our after-sale services using the spare part number: 12022801. Contact information for all countries can be found in the enclosed after sales service directory.
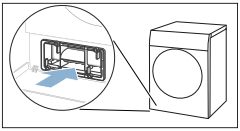
9. If there is visible soiling, carry out the following steps (optional):
a) Lift the middle tab on the insert slightly.
b) Pull the insert out horizontally.
c) Rinse the insert under running water and dry it off.
d) Clean the opening in the appliance with a soft, damp cloth.
Note: Take care not to damage the heat exchanger, as it is exposed.
e) Carefully clean the fins on the heat exchanger with a vacuum cleaner and brush attachment.
Note: Always clean the fins on the heat exchanger from top to bottom, taking care not to bend or damage them.
f) Push the insert in horizontally until you hear the tab click into place.

10.Slide the heat exchanger cover in by its grip.
Note: You can only slide the heat exchanger cover in if the insert is in the appliance.
11.Lock the levers on the heat exchanger cover.
12.Close the maintenance flap.
You have now finished cleaning the appliance's base unit.
Help with the appliance
Appliance does not start.
- Check the mains plug and the fuses.
Creasing.
- Load exceeded or incorrect programme selected for a type of fabric. All the required information can be found in the programme table.
- Remove laundry from the drum as soon as the drying programme has finished. Creasing occurs when clothing is left in the drum.
Water is leaking out.
- The appliance may be positioned at an angle. Level the appliance.
- In the base unit, make sure that:
- The heat exchanger cover is properly locked.
- There is no dirt or debris on the heat exchanger cover's seal.
- If the optional drain hose* is installed, make sure that the drain hose is correctly connected.
The appliance is paused but the drum is turning.
- The appliance has detected a high temperature and has started the CoolDown process. Temperature regulation can take up to 10 minutes. You can cancel the CoolDown process at any time by opening the door.
The programme does not start
Make sure that:
- The door is closed
- The
 3 sec. (Child lock) has been deactivated
- You have pressed Start/Pause
Note: If the programme has been delayed by setting Finished in, the programme starts at a later point.
Programme duration displayed changes as drying progresses.
- Not a fault. The moisture sensor measures the residual moisture in the laundry and adjusts the programme duration (with the exception of timed programmes).
Laundry is not dried properly or is still too damp.
- After the programme has ended, warm laundry feels damper than it actually is. Spread out the laundry and let it cool down.
- Adjust the drying time or increase the degree of dryness. This will extend the drying time but the temperature will remain the same.
- Select a timed programme to add extra drying time for laundry that is still damp.
- Select a timed programme for a small load.
- Do not exceed the maximum load for a programme.
- Clean the moisture sensor in the drum. The sensor may become covered in a fine layer of limescale or detergent and care product resi�due, which then impairs its performance.
- Drying has been interrupted as a result of a power cut, because the condensation container is full or because the maximum drying time has been exceeded.
Humidity in the room is increasing.
- Make sure the room is sufficiently ventilated.
Unusual noises when drying.
- When drying is in progress, the pump and compressor generate noise when operating normally. This does not indicate that the appliance is malfunctioning.
The appliance feels cold despite drying.
- Not a fault. The appliance can dry effectively at low temperatures using a heat pump.
Drying programme is stopped.
- If the drying programme is stopped due to a power failure, restart the programme or remove the laundry and spread it out.
Drying is taking too long.
- The appliance may have fluff in it. This will increase the required drying time.
- Remove the fluff
- Clean the base unit.
- The heat exchanger may have fluff in it. If you can see fluff in the exposed heat exchanger, clean it carefully using a vacuum cleaner.
- If the air inlet on the appliance is blocked or not fully open, this may increase the drying time. Make sure that the air inlet remains unobstructed.
- If the ambient temperature is lower than 15 °C or higher than 30 °C, this may increase the drying time.
- Inadequate air circulation in the room may increase the drying time. Make sure the room is adequately ventilated.