Loading ...
Loading ...
Loading ...
ENGLISH
12
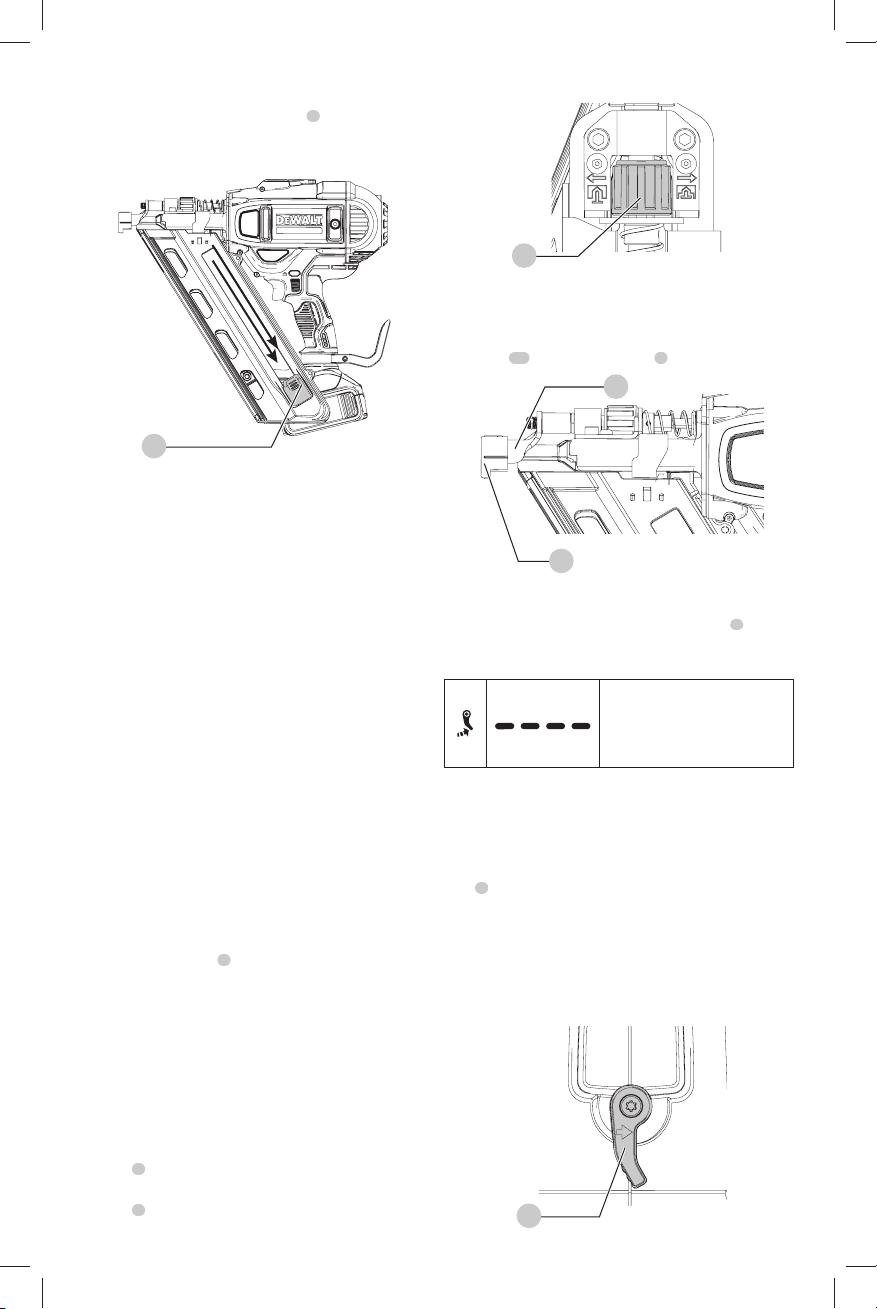
1. Turn the nailer upsidedown.
2. Slide the spring-loaded pusher latch
8
to the base of
the magazine to lock it intoplace.
Fig. H
8
3. Drop nail strips into the loading slot of the magazine,
making sure the nail heads align correctly with the slot
opening. (Refer to Nail Specifications to determine
compatible size.)
4. Keeping fingers clear of the track, close the magazine by
releasing the pusher latch. Carefully allow the latch to
slide forward and engage the nailstrip.
Unloading the Tool
WARNING: The trigger lock-off should always be
locked off whenever any adjustments are made or
when tool is not inuse.
1. Slide the spring-loaded pusher latch to the base of the
magazine to lock it intoplace.
2. Tip the tool up until the fastener strip slides freely out of
themagazine.
3. With battery removed, check the nosepiece to verify
there are no nailsremaining.
NOTE: The tool is equipped with a magnet in the nose
area for improved tool performance. When unloading,
always verify that the small sticks of nails are not held to the
magnetized nosepiece.
Adjusting Depth (Fig. I)
The depth that the nail is driven can be adjusted using the
depth adjustment wheel
4
on the nose of thetool.
WARNING: To reduce risk of serious injury from
accidental actuation when attempting to adjust
depth, ALWAYS:
• Remove battery pack
• Engage trigger lock-off.
• Always point the nose of the nailer away
fromyou.
• Avoid contact with trigger duringadjustments.
1. To drive the nail shallower, rotate the depth adjustment
wheel
4
to the left, toward the shallow nailicon.
2. To drive a nail deeper, rotate the depth adjustment
wheel
4
to the right, toward the deeper nail icon .
Fig. I
4
Non-mar Tip (Fig. J)
When using this tool on softer materials that you do not
want to mark, such as wood cladding, use the plastic
no-mar tip
13
over the contact trip
6
.
Fig. J
13
6
LED Indicator (Fig. A)
Your nailer is equipped with a LED indicator light
5
to alert
you of a jam/stall. Also refer to to the Troubleshooting
Guide for furtherinstruction.
JAM/STALL CONDITION
Rotate the stall release
lever to release. Refer to
StallRelease.
Stall Release (Fig. K)
If the nailer is used in harder wood where all available
energy in the motor is used to drive a fastener, the tool
may stall. The driver blade will not complete the drive cycle
and the jam/stall indicator will flash. Rotate the stall release
lever
6
on the tool and the mechanism willrelease.
NOTE: The tool will disable itself and not reset until the
battery pack has been removed and reinserted. If the driver
blade does not automatically return to the home position,
proceed to Clearing a Jammed Nail. If the unit continues
to stall please review the material and fastener length to be
sure that it is not too rigorous anapplication.
Fig. K
6
Loading ...
Loading ...
Loading ...