User manual for Television
Step 1 Set up your TV
Ready for the step-by-step? You’re only minutes away from TV bliss!
Remove your TV from the box
Be careful, it’s heavy!
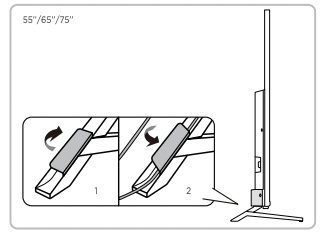
To use the stand
A To prevent damage to the screen, carefully place your TV on a soft, cushioned surface.
B Put the column of the stands into the TV, align the stands with the screw holes located on the TV. Secure the stands to the TV with four (4) screws.
Note: Make sure the installation direction of the stand is the same as illustrated.
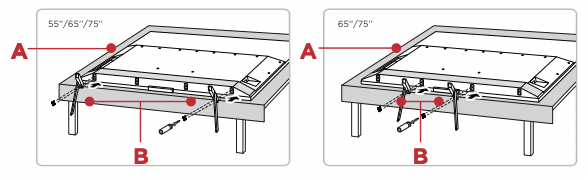
To use the cable clips
Use the cable clips on the TV stands on the left and right as illustrated below.
Warning:
Never place a television set in an unstable location. A television set may fall, causing serious personal injury or death. Many injuries, particularly to children, can be avoided by taking simple precautions such as:
- Using cabinets or stands recommended by the manufacturer of the television set.
- Only using furniture that can safely support the television set.
- Ensuring the television set is not overhanging the edge of the supporting furniture.
- Not placing the television set on tall furniture (for example, cupboards or bookcases) without anchoring both the furniture and the television set to a suitable support.
- Not placing the television set on cloth or other materials that may be located between the television set and supporting furniture.
- Educating children about the dangers of climbing on furniture to reach the television set or its controls.
If your existing television set is being retained and relocated, the same considerations as above should be applied.
Optional - To mount on a wall (wall mount not included)
To mount on a wall
Preparation must be done before mounting your TV on a wall.
Note: Do not place your TV in a location exposed to direct sunlight, heat, fire, or moisture. Exposure will damage the TV.
|

Place your TV on a soft, cushioned surface
|
|

Remove the 4 screws from the back of the TV
|
|

Screw the VESA bracket tightly onto the back cover with 4 VESA screws.
|
|

Follow the instructions that come with the wall mount to hang the TV on the wall.
|
f you are mounting your TV to the wall, don’t attach the stands
To mount your TV to the wall, purchase a VESA wall mount
|
| 55” Models |
Purchase a VESA 300x300, 4 M6x20mm screws |
| 65” Models |
Purchase a VESA 300x300, 4 M6x20mm screws |
| 75” Models |
Purchase a VESA 400x300, 4 M6x20mm screws |
The VESA number is the horizontal and vertical measurement of the mounting holes. For example, 200X200 refers to the fact that the mounting measurements are 200mm horizontally and 200mm vertically.
Follow the instructions that come with the wall mount. Your wall mount must be able to bear a minimum of five times the TV’s net weight to avoid causing damage.
Step 2 Power up
In this step, we’ll make sure all systems are a GO!
Connect your power cable to the TV, then plug it in to the wall outlet.
Power your TV remote by inserting the included batteries.
Connect other devices by referencing port label and descriptions on the next page.
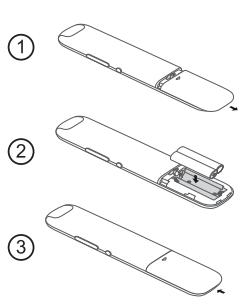
Insert batteries in the correct polarity as indicated in the battery compartment.
Power Tip! Always replace depleted batteries with two same brand-new batteries from the same manufacturer. Never use damaged batteries. If your remote gets warm/hot during use, discontinue use and contact customer support immediately at supporttcl
Step 3 Grab your remote
The TV remote should feel right at home in your hand. We designed it to be incredibly intuitive for watching TV and navigating on-screen menus.
|
A OPTIONS View more options when playing media
B POWER Turn TV on and o�ff
C WATCHLIST Open the Watchlist menu or future function
D SETTINGS Display the dashboard on screen
E REMOTE MICROPHONE Talk to the remote microphone after pressing the Google Assistant button
F GOOGLE ASSISTANT BUTTON Press to activate the remote’s Google Assistant microphone. Search content through your voice by holding down the button.
G VOLUME Raise and lower volume
H HOME Return to home screen
I BACK Return to previous screen
J ELECTRONIC PROGRAM GUIDE Display the live antenna TV channels
K MUTE Press the button to mute the sound. In Google TV, holding the button down about 3 seconds can display the “TalkBack”.
L VIRTUAL KEYBOARD Open virtual keyboard on screen
M QUICK PANEL Display the quick panel
N TCL HOME Open TCL home on screen
|
|

Tip! Follow the on-screen guide to pair the remote control with the TV when pressing the  button for the first time. button for the first time.
|
Step 4 Get to know your TV
 |
|
 |
|
A. STATUS LIGHT OF HANDS-FREE VOICE CONTROL Glows when you activate the hands-free voice control. (To learn more about the function, go to page 13.)
IR RECEIVER Receives signal from the TV remote
LIGHT SENSOR Analyzes ambient light conditions for optional auto picture adjustment.
B. POWER and OPTIONS BUTTON Press once to open the menu. Short click to change the menu and long click to select.
C. POWER PORT Connect your TV to the power source with the included power cable.
D. HANDS-FREE VOICE CONTROL MIC SWITCH Enable or disable the TV’s integrated microphone.
E. USB PORT Connect a USB device to access photos, music and movies. Or connect the optional TCL webcam to chat with friends using supported video call apps.
F. ETHERNET Connect an Ethernet cable to your home Internet router or switch.
|
|
G. HDMI PORTS Highest quality audio/video connection. Connect cable box, Blu-ray player, gaming console, or other devices to your TV using HDMI cables.
HDMI ports 1 & 2: Supports up to 4K/120Hz
HDMI ports 3 & 4: Supports up to 4K/60Hz
H. HDMI eARC/ARC PORT Connect HDMI eARC/ARC E (audio return channel) capable audio devices like sound bars or AV receivers
I. ANTENNA/CABLE IN Connect an outdoor VHF/UHF antenna or Cable TV feed.
J. AV IN adapter AV Input (analog audio/video)The AV Input can be used to connect older devices that use analog audio/video outputs. Compatible adapter (not included) connects to the RCA cable (video - yellow and audio - white and red) that you normally use to connect to that device.
K. HEADPHONE OUT Connect headphones or other external speakers.
L. OPTICAL (DIGITAL AUDIO OUT) Connect an optical cable to an external digital audio system.
|
Step 5 Complete guided setup
It’s the final stretch-hurray!
Let’s Connect
Once your language has been selected, you can quickly set up the TV using an Android phone with the pre-installed Google Home app.
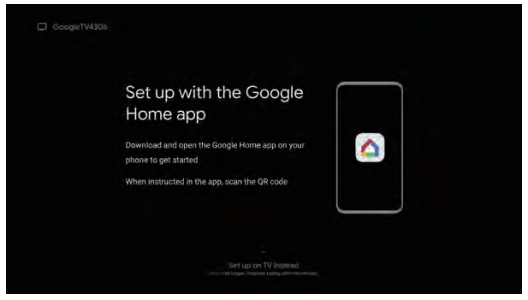
TV interface may vary and is subject to change
Or you can follow the easy on-screen instructions to setup your TV. If you aren’t ready to connect your TV to a wireless network, you can still use it as a regular TV.
To enjoy all smart features and services on your TCL Google TV, a free Google account, a free TCL account, and a reliable broadband internet connection, are required.
And setup is done...Congratulations!
Continue using the remote to personalize your Home screen, streaming apps line-up, stream movies, and so much more.
Key things to know:
A paid subscription or other payments may be required for some streaming apps. Streaming apps availability are subject to change and vary by country.
Troubleshooting
Having trouble completing the guided setup? Don’t worry, it’s usually an easy fix.
Cannot connect to wireless network (WiFi)
- Select the correct wireless network name and verify the password entered (case sensitive).
- Relocate the router from objects that interfere with performance (cordless phones, baby monitors, etc.).
- Reboot the router by disconnecting the power for more than 2 minutes and reconnect
Problems connecting my cable box or antenna through a coax cable
- For best performance, use the HDMI connection. If not available, then:
- Make sure the cable connections to the TV and your device are securely fastened.
- Select cable or antenna input.
- Select the channel scan menu and follow the on-screen instructions to perform a full channel scan
What is the remote code for programming my Universal or Cable box remote control?
Access parental control
- The initial personal password for your TV is 1234.
- You can change the personal password anytime.
- If you forget your personal password, you can use 0423 to reset.
How do I turn Text-to-Speech (TTS) on or off?
- Select “Settings” from the home screen.
- Select “System”.
- Select “Accessibility”.
- Select “TalkBack”
- Select “Enable” and press OK to turn it on or o�.
How to use voice control through the remote control?
- In Google TV mode, press and hold the “HOME” and “OK” buttons on your remote at the same time.
- Keep your remote within 3 ft. of your TV during the pairing process.
- Then, when the TV display shows that the Google Assistant is ready – speak towards the remote microphone by holding down the Google Assistant button to ask a question or try a suggestion.
How to use hands-free voice control?
Note: Make sure the hands-free voice control mic switch (refer to page 8 for its position) is turned on before using this function.
- In Google TV mode, press the Google Assistant button on your remote.
- Select “Yes, I’m in”.
- Say “OK Google” or “Hey Google” to activate the hands-free voice assistant without using the remote control.
- Speak towards the TV to ask a question or try a suggestion.
Follow these steps to enable the always-on hands-free voice control:
- Select “Settings” from the home screen.
- Select “System” > “Power & Energy” > “Quick Start” and turn it on.
- Select “System” > “Power & Energy” > “Screenless Service”.
- Turn on the “Screenless Service” and you can enjoy hands-free voice control in TV standby mode.