OWNER’S MANUAL
DIGITAL SIGNAGE MEDIA PLAYER
(Hardware)
DIGITAL SIGNAGE MEDIA PLAYER
NC1000 NC1100 NA1000 NA1100
NC2000 NC2100 NA2000 NA2100
www.lgsupersign.com
www.lgsolutions.com
Please read this manual carefully before operating
your set and retain it for future reference.

2
TABLE OF CONTENTS
Licenses ............................................................................................................4
Replacing Flash Memory Battery ......................................................................4
NC1000
....................................................................................................5
General Specifications .................................................................................................. 5
Multi I/O Port ................................................................................................................. 5
Operational Specifications ............................................................................................ 6
Included in the Box ............................................................................................7
Basic Components ........................................................................................................ 7
Optional Items ............................................................................................................... 7
Connections ......................................................................................................8
Back Panel .................................................................................................................... 8
Installation .........................................................................................................9
In/Out Cable Connection .................................................................................11
Connecting a Monitor with D-sub Cable .......................................................................11
Connecting a Monitor with an HDMI Cable ................................................................. 14
Connecting/Disconnecting HDMI Audio Device in Windows ....................................... 16
Connection to Multiple Monitors .................................................................................. 17
NC2000
..................................................................................................18
General Specifications ................................................................................................ 18
Multi I/O port ................................................................................................................ 18
Operational Specifications .......................................................................................... 19
Included in the Box ..........................................................................................20
Basic Components ...................................................................................................... 20
Connections ....................................................................................................21
Back Panel .................................................................................................................. 21
Installation .......................................................................................................22

3
NC1100/NA1000/NA1100
..................................................................................................23
General Specifications ................................................................................................ 23
Multi I/O Port ............................................................................................................... 23
Operational Specifications .......................................................................................... 24
Included in the Box ..........................................................................................25
Basic Components ...................................................................................................... 25
Optional Items ............................................................................................................. 25
Connections ....................................................................................................26
Back Panel .................................................................................................................. 26
Installation .......................................................................................................27
In/Out Cable Connection .................................................................................29
Connecting a Monitor with D-sub Cable ...................................................................... 29
Connecting a Monitor with an HDMI Cable ................................................................. 32
Connecting/Disconnecting HDMI Audio Device in Windows ....................................... 34
Connecting a Monitor with DP Cable .......................................................................... 35
Connection to Multiple Monitors .................................................................................. 38
NC2100/NA2000/NA2100
..................................................................................................39
General Specifications ................................................................................................ 39
Multi I/O Port ............................................................................................................... 39
Operational Specifications .......................................................................................... 40
Included in the Box ..........................................................................................41
Basic Components ...................................................................................................... 41
Connections ....................................................................................................42
Back Panel .................................................................................................................. 42
Installation .......................................................................................................43
Appendix
Limitations of Microsoft Windows Embedded Standard ..................................44
Frequently Asked Questions (FAQs) ...............................................................44
4
Serial Port One external RS-232 Serial port
USB Port Hi-Speed USB 2.0 port 480 Mbps rate (x5)
LAN Port Realtek RTL8103E 10/100 Mbps Ethernet controller (NC1000-**A*/**B*)
Realtek RTL8111E Gigabit Ethernet controller (NC1000-**P*/**Q*)
VGA / HDMI Nvidia MCP7A-ION integrated Graphic chipset
4-in-1 Card Secure Digital (SD) / MultiMedia Card (MMC/MMC4.0) /
Memory Stick (MS/MS-Pro) / xD Memory Card
PCI Express Card Slot Supported
LINE OUT Supported
SPDIF
(Digital Audio Out)
5.1 Channel Supported (depending on source signal)
NC1000
Licenses
Supported licenses may differ by model. For more information of the licenses,
visit www.lg.com.
HDMI, the HDMI logo and High-Definition Multimedia
Interface are trademarks or registered trademarks of HDMI
Licensing LLC.
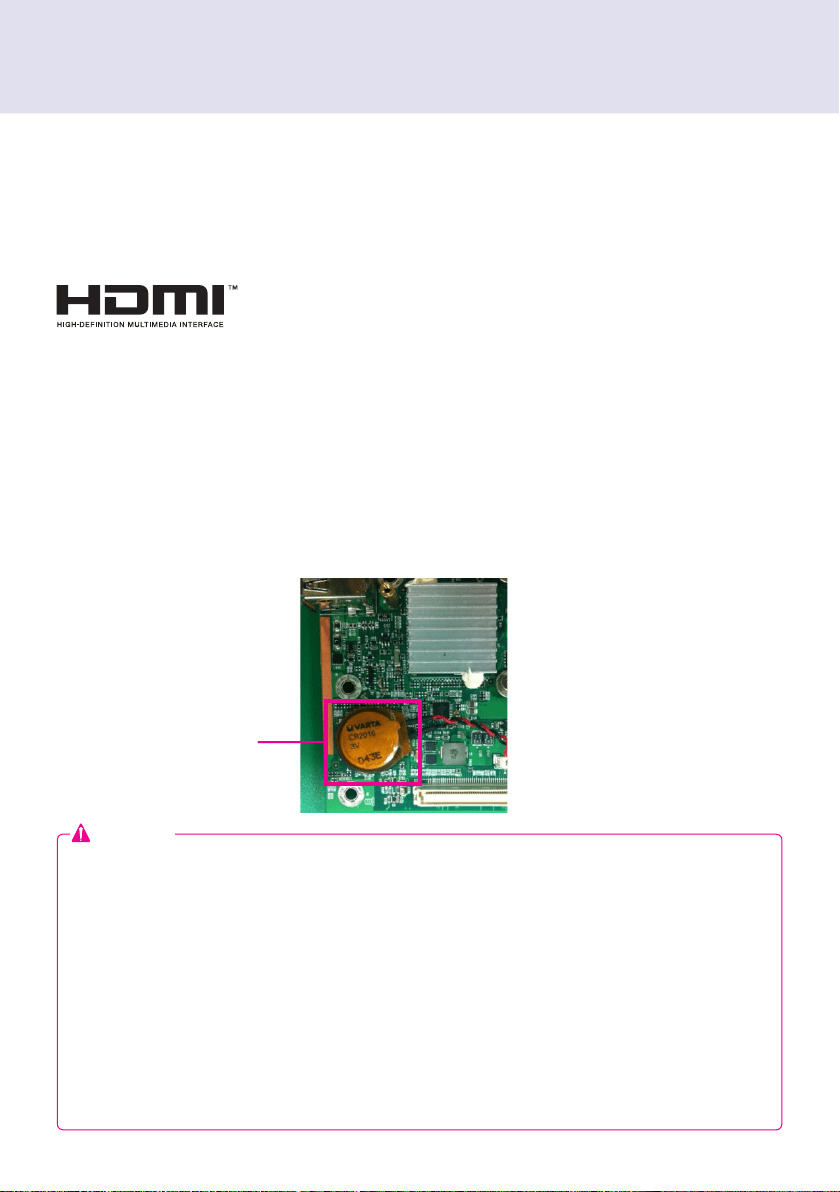
Electronics Service Center.
may be discharged. In this case, servicing will be charged.
replace the battery.
=> ERROR
0271: Check data and time settings
WARNING
0251: System CMOS checksum bad - Default configuration used
Press <F1> to resume, <F2> to Setup
Attention
Replacing Flash Memory Battery
Flash Memory Battery

5
Dimensions
250 mm (W) x 220 mm (H) x 45 mm (D) (only Set)
Weight
1.43 kg (only Set)
CPU
Intel ATOM Processor 330 1.6 GHz(Dual Core), FSB 533 MHz
Chip Set
Nvidia MCP7A-I ON
Main Memory
DDR3 1066 SODIMM type 1 GB, 2 GB
Secondary Storage Device
SATA SSD 8 GB, 16 GB, 32 GB
O/S
Windows Embedded Standard
General Specifications
Multi I/O Port
Serial Port One external RS-232 Serial port
USB Port Hi-Speed USB 2.0 port 480 Mbps rate (x5)
LAN Port Realtek RTL8103E 10/100 Mbps Ethernet controller (NC1000-**A*/**B*)
Realtek RTL8111E Gigabit Ethernet controller (NC1000-**P*/**Q*)
VGA / HDMI Nvidia MCP7A-ION integrated Graphic chipset
4-in-1 Card Secure Digital (SD) / MultiMedia Card (MMC/MMC4.0) /
Memory Stick (MS/MS-Pro) / xD Memory Card
PCI Express Card Slot Supported
LINE OUT Supported
SPDIF
(Digital Audio Out)
5.1 Channel Supported (depending on source signal)
Attention
Product specifications may change without prior notice to improve performance.
NC1000
HDMI, the HDMI logo and High-Definition Multimedia
Interface are trademarks or registered trademarks of HDMI
Licensing LLC.
Windows 7 is not supported in case of SSD 8 GB.
Note

6
Included in the Box
Resolution
Maximum Resolution 1920 x 1080 @ 60 Hz
Recommended Resolution 1920 x 1080 @ 60 Hz
Power
Power Rating 100-240 V~ 50/60 Hz 1.2 A
Operating Condition
Sync (H/V) Video LED
Normal Mode On/On Active On
Deep Sleep Mode
(Set = Off)
Off/Off Off Off
Operating Conditions
Operating Conditions Temperature 5 ℃ to 40 ℃ Humidity 10 % to 80 %
Storage Conditions Temperature -20 ℃ to 60 ℃ Humidity 5 % to 95 %
Operational Specifications
device.
Note

7
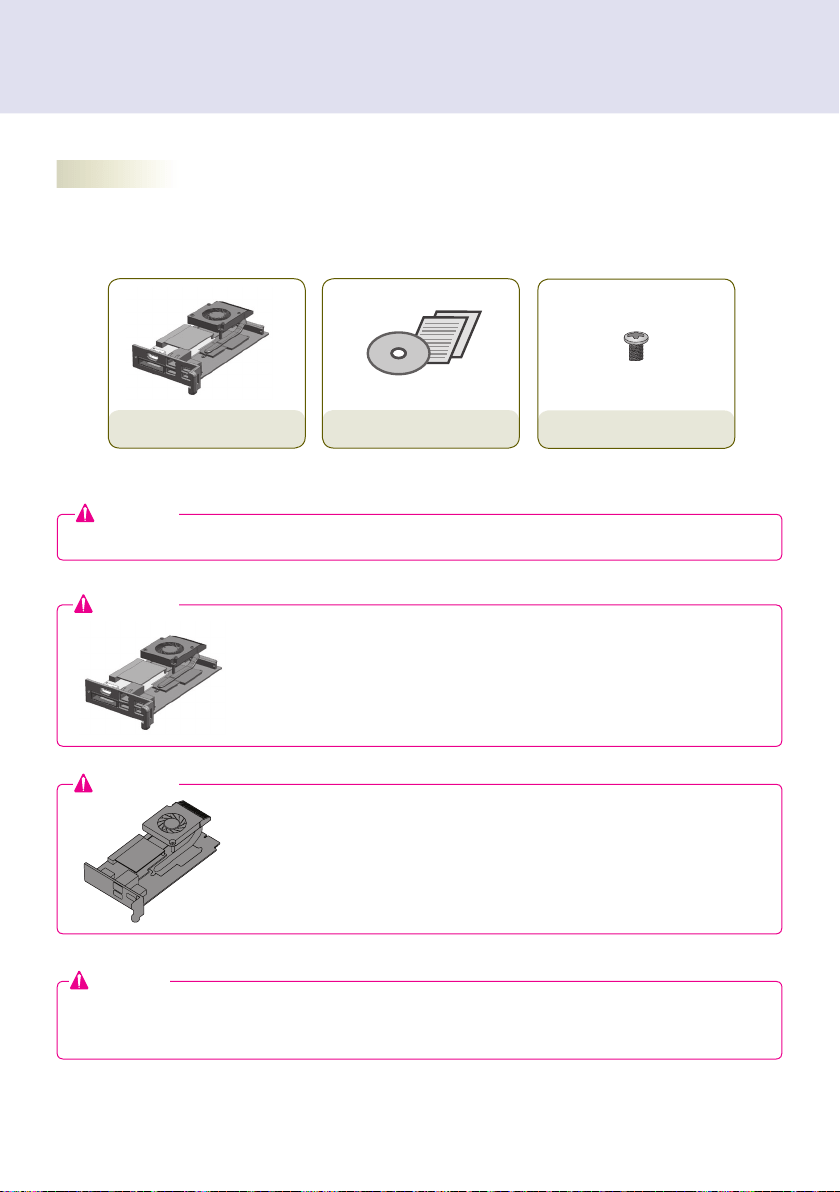
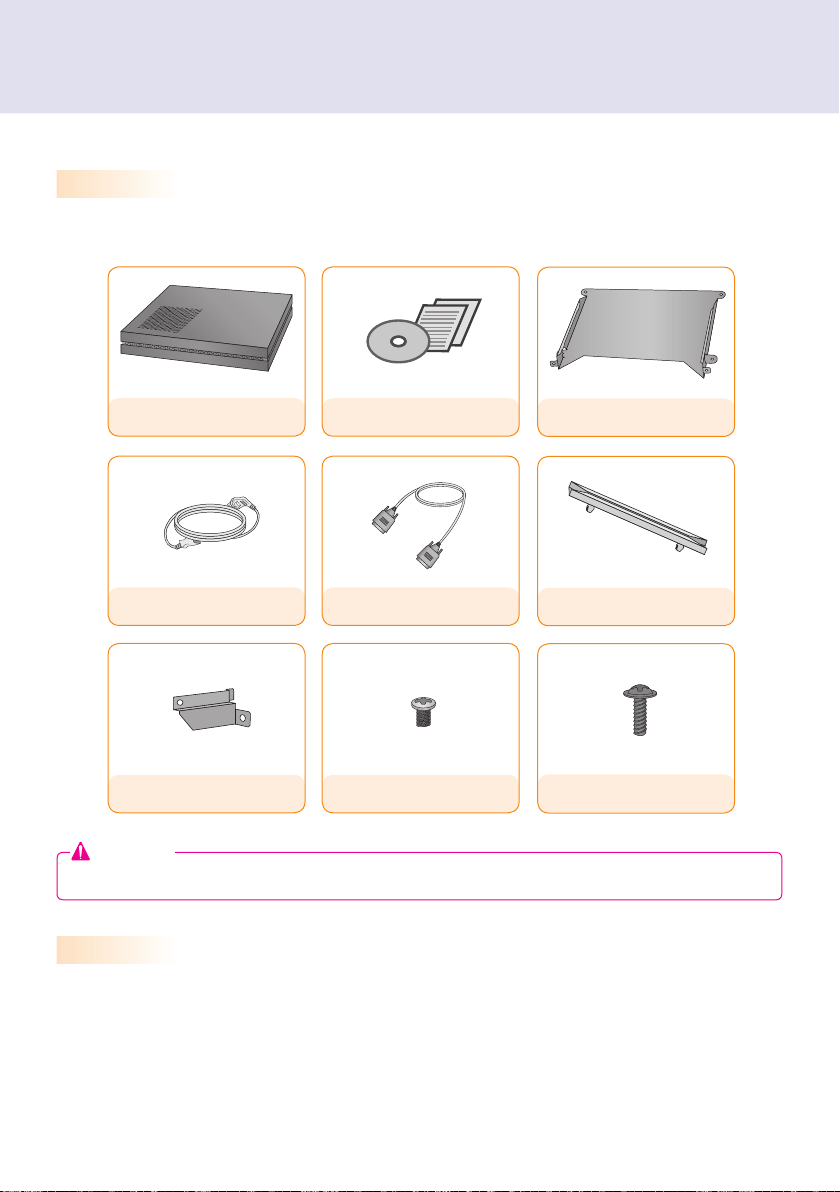
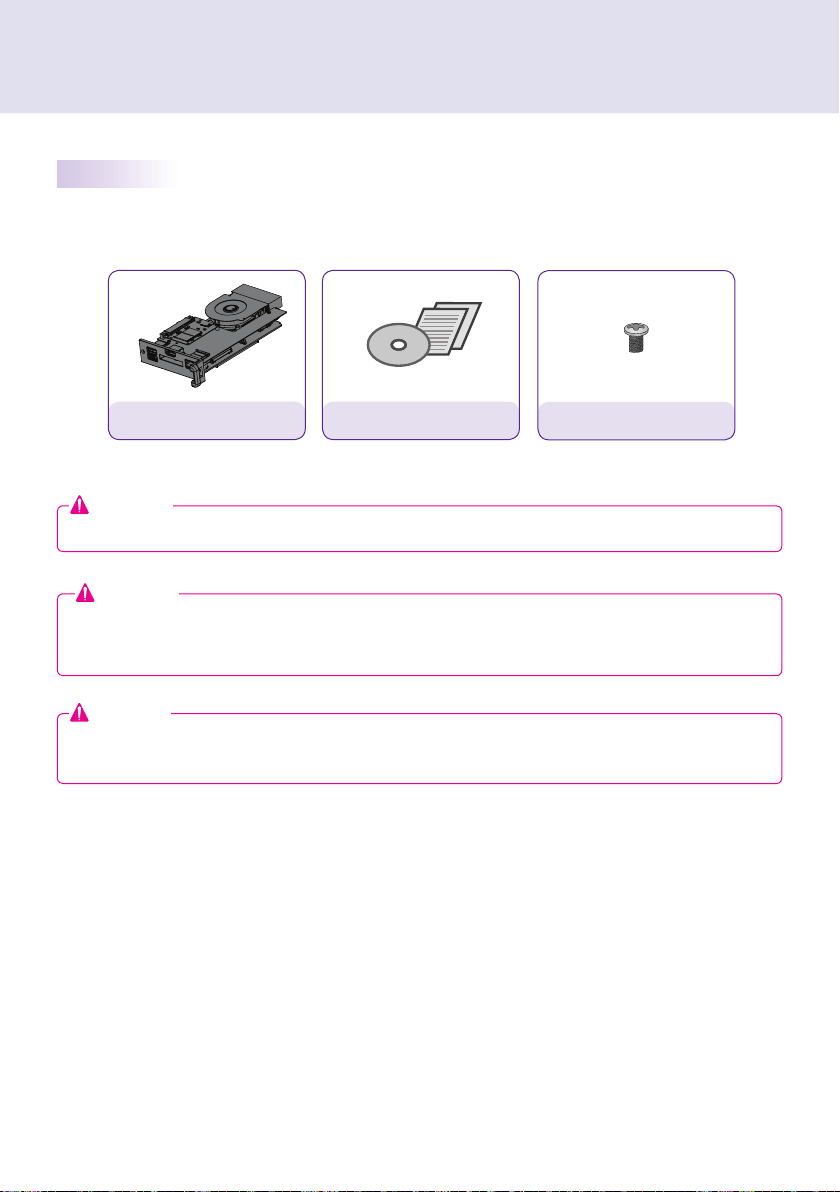
Basic Components
Optional Items
M3, L12 x 4
(for attachment of Box Guide on the monitor)
Included in the Box
The NC1000 with the following components. Please check that these components have been included prior
to installation.
The following items are supported by the NC1000, but are not provided with the product.
Please purchase optional items as needed.
NC1000
Power Cable
Handle x 2
User Manual / Cards
RS-232C Cable
M3, L8 x 8
(for attachment of handle)
Box Guide
Rail x 2
These illustrations may differ from your product and are subject to change.
Attention
8
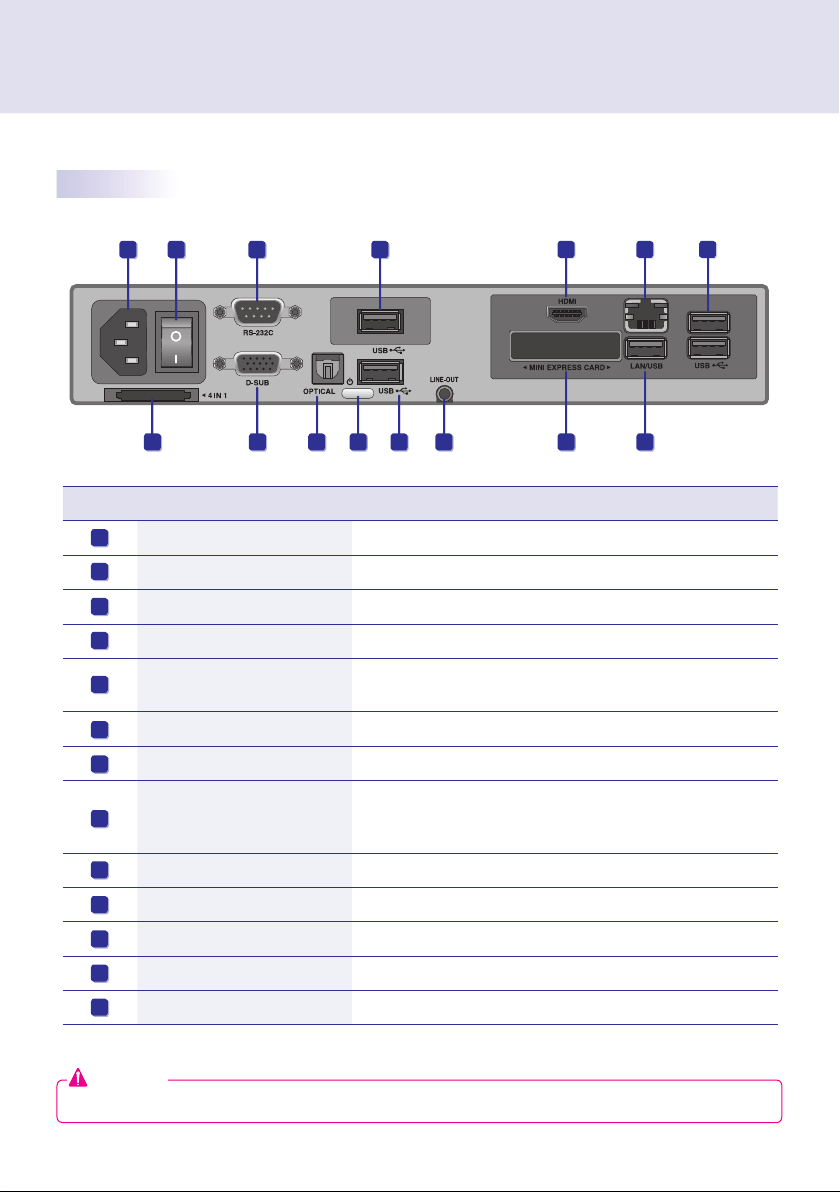
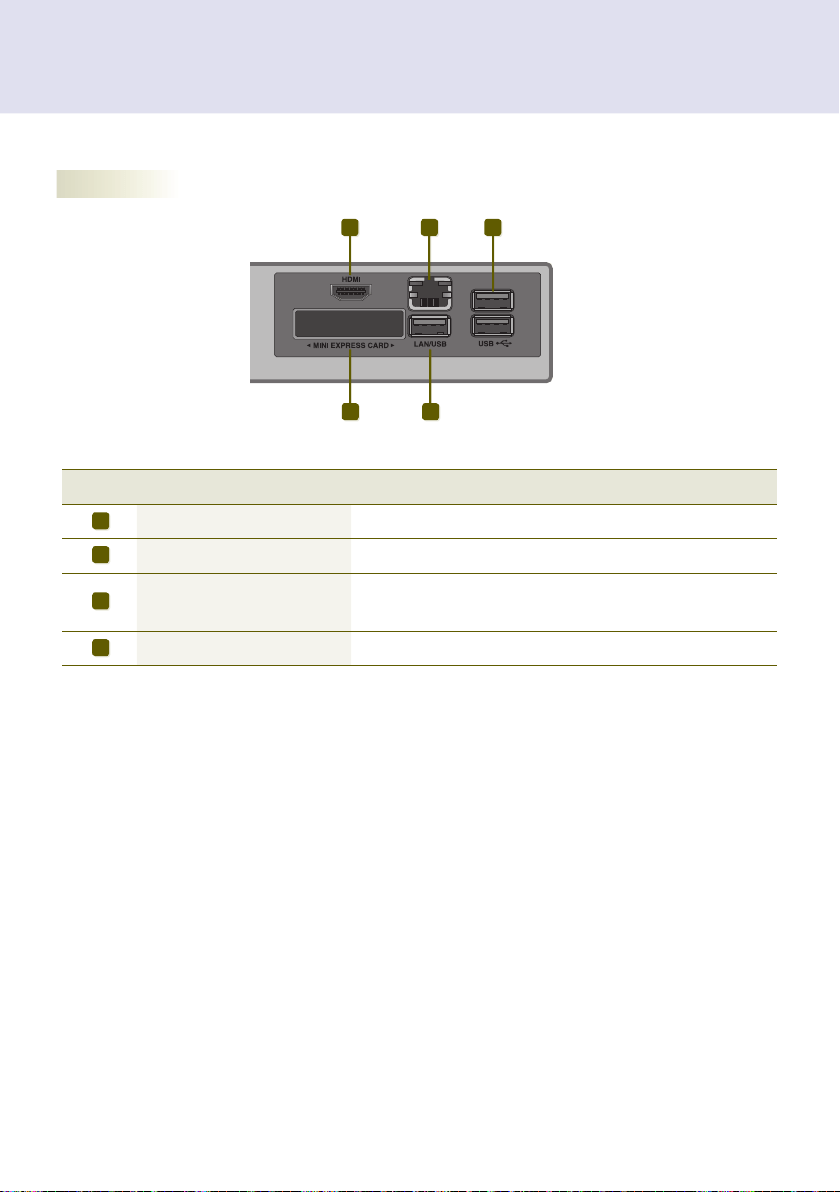
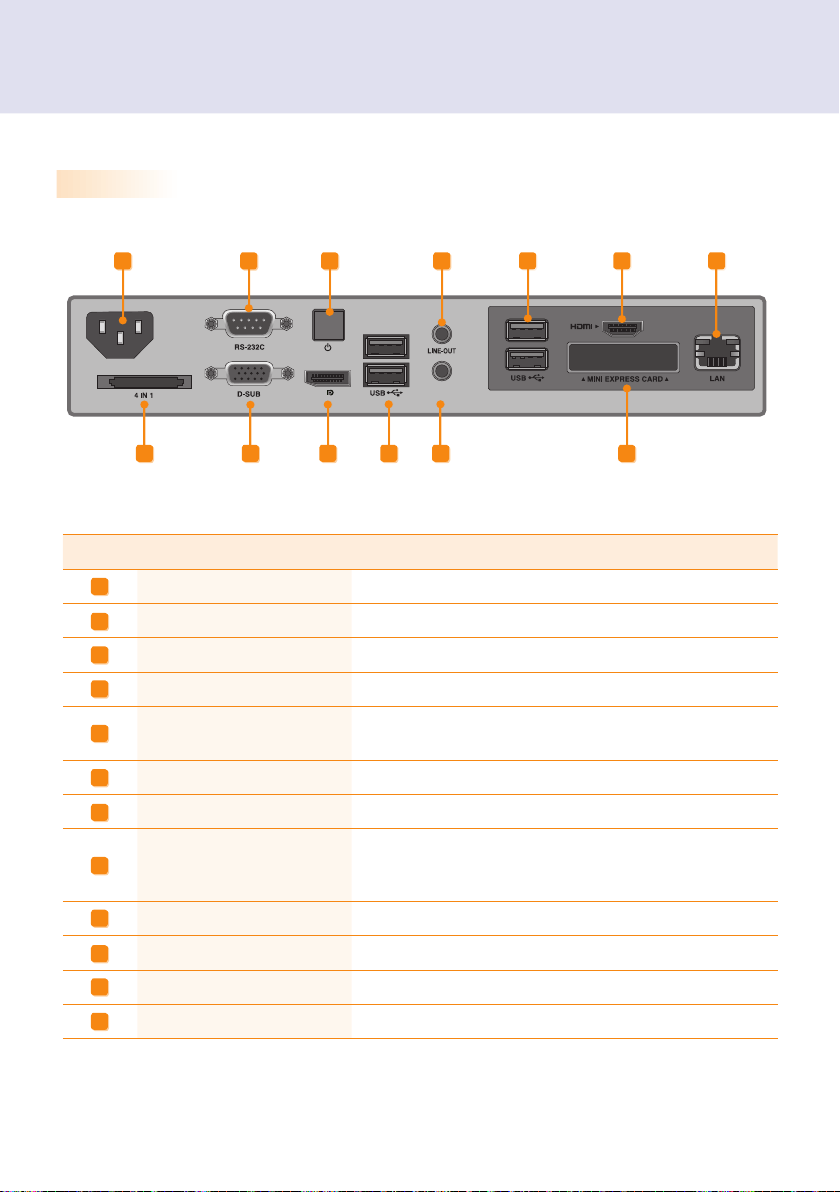
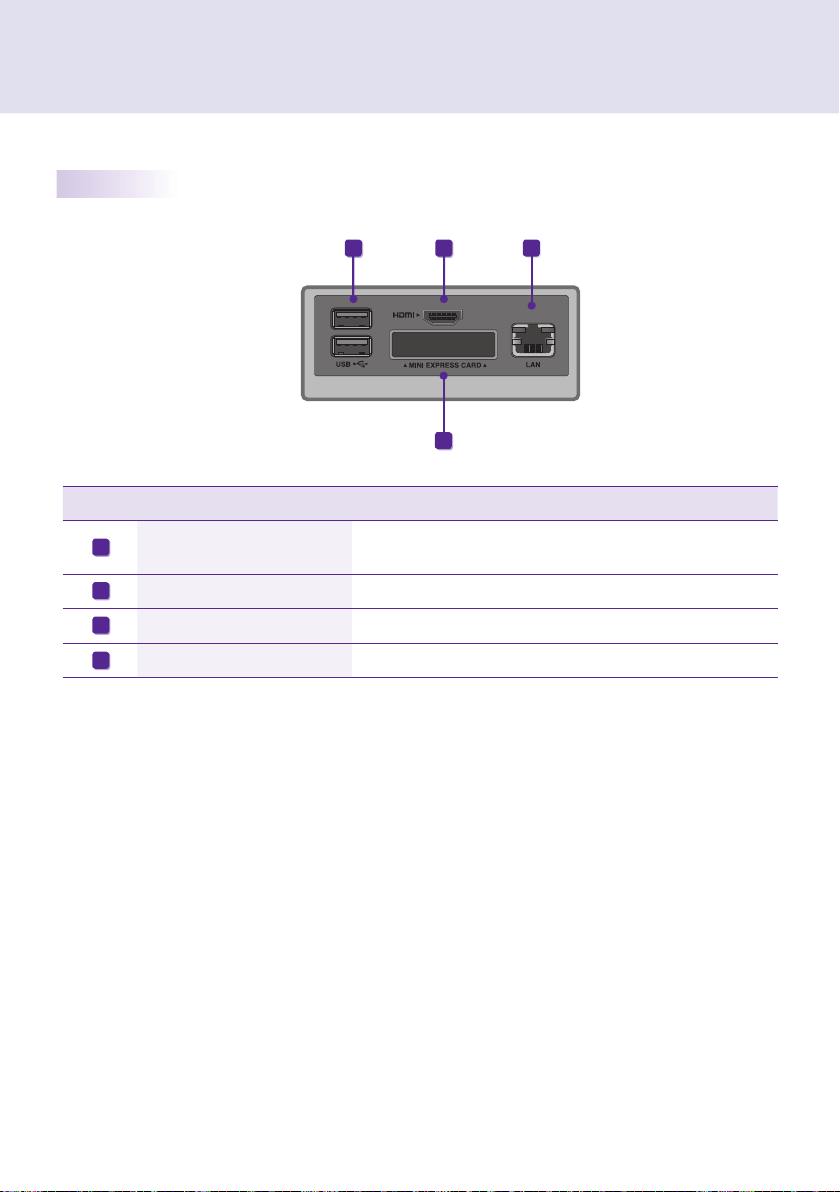
Back Panel
Number Connection Description
Power Cable In For the power cable.
Power Switch Provides power to the NC1000.
RS-232C Out For the RS-232C cable.
USB Wireless Modem In For a USB-type wireless modem.
USB In
For USB-type devices, including memory, hard disk, CD-ROM, key-
board, and mouse.
HDMI Out For an HDMI-compatible monitor.
LAN Connector For a LAN cable.
4 IN 1 Multi-Card Slot
Accommodates memory cards for storing video or reading images.
Supported cards include Secure Digital (SD), MultiMedia (MMC/
MMC4.0), Memory Stick (MS/MS-Pro), and xD Memory Cards.
D-sub Out For the monitor's RGB video in.
OPTICAL Out For an optical cable for digital audio transfer.
NC1000 Power Button Turns NC1000 on.
LINE-OUT Connector For a LINE-OUT cable for analog audio transfer.
PCI MINI EXPRESS Card Slot Provided for PCI Mini Express Cards.
A
B
C
D
E
F
G
H
I
J
K
L
M
A B
C
D
E
EE
F
G
H
I
J K
L
M
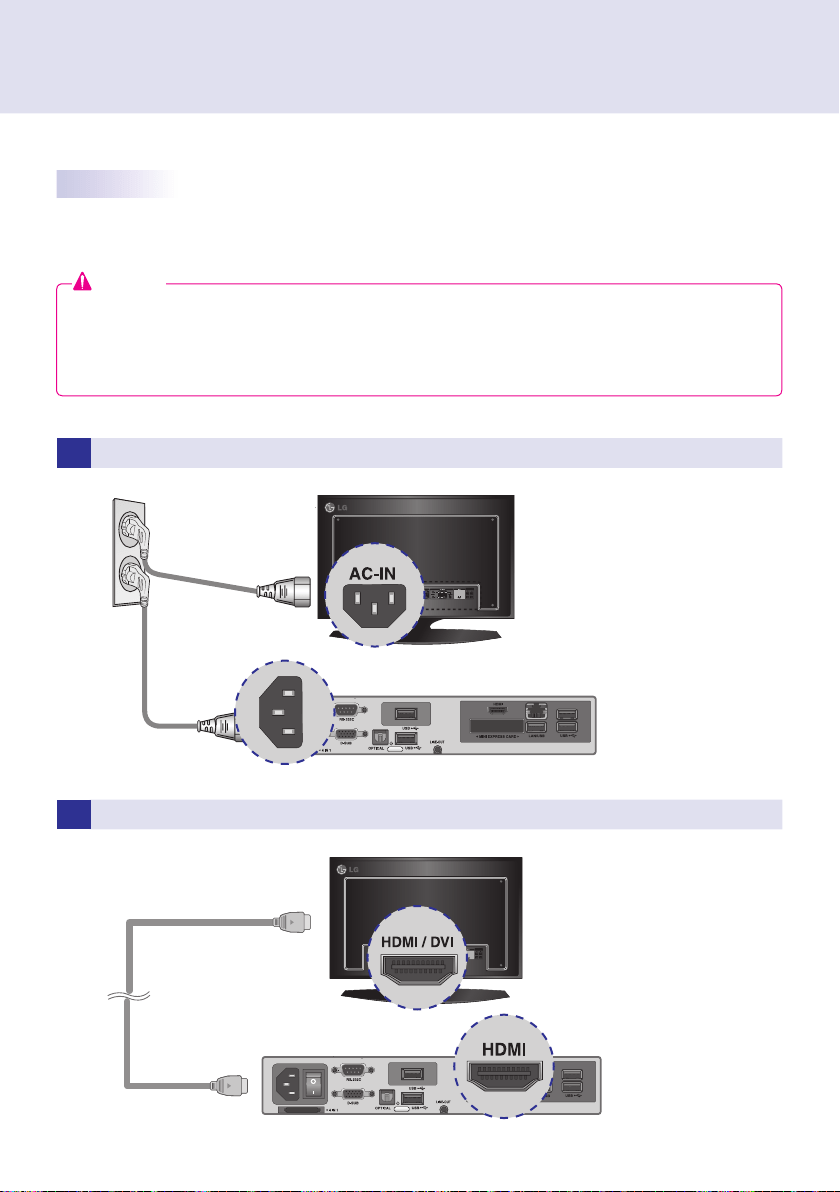
Connections
Attention
Turn on the power switch (B) and then turn on the power button (K) to power on NC1000.
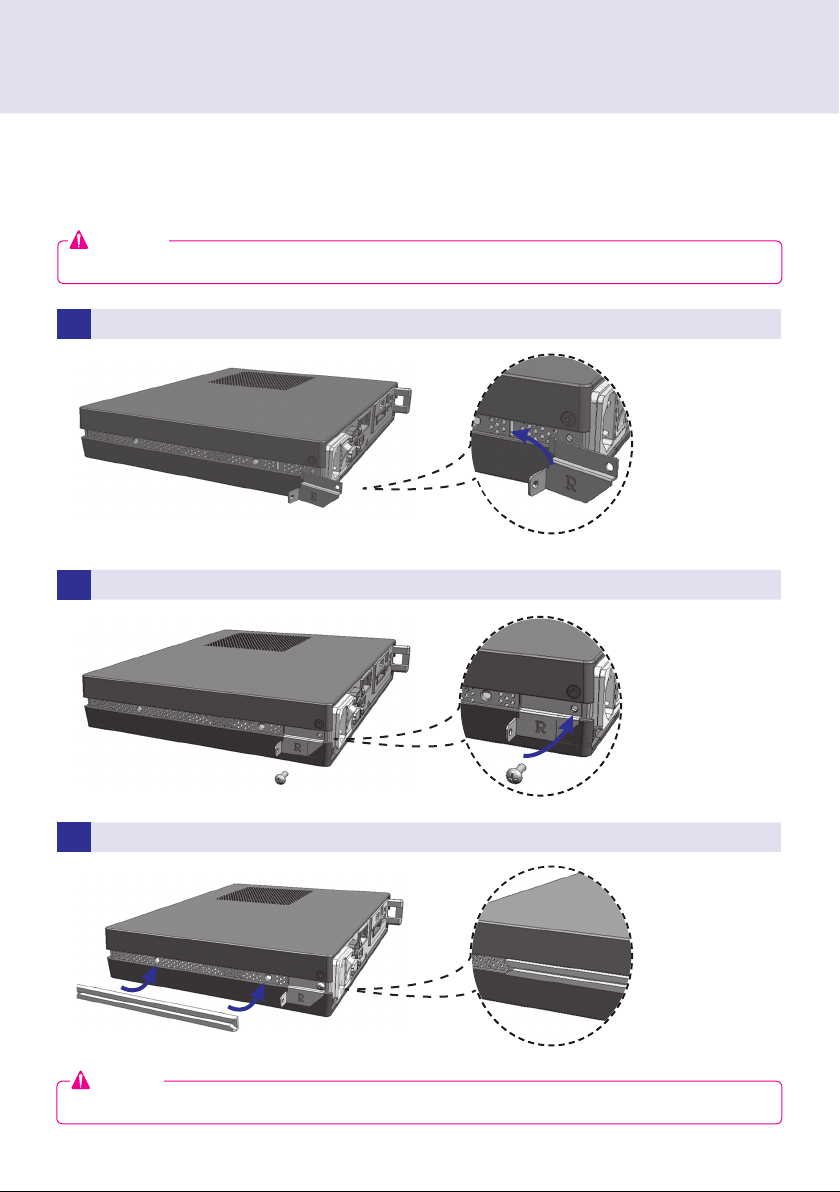
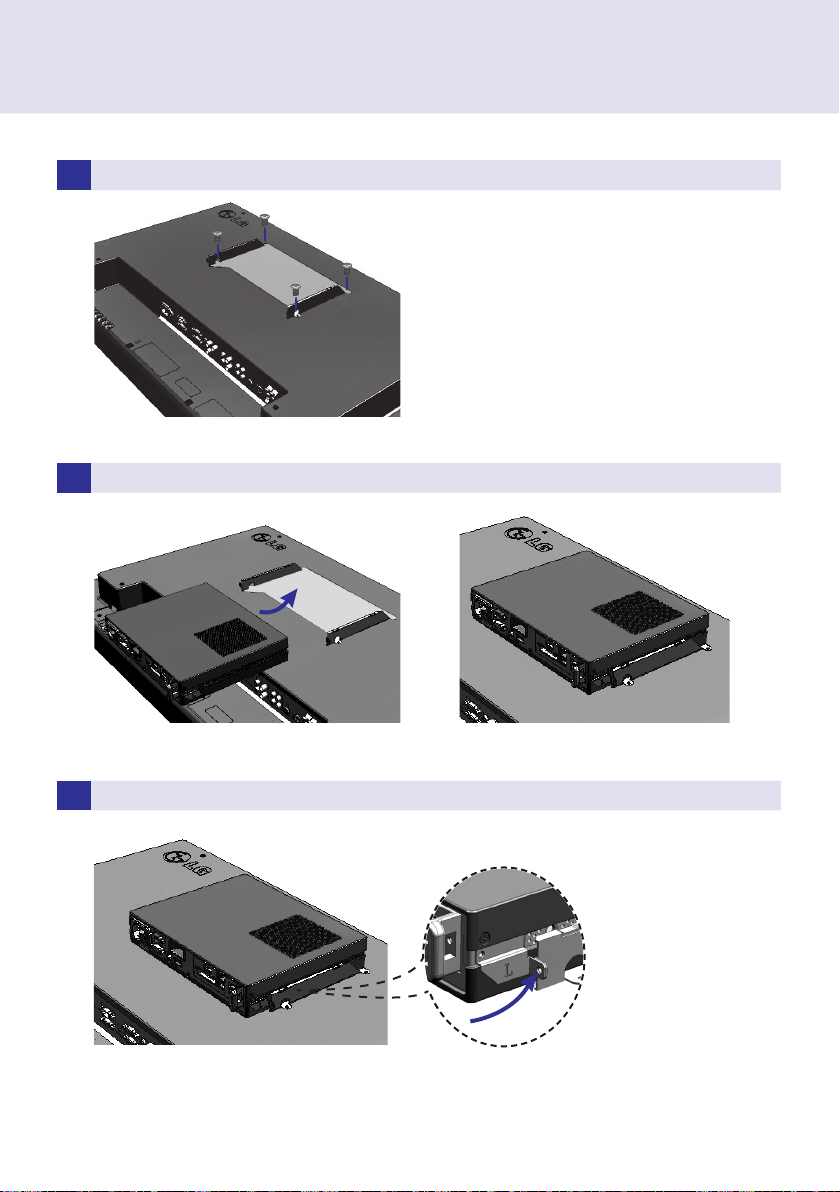
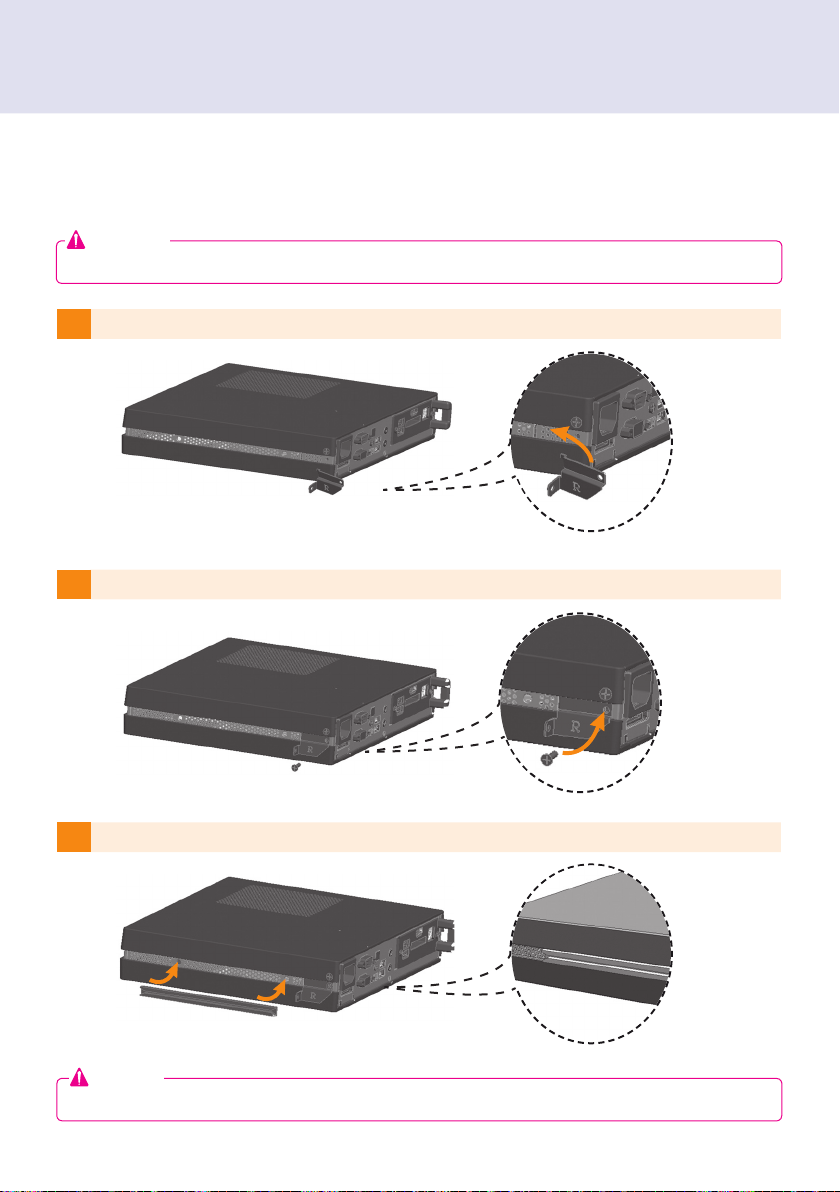
1 Place the handle into the slots on the side of the product.
2 Use screws to secure the handle.
3 Place the rail in the slots on the side of the product.
Installation
9
1 Place the handle into the slots on the side of the product.
2 Use screws to secure the handle.
3 Place the rail in the slots on the side of the product.
Installation
We recommend you to use the items provided with your NC1000 and follow our instructions for integrating
the product with your monitor in order to ensure the correct results.
Attention
The illustrations shown are to guide your integration and may differ from your product.
Warning
10
4 As shown below, use screws to secure the Box Guide in the four slots at the back of the monitor.
5 Attach the Box Guide to the rail slots, and press it upward.
6 Use screws to secure the player and the Box Guide as shown below.
1
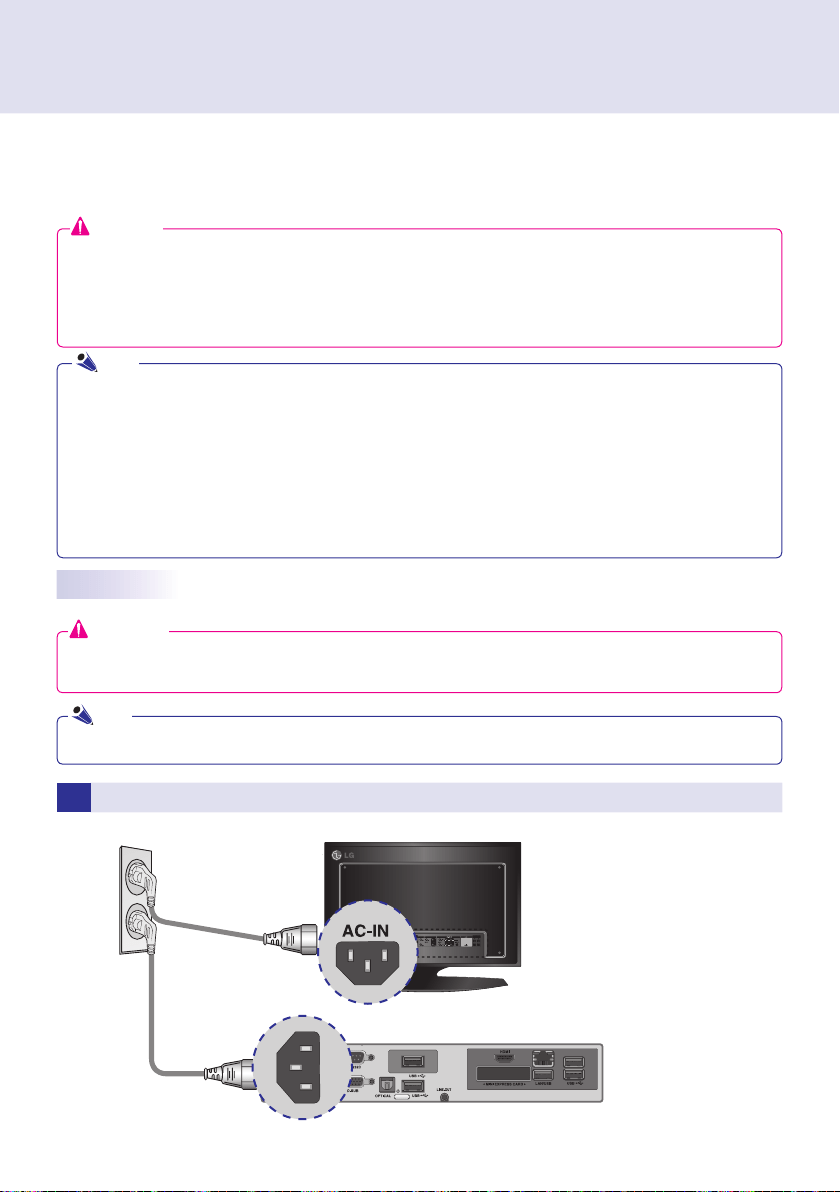
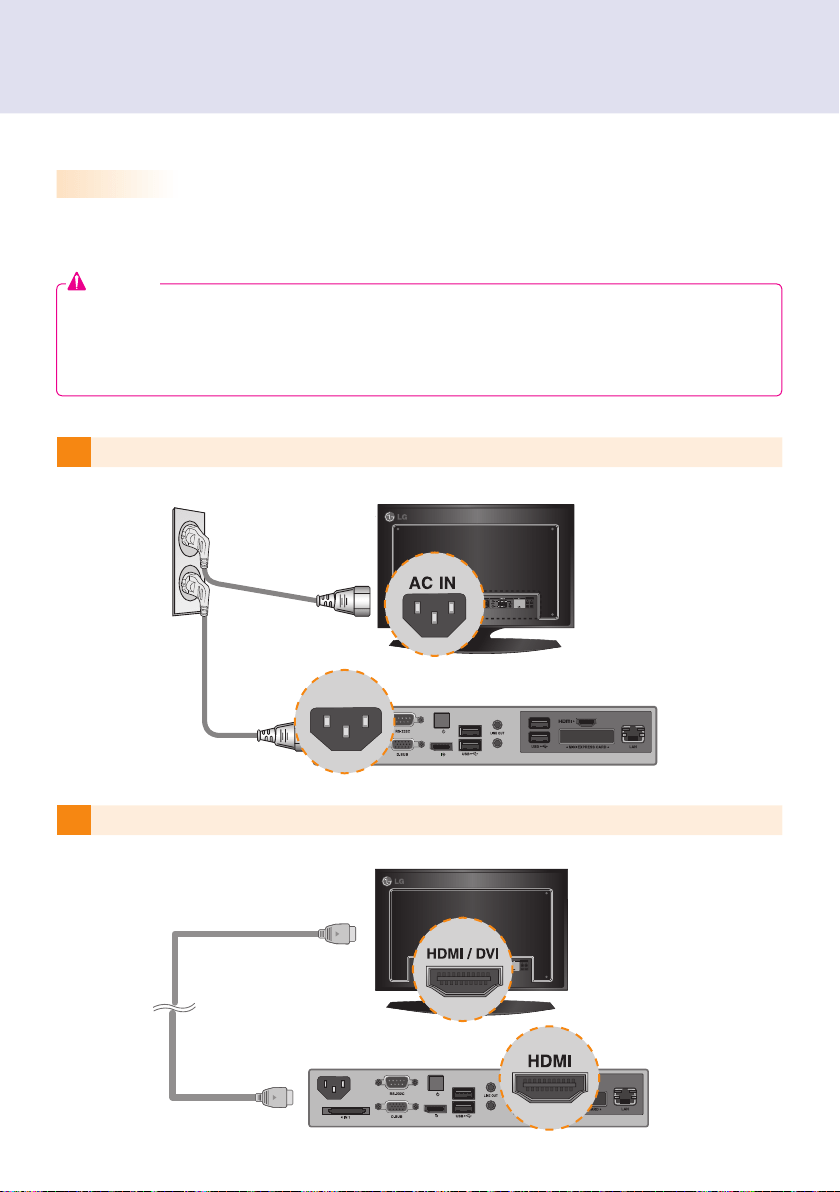
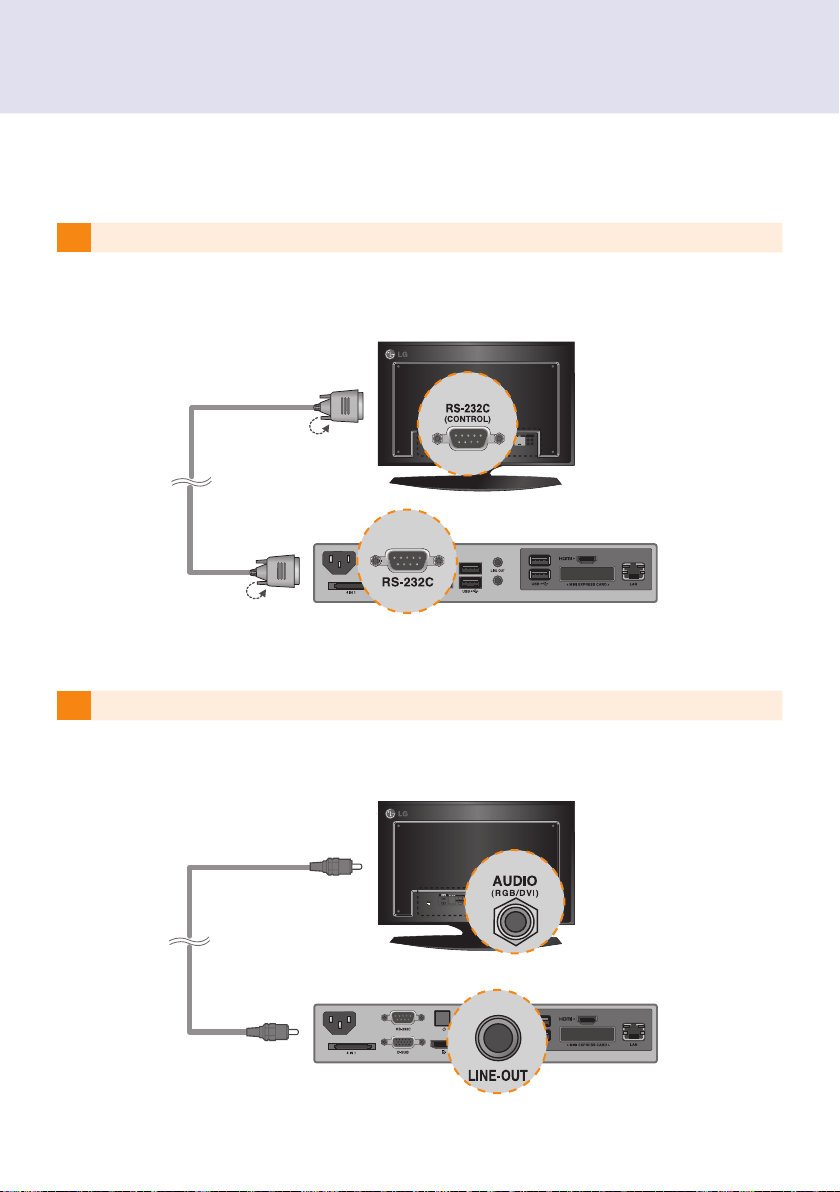
Connect the appropriate power cables to a monitor and NC1000 respectively.
In/Out Cable Connection
11
1
Connect the appropriate power cables to a monitor and NC1000 respectively.
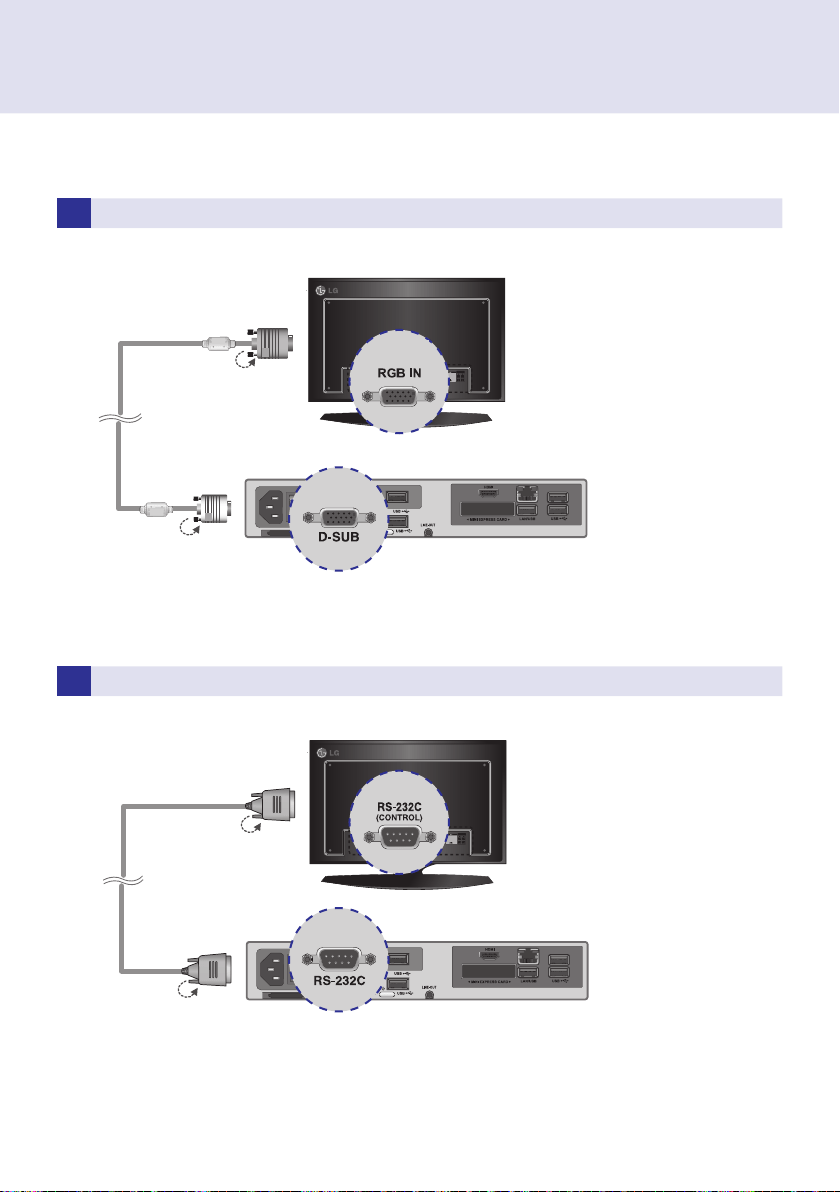
Connecting a Monitor with D-sub Cable
In/Out Cable Connection
In order to watch video on a monitor, you need to use a D-sub cable or an HDMI cable to connect the
NC1000 to a monitor.
Attention
D-sub, HDMI, LINE-OUT, OPTICAL, and LAN cables are not included with the NC1000. If the cables were
not provided with your monitor, you may need to purchase them separately.
After cabling is complete, assign the SET ID of the monitor to be connected to NC1000.
Attention
or OPTICAL cable.
When using the SuperSign Manager software:
The monitor SET ID is a unique number used to identify the monitor. You can choose a number from 1 to 25.
The SET ID allows the SuperSign Manager software to identify the monitor.
In order to directly connect the monitor to NC1000, its SET ID must be set to 1.
To use SuperSign Manager, the monitor that will be connected to NC1000 must support the LG RS232C pro-
tocol. A monitor supporting the LG RS232C protocol can control the monitor functions, such as brightness
and sound, using SuperSign Manager.
Note
● D-sub cables are also known as RGB cables.
Note
12
2 Connect the D-sub port of NC1000 and RGB-IN port of the monitor with a D-sub cable.
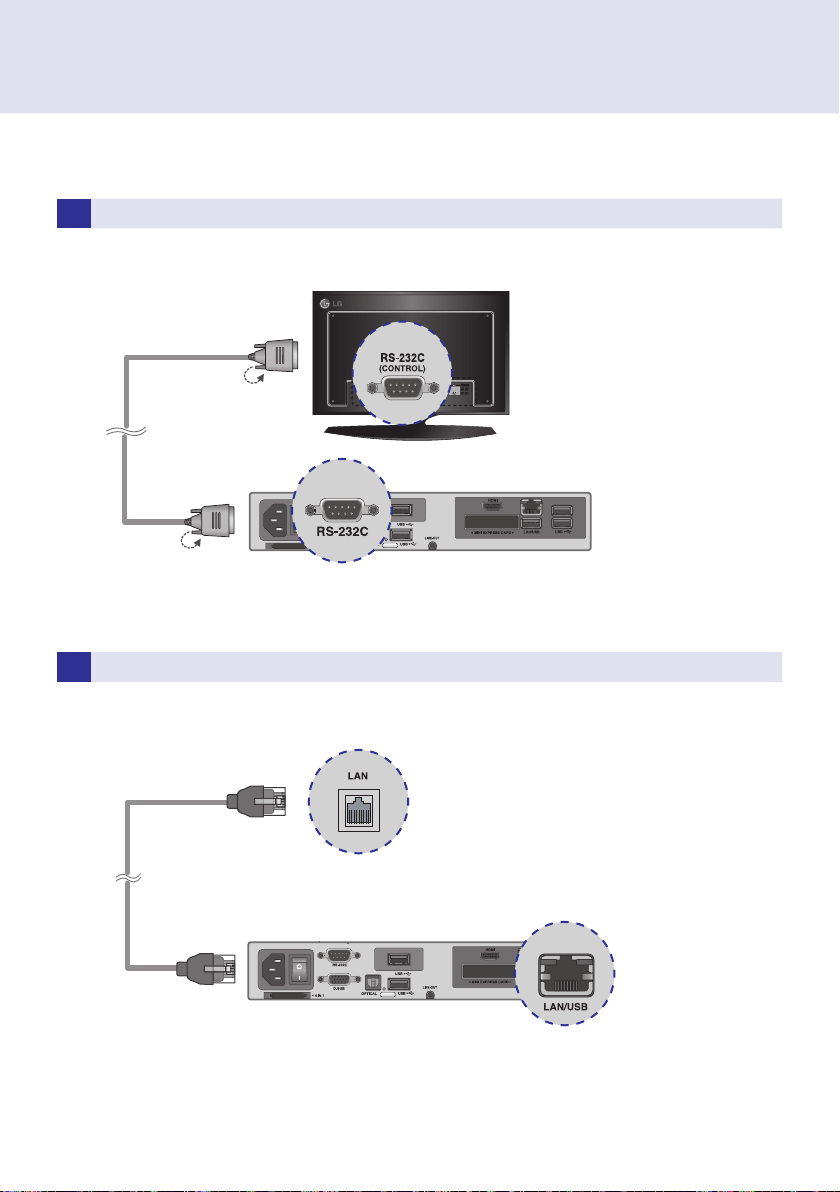
3 Connect NC1000 (OUT) to the monitor (IN) with an RS-232C cable.
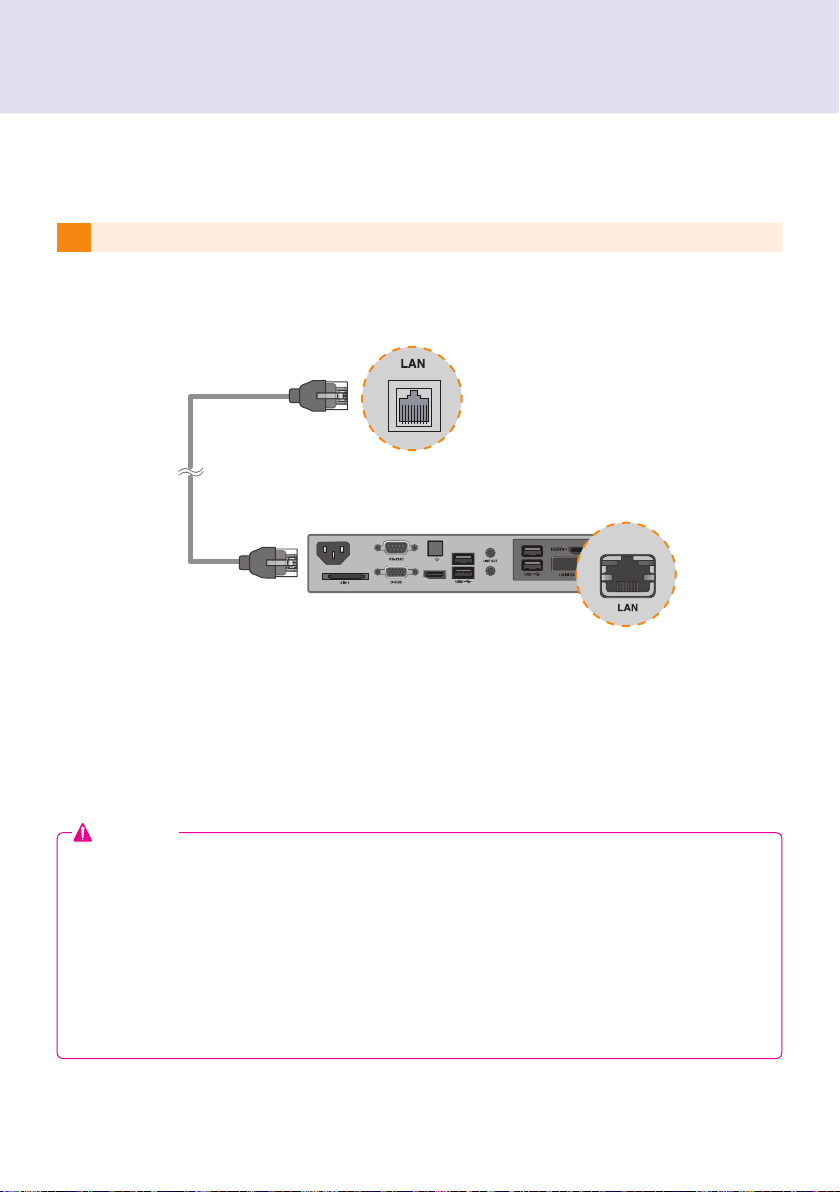
5 Connect a LAN cable to the NC1000.
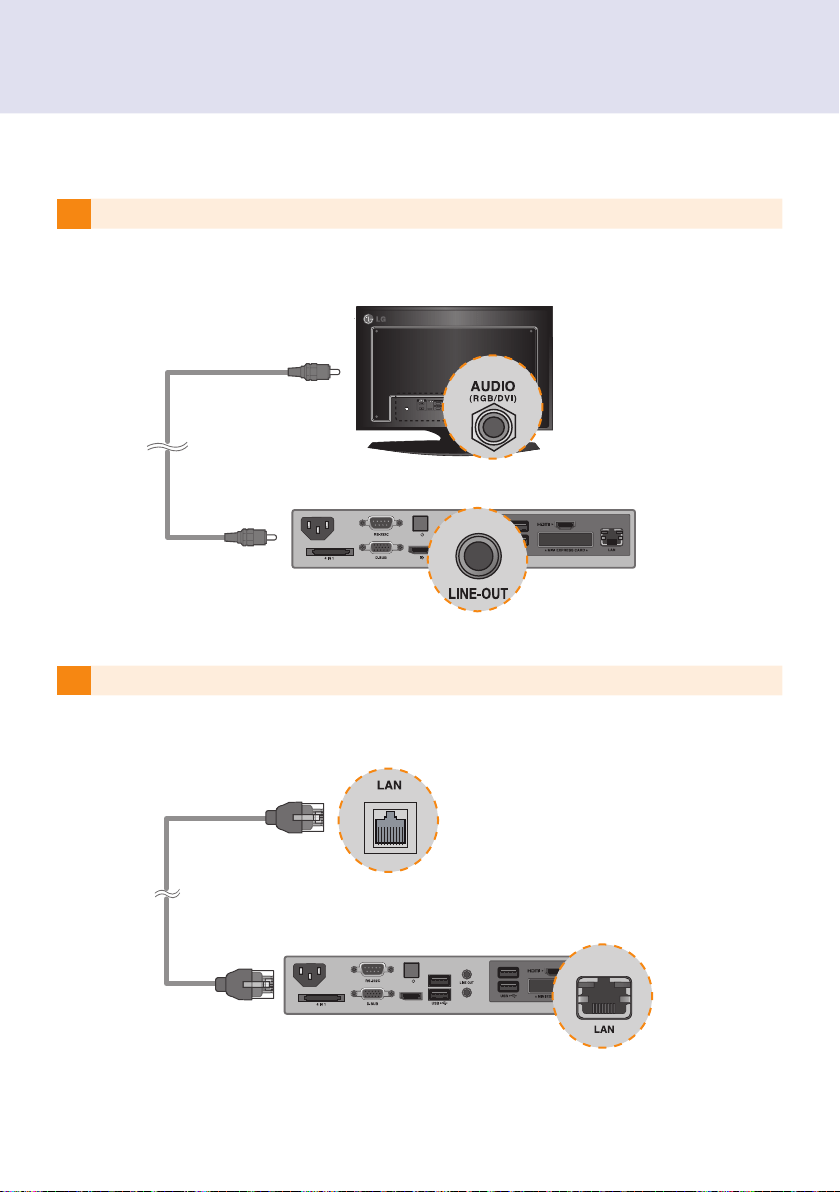
4 Connect the NC1000 to the monitor with a LINE-OUT cable.
13
2 Connect the D-sub port of NC1000 and RGB-IN port of the monitor with a D-sub cable.
3 Connect NC1000 (OUT) to the monitor (IN) with an RS-232C cable.
5 Connect a LAN cable to the NC1000.
4 Connect the NC1000 to the monitor with a LINE-OUT cable.
14
2 Connect NC1000 to a monitor with an HDMI cable.
1
Connect the appropriate power cables to a monitor and NC1000 respectively.
Connecting a Monitor with an HDMI Cable
HDMI connections allow digital video and audio signals to be transferred with one cable.
HDMI cable connections do not require an additional audio in cable.
operating system of the NC1000.
To connect and disconnect the HDMI audio device, see the Connecting/
Disconnecting HDMI Audio Device in Windows section of this document.
Attention
4 Connect a LAN cable to NC1000.
3 Connect NC1000 (OUT) to the monitor (IN) with an RS-232C cable.
15
2 Connect NC1000 to a monitor with an HDMI cable.
1
Connect the appropriate power cables to a monitor and NC1000 respectively.
4 Connect a LAN cable to NC1000.
3 Connect NC1000 (OUT) to the monitor (IN) with an RS-232C cable.

16
1
Click the button in the lower left of the screen.
2 Select Start > Control Panel > Sounds and Audio Devices > Audio.
3 Select Play Sounds > NVIDIA High Denition Audio from the list and click OK.
1
Click the button in the lower left of the screen.
2 Select Start > Control Panel > Sounds and Audio Devices > Audio.
3 Select Play Sounds > Realtek HD Audio output from the list and click OK.
Connecting/Disconnecting HDMI Audio Device in Windows
Connecting HDMI Audio Device
Disconnecting HDMI Audio Device
Move to the desktop of the monitor connected to the NC1000.
Move to the desktop of the monitor connected to the NC1000.
Attention
3
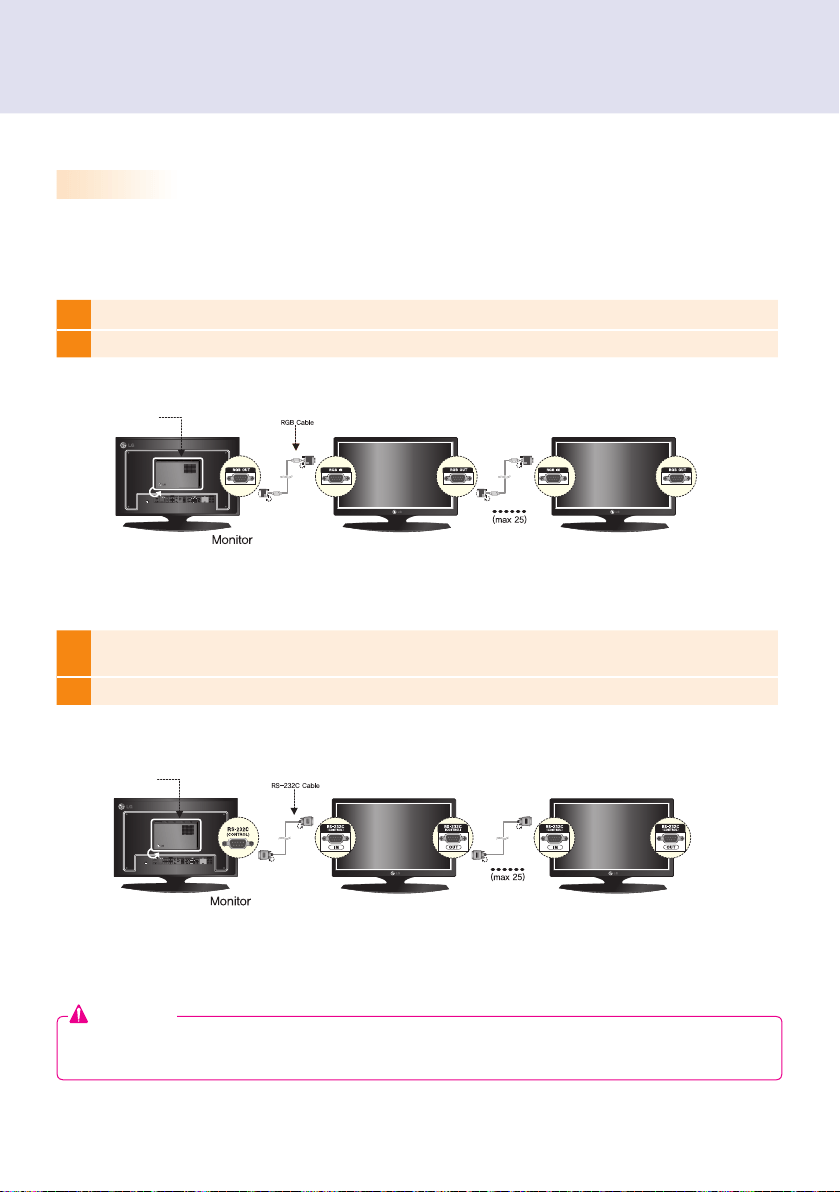
Connect the NC1000's RS-232C OUT to the RS-232C INSET ID = 1.
4
Connect other monitors with RS-232C cables as shown below (IN/OUT separated).
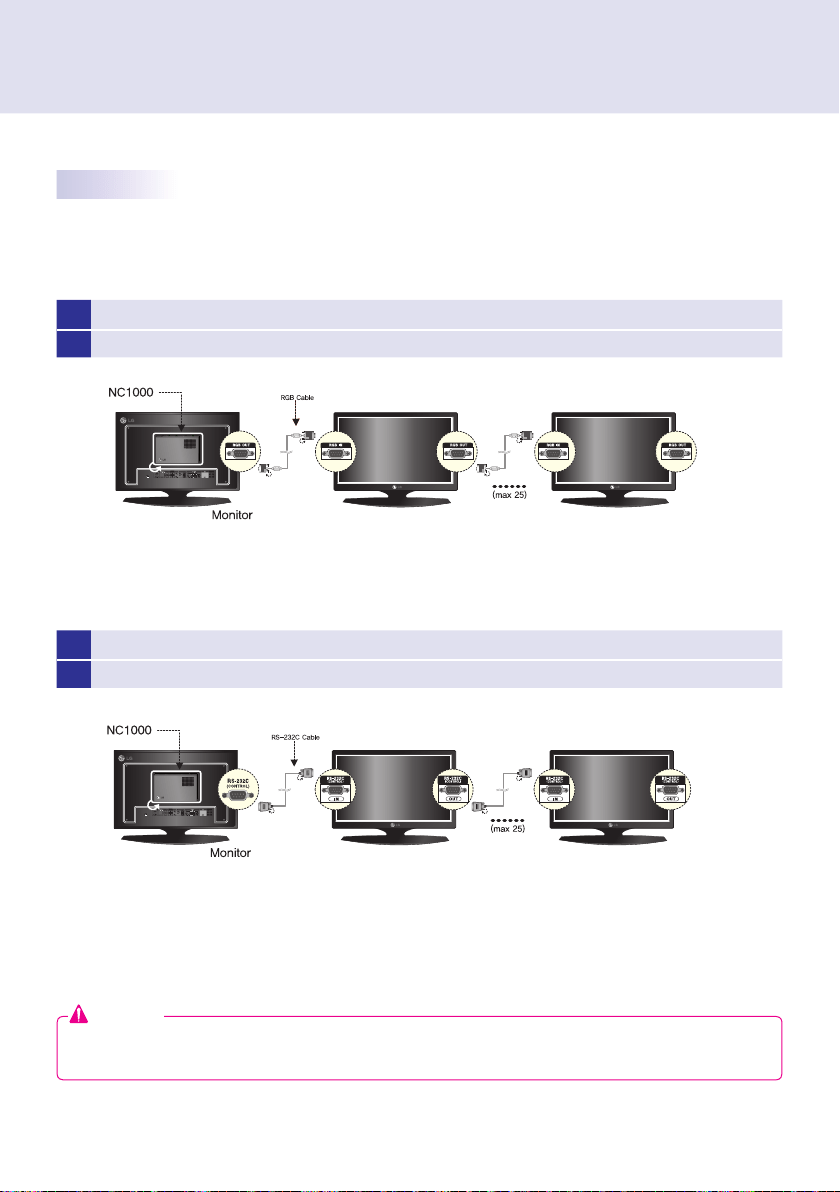
1 Connect the NC1000's D-sub OUT to the D-sub INSET ID = 1.
2 Connect other monitors with D-sub cables as shown below (IN/OUT separated).
17
1
Click the button in the lower left of the screen.
2 Select Start > Control Panel > Sounds and Audio Devices > Audio.
3 Select Play Sounds > NVIDIA High Denition Audio from the list and click OK.
1
Click the button in the lower left of the screen.
2 Select Start > Control Panel > Sounds and Audio Devices > Audio.
3 Select Play Sounds > Realtek HD Audio output from the list and click OK.
3
Connect the NC1000's RS-232C OUT to the RS-232C INSET ID = 1.
4
Connect other monitors with RS-232C cables as shown below (IN/OUT separated).
1 Connect the NC1000's D-sub OUT to the D-sub INSET ID = 1.
2 Connect other monitors with D-sub cables as shown below (IN/OUT separated).
Connection to Multiple Monitors
Each NC1000 can accommodate up to 25 monitors for video playback. (SET ID: 1 to 25)
You can set the tile mode by connecting multiple monitors.
Attention

18
NC2000
Dimensions 99.8 mm (W) x 183.3 mm (H) x 28.4 mm (D) (only Set)
Weight 0.215 kg (only Set)
CPU Intel ATOM Processor 330 1.6 GHz(Dual Core), FSB 533 MHz
Chip Set Nvidia MCP7A-I ON
Main Memory DDR3 1066 SODIMM type 1 GB, 2 GB
Secondary Storage
Device
SATA SSD 8 GB, 16 GB, 32 GB
O/S Windows Embedded Standard
General Specifications
Multi I/O port
Serial Port N/A
USB Port Hi-Speed USB 2.0 port 480 Mbps rate (x3)
LAN Port
Realtek RTL8103E 10/100 Mbps Ethernet controller (NC2000-**A*/**B*)
Realtek RTL8111E Gigabit Ethernet controller (NC2000-**P*/**Q*)
VGA / HDMI Nvidia MCP7A-ION integrated Graphic chipset
4-in-1 Card N/A
PCI Express Card Slot Supported
LINE OUT N/A
SPDIF
(Digital Audio Out)
N/A
Attention
Product specifications may change without prior notice to improve performance.
Windows 7 is not supported in case of SSD 8 GB.
Note

19
Serial Port N/A
USB Port Hi-Speed USB 2.0 port 480 Mbps rate (x3)
LAN Port
Realtek RTL8103E 10/100 Mbps Ethernet controller (NC2000-**A*/**B*)
Realtek RTL8111E Gigabit Ethernet controller (NC2000-**P*/**Q*)
VGA / HDMI Nvidia MCP7A-ION integrated Graphic chipset
4-in-1 Card N/A
PCI Express Card Slot Supported
LINE OUT N/A
SPDIF
(Digital Audio Out)
N/A
Resolution
Maximum Resolution 1920 x 1080 @ 60 Hz
Recommended Resolution 1920 x 1080 @ 60 Hz
Power
Power Rating
12 V 3.5 A
Operating Condition
Sync (H/V) Video LED
Normal Mode On/On Active On
Deep Sleep Mode
(Set = Off)
Off/Off Off Off
Operating Conditions
Operating Conditions Temperature 5 ℃ to 40 ℃ Humidity 10 % to 80 %
Storage Conditions Temperature -20 ℃ to 60 ℃ Humidity 5 % to 95 %
Operational Specifications
device.
Note
20
Basic Components
The NC2000 consists of the following components. Please check that these components have been
included prior to installation.
Attention
These illustrations may differ from your product and are subject to change.
NC2000
User Manual / Cards
screw x 2
Included in the Box
The NC2000-**A*/**B* model, as shown in the image, is compatible with
the following models.
Applicable models: M3204C**A**, M4214C**A**, M4716C**A**
Attention
The NC2000-**P*/**Q* model, as shown in the image, is compatible with
the following models.
Applicable models: M3204C**R**, M4214C**R**, M4716C**R**, 32VS10,
42VS10, 47VS10
Attention
Without prior notice, applicable models for NC2000 are subject to change to improve the performance
of the product.
Attention
Connections
21
Back Panel
Connections
A B C
CD
Number Connection Description
HDMI Out For an HDMI-compatible monitor.
LAN Connector For a LAN cable.
USB In
For USB-type devices, including memory, hard disk, CD-ROM, key-
board, and mouse.
PCI MINI EXPRESS Card Slot Provided for PCI Mini Express Cards.
A
B
C
D
22
Installation
1 Remove the screw and Metal cover.
2 Attach the Box Guide to the rail slots, and press it upward.
3 Use screws to secure the player and the Box Guide as shown below.
We recommend you to use the items provided with your NC2000 and follow our instructions for integrating
the product with your monitor in order to ensure the correct results.
Attention
The illustrations shown are to guide your integration and may differ from your product.
If card does not become fully inserted into the insertion direction. Hit by hand carefully to make fully
connected.
Note
Serial Port One external RS-232 Serial port
USB Port Hi-Speed USB 2.0 port 480 Mbps rate (x4)
LAN Port Intel 82577 Gigabit Ethernet PHY
VGA / HDMI / DP Intel HD Graphics Controller
4-in-1 Card Secure Digital (SD) / MultiMedia Card (MMC/MMC4.0) /
Memory Stick (MS/MS-Pro) / xD Memory Card
PCI Express Card Slot Supported
LINE OUT Supported
MIC IN Supported
NC1100/NA1000/NA1100
23
Dimensions 250 mm (W) x 220 mm (H) x 45 mm (D) (only Set)
Weight SSD 1.590 kg (only Set)
HDD 1860 g (only Set)
CPU NC1100 Intel Celeron Processor P4500 (2M Cache, 1.86 GHz)
NA1000 Intel Core™ i7-620M Processor (4M Cache, 2.66 GHz)
NA1100 Intel Core™ i5-520M Processor (3M Cache, 2.40 GHz)
Chip Set Mobile Intel QM57 Express Chipset
Main Memory DDR3 1066 SODIMM type 1 GB, 2 GB
Secondary Storage
Device
SATA SSD 8 GB, 16 GB, 32 GB, 64 GB
SATA SSD 320 GB
O/S
Microsoft Windows Embedded Standard
Microsoft Windows Embedded Standard 7 E
Microsoft Windows Embedded Standard 7 P
General Specifications
Multi I/O Port
Serial Port One external RS-232 Serial port
USB Port Hi-Speed USB 2.0 port 480 Mbps rate (x4)
LAN Port Intel 82577 Gigabit Ethernet PHY
VGA / HDMI / DP Intel HD Graphics Controller
4-in-1 Card Secure Digital (SD) / MultiMedia Card (MMC/MMC4.0) /
Memory Stick (MS/MS-Pro) / xD Memory Card
PCI Express Card Slot Supported
LINE OUT Supported
MIC IN Supported
Attention
Product specifications may change without prior notice to improve performance.
NC1100/NA1000/NA1100
Windows 7 is not supported in case of SSD 8 GB.
Note

24
Included in the Box
Resolution
Maximum Resolution 1920 x 1080 @ 60 Hz
Recommended Resolution 1920 x 1080 @ 60 Hz
Power
Power Rating 100-240 V~ 50/60 Hz 1.5 A
Operating Condition
Sync (H/V) Video LED
Normal Mode On/On Active On
Deep Sleep Mode
(Set = Off)
Off/Off Off Off
Operating Conditions
Operating Conditions Temperature 5 ℃ to 40 ℃ Humidity 10 % to 80 %
Storage Conditions Temperature -20 ℃ to 60 ℃ Humidity 5 % to 95 %
Operational Specifications
device.
Note
25
Basic Components
Optional Items
Included in the Box
The NC1100/NA1000/NA1100 with the following components. Please check that these components have
been included prior to installation.
The following items are supported by the NC1100/NA1000/NA1100, but are not provided with the product.
Please purchase optional items as needed.
M3, L12 x 4
(for attachment of Box Guide on the monitor)
NC1100/NA1000/NA1100
Power Cable
Handle x 2
User Manual / Cards
RS-232C Cable
M3, L8 x 8
(for attachment of handle)
Box Guide
Rail x 2
Attention
These illustrations may differ from your product and are subject to change.
26
Back Panel
Connections
Number Connection Description
Power Cable In For the power cable.
RS-232C Out For the RS-232C cable.
Power Button Turns the power on for NC1100/NA1000/NA1100's.
LINE-OUT Connector For a LINE-OUT cable for analog audio transfer.
USB In
For USB-type devices, including memory, hard disk, CD-ROM, key-
board, and mouse.
HDMI Out For an HDMI-compatible monitor.
LAN Connector For a LAN cable.
4 IN 1 Multi-Card Slot
Accommodates memory cards for storing video or reading images.
Supported cards include Secure Digital (SD), MultiMedia (MMC/
MMC4.0), Memory Stick (MS/MS-Pro), and xD Memory Cards.
D-sub Out For the monitor's RGB video in.
DP Output Port Connects the cable to the DP-supporting monitor.
MIC-In Connects the Mic-In cable to transfer analog audio input.
PCI MINI EXPRESS Card Slot Provided for PCI Mini Express Cards.
A
B
C
D
E
F
G
H
I
J
K
L
PW
MIC IN
A
B
C
D
E
E
F
G
H
I
J K
L
1 Place the handle into the slots on the side of the product.
2 Use screws to secure the handle.
3 Place the rail in the slots on the side of the product.
Installation
27
1 Place the handle into the slots on the side of the product.
2 Use screws to secure the handle.
3 Place the rail in the slots on the side of the product.
Installation
We recommend you to use the items provided with your NC1100/NA1000/NA1100 and follow our instructions
for integrating the product with your monitor in order to ensure the correct results.
Attention
The illustrations shown are to guide your integration and may differ from your product.
Warning

28
4 As shown below, use screws to secure the Box Guide in the four slots at the back of the monitor.
5 Attach the Box Guide to the rail slots, and press it upward.
6 Use screws to secure the player and the Box Guide as shown below.

29
1
Connect the appropriate power cables to a monitor and NC1100/NA1000/NA1100 respectively.
Connecting a Monitor with D-sub Cable
In/Out Cable Connection
To view images on the monitor, you need to connect NC1100/NA1000/NA1100 to the monitor via a D-SUB,
HDMI or DP cable.
Attention
D-SUB, HDMI, DP, LINE-OUT, MIC-IN and LAN cables are not included in the basic components. If the
cables were not provided with your monitor, you may need to purchase them separately.
After cabling is complete, assign the SET ID of the monitor to be connected to NA1000/NC1100/NA1100.
Attention
Audio is not available when only the D-SUB cable is connected to the monitor. A LINE-OUT cable must be
connected for audio output to function.
When using the SuperSign Manager software:
The monitor SET ID is a unique number used to identify the monitor. You can choose a number from 1 to 25.
The SET ID allows the SuperSign Manager software to identify the monitor.
In order to directly connect the monitor to NC1100/NA1000/NA1100, its SET ID must be set to 1.
To use SuperSign Manager, the monitor that will be connected to NC1100/NA1000/NA1100 must support the
LG RS232C protocol. A monitor supporting the LG RS232C protocol can control the monitor functions, such
as brightness and sound, using SuperSign Manager.
Note
D-sub cables are also known as RGB cables.
Note
MIC IN
PW
MIC IN
PW
MIC IN
PW
MIC IN
PW
MIC IN
PW
MIC IN
PW
MIC IN
PW
MIC IN
PW
MIC IN
PW
MIC IN
PW
MIC IN
PW
MIC IN
PW
MIC IN
PW
MIC IN
PW
MIC IN
PW
30
3 Connect NC1100/NA1000/NA1100 (OUT) to the monitor (IN) with an RS-232C cable.
2
Connect the D-sub port of NC1100/NA1000/NA1100 and RGB-IN port of the monitor with a D-sub cable.
MIC IN
PW
MIC IN
PW
MIC IN
PW
MIC IN
PW
MIC IN
PW
MIC IN
PW
MIC IN
PW
MIC IN
PW
MIC IN
PW
MIC IN
PW
MIC IN
PW
MIC IN
PW
MIC IN
PW
MIC IN
PW
MIC IN
PW
MIC IN
PW
MIC IN
PW
MIC IN
PW
MIC IN
PW
MIC IN
PW
MIC IN
PW
MIC IN
PW
MIC IN
PW
MIC IN
PW
MIC IN
PW
MIC IN
PW
MIC IN
PW
MIC IN
PW
MIC IN
PW
MIC IN
PW
31
3 Connect NC1100/NA1000/NA1100 (OUT) to the monitor (IN) with an RS-232C cable.
2
Connect the D-sub port of NC1100/NA1000/NA1100 and RGB-IN port of the monitor with a D-sub cable.
5 Connect a LAN cable to the NC1100/NA1000/NA1100.
4 Connect the NC1100/NA1000/NA1100 to the monitor with a LINE-OUT cable.
MIC IN
PW
MIC IN
PW
MIC IN
PW
MIC IN
PW
MIC IN
PW
MIC IN
PW
MIC IN
PW
MIC IN
PW
MIC IN
PW
MIC IN
PW
MIC IN
PW
MIC IN
PW
MIC IN
PW
MIC IN
PW
MIC IN
PW
MIC IN
P/W
DP
MIC IN
P/W
DP
MIC IN
P/W
DP
MIC IN
P/W
DP
MIC IN
P/W
DP
MIC IN
P/W
DP
MIC IN
P/W
DP
MIC IN
P/W
DP
MIC IN
P/W
DP
MIC IN
P/W
DP
MIC IN
P/W
DP
MIC IN
P/W
DP
MIC IN
P/W
DP
MIC IN
P/W
DP
MIC IN
P/W
DP
32
2 Connect NC1100/NA1000/NA1100 to a monitor with an HDMI cable.
1
Connect the appropriate power cables to a monitor and NC1100/NA1000/NA1100 respectively.
Connecting a Monitor with an HDMI Cable
HDMI connections allow digital video and audio signals to be transferred with one cable.
HDMI cable connections do not require an additional audio in cable.
NA1000/NA1100 should have the HDMI in for the HDMI connection.
the operating system of the NC1100/NA1000/NA1100. To connect and disconnect the HDMI audio device,
see the Connecting/Disconnecting HDMI Audio Device in Windows section of this document.
Attention
MIC IN
PW
MIC IN
PW
MIC IN
PW
MIC IN
PW
MIC IN
PW
MIC IN
PW
MIC IN
PW
MIC IN
PW
MIC IN
PW
MIC IN
PW
MIC IN
PW
MIC IN
PW
MIC IN
PW
MIC IN
PW
MIC IN
PW
PW
MIC IN
PW
MIC IN
PW
MIC IN
PW
MIC IN
PW
MIC IN
PW
MIC IN
PW
MIC IN
PW
MIC IN
PW
MIC IN
PW
MIC IN
PW
MIC IN
PW
MIC IN
PW
MIC IN
PW
MIC IN
PW
MIC IN
33
2 Connect NC1100/NA1000/NA1100 to a monitor with an HDMI cable.
1
Connect the appropriate power cables to a monitor and NC1100/NA1000/NA1100 respectively.
4 Connect a LAN cable to NC1100/NA1000/NA1100.
3 Connect NC1100/NA1000/NA1100 (OUT) to the monitor (IN) with an RS-232C cable.
MIC IN
PW
MIC IN
PW
MIC IN
PW
MIC IN
PW
MIC IN
PW
MIC IN
PW
MIC IN
PW
MIC IN
PW
MIC IN
PW
MIC IN
PW
MIC IN
PW
MIC IN
PW
MIC IN
PW
MIC IN
PW
MIC IN
PW
MIC IN
P/W
DP
MIC IN
P/W
DP
MIC IN
P/W
DP
MIC IN
P/W
DP
MIC IN
P/W
DP
MIC IN
P/W
DP
MIC IN
P/W
DP
MIC IN
P/W
DP
MIC IN
P/W
DP
MIC IN
P/W
DP
MIC IN
P/W
DP
MIC IN
P/W
DP
MIC IN
P/W
DP
MIC IN
P/W
DP
MIC IN
P/W
DP
34
1
Click the button in the lower left of the screen.
2 Select Start > Control Panel > Sounds and Audio Devices > Audio.
3 Select Play Sounds > Intel(R) Display Audio Output 1 from the list and click OK.
1
Click the button in the lower left of the screen.
2 Select Start > Control Panel > Sounds and Audio Devices > Audio.
3 Select Play Sounds > Realtek HD Audio output from the list and click OK.
1
Select Start > Control Panel > Hardware and Sound > Sound.
2
Click the PlayHDMI device or speakers you want and select Set
as Default Device then click OK to connect the HDMI audio device or select Disable to discon-
nect it.
※ In order to change the audio devices, you must restart the computer.
Connecting/Disconnecting HDMI Audio Device in Windows
Connecting HDMI Audio Device
Disconnecting HDMI Audio Device
Connecting/Disconnecting HDMI Audio Device in Windows Embedded Standard 7 E,P
Move to the desktop of the monitor connected to the NC1100/NA1000/NA1100.
Move to the desktop of the monitor connected to the NC1100/NA1000/NA1100.
Attention
work.
1
Connect the appropriate power cables to a monitor and NC1100/NA1000/NA1100 respectively.
2 Connect NC1100/NA1000/NA1100 to the monitor via a DP cable.
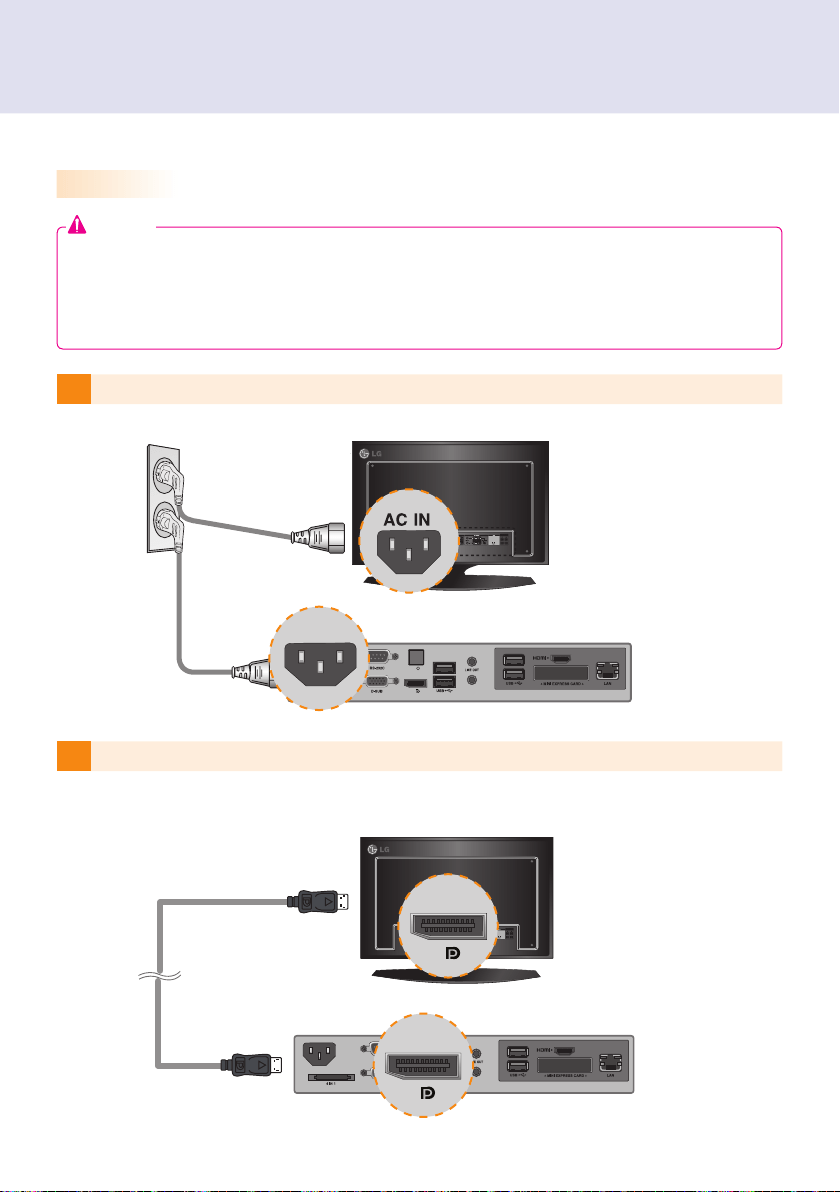
35
1
Click the button in the lower left of the screen.
2 Select Start > Control Panel > Sounds and Audio Devices > Audio.
3 Select Play Sounds > Intel(R) Display Audio Output 1 from the list and click OK.
1
Click the button in the lower left of the screen.
2 Select Start > Control Panel > Sounds and Audio Devices > Audio.
3 Select Play Sounds > Realtek HD Audio output from the list and click OK.
1
Select Start > Control Panel > Hardware and Sound > Sound.
2
Click the PlayHDMI device or speakers you want and select Set
as Default Device then click OK to connect the HDMI audio device or select Disable to discon-
nect it.
※ In order to change the audio devices, you must restart the computer.
Connecting a Monitor with DP Cable
Attention
DP input port.
cause a malfunction.
1
Connect the appropriate power cables to a monitor and NC1100/NA1000/NA1100 respectively.
2 Connect NC1100/NA1000/NA1100 to the monitor via a DP cable.
MIC IN
PW
MIC IN
PW
MIC IN
PW
MIC IN
PW
MIC IN
PW
MIC IN
PW
MIC IN
PW
MIC IN
PW
MIC IN
PW
MIC IN
PW
MIC IN
PW
MIC IN
PW
MIC IN
PW
MIC IN
PW
MIC IN
PW
PW
MIC IN
PW
MIC IN
PW
MIC IN
PW
MIC IN
PW
MIC IN
PW
MIC IN
PW
MIC IN
PW
MIC IN
PW
MIC IN
PW
MIC IN
PW
MIC IN
PW
MIC IN
PW
MIC IN
PW
MIC IN
PW
MIC IN
36
3 Connect NC1100/NA1000/NA1100 (OUT) to the monitor (IN) with an RS-232C cable.
4 Connect the NC1100/NA1000/NA1100 to the monitor with a LINE-OUT cable.
MIC IN
PW
MIC IN
PW
MIC IN
PW
MIC IN
PW
MIC IN
PW
MIC IN
PW
MIC IN
PW
MIC IN
PW
MIC IN
PW
MIC IN
PW
MIC IN
PW
MIC IN
PW
MIC IN
PW
MIC IN
PW
MIC IN
PW
MIC IN
PW
MIC IN
PW
MIC IN
PW
MIC IN
PW
MIC IN
PW
MIC IN
PW
MIC IN
PW
MIC IN
PW
MIC IN
PW
MIC IN
PW
MIC IN
PW
MIC IN
PW
MIC IN
PW
MIC IN
PW
MIC IN
PW
5 Connect a LAN cable to NC1100/NA1000/NA1100.
37
3 Connect NC1100/NA1000/NA1100 (OUT) to the monitor (IN) with an RS-232C cable. 5 Connect a LAN cable to NC1100/NA1000/NA1100.
Attention
NA1000/NA1100
connect multiple cables simultaneously and turn the product on, video output is prioritized accordingly.
DP and HDMI video output start operating.
It is only for DP output.
recommended to use it with a line-out cable for analog audio output.
MIC IN
P/W
DP
MIC IN
P/W
DP
MIC IN
P/W
DP
MIC IN
P/W
DP
MIC IN
P/W
DP
MIC IN
P/W
DP
MIC IN
P/W
DP
MIC IN
P/W
DP
MIC IN
P/W
DP
MIC IN
P/W
DP
MIC IN
P/W
DP
MIC IN
P/W
DP
MIC IN
P/W
DP
MIC IN
P/W
DP
MIC IN
P/W
DP
38
3
Connect the NC1100/NA1000/NA1100's RS-232C OUT to the RS-232C IN
SET ID = 1.
4 Connect other monitors with RS-232C cables as shown below (IN/OUT separated).
1
Connect the NC1100/NA1000/NA1100's D-sub OUT to the D-sub INSET ID = 1.
2 Connect other monitors with D-sub cables as shown below (IN/OUT separated).
Connection to Multiple Monitors
Each NC1100/NA1000/NA1100 can accommodate up to 25 monitors for video playback. (SET ID: 1 to 25)
Attention
NC1100/
NA1000/
NA1100
NC1100/
NA1000/
NA1100
Serial Port N/A
USB Port Hi-Speed USB 2.0 port 480 Mbps rate (x2)
LAN Port Intel
®
82577 Gigabit Ethernet PHY
VGA / HDMI / DP Intel
®
HD Graphics Controller
4-in-1 Card N/A
PCI Express Card Slot Supported
LINE OUT N/A
MIC IN N/A
NC2100/NA2000/NA2100

39
Dimensions 99 mm (W) x 179 mm (H) x 28.5 mm (D) (only Set)
Weight 0.288 kg (only Set)
CPU(NC2100)
CPU(NA2000)
CPU(NA2100)
Intel® Celeron® Processor P4500 (2M Cache, 1.86 GHz)
Intel® Core™ i7-620M Processor (4M Cache, 2.66 GHz)
Intel® Core™ i5-520M Processor (3M Cache, 2.40 GHz)
Chip Set Mobile Intel® QM57 Express Chipset
Main Memory DDR3 1066 SODIMM type 1 GB, 2 GB
Secondary Storage Device SATA SSD 8 GB, 16 GB, 32 GB, 64 GB
O/S Windows Embedded Standard
General Specifications
Multi I/O Port
Serial Port N/A
USB Port Hi-Speed USB 2.0 port 480 Mbps rate (x2)
LAN Port Intel
®
82577 Gigabit Ethernet PHY
VGA / HDMI / DP Intel
®
HD Graphics Controller
4-in-1 Card N/A
PCI Express Card Slot Supported
LINE OUT N/A
MIC IN N/A
Attention
Product specifications may change without prior notice to improve performance.
NC2100/NA2000/NA2100
Windows 7 is not supported in case of SSD 8 GB.
Note

40
Resolution
Maximum Resolution 1920 x 1080 @ 60 Hz
Recommended Resolution 1920 x 1080 @ 60 Hz
Power
Power Rating
12 V 4.5 A
Operating Condition
Sync (H/V) Video LED
Normal Mode On/On Active On
Deep Sleep Mode
(Set = Off)
Off/Off Off Off
Operating Conditions
Operating Conditions Temperature 5 ℃ to 40 ℃ Humidity 10 % to 80 %
Storage Conditions Temperature -20 ℃ to 60 ℃ Humidity 5 % to 95 %
Operational Specifications
device.
Note
41
Basic Components
The NC2100/NA2000/NA2100 consists of the following components. Please check that these components
have been included prior to installation.
Attention
These illustrations may differ from your product and are subject to change.
Attention
The NC2100/NA2000/NA2100 model is compatible with the following models.
Applicable models: 32VS10, 42VS10, 47VS10
Included in the Box
NC2100/NA2000/NA2100
User Manual / Cards
screw x 2
Attention
Without prior notice, applicable models for NC2100/NA2000/NA2100 are subject to change to improve
the performance of the product.
42
Back Panel
Connections
A B
C
D
Number Connection Description
USB In
For USB-type devices, including memory, hard disk, CD-ROM, key-
board, and mouse.
HDMI Out For an HDMI-compatible monitor.
LAN Connector For a LAN cable.
PCI MINI EXPRESS Card Slot Provided for PCI Mini Express Cards.
A
B
C
D
Installation
1 Remove the screw and Metal cover.
2 Attach the Box Guide to the rail slots, and press it upward.
3 Use screws to secure the player and the Box Guide as shown below.
43
Installation
1 Remove the screw and Metal cover.
2 Attach the Box Guide to the rail slots, and press it upward.
3 Use screws to secure the player and the Box Guide as shown below.
We recommend you to use the items provided with your NC2100/NA2000/NA2100 and follow our instructions
for integrating the product with your monitor in order to ensure the correct results.
Attention
The illustrations shown are to guide your integration and may differ from your product.
If card does not become fully inserted into the insertion direction. Hit by hand carefully to make fully
connected.
Note
44
Limitations of Microsoft Windows Embedded Standard
Frequently Asked Questions (FAQs)
The following are potential errors that may occur due to internal limitations of Microsoft Windows Embedded
Standard, which is the OS of SuperSign Player.
If you press Alt + Enter on the DOS window, text other than English may be shown corrupted.
If you use Save As function in the Print window, the menu window name will be displayed in English.
When you move to sub-menu items such as Control Panel, some of the items, such as hyper terminal, country
and language setting, will be written in English.
Question Answer
Where can I download the driver
lgsupersign.com).
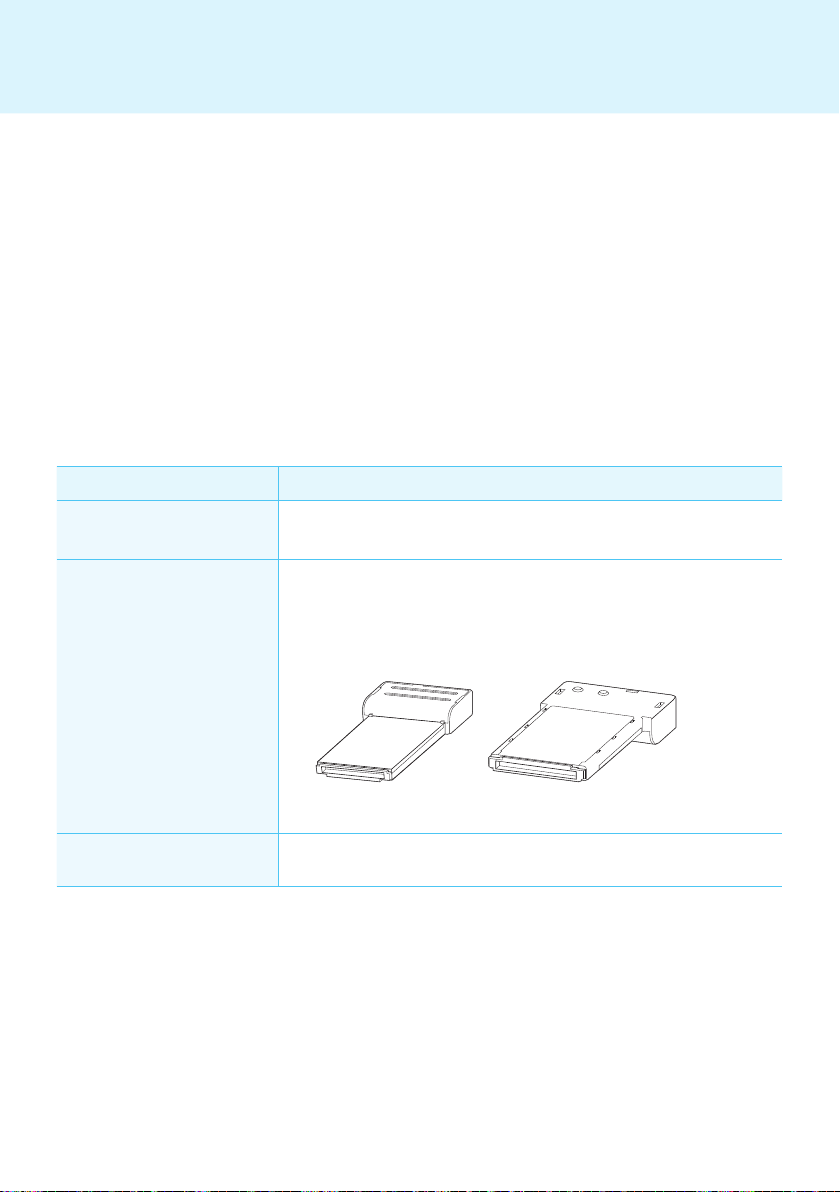
The Express Card does not
upward. (See Figure 1)
-
press Card with the bottom side facing upward. (See Figure 2)
Where can I get a vaccine pro-
This media player comes packaged with the Windows program only. Please pur-
chase a vaccine program separately for use.
< Figure 1 > < Figure 2 >
Appendix

Make sure to read the Important Precautions
before using the product.
Keep the User’s Guide(CD) in an accessible
place for furture reference.
The model and serial number of the SET is
located on the back and one side of the SET.
Record it below should you ever need service.
WARNING - This is a class A product. In
a domestic environment this product may
cause radio interference in which case the
user may be required to take adequate
measures.
MODEL
SERIAL
Temporary noise is normal when powering
ON or OFF this device.