
ERG600W ROWER
OWNER’S MANUAL
PLEASE CAREFULLY READ THIS ENTIRE MANUAL BEFORE OPERATING YOUR NEW ROWER
FITNESS

Table Of Contents
1
2
4
12
13
16
22
Product Registration
Important Safety Instructions
ERG600W Assembly Instructions
Fill and Empty the Tank
Adjustment Guides
Console Operation
Manufacturer’s Limited Warranty
Thank you for your purchase of this quality rower from XTERRA Fitness. Your new
rower has been manufactured by one of the leading tness manufacturers in the world.
XTERRA Fitness will do all we can to make your ownership experience as pleasant as
possible for many years to come. If you have questions, or if parts are missing or damaged,
or you require customer service, call (870) 333-5500. Please have your model number and
serial number handy when you call.
Please take a moment to record where you purchased your machine, as well as the date of
purchase for future reference. We appreciate your condence in XTERRA Fitness and we
will always remember that you are the reason that we are in business. Please complete and
mail your registration card today and enjoy your new rower.
Yours in Health,
XTERRA Fitness
Congratulations On Your New Rower and Welcome to the XTERRA Fitness Family!
ERG600W_VER4_20201019

ERG600W Rower
1
ATTENTION
THIS ROWER IS INTENDED FOR RESIDENTIAL USE ONLY AND IS WARRANTED FOR THE
APPLICATION. ANY OTHER APPLICATION VOIDS THIS WARRANTY IN ITS ENTIRETY.
Record Your Serial Number
Please record the Serial Number of this tness product in the space provided below.
Serial Number
Register Your Purchase
The self-addressed product registration card must be completed in full and returned to
XTERRA Fitness. You can also go to www.xterratness.com/warrantyreg.html
to register online.
Product Registration
Purchase Location
Purchase Date
2
ERG600W Rower
• Do not operate equipment on deeply padded, plush or shag carpet. Damage to both carpet and
equipment may result.
• Before beginning this or any exercise program, consult a physician. This is especially important for
persons over the age of 35 or persons with pre-existing health conditions.
• Keep hands away from all moving parts.
• Do not attempt to use your equipment for any purpose other than for the purpose it is intended.
• Wear proper shoes. High heels, dress shoes, sandals or bare feet are not suitable for use on your
equipment. Quality athletic shoes are recommended to avoid leg fatigue.
• Wear proper clothing for exercising, loose clothing could become caught in the machine.
• Only one person at a time should use the machine.
• If the user experiences dizziness, nausea, chest pain, or any other abnormal symptoms, STOP the workout
at once. CONSULT A PHYSICIAN IMMEDIATELY.
• Do not place any sharp object around the machine.
• Always use caution when moving and storing your equipment.
• User Weight Limit: 300 LBS
Important Safety Instructions
When using an appliance, basic precautions should always be followed, including the following:
Read all instructions before using this appliance.
WARNING - To reduce the risk injury to persons:
1. Do not operate under blanket or pillow.
2. Operate the machinery with ample free space around it to easily get on and o the machine.
3. This exercise equipment is not intended for use by persons with reduced physical, sensory or mental capa-
bilities, or lack of experience and knowledge.
4. Keep children and pets away from the machine at all times. DO NOT leave children unattended in the same
room with the machine.
5. Use this appliance only for its intended use as described in this manual. Do not use attachments not
recommended by the manufacturer.
6. Never operate this appliance if it is not working properly, if it has been dropped or damaged, or dropped into
water. Return the appliance to a service center for examination and repair.
7. Keep the appliance away from heated surfaces.
8. Never operate the appliance with the air openings blocked. Keep the air openings free of lint, hair, and the
like.
9. Never drop or insert any object into any opening.
10. Do not use outdoors.
11. Do not operate where aerosol (spray) products are being use or where oxygen is being administered.
12. The appliance is intended for household use.
13. After assembly, make sure to tighten all nuts and bolts.
SAVE THESE INSTRUCTIONS - THINK SAFETY!
Fitness Equipment Safety Instructions
CAUTION!! Please be careful when unpacking the carton.
Failure to follow all guidelines may compromise the eectiveness of the exercise experience, expose
yourself (and possibly others) to injury, and reduce the longevity of the equipment.
WARNING: This product can expose you to chemicals including Toluene and Acrylamide which are
known to the State of California to cause cancer and birth defects or other reproductive harm.
For more information go to www.P65Warnings.ca.gov
ERG600W Rower
3
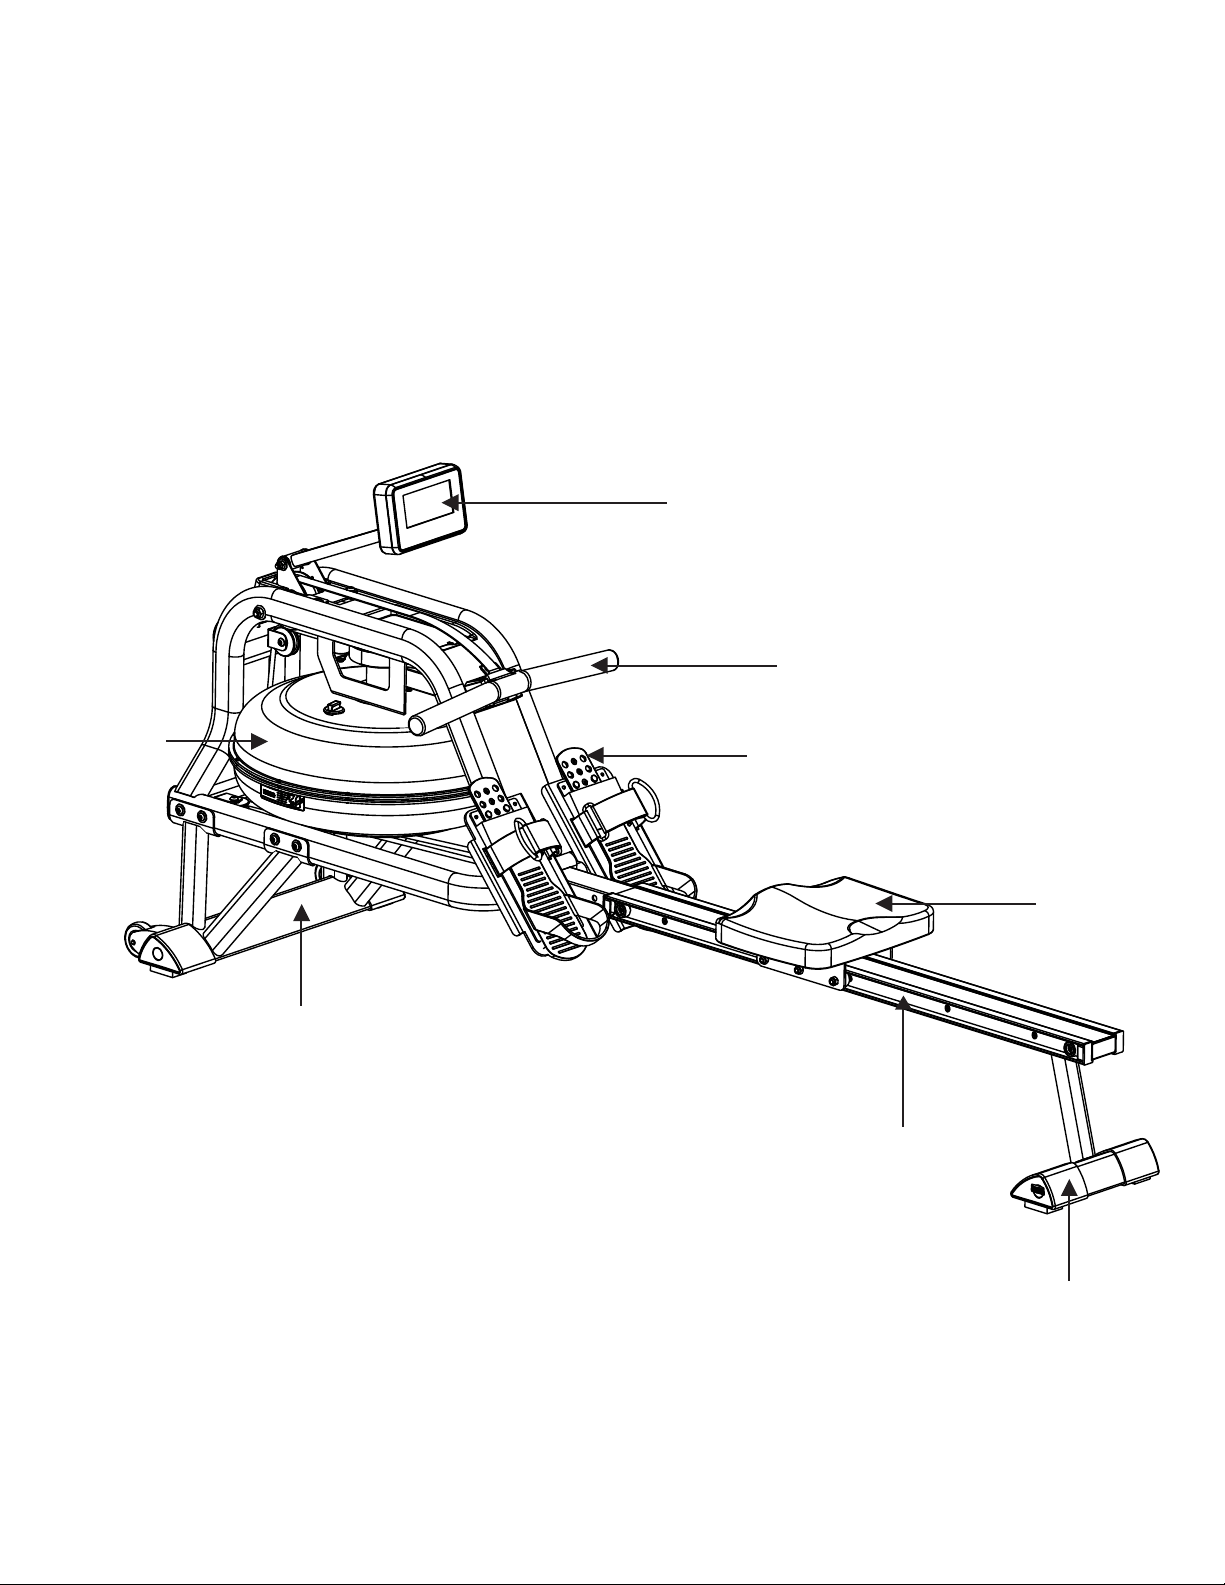
Before you begin
Thank you for selecting our revolutionary XTERRA ERG600W Water Rower. A rower is an eective exercise
for increasing cardiovascular tness, building endurance, and toning the body. Our Water Rower provides an
impressive selection of features designed to make your workouts at home more eective and enjoyable.
For your benet, read this manual carefully before you use the ERG600W Water Rower. To help us assist
you, note the product model number and serial number before contacting us. Before reading further, please
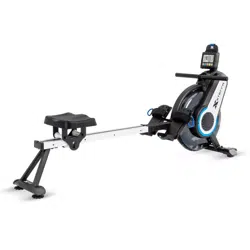
familiarize yourself with the parts that are labeled in the drawing below.
Console
Handle Bar
Pedals
Seat
Rear Stabilizer
Sliding Rail
Front Stabilizer
Tank
4
ERG600W Rower
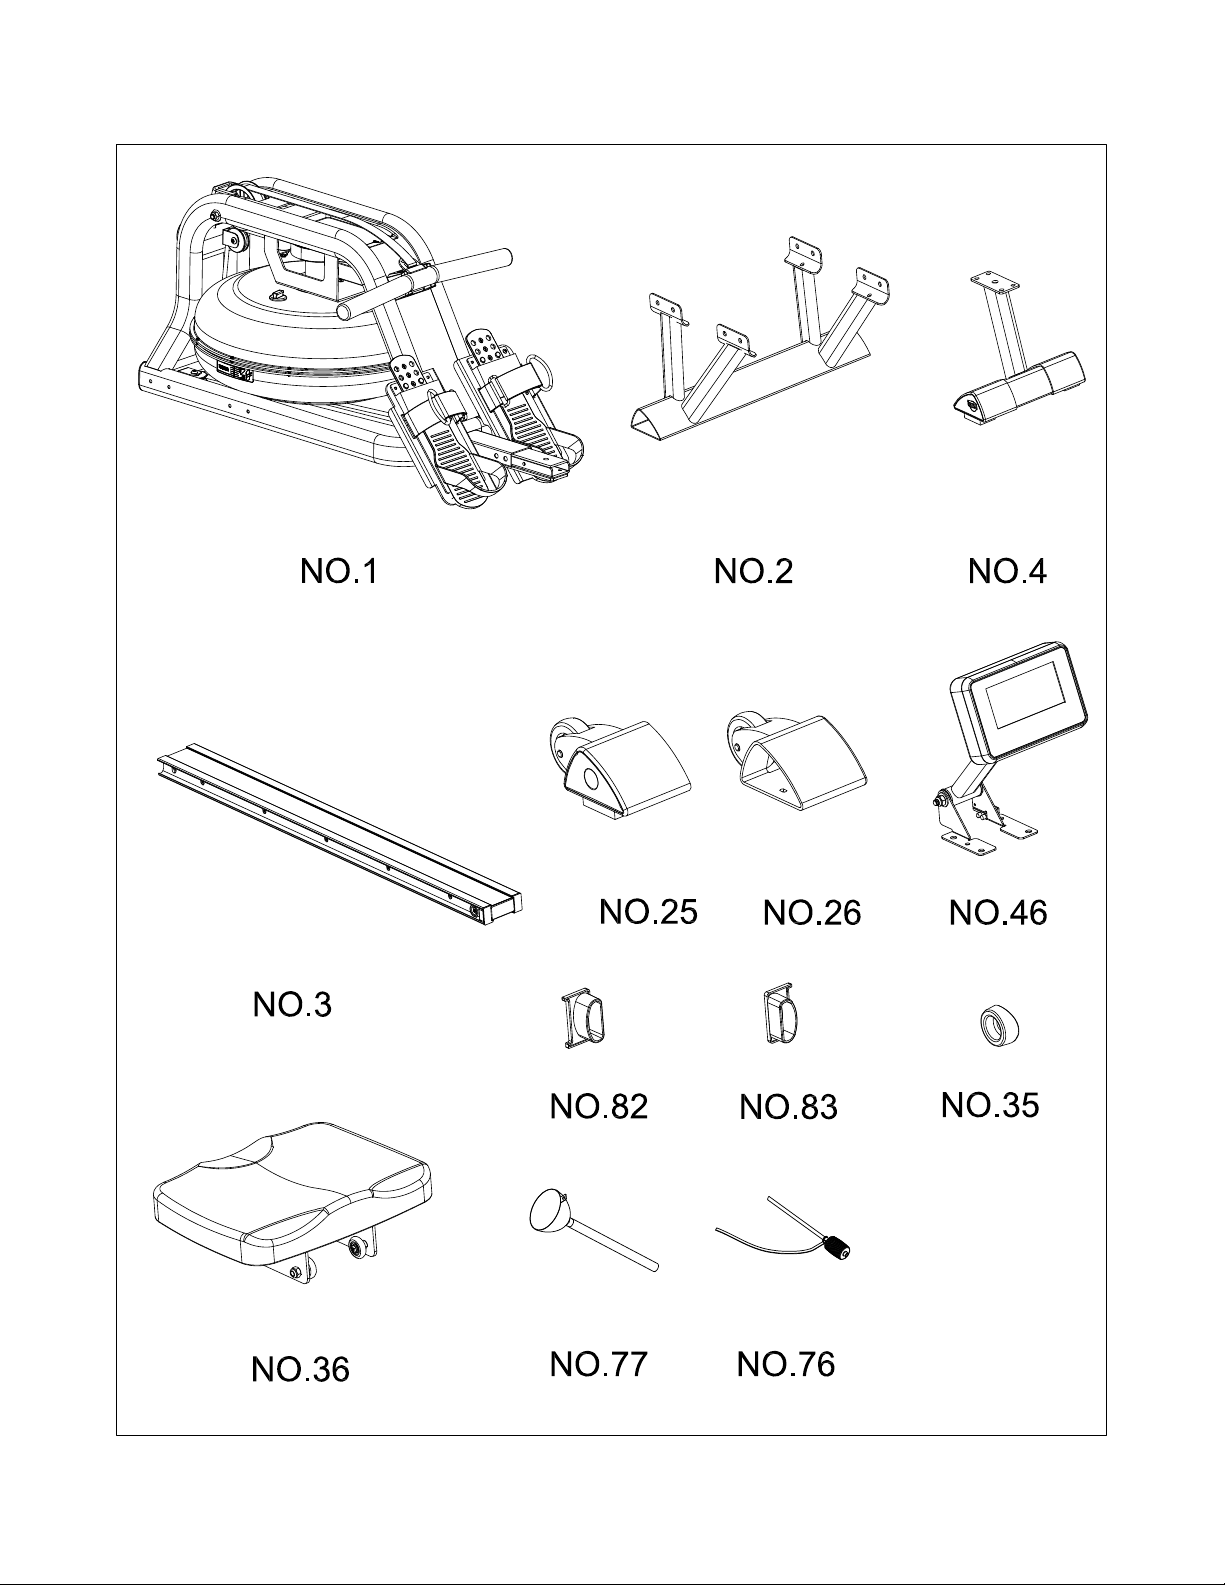
ERG600W Assembly Part Checklist

ERG600W Rower
5
ERG600W Assembly Part Checklist
Part No Description Q’ty
1 Main Frame 1
2 Front Stabilizer 1
4 Rear Stabilizer 1
3 Slide Rail 1
25 Left End Cap 1
26 Right End Cap 1
46 Console 1
82 Rail Endcap L 1
83 Rail Endcap R 1
35 Stopper 2
36 Seat 1
77 Funnel 1
76 Pumping Siphon 1
User Manual 1
Hardware Parts 1
Note: Above parts are all needed to assemble this machine. Before you start to assemble, please check
the hardware packing to make sure they are included.
6
ERG600W Rower
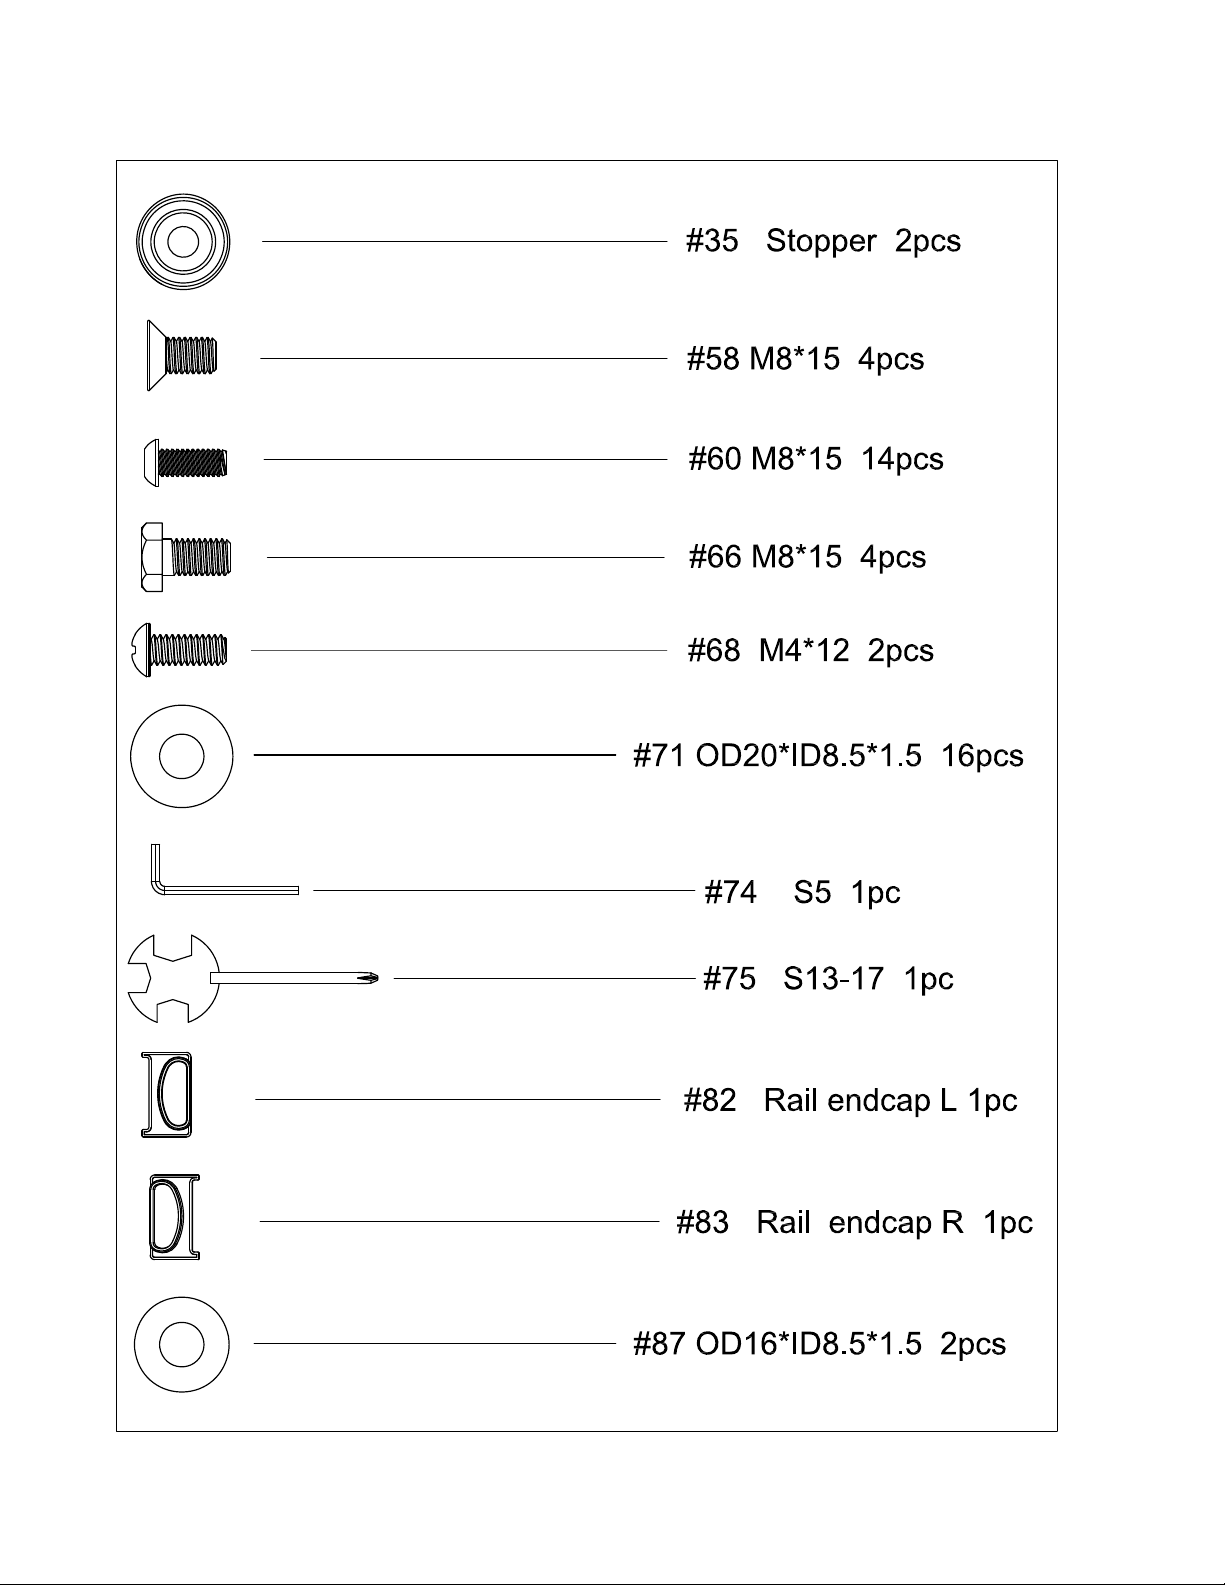
ERG600W Assembly Pack Checklist
ERG600W Rower
7
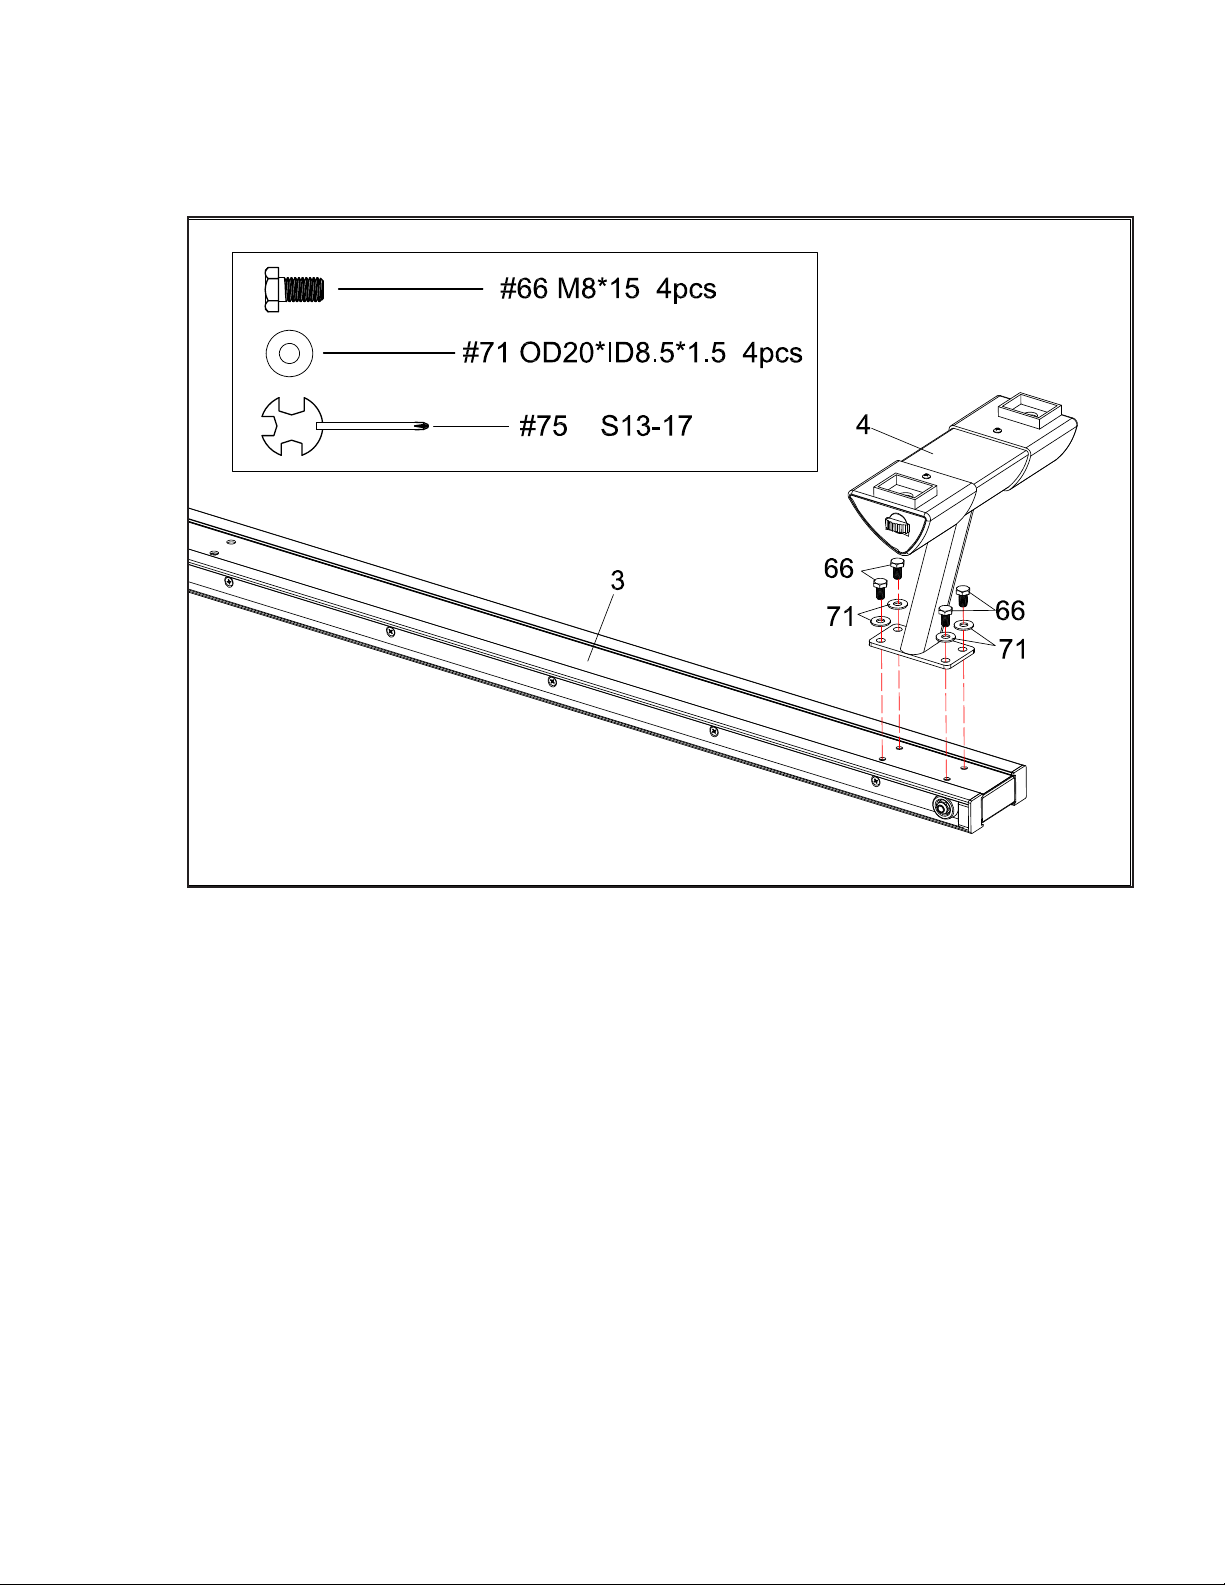
NOTE: We recommend having 2 people to assemble the product.
1. Turn over the Slide Rail (No. 3) as above. Attach the Rear Stabilizer (No.4)
to the Slide Rail with
4 Washers (No.71) and
4 Outer Hex Screws (No.66).
2. Tighten with Spanner (No.75).
ERG600W Assembly Instructions
Rear Stabilizer
1
8
ERG600W Rower
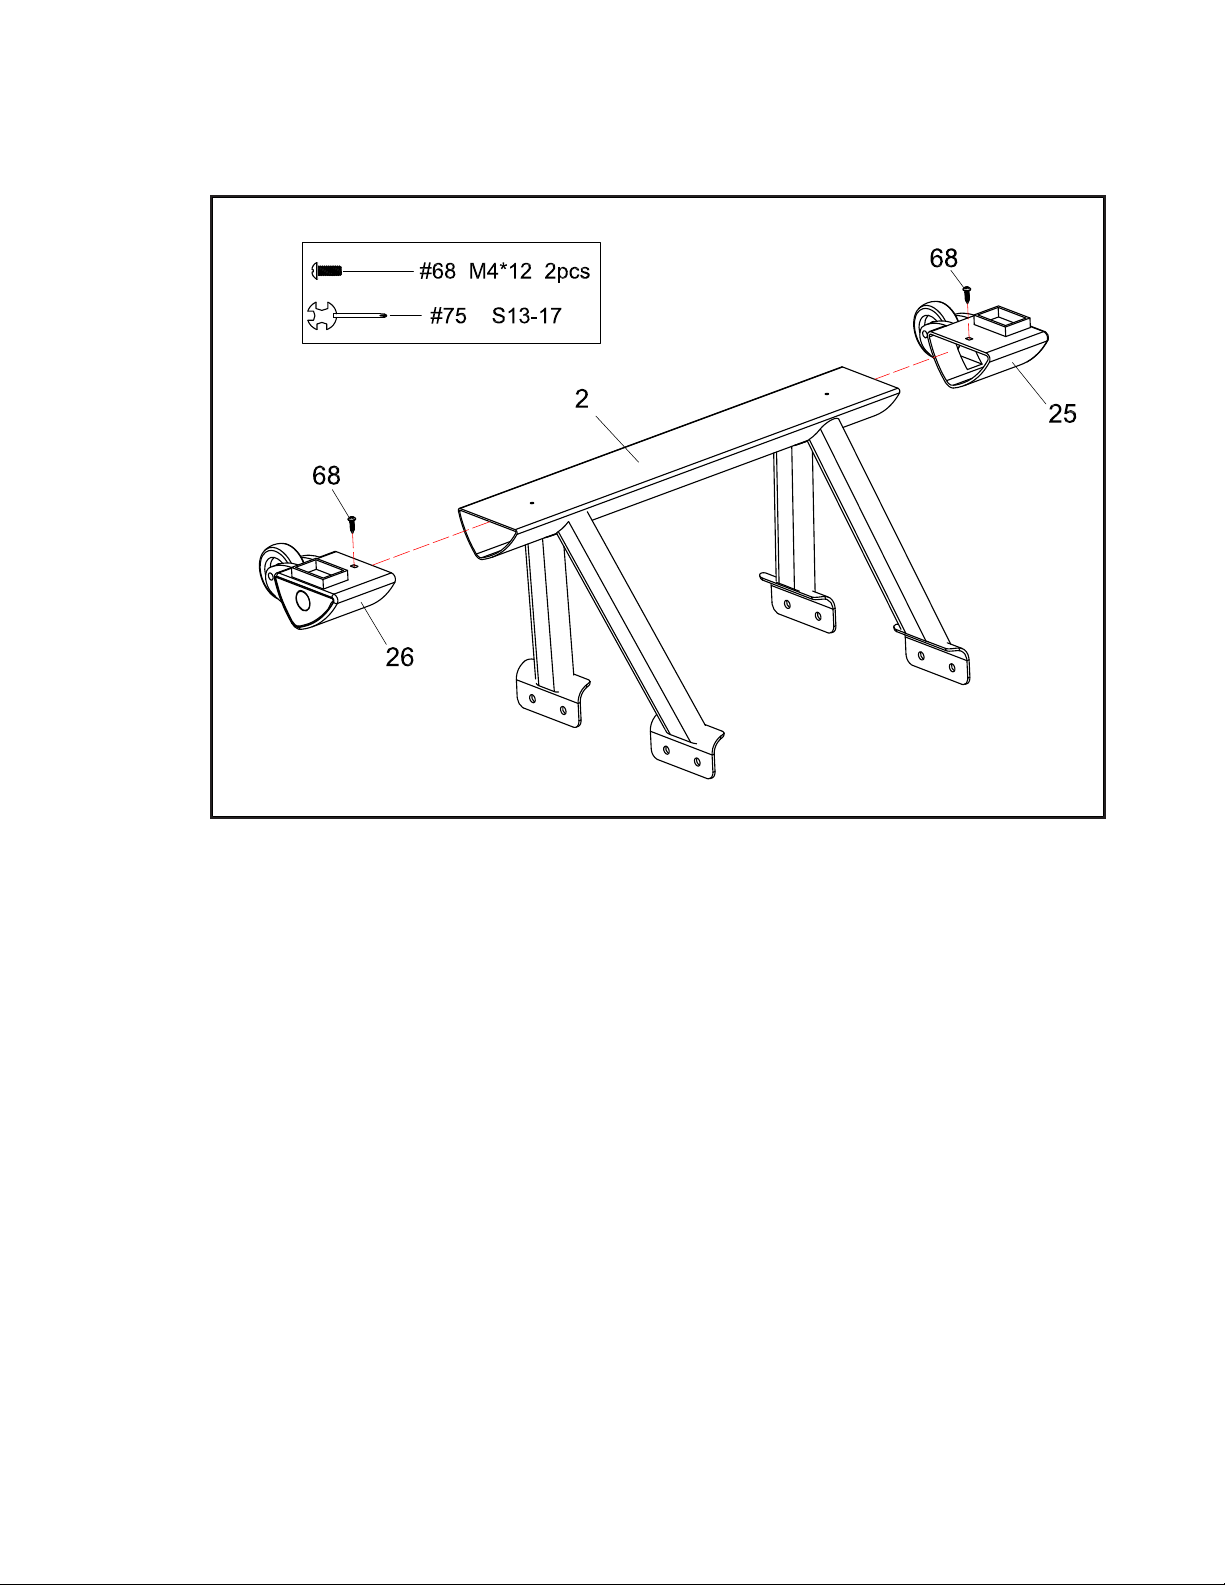
Front Stabilizer Endcaps
2
1. Attach L & R End Caps (No.25 & 26) to Front Stabilizer (No.2). Then tighten
with 2 Cross Screws (No.68) using the Spanner (No.75).
ERG600W Rower
9
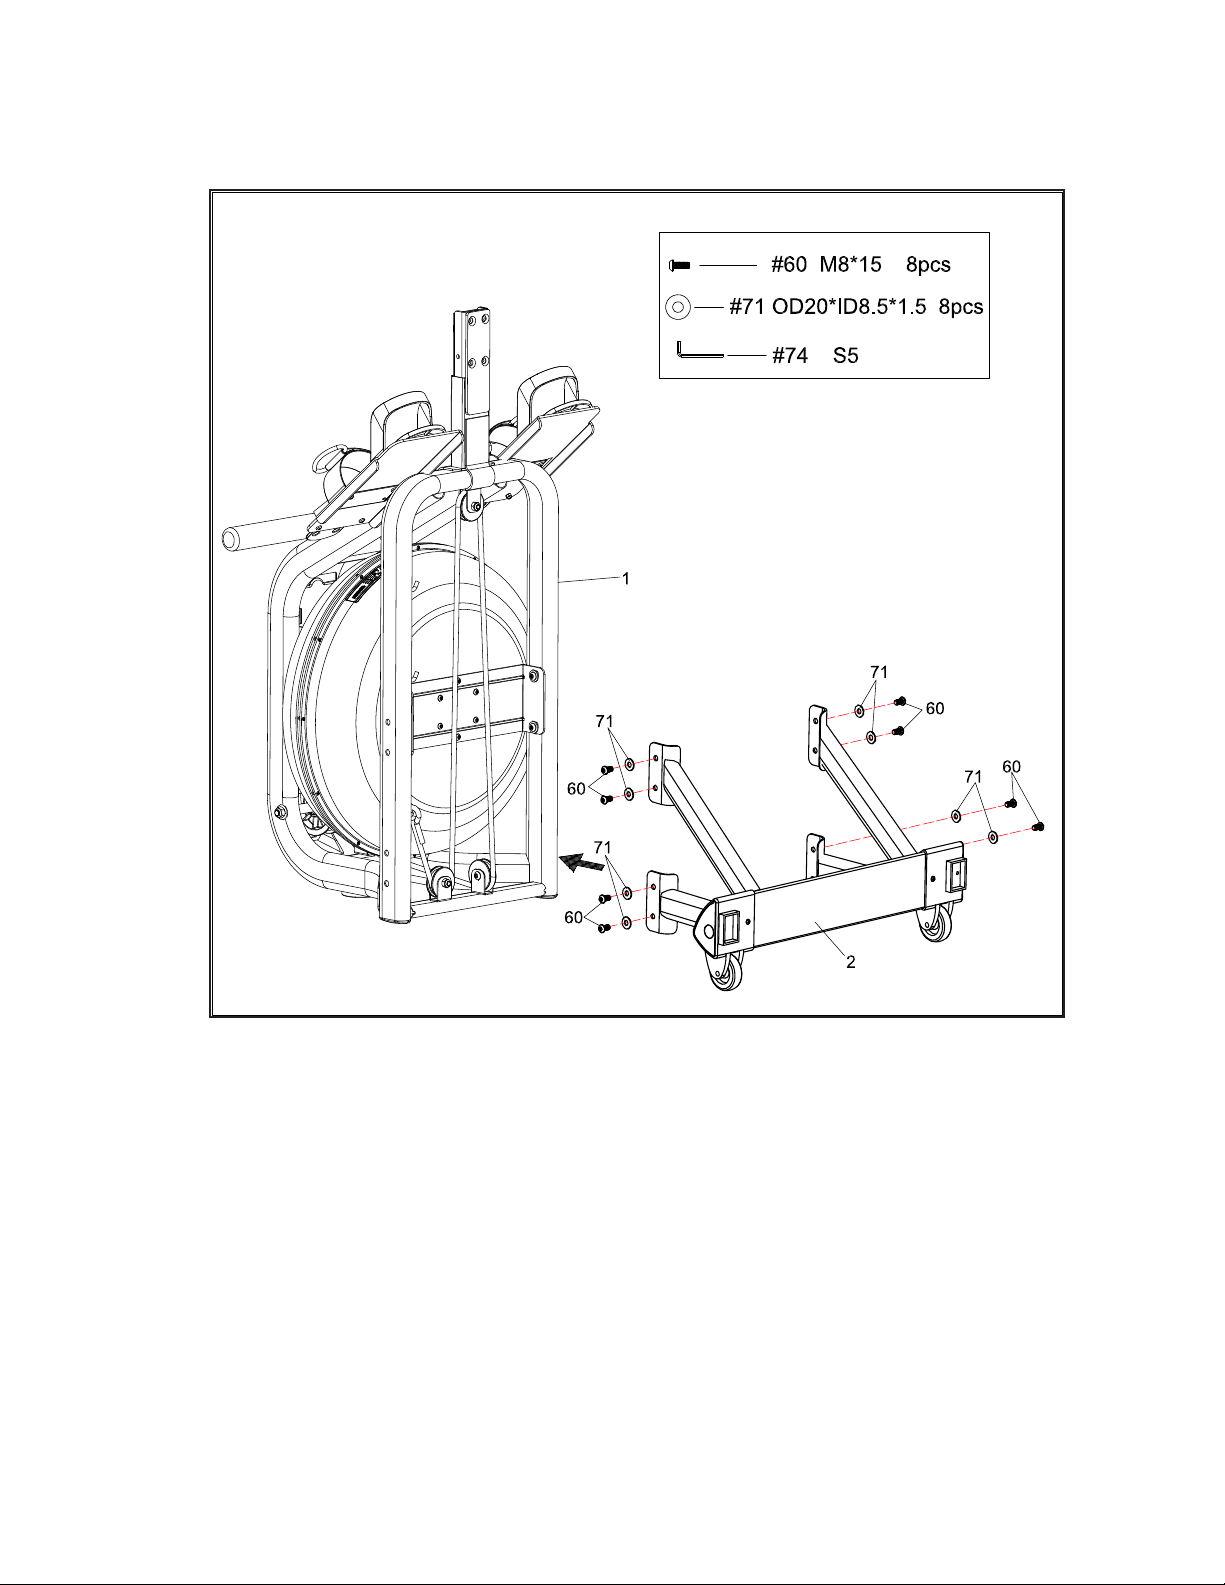
1. Turn the Main Frame (No.1) upright. Attach the Front Stabilizer (No.2) to
Main Frame (No.1) using
8 Washers (No.71) and
8 Screws (No.60).
Tighten with Allen Wrench (No.74).
2. You can put 3~4 screws into the holes rst, and start tightening by hand.
After all the screws are put in, then tighten with the tool.
Attaching the Front Stabilizer
3
10
ERG600W Rower
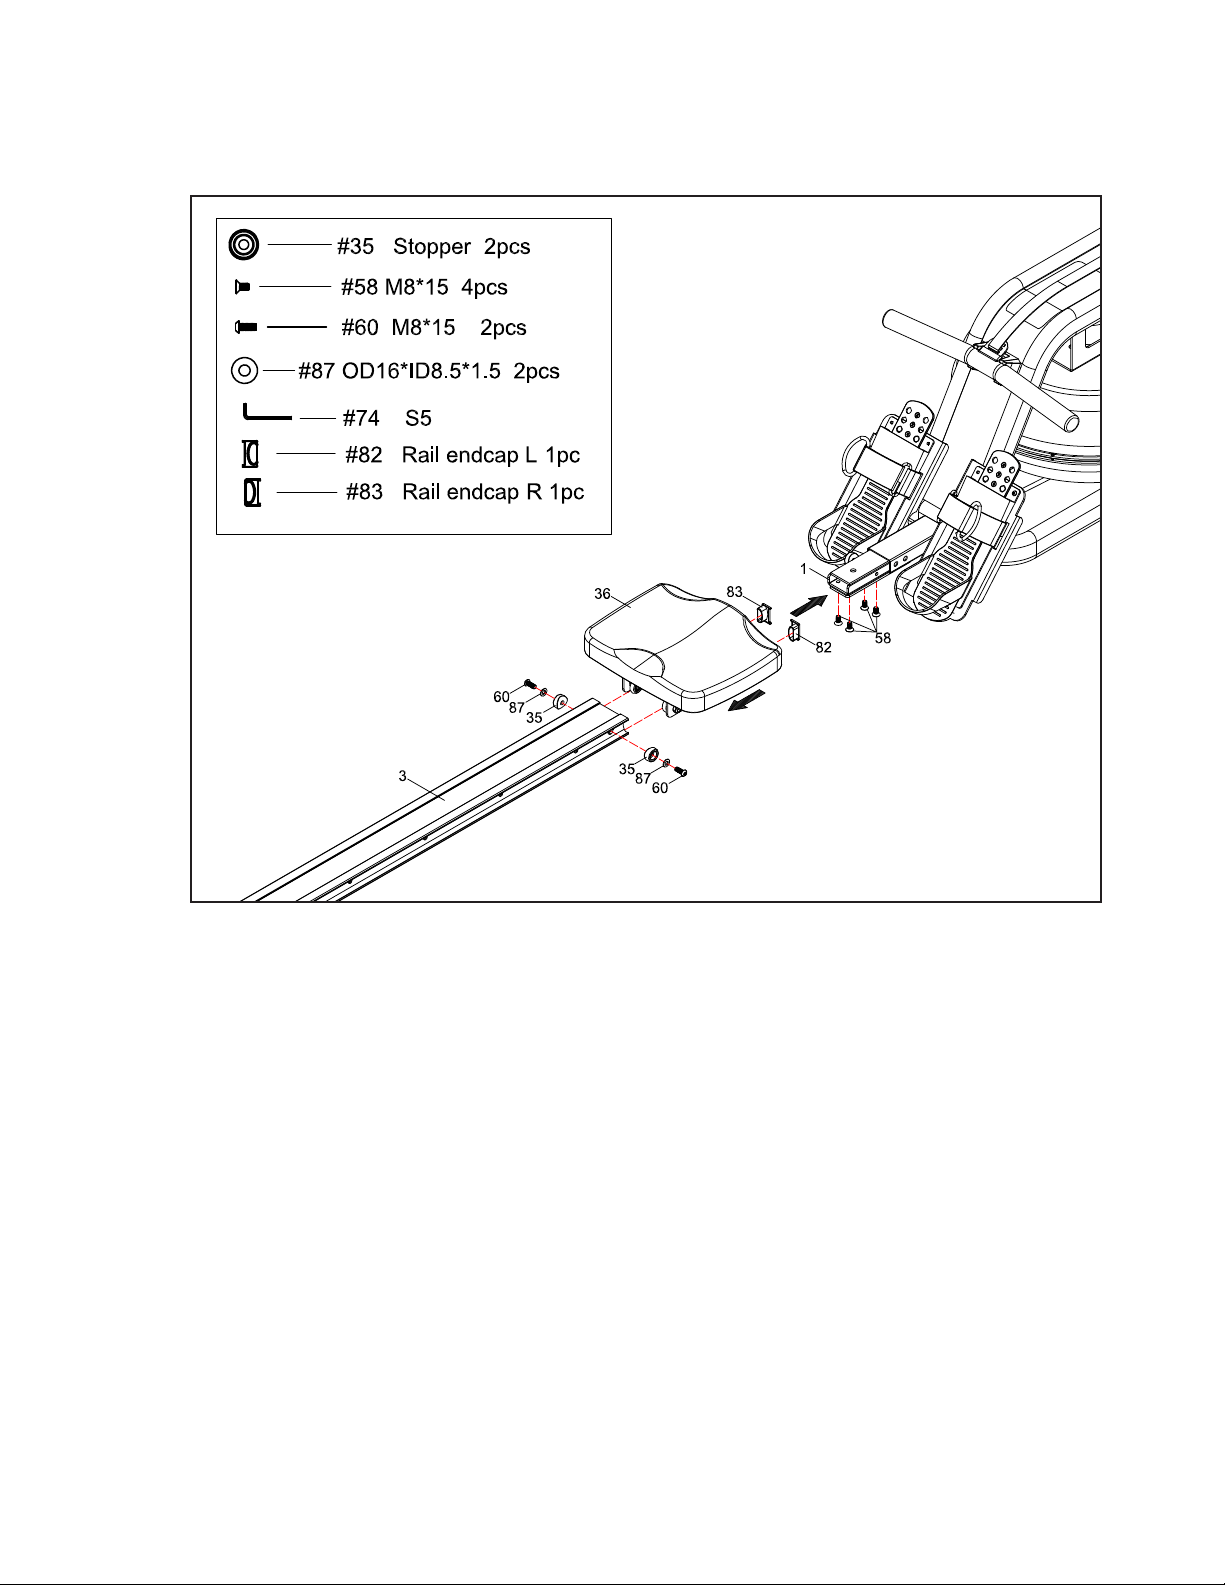
Seat and Rail
4
1. Slide the Seat (No.36) onto the Slide Rail (No.3).
2. Attach the Slide Rail (No. 3) to the Main Frame (No. 1) using 4 Flat Screws (No.
58).
3. Secure the Stopper (No.35) with 2 Screws (No.60) and Washers (No.87).
Insert all 6 screws partially into the holes rst, and then tighten with Allen Wrench
(No.74).
4. Attach Rail endcap L(No.82) and Rail endcap R(No.83) to the Slide Rail (No.3).
ERG600W Rower
11
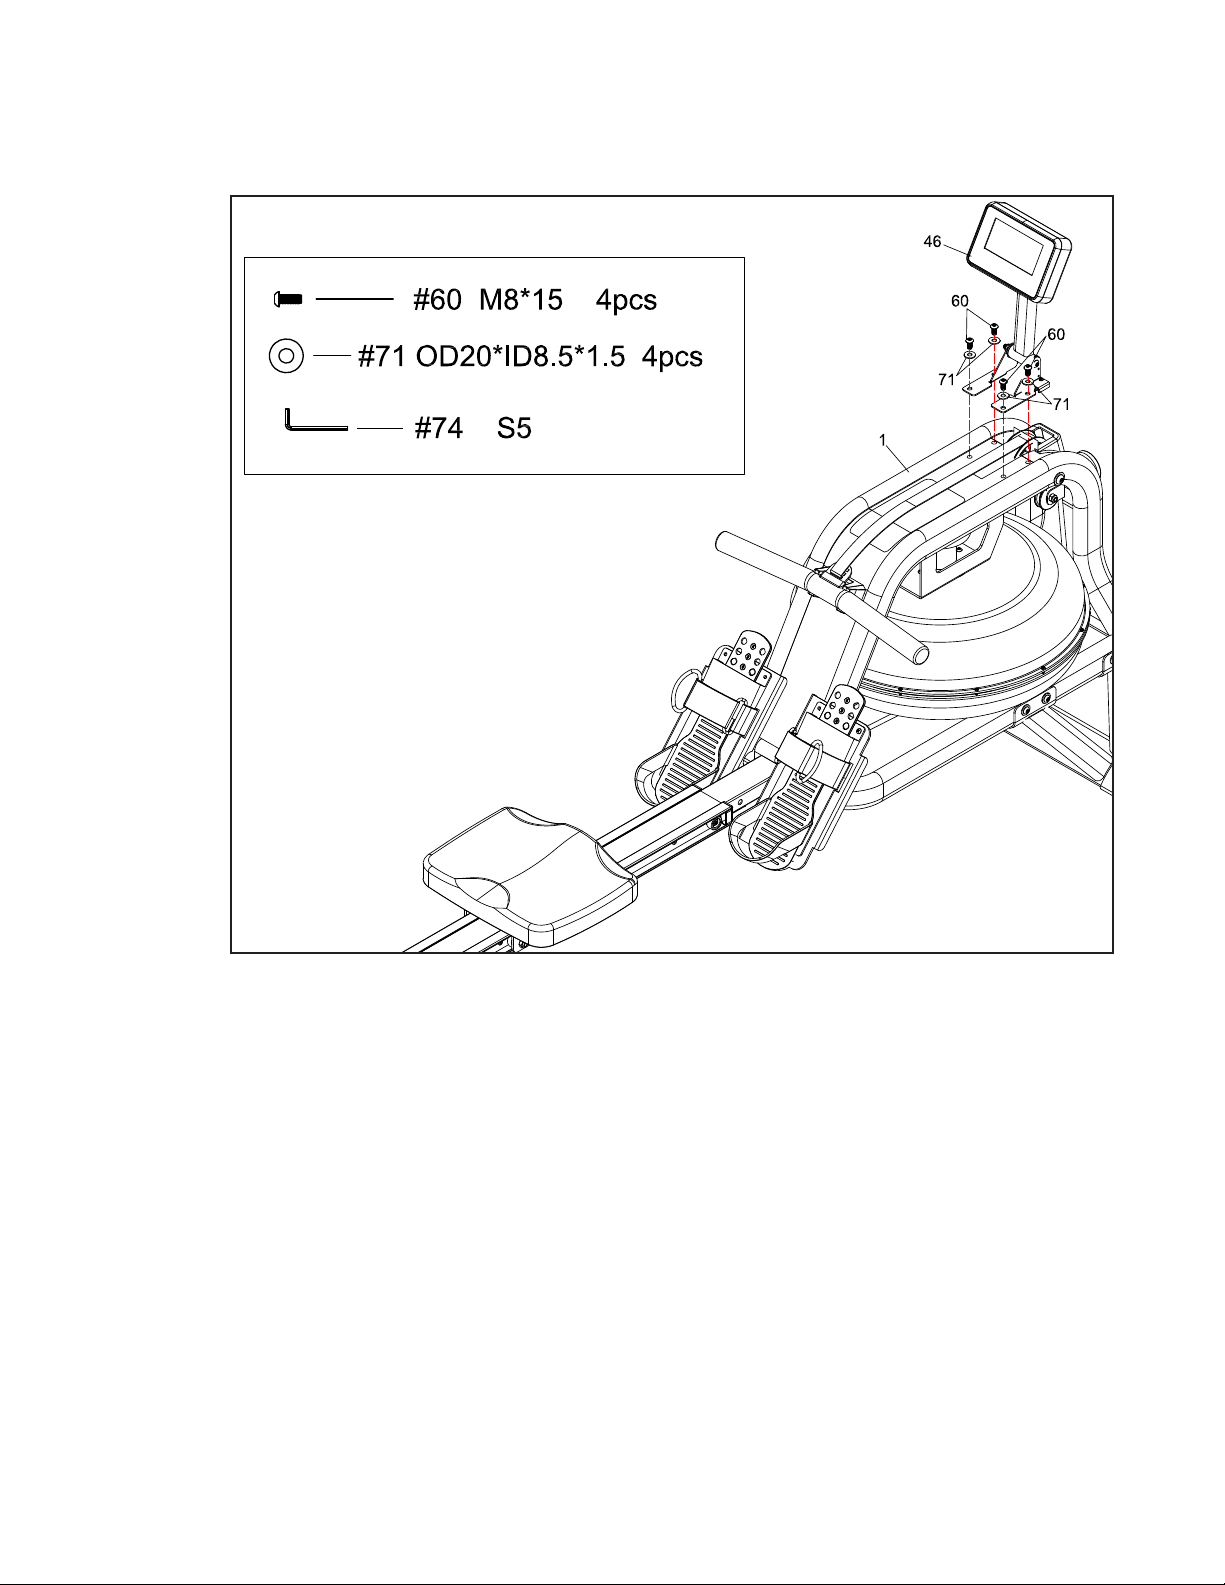
1. Attach Console(No.46) to Main Frame (No.1) using 4 Washers (No.71)
and 4 Screws (No.60). Tighten with Allen wrench (No.74).
Console
5
12
ERG600W Rower
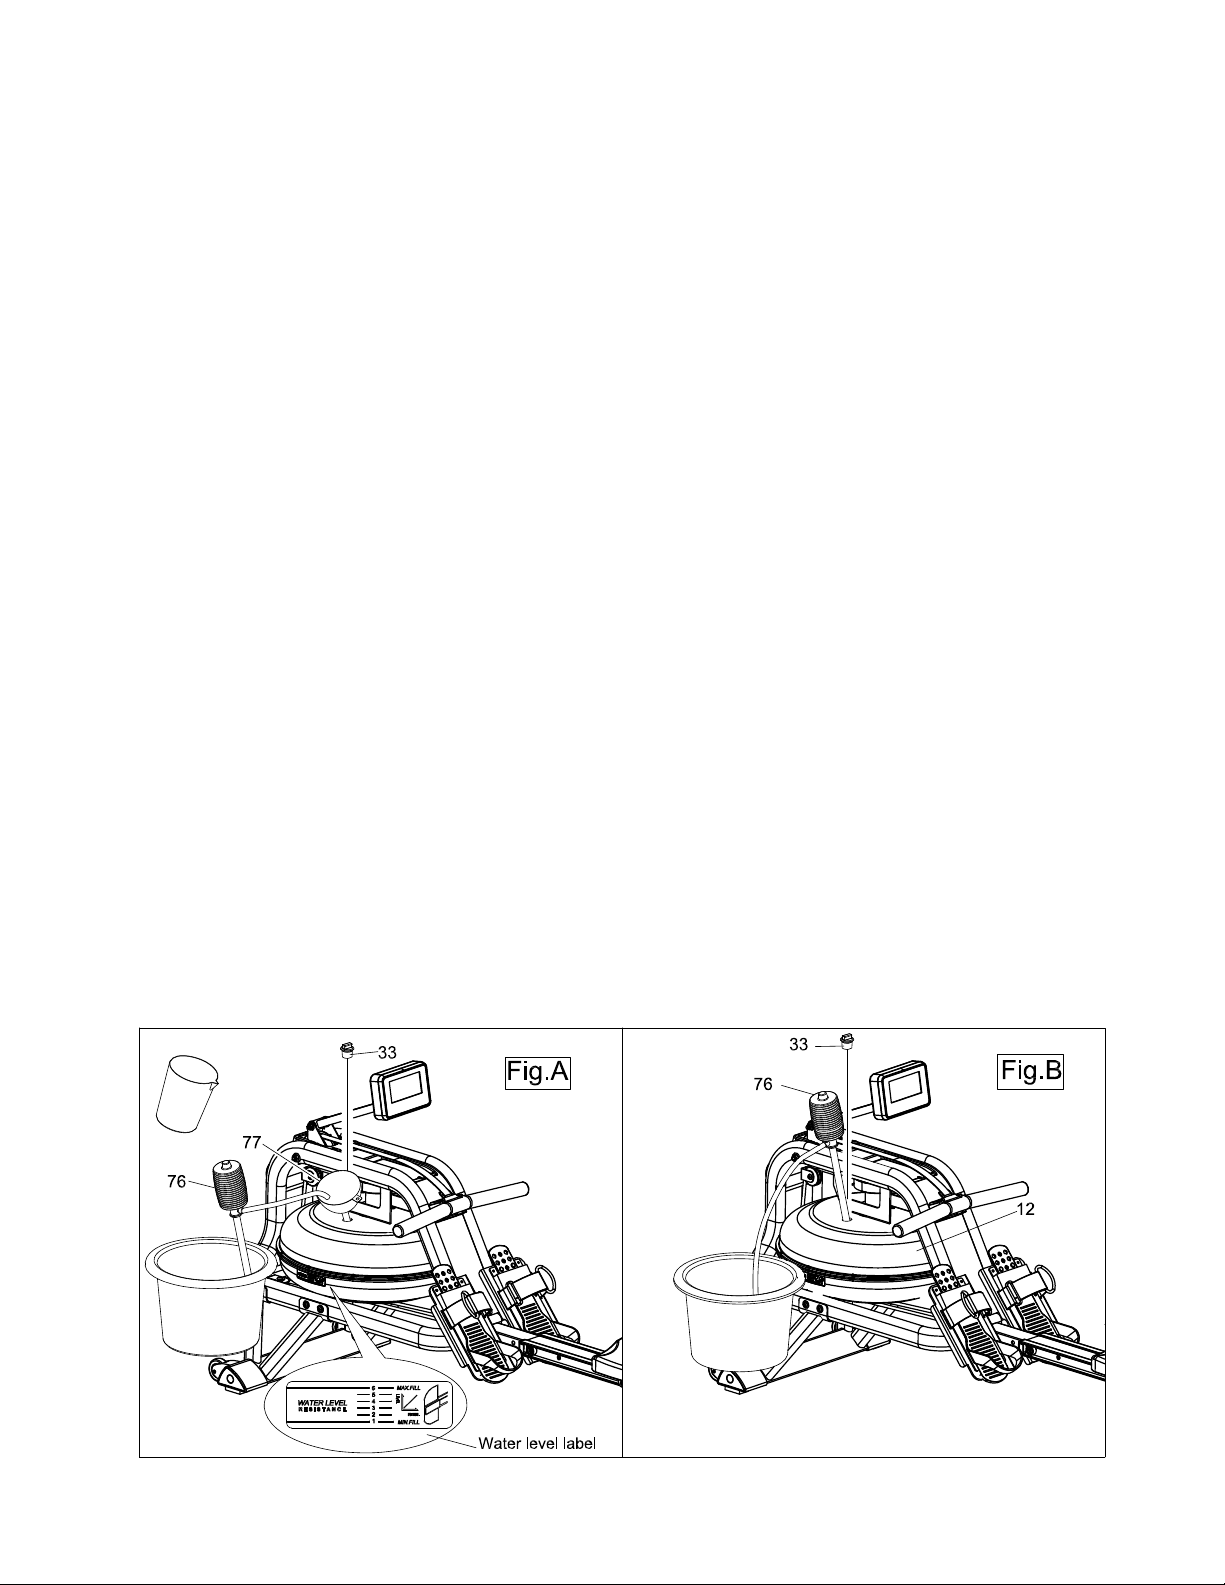
How to Fill and Empty the Tank
1. Remove the Fill Plug (No.33) from the Upper Tank Cover (No.12).
2. To ll tank with water, refer to Fig. A. Insert the Funnel (No.77) into the tank, then use a cup or
the Siphon Pump (No.76) and a bucket to ll the tank. Use the water level gauge on the side
of the tank to measure desired water level in the tank.
3. To empty the tank, refer to Fig. B. Place a bucket next to the rower, and use the Siphon
Pump (No.76) to pump out the water from the tank into the bucket.
4. Insert the Fill Plug (No.33) into the Upper Tank Cover (No.12). Wipe excess water o of the
frame.
NOTE:
• Fill the tank only with tap water. Never use pool chlorine or chlorine bleach. This will damage
the tank and void the warranty.
• Water from the tank is not suitable for consumption. Dispose the water after pumping it out
from the tank.
• To extend the life of your rower and prolong use between tank cleanings, please purchase
water cleaning tablets at www.xterratness.com, or by calling 1-(870) 333-5500.
WATER LEVEL
• See Fig. A. The water level gauge is on the side of the tank. The maximum ll level is 6. Never
ll it over this limit. Filling the tank over this limit will void the warranty.
• The resistance depends on the water level in the tank.
Water level 1 is the lowest resistance. Level 6 is the highest resistance.
ERG600W Rower
13
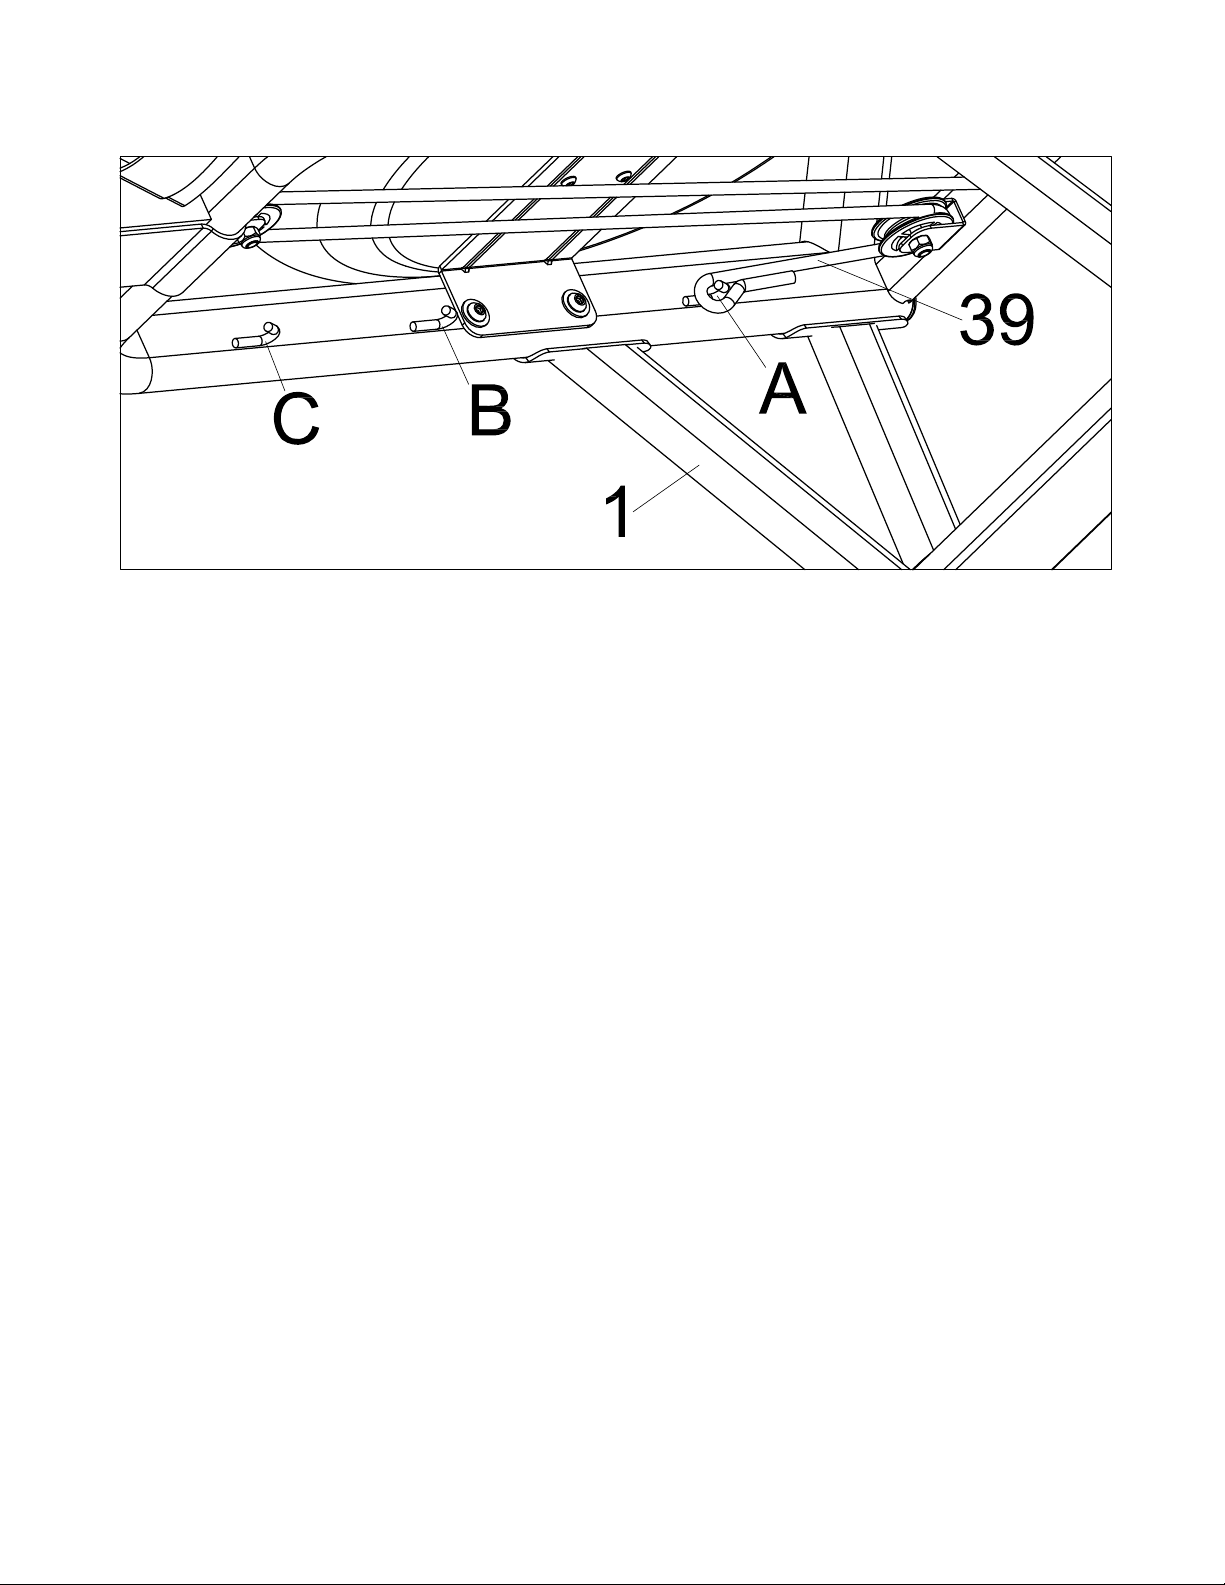
Adjustment Guide
There are 3 hooks (A, B, C) for the bungee cord, located on the inside of the Frame (No.1)
under the water tank. If you hook the Bungee Cord (No.39) on to B or C, it increases the
assisted return of the mesh belt. C is the fastest return.
Use caution when adjusting the bungee cord.
14
ERG600W Rower
Adjustment Guide and Storage
The pedal strap is adjustable and can be
personalized to t the user’s foot size.
To adjust the pedal strap, remove the Velcro
end of the strap from the mesh side by
pulling it upward and over to the side.
Once removed, you may increase the
opening of the pedal strap by pulling the
mesh end up and to the side.
To tighten, pull the Velcro end of the pedal
strap upward then over and down to secure it
to the mesh side of the strap.
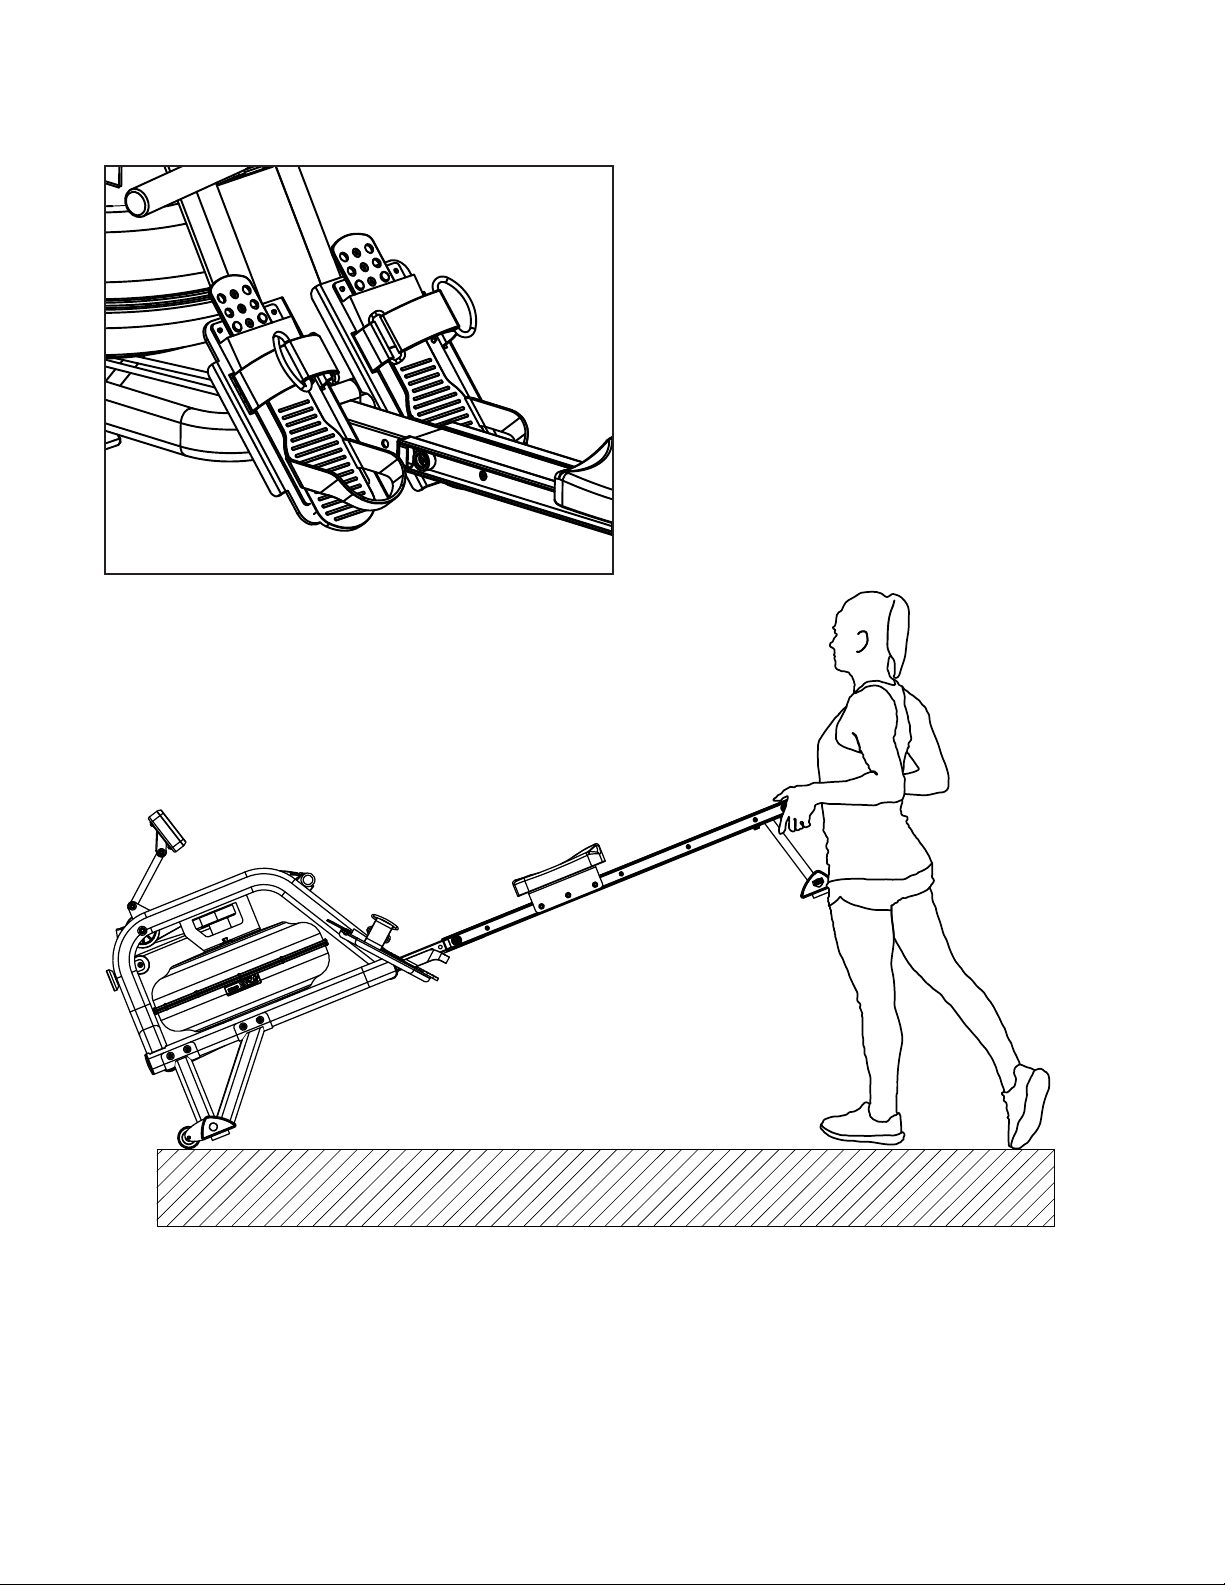
To move the machine, lift up the rear stabilizer until the transportation wheels
on the front stand touch the ground. With the wheels on the ground, you can
transport the rower to the desired location with ease.
ERG600W Rower
15
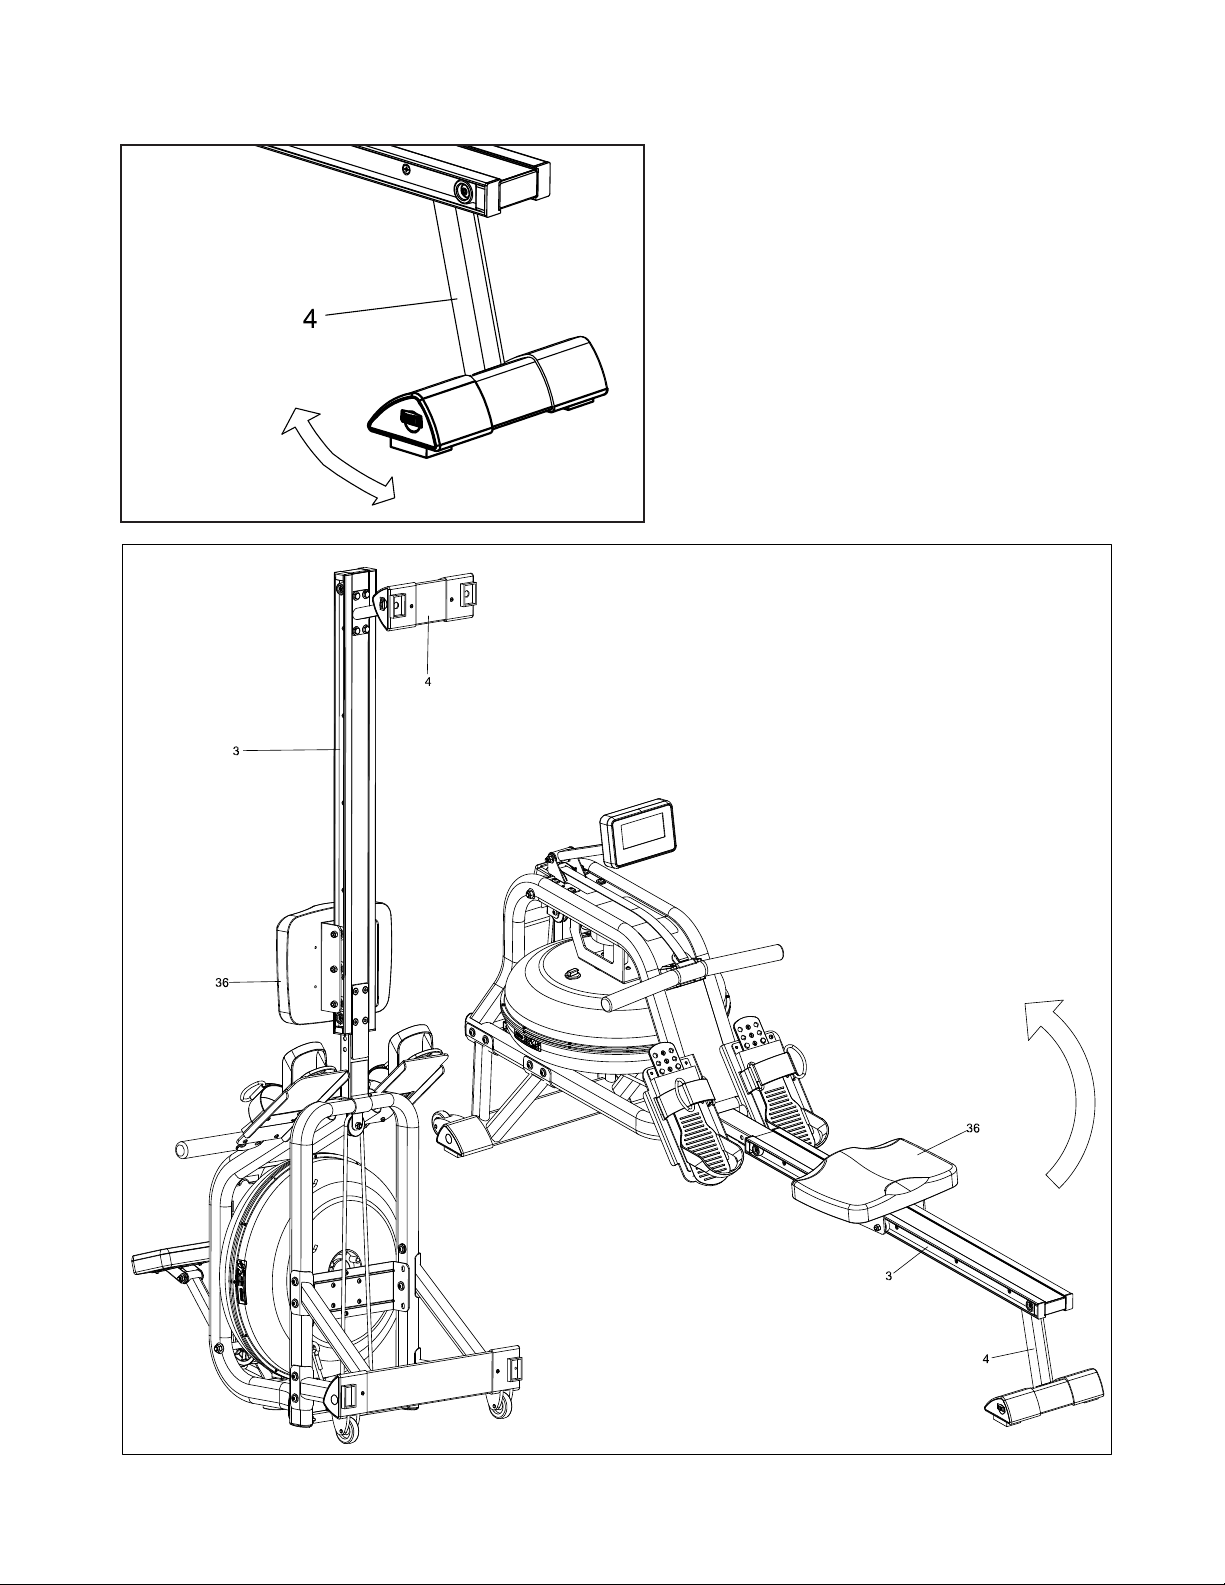
Adjustment Guide
Adjusting the Balance
Adjust the End Caps on the Rear Stabilizer
(No.4) of the machine if the machine is
unbalanced during use.
CAUTION!
Moving parts, such as the seat, can crush
and cut. Keep hands clear of the Slide Rail
during use.
CAUTION!
Move the Seat (No.36)
to front of Slide Rail
(No.3) rst or it will glide
down when raising the
rower up!
CAUTION!
Move with caution when
you raise the rower up, as
your head may touch the
Rear Stabilizer (No. 4).
CAUTION!
When not in use, you can save space
by storing the rower vertically. Lift by the
Rear Stabilizer (No.4) to raise the rower
to vertical position.
If not using the rower for more than a
month, empty the tank before storing.
16
ERG600W Rower
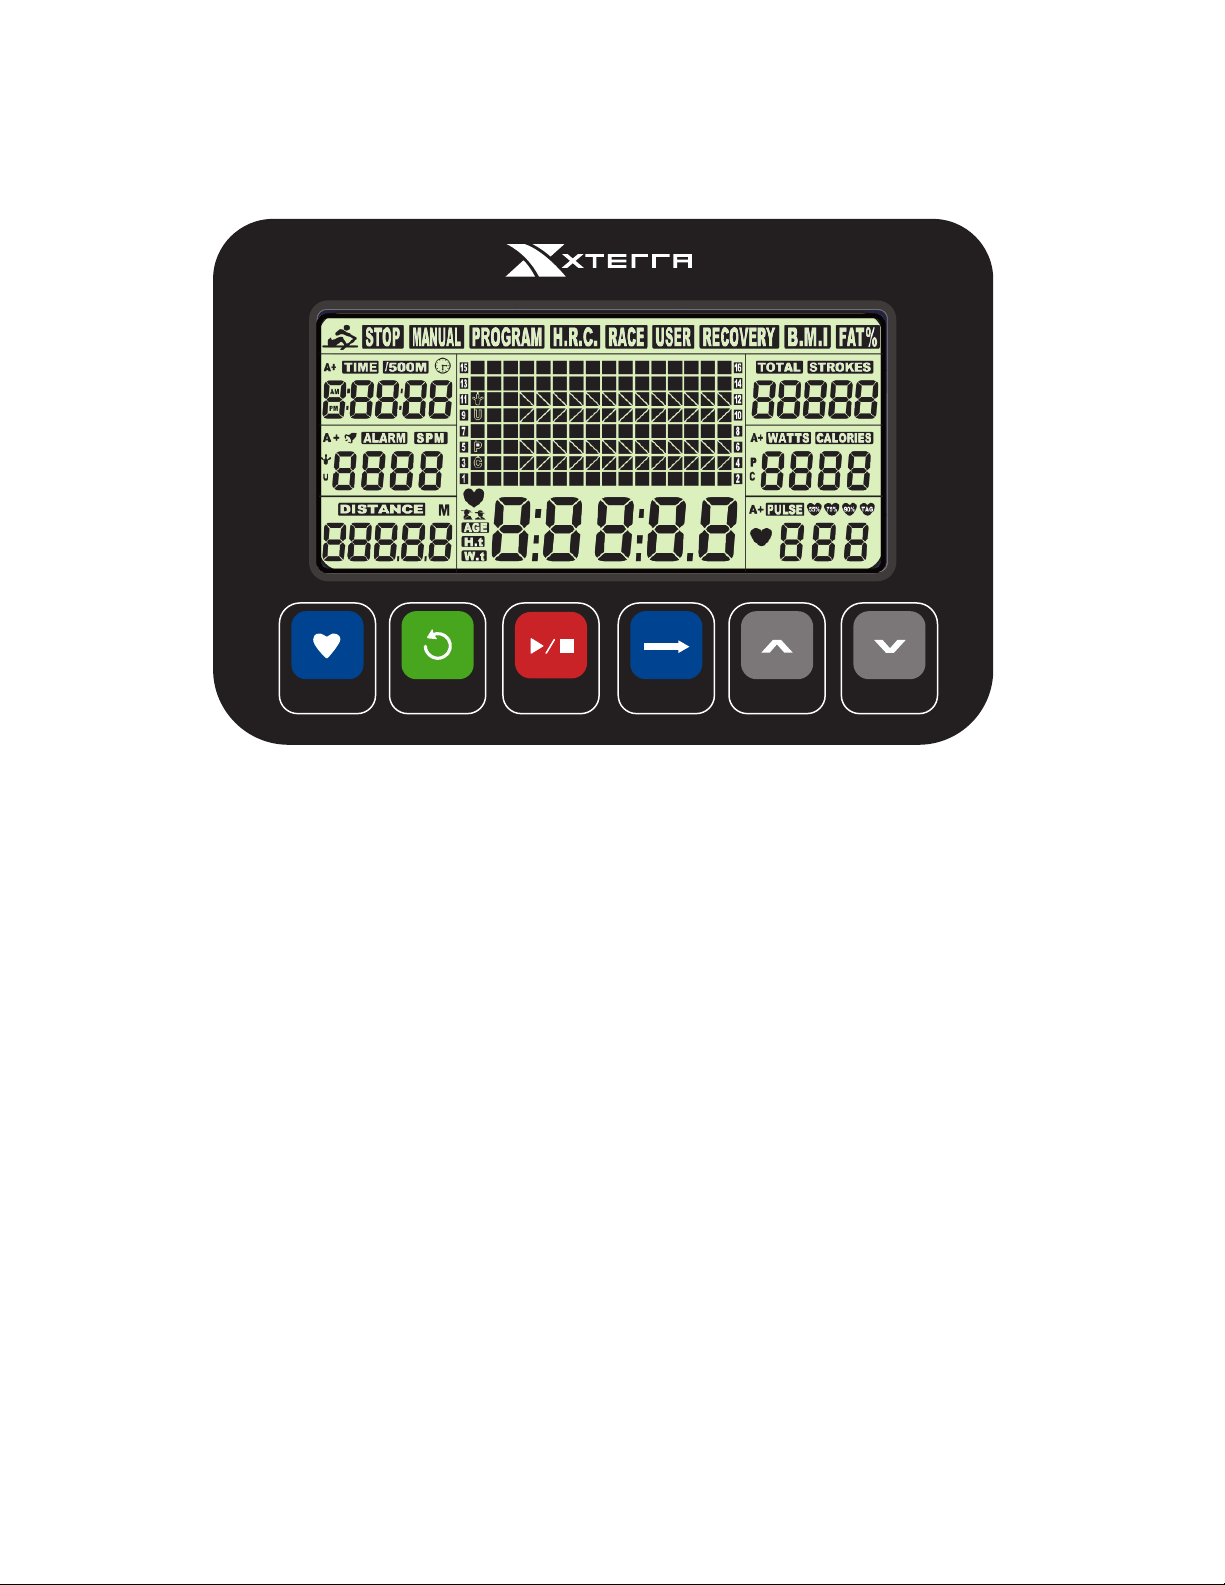
RECOVERY
RESET
START
STOP
ENTER
UP
DOWN
Operation of Your Console
ERG600W Console
UP / DOWN: Press these two buttons to scroll through available selection.
To adjust the function value upward and downward.
ENTER: Press to conrm your selection
During training, press the button to cycle scan each display function.
START / STOP: To start and stop your selected workout program.
RESET: To return the computer back to the main menu.
Press and hold to reset values.
RECOVERY: To activate the RECOVERY PROGRAM that will automatically evaluate
your tness immediately after your work out.
Button Fuctions
Our computerized display console on the Water Rower allows the user to tailor a personalized
workout by monitoring their progress. During a workout, the display console will alternately
and repeatedly display the Time, Time/500M, SPM, Distance, Strokes, Total Strokes, Calories
Burned and Pulse (all of the above).

ERG600W Rower
17
Functions
TIME: Set a target time by pressing the UP and/or DOWN buttons (1min ~ 99
min), in 1 minute increments.
TIME / 500M: Your average time to reach 500 meters is automatically displayed.
SPM: Strokes per minute.
DISTANCE: Preset a target value by pressing the UP and/or DOWN buttons
(0 ~ 99900meters), 100 meters increments.
STROKES: Set a target value by pressing the UP and/or DOWN buttons (0~9990
strokes). 10 strokes increments.
TOTAL
STROKES: Accumulates total strokes from 0 up to 9999.
CALORIES: Set a target value by pressing the UP and/or DOWN buttons (10~9990
Cal). 10 strokes increments.
PULSE: (Wireless chest strap sensor sold separately) - In Manual Mode,
set the target heart rate value by pressing up/down (available range is
30 to 240 in 1 BPM increments). The computer will display user’s
heart rate during training. When you are out of range of the target value
during exercise, the computer will beep and PULSE will blink until target
range is resumed or wireless chest strap sensor is removed. The pulse
measurement function is only usable with the optional wireless chest
strap sensor.
CALENDAR: The computer will display year, month, and day when computer is in
sleep mode.
TEMPERATURE: The computer will display current room temperature when the computer
is in sleep mode.
CLOCK: The computer will display current clock when the computer is in sleep
mode.
18
ERG600W Rower
Operation of Your Console
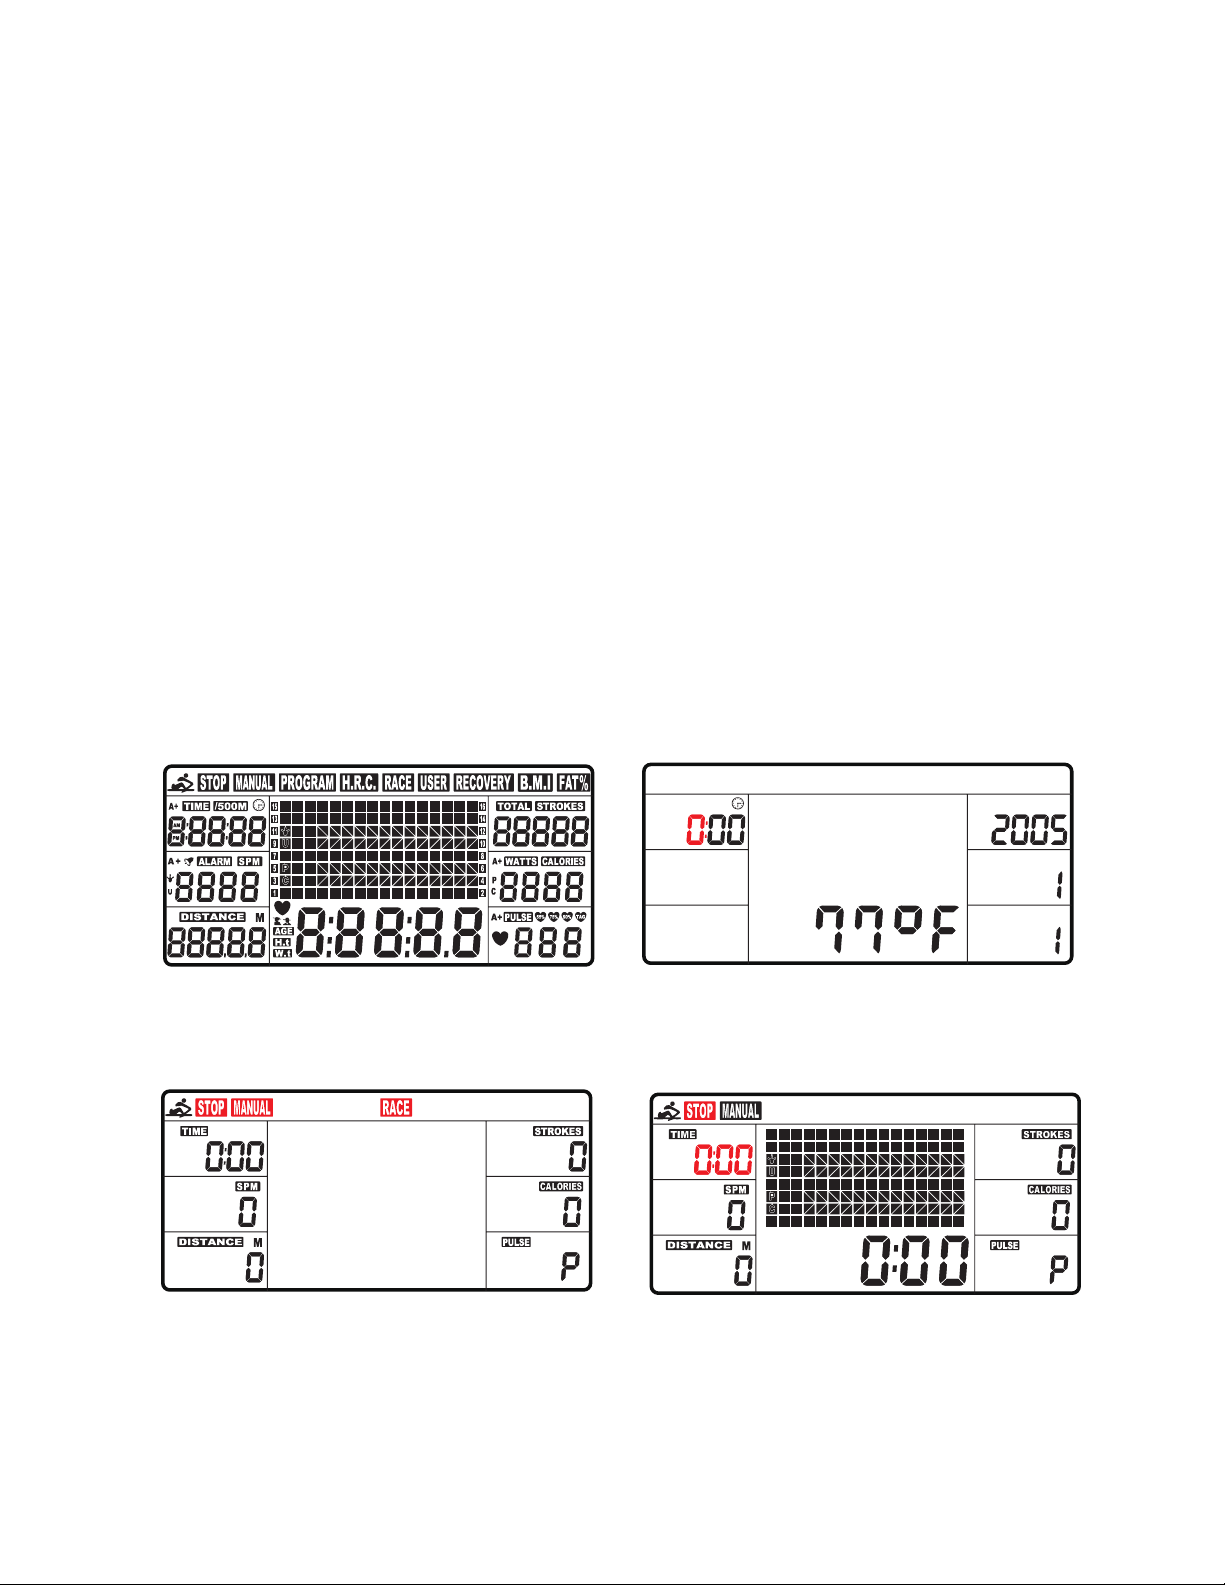
1. Install 2 AA batteries (included) and computer will beep for 2 seconds (Fig.1). Then, the
computer will enter into the CLOCK & CALENDAR MODE (Fig.2).
2. The CLOCK will ash. Press UP / DOWN to set the hour. Press ENTER to conrm.
Press UP / DOWN to set the minutes. Press ENTER to conrm.
Continue to set up YEAR (in the STROKES window); MONTH (in the CALORIES
window); DAY (in the PULSE window) by pressing UP or DOWN. Each time, press
ENTER to conrm.
After you conrm all values, ALARM will blink. To skip setting up an alarm, press ENTER.
To set up an alarm, press the UP KEY to turn on ALARM. An arrow will appear next to
ALARM. Press ENTER. CLOCK window will ash. Press UP or DOWN to set the alarm
time. Press ENTER to conrm.
Computer will then go into the SPORT screen (Fig.3).
3. When you enter into the SPORT screen, MANUAL and RACE will blink. Press UP or
DOWN to select MANUAL or RACE. Press ENTER to conrm your selection.
Fig. 1 Fig. 2
Fig. 3 Fig. 4
ERG600W Rower
19
Operation of Your Console
1. MANUAL (Fig.4): There are 2 options in MANUAL mode.
A. The computer can be set to countdown a dierent value.
When you select MANUAL, the value of TIME will start to ash. Press UP to set the value
of TIME to countdown. Press ENTER to conrm it. If you do not want to set the value of
time to COUNTDOWN, press ENTER to go to the next function.
You can set the values for DISTANCE, STROKES, CALORIES, or PULSE. (You can only
set the value for one function to countdown. For example, if you have set the target value
for TIME, then DISTANCE can’t be set.) Press START button to start.
The STOP icon will disappear. When the function you have selected counts down to zero
or you press STOP button, the computer will stop and display the average value.
B. The computer counts the value of your workout. Press START to start.
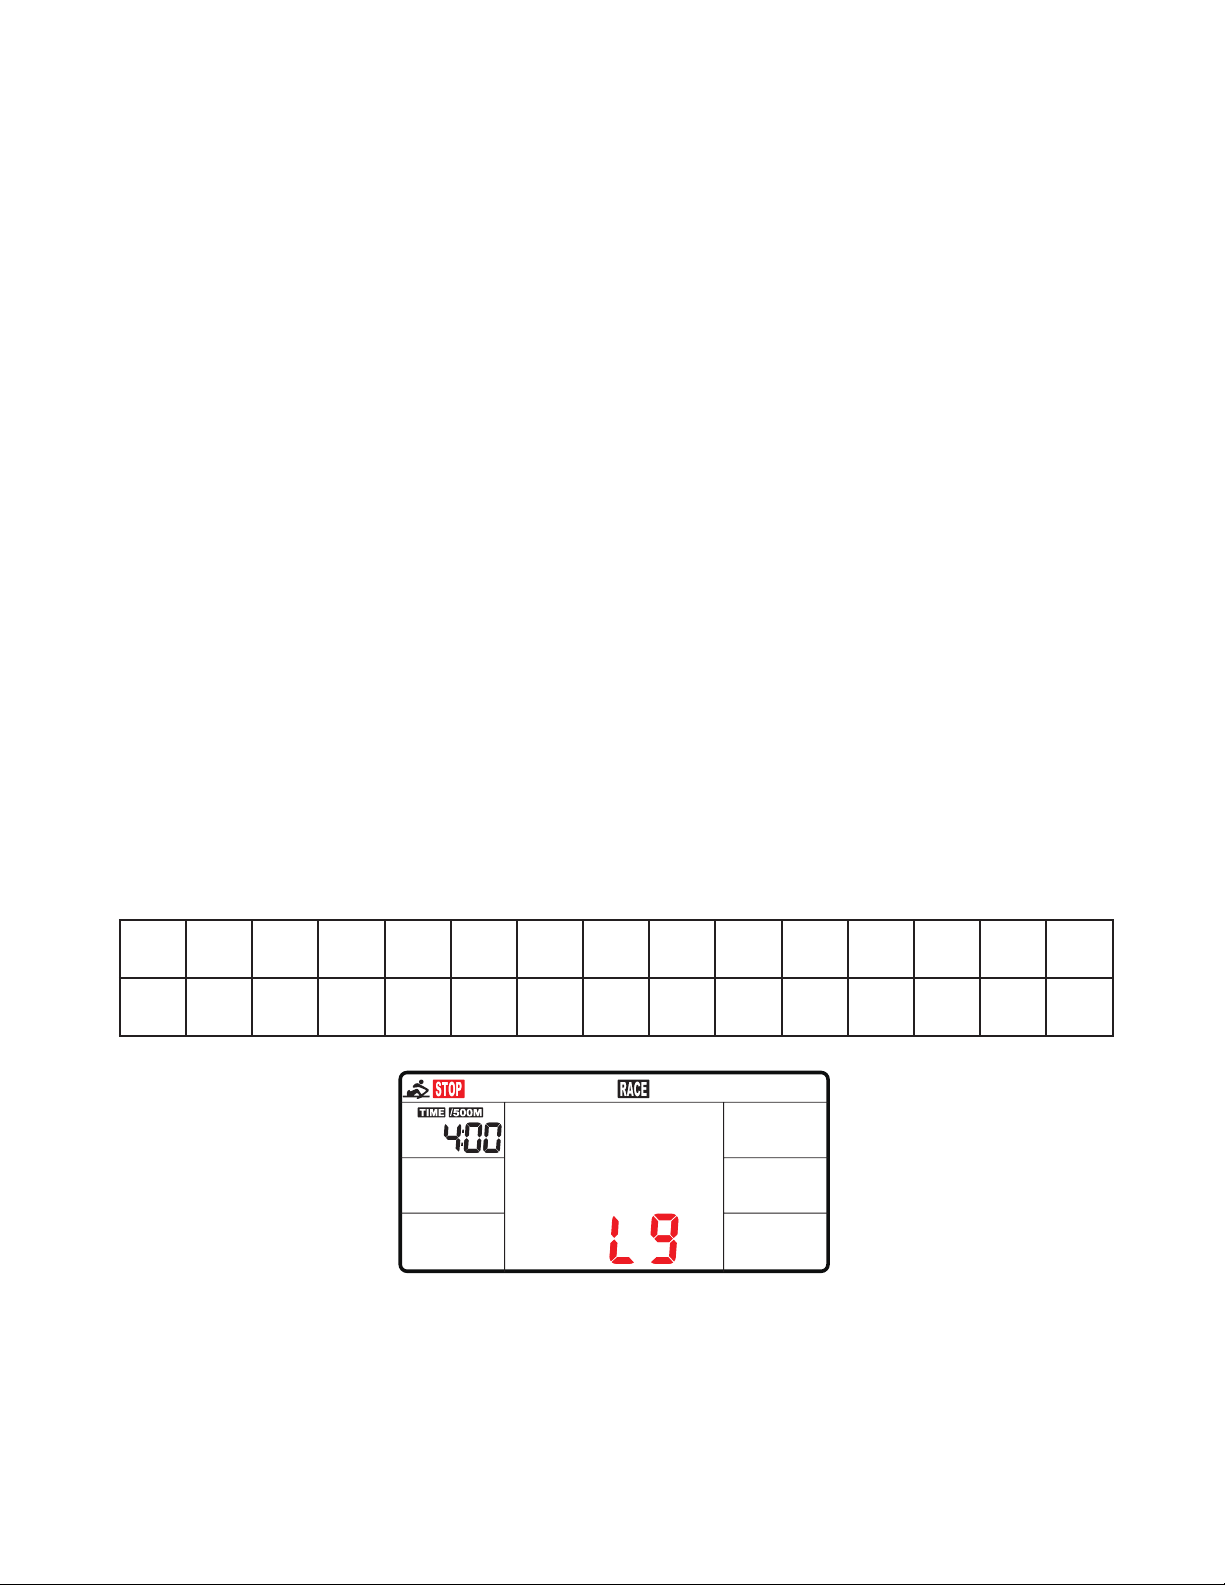
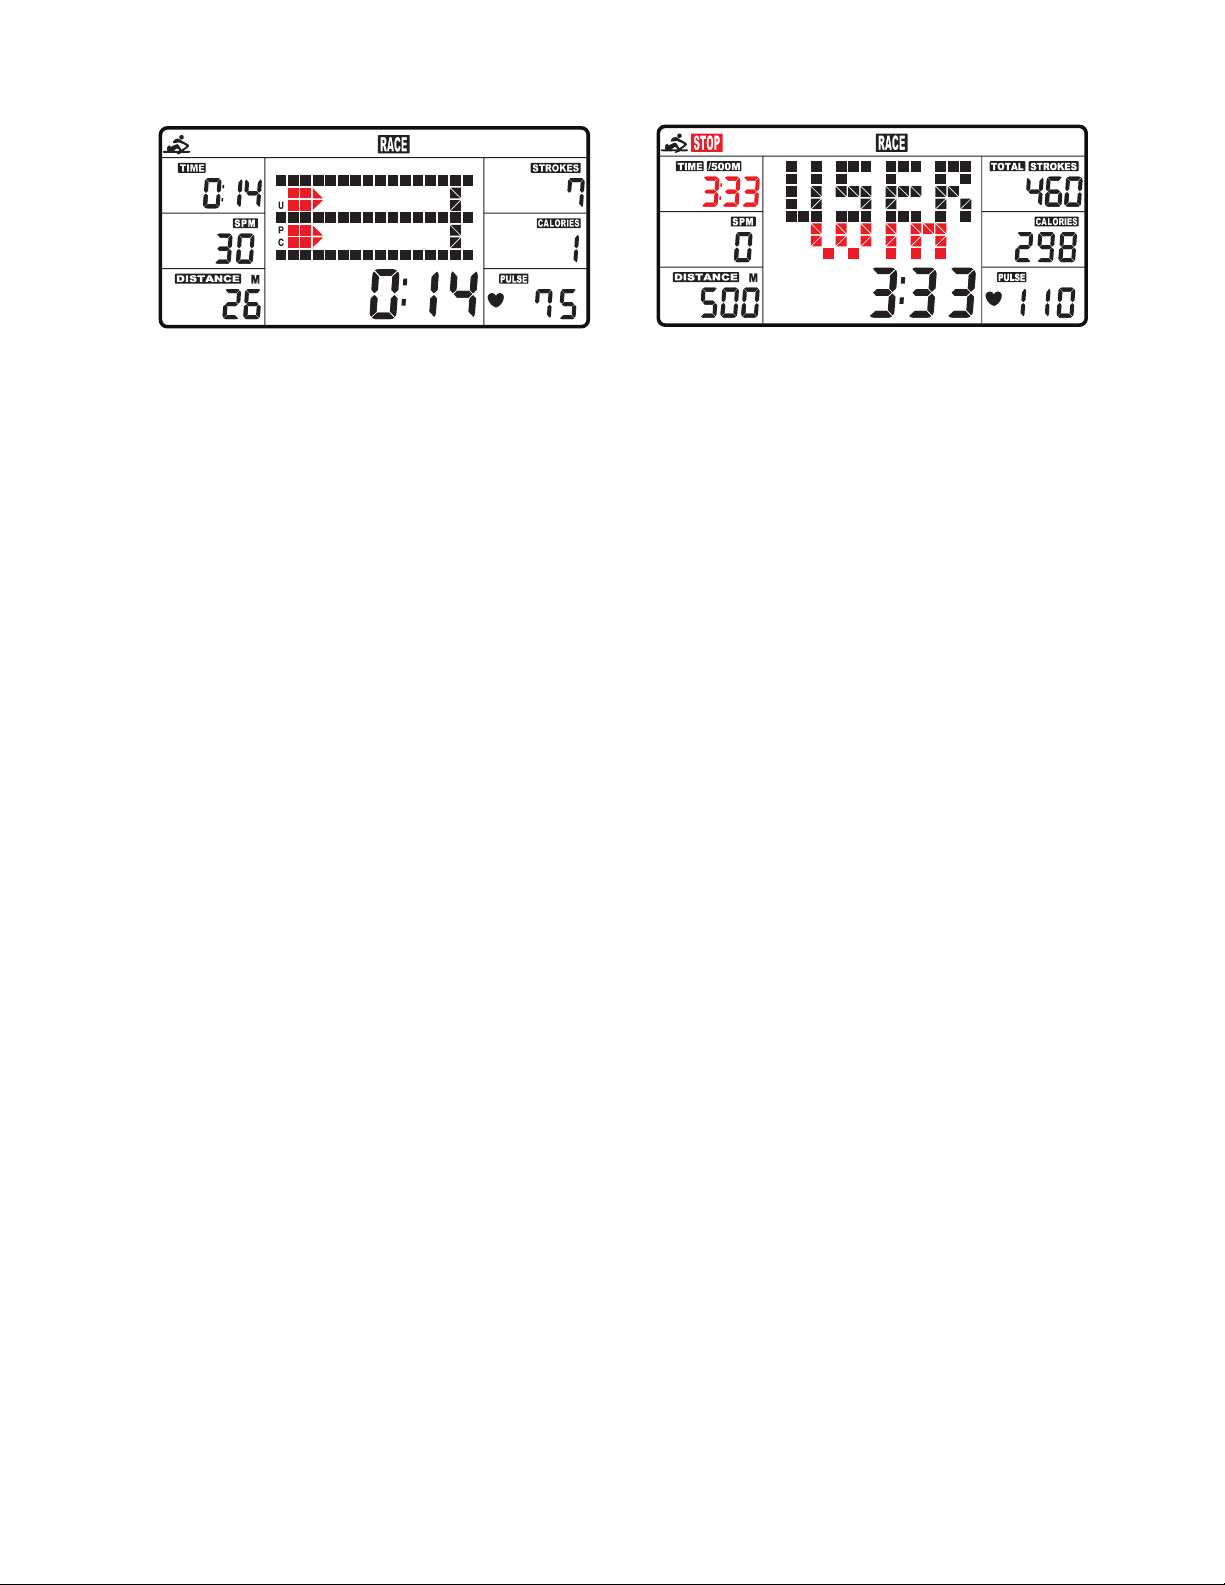
2. RACE (Fig.5):
Select RACE mode and L9 will ash. The TIME/500M will display 4:00.Then, press UP or
DOWN to select L1 ~ L15. Press ENTER to conrm.
Then, you can set the distance of the race (500M~10000M) while the value of DISTANCE
is blinking. Press ENTER and the picture of the race will display on the screen. The
TIME/500M of the programs are as follows:
L1 L2 L3 L4 L5 L6 L7 L8 L9 L10 L11 L12 L13 L14 L15
8:00 7:30 7:00 6:30 6:00 5:30 5:00 4:30 4:00 3:30 3:00 2:30 2:00 1:30 1:00
Fig. 5
20
ERG600W Rower
1. RECOVERY:
This is a measurement of how quickly your heart rate can return from a high (exercising)
BPM to a normal BPM.
This meter works with a 5.3 KHz chest strap heart rate monitor (not included). After
exercising for a period of time, keep wearing chest strap monitor and press “RECOVERY”
button. All function displays will stop except “TIME” starts counting down from 00:60 to
00:00.
Screen will display your heart rate recovery status with the F1, F2….to F6.
F1 is outstanding. F6 is poor. User may keep exercising to improve the heart rate recovery
status. (Press the RECOVERY button again to return the main display.)
ALARM:
Alarm only works while the computer is in sleep mode. Alarm will not sound during exercise.
Press and hold RESET to go to clock screen to set up ALARM.
SLEEP MODE:
The computer will go into sleep mode after about 4 minutes of inactivity.
BATTERIES:
This meter uses 2 AA batteries, which are included. Changing the batteries will reset all
values. If there is a problem with the display, try changing the batteries rst. When changing
the batteries, change both of them. Do not mix battery types. Do not mix old and new
batteries. Dispose of old batteries according to your regional guidelines
Fig. 6 Fig. 7
A. Press START button to start and STOP will disappear. USER and PC will
display in the matrix (Fig.6). The computer will stop when either user or computer has
reached the race distance that was set. Then the matrix displays “PC WIN” or “USER
WIN” (Fig.7).
B. When the race is over, you can press START to start a race once again. Press
RESET to leave the RACE screen.

ERG600W Rower
21
Trouble Shooting
Problem Cause Solution
Monitor does not display
Batteries not Installed Install Batteries
Computer Wires not
connected
Ensure the computer wires
are connected properly at
the upright and computer
No count or distance
displays on the monitor
Sensor wire not connected
Ensure the computer wires
are connected properly at
the upright and the computer
Sensor wire not working
properly
Replace sensor wire
Monitor not working properly Replace monitor
Squealing Belt slipping Adjust Belt

22
ERG600W Rower
Manufacturer’s Limited Warranty
Eective March 05, 2020 - ROWER LIMITED WARRANTY
Home Use Limited Warranty
Frame
5 Years
Parts
2 Years
XTERRA Fitness Inc. warrants all its home use Rower parts for a period of time listed below, from the date of retail sale, as determined by a
sales receipt or in the absence of a sales receipt, eighteen (18) months from the original factory shipping date. XTERRA Fitness’
responsibilities include providing new or remanufactured parts, at XTERRA Fitness’ option, and technical support to our independent dealers
and servicing organizations. In the absence of a dealer or service organization, these warranties will be administered by XTERRA Fitness
directly to a consumer. The warranty period applies to the following components:
NORMAL RESPONSIBILITIES OF THE CONSUMER
This warranty applies only to products in ordinary household use. The consumer is responsible for the items listed below:
1. The warranty registration card must be completed and returned to the address listed on the card within 10 days of the original purchase
to validate the manufacturer’s limited warranty or register online at the XTERRA Fitness website.
2. Proper use of the Rower in accordance with the instructions provided in this manual, including maintenance.
3. Proper connection to a power supply of sucient voltage, replacement of blown fuses, repair of loose connections or defects in house/
facility wiring.
4. Expenses for making the Rower accessible for servicing, including any item that was not part of the Rower at the time it was shipped
from the factory.
5. Damages to the Rower nish during shipping, installation or following installation.
EXCLUSIONS
This warranty does not cover the following:
1. CONSEQUENTIAL, COLLATERAL, OR INCIDENTAL DAMAGES SUCH AS PROPERTY DAMAGE AND INCIDENTAL
EXPENSESRESULTING FROM ANY BREACH OF THIS WRITTEN OR ANY IMPLIED WARRANTY. Note: Some states do not allow
the exclusion or limitation of incidental or consequential damages, so this limitation or exclusion may not apply to you.
2. Service call reimbursement to the consumer. Service call reimbursement to the dealer that does not involve malfunction or defects in
workmanship or material, for units that are beyond the warranty period, for units that are beyond the service call reimbursement period,
for Rowers not requiring component replacement, or Rowers not in ordinary household use.
3. Damages caused by services performed by persons other than authorized XTERRA Fitness service companies, use of parts other than
original XTERRA Fitness parts, or external causes such as alterations, modications, abuse, misuse, accident, improper maintenance,
inadequate power supply, or acts of God.
4. Products with original serial numbers that have been removed or altered.
5. Products that have been; sold, transferred, bartered, or given to a third party.
6. Products that are used as store display models.
7. Products that do not have a warranty registration on le at XTERRA Fitness Inc. XTERRA Fitness reserves the right to request proof of
purchase if no warranty record exists for the product.
8. Product use in any environment other than a residential setting.
9. THIS WARRANTY IS EXPRESSLY IN LIEU OF ALL OTHER WARRANTIES EXPRESSED OR IMPLIED, INCLUDING THE
WARRANTIES OF MERCHANTABILITY AND/OR FITNESS FOR A PARTICULAR PURPOSE.
SERVICE
Keep your bill of sale. Twelve (12) months from the date on the bill of sale or eighteen (18) months from the date of factory shipping as
determined by the serial number establishes the warranty period should service be required. If service is performed, it is in your best interest
to obtain and keep all receipts. This written warranty gives you specic legal rights. You may also have other rights that vary from state to
state. Service under this warranty must be obtained by following these steps, in order:
1. Contact your selling authorized XTERRA Fitness dealer. OR
2. Contact your local authorized XTERRA Fitness service organization.
3. If there is a question as to where to obtain service, contact our service department at (870)333-5500
4. XTERRA Fitness’ obligation under this warranty is limited to repairing or replacing, at XTERRA Fitness’ option, the product through one
of our authorized service centers. All repairs must be preauthorized by XTERRA Fitness. If the product is shipped to a service center
freight charges to and from the service center will be the customer’s responsibility. For replacement parts shipped while the product is
under warranty, the customer will be responsible for shipping and handling charges. For in-home service, the customer will be respon-
sible for a trip charge. There will be an additional trip charge if the customer is located over 100 miles from the nearest service center.
5. The owner is responsible for adequate packaging upon return to XTERRA Fitness. XTERRA Fitness is not responsible for damages in
shipping. Make all freight damage claims with the appropriate freight carrier. DO NOT SHIP ANY UNIT TO OUR FACTORY WITHOUT
A RETURN AUTHORIZATION NUMBER. All units arriving without a return authorization number will be refused.
6. For any further information, or to contact our service department by mail, send your correspondence to:
Product features or specications as described or illustrated are subject to change without notice. All warranties are made by
XTERRA Fitness, Inc. This warranty applies only in the 48 contiguous United States. NOTE: This does not include Alaska or Hawaii.
XTERRA Fitness, Inc.
P.O. Box 2037
Jonesboro, AR 72402-2037
Labor
90 Days

ERG600W Rower
23

24
ERG600W Rower

ERG600W Rower
25

www.xterrafitness.com
©2020 All RIghts Reserved. ERG600W Owner’s Manual
3000 Nestle Road Jonesboro, AR 72401 - Phone:870-333-5500 - Fax:870-935-7611