
3-231-408-12 (1)
Specifications
Dimensions Approx. 45 × 114 × 54 mm
(w/h/d)
(1
13
/
16
× 4
1
/
2
× 2
1
/
4
in.)
Mass Approx. 70 g (2.47 oz.)
Supplied accessories Screw (1)
Mounting hardware (1)
Labels (1)
Strap (1)
Lithium battery CR2025 (1)
Technische Daten
Abmessungen ca. 45 × 114 × 54 mm (B/H/T)
Gewicht ca. 70 g
Mitgeliefertes Zubehö r
Schraube (1)
Montageteil (1)
Aufkleber (1)
Riemen (1)
CR2025-Lithiumbatterie (1)
Spé cifications
Dimensions Approx. 45 × 114 × 54 mm
(l/h/p)
(1
13
/
16
× 4
1
/
2
× 2
1
/
4
pouces)
Masse Approx. 70 g (2,47 onces)
Accessoires fournis Vis (1)
Maté riel de montage (1)
Etiquettes (1)
Courroie (1)
Pile au lithium CR2025 (1)
Specifiche
Dimensioni Appross. 45 × 114 × 54 mm
(l/a/p)
Peso Appross. 70 g
Accessori in dotazione Vite (1)
Staffa di montaggio (1)
Etichette (1)
Cordino (1)
Batteria al litio CR2025 (1)
Specificaties
Afmetingen Ong. 45 × 114 × 54 mm (b/h/d)
Gewicht Ong. 70 g
Meegeleverde accessoires
Schroef (1)
Bevestigingselementen (1)
Labels (1)
Riem (1)
CR2025 lithiumbatterij (1)
Especificaciones
Dimensiones Aprox. 45 × 114 × 54 mm
(an/al/f)
Peso Aprox. 70 g
Accesorios suministrados
Tornillo (1)
Ferretería de montaje (1)
Etiquetas (1)
Correa (1)
Pila de litio CR2025 (1)
× ×
Sony Corporation 2001 Printed in Japan
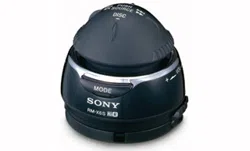
Wireless Rotary
Commander
Operating Instructions
Bedienungsanleitung
Mode d’emploi
Istruzioni per l’uso
Gebruiksaanwijzing
Manual de instrucciones
Voor de Klanten in Nederland
Gooi de batterij niet weg,
maar lever hem in als KCA
WARNING
This equipment has been tested and found
to comply with the limits for a Class B
digital device, pursuant to Part 15 of the
FCC Rules. The limits are designed to
provide reasonable protection against
harmful interference in a residential
installation. This equipment generates,
uses, and can radiate radio frequency
energy and, if not installed and used in
accordance with the instructions, may cause
harmful interference to radio
communications. However, there is no
guarantee that interference will not occur in
a particular television reception, which can
be determined by turning the equipment
off and on, the user is encouraged to try to
correct the interference by one or more of
the following measures:
— Reorient or relocate the receiving
antenna.
— Increase the separation between the
equipment and receiver.
— Connect the equipment into an outlet on
a circuit different from that to which the
receiver is connected.
— Consult the dealer or an experienced
radio/TV technician for help.
You are cautioned that any changes or
modifications not expressly approved in
this manual could void your authority to
operate this equipment.
THIS DEVICE COMPLIES WITH PART 15
OF THE FCC RULES. OPERATION IS
SUBJECT TO THE FOLLOWING
TWO CONDITIONS;
(1) THIS DEVICE MAY NOT CAUSE
HARMFUL INTERFERENCE, AND
(2) THIS DEVICE MUST ACCEPT ANY
INTERFERENCE RECEIVED, INCLUDING
INTERFERENCE THAT MAY CAUSE
UNDESIRED OPERATION.
VARNING
Explosionsfara vid felaktigt batteribyte.
Anvä nd samma batterityp eller en likvä rdig typ
som rekommenderas av apparattillverkaren.
Kassera anvä nt batteri enligt gä llande
fö reskrifter.
Entsorgungshinweis
Bitte werfen Sie nur entladene Batterien in die
Sammelboxen beim Handel oder den Kommunen.
Entladen sind Batterien in der Regel dann, wenn
das Gerä t abschaltet und signalisiert „Batterie
leer“ oder nach lä ngerer Gebrauchsdauer der
Batterien „nicht mehr einwandfrei funktioniert“.
Um sicherzugehen, kleben Sie die Batteriepole
z.B. mit einem Klebestreifen ab oder geben Sie
die Batterien einzeln in einen Plastikbeutel.
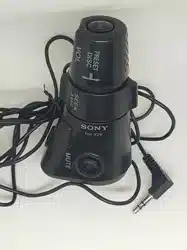
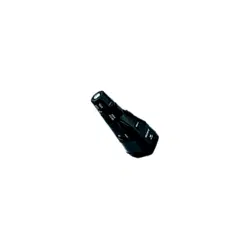
RM-X5S

OFF
A
T
T
S
EE
K
AM
S
P
R
E
S
E
T
D
I
S
C
V
O
L
S
O
U
R
C
E
V
O
L
S
O
U
R
C
E
c
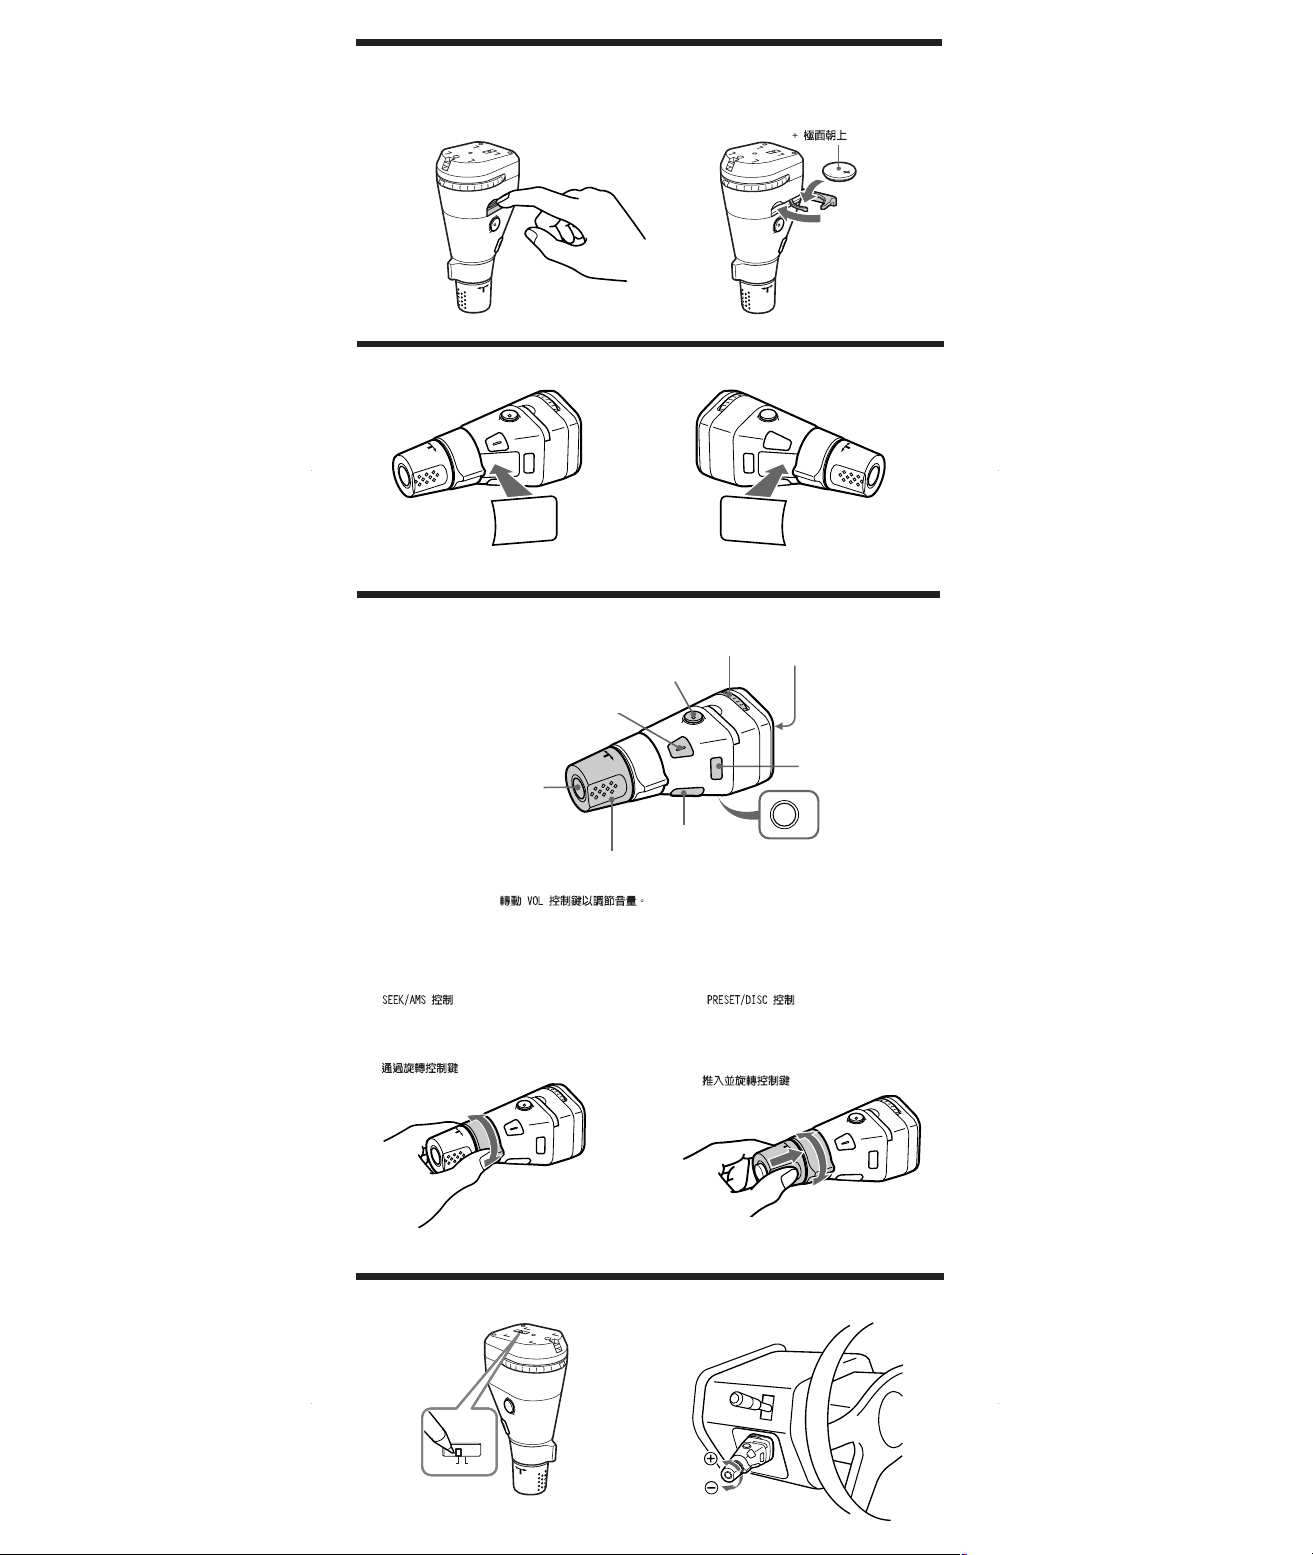
Rotate the VOL control to adjust the volume.
Drehen Sie den Regler VOL, um die Lautstä rke einzustellen.
Faites tourner la commande VOL pour ré gler le volume.
By pushing in and rotating the control
Drehen und Drü cken des Reglers
En pressant et en tournant la commande
(SOURCE)
(ATT)
1
2
(MODE)
3
SEEK/AMS control
Regler SEEK/AMS
la commande SEEK/AMS
By rotating the control
Drehen des Reglers
En tournant la commande
4
PRESET/DISC control
Regler PRESET/DISC
la commande PRESET/DISC
1
2
3
4
S
O
U
N
D
D
S
P
L
M
O
D
E
S
OU
N
D
D
S
P
L
MO
D
E
+ side up
Seite + nach oben
Cô té + vers le haut
Rev Nor
(SOUND)
(DSPL)
Replacing the lithium battery
(
1
)
Note on lithium battery life
• The battery will last for approximately 1 year in normal operation.
• When the battery becomes weak, you will not be able to operate the unit
with the rotary commander. Replace the battery as soon as possible with a
new CR2025 lithium battery.
Notes on lithium battery
• Keep the lithium battery out of the reach of children. Should the battery
be swallowed, immediately consult a doctor.
• Wipe the battery with a dry cloth to assure a good contact.
• Be sure to observe the correct polarity when installing the battery.
• Do not hold the battery with metallic tweezers, otherwise a short-circuit
may occur.
WARNING
Battery may explode if mistreated.
Do not recharge, disassemble, or dispose of in fire.
Labelling the rotary commander
(
2
)
First, attach the appropriate label depending on how you want to mount
the rotary commander.
Location and Function of Controls
(
3
)
Press To
(SOURCE) Change source
(Radio/CD/MD/Tape/TV
*
1
)
(MODE) Change operation
(Radio band/CD unit/MD unit
/Tape playback direction/TV
*
1
)
(ATT) Attenuate sound
(OFF)
*
2
Stop playback or radio reception
(SOUND) Adjust the sound menu
(DSPL) Change the display item
*
3
*
1
Only in the U.S.A. and Canada models.
*
2
If your car has no ACC (accessory) position on the ignition key switch, be
sure to press (OFF) for 2 seconds to turn off the clock indication after
turning off the ignition.
*
3
When using the RDS function, you can press ( DSPL ) to show “PTY” in
the display. Then you can only use your master unit or card remote
commander to receive the PTY data (Only European models).
1 Infrared rays dial
Turn the dial to change the direction of infrared rays.
2 Rev/Nor-select switch (See fig. 4 )
— Select “Nor” to use the rotary commander as the factory-set
position.
— Select “Rev” when you mount the rotary commander on the
right side of the steering column.
3 SEEK/AMS control
Rotate and release to:
— locate the beginning of tracks on the tape.
— tune in stations automatically.
— skip tracks on the disc.
Rotate, hold, and release to:
— first-wind the tape.
— find a station manually.
— fast-forward/reverse a track.
4 PRESET/DISC control
Push in and rotate the control to:
— receive preset stations.
— change the disc.
Tip
You need to push in and rotate the control each time you select a preset
station and a disc.
Changing the operative direction
(
4
)
You can change the operative direction of controls by setting the switch
to Rev/Nor.
If you need to mount the rotary commander on the left side of the
steering column, you can set the operative direction as shown in the
illustration.
When the POWER SELECT switch on your master unit is set to the
(OFF) position, your master unit cannot be operated with the
commander unless on of the operational buttons is pressed or a disc/
cassette is inserted to activate the master unit. Depending on the type of
the master unit, you can turn on the master unit with the (SOURCE)
button of the rotary commander. For details, refer to the Operating
Instructions of the master unit.
Austauschen der Lithiumbatterie
(
1
)
Hinweise zur Lebensdauer der Lithiumbatterie
• Unter normalen Bedingungen halten die Batterien etwa 1 Jahr.
• Wenn die Batterie schwä cher wird, kö nnen Sie das Gerä t nicht mehr mit
dem Joystick steuern. Tauschen Sie die Batterie so bald wie mö glich
gegen eine neue CR2025-Lithiumbatterie aus.
Hinweise zur Lithiumbatterie
• Halten Sie die Lithiumbatterie von Kindern fern. Falls ein Kind die Batterie
verschluckt, bringen Sie es bitte sofort zu einem Arzt.
• Wischen Sie die Batterie mit einem trockenen Tuch ab, damit die Kontakte
sauber sind und gut funktionieren.
• Achten Sie beim Einlegen der Batterie auf die korrekte Polaritä t.
• Halten Sie die Batterie nicht mit einer Metallpinzette. Andernfalls kann es
zu einem Kurzschluß kommen.
VORSICHT
Die Batterie kann bei falscher Handhabung explodieren!
Auf keinen Fall darf sie aufgeladen, auseinandergenommen oder ins
Feuer geworfen werden.
Anbringen der Aufkleber auf dem Joystick
(
2
)
Bringen Sie zunä chst den richtigen Aufkleber an, je nachdem, wie Sie den
Joystick montieren wollen.
Lage und Funktion der Teile und
Bedienelemente
(
3
)
Drü cken Sie Funktion
(SOURCE) Wechseln der Programmquelle
(Radio/CD/MD/Kassette/Fernsehgerä t
*
1
)
(MODE) Wechseln des Modus
(Radiofrequenzbereich/CD-Gerä t/MD-Gerä t/
Bandwiedergaberichtung/Fernsehgerä t
*
1
)
(ATT) Dä mpfen des Tons
(OFF)
*
2
Stoppen der Wiedergabe oder des Radioempfangs
(SOUND) Einstellen des Klangmodus
(DSPL) Wechseln der Anzeige
*
3
*
1
nur bei den Modellen fü r USA und Kanada.
*
2
Wenn Ihr Fahrzeug nicht ü ber ein Zü ndschloß mit Zubehö rposition (ACC
oder I) verfü gt, halten Sie unbedingt 2 Sekunden lang (OFF) gedrü ckt,
um die Uhrzeitanzeige auszuschalten. Andernfalls wird der Autobatterie
weiterhin Strom entzogen.
*
3
Wenn Sie die RDS-Funktion verwenden, kö nnen Sie mit der Taste (DSPL)
die Anzeige „PTY“ im Display anzeigen lassen. Sie kö nnen die PTY-Daten
dann nur ü ber die Bedienelemente am Hauptgerä t oder an der
Kartenfernbedienung empfangen (nur Modelle fü r Europa).
1 Regler fü r Infrarotstrahlen
Drehen Sie den Regler, um die Richtung der Infrarotstrahlen
zu ä ndern.
2 Wä hlschalter Rev/Nor (siehe Abb. 4)
— Wä hlen Sie „Nor“, wenn die werkseitig voreingestellte
Drehrichtung der Regler beibehalten werden soll.
— Wä hlen Sie „Rev“, wenn Sie den Joystick auf der rechten Seite
der Lenksä ule anbringen.
3 Regler SEEK/AMS
Drehen Sie den Joystick, und lassen Sie ihn los zum:
— ansteuern des Anfangs von Titeln auf der Kassette.
— automatischen Einstellen von Sendern.
— ü berspringen von Titeln.
Drehen und halten Sie den Regler, und lassen Sie ihn los zum:
— spulen der Kassette.
— manuellen Einstellen von Sendern.
— Vorwä rts-/Rü ckwä rtssuchen in einem Titel.
4 Regler PRESET/DISC
Wenn Sie den Regler gleichzeitig drü cken und drehen,
kö nnen Sie:
— gespeicherte Sender einstellen.
— die CD/MD wechseln.
Tip
Sie mü ssen den Regler jedesmal drü cken und drehen, wenn Sie einen
gespeicherten Sender oder eine CD/MD auswä hlen wollen.
Wechseln der Drehrichtung der Regler am
Joystick
(
4
)
Sie kö nnen die Drehrichtung der Regler auch ä ndern, indem Sie den
Schalter auf Rev/Nor stellen.
Wenn Sie den Joystick links von der Lenksä ule anbringen,kö nnen Sie
die Drehrichtung wie in der Abbildung gezeigt einstellen.
Wenn der Schalter POWER SELECT am Hauptgerä t in der Position
(OFF) steht, kö nnen Sie das Hauptgerä t nur ü ber den Joystick steuern,
wenn Sie am Hauptgerä t eine der Funktionstasten drü cken oder eine
CD/MD/Kassette einlegen, so daß sich das Hauptgerä t einschaltet. Je
nach dem Typ kö nnen Sie das Hauptgerä t aber auch mit der Taste
(SOURCE) am Joystick einschalten. Einzelheiten dazu finden Sie in der
Bedienungsanleitung zu Ihrem Hauptgerä t.
Remplacement de la pile au lithium
(
1
)
Remarques concernant la duré e de vie de la pile au lithium
• Dans les conditions d’utilisation normales, les batteries durent environ 1
an.
• Lorsque la pile faiblit, la porté e de la té lé commande carte se ré duit.
Remplacez la pile par une nouvelle pile au lithium CR2025.
Remarques concernant la pile au lithium
• Gardez la pile au lithium hors de porté e des enfants. En cas d’ingestion de
la pile, consultez un mé decin sans tarder.
• Nettoyez la pile avec un chiffon sec afin d’assurer un contact optimal.
• Respectez les polarité s lorsque vous installez la pile.
• Ne manipulez pas la pile avec des pinces mé talliques. Cette opé ration
pourrait provoquer un court-circuit.
AVERTISSEMENT
Utilisée de façon incorrecte, la pile peut exploser. Ne pas la recharger,
la dé monter ni la jeter au feu.
Etiquetage du satellite de commande
(
2
)
Commencez par fixer l’é tiquette appropriée suivant la position de montage
du satellite de commande.
Emplacement et fonction des commandes
(
3
)
Appuyer sur Pour
(SOURCE) Changer de source
(Radio/CD/MD/cassette/TV
*
1
)
(MODE) changer de fonction
(radio/CD/MD/sens de lecture de la bande/TV
*
1
)
(ATT) Atté nuer le son
(OFF)
*
2
Arrê ter la lecture ou l’é coute de la radio
(SOUND) Ré gler le menu son
(DSPL) Modifier la rubrique d’affichage
*
3
*
1
Modè les pour les U.S.A. et le Canada uniquement.
*
2
Si votre voiture ne dispose pas de position ACC sur le dé marreur, assurez-
vous que vous é teignez l’appareil en appuyant sur (OFF) pendant
2 secondes afin d’é viter de dé charger la batterie.
*
3
Lors de l'utilisation de la fonction RDS, vous pouvez appuyer sur la
touche (DSPL) pour faire apparaître “PTY” dans l'affichage. Vous pouvez
ensuite utiliser uniquement votre appareil principal ou votre
té lé commande à carte pour recevoir les donné es PTY (modè les europé ens
seulement).
1 Molette de ré glage des rayons IR
Tournez la molette pour changer le sens des rayons IR.
2 Commutateur de sé lection Rev/Nor (Voir figure 4 )
— Sé lectionnez “Nor” pour utiliser le satellite de commande dans
la position dé finie par dé faut.
— Sé lectionnez “Rev” si vous montez le satellite de commande du
cô té droit de la colonne de direction.
3 Commande SEEK/AMS
Tournez la commande et relâ chez-la pour :
— repé rer le dé but des pistes sur la bande.
— passer d’une plage à l’autre.
— rechercher des stations automatiquement.
Tournez, appuyez et relâ chez pour :
— rembobiner d’abord la bande.
— trouver une station manuellement.
— avancer rapidement/revenir au dé but d’une plage.
4 Commande PRESET/DISC
Appuyez et tournez la commande pour :
— ecoute des stations pré dé finies.
— changer le disque.
Conseil
Vous devez pousser et tourner la commande à chaque fois que vous
sé lectionnez une station pré ré glé e et un disque.
Inverser le sens de fonctionnement
(
4
)
Vous pouvez inverser le sens de fonctionnement des commandes en
ré glant le commutateur sur Rev/Nor.
Si vous devez monter le satellite du cô té gauche de la colonne de
direction, vous pouvez dé finir le sens de fonctionnement comme
indiqué dans l'illustration ci-contre.
Lorsque le sé lecteur POWER SELECT de votre appareil principal est
ré glé sur la position (OFF), votre appareil principal ne peut être
commandé à l’aide du satellite, sauf si l’une des touches de commande
est pressé e ou si un disque/cassette est introduit de maniè re à activer
l’appareil principal. Selon le type de l’appareil principal, vous pouvez
mettre l’appareil principal sous tension à l’aide de la touche (SOURCE)
du satellite de commande. Pour plus de dé tails, reportez-vous au mode
d’emploi de l’appareil principal.
4
Comando PRESET/DISC
PRESET/DISC
Control PRESET/DISC
OFF
A
T
T
SE
E
K
AM
S
P
R
E
S
E
T
D
I
S
C
V
OL
S
O
U
R
C
E
V
OL
S
O
U
R
C
E
c
(SOURCE)
(ATT)
1
2
(MODE)
1
2
3
4
S
O
U
N
D
D
S
PL
MO
D
E
S
OU
N
D
D
S
P
L
MO
D
E
Rev Nor
(SOUND)
(DSPL)
Ruotare il telecomando VOL per regolare il volume
Draai aan het bedieningselement VOL als u het volume wilt aanpassen.
Gire el control VOL para ajustar el volumen.
lato + verso l’alto
+ kant naar boven
Cara + hacia arriba
Ruotare il telecomando e spingerlo verso l’interno
Door de bedieningssatelliet in te drukken en te
verdraaien
Mediante el giro del control mientras lo presiona
3
Comando SEEK/AMS
SEEK/AMS
Control SEEK/AMS
Tramite rotazione del telecomando
Door aan de bedieningssatelliet te draaien
Mediante el giro del control
Sostituzione della batteria al litio
(
1
)
Note sulla durata della batteria al litio
• In condizioni normali, le batterie durano circa 1 anno.
• Quando la batteria si scarica, non sarà più possibile controllare l’unità principale con
il telecomando a rotazione. Sostituire la batteria con una nuova batteria al litio
CR2025.
Note sulle batterie al litio
• Tenere le batterie al litio fuori dalla portata dei bambini. Se venissero inghiottite,
consultare immediatamente un medico.
• Pulire le batterie con un panno asciutto per assicurare un buon contatto.
• Durante l’installazione, assicurarsi di osservare la giusta polarità .
• Non maneggiare le batterie con pinze di metallo, potrebbero verificarsi cortocircuiti.
AVVERTENZA
La batteria può esplodere se usata scorrettamente. Non ricaricatela, non
smontatela e non gettatela nel fuoco.
Applicazione dell’etichetta al telecomando a
rotazione
(
2
)
Per prima cosa, applicare l’apposita etichetta in base a come si desidera
montare il telecomando a rotazione.
Localizzazione e funzione dei comandi
(
3
)
Premere Per
(SOURCE) Cambiare sorgente
(Radio/CD/MD /cassetta/TV
*
1
)
(MODE) Cambiare operazione (Banda radio /unità CD /unità MD /
direzione di riproduzione della cassetta/TV
*
1
)
(ATT) Attenuare l’audio
(OFF)
*
2
Arrestare la riproduzione o la ricezione della radio
(SOUND) Regolare il menu audio
(DSPL) Cambiare la voce nel display
*
3
*
1
Solo per i modelli degli U.S.A e del Canada.
*
2
Se l’auto è priva della posizione ACC per la chiave di avviamento, accertarsi di
premere (OFF) per due secondi per disattivare l’indicazione dell’orologio dopo
aver spento il motore.
*
3
Se si utilizza la funzione RDS, è possibile premere (DSPL) per visualizzare
l'indicazione “PTY” sul display. È quindi possibile utilizzare l'apparecchio principale
o il telecomando a scheda per ricevere i dati PTY (solo modelli per l'Europa).
1
Manopola raggi infrarossi
Ruotare la manopola per modificare la direzione dei raggi infrarossi.
2
Interruttore di selezione Rev/Nor (vedere fig. 4)
— Selezionare “Nor” per utilizzare il telecomando a rotazione con le
impostazioni di fabbrica.
— Selezionare “Rev” quando il telecomando a rotazione viene montato sul
lato destro del piantone di guida.
3
Comando SEEK/AMS
Ruotare e rilasciare per:
— localizzare l’inizio dei brani sulla cassetta.
— sintonizzare automaticamente le stazioni.
— saltare i brani.
Ruotare, mantenere ruotato e rilasciare per:
— avvolgere prima la cassetta.
— trovare una stazione manualmente.
— avanzare/tornare indietro rapidamente all’interno di un brano.
4
Comando PRESET/DISC
Spingere e ruotare il telecomando per:
— ricevere le stazioni preimpostate.
— cambiare disco.
suggerimento
È necessario premere e ruotare il telecomando ogni volta che viene selezionata
una stazione preselezionata e un disco.
De bedieningsrichting wijzigen
(
4
)
È possibile cambiare la direzione operativa dei comandi impostando
l'interruttore su Rev/Nor.
Se fosse necessario installare il telecomando a rotazione sul lato sinistro
del piantone di guida, è possibile impostare la direzione operativa dei
comandi come mostrato in figura.
Quando l’interruttore POWER SELECT sull’apparecchio principale è
impostato sulla posizione (OFF), l’apparecchio principale non può essere
controllato con il comando a rotazione, a meno che non venga premuto uno
dei tasti operativi oppure non venga inserito un disco o una cassetta per
attivare l’apparecchio principale. A seconda del tipo di apparecchio
principale, è possibile accendere l’apparecchio con il tasto (SOURCE) del
comando a rotazione. Per ulteriori informazioni, fare riferimento al Manuale
d’uso dell’apparecchio principale.
Vervangen van de lithiumbatterij
(
1
)
Opmerking over de levensduur van een lithiumbatterij
• Normaal gaan de batterijen ongeveer 1 jaar mee.
• Wanneer de batterij uitgeput raakt, kunt u het toestel niet meer bedienen met de
bedieningssatelliet. Vervang de batterij dan zo snel mogelijk door een nieuwe
CR2025 lithiumbatterij.
Opmerking over de lithiumbatterij
• Hou de lithiumbatterij buiten het bereik van kinderen. Als de batterij wordt
ingeslikt, onmiddellijk een dokter raadplegen.
• Veeg de batterij schoon met een droge doek voor een goed contact.
• Plaats de batterij met de min- en plus-polen in de juiste richting.
• Hou de batterij niet vast met een metalen pincet, anders kan kortsluiting optreden.
WAARSCHUWING
Bij oneigenlijk gebruik kan de batterij ontploffen.
Probeer niet de batterij op te laden of te openen; werp ook een lege batterij
nooit in het vuur.
Label aanbrengen op de bedieningssatelliet
(
2
)
Bevestig eerst het juiste label afhankelijk van de manier waarop u de
bedieningssatelliet wilt monteren.
Positie en functie van de bedieningselementen
(
3
)
Druk op Om
(SOURCE) Van bron te veranderen
(radio/CD/MD /cassette/TV
*
1
)
(MODE) Van bediening te veranderen (radioband/CD speler /
MD-speler/weergaverichting cassette /TV
*
1
)
(ATT) Het geluid te dempen
(OFF)
*
2
De weergave of de radio-ontvangst te stoppen
(SOUND) Het geluidsmenu in te stellen
(DSPL) Het weergave-item te wijzigen
*
3
*
1
Enkel voor U.S.A. en Canada.
*
2
Indien uw auto niet is voorzien van een contactslot met ACC stand, moet u de
klokweergave afzetten door (OFF) 2 seconden lang in te drukken nadat u het
contact heeft afgezet.
*
3
Wanneer u gebruik maakt van de RDS functie, kunt u op (DSPL) drukken om
“PTY” in het display te laten verschijnen. U kunt dan PTY gegevens alleen
ontvangen met uw master unit of kaartafstandsbediening (alleen Europese
modellen).
1
Knop infraroodstralen
Draai aan de knop om de richting van de infraroodstralen te wijzigen.
2
Rev/Nor-keuzeschakelaar (Zie fig. 4)
— Kies “Nor” om de bedieningssatelliet te gebruiken met de
fabrieksinstelling.
— Kies “Rev” wanneer u de bedieningssatelliet rechts op de stuurkolom
monteert.
3 SEEK/AMS control
Draaien en loslaten om:
— het begin van tracks op de cassette te zoeken.
— handmatig af te stemmen op een zender.
— tracks over te slaan.
Draaien, vasthouden en loslaten om:
— snel vooruit te spoelen.
— handmatig een zender te zoeken.
— snel vooruit/achteruit naar een track te gaan.
4 PRESET/DISC control
Draai aan het bedieningselement en druk het tegelijkertijd in om:
— voorinstelzenders te ontvangen.
— van disc te veranderen.
Tip
Telkens wanneer u een voorinstelzender of een disc kiest, moiet u het
bedieningselement indrukken en eraan draaien.
De bedieningsrichting wijzigen
(4)
U kunt de bedieningsrichting van de bedieningselementen veranderen door de
schakelaar op Rev/Nor te zetten.
Als u de bedieningssatelliet aan de linkerzijde van de stuurkolom moet
monteren, kunt u de bedieningsrichting instellen zoals te zien is op de
afbeelding.
Wanneer de POWER SELECT schakelaar op uw hoofdtoestel in de stand
(OFF) staat, kan uw hoofdtoestel pas worden bediend met de
bedieningssatelliet als een van de werkingstoetsen wordt ingedrukt of als
een disc/cassette wordt ingebracht om het hoofdtoestel te activeren.
Afhankelijk van het type kan het hoofdtoestel worden aangezet met de toets
(SOURCE) op de bedieningssatelliet. Raadpleeg de handleiding van het
hoofdtoestel voor meer gedetailleerde informatie.
Sustitució n de la pila de litio
(
1
)
Notas sobre la duració n de la pila de litio
• En condiciones normales, las pilas duran aproximadamente 1 añ o.
• Cuando la pila dispone de poca energía, el margen de control del mando a distancia
de tarjeta será menor. Sustituya dicha pila por otra de litio CR2025 nueva.
Notas sobre la pila de litio
• Mantenga la pila fuera del alcance de los niñ os. En caso de ingestió n, pó ngase
inmediatamente en contacto con un mé dico.
• Limpie la pila con un pañ o seco para garantizar un contacto ó ptimo.
• Cuando instale la pila, insé rtela con la polaridad correcta.
• No maneje la pila con pinzas metá licas, ya que puede producirse un cortocircuito.
PRECAUCIÓ N
La pila puede explotar si la trata mal.
No la recargue, desarme, ni la tire al fuego.
Etiquetado del mando rotativo
(
2
)
En primer lugar, adhiera la etiqueta apropiada dependiendo de có mo desee
montar el mando a distancia.
Localizació n y funció n de los controles
(
3
)
Presione Para
(SOURCE) Cambiar la fuente
(radio/CD/MD/cassette/TV
*
1
)
(MODE) Cambiar la operació n
(banda de radio/unidad de CD/unidad de MD/TV
*
1
)
(ATT) Atenuar el sonido
(OFF)
*
2
Detener la reproducció n o la recepció n de la radio
(SOUND) Ajustar el menú de sonido
(DSPL) Cambiar el elemento del visualizador
*
3
*
1
Solo modelos para EE.UU.y Canadá
*
2
Si el automó vil no dispone de posició n ACC (auxiliar) en el interruptor de la llave de
encendido, asegú rese de presionar (OFF) durante 2 segundos para desactivar la
indicació n del reloj despué s de apagar el encendido.
*
3
Cuando utilice la funció n RDS, podrá presionar (DSPL) para hacer que en el
visualizador aparezca “PTY”. Despué s solamente podrá utilizar su unidad principal
o mando a distancia de tarjeta para recibir datos de PTY (Modelos para Europa
solamente).
1
Dial de rayos infrarrojos
Gire el dial para cambiar la direcció n de los rayos infrarrojos.
2
Selector Rev/Nor (Consulte Fig. 4)
— Seleccione “Nor” para utilizar el mando rotativo segú n la posició n
ajustada en fá brica.
— Seleccione “Rev” si monta el mando rotativo a la derecha de la columna
de direcció n.
3
Control SEEK/AMS
Gírelo y sué ltelo para:
— localizar el principio de las pistas de la cinta.
— sintonizar emisoras automá ticamente.
— omitir pistas.
Gírelo, manté ngalo en esa posició n y sué ltelo para:
— bobinar la cinta rápidamente.
— encontrar una emisora manualmente.
— avanzar/retroceder rá pidamente una pista.
4
Control PRESET/DISC
Presione y gire el control para:
— recibir emisoras memorizadas.
— cambiar el disco.
Sugerencia
Debe presionar y girar el control siempre que seleccione una emisora memorizada
y un disco.
Cambio de la direcció n de funcionamiento
(
4
)
Puede cambiar la direcció n de funcionamiento de los controles ajustando el
interruptor en Rev/Nor.
Si necesita instalar el mando rotativo en la parte izquierda de la columna
de direcció n, es posible invertir la direcció n de funcionamiento como se
indica en la ilustració n.
Cuando el selector POWER SELECT de la unidad principal se encuentra en
la posició n (OFF), no es posible utilizar la unidad principal con el mando, a
menos que pulse uno de los botones de control o inserte un disco/cinta para
activarla. Dependiendo del tipo de unidad principal de que disponga, será
posible activarla con el botó n (SOURCE ) del mando rotativo. Para obtener
informació n detallada, consulte el Manual de instrucciones de la unidad
principal.
1
•
•
•
•
•
•
2
3
(SOURCE)
*
1
(MODE)
*
1
(ATT)
(OFF)
*
2
(SOUND)
(DSPL)
*
3
*
1
*
2
(OFF)
*
3
(DSPL)
1
2 4
3
4
4
(OFF)
(SOURCE)